Parade Flag Holder or Quick Detach Rack Mounting Kit For 2009 and Newer Harley-Davidson FLH, FLHX & FLT Models Part # HWK020
|
|
|
- Hector Walker
- 5 years ago
- Views:
Transcription
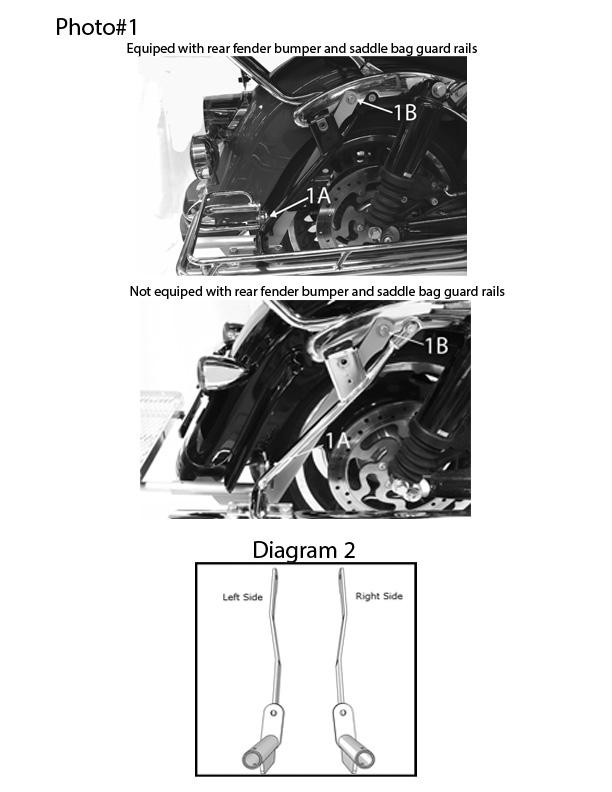
1 Parade Flag Holder or Quick Detach Rack Mounting Kit For 2009 and Newer Harley-Davidson FLH, FLHX & FLT Models Part # HWK020 Note: On 2009 thru 2013 models proceed as follows. On 2014 and newer models, see below after step 7of instructions. Note: On 2014 and newer models equipped with optional H-D accessory saddlebag guard rails, the rails mounting bracket will need to be modified as shown in photo (6) and described in Step 3. For 2014 and newer models. 1. Remove the saddlebags. 2. Referring to photo (1), locate and remove the two original lower fender/saddlebag support mounting bolts (1A) and the two original upper fender support bolts (1B). 3. Referring to Diagram (2) - Compare the two receiver brackets to identify the left and right. Refer to photo and Diagram (3) for installation on models with rear fender bumper and or saddle bag guard rails such as Classic and Ultra models. Refer to photo and Diagram (4) for installation on models without rear fender bumper and or saddle bag guard rails such as Street Glide and Road Glide models. 4. Using the two shorter 5/16 x 1 ¼ bolts (supplied) with a flat washer on each bolt (supplied), install the left and right receiver brackets as per Diagram (3 or 4) depending on your model. Note: Position of the rear fender bumper, saddlebag bag guard rail, inner fender support bracket and saddlebag support brackets as well as the use of the two additional 5/16 washers (supplied) if required on your model. Install the supplied locking nuts but do not tighten. 5. Install the remaining longer 5/16 x 1 ½ bolts in the upper holes (photo 1B) as follows. Place a lock washer and flat washer (supplied) onto each bolt. Place the bolt thru the bracket, place the supplied spacers onto the bolts then thread the bolt into the hole but do not tighten bolt. 6. Using your Flag Holder or Quick Detach Rack assembly - which should also be assembled loosely (the bolts which secure the rods should not be tightened yet). Spread a thin coat of light grease over the last 3 of the rods and inside the receiver tubes. Insert the rods into the receiver tubes. Tighten the upper and lower receiver bracket mounting bolts (1A & 1B) securely (10-12 ft lbs.), then tighten the four bolts which secure the pins to the Flag Holder or Quick Detach rack securely. Check to see that the flag holder assembly slides in and out of the receiver brackets smoothly. If it does not, you may need to loosen the bolts, realign the brackets and rods then retighten. It may also help to grasp the Flag Holder or the Rack firmly and twist or flex it slightly to gain the proper alignment. This step may be necessary due to variances in manufacturing tolerances from
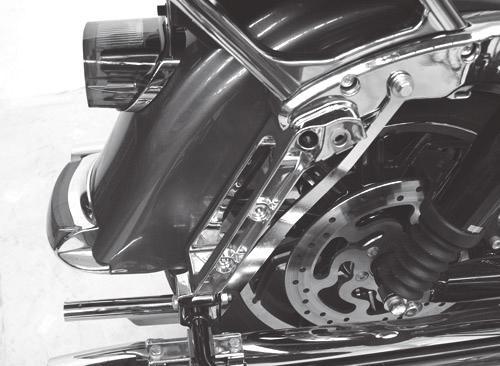
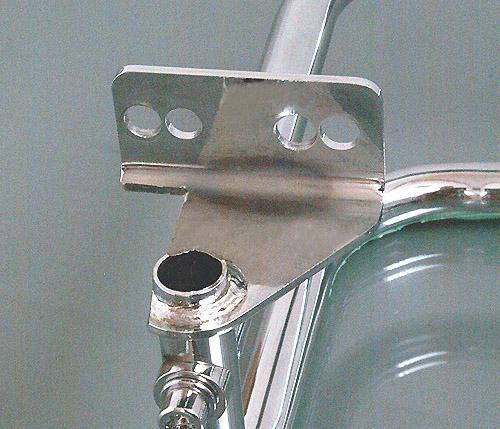
2 one motorcycle to another and that the fender/saddlebag supports brackets are not high precision parts. 7. Insert the locking pins supplied with the Flag Holder or Quick Detach Rack through the holes in the receiver brackets and rods, and lock the pins. Reinstall the saddlebags and newer models: 1. Starting on the right side - remove the saddle bag support to fender support bracket bolt and nut (photo 5 A) located just behind or inward of the larger bolts that are visible (1B) - these larger bolts will NOT be removed. Remove the fender support bolt (5C). 2. Referring to Diagram (2) - compare the two receiver brackets to identify the left and right. 3. If equipped with optional H-D accessory saddlebag guard rails, the Rails Mounting Bracket must be modified as shown in photo (6) to gain clearance for both accessories to be used at once. This will move the guard rails outward about 3/8 and they will actually be more centered on the saddlebag (as viewed from the rear) than they are originally. Remove the guard rails. Lay the rail upside down on a towel or cloth to prevent scratches. Referring to photo (6) (notice the guard rail is shown upside down) mark the bracket as shown for the cut out and two new holes. Make the cuts using a hacksaw or abrasive cut-off wheel. Drill the new 3/8 and 13/32 holes as shown. Using a small brush and silver or clear spray-paint, spray a small amount of paint into the can s cap and touch up or paint the bare steel edges and holes. Reinstall the guard rails, place the larger 3/8 bolt thru the new 13/32 hole. Install the nut on the bolt and the front clamp for the guard rail loosely. Install the flag/rack brackets (HWK020) as described below, and then tighten the guard rail mounting bolts and clamps. 4. Install the right bracket as shown in photo (3&4) with the lower tab of the bracket being behind or to the rear of the fender and saddlebag support brackets. At the bottom, use one of the supplied 5/16 x 1 ¼ bolts with a washer on it. Place the bolt thru all of the brackets and one of the supplied lock nuts on the front. At the top use one of the supplied 5/16 x 2 bolts with a lock washer and washer on it. Place the bolt thru the bracket, then one of the supplied spacers onto the bolt then thread the bolt into the hole. Do not tighten yet. Install the left bracket in the same manner as the right. 5. Using your Flag Holder or Quick Detach Rack assembly - which should also be assembled loosely (the bolts which secure the rods should not be tightened yet). Spread a thin coat of light grease over the last 3 of the rods and inside the receiver tubes. Insert the rods into the receiver tubes. Tighten the upper and lower receiver bracket mounting bolts (1A & 1C) securely (10-12 ft lbs.), then tighten the four bolts which secure the pins to the Flag Holder or Quick Detach Rack securely. Check to see that the Flag Holder Assembly slides in and out of the receiver brackets smoothly. If it does not, you may need to loosen the bolts, realign the brackets and rods, and then retighten. It may also help to grasp the Flag Holder or the Rack firmly and twist or flex it slightly to gain the proper alignment. This step may be necessary due to variances in manufacturing
3 tolerances from one motorcycle to another and that the fender/saddlebag supports brackets are not high precision parts. 6. Insert the locking pins supplied with the Flag Holder or Quick Detach Rack through the holes in the receiver brackets and rods, and lock the pins. Reinstall the saddlebags. IMPORTANT: When using the Quick Detach Rack, do not exceed the 35 lb. weight limit of the rack and be sure all tail lights and turn signals are visible when the rack is loaded. We offer an additional tail/brake and turn light set that mounts to the back of the rack (RIVCO pt# CRLGHT) for added safety and when the tail lights may be obstructed by cargo on the rack. When using RIVCO s Parade Flag Holder accessory with these brackets, refer to the 25 M.P.H. maximum speed recommended when riding with a flag displayed. RIVCO Products, Inc., 440 South Pine Street, Burlington, WI , rivcoproducts.com To register your warranty and see many other bagger and cruiser accessories, please visit our website.
4

5 RIVCO Products, Inc., 440 South Pine Street, Burlington, WI Visit rivcoproducts.com to register your warranty
6 5 C A B
LED Driving Light Set For 2014 & Newer Can-Am Spyder RT # CA006-RT
 LED Driving Light Set For 2014 & Newer Can-Am Spyder RT # CA006-RT 1. Lay-out and familiarize yourself with the components supplied with this set. 2. Remove the left mirror by pulling firmly outward on
F3006 LED Driving Light Set for 2016 & Newer Can-Am Spyder F3 Limited Installation instructions
 F3006 LED Driving Light Set for 2016 & Newer Can-Am Spyder F3 Limited Installation instructions 1. Lay out and familiarize yourself with the supplied components. 2. Remove the ignition switch bezel ring
GL1800 TRAILER HITCH - INSTALLATION INSTRUCTIONS #GL
 GL1800 TRAILER HITCH - INSTALLATION INSTRUCTIONS #GL18007-20 Read through these instructions completely before attempting installation, lay out all pieces including the numbered hardware bags to familiarize
#GL18006-L2 Honda Gold Wing 1800 & F6B models - All Years Lower Cowl LED Driving Lights INSTALLATION INSTRUCTIONS
 #GL18006-L2 Honda Gold Wing 1800 & F6B models - All Years Lower Cowl LED Driving Lights INSTALLATION INSTRUCTIONS 1. Lay out and familiarize yourself with the parts included in the set. Remove the left
SPORTSTER SADDLEBAG KIT. i i02212
 General These saddlebags are designed to fit 99 and later Sportster Model Motorcycles, except XL00 Sport models with gas reservoir shock absorbers and 88R models. See the Service Parts pages for a list
TEARDROP SPECIFIC-FIT
 TEARDROP SPECIFIC-FIT SADDLEBAGS 3501-0461 3501-0462 FEATURES OF THE SADDLEMEN SADDLEBAGS: Quality luggage system that adds style and function to your motorcycle Bag shape and mounts specially built to
w w w. h d o n l i n e s h o p. d e ELECTRA-GLO LIGHT BARS GENERAL INSTALLATION -J04723 REV Kit Number Models Kit Contents
 -J07 REV. 00-0-0 GENERAL Kit Number -09 Models For model fitment information, see the P&A Retail Catalog or the Parts and Accessories section of www.harley-davidson.com (English only). Kit Contents See
Trike Conversion Installation Guide for Zero Flex Solid Axle Wide Body Harley-Davidson FLH Series Motorcycles Revision 1
 Trike Conversion Installation Guide for Zero Flex Solid Axle Wide Body Harley-Davidson FLH Series Motorcycles 2014-2016 Revision 1 WARNING: Failure to follow these instructions can lead to serious personal
w w w. h d o n l i n e s h o p. d e DETACHABLE WINDSHIELD AND DOCKING HARDWARE KIT GENERAL INSTALLATION -J00325 REV Kit Number Models
 -J00 REV. 00-- DETACHABLE WINDSHIELD AND DOCKING HARDWARE KIT GENERAL Kit Number -A, 0-, -, 0-, -, - 0, -0 Models These kits fit and later FXST, FXSTB, FXSTC, and and later FXDWG Harley-Davidson model
Current. Installation Instructions
 by Trike Conversion Kit 2004 - Current Harley-Davidson Sportster Installation Instructions REVISED 4-2017 California Sidecar Parts & Technical Support 434.263.8866 Table of contents: 1. Warnings and Considerations
CRUISE CONTROL (FLHRC, FLHTCU, FLTR) 8.31
 8.31") CRUISE CONTROL (FLHRC, FLHTCU, FLTR) 8.31 GENERAL f1368a8x The Cruise Control system provides automatic vehicle speed control. The electronics and stepper motor are contained in a control module mounted
CRUISE CONTROL (FLHRC, FLHTCU, FLTR) 8.31 GENERAL f1368a8x The Cruise Control system provides automatic vehicle speed control. The electronics and stepper motor are contained in a control module mounted
Motion System Components Diagram. Note: #2 Mirror Cover and X-Axis Motor Cover have been removed for visibility. Maintenance.
 Professional Laser System PLS3.75, PLS4.75, PLS6.75 and PLS6.150D Keeping the laser system clean will ensure the highest quality engraving. A clean laser system is the best performing laser system. The
OIL COOLER KIT INSTALLATION INSTRUCTIONS PART NUMBER D
 OIL COOLER KIT INSTALLATION INSTRUCTIONS PART NUMBER D570-0907 APPLICATION: 2011-12 E90 335i/xi (N55 engine) with BMW M-Technic bumper and without stock oil cooler Congratulations for being selective enough
STARTER SYSTEM TESTING 5.6
 STARTER SYSTEM TESTING 5.6 ON-MOTORCYCLE TESTS Starter Relay Test NOTE Starter relay test also applies to ignition and key switch relays.. See Figure 5-5. Locate starter relay. The relay is attached to
WRANGLER TJ INSTALLATION INSTRUCTIONS Kit #: TJ251K/KN/KST/KSTN TJ401K/KN/KST/KSTN
 WRANGLER TJ INSTALLATION INSTRUCTIONS Kit #: TJ251K/KN/KST/KSTN TJ401K/KN/KST/KSTN Before beginning the installation, read these instructions and the enclosed driver s WARNING NOTICE thoroughly and completely.
INSTALLATION CONSTELLATION DRIVING LIGHTS 5009
 INSTALLATION CONSTELLATION DRIVING LIGHTS 5009 PARTS INCLUDED 1 Right Driving Light with Turn Signals 1 Left Driving Light with Turn Signals 1 Installation Component Kit Including: 8 Insulated Male Spades
ATTENTION. Installation Instructions. Custom Dynamics Windshield Trim LED Turn Signals. Installation. Part Number: CD-WT-14-B, CD-WT-14-C
 Custom Dynamics Windshield Trim LED Turn Signals Installation Instructions We thank you for purchasing the Custom Dynamics Windshield Trim LED turn signals. Our products utilize the latest technology and
SECTION 1 SEAT BACK SUPPORT INSTALLATION
 TM REAR SEAT KIT IMPORTANT: Do not fully tighten hardware until instructed. Read through all instructions before beginning installation. PATRIOT SEAT INSTALLATION TABLE OF CONTENTS: Section 1 - Seat Back
B100PBA Fender Mounting Instructions for MIN100, MIN150, MIN1600, MIN1900, MIN2200, MIN221800, MIN2260, MIN2480 & MIN9950 Fenders
 B100PBA Fender Mounting Instructions for MIN100, MIN150, MIN1600, MIN1900, MIN2200, MIN221800, MIN2260, MIN2480 & MIN9950 Fenders STEP 1 A. Unpack all cartons and lay out parts. B. Compare the parts with
Harley-Davidson Dyna large saddlebags installation guide
 ends@endscuoio.it www.endscuoio.com Harley-Davidson Dyna large saddlebags installation guide Summary Intro... 3 Compatibility... 3 Brackets... 3 Advice... 3 Video... 3 Installation... 4 Superglide, Wide
Rev TOOLS & MATERIALS REQUIRED QTY 3D PART NO. DESCRIPTION
 Rev. 04-10 QTY 3D PART NO. DESCRIPTION 1 691609 FRONT BUMPER REPLACEMENT 1 691610 RIGHT SIDE SKIRT 1 691611 LEFT SIDE SKIRT 1 691612 REAR LOWER SKIRT 4 3M 94 3M ADHESION PROMOTER 16 #8 X ¾ SELF DRILLING
OIL COOLER KIT INSTALLATION INSTRUCTIONS PART NUMBER D E92 335i/xi without stock oil cooler
 OIL COOLER KIT INSTALLATION INSTRUCTIONS PART NUMBER D570-0921 APPLICATION 2007-08 E92 335i/xi without stock oil cooler Congratulations for being selective enough to use a Dinan Engineering Oil Cooler
RS4 Style Grille. Installation. Audi B8 A4/S4 ES ES This tutorial is provided as a courtesy by ECS Tuning.
 RS4 Style Grille Audi 2013+ B8 A4/S4 Installation ES2627562 ES2627563 This tutorial is provided as a courtesy by ECS Tuning. Proper service and repair procedures are vital to the safe, reliable operation
INSTALLATION CONSTELLATION DRIVING LIGHTS 5009
 INSTALLATION CONSTELLATION DRIVING LIGHTS 5009 PARTS INCLUDED 1 Right Driving Light with Turn Signals 1 Left Driving Light with Turn Signals 1 Installation Component Kit Including: 8 Insulated Male Spades
w w w. h d o n l i n e s h o p. d e UNIVERSAL LUGGAGE INSTALLATION GENERAL -J02724 REV Kit Numbers Models Additional Parts Required
 -J074 REV. 006-09- GENERAL Kit Numbers 98944-04, 98945-04A and 98949-06 Models This instruction sheet describes installation of the: Universal Roller Bag, Part Number 98944-04 Universal Side Loading Bag,
Part Number: S-H-BAG-8 & S-H-8-RFEN Description: Saddlebags & Rear Fender / Undertail Fitment: Suzuki GSX 1300-R Hayabusa Revision: 1
 Part Number: S-H-BAG-8 & S-H-8-RFEN Description: Saddlebags & Rear Fender / Undertail Fitment: 2008-2009 Suzuki GSX 1300-R Hayabusa Revision: 1 Tools Required Phillips head screwdriver Small screwdriver
Harley-Davidson Dyna saddlebags installation guide
 Harley-Davidson Dyna saddlebags installation guide Summary Intro... 3 Compatibility... 3 Brackets... 3 Advice... 3 Motorcycles not equipped with a detachable sissy bar... 4 Motorcycles equipped with detachable
Current Softail FLST Harley-Davidson. Ground Effects Installation Instructions
 by 2000 - Current Softail FLST Harley-Davidson Ground Effects Installation Instructions Revised 1-2015 California Sidecar Parts & Technical Support 434.263.8866 Notice to installers 2007 and newer bikes
SUT-450-I ASSEMBLY REQUIREMENTS
 SUT-450-I Torque wrench, carpenters square, wire cutters, Phillips screwdriver, 7/16, 9/16, and 3/4 combination wrenches, ratchet, 9/16,3/4,13/16, and 7/8 sockets. ASSEMBLY REQUIREMENTS *Torque all T-bolt
Multistrada (MTS) Tank Installation Notes. Tools Required. Phase 1: Remove Fairings. Phase 2: Remove Fuel Tank
 Tank Installation Notes. Tools Required. Phase 1: Remove Fairings. Phase 2: Remove Fuel Tank") The California Cycleworks MTS tank provides an aftermarket alternative to the OEM nylon fuel tanks as used on aircooled Desmodue Ducati Multistrada 1100, 1000, and 620 models. This fuel tank is NOT for
The California Cycleworks MTS tank provides an aftermarket alternative to the OEM nylon fuel tanks as used on aircooled Desmodue Ducati Multistrada 1100, 1000, and 620 models. This fuel tank is NOT for
OIL COOLER KIT INSTALLATION INSTRUCTIONS PART NUMBER D E92 335is (N54 engine) with BMW M-Technic bumper and with stock oil cooler
 with BMW M-Technic bumper and with stock oil cooler") OIL COOLER KIT INSTALLATION INSTRUCTIONS PART NUMBER D570-0923 APPLICATION: 2011 E92 335is (N54 engine) with BMW M-Technic bumper and with stock oil cooler Congratulations for being selective enough to
OIL COOLER KIT INSTALLATION INSTRUCTIONS PART NUMBER D570-0923 APPLICATION: 2011 E92 335is (N54 engine) with BMW M-Technic bumper and with stock oil cooler Congratulations for being selective enough to
DL650 Odyssey Luggage Installation Guide
 DL650 Odyssey Luggage Installation Guide Thank you for purchasing Jesse Luggage for your Motorcycle. Our Luggage, handcrafted in the USA, is designed for those with an interest in finding the most durable
GMC Mesh Grille
 921701880 GMC 2014-15 1500 Mesh Grille Thank you for choosing Rough Country for all your lighting needs. Please read instructions before beginning installation. Check the kit hardware against the kit contents
84-01 Jeep XJ Cherokee ZJ Grand Cherokee 3" Suspension Lift Installation Instructions
 www.skyjacker.com 84-01 Jeep XJ Cherokee 93-98 ZJ Grand Cherokee 3" Suspension Lift Installation Instructions Before beginning the installation, read these instructions and the enclosed driver s WARNING
CHAINGUARD REGAL ST COLOR
 DESOTO/ REGAL HAULER PARTS LIST Item Part # Description QTY Item Part # Description QTY 1 11871 REFLECTOR KIT TRIKE 1 32 11764 FENDER BRACE 24" MWT 1 2 12199 SCREW #14 x 3/4 4 33 12176 NUT5/16-24 HEX 2
416 Air Shocks For Harley Davidson FLH/FLT 97-later*.
 Installation Instructions ATTENTION Statements in these instructions that are preceded by the following words are of special significance: W a r n i n g This means there is the possibility of injury to
AIR SUSPENSION KIT HP UNIVERSAL AIR SUSPENSION KIT
 AIR SUSPENSION KIT HP10019 - UNIVERSAL AIR SUSPENSION KIT KIT CONTENTS A A D B Make sure all the items shown in the photo are provided in your kit before starting the installation. J V III D D D VII I
Installation Instructions Harley-Davidson Saddlebag Lids
 Installation Instructions Harley-Davidson Saddlebag Lids Thank you for your purchase of Bagger Audio Saddlebag Lids for your Harley- Davidson motorcycle. We have carefully engineered these products to
OIL COOLER KIT INSTALLATION INSTRUCTIONS PART NUMBER D E92 335i/xi (N55 engine) with BMW Standard bumper and with stock oil cooler
 with BMW Standard bumper and with stock oil cooler") OIL COOLER KIT INSTALLATION INSTRUCTIONS PART NUMBER D570-0924 APPLICATION: 2011-12 E92 335i/xi (N55 engine) with BMW Standard bumper and with stock oil cooler Congratulations for being selective enough
OIL COOLER KIT INSTALLATION INSTRUCTIONS PART NUMBER D570-0924 APPLICATION: 2011-12 E92 335i/xi (N55 engine) with BMW Standard bumper and with stock oil cooler Congratulations for being selective enough
WARNING. BX Fiat 500 Abarth/Turbo 2014 Fiat 500c Abarth Installation Instructions
 Attachment Tab Height: 13 Attachment Tab Width: 22 Please read BOTH these and the General Instructions prior to installing or operating this equipment. 1. Blue Ox towing products and accessories are intended
w w w. h d o n l i n e s h o p. d e CRUISE CONTROL KIT GENERAL INSTALLATION -J04064 REV Kit Number Models Additional Parts Required
 -J006 REV. 006-08- CRUISE CONTROL KIT GENERAL Kit Number 7796-07 Models For the most up-to-date model fitment information, please see the product label or www.harley-davidson.com. Additional Parts Required.
CHAINGUARD REGAL ST COLOR
 DESOTO/ REGAL HAULER PARTS LIST Item Part # Description QTY Item Part # Description QTY 1 11871 REFLECTOR KIT TRIKE 1 32 11762 FENDER BRACE 20" MWT 1 2 12199 SCREW #14 x 3/4 4 11764 FENDER BRACE 24" MWT
Current Range Rover Sport STRUT Collection Installation Manual
 2014 - Current Range Rover Sport STRUT Collection Installation Manual 1 1. Removing Main Grille and Lower Fascia 1.1 Run a line of low tack masking tape across the front of the bumper below the grille
OIL COOLER KIT INSTALLATION INSTRUCTIONS PART NUMBER D
 OIL COOLER KIT INSTALLATION INSTRUCTIONS PART NUMBER D570-0904 APPLICATION: 2011-2012 E90 335i/xi (N55 engine) with BMW standard bumper and with stock oil cooler Congratulations for being selective enough
DETACHABLE QUARTER FAIRING AND DOCKING HARDWARE KIT
 INSTRUCTIONS -J09 REV. 0--00 Kit Numbers 7070-98 (primed kit) DETACHABLE QUARTER FAIRING AND DOCKING HARDWARE KIT General This kit is for installation on 988 and later XL, FXR and FXD model motorcycles
Tools Needed: Class 8.8 Class MM 55ft/lbs 75ft/lbs 14MM 85ft/lbs 120ft/lbs 16MM 130ft/lbs 165ft/lbs 18MM 170ft/lbs 240ft/lbs
 921788000 JEEP JK 6 LONGARM Rough Country recommends a certified technician install this system. In addition to these instructions, professional knowledge of disassemble/reassembly procedures as well as
Harley-Davidson Sportster Rapid Saddlebags Installation Guide
 Harley-Davidson Sportster Rapid Saddlebags Installation Guide Sommario Intro... 3 Compatibility... 3 Advice... 3 Video... 3 Installation... 4 2015 Sportster models not equipped with a detachable sissy
JEEP JK 4 LONGARM. Tools Needed: Thank you for choosing Rough Country for your suspension needs.
 921786000 Thank you for choosing Rough Country for your suspension needs. JEEP JK 4 LONGARM Rough Country recommends a certified technician install this system. In addition to these instructions, professional
Chevy Nova Pro-Touring Front Suspension Installation Instructions
 1962-1967 Chevy Nova Pro-Touring Front Suspension Installation Instructions 1-800-984-6259 www.totalcostinvolved.com 1 Pro-Touring Clip A-Arm Assembly Sway Bar Assembly Fender Panel Kit 8 7/16-20 * 1 ¼
Sport Sway Bar Kit Mustang
 Sport Sway Bar Kit 22102 2005 Mustang Installation of Hotchkis Front Sway Bar 1F Raising Vehicle Securely block the rear wheels of the vehicle. Use a jack to lift up the front of the vehicle and use jack
INSTALLATION INSTRUCTIONS Cherokee / Grand Cherokee 3" Value Flex Lifts
 INSTALLATION INSTRUCTIONS Cherokee / Grand Cherokee 3" Value Flex Lifts Before beginning the installation, read these instructions and the enclosed driver s WARNING NOTICE thoroughly and completely. Also
Fast Master Products, Inc. P.O. Box 654, Katy Texas Tel: (281) Fax: (281)
 Fax: (281)") Fast Master Products, Inc. P.O. Box 654, Katy Texas 77492-0654 Tel: (281) 391-6750 Fax: (281) 391-6760 Email: info@cruiserlift.com Easy installation and removal from the pick-up bed. Compatible with all
Fast Master Products, Inc. P.O. Box 654, Katy Texas 77492-0654 Tel: (281) 391-6750 Fax: (281) 391-6760 Email: info@cruiserlift.com Easy installation and removal from the pick-up bed. Compatible with all
Contour Floor Boards For 1991 through 2007 Big Twins
 Installation Instructions Contour Floor Boards For 1991 through 2007 Big Twins ATTENTION Statements in these instructions that are preceded by the following words are of special significance: W a r n i
Toyota Tacoma Winch Mount Bumper Installation Instructions Tools Required: Transmission cooler relocation brackets Torque Wrench
 2016-2017 Toyota Tacoma Winch Mount Bumper Installation Instructions Tools Required: Items Included: Small flat head screw driver Winch Mount Ratchet, 10mm, 12mm, 14mm, 17mm & Skid Plate 19mm sockets Transmission
Airtail I.A.S. Suspension System for Harley Davidson
 5572 Fresca Drive, La Palma, CA 90623 714.523.8700, FAX 714.523.3220 Airtail I.A.S. Suspension System for Harley Davidson Compressor Kit Installation Instructions FLH/FLT Models with and without Cruise
INSTALLATION INSTRUCTIONS FORD F-150 2WD & 4WD RETAINS FACTORY TOW HOOKS PART #P3063
 INSTALLATION INSTRUCTIONS FORD F-150 2WD & 4WD RETAINS FACTORY TOW HOOKS PART #P3063 PARTS LIST: 1 Grille Guard 2 10-1.5mm Nylon Lock Nuts 1 Driver/Left Frame Mounting Bracket 4 12mm Plastic Washers 1
2010 Camaro SS/V Underbody Brace Installation Instructions
 2010 Camaro SS/V6 20104 Underbody Brace Installation Instructions Thank you for your purchase of this Hotchkis Performance product. Your Underbody Brace set was designed with the performance and durability
OIL COOLER KIT INSTALLATION INSTRUCTIONS PART NUMBER D E92/E93 335i/xi with stock oil cooler
 OIL COOLER KIT INSTALLATION INSTRUCTIONS PART NUMBER D570-0920 APPLICATION 2007-10 E92/E93 335i/xi with stock oil cooler Congratulations for being selective enough to use a Dinan Engineering Oil Cooler
WRANGLER TJ INSTALLATION INSTRUCTIONS
 WRANGLER TJ INSTALLATION INSTRUCTIONS 1997-02 Models Kit# TJ251K/TJ401K 2003-06 Models Kit# TJ253K/TJ403K Before beginning the installation, read these instructions and the enclosed driver s WARNING NOTICE
CHALLENGER TWIN TURBO SYSTEM INSTALLATION INSTRUCTIONS
 CHALLENGER TWIN TURBO SYSTEM INSTALLATION INSTRUCTIONS 1 Verify contents of kits with supplied packing list 1) Unhook the battery. 2) Remove wheel wells & front fascia of vehicle. 3) Remove the catalytic
Installation Instructions for: SYSTEM # DODGE CHALLENGER R/T SCAT PACK, SRT 392 & SRT HELLCAT 6.2L / 6.4L V8 HEMI ENGINE.
 Installation Instructions for: SYSTEM #6350028 2015-2017 DODGE CHALLENGER R/T SCAT PACK, SRT 392 & SRT HELLCAT 6.2L / 6.4L V8 HEMI ENGINE 05/18/17 Removal: 1) Raise the vehicle and support securely with
R O A D S M I T H TRIKE CONVERSIONS BY THE TRIKE SHOP
 R O A D S M I T H TRIKE CONVERSIONS BY THE TRIKE SHOP Please thoroughly review the instructions before and during installation. Keep in mind that this product was designed to be installed by trained dealer
(2) 12mm x 40mm Short Low Profile Bolt Plates. (2) Spacer Washers. (4) 12mm Plastic Retainers. Passenger/Right Front.
 12mm x 40mm Short Low Profile Bolt Plates. (2) Spacer Washers. (4) 12mm Plastic Retainers. Passenger/Right Front.") PARTS LIST: 1 Driver/Left Running Board with 1 Rubber Backing (use on SX & Limited models) 4 12mm Plastic Retainer 1 Passenger/Right Running Board with 1 Rubber 4 12mm Lock Washer Backing (use on SX &
PARTS LIST: 1 Driver/Left Running Board with 1 Rubber Backing (use on SX & Limited models) 4 12mm Plastic Retainer 1 Passenger/Right Running Board with 1 Rubber 4 12mm Lock Washer Backing (use on SX &
harley davidson motorcycle equipment installation manual
 harley davidson motorcycle equipment installation manual (All mounting systems included in this manual were designed specifically for the Electra-Glide Model Harley Davidson Motorcycle. A current 2008
Fender Mounting Instructions for MIN100, MIN150, MIN1600, MIN161200, MIN1900, MIN2200, MIN221800, MIN2260, MIN2480 & MIN9950 Fenders
 STEP 1 100126 Fender Mounting Instructions for MIN100, MIN150, MIN1600, MIN161200, MIN1900, MIN2200, MIN221800, MIN2260, MIN2480 & MIN9950 Fenders A. Unpack all cartons and lay out parts. B. Compare the
INSTALLATION INSTRUCTIONS GRILLE GUARD TOYOTA TUNDRA TOYOTA SEQUOIA PART # P2067
 INSTALLATION INSTRUCTIONS GRILLE GUARD 07-14 TOYOTA TUNDRA 08-14 TOYOTA SEQUOIA PART # P2067 PARTS LIST: GRILLE GUARD 1 Grille Guard 2 10mm Cam Lever Quick Release Bolts with Special Pivot Washer 1 Driver/left
2. With the rear door open remove pull-style clip from the passenger side just below the door latch.
 LoD Offroad FJ Cruiser Rear Bumper with Tire Carrier Installation Instructions 1. Begin with removing factory spare from the rear door. 2. With the rear door open remove pull-style clip from the passenger
Raw Designs Scorpion Tips Install
 Raw Designs Scorpion Tips Install Disclaimer: The information contained in this website is for general information purposes only. The information is provided by mym109r.com and while I endeavor to keep
INSTALLATION INSTRUCTIONS Air Spring Kit IMPORTANT NOTES
 INSTALLATION INSTRUCTIONS 6119 Air Spring Kit Thank you for purchasing a quality Hellwig Product. PLEASE READ THIS INSTRUCTION SHEET COMPLETELY BEFORE STARTING YOUR INSTALLATION IMPORTANT NOTES DO NOT
Please read BOTH these Installation Instructions and the General Instructions prior to installing or operating this equipment.
 2011-15 BMW Mini Cooper Countryman (Includes S) Attachment Tab Height: 14 Serial Number Attachment Tab Width: 20 Please read BOTH these and the General Instructions prior to installing or operating this
Install rubber bump stop thru the tab on the left side of bumper. Use stainless steel 1/4 cap nut to tighten in place.
 Install rubber bump stop thru the tab on the left side of bumper. Use stainless steel 1/4 cap nut to tighten in place. Install the nylon scuff block with 1 steel spacer under it, use 2 @ 1/4 X1 1/4 SS
INSTRUCTION S G-Comp Front Suspension: Chevy Nova Speedway Motors, Inc. 2017
 INSTRUCTION S 350-100 G-Comp Front Suspension: 62-67 Chevy Nova Speedway Motors, Inc. 2017 Kit Contents: 91035700 G-Comp Bare Subframe 350101 G-Comp Support Tubes 91035702 G-Comp Front Subframe Hardware
INSTALLATION & OWNER S MANUAL
 Page 1 of 16 INSTALLATION & OWNER S MANUAL YAMAHA VIKING CAB KIT WITH HARD DOORS p/n: 1YAMVK fits model years 2014- (fits Yanmar Bull model years 2017-) NOTE: By design, the doors are made to not be removable!
54531/ FORD FUSION
 54531/51531 54531/51531 13-15 FORD FUSION 13-15 FORD FUSION FORD FUSION Upper Class Grille w/ Bars TOOLS REQUIRED: Socket Set Flat/Phillips Screw Drivers Torx Bits Plastic Pry Bar 3/16 Drill Bit and Drill
HITCH INSTALLATION INSTRUCTIONS TESLA MODEL 3 PACKAGE: RACK Present MODEL/TRIM: MAKE: YEARS: 2 HOURS TOOLS REQUIRED: PARTS SUPPLIED:
 HITCH INSTALLATION INSTRUCTIONS MAKE: TESLA YEARS: 2017 Present MODEL/TRIM: MODEL 3 WEIGHT CAPACITY TRAILER TONGUE N/A LBS. 200 LBS. PACKAGE: RACK INSTALLATION TIME: 2 HOURS DO NOT EXCEED VEHICLE MANUFACTURE
2015 Harley Davidson Road Glide Manual
 2015 Harley Davidson Road Glide Manual If searching for a ebook 2015 harley davidson road glide manual in pdf format, then you've come to right site. We presented the utter version of this book in txt,
409S Stainless Steel. Removal:
 Installation Instructions for: SYSTEM #817760 2015-2017 DODGE CHALLENGER R/T SCAT PACK, SRT 392 & SRT HELLCAT 6.2L / 6.4L V8 HEMI ENGINE 409S Stainless Steel Removal: 01/16/17 1) Raise the vehicle and
STARTER SYSTEM TESTING 5.6
 STARTER SYSTEM TESTING 5.6 ON-MOTORCYCLE TESTS b088x5x Starter Relay Test NOTE Starter relay test also applies to ignition and key switch relays.. See Figure 5-5. Locate starter relay. The relay is attached
Bill of Materials for
 Bill of Materials for 77060012 1 2-P5153572 Inlet Pipe 1 21-202M 2.75" Filter 1 103-BLO-4820N Filter Hose Clamp 1 559999 Washer, Fender M6x25 1 1-3028 Washer, 1/4 SAE Flat 1 1-2072 Bolt, 1/4-20-UNC x 1
INSTRUCTIONS OIL COOLER KIT 1WARNING -J00715 REV General. Kit Number B and B
 INSTRUCTIONS -J00715 REV. 4-24-00 Kit Number 62571-77B and 62577-77B General This Oil Cooler Kit is designed for: 1981 and Earlier XL 1982 and Later FXR 1984-1999 FXST 1986-1999 FLST including FLSTF Fat
Mustang GT Splitter Bracket Kit M-17A626-MB INSTALLATION INSTRUCTIONS
 !!! PLEASE READ THE FOLLOWING INSTRUCTIONS CAREFULLY PRIOR TO INSTALLATION!!! Caution: If you are not confident that you can complete the installation safely, have it completed by a certified technician!
Installation Instructions
 BY Trike Conversion Kit 2009 - Current FLHT Series Harley-Davidson Installation Instructions REVISED 7-2017 California Sidecar Parts & Technical Support 434.263.8866 2 Table of contents: 1. Warnings and
INSTALLATION INSTRUCTIONS 3 BULL BAR W-BUILT IN LED LIGHT TOYOTA TACOMA
 INSTALLATION INSTRUCTIONS PARTS LIST: 1 3 Bull Bar 4 12mm Hex Nuts 1 Driver/Left Frame Mounting Bracket 2 10-1.50mm x 120mm x 30mm Hex Bolts 1 Passenger/Right Frame Mounting Bracket 2 10mm x 30mm OD x
OIL COOLER KIT INSTALLATION INSTRUCTIONS PART NUMBER D E92 335i/xi (N55 engine) with M-Technic bumper and without stock oil cooler
 with M-Technic bumper and without stock oil cooler") OIL COOLER KIT INSTALLATION INSTRUCTIONS PART NUMBER D570-0925 APPLICATION 2011-12 E92 335i/xi (N55 engine) with M-Technic bumper and without stock oil cooler Congratulations for being selective enough
OIL COOLER KIT INSTALLATION INSTRUCTIONS PART NUMBER D570-0925 APPLICATION 2011-12 E92 335i/xi (N55 engine) with M-Technic bumper and without stock oil cooler Congratulations for being selective enough
INSTALLATION INSTRUCTIONS
 INSTALLATION INSTRUCTIONS Accessory SADDLEBAG MOUNTING Application Publications No. Mll 13304-13660 BRACKET After 2007 VT750C Issue Date P/N 08L56-MEG-100E Revised: April 2011 Honda Dealer: Please give
INSTALLATION INSTRUCTIONS
 INSTALLATION INSTRUCTIONS Trans4mer Mounting System Part No. 30090 (black) Part No. 30091 (chrome) for Chev & GMC S-series trucks NOTE: GMC SLE only: This model has a plastic bumper cover which protrudes
INSTALLING THE NEUTRAL SAFETY SWITCH WIRES
 Installation Instructions Magnum Grip Pro Bandit Shifter Part Number 81045 & 81046 2004, 2003 by B&M Racing and Performance Products (Visit www.bmracing.com for additional products and product information)
INSTALLATION. DRIVING LIGHTS for FLHT/FLHX/FLHR 5005
 DRIVING LIGHTS for FLHT/FLHX/FLHR 5005 PARTS INCLUDED 1 Right Driving Light Assembly 1 Left Driving Light Assembly 1 Right Driving Light Bracket 1 Left Driving Light Bracket 4 Driving Light Bracket Plugs
INSTALLATION INSTRUCTIONS FRONT RUNNER GRILLE GUARD 2015 TRANSIT VAN (FULL SIZE)
") INSTALLATION INSTRUCTIONS FRONT RUNNER GRILLE GUARD PARTS LIST: 1 Runner Grille Guard Center 6 12mm Lock Washers 1 Driver/Left Modular Wing 6 12mm Hex Nuts 1 Passenger/Right Modular Wing 2 8-1.25mm x 40mm
INSTALLATION INSTRUCTIONS FRONT RUNNER GRILLE GUARD PARTS LIST: 1 Runner Grille Guard Center 6 12mm Lock Washers 1 Driver/Left Modular Wing 6 12mm Hex Nuts 1 Passenger/Right Modular Wing 2 8-1.25mm x 40mm
BACKREST, SEAT & SISSYBAR BAG BR 1800
 BACKREST, SEAT & SISSYBAR BAG BR 00 FEATURES OF THE BACKREST, SEAT & SISSYBAR BAG: Two mounting systems included - a seat harness or adjustable sissy bar strap system easily attaches bag to your motorcycle
TOYOTA HIGHLANDER RUNNING BOARD HIGHLANDER HV Preparation
 Preparation Part Number: PT738-48080 Kit Contents Item # Quantity Reqd. Description 1 1 Driver Side Running Board 2 1 Passenger Side Running Board 3 4 /Middle Mount Bracket 4 2 Rear Mount Bracket 5 2 Rear
INSTALLATION INSTRUCTIONS
 INSTALLATION INSTRUCTIONS Accessory TRUNK INSTALLATION KIT P/N 08L73-MKC-A10ZA Application GL1800B/BD Honda Dealer: Please give a copy of these instructions to your customer. Publication No. MII 16426
TOYOTA TUNDRA BUMPER STEP ASSIST Preparation
 Preparation Part Number: PT392-34140 Kit Contents Item # Quantity Reqd. Description 1 1 Linkage Assembly 2 1 Mounting Bracket 3 1 Step Pad 4 1 Hardware Bag 5 1 Bumper Support Bracket 6 1 Bumper Re-enforcement
GM C10 Street Grip
 Part # 11365010/11365110-1973-1987 GM C10 StreetGrip Front Components 11369590 Delrin Control Arm Bushings 11369300 Drop Spindles 11362350/11362351 Front CoilSpring Kit 11369515 Front HQ Series Shocks
R O A D S M I T H TRIKE CONVERSIONS BY THE TRIKE SHOP
 R O A D S M I T H TRIKE CONVERSIONS BY THE TRIKE SHOP Please thoroughly review the instructions before and during installation. Keep in mind that this product was designed to be installed by trained dealer
2014+ DODGE RAM LIFT KIT PART# STOP! READ THIS FIRST!
 NOTE: 2014+ DODGE RAM 2500 8 LIFT KIT PART# 54320 STOP! READ THIS FIRST! **READ THESE ENTIRE INSTRUCTIONS BEFORE STARTING ANYTHING** or chroming, which can damage the strength and structure of the metal,
INSTALLATION CLAMP-ON FORK MOUNTED DRIVING LIGHTS 5015
 CLAMP-ON 5015 PARTS INCLUDED 2 Driving Lights 2 Side Mount Clamps-43mm/49mm 1 Hardware Kit Including: 2 49mm Spacers 4 43mm Spacers 2 Pivot Dome Washers 2 3/8-16 Serrated Hex Nut 1 Wiring Kit for Driving
Maintenance Information
 80234313 Edition 2 May 2014 Air Grinder, Die Grinder, Sander and Belt Sander Series G1 (Angle) Maintenance Information Save These Instructions Product Safety Information WARNING Failure to observe the
BACKREST, SEAT & SISSYBAR BAG BR 3400
 BACKREST, SEAT & SISSYBAR BAG BR 00 FEATURES OF THE BACKREST, SEAT & SISSYBAR BAG: Two mounting systems included - a seat harness or adjustable sissy bar strap system easily attaches bag to your motorcycle
Touring 14 Sheetmetal
 Touring 14 Sheetmetal TA 629730 629732 629731 Custom Fenders for Touring Models with 21x3.5 Wheels These versions of our popular front fenders come with some added width and extended mounting tabs to accommodate