2010 Camaro SS/V Underbody Brace Installation Instructions
|
|
|
- Angelica Newton
- 5 years ago
- Views:
Transcription

1 2010 Camaro SS/V Underbody Brace Installation Instructions Thank you for your purchase of this Hotchkis Performance product. Your Underbody Brace set was designed with the performance and durability you ve come to expect from Hotchkis Performance. Note: Please read the entire installation instructions before starting. Having the right tools will ensure a smooth install process. Hotchkis Performance LLC. 1


2 UNDER BODY BRACE INSTALLATION 1. Safely raise the vehicle and Unbolt the stock center plate. NOTE: This is the only stock part that needs to be removed before installation. These bolts will be used in the installation. 2. Install either side of the under brace by first placing the center mounting bracket holes where the stock plate was removed from. Use the stock bolts and the included LARGE washers for this bracket. NOTE: Do not tighten these bolts yet. Just start the bolts in the holes so that the brace is supported. This will make it easier to bolt up the other brackets. Hotchkis Performance LLC. 2


3 3. Now bolt the rear bracket onto the rear subframe using the holes that are already existing. Place the provided spacers between the frame and the brace as shown. Install the 12mm bolt from the bottom up and make sure to use the small washers on the head and nut ends. EXISTING HOLES SPACER 4. The Front bracket should now line up with its hole. Use the provided hex bolt and LARGE washer on that bracket. NOTE: Remember, do not tighten any bolts yet. Only start each bolt. 5. Now install the other side following the previous instructions. Hotchkis Performance LLC. 3


4 6. Once both sides are in, bolt on the center bridge plate using the provided flange bolts. Install the 10mm flange bolt from the bottom up and make sure to use the lock washer on the nut side. NOTE: Do not completely tighten the bolts yet. BRIDGE PLATE 7. Once everything has been bolted on, begin tightening the bolts on the outside main braces. Tighten M10 bolts to 50 ft-lbs and M12 bolts to 90 ftlbs. Hotchkis Performance LLC. 4


5 8. With the two main braces tight, now tighten the bridge plate and your under brace is ready for the road. Tighten bridge plate bolts to 50 ft-lbs. Hotchkis Performance LLC. 5

6 2010 Camaro SS Strut Brace Installation Instructions Thank you for your purchase of this Hotchkis Performance product. Your Strut Brace set was designed with the performance and durability you ve come to expect from Hotchkis Performance. Note: Please read the entire installation instructions before starting. Having the right tools will ensure a smooth install process. Hotchkis Performance LLC. 1

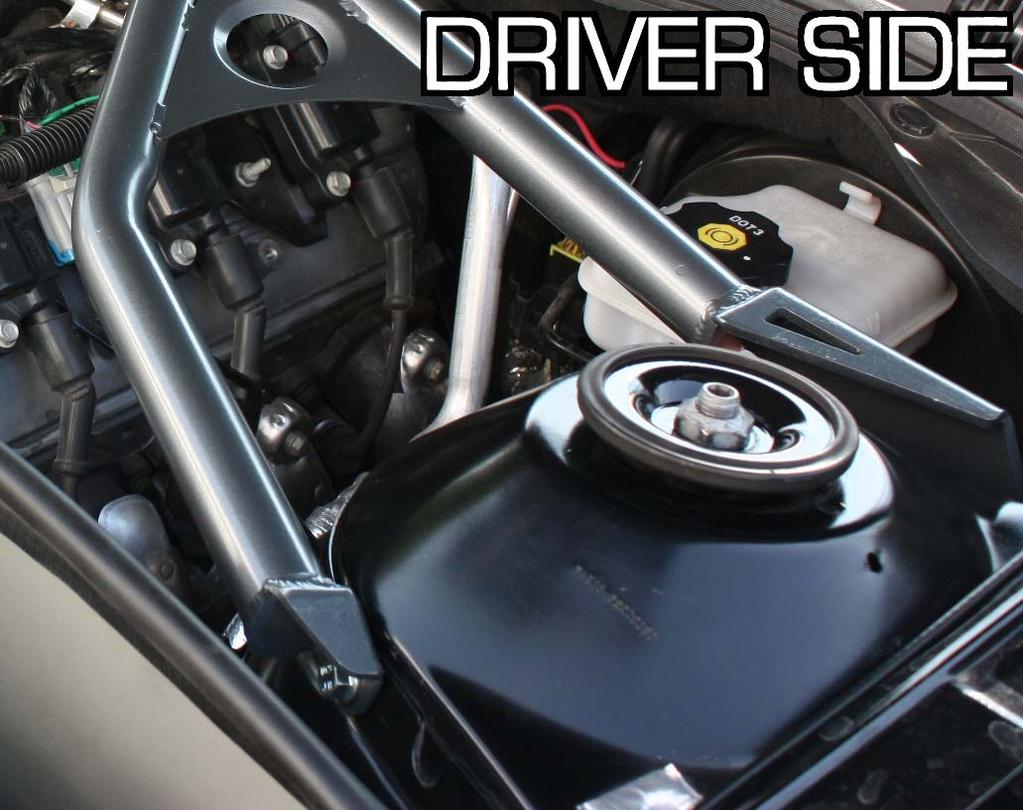
7 Supercharger Note: If you have the Magnuson supercharger (Magna Charger) installed on your vehicle, you will need to relocate the intercooler reservoir tank using the included Hotchkis bracket. The hotchkis bracket resembles the Magnuson bracket, but it positions the reservoir down and towards the rear to gain clearance for the brace. Reuse the bracket hardware from the Magnacharger kit. Undo the 3 bolts holding the reservoir to the bracket. Remove the single nut that holds the bracket to the engine. Replace Magnuson bracket with Hotchkis bracket. Reuse the nut to secure the bracket to the engine. Reuse 2 of the 3 bolts that hold the reservoir to the bracket. Proceed to the strut brace installation. Hotchkis Performance LLC. 2


8 STRUT BRACE INSTALLATION 1. The first step for this installation is to remove the front struts to gain more room to drill our strut brace mounting holes. There are 4 holes total that will be drilled. Jack the front of the car up and place the car on jack stands. Remove the front wheels. 2. Unbolt the brake line tab from the strut. BRAKE LINE BRACKET 3. Remove the ABS line from the bracket. ABS BRACKET Hotchkis Performance LLC. 3


9 4. Unbolt the sway bar link from the strut. 5. Loosen the nut on top of the strut underneath the hood. NOTE: Do not completely remove the nut. Loosen until it can be later removed by hand. This will make it easiest to remove the strut. 6. Mark the strut where the upright nuts are located with a marker. Remove the bolts that hold the spindle to the strut. SPINDLE BOLTS Hotchkis Performance LLC. 4


10 7. Now while supporting the strut with one hand, remove the nut on top and lower the strut. Use a bungee cord or wire to hold the upright close to the chassis. This will ensure the suspension does not hang too low putting tension on the brake hose. 8. Peek underneath the strut tower apron. The first holes you will be drilling are the rear holes located in the pictures below. Hotchkis Performance LLC. 5


11 9. Center punch the center of the semicircle shaped seam. Drill a pilot hole with a 1/16 or 1/8 drill bit. Then drill the hole out with a 3/8 drill bit. Hotchkis Performance LLC. 6


12 2010 Chevy Camaro 10. Once the rear holes are drilled out on the both sides, Position the strut brace in the engine bay. Install the longer rear bolts through the holes you just drilled and through the rear bracket of the brace. Spin the nuts on, but do not tighten. The front mounts will sit in front of the strut towers. Hotchkis Performance LLC. 7

13 11. With the strut brace in place you can now mark the front holes with a marker. Mark the center of the front bracket slot on each side. Remove the strut brace from the vehicle. 12. Drill the front holes in the same manner as the rear holes. Start with a 1/16 or 1/8 pilot hole and finish it off with a 3/8 hole. These holes can be drilled from the engine bay side. Hotchkis Performance LLC. 8

14 13. Reinstall the strut brace on the vehicle and insert the longer bolts from the bottom of the strut tower through the rear holes. The shorter bolts are for the front and can be inserted from the front. Use the lock washer on the nut side of the fasteners. Hotchkis Performance LLC. 9

15 Hotchkis Performance LLC. 10

16 14. Reinstall the front struts in reverse order and you are finished with your installation. Hotchkis Performance LLC. 11


17 Sport Sway Bar Kit Chevy Camaro IMPORTANT: PLEASE READ THE ENTIRE INSTRUCTION MANUAL BEFORE STARTING THIS INSTALLATION. Front Sway Bar Installation 1F Raise the Vehicle Raise front of the vehicle using a floor jack and place jack stands in the proper jacking points. Securely block the rear wheels of the vehicle.


18 2F Remove the Driver Side Front Wheel The front bar will sneak it s way out towards the driver side. Remove the driver side front wheel to gain more clearance for installation. 3F Disconnect the Front End Links Disconnect the front end links from the sway bar ends on each side.


19 4F 5F Detach the Sway Bar Bushing Brackets Just above the front subframe, the sway bar is attached by 2 bushing brackets, one on each side. Undo the 2 nuts per bracket to detach the sway bar from the subframe. Raise the Engine You will need more room to get the sway bar out from between the subframe and the engine. To do this, unbolt the 2 motor mounts attached to the subframe and jack the engine up. Make sure to use a block of wood between the jack and the engine to avoid damage.


20 6F Remove Stock Bar Fish the stock bar towards the driver side until it s completely out. If you need more clearance, carefully raise the engine more until the bar can be removed. 7F Reinstall the Hotchkis Sway Bar Reinstall the Hotchkis Sway Bar in the same manner as stock removal. Your kit comes with new bushings and brackets. Apply the provided silicone grease in the inside area of each bushing. Install the bushings onto the bar. When reinstalling the stock bushing bracket nuts, please use the provided washers from your hardware kit. You should use one washer for each nut totaling 4 for the front installation. Apply a small amount of lock threading compound (included in your kit) on each nut. Make sure to use the brackets that have the 90 grease fitting attached. You may choose to point the fitting towards the outside or inside depending on which direction is easiest for you to regrease in the future.


21 8F Reinstall the End Links Lower the engine down and fully tighten the motor mount nuts completely. Insert the end links back into the sway bar ends and fully tighten the nuts using the supplied lock threading compound. 9F Final Inspection Before lowering the front end back onto the ground, make sure all hardware is fully tightened. You are finished with the front Hotchkis Sway Bar installation. Let s move on to the rear bar.


22 Rear Sway Bar Installation 1R 2R Raise the Vehicle Raise rear of the vehicle by driving the rear of the vehicle onto floor ramps. You may use floor jacks to jack up the rear of the car, but the installation is easier with the suspension at ride height. Once the rear of the vehicle is accessible, securely block the front wheels of the vehicle. Disconnect the Rear End Links Disconnect the rear end links from the sway bar ends on each side. 3R Detach the Sway Bar Bushing Brackets The sway bar is attached by 2 bushing brackets, one on each side. Undo the 2 bolts per bracket to detach the sway bar from the subframe. The bar should be loose from the vehicle. There is enough room to fish the bar completely out without dropping the exhaust.

 on each bolt.")

23 4R Reinstall the Hotchkis Sway Bar Reinstall the Hotchkis Sway Bar in the same manner as stock removal. Your kit comes with new bushings and brackets. Apply the provided silicone grease in the inside area of each bushing. Install the bushings onto the bar. When reinstalling the stock bushing bracket nuts, please use the provided washers from your hardware kit. You should use one washer for each bolt totaling 4 for the rear installation. Apply a small amount of lock threading compound (included in your kit) on each bolt. Make sure to use the brackets that have the straight grease fitting attached. Fully tighten the bracket hardware. 5R Reinstall the End Links Insert the end links back into the sway bar ends and fully tighten the nuts using the supplied lock threading compound. 6R Final Inspection Before lowering the rear end back onto the ground, make sure all hardware is fully tightened. You are finished with the Rear Hotchkis Sway Bar installation. Enjoy your new Sway Bar set.


24 P/N# Sway Bar End Links Installation Instructions 2010 Chevy Camaro Thank you for your purchase of this Hotchkis Performance product. Your End Link set was designed with the performance and durability you ve come to expect from Hotchkis Performance. Note: Please read the entire installation instructions before starting. Having the right tools will ensure a smooth install process. FRONT END LINK INSTALLATION 1. Raise the front end of the vehicle. Remove the front wheels. 2. Disconnect the OE end link from the sway bar ends. Retain the nut for reinstallation. Hotchkis Performance LLC. 1
 6. Reinstall the Hotchkis end links onto the vehicle in the same manner as removal. Reuse the OE nuts. 7.")
25 3. Disconnect the OE end link from the front struts. Retain the nut for reinstallation. 4. As a default setting, set the length of the Hotchkis links to the same length as the OE links. 5. Assemble the links as shown in the diagram. (Use the longer bolts for the front) 6. Reinstall the Hotchkis end links onto the vehicle in the same manner as removal. Reuse the OE nuts. 7. Clock the rod ends (heim joints) so that there is proper articulation throughout the entire steering travel. You should be able to turn the steering wheel left or right (lock to lock) and the rod ends should not bind. Once the rod ends are properly clocked, tighten the jam nuts on each end. Hotchkis Performance LLC. 2


26 REAR END LINK INSTALLATION 2010 Chevy Camaro 1. Raise the rear end of the vehicle to access the underside. You do not need to remove the wheels. If you have drive-on floor ramps the installation will be easier. 2. Disconnect the OE end link from the sway bar ends. Retain the nut for reinstallation. 3. Disconnect the OE end link from the front struts. Retain the nut for reinstallation. 4. As a default setting, set the length of the Hotchkis links to the same length as the OE links. Tighten the jam nuts once the length is set. Hotchkis Performance LLC. 3
 2010 Chevy Camaro 6.")
27 5. Assemble the links as shown in the diagram. (Use the shorter bolts for the rear) 2010 Chevy Camaro 6. Reinstall the Hotchkis end links onto the vehicle in the same manner as removal. Reuse the OE nuts.
Sport Sway Bar Kit Mustang
 Sport Sway Bar Kit 22102 2005 Mustang Installation of Hotchkis Front Sway Bar 1F Raising Vehicle Securely block the rear wheels of the vehicle. Use a jack to lift up the front of the vehicle and use jack
Chrysler A-Body Tubular A-Arms Installation Instructions A-ARM INSTALLATION
 1967-1976 Dodge Demon 1112 67-72 Chrysler A-Body Tubular A-Arms Installation Instructions Thank you for your purchase of this Hotchkis Performance product. Your A-Arm set was designed with the performance
Sport Sway Bar Kit Chevy Camaro
 Sport Sway Bar Kit 22109 2010 Chevy Camaro Thank you for your purchase from our new line of Chevy parts. Please call us at 877-4NO - ROLL if you have any questions regarding the service or installation
Carli Suspension Front Instructions
 Carli Suspension Front Instructions 94-08 DODGE 2500-3500 4X4 SUSPENSION SYSTEM Note: Prior to installation, carefully inspect the vehicle=s steering and drive train components. Be sure to check ball joints,
GM F-Body Convertible 1404 Center X-Brace Installation Instructions
 1967-1969 GM F Body 1967-1969 GM F-Body Convertible 1404 Center X-Brace Installation Instructions Thank you for your purchase of this Hotchkis Performance product. Your X-Brace was designed with the performance
Sport Coil Springs Chysler 300C SRT-8 05 Dodge Charger SRT-8
 Sport Coil Springs 19105 05 Chysler 300C SRT-8 05 Dodge Charger SRT-8 Warning: This installation should be performed by a trained professional. The installation requires lowering of the rear cradle from
2014+ DODGE RAM LIFT KIT PART# STOP! READ THIS FIRST!
 NOTE: 2014+ DODGE RAM 2500 8 LIFT KIT PART# 54320 STOP! READ THIS FIRST! **READ THESE ENTIRE INSTRUCTIONS BEFORE STARTING ANYTHING** or chroming, which can damage the strength and structure of the metal,
RAM LIFT KIT PART# STOP! READ THIS FIRST!
 NOTE: 2014-2016 RAM 2500 4 LIFT KIT PART# 54340 STOP! READ THIS FIRST! **READ THESE ENTIRE INSTRUCTIONS BEFORE STARTING ANYTHING** or chroming, which can damage the strength and structure of the metal,
2013+ DODGE RAM " Kit PART# STOP! READ THIS FIRST!
 NOTE: 2013+ DODGE RAM 3500 4" Kit PART# 54346 STOP! READ THIS FIRST! **READ THESE ENTIRE INSTRUCTIONS BEFORE STARTING ANYTHING** or chroming, which can damage the strength and structure of the metal, any
CSS-C SUSPENSION LIFT KIT
 115 W. La Cadena Dr. Ste 100 Riverside, CA 92501 (951) 328-9902 phone (951) 328-9908 fax 2000-2006 CHEVROLET SILVERADO 1500 4WD CSS-C3-2 6-8 SUSPENSION LIFT KIT WARNING: CALIFORNIA SUPERTRUCKS RECOMMENDS
INSTALLATION INSTRUCTIONS CHEVY C-10 4-Link Rear End
 INSTALLATION INSTRUCTIONS 73-87 CHEVY C-10 4-Link Rear End Please read these instructions completely before starting your installation. Assemble suspension on vehicle before powder-coating to ensure proper
P/N# Performance Lowering Springs Installation Instructions
 P/N# 19110 Performance Lowering Springs Installation Instructions Thank you for your purchase of this Hotchkis Performance product. Your Lowering Spring set was designed with the performance and durability
Sport Coil Springs Dodge Magnum, Chrysler 300C Dodge Challenger SRT Dodge Challenger R/T
 Sport Coil Springs 19101 - Dodge Magnum, Chrysler 300C 19107 - Dodge Challenger SRT-8 19108 - Dodge Challenger R/T Warning: This installation should be performed by a trained professional. The installation
2013+ DODGE RAM LIFT KIT PART# STOP! READ THIS FIRST!
 NOTE: 2013+ DODGE RAM 3500 8 LIFT KIT PART# 54324 STOP! READ THIS FIRST! **READ THESE ENTIRE INSTRUCTIONS BEFORE STARTING ANYTHING** or chroming, which can damage the strength and structure of the metal,
1204AA Ford Mustang Double Adjustable Trailing Arms
 1204AA 79-04 Ford Mustang Double Adjustable Trailing Arms Special Tools Required for this Installation - 4 post lift or alignment rack preferable - Air Chisel, Angle Finder (Digital Preferred), Dead blow
KIT # CSS-C SUSPENSION LIFT KIT
 14385 Veterans Way Moreno Valley, CA 92553 Phone: (951) 571-0212 Fax: (951) 571-0215 2001-2010 CHEVROLET SILVERADO 1500 AND 2500 HD 4WD AND 2WD PICK-UP 1999-2010 CHEVY 2500 4WD PICK-UPS 2001-2010 2500
Alignment Spec. Power Rack & Pinion: 5 degrees positive Camber 0 degrees Toe-In 1/32
 333-TCIE237 1967-1969 Chevy Camaro Front Suspension 1968-1972 Chevy Nova Front Suspension 1967-1969 Pontiac Firebird Front Suspension 1-800-984-6259 www.totalcostinvolved.com 1967-1969 Chevy Camaro Front
Installations Instructions for Maier Racing Front Coilover Kit MS Ford Mustang
 22215 Meekland Avenue Hayward, CA 94541 Phone: (510) 581-7600 Fax: (510) 581-2406 Installations Instructions for Maier Racing Front Coilover Kit MS-02-001 1964-1973 Ford Mustang Contents Front Coilover
1203AA GM A-BODY Double Adjustable Trailing Arms
 1203AA 64-67 GM A-BODY Double Adjustable Trailing Arms Warning: This installation should be performed by a trained professional. Note, pictures in this booklet are from a 77-96 GM B Body. Installation
Suspension System RS6582B
 Suspension System RS6582B Tahoe/Yukon READ ALL INSTRUCTIONS THOROUGHLY FROM START TO FINISH BEFORE BEGINNING INSTALLATION IMPORTANT NOTES! WARNING: This suspension system will enhance the off-road performance
Ford Racing GT500 Style Strut Mount Upgrade (05-12 All):
:") Ford Racing GT500 Style Strut Mount Upgrade (05-12 All): Required tools: (2) Jack stands Floor jack (1 is required but 2 is preferred) Torque wrench Spring compressor tool (can be rented at your local
Ford Racing GT500 Style Strut Mount Upgrade (05-12 All): Required tools: (2) Jack stands Floor jack (1 is required but 2 is preferred) Torque wrench Spring compressor tool (can be rented at your local
You will be removing the suspension of your vehicle. If you are not comfortable with this or do not have the proper tools, please do not proceed.
 Thank you for purchasing the CorkSport Mazda 3 and Mazdaspeed 3 Coilover Kit. This suspension system features 15-way adjustable dampening settings and full length adjustment to meet every driver s handling
MAXTRAC SUSPENSION 4030 E LEAVERTON CT ANAHEIM, CA
 MAXTRAC SUSPENSION 4030 E LEAVERTON CT ANAHEIM, CA 92807 714 630 0363 WWW.MAXTRACSUSPENSION.COM SALES@MAXTRACSUSPENSION.COM PRODUCT: PARTS LIST K751364 6" LIFT KIT 07 12 GM 1500 PICKUP QTY SPINDLE, CHEVY
ACE 325/570 2 Lift Kit
 ACE 325/570 2 Lift Kit Polaris Ace 325/570 2014+ Part #: 5101244 Rev. 082316 491 W. Garfield Ave., Coldwater, MI 49036. Phone: 517-278-7768 E-mail: sales-rtpro@sporttruckusainc.com SAFETY WARNING RT Pro
"Engineered to Ride, Built to Last "
 Congratulations on your purchase of an Arnott air suspension product. We at Arnott Incorporated are proud to offer a high quality product at the industry s most competitive pricing. Thank you for your
INSTALLATION OF HOTCHKIS PERFORMANCE DOUBLE ADJUSTABLE TRAILING ARMS
 1215 DOUBLE ADJUSTABLE UPPER TRAILING ARMS 67-70 CHEVROLET B-BODY This installation will require: A hydraulic jack, jack stands The following wrenches or sockets: 15/16 Adjustable wrench (1-1/4 1-9/32
W205 C63 Suspension Adjustable Suspension Installation Guide
 W205 C63 Suspension Adjustable Suspension Installation Guide 2015+ C63 AMG Sedan 2015+ C63S AMG Sedan Thank you for your purchase of the Weistec W205 C63 Adjustable Suspension. Please follow all directions,
Rear Sway Bar Kit 22390R C-10 Truck STARTING THIS INSTALLATION. THIS INSTALLATION DEPICTS A TRUCK THAT DID NOT HAVE A SWAY BARS FROM FACTORY.
 Rear Sway Bar Kit 22390R 67-72 C-10 Truck IMPORTANT: PLEASE READ THE ENTIRE INSTRUCTION MANUAL BEFORE STARTING THIS INSTALLATION. THIS INSTALLATION DEPICTS A TRUCK THAT DID NOT HAVE A SWAY BARS FROM FACTORY.
Detroit Speed, Inc. Caster/Camber Plate Kit Camaro/Firebird P/N:
 Detroit Speed, Inc. Caster/Camber Plate Kit 1982-92 Camaro/Firebird P/N: 030330 The Detroit Speed Inc., Caster/Camber Plate Kit is a direct bolt-on kit that allows precise camber and caster adjustments
2016 & Up Miata MX-5 Coilover Installation Instructions
 Page1 2016 & Up Miata MX-5 Coilover Installation Instructions Tooling: Jack, jack stands or lift Socket wrench Torque wrench 10mm, 12mm, 14mm and 17mm sockets 14mm and 17mm wrenches Flat head screwdriver
Sport Sway Bar Kit VW MKV & MKVI Jetta, GTI, GLI Audi A3
 Sport Sway Bar Kit 22833 06-09 VW MKV & MKVI Jetta, GTI, GLI 06-07 Audi A3 Thank you for your purchase from our new line of Audi/VW parts. Please call us at 877-4NO - ROLL if you have any questions regarding
Product: Camaro Spec Adjustable Heavy Duty Sway Bar Package
 Product: Camaro Spec Adjustable Heavy Duty Sway Bar Package Part Number: 440-402001-G Applications: Chevrolet Camaro SS, and ZL1 2012 - Current Description: These racing sway bars are engineered to be
Camaro / Firebird. Please read the following key points before installing this kit.
 Please read the following key points before installing this kit. 1 Before performing the subframe connector installation, the vehicle must be completely assembled with all body and component parts installed
INSTRUCTION S G-Comp Front Suspension: Chevy Nova Speedway Motors, Inc. 2017
 INSTRUCTION S 350-100 G-Comp Front Suspension: 62-67 Chevy Nova Speedway Motors, Inc. 2017 Kit Contents: 91035700 G-Comp Bare Subframe 350101 G-Comp Support Tubes 91035702 G-Comp Front Subframe Hardware
Detroit Speed, Inc. Rear Coilover Tower Brace Kit Camaro P/N:
 Detroit Speed, Inc. Rear Coilover Tower Brace Kit 2016+ Camaro P/N: 042433 The Detroit Speed, Inc. 2016+ Camaro Rear Coilover Tower Brace Kit is a bolt-in design that increases overall vehicle stiffness.
Part # Mustang Complete CoilOver Kit
 Front Components: Part # 12100109 67-70 Mustang Complete CoilOver Kit 1 12103509 Non Adjustable Front CoilOvers 1 12102899 Lower StrongArms 1 12103699 Upper StrongArms Rear Components: 1 12106509 Non Adjustable
2010 Current Ford Raptor Lower Control Arm Installation Instructions
 PREPARATION 2010 Current Ford Raptor Lower Control Arm Installation Instructions 1. Disconnect the negative terminal on the battery. Park the vehicle on level ground and set the emergency brake. 2. We
INSTRUCTION S G-Comp Front Suspension: Chevy Camaro Speedway Motors, Inc Kit Contents:
 INSTRUCTION S 350-500 G-Comp Front Suspension: 70-81 Chevy Camaro Speedway Motors, Inc. 2017 Kit Contents: 350500.1 G-Comp Subframe, Camaro 350500.2 G-Comp Sway Bar Kit, Camaro 350500.3 Hardware Kit, G-Comp
STaSIS Engineering B6 B7 Streetsport Suspension
 STaSIS Engineering B6 B7 Streetsport Suspension SS Suspension Kit Parts List Qty Description Part Number 1 STaSIS adjusted Koni cadmium plated dampers (2 front, 2 rear) 1150-5061 Special Tools Required
Ford F150/Raptor & F150 Lower Control Arm Installation Instructions
 2009-2010 Ford F150/Raptor & 2015-2017 F150 Lower Control Arm Installation Instructions PREPARATION 1. Disconnect the negative terminal on the battery. Park the vehicle on level ground and set the emergency
Vehicle ride height chart
 Please read Instructions thoroughly and completely before beginning installation. Installation by a certified mechanic is recommended. ReadyLIFT Suspension Inc. is NOT responsible for any damage or failure
HEIDTS RF-110. INSTALLATION INSTRUCTIONS Fairlane Comet Rear 4-Link
 HEIDTS RF-110 INSTALLATION INSTRUCTIONS 66-67 Fairlane 66-67 Comet Rear 4-Link Please read these instructions completely before starting your installation. Remember the basic rule for a successful installation:
CSS-C CHEVROLET SUBURBAN & TAHOE WD AND 2WD CHEVROLET AVALANCHE WD AND 2WD 6-8 SUSPENSION LIFT KIT
 14385 Veterans Way Moreno Valley, CA 92553 Phone: (951) 571-0212 Fax: (951) 571-0215 WWW.CSTSUSPENSION.COM CSS-C3-3 2000-2006 CHEVROLET SUBURBAN & TAHOE 1500 4WD AND 2WD 2002-2006 CHEVROLET AVALANCHE 1500
TOYOTA FJ CRUISER 6 SUSPENSION KIT
 92177000 TOYOTA FJ CRUISER 6 SUSPENSION KIT Thank you for choosing Rough Country for your suspension needs. Rough Country recommends a certified technician installs this system. In addition to these instructions,
1209A GM B-BODY Double Adjustable Trailing Arms
 1209A 78-96 GM B-BODY Double Adjustable Trailing Arms Warning: This installation should be performed by a trained professional. Tools Required for this Installation - 4 post lift or alignment rack preferable
5) The trailing arm should then pivot smoothly on the chassis. 6) Install the rear bolt. 7) Place one drop of blue Loctite
 The trailing arm should then pivot smoothly on the chassis. 6) Install the rear bolt. 7) Place one drop of blue Loctite") INSTALLATION INSTRUCTIONS 1301 / 1302 / 1305 / 1306 THANK YOU FOR CHOOSING HOTCHKIS PERFORMANCE PRODUCTS Removal of Stock Lower Trailing Arms 1) Place car on level surface. 2) Support rear of the car on
INSTALLATION INSTRUCTIONS 1301 / 1302 / 1305 / 1306 THANK YOU FOR CHOOSING HOTCHKIS PERFORMANCE PRODUCTS Removal of Stock Lower Trailing Arms 1) Place car on level surface. 2) Support rear of the car on
Team Z Motorsports. K-Member installation instructions
 Team Z Motorsports K-Member installation instructions Parts Included: 1-Tubular K-Member Needed Items-Solid Steering Shaft Offset Steering Rack Bushings Optional-Heavy Duty Bolt Kit Tubular Front Lower
05 12 TOYOTA TACOMA 2WD
 MAXTRAC SUSPENSION 4030 E LEAVERTON CT ANAHEIM, CA 92807 714 630 0363 WWW.MAXTRACSUSPENSION.COM SALES@MAXTRACSUSPENSION.COM PRODUCT: PARTS LIST K756864 6" LIFT KIT 05 12 TOYOTA TACOMA 2WD QTY SPINDLE,
Tubular Lower A-Arms GM A-Body Tubular Lower A-Arms GM F-Body
 1104 - Tubular Lower A-Arms 64-72 GM A-Body 1108 - Tubular Lower A-Arms 70-81 GM F-Body Tubular Lower A-Arms: Thank you for your purchase from our new line of A-Body parts. Please call us at (877) 4NO
AEV30213AH Last Updated: 04/28/17. jk wrangler dualsport sc suspension INSTALLATION GUIDE
 AEV30213AH Last Updated: 04/28/17 jk wrangler 3.5 4.5 dualsport sc suspension INSTALLATION GUIDE PLEASE READ BEFORE YOU START TO GUARANTEE A QUALITY INSTALLATION, WE RECOMMEND READING THESE INSTRUCTIONS
Part # Cougar CoilOver System
 Front Components: 1 12103510 HQ Series Front CoilOvers 1 12102899 Lower StrongArms 1 12103699 Upper StrongArms 1 12109100 Front MuscleBar w/ PosiLinks 350 S. St. Charles St. Jasper, In. 47546 Ph. 812.482.2932
*1611BAG2* 1611BAG2 92PERF1611
 *1611BAG2* 1611BAG2 92PERF1611 97-06 JEEP TJ 2 1/2 X-SERIES SUSPENSION KIT Thank you for choosing Rough Country for your suspension needs. Rough Country recommends a certified technician installs this
C-10 Rear 4Link
 Part # 11367199-1973-1987 C10 Rear 4Link Recommended Tools 1973-1987 C-10 Rear 4Link Installation Table of contents Page 2... Included Components Page 3... Hardware List & Getting Started Page 4... Disassembly
99-04 GT. Hellion Power Systems Mustang GT Kit Instructions
 Hellion Power Systems 99-04 Mustang GT Kit Instructions Part 1 Hellion recommends that the front suspension system be installed either by trained professionals or by 5.Remove rack bolts K-Member Installation
97-06 JEEP TJ 3 1/4 PROGRESSIVE COIL/SPACER KIT
 92PERF1641 97-06 JEEP TJ 3 1/4 PROGRESSIVE COIL/SPACER KIT Thank you for choosing Rough Country for your suspension needs. Rough Country recommends a certified technician installs this system. In addition
Procharger Stage II Intercooled Supercharger System (11-14 GT)
") Procharger Stage II Intercooled Supercharger System (11-14 GT) Installation Time: Approximately one day. Installed on 2012 Mustang GT 5.0/Manual Required Tools 3/8 Socket Set (Standard and Metric) 1/2
Procharger Stage II Intercooled Supercharger System (11-14 GT) Installation Time: Approximately one day. Installed on 2012 Mustang GT 5.0/Manual Required Tools 3/8 Socket Set (Standard and Metric) 1/2
STOP---READ THIS FIRST!
 STOP---READ THIS FIRST! **Read These Entire Instructions Before Starting Anything** 2007-2010 GM 1500 TRUCK LIFT KIT INSTRUCTIONS (PART# 50700 & 50720) 5680 W. Barstow, Fresno, CA 93722 PH: (559) 226-8196
Part # Impala Fixed Valving Coil-Over Suspension Package
 350 S. St. Charles St. Jasper, In. 47546 Part # 11060109 59-64 Impala Fixed Valving Coil-Over Suspension Package Front Components: 1 11053509 RQ Series Front Coil-overs 1 11052899 Front Lower StrongArms
Detroit Speed, Inc. Mini-Tub Kit Chevy Nova, Oldsmobile Omega, Pontiac Ventura P/N: &
 Detroit Speed, Inc. Mini-Tub Kit 1968-74 Chevy Nova, Oldsmobile Omega, Pontiac Ventura P/N: 041207 & 041208 Item Component Quantity 1 DSE Mini Tubs 1968-74 X-Body 2 2 Rear Upper Shock Crossmember 1 3 Upper
INSTALLATION INSTRUCTION 88581
 INSTALLATION INSTRUCTION 88581 FOR RANCHO SUSPENSION SYSTEM RS6581B: DODGE RAM READ ALL INSTRUCTIONS THOROUGHLY FROM START TO FINISH BEFORE BEGINNING INSTALLATION Rev C IMPORTANT NOTES! WARNING: This suspension
INSTALLATION INSTRUCTION 88146
 INSTALLATION INSTRUCTION 88146 Rev H FOR RANCHO SUSPENSION SYSTEM RS6547: 4WD SUBURBAN/YUKON XL, 4WD TAHOE/YUKON, & 4WD AVALANCHE READ ALL INSTRUCTIONS THOROUGHLY FROM START TO FINISH BEFORE BEGINNING
INSTALLATION INSTRUCTIONS FOR: RE DOOR JK WRANGLER RE DOOR JK WRANGLER 3.5 STANDARD SUSPENSION SYSTEM
 RUBICON MANUFACTURING INC. 3290 MONIER CIR., RANCHO CORDOVA, CA. 95742 916-473-4600 INSTALLATION INSTRUCTIONS FOR: RE7122 2 DOOR JK WRANGLER RE7142 4 DOOR JK WRANGLER 3.5 STANDARD SUSPENSION SYSTEM Safety
PRE-INSTALLATION. INSTALLATION INSTRUCTIONS STEP 1: Park vehicle on level surface and chock rear wheels.
 2007-2013 7.5" GMC/Chevrolet 1500 4WD Suspension Lift kit PRE-INSTALLATION 15004 2 - Cross-member (Fr/Rr) 2 - Sway Bar Drop Bracket 2 - Knuckle (Dr/Pass) 1 - Driver Diff. Bracket 1 - Passenger Diff. Bracket
INSTALLATION INSTRUCTION 88088
 INSTALLATION INSTRUCTION 88088 For Rancho Suspension Systems RS6588 & RS6589: FORD F-150 READ ALL INSTRUCTIONS THOROUGHLY FROM START TO FINISH BEFORE BEGINNING INSTALLATION Rev B IMPORTANT NOTES! WARNING:
INSTALLATION INSTRUCTIONS Chevrolet Nova Superide II Independent Front Suspension
 INSTALLATION INSTRUCTIONS 1962 1967 Chevrolet Nova Superide II Independent Front Suspension Please read these instructions completely before starting your installation. Assemble suspension on vehicle before
1109 Tubular Lower A-Arms Camaro/Firebird
 1109 Tubular Lower A-Arms 67-69 Camaro/Firebird Tubular Lower A-Arms: Thank you for your purchase from our new line of F-Body parts. Please call us at (877) 4NO - ROLL if you have any questions regarding
Installation Guide for the JK Wrangler 4-Inch Suspension System with FlexArms
 INSTALLATION GUIDE Tera Manufacturing, Inc. 5251 South Commerce Dr. Murray, Utah 84107 Phone/801.288.2585 Fax/801.713.2313 www.teraflex.biz Installation Guide for the JK Wrangler 4-Inch Suspension System
Chevy Nova Pro-Touring Front Suspension Installation Instructions
 1962-1967 Chevy Nova Pro-Touring Front Suspension Installation Instructions 1-800-984-6259 www.totalcostinvolved.com 1 Pro-Touring Clip A-Arm Assembly Sway Bar Assembly Fender Panel Kit 8 7/16-20 * 1 ¼
Lightweight Tubular Sway Bar Kit Subaru WRX / STi / 09+ FXT
 915250 Lightweight Tubular Sway Bar Kit 2008+ Subaru WRX / STi / 09+ FXT Installation Instructions Congratulations on your purchase of the COBB Lightweight Tubular Sway Bar Kit for your Subaru WRX, STi
RHINO SUSPENSION SYSTEM INSTALLATION INSTRUCTIONS
 PARTS INCLUDED: 2 FRONT UPPER A-ARMS 2 FRONT LOWER A-ARMS 2 UNI-BALL JOINTS 2 UNI-BALL JOINT STUDS 2 UNI-BALL JOINT CAPS 2 RETAINING RINGS 1 FRONT SHOCK ASSEM. 2 DELRON STEERING STOPS 2 SHOCK MOUNT SPACERS
INSTALLATION INSTRUCTIONS Rear Stabilizer Bar Nissan Frontier Thank you for purchasing a quality Hellwig Product.
 INSTALLATION INSTRUCTIONS Rear Stabilizer Bar 2005+ Nissan Frontier Thank you for purchasing a quality Hellwig Product. 1 Driver Side Passenger Side 2 3 TORQUE TABLE BOLT SIZE: 3/8 = 20-30 ft. lbs. 7/16
AEV30213AF Last Updated: 05/24/18. jk wrangler dualsport sc suspension right hand drive INSTALLATION GUIDE
 AEV30213AF Last Updated: 05/24/18 jk wrangler 3.5 4.5 dualsport sc suspension right hand drive INSTALLATION GUIDE PLEASE READ BEFORE YOU START TO GUARANTEE A QUALITY INSTALLATION, WE RECOMMEND READING
03-04 Mach 1. Hellion Power Systems Mach 1 Kit Instructions
 Hellion Power Systems 03-04 Mach 1 Kit Instructions Part 1 Hellion recommends that the front suspension system be installed either by trained professionals or by 5.Remove rack bolts K-Member Installation
Special Note: On 4 Wheel Drive models you must remove the Drive Axle Bolts. Be sure to use the correct tool on these 12mm 12 Point Bolts.
 ReadyLift (Part# 69-2070) Strut extension 2003-2007 Ford Expedition 2WD & 4WD 3 Front Leveling Kit Instructions Check www.readylift.com for any updated installation instructions. Step 1: Position truck
Anti-Roll Bar Set # 2279, Cadillac CTS V6 & CTS-V
 Anti-Roll Bar Set # 2279, 2280 2003+ Cadillac CTS V6 & CTS-V Thank you for your purchase from our new line of CTS parts. Please call us at (877) 4NO-ROLL if you have any questions regarding the service
Jeep Grand Cherokee ZJ 4 Suspension Kit
 92168800 Jeep Grand Cherokee 93-98 ZJ 4 Suspension Kit Thank you for choosing Rough Country for all your suspension needs. Rough Country recommends a certified technician install this system. In addition
09-12 Dodge 4WD Leveling Kit
 9235900 09-12 Dodge 4WD 1500 2.5 Leveling Kit Thank you for choosing Rough Country for all your suspension needs. DOES NOT FIT TRX PACKAGE VEHICLES!! Rough Country recommends a certified technician install
CHECK ALL PARTS INCLUDED IN THIS KIT TO THE PARTS LIST BEFORE INSTALLATION. IF ANY PIECES ARE MISSING, PLEASE CONTACT: TOTAL COST INVOLVED
 333-TCIE237 1967-1969 Chevy Camaro Front End, 1968-1972 Chevy Nova Front End 1967-1969 Pontiac Firebird Front End Suspension Installation Instructions 1-855-693-1259 www.totalcostinvolved.com CHECK ALL
Sport Coil Springs (19425) Scion tc
 Scion tc") Sport Coil Springs (19425) Scion tc Thank you for your purchase from our new line of Scion tc parts. Please call us at (877) 4NO-ROLL if you have any questions regarding the service or installation of
Sport Coil Springs (19425) Scion tc Thank you for your purchase from our new line of Scion tc parts. Please call us at (877) 4NO-ROLL if you have any questions regarding the service or installation of
COBB WRX Sports Springs West 1820 South Salt Lake City, UT USA (801)
") COBB 3362 West 1820 South Salt Lake City, UT 84104 USA (801) 713-0035 2008 WRX Sports Springs Congratulations on your purchase of the COBB Sports Springs. The following instructions should assist you through
COBB 3362 West 1820 South Salt Lake City, UT 84104 USA (801) 713-0035 2008 WRX Sports Springs Congratulations on your purchase of the COBB Sports Springs. The following instructions should assist you through
Jeep Wrangler (JK) Present
 Present") Suspension System RS66110B (3 SPORT SYSTEM w/ Progressive Coil Springs Front & Rear) 2012 NEWER JEEP MODELS EQUIPPED WITH 3.6L V6 ENGINE NEED EXHAUST MODIFICATION KIT RS720003. OR REPLACEMENT FRONT DRIVESHAFT
Suspension System RS66110B (3 SPORT SYSTEM w/ Progressive Coil Springs Front & Rear) 2012 NEWER JEEP MODELS EQUIPPED WITH 3.6L V6 ENGINE NEED EXHAUST MODIFICATION KIT RS720003. OR REPLACEMENT FRONT DRIVESHAFT
INSTALLATION INSTRUCTION 88148
 INSTALLATION INSTRUCTION 88148 Rev C For Rancho Suspension Systems RS6548, RS6549 & RS6550: GM 2500HD, 2500, and 1500HD Trucks READ ALL INSTRUCTIONS THOROUGHLY FROM START TO FINISH BEFORE BEGINNING INSTALLATION
Part # GM F Body Complete CoilOver System
 350 S. St. Charles St. Jasper, In. 47546 Ph. 812.482.2932 Fax 812.634.6632 www.ridetech.com Part # 11170109 70-81 GM F Body Complete CoilOver System Front Components: 1 11173509 Front Fixed Valving CoilOvers
Make sure your vehicle is on a level surface prior to starting installation.
 Thank you for purchasing the CorkSport Mazdaspeed 3 Front Sway Bar. Our sway bar will help remove the vehicles tendency to overpower the front tires under hard cornering and minimize traction robbing body
INSTALLATION INSTRUCTIONS
 INSTALLATION INSTRUCTIONS 2005-2012 Nissan Xterra/Frontier / Pathfinder PART NUMBERS: NP17500, NP17525, NP17550 FRONTIER PARTS & CORRESPONDING HARDWARE LIST XTERRA PATHFINDER ABOVE LISTED 1/2 Metal Lock
Part # Impala Air Suspension System
 350 S. St. Charles St. Jasper, In. 47546 Ph. 812.482.2932 Fax 812.634.6632 www.ridetech.com Part # 11060298 59-64 Impala Air Suspension System Front Components: 1 11053001 HQ Series Front Shockwaves 1
RZR 900S/4, 1000S 1.5 Lift Kit
 RZR 900S/4, 1000S 1.5 Lift Kit Polaris RZR 900S/4, 1000S 2015+ Part #: 5101255 Rev. 082316 491 W. Garfield Ave., Coldwater, MI 49036. Phone: 517-278-7768 E-mail: sales-rtpro@sporttruckusainc.com SAFETY
STOP---READ THIS FIRST!
 STOP---READ THIS FIRST! **Read These Entire Instructions Before Starting Anything** 2003-2013 DODGE Ram 2500/3500, 8 LIFT KIT NOTE: * The factory wheels and tires WILL fit on the front of the vehicle once
USE THE PARTS LIST BELOW TO MAKE SURE YOUR KIT IS COMPLETE BEFORE INSTALLATION. IF ANY PIECES ARE MISSING, PLEASE CONTACT:
 1955-1959 Chevy Truck Rear Leaf Spring Kit Install Instructions Tech Line: 1-855-693-1259 www.totalcostinvolved.com Read and understand these instructions before starting any work! USE THE PARTS LIST BELOW
115 W. La Cadena Dr. Ste 100 Riverside, CA (909) phone (909) fax 2004 NISSAN TITAN 2WD (CSS-N3-1) 8 SUSPENSION LIFT KIT
 phone (909) fax 2004 NISSAN TITAN 2WD (CSS-N3-1) 8 SUSPENSION LIFT KIT") 115 W. La Cadena Dr. Ste 100 Riverside, CA 92501 (909) 328-9902 phone (909) 328-9908 fax 2004 NISSAN TITAN 2WD (CSS-N3-1) 8 SUSPENSION LIFT KIT PLEASE READ ALL INSTRUCTIONS THOROUGHLY FROM START TO FINISH
115 W. La Cadena Dr. Ste 100 Riverside, CA 92501 (909) 328-9902 phone (909) 328-9908 fax 2004 NISSAN TITAN 2WD (CSS-N3-1) 8 SUSPENSION LIFT KIT PLEASE READ ALL INSTRUCTIONS THOROUGHLY FROM START TO FINISH
INSTALLATION INSTRUCTION 88051
 INSTALLATION INSTRUCTION 88051 For Rancho Suspension System RS6551: Chevrolet 2500 Suburban & 2500 Avalanche READ ALL INSTRUCTIONS THOROUGHLY FROM START TO FINISH BEFORE BEGINNING INSTALLATION Rev C IMPORTANT
Installation Procedure GR40 S197 SLA Front Suspension System (Does not include Aluminum Spindle and Hub Instructions)
") Installation Procedure GR40 S197 SLA Front Suspension System (Does not include Aluminum Spindle and Hub Instructions) Please take the time and read these instructions first! The GR40 S197 system is designed
Installation Procedure GR40 S197 SLA Front Suspension System (Does not include Aluminum Spindle and Hub Instructions) Please take the time and read these instructions first! The GR40 S197 system is designed
INSTALLATION INSTRUCTIONS
 Product: Steering Stabilizer Relocation Kit Part Number: JKSOGS900 (JKSOGS162/JKSJSPEC1000/JKSOGS924) INSTALLATION INSTRUCTIONS Applications: Wrangler JK, 2007+ Welcome CONGRATULATIONS on purchasing a
63162K 2015 Chevrolet Colorado 4WD Leveling Kit w/ 1 Rear Lift Kit
 PRO COMP SUSPENSION 63162K 2015 Chevrolet Colorado 4WD Leveling Kit w/ 1 Rear Lift Kit This document contains very important information that includes warranty information and instructions for resolving
Part # Mustang Complete CoilOver Kit
 Front Components: 1 12103509 Front CoilOvers 1 12102899 Lower StrongArms 1 12103699 Upper StrongArms 350 S. St. Charles St. Jasper, In. 47546 Ph. 812.482.2932 Fax 812.634.6632 www.ridetech.com Part # 12100109
AEV30308AA Last Updated: 05/31/18. 4 DUALSPORT sc SUSPENSION system for RAM 1500 air ride standard and rebel INSTALLATION GUIDE
 AEV30308AA Last Updated: 05/31/18 4 DUALSPORT sc SUSPENSION system for RAM 1500 air ride standard and rebel INSTALLATION GUIDE PLEASE READ BEFORE YOU START TO GUARANTEE A QUALITY INSTALLATION, WE RECOMMEND
GM B-Body Street Grip
 Part # 11015010/11015110-1955-1957 GM B-Body StreetGrip Front Components 11019590 Delrin Control Arm Bushings 90003041 Tall Upper Balljoint 11012350/11012351 Front Dual Rate CoilSprings 22159847 Front
2216 (STOCK) / 2224 (3 LOWER) 2WD SPORT SWAY BAR SET 97-UP DODGE DAKOTA INSTALLATION OF HOTCHKIS PERFORMANCE FRONT SWAY BAR
 / 2224 (3 LOWER) 2WD SPORT SWAY BAR SET 97-UP DODGE DAKOTA INSTALLATION OF HOTCHKIS PERFORMANCE FRONT SWAY BAR") 2216 (STOCK) / 2224 (3 LOWER) 2WD SPORT SWAY BAR SET 97-UP DODGE DAKOTA Thank you for your purchase from our line of Dodge Dakota & Durango suspension parts. Please call us at (877) 4NO-ROLL if you have
2216 (STOCK) / 2224 (3 LOWER) 2WD SPORT SWAY BAR SET 97-UP DODGE DAKOTA Thank you for your purchase from our line of Dodge Dakota & Durango suspension parts. Please call us at (877) 4NO-ROLL if you have
INSTALLATION INSTRUCTIONS Progress Technology Rear Anti-Sway Bar Honda Civic Part # No Revision (7/20/16)
") INSTALLATION INSTRUCTIONS Progress Technology Rear Anti-Sway Bar Honda Civic 96-00 Part # 62.1042 No Revision (7/20/16) WHO SHOULD INSTALL THIS PRODUCT? Progress Technology products should only be installed
INSTALLATION INSTRUCTIONS Progress Technology Rear Anti-Sway Bar Honda Civic 96-00 Part # 62.1042 No Revision (7/20/16) WHO SHOULD INSTALL THIS PRODUCT? Progress Technology products should only be installed
1501 Industrial Way N., Toms River, NJ Fax: PACKING LIST MUSTANG GT LONG TUBE HEADERS (M30000)
") ADVANCED - Installation requires professional-type tools and advanced automotive-service skills. If you lack experience with internal engine modifications, an Advanced installation is probably beyond your
ADVANCED - Installation requires professional-type tools and advanced automotive-service skills. If you lack experience with internal engine modifications, an Advanced installation is probably beyond your