Installations Instructions for Maier Racing Front Coilover Kit MS Ford Mustang
|
|
|
- Susanna Edwards
- 6 years ago
- Views:
Transcription

1 22215 Meekland Avenue Hayward, CA Phone: (510) Fax: (510) Installations Instructions for Maier Racing Front Coilover Kit MS Ford Mustang Contents Front Coilover Item Check List... 2 Hardware Check List Models Models... 4 Tools needed... 4 Item Check List for Lower Control Arm... 4 Installing your Maier Racing Front Coilover Kit... 5 Installing Maier Racing Boxed Lower Control Arms Setting ride height


2 Item Check List Front Coilover Kit QTY Description 2 Maier Racing Tubular Upper Control Arms 2 Integra Shocks 2 PAC Racing Coil Springs 2 1 Upper Coilover Mount Spacer (64-66 only) 2


3 2 Upper Coilover Mount Retaining Rings 6 Flanged Stainless Steel Shock Mounting Spacers 2 Straight Stainless Steel Shock Mounting Spacers Hardware Check List Models QTY Description 6 3/8-24 Grade 8 Bolts 2.5 Thread Length 6 3/8-24 Grade 8 Nylock Nut models 12 3/8 Grade 8 Washers 8 1/2-20 Grade 8 Bolts 2.5 Thread Length 4 1/2-20 Grade 8 Nylock Nut 4 1/2"-20 Grade 8 Thin Nylock Nut 12 1/2 Grade 8 Washers 3


4 Models QTY Description 6 3/8-24 Grade 8 Bolts 1.5 Thread Length 6 3/8-24 Grade 8 Nylock Nut 12 3/8 Grade 8 Washers 4 4 1/2"-20 Grade 8 Bolts 2.25 Thread Length 1/2-20 Grade 8 Bolts 2.5 Thread Length models 4 1/2"-20 Grade 8 Nylock Nut 4 1/2-20 Grade 8 Thin Nylock Nut 12 1/2 Grade 8 Washers Tools needed Safety Glasses Gloves Floor Jack Jack Stands Wheel Chocks Lug Nut Wrench 3/8 or 1/2" Drive Ratchet 3/8 or 1/2" Drive Standard Socket Set Torque Wrench Standard Wrench Set Pliers Pickle Fork for ball joint removal Mallet Porting Tool Drill ½ Drill Bit Center Punch 1/8 Hex Key Item Check List for Lower Control Arm *If purchased with Maier Racing Stage 2 Coilover Kit 2 Maier Racing Boxed Lower Control Arms 4
 Make sure your vehicle is parked on a flat surface with the parking brake on.")
 Place wheel chocks behind the rear wheels and jack the front of your vehicle up. 5) Place jack stands under vehicle. *Note: Never use a floor jack to support your vehicle.")
5 2 Steel Spacers for Boxed Lower Control Arms 4 Aluminum Inserts for Boxed Lower Control Arms Installing your Maier Racing Front Coilover Kit 1) If you have the stock spring on your car, seek professional help for spring removal if you are uncomfortable removing them. 2) Make sure your vehicle is parked on a flat surface with the parking brake on. 3) Loosen the front lug nuts to allow easy removal of wheel when vehicle is lifted. *Note: Do not remove lug nuts during this step. 4) Place wheel chocks behind the rear wheels and jack the front of your vehicle up. 5) Place jack stands under vehicle. *Note: Never use a floor jack to support your vehicle. 6) Remove the front lug nuts and wheels. 7) Remove the sway bar end link from the lower control arms. a. This will allow the lower control arm and upper control arm to drop lower for ease of spring and shock removal. 5
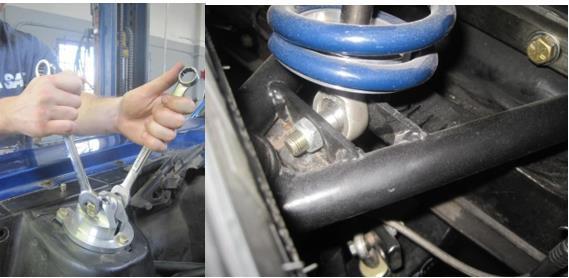
 Remove the nuts from the lower shock mount. 10) Remove the upper shock mount from shock tower and shock.")
 Lower the floor jack to")
 If you have a stock spring, use a spring compressor to remove the spring. a. Use extreme caution when removing spring.")
6 8) Jack up the lower control arm to allow access to the lower shock mount. 9) Remove the nuts from the lower shock mount. 10) Remove the upper shock mount from shock tower and shock. 11) Remove the original shock tower brace if equipped. Kit. a. The original shock tower brace will not fit with the Maier Racing Front Coilover 12) Lower the floor jack to allow suspension to droop. a. If your car has lowering springs, remove them at this time. 13) If you have a stock spring, use a spring compressor to remove the spring. a. Use extreme caution when removing spring. Seek professional help if needed. 14) Remove the castle nut from the upper control arm ball joint. 6
 Use a pickle fork to loosen the upper control arm ball joint from the spindle. a. If you don t have a pickle fork, then a mallet can be used.")
 Remove nuts of the upper control arms from inside the engine bay of the shock tower. a. Keep in mind to hold up the upper control arm as you re loosening the nuts. 7")
7 15) Flip the castle nut and screw into the upper control arm ball joint leaving about a ¼ gap from the spindle to the castle nut. a. Doing this will protect the threads of the ball joint when loosening the ball joint from the spindle. 16) Use a pickle fork to loosen the upper control arm ball joint from the spindle. a. If you don t have a pickle fork, then a mallet can be used. 17) Take a hammer and hit the spindle to loosen the upper control arm ball joint. a. Remember to keep the castle nut on the ball joint to protect the threads. Hit Here 18) Remove nuts of the upper control arms from inside the engine bay of the shock tower. a. Keep in mind to hold up the upper control arm as you re loosening the nuts. 7

")


8 Step 19 is only for models 19) Use a porting tool to enlarge the bolt holes to accommodate for the supplied 3/8 bolts. Steps are only for models 20) You will now need to remove the factory spring seat from the shock tower. 21) Locate the center of the spot welds and use a center punch to mark it. a. There will be 3 spot welds for each side. 8


 Install your Maier Racing Shock Tower")
9 b. The center punch is used for a starting point for your drill bit. 22) Use a ½ drill bit and drill to remove factory spring seat. a. You do not need to drill all the way through the shock tower. Just enough to shave off the spot welds. 23) Install your Maier Racing Shock Tower Brace. 24) Install 3/8 bolts through holes and install nuts and washers. 9


 Insert supplied")

10 models models 25) Line up holes of the retaining ring and billet upper coilover mount. a models need to install 1 spacer. 26) Insert supplied steel shock spacers into billet upper coilover mount. 10
 Reinstall the spindle onto the Maier Racing upper control arm ball joint and torque to 60-90 lbft.")

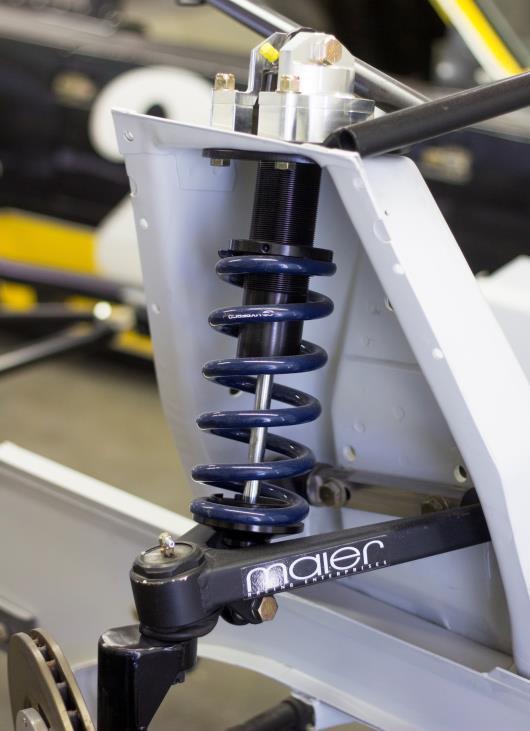
11 27) Install Maier Racing tubular upper control arms with supplied ½ bolts, nuts, and washers and torque to 90 lb-ft. a. Make sure to orient the inner shaft kit washers towards the rear of the vehicle. Washers toward rear 28) Reinstall the spindle onto the Maier Racing upper control arm ball joint and torque to lbft. 29) Install the Integra coilover shock and PAC spring combination with the supplied ½ bolts, nuts, and washers into your Maier Racing upper control arm and billet upper coilover mount and torque to 90 lb-ft. a. Install the shock body to the billet upper coilover mount, and the shaft side to the upper control arm. 11
12 12
 Remove strut rod nuts from lower control arm.")
13 Installing Maier Racing Boxed Lower Control Arms 1) Remove front sway bar end link from lower control arm. 2) Remove strut rod nuts from lower control arm. 13
 Flip castle nut and screw into lower control arm ball joint leaving about a ¼ gap from the spindle to the castle nut. a. Doing this will protect the threads of the ball joint when loosening the ball joint from the spindle.")
 Take a hammer and hit the spindle to loosen the lower control arm ball joint. a. Remember to keep the castle nut on the ball joint to protect the threads.")
14 3) Remove castle nut from lower control arm ball joint. 4) Flip castle nut and screw into lower control arm ball joint leaving about a ¼ gap from the spindle to the castle nut. a. Doing this will protect the threads of the ball joint when loosening the ball joint from the spindle. 5) Use a pickle fork to loosen the lower control arm ball joint from the spindle. a. If you don t have a pickle fork, then a mallet can be used. 6) Take a hammer and hit the spindle to loosen the lower control arm ball joint. a. Remember to keep the castle nut on the ball joint to protect the threads. HIT HERE 14
 Insert the supplied aluminum")


15 7) Remove the bolt from lower control arms. 8) Insert the supplied aluminum inserts on each side of the spherical bearing. 9) Install the Maier Racing Boxed Lower Control Arm. a. You may need to use a rubber mallet to install the lower control arm. 15
 Re-install the castle nut onto ball joint stud and torque to 60-90 lb-ft. 14) Insert supplied cotter pin to prevent castle nut from loosening up.")
16 10) Re-install inner lower control bolt and torque to lb-ft. 11) Re-install lower control arm ball joint to spindle. 12) Insert supplied aluminum spacer onto ball joint stud. 13) Re-install the castle nut onto ball joint stud and torque to lb-ft. 14) Insert supplied cotter pin to prevent castle nut from loosening up. 15) Inspect and/or replace strut rod and torque to lb-ft. 16) Re-install the sway bar end link and torque to lb-ft. 17) Re-install wheels and lug nuts and torque to lb-ft for 6 cylinder spindles and lb-ft for 8 cylinder spindles. 18) Remove jack stands and lower vehicle. Setting ride height 1) Roll the car forward and backward to allow the tires and chassis to settle. 16


17 2) On a flat surface, measure all four pinch weld seams that run on each side of the car and record it. a. You will need these measurements to determine if your vehicle is laterally straight. Should be same height in front 17


18 REAR FRONT 3) Listed on the next page are some example ride heights and changes that need to be made to correct ride height. 18
19 a. For the scenario shown above, you will need to lower the height in the right front. b. For the scenario shown above, you will need to lower the height in the left front. 19
 The front height should be lower than the rear and will vary depending on driving conditions, but the listed measurements are a good starting point: a.")
20 4) The rear height will be your reference point; generally, the rear of the car cannot be adjusted. 5) The front height should be lower than the rear and will vary depending on driving conditions, but the listed measurements are a good starting point: a. Street Driving: Front will be ½ lower than rear height b. Street/Track: Front will be ¾ to 1 lower than rear height ½ to 1 Lower Note: Lines and Measurements are not to scale 6) Raise the car with a floor jack and place jack stands underneath. 7) Locate and loosen set screw on spring perch. 8) Turn the spring perch to adjust height. 20
 Snug the set screw on spring perch. a. You do not need to tighten very much, just have the set screw touch the shock body.")
 Perform a wheel alignment on your vehicle. a. The wheel alignment was altered from changing the height of the car.")
21 a. One full turn of spring perch is about 1/16. b. Turning spring perch to the right will lower the car, turning the spring perch to the left will raise the car. LOWER HEIGHT RAISE HEIGHT 9) Snug the set screw on spring perch. a. You do not need to tighten very much, just have the set screw touch the shock body. 10) Lower the car and roll forward and backward to settle the tires and chassis. 11) Re-measure ride height and re-adjust height if needed. 12) Perform a wheel alignment on your vehicle. a. The wheel alignment was altered from changing the height of the car. 13) You are now ready to enjoy your Maier Racing Front Coilover Kit. 21
Mustang. MOD1 Coilover Kit FXXADK0100, FXXADK0200, FXXADK0400 FXXA1K0100, FXXA1K0200, FXXA1K0400
 1964.5-1973 Mustang MOD1 Coilover Kit FXXADK0100, FXXADK0200, FXXADK0400 FXXA1K0100, FXXA1K0200, FXXA1K0400 2276 Research Dr. Livermore, Ca 94550 Ph: (925)-443-6300 E: maier@mikemaierinc.com Page 1 of
LIFT-506 BMF Lift Kit Club Car DS Gas & Electric Installation Instructions
 LIFT-506 BMF Lift Kit Club Car DS Gas & Electric 2003.5-09 Installation Instructions Contents of LIFT-506 Club Car DS BMF Lift Kit: a (1 ea.) BMF Front Suspension b (1 ea.) Driver Side Upper A-Arm c (1
W205 C63 Suspension Adjustable Suspension Installation Guide
 W205 C63 Suspension Adjustable Suspension Installation Guide 2015+ C63 AMG Sedan 2015+ C63S AMG Sedan Thank you for your purchase of the Weistec W205 C63 Adjustable Suspension. Please follow all directions,
Part # Camber Caster Plates Ford Mustang All Ford Mustang GT500
 Part # 24220 Camber Caster Plates 2005-2010 Ford Mustang All 2007-2014 Ford Mustang GT500 J&M Products once again outdoes our competitors with these fully adjustable (Protected under US Patent No. 8,820,759
07-13 TOYOTA TUNDRA 2WD 6" LIFT SPINDLES
 MAXTRAC SUSPENSION 4030 E LEAVERTON CT ANAHEIM, CA 92807 714-630-0363 WWW.MAXTRACSUSPENSION.COM SALES@MAXTRACSUSPENSION.COM PRODUCT: K886764 07-13 TOYOTA TUNDRA 2WD 6" LIFT SPINDLES PARTS LIST QTY LIFT
Detroit Speed, Inc. Detroit Speed Control Arm and Spindle Kit A-Body P/N: &
 Detroit Speed, Inc. Detroit Speed Control Arm and Spindle Kit 1964-72 A-Body P/N: 030104 & 030105 The Detroit Speed A-Body front suspension kit is a bolt-on package that addresses the shortcomings of the
This procedure is best performed on a vehicle lift, however it is possible to install these coilovers using a floor jack and jack stands.
 Description: FeatherLight Single Adjustable Corvette Coilovers Part Number: 430-401004-N Application: 2014-2015 Chevrolet Corvette (C7) Note: Some models might be equipped with Magnetic Ride electric adjustable
Tacoma Front Suspension Install Instructions
 1995-04 Tacoma Front Suspension Install Instructions Important notices: These instructions are intended only as a general guide for installing All-Pro products. For some items, specialized mechanical skills,
2005-Pres. Ford Mustang Camber Plate Installation Instructions:
 2005-Pres. Ford Mustang Camber Plate Installation Instructions: J&M Products once again outdoes our competitors with these fully adjustable PATENT PENDING Camber & Caster plate assemblies for the 2005-2010
Team Z Motorsports. K-Member installation instructions
 Team Z Motorsports K-Member installation instructions Parts Included: 1-Tubular K-Member Needed Items-Solid Steering Shaft Offset Steering Rack Bushings Optional-Heavy Duty Bolt Kit Tubular Front Lower
Ford Racing GT500 Style Strut Mount Upgrade (05-12 All):
:") Ford Racing GT500 Style Strut Mount Upgrade (05-12 All): Required tools: (2) Jack stands Floor jack (1 is required but 2 is preferred) Torque wrench Spring compressor tool (can be rented at your local
Ford Racing GT500 Style Strut Mount Upgrade (05-12 All): Required tools: (2) Jack stands Floor jack (1 is required but 2 is preferred) Torque wrench Spring compressor tool (can be rented at your local
Carli Suspension Front Instructions
 Carli Suspension Front Instructions 94-08 DODGE 2500-3500 4X4 SUSPENSION SYSTEM Note: Prior to installation, carefully inspect the vehicle=s steering and drive train components. Be sure to check ball joints,
LIFT Drop Spindle Lift Kit E-Z-Go RXV Gas or Electric Installation Instructions
 LIFT-107 6 Drop Spindle Lift Kit E-Z-Go RXV Gas or Electric Installation Instructions Contents of LIFT-107 E-Z-Go RXV Drop Spindle Lift Kit: a (1 ea.) Driver Side Spindle b (1 ea.) Passenger Side Spindle
INSTALLATION INSTRUCTIONS
 INSTALLATION INSTRUCTIONS --300 W PONTIAC WAY CLOVIS, CA 93612 local: 559-875-0222 fax: 559-876-2249 toll free: 800-445-3767-- 25007 LIFT / LOWERING STRUT 2015+ FORD F-150 2WD (+1 to -3 ) 2015+ FORD F-150
Detroit Speed, Inc. Front Coilover Conversion GM A-body P/N: &
 Detroit Speed, Inc. Front Coilover Conversion 1964-67 GM A-body P/N: 030306 & 030307 The Detroit Speed, Inc. Front Coilover Conversion Kit is a direct bolt-in kit that provides excellent ride quality along
MM Caster/Camber Plates, (Mm5CC-7)
") 3430 Sacramento Dr., Unit D San Luis Obispo, CA 93401 Telephone: 805/544-8748 Fax: 805/544-8645 www.maximummotorsports.com MM Caster/Camber Plates, 2005-14 (Mm5CC-7) Supplemental Installation Notes This
3430 Sacramento Dr., Unit D San Luis Obispo, CA 93401 Telephone: 805/544-8748 Fax: 805/544-8645 www.maximummotorsports.com MM Caster/Camber Plates, 2005-14 (Mm5CC-7) Supplemental Installation Notes This
Installation Notes: #86000-R Race Series +3.5 L/T Kit
 159 North Maple St. Unit J, CORONA CA 92880 P. 951-737-9682 F. 951-737-9006 WWW.CHAOSFAB.COM Installation Notes: #86000-R Race Series +3.5 L/T Kit Factory manual is recommended for removal and re-installation
Global West Suspension 655 South Lincoln Ave San Bernardino Ca Phone Fax Web address globalwest.
 Global West Suspension 655 South Lincoln Ave San Bernardino Ca. 92408 Phone 877-470-2975 Fax 909-890-0703 Web address globalwest.net Mustang coilover instruction sheets for 64-66 Kit includes the following
INSTALLATION INSTRUCTIONS INS247
 INSTALLATION INSTRUCTIONS INS247 2015-2017 FORD MUSTANG CASTER CAMBER KIT Part # 2553 Special Tools required: xxx INCLUDED IN THIS KIT sdfgadsgf Install Time: xxx Difficulty: xxx STEP 1 STEP 3 Place the
Installation Instructions
 79-04 Ford Mustang Perfect Fit K-Member Part # 20022 Installation Instructions Congratulations on your purchase of the AFCO Perfect Fit K-member for the 79-04 Ford Mustang. Please read and understand each
Detroit Speed, Inc. Front Coilover Conversion F-Body, X-Body, A-Body P/N: &
 Detroit Speed, Inc. Front Coilover Conversion 1967-69 F-Body, 1968-74 X-Body, 1968-72 A-Body P/N: 030311 & 030312 The Detroit Speed, Inc. Front Coilover Conversion Kit is a direct bolt-in kit that provides
PRE-INSTALLATION Ford F150 4WD 4" Suspension Lift Kit
 2009-2013 Ford F150 4WD 4" Suspension Lift Kit PRE-INSTALLATION 25007 2 - Knuckle (Driv/Pass) 2 - Crossmember (Front/Rear) 2 - Differential Bracket (Driv/Pass) 1 - Diff. Brace Bracket (Pass) 2 - Front
99-04 GT. Hellion Power Systems Mustang GT Kit Instructions
 Hellion Power Systems 99-04 Mustang GT Kit Instructions Part 1 Hellion recommends that the front suspension system be installed either by trained professionals or by 5.Remove rack bolts K-Member Installation
MM Caster Camber Plates, (Mm6CC-10)
") 3430 Sacramento Dr., Unit D San Luis Obispo, CA 93401 Telephone: 805/544-8748 Fax: 805/544-8645 www.maximummotorsports.com MM Caster Camber Plates, 2015+ (Mm6CC-10) Read all instructions before beginning
3430 Sacramento Dr., Unit D San Luis Obispo, CA 93401 Telephone: 805/544-8748 Fax: 805/544-8645 www.maximummotorsports.com MM Caster Camber Plates, 2015+ (Mm6CC-10) Read all instructions before beginning
Technical Support Line: (952) Hanover Ave. Lakeville, MN
 Hanover Ave. Lakeville, MN") Technical Support Line: (952) 985-5675 Email: Sales@QA1.net 21730 Hanover Ave. Lakeville, MN 55044 www.qa1.net INSTALLATION INSTRUCTIONS QA1 1967-1979 Mopar A-Body Rear 6 link Conversion System QA1 p/n
Technical Support Line: (952) 985-5675 Email: Sales@QA1.net 21730 Hanover Ave. Lakeville, MN 55044 www.qa1.net INSTALLATION INSTRUCTIONS QA1 1967-1979 Mopar A-Body Rear 6 link Conversion System QA1 p/n
Install Time: Special Tools Required: Difficulty:
 Special Tools Required: Spring Compressor Floor Jack and Jack Stands Impact Gun Disc Sander or Sanding Paper Install Time: Approximately 3 Hours Difficulty: 3 out of 5 Follow these instructions carefully
Detroit Speed, Inc. Front Coilover Conversion Camaro/Firebird, A-Body P/N: , , &
 Detroit Speed, Inc. Front Coilover Conversion 1970-81 Camaro/Firebird, 1968-72 A-Body P/N: 030308, 030309, 030313 & 030314 The Detroit Speed, Inc. Front Coilover Conversion Kit is a direct bolt-in kit
OME SUSPENSION KIT INSTALLATION FJ CRUISER, RUNNER
 OME SUSPENSION KIT INSTALLATION 07-11 FJ CRUISER, 03-11 4RUNNER Support@toyteclifts.com Read all of the installation instructions prior to installation. ToyTec Lifts L.L.C. recommends that this be installed
KG09100BK / KG09101BK GM WD.
 KG09100BK / KG09101BK GM. 1988-2006 2 WD. KG09101BK KG09100BK Instruction Sheet: P10476-05 2013 Daystar Products International Inc. Tools Needed Quantity Description 1 Floor Jack 2 Jack Stands 2 Wheel
LIFT-304 (3 ) and LIFT-104 (6 ) Drop Spindle Lift Kits Yamaha G22, Gas or Electric Installation Instructions
 and LIFT-104 (6 ) Drop Spindle Lift Kits Yamaha G22, Gas or Electric Installation Instructions") LIFT-304 (3 ) and LIFT-104 (6 ) Drop Spindle Lift Kits Yamaha G22, Gas or Electric Installation Instructions LIFT-304 LIFT-104 Contents of LIFT-304/104 Yamaha G22 Lift Kit: a (1 ea.) Passenger Side Spindle
LIFT-304 (3 ) and LIFT-104 (6 ) Drop Spindle Lift Kits Yamaha G22, Gas or Electric Installation Instructions LIFT-304 LIFT-104 Contents of LIFT-304/104 Yamaha G22 Lift Kit: a (1 ea.) Passenger Side Spindle
Camaro Camber Kit Installation
 Camaro Camber Kit Installation Part Name: Camaro Camber Kit Part Number: 1410120/1410111 Application: 2010 + Chevrolet Camaro V8 and V6 Level of Difficulty: Moderate Expected Installation Time: 2 Hours
LIFT Standard A-Arm Lift Kit Club Car Precedent Installation Instructions
 LIFT-563 6 Standard A-Arm Lift Kit Club Car Precedent Installation Instructions Contents of LIFT-563 Club Car Precedent Lift Kit: a (1 ea.) Front Suspension b (1 ea.) Driver Side Upper A-Arm c (1 ea.)
Product: Variable Height Spring. Part Numbers: N. Applications: BMW F8x, M2/M3/M
 Product: Variable Height Spring Part Numbers: 415-503001-N Applications: BMW F8x, M2/M3/M4 2014-17 Contents in the box: Qty Part # Description 1 00P-0A1646-B Front Passenger Sleeve Assembly 1 00P-0A1645-N
HP10253 KIT Ford F-150 2WD / 4WD 2" Leveling Kit
 HP10253 KIT 2004-2017 Ford F-150 2WD / 4WD 2" Leveling Kit KIT CONTENT A B C KIT CONTENTS A Upper Strut Spacer (2) B M10 x 1.5 Flange Nut (6) C M10 x 1.5 x 40 mm Socket Head Cap Screw (6) Make sure all
Part # Cougar CoilOver System
 Front Components: 1 12103510 HQ Series Front CoilOvers 1 12102899 Lower StrongArms 1 12103699 Upper StrongArms 1 12109100 Front MuscleBar w/ PosiLinks 350 S. St. Charles St. Jasper, In. 47546 Ph. 812.482.2932
Front Coil-Over Kit, MMD-FCxxxxx Series (MMCO-24)
") 3430 Sacramento Dr., Unit D San Luis Obispo, CA 93401 Telephone: 805/544-8748 Fax: 805/544-8645 www.maximummotorsports.com Front Coil-Over Kit, MMD-FCxxxxx Series (MMCO-24) Overlooked by other companies,
3430 Sacramento Dr., Unit D San Luis Obispo, CA 93401 Telephone: 805/544-8748 Fax: 805/544-8645 www.maximummotorsports.com Front Coil-Over Kit, MMD-FCxxxxx Series (MMCO-24) Overlooked by other companies,
EVO EVO Enforcer PRO Stage 1
 EVO-201-1 EVO Enforcer PRO Stage 1 QTY PART # DESCRIPTION 1 EVO-11022B EVO Front Lower Control Arm, Driver 1 EVO-11023B EVO Front Lower Control Arm, Pass 1 EVO-11042B REARWARD BRACKET JK FRONT TRACKBAR
Part # Mustang Complete CoilOver Kit
 Front Components: 1 12103509 Front CoilOvers 1 12102899 Lower StrongArms 1 12103699 Upper StrongArms 350 S. St. Charles St. Jasper, In. 47546 Ph. 812.482.2932 Fax 812.634.6632 www.ridetech.com Part # 12100109
Installation Instructions For: Part Number EGK Honda Civic, Del Sol & Integra
 HASPORT PERFORMANCE Installation Instructions For: Part Number EGK1 1992-1995 Honda Civic, 1993-1997 Del Sol & 1994-2001 Integra HASPORT PERFORMANCE Inc. 4046 East Winslow Ave. Phoenix, AZ 85040 Phone:
MAXTRAC SUSPENSION 4030 E LEAVERTON CT ANAHEIM, CA
 MAXTRAC SUSPENSION 4030 E LEAVERTON CT ANAHEIM, CA 92807 714 630 0363 WWW.MAXTRACSUSPENSION.COM SALES@MAXTRACSUSPENSION.COM PRODUCT: PARTS LIST K751364 6" LIFT KIT 07 12 GM 1500 PICKUP QTY SPINDLE, CHEVY
Part # Mustang Complete SA CoilOver Kit
 Front Components: 350 S. St. Charles St. Jasper, In. 47546 Ph. 812.482.2932 Fax 812.634.6632 www.ridetech.com Part # 12100210 67-70 Mustang Complete SA CoilOver Kit 1 12103510 Single Adjustable Front CoilOvers
HP10251 KIT. Chevrolet Silverado WD / 4WD * GMC Sierra WD / 4WD * 1.5" / 2.25" Leveling Kit L6401_REV3_ECN1-1963
 HP10251 KIT Chevrolet Silverado 1500 2WD / 4WD * GMC Sierra 1500 2WD / 4WD * 1.5" / 2.25" Leveling Kit *See PacPro Application Guide for proper fitment _REV3_ECN1-1963 KIT CONTENT A B C KIT CONTENTS A
Note: ToyTec recommends that all products are installed by trained professionals.
 ToyTec Front Suspension Install Instructions 2.5" Front Suspension Kit 2003 2009 Toyota 4Runner, 2007 2009 Toyota FJ Cruiser, 2005+ Toyota Tacoma, 2002-2009 Prado 120, 2005-2011 Toyota Hilux Note: ToyTec
Technical Support Line: (952) Fax Line: (952) Hanover Ave. Lakeville, MN
 Fax Line: (952) Hanover Ave. Lakeville, MN") Technical Support Line: (952) 985-5675 Fax Line: (952) 985-5679 21730 Hanover Ave. Lakeville, MN 55044 www.qa1.net INSTALLATION INSTRUCTIONS QA1 P/N CC104MU Camber Caster Plates 1994-2004 Mustang 5.0/4.6
Technical Support Line: (952) 985-5675 Fax Line: (952) 985-5679 21730 Hanover Ave. Lakeville, MN 55044 www.qa1.net INSTALLATION INSTRUCTIONS QA1 P/N CC104MU Camber Caster Plates 1994-2004 Mustang 5.0/4.6
Maximum Motorsports Camber Caster Plates (05-10):
:") Maximum Motorsports Camber Caster Plates (05-10): Tools Required: Lug Wrench 21mm Deep Socket 18mm Deep Socket 15mm Deep Socket 17mm Socket 13mm Socket 10mm Socket Torque Wrench (requires 166lb-ft capacity
Maximum Motorsports Camber Caster Plates (05-10): Tools Required: Lug Wrench 21mm Deep Socket 18mm Deep Socket 15mm Deep Socket 17mm Socket 13mm Socket 10mm Socket Torque Wrench (requires 166lb-ft capacity
J&M Mustang Rear Adjustable Lower Control Arms Installation Guide (99-04)
") J&M Mustang Rear Adjustable Lower Control Arms Installation Guide (99-04) 1. Required Tools: 1.1. 3/8 ratchet 1.2. 1/2 ratchet 1.3. 18mm deep socket 1.4. 18mm standard socket (optional) 1.5. 19mm open
J&M Mustang Rear Adjustable Lower Control Arms Installation Guide (99-04) 1. Required Tools: 1.1. 3/8 ratchet 1.2. 1/2 ratchet 1.3. 18mm deep socket 1.4. 18mm standard socket (optional) 1.5. 19mm open
Installation Instructions
 Installation Instructions Eibach Springs, Inc. 264 Mariah Circle Corona, California 92879-1751 USA Tech Support 800-222-8811 Ext 114 Eibach Pro Street-S Coilovers - #2895.711 2009 Dodge Challenger, R/T,
LIFT-507 BMF Lift Kit E-Z-Go RXV Gas or Electric Installation Instructions
 LIFT-507 BMF Lift Kit E-Z-Go RXV Gas or Electric Installation Instructions Contents of LIFT-507 E-Z-Go RXV BMF Lift Kit: a (1 ea.) BMF A-Arm Assembly b (1 ea.) Driver Side Shock Tower c (1 ea.) Passenger
STaSIS Engineering B6 B7 Streetsport Suspension
 STaSIS Engineering B6 B7 Streetsport Suspension SS Suspension Kit Parts List Qty Description Part Number 1 STaSIS adjusted Koni cadmium plated dampers (2 front, 2 rear) 1150-5061 Special Tools Required
MM Rear Coil-Over Kit - Bilstein Shocks (MMCO-3)
") 3430 Sacramento Dr., Unit D San Luis Obispo, CA 93401 Telephone: 805/544-8748 Fax: 805/544-8645 www.maximummotorsports.com MM Rear Coil-Over Kit - Bilstein Shocks (MMCO-3) Read all instructions before
3430 Sacramento Dr., Unit D San Luis Obispo, CA 93401 Telephone: 805/544-8748 Fax: 805/544-8645 www.maximummotorsports.com MM Rear Coil-Over Kit - Bilstein Shocks (MMCO-3) Read all instructions before
Coil-Over Kit, MMD-RC1xxxx Shock (MMCO-23)
") 3430 Sacramento Dr., Unit D San Luis Obispo, CA 93401 Telephone: 805/544-8748 Fax: 805/544-8645 www.maximummotorsports.com Coil-Over Kit, MMD-RC1xxxx Shock (MMCO-23) Supplemental Installation Notes This
3430 Sacramento Dr., Unit D San Luis Obispo, CA 93401 Telephone: 805/544-8748 Fax: 805/544-8645 www.maximummotorsports.com Coil-Over Kit, MMD-RC1xxxx Shock (MMCO-23) Supplemental Installation Notes This
INSTALLATION INSTRUCTIONS
 INSTALLATION INSTRUCTIONS 2500 DROPPED FRONT SPINDLE CHEVROLET C / K and G.M.C. SIERRA 1500 / 2500 / 3500 Pick-Ups Congratulations! You were selective enough to choose a BELLTECH PRODUCT. We have spent
You will be removing the suspension of your vehicle. If you are not comfortable with this or do not have the proper tools, please do not proceed.
 Thank you for purchasing the CorkSport Mazda 3 and Mazdaspeed 3 Coilover Kit. This suspension system features 15-way adjustable dampening settings and full length adjustment to meet every driver s handling
Fox 2.0 Adjustable Coilovers (Par# ) Installation on a 2013 F-150 (2WD)
 Installation on a 2013 F-150 (2WD)") Fox 2.0 Adjustable Coilovers (Par# 983-02-052-2) Installation on a 2013 F-150 (2WD) This guide is for the install of the Fox 2.0 adjustable leveling struts on a 2013 F-150 2WD, these are being installed
Fox 2.0 Adjustable Coilovers (Par# 983-02-052-2) Installation on a 2013 F-150 (2WD) This guide is for the install of the Fox 2.0 adjustable leveling struts on a 2013 F-150 2WD, these are being installed
OME KIT INSTALLATION TACOMA
 OME KIT INSTALLATION 05-11 TACOMA Support@toyteclifts.com Read all of the installation instructions prior to installation. ToyTec Lifts L.L.C. recommends that this be installed by a certified auto technician
Part # Mustang Complete CoilOver Kit
 Front Components: Part # 12100109 67-70 Mustang Complete CoilOver Kit 1 12103509 Non Adjustable Front CoilOvers 1 12102899 Lower StrongArms 1 12103699 Upper StrongArms Rear Components: 1 12106509 Non Adjustable
82-01 Chevy S-10/ GMC Sonoma Front Kit Part No B
 www.airliftcompany.com 82-01 Chevy S-10/ GMC Sonoma Front Kit Part No. 75512B MN-481 (02105) ECN 3549 Please read these instructions completely before proceeding with installation Left Side Upper Shock
LIFT-503. BMF Lift Kit. Club Car Precedent. Installation Instructions
 LIFT-503 BMF Lift Kit Club Car Precedent Installation Instructions Contents of LIFT-503 Club Car Precedent BMF Lift Kit: a (1 ea.) BMF Front Suspension b (1 ea.) Driver Side Upper A-Arm (Shipped Loose)
Eibach Pro-Damper Shocks & Struts (05-09 All):
:") Eibach Pro-Damper Shocks & Struts (05-09 All): Required tools: 3/8 and 1/2 drive ratchets 7, 8, 10, 15, 16, 17, 18, 21 & 22 mm open ended wrenches 8 & 10 mm box end wrenches 10mm socket 13, 15 & 18 mm
Eibach Pro-Damper Shocks & Struts (05-09 All): Required tools: 3/8 and 1/2 drive ratchets 7, 8, 10, 15, 16, 17, 18, 21 & 22 mm open ended wrenches 8 & 10 mm box end wrenches 10mm socket 13, 15 & 18 mm
Installation Instructions
 Instructions Created by an: 1986-1995 Toyota Pickup 4Runner Hilux Front Ball Joint Spacer Kit - 2.5" 64mm Lift by Low Range Off-Road (SKU# TSP-BJS-1.5 & TSP-BJS-1.5-W/Shocks) Installation Instructions
INSTALLATION INSTRUCTIONS `64 ½ - 70 MUSTANG, HEIDTS IFS, PRO-G GEN II P/N: MTF-201
 INSTALLATION INSTRUCTIONS `64 ½ - 70 MUSTANG, HEIDTS IFS, PRO-G GEN II P/N: MTF-201 Please read these instructions completely Before starting your installation. Assemble suspension on vehicle before powder-coating
Detroit Speed, Inc. Front Coilover Kit Race Double Adjustable Camaro P/N:
 Detroit Speed, Inc. Front Coilover Kit Race Double Adjustable 2010+ Camaro P/N: 030321 Item Quantity Description 1 2 Front Strut Assembly (Double Adjustable) 2 2 Coilover Spring 250# x 2.5"ID x 8"L 3 2
PRO STREET-S INSTALLATION INSTRUCTIONS
 PARTS & HARDWARE LIST Part Number Description Qty Part Number Description Qty A 1534.8100 DAMPER ASSY FRONT 2 B 1534.8200 DAMPER ASSY REAR 2 C PDK4.TOOL 4mm ADJUSTMENT TOOL 1 D PDK6.TOOL 6mm ADJUSTMENT
2010 Current Ford Raptor Lower Control Arm Installation Instructions
 PREPARATION 2010 Current Ford Raptor Lower Control Arm Installation Instructions 1. Disconnect the negative terminal on the battery. Park the vehicle on level ground and set the emergency brake. 2. We
ToyTec Front Suspension Install Instructions 2.5" Coilovers Toyota 4Runner / FJ Cruiser ( NON-KDSS)
") ToyTec Front Suspension Install Instructions 2.5" Coilovers 2010+ Toyota 4Runner / FJ Cruiser ( NON-KDSS) Note: ToyTec recommends that all products are installed by trained professionals. List of contents:
ToyTec Front Suspension Install Instructions 2.5" Coilovers 2010+ Toyota 4Runner / FJ Cruiser ( NON-KDSS) Note: ToyTec recommends that all products are installed by trained professionals. List of contents:
Special Note: On 4 Wheel Drive models you must remove the Drive Axle Bolts. Be sure to use the correct tool on these 12mm 12 Point Bolts.
 ReadyLift (Part# 69-2070) Strut extension 2003-2007 Ford Expedition 2WD & 4WD 3 Front Leveling Kit Instructions Check www.readylift.com for any updated installation instructions. Step 1: Position truck
Installation Instructions For: Part Number EFK1 K-series Mount Kit for Civic and CR-X
 HASPORT PERFORMANCE Installation Instructions For: Part Number EFK1 K-series Mount Kit for 1988 1991 Civic and CR-X HASPORT PERFORMANCE Inc. 2849 S. 44 th St. Phoenix, AZ 85040 Phone: (602) 470-0065 Fax:
INSTALLATION INSTRUCTIONS
 INSTALLATION INSTRUCTIONS 2007-2015 GM C/K1500 TRUCK/SUV 4 BUDGET SYSTEM FOR USE WITH FACTORY STEEL SUSPENSION ONLY FTS21121/FTS21124 - w/ REAR PERFORMANCE SHOCKS FTS21186/FTS21187 - w/ STEALTH SHOCKS
Part # Chevy Level 2 CoilOver Suspension Package Two Piece Frame
 350 S. St. Charles St. Jasper, In. 47546 Ph. 812.482.2932 Fax 812.634.6632 www.ridetech.com Part # 11030210 55-57 Chevy Level 2 CoilOver Suspension Package Two Piece Frame Front Components: 1 11013510
TOYOTA FJ CRUISER 6 SUSPENSION KIT
 92177000 TOYOTA FJ CRUISER 6 SUSPENSION KIT Thank you for choosing Rough Country for your suspension needs. Rough Country recommends a certified technician installs this system. In addition to these instructions,
Part # Impala Fixed Valving Coil-Over Suspension Package
 350 S. St. Charles St. Jasper, In. 47546 Part # 11060109 59-64 Impala Fixed Valving Coil-Over Suspension Package Front Components: 1 11053509 RQ Series Front Coil-overs 1 11052899 Front Lower StrongArms
Coil-Over Kit, MMD-RC1xxxx Shock (MMCO-22)
") 3430 Sacramento Dr., Unit D San Luis Obispo, CA 93401 Telephone: 805/544-8748 Fax: 805/544-8645 www.maximummotorsports.com Coil-Over Kit, MMD-RC1xxxx Shock (MMCO-22) Supplemental Installation Notes This
3430 Sacramento Dr., Unit D San Luis Obispo, CA 93401 Telephone: 805/544-8748 Fax: 805/544-8645 www.maximummotorsports.com Coil-Over Kit, MMD-RC1xxxx Shock (MMCO-22) Supplemental Installation Notes This
MM Rear Coil-Over Kit - Koni Single and Double Adjustable Shocks (MMCO-5)
") 3430 Sacramento Dr., Unit D San Luis Obispo, CA 93401 Telephone: 805/544-8748 Fax: 805/544-8645 www.maximummotorsports.com MM Rear Coil-Over Kit - Koni Single and Double Adjustable Shocks (MMCO-5) Read
3430 Sacramento Dr., Unit D San Luis Obispo, CA 93401 Telephone: 805/544-8748 Fax: 805/544-8645 www.maximummotorsports.com MM Rear Coil-Over Kit - Koni Single and Double Adjustable Shocks (MMCO-5) Read
Ford F150/Raptor & F150 Lower Control Arm Installation Instructions
 2009-2010 Ford F150/Raptor & 2015-2017 F150 Lower Control Arm Installation Instructions PREPARATION 1. Disconnect the negative terminal on the battery. Park the vehicle on level ground and set the emergency
2009 & UP KC09113BK FRONT DODGE 1500/4WD 2009 & UP KC09114BK FRONT & REAR Kit 1500/4WD 2009 & UP KC09116BK REAR only KIT 2WD & 4WD
 2009 & UP KC09113BK FRONT DODGE 1500/4WD 2009 & UP KC09114BK FRONT & REAR Kit 1500/4WD 2009 & UP KC09116BK REAR only KIT 2WD & 4WD FRONT SPACERS & STUD EXTENDERS REAR SPACERS 1 Introduction is your number
Tacoma/Tundra/4-Runner/Sequoia/Sway-A-Way Front Coilover Installation
 191 Granite St, Corona, CA 92879 Phone # 888-901-7693 afepower.com/swayaway Tacoma/Tundra/4-Runner/Sequoia/Sway-A-Way Front Coilover Installation Parts List -2 Sway-A-Way Coilover Shocks Tool List -5/32
Installation Instructions
 Installation Instructions Eibach Springs, Inc. 264 Mariah Circle Corona, California 92879-1751 USA Tech Support 800-222-8811 Ext 114 Eibach Pro Street-S Coilovers - #28110.711 2011-13 Dodge Challenger
03-04 Mach 1. Hellion Power Systems Mach 1 Kit Instructions
 Hellion Power Systems 03-04 Mach 1 Kit Instructions Part 1 Hellion recommends that the front suspension system be installed either by trained professionals or by 5.Remove rack bolts K-Member Installation
MM Adjustable IRS Tie-Rod (MMIRSTR-2)
") 3430 Sacramento Dr., Unit D San Luis Obispo, CA 93401 Telephone: 805/544-8748 Fax: 805/544-8645 www.maximummotorsports.com MM Adjustable IRS Tie-Rod (MMIRSTR-2) Sample Bumpsteer Curve: Read all instructions
3430 Sacramento Dr., Unit D San Luis Obispo, CA 93401 Telephone: 805/544-8748 Fax: 805/544-8645 www.maximummotorsports.com MM Adjustable IRS Tie-Rod (MMIRSTR-2) Sample Bumpsteer Curve: Read all instructions
Maximum Motorsports Caster/Camber Plates (03-04 Cobra) - Installation Instructions
 - Installation Instructions") Maximum Motorsports Caster/Camber Plates (03-04 Cobra) - Installation Instructions The below installation instructions work for the following products: Maximum Motorsports Caster/Camber Plates (03-04 Cobra)
Maximum Motorsports Caster/Camber Plates (03-04 Cobra) - Installation Instructions The below installation instructions work for the following products: Maximum Motorsports Caster/Camber Plates (03-04 Cobra)
Detroit Speed, Inc. Rear Coilover Tower Brace Kit Camaro P/N:
 Detroit Speed, Inc. Rear Coilover Tower Brace Kit 2016+ Camaro P/N: 042433 The Detroit Speed, Inc. 2016+ Camaro Rear Coilover Tower Brace Kit is a bolt-in design that increases overall vehicle stiffness.
Installation Instructions. 6 Basic System FTS21060BK / FTS21061BK / FTS21042BK GM 2WD C1500 P/U ONLY
 Installation Instructions 6 Basic System FTS21060BK / FTS21061BK / FTS21042BK 2007-13 GM 2WD C1500 P/U ONLY 2007-13 GM 1500 Truck Basic System FTS21060BK / FTS21061BK / FTS21042BK 2007-13 GM 2WD C1500
INSTALLATION INSTRUCTIONS
 INSTALLATION INSTRUCTIONS 1075 North Ave. Sanger, CA 93657-3539 local: 559-875-0222 fax: 559-876-2259 toll free: 800-445-3767 av1075 North Ave Sanger, CA 93657-3539 local: 559-875-8883 fax: 559-875-9883
2.5" & 3.5" SUSPENSION SYSTEM 2018 JEEP JL WRANGLER 4 DOOR MODELS
 2.5" & 3.5" SUSPENSION SYSTEM 2018 JEEP JL WRANGLER 4 DOOR MODELS JSPEC1202/JSPEC1203 www.jksmfg.com jks@sporttruckusainc.com 517-278-1226 RV. 050318 GETTING STARTED Read all warnings, instructions, notes
ReadyLift (Part# T6-2059) (04-11) Ford F-150 2WD, (04-11) 4WD (All cabs) 2.0 Leveling Kit exc. Heritage & SVT Raptor
 (04-11) Ford F-150 2WD, (04-11) 4WD (All cabs) 2.0 Leveling Kit exc. Heritage & SVT Raptor") SAFETY WARNING:ReadyLift Suspension Inc. recommends this system be installed by a professional technician. In addition to these instructions, professional knowledge of disassembly/ reassembly procedures
SAFETY WARNING:ReadyLift Suspension Inc. recommends this system be installed by a professional technician. In addition to these instructions, professional knowledge of disassembly/ reassembly procedures
97-06 JEEP TJ 4 / 6 X-SERIES SUSPENSION KIT
 921661X00 97-06 JEEP TJ 4 / 6 X-SERIES SUSPENSION KIT Thank you for choosing Rough Country for your suspension needs. Rough Country recommends a certified technician to install this system. In addition
PRE-INSTALLATION. INSTALLATION INSTRUCTIONS Front Ford F150 4WD 4" Suspension Lift Kit
 2015 Ford F150 4WD 4" Suspension Lift Kit PRE-INSTALLATION 2 - Knuckle (Driv/Pass) 2 - Crossmember (Front/Rear) 2 - Differential Bracket (Driv/Pass) 1 - Diff. Brace Bracket (Pass) 2 - Front Brake Line
INSTALLATION INSTRUCTIONS CHEVY C-10 4-Link Rear End
 INSTALLATION INSTRUCTIONS 73-87 CHEVY C-10 4-Link Rear End Please read these instructions completely before starting your installation. Assemble suspension on vehicle before powder-coating to ensure proper
FRONT DRIVELINE MODIFICATION MAY BE NECESSARY!!!!
 INSTALLATION INSTRUCTIONS FOR 2009 DODGE 2500/3500 4WD & 1500 Mega Cab 6 SUSPENSION SYSTEM PART NUMBER 7206 Requires the following parts (sold separately) for a complete installation: Front Coil Spring
BRK JL CC5 K Hydraulic Front Brake Kit For Club Car DS Model Installation Instructions
 BRK JL CC5 K Hydraulic Front Brake Kit For Club Car 1982-2005 DS Model Installation Instructions Kit Components: A) Master Cylinder Mounting Bracket (x1) B) Master Cylinder Assembly (x1) C) Brake Line
2010 Camaro SS/V Underbody Brace Installation Instructions
 2010 Camaro SS/V6 20104 Underbody Brace Installation Instructions Thank you for your purchase of this Hotchkis Performance product. Your Underbody Brace set was designed with the performance and durability
MM Panhard Bar, Mustang (MMPBA)
") 3430 Sacramento Dr., Unit D San Luis Obispo, CA 93401 Telephone: 805/544-8748 Fax: 805/544-8645 www.maximummotorsports.com MM Panhard Bar, 1979-98 Mustang (MMPBA) Important Note for Customers with Baer
3430 Sacramento Dr., Unit D San Luis Obispo, CA 93401 Telephone: 805/544-8748 Fax: 805/544-8645 www.maximummotorsports.com MM Panhard Bar, 1979-98 Mustang (MMPBA) Important Note for Customers with Baer
LG CORVETTE GT2 COIL OVERS
 LG CORVETTE GT2 COIL OVERS THE MOST POWERFUL HEADERS ON THE PLANET Brought to you by LG Motorsports 972-429-1963 Parts Inventory: 1. Assembled Front shock and spring 2. Assembled Rear shock and spring
Part # GM F Body Complete CoilOver System
 350 S. St. Charles St. Jasper, In. 47546 Ph. 812.482.2932 Fax 812.634.6632 www.ridetech.com Part # 11170109 70-81 GM F Body Complete CoilOver System Front Components: 1 11173509 Front Fixed Valving CoilOvers
Installation Instructions S550 Mustang Xtreme-Grip Coil Over System CCK
 Sonoma Raceway Boise, ID 83704 p 415.489.0866 www.cortexxracing.com Installation Instructions 2015-2017 S550 Mustang Xtreme-Grip Coil Over System CCK-50-1000 2015-2017 Mustang GT, ECO Boost, and GT350/R
Detroit Speed, Inc. ALUMA-Frame Front Suspension System Ford Mustang P/N:
 Detroit Speed, Inc. ALUMA-Frame Front Suspension System 1964.5-1970 Ford Mustang P/N: 032050 INTRODUCTION All aluminum front suspension system for 1964.5-1970 Mustangs featuring DSE s unique suspension
LIFT-504. BMF Lift Kit. Yamaha G22 Gas or Electric. Installation Instructions
 LIFT-504 BMF Lift Kit Yamaha G22 Gas or Electric Installation Instructions Contents of LIFT-504 Yamaha G22 BMF Lift Kit: a (1 ea.) BMF A-Arm Assembly b (1 ea.) Driver Side Shock Tower c (1 ea.) Passenger
REVTEK SUSPENSION RECOMMENDS USING RED LOCTITE ON ALL FASTENERS UNLESS OTHERWISE NOTED. ALSO, HAVE THE FRONT END ALIGNMENT CHECKED AFTER INSTALLATION
 2016 TOYOTA TACOMA 4WD & PRERUNNER INSTRUCTIONS 3 SUSPENSION LIFT KIT W/BLOCKS P/N 40014 WARNING!!!! PRODUCT SAFETY LABEL MUST BE INSTALLED INSIDE THE CAB OF THE VEHICLE IN PLAIN VIEW OF ALL OCCUPANTS!
INSTALLATION INSTRUCTIONS Progress Technology Rear Anti-Sway Bar Honda Civic Part # No Revision (7/20/16)
") INSTALLATION INSTRUCTIONS Progress Technology Rear Anti-Sway Bar Honda Civic 96-00 Part # 62.1042 No Revision (7/20/16) WHO SHOULD INSTALL THIS PRODUCT? Progress Technology products should only be installed
INSTALLATION INSTRUCTIONS Progress Technology Rear Anti-Sway Bar Honda Civic 96-00 Part # 62.1042 No Revision (7/20/16) WHO SHOULD INSTALL THIS PRODUCT? Progress Technology products should only be installed
Maximum Motorsports Caster/Camber Plates Installation Guide (94-04)
") Maximum Motorsports Caster/Camber Plates Installation Guide (94-04) The below installation instructions work for the following products: Maximum Motorsports Caster/Camber Plates (94-04) Please read through
Maximum Motorsports Caster/Camber Plates Installation Guide (94-04) The below installation instructions work for the following products: Maximum Motorsports Caster/Camber Plates (94-04) Please read through