W205 C63 Suspension Adjustable Suspension Installation Guide
|
|
|
- Brian Daniel
- 5 years ago
- Views:
Transcription

1 W205 C63 Suspension Adjustable Suspension Installation Guide C63 AMG Sedan C63S AMG Sedan
2 Thank you for your purchase of the Weistec W205 C63 Adjustable Suspension. Please follow all directions, and keep a clean work space when commencing installation. Tools Required 3/8 Impact Gun 3/8 Drive Ratchet and Socket Set 3/8 Drive Torx set Rubber or Plastic Mallet Vehicle lift or jack Jack Stands Weistec Coilover Spanner Wrench(Included) 1/16 Hex L-Key (Included) 5/64 Hex L-Key (Included)

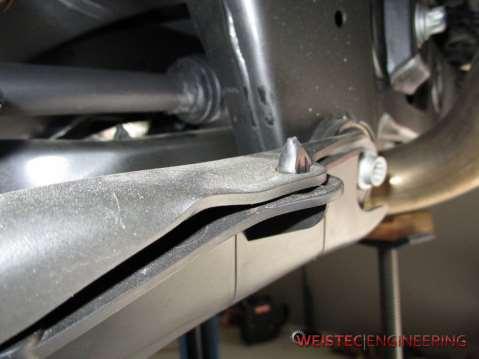
3 1. Rear Suspension 1. Securely lift vehicle(using a lift is recommended) 2. Remove rear wheels 3. Remove plastic control arm cover on the driver side by squeezing the locking pins and pushing them down
4
5


6 4. Remove the nut on the lower shock mount bolt 5. Remove the nut on the lower spindle mount bolt


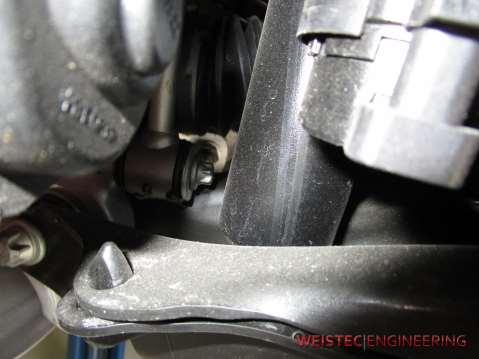
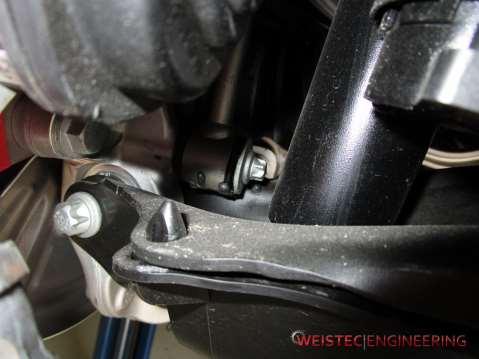
7 6. Support the control arm with a screw jack 7. Remove the lower shock mount bolt and the lower spindle mount bolt


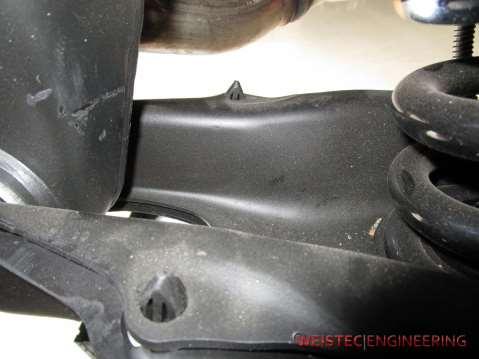
8 8. Slowly lower the screw jack to safely unload tension from the spring 9. Once the spring is fully unloaded, remove it from the vehicle

9 10. If the plastic upper spring perch did not come out with the spring, remove it from the vehicle. 11. Remove the white plastic nut that holds the rubber isolator in the spring cup


10 12. Line up the rubber isolator on the Weistec Threaded Anchor and put the prongs into the mounting holes

11 13. Fit the Threaded Anchor into the spring cup and reuse the plastic nut to help hold the anchor in place while continuing the installation

12 14. Screw on the red adjuster perch. Make sure the set screws are turned out to allow free turning of the perch 15. After screwing on the red adjuster perch, apply Loctite to the set screws and tighten them until they bottom out, then back them out ¼ to ½ turn

13 16. Fit the OEM lower spring rubber isolator to the Weistec spring. The stopper will meet up with the end of the spring coil. It can be easily pressed on by hand 17. Apply some grease to the lip of the red adjuster perch where the top of the Weistec spring will be contacting the perch. This allows for easier adjustment of ride height.

14 18. Fit the spring with OEM lower spring rubber isolator into position. 19. Push the control arm back into place with a screw jack 20. Reinstall the bolt and nut for the lower shock mount and torque to the lower spindle mount. Torque to 60 Nm plus 60 degrees 21. Reinstall the bolt and nut for the lower shock mount and torque to the lower spindle mount. Torque to 80 Nm plus 90 degrees 22. Repeat steps 3-21 for the passenger side

15 2. Front Suspension 1. Open the hood 2. Remove plastic strut tower cover on the driver side of the vehicle 3. Loosen the 3 nuts that bolt the strut mount to the strut tower. Leave them hand tight, they will be removed later

16 4. Securely lift vehicle and remove front wheels 5. Support the wheel carrier with a screw jack 6. Unplug the electrical connections from the strut and tuck them out of the way


17 7. Remove the nut that fastens the sway bar end link to the control arm and pull the end link off the ball joint 8. Remove the nut and bolt that fasten the control arm to the sub frame

18 9. Remove the nut and bolt that fasten the strut to the control arm 10. Lower, then remove the screw jack and swing the control arm downwards to clear it from the strut
19 11. Remove the 3 nuts that bolt the strut mount to the strut tower while holding the strut so that it does not fall 12. Remove the strut assembly from the vehicle 13. Repeat steps 2-12 to remove the passenger side strut


20 14. On one of the struts, remove the nut holding the top hat to the strut. Use a spring compressor to remove load from the top hat. An impact gun may be needed to loosen the nut 15. Remove top hat

21 16. Remove the OEM spring seat from the top hat

22 17. Remove the bump stop and dust boot by pulling it up and off the piston rod 18. Remove the factory spring


23 19. Using a mallet, gently hammer off the strut body cap. It will be reused 20. Using a mallet, gently hammer off the lower spring perch. It will not be reused

24 21. Clean off the body of the strut 22. Slide on the Weistec Lower Threaded Anchor. It is a very snug fit so be sure that it is slid on evenly and then use a press to press down into place

25 23. Tighten the four 8-32 set screws. Use Loctite and torque to 1.5 ft-lbs

26 24. Screw on the Weistec Coilover Adjuster Perch. Make sure the grub screws are loose so that they do not interfere with the threads on the lower anchor

27 25. Screw in the grub screw until they bottom out, then turn them back ¼ to ½ a turn. This will allow smooth rotation with a clicking sound every 90 degrees. The grub screws will be tightened with Loctite once final ride height is set 26. Using a mallet, gently hammer the strut body cap back onto the strut

28 27. Slide on the Coilover 61mm to 71mm Perch Adapter, with the flat side facing the adjuster perch 28. Slide on the supplied bump stop and dust boot


29 29. Slide on 100 N 70 I 200 L Spring, fitting the bottom of the spring onto the 71mm side of the perch adapter 30. Fit the Coilover Upper Perch Bushing onto the top hat. The flat square side should be facing downwards
30 31. Fit top hat onto piston rod and bolt it back on using the factory nut, torque to 30 ft-lbs 32. Repeat steps 14 through 31 for the other strut 33. Reinstall suspension by reversing steps 1 through 13. Torque all M14 hardware to 100 ft-lbs and all M12 hardware to 65 ft-lbs At this point you will be ready for ride height adjustment. LIFT THE VEHICLE UNTIL THE TIRE IS COMPLETELY OFF THE GROUND WHEN ADJUSTING RIDE HEIGHT TO MINIMIZE LOAD OF THE SUSPENSION COMPONENTS. After ride height has been set, tighten the grub screws with Loctite to lock the perches in place. The vehicle will then be ready to drive and get the suspension professionally aligned. Double check you have removed all tools, and also double check that all suspension arms are properly installed and fastened. Improperly installed suspension arms will result in poor alignment as well as excessive suspension noise and movement.
31 Thank you from Weistec Engineering! Always enjoy the added performance from your Weistec W205 C63 Adjustable Suspension responsibly. Use best judgment when driving, and remember to have fun! NOTES:
Weistec CLK Black Series SUSPENSION
 Weistec CLK Black Series SUSPENSION Rear Suspension Bushing Upgrade Installation Guide 1 Thank you for your purchase of the Weistec CLK Black Series Rear Suspension Bushing Upgrade for the 2008 Mercedes
Camaro Camber Kit Installation
 Camaro Camber Kit Installation Part Name: Camaro Camber Kit Part Number: 1410120/1410111 Application: 2010 + Chevrolet Camaro V8 and V6 Level of Difficulty: Moderate Expected Installation Time: 2 Hours
INSTALLATION INSTRUCTIONS SOLO WERKS S1 Coilover Suspension BMW F22 /F30/F31/F32/F33/F34 Platform Part Number: S1BW010 / S1BW020 Rev.1.
 Thank you for purchasing your new SOLO WERKS S1 Coilover suspension. IMPORTANT PLEASE READ BEFORE BEGINNING INSTALLATION: Please take a moment to review this installation process and verify that your kit
Product: Variable Height Spring. Part Numbers: N. Applications: BMW F8x, M2/M3/M
 Product: Variable Height Spring Part Numbers: 415-503001-N Applications: BMW F8x, M2/M3/M4 2014-17 Contents in the box: Qty Part # Description 1 00P-0A1646-B Front Passenger Sleeve Assembly 1 00P-0A1645-N
Installations Instructions for Maier Racing Front Coilover Kit MS Ford Mustang
 22215 Meekland Avenue Hayward, CA 94541 Phone: (510) 581-7600 Fax: (510) 581-2406 Installations Instructions for Maier Racing Front Coilover Kit MS-02-001 1964-1973 Ford Mustang Contents Front Coilover
MM Rear Coil-Over Kit - Koni Single and Double Adjustable Shocks (MMCO-5)
") 3430 Sacramento Dr., Unit D San Luis Obispo, CA 93401 Telephone: 805/544-8748 Fax: 805/544-8645 www.maximummotorsports.com MM Rear Coil-Over Kit - Koni Single and Double Adjustable Shocks (MMCO-5) Read
3430 Sacramento Dr., Unit D San Luis Obispo, CA 93401 Telephone: 805/544-8748 Fax: 805/544-8645 www.maximummotorsports.com MM Rear Coil-Over Kit - Koni Single and Double Adjustable Shocks (MMCO-5) Read
PRO STREET-S INSTALLATION INSTRUCTIONS
 PARTS & HARDWARE LIST Part Number Description Qty Part Number Description Qty A 1534.8100 DAMPER ASSY FRONT 2 B 1534.8200 DAMPER ASSY REAR 2 C PDK4.TOOL 4mm ADJUSTMENT TOOL 1 D PDK6.TOOL 6mm ADJUSTMENT
Installation Instructions
 Installation Instructions Eibach Springs, Inc. 264 Mariah Circle Corona, California 92879-1751 USA Tech Support 800-222-8811 Ext 114 Eibach Pro Street-S Coilovers - #2895.711 2009 Dodge Challenger, R/T,
9F1760/9F1761 COBB Sport Springs Ford Focus ST
 9F1760/9F1761 COBB Sport Springs 2013+ Ford Focus ST Installation Instructions Congratulations on your purchase of the COBB Sport Springs for your 2013+ Ford Focus ST. These instructions should only be
2015 up Mustang Front HQ CoilOver Strut
 Part # 70-05 up Mustang Recommended Tools 05 up Mustang Front HQ CoilOver Strut Installation Table of contents Page... Included components Page... Disassembly and Getting Started Page... Strut Assembly
INSTALLATION INSTRUCTIONS SOLO WERKS S1 Coilover Suspension VAG MK4 Platform Part Number: S1VW003/04 R1.2
 Thank you for purchasing your new SOLO WERKS S1 Coilover suspension. IMPORTANT PLEASE READ BEFORE BEGINNING INSTALLATION: Please take a moment to review this installation process and verify that your kit
OME KIT INSTALLATION TACOMA
 OME KIT INSTALLATION 05-11 TACOMA Support@toyteclifts.com Read all of the installation instructions prior to installation. ToyTec Lifts L.L.C. recommends that this be installed by a certified auto technician
STaSIS Engineering B6 B7 Streetsport Suspension
 STaSIS Engineering B6 B7 Streetsport Suspension SS Suspension Kit Parts List Qty Description Part Number 1 STaSIS adjusted Koni cadmium plated dampers (2 front, 2 rear) 1150-5061 Special Tools Required
Installation Instructions
 Installation Instructions Eibach Springs, Inc. 264 Mariah Circle Corona, California 92879-1751 USA Tech Support 800-222-8811 Ext 114 Eibach Pro Street-S Coilovers - #28110.711 2011-13 Dodge Challenger
OME SUSPENSION KIT INSTALLATION FJ CRUISER, RUNNER
 OME SUSPENSION KIT INSTALLATION 07-11 FJ CRUISER, 03-11 4RUNNER Support@toyteclifts.com Read all of the installation instructions prior to installation. ToyTec Lifts L.L.C. recommends that this be installed
INSTALLATION INSTRUCTIONS SOLO WERKS S1 Coilover Suspension Mini R50 / R52 / R53 Platform Part Number: S1MN001 Rev.1.0
 Thank you for purchasing your new SOLO WERKS S1 Coilover suspension. IMPORTANT PLEASE READ BEFORE BEGINNING INSTALLATION: Please take a moment to review this installation process and verify that your kit
READ THESE INSTRUCTIONS BEFORE STARTING. (If you are not comfortable doing the work, please have installed by a professional.)
") Front Lower Control Arms for Coil-Overs 1997-2004 F-150 (2WD)/1999-04 Lightning & Harley Davidson (FLCA-FT02) Basic Kit Includes: (1) Driver Side Control Arm Assembly (1) Passenger Side Control Arm Assembly
Front Lower Control Arms for Coil-Overs 1997-2004 F-150 (2WD)/1999-04 Lightning & Harley Davidson (FLCA-FT02) Basic Kit Includes: (1) Driver Side Control Arm Assembly (1) Passenger Side Control Arm Assembly
"Engineered to Ride, Built to Last "
 Congratulations on your purchase of an Arnott air suspension product. We at Arnott Incorporated are proud to offer a high quality product at the industry s most competitive pricing. Thank you for your
INSTALLATION INSTRUCTIONS SOLO WERKS S1 Coilover Suspension VAG MK5/6 Platform Part Number: S1VW006/7/8/10 R2.2
 Thank you for purchasing your new SOLO WERKS S1 Coilover suspension. IMPORTANT PLEASE READ BEFORE BEGINNING INSTALLATION: Please take a moment to review this installation process and verify that your kit
MM Rear Coil-Over Kit - Bilstein Shocks (MMCO-3)
") 3430 Sacramento Dr., Unit D San Luis Obispo, CA 93401 Telephone: 805/544-8748 Fax: 805/544-8645 www.maximummotorsports.com MM Rear Coil-Over Kit - Bilstein Shocks (MMCO-3) Read all instructions before
3430 Sacramento Dr., Unit D San Luis Obispo, CA 93401 Telephone: 805/544-8748 Fax: 805/544-8645 www.maximummotorsports.com MM Rear Coil-Over Kit - Bilstein Shocks (MMCO-3) Read all instructions before
INSTALLATION INSTRUCTIONS
 INSTALLATION INSTRUCTIONS 1075 North Ave. Sanger, CA 93657-3539 local: 559-875-0222 fax: 559-876-2259 toll free: 800-445-3767 av1075 North Ave Sanger, CA 93657-3539 local: 559-875-8883 fax: 559-875-9883
Installation Instructions for Teraflex 2.5 Inch Lift Kit with Shocks (2010 Jeep Wrangler Unlimited)
") Installation Instructions for Teraflex 2.5 Inch Lift Kit with Shocks (2010 Jeep Wrangler Unlimited) Installation Time: 6 Hours Tools Required: Floor Jack Jack Stands Ratchet Torque Wrench 15mm Socket 15mm
Installation Instructions for Teraflex 2.5 Inch Lift Kit with Shocks (2010 Jeep Wrangler Unlimited) Installation Time: 6 Hours Tools Required: Floor Jack Jack Stands Ratchet Torque Wrench 15mm Socket 15mm
Installation Instructions
 Installation Instructions Eibach Springs, Inc. 264 Mariah Circle Corona, California 92879-1751 USA Tech Support 800-222-8811 Ext 114 Eibach Multi-Pro R1 Coilovers - #2085.712 2006-2008 BMW, 325i, 328i,
INSTALLATION INSTRUCTIONS SOLO WERKS S1 Coilover Suspension VAG MK5/6 Platform Part Number: S1VW006/7/8/9 R1
 Thank you for purchasing your new SOLO WERKS S1 Coilover suspension. IMPORTANT: SOLO WERKS recommends that you have this kit installed by a qualified professional. Solo Werks or its authorized agents are
PRODUCT NOTES: These components are designed for suspension height adjustment lower than stock height.
 INSTALLATION INSTRUCTIONS Progress Technology Competition Series Coilover System 2001 2005 Acura RSX 2001-2005 Honda Civic, Civic Si Revision B (2/19/13) WHO SHOULD INSTALL THIS PRODUCT? Progress Technology
Eibach Pro-Damper Shocks & Struts (05-09 All):
:") Eibach Pro-Damper Shocks & Struts (05-09 All): Required tools: 3/8 and 1/2 drive ratchets 7, 8, 10, 15, 16, 17, 18, 21 & 22 mm open ended wrenches 8 & 10 mm box end wrenches 10mm socket 13, 15 & 18 mm
Eibach Pro-Damper Shocks & Struts (05-09 All): Required tools: 3/8 and 1/2 drive ratchets 7, 8, 10, 15, 16, 17, 18, 21 & 22 mm open ended wrenches 8 & 10 mm box end wrenches 10mm socket 13, 15 & 18 mm
INSTALLATION INSTRUCTIONS SOLO WERKS S1 Coilover Suspension Audi MLB Platform Part Number: S1AU005/06/07 Rev.2.0
 Thank you for purchasing your new SOLO WERKS S1 Coilover suspension. IMPORTANT PLEASE READ BEFORE BEGINNING INSTALLATION: Please take a moment to review this installation process and verify that your kit
2016 & Up Miata MX-5 Coilover Installation Instructions
 Page1 2016 & Up Miata MX-5 Coilover Installation Instructions Tooling: Jack, jack stands or lift Socket wrench Torque wrench 10mm, 12mm, 14mm and 17mm sockets 14mm and 17mm wrenches Flat head screwdriver
You will be removing the suspension of your vehicle. If you are not comfortable with this or do not have the proper tools, please do not proceed.
 Thank you for purchasing the CorkSport Mazda 3 and Mazdaspeed 3 Coilover Kit. This suspension system features 15-way adjustable dampening settings and full length adjustment to meet every driver s handling
Thank you for choosing Rough Country for all your suspension needs.
 06-UP JEEP COMMANDER 2 LIFT KIT Thank you for choosing Rough Country for all your suspension needs. Rough Country recommends a certified technician install this system. In addition to these instructions,
Weistec M156/M159 ENGINE
 Weistec M156/M159 ENGINE Oil / Air Separator System Installation Guide 2007-2011 S63 AMG 2007-2011 ML63 AMG 2007 R63 AMG 2007-2008 CLK63 AMG 2008 CLK63 Black Series 2007-2011 CLS63 AMG 2008-Present C63
PRODUCT USE INFORMATION
 921545200 *54520BAG1* 54520BAG1 Thank you for choosing Rough Country for all your suspension needs. 2009-17 Ford F150 3 Suspension Kit Rough Country recommends a certified technician install this system.
WD Dodge Suspension Kit
 92137600 02-05 2WD Dodge 1500 6 Suspension Kit Thank you for choosing Rough Country for your suspension needs. Rough Country recommends a certified technician installs this system. In addition to these
LIFT Standard A-Arm Lift Kit Club Car Precedent Installation Instructions
 LIFT-563 6 Standard A-Arm Lift Kit Club Car Precedent Installation Instructions Contents of LIFT-563 Club Car Precedent Lift Kit: a (1 ea.) Front Suspension b (1 ea.) Driver Side Upper A-Arm c (1 ea.)
Part # Chevy Level 2 CoilOver Suspension Package Two Piece Frame
 350 S. St. Charles St. Jasper, In. 47546 Ph. 812.482.2932 Fax 812.634.6632 www.ridetech.com Part # 11030210 55-57 Chevy Level 2 CoilOver Suspension Package Two Piece Frame Front Components: 1 11013510
INSTALLATION INSTRUCTIONS SOLO WERKS S1 Coilover Suspension VW Passat B5 / 5.5 2WD Platform Part Number: S1VW009 R1.1
 Thank you for purchasing your new SOLO WERKS S1 Coilover suspension. IMPORTANT PLEASE READ BEFORE BEGINNING INSTALLATION: Please take a moment to review this installation process and verify that your kit
Coil-Over Kit, MMD-RC1xxxx Shock (MMCO-22)
") 3430 Sacramento Dr., Unit D San Luis Obispo, CA 93401 Telephone: 805/544-8748 Fax: 805/544-8645 www.maximummotorsports.com Coil-Over Kit, MMD-RC1xxxx Shock (MMCO-22) Supplemental Installation Notes This
3430 Sacramento Dr., Unit D San Luis Obispo, CA 93401 Telephone: 805/544-8748 Fax: 805/544-8645 www.maximummotorsports.com Coil-Over Kit, MMD-RC1xxxx Shock (MMCO-22) Supplemental Installation Notes This
Carli Suspension Front Instructions
 Carli Suspension Front Instructions 94-08 DODGE 2500-3500 4X4 SUSPENSION SYSTEM Note: Prior to installation, carefully inspect the vehicle=s steering and drive train components. Be sure to check ball joints,
2004 Dodge Stratus ES. Access for the nuts attaching the rear shock assembly upper mount to the vehicle is through the inside of the trunk.
 REMOVAL - SHOCK ASSEMBLY NOTE: Access for the nuts attaching the rear shock assembly upper mount to the vehicle is through the inside of the trunk. 1. Roll back carpeting on top of the rear shock tower
Maximum Motorsports Camber Caster Plates (05-10):
:") Maximum Motorsports Camber Caster Plates (05-10): Tools Required: Lug Wrench 21mm Deep Socket 18mm Deep Socket 15mm Deep Socket 17mm Socket 13mm Socket 10mm Socket Torque Wrench (requires 166lb-ft capacity
Maximum Motorsports Camber Caster Plates (05-10): Tools Required: Lug Wrench 21mm Deep Socket 18mm Deep Socket 15mm Deep Socket 17mm Socket 13mm Socket 10mm Socket Torque Wrench (requires 166lb-ft capacity
25011 ADJUSTABLE STRUT GMC ENVOY & TRAILBLAZER RAISING AND LOWERING STRUT
 INSTALLATION INSTRUCTIONS 1075 North Ave. Sanger, CA 93657-3539 local: 559-875-0222 fax: 559-876-2259 toll free: 800-445-3767 25011 ADJUSTABLE STRUT 02-07 GMC ENVOY & TRAILBLAZER RAISING AND LOWERING STRUT
Installation Instructions HURST STAGE 1 SPRING KIT Chevrolet Camaro SS Fits: Coupe and Convertible Catalog #
 Installation Instructions HURST STAGE 1 SPRING KIT 2016-2017 Chevrolet Camaro SS Fits: Coupe and Convertible Catalog # 6130001 WORK SAFELY: Installation of any Hurst Spring Kit should be performed ONLY
INSTALLATION INSTRUCTIONS INS247
 INSTALLATION INSTRUCTIONS INS247 2015-2017 FORD MUSTANG CASTER CAMBER KIT Part # 2553 Special Tools required: xxx INCLUDED IN THIS KIT sdfgadsgf Install Time: xxx Difficulty: xxx STEP 1 STEP 3 Place the
Team Z Motorsports. K-Member installation instructions
 Team Z Motorsports K-Member installation instructions Parts Included: 1-Tubular K-Member Needed Items-Solid Steering Shaft Offset Steering Rack Bushings Optional-Heavy Duty Bolt Kit Tubular Front Lower
COBB SPORT SPRINGS
 913760 - COBB SPORT SPRINGS 2004-2007 Subaru WRX/STi Congratulations on your purchase of the COBB Sport Springs for your 2004-2007 Subaru WRX/STi. The following instructions will assist you through your
Fox 2.0 Adjustable Coilovers (Par# ) Installation on a 2013 F-150 (2WD)
 Installation on a 2013 F-150 (2WD)") Fox 2.0 Adjustable Coilovers (Par# 983-02-052-2) Installation on a 2013 F-150 (2WD) This guide is for the install of the Fox 2.0 adjustable leveling struts on a 2013 F-150 2WD, these are being installed
Fox 2.0 Adjustable Coilovers (Par# 983-02-052-2) Installation on a 2013 F-150 (2WD) This guide is for the install of the Fox 2.0 adjustable leveling struts on a 2013 F-150 2WD, these are being installed
COBB SPORT SPRINGS
 915760 - COBB SPORT SPRINGS 2008-2013 Subaru WRX/STi Congratulations on your purchase of the COBB Sport Springs for your 2008-2013 Subaru WRX/STi. The following instructions will assist you through your
FRONT SUSPENSION REMOVAL
 FRONT SUSPENSION REMOVAL 1. Raise the vehicle off the ground and firmly support it with safety stands, then, remove the front and rear tires. NOTE: Do not work on or underneath the car without the proper
MM Caster Camber Plates, (Mm6CC-10)
") 3430 Sacramento Dr., Unit D San Luis Obispo, CA 93401 Telephone: 805/544-8748 Fax: 805/544-8645 www.maximummotorsports.com MM Caster Camber Plates, 2015+ (Mm6CC-10) Read all instructions before beginning
3430 Sacramento Dr., Unit D San Luis Obispo, CA 93401 Telephone: 805/544-8748 Fax: 805/544-8645 www.maximummotorsports.com MM Caster Camber Plates, 2015+ (Mm6CC-10) Read all instructions before beginning
TJ/XJ/ZJ Front Installation Instructions
 TJ/XJ/ZJ Front Installation Instructions Thank you for choosing Fat Bob s Garage lift kits. We recommend that all lift kits be installed by a certified professional that is knowledgeable of disassembly
INSTALLATION INSTRUCTIONS
 INSTALLATION INSTRUCTIONS --300 W PONTIAC WAY CLOVIS, CA 93612 local: 559-875-0222 fax: 559-876-2249 toll free: 800-445-3767-- 25007 LIFT / LOWERING STRUT 2015+ FORD F-150 2WD (+1 to -3 ) 2015+ FORD F-150
Tacoma/Tundra/4-Runner/Sequoia/Sway-A-Way Front Coilover Installation
 191 Granite St, Corona, CA 92879 Phone # 888-901-7693 afepower.com/swayaway Tacoma/Tundra/4-Runner/Sequoia/Sway-A-Way Front Coilover Installation Parts List -2 Sway-A-Way Coilover Shocks Tool List -5/32
Ford Racing GT500 Style Strut Mount Upgrade (05-12 All):
:") Ford Racing GT500 Style Strut Mount Upgrade (05-12 All): Required tools: (2) Jack stands Floor jack (1 is required but 2 is preferred) Torque wrench Spring compressor tool (can be rented at your local
Ford Racing GT500 Style Strut Mount Upgrade (05-12 All): Required tools: (2) Jack stands Floor jack (1 is required but 2 is preferred) Torque wrench Spring compressor tool (can be rented at your local
M-Force E36 Camber Plate Installation
 Thank you for purchasing the Adjustable Camber Plate kit from Vorshlag Motorsports. In order to ensure proper installation and longevity of your kit, Vorshlag Motorsports recommends that you have your
Part # Impala Level 1 Complete Coil-Over System RQ Series
 350 S. St. Charles St. Jasper, In. 47546 Ph. 812.482.2932 Fax 812.634.6632 www.ridetech.com Part # 11290109 65-66 Impala Level 1 Complete Coil-Over System RQ Series Front Components: 1 11283509 RQ Series
Installation Instructions for BMR Lowering Springs Performance ( Mustang GT)
") Installation Instructions for BMR Lowering Springs Performance (2015-2017 Mustang GT) Time Required: 3+ hours Notes: This install was done with the performance springs from BMR, but install should be the
Installation Instructions for BMR Lowering Springs Performance (2015-2017 Mustang GT) Time Required: 3+ hours Notes: This install was done with the performance springs from BMR, but install should be the
M-3000-ZX3 SVT Focus Suspension Kit INSTALLATION INSTRUCTIONS
 Please contact the Tech Hot Line for the most current instruction information (586) 468-1356!!! PLEASE READ THE FOLLOWING INSTRUCTIONS CAREFULLY PRIOR TO INSTALLATION!!! INTRODUCTION: The components in
Installation Instructions
 Installation Instructions Eibach Springs, Inc. 264 Mariah Circle Corona, California 92879-1751 USA Tech Support 800-222-8811 Ext 114 Eibach Pro Street Coilovers - #8598.711 2006-2008 Volkswagen, GTi, 2.0L
2010 Camaro SS/V Underbody Brace Installation Instructions
 2010 Camaro SS/V6 20104 Underbody Brace Installation Instructions Thank you for your purchase of this Hotchkis Performance product. Your Underbody Brace set was designed with the performance and durability
Weistec M113K Supercharger System Installation Guide
 Weistec M113K Supercharger System Installation Guide WARNING! DO NOT HAVE YOUR ECU REPROGRAMMED ANYWHERE BUT AT WEISTEC FOR THIS SUPERCHARGER. THE AMG 55 USES AN ELECTRONIC THROTTLE CONTROL (ETC), WHICH
HP10251 KIT. Chevrolet Silverado WD / 4WD * GMC Sierra WD / 4WD * 1.5" / 2.25" Leveling Kit L6401_REV3_ECN1-1963
 HP10251 KIT Chevrolet Silverado 1500 2WD / 4WD * GMC Sierra 1500 2WD / 4WD * 1.5" / 2.25" Leveling Kit *See PacPro Application Guide for proper fitment _REV3_ECN1-1963 KIT CONTENT A B C KIT CONTENTS A
Dodge 5 Lift Kit Thank you for choosing Rough Country Suspension for your Off Road needs.
 *1368BAG4* 1368BAG4 921368200 2014-16 2500 Dodge 5 Lift Kit Thank you for choosing Rough Country Suspension for your Off Road needs. Rough Country recommends a certified technician installs this system.
Tacoma Front Suspension Install Instructions
 1995-04 Tacoma Front Suspension Install Instructions Important notices: These instructions are intended only as a general guide for installing All-Pro products. For some items, specialized mechanical skills,
This Package should contain: 1. Two CorkSport Assembled Front Adjustable Struts 2. Two CorkSport Rear Adjustable Shocks 3. Two CorkSport Rear Springs
 1 2 3 This Package should contain: 1. Two CorkSport Assembled Front Adjustable Struts 2. Two CorkSport Rear Adjustable Shocks 3. Two CorkSport Rear Springs Thank you for purchasing the CorkSport Mazda
Coil-Over Kit, MMD-RC0xxxx Shock (MMCO-20)
") 3430 Sacramento Dr., Unit D San Luis Obispo, CA 93401 Telephone: 805/544-8748 Fax: 805/544-8645 www.maximummotorsports.com Coil-Over Kit, MMD-RC0xxxx Shock (MMCO-20) Supplemental Installation Notes OEM
3430 Sacramento Dr., Unit D San Luis Obispo, CA 93401 Telephone: 805/544-8748 Fax: 805/544-8645 www.maximummotorsports.com Coil-Over Kit, MMD-RC0xxxx Shock (MMCO-20) Supplemental Installation Notes OEM
3430 Sacramento Dr., Unit D San Luis Obispo, CA Telephone: 805/ Fax: 805/
 3430 Sacramento Dr., Unit D San Luis Obispo, CA 93401 Telephone: 805/544-8748 Fax: 805/544-8645 www.maximummotorsports.com MM Caster/Camber Plates, 2005-10 (Mm5CC-1) Read all instructions before beginning
Installation Notes: #86000-R Race Series +3.5 L/T Kit
 159 North Maple St. Unit J, CORONA CA 92880 P. 951-737-9682 F. 951-737-9006 WWW.CHAOSFAB.COM Installation Notes: #86000-R Race Series +3.5 L/T Kit Factory manual is recommended for removal and re-installation
07 & UP GM 1500 PICKUP 2.0 FRONT 1.0 REAR LEVELING KIT INSTALLATION
 INSTRUCTION PART NO 15265 LEVELING KIT NO 3813 07 & UP GM 1500 PICKUP 2.0 FRONT 1.0 REAR LEVELING KIT INSTALLATION READ INSTRUCTIONS/WARNINGS COMPLETELY THROUGH BEFORE STARTING. FAILURE TO ADHERE TO THE
INSTALLATION INSTRUCTIONS
 INSTALLATION INSTRUCTIONS --1075 North Ave. Sanger, CA 93657-3539 local: 559-875-0222 fax: 559-876-2259 toll free: 800-445-3767-- 2505 Lowering Spindle Assembly Installation Instructions ½ TON SILVERADO
Part # Impala Level 2 Complete Coil-Over System HQ Series
 350 S. St. Charles St. Jasper, In. 47546 Ph. 812.482.2932 Fax 812.634.6632 www.ridetech.com Part # 11290210 65-66 Impala Level 2 Complete Coil-Over System HQ Series Front Components: 1 11283509 Front HQ
Installation Instructions Mustang Level 2 Coilover. Part # Mustang Level 2 CoilOver System.
 Part # 22020-979-989 Mustang Level 2 CoilOver System Front Components: 2230 Front CoilOver Strut Recommended Tools Rear Components: 2260 Rear Coilover 225899 Rear Lower StrongArms 226699 Rear Upper StrongArms
BOSS AND ULTIMATE LIFT INSTALLATION INSTRUCTIONS TACOMA.
 BOSS AND ULTIMATE LIFT INSTALLATION INSTRUCTIONS 2005-2015 TACOMA support@toyteclifts.com Prior to installation, please read all install directions and paperwork provided. ToyTec Lifts L.L.C. recommends
Installation Instructions
 Part # 115110-005 up Mustang Recommended Tools 005-up Mustang Front HQ CoilOver Strut Installation Table of contents Page... Included components Page... Disassembly and Getting Started Page... Strut Assembly
This procedure is best performed on a vehicle lift, however it is possible to install these coilovers using a floor jack and jack stands.
 Description: FeatherLight Single Adjustable Corvette Coilovers Part Number: 430-401004-N Application: 2014-2015 Chevrolet Corvette (C7) Note: Some models might be equipped with Magnetic Ride electric adjustable
COBB WRX Sports Springs West 1820 South Salt Lake City, UT USA (801)
") COBB 3362 West 1820 South Salt Lake City, UT 84104 USA (801) 713-0035 2008 WRX Sports Springs Congratulations on your purchase of the COBB Sports Springs. The following instructions should assist you through
COBB 3362 West 1820 South Salt Lake City, UT 84104 USA (801) 713-0035 2008 WRX Sports Springs Congratulations on your purchase of the COBB Sports Springs. The following instructions should assist you through
TOYOTA FJ CRUISER 6 SUSPENSION KIT
 92177000 TOYOTA FJ CRUISER 6 SUSPENSION KIT Thank you for choosing Rough Country for your suspension needs. Rough Country recommends a certified technician installs this system. In addition to these instructions,
PRODUCT USE INFORMATION
 921766200 *76620BAG* 76620BAG 2010-17 4 Runner 3 Front 2 Rear Leveling Kit Thank you for choosing Rough Country for your suspension needs. Rough Country recommends a certified technician install this system.
JEEP LIBERTY 2 COIL SPRING SPACER LIFT INSTALLATION INSTRUCTIONS IT# J 244
 3651 N. Hwy 89 Chino Valley, AZ 86323 (928) 636-7080 www.p-a-g.net 3651 N. Hwy 89 Chino Valley, AZ 86323 (928) 636-3175 www.p-a-g.net JEEP LIBERTY 2 COIL SPRING SPACER LIFT INSTALLATION INSTRUCTIONS 2008-201
Coil-Over Kit, MMD-RC1xxxx Shock (MMCO-23)
") 3430 Sacramento Dr., Unit D San Luis Obispo, CA 93401 Telephone: 805/544-8748 Fax: 805/544-8645 www.maximummotorsports.com Coil-Over Kit, MMD-RC1xxxx Shock (MMCO-23) Supplemental Installation Notes This
3430 Sacramento Dr., Unit D San Luis Obispo, CA 93401 Telephone: 805/544-8748 Fax: 805/544-8645 www.maximummotorsports.com Coil-Over Kit, MMD-RC1xxxx Shock (MMCO-23) Supplemental Installation Notes This
Steeda S550 Mustang Front Coilover Installation Instructions For Part:
 Steeda S550 Mustang Front Coilover Installation Instructions For Part: 555-8170 Tools required 1. Jack 2. Jack stands 3. Torque Wrench 4. 10mm wrench 5. 11mm wrench 6. 17mm wrench 7. 18mm socket 8. Plastic
2015 up Mustang Front HQ CoilOver Strut
 Part # 13110-015 up Mustang Recommended Tools 015 up Mustang Front HQ CoilOver Strut Installation Table of contents Page... Included components Page 3... Disassembly and Getting Started Page... Strut Assembly
Thank you for choosing Rough Country for all your suspension needs.
 2012-17 Dodge 4WD 1500 3 Leveling Kit Thank you for choosing Rough Country for all your suspension needs. DOES NOT FIT TRX PACKAGE VEHICLES!! Rough Country recommends a certified technician install this
Install Time: Special Tools Required: Difficulty:
 Special Tools Required: Spring Compressor Floor Jack and Jack Stands Impact Gun Disc Sander or Sanding Paper Install Time: Approximately 3 Hours Difficulty: 3 out of 5 Follow these instructions carefully
03-11 Ford Expedition 2WD/4WD 2.5 lift
 9258500REV1 03-11 Ford Expedition 2WD/4WD 2.5 lift Thank you for choosing Rough Country for all your suspension needs. Rough Country recommends a certified technician install this system. In addition to
1. Remove the front struts by first disconnecting the ABS wire and brake line(retain hardware) from the factory strut.
 from the factory strut.") Part # 12153111-2005 up Mustang Recommended Tools 2005-up Mustang Front TQ CoilOver Strut Installation Table of contents Page 2... Included components Page 3... Disassembly and Getting Started Page 4...
Part # 12153111-2005 up Mustang Recommended Tools 2005-up Mustang Front TQ CoilOver Strut Installation Table of contents Page 2... Included components Page 3... Disassembly and Getting Started Page 4...
2013-UP 3500 Dodge 5 Lift Kit SRW
 92369200 2013-UP 3500 Dodge 5 Lift Kit SRW Thank you for choosing Rough Country Suspension for your Off Road needs. Rough Country recommends a certified technician installs this system. In addition to
HP10253 KIT Ford F-150 2WD / 4WD 2" Leveling Kit
 HP10253 KIT 2004-2017 Ford F-150 2WD / 4WD 2" Leveling Kit KIT CONTENT A B C KIT CONTENTS A Upper Strut Spacer (2) B M10 x 1.5 Flange Nut (6) C M10 x 1.5 x 40 mm Socket Head Cap Screw (6) Make sure all
RHINO SUSPENSION SYSTEM INSTALLATION INSTRUCTIONS
 PARTS INCLUDED: 2 FRONT UPPER A-ARMS 2 FRONT LOWER A-ARMS 2 UNI-BALL JOINTS 2 UNI-BALL JOINT STUDS 2 UNI-BALL JOINT CAPS 2 RETAINING RINGS 1 FRONT SHOCK ASSEM. 2 DELRON STEERING STOPS 2 SHOCK MOUNT SPACERS
INSTALLATION INSTRUCTIONS 88511
 INSTALLATION INSTRUCTIONS 88511 For Suspension System RS6511: Ford Super Duty Requires coil spring kit RS80117 or RS80119 for a complete installation READ ALL INSTRUCTIONS THOROUGHLY FROM START TO FINISH
Street Density Performance Strut Mounts, MkVII Volkswagen Golf/GTI/R & 8V/8S Audi A3/S3/TT/TTS
 Street Density Performance Strut Mounts, MkVII Volkswagen Golf/GTI/R & 8V/8S Audi A3/S3/TT/TTS Supplied Parts: 034Motorsport Street Density Strut Mount for MQB Chassis (Quantity of 2) Tools Needed: Hands
ULTIMATE LIFT INSTALLATION INSTRUCTIONS TACOMA.
 ULTIMATE LIFT INSTALLATION INSTRUCTIONS 05-11 TACOMA support@toyteclifts.com Prior to installation, please read all install directions and paperwork provided. ToyTec Lifts L.L.C. recommends that all components
Detroit Speed, Inc. Detroit Speed Control Arm and Spindle Kit A-Body P/N: &
 Detroit Speed, Inc. Detroit Speed Control Arm and Spindle Kit 1964-72 A-Body P/N: 030104 & 030105 The Detroit Speed A-Body front suspension kit is a bolt-on package that addresses the shortcomings of the
INSTALLATION INSTRUCTIONS SOLO WERKS S1 Coilover Suspension Audi A4 (8D) B5 Platform Part Number: S1AU004 Quattro R1.2
 B5 Platform Part Number: S1AU004 Quattro R1.2") Thank you for purchasing your new SOLO WERKS S1 Coilover suspension. IMPORTANT PLEASE READ BEFORE BEGINNING INSTALLATION: Please take a moment to review this installation process and verify that your kit
Thank you for purchasing your new SOLO WERKS S1 Coilover suspension. IMPORTANT PLEASE READ BEFORE BEGINNING INSTALLATION: Please take a moment to review this installation process and verify that your kit
3 Dualsport rear suspension ram truck 2500 AIR RIDE. AEV30262AA Last Updated: 07/11/17 INSTALLATION GUIDE
 3 Dualsport rear suspension ram truck 2500 AIR RIDE AEV30262AA Last Updated: 07/11/17 INSTALLATION GUIDE PLEASE READ BEFORE YOU START TO GUARANTEE A QUALITY INSTALLATION, WE RECOMMEND READING THESE INSTRUCTIONS
MM IRS Coil-Over Kit - Bilstein/MM Shocks (MMCO-4)
") 3430 Sacramento Dr., Unit D San Luis Obispo, CA 93401 Telephone: 805/544-8748 Fax: 805/544-8645 www.maximummotorsports.com MM IRS Coil-Over Kit - Bilstein/MM Shocks (MMCO-4) The lower spring perch is drilled
3430 Sacramento Dr., Unit D San Luis Obispo, CA 93401 Telephone: 805/544-8748 Fax: 805/544-8645 www.maximummotorsports.com MM IRS Coil-Over Kit - Bilstein/MM Shocks (MMCO-4) The lower spring perch is drilled
SCION tc LOWERING SPRINGS Preparation
 Preparation Part Number: PTR11-21100 PTR11-21100-50 Kit Contents Item # Quantity Reqd. Description 1 2 Front Spring 2 2 Rear Spring 3 2 Locking Nut 4 2 Spring Bumper, Front 5 1 Instruction Form Hardware
Weistec True Downpipes
 Weistec True Downpipes Installation Guide, W212, W218, AWD 2014+ E63 2014+ CLS63 WARNING! IF YOU ARE NOT EXPERIENCED IN THE AREA OF AUTOMOTIVE MECHANICS, WE STRONGLY URGE THAT YOU REFER THIS INSTALLATION
TOYOTA COROLLA LOWERING SPRINGS Preparation
 Preparation Part Number: PTR07-02140 Kit Contents Item # Quantity Reqd. Description 1 2 Front Spring 2 2 Rear Spring 3 1 Hardware 4 1 Instruction Form Hardware Bag Contents Item # Quantity Reqd. Description
Lowering Spring Installation on a Mustang GT
 Lowering Spring Installation on a 99-04 Mustang GT This installation is very the same installation that many of the 79-04 Mustangs excluding Cobra require. Time to install: 2-3 hours to do alone with a
Next, set the bar level and tighten it down. Do this on both the driver and passenger sides.
 Next, set the bar level and tighten it down. Do this on both the driver and passenger sides. Using two tape measures, measure the outside width at the front and the rear of the tubes. The front dimension