YOU PERFORM THIS MODIFICATION AT YOUR OWN RISK
|
|
|
- Barry Briggs
- 5 years ago
- Views:
Transcription
1 This is a simple? guide to installing a Provent 200 Oil Vapour Filter into a Nissan X-Trail T31 Diesel 09 Model M9R Engine YOU PERFORM THIS MODIFICATION AT YOUR OWN RISK It may affect your warranty The author accepts NO RESPONSIBILITY Tools/Skills Required/Costs One Provent 200 CCV Oil Vapour Filter $ mm Spanner/Socket Directional tin snips (Aviation Snips) 90mm Hole saw (optional) Bracket template This is included on the last page as a document to be printed out on A4 paper Materials for the bracket (This bracket uses 2mm Sheet Aluminium) $ mm drill bit and Drill 5/8 heater hose cut to the following lengths $7-00 (You will have to buy 2 mtrs) 890mm 470mm 250mm 75mm NOTE Hose used here is just standard water heater hose it will break down and go soft over a period of years due to oil To use the correct oil resistant piping will cost approximately $ more (Your Choice) Sharp knife for cutting hoses 3 off Vultail 5/8 double barbed corners These are suitable for oil and rated to withstand 100 degrees Cel. $21-00 Irrigation fittings are no good RTV Silicone Gasket Silicone that is oil compatible 2 small flat head nails ½ inch long and a clearance drill bit to suit Basic sheet metal skills Optional extras One espresso coffee machine! One bottle of Rum (Medicinal purposes- Antiseptic/Anaesthetic for cuts) Typist Note (YEAH RIGHT!) The clearance to the underside of the bonnet is about 7mm when measured with plasticine Step 1 Shape, Cut, Drill the bracket being careful to remove all sharp edges as per template and shown below
 Step 2 Install the bracket onto the filter This is")

2 Paint it Black when finished (Colour is optional!) Step 2 Install the bracket onto the filter This is tricky you need to put a twist into the bracket to literally screw it on to the filter as shown below Bend bracket to get the twist

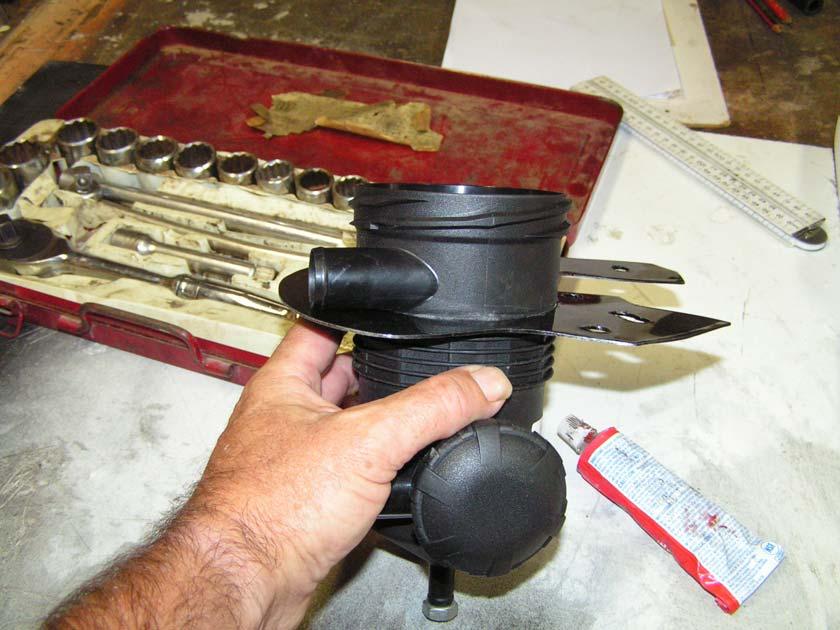
3 Screw on the bracket

4 Bracket installed It may be Necessary to file of some of the ridging near the thumb to allow the bracket to screw over depends how neat and accurate your hole is Step 3 Cut hose to lengths as detailed above Step 4 Silicone the top and bottom hoses in place before installation It is easier to do this on the bench than in the car! Trust me! The hoses actually fit inside the outlets on the filter so silicone well and insert fully Align the bend in the hoses with the general direction of the required direction that way there is less stress on the joints etc see photo below The 470 mm Hose goes into the TOP HOLE The 890 mm Hose goes into the BOTTOM HOLE If you wish you can Pin the hoses in place Drill a small hole through one side only in both outlets and insert a small flat head nail if so desired Tape over nail head to hold in place Allow the silicone to dry at least 24hrs Assembled unit note pipe bend direction Step 5

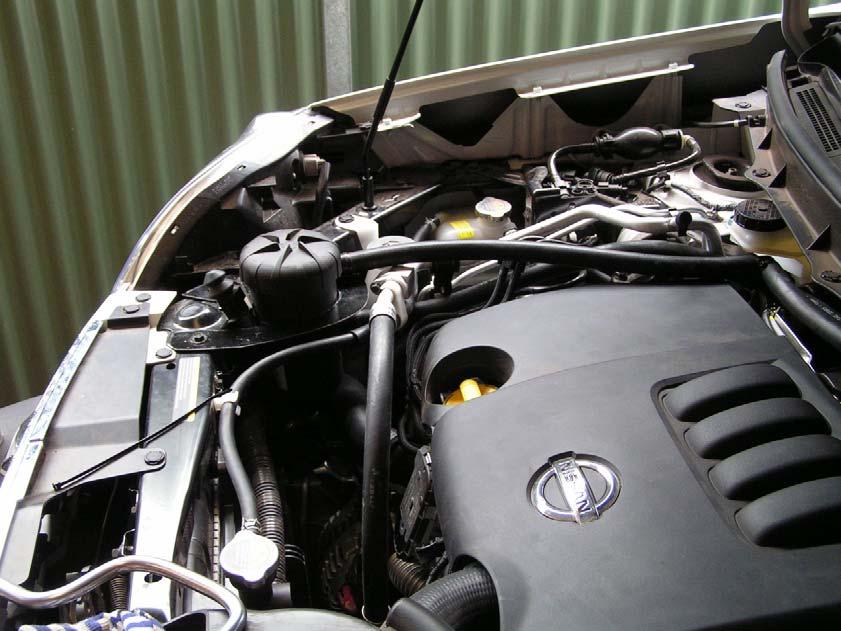
5 Remove the engine top cover 4 push in-plugs underneath Just run your fingers around underneath until you find them then pull upwards gently Step 6 Remove the existing CCV Pipe Do not throw away keep for later if needed


6 Step 7 Remove the three bolts near L/H headlight as shown Bolts removed

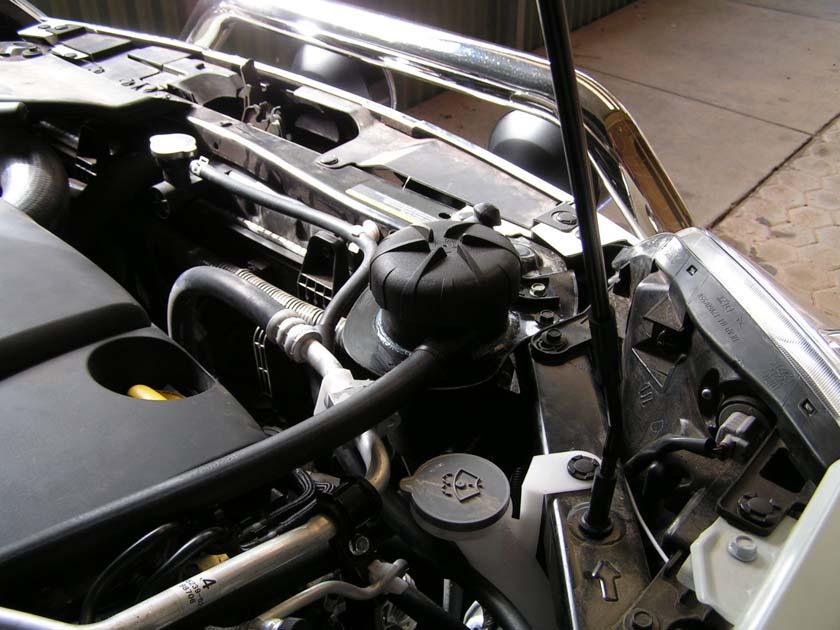
7 The Bonnet sensor switch will just flop about don t worry about it at this stage The above photo was included just for general information to show how the bracket should fit when installed minus the canister The white gives contrast so that things are easy to see. Note how the bonnet sensor has been re installed DO NOT FIX THE BRACKET AT THIS STAGE Step 8 This one is a Biggie Better get that coffee now! It is time to route the hoses and install the canister Remove the top of the washer bottle - Pull up the centre of the pin stud remove the stud and then pull up the bottle filler neck Disconnect the radiator overflow connection to the tank bottle All this makes it easier to get your hands in Carefully work the bottom hose into place as per the photos this is tricky as the hose is stiff but it can be done with a little patience The route has to go under and inside the A/C line and through the gap in the injector lines and will be quite obvious in real life - see photos. The top hose just travels over the top of everything and as such is not a problem. Whilst you are juggling this you must also get the canister and bracket into place as you feed it in Don t be afraid to twist and turn the hose etc


8 When in place bolt bracket into place but remember to put back the bonnet shut sensor (That is the push button thingy!) Replace washer and Radiator stuff

9 Step 9 Install remaining piping Join smaller pipes with elbows to access the outlet port of the oil separator as indicated by the red arrows and lines Lightly silicone all joins


10 The longer pipe from the bottom of the filter connects to the air inlet as indicated by the Green arrows and lines there are no elbows in the green line

11 DO NOT silicone the joints that reconnected to the engine and air intake this way the system can be removed and the old hose placed back should the need arise IE Going to the Nissan Dealer Etc Step 10 Last but not least replace engine top cover Install the guts to the filter checking cap is screwed on until it locks it actually has a little bit of a click to indicate Silicone around the canister for vibration and holding purposes Secure pipes to engine lift bracket at rear of engine by the first elbow with zip tie The finished item Crack a coldie!!
12

13 Bracket Template It is best to download the Bracket Template from HERE for printing! All holes are 10mm diameter This should print out correct size on a standard printer you may need to adjust your margins check the 91 mm measurement for accuracy of the whole template
4. Remove (4) 10mm and (1) 7mm bolt that holds fascia at front corners, on each side
 10mm and (1) 7mm bolt that holds fascia at front corners, on each side") 2010 Camaro LS3 1. Disconnect battery ground 2. Remove front wheels 3. Remove (5) push pins and (5) #20 torx screws on inner front wheel well liners and remove liners on each side 4. Remove (4) 10mm and
2010 Camaro LS3 1. Disconnect battery ground 2. Remove front wheels 3. Remove (5) push pins and (5) #20 torx screws on inner front wheel well liners and remove liners on each side 4. Remove (4) 10mm and
2015+ SUBARU STI FRONT-MOUNT INTERCOOLER PARTS LIST AND INSTALLATION GUIDE INSTALL DIFFICULTY DISCLAIMER CAUTION INSTALL PROCEDURE TOOLS NEEDED
 PARTS LIST AND PARTS INCLUDED 1PC ALUMINUM INTAKE PIPE 1PC BAR-AND-PLATE INTERCOOLER 1PC STEEL CRASH BAR W/ MOUNTING HARDWARE 2PC HOT-SIDE INTERCOOLER PIPES 2PC COLD-SIDE INTERCOOLER PIPES 1PC BPV FLANGE
mk3 SEAT Ibiza Cupra Front Mount Intercooler.
 mk3 SEAT Ibiza Cupra Front Mount Intercooler. Warning be sure not to let any foreign body enter the inlet track of the vehicle whilst the following work is being carried out. Serious engine damage may
Revised 10/23/2015 Page 2 of 10
 1.Remove the gauge, side panels, hood and headlight. Remove the air box from the throttle bodies then remove the seat and gas tank. 2.Carefully remove temp sensor from air box using a small pick or screw
Procharger Stage II Intercooled Supercharger System (11-14 GT)
") Procharger Stage II Intercooled Supercharger System (11-14 GT) Installation Time: Approximately one day. Installed on 2012 Mustang GT 5.0/Manual Required Tools 3/8 Socket Set (Standard and Metric) 1/2
Procharger Stage II Intercooled Supercharger System (11-14 GT) Installation Time: Approximately one day. Installed on 2012 Mustang GT 5.0/Manual Required Tools 3/8 Socket Set (Standard and Metric) 1/2
This is what we are trying to create in the steps below
 You will need: (1) Some 3/4 aluminium or steel flat bar (+/- 1 foot) (2) About 12 of 3 Aluminium or steel tubing. (2) Piece of 3X3 silicone hose and 2 hose clamps (3) 1 K&N (or similar) high flow filter
COLD AIR INTAKE INSTALLATION INSTRUCTIONS
 COLD AIR INTAKE INSTALLATION INSTRUCTIONS # D760-0033 Fits: 2013-15 F01 B7, 750i & xdrive (N63TU engine) 2013-15 F02 B7L, 750Li & xdrive (N63TU engine) PARTS LIST Left and right carbon fiber air box lids
Fitting Instructions For The TDV6 EGR Blanking Kit To A 2006 Model Discovery 3 TDV6 GHSE
 Part Number DA1112 Fitting Instructions For The TDV6 EGR Blanking Kit To A 2006 Model Discovery 3 TDV6 GHSE You do this modification at your own risk. Britpart won t be held responsible for what is written
Page 6 of 6 OUTLAW DIESEL EGR COOLER DELETE KIT W/INTAKE ELBOW L FORD POWERSTROKE
 What s in the box 1 Exhaust Block-Off Plate 1 Exhaust Gasket 2 Coolant Line Plugs 1 Brass Barbed Hose Connector 1 Stand-off Spacer 4 M10-1.25 x 40 Hex Head Bolts (Exhaust Manifold) 2 M10-1.25 x 20 Hex
Subaru Front Mount Intercooler Kit STI Subaru Front Mount Intercooler Kit STI
 Subaru Front Mount Intercooler Kit STI 2008-2014 715500 Subaru Front Mount Intercooler Kit STI 2008-2014 Congratulations on your purchase of the Subaru Front Mount Intercooler Kit STI 2008-2014. The following
HIGH FLOW COLD AIR INTAKE SYSTEM INSTALLATION INSTRUCTIONS D , D A
 HIGH FLOW COLD AIR INTAKE SYSTEM INSTALLATION INSTRUCTIONS D760-0320, D760-0320A 1992-95 325i, is 1995 M3 (3.0L) Parts List: 1 Intake Tube 1 Silicone Hose 1 Air Flow Meter Bracket 1 Hose Clamp (#36z) 1
XRT300 AND XRT350 BA XR6 TURBO UPGRADE KIT FITTING INSTRUCTIONS
 XRT300 AND XRT350 BA XR6 TURBO UPGRADE KIT FITTING INSTRUCTIONS The use of NFU (No Further use) and REUSE (Re Use) relates to the individual parts storage when performing the upgrade. Also note that all
Fitting the Bell Auto Services (B-A-S) TDV6 EGR Blanking Kit to a 2006 model Discovery 3 TDV6 HSE
 TDV6 EGR Blanking Kit to a 2006 model Discovery 3 TDV6 HSE") Fitting the Bell Auto Services (B-A-S) TDV6 EGR Blanking Kit to a 2006 model Discovery 3 TDV6 HSE Before I describe how I did this, I must first thank other members of the Disco3.co.uk forum (namely J,moore
Fitting the Bell Auto Services (B-A-S) TDV6 EGR Blanking Kit to a 2006 model Discovery 3 TDV6 HSE Before I describe how I did this, I must first thank other members of the Disco3.co.uk forum (namely J,moore
Installation Instructions for: TOYOTA 3.4L SUPERCHARGER SYSTEM
 Installation Instructions for: TOYOTA 3.4L SUPERCHARGER SYSTEM 1996-2002 4Runner 1997-1998 T100 1997-2004 Tacoma 2000-2003 Tundra * PREMIUM FUEL REQUIRED * Magnuson Products LLC 1990 Knoll Drive, Bldg
Installation instructions, accessories - Fuel driven heater 912-D
 XC90 Section Group Weight(Kg/Pounds) Year Month 8 87 2002 10 XC90 2003 D5244T, XC90 2004 D5244T, XC90 2005 D5244T AW50/51 AWD, XC90 2006 D5244T, XC90 2006 D5244T AW50/51 AWD D5244T R8703687 Page 1 of 20
WARNINGs! Read all instructions before starting installation of this product! Installing the improper FASS Pump can cause severe engine damage.
 WARNINGs! Read all instructions before starting installation of this product! Installing the improper FASS Pump can cause severe engine damage. FASS Recommended Application T F17 150G Powerstroke (6.7L)
All cores due 30 days after invoice date - no credit after 60 days.
 NO WARRANTY STATEMENT High performance parts & products no warranty policy: The purchaser understands and recognizes that high performance diesel products and services sold by INDUSTRIAL INJECTION SERVICE.
Cold Air Intake Installation Instructions
 BAVARIAN AUTOSPORT Cold Air Intake Installation Instructions Page 1/5 3.06 INS264 NOTE: The vehicle shown for this installation is equipped with ASC+T. If your vehicle dos not have this feature, installation
BLACKBIRD INSTALLATION SUPPLEMENT
 BLACKBIRD INSTALLATION SUPPLEMENT FOR 2003-7 FORD 6.0 LITER DIESEL F-SERIES DUAL ALTERNATOR VERSION 10/07 Blackbird Installation Supplement for Ford 6.0. Liter Dual Alternator Parts included in the 6.0
BLACKBIRD INSTALLATION SUPPLEMENT
 BLACKBIRD INSTALLATION SUPPLEMENT FOR 2008-105 FORD 6.4 LITER DIESEL F-SERIES VERSION 3/10 Parts Blackbird Wiring Manual Installation Supplement 6.4 liter Diesel Owner s Manual Includes Warrantee Registration
INSTALLATION INSTRUCTIONS
 HIGH FLOW AIRFLOW METER INSTALLATION INSTRUCTIONS PART NUMBER D763-1600A APPLICATION: 2001-06 E46 M3 Parts List: Hose clamp 64Z (7) Plastic Rivets Air Filter Temp Sensor & Harness (2) Button Head Screws
M-TUNED COOLANT RE-ROUTE KIT
 M-TUNED COOLANT RE-ROUTE KIT Part # MC-RR-216, MC-RR-218 Applications: 90-93 Miata 1.6L B6 94-97 Miata 1.8L BP More detailed instructions: http://www.etdracing.com/m-tuned/reroute.pdf 1) Disconnect Negative
Step 6: Remove and save the MAP sensor for later use. Step 7: Remove the passenger side intercooler pipe and the EGR intake manifold.
 LBZ Twin kit Install Step 1: Disconnect both batteries. Step 2: Drain coolant and oil also remove passenger side inner fender. Step 3: Remove intake box and piping. (Remove and save the MAF sensor in the
How To: Fit an enclosed induction kit to the V6
 How To: Fit an enclosed induction kit to the V6 As a couple have done this I thought I'd have a go, but do a write up at the same time. Here's a quick summary of the equipment you'll be needing: 1 x Universal
OIL COOLER KIT CHEVY CAMARO 2.0T PARTS LIST AND INSTALLATION GUIDE INSTALL DIFFICULTY DISCLAIMER CAUTION TOOLS NEEDED NOTE INSTALL PROCEDURE
 PARTS LIST AND PARTS INCLUDED 3PC APPLICATION-SPECIFIC MOUNTING BRACKETS 1PC HORN RELOCATION MOUNTING BRACKET 1PC 25-ROW OIL COOLER (SLEEK SILVER OR STEALTH BLACK) 1PC 4'4" STAINLESS STEEL BRAIDED HOSE
Mikuni RS Carburetor Conversion
 Mikuni RS Carburetor Conversion After putting your carbies on the bench or the kitchen table if the wife is out, you will see that the linkages may be in different positions depending on which brand of
Fuel Pump & Sending Unit Repair
 If your C4 s fuel gauge reads full regardless of how much fuel you actually have, the sending unit in the tank is most likely at fault. If you have priced a new sending unit, you realize that they run
Installation instruction do88 performance Turbo intake hoses Porsche 911 TT (997.2)
") Installation instruction do88 performance Turbo intake hoses Porsche 911 TT (997.2) 2010-2012 3. 2. 4. 6. 7. 5. 1. This instruction shows how to replace the OEM turbo intake pipes for do88 performance
Installation instruction do88 performance Turbo intake hoses Porsche 911 TT (997.2) 2010-2012 3. 2. 4. 6. 7. 5. 1. This instruction shows how to replace the OEM turbo intake pipes for do88 performance
BLACKBIRD INSTALLATION SUPPLEMENT
 BLACKBIRD INSTALLATION SUPPLEMENT FOR 2003-7 FORD 6.0 LITER DIESEL SINGLE ALTERNATOR F-350, F-450, F-550, EXCURSION VERSION 7-07 Parts Description Blackbird Wiring Manual Installation Supplement 6.0 Liter
SS740HF NISSAN D23 NAVARA (NP300) 2.3Ltr Intercooled Twin Turbo(YS23DDTT Engine) Built: Nissan Motor Co. Thailand
 2.3Ltr Intercooled Twin Turbo(YS23DDTT Engine) Built: Nissan Motor Co. Thailand") SS740HF NISSAN D23 NAVARA (NP300) 2.3Ltr Intercooled Twin Turbo(YS23DDTT Engine) Built: Nissan Motor Co. Thailand Parts List 21/12/2015 ITEM PART NO. DESCRIPTION QTY 1 435-133-000 BODY - SNORKEL (SS740HF)
SS740HF NISSAN D23 NAVARA (NP300) 2.3Ltr Intercooled Twin Turbo(YS23DDTT Engine) Built: Nissan Motor Co. Thailand Parts List 21/12/2015 ITEM PART NO. DESCRIPTION QTY 1 435-133-000 BODY - SNORKEL (SS740HF)
Installation Instructions
 2011-2013 LML DURAMAX COMPOUND-ADD 2011-2015 LML A Duramax TURBO KIT Add INSTALL A Turbo INSTRUCTIONS Compound Kit Installation Instructions 1-800-955-0476 - www.industrialinjection.com - info@industrialinjection.com
1963 GEN IV SUREFIT VINTAGE AIR CONDITIONING INSTALLATION
 by Randy Irwin 1963 GEN IV SUREFIT VINTAGE AIR CONDITIONING INSTALLATION Randy Irwin - Technical Writer Randy has been involved in the Chevy parts business for over 30 years. He is a wizard at creating,
Nissan GTR Alpha Fuel System
 Nissan GTR Alpha Fuel System Instructions V5 The goal of AMS is to provide the highest quality, best performing products available. By utilizing research and development, and rigorous testing programs
WPS-104 Heater Installation Instructions For 500EFI, 700 XP, & Crew Applications
 WPS-104 Heater Installation Instructions For 500EFI, 700 XP, & Crew Applications ORDER OF INSTALLATION FOR A COMPLETE ENCLOSURE OF A RANGERWARE WPS (Weather Protection System) IS AS FOLLOWS: 1. Heater
WK2 SNORKEL. Installation Instructions PLEASE READ AND UNDERSTAND ALL INSTRUCTIONS BEFORE YOU START
 WK2 SNORKEL Installation Instructions PLEASE READ AND UNDERSTAND ALL INSTRUCTIONS BEFORE YOU START Please note: This kit is specifically for diesel models only. WK2 Snorkel Installation Instructions Rev.
INSTALLATION INSTRUCTIONS
 COLD AIR INTAKE INSTALLATION INSTRUCTIONS PART NUMBER D760-0390C APPLICATION: 1999-2003 E39 M5 PARTS LIST 1 Left Aluminum Intake Tube 1 Air Pump Bracket (A) 1 Right Aluminum Intake Tube 1 Air Pump Bracket
ZX-14 Stage I Turbo Kit
 62910 Peerless Ct. Bend, OR 97701 Phone 541.385.0706 Fax 541.382.9406 ZX-14 Stage I Turbo Kit WARNING: This turbo kit is for OFF-ROAD RACING use ONLY. Advisement: These instructions are written to be comprehensive
INSTALLATION GUIDE NISSAN NAVARA INTERCOOLER KIT P/N PWI65094K
 INSTALLATION GUIDE NISSAN NAVARA INTERCOOLER KIT P/N PWI65094K ENGINEERING THE UNFAIR ADVANTAGE Contents CONDITIONAL MANUFACTURERS WARRANTY... 2 WARRANTY VOIDS... 2 WARRANTY DOES NOT COVER... 2 LIMIT OF
DUAL REMOTE OIL FILTER MODIFICATION 4 TH GENERATION FIREBIRDS
 Written by Dave Dorey (lonetechie) Copyright FirebirdNation.com The following article details how I installed a dual remote oil filter system on my 2001 Formula Firebird. If you decide to tackle this project,
(905)
") (905)953-9260 Marc@M-Tuned.com Coolant Reroute Kit *Professional Installation Recommended but not required 1) Disconnect Negative Terminal from Battery in trunk. 2) Drain Coolant from your cooling system.
(905)953-9260 Marc@M-Tuned.com Coolant Reroute Kit *Professional Installation Recommended but not required 1) Disconnect Negative Terminal from Battery in trunk. 2) Drain Coolant from your cooling system.
b o o s t r e t a i n e r v a l v e
 b o o s t r e t a i n e r v a l v e i n s t a l l a t i o n i n s t r u c t i o n s For questions or tech support, CONTACT US! Email: greg@hiperformancestore.com sales@hpsimotorsports.com Sites: www.hiperformancestore-fiat.com
Crawford Performance Top Mount Air/Oil Separator For 08 STi + Version 2 (S0713-1)
") Crawford Performance Top Mount Air/Oil Separator For 08 STi + Version 2 (S0713-1) Parts List Part Number Quantity Description Sent Received S0709-1 1 TMIC Air/Oil Separator 08STI V2 F0365 1 Crank Case
Crawford Performance Top Mount Air/Oil Separator For 08 STi + Version 2 (S0713-1) Parts List Part Number Quantity Description Sent Received S0709-1 1 TMIC Air/Oil Separator 08STI V2 F0365 1 Crank Case
Tools Required. Metric Wrench Set Screwdriver Set Metric Socket Set Pliers Heavy duty hydraulic Jack and Car Stands Box knife or similar Hacksaw WD40
 Subaru 2004+ Legacy GT & Outback XT For JDM 2.0 twinscroll turbo and USDM 2.5 turbo models Front Mount Intercooler Fitting Instructions PN# LEG-1348-000 You are now the proud owner of a highly tested and
SS1066HF Jeep JK Wrangler Left Hand Drive CRDI4 2.8Litre-I4 Diesel Engine and EGHV6 3.8Litre V6 Gasoline Engine
 SS1066HF Jeep JK Wrangler Left Hand Drive CRDI4 2.8Litre-I4 Diesel Engine and EGHV6 3.8Litre V6 Gasoline Engine Installation Guide Safari SS1066HF Page - 1 of 12 6/10/2009 ITEM PART NO DESCRIPTION QTY
Factory safe air/fuel ratio s for Optimum performance Patent# 7,359,795 Now equipped with Air Fusion
 Part number SP1989 2009 Nissan 370Z 3.7L V6 Dual Cold air intakes equipped with MR Technology, Air Fusion 1- Driver side cold air intake 1- Passenger side cold air intake 2-2.75 Injen/AMSOIL (#1010BB)
EXTERNAL OIL FILTER SYSTEM WITH COOLANT FILTER KIT
 EXTERNAL OIL FILTER SYSTEM WITH COOLANT FILTER KIT External Oil Filter with Coolant Filter Kit PACKING LIST: QTY. 4 4 Description Oil Filter Coolant Filter Small Brass 90 Fitting Large Brass 90 Fitting
Installation Manual Volvo C30 T5 Front Mount Intercooler System
 Installation Manual Volvo C30 T5 Front Mount System Volvo C30 T5 System / Installation Manual i C Contents Important Information i Parts List i Required Tools and Materials 1 1.0 - Vehicle Preparation
FULL LENGTH HEADERS/ CATTED HEAD PIPES
 INSTALLATION INSTRUCTIONS INS232 2016-2018 CAMARO 6.2L V8 FULL LENGTH HEADERS/ CATTED HEAD PIPES Part #4044 and 40440 Special Tools required: 10mm, 12mm, 13mm, 15mm Socket and Wrenches, Pliers, Saw, Welder
6.4L EGR Delete With Intake Elbow
 6.4L EGR Delete With Intake Elbow J I E C B F D G H A Part# A B C D E F G H I J PACKING LIST: QTY. 2 4 2 4 2 Description Exhaust Block-Off Plate Exhaust Gasket Coolant Line Plugs Brass Barbed Hose Connector
AIR INDUCTION SYSTEM
 Page 1 of 7 PART NUMBER: APPLICATION: 203.60.2505 HONKER C6 2005 07 CORVETTE AIR INDUCTION SYSTEM EXC. Z06 INSTRUCTION SHEET NUMBER: with supercharger 903.60.9852A PACKAGE CONTENTS: Air Box Cover Air Box
Z1 Motorsports 300zx 2.5 Upgraded piping & BA SMIC Install Guide
 Z1 Motorsports 300zx 2.5 Upgraded piping & BA SMIC Install Guide Congratulations on your new upgraded piping and intercooler kit, this kit has proven to provide the lowest intake air temps to date on our
COLD AIR INTAKE INSTALLATION INSTRUCTIONS. # D Fits: i (4.8L)
") COLD AIR INTAKE INSTALLATION INSTRUCTIONS # D760-0013 Fits: 2006-10 650i (4.8L) PARTS LIST Air Box Assembly Left tube Center tube Right tube Support bracket AFM housing AFM/TB tube Hardware Kit Congratulations
COLD AIR INTAKE INSTALLATION INSTRUCTIONS # D760-0013 Fits: 2006-10 650i (4.8L) PARTS LIST Air Box Assembly Left tube Center tube Right tube Support bracket AFM housing AFM/TB tube Hardware Kit Congratulations
DOWNLOAD ENHANCED INSTALL MANUALS
 U 3 October 2016 1041564 6.7L Performance Intake Plate Manual (I-00371) 1 DOWNLOAD ENHANCED INSTALL MANUALS Cummins 6.7L High Flow Intake Plenum Cover 1041564 2008-2016 6.7L RAM 2500-3500 Pickup PLEASE
COLD AIR INTAKE INSTALLATION INSTRUCTIONS
 COLD AIR INTAKE INSTALLATION INSTRUCTIONS # D760-0007 Fits: 2001-05 E46 325i NOTES: This intake MUST be used with the appropriate Dinan Performance Software for your vehicle. Evaluate & repair any stored
Cold Air Intake Installation Instructions
 BAVARIAN AUTOSPORT Cold Air Intake Installation Instructions PARTS LIST: PF BMWE36-4 PROCEDURE: 1. Using a flat-head screwdriver, loosen the hose clamp between the AFM and rubber boot leading to engine
M-Tuned reroute kit XX
 M-Tuned reroute kit 14-161XX Manufactured and designed by: *Professional Installation Recommended but not required 1) Disconnect the negative terminal from the battery in the trunk. 2) Drain the coolant
EAF164SY FITTING INSTRUCTIONS
 EAF164SY FITTING INSTRUCTIONS REPLACES: 00.00.00 REVISED: 16.08.16. FORD RANGER SERIES 2 and EVEREST ECB ARC BAR WITH FOG LIGHTS AND SONAR SYSTEM VEHICLE FRONTAL PROTECTION SYSTEM (VFPS) FOR AIR BAG &
WH/WK JEEP GRAND CHEROKEE 2005 ON WARNING
 Part Number: 3450130 F/KIT: 6172092 Product Description: Suited to vehicle/s: COMBINATION BULL BAR WH/WK JEEP GRAND CHEROKEE 2005 ON WARNING REGARDING VEHICLES EQUIPPED WITH SRS AIRBAG; When installed
Dual Remote Filtration System Installation and Servicing Instructions
 IMPORTANT NOTICE Read all instructions completely before attempting to install this unit. Improper installation could result in serious system and/or equipment damage. The installation of this system is
SLP Camaro ZL1 STAGE 3 (650 HP)
") SLP - 2012 Camaro ZL1 STAGE 3 (650 HP) PART #26002 PACKING LIST Before installation, use this check list to make sure all necessary parts have been included. ITEM QTY CHECK PART NUMBER DESCRIPTION 1. 1
SLP - 2012 Camaro ZL1 STAGE 3 (650 HP) PART #26002 PACKING LIST Before installation, use this check list to make sure all necessary parts have been included. ITEM QTY CHECK PART NUMBER DESCRIPTION 1. 1
FMCZTINT Mitsubishi Colt CZT front mounting intercooler installation
 FMCZTINT Mitsubishi Colt CZT front mounting intercooler installation Tools needed: Drill with 8mm HSS drill bit, hacksaw, dremel/stanley knife 3/8 drive ratchet with extension and 10mm,13mm sockets Torx
Single Barrel Shotgun HPFP Install Guide
 Single Barrel Shotgun HPFP Install Guide Thank you for purchasing the VTT Single Barrel Shotgun HPFP upgrade kit! PLEASE READ THE ENTIRE GUIDE BEFORE BEGINNING INSTALLATION! The first thing you should
AIR INDUCTION SYSTEM
 Page 1 PART NUMBER: APPLICATION: 203.51.2500 HONKER C5 1997 2000 CORVETTE AIR INDUCTION SYSTEM (without supercharger) INSTRUCTION SHEET NUMBER: 903.51.9850G PACKAGE CONTENTS: Air Box Cover Air Box Base
Toyota Tacoma Winch Mount Bumper Installation Instructions Tools Required: Transmission cooler relocation brackets Torque Wrench
 2016-2017 Toyota Tacoma Winch Mount Bumper Installation Instructions Tools Required: Items Included: Small flat head screw driver Winch Mount Ratchet, 10mm, 12mm, 14mm, 17mm & Skid Plate 19mm sockets Transmission
SS41HF Mitsubishi Pajero NS & NT V8/V9 Series 3.2 Litre Turbo Diesel (4M41 Engine) 3.8 Litre V6 Petrol (6G76 Engine)
 3.8 Litre V6 Petrol (6G76 Engine)") SS41HF Mitsubishi Pajero NS & NT V8/V9 Series 3.2 Litre Turbo Diesel (4M41 Engine) 3.8 Litre V6 Petrol (6G76 Engine) 21/7/2010 Parts List ITEM PART NO DESCRIPTION QTY 1 570-133-200 BODY - SNORKEL (SS41HF)
SS41HF Mitsubishi Pajero NS & NT V8/V9 Series 3.2 Litre Turbo Diesel (4M41 Engine) 3.8 Litre V6 Petrol (6G76 Engine) 21/7/2010 Parts List ITEM PART NO DESCRIPTION QTY 1 570-133-200 BODY - SNORKEL (SS41HF)
Includes: 1. Silicone Hose 2. EGR Block Off Plates 1. Exhaust Block Off Plate 2. Hose Clamps 1. Spacer/Washer 8. Bolts 2. Nuts
 Includes: 1. Silicone Hose 2. EGR Block Off Plates 1. Exhaust Block Off Plate 2. Hose Clamps 1. Spacer/Washer 8. Bolts 2. Nuts WARNING: This product is not legal for sale or use on pollution controlled
JEEP WRANGLER 5 DOOR 48L ADDITIONAL FUEL TANK FTJW003
 JEEP WRANGLER 5 DOOR 48L ADDITIONAL FUEL TANK FTJW003 INSTALL TIME: 1.5 Hours IMPORTANT WARNING! IT IS CRITICAL THAT ALL FRONT RUNNER PRODUCTS BE PROPERLY AND SECURELY ASSEMBLED AND ATTACHED TO YOUR VEHICLE.
EXPANSION TANK PARTS LIST AND INSTALLATION GUIDE
 PARTS LIST AND INSTALLATION GUIDE PARTS LIST 2 PC APPLICATION-SPECIFIC MOUNTING BRACKETS 2 PC BLACK, ANODIZED 6061 ALUMINUM CATCH CANS 4 PC SILICONE HOSES 4 PC PLASTIC BARBED FITTINGS 4 PC WORM-GEAR CLAMPS
Door panel removal F07 5 GT
 Things needed Decent plastic trim removal tools Torx 30 Spare door clips 07147145753 I got away with a set of 5 but if I did it again I d be cautious and get 10. From prior experience if they are damaged
Includes: 1. High Flow Turbo Up-Pipe 1. J-Hook Block Off / Coolant Reroute 1. Coolant Hose 1. EGR Valve Block Off Plate 2. Hose Clamps 4.
 Includes: 1. High Flow Turbo Up-Pipe 1. J-Hook Block Off / Coolant Reroute 1. Coolant Hose 1. EGR Valve Block Off Plate 2. Hose Clamps 4. Bolts & Nuts WARNING: This product is not legal for sale or use
DrVanos.com Stage II Installation Instructions. Tool rental is available with the purchase of a vanos kit *See website for more info*
 DrVanos.com Stage II Installation Instructions Special Tools Needed: Camshaft locking tool TDC Crank pin Sprocket turning tool Tool rental is available with the purchase of a vanos kit *See website for
Replacing the Vacuum Servo on 700/900 with ACC/ECC Double-Acting Servos. [Procedure from Dick Riess, to whom thanks are given; some notes from Dan]
![Replacing the Vacuum Servo on 700/900 with ACC/ECC Double-Acting Servos. [Procedure from Dick Riess, to whom thanks are given; some notes from Dan]](/thumbs/89/98811956.jpg "Replacing the Vacuum Servo on 700/900 with ACC/ECC Double-Acting Servos. [Procedure from Dick Riess, to whom thanks are given; some notes from Dan]") Replacing Vacuum Servos in ACC/ECC-Equipped 700/900 Cars FAQ Home Volvo Maintenance FAQ for 7xx/9xx/90 Cars HVAC Home OEM Manual Procedure for Replacing Vacuum Servos. See the FAQ file for a large.pdf
Replacing Vacuum Servos in ACC/ECC-Equipped 700/900 Cars FAQ Home Volvo Maintenance FAQ for 7xx/9xx/90 Cars HVAC Home OEM Manual Procedure for Replacing Vacuum Servos. See the FAQ file for a large.pdf
SW20 Coolant System Maintenance.
 SW20 Coolant System Maintenance. This article contains information on how to change and bleed the coolant, as well as flushing the system. It is based on information in the service manual, tips gathered
BJ74SY FITTING INSTRUCTIONS
 BJ74SY FITTING INSTRUCTIONS REPLACES: 00.00.00 REVISED: 05.08.13. Check installation hardware before commencing. 1. Lift bonnet. JEEP GRAND CHEROKEE OVERLAND WK MY14 6/13on BIG TUBE PROTECTION BAR WITH
VW SCIROCCO TWINTERCOOLER INSTALLATION INSTRUCTIONS
 VW SCIROCCO TWINTERCOOLER INSTALLATION INSTRUCTIONS Tools needed: T25 torx driver Small flat head screwdriver 12mm & 13mm socket, with ratchet Dremel or similar with cut off disc Large Phillips screwdriver
M-9603-FST FOCUS ST COLD AIR INTAKE KIT INSTALLATION INSTRUCTIONS
 M-9603-FST Please visit www.fordracingparts.com for the most current instruction information.!!! PLEASE READ ALL OF THE FOLLOWING INSTRUCTIONS CAREFULLY PRIOR TO INSTALLATION. AT ANY TIME YOU DO NOT UNDERSTAND
Jeep Wrangler TJ. Complete Air Conditioning System. Slide Control Head. Installation instructions
 WWW.JEEPAIR.COM 1996-1998 Jeep Wrangler TJ Complete Air Conditioning System Slide Control Head Installation instructions Kit Information After 1994 every vehicle was designed for R134a refrigerant. The
Porsche 928 with 16v LH-Jetronic Fuel System
 Porsche 928 with 16v LH-Jetronic Fuel System Toll-Free Tech Hot Line: 877-FOR-928M 877-367-9286 Please do not copy this manual and give copies to your friends. Our ability to bring you this supercharger
INSTALLATION INSTRUCTIONS FUEL SURGE TANK KIT
 INSTALLATION INSTRUCTIONS FUEL SURGE TANK KIT BMW E46 3-Series, Excl Convertible Document: 19-0056 Support: info@radiumauto.com Relieve fuel pressure in vehicle before beginingthe installation. Disconnect
NBF38SY FITTING INSTRUCTIONS. FORD TERRITORY 7/14on 76MM NUDGE BAR VEHICLE FRONTAL PROTECTION SYSTEM (VFPS) FOR AIR BAG & ADR COMPLIANT VEHICLES
 FOR AIR BAG & ADR COMPLIANT VEHICLES") NBF38SY FITTING INSTRUCTIONS COMMENCES: 280417 REVISED: 000000 Check installation hardware before commencing FORD TERRITORY 7/14on 76MM NUDGE BAR VEHICLE FRONTAL PROTECTION SYSTEM (VFPS) FOR AIR BAG &
NBF38SY FITTING INSTRUCTIONS COMMENCES: 280417 REVISED: 000000 Check installation hardware before commencing FORD TERRITORY 7/14on 76MM NUDGE BAR VEHICLE FRONTAL PROTECTION SYSTEM (VFPS) FOR AIR BAG &
Mahindra Pikup (2009 Production Onwards)
") Mahindra Pikup (009 Production Onwards) Steel Bull Bar INSTALLATION INSTRUCTIONS Accessory Part No. BBAR07 Installation Time: 60min Approx Bull Bar Weight: 60KG! Important: Please read each step of these
Mahindra Pikup (009 Production Onwards) Steel Bull Bar INSTALLATION INSTRUCTIONS Accessory Part No. BBAR07 Installation Time: 60min Approx Bull Bar Weight: 60KG! Important: Please read each step of these
Fuel Tank Fitment Instructions Tusk/Rally Raid Products/Seat Concepts kit Husqvarna 701 Enduro
 Fuel Tank Fitment Instructions Tusk/Rally Raid Products/Seat Concepts kit Husqvarna 701 Enduro Part #1849120001, 1849120002, 1849110001, 1849110002 Thank you for purchasing the Tusk/Rally Raid Products
MAKING YOUR DREAMS A REALITY FITTING INSTRUCTIONS. KAWASAKI ZXR250 Ninja Style Fairing Set BPFS-0071
 MAKING YOUR DREAMS A REALITY FITTING INSTRUCTIONS KAWASAKI ZXR250 Ninja Style Fairing Set BPFS-0071 Handy Hints for fitting our fairings: 1. We recommend trial fitting of our fairings before painting.
* PLEASE READ INSTRUCTIONS PRIOR TO INSTALLATION
 XDP 6.0L Complete EGR Delete Kit w/up-pipe Item Number: XD169 PACKING LIST: 2 - Lined 3/4" Hose Clamps, 1-180 Coolant Tube, 1-3/4 Silicone Hose, 1 - Stainless Steel Up-pipe 1 - EGR Valve Block-Off Plate,
Shotgun Single Barrel HPFP install guide
 Shotgun Single Barrel HPFP install guide Thank you for your purchase of the VTT Shotgun Single Barrel HPFP upgrade! First thing to do when you open your box is to make sure all parts are in their respective
Installation Instruction for '84-'89 Nissan 300ZX High Performance Intercooler System (Part No )
") Installation Instruction for '84-'89 Nissan 300ZX High Performance Intercooler System (Part No. 2-124) Page ii DCB (06/14/02 12:19 AM) Version 1.0 Page iii Table of Contents 1. TOOLS REQUIRED...1 2. INSTALLATION
Installation Instruction for '84-'89 Nissan 300ZX High Performance Intercooler System (Part No. 2-124) Page ii DCB (06/14/02 12:19 AM) Version 1.0 Page iii Table of Contents 1. TOOLS REQUIRED...1 2. INSTALLATION
Shotgun Double Barrel HPFP install guide
 Shotgun Double Barrel HPFP install guide Thank you for your purchase of the VTT Shotgun Double Barrel HPFP upgrade! First thing to do when you open your box is to make sure all parts are in their respective
OIL COOLER KIT INSTALLATION INSTRUCTIONS D Application: , E89 Z4 sdrive 35i without stock oil cooler* PARTS LIST
 OIL COOLER KIT INSTALLATION INSTRUCTIONS D570-0891 Application: 2009-11, E89 Z4 sdrive 35i without stock oil cooler* PARTS LIST Qty Part No. Description 1 D573-0050 Oil Cooler + Frame Assy 1 D573-0044
03-04 Mach 1. Hellion Power Systems Mach 1 Kit Instructions
 Hellion Power Systems 03-04 Mach 1 Kit Instructions Part 1 Hellion recommends that the front suspension system be installed either by trained professionals or by 5.Remove rack bolts K-Member Installation
Installation Instructions Z-Gate Shifter
 Installation Instructions Z-Gate Shifter Part Number 80681 1998, 2001 by B&M Racing and Performance Products The B&M Z-Gate shifter can be used in vehicles equipped with most popular three speed automatic
Installation Instruction for '84-'89 Nissan 300ZX High Performance Intercooler System (Part No )
") Installation Instruction for '84-'89 Nissan 300ZX High Performance Intercooler System (Part No. 2-124) Routing of the Intercooler Pipe It is necessary to follow the exact sequence of the installation
Installation Instruction for '84-'89 Nissan 300ZX High Performance Intercooler System (Part No. 2-124) Routing of the Intercooler Pipe It is necessary to follow the exact sequence of the installation
Corvette Stage X Twin Turbo Installation. Please read the entire instructions as we ve made many changes.
 Corvette Stage X Twin Turbo Installation Please read the entire instructions as we ve made many changes. Disconnect battery. Remove plastic fuel rail covers over the valve cover. Remove Air Box in front
Included parts: 1 - BorgWarner SX-E Turbocharger 1 - SX-E 90-Degree Compressor Outlet Elbow 1 - HSM Cast Exhaust Manifold 1 - HSM Downpipe
 TROUBLESHOOTING: Please read and understand all installation instructions before proceeding with the installation. If you have questions during the installation of this product, please email H&S Motorsports
Industrial Injections Compound Turbo Installation For 6.7L Scorpion
 Industrial Injections Compound Turbo Installation For 6.7L Scorpion Step 1: Whenever you are doing an installation the first thing you should do is unhook the batteries to avoid arcing. You will need an
FI AirGap intake installation instructions
 Updated March 2016 FI AirGap intake installation instructions Please read and understand all of the instructions and check to make sure that all of the parts (shown on last page) are present before you
Prerequisites: Shop Manual (recommended) pages 3-9 through 3-13.
 pages 3-9 through 3-13.") Prerequisites: Order your gaskets average about $25.00 bucks X 2 so $50.00 4NK-11193-00-00 Obtain a shim kit (Should have several 265 and 270s) (Some dealers will exchange) Obtain a Valve Bucket Tool YM-33961
Prerequisites: Order your gaskets average about $25.00 bucks X 2 so $50.00 4NK-11193-00-00 Obtain a shim kit (Should have several 265 and 270s) (Some dealers will exchange) Obtain a Valve Bucket Tool YM-33961
Installation Instructions :AUDI 8V RS3 : Page 1
 Installation Instructions :AUDI 8V RS3 : Page 1 1. We will start by removing the stock airbox system. Remove the 2 screws holding the inlet duct in place. Then push the duct into the airbox to release
Post-Paint>Fuselage>Assemble instrument panel. Objectives of this task: Materials and tools required: Prepare the work area
 Post-Paint>Fuselage>Assemble instrument panel Objectives of this task: To fit all instruments into the instrument panel, fit all of the electrical wiring and terminate to multi-pin connectors ready for
Cackle cure Kit Installation by Pete Cleveland (aka FTE) for Dino Fuel Alternatives
 for Dino Fuel Alternatives") Cackle cure Kit Installation by Pete Cleveland (aka F250_ @ FTE) for Dino Fuel Alternatives March 26, 2007 Test Vehicle: 2002 Ford F250 XLT, 7.3L PowerStroke TurboDiesel, 2WD, Crew Cab, SWB, SRW, 124,000
Cackle cure Kit Installation by Pete Cleveland (aka F250_ @ FTE) for Dino Fuel Alternatives March 26, 2007 Test Vehicle: 2002 Ford F250 XLT, 7.3L PowerStroke TurboDiesel, 2WD, Crew Cab, SWB, SRW, 124,000
Polaris Axys Sidekick Installation Instructions
 2016-2017 Polaris Axys Sidekick Installation Instructions 1. Remove hood and side panels. 2. Remove fasteners and slide console back. 3. Remove belt and driven clutch. 4. Remove clutch cover/ oil-tank