Revised 10/23/2015 Page 2 of 10
|
|
|
- Antony Austin
- 5 years ago
- Views:
Transcription


1


2 1.Remove the gauge, side panels, hood and headlight. Remove the air box from the throttle bodies then remove the seat and gas tank. 2.Carefully remove temp sensor from air box using a small pick or screw driver. DO NOT THROW AWAY; this will be used for later use in the install. 3.Remove the muffler and EGT. Remove the stock rubber muffler isolators from the bottom of the muffler. DO NOT THROW AWAY; these will be used later in the install. 4.Remove hood from headlight assembly and flip upside down. Break off the weld dots on the air box assembly. Pull apart the air box assembly. Discard the lower air box & white air box tube. 5.Cut the upper air box matching both sides on the cut (as seen in picture). 6.Cut the upper hood/air box assembly as seen in picture for clearance purposes. Cut remaining weld dots off of the upper air box. Revised 10/23/2015 Page 2 of 10


3 7.Remove the throttle bodies & reed cages from the machine. 8.Remove the stock reed pedals and replace them with new turbo reeds. DO NOT mix them up. Reinstall back in engine and install the throttle bodies. 9.Install the power adapter cable into the open fuse holder. Install supplied fuse. 10. Hook up the ground right below the fuse holder on the foot rest with the stock bolt. Tighten the bolt so wires are pointed to the top of the chain case. 11. Remove fuse holders from stock location and install the power harness on the end of the power adapter cable. Make sure red wire goes to red wire. 12. Hook up throttle position harness to throttle body. Zip tie all wires so they don t chaff or break off. Revised 10/23/2015 Page 3 of 10


4 13. Route wiring down the stock harness to the power adapter harness and throttle position hook ups. Use zip ties accordingly. 14. Install the throttle body tab clamp on the throttle body with the tightening screw at the top of the assembly. Install the silicone hose and twist clamp into position then tighten clamp. 15. Install silicone on the left side of the aluminum Y. Tighten the hose clamp. Leave all the other clamps loose for proper alignment and fitting. 16. Install the rest of the air box. Make sure you index the hose clamps so you can access them for tightening after you install the gas tank. Leave the hose clamps loose. 17. Install the injectors in the injector rails. Use assembly lube so you don t tear an o-ring. 18. Route the fuel line as shown in picture. Don t over tighten these bolts. Zip tie fuel lines so they don t kink then zip tie the wire harnesses securely. Revised 10/23/2015 Page 4 of 10


5 19. Cut and splice into the return fuel line. Install brass T into fuel line and tighten clamps. Position for clearance, zip tie and secure as shown. 20. Install the gas tank and tank support member. The Y will touch gas tank slightly on PTO side. There should be reasonable clearance elsewhere. 21. Remove the clear line on rave valve solenoid & Install check valve. Turn the blow off to down position. Route and zip tie. 22. Remove pipe and apply silicone to exhaust doughnut. Triple up springs on pipe and reinstall. 23. Install intercooler using hose clamps on cross bar. Install fan and route adapter harness. 24. Install the 3 charge tube. Do not tighten hose clamps. Try to slide the charge tube closer to the Y end for proper fit. Hook up the air temp sensor to the control box. Zip tie into place. Revised 10/23/2015 Page 5 of 10


6 25. Install clutch cover then turn the Y on the PTO side upwards until the clutch cover fits properly. 26. Install stock temp sensor and zip tie. Hook up the boost reference line to the push to connect on the intercooler. Route so it does not chaff or break. 27. CAREFULLY trim oil tank as shown using sharp knife or cutters. DO NOT puncture oil tank during this process. 28. Install heat tape on the chain case, hoses, stock EGT cable, and oil tank. Newer models do not require heat tape on chain case. 29. Drill the hole for the spring tab with a 3/16 drill bit. This hole already exists so you only will drill the plastic in the bell pan on the right side. 30. Install the stock muffler rubber bumpers on the turbo bracket using a flat blade screw driver. Revised 10/23/2015 Page 6 of 10


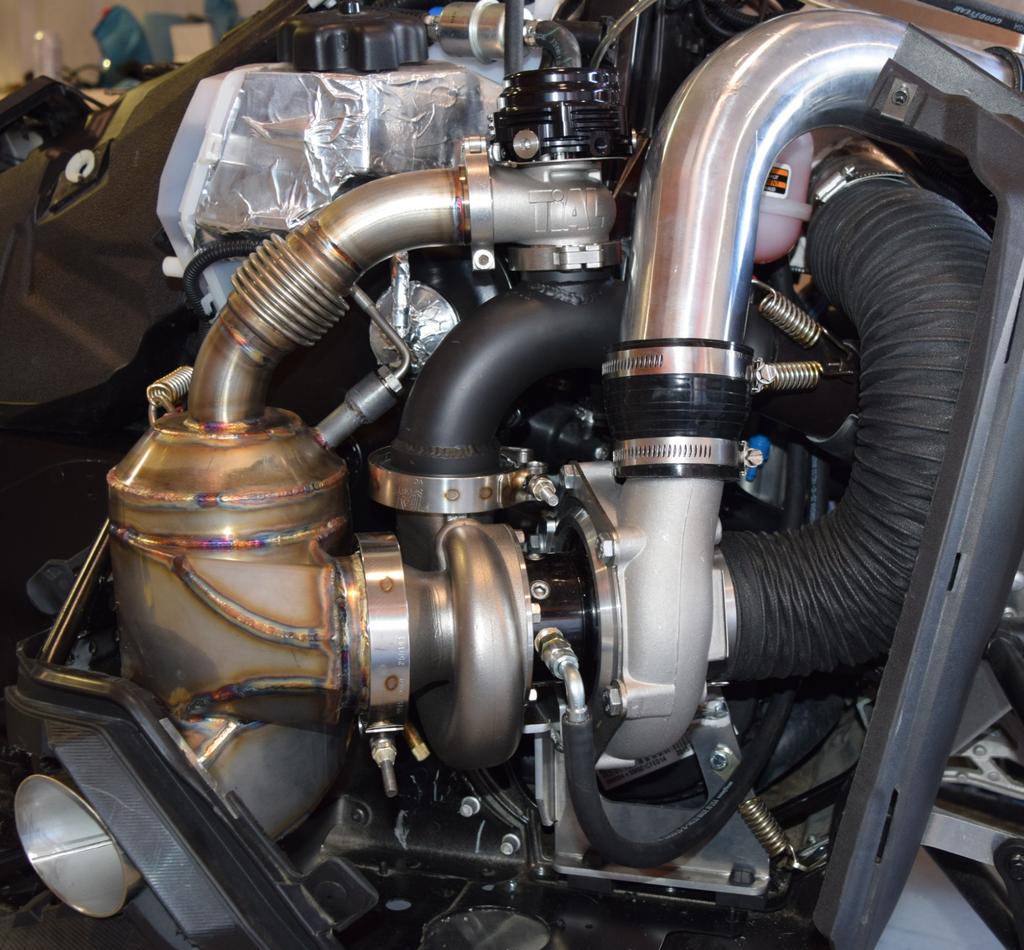
7 31.Install the turbo assembly then install the spring supplied for turbo bracket tab to bulk head spring tab. 32.Route the inside coolant line under the bulk head bracket. Route up to the back side of coolant bottle. 33.Remove the small coolant line from the back of the coolant bottle. Then route to the coolant hose you just removed. Make sure you secure hose. 34.Route the outside turbo coolant hose under the bulk head cross member to coolant bottle. On standard turbo kits clean the belly pan, apply heat to velcro, then install oil pump as shown. 35.Route & hook up power for oil pump to power harness. Route coolant hose to coolant bottle. Zip tie the hose & power harness away from any hazard. Tighten coolant hose clamps. 36.Install the waste gate solenoid. Use the Velcro supplied to mount the solenoid. Use heat to activate the glue on the Velcro. Revised 10/23/2015 Page 7 of 10


8 37.TIAL ONLY. Install the waste gate on the inlet. Plug the remaining holes in the Tial waste gate. You will not use the coolant fitting option on this waste gate. 38. Using an air saw, cut exhaust side plastic for exhaust to fit through. This hole will be approximately a 3 1/2 hole. If desired, install heat tape to the lower inside side panel. 39. Test fit the head light assembly to the intercooler mount bracket. Tighten all the hose clamps into position making sure the head light assembly and charge tubes fit correctly. 40. Check for clearance on the clutch cover and the 3 charge tube. Tighten all air box and charge tube hose clamps. 41.Install Tial muffler. When installing the muffler rotate the top of muffler to the inside of the snow machine for a equal clearance to both the side panel, chain case and stock oil tank. 42. Install the factory EGT sensor into the turbo muffler, then remove the stock heat tape and insulation from the side panel then install the heat tape as shown. Revised 10/23/2015 Page 8 of 10


9 43. Cut the shroud just enough to run control box wiring and boost reference line through, then zip tie wires as needed. 44. Turn handle bars all the way to the left and install the cold air intake as shown in picture. 45. Install the hose from boost solenoid to the intercooler. 46. Install the hose from ECM onto cold air intake box. Install the hose clamp on the cold air bracket. Test fit the head light then tighten the hose clamp. 47. Install the silicone hose on the cold air intake box tube. Install the hose clamps between the cold air intake tube and turbo. 48. Install the head light assembly. Route the control box as shown in picture. Clean the console then install Velcro. Heat the glue on the Velcro to activate. Revised 10/23/2015 Page 9 of 10


10 49. Remove primary clutch. Remove the old ramps. Install roll pins in ramps, index roll pins as seen in picture. Be sure to perform clutch adjustments to Ski-Doo specifications. 50. Install the pins in the clutch. At the top of the page is low elevation to 5,000ft clutching. At the bottom is 5000 ft up clutching. Tighten the set screws to cotter pins in both cases. 51. On Standard Turbo Kits fill the turbo oil tank with12oz of TC2 Turbo oil. Remove the oil feed line off of the turbo then start the snow machine. Verify oil is flowing, then reinstall the oil line and tighten. Revised 10/23/2015 Page 10 of 10
Revised 10/22/2014 Page 2 of?
 1.Remove side panels, hood, seat, fuel tank, and 2.Remove stock air box, remove fuel line muffler. Save exhaust springs and rubber muffler mounts for turbo bracket. Sand back surface flat for mounting.
Polaris Axys Sidekick Installation Instructions
 2016-2017 Polaris Axys Sidekick Installation Instructions 1. Remove hood and side panels. 2. Remove fasteners and slide console back. 3. Remove belt and driven clutch. 4. Remove clutch cover/ oil-tank
Pump Gas Instructions for Polaris And 800 Models. Important Information before Installing This System:
 Pump Gas Instructions for Polaris 600 700 And 800 Models Important Information before Installing This System: Before you begin your turbo install, read through these instructions to determine if you are
Skidoo XM Etec Installation Instructions
 Thank you for purchasing your Silber Turbo kit. This product was designed to give you endless amounts of power and satisfaction. During the installation feel free to call us with any question or concerns
Arctic Cat ProClimb Sidekick Installation Instructions
 2013-2017 Arctic Cat ProClimb Sidekick Installation Instructions 1.Remove side panels, front bumper, and hood 2. Remove pipe, muffler, heat shield and ECU 3. Remove cross brace. Unplug the servo motor
#TL T EA888 GEN 3 FUELING SYSTEM/ INSTALLATION INSTRUCTIONS
 #TL100069 2.0T EA888 GEN 3 FUELING SYSTEM/ INSTALLATION INSTRUCTIONS Notes: These instructions were written for a North American specification MkVII GTI. Other models, like the Golf R, are similar. When
Procharger Stage II Intercooled Supercharger System (11-14 GT)
") Procharger Stage II Intercooled Supercharger System (11-14 GT) Installation Time: Approximately one day. Installed on 2012 Mustang GT 5.0/Manual Required Tools 3/8 Socket Set (Standard and Metric) 1/2
Procharger Stage II Intercooled Supercharger System (11-14 GT) Installation Time: Approximately one day. Installed on 2012 Mustang GT 5.0/Manual Required Tools 3/8 Socket Set (Standard and Metric) 1/2
CHALLENGER TWIN TURBO SYSTEM INSTALLATION INSTRUCTIONS
 CHALLENGER TWIN TURBO SYSTEM INSTALLATION INSTRUCTIONS 1 Verify contents of kits with supplied packing list 1) Unhook the battery. 2) Remove wheel wells & front fascia of vehicle. 3) Remove the catalytic
SHELBY GT500
 2007-2009 SHELBY GT500 Removal of Factory Unit WARNING: 1. Radiator fluid must be handled properly. Please observe local ordinances with regards to handling and disposal. 2. Allow vehicle and components
mk3 SEAT Ibiza Cupra Front Mount Intercooler.
 mk3 SEAT Ibiza Cupra Front Mount Intercooler. Warning be sure not to let any foreign body enter the inlet track of the vehicle whilst the following work is being carried out. Serious engine damage may
IAG Street Series Air / Oil Separator (AOS) For WRX
 For WRX") P IAG Street Series Air / Oil Separator (AOS) For 2015-16 WRX Part# IAG-ENG-7152 Tools Required: Ratchet, torque wrench, extensions, needle nose pliers, hose cutter, snips/scissors, flat head screw driver,
P IAG Street Series Air / Oil Separator (AOS) For 2015-16 WRX Part# IAG-ENG-7152 Tools Required: Ratchet, torque wrench, extensions, needle nose pliers, hose cutter, snips/scissors, flat head screw driver,
05-08 GT. Hellion Power Systems Mustang Kit Instructions
 Hellion Power Systems 05-08 Mustang Kit Instructions 1. Disconnect Battery 2. Drain Radiator, keep fluid for re-installation. 3. Remove air box and inlethoses. 6. Next, underneath, punch oil pan for turbo
4. Remove (4) 10mm and (1) 7mm bolt that holds fascia at front corners, on each side
 10mm and (1) 7mm bolt that holds fascia at front corners, on each side") 2010 Camaro LS3 1. Disconnect battery ground 2. Remove front wheels 3. Remove (5) push pins and (5) #20 torx screws on inner front wheel well liners and remove liners on each side 4. Remove (4) 10mm and
2010 Camaro LS3 1. Disconnect battery ground 2. Remove front wheels 3. Remove (5) push pins and (5) #20 torx screws on inner front wheel well liners and remove liners on each side 4. Remove (4) 10mm and
2017+ L5P Duramax 3 ½ Down Pipe & EGR Fix Kit
 2017+ L5P Duramax 3 ½ Down Pipe & EGR Fix Kit Covers installation of PN s: WCF100630, WCF100829 Note: This Kit is for off road competition use only! Off Road Competition Use Tuning & Exhaust System is
IAG Competition Series Air / Oil Separator (AOS) For WRX
 For WRX") P IAG Competition Series Air / Oil Separator (AOS) For 2015-16 WRX Part# IAG-ENG-7252 Tools Required: Ratchet, torque wrench, extensions, needle nose pliers, hose cutter, snips/scissors, flat head screw
P IAG Competition Series Air / Oil Separator (AOS) For 2015-16 WRX Part# IAG-ENG-7252 Tools Required: Ratchet, torque wrench, extensions, needle nose pliers, hose cutter, snips/scissors, flat head screw
Installation Instructions
 2011-2013 LML DURAMAX COMPOUND-ADD 2011-2015 LML A Duramax TURBO KIT Add INSTALL A Turbo INSTRUCTIONS Compound Kit Installation Instructions 1-800-955-0476 - www.industrialinjection.com - info@industrialinjection.com
MTNTKperformance.com. '16-Current Polaris AXYS 800 Intercooled Turbo Kit Install Instructions
 1 '16-Current Polaris AXYS 800 Intercooled Turbo Kit Install Instructions '16-Current Polaris AXYS 800 Intercooled Turbo Kit Install Instructions 1. Remove: side panel, hood, seat, fuel tank, muffler,
INSTRUCTIONS. High Boost Upgrade Polaris PRO-RMK Polaris SKS 850 (155) 2019 Polaris ASSAULT 850. Page Number: 1 INSTRUCTIONS MODEL:
 2019 Polaris ASSAULT 850. Page Number: 1 INSTRUCTIONS MODEL:") INSTRUCTIONS MODEL: FITS: High Boost Upgrade 2019 Polaris PRO-RMK 850 2019 Polaris SKS 850 (155) 2019 Polaris ASSAULT 850 Page Number: 1 INSTRUCTIONS Table of Contents Contents INSTRUCTIONS...1 Contents
INSTRUCTIONS MODEL: FITS: High Boost Upgrade 2019 Polaris PRO-RMK 850 2019 Polaris SKS 850 (155) 2019 Polaris ASSAULT 850 Page Number: 1 INSTRUCTIONS Table of Contents Contents INSTRUCTIONS...1 Contents
RACE X INTERCOOLER INSTALLATION INSTRUCTIONS
 RACE X INTERCOOLER INSTALLATION INSTRUCTIONS The goal of AMS Performance is to provide the highest quality, best performing products available. By utilizing research and development, and rigorous testing
Step 6: Remove and save the MAP sensor for later use. Step 7: Remove the passenger side intercooler pipe and the EGR intake manifold.
 LBZ Twin kit Install Step 1: Disconnect both batteries. Step 2: Drain coolant and oil also remove passenger side inner fender. Step 3: Remove intake box and piping. (Remove and save the MAF sensor in the
IAG Street Series Air / Oil Separator (AOS) For 2017 WRX
 For 2017 WRX") P IAG Street Series Air / Oil Separator (AOS) For 2017 WRX Part# IAG-ENG-7152 Tools Required: Ratchet, torque wrench, extensions, needle nose pliers, hose cutter, snips/scissors, flathead screwdriver,
P IAG Street Series Air / Oil Separator (AOS) For 2017 WRX Part# IAG-ENG-7152 Tools Required: Ratchet, torque wrench, extensions, needle nose pliers, hose cutter, snips/scissors, flathead screwdriver,
Corvette Stage X Twin Turbo Installation. Please read the entire instructions as we ve made many changes.
 Corvette Stage X Twin Turbo Installation Please read the entire instructions as we ve made many changes. Disconnect battery. Remove plastic fuel rail covers over the valve cover. Remove Air Box in front
V1 Truck Manifold Turbo Kit for F-body
 V1 Truck Manifold Turbo Kit for 98-02 F-body Prep: -Remove all A/C Components, Alternator and brackets, tensioner, front bumper, front bumper foam, and front bumper support. Remove radiator and cooling
03-04 Mach 1. Hellion Power Systems Mach 1 Kit Instructions
 Hellion Power Systems 03-04 Mach 1 Kit Instructions Part 1 Hellion recommends that the front suspension system be installed either by trained professionals or by 5.Remove rack bolts K-Member Installation
1) Remove side panels. Remove clutch cover. Remove windshield by pulling up on the three posts secured into
 Remove side panels. Remove clutch cover. Remove windshield by pulling up on the three posts secured into") UNDER HOOD HEAT ELIMINATOR A.K.A. THE BLOW HOLE by Mountain Tek Application 2013 Model Year SKIDOO XM Kit Contents 1) (1) Fan Tube Assembly 2) (1) Accessory Connect Harness 3) (1) Fan Vent Cover Plate
UNDER HOOD HEAT ELIMINATOR A.K.A. THE BLOW HOLE by Mountain Tek Application 2013 Model Year SKIDOO XM Kit Contents 1) (1) Fan Tube Assembly 2) (1) Accessory Connect Harness 3) (1) Fan Vent Cover Plate
Parts List See cover Page
 Thank you for purchasing the CorkSport Front Mount Intercooler Kit for the 2010-2013 Mazdaspeed 3. Keep your BAT s under check with the CorkSport FMIC Kit with the small or large intercooler. Please let
PRODUCT INSTRUCTIONS
 PRODUCT INSTRUCTIONS Thank you for purchasing genuine Design Engineering, Inc. products. Be sure to always wear the proper safety equipment when installing any DEI product. Design Engineering Inc. WILL
99-04 GT. Hellion Power Systems Mustang GT Kit Instructions
 Hellion Power Systems 99-04 Mustang GT Kit Instructions Part 1 Hellion recommends that the front suspension system be installed either by trained professionals or by 5.Remove rack bolts K-Member Installation
Setting the World s Performance Standards
 Setting the World s Performance Standards 743 East Iona Road, Idaho Falls, ID 83401, (208) 529-0244 Fax (208) 529-9000 Forced Air Hot Air Elimination Kit (Bed Fan Kit) For 800 RZR-4 P/N 67-165 Kit Contents:
TCI FastGate Shifter Installation Instructions
 151 INDUSTRIAL DRIVE ASHLAND, MISSISSIPPI 38603 http://www.tciauto.com TELEPHONE: 662-224-8972 FAX LINE: 662-224-8255 E-MAIL: tech@tciauto.com TCI 616541 FastGate Shifter Installation Instructions The
XLT SPECIAL TRIPLE PIPE SET P.N Installation Instructions
 1995-97 XLT SPECIAL TRIPLE PIPE SET P.N. 09-598 Installation Instructions Revised 8/20/02 Read instructions carefully before installation 1 - Remove stock exhaust, Y-Pipe, front and rear muffler support.
Thompson Automotive Products
 Installation instructions for Quick-Change Oil Filter relocator for NB (1999+) Miatas (MX-5) Before beginning, get your car up where you have access to the undercarriage (Rhino Ramps work well). Tools
TURBO KIT INSTRUCTIONS
 Revision 12/20/10 TURBO KIT INSTRUCTIONS This turbo kit consists of the necessary parts to upgrade or add a turbo to your 22R/RE/RET. This kit may require some fabrication to address your particular application
Instant Chat off the main page of Or simply call our tech team at
 FRONT MOUNT INTERCOOLER 2015+ WRX 2017-07-07 Thank you for purchasing this PERRIN product for your car! Installation of this product should only be performed by persons experienced with installation of
3 October 2016 PN# V Dodge Twin Turbo Kit (I-00274) ½ D o d g e 2 4 v I S B
 ½ D o d g e 2 4 v I S B") 3 October 2016 PN#1045320 24V Dodge Twin Turbo Kit (I-00274) 1 DOWNLOAD ENHANCED INSTALL MANUALS AT dieselperformance.com BD Twin Turbo Kit 1998½- 2 0 0 2 D o d g e 2 4 v I S B Part# 1045320 PLEASE READ
3 October 2016 PN#1045320 24V Dodge Twin Turbo Kit (I-00274) 1 DOWNLOAD ENHANCED INSTALL MANUALS AT dieselperformance.com BD Twin Turbo Kit 1998½- 2 0 0 2 D o d g e 2 4 v I S B Part# 1045320 PLEASE READ
Z1 Motorsports 300zx 2.5 Upgraded piping & BA SMIC Install Guide
 Z1 Motorsports 300zx 2.5 Upgraded piping & BA SMIC Install Guide Congratulations on your new upgraded piping and intercooler kit, this kit has proven to provide the lowest intake air temps to date on our
This harness kit includes: Installing the Hybrid ReVolt Universal grid charger in an Insight
 Installing the Hybrid ReVolt Universal grid charger in an Insight This harness kit includes: Insight harness (2000 to 2006) (a) 4 #6 mounting screws for bulkhead (c) 2 sheet metal screws for fan board
COLD AIR INTAKE INSTALLATION INSTRUCTIONS. # D Fits: i (4.8L)
") COLD AIR INTAKE INSTALLATION INSTRUCTIONS # D760-0013 Fits: 2006-10 650i (4.8L) PARTS LIST Air Box Assembly Left tube Center tube Right tube Support bracket AFM housing AFM/TB tube Hardware Kit Congratulations
COLD AIR INTAKE INSTALLATION INSTRUCTIONS # D760-0013 Fits: 2006-10 650i (4.8L) PARTS LIST Air Box Assembly Left tube Center tube Right tube Support bracket AFM housing AFM/TB tube Hardware Kit Congratulations
Allison Lockup Controller
 19 February 2018 1031311/1031312/1031313 Allison Transmission Lockup and Pressure Module (I-00413) 1 Allison Lockup Controller Transmission Lockup and Pressure Controller 1031311 1031312 1031313 2001-2010
XCR 600/ XLT TRIPLE PIPE SET P.N Installation Instructions
 1994-97 XCR 600/1993-97 XLT TRIPLE PIPE SET P.N. 09-5970 Installation Instructions Read instructions carefully before installation 1-Remove stock exhaust, Y-pipe, and rear muffler support. 2-Install three
JBR MAZDASPEED
 Page1 james Barone Racing Aftermarket Parts and Accessories JBR 2007 2009 MAZDASPEED 3 Front Mount Intercooler Piping Kit Installation Instructions for TR8 Intercooler Tooling: o Jack, Jack Stands, Ramps
WPS-104 Heater Installation Instructions For 500EFI, 700 XP, & Crew Applications
 WPS-104 Heater Installation Instructions For 500EFI, 700 XP, & Crew Applications ORDER OF INSTALLATION FOR A COMPLETE ENCLOSURE OF A RANGERWARE WPS (Weather Protection System) IS AS FOLLOWS: 1. Heater
PFadvantage Metalfor Araus 1360
 Metalfor Araus 1360 Note: Indented items indicate parts included in an assembly listed above Part Name/Description Part Number Quantity Instruction Kit Metalfor Araus 2005300-14 1 Display Bracket 4000134
Rotated Tuner Kit for Garrett GT Turbos
 Rotated Tuner Kit for Garrett GT Turbos 031411 Thank you for purchasing the PERRIN performance rotated turbo kit. Installation of this turbo should only be performed by persons experienced in the installation
ITEM QTY CHECK PART NUMBER DESCRIPTION
 PART #21128 2010 Camaro Cold Air Induction Stage II PACKING LIST Before installation, use this check list to make sure all necessary parts have been included. ITEM QTY CHECK PART NUMBER DESCRIPTION 1.
Included parts: 1 - New Bosch CP3 Pump 1 - HSM Pulley 1 - Serpentine Belt 1 - Pump Bracket/ Hardware STEP 1
 TROUBLESHOOTING: Please read and understand all installation instructions before proceeding with the installation. If you have questions during the installation of this product, please contact H&S Motorsports
Installation Instructions Z-Gate Shifter
 Installation Instructions Z-Gate Shifter Part Number 80681 1998, 2001 by B&M Racing and Performance Products The B&M Z-Gate shifter can be used in vehicles equipped with most popular three speed automatic
LGT-306L / LB Club Car Precedent LED Light Bar Bumper Kit Installation Instructions
 LGT-306L / LB Club Car Precedent LED Light Bar Bumper Kit Installation Instructions Caution: Please read through the instructions carefully. Before starting this project, remove the system s positive and
INSTALLATION INSTRUCTIONS
 INSTALLATION INSTRUCTIONS Accessory Application Publications No. P/N 08E49-S2A-100 2004 S2000 AII 26325 Issue Date OCT 2003 PARTS LIST Hood switch harness TOOLS AND SUPPLIES REQUIRED #2 Phillips screwdriver
IAG Air / Oil Separator (AOS) For STi
 For STi") IAG Air / Oil Separator (AOS) For 2008-14 STi Part# IAG-ENG-7000 Tools Required: Ratchet, torque wrench, extensions, needle nose pliers, hose cutter, snips/scissors Sockets: 10mm, 12mm 13mm Wrenches: 10mm,
IAG Air / Oil Separator (AOS) For 2008-14 STi Part# IAG-ENG-7000 Tools Required: Ratchet, torque wrench, extensions, needle nose pliers, hose cutter, snips/scissors Sockets: 10mm, 12mm 13mm Wrenches: 10mm,
Installation Manual v1.0: Aurora Plus Turbo Kit ( ) 5.9L Dodge. Please read all instructions before installation.
 5.9L Dodge. Please read all instructions before installation.") Installation Manual v1.0: Aurora Plus - 4000 Turbo Kit (2003-2007) 5.9L Dodge Please read all instructions before installation. Figure 1: Aurora Plus - 4000 Kit Contents 1 Figure 2: Aurora Plus Hardware
Installation Manual v1.0: Aurora Plus - 4000 Turbo Kit (2003-2007) 5.9L Dodge Please read all instructions before installation. Figure 1: Aurora Plus - 4000 Kit Contents 1 Figure 2: Aurora Plus Hardware
XRT300 AND XRT350 BA XR6 TURBO UPGRADE KIT FITTING INSTRUCTIONS
 XRT300 AND XRT350 BA XR6 TURBO UPGRADE KIT FITTING INSTRUCTIONS The use of NFU (No Further use) and REUSE (Re Use) relates to the individual parts storage when performing the upgrade. Also note that all
Subaru Front Mount Intercooler Kit STI Subaru Front Mount Intercooler Kit STI
 Subaru Front Mount Intercooler Kit STI 2008-2014 715500 Subaru Front Mount Intercooler Kit STI 2008-2014 Congratulations on your purchase of the Subaru Front Mount Intercooler Kit STI 2008-2014. The following
L Ford Power Stroke Intercooler Pipe Upgrade
 Rev: 10.30.14 TROUBLESHOOTING: Please read and understand all installation instructions before proceeding with the installation. If you have questions during the installation of this product, please email
Z-Gate Universal Shifter
 Installation Instructions Z-Gate Universal Shifter Fits: GM, Ford, Lincoln and Chrysler Transmissions See Application Guide for Specific Applications Part #80681 Rev 06/01/2018 WORK SAFELY! For maximum
SL63 Weistec M156 Supercharger System Installation Guide Stage 1 / Stage 2
 SL63 Weistec M156 Supercharger System Installation Guide Stage 1 / Stage 2 WARNING! DO NOT HAVE YOUR ECU REPROGRAMMED ANYWHERE BUT AT WEISTEC FOR THIS SUPERCHARGER. THE AMG 63 USES AN ELECTRONIC THROTTLE
Fitting Instructions. Revo MQB Golf/GTi/Octavia/Leon Intercooler. Recommended Tools. Contents RV581M Dealer installation advised.
 RV581M100100 Recommended Tools Contents No. Description Tools Size Intercooler Torx Bit T25, T30 Bracket Kit llen Key 4, 5 mm Silicone Hoses Socket 7, 10, 16, 19 mm Hose Clamps Flat Head Screwdriver Small,
Installation Instructions - ECS Tuning Vent Pod Vacuum/Boost Gauge Kit
 Installation Instructions - ECS Tuning Vent Pod Vacuum/Boost Gauge Kit This tutorial is provided as a courtesy by ECS Tuning. Part Number for Audi B6 A4 (2002-2004) Proper service and repair procedures
2015+ EcoBoost F150 & Raptor Intercooler Install
 2015+ EcoBoost F150 & 2017+ Raptor Intercooler Install Note: This entire job can be performed with the truck on the ground - No need to raise the vehicle. The most difficult part is removing the grille
2016+ NISSAN TITAN XD
 PARTS LIST AND PARTS INCLUDED 1PC MISHIMOTO INTERCOOLER 2PC SILICONE BOOTS WITH DURACORE TECHNOLOGY 4PC CONSTANT-TENSION T-BOLT CLAMPS 2PC ALUMINUM SPACERS MOUNTING HARDWARE CAUTION Never work on the cooling
TURBOCHARGER L INSTALLATION GUIDE
 1 TURBOCHARGER INSTALLATION GUIDE TABLE OF CONTENTS Chapter Page 1 Intake and Cooling System Preparation 04 2 Intake Plenum and Manifold 08 3 Turbocharger Lubrication 11 4 Fuel Injectors 13 5 Re-installing
LML 3 Y-Bridge Kit or High Flow Intake Bundle Package
 2011-2016 LML 3 Y-Bridge Kit or High Flow Intake Bundle Package Covers installation of PN s: WCF100607, WCF100691, WCF100716, & WCF100353 Note: This Kit is for off road competition use only! Overview-
Part Number: SFR-713. Hardware Bag Contents. General Applicability All models. Conflicts - Fog Lights. Date: SCION FRS LED DRL
 Date: 01.30.2014 SCION FRS 2013-2015 LED DRL Part Number: SFR-713 Kit Contents Item # Quantity Reqd. Description 1 2 DRL s bezels w/led DRL 2 1 Driver Box 3 1 Harness bag 4 1 User s card 5 1 Switch Hardware
Chevy Sonic 1.4L Intake Manifold
 Chevy Sonic 1.4L Intake Manifold Install Time: 3 hours In the Box: (1) Racer X Intake manifold (6) M8x1.25 bolts (4) M6x1 bolts (2) 1/8 NPT plugs (1) 3/8 NPT plug (1) 1/4 NPT 90 degree barb (4) Small O-rings
INSTALLATION INSTRUCTIONS
 COLD AIR INTAKE INSTALLATION INSTRUCTIONS PART NUMBER D760-0390C APPLICATION: 1999-2003 E39 M5 PARTS LIST 1 Left Aluminum Intake Tube 1 Air Pump Bracket (A) 1 Right Aluminum Intake Tube 1 Air Pump Bracket
INSTRUCTIONS. INTERCOOLER UPGRADE BMW E82 135i 2008-
 INSTRUCTIONS INTERCOOLER UPGRADE BMW E82 135i 2008- Parts Included: - Intercooler - Left and right side pipes with hoses - 3 Silicone Hoses ( 2.5 x 3 ) - 1 Silicone Hose 90degree 2.5 elbow - 8 Hoseclamps
POLARIS XLT-SPECIAL TRIPLE PIPE SET P.N
 1998-99 POLARIS XLT-SPECIAL TRIPLE PIPE SET P.N. 09-596 Important: Read instructions carefully before installation. 1-Remove stock exhaust, Y-pipe, and rear muffler support. 2-Install three exhaust flanges,
COLD AIR INTAKE INSTALLATION INSTRUCTIONS. # D Fits: i (4.8L)
") COLD AIR INTAKE INSTALLATION INSTRUCTIONS # D760-0012 Fits: 2006-10 550i (4.8L) PARTS LIST Air Box Assembly Left tube Center tube Right tube Outer Tube AFM housing AFM/TB tube Hardware Kit Congratulations
COLD AIR INTAKE INSTALLATION INSTRUCTIONS # D760-0012 Fits: 2006-10 550i (4.8L) PARTS LIST Air Box Assembly Left tube Center tube Right tube Outer Tube AFM housing AFM/TB tube Hardware Kit Congratulations
B5 A4 1.8t Front Mount Intercooler Install Instructions
 B5 A4 1.8t Front Mount Intercooler Install Instructions Only work underneath your vehicle after properly supporting it with adequate jack stands on a flat surface. NEVER work under a vehicle only supported
Performance Inlet Manifold
 Performance Inlet Manifold Tools needed (some tools not required on some models): 13mm Combination Wrench Flat Blade Screwdriver T30 Torx Driver T25 Torx Driver 10mm Combination Wrench and/or Socket with
INSTALL MANUAL D o d g e 1 2 v 6 B T A PLEASE READ ALL INSTRUCTIONS BEFORE INSTALLATION.
 PN#1045310 12V Dodge Twin Turbo Kit (I-00273) 1 INSTALL MANUAL BD Twin Turbo Kit 1994-1 9 9 8 D o d g e 1 2 v 6 B T A Part# 1045310 PLEASE READ ALL INSTRUCTIONS BEFORE INSTALLATION. * Picture as shown
Mercedes E63/CLS AMG Carbon Turbo Intake System Instructions
 Mercedes E63/CLS AMG Carbon Turbo Intake System Instructions The goal of Alpha Performance is to provide the highest quality, best performing products available. By utilizing research and development,
MAZDASPEED3 Intercooler Instructions
 MAZDASPEED3 Intercooler Instructions Congratulations on your purchase of the COBB Tuning Front Mount Intercooler System for your 2007-2009 Mazdaspeed3. The following instructions should assist you through
Installation of Auto Meter Cobalt Boost/Vacuum Gauge:
 Installation of Auto Meter Cobalt Boost/Vacuum Gauge: Fitment: All 79-14 models. This installation was completed on a 2004 Mustang GT, and should be identical for all 1999-2004 model Mustangs. Time needed:
APIKOL AAN INTAKE MANIFOLD INSTALLATION INSTRUCTIONS
 APIKOL AAN INTAKE MANIFOLD INSTALLATION INSTRUCTIONS Estimated Installation Time: Approximately 2 hours Parts that will need to be modified/removed (Details provided later in the instructions): Intercooler
These instructions were written for reference only and the use of a factory service manual is recommended.
 Introducing the CorkSport High Pressure Fuel Line designed for the MZR DISI. This fuel line is designed to replace the OEM fuel line which are prone to failure at the brazed connection at the rail. The
Congratulations on purchasing the Edge Juice/Attitude system for the Dodge Cummins Diesel.
 Getting Started About the Juice Congratulations on purchasing the Edge Juice/Attitude system for the Dodge Cummins Diesel. The Juice/Attitude system features an intelligent module (Juice) that acts as
INSTALLATION INSTRUCTIONS FORD F-150 2WD & 4WD RETAINS FACTORY TOW HOOKS PART #P3063
 INSTALLATION INSTRUCTIONS FORD F-150 2WD & 4WD RETAINS FACTORY TOW HOOKS PART #P3063 PARTS LIST: 1 Grille Guard 2 10-1.5mm Nylon Lock Nuts 1 Driver/Left Frame Mounting Bracket 4 12mm Plastic Washers 1
Hayes TrailTrac Kit Installation Guidelines Polaris Rush / Pro-R / Indy
 Models: 2010-2014 Polaris Rush / Pro-R / Indy Packing List 1 Electronic Control Unit (ECU) 1 ECU Velcro, 3 inch 1 Switch face plate 1 Switch face plate adhesive 1 Switch 1 Wiring harness 1 Fully pre-filled
Ford 6.0L. Part #: Part #: BD GASKET PART# will be needed for this installation.
 1 BD EGR COOLER 2003-2007 Ford 6.0L Part #: 1090201 Part #: 1090202 PLEASE READ ALL INSTRUCTIONS BEFORE INSTALLATION BD GASKET PART# 1090002 will be needed for this installation. 2 K I T C O N T E N T
Installation instruction do88 Intercooler for SAAB 9-3SS/SC 4-cyl Turbo
 Installation instruction do88 Intercooler for SAAB 9-3SS/SC 4-cyl Turbo This instruction shows how to replace the OEM intercooler with this performance intercooler. 1. 4. 5. At this type of installation
This harness kit includes: Civic harness (2003 to 2005) Installing the Hybrid ReVolt Universal grid charger in a First Gen Civic ( )
 Installing the Hybrid ReVolt Universal grid charger in a First Gen Civic ( )") Installing the Hybrid ReVolt Universal grid charger in a First Gen Civic (2003-2005) This harness kit includes: Civic harness (2003 to 2005) (a) 1 HV warning label (c) 1 charger connector cover (e) 4 #6
Installing the Hybrid ReVolt Universal grid charger in a First Gen Civic (2003-2005) This harness kit includes: Civic harness (2003 to 2005) (a) 1 HV warning label (c) 1 charger connector cover (e) 4 #6
Owner smanual. Banks Techni-Cooler System Dodge 6.7L Cummins (24-valve) ISB Pickup Trucks (2500/3500) USE WITH SYSTEM P/N 25987
 ISB Pickup Trucks (2500/3500) USE WITH SYSTEM P/N 25987") Owner smanual with Installation Instructions Banks Techni-Cooler System 2013-16 Dodge 6.7L Cummins (24-valve) ISB Pickup Trucks (2500/3500) USE WITH SYSTEM P/N 25987 Gale Banks Engineering 546 Duggan Avenue
Owner smanual with Installation Instructions Banks Techni-Cooler System 2013-16 Dodge 6.7L Cummins (24-valve) ISB Pickup Trucks (2500/3500) USE WITH SYSTEM P/N 25987 Gale Banks Engineering 546 Duggan Avenue
2010+ Camaro Triple-Threat Wet Nitrous System
 2010+ Camaro Triple-Threat Wet Nitrous System This Installation Guide is to be used with the Ny-Trex Owner s Manual. (Refer to the Owner s Manual for installation tips, safety tips, and precautions) 1.
JODALE PERRY. Parts List & Mounting Instructions. Jacobsen HR9016 JDP BUILT FOR LIFE
 JODALE PERRY Parts List & Mounting Instructions Jacobsen HR9016 JDP BUILT FOR LIFE Jacobsen HR9016 Mounting Instructions Standard Parts 1 - LH Rear Mounting Bracket 1 - RH Rear Mounting Bracket 1 - Front
AEROCHARGER TURBO SYSTEM INSTALLATION MANUAL. Can-Am Maverick Version 1.0
 AEROCHARGER TURBO SYSTEM INSTALLATION MANUAL Can-Am Maverick 1000 Version 1.0 R INTRODUCTION Congratulations on your purchase of an Aerocharger Turbo system for the Can-Am Maverick 1000! You now own the
Instant Chat off the main page of Or simply call our tech team at
 FRONT MOUNT INTERCOOLER 2008-13 STI 2014-04- 08 Thank you for purchasing this PERRIN product for your car! Installation of this product should only be performed by persons experienced with installation
IAG Street Series Air / Oil Separator (AOS) For WRX
 For WRX") IAG Street Series Air / Oil Separator (AOS) For 2008-14 WRX Part# IAG-ENG-7100 Tools Required: Ratchet, extensions, needle nose pliers, hose cutter, snips/scissors, flat head screw driver, hose clamping
IAG Street Series Air / Oil Separator (AOS) For 2008-14 WRX Part# IAG-ENG-7100 Tools Required: Ratchet, extensions, needle nose pliers, hose cutter, snips/scissors, flat head screw driver, hose clamping
This information covers the proper procedure for replacing the Volvo D16F engine in a VT or VNL chassis.
 Volvo Trucks North America Greensboro, NC USA Engine, Replacement DService Bulletin Trucks Date Group No. Page 10.2007 210 139 1(47) Engine, Replacement Volvo D16F VNL, VT W2005773 This information covers
Installation instruction do88 Intercooler for SAAB 9-3SS/SC 2,8 V6 Turbo
 Installation instruction do88 Intercooler for SAAB 9-3SS/SC 2,8 V6 Turbo This instruction shows how to replace the OEM intercooler with this performance intercooler. At this type of installation we always
OEM Cruise Control Installation in GMC/Chevy NBS trucks
 OEM Cruise Control Installation in 99-02 GMC/Chevy NBS trucks May 2008 ~ Rampage_Rick Having just installed factory cruise control in my 00 Sierra, I thought I d share the fun. I followed the steps outlined
Installation Instruction for '84-'89 Nissan 300ZX High Performance Intercooler System (Part No )
") Installation Instruction for '84-'89 Nissan 300ZX High Performance Intercooler System (Part No. 2-124) Page ii DCB (06/14/02 12:19 AM) Version 1.0 Page iii Table of Contents 1. TOOLS REQUIRED...1 2. INSTALLATION
Installation Instruction for '84-'89 Nissan 300ZX High Performance Intercooler System (Part No. 2-124) Page ii DCB (06/14/02 12:19 AM) Version 1.0 Page iii Table of Contents 1. TOOLS REQUIRED...1 2. INSTALLATION
Installation instruction do88 performance Turbo intake hoses Porsche 911 TT (997.2)
") Installation instruction do88 performance Turbo intake hoses Porsche 911 TT (997.2) 2010-2012 3. 2. 4. 6. 7. 5. 1. This instruction shows how to replace the OEM turbo intake pipes for do88 performance
Installation instruction do88 performance Turbo intake hoses Porsche 911 TT (997.2) 2010-2012 3. 2. 4. 6. 7. 5. 1. This instruction shows how to replace the OEM turbo intake pipes for do88 performance
Crawford Performance Top Mount Air/Oil Separator Install Instructions Version 1.12
 Crawford Performance Top Mount Air/Oil Separator Install Instructions Version 1.12 Parts List Part Number Quantity Description Sent Received S0774 1 TMIC Air/Oil Separator F0365 1 Crank Case Breather Connector
PERFORMANCE INNOVATORS NOT IMITATORS! CPC TURBO M8 HANDBOOK USING GARRET TURBO FOR PROCLIMB / PROCROSS 800 Stage 1
 F PERFORMANCE INNOVATORS NOT IMITATORS! CPC TURBO M8 HANDBOOK USING GARRET TURBO FOR PROCLIMB / PROCROSS 800 Stage 1 CPC Turbo M8 Handbook Using Garrett Turbo For Pro Climb and Pro Cross 800 s Thank you
Installation Instruction for '84-'89 Nissan 300ZX High Performance Intercooler System (Part No )
") Installation Instruction for '84-'89 Nissan 300ZX High Performance Intercooler System (Part No. 2-124) Routing of the Intercooler Pipe It is necessary to follow the exact sequence of the installation
Installation Instruction for '84-'89 Nissan 300ZX High Performance Intercooler System (Part No. 2-124) Routing of the Intercooler Pipe It is necessary to follow the exact sequence of the installation
SCION FRS FOG LIGHTS. Part Number: SFR-313
 Part Number: SFR-313 Kit Contents Item # Quantity Reqd. Description 1 2 Light Housings 2 2 Fog Light bezels 3 1 Harness bag 4 1 User s card 5 1 Switch 6 1 Fuse jumper Hardware Bag Contents Item # Quantity
2015+ SUBARU STI FRONT-MOUNT INTERCOOLER PARTS LIST AND INSTALLATION GUIDE INSTALL DIFFICULTY DISCLAIMER CAUTION INSTALL PROCEDURE TOOLS NEEDED
 PARTS LIST AND PARTS INCLUDED 1PC ALUMINUM INTAKE PIPE 1PC BAR-AND-PLATE INTERCOOLER 1PC STEEL CRASH BAR W/ MOUNTING HARDWARE 2PC HOT-SIDE INTERCOOLER PIPES 2PC COLD-SIDE INTERCOOLER PIPES 1PC BPV FLANGE
Part Name/Description Part Number Quantity Instruction Kit Metalfor Flow Sensor
 NOTE: Indented items indicate parts included in an assembly listed above Part Name/Description Part Number Quantity Instruction Kit Metalfor 4101091 1 Flow Sensor 4001356 1 Deflector plate 2000612-1 1
Crawford Performance Top Mount Air/Oil Separator Version 2 (S0714-1)
") Crawford Performance Top Mount Air/Oil Separator 02-07 Version 2 (S0714-1) Parts List Part Number Quantity Description Sent Received S0707-1 1 TMIC Air/Oil Separator V2 F0365 1 Crank Case Breather Connector
Crawford Performance Top Mount Air/Oil Separator 02-07 Version 2 (S0714-1) Parts List Part Number Quantity Description Sent Received S0707-1 1 TMIC Air/Oil Separator V2 F0365 1 Crank Case Breather Connector