Subaru Front Mount Intercooler Kit STI Subaru Front Mount Intercooler Kit STI
|
|
|
- Alberta Hawkins
- 5 years ago
- Views:
Transcription

1 Subaru Front Mount Intercooler Kit STI Subaru Front Mount Intercooler Kit STI

2 Congratulations on your purchase of the Subaru Front Mount Intercooler Kit STI The following instructions will assist you through your installation process. Please read them first entirely BEFORE beginning the install and familiarize yourself with the steps and tools needed. If you feel that you cannot properly perform this installation, we HIGHLY recommend you take the vehicle to a qualified and experienced automotive technician. Part List Intercooler Core
3 Bumper Beam Cobb Subaru Universal XLE BPV Long Silicone Elbow 2.5" (Qty-2) Silicone Elbow 2.5" (Qty-2) 2.5" - 2" Silicone Reducer 2.75" - 2.5" Silicone Reducer 2.5" Straight Silicone Coupler (Qty-2) BPV Silicone Coupler Upper Hot Pipe Mid Hot Pipe Lower Hot Pipe Upper Cold Pipe Mid Cold Pipe Lower Cold Pipe Coolant Overflow Tank Coolant Overflow Tank Bracket Coolant Overflow Bracket Bottom Bung M6x25 Flange Head Bolt (Qty-3) M6x16 Flange Head Bolt Lower Pipe Mounting Spacer (Qty-2) 1/2"x1/2"x1/2" HDPE Black Tee 1/2"x1/2" HDPE Black Elbow GR Front Bumber Brace (Qty-2) 5/8" Rubber Grommet (Qty-2) 3/8" NPT Plug 2.75" Clamp 2.5" Clamp (Qty-14) 2" Clamp BPV Clamp (Qty-2) M6 x 18 Flat Washer (Qty-2) M6 Serrated Flange Nut (Qty-2) Tools Needed 7mm Socket 8mm Socket 10mm Socket 12mm Socket 3/8" Drive Ratchet Various length 3/8" Extensions Pliers Flat Blade Screwdriver Phillips Screwdriver Plastic Clip removal Tool Air Saw, rotary cutting tool, or utility knife Parts required for Install Cobb SF Intake Removal of Top Mount Intercooler 1. Locate your stock bypass valve.

4 2. Using a pair of pliers, remove the return line from the bypass valve.


5 3. Remove the vacuum line from the factory bypass valve. 4. Using a 12mm socket with ratchet, remove the 2 bolts that hold the bypass valve in place. TIP: Make sure to keep an eye on the factory gasket behind the BPV. It can fall when you remove the valve and end up in difficult to reach locations! 5. Remove the bypass valve.
.")
 and remove the intercooler.")
6 6. Use a 7mm socket or flat blade screwdriver, loosen the clamps at the throttle body and turbo outlet (yellow arrows). Then with a 12mm socket and ratchet remove the bolts holding the stock intercooler (blue arrows) and remove the intercooler. Removal of the Under Tray

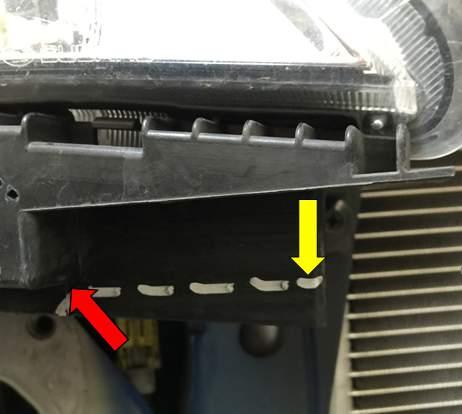
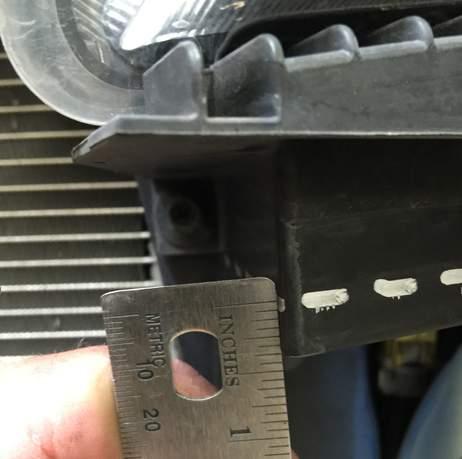
7 1. Raise the car up using on a lift or floor jack and jack stands to gain access to the underside of the car. 2. Inside the drivers side wheel well there will be a clip holding the top of the plastic under-tray. Use a plastic clip removal tool or flat blade screwdriver to remove them. Repeat this procedure on the passenger side. 3. From the bottom of the car, There will be 6 more clips to remove (two in the front and two on each side). Use a plastic clip removal tool or flat blade screwdriver to remove them. These are designated by the yellow arrows. Using a 12mm socket, remove the three bolts holding the bottom of the tray. These are designated by the blue arrows. Remove the final two clips by spreading and pulling them from the under-tray. These are designated by the red arrows. The under-tray can now be removed from the car.


8 Removal of Front Bumper 1. Using a plastic clip removal tool or small flat blade screw driver, remove the 4 clips above the grill opening of the bumper.

9 2. On the front of the drivers side wheel well, there will be 4 screw clips. Using a Phillips screwdriver, remove all 4 clips. It may be easier to access these with the wheel turned slightly. Repeat this procedure on the passenger side. 3. With all the clips removed, gently pull on the top of both sides of the bumper cover where it meets the front fender. The bumper cover will detach from the car and can be removed by pulling it forward and away. If equipped, you will need to disconnect the fog lights via the connector plugs before fully removing the bumper cover. TIP: It may be helpful to have an extra set of hands at this point to reduce the risk of scratching the bumper cover and/or bending the mounting clips.


10 4. In order to remove the bumper beam, loosen the eight mounting bolts with a 12mm socket and ratchet/impact. There will be 4 bolts on each side.


11 5. Now remove the two lower bumper cover braces from the bottom of the core support with a 12mm socket and ratchet.

 to release the reservoir from the shroud.")
12 Removal/ Installation of Coolant Overflow Reservoir The factory overflow tank will need to be removed and replaced with the Cobb Tuning low profile coolant overflow tank. This will provide adequate clearance for the cold side piping Remove the coolant overflow line from the top of the tank. Now press on the black tab on the right side of the radiator shroud (yellow arrow) to release the reservoir from the shroud. Push the reservoir towards the engine (red arrow.) Now lift upward to remove it from the car.
 Bolt the coolant overflow bracket bottom bung to the bracket using an M6x12 flange head bolt (red arrow.) Tighten all the bolts with a 10mm socket or wrench.")
13 3. It's now time to assemble the new coolant reservoir. Bolt the reservoir to the bracket with the M6x12 flange heads bolts provided (yellow arrows.) Bolt the coolant overflow bracket bottom bung to the bracket using an M6x12 flange head bolt (red arrow.) Tighten all the bolts with a 10mm socket or wrench. Make sure that the reservoir is bolted to the correct side of the bracket.

14 4. Remove the reservoir cap from the factory overflow tank and install it on the new tank.


15 5. To install the tank in the car, place the bottom bung of the bracket into the mounting hole on the radiator shroud. Bolt the top of the bracket to the radiator using the provided M6x25 flange head bolt. Make sure to install the 1/4"x3/4" spacer between the bracket and radiator. Tighten the bolt with a 10mm socket or wrench.


16 6. Now slide the tube back into the top of the overflow tank. The end of the tube should be about 1/4" away from the bottom of the tank. Fill the reservoir approximately half full with coolant. Trimming For the Front Mount Core - Core Support 1. With the removal of all factory components complete, it is now time to carefully trim some components to provide clearance for the intercooler core and piping. When looking down at the core support from the front of the car there are two tabs that stick out further than the rest. These will either need to be bent up or cut off to provide clearance for the core. Either method is acceptable. Check for clearance by holding up a straight edge along with bottom of the core support to ensure that these two tabs do not stick out further than the rest of the ridges.


17 2. Next, locate the ambient temp sensor on the drivers side of the bottom of the core support. Using a pair of pliers, gently remove the sensor and re-install it on the back side of the bracket.


18 3. Remove the two foam pads from the sides of the core support with a plastic clip removal tool. Trimming For the Front Mount Core - Headlights 1. The bottom of the headlight assemblies will also need to be trimmed to make room for the front mount core. Looking at the lower inner corner of the headlight from the front of the car, mark 1/2" up from the bottom corner (yellow arrow) and draw a straight line over 2.5" to the next corner (yellow line.)
19
. 3. Using an air saw, die grinder, utility knife, etc cut off the marked area.")


20 2. From the side, continue the line from the to the rear corner of the light (red arrows). 3. Using an air saw, die grinder, utility knife, etc cut off the marked area. After installing the core in the next step, double check for clearance to make sure the lights don't interfere with the intercooler core. Installation of Intercooler Core 1. If desired, use the provided template to paint "COBB" onto the front of your core as seen below. Make sure to mask off the surrounding areas around the template to prevent any over-spray.


21 2. Remove the bolt holding the hood latch to the center core support using a 12mm socket and ratchet. Install the intercooler and hand tighten the bolt. 3. Install the front bumper braces on the bottom of the intercooler. Do this by holding the front bumper braces in position and hand tightening the supplied M6x25mm flange bolts to capture both the bottom intercooler bracket as well as the front bumper brace. Leave the bolts a little loose to tighten later. 4. Install the replacement bumper beam by holding the beam in position and fastening it with the factory bolts.
 in both the lower hot and cold pipe.")

22 Modifying Inner Fender Liners and Under Tray With the intercooler now in place, it's time to mock up the lower hot and cold pipes and carefully trim the under tray and inner fender liners to provide clearance for the intercooler pipes. 1. Install the rubber grommets (yellow arrow) in both the lower hot and cold pipe. Then install the lower pipe mounting spacers (blue arrow) into the grommets so that the flange end of the spacer faces upward. Follow the same procedure for both pipes. Place the end without the logo of the 2.5" silicone 90 on the straight end of the pipe. The longer end (with the logo) should be facing forward as shown in the pictures.


23 2. Using a 10mm socket and ratchet, remove the two screws holding the inner fenders to the core support. This will allow the front of the inner fender that extends up to the front bumper cover to hang down. Then gently press the plastic screw insert out of the core support. You should be left with a small square hole.


24 3. Now install the pipe on the car by sliding the silicone 90 coupler over the passenger side outlet on the intercooler. The bracket with the bushing and grommet should sit on top of the core support bracket. 4. It's now time to trim the inner fender liner. With the pipe in place, hold the fender liner into position to see where it needs to be trimmed. This can be done with a variety of tools. We had best luck with an air saw, but a rotary tool, sheet metal snips or side cutting pliers can be used. Be sure to wear appropriate eye protection. Here is an example of the passenger side of our car once completed. TIP: Its much easier to cut less than the desired amount and work your way out than cutting too much the first time.


25 5. After the inner fender liner it trimmed, install the plastic under tray. With the fender liner re-attached to the core support., mark the under tray for trimming. Then cut the under tray in a similar fashion as the fender liner. Again, slowly work out toward the desired amount to be cut to prevent over trimming.

26 6. Repeat the last 3 steps with the drivers side. Installing Hot Side Intercooler Piping With the core installed and the necessary trimming to the fender liners and under tray done, it's now time to install the piping. For this step you can remove the under tray again. 1. Starting with the lower hot pipe, now install the Long 90 elbow on the end of the pipe with the bracket and grommet. The longer of the two ends of the coupler with the logo should be facing upward. The pipe with the silicone elbows installed should look like the picture below.


27 2. Slip the 2.5" 90 end of the pipe over the passenger side core outlet. Place the clamps over each end of the silicone before installation. Only loosely tighten as the fitment may need to be adjusted. The bracket with the bushing/grommet assembly should be on top of the square hole core support. Place the bolt through the top of the bushing->fender liner core support washer then tighten with an M6 flange nut with a 10MM socket and ratchet. 3. Next attach the 2.5" - 2.0" silicone reducer to the turbo. Tighten the clamp slightly but leave it loose enough to move the elbow to align the upper hot pipe.


28 4. Now slide a 2.5" coupler over the straight end of the hot pipe. Add a clamp on the 90 end of the hot pipe and install it on the vehicle as shown below. 5. Next, slide clamps over the straight silicone coupler and the long 90 coupler Install the mid hot pipe. The long end of the mid hot pipe will attach to the lower hot pipe; the short end will attach to the upper hot pipe. Check for clearance between the front of the engine, the chassis, and the radiator fan assembly. Tighten all the clamps with an 8mm wrench or socket once you've determined you like how it is fitting.


29 6. Once the hot side is fully installed it should look like this:


30 TIP: Due to limited clearance when tightening the clamp on the lower portion of the mid hot pipe it may be necessary to mark the tube when in place, pull from the vehicle, install the long silicone 90 on the mid hot pipe and reinstall it into the vehicle in that order.

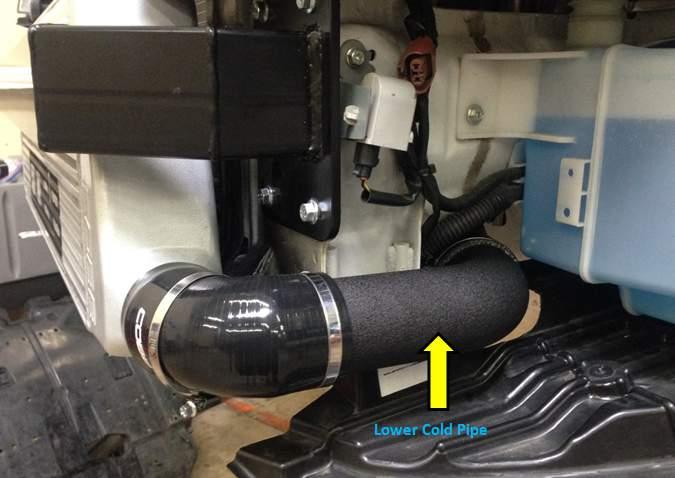
31 Installing Cold Side Intercooler Piping The cold side intercooler piping will install in similar fashion as the hot side. 1. Starting with the lower cold pipe, slip the Long 90 elbow on the end of the pipe with the bracket and grommet. The longer of the two ends of the coupler with the logo should be facing upward. The pipe with the silicone elbows installed should look like the picture below.

32 2. 3. Slip the 2.5" 90 end of the pipe over the drivers side core outlet. Place the clamps over each end of the silicone before installation. Only loosely tighten as the fitment may need to be adjusted. The bracket with the bushing/grommet assembly should be on top of the square hole core support. Place the bolt through the top of the bushing->fender liner core support washer then tighten with an M6 flange nut with a 10MM socket and ratchet. Next, slip the larger end of the 2.75" -2.5" reducer over the throttle body and tighten the clamp. Then slip a 2.5" coupler over the straight end of the upper cold pipe. Now install the upper cold pipe on the car.


33 4. Next, slide clamps over the straight silicone coupler and the long 90 coupler. Install the mid cold pipe. Check for clearance between the front of the engine, the chassis, and the radiator fan assembly. Tighten all the clamps with an 8mm wrench or socket when you like how it is fitting. 5. Once the hot side is fully installed it should look like this:
34

35 Installing Bypass Valve 1. Slip one end of the BPV silicone coupler over the inlet of the bypass valve. Slip a hose clamp clamp over the coupler and tighten using an 8MM socket or nut driver.

36 2. Next, Slip the BPV nose into the BPV return hose. Tighten the hose clamp using an 8MM socket or nut driver.


37 3. Now slip the silicone BPV coupler onto the BPV outlet on the upper cold pipe. 4. Reattach the vacuum line to the barbed fitting on the BPV body.

38 Trimming For Front Mount Core - Bumper Cover With all the new intercooler components in place, it's time to clearance the bumper cover to fit over the new front mounted core. These instructions are a general guideline as every install will be slightly different. There are a variety of tools one can use to accomplish this task, choose the one that you feel most comfortable with. The following steps are a quick overview of what trimming needs to take place. Go slowly. Be conservative. It's a lot easier to remove a little more than add material back in. 1. Start by marking the bumper in the 4 corners of the existing bumper opening. From the edge shown by the yellow arrows, measure inward 1.5" from each corner.
 to the points marked in step")

39 2. Looking downward at the bumper from the top side, draw/mark/tape a straight line from the edge of where the painted portion of the bumper meets the black plastic area(yellow arrow) to the points marked in step one (red arrows). 3. Now from the bottom of the bumper looking up, draw/mark/tape a straight line from where the center brace in the bumper opening meets the bumper to the points marked in step one as well (red arrows.)


40 4. Now place the supplied template in the opening and align the edges with the line drawn in step 3. Tape in place and trace the ends of the cutout to complete the cut line. (Make sure to transfer the template to something sturdy for us in this step.) 5. After double checking all measurements, use the method most comfortable (air saw, utility knife, cutoff wheel, etc.) to you to cut the bumper along the cut line.
41 TIP: Its much easier to cut less than the desired amount and work your way out than cutting too much the first time. Once the bumper is cut, loosely install it into place, making sure that you've removed enough material for everything to fit nicely. You may need to remove a small amount more in a few places to get that perfect fit. Once you're happy with the bumper clearance, it's time to reinstall everything in the order it was removed. Make sure to go back and tighten the lower bumper supports where the lower intercooler brackets are. Also, double check that all hose clamps are tight and secure. Once everything is back installed, make sure you're running a proper ECU calibration for your new piece of hardware and get out there and enjoy the fresh, cooler intake temps provided by your COBB FMIC!
MAZDASPEED3 Intercooler Instructions
 MAZDASPEED3 Intercooler Instructions Congratulations on your purchase of the COBB Tuning Front Mount Intercooler System for your 2007-2009 Mazdaspeed3. The following instructions should assist you through
7C1550 COBB Tuning R35 GT-R Silicone Hose Kit Install Instructions
 7C1550 COBB Tuning R35 GT-R Silicone Hose Kit Install Instructions Nissan GT-R (R35) Silicone Hose Kit Congratulations on your purchase of the COBB GT-R Silicone Hose Kit for your Nissan GT-R. The following
Parts List See cover Page
 Thank you for purchasing the CorkSport Front Mount Intercooler Kit for the 2010-2013 Mazdaspeed 3. Keep your BAT s under check with the CorkSport FMIC Kit with the small or large intercooler. Please let
Instant Chat off the main page of Or simply call our tech team at
 FRONT MOUNT INTERCOOLER 2008-13 STI 2014-04- 08 Thank you for purchasing this PERRIN product for your car! Installation of this product should only be performed by persons experienced with installation
Instant Chat off the main page of Or simply call our tech team at
 FRONT MOUNT INTERCOOLER 2015+ WRX 2017-07-07 Thank you for purchasing this PERRIN product for your car! Installation of this product should only be performed by persons experienced with installation of
2015+ SUBARU STI FRONT-MOUNT INTERCOOLER PARTS LIST AND INSTALLATION GUIDE INSTALL DIFFICULTY DISCLAIMER CAUTION INSTALL PROCEDURE TOOLS NEEDED
 PARTS LIST AND PARTS INCLUDED 1PC ALUMINUM INTAKE PIPE 1PC BAR-AND-PLATE INTERCOOLER 1PC STEEL CRASH BAR W/ MOUNTING HARDWARE 2PC HOT-SIDE INTERCOOLER PIPES 2PC COLD-SIDE INTERCOOLER PIPES 1PC BPV FLANGE
COBB Tuning MAZDASPEED6 SF Intake System. Install Instructions
 781500 COBB Tuning MAZDASPEED6 SF Intake System Install Instructions Congratulations on your purchase of the COBB Tuning SF Intake System. The following instructions will assist you through your installation
HARD PIPE KIT
 701550 HARD PIPE KIT 2014 Ford Fiesta ST Congratulations on your purchase of the COBB Hard Pipe Kit for your 2014+ Ford Fiesta ST. The following instructions will assist you through your installation process.
COBB 3 SF INTAKE SYSTEM
 COBB 3 SF INTAKE SYSTEM 2015 Mustang Ecoboost Congratulations on your purchase of the COBB 3 SF Intake System for your 2015 Mustang Ecoboost. The following instructions will assist you through your installation
Subaru WRX Performance Charge-Pipe System, 2015+
 PARTS LIST AND PARTS LIST 1PC BAR-AND-PLATE INTERCOOLER 1PC INTERCOOLER MOUNTING BRACKET 1PC CHARGE-PIPE ASSEMBLY 1PC AIR DIVERTER WITH ATTACHED RUBBER GASKETS 1PC CHARGE-PIPE-TO-INTERCOOLER HOSE INSTALLATION
Procharger Stage II Intercooled Supercharger System (11-14 GT)
") Procharger Stage II Intercooled Supercharger System (11-14 GT) Installation Time: Approximately one day. Installed on 2012 Mustang GT 5.0/Manual Required Tools 3/8 Socket Set (Standard and Metric) 1/2
Procharger Stage II Intercooled Supercharger System (11-14 GT) Installation Time: Approximately one day. Installed on 2012 Mustang GT 5.0/Manual Required Tools 3/8 Socket Set (Standard and Metric) 1/2
Tools Required. Metric Wrench Set Screwdriver Set Metric Socket Set Pliers Heavy duty hydraulic Jack and Car Stands Box knife or similar Hacksaw WD40
 Subaru 2004+ Legacy GT & Outback XT For JDM 2.0 twinscroll turbo and USDM 2.5 turbo models Front Mount Intercooler Fitting Instructions PN# LEG-1348-000 You are now the proud owner of a highly tested and
COBB Catback Exhaust
 591100 COBB Catback Exhaust 2013 Ford Focus ST Congratulations on your purchase of the COBB Catback Exhaust for your 2013 Ford Focus ST. The following instructions will assist you through your installation
B5 A4 1.8t Front Mount Intercooler Install Instructions
 B5 A4 1.8t Front Mount Intercooler Install Instructions Only work underneath your vehicle after properly supporting it with adequate jack stands on a flat surface. NEVER work under a vehicle only supported
7B1210 COBB BMW N54 Charge Pipe
 7B1210 COBB BMW N54 Charge Pipe Installation Instructions Congratulations on your purchase of the COBB BMW N54 Charge Pipe for your BMW. The following instructions will assist you through your installation
Turboback Exhaust
 501301 Turboback Exhaust 2014+ Ford Fiesta ST 501200 High Flow Catted Downpipe Page 2 501100 Catback Exhaust System Page 10 501200 High Flow Catted Downpipe 2014+ Ford Fiesta ST Congratulations on your
2015+ EcoBoost F150 & Raptor Intercooler Install
 2015+ EcoBoost F150 & 2017+ Raptor Intercooler Install Note: This entire job can be performed with the truck on the ground - No need to raise the vehicle. The most difficult part is removing the grille
FRONT MOUNT INTERCOOLER GOLF / JETTA IV 1.8T PART # & P INSTALATION INSTRUCTIONS
 FRONT MOUNT INTERCOOLER GOLF / JETTA IV 1.8T PART # 48.10.90 & 48.10.90P INSTALATION INSTRUCTIONS PART LIST: 1 INTERCOOLER CORE 1 U-BENT TUBE 1 L-SHAPED TUBE 1 INTERCOOLER INLET TUBE 4 M6 NYLOC NUT 3 M6
COBB Tuning Catback Exhaust System MAZDASPEED3
 572101 COBB Tuning Catback Exhaust System 2010+ MAZDASPEED3 Congratulations on your purchase of the COBB Tuning SS Catback Exhaust System for your 2010+ MAZDASPEED3. The following instructions will assist
Z1 Motorsports 300zx 2.5 Upgraded piping & BA SMIC Install Guide
 Z1 Motorsports 300zx 2.5 Upgraded piping & BA SMIC Install Guide Congratulations on your new upgraded piping and intercooler kit, this kit has proven to provide the lowest intake air temps to date on our
IE Audi B9 S4, S5, A4, A5, Allroad FDS Intercooler Install Guide IETPCK1
 IE Audi B9 S4, S5, A4, A5, Allroad FDS Intercooler Install Guide IETPCK1 Thank you for purchasing the best performing intercooler on the market! This instruction guide is used for installation of IE s
INSTALLATION INSTRUCTIONS Unitronic Intercooler Upgrade Kit for 2.0 TFSI (EA113) UH007-ICA
 UH007-ICA") Unitronic recommends that you read through the entire installation instructions prior to beginning the installation to familiarize yourself with the included components, tools required, and procedures
Unitronic recommends that you read through the entire installation instructions prior to beginning the installation to familiarize yourself with the included components, tools required, and procedures
INSTRUCTIONS. INTERCOOLER UPGRADE BMW E82 135i 2008-
 INSTRUCTIONS INTERCOOLER UPGRADE BMW E82 135i 2008- Parts Included: - Intercooler - Left and right side pipes with hoses - 3 Silicone Hoses ( 2.5 x 3 ) - 1 Silicone Hose 90degree 2.5 elbow - 8 Hoseclamps
Mercedes E63/CLS AMG Carbon Turbo Intake System Instructions
 Mercedes E63/CLS AMG Carbon Turbo Intake System Instructions The goal of Alpha Performance is to provide the highest quality, best performing products available. By utilizing research and development,
---Optional Items---
 1 2 3 4 5 6 ---Optional Items--- 10 9 11 7 8 12 This package should contain: 1. One (1) CorkSport Crashbar Weldment 2. Eight (8) M8x1.25x20 mm Bolts 3. Eight (8) M8x1.25mm Nyloc Nuts 4. Sixteen (16) M8
PARTS LIST INSTALLATION INSTRUCTIONS PARTS LIST AND INSTALLATION GUIDE INSTALL TIME: 2 HOURS INSTALL DIFFICULTY: 3/5
 PARTS LIST AND PARTS LIST 1PC MISHIMOTO INTERCOOLER 1PC M6 X 1.0 X 20MM FLANGE BOLT 1PC M4 X 0.7 X 12MM BUTTON-HEAD BOLT 1PC M4 LOCK WASHER 1PC MAP SENSOR O-RING 2. Remove the eight pop clips that hold
Integrated Engineering MK7/MQB Cold Air Intake Install Guide IEINCI2 & IEINCI8
 Integrated Engineering MK7/MQB Cold Air Intake Install Guide IEINCI2 & IEINCI8 Thank you for purchasing another high quality Integrated Engineering product! This instruction guide is used for installation
Nissan R35 GTR Intercooler Pipe Kit w/ Cold Air Intake Installation Instructions
 Nissan R35 GTR Intercooler Pipe Kit w/ Cold Air Intake Installation Instructions 1. Disconnect the negative terminal on the battery that is located at the passenger firewall side. 2. Remove both front
MAZDA 3 MPS FRONT MOUNTING INTERCOOLER INSTALLATION
 MAZDA 3 MPS FRONT MOUNTING INTERCOOLER INSTALLATION Tools needed: 7mm Hose clamp driver 10mm,12mm sockets and suitable ratchet with extensions Flat bladed screwdriver Pliers Phillips screwdriver KIT CONTENTS
2015+ WRX/STI RADIATOR SHROUD
 2015+ WRX/STI RADIATOR SHROUD Thank you for purchasing this PERRIN product for your car! Installation of this product should only be performed by persons experienced with installation of aftermarket performance
COBB Fuel Pressure Regulator Kit
 315100 COBB Fuel Pressure Regulator Kit 2008+ Subaru STI Congratulations on your purchase of the COBB Tuning Fuel Pressure Regulator Kit for your 2008+ Subaru STI. The following instructions will assist
SAFETY SENSORS FIELD OF VIEW WILL BE ALTERED WITH USE OF THE REPLACEMENT BUMPER. Injury hazard
 SAFETY Your safety and the safety of others is very important. In order to help you make informed decisions about safety, we have provided installation instructions and other information. These instructions
Owner smanual. Banks Techni-Cooler System Dodge 6.7L Cummins (24-valve) ISB Pickup Trucks (2500/3500) USE WITH SYSTEM P/N 25987
 ISB Pickup Trucks (2500/3500) USE WITH SYSTEM P/N 25987") Owner smanual with Installation Instructions Banks Techni-Cooler System 2013-16 Dodge 6.7L Cummins (24-valve) ISB Pickup Trucks (2500/3500) USE WITH SYSTEM P/N 25987 Gale Banks Engineering 546 Duggan Avenue
Owner smanual with Installation Instructions Banks Techni-Cooler System 2013-16 Dodge 6.7L Cummins (24-valve) ISB Pickup Trucks (2500/3500) USE WITH SYSTEM P/N 25987 Gale Banks Engineering 546 Duggan Avenue
FIAT 500 ABARTH FRONT MOUNTED INTERCOOLER INSTALLATION
 FIAT 500 ABARTH FRONT MOUNTED INTERCOOLER INSTALLATION Tools needed: T30 screwdriver/bit 10mm socket, suitable extension and ratchet 17mm socket, suitable extension and ratchet 10mm ratchet spanner Pozidriv/Phillips
APIKOL Ur-S4/S6 Gen. II Front Mount Intercooler INSTALLATION INSTRUCTIONS
 APIKOL Ur-S4/S6 Gen. II Front Mount Intercooler INSTALLATION INSTRUCTIONS Only work underneath your vehicle after properly supporting it with adequate jack stands on a flat surface. NEVER work under a
JBR MAZDASPEED
 Page1 james Barone Racing Aftermarket Parts and Accessories JBR 2007 2009 MAZDASPEED 3 Front Mount Intercooler Piping Kit Installation Instructions for TR8 Intercooler Tooling: o Jack, Jack Stands, Ramps
INSTALLATION INSTRUCTIONS
 COLD AIR INTAKE INSTALLATION INSTRUCTIONS PART NUMBER D760-0390C APPLICATION: 1999-2003 E39 M5 PARTS LIST 1 Left Aluminum Intake Tube 1 Air Pump Bracket (A) 1 Right Aluminum Intake Tube 1 Air Pump Bracket
SAFETY THIS PRODUCT IS FOR OFFROAD USE ONLY. ALL LIABILITY FOR INSTALLATION AND USE RESTS WITH THE OWNER.
 SAFETY Your safety and the safety of others is very important. In order to help you make informed decisions about safety, we have provided installation instructions and other information. These instructions
Banks High-Flow Boost Tubes. Step-by-step installation video: Bankspower.com/v/install-lml-boost-tubes
 with Installation Instructions Owner smanual Banks High-Flow Boost Tubes Stock Fitment 2011-2016 Chevy/GMC Turbo-Diesel Pickup Trucks THIS MANUAL IS FOR USE WITH PART NUMBER 25993 Gale Banks Engineering
COLD AIR INTAKE INSTALLATION INSTRUCTIONS. # D Fits: F10 M5 # D Fits: F06/F12/F13 M6 PARTS LIST
 COLD AIR INTAKE INSTALLATION INSTRUCTIONS # D760-0035 Fits: 2013-15 F10 M5 # D760-0037 Fits: 2012-15 F06/F12/F13 M6 PARTS LIST (1) Left Carbon Airbox Lid (1) Right Carbon Airbox Lid (1) Left Carbon Snorkel
BRZ/FR-S 3.00 Cold Air Intake
 BRZ/FR-S 3.00 Cold Air Intake Thank you for purchasing this PERRIN product for your car! Installation of this product should only be performed by persons experienced with installation of aftermarket performance
EXPANSION TANK PARTS LIST AND INSTALLATION GUIDE
 PARTS LIST AND INSTALLATION GUIDE PARTS LIST 1 PC MISHIMOTO RADIATOR 2 PC CAST THERMOSTAT HOUSINGS 1 PC MAGNETIC DRAIN PLUG W/ DOWTY OIL SEAL 4 PC RUBBER BUSHINGS AND METAL COLLARS 3 PC HARDWARE PACKETS
COBB Tuning Ford Carbon Fiber Air Scoop Focus ST COBB Ford Carbon Fiber Air Scoop Focus ST
 791450 - COBB Tuning Ford Carbon Fiber Air Scoop Focus ST 2013-2017 791450 COBB Ford Carbon Fiber Air Scoop 2013-2017 Focus ST Congratulations on your purchase of the COBB Tuning Carbon Fiber Air Scoop!
COLD AIR INTAKE INSTALLATION INSTRUCTIONS
 COLD AIR INTAKE INSTALLATION INSTRUCTIONS # D760-0030 Fits: 2007-10 135i (E82, E88; with N54 engine) 2007-08 335i/xi (E90) 2007-10 335i (E92, E93; with N54 engine) Congratulations for being selective enough
GMC Yukon
 Torch Series LED Grille TOOLS REQUIRED: Flat Head Screwdriver Long Flat Head Screwdriver Phillips Screwdriver 7mm Socket 10mm Socket Ratchet & Extensions 3/16 Drill Bit Power Drill Cutting Wheel or Saw
05-08 GT. Hellion Power Systems Mustang Kit Instructions
 Hellion Power Systems 05-08 Mustang Kit Instructions 1. Disconnect Battery 2. Drain Radiator, keep fluid for re-installation. 3. Remove air box and inlethoses. 6. Next, underneath, punch oil pan for turbo
IE MK5/MK6 2.0T FSI & TSI FDS INTERCOOLER INSTALL GUIDE PART NUMBER: IETPCB1
 IE MK5/MK6 2.0T FSI & TSI FDS INTERCOOLER INSTALL GUIDE PART NUMBER: IETPCB1 Thank you for purchasing another high quality Integrated Engineering product! This instruction sheet is used for installation
Slingshot Rotrex Supercharger Kit
 Slingshot Rotrex Supercharger Kit This supercharger kit improves on the Slingshot by forcing more dense air into the engine and creating more power. Installation time of the supercharger depends on you
INSTALLATION INSTRUCTIONS
 N-MT13-1 & N-MT13-2 COLD AIR INTAKE KIT INSTALLATION INSTRUCTIONS MUSTANG GT 2015-up PARTS INCLUDED Part Number Descrip on Qty 9-SA-INTAKE-100 Intake Assembly 1 9-SA-HEATSHIELD-100 Heatshield Assembly
Always wear safety glasses when working on your vehicle.
 90-93 MAZDA MIATA SUPERCHARGER KIT The KraftWerks 90-93 Mazda Miata Supercharger Kit was designed for easy installation. Competent mechanics with the appropriate tools will find the process to be relatively
IAG Competition Series Air / Oil Separator (AOS) For 2017 STI
 For 2017 STI") P IAG Competition Series Air / Oil Separator (AOS) For 2017 STI Part# IAG-ENG-7251 Tools Required: Ratchet, torque wrench, extensions, needle nose pliers, hose cutter, snips/scissors, flat head screw driver,
P IAG Competition Series Air / Oil Separator (AOS) For 2017 STI Part# IAG-ENG-7251 Tools Required: Ratchet, torque wrench, extensions, needle nose pliers, hose cutter, snips/scissors, flat head screw driver,
Focus ST Carbon Fiber Intake
 791400 - Focus ST Carbon Fiber Intake 791400 COBB Focus ST Carbon Fiber Intake Congratulations on your purchase of the COBB Tuning Carbon Fiber Intake System! The following instructions will assist you
INFINITI Q50/Q60 Red Alpha Heat Exchanger
 INFINITI Q50/Q60 Red Alpha Heat Exchanger Whether you live in a hot climate region, enjoy racing, or long high speed pulls the INFINITI Q60/Q50 Red Alpha Heat Exchanger will help keep your intake temps
IE B9 A4/A5 Cold Air Intake Install Guide
 IE B9 A4/A5 Cold Air Intake Install Guide Thank you for purchasing another high quality Integrated Engineering product! This instruction guide is used for installation of IE s Cold Air Intake Kit for Audi
07-11 GM 4WD 1500 P/U 1 1/4 Body Lift
 92RC70100 07-11 GM 4WD 1500 P/U 1 1/4 Body Lift Thank you for choosing Rough Country for all your suspension needs. Rough Country recommends a certified technician install this kit. Attempts to install
BLACKBIRD INSTALLATION SUPPLEMENT
 BLACKBIRD INSTALLATION SUPPLEMENT FOR 2003-7 FORD 6.0 LITER DIESEL SINGLE ALTERNATOR F-350, F-450, F-550, EXCURSION VERSION 7-07 Parts Description Blackbird Wiring Manual Installation Supplement 6.0 Liter
HYUNDAI VELOSTER SHORT RAM 1.6T INTAKE INSTALLATION INSTRUCTIONS
 Installation: HYUNDAI VELOSTER SHORT RAM 1.6T INTAKE INSTALLATION INSTRUCTIONS Tools needed: 1/4 or 3/8 drive ratchet 12 extension (shorter ones work, but will be difficult to reach some bolts) 10mm socket
Fitting Instructions. Revo MQB Golf/GTi/Octavia/Leon Intercooler. Recommended Tools. Contents RV581M Dealer installation advised.
 RV581M100100 Recommended Tools Contents No. Description Tools Size Intercooler Torx Bit T25, T30 Bracket Kit llen Key 4, 5 mm Silicone Hoses Socket 7, 10, 16, 19 mm Hose Clamps Flat Head Screwdriver Small,
Z06 Corvette Lingenfelter High Flow Air Intake
 2006-2007 Z06 Corvette Lingenfelter High Flow Air Intake LN4233 1557 Winchester Road Decatur, Indiana 46733 260 724 2552 phone 260 724 8761 fax www.lingenfelter.com Parts List # Part number Description
TyrolSport UGSMIC Install Instructions for Audi A4.
 TyrolSport UGSMIC Install Instructions for Audi A4. Tools Necessary: Torx T25, T45. 10mm socket and ratchet. 6mm hex wrench. Flat blade screwdriver. Hacksaw blade or die grinder or dremel tool. Drill (not
PRODUCT USE INFORMATION
 9RC61000 Jeep YJ Body Lift Thank you for choosing Rough Country for all your suspension needs. This body lift fits both manual and Automatic equipped vehicles!!! Refer to last page of this Instruction
COBB SF SHORT RAM INTAKE SYSTEM MazdaSpeed3
 COBB SF SHORT RAM INTAKE SYSTEM MazdaSpeed3 Congratulations on your purchase of the COBB Tuning SF Intake System. The following instructions should assist you through your installation process. Please
Deuce/Ace Installation Instructions
 HARDWARE KIT: Upper Mounting Plate: 2-7/16" (11mm) X 3.5" bolts 2-7/16" flange nuts 2-2" spacers 2-7/16" trim cap mounting washers 2 - plastic trim caps TOOLS NEEDED: safety glasses wrenches 16mm or 5/8"
INTERCOOLER PIPE KIT CHEVY CAMARO 2.0T PARTS LIST AND INSTALLATION GUIDE PARTS INCLUDED CAUTION INSTALL PROCEDURE TOOLS NEEDED
 PARTS LIST AND PARTS INCLUDED 2PC ALUMINUM PIPES W/ CNC-MACHINED QUICK-DISCONNECTS 1PC ALUMINUM PIPE W/ CNC-MACHINED 2-BOLT FLANGE 2PC QUICK-DISCONNECT SPRING CLIPS 1PC 2.75" 90 SILICONE COUPLER 1PC 2.25"
8 Zip Tie Zip Tie 1 Union Fitting 1 ½ ½ Union Reducer Fitting Union 1 5/8 ½ (For Plastic Intake Manifold Vehicles)
") P IAG Street Series Air / Oil Separator (AOS) For 2017 STI Part# IAG-ENG-7151 Tools Required: Ratchet, torque wrench, extensions, needle nose pliers, hose cutter, snips/scissors, flat head screw driver,
P IAG Street Series Air / Oil Separator (AOS) For 2017 STI Part# IAG-ENG-7151 Tools Required: Ratchet, torque wrench, extensions, needle nose pliers, hose cutter, snips/scissors, flat head screw driver,
OIL COOLER KIT INSTALLATION INSTRUCTIONS PART NUMBER D E92 335is (N54 engine) with BMW M-Technic bumper and with stock oil cooler
 with BMW M-Technic bumper and with stock oil cooler") OIL COOLER KIT INSTALLATION INSTRUCTIONS PART NUMBER D570-0923 APPLICATION: 2011 E92 335is (N54 engine) with BMW M-Technic bumper and with stock oil cooler Congratulations for being selective enough to
OIL COOLER KIT INSTALLATION INSTRUCTIONS PART NUMBER D570-0923 APPLICATION: 2011 E92 335is (N54 engine) with BMW M-Technic bumper and with stock oil cooler Congratulations for being selective enough to
2016+ NISSAN TITAN XD
 PARTS LIST AND PARTS INCLUDED 1PC MISHIMOTO INTERCOOLER 2PC SILICONE BOOTS WITH DURACORE TECHNOLOGY 4PC CONSTANT-TENSION T-BOLT CLAMPS 2PC ALUMINUM SPACERS MOUNTING HARDWARE CAUTION Never work on the cooling
COLD AIR INTAKE SYSTEM. Installation Instructions for: Part Number MazdaSpeed Protégé 2.0L Turbo
 COLD AIR INTAKE SYSTEM Installation Instructions for: Part Number 21-486 2003-2003.5 MazdaSpeed Protégé 2.0L Turbo ADVANCED ENGINE MANAGEMENT INC. 2205 126 TH Street, Unit A Hawthorne, CA. 90250 Phone:
2014+ FORD FIESTA ST DIRECT-FIT OIL COOLER KIT PARTS LIST AND INSTALLATION GUIDE CAUTION PARTS INCLUDED NOTE TOOLS NEEDED INSTALL PROCEDURE
 PARTS LIST AND PARTS INCLUDED 3PC APPLICATION-SPECIFIC MOUNTING BRACKETS & SPACER 1PC 19-ROW OIL COOLER 1PC 4 ', X 1'' BRAIDED HOSE W/90-10AN FITTINGS 1PC 3'' X 2.5 '' BRAIDED HOSE W/45 AND 90-10AN FITTINGS
INSTALLATION INSTRUCTIONS ELEVATION FRONT BUMPER DODGE RAM
 INSTALLATION INSTRUCTIONS PARTS LIST: 1 Elevation Bumper Assembly 24 12mm x 37mm OD x 3mm Flat Washers 2 Frame Mounting Brackets 12 12mm Nylon Lock Nuts 8 12-1.75mm x 50mm Hex Bolts 2 License Plate Mounting
Performance Inlet Manifold
 Performance Inlet Manifold Tools needed (some tools not required on some models): 13mm Combination Wrench Flat Blade Screwdriver T30 Torx Driver T25 Torx Driver 10mm Combination Wrench and/or Socket with
2017+ L5P Duramax 3 ½ Down Pipe & EGR Fix Kit
 2017+ L5P Duramax 3 ½ Down Pipe & EGR Fix Kit Covers installation of PN s: WCF100630, WCF100829 Note: This Kit is for off road competition use only! Off Road Competition Use Tuning & Exhaust System is
IAG Competition Series Air / Oil Separator (AOS) For WRX
 For WRX") P IAG Competition Series Air / Oil Separator (AOS) For 2015-16 WRX Part# IAG-ENG-7252 Tools Required: Ratchet, torque wrench, extensions, needle nose pliers, hose cutter, snips/scissors, flat head screw
P IAG Competition Series Air / Oil Separator (AOS) For 2015-16 WRX Part# IAG-ENG-7252 Tools Required: Ratchet, torque wrench, extensions, needle nose pliers, hose cutter, snips/scissors, flat head screw
Note: Hydro-shields, filter charger kits and replacement parts are sold on-line at injenonline.com
 Part number SES1202FMGT 2005 1/2-07 Subaru Impreza STi 2006-07 Subaru Impreza WRX 2.5L, 4 cyl. Turbo 1- Six piece mandrel bent piping 1- Giant size front mount (#11028) intercooler core and tanks 23 3/4
97-02 JEEP TJ BODY LIFT KIT INSTRUCTIONS
 92RC60500 97-02 JEEP TJ BODY LIFT KIT INSTRUCTIONS Congratulations on your purchase of a new Rough Country 2 /3 Body Lift. We are committed to providing you with the best product available for the best
INTERCOOLER UPGRADE INSTALLATION INSTRUCTIONS PART NUMBER D
 INTERCOOLER UPGRADE INSTALLATION INSTRUCTIONS PART NUMBER D330-0021 APPLICATION: 2014-16 F22 228i & xdrive coupe (see restrictions below) 2015-16 F23 228i & xdrive convertible 2012-16 F30 328i & xdrive
LPE C5 Battery Relocation Kit
 LPE C5 Battery Relocation Kit The LPE C5 Corvette battery relocation kit improves vehicle weight distribution by moving weight to the rear of the vehicle. The improved weight distribution increases traction
COBB 3-Port Electronic Boost Control Solenoid
 COBB 3-Port Electronic Boost Control Solenoid MazdaSpeed3/Mazdaspeed6 Congratulations on your purchase of the COBB Tuning 3-Port Electronic Boost Control Solenoid. The following instructions will assist
IAG Street Series Air / Oil Separator (AOS) For WRX
 For WRX") P IAG Street Series Air / Oil Separator (AOS) For 2015-16 WRX Part# IAG-ENG-7152 Tools Required: Ratchet, torque wrench, extensions, needle nose pliers, hose cutter, snips/scissors, flat head screw driver,
P IAG Street Series Air / Oil Separator (AOS) For 2015-16 WRX Part# IAG-ENG-7152 Tools Required: Ratchet, torque wrench, extensions, needle nose pliers, hose cutter, snips/scissors, flat head screw driver,
SAFETY THIS PRODUCT IS FOR OFFROAD USE ONLY. ALL LIABILITY FOR INSTALLATION AND USE RESTS WITH THE OWNER.
 SAFETY Your safety and the safety of others is very important. In order to help you make informed decisions about safety, we have provided installation instructions and other information. These instructions
OIL COOLER KIT INSTALLATION INSTRUCTIONS PART NUMBER D
 OIL COOLER KIT INSTALLATION INSTRUCTIONS PART NUMBER D570-0904 APPLICATION: 2011-2012 E90 335i/xi (N55 engine) with BMW standard bumper and with stock oil cooler Congratulations for being selective enough
Factory Five Racing, Inc. 818 Kit Assembly manual revision 1J update
 Factory Five Racing, Inc. 818 Kit Assembly manual revision 1J update Turbo coolant overflow tank...1 Shifter handle...4 Install...4 Door skin...7 Door Liner... 10 Side mirrors... 14 Door handles and pulls...
REVi RX-8 Intake. RX-8 REVi Intake System I PN Installation Instructions. Tools Required:
 RX-8 REVi Intake System PN 18299 Installation Instructions I-18299 Tools Required: Small/Stubby Phillips head screwdriver Small flat head screwdriver Medium Phillips head screwdriver 10mm socket and ratchet
4. Remove (4) 10mm and (1) 7mm bolt that holds fascia at front corners, on each side
 10mm and (1) 7mm bolt that holds fascia at front corners, on each side") 2010 Camaro LS3 1. Disconnect battery ground 2. Remove front wheels 3. Remove (5) push pins and (5) #20 torx screws on inner front wheel well liners and remove liners on each side 4. Remove (4) 10mm and
2010 Camaro LS3 1. Disconnect battery ground 2. Remove front wheels 3. Remove (5) push pins and (5) #20 torx screws on inner front wheel well liners and remove liners on each side 4. Remove (4) 10mm and
mk3 SEAT Ibiza Cupra Front Mount Intercooler.
 mk3 SEAT Ibiza Cupra Front Mount Intercooler. Warning be sure not to let any foreign body enter the inlet track of the vehicle whilst the following work is being carried out. Serious engine damage may
INTERCOOLER UPGRADE INSTALLATION INSTRUCTIONS PART NUMBER D
 INTERCOOLER UPGRADE INSTALLATION INSTRUCTIONS PART NUMBER D330-0021 APPLICATION: 2014-16 F22 228i & xdrive coupe (see restrictions below) 2012-16 F30 328i & xdrive sedan 2014-16 F31 328i xdrive wagon 2014-16
CHEVY AVALANCHE 1/2-TON ONLY 3 BODY LIFT KIT INSTALLATION INSTRUCTIONS KIT# 10173
 3651 N Highway 89 Chino Valley, AZ 86323 (928) 636-7080 www.p-a-g.net CHEVY AVALANCHE 1/2-TON ONLY 3 BODY LIFT KIT INSTALLATION INSTRUCTIONS 2003-2005 KIT# 10173 Installation of a Performance Automotive
CORKSPORT Power Series Cat Back Exhaust I N S T A L L A T I O N I N S T R U C T I O N S Mazda 6 2.5T PART #: ATK
 I N S T A L L A T I O N I N S T R U C T I O N S CORKSPORT Power Series Cat Back Exhaust 2018+ Mazda 6 2.5T PART #: ATK-6-101-12 Need Help With Your Installation? Call (360) 260-CORK PAGE 1 CORKSPORT Power
09-12 Dodge 4WD /4 Body Lift
 92RC80000 09-12 Dodge 4WD 1500 1 1/4 Body Lift Thank you for choosing Rough Country for all your suspension needs. Rough Country recommends a certified technician install this kit. Attempts to install
»Product» Safety Warning
 #C1354 Installation Instructions 1999-2002 Chevy/GM 1500 4wd 3.5" Combo Lift Kit Read and understand all instructions and warnings prior to installation of product and operation of vehicle. Zone Offroad
SAFETY THIS PRODUCT IS FOR OFFROAD USE ONLY. ALL LIABILITY FOR INSTALLATION AND USE RESTS WITH THE OWNER.
 SAFETY Your safety and the safety of others is very important. In order to help you make informed decisions about safety, we have provided installation instructions and other information. These instructions
COLD AIR INTAKE INSTALLATION INSTRUCTIONS PART NUMBER D A. APPLICATION: E36/7 M-Roadster or M-Coupe 3.
 COLD AIR INTAKE INSTALLATION INSTRUCTIONS PART NUMBER D760-0323A APPLICATION: 1998-00 E36/7 M-Roadster or M-Coupe 3.2 Liter PARTS LIST Air Filter Assembly 3 1/2" Tube Intake Shield Silicone Hose Airflow
Focus RS Catback
 593100 - Focus RS Catback 593100 Focus RS Catback Ford Focus RS 2016-18 Congratulations on your purchase of the COBB Tuning Focus RS Catback Exhaust! The following instructions will assist you through
Integrated Engineering MK7/MQB TSI GEN 3 FDS Intercooler Install. Part Number IETPCI1
 Integrated Engineering MK7/MQB TSI GEN 3 FDS Intercooler Install Part Number IETPCI1 Thank you for purchasing another high quality Integrated Engineering product! This instruction guide is used for installation
** DO NOT EXCEED THE RECOMMENDED VEHICLE TOWING WEIGHT RATING ** DODGE RAM 1500
 10/3/2017 DODGE RAM 1500 WARNING!! BRAKE, FUEL, AND ELECTRICAL LINES MAY NEED TO BE LOOSENED OR REPOSITIONED TO PROVIDE CLEARANCE FOR NEW HARDWARE. ON SHORT BED MODELS, CHECK FOR ADEQUATE TURNING CLEARANCE
COLD AIR INTAKE INSTALLATION INSTRUCTIONS
 COLD AIR INTAKE INSTALLATION INSTRUCTIONS # D760-0033 Fits: 2013-15 F01 B7, 750i & xdrive (N63TU engine) 2013-15 F02 B7L, 750Li & xdrive (N63TU engine) PARTS LIST Left and right carbon fiber air box lids
Installation instruction do88 performance Intercooler for Volvo S60/V60 T6 MY10-
 Installation instruction do88 performance Intercooler for Volvo S60/V60 T6 MY10-1. This instruction shows how to replace the OEM intercoolers with do88 performance intercoolers. At this type of installation
COLD AIR INTAKE INSTALLATION INSTRUCTIONS. # D Fits: i (4.8L)
") COLD AIR INTAKE INSTALLATION INSTRUCTIONS # D760-0013 Fits: 2006-10 650i (4.8L) PARTS LIST Air Box Assembly Left tube Center tube Right tube Support bracket AFM housing AFM/TB tube Hardware Kit Congratulations
COLD AIR INTAKE INSTALLATION INSTRUCTIONS # D760-0013 Fits: 2006-10 650i (4.8L) PARTS LIST Air Box Assembly Left tube Center tube Right tube Support bracket AFM housing AFM/TB tube Hardware Kit Congratulations
Audi A4 2.0T Front Mount Intercooler INSTALLATION GUIDE
 INSTALLATION GUIDE Congratulations on your purchase of the AWE Tuning Front Mount Intercooler for the 2005.5-08 B7 chassis A4 2.0T. 2005.5-08 Audi A4 2.0T Front Mount Intercooler FOR RACING USE ONLY Exquisite
IE Audi 3.0T Crank Pulley Upgrade Install Guide IEBAVJ3
 IE Audi 3.0T Crank Pulley Upgrade Install Guide IEBAVJ3 Thank you for purchasing your IE 3.0T crankshaft pulley upgrade! This instruction guide is used for installation of IE s lower overdrive pulley for