Mikuni RS Carburetor Conversion
|
|
|
- Clifford Skinner
- 6 years ago
- Views:
Transcription

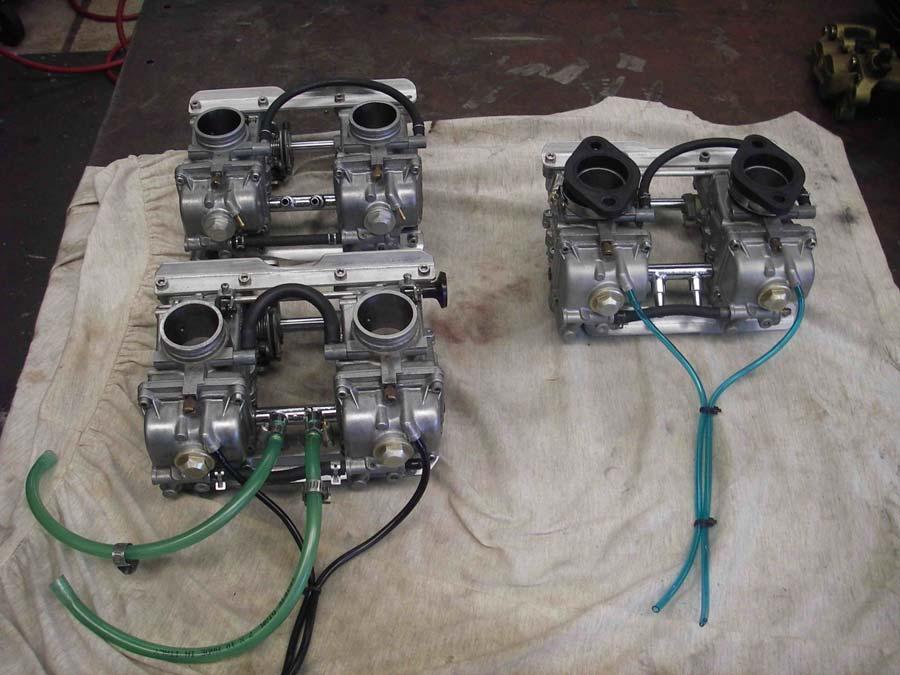
1 Mikuni RS Carburetor Conversion After putting your carbies on the bench or the kitchen table if the wife is out, you will see that the linkages may be in different positions depending on which brand of bike they have come off. Photo below shows two different positions, linkage is on the outer left on the upper set and in between 2 and 3 in lower set. Does not matter, goes back together different anyway. In this exercise we will call the carbies No s. 1, 2, 3 and 4, going from left to right. When I do the conversion I select carbies No.1, 2 and 4 which means that I have to modify carby No. 4 to accept a needle roller bearing to support the Throttle Shaft. You will notice that only two carbs actually have the needle rollers in them. Understanding that you would not generally have access to a milling machine we have supplied a Fuel Rail Bung so No. 3 can be used in lieu of No. 4. This will give you 2 bearings for throttle shaft support. Following conversion is for Carbies 1, 2 and 3.


2 Remove the caps off the top of the carbies and undo the four adjusting bolts that attach the slide to the throttle shaft. Note one has no adjusting nut, this is the main carby so to speak, rest are adjusted to match slide height. Knock out the 2 x 3mm roll pins that attach the linkages to the throttle shaft. There are two 3 mm pins.

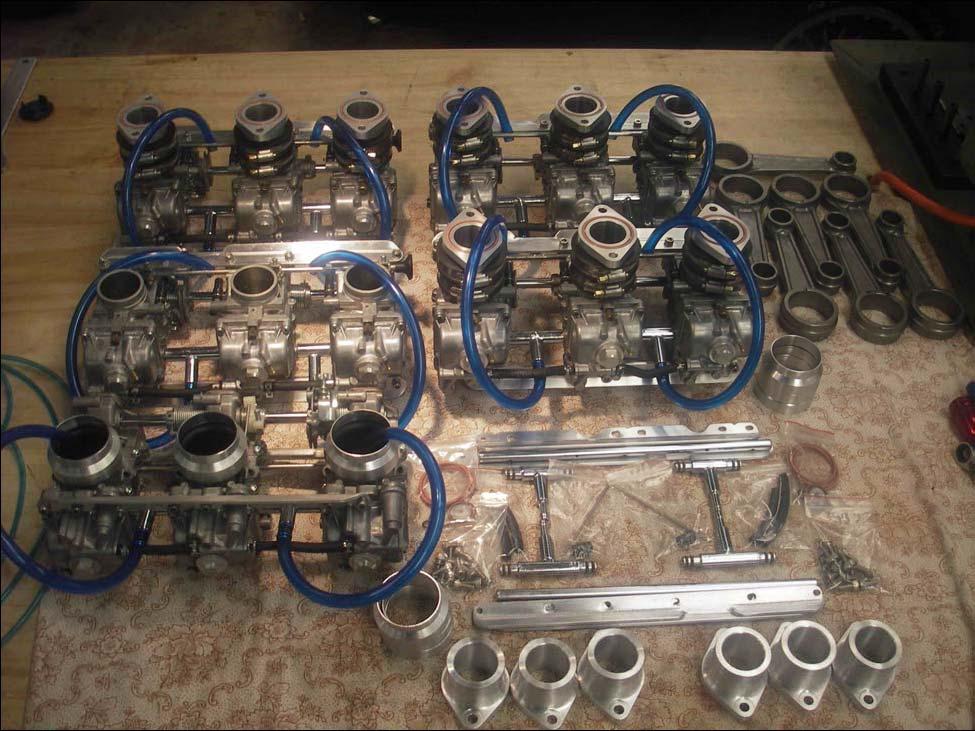
3 You can knock out the 2.5mm pin that attaches the accelerator linkage to the throttle shaft but be careful, you need to separate the Nylon section from the Alloy Activator bar to allow the pin to punch through. Or, you can leave this to last as everything comes off before it anyway, lot easier that way. Carefully remove the throttle shaft, undo all the retaining bolts on the spacer plates and remove the spacer plates from the carbies. The spacer bar screws can be real tight sometimes, try an impact driver with some reserve when hitting, do this before you damage the Phillips Heads too badly. Note how the three springs are mounted before pulling everything apart, including the tensioning spring on the Accelerator linkage arm. Note how it clips over the white tab and also hooks onto the carby body in below. You should have the pile below by now.


4 The only thing left holding the carbies together now are the fuel rails and accelerator pump transfer hoses. You can just cut the Pump transfer hoses as you can not use them anyway as they are to short. Should now look like this. Is best to remove the slides at this point so they do not get damaged but try and keep them matched with their respective bodies.

5 Remove Carb 4 from the pile but first take off the Fuel Bowl which needs to be changed with Carb 3. No 4 has a blanked off Accelerator Pump circuit being the outer bowl. At this stage inspect all the slides for wear and select best three, remove the needles and have a look at the needles you have. Needles that we recommend are 9DZH5-50 with the circlip set on the middle of 5 grooves. Make certain that the nylon washer is not lost and is put back onto the needle. Remove the bowls and check the jetting we recommend for 1,000 s:- Pilot Jets - 15 Main Jets ( this is generally just on the rich side but is where we prefer to start) Needle Jets P4 Air Jet.-0.8 Note that the bowl and gaskets for the Carby with the Accelerator Pump is different to the rest so don t get them mixed up. Spring goes down and when looking at the Piston, raised piece goes up, Spring fits into the recess section on the bottom of the piston. Clean the carbies as required make sure all the air passages are clear and reassemble. Note if you have to remove your floats support the post with a small socket as shown before knocking the pin out.

6 Failure to support the post will result in the post breaking and then the Carby is stuffed. Also at this stage remove the idle mixture screw and make certain the fine point has not been broken off the end. Best way of checking is to shine a torch in through the carby throat and look down the hole making sure you see a pin point light. If no light, shit, big trouble. See separate attachment for guidance. Set the screws at one turn out initially, is just a starting point to fire the beast up. Make certain when you seat the screws you just seat them lightly as the tips are tapered and they will lock into the seat and break off when you back the screw out. This is a very common problem with carbs that we buy 2 nd hand and is not easy to repair. BE VERY CAREFUL. Remember you need to swap float bowl No. 3 for float bowl No. 4 so the Accelerator Pump transfer port is now blanked off. At this stage also tap in the Fuel Rail Bung into the right hand Carby, No 3 now. See Black Nylon bung in below photo.


7 Reassembly. Look at the photo below, install the Accelerator Pump Alloy piece as shown and knock in the 2.5 mm Pin. Now slide over the shaft, the Nylon Arm, then the Spring followed by the Metal Ring with minor diameter facing towards the Nylon arm. Spring clips over the top of the Nylon Arm. Make certain that the Metal Ring goes over the Nylon spigot, inside the Spring, it tries to avoid the spring thus wearing out the Nylon Arm.

8 Now insert the throttle shaft into the center carby, but also be aware that you need to tension up the Spring, you will see the fine pin that has been cast into this Carby body, back side of spring slips over this pin. Once the spring is seated properly, line up the 2.5mm hole and knock the roll pin into place. Use a pin punch for best results. Now install the non adjustable screw that attaches the Slide Arm to the throttle Shaft. By now you would have worked out that the Throttle Shaft only goes one way. Next step, install secondary Spring mechanism as shown below. Once again you need to take up Spring Tension before installing the Retaining Pin. Amount of tension is up to you, we generally look for around 3/4 of a turn with the spring attached, same as with the Main Linkage. Line up the 3mm hole and knock the pin into place. You should have the above. Next install Carby 1, it is easier then the other Carby. No major problems, just slide it over the shaft and attach with the Adjustable Screw type, has the concentric nut. Do not forget to install the appropriate Fuel Tee first.

9 You also need to make certain that the hole that had the original Throttle Linkage attached is now filled in with the proper screw, taken from the Carby No 3. Depending on what bike your carbs came from, this will vary between carby bodies. It must be closed off no matter which body had the original linkage. No. 3 carby needs to be set up with the throttle linkage as shown. Also note that you may need to install one or two of the white Nylon Washers supplied behind the Linkage Plate, in between the plate and the Carby body to space the Plate out. This is to line up the Wheel with the Linkage Arm. Have supplied enough Washers for two below each Screw in extreme cases. It has been noted that there is some variance in position, due to manufacturing tolerances and also previous owners of the carbs bending the arms. You need to have the cable entry hole inline with the center of the Wheel to avoid the cable binding. Time taken here getting it all lined up will result in a very light throttle. Just slide the main linkage over the shaft and leave it unpinned for now. Hook the Spring in below the Throttle Linkage Plate and hook it over the Carby Body as shown, see arrow.

10 Don t forget to install the correct Fuel T before positioning the carby. Install the Adjustable Nut and Retaining Screw into the Throttle Slide and attach to the Throttle Shaft. Note that you need to install two opposing Nylon Washers onto the Throttle Shaft as well. These would have been in place when you first pulled the bank of 4 apart. They limit the amount of sideways movement available to the Shaft itself. There are two ways of doing it, you can have both in one carby on opposing sides or have them at the far Carbies, on opposite ends, really depends on how your lower Throttle Slide linkages are lining up. Now slide the Main Linkage wheel back towards the Carby, once again you need to pretension the Spring, Slide it into position with the Tab hooked under the Adjusting Screw and while holding tension with the hole lined up, knock in the 3 mm pin until it seats home. If all has been done well then all will be free, we hope. Now install both sets of Spacer Plates. These have been pre fitted hence the filed out holes so they should go on okay. Do not tighten them until all 12 bolts are started, install a spring washer on each bolt. Sometimes you need to twist the bodies slightly to start the thread and also be very careful to line the Screws up properly, they can cross thread very easily.

11 Once all the bolts are installed, tighten everything up and then install the Fuel Transfer hoses for the Accelerator Pumps. Grease those little Brass suckers first, is a bitch to get the supplied hose on. Feel free to find something else, needs to be fuel line though. Now slide the old Choke Shaft into the Carbs, position the Nylon end as shown above, with a small amount of clearance. Mark the other end with a Marker Pen. You can see the Blue mark in the photo above, to the extreme left. This is where we cut the original shaft off. Now the original shaft has a set of holes shallow drilled that provides a detent system for the Choke System. This basically means that the Choke can be left on without holding it. In Aussie we do not really need a choke so I have never bothered with it. I just start my bike by hitting the throttle twice and punching the button. But with most of you being in the colder climates then you may wish to use the original system which would mean drilling or filing some extra holes. These are for the very small ball bearings and springs that fell out when you removed the Choke Shaft at the start. They slide down inside the small spigot that the choke shaft goes through.

12 It may be better to just mark the position of the required holes and to just use a Triangular File to file the grooves into the shaft, does the same thing and easier then trying to drill onto the centre of such a small shaft. To install the Airbox Adaptors you need to gently file the casting ridge off the outside of the Air Inlet throats, both on the top and bottom side. Just gently, does not need a great deal taken off, just smooth it out. The adaptors are quite thin and do have some flex in them. By now you should have something looking like the following.

13 Now before putting the top Caps on for the final time, look at the Center Carby Throttle Slide from the Inlet side, looking down the throat. Lower the slide by adjusting the idle screw until the slide is just open. Now compare the outer two adjustable Carbies and see if the gap is the same. You adjust the slides by backing off the screw slightly then rotate the adjustable nut. It just goes around 360 degrees so don t go winding it at will, also, keep the screw just nearly pinched up to see the proper effect. Note the small pin punch dot on the outer of the nut, just keep moving it around within 360 degrees to get the full adjustment. Just keep trying until all slides are even, lock down and then install top caps. Final setting will need to be done on a set of Vacuum Gauges for best results. Best to install some 1/8 Fuel Line on the Bowl Vents, very lowest ones. Make them long enough to join together and go down to the section between the bottom of the motor and the swingarm. Recommend looking on Fleabay for the Fuel Line Guy, sells grea Fuel Line like the Blue Vent lines on the Monty and Triple sets shown below, does look proper flash.
14
The Zenith Stromberg Water Choke
 Page 1 of 16 The Zenith Stromberg Water Choke Rick Jaskowiak Bemidji, MN 11/24/2001 Click here to email me. Return to my home page When my last Midget project ran poorly after an engine rebuild due to
Performer Series Carburetor Rebuild Kit Catalog #1477 Models
 Please read these instructions carefully before attempting to rebuild your carburetor. Make sure to refer to your carburetor Owner s Manual for further information if need be. If you have any questions
Moped Hospital Racing. Installation of performance parts MANUAL. Tecnigas Extreme Super 9
 Moped Hospital Racing Installation of performance parts MANUAL Tecnigas Extreme Super 9 Page 2 These pages are to help the shop/person installing the parts that we sell. It is a general explanation of
Gearbox Assembly 101. Introduction. Before Beginning. By Mark Schutzer 4/13/06
 Gearbox Assembly 101 By Mark Schutzer 4/13/06 Introduction If you are planning to re-motor an old brass locomotive you may want to upgrade to a new gearbox at the same time. The early 60 s and 70 s gearboxes
HSR Carburetor. Total Kits. Installation Instructions. # Evo Big Twin # present Twin Cam
 HSR Carburetor Total Kits Installation Instructions HSR42 Kits: HSR45 Kits: #42-8 84-99 Evo Big Twin #42-19 99 - present Twin Cam #45-2 84-99 Evo Big Twin #45-3 84-99 Evo Big Twin #45-4 99 - present Twin
Днепр) Russian Motorcycle Carburetors Part 2B: PZ-24 and PZ-28 Carburetor Assembly and Jet Drilling
 Russian Motorcycle Carburetors Part 2B: PZ-24 and PZ-28 Carburetor Assembly and Jet Drilling") Ural (Урал( Урал) - Dnepr (Днепр( Днепр) Russian Motorcycle Carburetors Part 2B: PZ-24 and PZ-28 Carburetor Assembly and Jet Drilling (applies also to K-37 K and K-38 K carbs) Ernie Franke eafranke@tampabay.rr.com
Ural (Урал( Урал) - Dnepr (Днепр( Днепр) Russian Motorcycle Carburetors Part 2B: PZ-24 and PZ-28 Carburetor Assembly and Jet Drilling (applies also to K-37 K and K-38 K carbs) Ernie Franke eafranke@tampabay.rr.com
KEIHIN CARBURATORS FOR 4-CYLINDER HONDA MOTORCYCLES
 KEIHIN CARBURATORS FOR 4-CYLINDER HONDA MOTORCYCLES Set of 4 Keihin carburetors marked 089A and used on 1976 CB550K GENERAL NOTES: All carburetors perform the same function: mixing air and fuel for supply
This LED flashtube kit covers models 400, 404, 500, 504, 600, 680 & 506.
 L.E.D. INSTRUCTIONS I D T S O T U B I R M O C R Y N A P Kit contains: This LED flashtube kit covers models 400, 404, 500, 504, 600, 680 & 506. For the power supply: 1-LED power supply circuit board, 2
235/245400, , 28N
 Models 235/245400, 287000, 28N thru W, 310/312/313700 These carburetors have a fixed high speed main jet with adjustable idle, Fig 183. The different carburetors are identified as LMT 1 and up. The letters
HSR Carburetor. Total Kits. Installation Instructions. # Evo Big Twin # present Twin Cam
 HSR Carburetor Total Kits Installation Instructions HSR42 Kits: HSR45 Kits: #42-8 84-99 Evo Big Twin #42-19 99 - present Twin Cam #45-2 84-99 Evo Big Twin #45-3 84-99 Evo Big Twin #45-4 99 - present Twin
Adjusting Carbs For Re-Jetting (Procedure written for an Intruder 1500 LC) NEWLY UPDATED: APRIL 2003
 NEWLY UPDATED: APRIL 2003") SECTION ONE: Get Prepared - Tools Adjusting Carbs For Re-Jetting (Procedure written for an Intruder 1500 LC) NEWLY UPDATED: APRIL 2003 Courtesy of: Half-Crazy Get a manual impact driver (the kind you hit
SECTION ONE: Get Prepared - Tools Adjusting Carbs For Re-Jetting (Procedure written for an Intruder 1500 LC) NEWLY UPDATED: APRIL 2003 Courtesy of: Half-Crazy Get a manual impact driver (the kind you hit
Slave Cylinder Weep Hole Drilling Procedure
 Slave Cylinder Weep Hole Drilling Procedure Tools Required: T20 Torx Driver T25 Torx Driver T25 Torx Bit with ¼ Ratchet Wrench 4mm Hex Key (Allen wrench) 5mm Hex Key 6mm Hex Key 8mm Hex Key 12mm Hex Key
1996+ Yamaha G16 / G22 Yamaha G29/YDRA Drive
 Vegas Carts & Performance 2995 Coleman St North Las Vegas, NV 89032 702-530-7753 VegasCarts.com 625cc Big Block Installation Instructions 1996+ Yamaha G16 / G22 Yamaha G29/YDRA Drive Revised 8/6/2018 1
Our goal is to make the install a breeze. Please read the entire guide before beginning.
 www.airkewld.com Page 1 of 6 IRS Axle Kit Install IRS Axle Kit Install Our goal is to make the install a breeze. Please read the entire guide before beginning. KITS SHOULD INCLUDE 2 - Control-arm mounting
BA /02/03/04/06/07/08/13/13B/15 BIG AIR KIT (BAK) - Yamaha Road Star (99-07)
 - Yamaha Road Star (99-07)") BA-2020-00/02/03/04/06/07/08/13/13B/15 BIG AIR KIT (BAK) - Yamaha Road Star (99-07) Page: 1 Revision: 6.2-02/23/2011 Install Time: 1.5 Hours We recommend a qualified Yamaha technician install this kit
BA-2020-00/02/03/04/06/07/08/13/13B/15 BIG AIR KIT (BAK) - Yamaha Road Star (99-07) Page: 1 Revision: 6.2-02/23/2011 Install Time: 1.5 Hours We recommend a qualified Yamaha technician install this kit
CARBURETION. Carburetor Identification. Models , , , , , , , , , , ,
 Carburetor Identification Models 110400, 110600, 111400, 111600, 113400, 120400, 120600, 121400, 121600, 122600, 123400, 123600 Models 28S700, 311700 Service Carburetor Briggs & Stratton/Walbro LMS Models
AN EXPLANATION OF CIRCUITS CARTER YH HORIZONTAL CLIMATIC CONTROL CARBURETER
 AN EXPLANATION OF CIRCUITS CARTER YH HORIZONTAL CLIMATIC CONTROL CARBURETER The Carter Model YH carbureter may be compared with a Carter YF downdraft carbureter with the circuits rearranged to operate
VM Carb Rebuild Paul Musser October 2005 v1.0
 VM Carb Rebuild Paul Musser October 2005 v1.0 A big thank you to all the folks at GS Resources (www.thegsresources.com) for their invaluable assistance. Much of the information for his document came from
Hornby Railroad Hall EM Finescale Conversion.
 Hornby Railroad Hall EM Finescale Conversion. The subject of this sheet is the new (2015) Hornby Railroad Hall. There are several specification and livery variants, but all have a common chassis and as
INSIDE YOUR HOLLEY CARBURETOR FUEL INLET SYSTEM
 INSIDE YOUR HOLLEY CARBURETOR The carburetor is quite simply a fuel metering device that operates under the logical and straightforward laws of physics. It has evolved over the years from a very simple
SECTION 4 - FUEL SYSTEMS AND CARBURETION
 SECTION - FUEL SYSTEMS AND CARBURETION FUEL SYSTEMS - - - - - - - - - - - - - - - - - - - - - - - - - - - - - - - - - - - - - - - - - - - - - - - - - - - - - - - - - - - - - -62 FUEL PUMP - - - - - - -
Installing the Wireless Charging upgrade kit in a 2018 XT5 (Platinum version)
") Installing the Wireless Charging upgrade kit in a 2018 XT5 (Platinum version) September 2, 2018 Tools needed: Wireless charger upgrade kit Plastic trim tools 7 mm nut driver Background: I purchased the
Installing the Wireless Charging upgrade kit in a 2018 XT5 (Platinum version) September 2, 2018 Tools needed: Wireless charger upgrade kit Plastic trim tools 7 mm nut driver Background: I purchased the
HW Prowler Carburetor Installation Instructions
 HW Prowler Carburetor Installation Instructions Page 1 of 6 Carb Kit Contains: HW modified Mikuni 36mm pumper style carb Custom choke cable Fuel Line Clamp Instructions (2) Leaner and (2) richer main jets
CARTER DOWNDRAFT CARBURETOR Terraplane All Models. Technical Information
 CARTER DOWNDRAFT CARBURETOR 1934 Terraplane All Models Technical Information . Carter W-1 Downdraft Carburetors 1934 Terraplane Challenger, Model KS NOTE: Terraplane Models. Carburetor fitted with Anti-
CARBURETOR - HITACHI 2-BBL
 CARBURETOR - HITACHI 2-BBL 1986 Isuzu Trooper II 1986 Hitachi Carburetors HITACHI DCH340, DCR384, DFP340, DFP384 & DHP340 2-BARREL P UP & Trooper II DESCRIPTION Carburetor is a 2-barrel downdraft type
Backwater Performance Systems Large Vanguard Mikuni Twin Carburetor Kit
 Backwater Performance Systems Large Vanguard Mikuni Twin Carburetor Kit 1. Throttle Cable Twin (CKC-41) 2. Carburetor VM30mm (CKC-40) 3. Loctite 242.5mL (A-210) 4. Air Cleaner Filter 6000 (EC-86) 5. Rev
Motorcycle Carburetor Theory 101
 Motorcycle Carburetor Theory 101 Motorcycle carburetors look very complex, but with a little theory, you can tune your bike for maximum performance. All carburetors work under the basic principle of atmospheric
Setting up and adjusting SU/Hitachi carbs on the Datsun Roadster by Keith Williams. Service screw
 Setting up and adjusting SU/Hitachi carbs on the Datsun Roadster by Keith Williams Service screw This is the service screw it s only use it to raise the engine speed while adjusting the carbs. In normal
Heljan EM Finescale Conversion.
 Heljan 02 2-8-0 EM Finescale Conversion. Before you start, it is a good idea to have some small containers or snap top poly bags to put screws and components in for safe keeping...much better than crawling
Nikki Carburetor Vertical Models , ,
 Nikki Carburetor Vertical Models 280000, 310000, 330000 Disassemble Carburetor 1. Remove fuel bowl screws (A, Figure 56). Remove the fuel bowl (B) from the carburetor body. WARNING Before servicing the
TILLOTSON LTD., CLASH INDUSTRIAL ESTATE, TRALEE, CO. KERRY, IRELAND PHONE: FAX:
 TILLOTSON LTD., CLASH INDUSTRIAL ESTATE, TRALEE, CO. KERRY, IRELAND PHONE: +353 66 7121911 FAX: +353 66 7124503 e-mail: sales@tillotson.ie SERIES SERVICE MANUAL INTRODUCTION The gasoline engine industry
Hornby GWR Star Class EM Finescale Conversion.
 Hornby GWR Star Class EM Finescale Conversion. Before you start, it is a good idea to have some small containers or snap top poly bags to put screws and components in for safe keeping...much better than
Return to Instruction Sheet index. Installation Instructions For C-4 70 and Later, Except 70 Falcon
 Page 1 of 8 Return to Instruction Sheet index TCI 260100 Trans-Scat Automatic Transmission Installation Instructions For C-4 70 and Later, Except 70 Falcon TCI 260100 Kit Contains: Qty. Description One
1 Green Pressure Regulator Spring Automatic transmissions operate at temperatures between 150ºF and
 Installation Instructions for 603107 Valve Body Kit C-4 1970 & Later Tools Required Speed Handle or Ratchet 3/8 Drive 1/2 Socket 3/8 Drive 7/16 Socket 3/8 Drive 5/16 Socket 3/8 Drive Small Screwdriver
Base Kit Rochester Tri Power Carb small parts kit contents:
 910-11589 Base Kit Rochester Tri Power Carb small parts kit contents: Installation of Rochester 2 GC Tri-Power Base Kit Modifications to center (primary) carb 1) Remove, disassemble, and clean carb as
I suggest you read through this guide first to familiarise yourself with what you need to do before doing it. Let s get into it!
 This guide was written for those with standard (or close to standard) NC30 s that have yet to get up close and friendly with their bike s fuelling system. It was put together using a few different bikes
My Hawk build Part 8 by Stuart Clarke
 My Hawk build Part 8 by Stuart Clarke Front hubs, brakes and brake lines. There was still no news on my rear springs so I thought I d find something else to get on with. I had the front hubs, brake calipers
LUGGAGE RACK MG TD with Original Steel Wheels. Installation Instructions. Step 1
 Created on 7/7/2003 8:34:00 PM by Michael Grant Last Revised 2/2/2008 1:55:00 PM Page 1 of 14 1 2 3 243-705 LUGGAGE RACK MG TD with Original Steel Wheels If your TD has been converted to wire wheels, please
HSR Carburetor Easy Kits Installation Instructions For Evo Big Twin Kit: # 42-7 Twin Cam Kit: # 42-18
 HSR Carburetor Easy Kits Installation Instructions For Evo Big Twin Kit: # 42-7 Twin Cam Kit: # 42-18 Revised 5/01/01 EK-1 Easy Kit Installation Instructions The HSR series carburetors are precise yet
ANDY'S CARB CLEANING GUIDE - REV 1.DOC APRIL 04, 2012
 ANDY'S CARB CLEANING GUIDE - REV 1.DOC APRIL 04, 2012 L:\000 - Files\Motorcycle\1984 V45 Magna\Carbs\Andy's Carb Cleaning Guide - Rev 1.doc Page 1 of 7 Don t worry about the lost first page it is a BS
Tillotson Tc3A Carburator
 Tillotson Tc3A Carburator 176 FUEL SYSTEMS - 5B-11 CENTER BOWL TYPE CARBURETOR Removal 1. Remove front cowl cover and wrap-around cowl. 2. Remove swivel link from lower carburetor. (Figure 2) 3. Loosen
Arrow Shark TS 760A E Starter for Gas Cars. Owner s Manual
 Arrow Shark TS 760A E Starter for Gas Cars Starting a Gas Engine Has Never Been So Easy! Owner s Manual The TS 760A is heavy duty equipment with most main components being CNC billet finished and anodized
Rotax Sprag Replacement
 Rotax Sprag Replacement This is intended as a full walk through on a Sprag replacement on a Electric start Rotax engine These instructions were made from a sprag replacement on an MT 350 Tools List Non
GY6 BIG BORE KIT AND TOP END REBUILD GUIDE
 GY6 BIG BORE KIT AND TOP END REBUILD GUIDE 1 The following is a general guide for installing a big bore kit OR rebuilding the GY6 type engine. The photographs in this booklet are installing an 80cc bore
WARNING: the engine does not come with oil in it. Please fill the oil before starting. The 200cc hardknock requires 9/10 of a quart of oil.
 WARNING: the engine does not come with oil in it. Please fill the oil before starting. The 200cc hardknock requires 9/10 of a quart of oil. Things needed for assembly. -2 tubes of blue loc-tite. I don
EGR Performance Brakes Assembly Instructions DODGE DANA 70 '87 - '93 (Will not fit stock sized dual rear wheels)
") EGR Performance Brakes Assembly Instructions DODGE DANA 70 '87 - '93 (Will not fit stock sized dual rear wheels) Got Brakes? Parts List (2) Vented Rotors (2) Multi hole Cable Mount & L Brkt (2) Axle Tube
EGR Performance Brakes Assembly Instructions DODGE DANA 70 '87 - '93 (Will not fit stock sized dual rear wheels) Got Brakes? Parts List (2) Vented Rotors (2) Multi hole Cable Mount & L Brkt (2) Axle Tube
PYRTE. Building The Front Axle, Fork and Steering
 PYRTE Building The Front Axle, Fork and Steering The front axle on this traction engine is a very simple affair, in that it is a rectangular steel rod, sat on edge, with a pivot in the centre, which is
RS-2 SINGLE ACTION REAR BUMPER WITH TIRE CARRIER INSTALL MANUAL FOR JEEP WRANGLER ALL MODELS.
 RS-2 SINGLE ACTION REAR BUMPER WITH TIRE CARRIER INSTALL MANUAL FOR 2007-2016 JEEP WRANGLER ALL MODELS. Rear Bumper Installation Instructions 1) Remove factory rear bumper, (this includes all tow hitch
We thank you for purchasing a manual petcock conversion kit from Murphs!
 We thank you for purchasing a manual petcock conversion kit from Murphs! The first step is removing the gas tank from the bike. We suggest running the tank down to reserve before removal, both for the
Honda Super Cub Etc. Frame & Forks
 Honda Super Cub Etc. Frame & Forks Introduction This section is all about how to strip, servioce and rebuild the frame and forks of the Honda Super Cub and other bikes using the same frames, plus all the
Installation Instructions for TCI Turbo 700R TCI Turbo 700R
 Installation Instructions for TCI 378805 Turbo 700R4 1982-1984 TCI 378905 Turbo 700R4 1985-1993 KIT INTRODUCTION Read all instructions first to familiarize yourself with the parts and procedures. Work
 www.odometergears.com Mercedes-Benz Mechanical Odometer Repair This how to can be used for all mechanical repairs as the only difference will be the removal of the instrument cluster. http://www.dieselgiant.com/repairyourodometer.htm
Phil s Ear Shave Procedure
 http://06vn750.blogspot.com/2011/05/ear-shave-procedure-different-format.html 06VN750 Thursday, May 19, 2011 Ear Shave Procedure Phil s Ear Shave Procedure Preface: GENERALLY speaking: If you change the
S1 Sequential. T56 Magnum. Sequential shifter. Contents and assembly instructions
 S1 Sequential Sequential shifter T56 Magnum Contents and assembly instructions Parts List Sequential shifter x1 Base plate x1 Base spacer x1 Drill Square x1 Shaft fitting x1 Square washer x1 8mm Aluminium
Typical Install Instructions
 Typical Install Instructions Read & understand all steps of these instructions before beginning this installation. WEBER Conversion Kit, VW T-1/2, up to 1835cc 32 / 36 DFEV Weber Carburetor These instructions
Bachmann GWR Earl (Dukedog) EM Finescale Conversion
 EM Finescale Conversion") Bachmann GWR Earl (Dukedog) EM Finescale Conversion Before you start, it is a good idea to have some small containers or snap top poly bags to put screws and components in for safe keeping...much better
Bachmann GWR Earl (Dukedog) EM Finescale Conversion Before you start, it is a good idea to have some small containers or snap top poly bags to put screws and components in for safe keeping...much better
Modular Engine 1, 2008 revision August 3, 2008
 Modular Engine 1, 2008 revision August 3, 2008 David Kerzel 2008 Back in 2002 I wanted to build a bunch of different engines without a lot of detail to learn how to build an engine, what works and what
THE IDIOT S GUIDE TO TUNING SU CARBURETTERS
 THE IDIOT S GUIDE TO TUNING SU CARBURETTERS There are four distinct phases to tuning SU carburetters (carbies). The first is to set the fuel level in the float bowl, the second is to centre the needle
Jabiru J170/230/430/250/450 Constructors Manual. Pre-Paint>Fuselage>Undercarriage>Assemble main gear
 Objectives of this task: In this task you will assemble the main undercarriage legs, which includes fitting the axles, disc brakes and wheels and adjusting the brakes. Materials required: Cards # J8 Dual
~. a~' ~ ( I o~~~ 4-0. ~Sj~' AO~ i/~ CB1000C (ij)aon'da in-ib) ~ "" ~ ~!~~P. ~ J N m (6-12 kg-em,
aon'da in-ib) ~ ~ ~!~~P. ~ J N m (6-12 kg-em,") e V ~. a~' ~ I ~ J C t \"" 8.0- ( I o~~~ ~ "" ~ ~. ~!~~P. C8 0 & 0,-t. ~ CB1000C (ij)aon'da 0.6-1.2 N m (6-12 kg-em, 5-10 in-ib) 4-0 / 4.0-6.0 N m (40-60 kg-em, 35-52 in-i b) t$ "'07~ / c;:::/ j ~Sj~'
e V ~. a~' ~ I ~ J C t \"" 8.0- ( I o~~~ ~ "" ~ ~. ~!~~P. C8 0 & 0,-t. ~ CB1000C (ij)aon'da 0.6-1.2 N m (6-12 kg-em, 5-10 in-ib) 4-0 / 4.0-6.0 N m (40-60 kg-em, 35-52 in-i b) t$ "'07~ / c;:::/ j ~Sj~'
TILLOTSON LTD., CLASH INDUSTRIAL ESTATE, TRALEE, CO. KERRY, IRELAND PHONE: FAX:
 TILLOTSON LTD., CLASH INDUSTRIAL ESTATE, TRALEE, CO. KERRY, IRELAND PHONE: +353 66 7121911 FAX: +353 66 7124503 e-mail: sales@tillotson.ie HU SERIES SERVICE MANUAL INTRODUCTION To keep apace of new market
Jetting and understanding your CV carburetor
 Jetting and understanding your CV carburetor What do all these pieces do? You may also ask, how or why would I do this to my carb? The goal of this article is to unravel the mystery of carburetor jetting
Bag 1. Bag 1. Center Pivot. Center Pivot
 8 00734 01901 5 Center Pivot Bag 1 3374 - Center Pivot Socket 4019 - Alum Pivot ball 3254-2-56 Button Head *Note - Sometimes it is helpful to slightly over-tighten the top clamp screws, then work the ball
RJS2021 LTO SPORT OVAL RACER LESS ELECTRICS
 RJS2021 LTO SPORT OVAL RACER LESS ELECTRICS THANKS FOR BUYING THE RJ SPEED 1/10 LTO SPORT KIT FOR OVAL RACING. THE ASSEMBLY WILL NOT BE DIFFICULT IF YOU READ THE TEXT, LOOK AT THE PICTURES, AND THE EXPLODED
Conversion to Renault NG 5 speed gearbox with cable actuated gear change
 Europa Series 2 (1969) Conversion to Renault NG 5 speed gearbox with cable actuated gear change NB: this is theoretical it shifts very precisely without too much effort in the garage with no oil in the
7. FUEL SYSTEM ('04 - '05)
") 7. FUEL SYSTEM ('04 - '05) SYSTEM COMPONENTS 7-2 CARBURETOR DISASSEMBLY 7-81 SERVICE INFORMATION 7-3 CARBURETOR ASSEMBLY 7-14 TROUBLESHOOTING 7-4 CARBURETOR INSTALLATION 7-21 AIR CLEANER HOUSING 7-5 PILOT
7. FUEL SYSTEM ('04 - '05) SYSTEM COMPONENTS 7-2 CARBURETOR DISASSEMBLY 7-81 SERVICE INFORMATION 7-3 CARBURETOR ASSEMBLY 7-14 TROUBLESHOOTING 7-4 CARBURETOR INSTALLATION 7-21 AIR CLEANER HOUSING 7-5 PILOT
TECH INFORMATION EMPI D Performance 2-Barrel Carburetor
 TECH INFORMATION EMPI D Performance 2-Barrel Carburetor The New EMPI D 2-Barrel Performance Carburetor.Built specifically for the VW Aftermarket. With all the features that you have asked for More Progression
Feeding the Barbarian
 Feeding the Barbarian Running your Onan generator on propane or todays crap gas at the flip of a switch Text and photos by Jerry Work GMCWS rally Coos Bay, Oregon, 2016 Today s gasoline is killing our
INSTRUCTION SHEET ROCHESTER CARBURETOR MODELS 4MC 4MV
 INSTRUCTION SHEET ROCHESTER CARBURETOR MODELS 4MC 4MV GENERAL EXPLODED VIEW THE GENERAL DESIGN AND PARTS SHOWN WILL VARY TO INDIVIDUAL UNITS COVERED ON THIS INSTRUCTION SHEET DISASSEMBLY Use exploded view
05/06 Gsxr 1000 Clutch Mod
 By: Ali (Jetspeedz) 05/06 Gsxr 1000 Clutch Mod Parts: 21472-41G10 - WASHER, CLUTCH - $10.09 From 06 Gsxr 750 Opt: 11482-40F00 - GASKET, CL COVER - $8.29 Tools: 13/64 Drill bit, 30mm, 12mm, 10mm, 8mm sockets,
Ford Racing BOSS 302 Engine Oil Cooler (11-14 GT)
") Tools needed: 14mm hex socket 7mm socket/wrench 8mm socket/wrench Ford Racing BOSS 302 Engine Oil Cooler (11-14 GT) 10mm socket (for airbox removal) ¾ inch or 19mm wrench Torque wrench Appropriate ratchets
Tools needed: 14mm hex socket 7mm socket/wrench 8mm socket/wrench Ford Racing BOSS 302 Engine Oil Cooler (11-14 GT) 10mm socket (for airbox removal) ¾ inch or 19mm wrench Torque wrench Appropriate ratchets
Prerequisites: Shop Manual (recommended) pages 3-9 through 3-13.
 pages 3-9 through 3-13.") Prerequisites: Order your gaskets average about $25.00 bucks X 2 so $50.00 4NK-11193-00-00 Obtain a shim kit (Should have several 265 and 270s) (Some dealers will exchange) Obtain a Valve Bucket Tool YM-33961
Prerequisites: Order your gaskets average about $25.00 bucks X 2 so $50.00 4NK-11193-00-00 Obtain a shim kit (Should have several 265 and 270s) (Some dealers will exchange) Obtain a Valve Bucket Tool YM-33961
Fitting the Bell Auto Services (B-A-S) TDV6 EGR Blanking Kit to a 2006 model Discovery 3 TDV6 HSE
 TDV6 EGR Blanking Kit to a 2006 model Discovery 3 TDV6 HSE") Fitting the Bell Auto Services (B-A-S) TDV6 EGR Blanking Kit to a 2006 model Discovery 3 TDV6 HSE Before I describe how I did this, I must first thank other members of the Disco3.co.uk forum (namely J,moore
Fitting the Bell Auto Services (B-A-S) TDV6 EGR Blanking Kit to a 2006 model Discovery 3 TDV6 HSE Before I describe how I did this, I must first thank other members of the Disco3.co.uk forum (namely J,moore
Tri-Spark Ignition System Installation Triple Cylinder TRI-0001
 Tri-Spark Ignition System Installation Triple Cylinder TRI-0001 There are potentially lethal high voltages produced at the ignition coils and spark plugs, therefore every precaution must be taken to prevent
Converting a Chevy Non-positraction rear-end to a positraction rear using an Eaton posi unit.
 Converting a 56-62 Chevy Non-positraction rear-end to a positraction rear using an Eaton posi unit. Tom Parsons Non-posi unit Posi unit 1 Converting a 56-62 Chevy Non-positraction rear-end to a positraction
TILLOTSON LTD., CLASH INDUSTRIAL ESTATE, TRALEE, CO. KERRY, IRELAND PHONE: FAX:
 TILLOTSON LTD., CLASH INDUSTRIAL ESTATE, TRALEE, CO. KERRY, IRELAND PHONE: +353 66 7121911 FAX: +353 66 7124503 e-mail: sales@tillotson.ie HS SERIES SERVICE MANUAL INTRODUCTION The demand for a miniature
The spacers can be made out of.750 round aluminum bar with a.3125 to.318 hole drilled in center.
 SECTION I : FRONT COVER INSTALLATION With Crankshaft, Camshaft and oil Galley plugs installed in engine, you need to verify that the front cover clears the oil galley plugs and fits on engine block. The
The Holly Buddy. 2.5cc Model Diesel - Compression Ignition engine.
 The Holly Buddy 2.5cc Model Diesel - Compression Ignition engine. Firstly I want to dedicate this engine to David Owen. I didn t know David for very long, but his influence on me and my affection for these
LJ20 Distributor - Disassembly Inspection Repair
 LJ20 Distributor - Disassembly Inspection Repair Old Codger New To Old Suzuki Jeeps The odometer on this 1972 LJ20 indicated the distributor had less than 10,000 miles of wear but during that time it had
HSR Carburetor Sportster & Buell. Installation Manual. Revised 7/5/00
 HSR Carburetor Sportster & Buell Installation Manual Carb Kit# 42-10 Carb Kit# 42-11 94 - present Sportster All Buells Revised 7/5/00 SB-1 Sportster/Buell Installation The HSR series carburetors are precise
INSTALLATION INSTRUCTIONS FOR ELECTRIC CHOKE KIT P/Ns , S, &
 INSTALLATION INSTRUCTIONS FOR ELECTRIC CHOKE KIT P/Ns 45-224, 45-224S, & 745-224 INTRODUCTION: Congratulations on your purchase of a new electric choke kit from Holley! These kits can be used to convert
Replacing the hub oil seal.
 Replacing the hub oil seal. The most common reason for hub oil seal failure is a blocked axle breather, so check this first before you start. Remove the brass bell-shaped fitting on the top of the axle,
2 of 10. Bronco Parts. Dana 44 Yukon Hardcore Chrome Moly Axle Set $ Dana 44 Chrome Moly 4340 Axle Set With $325.00
 1 of 10 Next, remove the long main filter bolts and the 9 shorter VB bolts. Notice the correct location of the ID tag. This picture shows the throttle pressure limit valve and spring have not yet been
The All-New BIG97 Tri-Power. In Detail.
 The All-New BIG97 Tri-Power. In Detail. The all-new Stromberg BIG97. On the outside, it s Genuine 97 all the way. But on the inside, we re talking 250cfm, new improved fuel circuits, ported distributor
10/12/2015 boostcontrol
 Boost Controller Updated May 14, 2002 Here is a boost controller that incorporates quick spool up, minimal spikes, and minimal hassle. You will merely have to clean it once in a while, or else put a tiny
FI AirGap intake installation instructions
 Updated March 2016 FI AirGap intake installation instructions Please read and understand all of the instructions and check to make sure that all of the parts (shown on last page) are present before you
DrVanos.com Stage II Installation Instructions. Tool rental is available with the purchase of a vanos kit *See website for more info*
 DrVanos.com Stage II Installation Instructions Special Tools Needed: Camshaft locking tool TDC Crank pin Sprocket turning tool Tool rental is available with the purchase of a vanos kit *See website for
SPEED & ROAD DEMON ELECTRIC CHOKE KIT #421440
 SPEED & ROAD DEMON ELECTRIC CHOKE KIT #421440 CHOKE INSTALLATION INSTRUCTIONS LIT702 Please make sure you have read and completely understand the instructions before you begin the installation. Keep in
CHAPTER 2: HEAD, BARREL, SUMP, BIGENDS, ALTERNATOR
 CHAPTER 2: HEAD, BARREL, SUMP, BIGENDS, ALTERNATOR Posted on the Wildguzzi forum by Pete Roper: December 10, 2005: Contents: Head, barrel and sump off, bigend bearings, alternator off Pic 2-01: Note that
QUICK FUEL TECHNOLOGY HOT ROD SERIES CARBURETORS SLAYER SERIES CARBURETORS SUPER STREET SERIES CARBURETORS
 QUICK FUEL TECHNOLOGY Installation Instructions HOT ROD SERIES CARBURETORS SLAYER SERIES CARBURETORS SUPER STREET SERIES CARBURETORS HR-580-VS 580 CFM Vac. Secondary!!! SS-680-VS 680 CFM Vac. Secondary
HUDSON MOTOR CAR COMPANY
 HUDSON MOTOR CAR COMPANY 1935-1942 Carburetor Tune-up Manual ( for Hudson and Terraplane Models) Index Carter W-1 Downdraft 1935-1942 1 Carter W-1 Vacumeter Type 1938 Hudson 4 Carter WA-1 Vacumeter Type
WEBER CARBURETOR TROUBLESHOOTING GUIDE
 This guide is to help pinpoint problems by diagnosing engine symptoms associated with specific vehicle operating conditions. The chart will guide you step by step to help correct these problems. For successful
MAXI-BORE TM CARBURETTORS
 MAXI-BORE TM CARBURETTORS 26mm/28mm Mik bored to 30.5mm 33mm Smoothbores bored to 38.5mm Don t just rebuild your carbs MAXI-BORE TM them! MAXI-BORE TM carbs are more than just cleaned, rebuilt, or bored,
SECTION 4 - FUEL/LUBRICATION/COOLING
 For Arctic Cat Discount Parts Call 606-678-9623 or 606-561-4983 SECTION 4 - FUEL/LUBRICATION/COOLING 4 TABLE OF CONTENTS Carburetor Specifications... 4-2 Carburetor Schematic... 4-2 Carburetor... 4-3 Cleaning
1. Invert the tender, and hold in a suitable device. We use a foam cradle the Peco loco service cradle being ideal.
 Bachmann J11 EM Finescale Conversion Before you start, it is a good idea to have some small containers or snap top poly bags to put screws and components in for safe keeping...much better than crawling
TRANS-SCAT Installation Instructions for Ford AOD
 TCI 436000 TRANS-SCAT Installation Instructions for Ford AOD 1980-1993 TCI 436000 Kit Contains: Qty. Description Five (5) Gaskets: Three (3) Valve Body One (1) Filter One (1) Duraprene Pan Two (2) Springs:
CARBURETOR REBUILD KIT (Vacuum Secondary) Models Demon Carburetors & Holley Model 4160 LIT704
 Models Demon Carburetors & Holley Model 4160 LIT704") CARBURETOR REBUILD KIT 190000 (Vacuum Secondary) Models Demon Carburetors & Holley Model 4160 LIT704 INSTRUCTIONS: Before getting to the actual rebuild, it should be noted that the carbs shown here are
CARBURETOR REBUILD KIT 190000 (Vacuum Secondary) Models Demon Carburetors & Holley Model 4160 LIT704 INSTRUCTIONS: Before getting to the actual rebuild, it should be noted that the carbs shown here are
INSTRUCTION SHEET Rochester Carburetor Models 4G 4GC
 INSTRUCTION SHEET Rochester Carburetor Models 4G 4GC General Exploded View The general design and parts shown will vary to individual units covered on this instruction sheet. Disassembly Use the exploded
CHAPTER 4. CARBURETION
 CHAPTER 4. CARBURETION CARBURETOR... 4l SECTIONAL VIEW.... 42 REMOVAL... 44 DISASSEMBLY... 44 INSPECTION... 47 ASSEMBLY... 48 INSTALLATION....4l 1 ADJUSTMENT....4l 1 1 C A R B U R E T O R CARBURETOR @connection
CARBURETION. Flo-Jet Carburetors. One Piece. One-Piece Flo-Jet. Main Jet Adjustment N eedle
 One Piece One-Piece Flo-Jet The small One-Piece Flo-Jet carburetor is illustrated in Fig. 122 and was used on early Model 170700. These are float feed carburetors with adjustable orifice main jet needle