Nissan GTR Alpha Fuel System
|
|
|
- Rafe Alexander
- 5 years ago
- Views:
Transcription
1 Nissan GTR Alpha Fuel System Instructions V5
2 The goal of AMS is to provide the highest quality, best performing products available. By utilizing research and development, and rigorous testing programs AMS will never compromise the quality or performance of our products. In addition, AMS will only provide the finest customer service offering only parts and advice that are in the best interests of the customer. AMS was built on a foundation of integrity. This is who we are; this is what you can count on. A vehicle modified by the use of performance parts may not meet the legal requirements for use on public roads. Federal and state laws prohibit the removal, modification, or rendering inoperative of any part or element of design affecting emissions or safety on motor vehicles used for transporting persons or property on public streets or highways. Use or installation of performance parts may adversely affect the drivability and reliability of your vehicle, and may also affect or eliminate your insurance coverage, factory warranty, and/or new OEM part warranty. Performance parts are sold as-is without any warranty of any type. There is no warranty stated or implied due to the stresses placed on your vehicle by performance parts and our inability to monitor their use, tuning, or modification. These instructions are provided as a guide only as there are many variables that cannot be accounted for concerning your particular vehicle, including but not limited to model year differences, model differences, the presence of non- OEM parts, and modifications that may already be or were previously installed. A basic knowledge of automotive parts and systems is helpful but a better understanding of the parts and systems on your particular vehicle may be required. If you have any questions or issues at any time during the installation of your AMS product(s) please call us for technical assistance. The AMS tech line can be reached during business hours at for AMS products only.

3 Packing List: Fuel pump mounting plate with built in regulator Fuel filter and distribution block assembly 3 - Hose clamps 7 - Hoses 2 - Large electrical ring terminals 2 - Small electrical ring terminals 2 - M5 nuts with washers 2 - M6 nuts with washers 2-8AN fuel pump fittings with sealing washers 2 - Bosch fuel pumps Fuel pump re-wire supplies and relays Length of grommet for fuel tank Hobbs switch kit Cowl splash shield
4 The installation of this fuel system is fairly involved, most of the assembly must be done inside the tank and some safety precautions should be taken before starting work. Keep ALL possible sources of spark or flame AWAY from the work area in and around the vehicle AT ALL TIMES! Before beginning installation run the vehicle as low on fuel as possible, it is much easier to work inside of the gas tank with little to no fuel in it. Work in a well ventilated area and roll both car windows down. Disconnect the negative terminal of your battery. Remove your passenger seat. This isn t required but it makes the job a lot easier and opens up the work area quite a bit.

5 1. Begin by removing the passenger side portion of the rear seat. This is done by pulling on the lever under the frontcenter of it and then pulling the seat up and forward. 2. Remove the fuel tank access panel: the fasteners that hold it in will stay on the car but they turn clockwise to line up with their holes and release the cover. Once the cover is loose disconnect the 2 connectors going to the sending unit and pull the cover back.

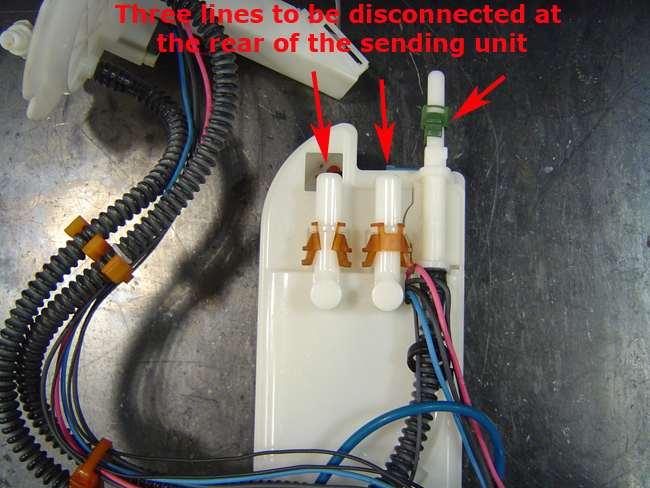
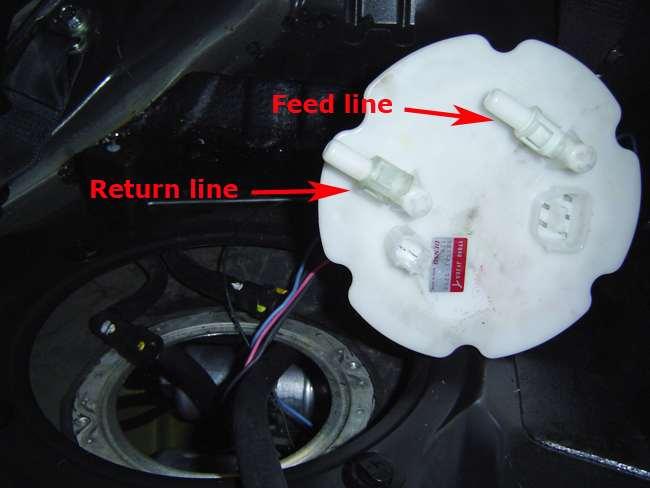
6 3. Disconnect both fuel lines from the sending unit. This is done by pinching the white clips and pulling the line back. The hose and fitting will pull off but the white clips will stay on the sending unit. This may take a bit of twisting and pulling. Have towels handy to clean up fuel that will most likely come out of these connections.

7 4. You can now remove the fasteners holding the sending unit plate down and remove the sending unit plate. Pull the upper portion of the sending unit out; the hoses and wires are long enough that it can be put off to the side.

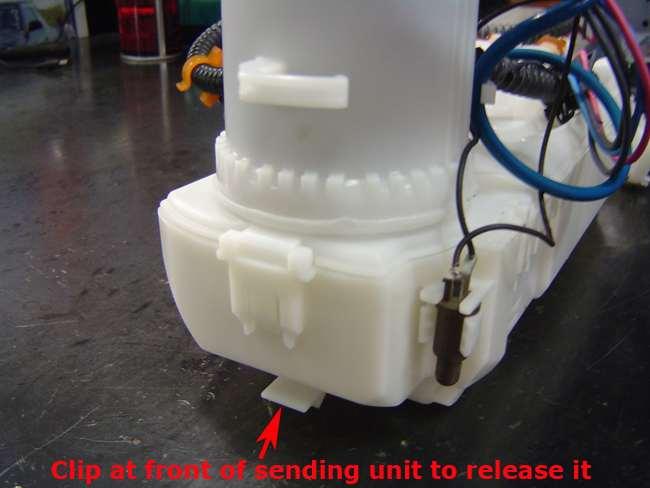
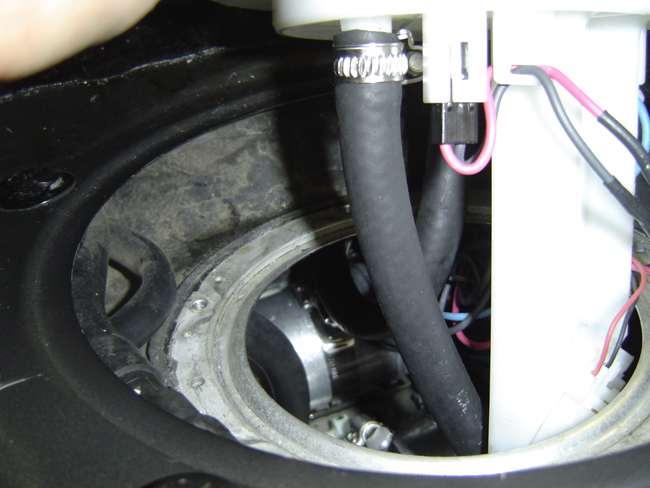
8 5. You can now begin the removal of the in-tank portion of the fuel sending unit. There are three lines on the back of the sending unit that must be disconnected; these lines use the same style connector as the lines on the top portion of the sending unit. Then reach under the front center of the unit and it can be unclipped, slide forward to release it and then remove from the fuel tank. If you find it easier to unclip it to slide it forward for easier access to the lines you can remove the lines after.
9

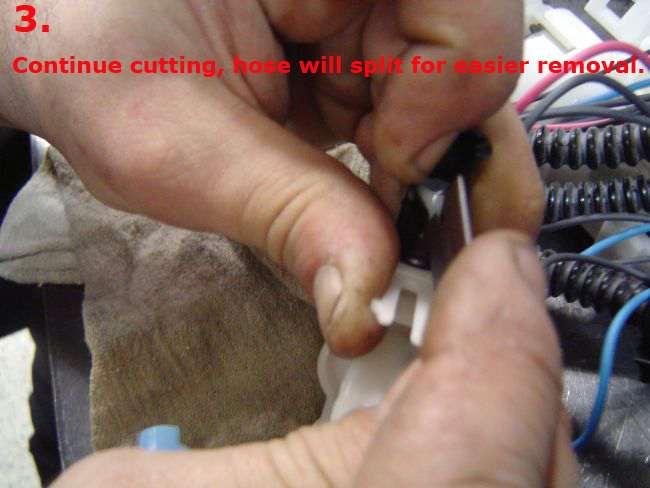
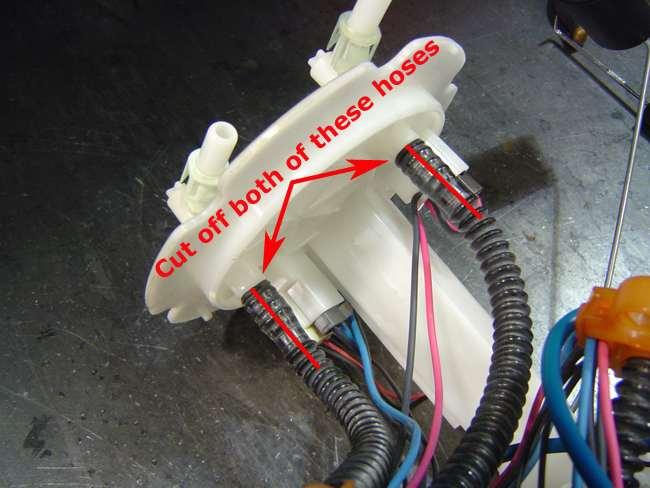
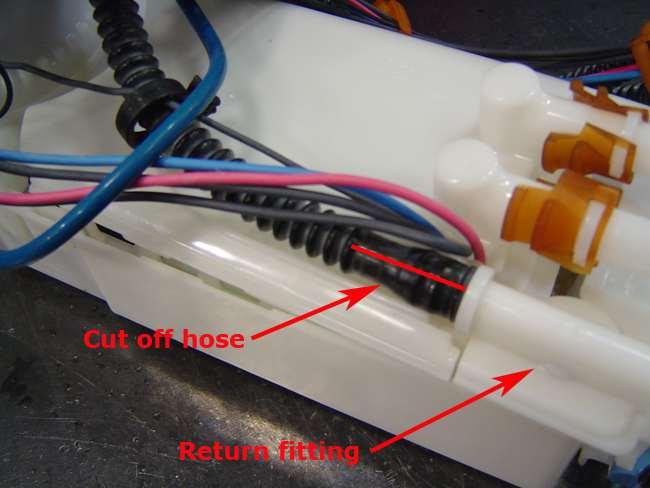
10 6. Now that the sending unit is completely out of the gas tank you can begin the disassembly. Begin by cutting off both hoses that go to the upper sending unit and the single hose that goes to the return fitting on the lower portion of the sending unit. Be very careful cutting hoses off of their fittings, you don t want to cut into the plastic under the hose. The best way to do this is cut off the hose about ¼ from where the plastic barb ends inside the hose and then cut parallel with the hose, this will make the hose begin to split so you can see the plastic barb as you are cutting. Refer to the pictures below.

11
12

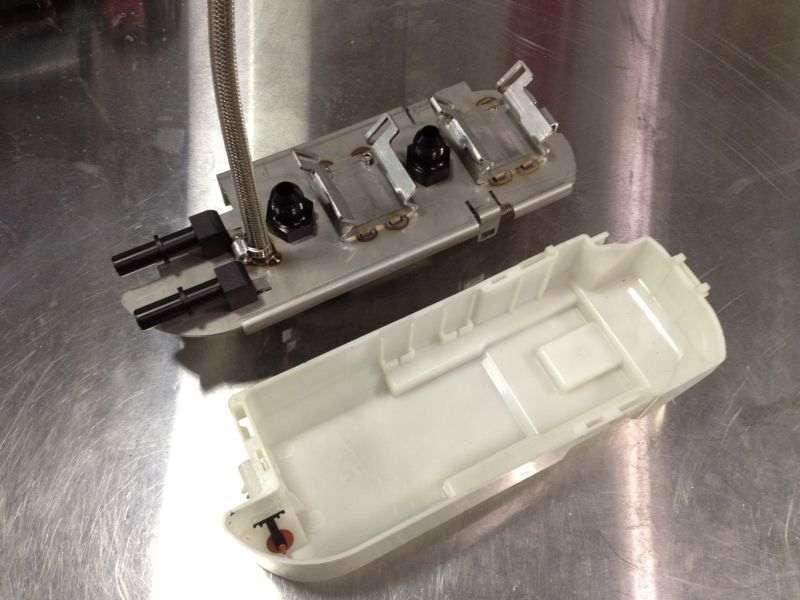
13 Next you can separate the top plate and the sending unit tub. This is done by releasing numerous clips that are around it. To release the clips you gently pull up the center plastic tab and then pinch the other two tabs together to release the clip. Also remove the return fitting and pump mount assembly. Don t forget to unclip the fuel temp sensor from the tub and note its orientation. This will be getting reinstalled later on.

14 Once everything is apart you should end up with this: 7. You can now disconnect the wiring harness from the pump mount assembly. You will not be using the original connectors so you can just cut them off 10 inches before the fuel pump connector. In the harness for the fuel pump that has a red wire there is an additional small black wire, when you cut off the harnesses you can just leave the wire with the pump mount assembly. Keep each ground wire with their power wire, tape them or zip tie them together in the meantime before you connect them to the fuel pumps. 8. Now it is time to prepare the harness for the new pumps. Install the two larger ring terminals onto the positive wires (red and blue) and the smaller ring terminals onto the two ground wires (black).

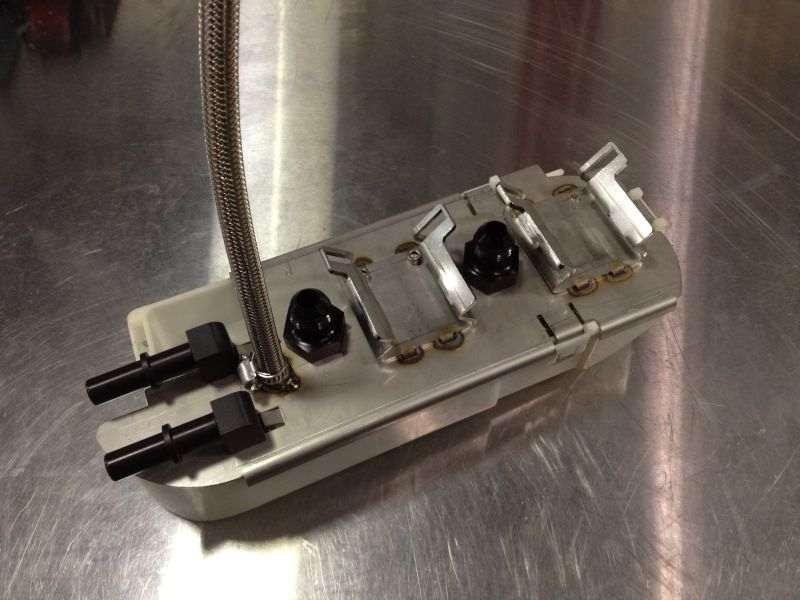
15 At this point you are now done with the pump mount assembly and the top plate, you can put them aside. 9. Next, install the pre-assembled AMS fuel pump mount top plate assembly onto the factory sending unit tub; it snaps into place very tightly and pliers may be needed to fully engage the clips.
16

17 10. Install the short hose assembly onto the return fitting as show below. The fitting should face to the side and be horizontal. It s easier to install it onto the return fitting before clipping the return fitting into the pump mount assembly. The worm screw should face straight up. 11. Install the return fitting, it will also clip into place. If the clips from the in-tank hoses are still on the fittings at this point remove them and put them back on the lines.

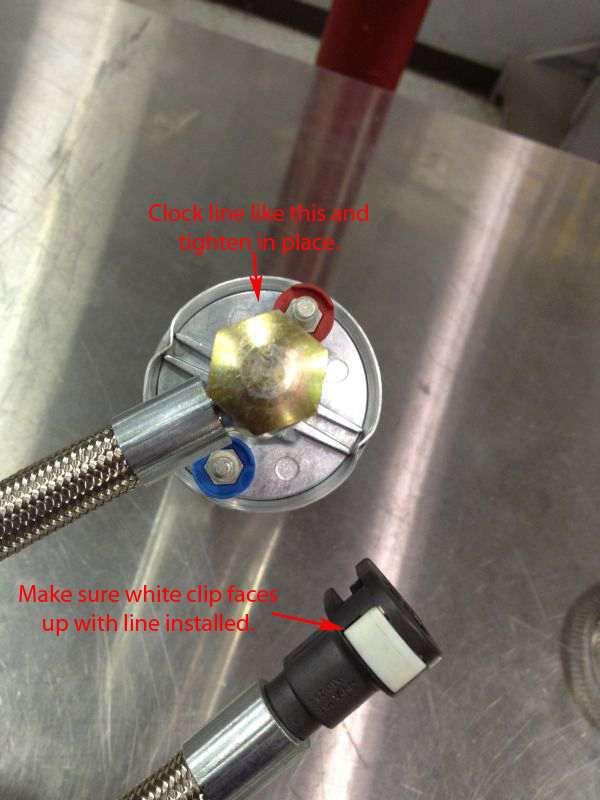
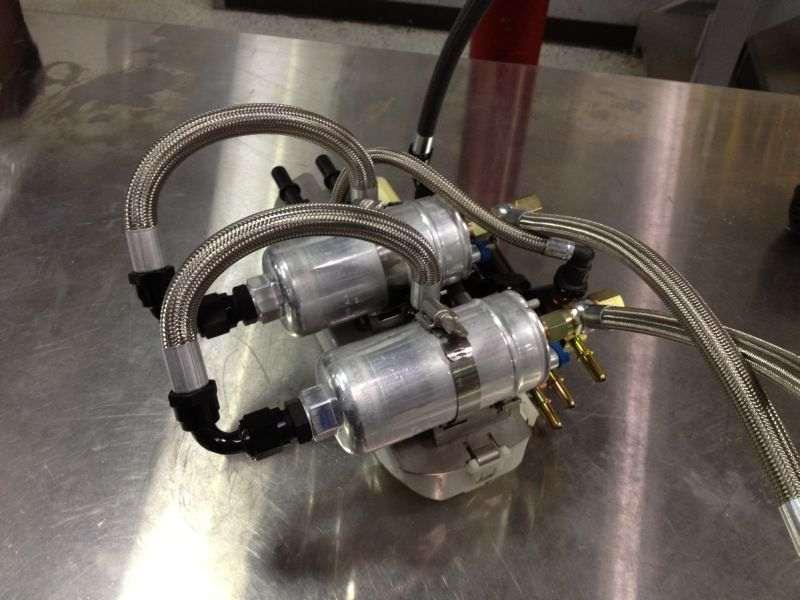
18 12. Next you will be preparing the fuel pumps for installation, find the two lines that have banjo fittings on one end and quick connect fittings on the other, these are the fuel pump outlet lines. Install the lines on the outlet of the fuel pumps using the supplied nuts and washers. Clock as shown below, making sure that the white clip on the fitting is facing up.

19

20 13. Next install the -8 AN fittings into the inlets of the fuel pumps using the supplied crush washers. 14. Connect the fuel feed line to the fuel filter, line it up with the fitting as pictured below.

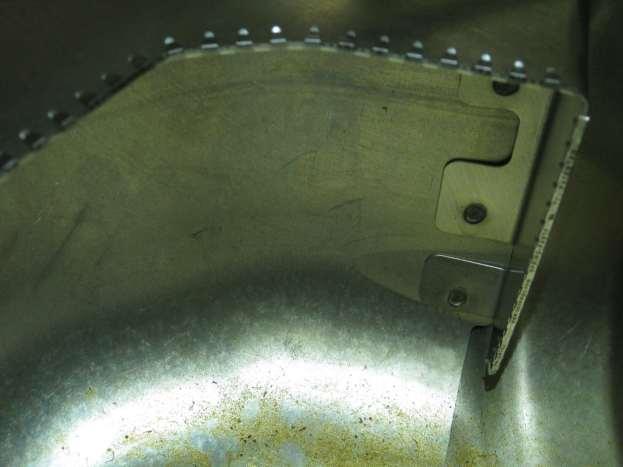
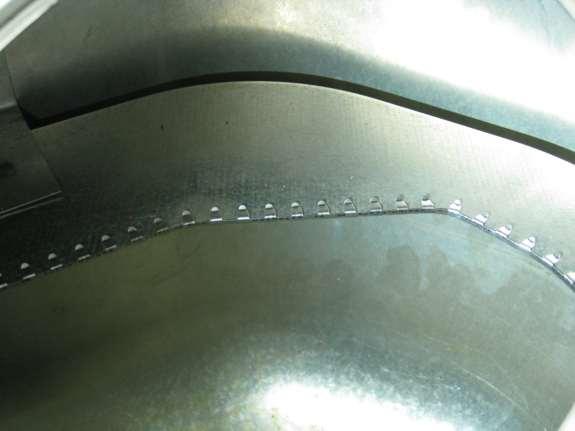
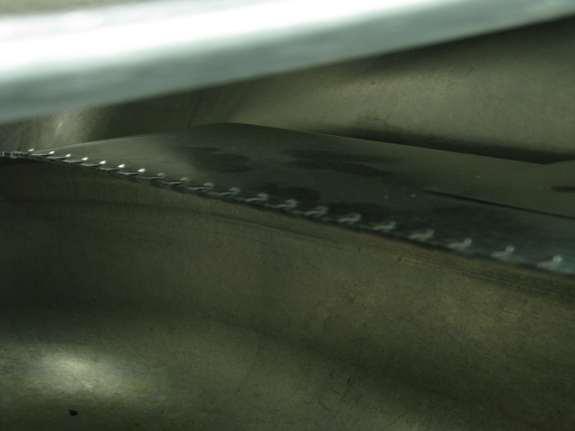
21 Now the in-tank installation begins. The Nissan GT-R fuel tank is baffled to try and keep fuel around the fuel pump assembly during accelerating, braking, and hard cornering. These baffles have sharp edges which may cut into the fuel-safe lines included with the AMS GT-R Alpha Fuel System. As an extra precautionary measure there are 2 sections of grommet edging included that need to be installed BEFORE the installation of your AMS GT-R Alpha Fuel System. The short section installs vertically while the long section installs horizontally as shown below along the yellow lines (the letters A and B are to be used as a continuation reference since the entire baffle system could not be shown with just one picture).
22 A
23 A B B

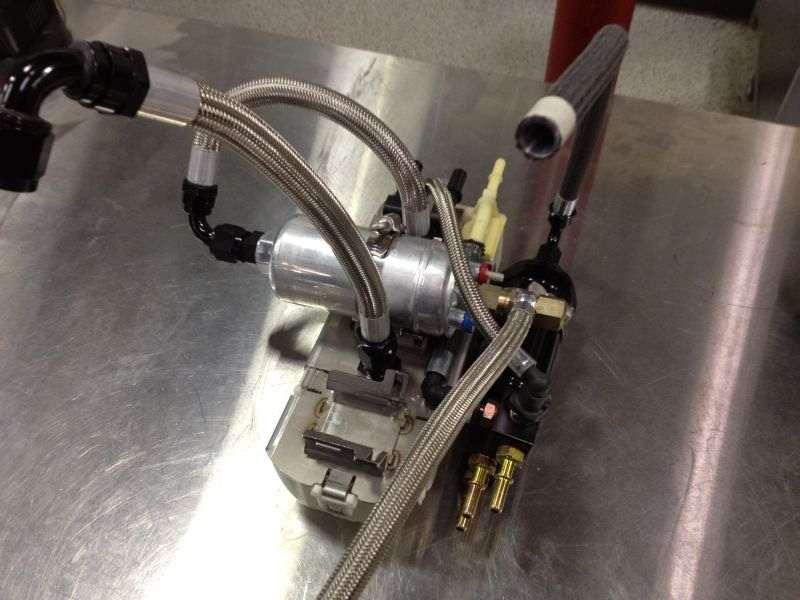
24 At this point you can place the pump mount assembly into the fuel tank where it will be final assembled. The following pictures show it outside of the tank for a better view. 15. Once in the tank you will first be connecting the lines that are in the tank to the rear of the sending unit. The two large lines can go on either port, it doesn t matter. Dip the lines into fuel for lubrication and snap them onto the ports on the sending unit.

25 16. Next you will be installing the fuel filter and distribution block assembly. Thread the hose clamp through the tab on the side of the fuel pump mounting bracket. Then place the fuel filter in the clamp and clip the side fitting into the hose that you installed onto the fuel return fitting earlier and tighten the clamp. Push the knob of the clamp as close to the top plate as possible or it will rub inside the fuel tank. 17. Now it is time to install the fuel pumps. Begin by connecting their power wires as shown below using the supplied SS nuts and star washers. It doesn t matter which pump gets what set of wires but as mentioned before you must keep the grounds with their respective power wires.


26 18. Begin by installing the pickup hose for the rear pump.

27 19. Next slide the clamp for the rear pump in place and lay the pump in the mount with the ridge in the slot on the driver s side of the mount. Tighten the clamp just enough to locate the pump, don t final tighten it yet. The pump should be positioned so the electrical connections are horizontal. After the pump is located properly connect the pickup hose to the bottom of the pump. After that, clip the line coming from the top plate to the top port of the distribution block. 20. Install the front pump in the same fashion.
28

29 21. Now would be a good time to clip in the fuel temp sensor. Note how it is installed, it is offset. At this time you can also slide the whole assembly back into the channels in the fuel tank until it clicks in place and doesn t move. 22. Snap the fuel pump outlet lines to the two bottom ports of the distribution block. Once both lines are connected take a look around and make sure the lines aren t rubbing on any sharp edges inside the tank, if they are you can pivot the fuel pumps as needed to move the lines. Finally, tighten the pump clamps.

30 23. At this point you can clip the return line onto the last port of the distribution block, this should be the top horizontal fitting. This should be the last hose you have, it will have a straight quick connect fitting on one side and nothing on the other.

31 24. Now you will have two hoses left to connect, go ahead and pull them out of the fuel tank in preparation of connecting them to the top sending unit plate. You can also use the supplied zip ties and organize the wiring as you see fit. The main idea here is to keep it as short as possible and near the back of the tank away from the level sensing arm.

32 25. You can now connect the last two lines to the sending unit plate but first the feed and return need to be determined. Looking at the lines that connect to the top of the sending unit on the outside, the straight fitting is the feed line and the 90 fitting is the return. Connect the line coming from the fuel filter to the feed port and the line from the distribution block to the return port. Clamp with the supplied hose clamps.
33

34 26. Re-install the sending unit carefully. Watch it for as long as possible and make sure that no hoses get caught or rub against the level sensing arm. Be sure to place the blue o- ring in place, and tighten down the black ring. Re-connect the feed and return lines. At this point you can now re-wire the fuel pumps following the instructions next.
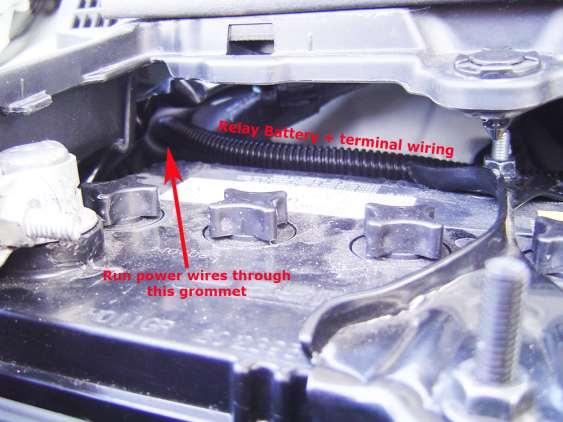
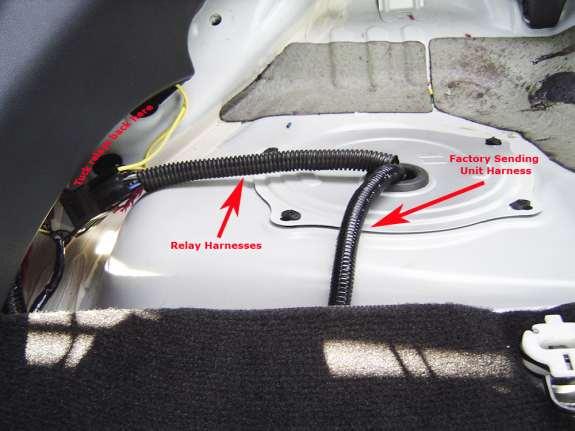
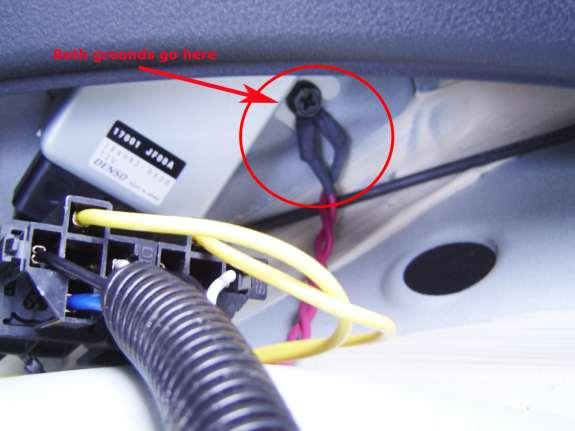
35 At this point you can now install our fuel pump rewire and hobbs switch kit. This will supply full battery voltage to the fuel pumps for maximum flow. After the installation the cowl splash shield can be put in place. Packing List: 2 Relays w/ Harnesses 4 Blue Ring Terminals 8 14G-16G Butt Connectors 4 18G-22G Butt Connectors 20 14G Wire 2 Fuse Holders w/ 30A fuses 6 1/8 Heat Shrink 12 3/16 Heat Shrink Hobbs switch w/ install parts Installation Instruction: 1) Disconnect the negative battery cable. Install both fuse holders at the battery connecting them to the positive battery harness with a ring terminal. Connect a wire to each fuse holder using a butt connector. Run wires from each fuse holder back to the fuel pump area. This area is under the rear right seat cushion. I ran the wires into the car through a small slit I made in the factory engine wire harness grommet. This grommet is on the firewall behind the battery. I removed the sill plates and routed the wires back under the carpet. The wires from the battery get attached to wire 30 of each relay harness using a butt connector. The relay harness wire numbers are labeled on the bottom of the relay.
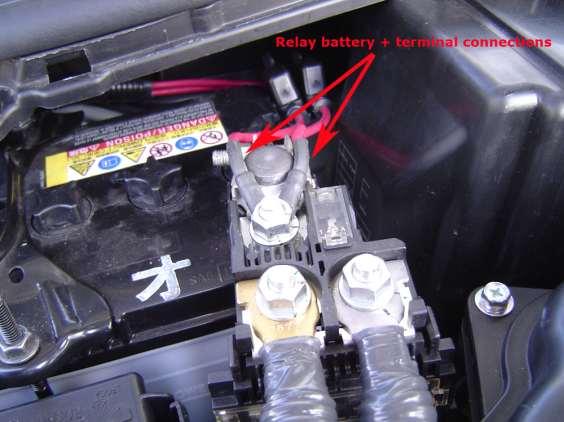
36

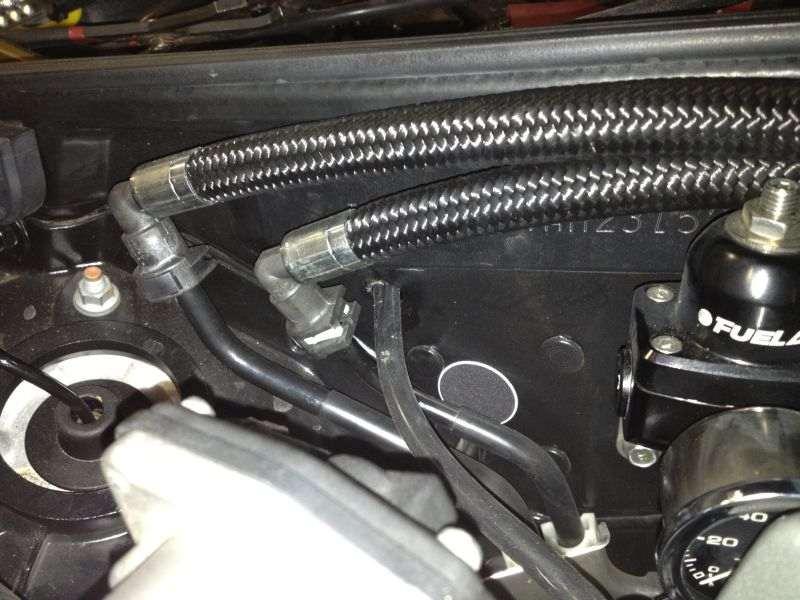
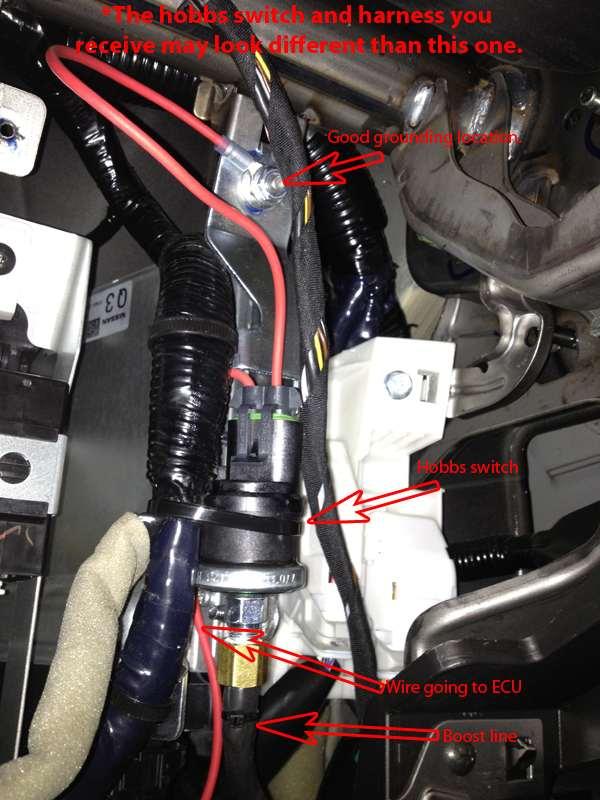
37 2) At this point you can now install the Hobbs switch that is used to turn on the 2 nd fuel pump when 10 psi of boost is reached. Begin by running a boost source line into the cabin through the harness grommet in the same fashion as the power wires, this line must come from the intake manifold. IF you have a boost gauge in the car you can tap into that line instead of running a new one.
38


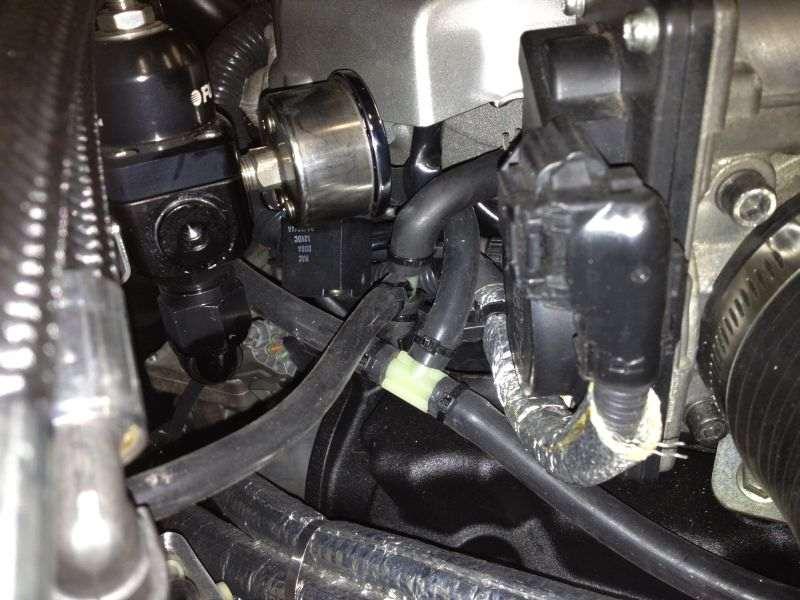
39 3) Connect this line to the Hobbs switch and mount the switch near the ECU. Next find pin 126 of the Grey colored ECU connector; this is the connector farthest back when referencing the front of the car. This wire will be blue. Tap one side of the Hobbs harness into this wire using the vampire clip and spade connector. The other Hobbs harness wire goes to a good ground point.
40
41
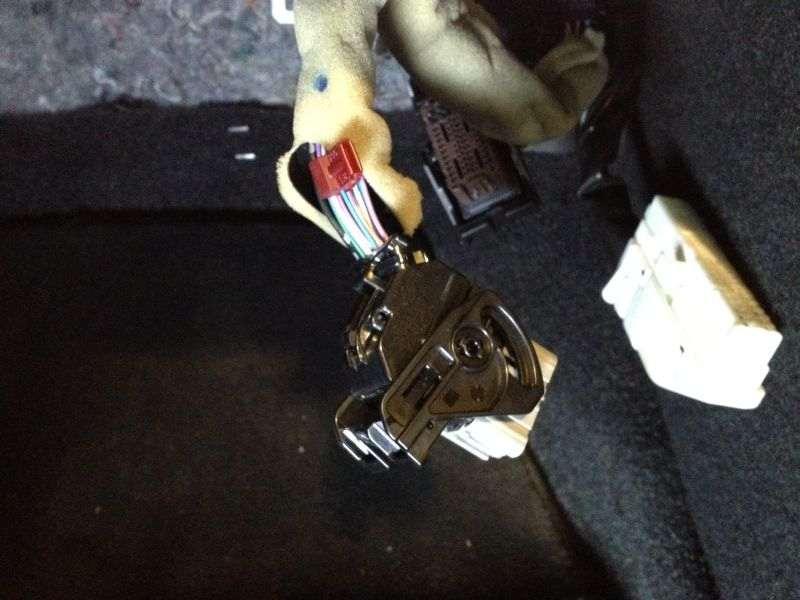
42 4) Remove the access cover and unplug both electrical connectors at the sending unit. Wire up one relay at a time. a. Cut the 2 pin connector off the factory harness leaving 1 of wiring on the connector side. Connect wire 87 of the relay harness to the orange wire of the connector using a butt connector. All relay wires should be routed through the grommet in the access panel to prevent wires from getting pinched or chaffed. Make wire connections using provided butt connectors. Extend the black wire of the connector long enough to reach a suitable ground. Connect it to ground using a ring terminal. Plug the 2 pin connector back into the sending unit. Connect the orange wire of the harness to wire 85 of the relay harness. Connect the black wire of the harness to wire 86 of the relay harness. b. Cut the two thicker wires of the 5 pin connector leaving 1 of wiring on the connector side. Connect wire 87 of the relay harness to the brown wire of the connector. Extend the green wire of the connector long enough to reach a suitable ground location. Connect it to ground using a ring terminal. Plug the 5 pin connector back into the sending unit. Connect the brown wire of the harness to wire 85 of the relay. Connect the green wire of the harness to wire 86 of the relay.

43 5) Reinstall the access panel making sure not to pinch any wires. Secure the relays off to the side and route the wiring so it will not get pinched by the seat cushion. Reinstall the seat cushion and put the interior back together. Install the fuses in the fuse holder and test fuel system operation.
44

45 6) The final step of the installation is to install the AMS cowl splash shield. This shield goes protects the area where the engine harness enters the car.
GT-R Alpha 10/12 Turbo Kit
 GT-R Alpha 10/12 Turbo Kit Instructions V6 The goal of AMS is to provide the highest quality, best performing products available. By utilizing research and development, and rigorous testing programs AMS
AMS EVO X Fuel Pressure Regulator Kit
 AMS EVO X Fuel Pressure Regulator Kit The goal of AMS is to provide the highest quality, best performing products available. By utilizing research and development, and rigorous testing programs AMS will
Alpha Performance Air/Oil Separator Installation Instructions
 Alpha Performance Air/Oil Separator Installation Instructions 5-1-15 The goal of Alpha Performance is to provide the highest quality, best performing products available. By utilizing research and development,
RED ALPHA COOLANT EXPANSION TANK
 RED ALPHA COOLANT EXPANSION TANK Our Q60 and Q50 VR30 Red Alpha Expansion Tank increases the Red Alpha Heat Exchanger coolant capacity by an astounding 70% and the radiator coolant capacity by 28%! Our
AMS F1-I INTAKE MANIFOLD
 AMS F1-I INTAKE MANIFOLD The goal of AMS is to provide the highest quality, best performing products available. By utilizing research and development, and rigorous testing programs AMS will never compromise
Nissan GT-R Intercooler Pipe Kit
 Nissan GT-R Intercooler Pipe Kit The goal of AMS is to provide the highest quality, best performing products available. By utilizing research and development, and rigorous testing programs AMS will never
Alpha Intercooler Install Instructions w/stock turbo
 Alpha 997.1 Intercooler Install Instructions w/stock turbo The goal of Alpha Performance is to provide the highest quality, best performing products available. By utilizing research and development, and
Difficulty Level: 3-4. This is very intensive for an intercooler installation. Experienced mechanical skills recommended. Wrenches Sockets Specialty
 Nissan GT-R FMIC The goal of AMS is to provide the highest quality, best performing products available. By utilizing research and development, and rigorous testing programs AMS will never compromise the
RACE X INTERCOOLER INSTALLATION INSTRUCTIONS
 RACE X INTERCOOLER INSTALLATION INSTRUCTIONS The goal of AMS Performance is to provide the highest quality, best performing products available. By utilizing research and development, and rigorous testing
INFINITI Q50/Q60 LOWER DOWNPIPE
 INFINITI Q50/Q60 LOWER DOWNPIPE The Alpha Performance Q60 Red Alpha lower downpipes offer a more pronounced, throaty exhaust note under wide open throttle yet are subdued at idle and while cruising. 2
Mercedes E63/CLS AMG Carbon Turbo Intake System Instructions
 Mercedes E63/CLS AMG Carbon Turbo Intake System Instructions The goal of Alpha Performance is to provide the highest quality, best performing products available. By utilizing research and development,
INFINITI Q50/Q60 Red Alpha Heat Exchanger
 INFINITI Q50/Q60 Red Alpha Heat Exchanger Whether you live in a hot climate region, enjoy racing, or long high speed pulls the INFINITI Q60/Q50 Red Alpha Heat Exchanger will help keep your intake temps
Alpha GTR Transmission Pan/Spacer Kit
 Alpha GTR Transmission Pan/Spacer Kit 12-2-15 The goal of Alpha Performance is to provide the highest quality, best performing products available. By utilizing research and development, and rigorous testing
MERCEDES AMG45 HPFP UPGRADE
 MERCEDES AMG45 HPFP UPGRADE WARNING/DANGER: SERIOUS RISK OF FIRE, EXPLOSION, BODILY INJURY INCLUDING RESULTING DEATH, AND ENGINE, VEHICLE, AND OTHER PROPERTY DAMAGE. THIS FUEL PUMP MUST BE INSTALLED AND
Installation MKIV Headlight Housings with Fog Lamps (Procedures apply to both MKIV Jetta and Golf)
") Page 1 This tutorial is provided as a courtesy by ECS Tuning. Service Procedure Installation Proper service and repair procedures are vital to the safe, reliable operation of all motor vehicles as well
Page 1 This tutorial is provided as a courtesy by ECS Tuning. Service Procedure Installation Proper service and repair procedures are vital to the safe, reliable operation of all motor vehicles as well
Depress each tab as you pull the bezel off. The bezels are tight. L.H. shown.
 2013-2014 Ford Mustang V6 & Boss 302 Lower Valance Fog Light Kit Parts List: Quantity: Tool List: Fog light & bulb with bracket 2 Flat head & Phillips screwdriver Black bezels 2 Ratchet & Socket set OR
ECS Tuning 3095 Cleveland-Massillon Rd. Norton, Ohio Phone Fax Web
 B7 A4 Gauge Pod Installation Instructions Safety first:. When working with your vehicles electrical system; always disconnect the battery! Avoid shorting any circuits, or probing around wires. Failure
R35 GTR ALPHA X TURBO KIT INSTALLATION INSTRUCTIONS
 R35 GTR ALPHA X TURBO KIT INSTALLATION INSTRUCTIONS 04 06 09 10 14 21 30 31 34 Turbo Kit Packaging Information Engine Mount Installation Exhaust Manifold Installation Heat Shield Exhaust Manifold Shield
SHELBY GT500
 2007-2009 SHELBY GT500 Removal of Factory Unit WARNING: 1. Radiator fluid must be handled properly. Please observe local ordinances with regards to handling and disposal. 2. Allow vehicle and components
Installation Manual TWM Performance Short Shifter Cobalt SS/SC, SS/TC, HHR SS, Ion Redline and Saab 9-3
 Page 1 Installation Manual TWM Performance Short Shifter Cobalt SS/SC, SS/TC, HHR SS, Ion Redline and Saab 9-3 Please Note: It is preferable to park on a flat surface, as you will have to engage and disengage
INSTALLATION INSTRUCTIONS
 INSTALLATION INSTRUCTIONS FUEL SURGE TANK INSTALL KIT Honda S2000 Document# 19-0063 Support: info@radiumauto.com WARNING: DO NOT SMOKE WHILE WORKING ON FUEL SYSTEMS. KEEP SPARKS AND OPEN FLAMES AWAY FROM
X-Type w/ non-premium sound amplifier installation instructions
 X-Type w/ non-premium sound amplifier installation instructions 1. Pull radio from dash (see Radio Removal Instructions ) 2. Disconnect wiring harness from back of radio by pushing in tab on plug and pulling
TOYOTA PRIUS FOG LIGHT (Halogen or LED)
") Part Number: TPR-413 / TPR-813 Kit Contents Item # Quantity Reqd. Description 1 2 Fog Lamps 2 1 Lower Grill 3 1 Switch Assembly 4 1 Fog Light Operation guide 5 1 Harness Bag Hardware Bag Contents Item
Part Number: TPR-413 / TPR-813 Kit Contents Item # Quantity Reqd. Description 1 2 Fog Lamps 2 1 Lower Grill 3 1 Switch Assembly 4 1 Fog Light Operation guide 5 1 Harness Bag Hardware Bag Contents Item
MKVI Jetta Fog Light Kit
 MKVI Jetta Fog Light Kit Part Number VW Jetta Fog Light Installation This tutorial is provided as a courtesy by ECS Tuning. Proper service and repair procedures are vital to the safe, reliable operation
Installation Instructions - ECS Tuning Vent Pod Vacuum/Boost Gauge Kit
 Installation Instructions - ECS Tuning Vent Pod Vacuum/Boost Gauge Kit This tutorial is provided as a courtesy by ECS Tuning. Part Number for Audi B6 A4 (2002-2004) Proper service and repair procedures
Installation Instructions for Chevrolet Colorado, GMC Canyon, LT, Z71, With Factory Fog Lights
 Installation Instructions for 2015-2018 Chevrolet Colorado, GMC Canyon, LT, Z71, With Factory Fog Lights This kit is designed to allow use of your factory fog light operation along with an addition auxiliary
ROUSH Active IO Exhaust. Installation Instructions P/N: (R LITE) Fastback GT Convertible GT V8
 Fastback GT Convertible GT V8") Installation Instructions P/N: 422128 (R1318-5231LITE) Fastback GT Convertible GT V8 39555 Schoolcraft Rd, Plymouth MI, 48170 800.59.ROUSH ROUSH Active IO Exhaust Installation Instructions P/N: 422128
Installation Instructions P/N: 422128 (R1318-5231LITE) Fastback GT Convertible GT V8 39555 Schoolcraft Rd, Plymouth MI, 48170 800.59.ROUSH ROUSH Active IO Exhaust Installation Instructions P/N: 422128
LGT-311L Bumper LED Light Kit EZ-Go RXV Installation Instructions
 LGT-311L Bumper LED Light Kit EZ-Go RXV Installation Instructions Caution: Please read through the instructions carefully. Before starting this project, remove the system s positive and negative connections
INSTALLATION INSTRUCTIONS Mitsubishi Lancer Evolution VIII / IX Fuel Surge Tank Kit Document#
 d INSTALLATION INSTRUCTIONS Mitsubishi Lancer Evolution VIII / IX Fuel Surge Tank Kit Document# 19-0077 Brie Tech Support: info@radiumauto.com CAUTION: Exercise extreme caution when working with the fuel
PN R CHEVY CAMARO w/reverse Two panel Sequential LED Taillight kit installation guide. Kit Contents:
 Two panel Sequential LED Taillight kit installation guide Kit Contents: 2 LED panels 4 rubber grommets 1 power wire with t-tap 1 driver side LED harness, 24 1 passenger side LED harness, 48 2 LED extension
Installation Manual TWM Performance Kia Forte Short Shifter
 Installation Manual TWM Performance Kia Forte 2009+ Short Shifter Begin the installation by parking on a flat surface, as you will have to engage and disengage the hand brake and shift from gears to neutral.
Ford Mustang GT-Style Fog Light Kit Parts List: Quantity: Tool List:
 2013-2014 Ford Mustang GT-Style Fog Light Kit Parts List: Quantity: Tool List: Fog light (Left& Right) 2 Flat head & Phillips screwdriver Upper grille with surround 1 Ratchet & Socket set OR Lower grille
Mustang One-Touch Convertible Top Module (2005+) - Installation Instructions
 - Installation Instructions") Mustang One-Touch Convertible Top Module (2005+) - Installation Instructions The below installation instructions work for the following products: Mustang One-Touch Convertible Top Module (2005+) Please
Mustang One-Touch Convertible Top Module (2005+) - Installation Instructions The below installation instructions work for the following products: Mustang One-Touch Convertible Top Module (2005+) Please
Retro it Steering Column
 Retro it Steering Column INSTALLATION INSTRUCTIONS for 1976-86 CJ5 & CJ7 FOR PART NUMBER S: 1520800010, 1520800020, 1520800051, 1526800010, 1526800020, 1526800051 S I NCE 1986 Instruction # 8000000010
Installation. Instructions ES416. VW MKIV Golf/Jetta/GLI 337/20AE. to activate integral fog lights in Jetta GLX, E-Code, and HID Lighting Systems
 Installation Instructions to activate integral fog lights in Jetta GLX, E-Code, and HID Lighting Systems This tutorial is provided as a courtesy by ECS Tuning. VW MKIV Golf/Jetta/GLI 337/20AE best viewed
Designed for 2015 Ford F150 Super-Cab and Super-Crew vehicles (Compatible in vehicles with or without Sony System. M6 Bolt X 2
 SF150SC15 Designed for 2015 Ford F150 Super-Cab and Super-Crew vehicles (Compatible in vehicles with or without Sony System Subwoofer Assembly Amplifier Relocation Bracket (not used on non Sony trucks)
Detroit Speed, Inc. Electric Headlight Door Kit Corvette P/N: &
 Detroit Speed, Inc. Electric Headlight Door Kit 1968-82 Corvette P/N: 122006 & 122007 The Detroit Speed Inc. Electric Headlight Door Kit replaces the stock vacuum actuated system on all 1968-82 Corvettes.
Tusk UTV Horn & Signal Kit Installation Instructions
 Tusk UTV Horn & Signal Kit Installation Instructions The Tusk UTV signal kit is designed to be a simple way to provide front and rear turn signals, license plate mount with light, horn, and rearview mirrors
4. Remove (4) 10mm and (1) 7mm bolt that holds fascia at front corners, on each side
 10mm and (1) 7mm bolt that holds fascia at front corners, on each side") 2010 Camaro LS3 1. Disconnect battery ground 2. Remove front wheels 3. Remove (5) push pins and (5) #20 torx screws on inner front wheel well liners and remove liners on each side 4. Remove (4) 10mm and
2010 Camaro LS3 1. Disconnect battery ground 2. Remove front wheels 3. Remove (5) push pins and (5) #20 torx screws on inner front wheel well liners and remove liners on each side 4. Remove (4) 10mm and
Thank you for purchasing the Craven Speed FlexPod Complete Gauge Pod Kit For R56, R58, R59, R60 with Refresh Engines (2011+)
") Thank you for purchasing the Craven Speed FlexPod Complete Gauge Pod Kit For R56, R58, R59, R60 with Refresh Engines (2011+) Before You Start Please read instructions completely before installing. These
Thank you for purchasing the Craven Speed FlexPod Complete Gauge Pod Kit For R56, R58, R59, R60 with Refresh Engines (2011+) Before You Start Please read instructions completely before installing. These
INSTALLATION INSTRUCTIONS
 HIGH FLOW AIRFLOW METER INSTALLATION INSTRUCTIONS PART NUMBER D763-1600A APPLICATION: 2001-06 E46 M3 Parts List: Hose clamp 64Z (7) Plastic Rivets Air Filter Temp Sensor & Harness (2) Button Head Screws
Deuce/Ace Installation Instructions
 HARDWARE KIT: Upper Mounting Plate: 2-7/16" (11mm) X 3.5" bolts 2-7/16" flange nuts 2-2" spacers 2-7/16" trim cap mounting washers 2 - plastic trim caps TOOLS NEEDED: safety glasses wrenches 16mm or 5/8"
ATTENTION. Custom Dynamics UTV Turn Signal Kit Installation Instructions
 Custom Dynamics UTV Kit Installation Instructions We thank you for purchasing the Custom Dynamics UTV LED Kit. Our products utilize the latest technology and high quality components to ensure you the most
Installation Instructions Jeep CJ-7
 Retrofit Steering Column Installation Instructions 1976-86 Jeep CJ-7 For Part # s 1520800010, 152800020, 1520800051 www.ididitinc.com 610 S. Maumee St., Tecumseh, MI 49286 (517) 424-0577 (517) 424-7293
750 Paso Wiring Upgrade
 750 Paso Wiring Upgrade Supplies required: 2 Bosch 30A/12V Relays # #0 332 209 150 (with mounting tab) 1 30 Amp fuse holder 1 10 Amp fuse holder 12 inches of brown 12 gauge wire 60 inches of red 14 gauge
ITEM QTY CHECK PART NUMBER DESCRIPTION
 PART #21128 2010 Camaro Cold Air Induction Stage II PACKING LIST Before installation, use this check list to make sure all necessary parts have been included. ITEM QTY CHECK PART NUMBER DESCRIPTION 1.
Installation Manual TWM Performance Short Shifter Subaru STi 2008+
 - 1 - Installation Manual TWM Performance Short Shifter Subaru STi 2008+ Please Note: It is preferable to park on a flat surface, as you will have to engage and disengage the hand brake and shift from
Ford 6.7 EGR Delete Kit
 Fits: 2011 12 Powerstroke 6.7L Read instructions thoroughly before proceeding! ***This kit may void factory warranty please check with manufacturer.*** ***This kit is intended for off road use only.***
Part Number: TAV-713 TOYOTA AVALON LED DRL
 Part Number: TAV-713 Kit Contents Item # Quantity Reqd. Description 1 2 DRL s bezels w/led DRL 2 1 Driver Box 3 1 Harness bag 4 1 User s card 5 1 Cushion pad 6 1 Switch 7 2 Drill Jigs Hardware Bag Contents
INSTALLATION INSTRUCTIONS BILLET FUEL RAIL KIT
 INSTALLATION INSTRUCTIONS BILLET FUEL RAIL KIT MITSUBISHI LANCER EVOLUTION X Document# 19-0067 Support: info@radiumauto.com WARNING: DON'T SMOKE OR WORK WITH OPEN SPARKS WHILE WORKING ON THE FUEL SYSTEM
Wiper motor bolt and spacer. 3. Place relays as shown in picture so you can route the wires.
 TSB Fan Relay Kit Please refer to a factory repair manual when working on your car. 1. Disconnect battery cables from the battery. 2. Remove bolt and spacer from wiper motor as shown in the picture. Wiper
GVW AGM Auxiliary Battery Kit for Air-cooled Westfalia Campers and all Vanagon NON-campers
 GVW-253-701AGM Auxiliary Battery Kit for 1980-1983 Air-cooled Westfalia Campers and all Vanagon NON-campers The purpose of this kit is to add an Interstate SLA1161 battery as an auxiliary battery under
All cores due 30 days after invoice date - no credit after 60 days.
 NO WARRANTY STATEMENT High performance parts & products no warranty policy: The purchaser understands and recognizes that high performance diesel products and services sold by INDUSTRIAL INJECTION SERVICE.
IAG Street Series Air / Oil Separator (AOS) For 2017 WRX
 For 2017 WRX") P IAG Street Series Air / Oil Separator (AOS) For 2017 WRX Part# IAG-ENG-7152 Tools Required: Ratchet, torque wrench, extensions, needle nose pliers, hose cutter, snips/scissors, flathead screwdriver,
P IAG Street Series Air / Oil Separator (AOS) For 2017 WRX Part# IAG-ENG-7152 Tools Required: Ratchet, torque wrench, extensions, needle nose pliers, hose cutter, snips/scissors, flathead screwdriver,
Slingshot Rotrex Supercharger Kit
 Slingshot Rotrex Supercharger Kit This supercharger kit improves on the Slingshot by forcing more dense air into the engine and creating more power. Installation time of the supercharger depends on you
Stand Alone Kit Installation Instructions
 Before installation: Stand Alone Kit Installation Instructions Read all information in this manual carefully Check the product for all components before starting the installation Remove the negative battery
Raxiom Factory GPS Rear Back-up Camera Kit (07-17 Wrangler)
") Raxiom Factory GPS Rear Back-up Camera Kit (07-17 Wrangler) Installation Time: 2.5-3Hrs Tools Required: 7mm Socket & Driver 10mm Socket 10mm Open end wrench Knife / Razor blade Zip-ties Wire Cutters Needle
Raxiom Factory GPS Rear Back-up Camera Kit (07-17 Wrangler) Installation Time: 2.5-3Hrs Tools Required: 7mm Socket & Driver 10mm Socket 10mm Open end wrench Knife / Razor blade Zip-ties Wire Cutters Needle
Conflicts. TOYOTA Prius Foglights. Part Number: Accessory Code: LF1. Factory Fog Lights
 TOYOTA Prius 2011- Foglights Part Number: 00016-47401 Accessory Code: LF1 Conflicts Factory Fog Lights Item # Quantity Reqd. Description 1 2 Fog Lamps 2 2 Fog Lamp s bezels 3 1 Switch Assembly 4 1 Fog
#TL T EA888 GEN 3 FUELING SYSTEM/ INSTALLATION INSTRUCTIONS
 #TL100069 2.0T EA888 GEN 3 FUELING SYSTEM/ INSTALLATION INSTRUCTIONS Notes: These instructions were written for a North American specification MkVII GTI. Other models, like the Golf R, are similar. When
INSTALLATION INSTRUCTIONS AIR/OIL SEPARATOR KIT
 INSTALLATION INSTRUCTIONS AIR/OIL SEPARATOR KIT 2015+ SUBARU WRX (LHD ONLY) Document: 19-0136 Support: info@radiumauto.com This document covers the installation of the Radium brake master cylinder brace
Installation Tips for your Crimestopper/ProStart Remote Start system (add-on for GM vehicles) v1.02 updated 1/16/2013
 v1.02 updated 1/16/2013") Installation Tips for your Crimestopper/ProStart Remote Start system (add-on for GM vehicles) v1.02 updated 1/16/2013 Thank you for purchasing your remote start from MyPushcart.com - an industry leader
Installation Tips for your Crimestopper/ProStart Remote Start system (add-on for GM vehicles) v1.02 updated 1/16/2013 Thank you for purchasing your remote start from MyPushcart.com - an industry leader
Headlight Removal & Installation: VW Jetta Mk.4 / Bora
 Headlight Removal & Installation: 99-04 VW Jetta Mk.4 / Bora Disclaimer: Buyer assumes any and all risk and liability from the installation and use of this product. Seller, author, or any of their affiliates
INSTALLATION MANUAL
 315000 INSTALLATION MANUAL EGR & Cooler Race Kit for 2015+ 6.7L Ford Powerstroke WARNING ONLY install this kit if you are using a tuner that disables the EGR sensors & circuit system. Any product that
Kodak 750H Carousel Projector Repair
 Kodak 750H Carousel Projector Repair An AT YOUR OWN RISK PROJECT by Klaus Wolter, Rev B, 3-26-2016 Here I documen the repair of my 750H carousel. A common problem with this projector, and all of the projectors
Part Number: SFR-713. Hardware Bag Contents. General Applicability All models. Conflicts - Fog Lights. Date: SCION FRS LED DRL
 Date: 01.30.2014 SCION FRS 2013-2015 LED DRL Part Number: SFR-713 Kit Contents Item # Quantity Reqd. Description 1 2 DRL s bezels w/led DRL 2 1 Driver Box 3 1 Harness bag 4 1 User s card 5 1 Switch Hardware
STEP 1 STEP 2. Disconnect the negative terminal from both batteries.
 TROUBLESHOOTING: Please read and understand all installation instructions before proceeding with the installation. If you have questions during the installation of this product, please email H&S Motorsports
2015+ S550 MUSTANG Battery Relocation Kit WR-BTRYRELOKIT-LH WR-BTRYRELOKIT-RH
 2015+ S550 MUSTANG Battery Relocation Kit WR-BTRYRELOKIT-LH WR-BTRYRELOKIT-RH The Watson Racing Battery Relocation Kit is NOT designed to protect you in the case of an accident, and therefore is INTENDED
INSTALLATION INSTRUCTIONS FUEL SURGE TANK KIT
 INSTALLATION INSTRUCTIONS FUEL SURGE TANK KIT BMW E46 3-Series, Excl Convertible Document: 19-0056 Support: info@radiumauto.com Relieve fuel pressure in vehicle before beginingthe installation. Disconnect
SKID MARK GARAGE. Axillary Fuel Supply
 1 SKID MARK GARAGE Axillary Fuel Supply *Disclaimer: Our Axillary Fuel kits are designed to fit most late model GM vehicles with minimum modifications. While not quite a universal kit for all, it has been
MKVI Jetta Fog Light Kit
 MKVI Jetta Fog Light Kit Part Number VW Jetta Fog Light Installation This tutorial is provided as a courtesy by ECS Tuning. Proper service and repair procedures are vital to the safe, reliable operation
3 October 2016 PN# V Dodge Twin Turbo Kit (I-00274) ½ D o d g e 2 4 v I S B
 ½ D o d g e 2 4 v I S B") 3 October 2016 PN#1045320 24V Dodge Twin Turbo Kit (I-00274) 1 DOWNLOAD ENHANCED INSTALL MANUALS AT dieselperformance.com BD Twin Turbo Kit 1998½- 2 0 0 2 D o d g e 2 4 v I S B Part# 1045320 PLEASE READ
3 October 2016 PN#1045320 24V Dodge Twin Turbo Kit (I-00274) 1 DOWNLOAD ENHANCED INSTALL MANUALS AT dieselperformance.com BD Twin Turbo Kit 1998½- 2 0 0 2 D o d g e 2 4 v I S B Part# 1045320 PLEASE READ
GrimmSpeed Install Guide Series Installing the GrimmSpeed WRX Boost Control Solenoid Updated 4/14/15
 GrimmSpeed Install Guide Series Installing the GrimmSpeed 2015+ WRX Boost Control Solenoid Updated 4/14/15 Introduction: This guide will illustrate the installation of the GrimmSpeed 2015+ WRX Boost Control
Installation Instructions - ECS Tuning Vent Pod Vacuum/Boost Gauge Kit
 Installation Instructions - ECS Tuning Vent Pod Vacuum/Boost Gauge Kit This tutorial is provided as a courtesy by ECS Tuning. Part Number for (2005-2008) Proper service and repair procedures are vital
Ford Mustang V6 OEM-Style Fog Light Kit Parts List: Quantity: Tool List:
 2015-2017 Ford Mustang V6 OEM-Style Fog Light Kit Parts List: Quantity: Tool List: LED Foglights/ Bezels 2 Flat head & Phillips screwdriver (if you ordered part#3600) Ratchet & Socket set OR Wiring harness
Detroit Speed, Inc. Selecta-Speed Wiper Kit Corvette P/N:
 Detroit Speed, Inc. Selecta-Speed Wiper Kit 1968-72 Corvette P/N: 121621 A downpour of rain will no longer hinder your ability to clearly see the road. The Detroit Speed Selecta-Speed Wiper Kit provides
SCION FRS FOG LIGHTS. Part Number: SFR-313
 Part Number: SFR-313 Kit Contents Item # Quantity Reqd. Description 1 2 Light Housings 2 2 Fog Light bezels 3 1 Harness bag 4 1 User s card 5 1 Switch 6 1 Fuse jumper Hardware Bag Contents Item # Quantity
INSTALLATION INSTRUCTIONS Part# , , ,
 INSTALLATION INSTRUCTIONS Part# 20-0218, 22-0318, 20-0118, 22-0219 20-0218 - 4 Tire On Board Air Delivery System and Dual Compressed Air System Includes ARB CKMTA12 Compressor 20-0118 - 2017 FORD RAPTOR
Hush-O-Matic MRS Control Package
 Hush-O-Matic MRS Control Package 06-49192 Congratulations on your purchase! The Hush-O-Matic MRS Control package allows you to choose a few different modes including always quiet and always loud. Controlling
Included parts: 1 - New Bosch CP3 Pump 1 - HSM Pulley 1 - Serpentine Belt 1 - Pump Bracket/ Hardware STEP 1
 TROUBLESHOOTING: Please read and understand all installation instructions before proceeding with the installation. If you have questions during the installation of this product, please contact H&S Motorsports
Installation Instructions - ECS Tuning Vent Pod Vacuum/Boost Gauge Kit
 Installation Instructions - ECS Tuning Vent Pod Vacuum/Boost Gauge Kit This tutorial is provided as a courtesy by ECS Tuning. Part Number (also available as steering wheel mounted kit ES2593248) for VW
INSTALLATION INSTRUCTIONS
 INSTALLATION INSTRUCTIONS Accessory Application Publications No. All 12035 SYSTEM 2012 RIDGELINE Issue Date NOV 2011 PARTS LIST Security System Attachment Kit: P/N 08E55-SJC-101 Flange bolt Unit bracket
IAG Street Series Air / Oil Separator (AOS) For WRX
 For WRX") P IAG Street Series Air / Oil Separator (AOS) For 2015-16 WRX Part# IAG-ENG-7152 Tools Required: Ratchet, torque wrench, extensions, needle nose pliers, hose cutter, snips/scissors, flat head screw driver,
P IAG Street Series Air / Oil Separator (AOS) For 2015-16 WRX Part# IAG-ENG-7152 Tools Required: Ratchet, torque wrench, extensions, needle nose pliers, hose cutter, snips/scissors, flat head screw driver,
Polaris Axys Sidekick Installation Instructions
 2016-2017 Polaris Axys Sidekick Installation Instructions 1. Remove hood and side panels. 2. Remove fasteners and slide console back. 3. Remove belt and driven clutch. 4. Remove clutch cover/ oil-tank
INSTALLATION INSTRUCTIONS AOS-R (Air Oil Separator-Return) Turbo Subaru and STi
 Turbo Subaru and STi") INSTALLATION INSTRUCTIONS AOS-R (Air Oil Separator-Return) 02-14 Turbo Subaru and 2015+ STi These instructions are based on a vehicle with an OEM turbocharger and top-mount intercooler. If a front-mount
INSTALLATION INSTRUCTIONS AOS-R (Air Oil Separator-Return) 02-14 Turbo Subaru and 2015+ STi These instructions are based on a vehicle with an OEM turbocharger and top-mount intercooler. If a front-mount
Part Number: TCA-712SE
 Date: 09.04.2013 TOYOTA CAMRY SE 2012-14 LED DRL Part Number: TCA-712SE Kit Contents Item # Quantity Reqd. Description 1 2 DRL s bezels w/led DRL 2 1 Driver Box 3 1 Harness bag 4 1 User s card 5 1 Cushion
Installation of Auto Meter Cobalt Boost/Vacuum Gauge:
 Installation of Auto Meter Cobalt Boost/Vacuum Gauge: Fitment: All 79-14 models. This installation was completed on a 2004 Mustang GT, and should be identical for all 1999-2004 model Mustangs. Time needed:
Audi Mk1 TT Vent Boost Gauge Kit
 2000-05 Audi Mk1 TT Vent Boost Gauge Kit Congratulations on your purchase of the A.W.E. Tuning Center Vent Boost Gauge for your Audi TT. While the install is fairly straight forward, please review these
Jeep JK Wrangler XHD Rear Tire Carrier
 Contents: 1. Frame (1) 2. Pivot Mount (1) 3. Latch Mount (1) 4. Lug Nuts (3) 5. Catch Pin (1) 6. M12 Washer (18) 7. M12 x 30 Hex Bolt (14) 8. Brake Light Mount (1) 9. Snap Ring (1) 10. Rub Strip (1) 11.
PRODUCT SAFETY NOTICE
 PRODUCT SAFETY NOTICE Congratulations. This vehicle has been equipped with a Firestone air suspension system. This suspension will enhance the vehicle s handling when loaded, however, the vehicle s performance
Adjustable Light Kits E-Z-Go TXT All Models Installation Instructions
 Adjustable Light Kits E-Z-Go TXT All Models 1996-2013 Installation Instructions Caution: Please read through the instructions carefully. Before starting this project, remove the system s positive and negative
Installation Tips for your Crimestopper/ProStart Remote Start system (for GM vehicles) v1.01 updated 2/27/2012
 v1.01 updated 2/27/2012") Installation Tips for your Crimestopper/ProStart Remote Start system (for GM vehicles) v1.01 updated 2/27/2012 Thank you for purchasing your remote start from MyPushcart.com - an industry leader in providing
Installation Tips for your Crimestopper/ProStart Remote Start system (for GM vehicles) v1.01 updated 2/27/2012 Thank you for purchasing your remote start from MyPushcart.com - an industry leader in providing
Installation Manual TWM Performance Short Shifter Nissan 350Z, 370Z Infiniti G35, G37
 Installation Manual TWM Performance Short Shifter Nissan 350Z, 370Z Infiniti G35, G37 It is preferable to park on a flat surface, as you will have to engage and disengage the hand brake and shift from
TIP SHEET T0491. Installation Tips for your Excalibur RS Passlock-sl2(4) + DLRC + SPDT
 + DLRC + SPDT") TIP SHEET T0491 Installation Tips for your Excalibur RS-360 + Passlock-sl2(4) + DLRC + SPDT For Chevrolet: Astro 1998-2005, Avalanche 2002, Blazer 1998-2005, Cavalier 2000-2003, Express Van 1998-2005,
TIP SHEET T0491 Installation Tips for your Excalibur RS-360 + Passlock-sl2(4) + DLRC + SPDT For Chevrolet: Astro 1998-2005, Avalanche 2002, Blazer 1998-2005, Cavalier 2000-2003, Express Van 1998-2005,
Special Note About The JDM High Performance Water Pump:
 Page 1 of 30 JDM Engineering, Inc. home Call Us! 732-780- 0770 back to Installation Instructions Electric Fan Upgrade Kit Electric Fan Wiring Diagram Thank you for your purchase of the JDM Engineering
Remove black panel shown. Save 6 retaining pins for re-install later. Pry up on center part of pin first. Then pry out entire retaining pin.
 2005-2009 Ford Mustang V6 Fog Light Wiring Kit Parts List: Quantity: Tools Required: Wiring harness 1 Flat head screwdriver Supplemental wire leads 2 Ratchet & Socket set OR Wire tap red 2 Adjustable Wrench
Ford Super Duty F-250, F and up
 Ford Super Duty F-250, F-350 2005 and up Installing Upfitter Switches by Richard L. Ray If you want to add a few aftermarket options to your new Ford Super Duty, Ford Motor Company makes things easy for
Aux. Battery and Isolator
 Aux. Battery and Isolator ISOLATOR MOUNTING ALL YEAR VANAGONS Fig.1 1. Disconnect ground from main battery under passenger seat 2. Remove driver seat 3. Remove driver seat belt buckle from seat pedestal
INSTALLATION INSTRUCTIONS AOS-R (Air Oil Separator-Return) Turbo Subaru and STi Document# Support:
 Turbo Subaru and STi Document# Support:") INSTALLATION INSTRUCTIONS AOS-R (Air Oil Separator-Return) 02-14 Turbo Subaru and 2015+ STi Document# 19-0102 Support: info@radiumauto.com These instructions are based on a vehicle with an OEM turbocharger
INSTALLATION INSTRUCTIONS AOS-R (Air Oil Separator-Return) 02-14 Turbo Subaru and 2015+ STi Document# 19-0102 Support: info@radiumauto.com These instructions are based on a vehicle with an OEM turbocharger
MAX FLOW FUEL KIT KIA FORTE SX HYUNDAI VELOSTER TURBO INSTALLATION INSTRUCTIONS
 MAX FLOW FUEL KIT KIA FORTE SX 2014+ HYUNDAI VELOSTER TURBO INSTALLATION INSTRUCTIONS Installation: Tools needed: 1/4 or 3/8 drive ratchet Different length extensions 8mm socket / 10mm socket / 12mm socket
Part Number: TAV-713. Kit Contents Item # Quantity Reqd. Description 1 2 DRL s bezels w/led DRL. Hardware Bag Contents.
 Date: 09.04.2013 TOYOTA AVALON 2013 - LED DRL Part Number: TAV-713 Kit Contents Item # Quantity Reqd. Description 1 2 DRL s bezels w/led DRL 2 1 Driver Box 3 1 Harness bag 4 1 User s card 5 1 Cushion pad