WARNINGs! Read all instructions before starting installation of this product! Installing the improper FASS Pump can cause severe engine damage.
|
|
|
- Francis Johns
- 6 years ago
- Views:
Transcription
 2011-2016 with stock - moderate horsepower modifications Note: Because of the higher fuel flow these systems have to offer, you may encounter problems with the stock fuel module.")

1 WARNINGs! Read all instructions before starting installation of this product! Installing the improper FASS Pump can cause severe engine damage. FASS Recommended Application T F17 150G Powerstroke (6.7L) with stock - moderate horsepower modifications Note: Because of the higher fuel flow these systems have to offer, you may encounter problems with the stock fuel module. FASS can solve this issue with a Suction Tube Kit. Secure vehicle from ROLLING! Cab and Chassis may require modifications Consult vehicle s manufacturers instructions concerning the electrical system before attempting any electrical connections. Be sure that the serial # on this installation manual matches that of the outside of the box. Serial # Flush and clean all brass fittings and fuel line from debris Keep debris from entering the internals of the system during installation. Getting debris in the water separator nipple can lock up the motor. Wear safety glasses when operating power tools such as drills and grinders or when using a punch or chisel. Properly secure lines to prevent chaffing. BEFORE STARTING THE INSTALLATION PROCESS LUBRICATE THE BED BOLT WITH WD-40 TO HELP WITH INSTALLATION


2 INSTALLATION MANUAL Follow these steps to ensure a simple installation of your new FASS TITANIUM FUEL SYSTEM 1. Read the installation manual completely before attempting installation. The installation of this product indicates that the buyer has read and understands the limitations of the FASS manufacturers warranty agreement and accepts the responsibility of its terms and conditions. 2. Inventory the package components. Notify the place of purchase immediately of any parts missing or damaged. 3. The installation recommendations contained herein are guidelines. Its important to understand your vehicles accessories and limitations. Use good judgment and take in to consideration your vehicles' accessories. 4. For best results in accuracy and efficiency (due to training, communication, and our relationship with our dealer network), we recommend a ViP FASS dealer for the installation. They are prepared to install the FASS fuel pumps with the most efficiency. If a situation/problem arises during the installation, they are the most prepared for that situation/problem. We are not responsible for any installation mistakes.

3 titanium Series 150 GPH 10 PSI (Approximately) A fuel pressure gauge is highly recommended to identify fuel filter life and to prevent engine damage! H Coolant Heater E To Engine R Fuel Return to Tank T Fuel Inlet 2nd Electric Heater Port G Fuel Pressure Electric Heater Port Serial Number Location Installation Step 1: Install Electrical Harness Step 2: Prepare Suction and Return Lines Step 3: Mount Fuel System Step 4: Install Fuel Line Step 5: Check Installation


4 Contents MP-9075 FL-1002 x 14 PBR-2001 WH-1006


")


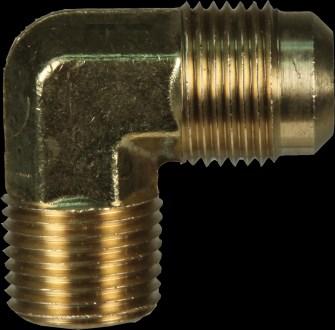

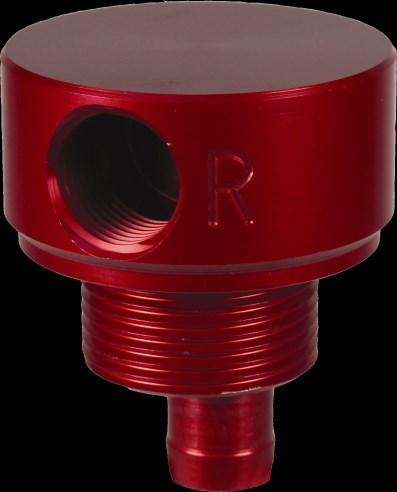


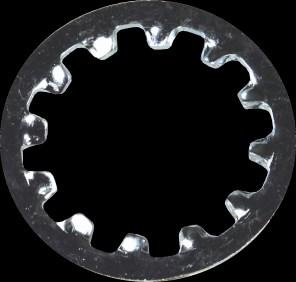


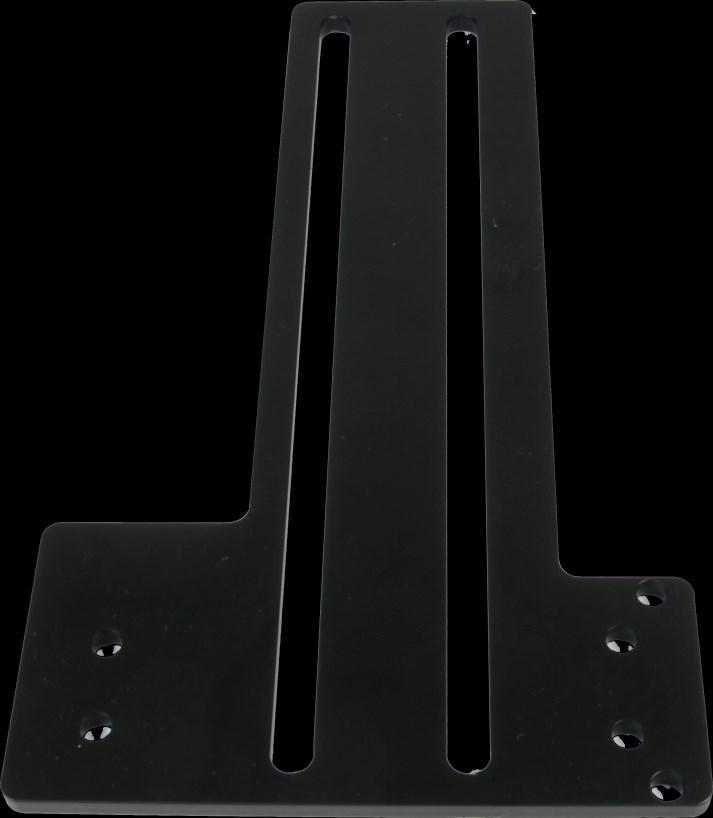
5 Mounting Package Contents /2 Plug BHF-1002 (3) PL-1005 PL-1004 (4) HC-1001 Ring Termi (2) TC-1001 Screw OR-223 LW-1001 BHN-1001 DT-1002 (1) 1/2 Washer (2) Set Screw (1) Hex Bolt 1/2-20 x 1 3/4 ST-1006P (2) A624C TC-1001 (4) Hex Bolt 3/8-16x 1 1/2 (3) Hex Bolt 1/4-20x1 3/4 (4) Locking Nut 3/8 (3) WA-1001D (4) 3/8 Washers *Cable Ties* RS-2001C RS-2002 RS-2001


. C.")


6 Step 1: Install Electrical Harness The installation of the electrical harness is done first, allowing power to be applied to the pump for A. Using wire stripping tool remove excess insulation off the and the WH B. Place wire from and WH-1006 into butt connector. Using crimping tool connect and WH with butt connector. Install to bottom slot (opening that is near the spade). C. Crimp the ring terminals to the red and green wires of the WH-1006 Wire Harness. Attach red wire to the positive terminal of the battery and the green terminal to the negative terminal. The use of a corrosion preventative on electrical connections is recommended. D. Secure relay and fuse in an upright position, as shown, to prevent moisture from entering. Di-electric grease may be applied to prevent corrosion. RELAY FUSE
 that is hot when the key is on. Example: #54 or #55. Use a test probe to locate the hot side of the circuit in the fuse block.")
7 Step 1: Install Electrical Harness The installation of the electrical harness is done first, allowing power to be applied to the pump for E. Route the extension to the engine bay fuse panel. Remove a fuse (maximum of 10A) that is hot when the key is on. Example: #54 or #55. Use a test probe to locate the hot side of the circuit in the fuse block. Install the fuse tap into the open location. Install the pulled fuse into the open space on the fuse tap. Disconnect the vehicles battery and continue installation. 56 F. Route WH-1006 wire harness along frame rail to mounting location of pump. Completion of this step will be addressed in the mounting step.

, 2.")


8 Step 2: Prepare Suction & Return lines Some of the photo s are of a different application, procedures are the same. NOTE: Before installing fittings make sure to inspect for burs or flare imperfections. When cutting fuel line make sure to blow out line to keep debris from moving forward. Helpful Hint: Directions for removing factory lines. 1. Pull up on the locking tab (blue), 2. Push in slightly on the connector, 3. Press down on the release tab, 4. Pull the connector straight off, A. Before tank is removed, identify ALL areas of clearance between the tank and the truck s bed for the best location to install the BHF assembly. With proper clearance, you want to install it as close to the Fuel sending unit as possible. B. Remove the filler neck and overflow tubes from the truck by loosening the clamps at both ends. C. Disconnect factory suction and return lines (refer to diagram at the beginning of step 2). D. With the fuel tank empty of fuel, unbolt the tank straps and remove it from the vehicle. E. Clean the fuel module area then remove the lock ring on the top of the fuel tank. This is spring loaded, so, holding it down while removing the ring will prevent the sending unit from popping up and possibly causing damage.


9 STEP 2: Prepare Suction & Return Lines F. Note the location of the tab and arrow. Re-install the sending unit in the same location to prevent the fuel level arm from binding. G. Once the lock ring is removed, carefully remove pick up module from fuel tank without bending fuel level arm. H. VERY IMPORTANT: Support fuel tank on both ends allowing the natural formation of the tank to take place. Failure to perform this step can and will create an issue with less usable fuel! I. Push the ST-1006P onto the barb portion of the BHF Slide HC onto the ST-1006P down to barb portion of BHF-1002, and tighten accordingly. Insert O-ring OR-223 into groove on the bottom side of BHF Install 1/2 plug into the R port of BHF J. Place the BHF-1002 bulkhead fitting on the tank with enough clearance for the fuel line and fittings. Keep in mind the bulkhead must also clear the bottom of the bed support structure. Note: Fuel tank left in vehicle for visual representation.


10 STEP 2: Prepare Suction & Return Lines K. Once location has been established, double check! Mark location and drill 1 3/8 hole with hole saw. Hold a cup or catch can inside the tank while drilling to catch any debris. Place a rag over the opening to prevent tank contamination. Double check for debris around the ring and inside tank. L. De-burr hole and check for fit. M. Place fuel tank module on a suitable work area, utilizing provided template mark mounting holes for TC Drill pilot holes for the draw tube assembly with a 1/16 bit. Use a 1/4 bit for the final hole N. Install TC-1001 onto fuel tank module, be sure to apply red Loctite onto mounting screws and set screws. Install DT-1002 into TC using supplied set screws, and adjust 1-1 1/2 from bottom of tank module. O. Install BHF-1002 into fuel tank hole previously drilled, slide LW-1001/BHN-1001 onto BHF-1002 and tighten accordingly. Carefully install tank module into fuel tank while guiding float arm. Attach ST- 1006P onto DT-1002 using hose clamp HC Reinstall tank module locking ring. Install PL-1004 into BHF-1002 using thread tape and torque to 20 ft./lbs. Install one end of FASS hose onto BHF-1002, and the other end onto the factory tank module supply using fitting A624C and HC Reinstall fuel tank by reversing steps taken for removal. Be sure FASS lines are free from obstructions and will not be pinched by body/frame mounting points.


11 NOTE ATTENTION: While installing fittings into Titanium pump DO NOT Apply side pressure to draw tube of pump Proper Improper

.")


 1/4-20x1 3/4 bolts and (3)")

12 Step 3: Mount Fuel System A. Using thread tape, install the into E and the into the T port (on opposite end). Tighten 2-3 turns from finger tight. Note: Do Not Put Thread Tape on Flare of Fitting ***The use of thread sealant is not recommended*** B. For fitting purposes. Secure PBR-2001 to pump assembly lightly with (3) 1/4-20x1 3/4 bolts and (3) WA-1001D. Assembly will be used in future steps for correct fitting of brackets. (Note: Bracket maybe flipped to accommodate your application.)


 hex bolt 1/2-20 x 1")


13 Step 3: Mount Fuel System C. Assemble PFB-2002C and RS-2001C RS will make contact with bed channel when assembled correctly. Insert the PFB-2002C assembly in to bed channel align the nut with the opening on the channel. D. Secure PFB-2002 and RS-2001 with (1) hex bolt 1/2-20 x 1 1/2 and (1) 1/2 washer to PFB-2002C E. Plug female plug of the WH-1006 harness into the FASS pump. Reconnect the vehicles battery. Turn key on. With pump operating, liberally spray WD-40 (or equivalent) into Water Separator nipple. This process helps lubricate the gear for easier initial priming.


14 Step 3: Mount Fuel System F. Position the PBR-2001 to the PFB-2002 pump assembly at the mounting location and check for fit. Once location is established mark location for mounting in next step. G. Assemble the FASS pump bracket PBR-2001 using the RS-2002 spacer between PFB-2002 and PBR bracket with 4-3/8 bolts, nuts, and washers. Note: Torque bolts not flange nut.


15 Step 3: Mount Fuel System H. Once secure use 3-1 3/4 bolts and 3-WA-1001D spacers to mount the pump to the bracket. I. Apply motor oil to gasket located on filters. Attach to system and hand tighten. Fuel Filter Install FF-3003 on side of pump with draw tube in the middle of the filter nipple. Water Separator Filter Install FS-1001 on water separator nipple without the draw tube. Make sure to insert O-Ring provided on nipple.


16 STEP 4: Install Fuel Line Do Not use sealant on AN (male flare) fittings. Only use sealant on threads installed into pump assembly. A. Route suction line from the suction tube assy. to port T on the FASS system. Cut FL-1002 to needed length. Insert PL-1005 using oil. Connect to in port T. Torque to 18 ft./lbs. NOTE: Hose clamps are not recommended for push lock fittings. They will hold up to 300psi! Use oil on fittings and inside fuel line when installing Push-Lok fittings B. Route fuel line from the S port of the suction tube assy. to the R port on the FASS system with a gentle bend. Cut and insert PL-1005 using oil. Attach fitting to the R port. Do not use any sealant. Torque to 18 ft./lbs. C. Insert PL-1005 into remaining fuel line using oil. Attach fuel line to the E port of the FASS system. Torque to 18 ft./lbs. Route this line to the engine side of the factory lift pump. Do not cut at this time. D. Disconnect factory fuel supply line on rear of factory Ford lift pump, and connect FASS hose using fitting A624C and HC Note: Secure all fuel lines with cable ties. Cable ties are an economical way to prevent the possibility of problems occurring! The factory suction line can be capped off or removed from the truck. The openings on the filter and tank will need to be capped off to keep debris from getting into lines or canister.
17 Step 5: Review Installation Blow out any open lines/cover any open ports Bolts and fasteners properly tightened? Electrical harness and fuel lines secured and properly tightened? Reconnect the battery. Has the system been primed? 1. Turn key to the ignition position, turning on the FASS pump for 15 sec.. 2. Crank engine and allow to run for at least 1 minute. Check for leaks. Start the engine Recheck all fluid and filter connections for leaks


18 Step 5: Review Installation Note: O-Ring must be put back on suction side of pump. Failure to do so can result in priming issues, cavitation, or pressure loses. To assist with priming your FASS pump crack the FF Put power to the FASS pump to activate the pump. When the tone of the pump changes you can tighten up the fuel filter. Note: The Red Plastic Plugs located in the H ports can stay in place fuel will not flow through these ports. Coolant can be plumbed into these ports to heat the fuel in the Winter months.
INSTALLATION MANUAL APPLICATION: T D07 220G 16-18psi) T D07 260G 16-18psi) Cummins 5.9L /6.7L 24Valve Standard Pickup Truck
 T D07 260G 16-18psi) Cummins 5.9L /6.7L 24Valve Standard Pickup Truck") INSTALLATION MANUAL APPLICATION: T D07 220G (220GPH @ 16-18psi) T D07 260G (260GPH @ 16-18psi) Cummins 5.9L /6.7L 24Valve Standard Pickup Truck 2005-2016 1998.5-2004 *with In-tank Lift Pump* **Note: Cab
INSTALLATION MANUAL APPLICATION: T D07 220G (220GPH @ 16-18psi) T D07 260G (260GPH @ 16-18psi) Cummins 5.9L /6.7L 24Valve Standard Pickup Truck 2005-2016 1998.5-2004 *with In-tank Lift Pump* **Note: Cab
INSTALLATION MANUAL APPLICATION: T C10 095G T C10 150G 8psi) Duramx 2500 &
 Duramx 2500 &") INSTALLATION MANUAL APPLICATION: T C10 095G (95gph @8psi) T C10 150G (150gph @ 8psi) Duramx 2500 & 3500 2006-2010 **Note: Cab and Chassis may require modifications** WARNINGs! Read all instructions before
INSTALLATION MANUAL APPLICATION: T C10 095G (95gph @8psi) T C10 150G (150gph @ 8psi) Duramx 2500 & 3500 2006-2010 **Note: Cab and Chassis may require modifications** WARNINGs! Read all instructions before
INSTALLATION MANUAL APPLICATION: T F16 95G 8-10psi) T F16 150G 8-10psi) Powerstroke 6.4L Standard Pickup Truck
 T F16 150G 8-10psi) Powerstroke 6.4L Standard Pickup Truck") INSTALLATION MANUAL APPLICATION: T F16 95G (95GPH @ 8-10psi) T F16 150G (150GPH @ 8-10psi) Powerstroke 6.4L Standard Pickup Truck 2008-2010 **Note: Cab and Chassis may require modifications** WARNINGs!
INSTALLATION MANUAL APPLICATION: T F16 95G (95GPH @ 8-10psi) T F16 150G (150GPH @ 8-10psi) Powerstroke 6.4L Standard Pickup Truck 2008-2010 **Note: Cab and Chassis may require modifications** WARNINGs!
INSTALLATION MANUAL APPLICATION:
 INSTALLATION MANUAL APPLICATION: FA C09 220G (220GPH @ 12-14psi) FA C09 260G (2600GPH @ 12-14psi) Standard Pickup Truck Duramax 2500 & 3500 2001-2014 WARNINGS! Read all instructions before starting installation
WARNINGs! Read all instructions before starting installation of this product! Installing the improper FASS Pump can cause severe engine damage.
 WARNINGs! Read all instructions before starting installation of this product! Installing the improper FASS Pump can cause severe engine damage. FASS T C12 095G T C12 150G Recommended Application Duramax
INSTALLATION MANUAL AppLIcATION:
 INSTALLATION MANUAL Application: P D07 095G (95gph @ 16psi) P D07 150G (150gph @ 16psi) Cummins 5.9L /6.7L 24 Valve 2005-2012 *1998.5-2004 with In-tank Lift Pump* Dear Valued Customer, Made in the USA
INSTALLATION MANUAL APPLICATION: FA D07 095G 16-18psi) FA D07 150G 16-18psi) Cummins 5.9L/6.7L 24 Valve
 FA D07 150G 16-18psi) Cummins 5.9L/6.7L 24 Valve") INSTALLATION MANUAL APPLICATION: FA D07 095G (95GPH @ 16-18psi) FA D07 150G (150GPH @ 16-18psi) Cummins 5.9L/6.7L 24 Valve 2005-2009 *1998.5-2004 with In-tank Pump Modification* **2003-2004 must order
INSTALLATION MANUAL APPLICATION: FA D07 095G (95GPH @ 16-18psi) FA D07 150G (150GPH @ 16-18psi) Cummins 5.9L/6.7L 24 Valve 2005-2009 *1998.5-2004 with In-tank Pump Modification* **2003-2004 must order
INSTALLATION MANUAL APPLICATION: FA D08 095G FA D08 150G 16-18psi) Cummins 5.9L 24 Valve Standard Pickup Truck 1998.
 Cummins 5.9L 24 Valve Standard Pickup Truck 1998.") INSTALLATION MANUAL APPLICATION: FA D08 095G (95GPH @16-18psi) FA D08 150G (150GPH @ 16-18psi) Cummins 5.9L 24 Valve Standard Pickup Truck 1998.5-2004 WARNINGs! Read all instructions before starting installation
INSTALLATION MANUAL APPLICATION: FA D08 095G (95GPH @16-18psi) FA D08 150G (150GPH @ 16-18psi) Cummins 5.9L 24 Valve Standard Pickup Truck 1998.5-2004 WARNINGs! Read all instructions before starting installation
INSTALLATION MANUAL APPLICATION: T F14 125G 55psi) Powerstroke 7.3L *Bypassing the Factory Lift Pump*
 Powerstroke 7.3L *Bypassing the Factory Lift Pump*") INSTALLATION MANUAL APPLICATION: T F14 125G (125GPH @ 55psi) Powerstroke 7.3L *Bypassing the Factory Lift Pump* 1999-2003 Powerstroke 6.0L *Bypassing the Factory Lift Pump* 2003-2007 **Note: Cab and Chassis
INSTALLATION MANUAL APPLICATION: T F14 125G (125GPH @ 55psi) Powerstroke 7.3L *Bypassing the Factory Lift Pump* 1999-2003 Powerstroke 6.0L *Bypassing the Factory Lift Pump* 2003-2007 **Note: Cab and Chassis
INSTALLATION MANUAL APPLICATION: T D07 095G 16psi) T D07 150G 16psi) Cummins 5.9L/6.7L 24 Valve
 T D07 150G 16psi) Cummins 5.9L/6.7L 24 Valve") INSTALLATION MANUAL APPLICATION: T D07 095G (95gph @ 16psi) T D07 150G (150gph @ 16psi) Cummins 5.9L/6.7L 24 Valve 2005-2015 1998.5-2004 *with In-tank Lift Pump* **Note: Cab and Chassis may require modifications**
INSTALLATION MANUAL APPLICATION: T D07 095G (95gph @ 16psi) T D07 150G (150gph @ 16psi) Cummins 5.9L/6.7L 24 Valve 2005-2015 1998.5-2004 *with In-tank Lift Pump* **Note: Cab and Chassis may require modifications**
INSTALLATION MANUAL APPLICATION: T F16 220G 8-10psi) Powerstroke 6.4L **Note: Cab and Chassis may require modifications**
 Powerstroke 6.4L **Note: Cab and Chassis may require modifications**") INSTALLATION MANUAL APPLICATION: T F16 220G (220GPH @ 8-10psi) Powerstroke 6.4L 2008-2010 **Note: Cab and Chassis may require modifications** Dear Valued Customer, Made in the USA is not just a slogan
INSTALLATION MANUAL APPLICATION: T F16 220G (220GPH @ 8-10psi) Powerstroke 6.4L 2008-2010 **Note: Cab and Chassis may require modifications** Dear Valued Customer, Made in the USA is not just a slogan
INSTALLATION MANUAL APPLICATION: T D10 125G 45psi) Cummins 5.9L 12Valve *with P7100 Injection Pump*
 Cummins 5.9L 12Valve *with P7100 Injection Pump*") INSTALLATION MANUAL APPLICATION: T D10 125G (125GPH @ 45psi) Cummins 5.9L 12Valve *with P7100 Injection Pump* 1994-1998 **Note: Cab and Chassis may require modifications** Dear Valued Customer, Made in
INSTALLATION MANUAL APPLICATION: T D10 125G (125GPH @ 45psi) Cummins 5.9L 12Valve *with P7100 Injection Pump* 1994-1998 **Note: Cab and Chassis may require modifications** Dear Valued Customer, Made in
INSTALLATION MANUAL APPLICATION: T D02 095G 8-10psi) T D02 150G 8-10psi) Cummins 5.9L 12 Valve *with VE Pump*
 T D02 150G 8-10psi) Cummins 5.9L 12 Valve *with VE Pump*") INSTALLATION MANUAL APPLICATION: T D02 095G (95GPH @ 8-10psi) T D02 150G (150GPH @ 8-10psi) Cummins 5.9L 12 Valve *with VE Pump* 1989-1993 Dear Valued Customer, Made in the USA is not just a slogan at
INSTALLATION MANUAL APPLICATION: T D02 095G (95GPH @ 8-10psi) T D02 150G (150GPH @ 8-10psi) Cummins 5.9L 12 Valve *with VE Pump* 1989-1993 Dear Valued Customer, Made in the USA is not just a slogan at
INSTALLATION MANUAL. 220 gph (T D08 220G) Cummins 5.9L 24 Valve REVISED 4/05/11
 Cummins 5.9L 24 Valve REVISED 4/05/11") INSTALLATION MANUAL Application: 220 gph (T D08 220G) Cummins 5.9L 24 Valve 1998.5-2004 REVISED 4/05/11 Dear Valued Customer, Made in the USA is not just a slogan at FASS; it s what we live by! FASS is
INSTALLATION MANUAL Application: 220 gph (T D08 220G) Cummins 5.9L 24 Valve 1998.5-2004 REVISED 4/05/11 Dear Valued Customer, Made in the USA is not just a slogan at FASS; it s what we live by! FASS is
INSTALLATION MANUAL APPLICATION: T 125G 45psi) CLASS 1-CLASS 8 *Requires a Fuel Line Kit*
 CLASS 1-CLASS 8 *Requires a Fuel Line Kit*") INSTALLATION MANUAL APPLICATION: T 125G (125GPH @ 45psi) CLASS 1-CLASS 8 *Requires a Fuel Line Kit* WARNINGs! WARNING: Do not tie FASS Return in with engine return. Back pressure can cause damage to engine.
INSTALLATION MANUAL APPLICATION: T 125G (125GPH @ 45psi) CLASS 1-CLASS 8 *Requires a Fuel Line Kit* WARNINGs! WARNING: Do not tie FASS Return in with engine return. Back pressure can cause damage to engine.
INSTALLATION MANUAL TITANIUM SIGNATURE SERIES ALL 1/2 FUEL PORTS LIFETIME WARRANTY AVAILABLE. Manufacture Date: APPLICATION: Cummins 5.
 Manufacture Date: TITANIUM SIGNATURE SERIES INSTALLATION MANUAL ALL 1/2 FUEL PORTS APPLICATION: TS-D08-250G (250GPH @ 16-18PSI) TS-D08-290G (290G @ 16-18PSI) Cummins 5.9L 24 Valve Standard Pickup Truck
INSTALLATION MANUAL TITANIUM SIGNATURE SERIES ALL 1/2 FUEL PORTS LIFETIME WARRANTY AVAILABLE APPLICATION: Cummins 5.9L 24 Valve
 TITANIUM SIGNATURE SERIES INSTALLATION MANUAL ALL 1/2 FUEL PORTS APPLICATION: TS-D08-250G (250GPH @ 16-18PSI) TS-D08-290G (290G @ 16-18PSI) Cummins 5.9L 24 Valve Standard Pickup Truck 1998.5-2004 LIFETIME
INSTALLATION MANUAL APPLICATION: T D08 095G 16-18psi) T D08 150G 16-18psi) Cummins 5.9L 24 Valve
 T D08 150G 16-18psi) Cummins 5.9L 24 Valve") INSTALLATION MANUAL APPLICATION: T D08 095G (95GPH @ 16-18psi) T D08 150G (150GPH @ 16-18psi) Cummins 5.9L 24 Valve 1998.5-2004 **Note: Cab and Chassis may require modifications** Dear Valued Customer,
INSTALLATION MANUAL APPLICATION: T D08 095G (95GPH @ 16-18psi) T D08 150G (150GPH @ 16-18psi) Cummins 5.9L 24 Valve 1998.5-2004 **Note: Cab and Chassis may require modifications** Dear Valued Customer,
INSTALLATION MANUAL TITANIUM SERIES ALL 1/2 FUEL PORTS LIFETIME WARRANTY AVAILABLE APPLICATION: Cummins 5.9L/6.7L 24 Valve
 TITANIUM SERIES INSTALLATION MANUAL ALL 1/2 FUEL PORTS APPLICATION: TS-D07-095G (95GPH @ 16-18PSI) TS-D07-165G (165GPH @16-18PSI) Cummins 5.9L/6.7L 24 Valve Standard Pickup Truck 2005-2017 1998.5-2004
INSTALLATION MANUAL TITANIUM SIGNATURE SERIES ALL 1/2 FUEL PORTS LIFETIME WARRANTY AVAILABLE. Manufacture Date:
 Manufacture Date: TITANIUM SIGNATURE SERIES INSTALLATION MANUAL ALL 1/2 FUEL PORTS APPLICATION: TS-F17-125G (125GPH @ 70-75PSI) Powerstroke 6.7L *Bypassing the Factory Lift Pump* Standard Pickup Truck
INSTALLATION MANUAL STK-1003B & STK Suction Tube Kit Dodge Cummins Ford Powerstroke GM Duramax
 INSTALLATION MANUAL STK-1003B & STK-1003 Suction Tube Kit Dodge Cummins 1989-2012 Ford Powerstroke 1999-2012 GM Duramax 2001-2012 Dear Valued Customer, Made in the USA is not just a slogan at FASS; it
Limited lifetime Warranty
 T C10 095G or T C10 165G Limited lifetime Warranty Motor No: Manufactured Date: Serial No: Warranty Stipulations: Copy of sales receipt mailed with this form All warranty information, located on the front
Limited lifetime Warranty
 T D07 095G or T D07 165G Limited lifetime Warranty Motor No: Manufactured Date: Serial No: Warranty Stipulations: Copy of sales receipt mailed with this form All warranty information, located on the front
INSTALLATION MANUAL APPLICATION: FA D10 240G 45psi) Cummins 5.9L 12 Valve *With P7100 Injection pump* **bypassing the factory lift pump**
 Cummins 5.9L 12 Valve *With P7100 Injection pump* **bypassing the factory lift pump**") INSTALLATION MANUAL APPLICATION: FA D10 240G (240gph @ 45psi) Cummins 5.9L 12 Valve *With P7100 Injection pump* **bypassing the factory lift pump** 1994-1998 Dear Valued Customer, Made in the USA is not
INSTALLATION MANUAL APPLICATION: FA D10 240G (240gph @ 45psi) Cummins 5.9L 12 Valve *With P7100 Injection pump* **bypassing the factory lift pump** 1994-1998 Dear Valued Customer, Made in the USA is not
INSTALLATION MANUAL APPLICATION: DRP psi) Dodge Replacement
 Dodge Replacement") INSTALLATION MANUAL APPLICATION: DRP 02 (110GPH @ 16-18psi) Dodge Replacement 1998.5-2002 WARNINGs! Read all instructions before starting installation of this product! Installing the improper FASS Pump
INSTALLATION MANUAL APPLICATION: DRP 02 (110GPH @ 16-18psi) Dodge Replacement 1998.5-2002 WARNINGs! Read all instructions before starting installation of this product! Installing the improper FASS Pump
INSTALLATION MANUAL APPLICATION: T C10 095G 8-10psi) T C10 150G 8-10psi) Duramax 2500 & 3500 Standard Pickup Truck
 T C10 150G 8-10psi) Duramax 2500 & 3500 Standard Pickup Truck") INSTALLATION MANUAL APPLICATION: T C10 095G (95GPH @ 8-10psi) T C10 150G (150GPH @ 8-10psi) Duramax 2500 & 3500 Standard Pickup Truck 2001-2010 **Note: Cab and Chassis may require modifications** Revision
INSTALLATION MANUAL APPLICATION: T C10 095G (95GPH @ 8-10psi) T C10 150G (150GPH @ 8-10psi) Duramax 2500 & 3500 Standard Pickup Truck 2001-2010 **Note: Cab and Chassis may require modifications** Revision
INSTALLATION MANUAL TITANIUM SERIES ALL 1/2 FUEL PORTS LIFETIME WARRANTY AVAILABLE DURAMAX 2500 & 3500 APPLICATION:
 TITANIUM SERIES INSTALLATION MANUAL ALL 1/2 FUEL PORTS APPLICATION: TS-C11-095G (95GPH @ 8-10PSI) TS-C11-165G (165GPH @ 8-10PSI) DURAMAX 2500 & 3500 Standard Pickup Truck 2011-2014 *NOTE: CAB AND CHASSIS
INSTALLATION MANUAL TITANIUM SIGNATURE SERIES ALL 1/2 FUEL PORTS LIFETIME WARRANTY AVAILABLE APPLICATION: Cummins 5.9L/6.
 TITANIUM SIGNATURE SERIES INSTALLATION MANUAL ALL 1/2 FUEL PORTS APPLICATION: TS-D07-095G (95GPH @ 16-18PSI) TS-D07-165G (165GPH @16-18PSI) Cummins 5.9L/6.7L 24 Valve Standard Pickup Truck 2005-2017 1998.5-2004
INSTALLATION MANUAL STK ACCESSORY: Suction Tube Kit SUMP
 INSTALLATION MANUAL STK-5500 ACCESSORY: Suction Tube Kit SUMP Dear Valued Customer, Made in the USA is not just a slogan at FASS; it s what we live by! FASS is not only assembled in the USA but 98%+ of
INSTALLATION MANUAL TITANIUM SERIES ALL 1/2 FUEL PORTS LIFETIME WARRANTY AVAILABLE CUMMINS 5.9L 24 VALVE APPLICATION:
 TITANIUM SERIES INSTALLATION MANUAL ALL 1/2 FUEL PORTS APPLICATION: TS-D08-095G (95GPH @ 16-18PSI) TS-D08-165G (165GPH @16-18PSI) CUMMINS 5.9L 24 VALVE 1998.5-2004 LIFETIME WARRANTY AVAILABLE FASS DIESEL
INSTALLATION MANUAL TITANIUM SERIES ALL 1/2 FUEL PORTS LIFETIME WARRANTY AVAILABLE DURAMAX 2500 & 3500 APPLICATION:
 TITANIUM SERIES INSTALLATION MANUAL ALL 1/2 FUEL PORTS APPLICATION: TS-C10-095G (95GPH @ 8-10PSI) TS-C10-165G (165GPH @ 8-10PSI) DURAMAX 2500 & 3500 Standard Pickup Truck 2001-2010 *NOTE: CAB AND CHASSIS
INSTALLATION MANUAL TITANIUM SERIES ALL 1/2 FUEL PORTS LIFETIME WARRANTY AVAILABLE APPLICATION:
 TITANIUM SERIES INSTALLATION MANUAL ALL 1/2 FUEL PORTS APPLICATION: TS-C12-095G (95GPH @ 8-10PSI) TS-C12-165G (165GPH @ 8-10PSI) GM DURAMAX 2015-2016 *NOTE: CAB AND CHASSIS MAY REQUIRE MODIFICATIONS LIFETIME
INSTALLATION MANUAL FASS FUEL SYSTEM MODEL NO. FASS 150/ & FASS 150/ HIGH PERFORMANCE FUEL DELIVERY SYSTEM
 INSTALLATION MANUAL MODEL NO. FASS 150/95-1007 & FASS 150/150-1007 HIGH PERFORMANCE FUEL DELIVERY SYSTEM FROM: SUBJECT: TO: Diesel Performance Products, Inc. Welcome/Thank You Valued Customer We at Diesel
INSTALLATION MANUAL APPLICATION: D-MAX psi) Duramax Fuel Pump
 Duramax Fuel Pump") INSTALLATION MANUAL APPLICATION: D-MAX 7001 (120GPH @ 8-10psi) Duramax Fuel Pump 2001-2010 Dear Valued Customer, Made in the USA is not just a slogan at FASS; it s what we live by! FASS is not only assembled
INSTALLATION MANUAL APPLICATION: D-MAX 7001 (120GPH @ 8-10psi) Duramax Fuel Pump 2001-2010 Dear Valued Customer, Made in the USA is not just a slogan at FASS; it s what we live by! FASS is not only assembled
INSTALLATION MANUAL APPLICATION: FA C09 220G 12-14psi) FA C09 260G 12-14psi) Standard Pickup Truck Duramax 2500 &
 FA C09 260G 12-14psi) Standard Pickup Truck Duramax 2500 &") INSTALLATION MANUAL APPLICATION: FA C09 220G (220GPH @ 12-14psi) FA C09 260G (2600GPH @ 12-14psi) Standard Pickup Truck Duramax 2500 & 3500 2001-2014 Revision Date: 10/12/2015 Dear Valued Customer, Made
INSTALLATION MANUAL APPLICATION: FA C09 220G (220GPH @ 12-14psi) FA C09 260G (2600GPH @ 12-14psi) Standard Pickup Truck Duramax 2500 & 3500 2001-2014 Revision Date: 10/12/2015 Dear Valued Customer, Made
INSTALLATION MANUAL TITANIUM SIGNATURE SERIES ALL 1/2 FUEL PORTS LIFETIME WARRANTY AVAILABLE APPLICATION: TS-F18-125G 65PSI)
") TITANIUM SIGNATURE SERIES INSTALLATION MANUAL ALL 1/2 FUEL PORTS APPLICATION: TS-F18-125G (125GPH @ 65PSI) Powerstroke 6.7L *Bypassing the Factory Lift Pump* Standard Pickup Truck 2017-2019 LIFETIME WARRANTY
TITANIUM SIGNATURE SERIES INSTALLATION MANUAL ALL 1/2 FUEL PORTS APPLICATION: TS-F18-125G (125GPH @ 65PSI) Powerstroke 6.7L *Bypassing the Factory Lift Pump* Standard Pickup Truck 2017-2019 LIFETIME WARRANTY
INSTALLATION MANUAL STK-5500BO ACCESSORY: Sump Kit
 INSTALLATION MANUAL STK-5500BO ACCESSORY: Sump Kit INSTALLATION MANUAL Follow these steps to ensure a simple installation of your new FASS ACCESSORY 1. Read the installation manual completely before attempting
HIGH PERFORMANCE FUEL PUMP
 MODEL NO. FASS-HPFP-95-1003 & FASS-HPFP-150-1003 HIGH PERFORMANCE FUEL PUMP A MUST READ FROM: SUBJECT: TO: Diesel Performance Products, Inc. Welcome/Thank You Valued Customer We at Diesel Performance Products,
INSTALLATION MANUAL APPLICATION: DRP psi) Dodge Replacement
 Dodge Replacement") INSTALLATION MANUAL APPLICATION: DRP 04 (110GPH @ 16-18psi) Dodge Replacement 2003-2004 Dear Valued Customer, Made in the USA is not just a slogan at FASS; it s what we live by! FASS is not only assembled
INSTALLATION MANUAL APPLICATION: DRP 04 (110GPH @ 16-18psi) Dodge Replacement 2003-2004 Dear Valued Customer, Made in the USA is not just a slogan at FASS; it s what we live by! FASS is not only assembled
INSTALLATION MANUAL ACCESSORY:
 INSTALLATION MANUAL ACCESSORY: No Drill Bolt on Bracket Kit Dodge Cummins 1989-1993 Ford Powerstroke 1999-2012 Dear Valued Customer, Made in the USA is not just a slogan at FASS; it s what we live by!
INSTALLATION MANUAL APPLICATION: DRP psi) Dodge Replacement
 Dodge Replacement") INSTALLATION MANUAL APPLICATION: DRP 02 (110GPH @ 16-18psi) Dodge Replacement 1998.5-2002 Dear Valued Customer, Made in the USA is not just a slogan at FASS; it s what we live by! FASS is not only assembled
INSTALLATION MANUAL APPLICATION: DRP 02 (110GPH @ 16-18psi) Dodge Replacement 1998.5-2002 Dear Valued Customer, Made in the USA is not just a slogan at FASS; it s what we live by! FASS is not only assembled
FORD POWERSTROKE 6.0L DIESEL ENGINE
 #8 INSTALLATION MANUAL MODEL FP-100 & FP-150 With New Quick Connect Components! 2003-2007 FORD POWERSTROKE 6.0L DIESEL ENGINE Performance Fuel System Parts PLEASE READ THESE INSTRUCTIONS THOROUGHLY BEFORE
INSTALLATION MANUAL ACCESSORY:
 INSTALLATION MANUAL ACCESSORY: No Drill Bolt on Bracket Kit Dodge Cummins 1994-2012 GM Duramax 2001-2012 Dear Valued Customer, Made in the USA is not just a slogan at FASS; it s what we live by! FASS is
INSTALLATION MANUAL STK-5500BO ACCESSORY: Sump Kit
 INSTALLATION MANUAL STK-5500BO ACCESSORY: Sump Kit Dear Valued Customer, Made in the USA is not just a slogan at FASS; it s what we live by! FASS is not only assembled in the USA but 98%+ of the FASS product
INSTALLATION MANUAL RK-1002 ACCESSORY: Relocation Kit DDRP 02
 INSTALLATION MANUAL RK-1002 ACCESSORY: Relocation Kit DDRP 02 Dodge Cummins 1998.5-2002 Contents FL-1001 x14 FB-4001 WE-1007 FF-3270 HC-1001 PL-1003 DIPF-1001 QD-1001 Self Tapping Screw Before you get
INSTALLATION MANUAL. Application: DRP 04 18psi) Dodge Replacement
 Dodge Replacement") INSTALLATION MANUAL Application: DRP 04 (70gph @ 18psi) Dodge Replacement 2003-2004 Dear Valued Customer, Made in the USA is not just a slogan at FASS; it s what we live by! FASS is not only assembled
INSTALLATION MANUAL Application: DRP 04 (70gph @ 18psi) Dodge Replacement 2003-2004 Dear Valued Customer, Made in the USA is not just a slogan at FASS; it s what we live by! FASS is not only assembled
7.3L Ford PowerStroke 1999 THROUGH 2003 Without a Mechanical Lift Pump
 INSTALLATION MANUAL #34 7.3L Ford PowerStroke 1999 THROUGH 2003 Without a Mechanical Lift Pump MODEL RP-150 High Pressure Lift Pump With New Quick Connect Components! PLEASE READ THESE INSTRUCTIONS THOROUGHLY
INSTALLATION MANUAL. CUMMINS POWERED DODGE TRUCKS Model Year 1994 THROUGH High Performance Fuel System! With New Quick Connect Components!
 #2 MODEL FP-100 & FP-150 INSTALLATION MANUAL CUMMINS POWERED DODGE TRUCKS Model Year 1994 THROUGH 1998 High Performance Fuel System! With New Quick Connect Components! READ INSTRUCTIONS THOROUGHLY BEFORE
UNIVERSAL PUMP HANGER INSTALLATION INSTRUCTIONS
 UNIVERSAL PUMP HANGER INSTALLATION INSTRUCTIONS WARNING! THESE INSTRUCTIONS MUST BE READ AND FULLY UNDERSTOOD BEFORE BEGINNING INSTALLATION. FAILURE TO FOLLOW THESE INSTRUCTIONS MAY RESULT IN POOR PERFORMANCE,
ELECTRIC FUEL PUMPS P/N , , & FUEL PRESSURE REGULATOR P/N
 ELECTRIC FUEL PUMPS P/N 80000100, 80000101, & 80000102 FUEL PRESSURE REGULATOR P/N 80000103 Installation Instructions 199R10583 These instructions must be read and fully understood before beginning the
Installation Instructions
 Installation Instructions for 15912 to 15916 Electric Fuel Pumps & Fuel Pressure Regulators Installation Instructions WARNING! These instructions must be read and fully understood before beginning the
Duramax Lift Pump Kit 9-11 PSI Installation Instructions P/N# D
 2001-10 Duramax Lift Pump Kit 9-11 PSI Installation Instructions P/N# 1050320D PLEASE READ ALL INSTRUCTIONS CAREULLY BEORE INSTALLATION Kit Contents 1500365-P2 1500330-D lowmax Lift Pump V3 lowmax Wiring
UNIVERSAL PUMP HANGER INSTALLATION INSTRUCTIONS
 UNIVERSAL PUMP HANGER INSTALLATION INSTRUCTIONS WARNING! THESE INSTRUCTIONS MUST BE READ AND FULLY UNDERSTOOD BEFORE BEGINNING INSTALLATION. FAILURE TO FOLLOW THESE INSTRUCTIONS MAY RESULT IN POOR PERFORMANCE,
DF-200 w/adjustable Regulator INSTALLATION MANUAL. CUMMINS POWERED DODGE TRUCKS Model Year 1994 THROUGH 1998
 #12 DF-200 w/adjustable Regulator INSTALLATION MANUAL CUMMINS POWERED DODGE TRUCKS Model Year 1994 THROUGH 1998 High Performance Demand Flow Fuel System With New Quick Connect Components PLEASE READ THIS
INSTALLATION INSTRUCTIONS
 2807 INSTALLATION INSTRUCTIONS SECTION - AIR SPRING SECTION 2 - AIR ACCESSORY -6 ! IMPORTANT PLEASE DON T HURT YOURSELF, YOUR KIT OR YOUR VEHICLE. TAKE A MINUTE TO READ THIS IMPORTANT INFORMATION. This
ONBOARD AIR SYSTEM FOR ALL VEHICLES APPLICATIONS
 ONBOARD SYSTEM FOR ALL VEHICLES APPLICATIONS Thank you and congratulations on the purchase of a Pacbrake onboard air system. Please read the manual prior to starting to ensure you can complete the installation
INSTALLATION INSTRUCTIONS
 28 INSTALLATION INSTRUCTIONS SECTION - AIR SPRING SECTION 2 - AIR ACCESSORY 2-5 ! IMPORTANT PLEASE DON T HURT YOURSELF, YOUR KIT OR YOUR VEHICLE. TAKE A MINUTE TO READ THIS IMPORTANT INFORMATION. This
Not required for most applications. Not required for most applications. High pressure ( provided) High pressure ( provided)
 High pressure ( provided)") ELECTRIC FUEL PUMPS P/N 12-801-1, 712-801-1, 12-802-1, 12-802-2, 712-802-1, 12-812, 12-815-1, & 712-815-1 FUEL PRESSURE REGULATORS P/N 12-500, 12-501, 12-803, 12-803BP, 12-804, & 15812NOS Installation
ELECTRIC FUEL PUMPS P/N 12-801-1, 712-801-1, 12-802-1, 12-802-2, 712-802-1, 12-812, 12-815-1, & 712-815-1 FUEL PRESSURE REGULATORS P/N 12-500, 12-501, 12-803, 12-803BP, 12-804, & 15812NOS Installation
Mechanical Lift Pump System
 Installation Manual FUEL BOSS Mechanical LP P/N FB-03045 2003 2004.5 DODGE CUMMINS FUEL BOSS Mechanical Lift Pump System Installation Instructions Fuel Boss LP System p/n FB-03045 PLEASE READ ALL INSTRUCTIONS
INSTALLATION INSTRUCTIONS FUEL SURGE TANK KIT
 INSTALLATION INSTRUCTIONS FUEL SURGE TANK KIT BMW E46 3-Series, Excl Convertible Document: 19-0056 Support: info@radiumauto.com Relieve fuel pressure in vehicle before beginingthe installation. Disconnect
INSTALLATION INSTRUCTIONS
 INSTALLATION INSTRUCTIONS Part # 751-FP2500 IMPORTANT INFORMATION This Jagg oil cooler must be installed following these instructions. Read the easy-to-follow instructions fully prior to starting the installation
INSTALLATION INSTRUCTIONS
 INSTALLATION INSTRUCTIONS FUEL SURGE TANK KIT 2013+ FORD FOCUS ECOBOOST Document: 19-0168 Support: info@radiumauto.com Working under the vehicle is required. This installation is best performed with the
C40008 & C40009 EXHAUST BRAKES
 EXHAUST BRAKES C40008 & C40009 1995 2003 Ford F250 / F350 7.3 L Powerstroke Diesel with manual transmissions 1995 1998 Ford F250 / F350 7.3 L Powerstroke Diesel with automatic transmission* *Requires the
READ INSTRUCTIONS COMPLETELY BEFORE BEGINNING INSTALLATION
 INSTALLATION INSTRUCTIONS Hot Fox In-Tank Fuel Warmer READ INSTRUCTIONS COMPLETELY BEFORE BEGINNING INSTALLATION Models covered by these instructions include: HFG 0-0 HFG 0- SHFT--0- SHH--0 TWHF 0- HFG
Pump Gas Instructions for Polaris And 800 Models. Important Information before Installing This System:
 Pump Gas Instructions for Polaris 600 700 And 800 Models Important Information before Installing This System: Before you begin your turbo install, read through these instructions to determine if you are
7.3L Ford PowerStroke
 INSTALLATION MANUAL #31 7.3L Ford PowerStroke 1999-2003 MODEL RP-100 & RP-150 Supplemental Lift Pump With New Quick Connect Components! PLEASE READ THESE INSTRUCTIONS THOROUGHLY BEFORE BEGINNING INSTALLATION!
Cut zip ties and remove 2 plastic wiring harness brackets.
 TROUBLESHOOTING: Please read and understand all installation instructions before proceeding with the installation. Included parts: 1 - New Bosch Cp3 Pump 1 - HSM Pulley 1 - Serpentine Belt 1 - Pump Bracket/
BMK-12. Dual-Gard By-Pass Filter Mounting Kit Installation and Servicing Instructions
 BMK-12 Dual-Gard By-Pass Filter Mounting Kit Installation and Servicing Instructions IMPORTANT NOTICE Read all instructions completely before attempting to install this unit. Improper installation could
DODGE CUMMINS MK-2 Micro-Kleen System
 Installation Manual P/N MK20306 2003-07 DODGE CUMMINS MK-2 Micro-Kleen System Installation Instructions P/N MK20306 2 Micron Fuel Filter Installation PLEASE READ ALL INSTRUCTIONS BEFORE BEGINNING INSTALLATION
Installation Manual v1.0: Force Cool Kit Dodge with NV4500/NV4500HD/NV5600 Manual Transmissions. Please read all instructions before installation.
 Installation Manual v1.0: Force Cool Kit Dodge with NV4500/NV4500HD/NV5600 Manual Transmissions Please read all instructions before installation. Figure 1 - Force Cool Kit Note: Use Teflon sealing tape
INSTALLATION INSTRUCTIONS
 INSTALLATION INSTRUCTIONS 6525 REAR AXLE FLIP & HANGER KIT 5 OR 6 INCH LOWERING 14&UP CHEVROLET SILVERADO / GMC SIERRA 1500 Thank you for being selective enough to choose our high quality BELLTECH PRODUCT.
HP10134 & HP10135 KITS BASIC SIMULTANEOUS AIR SPRING ACTIVATION KIT
 HP10134 & HP10135 KITS BASIC SIMULTANEOUS AIR SPRING ACTIVATION KIT Thank you and congratulations on the purchase of a Pacbrake simultaneous air spring activation kit. This kit was designed to add in-cab
#TL T EA888 GEN 3 FUELING SYSTEM/ INSTALLATION INSTRUCTIONS
 #TL100069 2.0T EA888 GEN 3 FUELING SYSTEM/ INSTALLATION INSTRUCTIONS Notes: These instructions were written for a North American specification MkVII GTI. Other models, like the Golf R, are similar. When
WPS-104 Heater Installation Instructions For 500EFI, 700 XP, & Crew Applications
 WPS-104 Heater Installation Instructions For 500EFI, 700 XP, & Crew Applications ORDER OF INSTALLATION FOR A COMPLETE ENCLOSURE OF A RANGERWARE WPS (Weather Protection System) IS AS FOLLOWS: 1. Heater
INSTALLATION AND USER MANUAL
 INSTALLATION AND USER MANUAL SDKIT-730 & SDKIT-734 100% Bolt-On 150 PSI Train Horn System for 2011-2015 F-250 & F-350 Super Duty P/N SDKIT-730 P/N SDKIT-734 Thank you for purchasing a Kleinn Air Horns
INSTALLATION INSTRUCTIONS
 INSTALLATION INSTRUCTIONS FST KIT FOR PORT INJECTION 2013+ FORD FOCUS ECOBOOST Document: 19-0168 Support: info@radiumauto.com Working under the vehicle is required. This installation is best performed
Procharger Stage II Intercooled Supercharger System (11-14 GT)
") Procharger Stage II Intercooled Supercharger System (11-14 GT) Installation Time: Approximately one day. Installed on 2012 Mustang GT 5.0/Manual Required Tools 3/8 Socket Set (Standard and Metric) 1/2
Procharger Stage II Intercooled Supercharger System (11-14 GT) Installation Time: Approximately one day. Installed on 2012 Mustang GT 5.0/Manual Required Tools 3/8 Socket Set (Standard and Metric) 1/2
Included parts: 1 - New Bosch CP3 Pump 1 - HSM Pulley 1 - Serpentine Belt 1 - Pump Bracket/ Hardware STEP 1
 TROUBLESHOOTING: Please read and understand all installation instructions before proceeding with the installation. If you have questions during the installation of this product, please contact H&S Motorsports
6.0L Ford Powerstroke 2003 THROUGH 2007
 INSTALLATION MANUAL #32 6.0L Ford Powerstroke 2003 THROUGH 2007 MODEL RP-100 & RP-150 Supplemental Lift Pump With New Quick Connect Components! PLEASE READ THESE INSTRUCTIONS THOROUGHLY BEFORE BEGINNING
ZX-14 Stage I Turbo Kit
 62910 Peerless Ct. Bend, OR 97701 Phone 541.385.0706 Fax 541.382.9406 ZX-14 Stage I Turbo Kit WARNING: This turbo kit is for OFF-ROAD RACING use ONLY. Advisement: These instructions are written to be comprehensive
HP10098 BASIC INDEPENDENT AIR SPRING ACTIVATION KIT
 HP10098 BASIC INDEPENDENT AIR SPRING ACTIVATION KIT Thank you and congratulations on the purchase of a Pacbrake basic independent air spring activation kit. Please read the entire installation manual prior
1 set. Bulkhead Fitting, flat seal, washer & lock nut. 1 ea. Grommet Adapter. 1 ea. ½ male quick connect. 5 ea. Wire clamps.
 PureFlow AirDog Universal Fuel Module Upgrade Kit Installation Instructions This Kit Includes: Please verify all parts are included before beginning install. 1 set. Bulkhead Fitting, flat seal, washer
BLACKBIRD INSTALLATION SUPPLEMENT
 BLACKBIRD INSTALLATION SUPPLEMENT FOR 2003-7 FORD 6.0 LITER DIESEL SINGLE ALTERNATOR F-350, F-450, F-550, EXCURSION VERSION 7-07 Parts Description Blackbird Wiring Manual Installation Supplement 6.0 Liter
FORD POWERSTROKE 7.3L DIESEL ENGINE
 INSTALLATION MANUAL MODEL FP-100 & FP-150 With New Quick Connect Components! 1994.5-2003 FORD POWERSTROKE 7.3L DIESEL ENGINE PLEASE READ THESE INSTRUCTIONS THOROUGHLY BEFORE BEGINNING INSTALLATION. PureFlow
Cut zip ties and remove 2 plastic wiring harness brackets.
 TROUBLESHOOTING: Please read and understand all installation instructions before proceeding with the installation. If you have questions during the installation of this product, please email H&S Motorsports
frame bracket
 , Rev 4 02/19 frame bracket 8552012 Chevrolet & GMC ITEM PART # QTY DESCRIPTION 1 00248 4 WASHER,.625 LOCK 2 00253 2 NUT,.75 HEX 3 00254 2 WASHER,.75 LOCK 4 00477 4 WASHER,.625 FLAT 5 00492 2 WASHER,.75
Installation Instructions for: TOYOTA 3.4L SUPERCHARGER SYSTEM
 Installation Instructions for: TOYOTA 3.4L SUPERCHARGER SYSTEM 1996-2002 4Runner 1997-1998 T100 1997-2004 Tacoma 2000-2003 Tundra * PREMIUM FUEL REQUIRED * Magnuson Products LLC 1990 Knoll Drive, Bldg
PRODUCT SAFETY NOTICE
 PRODUCT SAFETY NOTICE Congratulations. This vehicle has been equipped with a Firestone air suspension system. This suspension will enhance the vehicle s handling when loaded, however, the vehicle s performance
Size Grade Torque 9/ ft/lbs. 5/ ft/lbs. 3/ ft/lbs. 7/ ft/lbs ft/lbs.
 Ford 150 5 1/2, 6 1/2 & 8 Boxes 4/16 HJ32003,Rev 2 BOlT TORQUE SPECIFICATIONS STANDARD BOlTS: Size Grade Torque 5/16 5 20 ft/lbs. 3/8 5 35 ft/lbs. 7/16 5 56 ft/lbs. 1/2 5 85 ft/lbs. Size Grade Torque 9/16
INSTALLATION INSTRUCTIONS Auto Level Compressor Kit IMPORTANT NOTES
 INSTALLATION INSTRUCTIONS 4880 Auto Level Compressor Kit Thank you for purchasing a quality Hellwig Product. PLEASE READ THIS INSTRUCTION SHEET COMPLETELY BEFORE STARTING YOUR INSTALLATION IMPORTANT NOTES
INSTALLATION INSTRUCTIONS
 INSTALLATION INSTRUCTIONS FUEL SURGE TANK INSTALL KIT Honda S2000 Document# 19-0063 Support: info@radiumauto.com WARNING: DO NOT SMOKE WHILE WORKING ON FUEL SYSTEMS. KEEP SPARKS AND OPEN FLAMES AWAY FROM
Scion FR-S ZN6. GTX2867R Gen2 (Internal Wastegate) Installation Instructions GPP P/N #
 Installation Instructions GPP P/N #") TURBO KIT Scion FR-S ZN6 Subaru BRZ ZC6 GTX2867R Gen2 (Internal Wastegate) Installation Instructions GPP P/N # 11518000 Vehicle Type Chassis Code Engine Code Transmission Model Year Scion FR-S DBA-ZN6
TURBO KIT Scion FR-S ZN6 Subaru BRZ ZC6 GTX2867R Gen2 (Internal Wastegate) Installation Instructions GPP P/N # 11518000 Vehicle Type Chassis Code Engine Code Transmission Model Year Scion FR-S DBA-ZN6
Ford C4 and C6 Floor Mount Automatic Transmission Shifter Installation Instructions
 Ford C4 and C6 Mount Automatic Transmission Shifter Installation Instructions Building American Quality With A Lifetime Warranty! TOLL FREE 1-877-469-7440 tech@lokar.com www.lokar.com Ford C4 and C6 Mount
INSTALLATION INSTRUCTIONS FOR THE TOMAHAWK ELECTRIC REVERSE
 INSTALLATION INSTRUCTIONS FOR THE TOMAHAWK ELECTRIC REVERSE LAST UPDATED: April 2018 Thank you for choosing the Motor Trike Electric Reverse. We ask that you read the directions before you start and follow
I N S TA L L AT I O N
 I N S TA L L AT I O N 5008 fits: H-D: '80-Up Electra glide, tour glide, road king, road glide or street glide PartS Included 1 Right Fork Mount Assembly 1 Left Fork Mount Assembly 2 H3 Driving Light Assemblies
FAX
 INSTALLATION INSTRUCTIONS 6299 Air Suspension Kit (pat. pending) 2009+ Dodge 1500 Pickup with Rear Coil Springs Thank you for purchasing a quality Hellwig Product. PLEASE READ THIS INSTRUCTION SHEET COMPLETELY
Important: Please read these instructions carefully and completely before starting the installation. TITAN Fuel Tanks INSTALLATION GUIDE
 TITAN pt. no.: 02 0000 0180 Important: Please read these instructions carefully and completely before starting the installation. TITAN Fuel Tanks INSTALLATION GUIDE 30 Gallon* Spare Tire Auxiliary Fuel
Important: Please read these instructions carefully and completely before starting the installation. TITAN Fuel Tanks INSTALLATION GUIDE
 TITAN pt. no.: 03 0000 0128 Important: Please read these instructions carefully and completely before starting the installation. TITAN Fuel Tanks INSTALLATION GUIDE 30 Gallon* Spare Tire Auxiliary Fuel
Thank you for purchasing the Craven Speed FlexPod Complete Gauge Pod Kit For R56, R58, R59, R60 with Refresh Engines (2011+)
") Thank you for purchasing the Craven Speed FlexPod Complete Gauge Pod Kit For R56, R58, R59, R60 with Refresh Engines (2011+) Before You Start Please read instructions completely before installing. These
Thank you for purchasing the Craven Speed FlexPod Complete Gauge Pod Kit For R56, R58, R59, R60 with Refresh Engines (2011+) Before You Start Please read instructions completely before installing. These
PureFlow AirDog PROTECTED BY CANADIAN PATENT US PATENTS AUSTRALIAN PATENT 2,108,391 5,355,860; 5,746,184; 6,729,
 #8 PROTECTED BY CANADIAN PATENT US PATENTS AUSTRALIAN PATENT 2,108,391 5,355,860; 5,746,184; 6,729,310 2005101054 NEW ZEALAND PATENT 532356 Additional Foreign Patents Pending in Europe, South America,