EMD DD35 Powered & Dummy Units. Assembly Instructions
|
|
|
- Ann Spencer
- 6 years ago
- Views:
Transcription
1 EMD DD35 Powered & Dummy Units Assembly Instructions Main Shell Side Handrail End Handrails Fuel Tank (Loose Part, Powered Unit Only) Side Handrail End Handrails 2 No. MT N Scale Body Mount Coupler Shorten Screw (Not included, Dummy Only) Truck (Loose Part, Dummy Only) With 8 No. 36 Fox Valley (FVM3611) N Scale Wheels (Not included, Dummy Only) Note: Carefully cut handrails from inside shell before removing the wax residue. Use new or very sharp craft knife. The 1 st 1mm of material on each post is not required. The handrails are soft and brittle just after printing. Chasses (Loose Part, Dummy Only) Truck Bolster Pin (Loose Parts, Dummy Only) Truck (Loose Part, Dummy Only) With 8 No. 36 Fox Valley (FVM3611) N Scale Wheels (Not included, Dummy Only) Kit Includes Per Powered Body Kit 1. Main Body 1. Fuel Tank 2. Side Handrails 4. End Handrails Per Dummy Body Kit 1. Main Body 1. Chassis 2. Side Handrails 4. End Handrails 2. Trucks 2. Truck Bolster Pins


.")
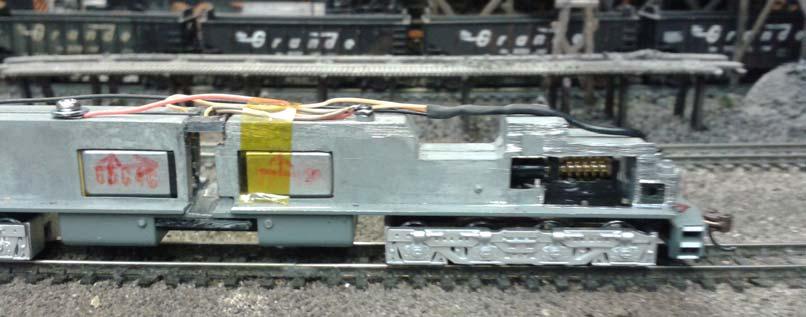
2 DD35 Powered Unit Chassis Modification Instructions This unit uses a modified Bachmann 4 th generation DD40AX (DCC version). Carefully spread the shell with your fingers and pull up to remove it from the chassis. Pull the fuel tank down and it should also pull off. Unscrew and remove the circuit board. (two screws), and the screw holding the front light. Keep the screws! The motor wires will need to be unsoldered from the underside of the board. Remove the 3 Screws holding the chassis together and separate the two halves. The two motors can now be removed from the chassis. It's best to mark them with arrows to denote top and front or rear. The smaller of the two fly wheels will need to be cut off each motor. (This is the fly wheel without the black shaft connection on the end). Next the two chassis halves need to be shortened. 24mm (0.944 ) needs to be removed from the centre or each half. Mark the area to be removed, start by centring the area around the middle screw hole.


3 Once you have marked both side and checked that it is correct cut the centre part of each frame out with a hacksaw. You can cut them both at the same time if the end bolts are used minus the black plastic isolating washer to hold the halves together. Because the DD35 does not have a cab you will also need to thin the cab end of the DD40AX chassis. The cab area needs to be cut flush with the main part of the chassis as marked below. If you want to keep this as a DCC locomotive you will also need to remove the up stand in the cab area to make room for the chip as shown above right. When finished the cab area should look like this. Cut two pieces of plastic to join the front and rear chassis parts together. These will be hidden in the fuel tank. See photo below. Lay the parts on their side on a smooth surface to glue these together, so they are perfectly aligned. Superglue works well.


4 Reassemble the two frame halves ensuring the two motors are fitted correctly and remembering to use the plastic isolating washers. Before fully tightening the screws, cut a piece of plastic/styrene the same thickness as the gap between the chassis halves in to a H shape. The size will need to be measured after you have made your cuts and test fitted the 4 parts of the chassis together. Using a strong glue, fix the H shape to only one side, as you may need to disassemble the chassis for maintenance. If the chassis is for DC only, the two brown wires need to be attached to the right hand side of the chassis, the orange to the left. Also jumper wires need to run from the front to the back halves. Remember those screws? One hole needs to be drilled somewhere on the rear right chassis part and another screw found for that. For DCC, install a decoder of your choice where the cab used to be, brown motor wires to orange decoder wire, orange motor wires to decoder grey wire. Red decoder wire to front & back right hand parts of chassis (screws), black decoder wire to front & back left hand parts of chassis (screws). If you wish to add lights, there is plenty of room.

.")
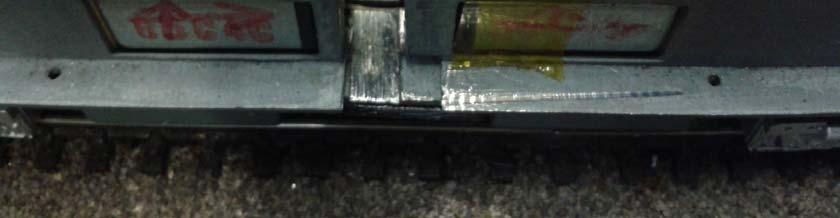
5 Once complete the Chassis should look like this. The shell should slip over the chassis and clip into place. The new fuel tank should also shape on in the same way. If you are feeling BRAVE, you can cut out the passageway through the chassis as in the photos on the next page. This was done before the four chassis parts were re-assembled. Using the body as a guide, cut down as far as the running board 3.5mm from each side. The plastic spine will now be in two parts, one at the top, one at the bottom, and two small jumpers were glued in the gap at the top (see 2 nd photo). This chassis was DC and you can see the screws and the right hand jumper wire.


6
Application Note. Walthers/Proto 2000 E7A Tsunami Digital Sound Decoder Installation Notes
 Application Note Overview This application note describes how to install a TSU-1000 digital sound decoder into a Walthers/ Proto 2000 E7A. Skill Level 2: The entire installation can be completed in one
Upgrading Proto axle Geeps with Stewart Trucks. November 27, 2010 Mark Schutzer
 Upgrading Proto 2000 4 axle Geeps with Stewart Trucks November 27, 2010 Mark Schutzer Introduction Several years ago Proto 2000 made a bunch of 4 axle locomotives that used trucks that were a copy of an
Tip: Liliput S LED Light for Forward Cabin Locomotive Date:
 Hi All, I obtained this Liliput locomotive catalogue number L131541-S some time ago and was disappointed that the feature of a steam locomotive with a forward driving cabin didn t have a detailed cabin
Micro-Trains #1021/#1022 Low short profile coupler
 1 Micro-Trains #1021/#1022 Low short profile coupler Low short profile coupler, for locomotives and cars with limited mounting area, makes 2 pair of either (1021) Life-Like E8A Pilot or Bachmann 4-8-4
Thank you for purchasing the Blackstone Models K-27!
 Operations Manual Thank you for purchasing the Blackstone Models K-27! Before your Mudhen whistles off, we want to tell you about a few things that will enhance your operating experience and ensure that
Bachmann Digital Sound Decoder Installation Notes
 New Dimensions in Digital Sound Technology TM APPLICATION NOTE Bachmann 2-6-6-2 Digital Sound Decoder Installation Notes Overview This application note describes the installation of a DSD-090LC Digital
Build your own THUNDERBIRD 2
 PACK 01 STAGE PAGE 01 Nose assembly and Elevator Car rear wheels 3 02 Cockpit interior and Elevator Car 1 completion 7 03 Missile launcher and Thunderbird 4 11 04 Nose assembly and the Tracy brothers 15
Motorising Set for Corgi Feltham Tram BEC-KITS) Fitting instructions
 Fitting instructions") Motorising Set for Corgi Feltham Tram The KW Trams (ex BEC-KITS) motorising set for the Corgi Feltham tram contains 2 motorised maximum traction bogies, with link wiring, and 2 bolsters. The following
Motorising Set for Corgi Feltham Tram The KW Trams (ex BEC-KITS) motorising set for the Corgi Feltham tram contains 2 motorised maximum traction bogies, with link wiring, and 2 bolsters. The following
Tip: and Orient Express LED Light Upgrade Date: Correction
 Hi All, I have since inherited my friend Rudolf s 42755 Orient Express with the extra 42760 car set and wanted to complete the LED light upgrade as we had planned. Side view of the Restaurant car with
Tip: 2856 LED Lighting for the Airport Express Set Date:
 Hi All, The 2856 Airport Express set was manufactured in 1983. On 09-11-1989 the locomotive was given a digital upgrade using a 6080 decoder. It has since had a digital upgrade to a high performance motor
This year Märklin have released a coach which has included LED lighting with a currentconducting close coupler (single pole)
") Hi All, Over the past few months I have been working at a steady pace to install LED lighting in my passenger coaches. The coach lighting must have LED lights to reduce power consumption on the layout
Hi All, Over the past few months I have been working at a steady pace to install LED lighting in my passenger coaches. The coach lighting must have LED lights to reduce power consumption on the layout
Walthers/Life-Like USRA Steam Locomotive
 North Raleigh Model Railroad Club Installing Decoders in N Scale Locomotives Detailed Instructions Walthers/Life-Like USRA 2-8-8-2 Steam Locomotive by David Derway May 17, 2010 Table of Contents Introduction...
Tip: LED Lighting for the 4367 SBB Euro City Set, 4366 and 4368 Cars Date: , Corrections Modified , Photos
 Hi All, I have had the 4367 SBB Euro City set with extra cars 4366 and 4368 since 1998, apart from a test run on the layout they have stayed in storage ever since. I decided to change some rolling stock
Application Note. Athearn RTR SW-1000/SW-1500 Tsunami Digital Sound Decoder Installation Notes
 Application Note Athearn RTR SW-1000/SW-1500 Tsunami Digital Sound Decoder Installation Notes Overview This application note describes how to install a TSU-AT1000 Digital Sound Decoder into the HO Athearn
Cabin Light. Hi All, 1
 Hi All, My friend Rudolf set me a challenge for his 36331 electric locomotive, wanting Telex couplers fitted. When I opened up the locomotive I discovered there is very little room to add extra components
Application Note. Atlas RS-3 Tsunami Digital Sound Decoder Installation Notes
 Application Note Atlas RS-3 Tsunami Digital Sound Decoder Installation Notes Overview This application note describes how to install a TSU-AT1000 digital sound decoder into an HO Atlas RS-3. Skill Level
Bachmann 38 Ton Shay
 Bachmann 38 Ton Shay Phoenix Sound Systems, Inc. 3514 West Liberty Road Ann Arbor MI 48103 www.phoenixsound.com phone: 800-651-2444 fax: 734-662-0809 e-mail: phoenixsound@phoenixsound.com 2005-2008 Phoenix
Tip: 3425 Kittle Loco with LP4.0 Micro Conversion and LED Lighting Date: , Corrections Addition Link added
 Hi All, This is the last of Rudolf s LokPilot Micro V4.0 decoder conversions. He asked me to convert his Märklin Delta 3425 steam locomotive and wanted to improve the lighting effects for the cabin, change
5 Amp Dual Mode Sound Decoder by Frank T.Verrico
 5 Amp Dual Mode Sound Decoder by Frank T.Verrico Model Rectifier Corp. s latest venture into O scale is a 5 amp. dual mode, [DC/DCC], sound decoder. This full featured N.M.R.A. compatible sound decoder
4mm scale 009 gauge Lodge Hill & Upnor railway Chattenden Drewry loco body kit.
 RT Models 4mm scale 009 gauge Lodge Hill & Upnor railway Chattenden Drewry loco body kit. HISTORY The loco was supplied by the Drewry car co. to the Lodge Hill & Upnor Railway in 1949, works number 2263.
Tip: 3652 and 3756 Crocodiles with LP4.0 and LED Lighting Date:
 Hi All, My friend Adrian asked me to convert two crocodiles 3652 and 3756 using LokPilot 4.0 decoders. Adrian wanted to run both locomotives as a double headed configuration so this would require that
Bachmann GWR Earl (Dukedog) EM Finescale Conversion
 EM Finescale Conversion") Bachmann GWR Earl (Dukedog) EM Finescale Conversion Before you start, it is a good idea to have some small containers or snap top poly bags to put screws and components in for safe keeping...much better
Bachmann GWR Earl (Dukedog) EM Finescale Conversion Before you start, it is a good idea to have some small containers or snap top poly bags to put screws and components in for safe keeping...much better
THE MOTOR. Page 1 of 9
 Page 1 of 9 The Bachmann HO Old Time 4-4-0 has been around a long time and suffers from two problems: the latest motor will burnout with a frying of the added DCC decoder and the pickup system is very
Kato P42 Tsunami Digital Sound Decoder Installation Notes
 Kato P42 Tsunami Digital Sound Decoder Installation Notes Overview This application note describes the procedure for installing a TSU-KT1000 Digital Sound Decoder into a Kato HO P42 locomotive. Skill Level
Build your own THUNDERBIRD 2
 PACK 03 PAGE 12 Pod 3 front hatch and Elevator Car 2 43 13 Pod 3 rear hatch and Elevator Car 2 46 14 Pod 3 floor and Elevator Car 2 49 15 Pod 3 frames and FAB 1 52 16 Pod 3 frames and FAB 1 55 17 Pod 3
Irunning Board Installation Instruction
 PARTS LIST: Item QTY Description Item QTY Description #1 2 Running Board(use for left or right) #8 13 8-1.25mm x 25mm Hex Bolt #2 1 Passenger/right Upper Bracket #9 13 8mm x 24mm x 2mm Flat Washer #3 1
MYLOCOSOUND LARGE SCALE DIESEL LOCOMOTIVE KIT
 1 MYLOCOSOUND LARGE SCALE DIESEL LOCOMOTIVE KIT 1.OVERVIEW 16mm to the foot scale model of an 0-4-0 Sugar Cane locomotive. Easy glued assembly. Heavy, high quality motor, gears and steel chassis for a
REAR INTERIOR AMBIENT LED FITTING INSTRUCTIONS AUDI A4(B6) 2001 onwards
 2001 onwards") GLUE is required to secure the supplied lighting module into place, and is not included as part of this modification kit. Please read the instructions fully before commencing this modification. NOTE: Ensure
GLUE is required to secure the supplied lighting module into place, and is not included as part of this modification kit. Please read the instructions fully before commencing this modification. NOTE: Ensure
GM TRUCK Double Din Head Unit Install Kit
 www.thedetailss.com 95-99 GM TRUCK Double Din Head Unit Install Kit Please read all instructions including the *install tips* first! 1. Disconnect the vehicle s battery. 2. Remove the dash panel; Lower
Athearn RTR EMD CF7 Tsunami Digital Sound Decoder Installation Notes
 Athearn RTR EMD CF7 Tsunami Digital Sound Decoder Installation Notes Overview This application note describes how to install a TSU-AT1000 into an Athearn HO Ready-To-Roll EMD CF7. Skill Level 2: The entire
Build your own THUNDERBIRD 2
 PACK 11 PAGE 67 Pod 4 ramp tracks and Jet Air Transporter 224 68 Left rear booster and Alan s Racing Car 227 69 Right rear booster and Alan s Racing Car 230 70 Left booster speaker 233 71 Right rear booster
Application Note. Bachmann F40PH Tsunami Digital Sound Decoder Installation Notes
 Application Note Bachmann F40PH Tsunami Digital Sound Decoder Installation Notes Overview This application note describes how to install a TSU-AT1000 Digital Sound Decoder into a Bachmann HO F40PH. Skill
Tip: LED Lighting for the 3098 Locomotive and 4392 Coach Set Date: , ,
 Hi All, Over the past few months I have been working at a steady pace to install LED lighting in my passenger coaches. The coach lighting must have LED lights to reduce power consumption on the layout
NSWGR C30T LOCOMOTIVE AND TENDER KIT
 Australian Railway Kits ABN: 27 416 246 418 Incorporating Main West Models Manufacturers, Wholesalers and Retailers of Quality Australian Model Railways PO Box 252 Warwick, Queensland, 4370 Australia Phone/Fax:
Athearn RTR EMD GP35 Tsunami Digital Sound Decoder Installation Notes
 Athearn RTR EMD GP35 Tsunami Digital Sound Decoder Installation Notes Overview This application note describes how to install a TSU-AT1000 into an Athearn HO Ready-To-Roll EMD GP35. Skill Level 2: The
BROOKS STAIRLIFTS SUPERGLIDE 120
 BROOKS STAIRLIFTS SUPERGLIDE 120 INSTALLATION PROCEDURES CONTENTS Health And Safety Hazards 3 Unpacking the Stairlift Carriage 4 Pre-Installation Procedure 5 Box Contents 6 Installation Tools 9 1.1 Required
Atlas HO MP-15 Tsunami Digital Sound Decoder Installation Notes
 Atlas HO MP-15 Tsunami Digital Sound Decoder Installation Notes Overview This application note describes how to install a TSU-AT1000 digital sound decoder into an Atlas HO MP-15. Skill Level 2: The entire
INSTRUCTIONS FOR NYC K-11 PACIFIC KIT #100200
 INSTRUCTIONS FOR NYC K-11 PACIFIC 4-6-2 KIT #100200 These instructions provide photographs of completed model, exploded-view drawings, diagrams, step-by-step instructions and an itemized parts list. If
SERIES A & AA ROLLER DOORS INSTALLATION GUIDE
 SERIES A & AA ROLLER DOORS INSTALLATION GUIDE THESE INSTRUCTIONS ARE PROVIDED FOR USE BY EXPERIENCED INSTALLERS OF GARAGE DOORS BY UNDER-TAKING THE INSTALLATION OF THIS DOOR, THE INSTALLER UNDERSTANDS
Build your own THUNDERBIRD 2
 PACK 12 STAGE PAGE 74 Tailwing ramjets and Cobra Half-track 247 75 Tailwing intakes 250 76 Tailwing fins 253 77 T2 control board 255 78 T2 wings and Mobile Crane 258 79 T2 side frames and Mobile Crane
FMCZTINT Mitsubishi Colt CZT front mounting intercooler installation
 FMCZTINT Mitsubishi Colt CZT front mounting intercooler installation Tools needed: Drill with 8mm HSS drill bit, hacksaw, dremel/stanley knife 3/8 drive ratchet with extension and 10mm,13mm sockets Torx
Tip: LED Lighting Improvements for Rheingold Set Date:
 Hi All, Recently I came into possession of the 41928 Rheingold set and was excited to see that I could add a function decoder to switch the light functions on and off. The first problem is Märklin don
Bachmann. Climax. Phoenix Sound Systems, Inc West Liberty Road Ann Arbor MI
 Bachmann Climax Phoenix Sound Systems, Inc. 3514 West Liberty Road Ann Arbor MI 48103 www.phoenixsound.com phone: 800-651-2444 fax: 734-662-0809 e-mail: phoenixsound@phoenixsound.com 2004-2007 Phoenix
Athearn Genesis GP38-2 Tsunami Digital Sound Decoder Installation Notes
 Athearn Genesis GP38-2 Tsunami Digital Sound Decoder Installation Notes Overview This application note describes how to install a TSU-GN1000 digital sound decoder into an Athearn Genesis HO GP38-2. Skill
Athearn SD40 Tsunami Digital Sound Decoder Installation Notes
 Athearn SD40 Tsunami Digital Sound Decoder Installation Notes Overview This application note describes how to install a TSU-AT1000 into an Athearn Ready-To-Roll HO SD40. Skill Level 2: The entire installation
Stephenson's Valve Gear: 7mm cast white-metal kit 19 th Century swing-link version - non-working, cosmetic only. Instructions
 SER-Kits Stephenson's Valve Gear: 7mm cast white-metal kit 19 th Century swing-link version - non-working, cosmetic only Page 1 of 5 Instructions HEALTH & SAFETY: The castings contain some lead. Dispose
Chopper Couplings. Assembly. Fitting
 Chopper Couplings Unlike most model chopper couplings, these will work with two opposing hooks, which looks so much better and allows you to turn stock at will. They are still compatible with most other
How to Replace the Main Axle Gear on the Bachmann Spectrum GScale using the NWSL # upgrade gear.
 How to Replace the Main Axle Gear on the Bachmann Spectrum GScale 4-4-0 and 2-6-0 Mogul (2001era), using the NWSL #2223-6 upgrade gear. By Paul M. Newitt (all text and photos Copyright Paul M. Newitt,
BRL-007 Detailing and Conversion Kit for NOVO/Triang Class 35 Hymek. Building Instructions
 Peter Besant Tel 07807225801 prmrp@fsmail.net www.prmrp.com BRL-007 Detailing and Conversion Kit for NOVO/Triang Class 35 Hymek Building Instructions SCALE MODEL PRODUCT FOR ADULT MODELLERS ONLY. WHITE
BRL CLASS 66 LOCOMOTIVE. Building Instructions
 Tel 07807225801 prmrp@fsmail.net www.prmrp.com BRL - 066 CLASS 66 LOCOMOTIVE Building Instructions SCALE MODEL PRODUCT FOR ADULT MODELLERS ONLY. WHITE METAL CONTAINS LEAD WASH HANDS AFTER USE. MAY CONTAIN
8mm Bolt Plate. Passenger/right front only Upper Mounting Bracket
 4 SIDE STEPS PARTS LIST: 1 Driver/left Side Step 13 8-1.25mm x 25mm Hex Bolts 1 Passenger/right Side Step 13 8mm x 24mm x 2mm Flat Washers 1 Passenger/right Upper Bracket (all incl. DEF) 13 8mm Lock Washers
Fitting Radio Control to a Mamod Boulton
 Fitting Radio Control to a Mamod Boulton How To Fit Radio Control To A Mamod Boulton using FlySky Equipment I assume that you already have a Mamod Boulton and have fitted rechargeable AA batteries instead
YOU PERFORM THIS MODIFICATION AT YOUR OWN RISK
 This is a simple? guide to installing a Provent 200 Oil Vapour Filter into a Nissan X-Trail T31 Diesel 09 Model M9R Engine YOU PERFORM THIS MODIFICATION AT YOUR OWN RISK It may affect your warranty The
S SCALE CONCEPT MODELS INSTRUCTIONS FOR PRODUCT S SCALE IAPX CRYOGENIC TANK CAR El Toro Way Stockton, CA 95210
 CONCEPT MODELS Web Address: http://www.con-sys.com Email: concept_models@con-sys.com 8810 El Toro Way Stockton, CA 95210 S SCALE INSTRUCTIONS FOR PRODUCT S SCALE IAPX 1028-37 CRYOGENIC TANK CAR 2 CONCEPT
Basic Electronics Course Part 1
 Basic Electronics Course Part 1 Simple Projects using basic components Following are instructions to complete several basic electronic projects Identify each component in your kit Image 1. [There are other
Atlas Silver Series HO RS-3 (2014 Release) Tsunami Digital Sound Decoder Installation Notes
 Tsunami Digital Sound Decoder Installation Notes") Atlas Silver Series HO RS-3 (2014 Release) Tsunami Digital Sound Decoder Installation Notes Overview This application note describes how to install a TSU-AT1000 Digital Sound Decoder into an Atlas Silver
Atlas Silver Series HO RS-3 (2014 Release) Tsunami Digital Sound Decoder Installation Notes Overview This application note describes how to install a TSU-AT1000 Digital Sound Decoder into an Atlas Silver
Hyundai EXCEL Remote Immobiliser System Installation Manual Revision 1 10/12/99 Part No
 Hyundai EXCEL Remote Immobiliser System Installation Manual Part No. 00243-22500 The Excel remote immobiliser system is central locking compatible. For vehicle's already fitted with Factory central locking,
$1.00 FOR THE TQIO/RCIO
 $1.00 FOR THE TQIO/RCIO m mm HDBBYSHOP Champion Jay Halsey has an impressive track record. One of Jay's advantages is a whisper smooth tranny thanks to his dad, Jim. Now you can build a Halsey transmission!
Athearn SD40T-2 Tsunami Digital Sound Decoder Installation Notes
 Athearn SD40T-2 Tsunami Digital Sound Decoder Installation Notes Overview This application note describes how to install a TSU-AT1000 into an Athearn Ready-To-Roll HO SD40T-2. Skill Level 2: The entire
The H-MAC Heavy Metal Articulating Chassis Construction Guide
 The H-MAC Heavy Metal Articulating Chassis Construction Guide The Heavy Metal Chassis is constructed with two identical drive modules built using 10 mechanical sub-assemblies. The drive modules are integrated
Lenz Gold Maxi DCC Decoder Install for DCC operation with Sound for Bachmann s K27 Large Scale Steam Locomotive
 Lenz Gold Maxi DCC Decoder Install for DCC operation with Sound for Bachmann s K27 Large Scale Steam Locomotive Lenz produces a DCC decoder that easily installs in the Bachmann K-27. The following installation
Instructions for Assembling Driving Wheels, Axles and Crankpins
 Instructions for Assembling Driving Wheels, Axles and Crankpins (Version 1; October 2008) Introduction These instructions explain how to assemble Exactoscale 4mm scale driving wheels, axles and crankpins
Application Note. Athearn Genesis SD70MAC Tsunami Digital Sound Decoder Installation Notes
 Application Note Athearn Genesis SD70MAC Tsunami Digital Sound Decoder Installation Notes Overview This application note describes how to install a TSU-GN1000 digital sound decoder into an Athearn Genesis
Athearn Pacific Digital Sound Decoder Installation Notes
 New Dimensions in Digital Sound Technology TM APPLICATION NOTE Overview This application note describes how to install a DSD-100LC Digital Sound Decoder into the Athearn Pacific Locomotive. All of the
8mm Bolt Plate. (15) 8mm U-Clip Nuts. Passenger/right front Upper Bracket
 8mm U-Clip Nuts. Passenger/right front Upper Bracket") PARTS LIST: 2 T-6 Side Bars 8 8mm Double Bolt Plates 1 Passenger/right Upper Bracket (all incl. DEF) 17 8-1.25mm x 25mm Hex Bolts 1 Passenger/right Lower Bracket (all incl. DEF) 33 8mm x 24mm x 2mm Flat
PARTS LIST: 2 T-6 Side Bars 8 8mm Double Bolt Plates 1 Passenger/right Upper Bracket (all incl. DEF) 17 8-1.25mm x 25mm Hex Bolts 1 Passenger/right Lower Bracket (all incl. DEF) 33 8mm x 24mm x 2mm Flat
Sound Install Steam. Presented by Tim s Trains
 Presented by Tim s Trains This presentation will show you the basic steps required to install a sound decoder and speaker in a steam locomotive. This particular locomotive is a Bachmann 4-8-4 with a Vanderbilt
Build your own THUNDERBIRD 2
 PACK 04 PAGE 19 Pod 3 base 66 20 Pod 3 details and Firefly 69 21 Pod 3 laboratory and Firefly 72 22 Pod 3 floor details and Firefly 75 23 Pod 3 inspection walkways 78 24 Pod 3 right inner wall 81 25 Pod
Biasing the Vintage Series (Nomad, BelAir, VT50, Vintage 33)
") Biasing the Vintage Series (Nomad, BelAir, VT50, Vintage 33) This chapter will outline and guide you through the procedures of biasing the Vintage series amplifier. The procedures are broken down in a
Biasing the Vintage Series (Nomad, BelAir, VT50, Vintage 33) This chapter will outline and guide you through the procedures of biasing the Vintage series amplifier. The procedures are broken down in a
INSTALLATION INSTRUCTIONS 5" BENT END SIDEBARS ROCKER PANEL MOUNT SILVERADO/SIERRA CREW CAB INCLUDES DIESEL W/DEF PART NUMBER
 INSTALLATION INSTRUCTIONS 5" BENT END SIDEBARS ROCKER PANEL MOUNT PART NUMBER WB51010S WB51010B WB51019S WB51019B PARTS LIST: 1 Driver/left Sidebar 25 8-1.25mm x 25mm Hex Bolt 1 Passenger/right Sidebar
MODELING MARS LIGHTS ON CGW F-UNITS. David Webb
 MODELING MARS LIGHTS ON CGW F-UNITS David Webb In the pre-ditch light diesel era, the Chicago Great Western, as did many other, but not all, roads, specified dual headlights on its cab units. I gather
8 Tips and Tricks for Improving Rolling Stock Lighting ( Robert J. Wilkins Oct 2017)
") 8 Tips and Tricks for Improving Rolling Stock Lighting ( Robert J. Wilkins Oct 2017) The following are some ideas and suggestions for improving the lighting in your HO rolling stock including passenger
8 Tips and Tricks for Improving Rolling Stock Lighting ( Robert J. Wilkins Oct 2017) The following are some ideas and suggestions for improving the lighting in your HO rolling stock including passenger
Jacobsen 600 Series Ransomes 700 Series
 Jacobsen 600 Series Ransomes 700 Series Parts List & Mounting Instructions Jodale Perry Printed: 2004/01 Standard Parts List Qty Description Photo L&R Rear Mounting Brackets L&R Front Mounting Brackets
Lionel Hot Box Car Mini Commander Installation Guide
 Lionel Hot Box Car Mini Commander Installation Guide Revised: October, 2008 OVERVIEW: The Hot Box Car is normally active when powered on, and may be switched off by an extended press of the horn button.
Tip: Difficult Conversions for F800 (3026) and 3111 Date: Led lighting added, LED Addition 3111
 and 3111 Date: Led lighting added, LED Addition 3111") Hi All, It s good to revisit previous conversions and see if you can improve on what has been done before. I decided to add LED lighting to my F800 (3026) and 3111. This document update shows how it was
Hi All, It s good to revisit previous conversions and see if you can improve on what has been done before. I decided to add LED lighting to my F800 (3026) and 3111. This document update shows how it was
LED NEON FLEX INSTALLATI ON GUI DE
 LED NEON FLEX INSTALLATI ON GUI DE F I R E F L Y L I G H T I N G. C O M. A U WHAT IS LED NEON FLEX? THE MOST VERSATILE AND SIMPLE LIGHTING SYSTEM YOU WILL EVER USE LED Neon Flex is a green friendly, safe,
SEARAILS RR-XXX STEAM LOCOMOTIVES ASSEMBLY MANUAL
 SEARAILS RR-XXX 0-4-0 STEAM LOCOMOTIVES ASSEMBLY MANUAL 30 March 2015 T R Knapp Model Engineering 1 This diagram shows basic assembly of Nn3/Z Porter 0-4-0T 2 This diagram shows basic assembly of Baldwin
1967 (Late) and 1968 CORVETTE TELESCOPING STEERING COLUMN DISASSEMBLY & REPAIR INSTRUCTIONS - PAPER #1
 and 1968 CORVETTE TELESCOPING STEERING COLUMN DISASSEMBLY & REPAIR INSTRUCTIONS - PAPER #1") Last Revision: 03SE2012 1967 (Late) and 1968 CORVETTE TELESCOPING STEERING COLUMN DISASSEMBLY & REPAIR INSTRUCTIONS - PAPER #1 Disassembly and Repair Instructions Addressed in this Paper Difficulty Page
Last Revision: 03SE2012 1967 (Late) and 1968 CORVETTE TELESCOPING STEERING COLUMN DISASSEMBLY & REPAIR INSTRUCTIONS - PAPER #1 Disassembly and Repair Instructions Addressed in this Paper Difficulty Page
Owner s Manual: Standard Gauge Diesel shunter Locomotive in Gauge 3 scale. PLine. Built in Brass. Standard Gauge Shunter Locomotive Model (G3 scale)
") PLine Built in Brass Standard Gauge Shunter Locomotive Model (G3 scale) PLEASE READ THIS OWNERS MANUAL CAREFULLY BEFORE OPERATING THE MODEL Prototype Information: Not many Standard gauge locomotives operated
PLine Built in Brass Standard Gauge Shunter Locomotive Model (G3 scale) PLEASE READ THIS OWNERS MANUAL CAREFULLY BEFORE OPERATING THE MODEL Prototype Information: Not many Standard gauge locomotives operated
Jacobsen 600, Ransomes 700 Series
 Jacobsen 600, Ransomes 700 Series Soft Side/ROPS Parts List & Mounting Instructions Jodale Perry Printed: 2001/11 Standard Parts List Qty Description Photo L&R Rear Mounting Brackets L&R Front Mounting
channel damage the internal components and the weight may break the internal wiring or flexible strip.
 YOU MAY NEED End cap Power adaptor Connector pin Splicing pin Connector Silicone glue Pliers Power converter Converter + surge protector Heat shrink Aluminium channel Heat gun NT cutter IMPORTANT NOTES
DELTA STYLE 9500 CARTRIDGE SPLIT SEAL INSTALLATION INSTRUCTIONS INTRODUCTION:
 DELTA STYLE 9500 CARTRIDGE SPLIT SEAL INSTALLATION INSTRUCTIONS INTRODUCTION: The Type 9500 Cartridge Split Seal sets the standard in the evolution of split seal designs. It is well suited for the widest
Installation Instructions Supertop for Truck
 Installation Instructions Supertop for Truck US Patent 6827391 Vehicle Application: Ford F150 1987-1996 (8 ft.) Part Number: 76315 Ford F250 1987-1998 (8 ft.) Part Number: 76315 Ford F350 1987-1998 (8
4-Bank 6-POSition Chip. Vehicle Application
 INSTALLATION Manual 4-Bank 6-POSition Chip Vehicle Application Part# F250-F350 7.3L 94-97 Automatic Transmission Ford Power Stroke 41611 F250-F350 7.3L 94-97 Standard Transmission Ford Power Stroke 41612
Broadway Limited (and Blueline) SD40-2 Tsunami Digital Sound Decoder Installation Notes
 SD40-2 Tsunami Digital Sound Decoder Installation Notes") Broadway Limited (and Blueline) SD40-2 Tsunami Digital Sound Decoder Installation Notes Overview This application note describes how to install a TSU-AT1000 digital sound decoder into a HO Broadway Limited
Broadway Limited (and Blueline) SD40-2 Tsunami Digital Sound Decoder Installation Notes Overview This application note describes how to install a TSU-AT1000 digital sound decoder into a HO Broadway Limited
Installing AMP-wiring in a New Beetle
 Installing AMP-wiring in a New Beetle Vehicle used: New Beetle 2.0i Type 9C (1999) Used set of cables: Dietz 35mm² power cable, double shielded Dietz chinch cable ( 35mm² Professional Line ) First of all:
J2 Remove sound insulation/knee guard 1 and side panel 2 on center console
 J1 Preparations Drive car forward on a level surface so that wheels are straight. Disconnect battery negative lead. Turn ignition key to position 1 so that steering lock is off. J2 Remove sound insulation/knee
Z8 Engine Start Button Install for the BMW E46 3 Series
 Z8 Engine Start Button Install for the BMW E46 3 Series This write up is a specific installation of a Z8 engine start button on the E46, but it can be used as a general guide for an engine start button
Last Revision: 07SE2009
 Last Revision: 07SE2009 1967 (Late) and 1968 CORVETTE STANDARD (NON-ADJUSTABLE) STEERING COLUMN DISASSEMBLY & REPAIR INSTRUCTIONS PAPER #1 Disassembly and Repair Instructions Addressed in this Paper Difficulty
GL1800 TRAILER HITCH - INSTALLATION INSTRUCTIONS #GL
 GL1800 TRAILER HITCH - INSTALLATION INSTRUCTIONS #GL18007-20 Read through these instructions completely before attempting installation, lay out all pieces including the numbered hardware bags to familiarize
The speaker soundbox improves the performance of the speaker in locos which have no purpose designed speaker cradle.
 1 1.OVERVIEW 8 pin DCC sound decoder with adjustable back-emf loco control. Fully adjustable sounds to match the chuff and whistle to the prototype loco. Provides a chuff which matches the loco speed and
Subaru SVX 1/43 Scale Model Assembly Instructions
 Subaru SVX 1/43 Scale Model Assembly Instructions Congratulations on your purchase of an unassembled 1/43 scale Subaru SVX! You now own a model that is even more rare than the car it represents. Currently
Working Stirling-Motor
 PARTS LIST 113.174 Working Stirling-Motor Please Note The OPITEC range of projects is not intended as play toys for young children.they are teaching aids for young people learning the skills of Craft,
SAN FELIPE: Step by Step Pack 8
 Pack 8 Your parts Gun port frames Complete gun ports Tools and equipment Tweezers Superglue Pliers Hammer Sandpaper Wood stain Paintbrushes Black pen a Glue gun port frames to the gun ports of the main
Instruction Manual book
 book ITEM CODE:BH 115. SPECIFICATION Wingspan : 6,000 mm 236,22 in. Length : 2,740 mm 107,87 in. Weight : 17.5kg 38.5Lbs. Radio : 08 channels. Servo : 07-08 HS-5685MH(HITEC) Battery : 2 Cells-Li-Po 7.4V
Right On Replicas, LLC SnapShot Review * Auto Transport Trailer 1:25 Scale Revell Model Kit # Review
 Right On Replicas, LLC SnapShot Review 20150717* Auto Transport Trailer 1:25 Scale Revell Model Kit #85-1509 Review An auto transport trailer is a type of semi-trailer designed to efficiently transport
SECTION D Fuel Charging and Controls Turbocharger
 303-04D-i Fuel Charging and Controls Turbocharger 303-04D-i SECTION 303-04D Fuel Charging and Controls Turbocharger CONTENTS PAGE Turbocharger... 303-04D-2 303-04D-2 Fuel Charging and Controls Turbocharger
Repair of warped dial scale - Sony CRF-5090.
 Repair of warped dial scale - Sony CRF-5090. Apparently this is quite a common problem with this series of receivers. This one was bought on a local auction site where it was clearly advertised as having
When installing the screwed end, socket weld & flanged end valves the following respective procedures shall be followed for better performance.
 1. Storage LARSEN & TOUBRO LIMITED Page 1 of 5 1.1. All valves are to be stored in fully open position, in order to protect the sphere surface and soft valve seats. 1.2. Before shipping, the inlet and
Hi All, Update
 Hi All, With the success of my last Telex conversion on the 3704 locomotive I chose the 3796 tank locomotive to add Telex couplers controlled by a LokPilot 4 decoder. The locomotive does an un-coupling
FIAT 500 ABARTH FRONT MOUNTED INTERCOOLER INSTALLATION
 FIAT 500 ABARTH FRONT MOUNTED INTERCOOLER INSTALLATION Tools needed: T30 screwdriver/bit 10mm socket, suitable extension and ratchet 17mm socket, suitable extension and ratchet 10mm ratchet spanner Pozidriv/Phillips