How to Replace the Main Axle Gear on the Bachmann Spectrum GScale using the NWSL # upgrade gear.
|
|
|
- Isaac Cummings
- 5 years ago
- Views:
Transcription

1 How to Replace the Main Axle Gear on the Bachmann Spectrum GScale and Mogul (2001era), using the NWSL # upgrade gear. By Paul M. Newitt (all text and photos Copyright Paul M. Newitt, 2017) Many owners of the 2001-era production Bachmann Spectrum and Fn3 locomotives have unfortunately discovered that their main drive gear is
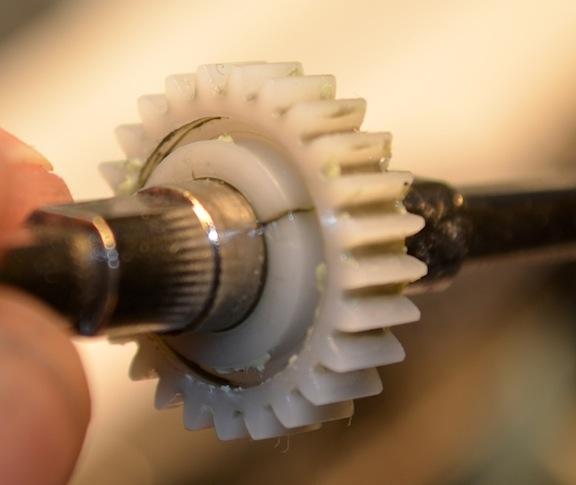
2 cracked or broken. Unfortunately, many original, 2001-era versions of this locomotive have cracked main gears. These cracks originate from the center outward over time, to fail under load while on the tracks. If the drivers of these locomotives move freely with no electrical power, then it means that the main drive gear has cracked on the main shaft and is slipping, unable to work properly, requiring this repair procedure. This article describes the replacement of the original Bachmann nylon drive gear with the North West Short Line gear (part number , 24 tooth, 15.5mm OD SG ; Fn Gear) in a few simple steps with some basic tools. NWSL gears are machined and offer a lifetime warranty. The photos provided for this article show the locomotive up-side down, so, we'll call the pilot end "right", the cab end "left", and the driver assembly "top" or "bottom". This procedure does not include any details for sound systemsrelated parts or sensors. When removing parts that are attached by soldered wires, please use care to not break those connection(s). PREPARING YOUR LOCOMOTIVE: 1. First, you'll need to round up a few tools: A small Philips-head screwdriver, and a small flat-head screwdriver. A 7mm or 17/64" size hex nut driver (a wrench or screwdriver type) will be required to remove the nuts that hold the side rods in place. Angled needle-nose pliers can be used if necessary. To remove and replace the main gear part from the drive shaft, you'll need a small vise, a 1/2" or 5/16" size deep (ratchet type) socket, and a small hammer (preferably with plastic rubber heads). A few small plastic bags to hold parts is a good idea, too. 2. Next is to set up a cradle to carefully hold the locomotive upside-down while working on it. If you still have the original box styrofoam packaging, use the top piece and turn it over, which works perfectly. Separate the locomotive from the tender. GETTING TO THE DRIVE GEAR 1. On the underside, you'll see a total of eight black screws that hold the main baseplate (ignore the magnet on this baseplate). Carefully remove these screws with a small Phillips-head screwdriver, one by one, placing them into a small plastic bag for safekeeping. When you lift the baseplate (taking hold of it near the front of the loco), you'll discover that there are two clips that are part of the "chuff" effect, pressed against the middle of the rear drivers under the cab. Carefully lift and rotate the plate upwards, and the clips will pop out. You can't remove the plate entirely, because of the wires attached to it. Just set the baseplate out of the way, without too much stress on the attached wires. You'll also see the two yellow firebox LEDs on a small circuit board, which you can lift out if necessary for access.


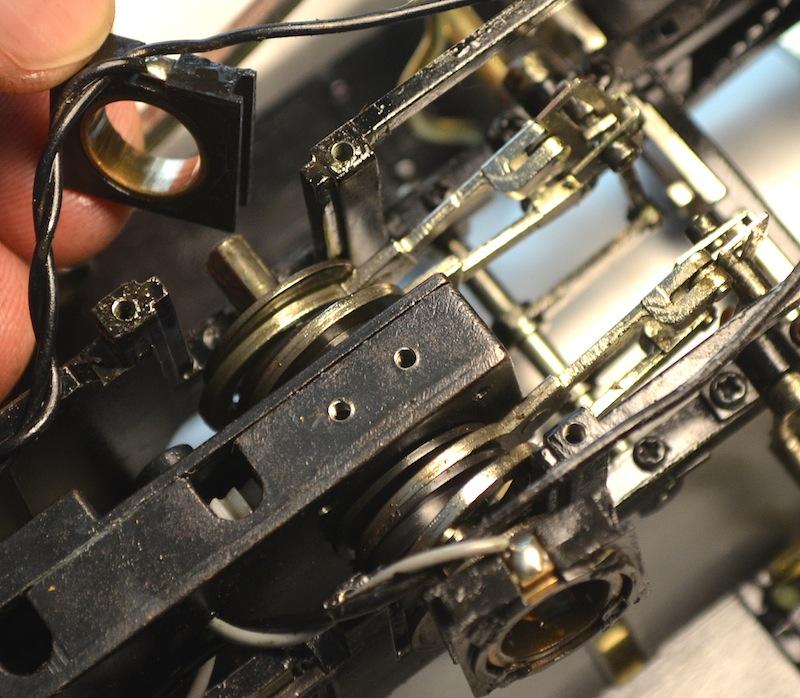
3 2. With the small flat-headed screwdriver, pop off the little caps located in the center of the drivers (on the it's the middle drivers, and on the 4-4-0, it's the forward drivers (the same part for each loco)).
. If the side rods are too difficult to remove, just tap wires from a 9 volt battery onto the drive wheels to rotate them a bit for easier side rod removal.")
4 3. With the hex-driver, remove the hex nuts that hold the side rods on the center and rear drivers (only), and each rod from the cylinders (on the 2-6-0, you can leave the side rods attached to the front drivers). If the side rods are too difficult to remove, just tap wires from a 9 volt battery onto the drive wheels to rotate them a bit for easier side rod removal. Lift up and rest the side rods out of the way, on the underside of the pilot (Note: If you don't have a hex-driver, angled needle-nosed pliers will work just as well). 4. Next, with the small Phillips-head screwdriver, remove the drivers from the loco. They are attached to the main drive shaft. Set the drivers aside, and make note of the attaching screws with washers. They drivers are the same part (L or R), but keep track of which side they were removed from anyway. Place the side rod bolts, driver screws and washers, and plastic driver center caps into a second plastic bag for safekeeping.
 with a wire attached to each. Remove them from of the main drive shaft as you lift the motor/gearbox assembly upwards.")
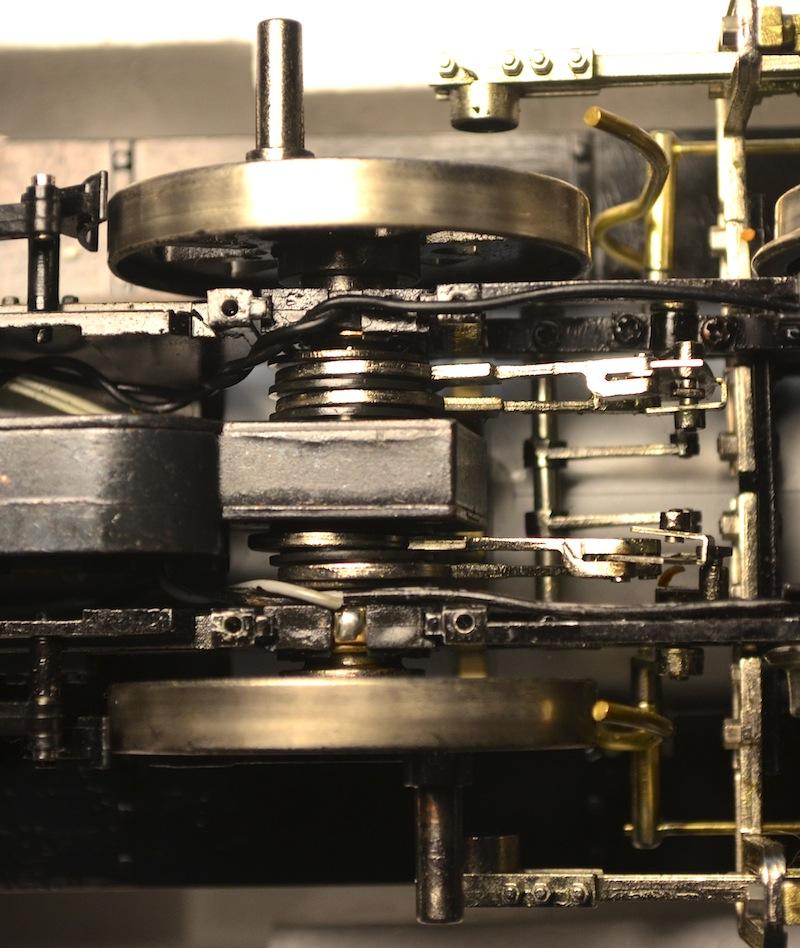
5 5. To remove the motor and gearbox assembly, you'll need to lift it out (if the guide pins bracket is in place on top of the gearbox, now is the time to remove it). First, you'll see the two bearing blocks (L & R) with a wire attached to each. Remove them from of the main drive shaft as you lift the motor/gearbox assembly upwards. At the same time, you'll see the eccentric rods and their plastic spacers are attached to the drive shaft (Note: all of these items will come off the drive shaft at the same time, so take your time to remove them).
6

7 To remove the eccentric parts, first take note of where: 1. the outer metal washers are, 2. which eccentric rod is higher than the other when in place, 3. that there are two specific plastic spacers dedicated to each side, by the shape of the oval eccentric as it sits on the drive shaft (as you set them aside, make note of which plastic spacers are from the left or right side. Do not mix them up after they have been removed). In this photo, the bottom spacers and washer (shown below) are from the eccentric assembly shown on the right in the above photo.
.")
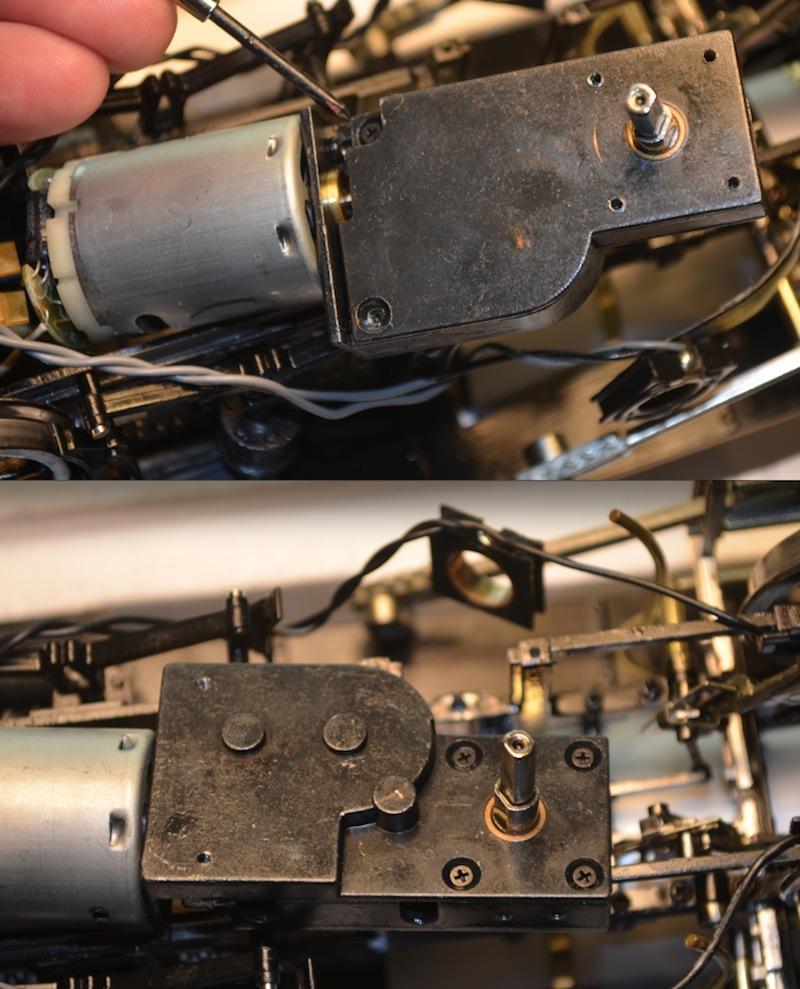
8 REPLACING THE DRIVE GEAR 1. With the eccentric rods and plastic spacers set aside, you may lift the motor and gearbox assembly up for repair. The motor is attached by wires to the loco, so you can't completely remove it (there's a plug, but it's too difficult to get to). Turn it on it's side and you'll see 4 screws on one side, and 2 on the other side. Carefully remove all 6 screws, and place them into another plastic bag for safekeeping. Be advised that once the screws and plate are removed, the nylon gears can fall out! Keep the gears in place as you remove the top of the gearbox, then you can lift the drive shaft with the (broken or cracked gear) out. Carefully set the gearbox assembly aside to keep the other gears from falling out.
9

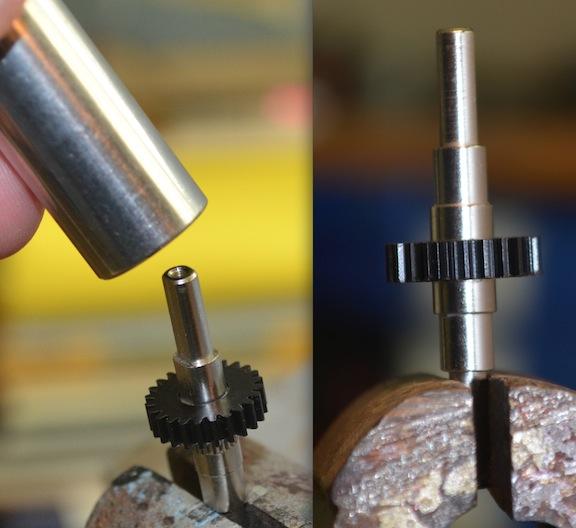
10 2. The main drive shaft is symmetrical, so there in no proper orientation to remember for re-assembly. Place the drive shaft into a vise, and with the long socket just gently tap the broken gear and it will fall off the center of the shaft. 3. Take the NWSL gear (#2223-6) and place it onto the drive shaft as it sits in the vise. Make sure that it sits level, and then with the same deep socket tool and small hammer, gently tap it into place. You'll know that it's properly seated in the middle when the gear part totally covers the knurled marks on the center of the shaft. 4. With the gearbox in hand return the main drive shaft into place next to the other gears. Since the NWSL gear part is made of Delrin, it's self-lubricating. At this time you can either spread the existing gear grease onto all the gears (or clean it out completely, and replace with appropriate, plastic-friendly gear grease). Carefully align the gears inside the gearbox, and then install the screws (4 on one side, 2 on the other side).

11
12
13
 circuit board should be reinstalled into it's side slots. 2. The reassembly of the eccentrics can be tricky (see photo).")
14 REASSEMBLING THE LOCOMOTIVE 1. Set the Motor Gearbox back into the loco, with the flat side (no hump) up. You'll see the two screw holes for the pin guide that some locos may still use. The motor will seat into the chassis, and the firebox LEDs (yellow) circuit board should be reinstalled into it's side slots. 2. The reassembly of the eccentrics can be tricky (see photo). As you're looking down on the frame (pilot to the right, cab to the left), on the top side, the lower eccentric rod sits against the gearbox, and the upper eccentric rod sits on the outside. On the bottom side, the upper eccentric rod sits against the gearbox, and the lower eccentric rod sits on the outside.
15
 onto the drive shaft so that the offset is up for one and down for the other. Do the same on the other side.")
16 3. On ALL four eccentric rods, the plastic spacers are oriented where the flat parts face inward, and the raised centers set into the eccentric rod centers. The trick is to place each set of two plastic spacers (each side) onto the drive shaft so that the offset is up for one and down for the other. Do the same on the other side. This will create the offset cranking effect for each set of rods. Once the eccentric assemblies are set, then slide on the washers. You'll have to carefully hold the eccentric assembly together as you attach the bearing blocks. Then set it all into the frame. 4. Now reattach the drivers, and note to "quarter" them by how they seat onto the shape of the drive shafts. Align the drivers to match how the other drivers are oriented (quartered). Re-attach with the driver screws and washers, and you'll notice that the (seemingly) loose gearbox/eccentrics/blocks will properly tighten up all at once (don't over tighten the screws). Re-attach the plastic center caps to the drivers. 5. With the entire center driver assembly completed, you may need to tap the driver flanges with a 9V battery and wires (or similar) to get the drivers to move a bit to align for the re-installation of the side rods (since the drive shaft is keyed, it's easy to determine if it's lined up or not for the side rods). Install the side rod bolts.

17 6. Carefully insert the baseplate back into position, with the clips for the "chuff" effect set back into its original location. Be sure that the firebox LEDs and circuit board is also set into the slots provided. Attach the baseplate with the eight black screws, and you're completed. 7. Test the repaired assembly as it sits in the cradle to make sure that nothing is binding. Then test your loco on the track, and you're good to go!
Mobtown Offroad Toyota Tacoma Bolt On Rock Slider Installation Instructions
 Mobtown Offroad 2005+ Toyota Tacoma Bolt On Rock Slider Installation Instructions Tools Needed: 9/16 Box Wrench 9/16 Standard and Deep Well Socket, 3/8 Drive Ratchet, 3/8 Drive 3/4 Standard Socket 3/4
Installation Manual TWM Performance Short throw shifter 2001 and up Hyundai Accent
 Installation Manual TWM Performance Short throw shifter 2001 and up Hyundai Accent 1. Place the vehicle on a flat surface with blocks in front and behind the wheels preventing unwanted movement. The car
The HMC-Lite Construction Guide
 The HMC-Lite Construction Guide The Heavy Metal-Lite Chassis is constructed using two identical drive modules. The drive modules are constructed using 3 mechanical sub-assemblies. The drive modules are
Heljan EM Finescale Conversion.
 Heljan 02 2-8-0 EM Finescale Conversion. Before you start, it is a good idea to have some small containers or snap top poly bags to put screws and components in for safe keeping...much better than crawling
SR Performance Sway Bars (2010 Mustang GT)
") Total Installation time: Approximately 2 hours SR Performance Sway Bars (2010 Mustang GT) Tools Required: 15mm deep socket 18mm deep socket 19mm deep socket Ratchet with ½ drive Pliers Torque wrench 15mm
Total Installation time: Approximately 2 hours SR Performance Sway Bars (2010 Mustang GT) Tools Required: 15mm deep socket 18mm deep socket 19mm deep socket Ratchet with ½ drive Pliers Torque wrench 15mm
Bachmann GWR Earl (Dukedog) EM Finescale Conversion
 EM Finescale Conversion") Bachmann GWR Earl (Dukedog) EM Finescale Conversion Before you start, it is a good idea to have some small containers or snap top poly bags to put screws and components in for safe keeping...much better
Bachmann GWR Earl (Dukedog) EM Finescale Conversion Before you start, it is a good idea to have some small containers or snap top poly bags to put screws and components in for safe keeping...much better
$1.00 FOR THE TQIO/RCIO
 $1.00 FOR THE TQIO/RCIO m mm HDBBYSHOP Champion Jay Halsey has an impressive track record. One of Jay's advantages is a whisper smooth tranny thanks to his dad, Jim. Now you can build a Halsey transmission!
Prusa i3 Printer Assembly Guide
 Prusa i3 Printer Assembly Guide Special thanks to Carlos Sanchez and Miguel Sanchez for the graphics. All graphics captured from their great animation: http://www.carlos-sanchez.com/ Prusa3/ For copyright
Deuce/Ace Installation Instructions
 HARDWARE KIT: Upper Mounting Plate: 2-7/16" (11mm) X 3.5" bolts 2-7/16" flange nuts 2-2" spacers 2-7/16" trim cap mounting washers 2 - plastic trim caps TOOLS NEEDED: safety glasses wrenches 16mm or 5/8"
1. Invert the tender, and hold in a suitable device. We use a foam cradle the Peco loco service cradle being ideal.
 Bachmann J11 EM Finescale Conversion Before you start, it is a good idea to have some small containers or snap top poly bags to put screws and components in for safe keeping...much better than crawling
FIAT 500 ABARTH FRONT MOUNTED INTERCOOLER INSTALLATION
 FIAT 500 ABARTH FRONT MOUNTED INTERCOOLER INSTALLATION Tools needed: T30 screwdriver/bit 10mm socket, suitable extension and ratchet 17mm socket, suitable extension and ratchet 10mm ratchet spanner Pozidriv/Phillips
Bag 1. Bag 1. Center Pivot. Center Pivot
 8 00734 01901 5 Center Pivot Bag 1 3374 - Center Pivot Socket 4019 - Alum Pivot ball 3254-2-56 Button Head *Note - Sometimes it is helpful to slightly over-tighten the top clamp screws, then work the ball
Installation Instructions COMPETITION/PLUS SHIFTER Ford Mustang MT82 6-Speed Manual Transmission Catalog#
 Installation Instructions COMPETITION/PLUS SHIFTER 2015-2017 Ford Mustang MT82 6-Speed Manual Transmission Catalog# 3916037 Rev. 00 WORK SAFELY! For maximum safety, perform this installation on a clean,
Installation Manual TWM Performance Short Shifter Cobalt SS/SC, SS/TC, HHR SS, Ion Redline and Saab 9-3
 Page 1 Installation Manual TWM Performance Short Shifter Cobalt SS/SC, SS/TC, HHR SS, Ion Redline and Saab 9-3 Please Note: It is preferable to park on a flat surface, as you will have to engage and disengage
REVi RX-8 Intake. RX-8 REVi Intake System I PN Installation Instructions. Tools Required:
 RX-8 REVi Intake System PN 18299 Installation Instructions I-18299 Tools Required: Small/Stubby Phillips head screwdriver Small flat head screwdriver Medium Phillips head screwdriver 10mm socket and ratchet
Bachmann. Climax. Phoenix Sound Systems, Inc West Liberty Road Ann Arbor MI
 Bachmann Climax Phoenix Sound Systems, Inc. 3514 West Liberty Road Ann Arbor MI 48103 www.phoenixsound.com phone: 800-651-2444 fax: 734-662-0809 e-mail: phoenixsound@phoenixsound.com 2004-2007 Phoenix
The H-MAC Heavy Metal Articulating Chassis Construction Guide
 The H-MAC Heavy Metal Articulating Chassis Construction Guide The Heavy Metal Chassis is constructed with two identical drive modules built using 10 mechanical sub-assemblies. The drive modules are integrated
Luminator Low-Rise Headlight. Designed and built by Radioflyer Innovations
 Luminator Low-Rise Headlight system for C5 Corvette Designed and built by Radioflyer Innovations 1 Tools Required Phillips head screwdriver Flathead screwdriver Torx 15 screwdriver Torx 20 screwdriver
Bachmann D11 EM/S4 Finescale Conversion
 Bachmann D11 EM/S4 Finescale Conversion Before you start, it is a good idea to have some small containers or snap top poly bags to put screws and components in for safe keeping...much better than crawling
TESLA MODEL S REAR UNDER SPOILER & DIFFUSER SYSTEM
 TESLA MODEL S Thank you for purchasing your Unplugged Performance Rear Under Spoiler & Diffuser System for the Tesla Model S! Please read this manual carefully prior to installation. REAR UNDER SPOILER
Installation Manual TWM Performance Short Shifter Nissan 350Z, 370Z Infiniti G35, G37
 Installation Manual TWM Performance Short Shifter Nissan 350Z, 370Z Infiniti G35, G37 It is preferable to park on a flat surface, as you will have to engage and disengage the hand brake and shift from
Subaru Front Mount Intercooler Kit STI Subaru Front Mount Intercooler Kit STI
 Subaru Front Mount Intercooler Kit STI 2008-2014 715500 Subaru Front Mount Intercooler Kit STI 2008-2014 Congratulations on your purchase of the Subaru Front Mount Intercooler Kit STI 2008-2014. The following
Installation Manual TWM Performance Short Shifter Subaru STi 2008+
 - 1 - Installation Manual TWM Performance Short Shifter Subaru STi 2008+ Please Note: It is preferable to park on a flat surface, as you will have to engage and disengage the hand brake and shift from
How I Installed the Edgerider Wheels on my Gammill Classic Plus
 How I Installed the Edgerider Wheels on my Gammill Classic Plus Jeffrey Lomicka May 15, 2004 I'd been looking forward to installing these wheels since I tried them this year at MQX. This is my pictorial
Gearbox Assembly 101. Introduction. Before Beginning. By Mark Schutzer 4/13/06
 Gearbox Assembly 101 By Mark Schutzer 4/13/06 Introduction If you are planning to re-motor an old brass locomotive you may want to upgrade to a new gearbox at the same time. The early 60 s and 70 s gearboxes
Oreck Magnesium Series Service Manual. The Oreck Manufacturing Company
 Oreck Magnesium Series Service Manual The Oreck Manufacturing Company 08/2012 10/2011 The Oreck Manufacturing Company Contents Covering all Magnesium Upright Models Including: LW100, LW125, LW1000, AND
Installation Manual TWM Performance Short Shifter 2008 Mitsubishi Lancer
 Page 1 Installation Manual TWM Performance Short Shifter 2008 Mitsubishi Lancer Please Note: It is preferable to park on a flat surface, as you will have to engage and disengage the hand brake and shift
Bachmann 38 Ton Shay
 Bachmann 38 Ton Shay Phoenix Sound Systems, Inc. 3514 West Liberty Road Ann Arbor MI 48103 www.phoenixsound.com phone: 800-651-2444 fax: 734-662-0809 e-mail: phoenixsound@phoenixsound.com 2005-2008 Phoenix
Curt Mfg. Trailer Hitch and Hoppy Wiring Kit Installation Instructions
 Curt Mfg. Trailer Hitch and Hoppy Wiring Kit Installation Instructions The Curt trailer hitch replaces the stock rear cross member in the Touareg. It attaches with 8 bolts just like the factory VW hitch.
INFINITY MULTA SERIES
 ASSEMBLY ASSEMBLY INSTRUCTIONS INSTRUCTIONS ASSEMBLY INSTRUCTIONS INFINITY MULTA SERIES Workstations, WORKSTATIONS, desks, DESKS, and AND tables TABLES with WITH powered POWERED ADJUSTMENT adjustment PARTS
Hornby Railroad Hall EM Finescale Conversion.
 Hornby Railroad Hall EM Finescale Conversion. The subject of this sheet is the new (2015) Hornby Railroad Hall. There are several specification and livery variants, but all have a common chassis and as
Bachmann 1F (Half Cab) EM Finescale Conversion
 EM Finescale Conversion") Bachmann 1F (Half Cab) EM Finescale Conversion Before you start, it is a good idea to have some small containers or snap top poly bags to put screws and components in for safe keeping...much better than
Bachmann 1F (Half Cab) EM Finescale Conversion Before you start, it is a good idea to have some small containers or snap top poly bags to put screws and components in for safe keeping...much better than
RHINO SUSPENSION SYSTEM INSTALLATION INSTRUCTIONS
 PARTS INCLUDED: 2 FRONT UPPER A-ARMS 2 FRONT LOWER A-ARMS 2 UNI-BALL JOINTS 2 UNI-BALL JOINT STUDS 2 UNI-BALL JOINT CAPS 2 RETAINING RINGS 1 FRONT SHOCK ASSEM. 2 DELRON STEERING STOPS 2 SHOCK MOUNT SPACERS
PRODUCT USE INFORMATION
 9RC61000 Jeep YJ Body Lift Thank you for choosing Rough Country for all your suspension needs. This body lift fits both manual and Automatic equipped vehicles!!! Refer to last page of this Instruction
Maintenance Information
 Form 16575334 Edition 1 April 2005 Electric Screwdrivers EL, EP and ET 34V DC Series Maintenance Information Save These Instructions WARNING Maintenance procedures have the potential for severe shock hazard
Assembly Instructions
 Assembly Instructions Part Number Description Model Approx. Assembly Time 99994-0903 Windshield Wiper Kit Mule SX 1 Hour WARNING Improper installation of this accessory could result in an accident causing
Hornby GWR Star Class EM Finescale Conversion.
 Hornby GWR Star Class EM Finescale Conversion. Before you start, it is a good idea to have some small containers or snap top poly bags to put screws and components in for safe keeping...much better than
Section 5: Parts Replacement
 Section 5: Parts Replacement Should the STAR TRAC 4500 Treadmill experience a problem requiring replacement of a specific part, the following procedures will help and instruct in the replacement of major
Remove the 3-11mm nuts holding mirror on. Don t drop the nuts!
 2005-2012 Ford Mustang Puddle Lamp Kit Parts List: Quantity: Tool List: LED Lamps 2 Flat head screwdriver Seals 2 Ratchet & Socket set OR Nuts 2 Adjustable Wrench Wiring harness 1 Drill & 11/16 th bit
Solar Dolly. Assembly Manual
 Solar Dolly Assembly Manual Components and Hardware 5 5 4 4 7 7 6. 1. Battery Box 2. Stabilizer Legs (R,L) 3. Uprights (R, L) 4. Adjustable Angle Brackets 5. Panel Brackets (R,L) 6. Controller Mounting
BMW 528i E39 Sunroof Repair
 These instructions will help guide you through the repair process for broken sunroof control rails on an E39 chassis. Before I get started, I want to give a shout-out to a couple people who also posted
Flip Extension Install Instructions
 Tools Required: Tape Measure, knife, Allen key set, Phillips screwdriver, a 1/2" wrench, and a 1/2" socket 1.0 Preparing TRUCKBOSS Deck. 1.1 Remove the plastic end caps from the rear of the TRUCKBOSS deck.
INSTALLATION INSTRUCTIONS C-VS-2000-DUR-1 20 VEHICLE SPECIFIC CONSOLE for 2018 Dodge Durango with Standard Shifter
 INSTALLATION INSTRUCTIONS C-VS-2000-DUR-1 20 VEHICLE SPECIFIC CONSOLE for 2018 Dodge Durango with Standard Shifter TOOLS REQUIRED: Phillips Screw Driver T-20 Torx bit Standard Socket set 9/64 Allen wrench
Bachmann Digital Sound Decoder Installation Notes
 New Dimensions in Digital Sound Technology TM APPLICATION NOTE Bachmann 2-6-6-2 Digital Sound Decoder Installation Notes Overview This application note describes the installation of a DSD-090LC Digital
Technical Support (707)
") Installation Instructions CONSOLE MEGASHIFTER Fits: 1982-1992 Camaro & Firebird w/automatic Transmission *except 1988-1992 Firebird Formula Model Catalog # 80692 WORK SAFELY! For maximum safety, perform
Installation Instructions CONSOLE MEGASHIFTER Fits: 1982-1992 Camaro & Firebird w/automatic Transmission *except 1988-1992 Firebird Formula Model Catalog # 80692 WORK SAFELY! For maximum safety, perform
Ford Racing GT500 Style Strut Mount Upgrade (05-12 All):
:") Ford Racing GT500 Style Strut Mount Upgrade (05-12 All): Required tools: (2) Jack stands Floor jack (1 is required but 2 is preferred) Torque wrench Spring compressor tool (can be rented at your local
Ford Racing GT500 Style Strut Mount Upgrade (05-12 All): Required tools: (2) Jack stands Floor jack (1 is required but 2 is preferred) Torque wrench Spring compressor tool (can be rented at your local
3/8 Universal Joint Phillips Head Screwdriver
 Magnetic retrieval tool Pliers 1/4 Ratchet Drive T-35 Torx Socket 3/8 Ratchet Drive 5mm Allen Head Socket Torque Wrench 7-3/8 Drive Extension Flat Head Screwdriver 10mm Socket 8mm Socket 3/8 Universal
Raxiom Mustang Headlights (94-98) - Installation Instructions
 - Installation Instructions") Raxiom Mustang Headlights (94-98) - Installation Instructions The below installation instructions work for the following products: Dark Smoked Mustang Headlights (94-98) Raxiom Chrome Mustang Headlights
Raxiom Mustang Headlights (94-98) - Installation Instructions The below installation instructions work for the following products: Dark Smoked Mustang Headlights (94-98) Raxiom Chrome Mustang Headlights
IE Audi 3.0T Crank Pulley Upgrade Install Guide IEBAVJ3
 IE Audi 3.0T Crank Pulley Upgrade Install Guide IEBAVJ3 Thank you for purchasing your IE 3.0T crankshaft pulley upgrade! This instruction guide is used for installation of IE s lower overdrive pulley for
Rear End Installation and Bearing Kit - 8.8in (86-12 V8; V6)
") Rear End Installation and Bearing Kit - 8.8in (86-12 V8; 11-13 V6) Tools Required: Jack Stands 5 Floor Jack 2 Oil Pans 1 Wheel Blocks 2 Differential Oil 3 qts Friction Modifier 3 bottles Tube of Black
Rear End Installation and Bearing Kit - 8.8in (86-12 V8; 11-13 V6) Tools Required: Jack Stands 5 Floor Jack 2 Oil Pans 1 Wheel Blocks 2 Differential Oil 3 qts Friction Modifier 3 bottles Tube of Black
BODY-24, Late Model 944 ( and Newer) Dash Replacement
 Dash Replacement") BODY-24, Late Model 944 (1985.5 and Newer) Dash Replacement Introduction Replacing the dash in a late model 944 is not overly difficult. However, it is very tedious and a lot of patience is required. It's
BODY-24, Late Model 944 (1985.5 and Newer) Dash Replacement Introduction Replacing the dash in a late model 944 is not overly difficult. However, it is very tedious and a lot of patience is required. It's
Evo X Walbro 450 Pump System
 Evo X Walbro 450 Pump System Installation Guide Please contact us at sales@wtftuned.com with any additional questions Tools required: 8 mm socket and wrench, needle-nose pliers, razor, drill w/ 5/64 bit,
Owner smanual. Banks Techni-Cooler System Dodge 6.7L Cummins (24-valve) ISB Pickup Trucks (2500/3500) USE WITH SYSTEM P/N 25987
 ISB Pickup Trucks (2500/3500) USE WITH SYSTEM P/N 25987") Owner smanual with Installation Instructions Banks Techni-Cooler System 2013-16 Dodge 6.7L Cummins (24-valve) ISB Pickup Trucks (2500/3500) USE WITH SYSTEM P/N 25987 Gale Banks Engineering 546 Duggan Avenue
Owner smanual with Installation Instructions Banks Techni-Cooler System 2013-16 Dodge 6.7L Cummins (24-valve) ISB Pickup Trucks (2500/3500) USE WITH SYSTEM P/N 25987 Gale Banks Engineering 546 Duggan Avenue
SAFETY THIS PRODUCT IS FOR OFFROAD USE ONLY. ALL LIABILITY FOR INSTALLATION AND USE RESTS WITH THE OWNER.
 SAFETY Your safety and the safety of others is very important. In order to help you make informed decisions about safety, we have provided installation instructions and other information. These instructions
Acura NSX Harness Bar Parts List and Installation Instructions
 Acura NSX Harness Bar Parts List and Installation Instructions DISCLAIMER Harness bars are not intended for roll over protection. This harness bar is intended to facilitate the installation of four-, five-
WARNING. BX Fiat 500L Trekking/Easy/Pop/Lounge Installation Instructions
 2014-16 Fiat 500L Trekking/Easy/Pop/Lounge Attachment Tab Height: 15 Attachment Tab Width: 23 Please read BOTH these and the General Information sheet prior to installing or operating this equipment. 1.
Shimano Trinidad\Torium Drag Upgrade Tutorial
 Shimano Trinidad\Torium Drag Upgrade Tutorial Introduction: This tutorial is provided to assist those of you who may be interested in performing upgrade of the drag system of your Shimano Trinidad 16,
Installation Manual TWM Performance Short Shift Kit Stage 1 and Stage 2 MazdaSpeed 6
 Page 1 Installation Manual TWM Performance Short Shift Kit Stage 1 and Stage 2 MazdaSpeed 6 Please Note: It is preferable to park on a flat surface, as you will have to engage and disengage the hand brake
Assembly Manual. 1/10th Formula 1 Car
 Assembly Manual 1/10th Formula 1 Car Center Pivot Bag 1 3374 - Center Pivot Socket 40194 - Hard Anodized Alum Pivot ball 3254-2-56 *Note - Sometimes it is helpful to slightly over-tighten the top clamp
Bow Extension Cylinders
 Bow Extension Cylinders Level of difficulty: Fairly easy to intermediate very rewarding! Requires some patience. Tools needed: - 5-mm Allen wrench or socket (only for 90-95 models) - Needle nose pliers
INSTALLATION INSTRUCTIONS Product Revision Form Rev. C INST-439 CRADLE, DELL E-6510/6500
 7160-0202 Cradle is designed to be used with a Dell E-Port or E-Port Plus Port Replicator. The cradle is assembled for used with Dell E-6510. By removing 2 Side Spacers the Cradle can also be used with
LoMax 205 CASE & 3:1 GEAR SET. Manufactured by JB CONVERSIONS, INC. Phone: Installation Instructions for the GM NP205 Transfer Case
 LoMax 205 CASE & 3:1 GEAR SET Part No. 2800 Instruction Rev: 2007.08.16 Manufactured by JB CONVERSIONS, INC. Phone: Installation Instructions for the GM NP205 Transfer Case Kit Components: 1. (1) 42x25
Main Lift Cylinders. Level of difficulty: Not very hard, only a number of steps involved requires some patience, but is very rewarding!
 Main Lift Cylinders Level of difficulty: Not very hard, only a number of steps involved requires some patience, but is very rewarding! Tools needed: - Stubby Phillips screwdriver, or ratchet with Phillips
INSTALLATION & OWNER S MANUAL
 INSTALLATION & OWNER S MANUAL CAB INSTALLATION INSTRUCTIONS JOHN DEERE 4000 SERIES (4500/4600/4700) (4510/4610/4710) (4120/4320/4520/4720) HARD SIDED CAB ENCLOSURE (p/n 1JD4120AS) SOFT SIDED CAB ENCLOSURE
REPLACEMENT GEAR CHANGE CABLES Installation Guide
 Some sections are from the Lotus Service Manual V6: REPLACEMENT GEAR CHANGE CABLES Installation Guide For additional assistance, send questions by email to cables@lotusm100.com Copyright 2013 lotusm100.com
<THESE INSTRUCTIONS MUST BE GIVEN TO THE END USER> B&W Trailer Hitches 1216 Hawaii Road / PO Box 186 Humboldt, KS P: F:
 B&W Trailer Hitches 26 Hawaii Road / PO Box 86 Humboldt, KS 6678 P:620.73.366 F:620.869.903 RAM OEM Mount System Installation Instructions 25,000 LBS.
Max IV Rear Axle Replacement For models after Serial Number and all rear splined axle replacements.
 Max IV Rear Axle Replacement For models after Serial Number 19089 and all rear splined axle replacements. 10/8/03 Max IV Snap Ring Rear Axle replacement.doc Tools required: 9/16 Wrench 6 Extension Steel
Merkur Scorpio Odometer Repair Instructions
 www.odometergears.com Merkur Scorpio Odometer Repair Instructions http://www.bitsprings.com/gearinst.pdf Please read through these instructions completely once before proceeding. It is important to understand
Please visit for the latest version of these installation instructions.
 Please visit www.blueox.com for the latest version of these installation instructions. BX2338 2012-17 Hyundai Accent GLS/SE (Includes Foglights) Attachment Tab Height: 14 Serial Number Attachment Tab Width:
Rekluse Motor Sports. The e-axle KTM. Installation Guide Copyright 2006 Rekluse Motor Sports e-axle Revision 1.
 Rekluse Motor Sports The e-axle 2003 2007 KTM Installation Guide Copyright 2006 Rekluse Motor Sports e-axle Revision 1.000 RMS 2733 195-2733C Manual Revision: 032207 Rekluse Motor Sports, Inc. 110 E. 43
YZ-PSSB10 Yamaha YXZ 1000 R Behind Seat 10 Subwoofer Enclosure
 SSV WORKS, 201 N. Rice Ave Unit A, Oxnard, CA 93030 www.ssvworks.com Phone: 818-991-1778 Fax: 866-293-6751 Yamaha YXZ 1000 R Behind Seat 10 Subwoofer Enclosure WARRANTY INFORMATION: All SSV Works enclosures
Installation Instructions Z-Gate Shifter
 Installation Instructions Z-Gate Shifter Part Number 80681 1998, 2001 by B&M Racing and Performance Products The B&M Z-Gate shifter can be used in vehicles equipped with most popular three speed automatic
Spherical MQB Rear Trailing Arm Kit, MkVII Volkswagen Golf/GTI/R & 8V/8S Audi A3/S3 & TT/TTS
 Spherical MQB Rear Trailing Arm Kit, MkVII Volkswagen Golf/GTI/R & 8V/8S Audi A3/S3 & TT/TTS Supplied Parts: 034Motorsport Spherical MQB Rear Trailing Arm Upgrade (Driver Side) 034Motorsport Spherical
RJS2020 SPORT 3.2 1/10 PAN CAR KIT LESS ELECTRICS
 RJS2020 SPORT 3.2 1/10 PAN CAR KIT LESS ELECTRICS THANKS FOR BUYING THE RJ SPEED 1/10 SPORT 3.2 KIT. THE ASSEMBLY WILL NOT BE DIFFICULT IF YOU READ THE TEXT, LOOK AT THE PICTURES, AND THE EXPLODED VIEW
Installation Instructions for the EVO3 Height-Adjustable Ultimate Short Shifter
 Installation Instructions for the EVO3 Height-Adjustable Ultimate Short Shifter for 1992-2005 325, 323, 318 and 1986-1994 525, 528, 535, 540 5-speed models only. (part number USSE3 and USSE5) Thank you
Eibach Pro-Damper Shocks & Struts (05-09 All):
:") Eibach Pro-Damper Shocks & Struts (05-09 All): Required tools: 3/8 and 1/2 drive ratchets 7, 8, 10, 15, 16, 17, 18, 21 & 22 mm open ended wrenches 8 & 10 mm box end wrenches 10mm socket 13, 15 & 18 mm
Eibach Pro-Damper Shocks & Struts (05-09 All): Required tools: 3/8 and 1/2 drive ratchets 7, 8, 10, 15, 16, 17, 18, 21 & 22 mm open ended wrenches 8 & 10 mm box end wrenches 10mm socket 13, 15 & 18 mm
SCION FR-S FOG LIGHTS
 Part #: PT413-18130 Conflicts: Lowering Springs PTR07-18130-LL (California only) Kit Contents: For Anniversary Edition, Monogram & RS 2.0 vehicles, additional parts need to be ordered (PT413-18130-LL)
INSTALL INSTRUCTIONS C-VS-1500-DUR-1 15 VEHICLE SPECIFIC CONSOLE for Dodge Durango with OEM Center Shifter
 INSTALL INSTRUCTIONS C-VS-1500-DUR-1 15 VEHICLE SPECIFIC CONSOLE for 2011-2013 Dodge Durango with OEM Center Shifter TOOLS NEEDED: Phillips Screw Driver Standard Socket set Metric Socket set 90 Phillips
Suzuki Samurai 6.5 Transfer Case Gear Kit, KIT
 Suzuki Samurai 6.5 Transfer Case Gear Kit, 105004-3-KIT Kit Contents: Gear, 26 Spline/26 Tooth 1.0 Gear, 44 Tooth 1.0 Gear, 58 Tooth/23 Tooth 1.0 Gear, 67 Tooth/ 27 Tooth 1.0 Counter Shaft 1.0 Counter
Assembly Manual. 1/10th World GT car
 Assembly Manual 1/10th World GT car Center Pivot Bag 1 3374 - Center Pivot Socket 40194 - Hard Anodized Alum Pivot ball 3254-2-56 Button Head *Note - Sometimes it is helpful to slightly over-tighten the
Service Bulletin. HIITMill (X) Brake Lever Drift
 Brake Lever Drift") HIITMill (X) Brake Lever Drift Applies to: HIITMill (9-4590) + HIITMIll X (9-4640) On some HIITMill and HIITMill X units, the brake lever can drift when the user is Rev. A applying load to the belt. This
HIITMill (X) Brake Lever Drift Applies to: HIITMill (9-4590) + HIITMIll X (9-4640) On some HIITMill and HIITMill X units, the brake lever can drift when the user is Rev. A applying load to the belt. This
P-600. Technical Manual. Troubleshooting Repairs Replacements
 P-600 Technical Manual Troubleshooting Repairs Replacements Table of Contents P-600 Lift Symptoms and Problems Finding the Problem Before Getting Inside 3 Pneumatic Systems 4 Electrical Systems 5 Mechanical
1. Get fork mounted in stand. You can leave it in the bike, but you must remove the wheel and front brake.
 Tools Needed: Bike stand Lint free shop Towels 1.5mm Allen Key Pick Set Grease (We recommend Slick Honey) Oil Measuring Cup (with cc Scale) Small Metal Drift Shop Vise Oil Bucket 13mm Deep Socket (6 point)
Steeda Lower Control Arms ( )
") Steeda Lower Control Arms (2005-2012) NOTE: The following installation was performed on a 2007 Mustang GT/California Special. The control arms were previously sold in a blue color, but now they are sold
Steeda Lower Control Arms (2005-2012) NOTE: The following installation was performed on a 2007 Mustang GT/California Special. The control arms were previously sold in a blue color, but now they are sold
Ford Mustang V6 OEM-Style Fog Light Kit Parts List: Quantity: Tool List:
 2015-2017 Ford Mustang V6 OEM-Style Fog Light Kit Parts List: Quantity: Tool List: LED Foglights/ Bezels 2 Flat head & Phillips screwdriver (if you ordered part#3600) Ratchet & Socket set OR Wiring harness
BELT DRIVE SYSTEM TROUBLESHOOTING CHART CAUSES CORRECTIVE ACTION ENGINE RUNS BUT PADDLES DO NOT TURN
 ELT DRIVE SYSTEM TROULESHOOTING HRT USES ORRETIVE TION ENGINE RUNS UT PDDLES DO NOT TURN elt jumps off the drive pulleys. Inspect the belt for damage. Replace belt if needed. heck belt alignment. Idler
Installation instructions for Camaro/Firebird and Nova* Windshield Wiper Systems
 Installation instructions for 1967-69 Camaro/Firebird and 1968-74 Nova* Windshield Wiper Systems The Raingear 1967-69 Camaro/Firebird and 1964-74 Nova wiper system is designed for ease of installation
Kysor On/Off Rear Air Fan Drive
 . Proper precautions must be taken to prevent personal injury from contact with moving parts, unintended engine start, or other hazards present when working with powered equipment. Refer to the vehicle
6th generation (2015+) Mustang Harness Mount Bar Installation Instructions
 Mustang Harness Mount Bar Installation Instructions") R-1180 6th generation (2015+) Mustang Harness Mount Bar Installation Instructions A. Install harness bar 1. Remove front seats. First remove the plastic bolt covers front and rear using a small flat head
R-1180 6th generation (2015+) Mustang Harness Mount Bar Installation Instructions A. Install harness bar 1. Remove front seats. First remove the plastic bolt covers front and rear using a small flat head
Prerequisites: Shop Manual (recommended) pages 3-9 through 3-13.
 pages 3-9 through 3-13.") Prerequisites: Order your gaskets average about $25.00 bucks X 2 so $50.00 4NK-11193-00-00 Obtain a shim kit (Should have several 265 and 270s) (Some dealers will exchange) Obtain a Valve Bucket Tool YM-33961
Prerequisites: Order your gaskets average about $25.00 bucks X 2 so $50.00 4NK-11193-00-00 Obtain a shim kit (Should have several 265 and 270s) (Some dealers will exchange) Obtain a Valve Bucket Tool YM-33961
GruvenParts.com BRASS GM Power Folding Mirror Gear Replacement Instructions. Updated 8/25/2017 Additional Pictures / Tips Posted!
 Page 1 GruvenParts.com BRASS GM Power Folding Mirror Gear Replacement Instructions Updated 8/25/2017 Additional Pictures / Tips Posted! ** Latest Design is uses an ALL BRASS SPUR GEAR!!! ** ** If you don
Automatic Roof Hatch Opener
 Automatic Roof Hatch Opener Installation Guide REQUIRED TOOLS (These tools are required to complete the installation) Cordless Drill 1/8 1/4 Drill Bits 1/8 Pin Punch #2 Philips Bit Rachet Sharpie Hammer
Steeda Billet Charge Motion Control Plates (05-08 GT) - Installation Instructions
 - Installation Instructions") Steeda Billet Charge Motion Control Plates (05-08 GT) - Installation Instructions The below installation instructions work for the following products: Steeda Billet Charge Motion Control Plates (05-08
Steeda Billet Charge Motion Control Plates (05-08 GT) - Installation Instructions The below installation instructions work for the following products: Steeda Billet Charge Motion Control Plates (05-08
2. With the rear door open remove pull-style clip from the passenger side just below the door latch.
 LoD Offroad FJ Cruiser Rear Bumper with Tire Carrier Installation Instructions 1. Begin with removing factory spare from the rear door. 2. With the rear door open remove pull-style clip from the passenger
Z-Gate Universal Shifter
 Installation Instructions Z-Gate Universal Shifter Fits: GM, Ford, Lincoln and Chrysler Transmissions See Application Guide for Specific Applications Part #80681 Rev 06/01/2018 WORK SAFELY! For maximum
By Mark Schutzer NMRA National Convention, Sacramento, CA July 2011 Copies of this presentation can be found at
 Troubleshooting and dr Repairing i Brass Steam Locomotives By Mark Schutzer NMRA National Convention, Sacramento, CA July 2011 Copies of this presentation can be found at http://www.markschutzer.com Clinic
RS-2 SINGLE ACTION REAR BUMPER WITH TIRE CARRIER INSTALL MANUAL FOR JEEP WRANGLER ALL MODELS.
 RS-2 SINGLE ACTION REAR BUMPER WITH TIRE CARRIER INSTALL MANUAL FOR 2007-2016 JEEP WRANGLER ALL MODELS. Rear Bumper Installation Instructions 1) Remove factory rear bumper, (this includes all tow hitch
5X Racing Mazda Miata Aluminum Shifter Bushing Installation Instructions
 5X Racing Mazda Miata Aluminum Shifter Bushing Installation Instructions Thank you for your purchase! These instructions will explain how to properly install a 5X Racing Aluminum Shifter Bushing in your
Please read BOTH these Installation Instructions and the General Information sheet prior to installing or operating this equipment.
 2015-18 Chevy Suburban/Tahoe 2015-18 GMC Yukon/Yukon XL (Includes Denali) Please read BOTH these and the General Information sheet prior to installing or operating this equipment. 1. Blue Ox towing products
LIMITED SLIP DIFFERENTIAL INSTALLATION
 Installation of the limited slip gear can be done with axle out of car or with car lifted to gain access from underneath. Refer to repair manual for proper lifting instructions if car is to be lifted.