MODELING MARS LIGHTS ON CGW F-UNITS. David Webb
|
|
|
- Peter Robinson
- 5 years ago
- Views:
Transcription
 was \"to be seen,\" i.e., for signaling other trains, to be more conspicuous at grade crossings, etc.")
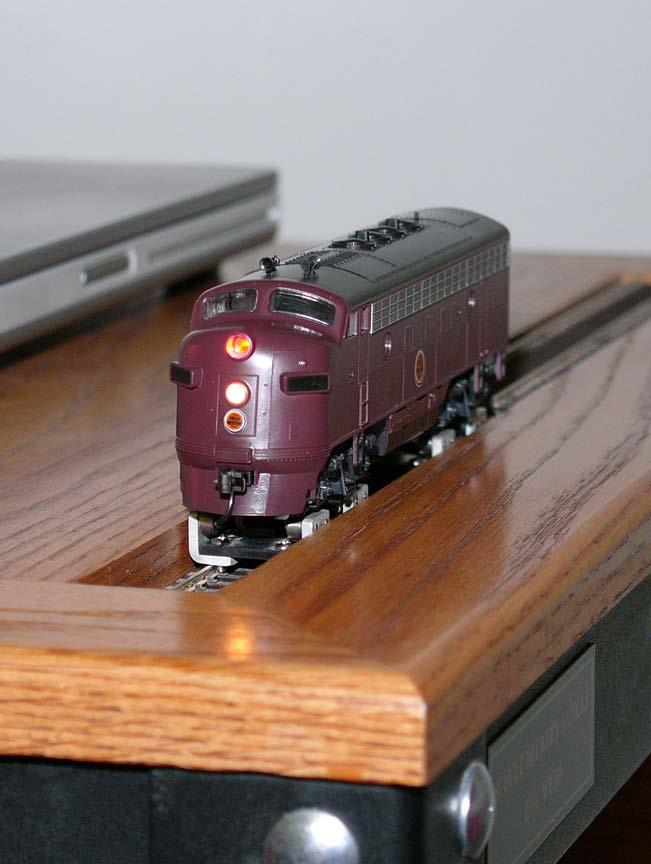
1 MODELING MARS LIGHTS ON CGW F-UNITS David Webb In the pre-ditch light diesel era, the Chicago Great Western, as did many other, but not all, roads, specified dual headlights on its cab units. I gather that the main purpose of the upper headlight (actually two Mars lights) was "to be seen," i.e., for signaling other trains, to be more conspicuous at grade crossings, etc. The main purpose of the lower was "to see," i.e., to illuminate the track ahead. Use of the lights was governed by Rule 17: "TRAIN SIGNALS "17. The [standard locomotive] headlight [lower light] will be displayed to the front of every train by day and by night. It must be concealed or extinguished when a train turns out to meet another and has stopped clear of the main track, or is standing to meet a train at end of two or more tracks at a junction "S-17 (B). When trains meet within Centralized Traffic Control limits, and it is not necessary to stop for opposing train, headlight will be dimmed instead of extinguished when on siding "OPERATING INSTRUCTIONS FOR MARS COMBINATION WHITE AND RED FIGURE "8" HEADLIGHT
2 "17 C. White light. "To be used in figure "8" position whenever the standard locomotive headlight is in operation at night. "Red light. "ON SINGLE TRACK - When head end protection is required as provided by Rule 99, enginemen will immediately display RED HEADLIGHT When occupying main track meeting an opposing train, RED HEADLIGHT will be displayed approaching and while standing on main track awaiting arrival of opposing train. "ON TWO OR MORE TRACKS - [Under various circumstances which might result] in fouling adjacent tracks, or when necessary to provide protection doing station work, enginemen will immediately display RED HEADLIGHT " In all cases, approaching trains would have to stop immediately were the red Mars displayed. After the infamous merger, C&NW discontinued use of the Mars lights, and the upper headlight openings on the cab units were plated over. Modeling notes: Using a sophisticated decoder such as the Train Control Systems A6X, it would theoretically be possible digitally to control the headlights exactly prototypically. However, the physical modeling challenges of trying to do so, certainly in HO or smaller scale, would be, to say the least, daunting. One would have to use very small red and white LED's or, if such were even available, a small red-white bipolar LED for the upper. In addition to the physical space constraints is the observation that LED's don't simulate Mars function as well as incandescents. Accordingly, for me, some compromise with true fidelity to prototype operation, choosing white or red Mars light, not both, was the better part of valor. For my Athearn Genesis/Lombard Hobbies model, I chose to keep the already installed 1.5v white lights, replacing the Athearn circuit board with a TCS A6X decoder. The result is upper white Mars and lower white constant lights, both of which are on, whenever the "lights are turned on," regardless of direction. For my Stewart models, I chose to use 12 v bulbs (from my parts bin), white lower and red upper, because I liked the more dramatic effect of the red Mars light. The Stewart F-units, I think, look good and run very well, but having been around for awhile, do have some shortcomings cf. some newer models. The most obvious is the lighting. On the dual headlight A-units, a single bulb is used to illuminate both headlights via a single clear plastic "lens."
3 Below are illustrated, step-by-step installation instructions for modifying the Stewart model for independent control of the two headlights using a Train Control Systems A6X decoder. Modification of Stewart (Bowser) dual headight F A unit for independent control of the two headlights using a Train Control Systems A6X decoder: 1. Remove front coupler. 2. Remove shell from chassis. 3. Remove clear plastic headlight "lens" part from shell. 4. Replace shell on chassis. 5. Using a drill bit that just fits into the lower headlight opening (#30, I believe), mark the centerpoint of the headlight opening on the plastic front coupler holder. 6. Remove the shell again, then remove the front coupler holder, then replace the shell. As in the preceding step, mark the centerpoint of the lower headlight opening on the metal chassis, then again remove the shell. 7. Disconnect the left and right, front and rear track power pick-up wires and the red and black motor wires from the clip-in plugs on the Stewart circuit board. Then remove the circuit board. 8. Using a screwdriver, pop off the cover of the front truck gear case, disconnect the drive shaft, and let the truck drop out. 9. Using a center punch, deepen the mark made on the chassis nose. 10. Using a drill press, drill a small hole at that mark. Replace the shell to check that the drilled hole lines up exactly behind the lower headlight opening. 11. Again using a drill press, drill a hole of sufficient diameter to accommodate a metal housing for the lower headlight bulb. (I used a spare diecast metal part, the lamp holder from a Bachmann 44 tonner, but a brass tube should work as well for a lamp holder/heat sink.)

4 12. Using a pin vise and rat tail file, make a similar opening in the front coupler holder, and replace it in the chassis. Again, replace shell to ascertain that everything lines up correctly, then remove it. 13. Put lamp holder tube in place, checking to see that it does not protrude too far to seat the shell on the chassis. Depending on the diameter of the tube, it might be necessary to file the corners of the vertical slot on the nose of the chassis just a bit to permit the tube to be oriented perfectly horizontally (see photos 1 and 2). Then cement the tube in place with ACC. Photo 1

5 Photo Placement of the upper light is easier, Use the cutout at the top of the coupler holder to hold the tube for the top lamp. 15. Replace the front truck, drive shaft, and gear box cover. 16. Orient the A6X on the chassis. I arbitrarily chose to use the rear light (yellow wire) connection on the A6X board to control the (lower) headlight, and the forward light (white wire) connection to control the (upper) Mars light. (It's not critical, either light is programmable.) However, for a cleaner installation, one should orient the A6X such that leads from the lower light go to the connections closer to the front of the locomotive and those from the upper light can then go untangled on top of the board to the rear (see photo 3). I chose to use 12 v incandescent lamps, so the wires go to the two center connections on either end of the board. With my using the forward light connections to control the upper headlight, I oriented the A6X "backwards," i.e., with the forward light connections on the board facing the rear of the locomotive. If you choose to use 1.5 v incandescents or LED's, the lighting wiring will be different; just follow the TCS wiring diagram.

6 Photo Solder in the front and rear track power pick-up wires, the red and black motor wires, and the lamp wires following the TCS wiring diagram. 18. Test the installation on the test track. If satisfied, clip off the off-center front pin on the plastic motor mount, cover the motor with a piece of twosided foam tape, and press the A6X in place. 19. Painting the inside of the nose of the shell and the inside of the headlight openings black will eliminate "plastic glow through" artefact. 20. Cut the Stewart clear plastic headlight "lens" to make two separate lens assemblies, trimming the lower one so that it fits virtually flush with the inside of the shell, or install appropriate glass lenses. 21. Replace the shell and test. 22. If satisfied, replace the front coupler, and the mechanical work is done. 23. I programmed the upper light (with red lamp) to simulate a Mars light and to be on in either direction of running. I programmed the lower to be constant white. The effect is shown in photo 4.
7 Photo 4
Athearn Genesis GP38-2 Tsunami Digital Sound Decoder Installation Notes
 Athearn Genesis GP38-2 Tsunami Digital Sound Decoder Installation Notes Overview This application note describes how to install a TSU-GN1000 digital sound decoder into an Athearn Genesis HO GP38-2. Skill
Walthers/Life-Like USRA Steam Locomotive
 North Raleigh Model Railroad Club Installing Decoders in N Scale Locomotives Detailed Instructions Walthers/Life-Like USRA 2-8-8-2 Steam Locomotive by David Derway May 17, 2010 Table of Contents Introduction...
Upgrading Proto axle Geeps with Stewart Trucks. November 27, 2010 Mark Schutzer
 Upgrading Proto 2000 4 axle Geeps with Stewart Trucks November 27, 2010 Mark Schutzer Introduction Several years ago Proto 2000 made a bunch of 4 axle locomotives that used trucks that were a copy of an
Tip: LED Lighting for the 3098 Locomotive and 4392 Coach Set Date: , ,
 Hi All, Over the past few months I have been working at a steady pace to install LED lighting in my passenger coaches. The coach lighting must have LED lights to reduce power consumption on the layout
Atlas Silver Series HO RS-3 (2014 Release) Tsunami Digital Sound Decoder Installation Notes
 Tsunami Digital Sound Decoder Installation Notes") Atlas Silver Series HO RS-3 (2014 Release) Tsunami Digital Sound Decoder Installation Notes Overview This application note describes how to install a TSU-AT1000 Digital Sound Decoder into an Atlas Silver
Atlas Silver Series HO RS-3 (2014 Release) Tsunami Digital Sound Decoder Installation Notes Overview This application note describes how to install a TSU-AT1000 Digital Sound Decoder into an Atlas Silver
Athearn Pacific Digital Sound Decoder Installation Notes
 New Dimensions in Digital Sound Technology TM APPLICATION NOTE Overview This application note describes how to install a DSD-100LC Digital Sound Decoder into the Athearn Pacific Locomotive. All of the
Application Note. Athearn Genesis SD70MAC Tsunami Digital Sound Decoder Installation Notes
 Application Note Athearn Genesis SD70MAC Tsunami Digital Sound Decoder Installation Notes Overview This application note describes how to install a TSU-GN1000 digital sound decoder into an Athearn Genesis
5 Amp Dual Mode Sound Decoder by Frank T.Verrico
 5 Amp Dual Mode Sound Decoder by Frank T.Verrico Model Rectifier Corp. s latest venture into O scale is a 5 amp. dual mode, [DC/DCC], sound decoder. This full featured N.M.R.A. compatible sound decoder
Bachmann Digital Sound Decoder Installation Notes
 New Dimensions in Digital Sound Technology TM APPLICATION NOTE Bachmann 2-6-6-2 Digital Sound Decoder Installation Notes Overview This application note describes the installation of a DSD-090LC Digital
Bachmann Spectrum Peter Witt in HO
 Bachmann Spectrum Peter Witt in HO By Bob Dietrich This is my impression of an unpainted Peter Witt from Bachmann Spectrum. The packaging of the car was impressive a large red box with a clear cover showing
Athearn RTR F59PHI Tsunami Digital Sound Decoder Installation Notes
 Athearn RTR F59PHI Tsunami Digital Sound Decoder Installation Notes Overview This application note describes how to install a TSU-GN1000 Digital Sound Decoder into an Athearn HO Ready to Roll EMD F59PHI
Tip: and Orient Express LED Light Upgrade Date: Correction
 Hi All, I have since inherited my friend Rudolf s 42755 Orient Express with the extra 42760 car set and wanted to complete the LED light upgrade as we had planned. Side view of the Restaurant car with
Tip: 3652 and 3756 Crocodiles with LP4.0 and LED Lighting Date:
 Hi All, My friend Adrian asked me to convert two crocodiles 3652 and 3756 using LokPilot 4.0 decoders. Adrian wanted to run both locomotives as a double headed configuration so this would require that
Kato P42 Tsunami Digital Sound Decoder Installation Notes
 Kato P42 Tsunami Digital Sound Decoder Installation Notes Overview This application note describes the procedure for installing a TSU-KT1000 Digital Sound Decoder into a Kato HO P42 locomotive. Skill Level
Bachmann. Climax. Phoenix Sound Systems, Inc West Liberty Road Ann Arbor MI
 Bachmann Climax Phoenix Sound Systems, Inc. 3514 West Liberty Road Ann Arbor MI 48103 www.phoenixsound.com phone: 800-651-2444 fax: 734-662-0809 e-mail: phoenixsound@phoenixsound.com 2004-2007 Phoenix
Application Note. Atlas RS-3 Tsunami Digital Sound Decoder Installation Notes
 Application Note Atlas RS-3 Tsunami Digital Sound Decoder Installation Notes Overview This application note describes how to install a TSU-AT1000 digital sound decoder into an HO Atlas RS-3. Skill Level
VRSC-DX Truck-Lite LED Headlight Installation Instructions
 VRSC-DX Truck-Lite LED Headlight Installation Instructions The following Instructions are for installing a 7 Truck-Lite LED headlight into a Harley Davidson VRSC-DX Night Rod Special fairing. Other 7 headlights
Adding an LED indicator to the X10-WS467 wall switch Credit: Bruce Stydnicki
 1 of 6 1/2/2009 4:33 PM Adding an LED indicator to the X10-WS467 wall switch Credit: Bruce Stydnicki 1. I had a need to monitor the status of my outdoor lights which are connected to X10-WS467 wall switches.
Athearn SD40T-2 Tsunami Digital Sound Decoder Installation Notes
 Athearn SD40T-2 Tsunami Digital Sound Decoder Installation Notes Overview This application note describes how to install a TSU-AT1000 into an Athearn Ready-To-Roll HO SD40T-2. Skill Level 2: The entire
Modeling Ideas and techniques, by Bob Rohwer What is the right DCC Decoder for my Locomotive?
 Modeling Ideas and techniques, by Bob Rohwer What is the right DCC Decoder for my Locomotive? I hear this question a lot. Fortunately there are a lot of resources to answer the question. The best I have
Scratchbuilding an F25 Well Flat Car
 Scratchbuilding an F25 Well Flat Car By David J. Vinci (Flat Figure 1) Well flats are a pretty rare car type generally, but the Pennsy seems to have had the lion s share of variety. Most of these cars
Sound Install Steam. Presented by Tim s Trains
 Presented by Tim s Trains This presentation will show you the basic steps required to install a sound decoder and speaker in a steam locomotive. This particular locomotive is a Bachmann 4-8-4 with a Vanderbilt
Athearn RTR EMD CF7 Tsunami Digital Sound Decoder Installation Notes
 Athearn RTR EMD CF7 Tsunami Digital Sound Decoder Installation Notes Overview This application note describes how to install a TSU-AT1000 into an Athearn HO Ready-To-Roll EMD CF7. Skill Level 2: The entire
Cabin Light. Hi All, 1
 Hi All, My friend Rudolf set me a challenge for his 36331 electric locomotive, wanting Telex couplers fitted. When I opened up the locomotive I discovered there is very little room to add extra components
Connecting the rear fog light on the A4 Jetta, while keeping the 5 Light Mod
 Connecting the rear fog light on the A4 Jetta, while keeping the 5 Light Mod DISCLAIMER: I'm human and make mistakes. If you spot one in this how to, tell me and I'll fix it This was done on my 99.5 Jetta.
Tip: Liliput S LED Light for Forward Cabin Locomotive Date:
 Hi All, I obtained this Liliput locomotive catalogue number L131541-S some time ago and was disappointed that the feature of a steam locomotive with a forward driving cabin didn t have a detailed cabin
STEPS FOR REMOVING REAR ASHTRAY & CUP HOLDER, CENTER ARMREST, E- BRAKE CONSOLE, FRONT ASHTRAY, LOWER CENTER CONSOLE AND GLOVE BOX
 Please give credit where credit is due! This DIY was completed ENTIRELY by the hardest working VW Vortex moderator on the site!! Gary Thompson, Ph.D. - vortex ID VGRT6, email address vgrt6@yahoo.com. Please
Application Note. Athearn RTR SW-1000/SW-1500 Tsunami Digital Sound Decoder Installation Notes
 Application Note Athearn RTR SW-1000/SW-1500 Tsunami Digital Sound Decoder Installation Notes Overview This application note describes how to install a TSU-AT1000 Digital Sound Decoder into the HO Athearn
General Purpose Flasher Circuit
 General Purpose Flasher Circuit By David King Background Flashing lights can be found in many locations in our neighbourhoods, from the flashing red light over a stop sign, a yellow warning light located
By Coranzo on VW Vortex:
 By Coranzo on VW Vortex: First off, let me just say, these bulbs are BRIGHT! They are a nice rich red LED that you see on newer high end cars nowadays. They have had these available for quite a while now
Atlas HO MP-15 Tsunami Digital Sound Decoder Installation Notes
 Atlas HO MP-15 Tsunami Digital Sound Decoder Installation Notes Overview This application note describes how to install a TSU-AT1000 digital sound decoder into an Atlas HO MP-15. Skill Level 2: The entire
Athearn SD40 Tsunami Digital Sound Decoder Installation Notes
 Athearn SD40 Tsunami Digital Sound Decoder Installation Notes Overview This application note describes how to install a TSU-AT1000 into an Athearn Ready-To-Roll HO SD40. Skill Level 2: The entire installation
How to Replace the Main Axle Gear on the Bachmann Spectrum GScale using the NWSL # upgrade gear.
 How to Replace the Main Axle Gear on the Bachmann Spectrum GScale 4-4-0 and 2-6-0 Mogul (2001era), using the NWSL #2223-6 upgrade gear. By Paul M. Newitt (all text and photos Copyright Paul M. Newitt,
Instructions to Improve SS Dash Gauge Cluster Lighting. By Paul Carreiro, Updated June 2nd, Introduction
 Page 1 Instructions to Improve SS Dash Gauge Cluster Lighting By Paul Carreiro, Updated June 2nd, 2004 Introduction One of the more common complaints from 4th Generation Monte Carlo SS owners is the dim
Four Panel Amber LED Front Light Kit Installation Guide
 Four Panel Amber LED Front Light Kit Installation Guide Kit Contents: 2 LED panels 4 socket plugs 1 cut out template PN 2100886 Please refer to webiste for full warranty information. DIGI-TAILS is not
INSTALLATION INSTRUCTIONS
 COLD AIR INTAKE INSTALLATION INSTRUCTIONS PART NUMBER D760-0390C APPLICATION: 1999-2003 E39 M5 PARTS LIST 1 Left Aluminum Intake Tube 1 Air Pump Bracket (A) 1 Right Aluminum Intake Tube 1 Air Pump Bracket
WifiTrax WMR-10 in Atlas RS-3
 WifiTrax WMR-10 in Atlas RS-3 How to Install the WifiTrax WMR -10 Board Replacement Wi-Fi Controller in Atlas RS-3 Locomotive Practical notes by Steve Shrimpton Back to Web Site In my opinion the Alco
Athearn RTR EMD GP35 Tsunami Digital Sound Decoder Installation Notes
 Athearn RTR EMD GP35 Tsunami Digital Sound Decoder Installation Notes Overview This application note describes how to install a TSU-AT1000 into an Athearn HO Ready-To-Roll EMD GP35. Skill Level 2: The
SYSTEM OPERATION IMPORTANT CAUTIONS
 SYSTEM OPERATION The system is turned on by placing the gear shift lever in the reverse position. The green light on the cab Control Box will illuminate to indicate the system is operating. When an object
Tip: Axle Bearing Replacement Date:
 Hi All, Some time ago I came into possession of some Donnerbüchsen or Thunder Boxes, Märklin items 4313,4314 and 4315 which were no longer usable as the axle bearings had worn out causing the wheels to
Application Note. Walthers/Proto 2000 E7A Tsunami Digital Sound Decoder Installation Notes
 Application Note Overview This application note describes how to install a TSU-1000 digital sound decoder into a Walthers/ Proto 2000 E7A. Skill Level 2: The entire installation can be completed in one
LiteDOT Installation Document
 LiteDOT Installation Document This document designed to aid in installation of LiteDOT s on Jeep TJ models, other models are similar. NOTE: Installing LiteDOT s on a Jeep where the 2 necessary mounting
Mobtown Offroad Toyota Tacoma Bolt On Rock Slider Installation Instructions
 Mobtown Offroad 2005+ Toyota Tacoma Bolt On Rock Slider Installation Instructions Tools Needed: 9/16 Box Wrench 9/16 Standard and Deep Well Socket, 3/8 Drive Ratchet, 3/8 Drive 3/4 Standard Socket 3/4
LEVELe ELEVATOR INTERIORS WITH LIGHTPLANE INSTALLATION INSTRUCTIONS. STANDARD LEVELe COMPONENTS CEILING COMPONENTS LIGHTPLANE COMPONENTS TOOLS NEEDED
 TOOLS NEEDED SUCTION CUP(S) IMPACT DRILL CRESCENT WRENCH #8-18 SQUARE / PHILIPS COMBO DRIVE BIT SQUARE MASKING TAPE PENCIL DRILL BIT EXTENDER 3/8" DRILL BIT TAPE MEASURE CENTER PUNCH LEVEL BRUSH INCLUDED
Tip: 3425 Kittle Loco with LP4.0 Micro Conversion and LED Lighting Date: , Corrections Addition Link added
 Hi All, This is the last of Rudolf s LokPilot Micro V4.0 decoder conversions. He asked me to convert his Märklin Delta 3425 steam locomotive and wanted to improve the lighting effects for the cabin, change
THE MOTOR. Page 1 of 9
 Page 1 of 9 The Bachmann HO Old Time 4-4-0 has been around a long time and suffers from two problems: the latest motor will burnout with a frying of the added DCC decoder and the pickup system is very
Desire Streetcar Installation Guide
 Desire Streetcar Installation Guide 2004 Phoenix Sound Systems, Inc. All Rights Reserved. Page 1 1 Mar 04 Overview The LGB Streetcar is one of the more interesting (e.g. difficult, challenging) installations.
In This DIY We Will Show You How To Install Recon Backup Lamps (part # To Run On A Separate Switch & In Reverse.
 In This DIY We Will Show You How To Install Recon Backup Lamps (part # 264150 To Run On A Separate Switch & In Reverse. Please Note, There Are Many Ways of Installing These Lights, Including Wiring Methods,
BMW 528i E39 Sunroof Repair
 These instructions will help guide you through the repair process for broken sunroof control rails on an E39 chassis. Before I get started, I want to give a shout-out to a couple people who also posted
Prius XM Radio Installation Instructions. Eddie Bell
 2004-2005 Prius XM Radio Installation Instructions By Eddie Bell www.metrotpn.com 1 Let me begin by saying this is an easy but time consuming job. Set aside a few hours of your time for the install. If
$1.00 FOR THE TQIO/RCIO
 $1.00 FOR THE TQIO/RCIO m mm HDBBYSHOP Champion Jay Halsey has an impressive track record. One of Jay's advantages is a whisper smooth tranny thanks to his dad, Jim. Now you can build a Halsey transmission!
Sunroof Repair. Sunroof Repair TSB. The sunroof repair kit available for the J30 is part number Y20. See images at bottom of document.
 Sunroof Repair This document is the text/images from the TSB (technical service bulletin) issued by Infiniti concerning the repair procedure for sunroof issues. Be advised that this is a LARGE, TIME-CONSUMING
2010 Toyota Prius Fog Light Retrofit
 2010 Toyota Prius Fog Light Retrofit A DIY prospective Last updated: Friday, December 25, 2009 *** Disclaimer Use this document and its contents at your own risk! *** Forward: This document was compiled
Bachmann GWR Earl (Dukedog) EM Finescale Conversion
 EM Finescale Conversion") Bachmann GWR Earl (Dukedog) EM Finescale Conversion Before you start, it is a good idea to have some small containers or snap top poly bags to put screws and components in for safe keeping...much better
Bachmann GWR Earl (Dukedog) EM Finescale Conversion Before you start, it is a good idea to have some small containers or snap top poly bags to put screws and components in for safe keeping...much better
*Some speedometers have these additional electronic connections. If yours does, then remove the smaller slotted screws shown.
 www.odometergears.com 1981-1985 240 Cable-Driven Speedometers (NOT for 1986 and later electronic units) http://www.davebarton.com/240-odometer-repair.html For this set of instructions below, I will not
Mustang Radiator Conversion DIY. By GearHeadPeter. January 27, 2011
 1964-1966 Mustang Radiator Conversion DIY By GearHeadPeter January 27, 2011 We all know that the radiators in our cars are not the best, especially if you have done any customization to the engine, which
Tip: 2856 LED Lighting for the Airport Express Set Date:
 Hi All, The 2856 Airport Express set was manufactured in 1983. On 09-11-1989 the locomotive was given a digital upgrade using a 6080 decoder. It has since had a digital upgrade to a high performance motor
SEARAILS RR-XXX STEAM LOCOMOTIVES ASSEMBLY MANUAL
 SEARAILS RR-XXX 0-4-0 STEAM LOCOMOTIVES ASSEMBLY MANUAL 30 March 2015 T R Knapp Model Engineering 1 This diagram shows basic assembly of Nn3/Z Porter 0-4-0T 2 This diagram shows basic assembly of Baldwin
Hornby 08 Diesel Shunter EM Finescale Conversion.
 Hornby 08 Diesel Shunter EM Finescale Conversion. Before you start, it is a good idea to have some small containers or snap top poly bags to put screws and components in for safe keeping...much better
ST1100 HID HEADLAMP CONVERSION
 ST1100 HID HEADLAMP CONVERSION HID lighting systems have become increasingly popular among the Long Distance Riding community within the last few years. The ability of HID lighting to cast light far down
EMD DD35 Powered & Dummy Units. Assembly Instructions
 EMD DD35 Powered & Dummy Units Assembly Instructions Main Shell Side Handrail End Handrails Fuel Tank (Loose Part, Powered Unit Only) Side Handrail End Handrails 2 No. MT N Scale Body Mount Coupler Shorten
Application Note. Bachmann F40PH Tsunami Digital Sound Decoder Installation Notes
 Application Note Bachmann F40PH Tsunami Digital Sound Decoder Installation Notes Overview This application note describes how to install a TSU-AT1000 Digital Sound Decoder into a Bachmann HO F40PH. Skill
USER MANUAL FOR ATLAS HO DUAL-MODE 4-FUNCTION DCC DECODER (ITEM #342)
") HO Dual-Mode 4-Function Decoder 1 USER MANUAL FOR ATLAS HO DUAL-MODE 4-FUNCTION DCC DECODER (ITEM #342) By Dual Mode, we mean that the Atlas #342 HO 4-function decoder has a jumper plug that allows the
HO Dual-Mode 4-Function Decoder 1 USER MANUAL FOR ATLAS HO DUAL-MODE 4-FUNCTION DCC DECODER (ITEM #342) By Dual Mode, we mean that the Atlas #342 HO 4-function decoder has a jumper plug that allows the
Micro-Trains #1021/#1022 Low short profile coupler
 1 Micro-Trains #1021/#1022 Low short profile coupler Low short profile coupler, for locomotives and cars with limited mounting area, makes 2 pair of either (1021) Life-Like E8A Pilot or Bachmann 4-8-4
GENUINE PARTS INSTALLATION INSTRUCTIONS
 GENUINE PARTS INSTALLATION INSTRUCTIONS 1. 2. 3. DESCRIPTION: APPLICATION: PART NUMBER: Accent light Kit Cube (MY2013+) 999F3 AW000 - Universal Accent Lighting Kit. 4. KIT CONTENTS: Item QTY Description
Shelby GT500 Front Fascia Conversion Kit (05-09 All) Item # Installation Time: 1 Day. Required tools:
 Item # Installation Time: 1 Day. Required tools:") Shelby GT500 Front Fascia Conversion Kit (05-09 All) Item #53611 Installation Time: 1 Day Required tools: Phillips Screw driver 10mm Socket + Ratchet/Wrench 8mm Socket + Ratchet/Wrench 5mm Socket + Ratchet/Wrench
Shelby GT500 Front Fascia Conversion Kit (05-09 All) Item #53611 Installation Time: 1 Day Required tools: Phillips Screw driver 10mm Socket + Ratchet/Wrench 8mm Socket + Ratchet/Wrench 5mm Socket + Ratchet/Wrench
2010 Toyota Prius model II Head Unit Upgrade
 2010 Toyota Prius model II Head Unit Upgrade Monday, December 21, 2009 Disclaimer: Use this document and its contents at your own risk. Forward: Huge thanks to those members on Priuschat.com that forged
Toyota Tacoma Winch Mount Bumper Installation Instructions Tools Required: Transmission cooler relocation brackets Torque Wrench
 2016-2017 Toyota Tacoma Winch Mount Bumper Installation Instructions Tools Required: Items Included: Small flat head screw driver Winch Mount Ratchet, 10mm, 12mm, 14mm, 17mm & Skid Plate 19mm sockets Transmission
Tip: Difficult Conversions for F800 (3026) and 3111 Date: Led lighting added, LED Addition 3111
 and 3111 Date: Led lighting added, LED Addition 3111") Hi All, It s good to revisit previous conversions and see if you can improve on what has been done before. I decided to add LED lighting to my F800 (3026) and 3111. This document update shows how it was
Hi All, It s good to revisit previous conversions and see if you can improve on what has been done before. I decided to add LED lighting to my F800 (3026) and 3111. This document update shows how it was
GENUINE PARTS INSTALLATION INSTRUCTIONS
 GENUINE PARTS INSTALLATION INSTRUCTIONS 1. 2. 3. 4. DESCRIPTION: Accent light Kit APPLICATION: R42H (2011) PART NUMBER: 999F3 AW000 - Universal Accent Lighting Kit. KIT CONTENTS: Item QTY Description Service
ML63AMG appartiens à un membre de mbworld.org merci. W210 E Class Folding Mirror Modification
 ML63AMG appartiens à un membre de mbworld.org merci W210 E Class Folding Mirror Modification Originally installed in 2002. Revised write up completed September 5, 2013. Step 1 - New Switch and Wiring Harness
Locomotive decoder LE1025 1
 Locomotive decoder LE1025 1 The DIGITAL plus locomotive decoder LE1025 is suitable for all DC motors in HO scale locomotives with continuous current draw of 1.0 Amp. or less. The characteristics of the
Installing Custom Puddle Lamps 2009 Subaru Forester
 Installing Custom Puddle Lamps 2009 Subaru Forester By John Perkins This guide will assist you in installing a set of LED puddle lamps on a 2009 Subaru Forester. This is NOT using the $150 Subaru kit.
Prusa i3 Printer Assembly Guide
 Prusa i3 Printer Assembly Guide Special thanks to Carlos Sanchez and Miguel Sanchez for the graphics. All graphics captured from their great animation: http://www.carlos-sanchez.com/ Prusa3/ For copyright
C4 Sound Deadening & Insulation Kit Interior Removal & Installation Instructions
 C4 Sound Deadening & Insulation Kit Interior Removal & Installation Instructions Ok, let's start with taking the radio bezel dash area off first. Here is what the OEM radio looks like, and the points you
Placement on the fireground simply refers to how and where an apparatus is placed at the scene.
 Placement on the fireground simply refers to how and where an apparatus is placed at the scene. The success of fireground operations can directly or indirectly depend on the effective placement of fire
Mustang CDC Lightbar (94-04) - Installation Instructions
 - Installation Instructions") Mustang CDC Lightbar (94-04) - Installation Instructions The below installation instructions work for the following products: Classic Design Concepts Mustang Convertible Lightbar (94-04 Carbon Fiber) Classic
Mustang CDC Lightbar (94-04) - Installation Instructions The below installation instructions work for the following products: Classic Design Concepts Mustang Convertible Lightbar (94-04 Carbon Fiber) Classic
There was some debate whether or not there was a write up, with Pictures, for replacing the ignition switch.
 Replacing the Ignition Switch - Step by Step with Pictures. http://forums.audiworld.com/showthread.php?p=18927576 (Corey 02ALMSTT) (With updates/corrections by Dave F.) February 1, 2013 (I = Corey, mostly)
Owner s Manual: Standard Gauge Diesel shunter Locomotive in Gauge 3 scale. PLine. Built in Brass. Standard Gauge Shunter Locomotive Model (G3 scale)
") PLine Built in Brass Standard Gauge Shunter Locomotive Model (G3 scale) PLEASE READ THIS OWNERS MANUAL CAREFULLY BEFORE OPERATING THE MODEL Prototype Information: Not many Standard gauge locomotives operated
PLine Built in Brass Standard Gauge Shunter Locomotive Model (G3 scale) PLEASE READ THIS OWNERS MANUAL CAREFULLY BEFORE OPERATING THE MODEL Prototype Information: Not many Standard gauge locomotives operated
The Mysteries of DCC Consisting. Presented by Tims Trains and Hobbies
 The Mysteries of DCC Consisting Presented by Tims Trains and Hobbies What is CONSISTING?? Consisting or MU ing is the process of running two, or more, locomotives as one unit, on any given throttle, on
Stay-IN-Play with Panic Stop Braking
 INSTALLATION INSTRUCTIONS TOWED VEHICLE BRAKING SYSTEM Stay-IN-Play with Panic Stop Braking SMI Manufacturing, Inc. P.O. Box 14040 Evansville, IN 47728 1-800-893-3763 www.smibrake.com SIP0906 Model SIP0603
Plumbing Part VI - Blowdown Valve Nelson Riedel Initial: 9/28/03 Last Revised: 04/24/2006
 Page 1 of 8 Plumbing Part VI - Blowdown Valve Nelson Riedel Nelson@NelsonsLocomotive.com Initial: 9/28/03 Last Revised: 0 When I started to think about the blowdown I realized that I'd never seen the actual
Tip: - Württemberg Era 1 Open Platform Cars LED Lighting Upgrade Date: , Photos
 Hi All, As I continue my LED light conversions of my rolling stock I have just completed all the Württemberg era 1 open platform cars I have which will make up four trains with eight cars per train. These
Wolverine Turn Signal / Horn Kit 2102
 All years Yamaha Wolverine STOP - THIS KIT IS DESIGNED SPECIFICALLY FOR ALL YEAR AND MODELS YAMAHA WOLVERINE. IF YOUR MACHINE IS NOT ONE OF THESE MODELS DO NOT PROCEED. Contact Ryco Motorsports or your
2479 Hella oem turn signal flasher relay short diagnosis and repair
 2479 Hella oem turn signal flasher relay short diagnosis and repair Identifying the Hella relay in your headlight bucket: Early Hella 2479 current Hella 3425 The /6s were all supplied with the early Hella
Side Mount Installation & Wiring Instructions
 E81/E87/E90/E91/E92/F22/F30/F31/F32/F80/F82/F87 (and other cars with the same sliders) Side Mount Installation & Wiring Instructions These instructions assume a basic comfort with crimping and/or soldering.
Char-Griller Smokin Pro Modifications
 Char-Griller Smokin Pro Modifications By Phil Lee aka HawgHeaven Right out of the box, the Char-Griller Smokin Pro has a few design deficiencies that need to be addressed, and are fairly easy to remedy.
Replacing MK4 Golf/Jetta radiator mounts in-car
 Replacing MK4 Golf/Jetta radiator mounts in-car This is a guide to replacing the radiator mounts in a MK4 Golf/Jetta. This involves moving the core support to the service position which allows you to do
LED Lighting Upgrade Kit for Tesla Model X Review and Installation Guide [As seen in Teslarati]
![LED Lighting Upgrade Kit for Tesla Model X Review and Installation Guide [As seen in Teslarati]](/thumbs/88/116969049.jpg "LED Lighting Upgrade Kit for Tesla Model X Review and Installation Guide [As seen in Teslarati]") LED Lighting Upgrade Kit for Tesla Model X Review and Installation Guide [As seen in Teslarati] Tesla s [factory] Premium Upgrade Package for the Model X and Model S includes what the company describes
LED Lighting Upgrade Kit for Tesla Model X Review and Installation Guide [As seen in Teslarati] Tesla s [factory] Premium Upgrade Package for the Model X and Model S includes what the company describes
Bosch hydraulic cylinder inlet ports seals replacement Ivan Ruiz December 2017
 Bosch hydraulic cylinder inlet ports seals replacement Ivan Ruiz December 2017 I recently purchased a Khamsin and noticed some hydraulic fluid (LHM) leakage in the areas under the headlights. I also noticed
Terminating RFS LCF /8 Corrugated Coaxial Cable with RFS Omni-Fit (F) N-Connector
 N-Connector") December 12, 2018 RFS TRIM-L-158-A Trimming and Stripping Tool Additional Tools Used for Termination Drill press vice temporarily attached to trailer tailgate to secure cable during termination. Obviously,
December 12, 2018 RFS TRIM-L-158-A Trimming and Stripping Tool Additional Tools Used for Termination Drill press vice temporarily attached to trailer tailgate to secure cable during termination. Obviously,
PENNSYLVANIA X29D PARTS HISTORY RECOMMENDED TOOLS
 PENNSYLVANIA X29D Thank you for purchasing our WrightTRAK X29D boxcar kit. We hope that you find building this kit to be an enjoyable experience. If you find any pieces broken or missing please feel free
1. Invert the tender, and hold in a suitable device. We use a foam cradle the Peco loco service cradle being ideal.
 Bachmann J11 EM Finescale Conversion Before you start, it is a good idea to have some small containers or snap top poly bags to put screws and components in for safe keeping...much better than crawling
Pantera Electronics LED Taillight Installation Manual
 Pantera Electronics LED Taillight Installation Manual (2nd Gen) This LED signal lamp conversion was designed to replace the incandescent lamp 1157 with a Light Emitting Diode Array designed specifically
Hi All, Update
 Hi All, With the success of my last Telex conversion on the 3704 locomotive I chose the 3796 tank locomotive to add Telex couplers controlled by a LokPilot 4 decoder. The locomotive does an un-coupling
This is what we are trying to create in the steps below
 You will need: (1) Some 3/4 aluminium or steel flat bar (+/- 1 foot) (2) About 12 of 3 Aluminium or steel tubing. (2) Piece of 3X3 silicone hose and 2 hose clamps (3) 1 K&N (or similar) high flow filter
Shay Steam Brake Valve
 Shay Steam Brake Valve Nelson Riedel Nelson@NelsonsLocomotive.com Initial: 10/26/2003 Last Revised: 06/05/2004 Update 10/28/2003: The day after I published this page Mike Green from up in Ontario emailed
Pantera Electronics LED Taillight Conversion Installation Manual
 Pantera Electronics LED Taillight Conversion Installation Manual This LED signal lamp conversion was designed to replace the incandescent lamp 1157 with a Light Emitting Diode Array designed specifically
ELS Electronic Lighting System
 ELS Electronic Lighting System T-8 Lamp Replacement November, 2012 99-20374-I001 I. T-8 Lamp Replacement Instructions Center Mullion Fixtures 1. Turn light power off before start of lamp replacement. 2.
Stephenson's Valve Gear: 7mm cast white-metal kit 19 th Century swing-link version - non-working, cosmetic only. Instructions
 SER-Kits Stephenson's Valve Gear: 7mm cast white-metal kit 19 th Century swing-link version - non-working, cosmetic only Page 1 of 5 Instructions HEALTH & SAFETY: The castings contain some lead. Dispose