Application Note. Athearn Genesis SD70MAC Tsunami Digital Sound Decoder Installation Notes
|
|
|
- Cameron James
- 5 years ago
- Views:
Transcription


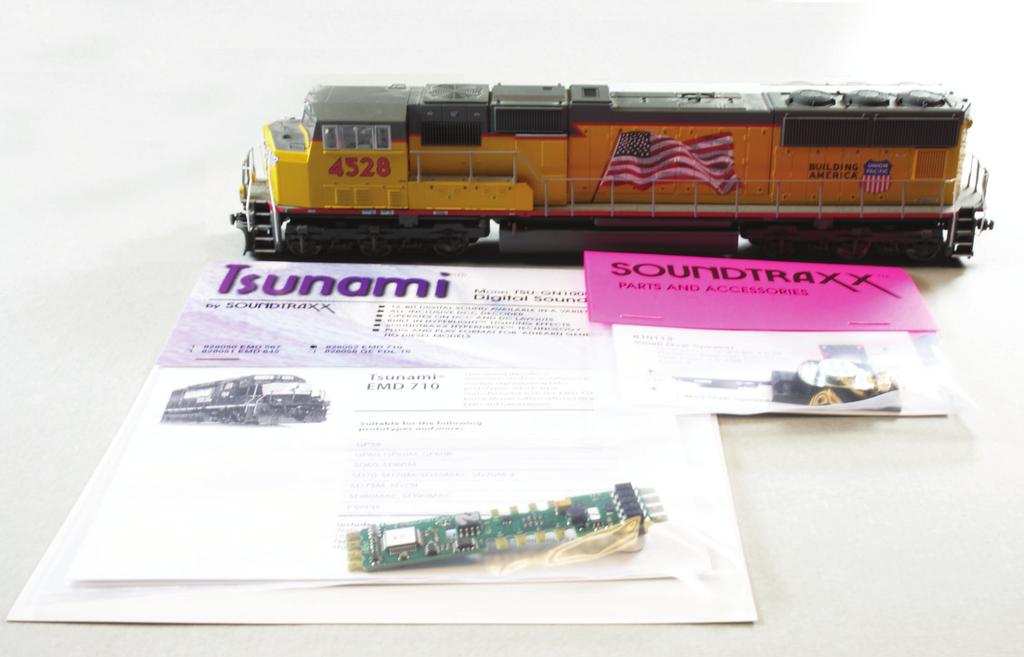
1 Application Note Athearn Genesis SD70MAC Tsunami Digital Sound Decoder Installation Notes Overview This application note describes how to install a TSU-GN1000 digital sound decoder into an Athearn Genesis HO SD70MAC. Skill Level 2: The entire installation can be completed in one to two hours with no modification required to the model. Bill of Materials P.N. Description TSU-GN1000 for EMD mm x 35.1mm Oval Speaker 28 Gauge Wire Evergreen P.N Sheet Styrene For your convenience, Evergreen part numbers have been listed above. Please visit their website at Tools You Will Need Miniature Screwdriver Set Micro Drill Set Pin Vise X-Acto Knife Soldering Iron Rosin Core Solder Clear Silicone or Aquarium Sealant Liquid Plastic Cement (Tenax 7r or equivalent) Masking Tape
 4.")
 Photo 4 Photo 1 2. Gently remove the shell from the frame.")
 5.")
 and motor (7 and 8) wires to the correct tabs following the diagram at the end of this")
 Photo 2 3.")
2 Installation 1. Start by removing the Phillips screws holding the coupler boxes in place at either end of the locomotive. Remove the coupler boxes and set aside. (Photo 1) 4. Remove the circuit board by using a small flathead screwdriver to press on the tabs that hold the board in place. Then lift the board out of the model. (Photo 4) Photo 4 Photo 1 2. Gently remove the shell from the frame. There are four tabs located on either side above the centermost axles. Gently squeeze these and wiggle the shell up and off of the frame to expose the factory circuit board. (Photo 2) 5. Install the TSU-GN1000 using the mounting tabs for the factory circuit board. 6. Attach the track pickup (1, 4, 9, and 12) and motor (7 and 8) wires to the correct tabs following the diagram at the end of this document. We recommend that these connections be soldered. After soldering, you can use the plastic clips removed in Step 3 to cover the connection. (Photo 5) Photo 2 3. Familiarize yourself with the locomotive s wire placement and mark with masking tape if desired. Remove the small black clips holding the wires to the circuit board. Pull the wires out of the mounting tab on the circuit board. (Photo 3) Photo 3 Photo 5 7. Test the decoder for operation by placing the locomotive on your mainline, selecting address 3, and running it in both directions.

 Headlights Ditch lights Photo 6 11.")


3 8. On the model we used for this document, the ditch light wires were already attached to separate terminals. However, some models may have the ditch light wires attached to the headlight output. If the ditch lights have not already been separated, do so now and mark both wires for each lamp. Note: To determine which wires are for which lights, use a 1.5V battery (AA) to apply power to one wire on the positive terminal and to each of the wires on the negative terminal one at a time untill a light illuminates. This will help determine which wires lead to which light. Use masking tape to mark the two wires function accordingly. (Photo 6) Headlights Ditch lights Photo To install the speaker, start by soldering a 3 piece of 28 gauge wire to each speaker terminal. 12. Lay the speaker face down on your work surface. Using the baffle template located at the end of this document, build the walls of speaker baffle from the sheet styrene. Cut the pieces as indicated and attach them to the sides of the speaker using liquid plastic cement. (Photo 8) Photo Drill a small hole in the side big enough to allow the speaker wires to be threaded through. Thread the wires through the hole. Next, cement the top of the enclosure to seal the speaker completely. Seal the four holes on the front of the speaker and any gaps with silicone or aquarium sealant. (Photo 9) 9. This decoder is designed for use with 1.5V lamps without the need for additional resistors. Attach the wires for the lights to the decoder. The headlight and backup light wires attach to the two center tabs on each end of the decoder. (2, 3, 10, and 11). 10. Attach one wire from one ditch light to FX5 (14) and one wire from the other to FX6 (16), and the remaining wires to the corresponding common tab (13 and 15). (Photo 7) Photo 7 Photo Thread the wires beneath the track pickup wires as shown. Then solder the wires to the S+ and S- terminals on the decoder (5 and 6). (Photo 10) Photo 10

4 15. Using the silicone, cement the speaker to the top of the frame above the rear driveline. Use tape to hold it in place until the silicone fully cures. (Photo 11) 16. Take the decoder for a test spin to ensure that it is functioning properly and the lights are operating. Place the locomotive chasis on your mainline with the shell beside it, and run it in both directions, test the lights, and play the sound. 17. After the silicone dries, remove tape, reattach the shell and reinstall the coupler boxes removed in Step 1. Be sure not to get the wires pinched between the shell and the motor or driveline. Photo 11 Take it for a run to ensure smooth operation. Enjoy!
5 Programming Notes: To set up alternating ditch lights, there are a few CVs that need to be set up. Decide if F5 or F6 will turn on both ditch lights. If F5, set CV 39 to 6 and 40 to 0. If F6, set CV 39 to 0 and CV 40 to 6. To have the ditch lights alternate when the horn is blown, set CV 51 to 41 and CV 52 to 57. For further programming instructions, please see the Diesel User s Guide. Speaker Baffle Top Front Back Side Side TSU-GN1000 Wiring Diagram Front Right Pickup FX6 1.5V FX5 1.5V Rear Right Pickup Headlight F6 F5 S+ S- M- M Backup Light Front Left Pickup Speaker + Speaker - Motor - Motor Motor + Rear Left Pickup New Dimensions in Digital Sound Technology 2013 Throttle Up! Corp. All Rights Reserved 141 Burnett Drive Durango, CO Phone: (970) Toll Free: Fax: (970) support@soundtraxx.com Website:
Athearn Genesis GP38-2 Tsunami Digital Sound Decoder Installation Notes
 Athearn Genesis GP38-2 Tsunami Digital Sound Decoder Installation Notes Overview This application note describes how to install a TSU-GN1000 digital sound decoder into an Athearn Genesis HO GP38-2. Skill
Athearn RTR F59PHI Tsunami Digital Sound Decoder Installation Notes
 Athearn RTR F59PHI Tsunami Digital Sound Decoder Installation Notes Overview This application note describes how to install a TSU-GN1000 Digital Sound Decoder into an Athearn HO Ready to Roll EMD F59PHI
Atlas Silver Series HO RS-3 (2014 Release) Tsunami Digital Sound Decoder Installation Notes
 Tsunami Digital Sound Decoder Installation Notes") Atlas Silver Series HO RS-3 (2014 Release) Tsunami Digital Sound Decoder Installation Notes Overview This application note describes how to install a TSU-AT1000 Digital Sound Decoder into an Atlas Silver
Atlas Silver Series HO RS-3 (2014 Release) Tsunami Digital Sound Decoder Installation Notes Overview This application note describes how to install a TSU-AT1000 Digital Sound Decoder into an Atlas Silver
Atlas HO MP-15 Tsunami Digital Sound Decoder Installation Notes
 Atlas HO MP-15 Tsunami Digital Sound Decoder Installation Notes Overview This application note describes how to install a TSU-AT1000 digital sound decoder into an Atlas HO MP-15. Skill Level 2: The entire
Athearn RTR EMD CF7 Tsunami Digital Sound Decoder Installation Notes
 Athearn RTR EMD CF7 Tsunami Digital Sound Decoder Installation Notes Overview This application note describes how to install a TSU-AT1000 into an Athearn HO Ready-To-Roll EMD CF7. Skill Level 2: The entire
Athearn SD40 Tsunami Digital Sound Decoder Installation Notes
 Athearn SD40 Tsunami Digital Sound Decoder Installation Notes Overview This application note describes how to install a TSU-AT1000 into an Athearn Ready-To-Roll HO SD40. Skill Level 2: The entire installation
Athearn RTR EMD GP35 Tsunami Digital Sound Decoder Installation Notes
 Athearn RTR EMD GP35 Tsunami Digital Sound Decoder Installation Notes Overview This application note describes how to install a TSU-AT1000 into an Athearn HO Ready-To-Roll EMD GP35. Skill Level 2: The
Athearn SD40T-2 Tsunami Digital Sound Decoder Installation Notes
 Athearn SD40T-2 Tsunami Digital Sound Decoder Installation Notes Overview This application note describes how to install a TSU-AT1000 into an Athearn Ready-To-Roll HO SD40T-2. Skill Level 2: The entire
Application Note. Bachmann F40PH Tsunami Digital Sound Decoder Installation Notes
 Application Note Bachmann F40PH Tsunami Digital Sound Decoder Installation Notes Overview This application note describes how to install a TSU-AT1000 Digital Sound Decoder into a Bachmann HO F40PH. Skill
Application Note. Athearn RTR SW-1000/SW-1500 Tsunami Digital Sound Decoder Installation Notes
 Application Note Athearn RTR SW-1000/SW-1500 Tsunami Digital Sound Decoder Installation Notes Overview This application note describes how to install a TSU-AT1000 Digital Sound Decoder into the HO Athearn
Broadway Limited (and Blueline) SD40-2 Tsunami Digital Sound Decoder Installation Notes
 SD40-2 Tsunami Digital Sound Decoder Installation Notes") Broadway Limited (and Blueline) SD40-2 Tsunami Digital Sound Decoder Installation Notes Overview This application note describes how to install a TSU-AT1000 digital sound decoder into a HO Broadway Limited
Broadway Limited (and Blueline) SD40-2 Tsunami Digital Sound Decoder Installation Notes Overview This application note describes how to install a TSU-AT1000 digital sound decoder into a HO Broadway Limited
Kato P42 Tsunami Digital Sound Decoder Installation Notes
 Kato P42 Tsunami Digital Sound Decoder Installation Notes Overview This application note describes the procedure for installing a TSU-KT1000 Digital Sound Decoder into a Kato HO P42 locomotive. Skill Level
Application Note. Atlas RS-3 Tsunami Digital Sound Decoder Installation Notes
 Application Note Atlas RS-3 Tsunami Digital Sound Decoder Installation Notes Overview This application note describes how to install a TSU-AT1000 digital sound decoder into an HO Atlas RS-3. Skill Level
Application Note. KATO SD40-2 Mid Tsunami Digital Sound Decoder Installation Notes
 Application Note Overview This application note describes how to install a Tsunami TSU-KT1000 Digital Sound Decoder into the HO Kato SD40-2 (Mid-production). Skill Level 2: The entire installation can
Application Note. Walthers/Proto 2000 E7A Tsunami Digital Sound Decoder Installation Notes
 Application Note Overview This application note describes how to install a TSU-1000 digital sound decoder into a Walthers/ Proto 2000 E7A. Skill Level 2: The entire installation can be completed in one
Bachmann Digital Sound Decoder Installation Notes
 New Dimensions in Digital Sound Technology TM APPLICATION NOTE Bachmann 2-6-6-2 Digital Sound Decoder Installation Notes Overview This application note describes the installation of a DSD-090LC Digital
Athearn Pacific Digital Sound Decoder Installation Notes
 New Dimensions in Digital Sound Technology TM APPLICATION NOTE Overview This application note describes how to install a DSD-100LC Digital Sound Decoder into the Athearn Pacific Locomotive. All of the
By Mark Schutzer PCR Regional Convention, San Luis Obispo May 2014 Copies of this presentation can be found at
 A Beginners Guide to Installing DCC Decoders By Mark Schutzer PCR Regional Convention, San Luis Obispo May 2014 Copies of this presentation can be found at http://www.markschutzer.com Clinic Overview Installing
DOWNLOAD ENHANCED INSTALL MANUALS
 U 3 October 2016 1041564 6.7L Performance Intake Plate Manual (I-00371) 1 DOWNLOAD ENHANCED INSTALL MANUALS Cummins 6.7L High Flow Intake Plenum Cover 1041564 2008-2016 6.7L RAM 2500-3500 Pickup PLEASE
DH165IP Fits Many HO Locomotives with DCC 8pin Medium Socket
 Digitrax Command Control Run Your Trains, Not Your Track! DH165IP Fits Many HO Locomotives with DCC 8pin Medium Socket HO Scale Mobile Decoder DCC Plug N Play 1.0 Amp/1.5 Amp Peak 6 FX 3 Functions, 0.5
INSTALLATION INSTRUCTIONS
 INSTALLATION INSTRUCTIONS Accessory P/N 08E10-TA0-100 Application 2008 ACCORD 2-AND 4-DOOR Publications No. AII 35358 Issue Date AUG 2007 PARTS LIST Ambient Light Kit 2 Ambient lights Fuse label Washer
MODELING MARS LIGHTS ON CGW F-UNITS. David Webb
 MODELING MARS LIGHTS ON CGW F-UNITS David Webb In the pre-ditch light diesel era, the Chicago Great Western, as did many other, but not all, roads, specified dual headlights on its cab units. I gather
Walthers/Life-Like USRA Steam Locomotive
 North Raleigh Model Railroad Club Installing Decoders in N Scale Locomotives Detailed Instructions Walthers/Life-Like USRA 2-8-8-2 Steam Locomotive by David Derway May 17, 2010 Table of Contents Introduction...
5 Amp Dual Mode Sound Decoder by Frank T.Verrico
 5 Amp Dual Mode Sound Decoder by Frank T.Verrico Model Rectifier Corp. s latest venture into O scale is a 5 amp. dual mode, [DC/DCC], sound decoder. This full featured N.M.R.A. compatible sound decoder
Micro-Tsunami Digital Sound Decoder Quick Start Guide
 Micro-Tsunami Digital Sound Decoder Quick Start Guide for the Experienced User Software Release 1.04 Notice The information in this document is subject to change without notice. SoundTraxx (Throttle Up!)
DCC Decoders for Brass Steam Locomotives
 DCC Decoders for Brass Steam Locomotives By Mark Schutzer PCR Regional Convention, Concord, CA May 2005 Copies of this presentation can be found at http://www.markschutzer.com Clinic Overview Part 3 Installing
INSTALLATION INSTRUCTIONS
 INSTALLATION INSTRUCTIONS Accessory Application Publications No. AII 24642 BODY SIDE CLADDING 2003 CR-V P/N 08P21-S9A-100 Issue Date OCT 2002 PARTS LIST Right rear bumper piece Right front fender piece
Thank you for purchasing the Blackstone Models K-27!
 Operations Manual Thank you for purchasing the Blackstone Models K-27! Before your Mudhen whistles off, we want to tell you about a few things that will enhance your operating experience and ensure that
M-9603-FST FOCUS ST COLD AIR INTAKE KIT INSTALLATION INSTRUCTIONS
 M-9603-FST Please visit www.fordracingparts.com for the most current instruction information.!!! PLEASE READ ALL OF THE FOLLOWING INSTRUCTIONS CAREFULLY PRIOR TO INSTALLATION. AT ANY TIME YOU DO NOT UNDERSTAND
WARNING. BX Saturn Vue and Redline Chevy Captiva (All Models) Installation Instructions
 Installation Instructions") Attachment Tab Height: 21-1/2 Attachment Tab Width: 18-1/2 Please read BOTH these and the General Information sheet prior to installing or operating this equipment. 1. Blue Ox towing products and accessories
Attachment Tab Height: 21-1/2 Attachment Tab Width: 18-1/2 Please read BOTH these and the General Information sheet prior to installing or operating this equipment. 1. Blue Ox towing products and accessories
Railsounds Commander Instruction Manual
 Railsounds Commander Instruction Manual Revised: October 2009 Railsounds Commander Kit Cool Features Combines Railsounds 4.0 standard hardware with next generation technology Compact size, uses Railsounds
HO Scale AC-12 Gear Box Replacement Instructions
 HO Scale AC-12 Gear Box Replacement Instructions Introduction Thank you for your purchase of the HO Scale AC-12 from InterMountain Railway Company. The enclosed gear box kit will increase the speed of
INSTALLATION INSTRUCTIONS
 INSTALLATION INSTRUCTIONS Accessory Application Publications No. CIVIC All 30175-31616 2 AND 4-DOOR P/N 08E10-SNA-100 Issue Date DEC 2005 NOTE: The interior illumination lights cannot be installed on 2-door
Tsunami Digital Sound Decoder Installation Guide
 Tsunami Digital Sound Decoder Installation Guide for the New User Software Release 1.00 Rev. A 11/18/05 Notice The information in this document is subject to change without notice. SoundTraxx (Throttle
 INSTALLATION INSTRUCTIONS Accessory Application Publications No. 2010 CIVIC All 42479 2- AND 4-DOOR P/N 08E10-SNA-110 Issue Date AUG 2009 NOTE: The interior illumination lights cannot be installed on 2-door
SEARAILS RR-XXX STEAM LOCOMOTIVES ASSEMBLY MANUAL
 SEARAILS RR-XXX 0-4-0 STEAM LOCOMOTIVES ASSEMBLY MANUAL 30 March 2015 T R Knapp Model Engineering 1 This diagram shows basic assembly of Nn3/Z Porter 0-4-0T 2 This diagram shows basic assembly of Baldwin
WARNING. BX Suzuki Grand Vitara Installation Instructions. Bolt Torque Specifications. Bolt Torque Specifications
 Attachment Tab Height: 21-1/2 Attachment Tab Width: 24 Please read BOTH these and the General Instructions prior to installing or operating this equipment. 1. Blue Ox towing products and accessories are
INSTALLATION INSTRUCTIONS
 INSTALLATION INSTRUCTIONS Accessory S P/N 08E10-TK6-100 Application 2013 FIT Publications No. AII 13198 Issue Date JULY 2012 PARTS LIST Ambient light kit 2 Ambient lights 6 Wire ties Fuse label 2 Grommets
Tsunami Digital Sound Decoder Quick Start Guide
 Tsunami Digital Sound Decoder Quick Start Guide for the Experienced User Software Release 1.00 Rev. A 11/15/05 Notice The information in this document is subject to change without notice. SoundTraxx (Throttle
DH163PS Fits Many DCC-Ready HO Locomotives
 Digitrax Command Control Run Your Trains, Not Your Track! DH163PS Fits Many DCC-Ready HO Locomotives HO Scale Mobile Decoder DCC Plug N Play with 1.25 Harness 1.5 Amp/2 Amp Peak 6 FX3 Functions, 0.5 Amp
Raxiom Mustang Headlights (94-98) - Installation Instructions
 - Installation Instructions") Raxiom Mustang Headlights (94-98) - Installation Instructions The below installation instructions work for the following products: Dark Smoked Mustang Headlights (94-98) Raxiom Chrome Mustang Headlights
Raxiom Mustang Headlights (94-98) - Installation Instructions The below installation instructions work for the following products: Dark Smoked Mustang Headlights (94-98) Raxiom Chrome Mustang Headlights
BX Honda CR-V Installation Instructions
 Attachment Tab Height: 15.5 Attachment Tab Width: 24 Serial Number Please read BOTH these and the General Instructions prior to installing or operating this equipment. 1. Blue Ox towing products and accessories
COBB SF SHORT RAM INTAKE SYSTEM MazdaSpeed3
 COBB SF SHORT RAM INTAKE SYSTEM MazdaSpeed3 Congratulations on your purchase of the COBB Tuning SF Intake System. The following instructions should assist you through your installation process. Please
Installing a TCS FL4 into the Eureka CTH Ben O Malley
 Please note, this modification requires soldering skill at board level and involves removing surface mount components. This modification will also void your warranty and all responsibility resides with
Instructions for DH142 Series Decoder Installation DH142, DH142P, DH142PS, DH142AT. DH142 Series 1.5 Amp Digital Command Control Decoder
 Instructions for DH142 Series Decoder Installation DH142, DH142P, DH142PS, DH142AT R 450 Cemetery ST #206 Norcross, GA USA 30071 (770)441-7992 FAX (770)441-0759 Web Site: http://www.digitrax.com Digitrax
INSTALLATION INSTRUCTIONS
 INSTALLATION INSTRUCTIONS Accessory Application Publications No. 3RD ROW AII 27366 ODYSSEY Issue Date P/N 08R12-SHJ-100 SEP 2004 PARTS LIST Left side rear sunshade Driver s Side 1. Remove the left speaker
INSTALLATION INSTRUCTIONS
 INSTALLATION INSTRUCTIONS Accessory Application Publications No. 3RD ROW P/N 08R12-SHJ-100 2006 ODYSSEY AII 30563-31117 Issue Date OCT 2005 PARTS LIST Left side rear sunshade Driver s Side 1. Remove the
INSTALLATION INSTRUCTIONS
 INSTALLATION INSTRUCTIONS Accessory Application Publications No. P/N 08E49-S2A-100 2004 S2000 AII 26325 Issue Date OCT 2003 PARTS LIST Hood switch harness TOOLS AND SUPPLIES REQUIRED #2 Phillips screwdriver
Cummins 6.7L High Flow Intake Plenum Cover PLEASE READ ALL INSTRUCTIONS BEFORE INSTALLATION
 U 4 February 2016 1041564 6.7L Performance Intake Plate Manual (I-00371) 1 Cummins 6.7L High Flow Intake Plenum Cover 1041564 2008-2016 6.7L RAM 2500-3500 Pickup PLEASE READ ALL INSTRUCTIONS BEFORE INSTALLATION
INSTALLATION INSTRUCTIONS
 INSTALLATION INSTRUCTIONS Accessory Application 2012 CIVIC 4-DOOR Publications No. AII 45625-46263 Issue Date MAY 2011 PARTS LIST Trunk spoiler Left trunk spring (marked yellow) Template 4 Clip grommets
Mustang CDC Lightbar (94-04) - Installation Instructions
 - Installation Instructions") Mustang CDC Lightbar (94-04) - Installation Instructions The below installation instructions work for the following products: Classic Design Concepts Mustang Convertible Lightbar (94-04 Carbon Fiber) Classic
Mustang CDC Lightbar (94-04) - Installation Instructions The below installation instructions work for the following products: Classic Design Concepts Mustang Convertible Lightbar (94-04 Carbon Fiber) Classic
IMPORTANT: PLEASE KEEP THIS INSTRUCTION MANUAL FOR FUTURE REFERENCE! TOOLS REQUIRED
 IMPORTANT: PLEASE KEEP THIS INSTRUCTION MANUAL FOR FUTURE REFERENCE! 2014-15 Toyota Tundra Mesh Grille Upper Insert - Fits ALL model Tundras with chrome or painted factory grille surround Black Mesh Part
HIGH FLOW COLD AIR INTAKE SYSTEM INSTALLATION INSTRUCTIONS D , D A
 HIGH FLOW COLD AIR INTAKE SYSTEM INSTALLATION INSTRUCTIONS D760-0320, D760-0320A 1992-95 325i, is 1995 M3 (3.0L) Parts List: 1 Intake Tube 1 Silicone Hose 1 Air Flow Meter Bracket 1 Hose Clamp (#36z) 1
Upgrading Proto axle Geeps with Stewart Trucks. November 27, 2010 Mark Schutzer
 Upgrading Proto 2000 4 axle Geeps with Stewart Trucks November 27, 2010 Mark Schutzer Introduction Several years ago Proto 2000 made a bunch of 4 axle locomotives that used trucks that were a copy of an
Gauge Wiring Instructions
 Thank you for purchasing the Track Dog Racing Gauges. These instructions are for wiring the Westach brand gauges with the TDR gauge panel for all model years of the Miata. Refer to the installation instructions
Preparation IMPORTANT! BMW K 1600 GTL EXCLUSIVE ONLY. Assembly:
 BMW K 1600 GT BMW / GTL K 1600 / EXCLUSIVE GTL EXCLUSIVE SEAT INSTALLATION ADDENDUM SHEET GUIDE BMW K 1600 GTL EXCLUSIVE PRE-INSTALLATION INSTRUCTIONS Preparation IMPORTANT! BMW K 1600 GTL EXCLUSIVE ONLY
INSTALLATION INSTRUCTIONS
 INSTALLATION INSTRUCTIONS Accessory Application Publications No. UNDER 2007 CIVIC SI All 33529 Issue Date AUG 2006 PARTS LIST Rear under spoiler Clip Rubber washer 6 Flange bolts 6 Flange nuts TOOLS REQUIRED
Remove the 3-11mm nuts holding mirror on. Don t drop the nuts!
 2005-2012 Ford Mustang Puddle Lamp Kit Parts List: Quantity: Tool List: LED Lamps 2 Flat head screwdriver Seals 2 Ratchet & Socket set OR Nuts 2 Adjustable Wrench Wiring harness 1 Drill & 11/16 th bit
Mustang CLASSIC LIGHT BAR INSTALLATION INSTRUCTIONS CDC #
 1990-1993 Mustang CLASSIC LIGHT BAR INSTALLATION INSTRUCTIONS CDC # 101000 Kit Components: 1 Light Bar 4 Bolts ( 5 / 16-18 x 2.5 ) #182010 4 Washer #182005 4 Shims #182009 2 Dark Blue Connectors #182004
6.7L Dodge Cummins Performance Intake Plate Instruction Manual PLEASE READ ALL INSTRUCTIONS BEFORE INSTALLATION
 U 28 March 2013 1041562 6.7L Performance Intake Plate Manual 1 6.7L Dodge Cummins Performance Intake Plate Instruction Manual P/N# 1041562 6.7L Dodge Cummins Grid Heater PLEASE READ ALL INSTRUCTIONS BEFORE
Subaru Front Mount Intercooler Kit STI Subaru Front Mount Intercooler Kit STI
 Subaru Front Mount Intercooler Kit STI 2008-2014 715500 Subaru Front Mount Intercooler Kit STI 2008-2014 Congratulations on your purchase of the Subaru Front Mount Intercooler Kit STI 2008-2014. The following
SAFETY SENSORS FIELD OF VIEW WILL BE ALTERED WITH USE OF THE REPLACEMENT BUMPER. Injury hazard
 SAFETY Your safety and the safety of others is very important. In order to help you make informed decisions about safety, we have provided installation instructions and other information. These instructions
INSTALLATION INSTRUCTIONS
 INSTALLATION INSTRUCTIONS Accessory P/N 08E10-TA0-110A Application 2012 ACCORD 2- AND 4-DOOR Publications No. AII 46501 Issue Date AUG 2011 PARTS LIST Ambient Light Kit Fuse label 2 Ambient lights Washer
INSTALLATION INSTRUCTIONS
 INSTALLATION INSTRUCTIONS Accessory Application Publications No. CIVIC AII 24171 S 2- AND 4-DOOR Issue Date (DX, HX) AUG 2002 NOTE: Fog Lights cannot be installed if the vehicle is equipped with an optional
3/8 Universal Joint Phillips Head Screwdriver
 Magnetic retrieval tool Pliers 1/4 Ratchet Drive T-35 Torx Socket 3/8 Ratchet Drive 5mm Allen Head Socket Torque Wrench 7-3/8 Drive Extension Flat Head Screwdriver 10mm Socket 8mm Socket 3/8 Universal
INSTALLATION INSTRUCTIONS
 INSTALLATION INSTRUCTIONS Accessory Application Publications No. CD CHANGER ATTACHMENT KIT 2005 CIVIC SI AII 27936 Issue Date AUG 2004 PARTS LIST CD Changer Attachment Kit (sold separately): P/N 08B26-S5T-100
This year Märklin have released a coach which has included LED lighting with a currentconducting close coupler (single pole)
") Hi All, Over the past few months I have been working at a steady pace to install LED lighting in my passenger coaches. The coach lighting must have LED lights to reduce power consumption on the layout
Hi All, Over the past few months I have been working at a steady pace to install LED lighting in my passenger coaches. The coach lighting must have LED lights to reduce power consumption on the layout
INSTALLATION INSTRUCTIONS
 INSTALLATION INSTRUCTIONS Accessory Application Publications No. CASSETTE PLAYER 2000 ACCORD (EX) 2- AND 4-DOOR All 20497 Issue Date JULY 1999 PARTS LIST Cassette Player Attachment Kit Except V6: P/N 08B12-S84-100
INSTALLATION INSTRUCTIONS
 INSTALLATION INSTRUCTIONS Accessory Application Publications No. S CIVIC 2 AND 4-DOOR (EX, LX) AII 24188 Issue Date AUG 2002 NOTE: Fog Lights cannot be installed if the vehicle is equipped with an optional
Amp & Speaker Upgrade Install Instructions for Victory Cross Country
 Amp & Speaker Upgrade Install Instructions for Victory Cross Country Tools Needed: 13mm Socket 4mm Ball Head Allen Socket 5mm Allen Wrench 10mm Wrench Wire Cutters Wire Strippers Phillips Screwdriver Pocket
2015+ EcoBoost F150 & Raptor Intercooler Install
 2015+ EcoBoost F150 & 2017+ Raptor Intercooler Install Note: This entire job can be performed with the truck on the ground - No need to raise the vehicle. The most difficult part is removing the grille
PRELIMINARY INSTALLATION INSTRUCTIONS. PARTS LIST Attachment Kit(sold separately): P/N 08B23-S9V-100B. Display bracket.
: P/N 08B23-S9V-100B. Display bracket.") INSTALLATION INSTRUCTIONS Accessory Application Publications No. in- ENTERTAINMENT SYSTEM 2006 PILOT All 30502 Issue Date SEP 2005 PARTS LIST Attachment Kit(sold separately): P/N 08B23-S9V-100B Display
INSTALLATION INSTRUCTIONS Accessory Application Publications No. in- ENTERTAINMENT SYSTEM 2006 PILOT All 30502 Issue Date SEP 2005 PARTS LIST Attachment Kit(sold separately): P/N 08B23-S9V-100B Display
Four Panel Amber LED Front Light Kit Installation Guide
 Four Panel Amber LED Front Light Kit Installation Guide Kit Contents: 2 LED panels 4 socket plugs 1 cut out template PN 2100886 Please refer to webiste for full warranty information. DIGI-TAILS is not
INSTALLATION INSTRUCTIONS
 INSTRUCTIONS Accessory Application Publications No. SIDE 2008 CIVIC 4-DOOR All 37741 Issue Date AUG 2007 PARTS LIST Left side under spoiler Right side under spoiler 2 Side lower brackets The side lower
FOG-LAMPS INSTALL KIT
 FOG-LAMPS INSTALL KIT DODGE RAM (BR, BE) Installation Instructions Read entire instructions thoroughly before starting. For proper removal and installation, follow procedures in the service manual. NOTES:
INSTALLATION INSTRUCTIONS
 COLD AIR INTAKE INSTALLATION INSTRUCTIONS PART NUMBER D760-0620 & D760-0621 PARTS LIST APPLICATION: 9/98-2003 E39 540i 4.4L 4" Intake Tube Air Filter w/ clamp Silicone Hose 80-100mm Hose Clamp 90-110mm
WARNING Acura MDX Installation Instructions BX1015. Serial Number
 Please read BOTH these and the General Instructions before attempting to install or operate this equipment. 1. Blue Ox towing products and accessories are intended to be installed by Blue Ox Dealers who
INSTALLATION INSTRUCTIONS
 INSTALLATION INSTRUCTIONS Accessory Application Publications No. AII 27367 HITCH 2005 ODYSSEY Issue Date DEC 2004 NOTE: An optional heavy-duty power steering cooler, ATF cooler and air duct are required
INSTALLATION INSTRUCTIONS
 INSTALLATION INSTRUCTIONS Accessory Application Publications No. THIRD-ROW P/N 08R12-SHJ-100 2008 ODYSSEY AII 38141 Issue Date OCT 2007 PARTS LIST Left rear sunshade Driver s Side 1. Remove the spare tire
 INSTALLATION INSTRUCTIONS Accessory ACCESSORY HANDSFREELINK (WITH MOON) Application 2009 PILOT Publications No. AII 39492 Issue Date MAY 2008 PARTS LIST HFL Attachment Kit 2 Washer screws, 4 x 12 mm HFL
INSTALLATION INSTRUCTIONS
 INSTALLATION INSTRUCTIONS Accessory Application Publications No. CD CHANGER ATTACHMENT KIT 2004 CR-V AII 26118 Issue Date SEP 2003 PARTS LIST CD Changer Attachment Kit (sold separately): P/N 08B26-S9A-100
LGT-306L / LB Club Car Precedent LED Light Bar Bumper Kit Installation Instructions
 LGT-306L / LB Club Car Precedent LED Light Bar Bumper Kit Installation Instructions Caution: Please read through the instructions carefully. Before starting this project, remove the system s positive and
 INSTALLATION INSTRUCTIONS Accessory Application Publications No. 2009 CIVIC HYBRID All 40191 Issue Date AUG 2008 PARTS LIST Rear under spoiler 2 Step bolts 4 Self-tapping screws TOOLS REQUIRED Phillips
INSTALLATION INSTRUCTIONS
 INSTALLATION INSTRUCTIONS Accessory P/N 08U89-TK6-111 Application 2012 FIT Publications No. AII 45981 Issue Date AUG 2011 PARTS LIST Armrest console Armrest cover Bolt cover Floor bracket Washer bolt,
Operation and care of the Visual Optics Fiber Scopes
 Operation and care of the Visual Optics Fiber Scopes Congratulations on buying a high quality product from Visual Optics, Inc. We take pride in not only selling our products but serving and reacting to
ATLAS HARNESS. Plug and play wiring harness $12.95
 ATLAS HARNESS Plug and play wiring harness $12.95 Converts D408SR decoder to a plug and play decoder for: Weaver 2-8-0 and New Haven I-5 Atlas (new)sw8/9, RS1, C44-9, SD35, C40-8, and other locomotives
 INSTALLATION INSTRUCTIONS Accessory Application Publications No. AII 38133-38406 HITCH 2008 ODYSSEY Issue Date NOV 2007 NOTE: A required heavy-duty power steering cooler, ATF cooler and air duct are required
INSTALLATION INSTRUCTIONS
 INSTALLATION INSTRUCTIONS Accessory Application Publications No. P/N 08V31-SDN-100 2004 ACCORD 2-DOOR AII 25735 Issue Date SEP 2003 NOTE: The outside temperature gauge can not be installed in a vehicle
Please read BOTH these Installation Instructions and the General Towing Instructions before attempting to install or operate this equipment.
 Serial Number (No S, Clubman or Convertible) (Manual Transmission Only) Please read BOTH these and the General Towing Instructions before attempting to install or operate this equipment. 1. Blue Ox towing
INSTALLATION INSTRUCTIONS
 INSTALLATION INSTRUCTIONS Accessory Application Publications No. SYSTEM 2005 ACCORD All 27511 (DX, LX) 2-AND 4-DOOR Issue Date AUG 2004 PARTS LIST Security System Attachment (LX): P/N 08E55-SDA-100A Unit
OPTIMAX RADIANT FIELD RETROFIT INSTRUCTIONS
 OPTIMAX RADIANT FIELD RETROFIT INSTRUCTIONS 99-24283-I001 Table of Contents 1. 24V LED Approved Drivers 5 1.1. 24V LED Driver (60-19910-0002).. 5 2. Optimax Radiant 24V LED Lighting. 6 2.1. OP30 6 2.2.
INSTALLATION INSTRUCTIONS
 INSTALLATION INSTRUCTIONS Accessory Application Publications No. AII 23092 KIT CR-V P/N 08A55-S9A-100 Issue Date NOV 2001 PARTS LIST 2 Tweeters INSTALLATION Customer Information: The information in this
Please read BOTH these Installation Instructions and the General Instructions prior to installing or operating this equipment.
 Attachment Tab Height: 13-1/2 Attachment Tab Width: 23 Serial Number Please read BOTH these and the General Instructions prior to installing or operating this equipment. 1. Blue Ox towing products and
2010+ Audi B8 S4/S5 3.0T S-FLO Intake Kit INSTALLATION GUIDE FOR RACING USE ONLY
 INSTALLATION GUIDE 2010+ Audi B8 S4/S5 3.0T S-FLO Intake Kit FOR RACING USE ONLY Congratulations on your purchase of the AWE Tuning S-FLO Intake for the 2010+ Audi B8 S4 and B8 S5 3.0T. Exquisite build
INSTALLATION INSTRUCTIONS
 INSTALLATION INSTRUCTIONS Accessory Application 2011 RDX Publications No. BII 43544 Issue Date JULY 2010 PARTS LIST 2 Bolts, 12 x 40 mm Trailer Hitch Kit P/N 08L92-STK-200A Trailer hitch Hitch pin Hitch
INSTALLATION INSTRUCTIONS
 INSTALLATION INSTRUCTIONS Accessory Application Publications No. BII 37518 2008 RDX Issue Date JUL 2007 PARTS LIST 10 Plain washers, 12 mm Trailer Hitch Kit P/N 08L92-STK-200 Trailer hitch 6 Lock washers,
Front aero bumper Lower grille Right air spoiler. Left air spoiler Bolts (15) Self-tapping screws (8)
 Self-tapping screws (8)") INSTALLATION INSTRUCTIONS Parts List AERO ACCORD FEB. 2008 Front aero bumper Lower grille Right air spoiler Left air spoiler Bolts (15) Self-tapping screws (8) Nuts (10) Tools and Supplies Required Phillips
INSTALLATION INSTRUCTIONS Parts List AERO ACCORD FEB. 2008 Front aero bumper Lower grille Right air spoiler Left air spoiler Bolts (15) Self-tapping screws (8) Nuts (10) Tools and Supplies Required Phillips
BX1306. Please read BOTH these Installation Instructions and the General Towing Instructions before attempting to install or operate this equipment.
 Serial Number Please read BOTH these and the General Towing Instructions before attempting to install or operate this equipment. 1. Blue Ox towing products and accessories are intended to be installed
LocoMatic type2d DIESEL Sound & Control for AC or DC track power by. AC or DC TRACK POWERED SOUND & CONTROL SYSTEM - DIESEL LOCOMOTIVES
 LocoMatic type2d DIESEL Sound & Control for AC or DC track power by instructions, rev1 CAUTION: this device can be damaged by static discharge. please exercise care during installation to avoid this possibility.
INSTALLATION INSTRUCTIONS
 INSTALLATION INSTRUCTIONS Accessory Application 2010 RDX Publications No. BII 41807 Issue Date JULY 2009 PARTS LIST 2 Bolts, 12 x 40 mm Trailer Hitch Kit P/N 08L92-STK-200A Trailer hitch Hitch pin Ball