BRL-007 Detailing and Conversion Kit for NOVO/Triang Class 35 Hymek. Building Instructions
|
|
|
- Dale Dawson
- 5 years ago
- Views:
Transcription


1 Peter Besant Tel BRL-007 Detailing and Conversion Kit for NOVO/Triang Class 35 Hymek Building Instructions SCALE MODEL PRODUCT FOR ADULT MODELLERS ONLY. WHITE METAL CONTAINS LEAD - WASH HANDS AFTER USE. MAY CONTAIN SMALL PARTS. ETCHED BRASS HAS FUNCTIONAL SHARP EDGES - HANDLE WITH EXTREME CARE
2 Thank you for purchasing this kit. This instruction pack should provide a guide for building this model given some experience of soldering and the basics of etched kit construction. Please read all the pack before starting to build. Drawings and photos are essential for builders to acquaint themselves with the prototype they wish to model. This instruction pack should provide an easy to follow guide when converting the Triang/Novo Hymek toy to a highly detailed scale model. It is worth mentioning at the outset that when obtaining a Triang/Novo Hymek if possible buy the Triang one. This is because the Novo version was made from a plastic that is brittle and difficult to file, cut and drill. The Triang version is recognisable by having the words Blue Flier embossed on the sides whereas the Novo version has a rectangular raised section in its plate. For builders of modern image in 7mm, consider joining MIGO+1, the Modern Image Gauge 0/1 organisation. For more details see the MIGO+1 Transfers are available from Fox Transfers. 2
3 MOTOR BOGIES. Introduction. The motor bogies in this range of models are of a standard type with an inner U section chassis and outer cosmetic bogie sideframes. The steel wheels have a small nylon bush at one end of the axle to allow pick up via the live chassis. The model will run on one motor but for increased traction and better adhesion, the use of two motors plus a Delrin chain set is recommended. When assembling the bogies remember that although the motors as supplied have fixing screws, the motor body may not be tapped to take them. See Motors, Gears and Delrin. Ensure that the insulated wheels on bogie one are opposite those on bogie two. Construction. The Chassis. Bearings and Wheels Motors, Gears and Delrin Sideframes and Castings. The Chassis. Fold the chassis e1 noting that the bulkhead is an integral part and is folded and soldered where marked by the half etched lines on the chassis. Now the saddles e2 and e6 can be folded and soldered into place noting that these determine the wheelbase of 74.5mm and the bogie centre dimension of 178mm relates to a point halfway between the axles on the two bogies. The pivot overlay e9 can now be folded and soldered on the top as shown, however if the body sits too high, it may be necessary to omit this item. The key to decide this is that the buffers are the correct height above the rail. Bearings and Wheels. For the wheels to be true and level, the top hat bearings must be soldered in on a flat surface such as a piece of plate glass. The bearing holes may need enlarging and a tapered reamer is ideal for this. Fit the bearings and wheels and when happy that everything is true and square, solder into place. The pin points on the axles have to be removed until they are flush with the wheels. Remember when fitting wheels that the fibre washers are placed at the insulating wheel end to prevent shorting. Motors, Gears and Delrin. (Not supplied in kit) The can motors as supplied have fixing screws but the motor body may not be tapped to take them. Dismantling them is an easy task as described below. Simply remove the brushes and springs from top of motor and prise back the two securing lugs. Pull up the motor top and remove the armature noting the number of packing washers under it. Tap the holes 2.5mm and be sure to remove all the swarf. Re-assembly is the reverse of above. Now check that the fixing holes in chassis top line up with motor and enlarge if necessary. The brass sleeve m9 fits inside the steel worm m10 ensuring that it is proud by 2.5mm at the shouldered end. For the worm to grip onto the motor shaft, use a 3/32 drill and bore a hole through the brass sleeve in the side of the worm and tap 6BA. 3
4 By enlarging the hole in the chassis top, the motor complete with worm can be fitted or removed with ease. Fit the motor followed by driving axle and brass gear m11 adjusting as necessary to produce a good mesh. Sometimes, inserting a shim of scrap brass between one end of the motor and saddle can improve this. Fix solder tags m2 to inside ends of chassis. Before continuing it is advisable to test the bogies. Fit wheels, attach wires and couple up to a nylon terminal block. If the motors turn in different directions swap the motor wires on one bogie. Note : Do not fix the Delrin cogs at this stage as once in place they are not easily removed, and if fitting brake shoes see sideframes and castings before painting the chassis and fitting Delrin. The chassis can now be dismantled and along with the wheels, painted before final assembly. If fitting Delrin note: - that the cogs are in line with the bulkhead cut-outs - you may have to file either the shank of the cog or the inner face of the bearing if there is insufficient room on the driving axle. The bogies can now be reassembled. Useful Tip : Use Loctite Lock n seal to prevent the wheels unscrewing. Side frames and Castings. Study the sideframes c7 and open out any holes that are not formed completely. The crossbrace c8 fits into holes at the ends of the sideframes and the rectangular section sits inside the ends of the chassis e1. The leaf spring c9 sits centrally on the sideframe below the raised area and is soldered from behind. Fit the air cylinders c10 where shown and the sandboxes c11 which are handed. The bogie steps c12 fit next to the axleboxes and should line up with the cab door on the body. If fitting brake shoes, note that there are some with cylinders, c14 and some without, c13. The ones with the cylinders (c14) fir on the outer ends of the bogies. They can either be soldered to the rear of the side frames, or by using 0.7mm wire and referring to A1 & A2, built up as follows. Drill though the shoes as shown at A2 using a.7mm drill then place the shoes in position on the chassis ensuring there is adequate clearance and drill through as shown at A1. Fit.7mm wire, trial fit shoes then solder into position. Note that if fitting Delrin chain, it is preferable to fit the shoes onto the sideframes. After painting the completed sideframes, solder to the chassis ensuring the axleboxes line up with wheels both vertically and horizontally. Now the completed bogies can be laid to one side until the body conversion is complete. Body Conversion. As previously mentioned, use the Triang body as this is made from a type of plastic that is easier to work on. Unscrew the roof, unclip the cab window assemblies and fuel tanks and discard both bogies by drilling out the rivets. Bodyshell Looking at the now dismantled body, start by removing the Blue Flier name/rectangular raised plate from the bodyside. Now the moulded handrails can be chiselled away ( a small sharpened screwdriver is ideal for this) to reveal the recesses below. Cut off the marker lights and cab front handrails then chain drill and file out the route indicator box. Looking at the body from underneath, remove the battery housings by chain drilling and filing but retain the centre section for rigidity. The cab floors can now be removed by the same method, retaining the bulkheads. Bufferbeam castings c2 needs studying before 4
5 removing the old ones from the body. Drill out the engine room windows and open out the step holes beneath the cab doors to 8mm x 4mm. Moving on to the cab ends, remove the moulded handrails from the sides, then the moulded roof horns and vents. If using a flush glazing kit, chamfer the inside window frames and trial fit. Several apertures have to be drilled out and filed on the roof, and the illustration shows their position. The circular holes are 5mm in diameter, rectangular holes towards B end 5mm x 8mm and rectangular hole towards A end is 5mm x 3mm. The roof fan grille is in the wrong place so cut a card template 38mm in diameter and reposition approx 5mm to the side as shown. Rebuilding. Cut the brass channel to 248mm and fold up, this sits along the bottom of the body, then sand both channel and body before fixing with an epoxy glue (bulldog clips are useful here to hold the parts together). Laminate by soldering the bogie mounting stretchers e4 and e5 together, noting that the sides of e4 are folded up. Solder the nut m4 centrally over the hole on the inside of the pivot box e3 then fold and solder this to e4. With the pivot holes in the top of the chassis being off centre allow for this when fitting the completed bogie stretchers to the body. The bogie centre to centre measurement is 178mm, this being taken from a point halfway between the two axles on each bogie. Finally stick the self adhesive insulating sheet onto the pivot box e3 cutting a hole for the nylon screw. Using a polystyrene cement refix the main roof and cab ends back on to the locomotive, and a piece of 60 thou plasticard to fill the now redundant battery lever slot and file to shape when set. Solder the underframe tank sides c16 and ends c17 together and fix under the body, fitting the bogies into place will help position this. The bufferstocks c1 are drilled out firstly to the diameter of the shank and then to a suitable depth and diameter of the Oleo section. The loop on buffer m1 may need to be carefully drilled out these being provided to accept a wire passed through a hole in the coupling hook and running to each buffer loop preventing the heads from revolving. Solder the stocks into place then fit the buffer beams on to the front of the loco. Some fettling and filing being necessary to achieve a good fit. For extra support for the stocks use the spiders e17 behind the buffer beam. Cut the mesh to fit the repositioned roof van hole and fix into place. The fan blades e10 should be bent to 30 degrees and soldered to the bracket e11 that has strips on either side that are bent down and out to pass under opposite blades of the fan. Position the completed assembly under the mesh with the strips glued to each side of the roof. If you wish to paint the fan, leave the assembly off until the model is painted then glue into place. Fill in the screw holes on the roof and add the rectangular roof vents c23 where shown, fit the marker lights c19 onto the cab fronts and prepare the model for painting. After painting the remaining detail can be added starting with the buffer beam. Fit the buffers as described above, followed by the air pipes c3, m.u. terminals c4, steam heat pipes c5, vacuum pipes c6, lamp brackets c20 and drawbar plates e13 where indicated. If screw couplings (which are extra) are used, they are assembled with the spring and split pin behind the bufferbeam. The air tank c15 fits behind the buffer beam drilling two holes into the floor. Drill holes into the cab roof and fit the cab roof vent c22 and the roof horns c21 where indicated. Fit the glazing and add the engine room windows, then make and fit handrails, door handles, and windscreen wiper blades from nickel silver wire. Back the route indicators with black plasticard and apply running numerals. Interior detail can be 5
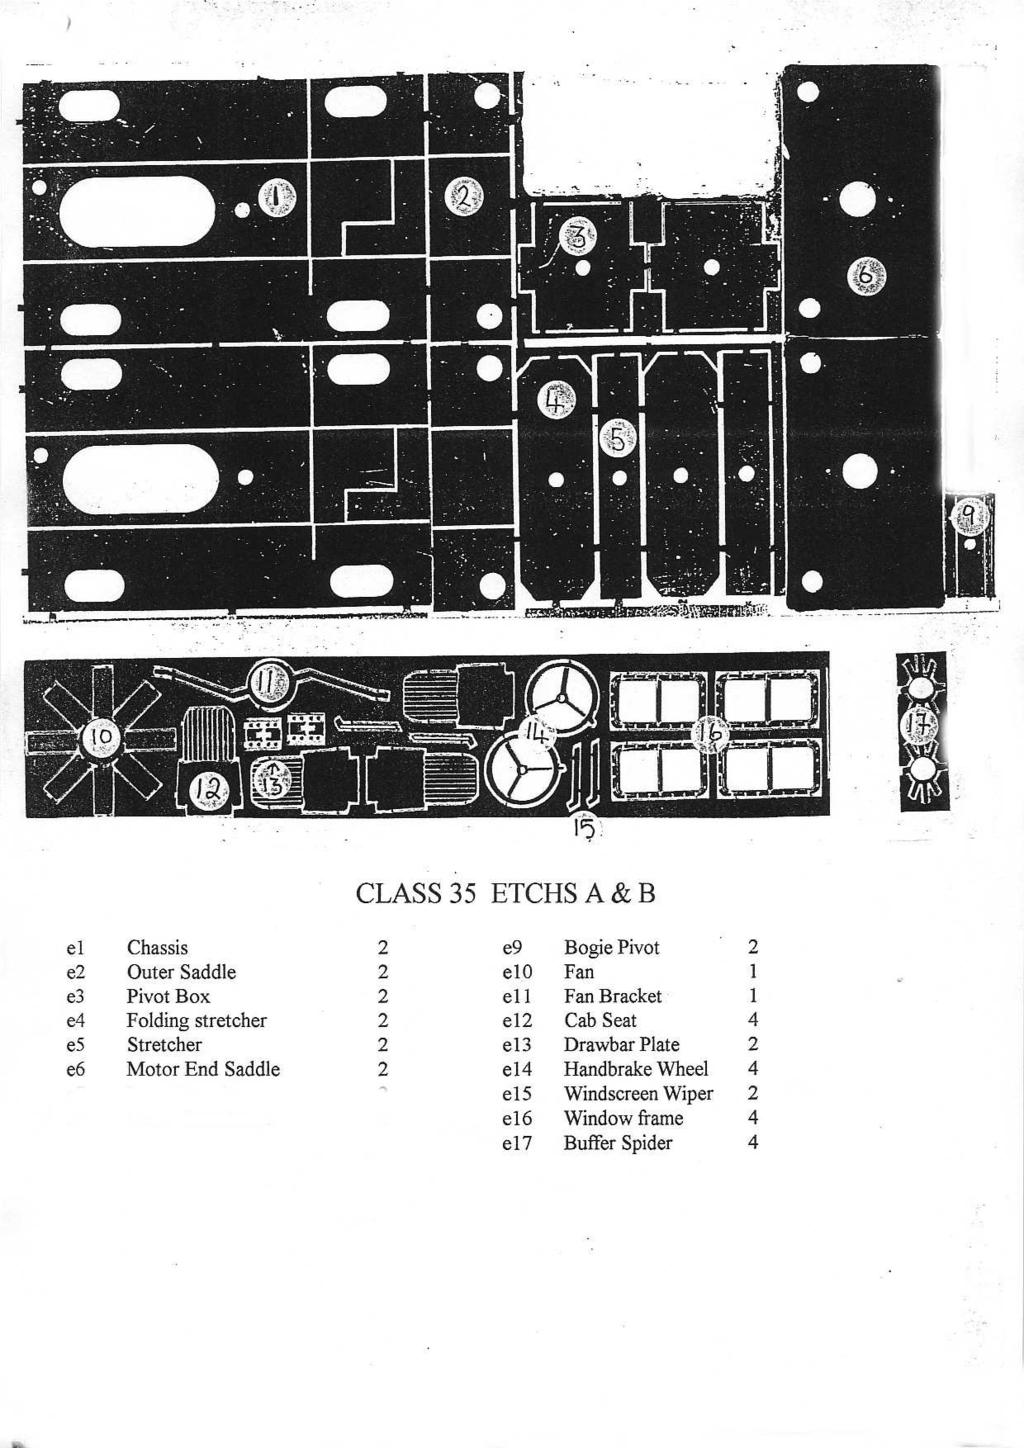
6 added by fixing the seats e12 and bases c18 together then fixing to the floors, made from plasticard or hardboard. CLASS 35 ETCHS A & B e1 Chassis 2 e9 Bogie Pivot 2 e2 Outer Saddle 2 e10 Fan 1 e3 Pivot Box 2 e11 Fan Bracket 1 e4 Folding stretcher 2 e12 Cab Seat 4 e5 Stretcher 2 e13 Drawbar Plate 2 e6 Motor End Saddle 2 e14 Handbrake Wheel 4 e15 Windscreen Wiper 2 e16 Window frame 4 e17 Buffer Spider 4 Class 35 - the Castings c1 Bufferstock 4 c2 Bufferbeam 2 c3 Airpipe 2 sets c4 m.u. terminal 2 sets c5 Steam heat pipe 2 c6 Vacuum pipe 2 c7 Bogie Sideframe 4 c8 Crossbrace 4 c9 Leaf Spring 4 c10 Air Cylinder 8 c11 Sandbox 4RH & 4LH c12 Step 4 c13 Brake shoe 4RH & 4LH c14 Brake shoe with Cyl.4RH & 4LH c15 Air Tank 2 c16 U/F tank side 2 c17 U/F tank end 2 c18 Cab seat base 4 c19 Marker light 4 c20 Lamp Bracket 4 c21 Cab roof horn 4 c22 Cab roof vent 2 c23 Rect. Roof vent 2 6
7 Class 35 - Miscellaneous Parts M1 Lost wax buffer with spring 4 M9 Steel worm (extra to kit) M2 Solder Tag 2 M10 Brass Gear (extra to kit) M3 Nut & Bolt for above 2 M11 Delrin Chain (extra to kit) M4 Pivot box Nut 2 M12 Delrin Cog (extra to kit) M5 Nylon Screw 2 M13 Insul Pad M6 Brass wheel Bearing 8 M14 Steel wheel 3 9 (extra to kit) M7 Can motor (extra to kit) 2 M15 Axle with ins. Wheel (extra to kit) M8 Brass Sleeve (extra to kit) 2 Not illustrated: Brass channel, clear plastic, fibre washers, motor fixing screws, mesh. Worm and gear screws. 7
8 8
9 9


10 10
11 11
12 12
13 13
14 14
15 15
BRL CLASS 66 LOCOMOTIVE. Building Instructions
 Tel 07807225801 prmrp@fsmail.net www.prmrp.com BRL - 066 CLASS 66 LOCOMOTIVE Building Instructions SCALE MODEL PRODUCT FOR ADULT MODELLERS ONLY. WHITE METAL CONTAINS LEAD WASH HANDS AFTER USE. MAY CONTAIN
BRL-142/143 Class 142/143. Building Instructions
 Peter Besant Tel 07807225801 prmrp@fsmail.net www.prmrp.com BRL-142/143 Class 142/143 Building Instructions SCALE MODEL PRODUCT FOR ADULT MODELLERS ONLY. WHITE METAL CONTAINS LEAD WASH HANDS AFTER USE.
Heljan EM Finescale Conversion.
 Heljan 02 2-8-0 EM Finescale Conversion. Before you start, it is a good idea to have some small containers or snap top poly bags to put screws and components in for safe keeping...much better than crawling
Finney7 BEYER PEACOCK BUILT LOCOMOTIVE
 BEYER PEACOCK BUILT LOCOMOTIVE Fig 1. Beyer, Peacock Built Locomotive Nos. 415-426 Depicted as built with short tanks, blower valve on the left, small dome, low tank front, 3 0 trailing wheels, snap head
Hornby GWR Star Class EM Finescale Conversion.
 Hornby GWR Star Class EM Finescale Conversion. Before you start, it is a good idea to have some small containers or snap top poly bags to put screws and components in for safe keeping...much better than
1. Invert the tender, and hold in a suitable device. We use a foam cradle the Peco loco service cradle being ideal.
 Bachmann J11 EM Finescale Conversion Before you start, it is a good idea to have some small containers or snap top poly bags to put screws and components in for safe keeping...much better than crawling
NSWGR C LOCOMOTIVE AND TENDER KIT
 Australian Railway Kits ABN: 27 416 246 418 Incorporating Main West Models Manufacturers, Wholesalers and Retailers of Quality Australian Model Railways PO Box 252 Warwick, Queensland, 4370 Australia Phone/Fax:
Bachmann GWR Earl (Dukedog) EM Finescale Conversion
 EM Finescale Conversion") Bachmann GWR Earl (Dukedog) EM Finescale Conversion Before you start, it is a good idea to have some small containers or snap top poly bags to put screws and components in for safe keeping...much better
Bachmann GWR Earl (Dukedog) EM Finescale Conversion Before you start, it is a good idea to have some small containers or snap top poly bags to put screws and components in for safe keeping...much better
4mm scale 009 gauge Lodge Hill & Upnor railway Chattenden Drewry loco body kit.
 RT Models 4mm scale 009 gauge Lodge Hill & Upnor railway Chattenden Drewry loco body kit. HISTORY The loco was supplied by the Drewry car co. to the Lodge Hill & Upnor Railway in 1949, works number 2263.
FINNEY7. 24 Jul 18 A3-4 LNER A3. Fig 1. General Arrangement
 Fig 1. General Arrangement - 4 COUPLING RODS. The coupling rods are now made so that they can be used as a jig to align the hornguides accurately. First drill out all the crankpin holes to a convenient
- 0 Gauge - Southern Railway Class 02 Chassis Construction & Parts Identification
 - 0 Gauge - Southern Railway Class 02 Chassis Construction & Parts Identification I would recommend constructing the body to the fitting of parts 42 before starting chassis construction. As the basic body
FINNEY7. 24 Jul 18 4 LNER A4. Fig 1. A4 GA Drawing
 Fig 1. A4 GA Drawing 24 Jul 18 4 COUPLING RODS & FRAME PREPARATION Coupling rods. The coupling rods are made so that they can be used as a jig to align the horn blocks accurately. First drill out all the
The 2mm Scale Association etched replacement chassis for RTR loco bodies
 The 2mm Scale Association etched replacement chassis for RTR loco bodies Required Parts List Chassis etch (supplied) Motor - for all designs the Association can motor is suitable, alternatives are shown
Mamod SL1K Locomotive Assembly Instructions
 Mamod SL1K Locomotive Assembly Instructions LOCOMOTIVE ASSEMBLY INSTRUCTIONS To ensure ease of construction reference to these instructions are essential. All the major parts are in the front of the box
Motorising Set for Corgi Feltham Tram BEC-KITS) Fitting instructions
 Fitting instructions") Motorising Set for Corgi Feltham Tram The KW Trams (ex BEC-KITS) motorising set for the Corgi Feltham tram contains 2 motorised maximum traction bogies, with link wiring, and 2 bolsters. The following
Motorising Set for Corgi Feltham Tram The KW Trams (ex BEC-KITS) motorising set for the Corgi Feltham tram contains 2 motorised maximum traction bogies, with link wiring, and 2 bolsters. The following
NSWGR Z Tank Locomotive
 Australian Railway Kits ABN: 27 416 246 418 Incorporating Main West Models Manufacturers, Wholesalers and Retailers of Quality Australian Model Railways PO Box 252 Warwick, Queensland, 4370 Australia Phone/Fax:
MKD 08 BR 21.5 TON FLYASH HOPPER. Wagon Kit To cover Vacuum (CSV) and air braked types (CSA)
 and air braked types (CSA)") 1 MKD 08 BR 21.5 TON FLYASH HOPPER. Wagon Kit To cover Vacuum (CSV) and air braked types (CSA) History. Pulverised fuel ash (PFA), know as fly ash which is a by-product from the combustion process in coal
1 MKD 08 BR 21.5 TON FLYASH HOPPER. Wagon Kit To cover Vacuum (CSV) and air braked types (CSA) History. Pulverised fuel ash (PFA), know as fly ash which is a by-product from the combustion process in coal
NSWGR C30T LOCOMOTIVE AND TENDER KIT
 Australian Railway Kits ABN: 27 416 246 418 Incorporating Main West Models Manufacturers, Wholesalers and Retailers of Quality Australian Model Railways PO Box 252 Warwick, Queensland, 4370 Australia Phone/Fax:
Furness Railway Wagon Co.
 Furness Railway Wagon Co. The Parts. S&DJR/LMS/BR 20ton 6-Wheel Brake van Wheels, paint and transfers required to complete. Parts 13/15 Bolts/nuts/ washers Part 22 Part 5 Parts 10/19/20/21/ 23/24/25 Part
Chopper Couplings. Assembly. Fitting
 Chopper Couplings Unlike most model chopper couplings, these will work with two opposing hooks, which looks so much better and allows you to turn stock at will. They are still compatible with most other
Finney7 PC May17 PRINCESS CORONATION. Fig 1. GA Curved Footplate
 Fig 1. GA Curved Footplate PC - 5 Fig 2. GA Utility Footplate PC - 6 COUPLING RODS & FRAME ASSEMBLY COUPLING RODS. The coupling rods are now made so that they can be used as a jig to align the remaining
Bachmann D11 EM/S4 Finescale Conversion
 Bachmann D11 EM/S4 Finescale Conversion Before you start, it is a good idea to have some small containers or snap top poly bags to put screws and components in for safe keeping...much better than crawling
Hornby Railroad Crosti 9F EM Finescale Conversion.
 Hornby Railroad Crosti 9F EM Finescale Conversion. Before you start, it is a good idea to have some small containers or snap top poly bags to put screws and components in for safe keeping...much better
PYRTE. Building The Front Axle, Fork and Steering
 PYRTE Building The Front Axle, Fork and Steering The front axle on this traction engine is a very simple affair, in that it is a rectangular steel rod, sat on edge, with a pivot in the centre, which is
Stephenson's Valve Gear: 7mm cast white-metal kit 19 th Century swing-link version - non-working, cosmetic only. Instructions
 SER-Kits Stephenson's Valve Gear: 7mm cast white-metal kit 19 th Century swing-link version - non-working, cosmetic only Page 1 of 5 Instructions HEALTH & SAFETY: The castings contain some lead. Dispose
Furness Railway Wagon Co.
 Furness Railway Wagon Co. The Parts. S&DJR/LMS/BR 10ton 4-Wheel Brake van Wheels, paint and transfers required to complete. Part 3 Part 2a Part 2b Part 5 Parts 8/9/10 Part 15 Part 15 Part 6 Part 4 Part
Furness Railway Wagon Co. NER/LNER/BR Cattle Van
 NER/LNER/BR Medium Cattle Van Wheels, paint and transfers required to complete. Part 1 The Parts. Part 4 Part 3 Part 2 Part 17 Part 5 Part 12/16 Part 11 Part 13/14/15 Part 6/7 Parts 8/9/10 not shown Assembly
Hornby Railroad Hall EM Finescale Conversion.
 Hornby Railroad Hall EM Finescale Conversion. The subject of this sheet is the new (2015) Hornby Railroad Hall. There are several specification and livery variants, but all have a common chassis and as
Dinorwic Quarry Hunslet `Alice Class with cab 7mm Scale kit for 16.5mm or 14mm Gauge
 EDM Models 19 Briar Avenue, Acomb, York. Y026 5BX Dinorwic Quarry Hunslet `Alice Class with cab 7mm Scale kit for 16.5mm or 14mm Gauge Introduction This kit, which has been researched by Jonathan Matthews
AIRCRAFT LANDING GEAR CONSTRUCTION MANUAL
 APPENDIX AI KITPLANES FOR AFRICA AIRCRAFT LANDING GEAR CONSTRUCTION MANUAL Revision: C September 2008 Page L1 of 20 NOTE: Please read the General Manual before proceeding. Please read through the entire
Furness Railway Coach Co.
 Furness Railway Coach Co. Outside Framed Coaches Paint and transfers required to complete. Part 32 Part 7/8 Part 9 Part 6 Part 31 Part 14 The Parts. Part 19 Parts 20/21/22 Part 5 Part 4 Part 1 Part 3 Part
Furness Railway Wagon Co. NER/LNER/BR Box Van
 Furness Railway Wagon Co. NER/LNER/BR G1 Box Van Wheels, paint and transfers required to complete. The Parts. Parts 8/9/10 12/13/15/16 Part Part 11 Part 6 Part 2 Part 3 Part 14 Part 1 Part 4 Parts 5/7
MANNING WARDLE ex-penrhyn Quarry Railway Narrow Gauge `Jubilee mm Scale kit for 16.5mm or 14mm Gauge
 EDM Models 19 Briar Avenue, Acomb, York. Y026 5BX MANNING WARDLE ex-penrhyn Quarry Railway Narrow Gauge 0-4-0 `Jubilee 1897 7mm Scale kit for 16.5mm or 14mm Gauge Introduction This kit, which was researched
RT Models. 4mm scale, 00/EM/P4 Manning Wardle, class K 0-6-0ST loco kit
 1 RT Models 4mm scale, 00/EM/P4 Manning Wardle, class K 0-6-0ST loco kit History The first of Manning Wardle s Class K was built in 1864. Many of these locos were mainly built for contractors with only
ALAN GIBSON, THE BUNGALOW CHURCH ROAD, LINGWOOD, NORWICH, NORFOLK. MIDLAND/L.M.S. Class 4F.
 ALAN GIBSON, THE BUNGALOW CHURCH ROAD, LINGWOOD, NORWICH, NORFOLK MIDLAND/L.M.S. Class 4F. These instructions and history should be carefully studied BEFORE starting on any assembly. The standard kit is
Instructions for Assembling Driving Wheels, Axles and Crankpins
 Instructions for Assembling Driving Wheels, Axles and Crankpins (Version 1; October 2008) Introduction These instructions explain how to assemble Exactoscale 4mm scale driving wheels, axles and crankpins
GWR 4 Wheel Parcel Van, Diagram W1
 GWR 4 Wheel Parcel Van, Diagram W1 From a Colin Waite bodyline kit with a scratch built underframe April 2013. While recovering from a very nasty cold and not feeling much like doing anything I was idly
Instructions: General American 6,000 Gallon, 3-Compartment Tank Car Kit 11/2013
 Instructions: General American 6,000 Gallon, 3-Compartment Tank Car Kit 11/2013 Thank you for purchasing the Tangent Scale Models General American 6,000 Gallon, 3- Compartment Tank Car Kit! A few quick
Owner s Manual: Standard Gauge Diesel shunter Locomotive in Gauge 3 scale. PLine. Built in Brass. Standard Gauge Shunter Locomotive Model (G3 scale)
") PLine Built in Brass Standard Gauge Shunter Locomotive Model (G3 scale) PLEASE READ THIS OWNERS MANUAL CAREFULLY BEFORE OPERATING THE MODEL Prototype Information: Not many Standard gauge locomotives operated
PLine Built in Brass Standard Gauge Shunter Locomotive Model (G3 scale) PLEASE READ THIS OWNERS MANUAL CAREFULLY BEFORE OPERATING THE MODEL Prototype Information: Not many Standard gauge locomotives operated
Furness Railway Wagon Co. NER/LNER/BR C1 5ton Fitted Open Fish
 Furness Railway Wagon Co. NER/LNER/BR C1 5ton Fitted Open Fish Wheels, paint and transfers required to complete. Please note that to aid the folding of the various parts score all the halfetched foldlines
Furness Railway Wagon Co.
 Furness Railway Wagon Co. Great Eastern Railway/LNER/BR 1900 Diagram 7 10ton Cattle Van Steel Under-Frame Wheels, paint and transfers required to complete. Please note that to aid the folding of the various
Bachmann 1F (Half Cab) EM Finescale Conversion
 EM Finescale Conversion") Bachmann 1F (Half Cab) EM Finescale Conversion Before you start, it is a good idea to have some small containers or snap top poly bags to put screws and components in for safe keeping...much better than
Bachmann 1F (Half Cab) EM Finescale Conversion Before you start, it is a good idea to have some small containers or snap top poly bags to put screws and components in for safe keeping...much better than
Brassmasters Scale Models
 Brassmasters Scale Models www.brassmasters.co.uk L&SWR/SOUTHERN RAILWAY DRUMMOND M7 0-4-4T LOCOMOTIVE KIT Designed by Martin Finney 4MM SCALE OO - EM - P4 INSTRUCTIONS AND PROTOTYPE NOTES PO Box 1137 Sutton
Hornby 08 Diesel Shunter EM Finescale Conversion.
 Hornby 08 Diesel Shunter EM Finescale Conversion. Before you start, it is a good idea to have some small containers or snap top poly bags to put screws and components in for safe keeping...much better
Wheels, paint and transfers required to complete. Please note that to aid the folding of the various parts score all the halfetched fold lines.
 Furness Railway Wagon Co. Furness Railway/LMS 45ton All Steel Bogie Iron Ore Hopper Wagon Built by The Pressed Steel Car Co. Pittsburgh, Pennsylvania, USA Circ. 1899 Wheels, paint and transfers required
Bowaters cab. Rear half of tropical cab frame. Cab door 82. Bend tags and solder to cab rear in open or closed position.
 Bowaters cab 29 32 44 31 Rear half of tropical cab frame 22 27 Cab door 82. Bend tags and solder to cab rear in open or closed position. 20 21 33 Side rod fitting and valve gear - Stephensons 44 0.7mm
INSTRUCTIONS FOR NYC K-11 PACIFIC KIT #100200
 INSTRUCTIONS FOR NYC K-11 PACIFIC 4-6-2 KIT #100200 These instructions provide photographs of completed model, exploded-view drawings, diagrams, step-by-step instructions and an itemized parts list. If
WW03e Welcome Wagons 8 Shoe Brake Pipe Wagon
 WW03e Welcome Wagons 8 Shoe Brake Pipe Wagon History The pipe wagons were built to four basic diagrams sharing the same basic dimensions. The first 300 pipe wagons were built at Derby works to diagram
FITTING FRONT SEAT BELTS TO THE MG Y TYPE SALOON
 FITTING FRONT SEAT BELTS TO THE MG Y TYPE SALOON Background After much thought I decided to fit front seatbelts to my Y type during the body off restoration. There is an ongoing debate as to whether the
Caley Coaches True Line kits in etched brass
 Caley Coaches True Line kits in etched brass 0141-772 37 Jim Smellie, 1 Tay Crescent, Bishopbriggs, Glasgow, G64 1EU. Jim Smellie Nov. 1992 10' Building Instructions for kit CC20 Caledonian Railway 1 Ton
Welcome Wagons WW ton Mineral (2 & 4 shoe brake)
") Welcome Wagons WW13 16 ton Mineral (2 & 4 shoe brake) HISTORY The 16T open mineral wagon was the most numerous type built by BR from 1950 to 1957, the first diagram being 108, although there was 16T steel
Welcome Wagons WW13 16 ton Mineral (2 & 4 shoe brake) HISTORY The 16T open mineral wagon was the most numerous type built by BR from 1950 to 1957, the first diagram being 108, although there was 16T steel
Instructions: PRR Sam Rea Shops X58 Class Box Car Kit Tangent Part Numbers: XX through XX 9/2015
 Instructions: PRR Sam Rea Shops X58 Class Box Car Kit Tangent Part Numbers: 14000-XX through 14002-XX 9/2015 Thank you for purchasing the Tangent Scale Models PRR Sam Rea Shops X58 Class Box Car Kit! A
Heljan Class 16 EM Finescale Conversion
 Heljan Class 16 EM Finescale Conversion This is a simple conversion using Alan Gibson wheels from the bogie/tender range. The Class 16 has 3 7 diameter spoked wheels. The Heljan model has 8 spoked wheels,
INSTALLATION INSTRUCTIONS
 INSTALLATION INSTRUCTIONS ----3300 W. Pontiac Way Clovis, CA 93612 toll free: 1-800-445-3767 web: www.belltech.com---- 6605-6607 FLIP KIT CHEVROLET C/K 1500 / 2500 PICK UP Thank you for being selective
THE MOTOR. Page 1 of 9
 Page 1 of 9 The Bachmann HO Old Time 4-4-0 has been around a long time and suffers from two problems: the latest motor will burnout with a frying of the added DCC decoder and the pickup system is very
Locomotive parts April 2018
 Locomotive parts April 2018 CONTENTS Page GNR Detail parts 3 LBSC Detail parts 4 GWR Detail parts 5 LMS Detail parts 10 LNER Detail parts 13 GER Details Parts 13 BR castings 14 Tooling & spares 15 2 GNR
Houstoun Gate Locomotive Works Gordon 4-Wheel Drive Chassis Assembly Instructions
 Houstoun Gate Locomotive Works Gordon 4-Wheel Drive Chassis Assembly Instructions It is suggested that you read these instructions through before commencing construction. A minimum of tools are needed
Jabiru J170/230/430/250/450 Constructors Manual. Pre-Paint>Fuselage>Undercarriage>Assemble main gear
 Objectives of this task: In this task you will assemble the main undercarriage legs, which includes fitting the axles, disc brakes and wheels and adjusting the brakes. Materials required: Cards # J8 Dual
Instructions: Pullman-Standard PS-3 Coal Hopper Kit Tangent Part Numbers: through /2015
 Instructions: Pullman-Standard PS-3 Coal Hopper Kit Tangent Part Numbers: 15000-01 through 15001-01 10/2015 Thank you for purchasing the Tangent Scale Models Pullman-Standard PS-3 Coal Hopper Kit! A few
5 Mechanisms and accessories
 5 Mechanisms and accessories 51A SIDE OPENING ELEMENT MECHANISMS 52A NON-SIDE OPENING ELEMENT MECHANISMS 54A WINDOWS 55A EXTERIOR PROTECTION 56A EXTERIOR EQUIPMENT 57A INTERIOR EQUIPMENT 59A SAFETY ACCESSORIES
1989 Jeep Cherokee. STEERING COLUMN' '1989 STEERING Jeep Steering Columns STEERING COLUMN STEERING Jeep Steering Columns
 STEERING COLUMN 1989 STEERING Jeep Steering Columns DESCRIPTION All models use collapsible steering columns. All columns have integral ignition switch and locking device. Optional tilt wheel is available
INSTRUCTIONS FOR F.C. HIBBERD 11-TON PLANET 4W DIESEL MECHANICAL LOCOMOTIVE
 NONNEMINSTRE MODELS INSTRUCTIONS FOR F.C. HIBBERD 11-TON PLANET 4W DIESEL MECHANICAL LOCOMOTIVE Requires Hanazono (formerly Tenshodo) WB24.5 SPUD unit to motorise, or build non-working PRELIMINARY: This
9 Locomotive Compensation
 Part 3 Section 9 Locomotive Compensation August 2008 9 Locomotive Compensation Introduction Traditionally, model locomotives have been built with a rigid chassis. Some builders looking for more realism
10.0 GRP Dash panel and fascia Fuse box and Relay block
 10.0 GRP Dash panel and fascia 10.1 Fuse box and Relay block Decide the fixing point for the fuse boxes and relay blocks, check that the under dash section of the wiring loom can reach all the instruments,
Brassmasters Scale Models
 Brassmasters Scale Models www.brassmasters.co.uk Cleminson 6-wheel underframe kit PO Box 1137 Sutton Coldfield B76 1FU Copyright Brassmasters 2016 1 Introduction 1.1 The purpose of this booklet is to guide
Tip: Difficult Conversions for F800 (3026) and 3111 Date: Led lighting added, LED Addition 3111
 and 3111 Date: Led lighting added, LED Addition 3111") Hi All, It s good to revisit previous conversions and see if you can improve on what has been done before. I decided to add LED lighting to my F800 (3026) and 3111. This document update shows how it was
Hi All, It s good to revisit previous conversions and see if you can improve on what has been done before. I decided to add LED lighting to my F800 (3026) and 3111. This document update shows how it was
CAE PERFORMANCE PRODUCTS A.B.N MAIN ROAD, CASTLEMAINE, VIC Ford Zephyr Cable Wiper Kit Component List
 Ford Zephyr Cable Wiper Kit Component List Wiper Motor Assembly with Flexible Drive Cable (125 Deg Sweep, x 1200 mm Flexible Cable) Wiper Mounting Bracket, U Clamp, and Rubber Two Wheel boxes, Spacers,
(WW03f) BR PIPE WAGON 4 shoe brake
 BR PIPE WAGON 4 shoe brake") (WW03f) BR PIPE WAGON 4 shoe brake History. The pipe wagons were built to four basic diagrams sharing the same basic dimensions. The first 300 pipe wagons were built at Derby works to diagram 460, and
(WW03f) BR PIPE WAGON 4 shoe brake History. The pipe wagons were built to four basic diagrams sharing the same basic dimensions. The first 300 pipe wagons were built at Derby works to diagram 460, and
LEGO Parts Guide. Naming and Building with LEGO parts. Version 1.3 4/12/10
 LEGO Parts Guide Naming and Building with LEGO parts Version 1.3 4/12/10 Table of Contents Connectors... 4 Friction Pegs... 4 Frictionless Pegs... 5 Ball Joints / Tie Rods... 6 Bushings... 7 Angle Connectors...
Tip: and Orient Express LED Light Upgrade Date: Correction
 Hi All, I have since inherited my friend Rudolf s 42755 Orient Express with the extra 42760 car set and wanted to complete the LED light upgrade as we had planned. Side view of the Restaurant car with
The H-MAC Heavy Metal Articulating Chassis Construction Guide
 The H-MAC Heavy Metal Articulating Chassis Construction Guide The Heavy Metal Chassis is constructed with two identical drive modules built using 10 mechanical sub-assemblies. The drive modules are integrated
Installation Instructions
 GOOSENECK MOUNTING KIT Equipment Required: Fastener Kit: F Wrenches: 13mm, 3/4, 7/8, 15/16 Drill Bits: 1/4 Other Tools: Drill WARNING: Under no circumstances do we recommend exceeding the towing vehicle
SEARAILS RR-XXX STEAM LOCOMOTIVES ASSEMBLY MANUAL
 SEARAILS RR-XXX 0-4-0 STEAM LOCOMOTIVES ASSEMBLY MANUAL 30 March 2015 T R Knapp Model Engineering 1 This diagram shows basic assembly of Nn3/Z Porter 0-4-0T 2 This diagram shows basic assembly of Baldwin
Furness Railway Wagon Co.
 Furness Railway Wagon Co. The Parts. SE&CR/LB&SCR/W^D/GNR/SR/LNER/BR 1909 RCH 12ton 7 Plank Coal Wagon Wheels, paint and transfers required to complete. Part 1 Part 2 Part 9 Part 5 Part 12 Part 10 Part
This year Märklin have released a coach which has included LED lighting with a currentconducting close coupler (single pole)
") Hi All, Over the past few months I have been working at a steady pace to install LED lighting in my passenger coaches. The coach lighting must have LED lights to reduce power consumption on the layout
Hi All, Over the past few months I have been working at a steady pace to install LED lighting in my passenger coaches. The coach lighting must have LED lights to reduce power consumption on the layout
Installation Instructions
 Equipment Required: Fastener Kit: F Wrenches: 3/4, 15/16 Drill Bits: 1/4 Other Tools: Drill WARNING: Under no circumstances do we recommend exceeding the towing vehicle manufacturers recommended vehicle
BOWSER - PARTS Air compresser mounting brkt Air compressor Back plate for LEAD Cast K Air tank.
 A 70044 Air compressor 70111 Air compressor 70192 Air compresser mounting brkt. B 15011 Bearing, driver 1/8" hole 15012 Bearing, driver, square, 1/8" hole, for.040 side rails on underframe 908 Brass bearing,
Build your own THUNDERBIRD 2
 PACK 01 STAGE PAGE 01 Nose assembly and Elevator Car rear wheels 3 02 Cockpit interior and Elevator Car 1 completion 7 03 Missile launcher and Thunderbird 4 11 04 Nose assembly and the Tracy brothers 15
10. Lower Fuselage Assembly Undercarriage
 10. Lower Fuselage Assembly Undercarriage Undercarriage 10.27 2 230399 0 Jabiru Undercarriage Configurations There are four combinations of tyres available, utilising two sets of hubs (standard and heavy
SUMMIT COMBAR TACOMA 16ON AF2O 8-10
 Part Number: 32350 Product Description: Suited to vehicle/s: Optional Fitting Kits: SUMMIT COMBAR TACOMA 6ON AF2O 8-0 TOYOTA TACOMA 206 350060 - ARB AUX Fog Light Adaptor 3500530 - ARB AUX Fog Light Loom
WH/WK JEEP GRAND CHEROKEE 2005 ON WARNING
 Part Number: 3450130 F/KIT: 6172092 Product Description: Suited to vehicle/s: COMBINATION BULL BAR WH/WK JEEP GRAND CHEROKEE 2005 ON WARNING REGARDING VEHICLES EQUIPPED WITH SRS AIRBAG; When installed
Ballast Usually stone chippings, or similar material, which support the sleepers and hold them in place on the ground.
 Model Rail Terminology Alternating Current/AC The electric current that flows alternately through each wire in a rapid sequence called a cycle. The normal mains electricity supply is powered by Alternating
Furness Railway Wagon Co. Glasgow & South Western Railway/LMS/BR 12ton Mineral Steel Under-Frame
 Furness Railway Wagon Co. Glasgow & South Western Railway/LMS/BR 12ton Mineral Steel Under-Frame Wheels, paint and transfers required to complete. Please note that to aid the folding of the various parts
Chevrolet 3100 IFS Kit
 1947-54 Chevrolet 3100 IFS Kit Congratulations on your purchase on what we believe is the finest IFS kit available for 1947-54 Chevrolet pickups with stock frames. We have invested many hours into designing
WEDICO. aêçé=aéåâ=péãájqê~áäéê= Art.-No. 21 yellow
 WEDICO Art.-No. 1 yellow ^ÅÅÉëëçêáÉë=EçéíáçåëFW= Electronic Speed Controller...Art.-No. 95 Winch for Drop Deck Semi-Trailer...Art.-No. 44 Electrical System...Art.-No. 784 Electrical System MF-A...Art.-No.
SIDEWALK PLAY CAR 174 POPULAR MECHANICS
 SIDEWALK PLAY CAR L By Elmer V. Clark IVELY youngsters and craftsman fathers alike will get a thrill out of this tiny play car, which looks and drives like a real automobile except that it's scaled down
Conversion to Renault NG 5 speed gearbox with cable actuated gear change
 Europa Series 2 (1969) Conversion to Renault NG 5 speed gearbox with cable actuated gear change NB: this is theoretical it shifts very precisely without too much effort in the garage with no oil in the
Installation instructions for Camaro/Firebird and Nova* Windshield Wiper Systems
 Installation instructions for 1967-69 Camaro/Firebird and 1968-74 Nova* Windshield Wiper Systems The Raingear 1967-69 Camaro/Firebird and 1964-74 Nova wiper system is designed for ease of installation
Instructions: PRR / PC Shops G43 Series Gondola Kit Tangent Part Numbers: through /2016
 Instructions: PRR / PC Shops G43 Series Gondola Kit Tangent Part Numbers: 17000-01 through 17002-02 8/2016 Thank you for purchasing the Tangent Scale Models PRR / PC Shops G43 Series Gondola Kit! A few
Original BMW Accessories. Installation Instructions.
 Original BMW Accessories. Installation Instructions. Installing the M Performance rear diffuser and Carbon front splitter BMW 5 Series Saloon (F0) BMW 5 Series Touring (F ) Retrofit kit number single-sided
THE SERIES-E POWR Slider
 C.R. LAURENCE CO., INC. PATENT NO. 4,920,698 THE SERIES-E POWR Slider MODEL: EPC814S 2014+ CHEVY/GMC SILVERADO/SIERRA 1500 NAGS: DY90122PK5 ELECTRIC SLIDING REAR WINDOW 2014 + CHEVY/GMC SILVERADO/SIERRA
EMD DD35 Powered & Dummy Units. Assembly Instructions
 EMD DD35 Powered & Dummy Units Assembly Instructions Main Shell Side Handrail End Handrails Fuel Tank (Loose Part, Powered Unit Only) Side Handrail End Handrails 2 No. MT N Scale Body Mount Coupler Shorten
Bumper Bumper Removal and Installation. 1. Bumper 2. Front Mounting Brackets 3. End Mounting Brackets
 Bumper.0 Bumper Removal and Installation 0/9/00. Bumper. Front Mounting Brackets. End Mounting Brackets f88088 Fig., Bumper, -Inch Steel Logger, Severe Service, Set-Back Axle Coronado Workshop Manual,
Victorian Railways X Class Locomotive and tender kit
 Victorian Railways X Class 2-8-2 Locomotive and tender kit Ref.E226A&B and E227, Manufactured by DJH exclusively for Steam Era Models Introduction The first X class Heavy Mikado, number 27, entered traffic
Tip: LED Lighting for the 3098 Locomotive and 4392 Coach Set Date: , ,
 Hi All, Over the past few months I have been working at a steady pace to install LED lighting in my passenger coaches. The coach lighting must have LED lights to reduce power consumption on the layout
MAIN PRICE LIST. - B 487 Perforated Strip 2 1/2" B 488 Perforated Strip 3 1/2" B 482 Perforated Strip 4 1/2" 9 1.
 PERFORATED STRIPS LENGTH HOLES GBP 1 Perforated Strip 12 1/2" 25 1.63 1 a Perforated Strip 9 1/2" 19 1.51 1 b Perforated Strip 7 1/2" 15 1.39 2 Perforated Strip 5 1/2" 11 0.90 2 a Perforated Strip 4 1/2"
Furness Railway Wagon Co. NBR/LNER 8ton 3PLK General Merchandise Wagon
 Furness Railway Wagon Co. General Merchandise Wagon Wheels, paint and transfers required to complete. Please note that to aid the folding of the various parts score all the halfetched foldlines that are
Class BR Class 03/04 Shunter. Foldup
 Crank overlays The 2mm Scale Association BR Class 03/04 Shunter Bachmann replacement chassis Inside frames gearbox 3-680 Class 03 Class 04 coupling rods Bachmann etched replacement 03/04 chassis etch 30:1
SUPPLEMENTARY ASSEMBLY GUIDE CATERHAM CSR
 SUPPLEMENTARY ASSEMBLY GUIDE CATERHAM CSR Page 1 of 25 Table of Contents Front Suspension...3 Top wishbone orientation... 3 Fitting top wishbones... 3 Lower wishbone orientation... 3 Fitting lower wishbone...
Lower Fuselage Assembly. Controls
 Lower Fuselage Assembly Jabiru Aircraft Controls Lower Fuselage Assembly 10.11 3 051000 1 Assemble & Fit Control References: Drawings 3000092-7 and 93000K4/1 see (10.12) Photo 10.11(a) to 10.11(i) Parts