Brassmasters Scale Models
|
|
|
- Winifred Stanley
- 5 years ago
- Views:
Transcription


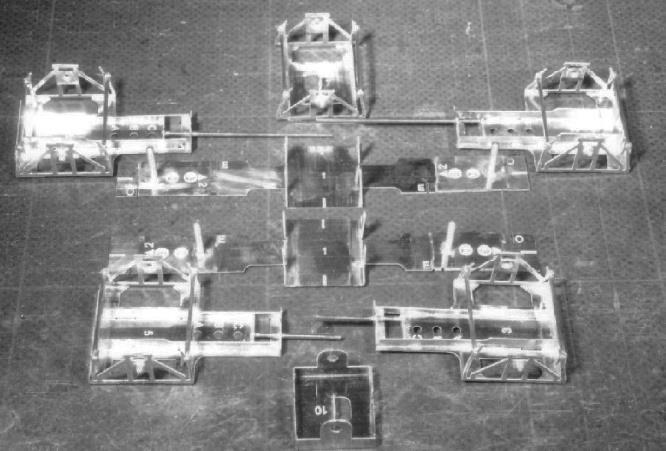
1 Brassmasters Scale Models Cleminson 6-wheel underframe kit PO Box 1137 Sutton Coldfield B76 1FU Copyright Brassmasters 2016
2 1 Introduction 1.1 The purpose of this booklet is to guide the modeller in the building of the Brassmasters kit for the Cleminson truck. The prototype information is not, and was not intended to be, a comprehensive history. 1.2 This chassis may be used with any 6 wheeled vehicle built to the scale of 4mm/ft, which has wheels of 3 7 diameter and a wheel base between 18 and 27 6 in length. The kit caters for any wheel base between these sizes, in 6 intervals, eg. 18, 18 6, 19, 19 6 etc. 1.3 This kit contains only the functional parts required to build the Cleminson Truck, and may be used either in scratch built vehicles or to replace functional chassis components in kits which use other chassis designs. 1.4 The instructions cover only the construction of the kit components. Modifications to other kit designs to accommodate the Cleminson Truck, and the fitting of detail components eg. axleboxes, has not been included. 2 Prototype Notes 2.1 Whilst the parts provided in this kit are not intended to assemble into a representation of a full size original, the mechanical principles on which the kit has been based have been tried and tested on railways around Britain. The first passenger coaches to be used on the North Wales Narrow Gauge Railway were sixwheelers with Cleminson trucks. They were roofed and fully glazed above the waistline, weighing 4½ tons each and were 30 ft long, with seating for 42 passengers. The Ffestiniog Railway, the Southwold Railway and the Manx Northern Railway have also used vehicles based on the Cleminson truck. 3 Construction - General Notes 3.1 The kit contains the principal components necessary to build the chassis. Numbers shown in the instructions in square brackets [ ] are part numbers. These numbers appear on the parts. Certain parts, e.g., nuts, bolts etc. are not numbered. 3.2 On the etched components all folds and bends are made with the half-etched line to the inside. 3.3 Soldering operations can be performed with 145 degree solder and Carr s green label flux or similar, using a 25 watt iron. 3.4 Solder flux is highly corrosive and leaves deposits on the metal surface. At the end of each work session involving soldering, wash the components / assemblies in warm water and gently apply Jif or a similar cleaner using an old paint brush. Rinse the parts thoroughly in warm water and allow to dry. Do this in a sink or basin with the plug in place so that if anything falls off it won t go down the plug- ole! 3.5 Try to keep the amount of soldering in close proximity to the wheels steel tyres to a minimum. It is recommended that wheel tyres be coated with a thin layer of paint to prevent corrosion during assembly, then cleaned off when construction is complete. 3.6 The terms fit and fix as used in these instructions have definite and separate meanings. Fit means put in place but do not secure, e.g., fit the wheel sets in the bearing units. Fix means secure in place (using solder, adhesive, etc.). 3.7 The term fold as used in these instructions means bend the brass component to 90 along a half etched fold line. 3.8 Some of the etched components are delicate and easily damaged, so do take care in handling them. Components should be removed from the fret using a small scalpel and the tabs removed with a small finecut file. 3.9 To achieve the correct wheel base for the selected vehicle, it is necessary to assemble some components both in the correct position and in the correct orientation. Table 1 shows the component 1
3 positions and orientation which should be used. The instructions give a step-by-step build-up of the components, stating which column of the table should be used at each stage To enable the chassis to be used in a wide range of vehicle types, the centre axle may be supported in one of two ways. For the majority of vehicles, which had centre W-irons mounted on the inside of the solebars, the Centre W-iron Unit [7] which enables the centre axle to be mounted between pin-point bearings should be used. For vehicles such as Great Northern Railway 6 wheel coaches, which had centre W-irons mounted on the outside of the solebars, one of the Centre Axle Carrier units [8], [9] or [10] should be used, and the kit s W-irons should be fitted cosmetically to the solebars When fitting items below solebar level (e.g., foot boards) remember to allow for the swing of all three wheel sets For those using Alex Jackson automatic couplings, mounting holes and height rests for have been provided in the chassis design Wheels are not included in the kit and must be sourced by the modeller. You will require three axles of 3 7 diameter wheels to a pattern appropriate for the vehicle being modelled. Please remember to specify the gauge (OO, EM or P4) when ordering. 4 Chassis Construction 4.1 Identify and highlight or underline the required wheel base for the vehicle on Table Fold the four locating arms on the Baseplate [1] and secure each with a small fillet of solder. 4.3 Fold the tabs on each end of the Pivot Location Plates [2]. 4.4 Fix the Pivot Location Plates [2] to the ends of the Baseplate [1], locating the plates in the correct orientation and position as follows: If the wheel base of the vehicle has an even number of whole feet, the tabs will locate in the slots marked E, if there are an odd number of feet the tabs will locate in the slots marked O, this can be read directly from Table 1 in the Chassis Position column. The plates at both ends of the vehicle will be in slots marked with the same letter. The plates must also be orientated correctly. Use the Arrow column in Table 1 to identify whether the half etched arrows on the plates should point towards the centre or the ends of the vehicle. The arrows on the plates will both point either towards the ends of the vehicle or the centre. Example: For a vehicle with a 24 6 wheel base, the Pivot Location Plates [2] should be located in the slots marked E and the arrows on the plates should point towards the Ends of the vehicle. 4.5 File away the excess length of the tab which projects through the Baseplate [1] to restore a smooth flat top surface. 4.6 Fix a 10BA cheese head screw to each Pivot Location Plate [2], locating the screw in the correct position as follows: Place the head of the screw into the half etched circular recess marked 1, 2 or 3, using the location indicated in the Screw Position column in Table 1. Example: For a vehicle with a 24 6 wheel base, each screw should be located in a recess numbered Fix the Baseplate [1] to the underside of the floor of the vehicle. Use the half etched marks at the ends and sides of the base plate to position the plate centrally. 4.8 Fold up the W-iron Unit [3], making five folds to form the ends, W-irons and beam location tab. Run a small fillet of solder into the folds formed by the W-iron units to secure them firmly. 4.9 Fix the Strengthening Bars [4] to the underside of the W-iron Unit [3] using the locating slots provided File away the excess length of the locating tabs at the wide end of each Strengthening Bar [4]. 2
4 4.11 Using the W-iron Hole column in Table 1, identify the hole in the W-iron unit which will be used for the pivot. File away the round topped stabilising tabs adjacent to the holes which will not be used. Example: For a vehicle with a 24 6 wheel base, stabilising tabs should remain only adjacent to the hole lettered C Fold up the W-iron Unit [5], making five folds to form the ends, W-irons and beam location tab. Run a small fillet of solder into the folds formed by the W-iron units to secure them firmly Fix the Strengthening Bars [6] to the underside of the W-iron Unit [5] using the locating slots provided File away the excess length of all the locating tabs to restore a smooth flat top surface Fix pin point bearings to bearing location holes in W-iron Units [3] and [5] Temporarily fit axles to W-iron Units [3] and [5]. Adjust position of brake blocks to align correctly with the wheel tyres. Remove the axles Fix lengths of 0.9mm dia. brass wire through holes in the brake blocks. Cut the wire to length and clean up the ends as necessary with a small file or grinding disc Cut two lengths of 0.9mm dia. brass wire to the length shown in the Beam Length column in Table 1. Clean off any burrs or sharp ends with a fine file Fit beams to W-iron Units [3] and [5], passing the beam through the aligned holes in the fold down sections. To ensure adequate clearance for the nut which secures the W-iron unit, the beam should not project more than 0.5mm through the inner hole (nearest to pivot hole C) The centre axle may be supported either in pin-point bearings using the Centre W-iron Unit [7], or by inside bearings using one of the Centre Axle Carrier units [8], [9] or [10]. If using the Centre Axle Carrier units [8], [9] or [10], move directly to instruction Fold up the Centre W-iron Unit [7], making five folds to form the ends, W-irons and beam location tab. It may be necessary to trim the width of the ends to enable the W-irons to fold correctly. Run a small fillet of solder into the folds formed by the W-irons to secure them firmly Fix pin point bearings to bearing location holes in Centre W-iron Unit [7] Temporarily fit axles to Centre W-iron Unit [7]. Adjust position of brake blocks to align correctly with the wheel tyres. Remove the axles Fix lengths of 0.9mm dia. brass wire through holes in the brake blocks. Cut the wire to length and clean up the ends as necessary with a small file or grinding disc Fit the wheels to the Centre W-iron Unit [7]. Move directly to instruction Select the correct Centre Axle Carrier unit. For OO use part [8], for EM use part [9] and for P4 use part [10] Fold up the Centre Axle Carrier unit, making five folds to form the ends, inside bearing legs and beam location tab. Run a small fillet of solder into the folds formed by the inside bearing legs to secure them firmly Open up the holes in the inside bearing legs as necessary, to provide running fit for the axle Fit the wheels to the Centre Axle Carrier unit Assemble W-iron units [3] and [5] onto Baseplate [1]. Pass the beams through the slots in the sides of the Centre W-iron Unit [7] or Centre Axle Carrier [8], [9] or [10], and then through the holes in the centre web. Lower the centre axle unit between the locating arms on the baseplate, and the end W-iron units over the pivot screws using the correct locating holes as identified earlier (instruction 4.11) Fit the wheels to the W-iron units [3] & [5]. 3
5 4.32 Place the chassis on a piece of straight track and check for height. Add washers between the W-iron units [3] and [5] and Baseplate [1] to raise height if necessary. Fit retaining nuts to pivot screws Fix lengths of 0.9mm dia. brass wire through the holes in the locating arms on the Baseplate [1] to retain the centre axle unit If necessary, adjust the position of the axle units relative to the base plate, by bending the wire beams. Only very slight adjustment should be required if any, to get the chassis to run correctly Fix Alex Jackson couplings if required. Pass the wire through the small hole adjacent to the beam and solder in place. Adjust the coupling using the outer end of the W-iron unit to control the height of the coupling from the rail head. Reference Works Scalefour Society - 4mm Finescale Narrow Gauge News No. 13 -April 1998 Pages 6 & 7 A History of the Welsh Highland Railway - By Alun Turner, edited by Richard Beton Table 1 Wheel Base Table 2 Chassis Position Arrow Screw Position W-iron Hole Beam Length (mm) 18 Even End 1 A Even Centre 3 A Odd End 1 A Odd Centre 3 A Even End 1 B Even Centre 3 B Odd End 1 B Odd Centre 3 B Even End 2 B Even Centre 2 B Odd End 2 B Odd Centre 2 B Even End 2 C Even Centre 2 C Odd End 2 C Odd Centre 2 C Even End 3 C Even Centre 1 C Odd End 3 C Odd Centre 1 C 37 Description Quantity Brass Fret 1 0.9mm Brass Wire 2 lengths 10 BA Bolts 2 10 BA Nuts 2 Pin-Point Bearings 6 4


6 5
BRL CLASS 66 LOCOMOTIVE. Building Instructions
 Tel 07807225801 prmrp@fsmail.net www.prmrp.com BRL - 066 CLASS 66 LOCOMOTIVE Building Instructions SCALE MODEL PRODUCT FOR ADULT MODELLERS ONLY. WHITE METAL CONTAINS LEAD WASH HANDS AFTER USE. MAY CONTAIN
Caley Coaches True Line kits in etched brass
 Caley Coaches True Line kits in etched brass 0141-772 37 Jim Smellie, 1 Tay Crescent, Bishopbriggs, Glasgow, G64 1EU. Jim Smellie Nov. 1992 10' Building Instructions for kit CC20 Caledonian Railway 1 Ton
BRL-142/143 Class 142/143. Building Instructions
 Peter Besant Tel 07807225801 prmrp@fsmail.net www.prmrp.com BRL-142/143 Class 142/143 Building Instructions SCALE MODEL PRODUCT FOR ADULT MODELLERS ONLY. WHITE METAL CONTAINS LEAD WASH HANDS AFTER USE.
(WW03f) BR PIPE WAGON 4 shoe brake
 BR PIPE WAGON 4 shoe brake") (WW03f) BR PIPE WAGON 4 shoe brake History. The pipe wagons were built to four basic diagrams sharing the same basic dimensions. The first 300 pipe wagons were built at Derby works to diagram 460, and
(WW03f) BR PIPE WAGON 4 shoe brake History. The pipe wagons were built to four basic diagrams sharing the same basic dimensions. The first 300 pipe wagons were built at Derby works to diagram 460, and
GWR 4 Wheel Parcel Van, Diagram W1
 GWR 4 Wheel Parcel Van, Diagram W1 From a Colin Waite bodyline kit with a scratch built underframe April 2013. While recovering from a very nasty cold and not feeling much like doing anything I was idly
WW03e Welcome Wagons 8 Shoe Brake Pipe Wagon
 WW03e Welcome Wagons 8 Shoe Brake Pipe Wagon History The pipe wagons were built to four basic diagrams sharing the same basic dimensions. The first 300 pipe wagons were built at Derby works to diagram
MKD 08 BR 21.5 TON FLYASH HOPPER. Wagon Kit To cover Vacuum (CSV) and air braked types (CSA)
 and air braked types (CSA)") 1 MKD 08 BR 21.5 TON FLYASH HOPPER. Wagon Kit To cover Vacuum (CSV) and air braked types (CSA) History. Pulverised fuel ash (PFA), know as fly ash which is a by-product from the combustion process in coal
1 MKD 08 BR 21.5 TON FLYASH HOPPER. Wagon Kit To cover Vacuum (CSV) and air braked types (CSA) History. Pulverised fuel ash (PFA), know as fly ash which is a by-product from the combustion process in coal
Furness Railway Wagon Co.
 Furness Railway Wagon Co. The Parts. S&DJR/LMS/BR 20ton 6-Wheel Brake van Wheels, paint and transfers required to complete. Parts 13/15 Bolts/nuts/ washers Part 22 Part 5 Parts 10/19/20/21/ 23/24/25 Part
Wheels, paint and transfers required to complete. Please note that to aid the folding of the various parts score all the halfetched fold lines.
 Furness Railway Wagon Co. Furness Railway/LMS 45ton All Steel Bogie Iron Ore Hopper Wagon Built by The Pressed Steel Car Co. Pittsburgh, Pennsylvania, USA Circ. 1899 Wheels, paint and transfers required
Chopper Couplings. Assembly. Fitting
 Chopper Couplings Unlike most model chopper couplings, these will work with two opposing hooks, which looks so much better and allows you to turn stock at will. They are still compatible with most other
The 2mm Scale Association etched replacement chassis for RTR loco bodies
 The 2mm Scale Association etched replacement chassis for RTR loco bodies Required Parts List Chassis etch (supplied) Motor - for all designs the Association can motor is suitable, alternatives are shown
Welcome Wagons WW ton Mineral (2 & 4 shoe brake)
") Welcome Wagons WW13 16 ton Mineral (2 & 4 shoe brake) HISTORY The 16T open mineral wagon was the most numerous type built by BR from 1950 to 1957, the first diagram being 108, although there was 16T steel
Welcome Wagons WW13 16 ton Mineral (2 & 4 shoe brake) HISTORY The 16T open mineral wagon was the most numerous type built by BR from 1950 to 1957, the first diagram being 108, although there was 16T steel
7mm Axleguards AX1_7 RCH/MR Standard Axleguards
 AX1_7 RCH/MR Standard Axleguards Exhibitions, or through selected retailers. GX1_7 GWR Standard 4 bolt Axleguards Exhibitions, or through selected retailers. AX2/7 Pre Group General Axleguards (Includes
ALAN GIBSON, THE BUNGALOW CHURCH ROAD, LINGWOOD, NORWICH, NORFOLK. MIDLAND/L.M.S. Class 4F.
 ALAN GIBSON, THE BUNGALOW CHURCH ROAD, LINGWOOD, NORWICH, NORFOLK MIDLAND/L.M.S. Class 4F. These instructions and history should be carefully studied BEFORE starting on any assembly. The standard kit is
Finney7 BEYER PEACOCK BUILT LOCOMOTIVE
 BEYER PEACOCK BUILT LOCOMOTIVE Fig 1. Beyer, Peacock Built Locomotive Nos. 415-426 Depicted as built with short tanks, blower valve on the left, small dome, low tank front, 3 0 trailing wheels, snap head
Furness Railway Wagon Co.
 Furness Railway Wagon Co. The Parts. S&DJR/LMS/BR 10ton 4-Wheel Brake van Wheels, paint and transfers required to complete. Part 3 Part 2a Part 2b Part 5 Parts 8/9/10 Part 15 Part 15 Part 6 Part 4 Part
Brake Blocks Product Code BB_7. Brake Blocks Product Code BB_7. A product from: A product from:
 Brake Blocks Product Code BB_7 The brake block types provided by these etchings are: Early sin gle sided brakes (three 4 shoe Early ei ther sided brakes ( one 4 shoe set) Later ei ther sided brakes ( three
FINNEY7. 24 Jul 18 4 LNER A4. Fig 1. A4 GA Drawing
 Fig 1. A4 GA Drawing 24 Jul 18 4 COUPLING RODS & FRAME PREPARATION Coupling rods. The coupling rods are made so that they can be used as a jig to align the horn blocks accurately. First drill out all the
Build your own THUNDERBIRD 2
 PACK 03 PAGE 12 Pod 3 front hatch and Elevator Car 2 43 13 Pod 3 rear hatch and Elevator Car 2 46 14 Pod 3 floor and Elevator Car 2 49 15 Pod 3 frames and FAB 1 52 16 Pod 3 frames and FAB 1 55 17 Pod 3
Build your own THUNDERBIRD 2
 PACK 06 PAGE 33 Telescopic legs C and I.R.3 112 34 Telescopic legs D and I.R.3 115 35 Leg bases and Thunderizer 118 36 Landing feet and Elevator Car 3 121 37 Leg rail-gear racks and Elevator Car 3 124
Motorising Set for Corgi Feltham Tram BEC-KITS) Fitting instructions
 Fitting instructions") Motorising Set for Corgi Feltham Tram The KW Trams (ex BEC-KITS) motorising set for the Corgi Feltham tram contains 2 motorised maximum traction bogies, with link wiring, and 2 bolsters. The following
Motorising Set for Corgi Feltham Tram The KW Trams (ex BEC-KITS) motorising set for the Corgi Feltham tram contains 2 motorised maximum traction bogies, with link wiring, and 2 bolsters. The following
Brassmasters Scale Models
 Brassmasters Scale Models www.brassmasters.co.uk L&SWR/SOUTHERN RAILWAY DRUMMOND M7 0-4-4T LOCOMOTIVE KIT Designed by Martin Finney 4MM SCALE OO - EM - P4 INSTRUCTIONS AND PROTOTYPE NOTES PO Box 1137 Sutton
4mm scale 009 gauge Lodge Hill & Upnor railway Chattenden Drewry loco body kit.
 RT Models 4mm scale 009 gauge Lodge Hill & Upnor railway Chattenden Drewry loco body kit. HISTORY The loco was supplied by the Drewry car co. to the Lodge Hill & Upnor Railway in 1949, works number 2263.
Furness Railway Wagon Co.
 Furness Railway Wagon Co. Great Eastern Railway/LNER/BR 1900 Diagram 7 10ton Cattle Van Steel Under-Frame Wheels, paint and transfers required to complete. Please note that to aid the folding of the various
Furness Railway Coach Co.
 Furness Railway Coach Co. Outside Framed Coaches Paint and transfers required to complete. Part 32 Part 7/8 Part 9 Part 6 Part 31 Part 14 The Parts. Part 19 Parts 20/21/22 Part 5 Part 4 Part 1 Part 3 Part
NSWGR C30T LOCOMOTIVE AND TENDER KIT
 Australian Railway Kits ABN: 27 416 246 418 Incorporating Main West Models Manufacturers, Wholesalers and Retailers of Quality Australian Model Railways PO Box 252 Warwick, Queensland, 4370 Australia Phone/Fax:
- 0 Gauge - Southern Railway Class 02 Chassis Construction & Parts Identification
 - 0 Gauge - Southern Railway Class 02 Chassis Construction & Parts Identification I would recommend constructing the body to the fitting of parts 42 before starting chassis construction. As the basic body
Furness Railway Wagon Co. NBR/LNER 8ton 3PLK General Merchandise Wagon
 Furness Railway Wagon Co. General Merchandise Wagon Wheels, paint and transfers required to complete. Please note that to aid the folding of the various parts score all the halfetched foldlines that are
SEARAILS RR-XXX STEAM LOCOMOTIVES ASSEMBLY MANUAL
 SEARAILS RR-XXX 0-4-0 STEAM LOCOMOTIVES ASSEMBLY MANUAL 30 March 2015 T R Knapp Model Engineering 1 This diagram shows basic assembly of Nn3/Z Porter 0-4-0T 2 This diagram shows basic assembly of Baldwin
Furness Railway Wagon Co. NER/LNER/BR Cattle Van
 NER/LNER/BR Medium Cattle Van Wheels, paint and transfers required to complete. Part 1 The Parts. Part 4 Part 3 Part 2 Part 17 Part 5 Part 12/16 Part 11 Part 13/14/15 Part 6/7 Parts 8/9/10 not shown Assembly
FINNEY7. 24 Jul 18 A3-4 LNER A3. Fig 1. General Arrangement
 Fig 1. General Arrangement - 4 COUPLING RODS. The coupling rods are now made so that they can be used as a jig to align the hornguides accurately. First drill out all the crankpin holes to a convenient
RT Models. 4mm scale, 00/EM/P4 Manning Wardle, class K 0-6-0ST loco kit
 1 RT Models 4mm scale, 00/EM/P4 Manning Wardle, class K 0-6-0ST loco kit History The first of Manning Wardle s Class K was built in 1864. Many of these locos were mainly built for contractors with only
Finney7 PC May17 PRINCESS CORONATION. Fig 1. GA Curved Footplate
 Fig 1. GA Curved Footplate PC - 5 Fig 2. GA Utility Footplate PC - 6 COUPLING RODS & FRAME ASSEMBLY COUPLING RODS. The coupling rods are now made so that they can be used as a jig to align the remaining
Furness Railway Wagon Co. NER/LNER/BR Box Van
 Furness Railway Wagon Co. NER/LNER/BR G1 Box Van Wheels, paint and transfers required to complete. The Parts. Parts 8/9/10 12/13/15/16 Part Part 11 Part 6 Part 2 Part 3 Part 14 Part 1 Part 4 Parts 5/7
NSWGR Z Tank Locomotive
 Australian Railway Kits ABN: 27 416 246 418 Incorporating Main West Models Manufacturers, Wholesalers and Retailers of Quality Australian Model Railways PO Box 252 Warwick, Queensland, 4370 Australia Phone/Fax:
BRL-007 Detailing and Conversion Kit for NOVO/Triang Class 35 Hymek. Building Instructions
 Peter Besant Tel 07807225801 prmrp@fsmail.net www.prmrp.com BRL-007 Detailing and Conversion Kit for NOVO/Triang Class 35 Hymek Building Instructions SCALE MODEL PRODUCT FOR ADULT MODELLERS ONLY. WHITE
Tip: Water Crane with Servo Motor, LED Lantern, Moving Man Date: Update includes video
 Hi All, I ve had the Faller Swivel Water Spouts kit 120137 (B137 = old number) since 2000, which I will refer to as a Water Crane. I assembled the kit at the time with the intent of animating it with a
MANNING WARDLE ex-penrhyn Quarry Railway Narrow Gauge `Jubilee mm Scale kit for 16.5mm or 14mm Gauge
 EDM Models 19 Briar Avenue, Acomb, York. Y026 5BX MANNING WARDLE ex-penrhyn Quarry Railway Narrow Gauge 0-4-0 `Jubilee 1897 7mm Scale kit for 16.5mm or 14mm Gauge Introduction This kit, which was researched
Houstoun Gate Locomotive Works Gordon 4-Wheel Drive Chassis Assembly Instructions
 Houstoun Gate Locomotive Works Gordon 4-Wheel Drive Chassis Assembly Instructions It is suggested that you read these instructions through before commencing construction. A minimum of tools are needed
PYRTE. Building The Front Axle, Fork and Steering
 PYRTE Building The Front Axle, Fork and Steering The front axle on this traction engine is a very simple affair, in that it is a rectangular steel rod, sat on edge, with a pivot in the centre, which is
NSWGR C LOCOMOTIVE AND TENDER KIT
 Australian Railway Kits ABN: 27 416 246 418 Incorporating Main West Models Manufacturers, Wholesalers and Retailers of Quality Australian Model Railways PO Box 252 Warwick, Queensland, 4370 Australia Phone/Fax:
Furness Railway Wagon Co. Great Eastern Railway/LNER/BR Diagram 18 10ton 3 Plank General Merchandise Wagon Steel Under-Frame
 Furness Railway Wagon Co. Great Eastern Railway/LNER/BR Diagram 18 10ton 3 Plank General Merchandise Wagon Steel Under-Frame Wheels, paint and transfers required to complete. The Parts. Part 1 Part 5 Part
Novel Method for Gapping Rails
 Novel Method for Gapping Rails Wayne Perrier O Scale West 2013 www.americantieandtimber.com 1 My Dad was a Real Engineer O Scale West 2013 www.americantieandtimber.com 2 Something Completely Unrelated
Installation instructions, accessories - Rear Seat Entertainment
 XC90 Section Group Weight(Kg/Pounds) Year Month 3 39 2004 10 XC90 2003, XC90 2004, XC90 2005, XC90 2006, XC90 2007, XC90 2008 Replaces issue: 2003 12 J3904620 Page 1 of 18 Required tools A0000162 A0000163
Arlo Power Distribution Board Kit Rev B (#28996)
") Web Site: www.parallax.com Forums: forums.parallax.com Sales: sales@parallax.com Technical: support@parallax.com Office: (916) 624-8333 Fax: (916) 624-8003 Sales: (888) 512-1024 Tech Support: (888) 997-8267
Web Site: www.parallax.com Forums: forums.parallax.com Sales: sales@parallax.com Technical: support@parallax.com Office: (916) 624-8333 Fax: (916) 624-8003 Sales: (888) 512-1024 Tech Support: (888) 997-8267
Bachmann GWR Earl (Dukedog) EM Finescale Conversion
 EM Finescale Conversion") Bachmann GWR Earl (Dukedog) EM Finescale Conversion Before you start, it is a good idea to have some small containers or snap top poly bags to put screws and components in for safe keeping...much better
Bachmann GWR Earl (Dukedog) EM Finescale Conversion Before you start, it is a good idea to have some small containers or snap top poly bags to put screws and components in for safe keeping...much better
Bachmann D11 EM/S4 Finescale Conversion
 Bachmann D11 EM/S4 Finescale Conversion Before you start, it is a good idea to have some small containers or snap top poly bags to put screws and components in for safe keeping...much better than crawling
Mamod SL1K Locomotive Assembly Instructions
 Mamod SL1K Locomotive Assembly Instructions LOCOMOTIVE ASSEMBLY INSTRUCTIONS To ensure ease of construction reference to these instructions are essential. All the major parts are in the front of the box
The correct position of the bonding surface is: In the middle of the tire inner layer. In the area of the DOT stamp.
 5.4.6 Bonding position in the tire The correct position of the bonding surface is: In the middle of the tire inner layer. In the area of the DOT stamp. Dimensions of the bonding surface: Dimensions of
Roll Bar (MMRB-6.1 to -6.7)
") 3430 Sacramento Dr., Unit D San Luis Obispo, CA 93401 Telephone: 805/544-8748 Fax: 805/544-8645 www.maximummotorsports.com 1994-04 Roll Bar (MMRB-6.1 to -6.7) NOTE: These instructions cover Roll Bars with
3430 Sacramento Dr., Unit D San Luis Obispo, CA 93401 Telephone: 805/544-8748 Fax: 805/544-8645 www.maximummotorsports.com 1994-04 Roll Bar (MMRB-6.1 to -6.7) NOTE: These instructions cover Roll Bars with
Dinorwic Quarry Hunslet `Alice Class with cab 7mm Scale kit for 16.5mm or 14mm Gauge
 EDM Models 19 Briar Avenue, Acomb, York. Y026 5BX Dinorwic Quarry Hunslet `Alice Class with cab 7mm Scale kit for 16.5mm or 14mm Gauge Introduction This kit, which has been researched by Jonathan Matthews
Furness Railway Wagon Co. NER/LNER/BR C1 5ton Fitted Open Fish
 Furness Railway Wagon Co. NER/LNER/BR C1 5ton Fitted Open Fish Wheels, paint and transfers required to complete. Please note that to aid the folding of the various parts score all the halfetched foldlines
Bachmann. Climax. Phoenix Sound Systems, Inc West Liberty Road Ann Arbor MI
 Bachmann Climax Phoenix Sound Systems, Inc. 3514 West Liberty Road Ann Arbor MI 48103 www.phoenixsound.com phone: 800-651-2444 fax: 734-662-0809 e-mail: phoenixsound@phoenixsound.com 2004-2007 Phoenix
KITS AND FITTINGS CATALOGUE AND PRICE LIST
 Brassmasters Scale Models PO Box 1137 Sutton Coldfield West Midlands B76 1FU www.brassmasters.co.uk 4mm SCALE KITS AND FITTINGS CATALOGUE AND PRICE LIST 1 November 2012 email : sales@brassmasters.co.uk
Next, chase the threads in the lower A-arm mounts with the 5/8-18 tap and blowout any remaining particles.
 Next, chase the threads in the lower A-arm mounts with the 5/8-18 tap and blowout any remaining particles. Now, apply some anti-seize to the threads of the pivot stud. Also put anti-seize inside the bore
Instructions for Assembling Driving Wheels, Axles and Crankpins
 Instructions for Assembling Driving Wheels, Axles and Crankpins (Version 1; October 2008) Introduction These instructions explain how to assemble Exactoscale 4mm scale driving wheels, axles and crankpins
Furness Railway Wagon Co. Glasgow & South Western Railway/LMS/BR 12ton Mineral Steel Under-Frame
 Furness Railway Wagon Co. Glasgow & South Western Railway/LMS/BR 12ton Mineral Steel Under-Frame Wheels, paint and transfers required to complete. Please note that to aid the folding of the various parts
Detroit Speed, Inc. Second Generation Camaro/Firebird Mini-Tub Kit Camaro/Firebird P/N: ,
 Detroit Speed, Inc. Second Generation Camaro/Firebird Mini-Tub Kit 1970-1981 Camaro/Firebird P/N: 041222, 041223 The Detroit Speed Second Generation Camaro/Firebird Rear Mini-Tub Kit is designed to accommodate
400 SERIES STANDARD DUTY STRAIGHT TRACK INSTALLATION INSTRUCTIONS
 400 SERIES STANDARD DUTY STRAIGHT TRACK INSTALLATION INSTRUCTIONS PLEASE READ INSTRUCTIONS THOROUGHLY BEFORE BEGINNING. A. BI-PARTING TRAVEL BATTEN INSTALLATION 1. Place track either on the floor or on
PK016 SPRUNG BOGIE KIT BACHMANN CLASS 40
 ASSEMBLY INSTRUCTIONS PK016 SPRUNG BOGIE KIT BACHMANN CLASS 40 PenBits Model Railways www.penbits.co.uk c/o 12 Fieldside, Long Wittenham, ABINGDON, Oxon, OX14 4QB Table of Contents 2/67 Table of Contents
type r remote drive for auxiliary
 type r remote drive for auxiliary KICKER MOTORs installation MANUAL OC15374 03/08/2013 Revision NEW First Edition Revision History Description 2013 Canada Metal (Pacific) Limited. All rights reserved.
Cleaning, Maintenance and Repair
 aluminium www.egaluminium.co.uk Cleaning, Maintenance and Repair Aluminium and PVC-U Windows, Doors and Architectural Products Windows - Doors - Bi-Folds - Roof Lanterns - Shop Fronts Tel: 01823 618181
Detroit Speed, Inc. Mini-Tub Kit Chevy Nova, Oldsmobile Omega, Pontiac Ventura P/N: &
 Detroit Speed, Inc. Mini-Tub Kit 1968-74 Chevy Nova, Oldsmobile Omega, Pontiac Ventura P/N: 041207 & 041208 Item Component Quantity 1 DSE Mini Tubs 1968-74 X-Body 2 2 Rear Upper Shock Crossmember 1 3 Upper
Stephenson's Valve Gear: 7mm cast white-metal kit 19 th Century swing-link version - non-working, cosmetic only. Instructions
 SER-Kits Stephenson's Valve Gear: 7mm cast white-metal kit 19 th Century swing-link version - non-working, cosmetic only Page 1 of 5 Instructions HEALTH & SAFETY: The castings contain some lead. Dispose
Furness Railway Wagon Co. CR/HR/LMS/PO 8ton 4PLK General Merchandise Wagon
 Furness Railway Wagon Co. CR/HR/LMS/PO 8ton 4PLK General Merchandise Wagon Wheels, paint and transfers required to complete. Please note that to aid the folding of the various parts score all the halfetched
Hornby GWR Star Class EM Finescale Conversion.
 Hornby GWR Star Class EM Finescale Conversion. Before you start, it is a good idea to have some small containers or snap top poly bags to put screws and components in for safe keeping...much better than
Hornby Railroad Crosti 9F EM Finescale Conversion.
 Hornby Railroad Crosti 9F EM Finescale Conversion. Before you start, it is a good idea to have some small containers or snap top poly bags to put screws and components in for safe keeping...much better
INSTALLATION INSTRUCTIONS
 INSTALLATION INSTRUCTIONS Trans4mer Grille Guard/Winch Mount For 2007 Toyota Tundra Kit 76380 (Black) and 76381 (Stainless) Your safety, and the safety of others, is very important. To help you make informed
WARNING. When installed in accordance with these instructions, the front protection bar does not affect operation of the SRS airbag.
 Part Number: 343870 F/Kit 17557 Product Deluxe Combination Winch and Non Winch Bull Bar Description: Suited to Nissan XTERRA 05ON USA Only vehicle/s: WARNING REGARDING VEHICLES EQUIPPED WITH SRS AIRBAG;
Jabiru J170/230/430/250/450 Constructors Manual. Pre-Paint>Fuselage>Undercarriage>Assemble main gear
 Objectives of this task: In this task you will assemble the main undercarriage legs, which includes fitting the axles, disc brakes and wheels and adjusting the brakes. Materials required: Cards # J8 Dual
Arlo Power Distribution Board Kit Rev B (#28996)
") Web Site: www.parallax.com Forums: forums.parallax.com Sales: sales@parallax.com Technical: support@parallax.com Office: (916) 624-8333 Fax: (916) 624-8003 Sales: (888) 512-1024 Tech Support: (888) 997-8267
Web Site: www.parallax.com Forums: forums.parallax.com Sales: sales@parallax.com Technical: support@parallax.com Office: (916) 624-8333 Fax: (916) 624-8003 Sales: (888) 512-1024 Tech Support: (888) 997-8267
INSTALLATION INSTRUCTIONS
 INSTALLATION INSTRUCTIONS Accessory MOON P/N 08R01-SZA-101 Application 2014 PILOT Publications No. AII 50258 Issue Date AUG 2013 PARTS LIST TOOLS AND SUPPLIES REQUIRED Phillips screwdriver 10 mm Combination
Drag Race Roll Bar (MMRB-6, -7)
") 3430 Sacramento Dr., Unit D San Luis Obispo, CA 93401 Telephone: 805/544-8748 Fax: 805/544-8645 www.maximummotorsports.com 1994-04 Drag Race Roll Bar (MMRB-6, -7) The Maximum Motorsports 6-point Drag Race
3430 Sacramento Dr., Unit D San Luis Obispo, CA 93401 Telephone: 805/544-8748 Fax: 805/544-8645 www.maximummotorsports.com 1994-04 Drag Race Roll Bar (MMRB-6, -7) The Maximum Motorsports 6-point Drag Race
KITS AND FITTINGS CATALOGUE AND PRICE LIST
 Brassmasters Scale Models PO Box 1137 Sutton Coldfield West Midlands B76 1FU www.brassmasters.co.uk 4mm SCALE KITS AND FITTINGS CATALOGUE AND PRICE LIST 1 March 2014 email : sales@brassmasters.co.uk Payment
1. Invert the tender, and hold in a suitable device. We use a foam cradle the Peco loco service cradle being ideal.
 Bachmann J11 EM Finescale Conversion Before you start, it is a good idea to have some small containers or snap top poly bags to put screws and components in for safe keeping...much better than crawling
Bachmann 1F (Half Cab) EM Finescale Conversion
 EM Finescale Conversion") Bachmann 1F (Half Cab) EM Finescale Conversion Before you start, it is a good idea to have some small containers or snap top poly bags to put screws and components in for safe keeping...much better than
Bachmann 1F (Half Cab) EM Finescale Conversion Before you start, it is a good idea to have some small containers or snap top poly bags to put screws and components in for safe keeping...much better than
SS1135HF Jeep KJ Cherokee CRDI4 2.8Litre-I4 Diesel Engine
 SS1135HF Jeep KJ Cherokee CRDI4 2.8Litre-I4 Diesel Engine Parts List 23/2/2010 ITEM PART NO DESCRIPTION QTY 1 965-133-000 BODY - SNORKEL (SS1130HF) 1 2 000-135-800 3 ½" AIR RAM ASSEMBLY 1 3 965-032-000
Micro-Trains #1021/#1022 Low short profile coupler
 1 Micro-Trains #1021/#1022 Low short profile coupler Low short profile coupler, for locomotives and cars with limited mounting area, makes 2 pair of either (1021) Life-Like E8A Pilot or Bachmann 4-8-4
INSTALLATION INSTRUCTIONS
 INSTALLATION INSTRUCTIONS Accessory Application Publications No. AII 27955 SIDE 2005 CIVIC SI Issue Date AUG 2004 PARTS LIST Left side under spoiler Right side under spoiler 6 Plates 8 Clips Template INSTALLATION
Owners Manual and Parts List. Modern Ton 33" Wheel Roller Bearing Freight Car Truck, 1 1/2 Scale Catalog Number 15T1A or 15T1B
 Owners Manual and Parts List Modern 70-100 Ton 33" Wheel Roller Bearing Freight Car Truck, 1 1/2 Scale Catalog Number 15T1A or 15T1B Features True Roller Bearing Design - Same as Prototype - Double Sealed
130' TURNTABLE. N Scale Structure Built-up
 933-2613 I sheet 12/15/05 12:25 PM Page 1 N Scale Structure Built-up 933-2613 130' TURNTABLE Thanks for purchasing this Cornerstone Series Built-up. HISTORY OF THE TURNTABLE Although we associate turntables
Caution Improper installation could result in tape failure, mounting hardware, and reader. Please read instructions before installing!
 Elgo Sensor Mounting Motion High Speed Landing/Positioning System The encoded tape used for the landing system is suspended between two mounting brackets that attach to the car rail using forged clips
Installation Instructions Supertop for Truck
 Installation Instructions Supertop for Truck Vehicle Application: Ford F-150 5.5 Ft. Styleside 2004 and newer Part Number: 76309 www.bestop.com - We re here to help! Visit our web site and click on Ask
Tip: 3425 Kittle Loco with LP4.0 Micro Conversion and LED Lighting Date: , Corrections Addition Link added
 Hi All, This is the last of Rudolf s LokPilot Micro V4.0 decoder conversions. He asked me to convert his Märklin Delta 3425 steam locomotive and wanted to improve the lighting effects for the cabin, change
INSTALLATION INSTRUCTIONS
 INSTALLATION INSTRUCTIONS MODEL: GRAFTON RH-510 1 REV.A Restoration Hardware Balance Pressure Tub /Shower Set Specification Diagram Ensure that the stop ring () is correctly installed, prior to finished
Application Tooling Specification Sheet
 Tool Kit Order No. 63811-6570 FEATURES Application Tooling Specification Sheet TYPE 2C Hand Crimp Tool Order No. 63811-6500 % A full cycle ratcheting hand tool ensures complete crimps % Ergonomically designed
TECHNICAL BULLETIN. Servicing Meritor TM EASY STEER PLUS TM Series Unitized Truck Hub Unit Assembly
 TP-9819 Revised 12-97 TECHNICAL BULLETIN Servicing Meritor TM EASY STEER PLUS TM Series Unitized Truck Hub Unit Assembly Attention Freightliner dealers and direct warranty customers. Please discard this
THE ENGINE & INTERIOR Completing this section of your Aston Martin DB5 model.
 THE PARTS YOU WILL NEED: READER-ASSEMBLED SECTIONS: Bulkhead Speaker 081-a Floor panel Dashboard Engine and fan belt Bulkhead Front wheels Speaker NUMBERED PARTS: 078-A : Left spring retainer 078-B : Right
Build your own THUNDERBIRD 2
 PACK 01 STAGE PAGE 01 Nose assembly and Elevator Car rear wheels 3 02 Cockpit interior and Elevator Car 1 completion 7 03 Missile launcher and Thunderbird 4 11 04 Nose assembly and the Tracy brothers 15
DC Series Installation Manual (# )
") DC Series Installation Manual (# 101630) Page 1 of 33 In this booklet you will find: TOWER INSTALLATION... 3 U-Bolt Style mount... 4 Side Frame Style mount... 4 PIVOT INSTALLATION... 5 External Pivot Installation:
DC Series Installation Manual (# 101630) Page 1 of 33 In this booklet you will find: TOWER INSTALLATION... 3 U-Bolt Style mount... 4 Side Frame Style mount... 4 PIVOT INSTALLATION... 5 External Pivot Installation:
Kit No Please read these instructions completely before proceeding with installation. Figure 1 MN-614 (06601) ECR
 ECR") Kit No. 57291 MN-614 (06601) ECR 5445 Please read these instructions completely before proceeding with installation. by www.airliftcompany.com Figure 1 1 Hardware List Item Part No. Description Quantity
Kit No. 57291 MN-614 (06601) ECR 5445 Please read these instructions completely before proceeding with installation. by www.airliftcompany.com Figure 1 1 Hardware List Item Part No. Description Quantity
Personal Protection Equipment (PPE) Safety Glasses Protect eyes Welding Mask Protect eyes and face
 Safety Glasses Protect eyes Welding Mask Protect eyes and face") Table of Contents: Title Page... 1 Introduction... 3 Before Construction... 3 Equipment Needed... 3 Drawings... 4 Construction... 5 1. Cut Sheet Drawings... 5 2. Base... 5 3. Combustion Chamber... 12 4.
Table of Contents: Title Page... 1 Introduction... 3 Before Construction... 3 Equipment Needed... 3 Drawings... 4 Construction... 5 1. Cut Sheet Drawings... 5 2. Base... 5 3. Combustion Chamber... 12 4.
E17H RAIL WHEEL INSPECTION
 E17H RAIL WHEEL INSPECTION PURPOSE AND SCOPE This Procedure applies to all items of rolling stock purchased or acquired through hiring or other means by Laing O Rourke for the railway operations they will
General Information R B F L. Grease Bank Kit 7- and 10-Foot EWNT Drills. Kit Description. Call-Outs. Installation Instructions 1
 Installation Instructions 1 Grease Bank Kit 7- and 10-Foot EWNT Drills Used with: 705 (all models) 1005 (all models) General Information These instructions explain how to install a Grease Bank Kit. These
Heljan EM Finescale Conversion.
 Heljan 02 2-8-0 EM Finescale Conversion. Before you start, it is a good idea to have some small containers or snap top poly bags to put screws and components in for safe keeping...much better than crawling
The H-MAC Heavy Metal Articulating Chassis Construction Guide
 The H-MAC Heavy Metal Articulating Chassis Construction Guide The Heavy Metal Chassis is constructed with two identical drive modules built using 10 mechanical sub-assemblies. The drive modules are integrated
60-65 Falcon, Comet & Ranchero Coil Spring IFS
 60-65 Falcon, 62-65 Comet & 62-65 Ranchero Coil Spring IFS All engine installations with this front end will require a rear sump oil pan. 289-302 Small Block Ford Motors Milodon rear sump pan holds 7 quarts
Application Tooling Specification Sheet
 Tool Kit Order No. 63811-7070 FEATURES Application Tooling Specification Sheet TYPE 2C Hand Crimp Tool Order No. 63811-7000 % A full cycle ratcheting hand tool ensures complete crimps % Ergonomically designed
Installation Instructions Supertop for Truck
 Installation Instructions Supertop for Truck Vehicle Application: Ford F-150 Regular / Super Cab 2004 2011 (6.5 ft.) Part Number: 76305 US Patent 6827391 www.bestop.com - We re here to help! Visit our
C15C C15C. Page 1 of 20
 2 x Lid Front Hinge 1135 8 x M8 Bolt 8 x M8 Washer (3mm Thick) 4 x M6 Large washers 4 x M6 Spring washers 4 x M6 x 40mm Bolts 6 x M6 20mm Bolts 6 x M6 Washers 20 x Screws 2 x Lid mount gas strut bracket