Build your own THUNDERBIRD 2
|
|
|
- Sharon Wilson
- 5 years ago
- Views:
Transcription


1 PACK 06

2 PAGE 33 Telescopic legs C and I.R Telescopic legs D and I.R Leg bases and Thunderizer Landing feet and Elevator Car Leg rail-gear racks and Elevator Car Leg rail-gear racks and Elevator Car Leg rail-gear pinions and Monobrake 130 Editorial and design by Continuo Creative, North Road, London N7 9DP. Published. in the UK by De Agostini UK Ltd, Battersea Studios 2, 82 Silverthorne Road, London SW8 3HE. Published in the USA by De Agostini Publishing USA, Inc., 121 E. Calhoun Street, Woodstock, IL All rights reserved 27 Warning: Not suitable for children under the age of 14. This product is not a toy and is not designed or intended for use in play. Items may vary from those shown.


3 33 Build your own TELESCOPIC LEGS C YOUR PARTS + I.R.3 Legs C x 4 Slide a leg C over the tip of one of the leg assemblies, like this. 02 Make sure the leg parts A, B and C are arranged like this. Repeat for all the legs. 112


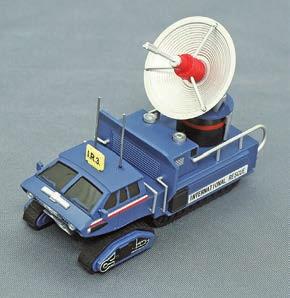
4 I.R.3 Tools and materials: Superglue, tweezers Ladder Body details x 4 De-icer unit Transmitter struts x 2 Dish Transmitter arms Transmitter base A Transmitter base B Transmitter aerial Cable Transmitter base unit Transmitter platform Transmitter condenser Glue the transmitter base A to the centre of the arms like this. Glue the transmitter base B Now glue this to the dish s to the assembly like this. centre pin, like this. 05 Rear Front No glue The tips of the transmitter arms should touch the edge of the dish. Now fit, without glue, a transmitter strut to this hole on the condenser. Orient the parts as shown. The parts should be able to move a little, but their standard position should be like this. Repeat for the other strut Glue the condenser to the transmitter platform via its two struts. The parts should look like this. Make sure they are oriented as shown. Now fit the platform to the base unit like this.


5 Fit the straight end of the cable to this hole, again without glue. Its other, curved end, fits in here, also without glue. Glue the ladder to this slot. Your assembly should look like this Glue the body details to the body, here here here and here. Check all are seated securely. The de-icer unit goes here. Make sure the orientation is correct 23 Next, fit the transmitter base assembly to this hole, without glue. 24 Glue the dish in place, here. The D-shaped post and hole will ensure it is the right way up. 25 Finally, glue the transmitter aerial here. 114


6 34 Build your own TELESCOPIC LEGS D YOUR PARTS + I.R.3 Legs D x 4 Fit a leg D in the same way 02 you have done previously. Make sure the parts sit together neatly, like this. Repeat for all four leg assemblies. 115


7 I.R.3 Tools and materials: Superglue, tweezers Build your own Name plate Battery covers x 2 Aerials x 2 Wing mirrors x 2 Rails L Rails R Top 02 Fit a battery cover here. Unless specified, all parts used in this stage will be glued. 04 Make sure it is positioned correctly. Fit the other cover here positioned as shown. Fit the main body assembly to the chassis, without glue. The details (inset) are at the rear of the chassis. 116 Fit the parts securely.


8 Right Left Carefully remove the rails from their sprue, cutting along these lines. Fit the curved tip of the left rail into this hole. Be careful with these thin parts. Now fit the other pins into these holes Repeat for the right rail. Again, fit all the pins into their holes. Glue a wing mirror here, its silver face pointing backwards The other one goes here. Check both are level. The name plate fits in this slot like this. The aerials go here. 117


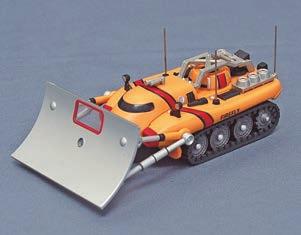
9 35 Build your own LEG BASES YOUR PARTS Tools and materials: Screwdriver + THUNDERIZER Leg bases x 4 Fixing screws x 9 02 Fit one of the leg bases into this hole, from the inside of the underframe. Make sure the part s tabs come to rest onto these mounting posts. Use two screws to secure the leg base Repeat Steps - to fit all four bases like this. 118 (Nose section temporarily fitted.)


10 THUNDERIZER Tools and materials: Superglue, tweezers Light Cockpit interior Body Gun barrel Chassis Side detail R Cockpit Canopy Side detail L Turret Tracks x Slot one of the tracks into the side-facing recess on the chassis. Glue the tracks in position. Unless specified, all parts will be glued in this stage. Now fit the other set of tracks like this. Make sure the parts are flush with the chassis. 05 Narrow Wide Fit the cockpit interior to the cockpit like this. Be sure to orient the parts as shown. Now fit the canopy over it. 119 Find the L and R marks on the side details.


11 Fit the left detail into this slot. Fit the right one here. The parts should look like this Fit the turret to this slot. The gun barrel will fit into the turret through its underside, like this. Do not glue these parts. The pins on either side of the gun barrel will sit in these slots With the gun barrel still in place, join the cockpit/turret assembly to the body. Your assembly should look like this. Now add the chassis, oriented as shown here. The end with the detailing is the front of the chassis. Check the parts are secure Fit the light here like this. Check the gun can swing up and down freely. 120


12 36 Build your own LANDING FEET YOUR PARTS + ELEVATOR CAR 3 Landing feet x 4 Fixing screws x 5 Feed one of your telescopic leg assemblies through the first leg base fitted in the previous stage. 02 The metal leg sections should fit right through, but with the tip of their spring still visible. Turn the model over and fit a landing foot onto the leg s tip, oriented as shown. Make sure all the parts stay in position as you do this. 04 A fixing screw will secure it. 121


 Rear chassis")


13 05 Turn the screw all the way in to secure the foot to the leg (the leg will still be able to turn). 06 The parts should look like this. 07 Repeat for all the legs and feet. ELEVATOR CAR 3 Tools and materials: Superglue Rear wheels x 8 (Nose section temporarily fitted.) Rear axles x 2 Rear hubcaps x 4 Rear chassis (lower section) Rear chassis (upper section) Rear buffer Slide two wheels over the tip of one of the axles, silver side first, so that the side with the central recess faces out. 02 Now push a hubcap onto the ribbed end of the axle to secure the wheels. 122


14 04 05 Slide the wheels back up the axle until they rest against the hubcap. Repeat Steps to fit two more wheels and hubcaps to the other end of the axle. Make sure both pairs of wheels fit together snugly and are pushed up against the hubcaps, as shown Repeat Steps to fit another set of wheels to the second axle. Complete the second axle with another set of wheels. Here is how the two completed axle assemblies should look Glue the rear buffer here. Fit the wheel/axle sets to the lower chassis. There should be no gaps Glue the upper chassis to the lower chassis via these pins like this. 123


15 37 Build your own LEG RAIL-GEAR RACKS YOUR PARTS + ELEVATOR CAR 3 Rail-gear rack L2 Rail-gear rack L1 02 Find the L1 and L2 markings on the two rail-gear racks, printed onto the reverse of the parts. Gently work the front-left leg s spring up through its metal sections, then place the L2 rack s mounting screw into its tip. Turn the rack into the spring. 124


16 Do not glue the parts, but make sure they are securely fixed, and that the screwed section of the rack is fully inserted into the spring. Repeat this for the L1 rack at the rear-left leg. Again, turn the rack so it affixes tightly to the spring like this. That completes this assembly. ELEVATOR CAR 3 Tools and materials: Superglue (Nose section temporarily fitted.) Hubcap Front chassis upper Front chassis lower Front wheels x 4 Hubcap Axle Front nozzles Number plate Side blocks (left) (right) Air intakes (left) (right) Transmission cables x 2 Suspension damper 125


17 02 Assemble the front wheels and their hubcaps on the axle in the same way as previous wheel sets. Glue the nozzles to the upper front chassis, angled as those in the inset. Now fit the transmission cables to the lower chassis, without glue R 06 L Seat the axle in its slots, then seal them in by joining the upper and lower chassis. Use glue on the indicated pins. Glue the side blocks to these slots (they have R and L marked on them). Now add the air intakes 底面底面 Connect the front chassis section to the rear chassis upper (holding both parts upside down) via the arrowed tabs and slots Link the transmission cables to the holes in the rear chassis. Now glue the suspension damper into its position, shown here. Fit the number plate. The chassis of Elevator Car 3 is complete. 126


 spring coming from the")
18 38 Build your own LEG RAIL-GEAR RACKS YOUR PARTS + ELEVATOR CAR 3 Rail-gear rack R2 A. スライドギア R2 R2 B. スライドギア R1 Rail-gear rack R1 02 Find the R1 and R2 markings on the two rail-gear racks, printed onto the reverse of the parts. Fit the R2 rack s mounting screw into the (extended) spring coming from the front-right leg. Turn the rack into the spring. 127


19 Do not glue the parts, but make sure they are securely fixed, and that the screwed section of the rack is fully inserted into the spring. Repeat this for the R1 rack at the rear-left leg. Again, screw the parts together like this. That completes this assembly. ELEVATOR CAR 3 Tools and materials: Superglue (Nose section temporarily fitted.) Platform Platform frames (long) x 2 Compressor cage Platform frames (short) x 2 Suspension arms x 2 Compressor Hydraulic jack 128

.")


20 02 Take all the platform frames and glue their ends together via the square tabs and matching holes (arrow). Once the superglue has dried, place the frame over the raised ridge on the underside of the platform. Let the glue dry Fit the compressor to the platform underside as shown. Then use glue to secure the cage over it. Now take the hydraulic jack and fit it into the arrowed section above. Its thinner and thicker pins have correspondingly sized holes to make sure you position the part correctly Glue one of the suspension arms to the arrowed holes on the platform underside. The tab at the join of the arms should be on the inside, facing the jack. Repeat for both suspension arms. Lower the platform onto the chassis, so the tabs on its suspension arms and hydraulic jack fit into the slots on the chassis rear section. Use glue to secure the parts. 129


21 39 Build your own LEG RAIL-GEAR PINIONS YOUR PARTS + MONOBRAKE Pinion gears x 2 02 Fit the first pinion gear here. Position the part exactly as shown. It should sit in the space like this. Do not glue this part. The other pinion goes across from the first, in this space Again, do not glue this part. Both pinions are in place. 130 (Nose section temporarily fitted.)


22 MONOBRAKE Tools and materials: Superglue, tweezers, side cutters Wheels A x 8 Axles x 4 Wheels B x 8 Tracks x 2 Chassis lower 02 Remove all the wheels from their sprues. Carefully trim away any burrs. Glue the wheels parts A and B together like this Press the parts to bond them. You should have eight wheels. Fit one wheel onto an axle, like this. 131


23 Fit another to the opposite axle tip. Press the wheels together. At the halfway point of the build, your Thunderbird 2 Rescue Collection is really beginning to take shape! Repeat so you have all eight wheels fitted to their axles. 132
Build your own THUNDERBIRD 2
 PACK 03 PAGE 12 Pod 3 front hatch and Elevator Car 2 43 13 Pod 3 rear hatch and Elevator Car 2 46 14 Pod 3 floor and Elevator Car 2 49 15 Pod 3 frames and FAB 1 52 16 Pod 3 frames and FAB 1 55 17 Pod 3
Build your own THUNDERBIRD 2
 PACK 04 PAGE 19 Pod 3 base 66 20 Pod 3 details and Firefly 69 21 Pod 3 laboratory and Firefly 72 22 Pod 3 floor details and Firefly 75 23 Pod 3 inspection walkways 78 24 Pod 3 right inner wall 81 25 Pod
Build your own THUNDERBIRD 2
 PACK 01 STAGE PAGE 01 Nose assembly and Elevator Car rear wheels 3 02 Cockpit interior and Elevator Car 1 completion 7 03 Missile launcher and Thunderbird 4 11 04 Nose assembly and the Tracy brothers 15
Build your own THUNDERBIRD 2
 PACK 12 STAGE PAGE 74 Tailwing ramjets and Cobra Half-track 247 75 Tailwing intakes 250 76 Tailwing fins 253 77 T2 control board 255 78 T2 wings and Mobile Crane 258 79 T2 side frames and Mobile Crane
Build your own THUNDERBIRD 2
 PACK 11 PAGE 67 Pod 4 ramp tracks and Jet Air Transporter 224 68 Left rear booster and Alan s Racing Car 227 69 Right rear booster and Alan s Racing Car 230 70 Left booster speaker 233 71 Right rear booster
Build the legendary PORSCHE RS 2.7. Pack 12
 Build the legendary PORSCHE RS 2.7 Pack 12 Build the legendary P O R S C H E RS 2.7 Contents PAGE STAGE 92 The rear shelf 368 93 The engine cover 372 94 The engine cover hinges 376 95 The rear panel 380
The front wheel and mirror
 Pack 01 1 The fuel tank 3 2 The front wheel and mirror 5 3 The headlight 6 Editorial and design by Continuo Creative, 39-41 North Road, London N7 9DP. Published in the UK by De Agostini UK Ltd, Battersea
Build the legendary PORSCHE RS 2.7. Pack 5
 Build the legendary PORSCHE RS 2.7 Pack 5 Build the legendary P O R S C H E RS 2.7 Contents PAGE STAGE 29 Rear disc brake 120 30 Rear wheel 123 31 Rear disc brake 126 32 Rear wheel 129 33 The crankcase
Build the legendary PORSCHE RS 2.7. Pack 3
 Build the legendary PORSCHE RS 2.7 Pack 3 Build the legendary P O R S C H E RS 2.7 Contents PAGE STAGE 13 The rear engine cover 55 14 The left intake manifolds and throttle bodies 59 15 The right intake
Build the. Steam Locomotive. Pack 01
 Build the Steam Locomotive Pack 01 Build the Steam Locomotive Contents Step by step Stage 01: The smokebox door Stage 02: The smokebox Stage 03: The first driving wheels and coupling rods Stage 04: The
Build your own. Pack. Stages 39-42: Receive more of Robi s electrical components
 Build your own Pack 11 Stages 39-42: Receive more of Robi s electrical components Build your own All rights reserved 2016 CONTENTS Published in the UK by De Agostini UK Ltd, Battersea Studios 2, 82 Silverthorne
3D PRINTER. Pack 09. Anything you can imagine, you can make! 3D technology is now available for you at home! BUILD YOUR OWN
 BUILD YOUR OWN Pack 09 Anything you can imagine, you can make! 3D PRINTER Compatible with Windows 7 & 8 Mac OS X 3D technology is now available for you at home! www.model-space.com BUILD YOUR OWN 3D PRINTER
BUILD YOUR OWN. Pack 16
 BUILD YOUR OWN TM Pack 6 0 CONTENTS Assembly Guide 43 Stage 5: The left fuel tank base Stage 5: The engine cables Stage 53: The LED tester Editorial and design by Continuo Creative, 39-4 North Road, London
3D PRINTER. Pack 10. Anything you can imagine, you can make! 3D technology is now available for you at home! BUILD YOUR OWN
 BUILD YOUR OWN Pack 10 Anything you can imagine, you can make! 3D PRINTER Compatible with Windows 7 & 8 Mac OS X 3D technology is now available for you at home! BUILD YOUR OWN 3D PRINTER CONTENTS PACK
Instructions: Pullman-Standard PS-3 Coal Hopper Kit Tangent Part Numbers: through /2015
 Instructions: Pullman-Standard PS-3 Coal Hopper Kit Tangent Part Numbers: 15000-01 through 15001-01 10/2015 Thank you for purchasing the Tangent Scale Models Pullman-Standard PS-3 Coal Hopper Kit! A few
Chopper Couplings. Assembly. Fitting
 Chopper Couplings Unlike most model chopper couplings, these will work with two opposing hooks, which looks so much better and allows you to turn stock at will. They are still compatible with most other
Instructions: General American 6,000 Gallon, 3-Compartment Tank Car Kit 11/2013
 Instructions: General American 6,000 Gallon, 3-Compartment Tank Car Kit 11/2013 Thank you for purchasing the Tangent Scale Models General American 6,000 Gallon, 3- Compartment Tank Car Kit! A few quick
ASSEMBLY MANUAL. Kit features. MS:76
 ASSEMBLY MANUAL MS:76 Graphics and specfications may change without notice. Specifications: Wingspan---------------------------------------------------- 82.8 in------------------------------------- 210.3cm.
Instructions: PRR Sam Rea Shops X58 Class Box Car Kit Tangent Part Numbers: XX through XX 9/2015
 Instructions: PRR Sam Rea Shops X58 Class Box Car Kit Tangent Part Numbers: 14000-XX through 14002-XX 9/2015 Thank you for purchasing the Tangent Scale Models PRR Sam Rea Shops X58 Class Box Car Kit! A
C15C C15C. Page 1 of 20
 2 x Lid Front Hinge 1135 8 x M8 Bolt 8 x M8 Washer (3mm Thick) 4 x M6 Large washers 4 x M6 Spring washers 4 x M6 x 40mm Bolts 6 x M6 20mm Bolts 6 x M6 Washers 20 x Screws 2 x Lid mount gas strut bracket
RECOMMENDED MOTOR AND BATTERY SET UP
 SPECIFICATION - Wingspan: 6000mm (236.2 in) - Length: 2873mm (113.1 in) - Flying weight: 14-18 kg - Wing area: 219.4 dm2 - Wing loading: 64g/dm2 - Wing type: HQ airfoils - Covering type: Genuine ORACOVER
Introduction Date: October 2007 Pt No INSTRUCTION KIT JOINER RF 1 KIT COMPONENTS
 KIT COMPONENTS Part Illustration Rear Bracket Description Front Lower Bracket KIT APPLICATION This kit is designed for use on 1595mm / 62 & 1695mm / 66 high cabinet models, incorporating the B, C, D &
WARNING. Part Number: Description: Suited to TOYOTA FJ CRUISER ALSO, NOTE THE FOLLOWING:
 Part Number: 5620010 Product ARB REAR BAR Description: Suited to TOYOTA FJ CRUISER vehicle/s: ALSO, NOTE THE FOLLOWING: WARNING This product must be installed exactly as per these instructions using only
One- Touch Installation Instructions
 One- Touch Installation Instructions 1 1 Height Adjustable Pivot w/ screws 9 Upper Work Surface 2 Rail Mount Knobs 10 Back Cover 3 Transformer 11 Center Pivot w/ screws 4 Support Legs 12 Left Monitor Arm
Instruction Manual. Wingspan : 1694mm (66.69 in) : 1470mm (57.87 in) : 3200gr gr. : 61 two stroke/ 71 four stroke. : 6 channel / 7 servo
 : 1470mm (57.87 in) : 3200gr gr. : 61 two stroke/ 71 four stroke. : 6 channel / 7 servo") Wingspan : 1694mm (66.69 in) g Length : 1470mm (57.87 in) Weight : 3200gr - 3800gr Engine : 61 two stroke/ 71 four stroke Radio : 6 channel / 7 servo KIT CONTENTS: We have organized the parts as they
Wingspan : 1694mm (66.69 in) g Length : 1470mm (57.87 in) Weight : 3200gr - 3800gr Engine : 61 two stroke/ 71 four stroke Radio : 6 channel / 7 servo KIT CONTENTS: We have organized the parts as they
Instructions: PRR / PC Shops G43 Series Gondola Kit Tangent Part Numbers: through /2016
 Instructions: PRR / PC Shops G43 Series Gondola Kit Tangent Part Numbers: 17000-01 through 17002-02 8/2016 Thank you for purchasing the Tangent Scale Models PRR / PC Shops G43 Series Gondola Kit! A few
ASSEMBLY MANUAL. Graphics and specifications may change without notice.
 NEMESISMS: SEA 111 ASSEMBLY MANUAL Graphics and specifications may change without notice. Specifications Wing span------------------------------------- 55.9in ------------------------------- 142cm. Wing
RECOMMENDED EDF AND BATTERY SET UP
 SPECIFICATION - Wingspan: 1150mm (45.3 in) - Length: 1587mm (62.5 in) - Flying weight: 5.0-5.3 kg - Wing area: 40dm2 - Wing loading: 125g/dm2 - Wing type: Naca airfoils - Covering type: Genuine ORACOVER
RECOMMENDED MOTOR AND BATTERY SET UP
 SPECIFICATION - Wingspan: 1404mm (55.3in) - Length: 1134mm (44. 6 in) - Flying weight: 3.2-3.4 kg - Covering type: Genuine ORACOVER - Spinner size: scale type (not included) - Radio: 4 channel minimum
Instruction Manual. Wingspan : 1884 mm (74.17 in) Length. Weight. Engine. : 4 channels / 5 servo standard. : 1450 mm (57.
 Length. Weight. Engine. : 4 channels / 5 servo standard. : 1450 mm (57.") Wingspan : 1884 mm (74.17 in) Length : 1450 mm (57.09 in) Weight : 4000 gr Engine : 60 two strokes Radio : 4 channels / 5 servo standard KIT CONTENTS: We have organized the parts as they come out of the
Wingspan : 1884 mm (74.17 in) Length : 1450 mm (57.09 in) Weight : 4000 gr Engine : 60 two strokes Radio : 4 channels / 5 servo standard KIT CONTENTS: We have organized the parts as they come out of the
Instructions for Assembling Driving Wheels, Axles and Crankpins
 Instructions for Assembling Driving Wheels, Axles and Crankpins (Version 1; October 2008) Introduction These instructions explain how to assemble Exactoscale 4mm scale driving wheels, axles and crankpins
SMITHS CAR CLOCK REPAIR KIT
 SMITHS CAR CLOCK REPAIR KIT Version 9 1 Introduction These instructions explain how to repair a Smith s electric car clock mechanism using the Clocks4Classics repair kit. This kit uses a specially developed
REAR INTERIOR AMBIENT LED FITTING INSTRUCTIONS AUDI A4(B6) 2001 onwards
 2001 onwards") GLUE is required to secure the supplied lighting module into place, and is not included as part of this modification kit. Please read the instructions fully before commencing this modification. NOTE: Ensure
GLUE is required to secure the supplied lighting module into place, and is not included as part of this modification kit. Please read the instructions fully before commencing this modification. NOTE: Ensure
Q15P. Mitsubishi MQ Triton Dual Cab
 Mitsubishi MQ Triton Dual Cab Page 1 of 12 Fitting Instructions Part Number Mitsubishi MQ Triton Dual Cab 2015+ To suit Sports Bars Check contents of kit before commencing fitment and report any discrepancies
MARACANA ASSEMBLY INSTRUCTION .40 ARF LOW WING TRAINER RADIO CONTROL MODEL. Every body can fly
 RADIO CONTROL MODEL ASSEMBLY INSTRUCTION MARACANA.40 ARF LOW WING TRAINER Every body can fly VQA085 EP GP You can use both Gas or Electric power Wingspan: 59in.(1520mm) Fuselage length: 48in.(1220mm) Engine:
ASSEMBLY MANUAL. Kit features. MS:88
 MS:88 ASSEMBLY MANUAL Graphics and specfications may change without notice. Specifications: Wingspan-------------------------------------------------- 70.9 in--------------------------------------- 180cm.
Instruction Manual. Wingspan : 1400 mm (55.12 inch) : 1480 mm (58.27 inch) : 5500gr gr. : 6-9 channel/ 8 servo high torque,1 standard
 : 1480 mm (58.27 inch) : 5500gr gr. : 6-9 channel/ 8 servo high torque,1 standard") Wingspan : 1400 mm (55.12 inch) g Length : 1480 mm (58.27 inch) Weight : 5500gr - 6000gr Radio : 6-9 channel/ 8 servo high torque,1 standard Engine : GT 22 OS KIT CONTENTS: We have organized the parts
Wingspan : 1400 mm (55.12 inch) g Length : 1480 mm (58.27 inch) Weight : 5500gr - 6000gr Radio : 6-9 channel/ 8 servo high torque,1 standard Engine : GT 22 OS KIT CONTENTS: We have organized the parts
1660mm (65.4 in) 1200mm (47.2 in) 2700gr gr 6 channel - 7 servo standard 46/ 2 stroke or 52/ 4 stroke
 1200mm (47.2 in) 2700gr gr 6 channel - 7 servo standard 46/ 2 stroke or 52/ 4 stroke") Instruction Manual CESSNA-46 1660mm (65.4 in) 1200mm (47.2 in) 2700gr - 3000gr 6 channel - 7 servo standard 46/ 2 stroke or 52/ 4 stroke KIT CONTENTS: We have organized the parts as they come out of the
Instruction Manual CESSNA-46 1660mm (65.4 in) 1200mm (47.2 in) 2700gr - 3000gr 6 channel - 7 servo standard 46/ 2 stroke or 52/ 4 stroke KIT CONTENTS: We have organized the parts as they come out of the
FIAT 500 ABARTH FRONT MOUNTED INTERCOOLER INSTALLATION
 FIAT 500 ABARTH FRONT MOUNTED INTERCOOLER INSTALLATION Tools needed: T30 screwdriver/bit 10mm socket, suitable extension and ratchet 17mm socket, suitable extension and ratchet 10mm ratchet spanner Pozidriv/Phillips
Coil Spring Conversion Kit
 Coil Spring Conversion Kit Land Rover Discovery 3 INTRODUCTION Thank you for your purchase of a coil spring conversion kit from Dunlop Systems and Components Limited, suitable for the Land Rover Discovery
Instruction Manual MUSTANG P51 - EP. Wingspan : 1377mm (54.21in) : 1180mm (46.46 in) : 2200gr gr. : AXI motor 2826 or 4120
 : 1180mm (46.46 in) : 2200gr gr. : AXI motor 2826 or 4120") Instruction Manual MUSTANG P51 - EP Wingspan : 1377mm (54.21in) g Length : 1180mm (46.46 in) Weight : 2200gr - 2600gr Engine : AXI motor 2826 or 4120 Radio : 4 channel / 4 servos standard KIT CONTENTS:
Instruction Manual MUSTANG P51 - EP Wingspan : 1377mm (54.21in) g Length : 1180mm (46.46 in) Weight : 2200gr - 2600gr Engine : AXI motor 2826 or 4120 Radio : 4 channel / 4 servos standard KIT CONTENTS:
Instruction Manual BULLDOG. Wingspan : 1410 mm (55.5in) : 1450 mm (57.1in) : 4900gr gr. Weight. : 6-9 Channel/ 7 servo high torque, 1standard
 : 1450 mm (57.1in) : 4900gr gr. Weight. : 6-9 Channel/ 7 servo high torque, 1standard") Wingspan : 1410 mm (55.5in) Length Weight Radio Engine : 1450 mm (57.1in) : 4900gr - 5600gr : 6-9 Channel/ 7 servo high torque, 1standard : 1.20/ 2 stroke 1.80/ 4 stroke KIT CONTENTS: We have organized
Wingspan : 1410 mm (55.5in) Length Weight Radio Engine : 1450 mm (57.1in) : 4900gr - 5600gr : 6-9 Channel/ 7 servo high torque, 1standard : 1.20/ 2 stroke 1.80/ 4 stroke KIT CONTENTS: We have organized
Jabiru J170/230/430/250/450 Constructors Manual. Pre-Paint>Fuselage>Undercarriage>Assemble main gear
 Objectives of this task: In this task you will assemble the main undercarriage legs, which includes fitting the axles, disc brakes and wheels and adjusting the brakes. Materials required: Cards # J8 Dual
Brassmasters Scale Models
 Brassmasters Scale Models www.brassmasters.co.uk Cleminson 6-wheel underframe kit PO Box 1137 Sutton Coldfield B76 1FU Copyright Brassmasters 2016 1 Introduction 1.1 The purpose of this booklet is to guide
ARB TOYOTA 100 SERIES IFS REAR STEP TOW BAR
 ARB TOYOTA 100 SERIES IFS REAR STEP TOW BAR Product number: 5613210 Optional Jerry Can Carrier Optional Wheel Carrier Left Hand Side of vehicle (LHS) Rear Step Tow Bar Right Hand Side of vehicle (RHS)
I n s t r u c t i o n M a n u a l. Instruction Manual SPECIFICATION
 I n s t r u c t i o n M a n u a l Instruction Manual SPECIFICATION - Wingspan: 3200mm (125,9 in) - Length: 1650mm (64,9 in) - Flying weight: 3000gr 3200gr - Wing area: 64.5 dm2 - Wing loading: 46g/dm2
ASSEMBLY MANUAL. Kit features. MS:110
 MS:110 ASSEMBLY MANUAL Graphics and specifications may change without notice. Specifications: Wing span-------------------------------------------------- 62.9 in---------------------------------------
CAP 232 ASSEMBLY MANUAL
 CAP 232 MS: ASSEMBLY MANUAL SEA 91 Graphics and specfications may change without notice. Specifications Wingspan------------------------------------ 65 in --------------------------------- 165cm. Wing
11 - Fairings. Fairings. February XLF Page 11-1
 11 - Fairings Fairings February 2003 11-XLF Page 11-1 11 - Fairings This Page Intentionally Left Blank Page 11-2 11-XLF February 2003 11 - Fairings Contents 11.0 - Chapter Preface... 11-4 11.0.1 - Parts
Instruction Manual book
 Instruction Manual book SPECIFICATION Wingspan : 1,800mm. 70.87 in. Length : 1,350 mm. 53.15in. Weight : 3.6kg. 7.92lbs. Parts Listing required (not included). Glow Engine : 55-61 2 stroke. 91 4 stroke.
SAN FELIPE: Step by Step Pack 8
 Pack 8 Your parts Gun port frames Complete gun ports Tools and equipment Tweezers Superglue Pliers Hammer Sandpaper Wood stain Paintbrushes Black pen a Glue gun port frames to the gun ports of the main
Bob's Card Model and [Resources]
![Bob's Card Model and [Resources]](/thumbs/89/98424237.jpg "Bob's Card Model and [Resources]") Bob's Card Model www.bobscardmodels.altervista.org and www.zealot.com [Resources] Conair C S 2F (Tracker) water-bomber(1:144) Securité Civile's converted Tracker, used for patrol duty, but also for water-bombing
Bob's Card Model www.bobscardmodels.altervista.org and www.zealot.com [Resources] Conair C S 2F (Tracker) water-bomber(1:144) Securité Civile's converted Tracker, used for patrol duty, but also for water-bombing
: 7 channel - 9 servo, Hi-Torque ( Minimum 6 kg ).
.") g Wingspan : 1820mm (71.65 inches) Length : 1625mm (63.98 inches) Weight : 6900gr Engine : 25cc - 35cc Radio : 7 channel - 9 servo, Hi-Torque ( Minimum 6 kg ). KIT CONTENTS: We have organized the parts
g Wingspan : 1820mm (71.65 inches) Length : 1625mm (63.98 inches) Weight : 6900gr Engine : 25cc - 35cc Radio : 7 channel - 9 servo, Hi-Torque ( Minimum 6 kg ). KIT CONTENTS: We have organized the parts
CORKSPORT CX-3 Interior LED Light Kit
 I N S T A L L A T I O N I N S T R U C T I O N S CORKSPORT CX-3 Interior LED Light Kit 2016+ Mazda CX-3 PART #: CX3-9-011-10 Need Help With Your Installation? Call (360) 260-CORK PAGE 1 CORKSPORT CX-3 Interior
CANOPY WIRING PATCH KIT INSTALLATION INSTRUCTIONS Holden Colorado RG
 CANOPY WIRING PATCH KIT INSTALLATION INSTRUCTIONS Holden Colorado RG IMPORTANT! Read instructions carefully before installation. It is strongly recommended that installation is conducted by an authorized
LIFT-507 BMF Lift Kit E-Z-Go RXV Gas or Electric Installation Instructions
 LIFT-507 BMF Lift Kit E-Z-Go RXV Gas or Electric Installation Instructions Contents of LIFT-507 E-Z-Go RXV BMF Lift Kit: a (1 ea.) BMF A-Arm Assembly b (1 ea.) Driver Side Shock Tower c (1 ea.) Passenger
Prusa i3 Printer Assembly Guide
 Prusa i3 Printer Assembly Guide Special thanks to Carlos Sanchez and Miguel Sanchez for the graphics. All graphics captured from their great animation: http://www.carlos-sanchez.com/ Prusa3/ For copyright
AP-Xtreme Sim-Racing Chassis Master Assembly Guide
 AP-Xtreme Sim-Racing Chassis Master Assembly Guide This guide covers all options available for the AP-Xtreme chassis. Some sections of this guide will be skipped based on the options chosen. APX1000 APX2000
the leading edge of the wing, at the fuselage - Length: 1540mm (60.6 in) 10% expo; High: 15mm up/down, 10% expo - Wing area: 40dm2
 10% expo; High: 15mm up/down, 10% expo - Wing area: 40dm2") SPECIFICATION - Gravity CG: 165-170 mm (6.5-6.7 in) Back from - Wingspan: 1400mm (55.1 in) the leading edge of the wing, at the fuselage - Length: 1540mm (60.6 in) - Control throw Ailerons: Low: 12mm up/down,
SPECIFICATION - Gravity CG: 165-170 mm (6.5-6.7 in) Back from - Wingspan: 1400mm (55.1 in) the leading edge of the wing, at the fuselage - Length: 1540mm (60.6 in) - Control throw Ailerons: Low: 12mm up/down,
Instruction Manual book
 book SPECIFICATION Wingspan : 1,450 mm 57.09 in. Length : 1,200mm 47.24in. Weight : 3.1 kg 6.82 Lbs. Radio : 05 channels. Servo : 07 servos. Engine : 61-75 2 stroke. 91 4 stroke. Made in Vietnam. This
$1.00 FOR THE TQIO/RCIO
 $1.00 FOR THE TQIO/RCIO m mm HDBBYSHOP Champion Jay Halsey has an impressive track record. One of Jay's advantages is a whisper smooth tranny thanks to his dad, Jim. Now you can build a Halsey transmission!
4mm scale 009 gauge Lodge Hill & Upnor railway Chattenden Drewry loco body kit.
 RT Models 4mm scale 009 gauge Lodge Hill & Upnor railway Chattenden Drewry loco body kit. HISTORY The loco was supplied by the Drewry car co. to the Lodge Hill & Upnor Railway in 1949, works number 2263.
Tools Required. Saw. Knife. Side cutters. Pin vice. Plastic glue. Superglue.
 Page 1 of 6 Guide to Converting an Ork War Buggy From a Trukk Kit. Introduction. At this time (April 2013) the war buggy kit available from Games Workshop is the same kit that was available during the
Utah Soaring Association Rigging and De-Rigging. USA G-103 Twin II. Procedures for safe assembly and dis-assembly of the glider. (Trailers 1, 2 and 3)
") USA G-103 Procedures for safe assembly and dis-assembly of the glider (Trailers 1, 2 and 3) Grob Glider Rigging Tools Required: Large blade standard screwdriver #2 (medium blade) Phillips screwdriver (if
USA G-103 Procedures for safe assembly and dis-assembly of the glider (Trailers 1, 2 and 3) Grob Glider Rigging Tools Required: Large blade standard screwdriver #2 (medium blade) Phillips screwdriver (if
HIGH WING MK2 GP/EP ARF SCALE
 SONIC HIGH WING MK2 GP/EP.25-.32 ARF SCALE 1:10 SPECIFICATION - Wingspan: 1340mm (52.7in) - Length: 1040mm (40.9 in) - Flying weight: 1800-2000 gr - Wing area: 27 dm2 - Wing loading: 79g/dm2 - Wing type:
Bachmann. Climax. Phoenix Sound Systems, Inc West Liberty Road Ann Arbor MI
 Bachmann Climax Phoenix Sound Systems, Inc. 3514 West Liberty Road Ann Arbor MI 48103 www.phoenixsound.com phone: 800-651-2444 fax: 734-662-0809 e-mail: phoenixsound@phoenixsound.com 2004-2007 Phoenix
deutsch Taifun GT II Bedienungsanleitung User Manual english
 Taifun GT II Bedienungsanleitung deutsch User Manual english english Taifun GS II User Manual IMPORTANT Please read these instructions carefully, before using your Taifun GT II rebuildable tank atomizer.
ASSEMBLY. Transmission Automatic Transmission 5R44E and 5R55E. Special Tool(s)
") 307-01-1 Automatic Transmission 5R44E and 5R55E 307-01-1 ASSEMBLY Transmission Special Tool(s) Holding Fixture, Transmission 307-262 (T93T-77002-AH) Special Tool(s) Installer, Transmission Extension Housing
307-01-1 Automatic Transmission 5R44E and 5R55E 307-01-1 ASSEMBLY Transmission Special Tool(s) Holding Fixture, Transmission 307-262 (T93T-77002-AH) Special Tool(s) Installer, Transmission Extension Housing
This year Märklin have released a coach which has included LED lighting with a currentconducting close coupler (single pole)
") Hi All, Over the past few months I have been working at a steady pace to install LED lighting in my passenger coaches. The coach lighting must have LED lights to reduce power consumption on the layout
Hi All, Over the past few months I have been working at a steady pace to install LED lighting in my passenger coaches. The coach lighting must have LED lights to reduce power consumption on the layout
Maximum Motorsports Camber Caster Plates (05-10):
:") Maximum Motorsports Camber Caster Plates (05-10): Tools Required: Lug Wrench 21mm Deep Socket 18mm Deep Socket 15mm Deep Socket 17mm Socket 13mm Socket 10mm Socket Torque Wrench (requires 166lb-ft capacity
Maximum Motorsports Camber Caster Plates (05-10): Tools Required: Lug Wrench 21mm Deep Socket 18mm Deep Socket 15mm Deep Socket 17mm Socket 13mm Socket 10mm Socket Torque Wrench (requires 166lb-ft capacity
Instruction Manual. Wingspan : 1670mm. : 3400gr gr. : 61/75 two stroke. : 5 servo + 1 servo retract / 6 channel
 Wingspan : 1670mm g Length Weight Engine Radio : 1350mm : 3400gr - 4000gr : 61/75 two stroke : 5 servo + 1 servo retract / 6 channel KIT CONTENTS: We have organized the parts as they come out of the box
Hornby Railroad Crosti 9F EM Finescale Conversion.
 Hornby Railroad Crosti 9F EM Finescale Conversion. Before you start, it is a good idea to have some small containers or snap top poly bags to put screws and components in for safe keeping...much better
ARF. Specifications: ASSEMBLY MANUAL MS: 193. Graphics and specifications may change without notice.
 ASSEMBLY MANUAL Graphics and specifications may change without notice. MS: 193 ARF Specifications: Wingspan---------------62.0 in (157.5 cm). Wing area----------------620 sq.in (40.0 sq.dm). Weight-------------------3.3-3.9
Repair of warped dial scale - Sony CRF-5090.
 Repair of warped dial scale - Sony CRF-5090. Apparently this is quite a common problem with this series of receivers. This one was bought on a local auction site where it was clearly advertised as having
The Sidewinder Wheeled Armoured Personnel Carrier.
 The Sidewinder Wheeled Armoured Personnel Carrier. The sidewinder APC is a simple wheeled vehicle I scratch built. This document will provide you with the information to duplicate it for yourself. This
Instruction Manual. Wingspan : 2270mm (89.37 inches) : 1870mm (73.62 inches) : 7400gr gr. : 4 channel - 6 standard servo.
 : 1870mm (73.62 inches) : 7400gr gr. : 4 channel - 6 standard servo.") Wingspan : 2270mm (89.37 inches) g Length : 1870mm (73.62 inches) Weight : 7400gr - 7600gr Radio : 4 channel - 6 standard servo Engine : 25cc-35cc KIT CONTENTS: We have organized the parts as they come
Wingspan : 2270mm (89.37 inches) g Length : 1870mm (73.62 inches) Weight : 7400gr - 7600gr Radio : 4 channel - 6 standard servo Engine : 25cc-35cc KIT CONTENTS: We have organized the parts as they come
I/C FLIGHT GUIDELINES
 SPECIFICATION - Wingspan: 3500mm (137.8 in) - Length: 1650mm (64.96 in) - Flying weight: 3700-4000 gr - Wing area: 75 dm2 - Wing loading: 49g/dm2 - Wing type: HQ profile - Covering type: Genuine ORACOVER
RECOMMENDED MOTOR AND BATTERY SET UP
 SPECIFICATION - Wingspan: 2190mm (86.2 in) - Length: 1907mm (75 in) - Flying weight: 9000-12000 gr - Wing area: 92 dm2 - Wing loading: 98g/dm2 - Wing type: Naca airfoils - Retract gear type: Air-retract
Instruction Manual book
 book ITEM CODE:BH 139 SPECIFICATION Wingspan : 1,450mm 57.09 in. Length : 1,140 mm 44.88 in. Weight : 3.3kg 7.26 Lbs. Radio : 05 channels. Servo : 07 mini servos+ 3servos Retracts (FUTABA S3170G) EDF:
ASSEMBLY MANUAL
 www.seagullmodels.com MS: X104 ASSEMBLY MANUAL Graphics and specifications may change without notice. Specifications: Wing span ----------------- 35.4in (90.0cm). Wing area ------------------392.2sq.in
SBD DAUNTLESS GP/EP SIZE ARF SCALE 1:8. Instruction Manual
 GP/EP SIZE.46-.55 ARF SCALE 1:8 SPECIFICATION - Wingspan: 1440mm (56.7in) - Length: 1140mm (44.9 in) - Flying weight: 3000-3300 g - Wing area: 42 dm2 - Wing loading: 78g/dm2 - Wing type: Naca airfoils
deutsch Taifun GSL Bedienungsanleitung User Manual english
 Taifun GSL Bedienungsanleitung deutsch User Manual IMPORTANT Please read these instructions carefully, before using your Taifun GSL rebuildable tank atomizer. Thank you for purchasing a Taifun GSL. With
(Glider) ASSEMBLY MANUAL
 ASSEMBLY MANUAL") (Glider) MS:132 ASSEMBLY MANUAL Graphics and specifications may change without notice. Specifications: Wing span ------------------------------118.1in (300cm). Wing area ---------------------902.1sq.in
(Glider) MS:132 ASSEMBLY MANUAL Graphics and specifications may change without notice. Specifications: Wing span ------------------------------118.1in (300cm). Wing area ---------------------902.1sq.in
SIZE.120 OR 30CC SCALE 1:5 ARF
 PC21 PILATUS MK2 SIZE.120 OR 30CC SCALE 1:5 ARF SPECIFICATION - Wingspan: 1772mm (69.72in) - Length: 2019mm (79.5 in) - Flying weight: 6.4-7.2 kg - Wing area: 57.6 dm2 - Wing loading: 113g/dm2 - Wing type:
NSWGR Z Tank Locomotive
 Australian Railway Kits ABN: 27 416 246 418 Incorporating Main West Models Manufacturers, Wholesalers and Retailers of Quality Australian Model Railways PO Box 252 Warwick, Queensland, 4370 Australia Phone/Fax:
WARNING: CHOCKING HAZARD
 Hover Racer WARNING: CHOCKING HAZARD - Small parts. Not for Children under 3 years. To Parents: Please read all instructions before giving guidance to your children. A. SAFETY MESSAGES 1. This kit is intended
to fly. Most hardware included and all replacement parts are available.
 Instruction Manual The Thunderbolt P47 was perhaps the greatest of world war II in terms of all round performance and capability Phoenix Model has recreated a 2C - 60 class engine (or 4c 91 class) It was
Pioneer Tray, Pioneer Platform & Pioneer Tradie
 CONTROLLED Pioneer Tray, Pioneer Platform & Pioneer Tradie Place these instructions in the vehicle s glove box after installation is complete. Important: Please read these instructions carefully prior
HASEGAWA: P-40E/K~1/48 th scale SuperScale Decals: Curtiss P-40K 64 th, 16 th & 25 th FS
 HASEGAWA: P-40E/K~1/48 th scale SuperScale Decals: Curtiss P-40K 64 th, 16 th & 25 th FS Norris Graser I built this model for the IPMS McKinstry September 2012 theme night for P-40 s. It s an easy enough
Instruction Manual book
 book SPECIFICATION Wingspan : 1,920 mm 75.59 in. Length : 1,560 mm 61.42 in. Weight : 5 kg 11.00Lbs. Radio : 06 channels. Servo : 09 servos. Engine : 120 4 stroke. Made in Vietnam. This instruction manual
Next, chase the threads in the lower A-arm mounts with the 5/8-18 tap and blowout any remaining particles.
 Next, chase the threads in the lower A-arm mounts with the 5/8-18 tap and blowout any remaining particles. Now, apply some anti-seize to the threads of the pivot stud. Also put anti-seize inside the bore
Instruction Manual. Wingspan : 1400mm (55.12 in) : 1370mm (53.94 in) : 2600gr gr. : 4 channel / 5 servo. : / 2 stroke_52-71 / 4 stroke
 : 1370mm (53.94 in) : 2600gr gr. : 4 channel / 5 servo. : / 2 stroke_52-71 / 4 stroke") Instruction Manual 540 Wingspan : 1400mm (55.12 in) g Length : 1370mm (53.94 in) Weight : 2600gr - 2800gr Radio : 4 channel / 5 servo Engine : 46-52 / 2 stroke_52-71 / 4 stroke KIT CONTENTS: We have organized
Instruction Manual 540 Wingspan : 1400mm (55.12 in) g Length : 1370mm (53.94 in) Weight : 2600gr - 2800gr Radio : 4 channel / 5 servo Engine : 46-52 / 2 stroke_52-71 / 4 stroke KIT CONTENTS: We have organized
RECOMMENDED MOTOR AND BATTERY SET UP
 SPECIFICATION - Wingspan: 1600mm (63 in) - Length: 1285mm (50.5 in) - Flying weight: 2800-3200 gr - Wing area: 40.1 dm2 - Wing loading: 78g/dm2 - Wing type: Naca airfoils - Covering type: Genuine ORACOVER
7211 A-ARM FRONT, 4-LINK, 3 X 2 FRAME, INTERMEDIATE, ELIMINATOR CHASSIS ITEM QTY SIZE/PART NO. TUBE CODE DESCRIPTION
 #917211 Page 1 of 6 7211 A-ARM FRONT, 4-LINK, 3 X 2 FRAME, INTERMEDIATE, ELIMINATOR CHASSIS ITEM QTY SIZE/PART NO. TUBE CODE DESCRIPTION 1 2 4138 Cage Side 2 2 4208 Forward strut 3 1 4038 Main Hoop 4 1
How To: Replace Brembo front discs & pads
 How To: Replace Brembo front discs & pads Necessary Tools required Good quality socket set. T55 Torx/spline bit of very good quality. T30 Torx/spline bit. T27 Torx /spline bit WD40 Mallet. Punch. Brake
Right On Replicas, LLC Step-by-Step Review * Thames Panel Truck Gasser 1:25 Scale Revell Model Kit # Review
 Right On Replicas, LLC Step-by-Step Review 20140422* Thames Panel Truck Gasser 1:25 Scale Revell Model Kit #85-4199 Review Review and Photos by Alan Mann London has long been one of the most busy and populous
NSWGR C30T LOCOMOTIVE AND TENDER KIT
 Australian Railway Kits ABN: 27 416 246 418 Incorporating Main West Models Manufacturers, Wholesalers and Retailers of Quality Australian Model Railways PO Box 252 Warwick, Queensland, 4370 Australia Phone/Fax:
Instruction Manual book
 book (pusher propeller) ITEM CODE:BH 142 SPECIFICATION Wingspan : 1,450mm 57.09 in. Length : 1,165 mm 45.87 in. Weight : 3.3kg 7.26 Lbs. Radio : 05 channels. Servo : 07 size (29 x 13 x 30) mm. Electric
Instruction Manual book
 Instruction Manual book SPECIFICATION Wingspan : 1,920 mm 75.59 in. Length : 1,560 mm 61.42 in. Weight : 5 kg 11.00Lbs. Radio : 06 channels. Servo : 09 servos. Engine : 120 4 stroke. Made in Vietnam. JU87-STUKA
Pioneer Tray, Pioneer Platform & Pioneer Tradie
 Place these instructions in the vehicle s glove box after installation is complete. Important: Please read these instructions carefully prior to installation. Check the contents of this kit before commencing