Build the. Steam Locomotive. Pack 01
|
|
|
- Monica Gray
- 5 years ago
- Views:
Transcription


1 Build the Steam Locomotive Pack 01


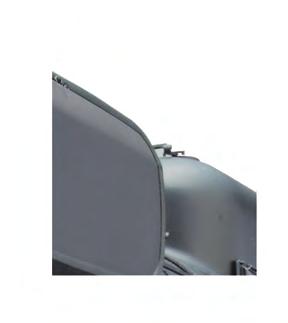
2 Build the Steam Locomotive Contents Step by step Stage 01: The smokebox door Stage 02: The smokebox Stage 03: The first driving wheels and coupling rods Stage 04: The chimney, spark arrester and blast pipe Pages Editorial and design by Continuo Creative, North Road, London N7 9DP. Published in the UK by De Agostini UK Ltd, Battersea Studios 2, 82 Silverthorne Road, London SW8 3HE. Published in the USA by De Agostini Publishing USA, Inc., 915 Broadway, Suite 609, New York, NY All rights reserved 2015 Warning: Not suitable for children under the age of 14. This product is not a toy and is not designed or intended for use in play. Items may vary from those shown.


3 Step by step: Stage 01 The smokebox door Smokebox door Where your parts fit Smoke chamber body Your parts 1 Number plate Brass wire Smokebox door Mounting jig Smokebox Tools Cutters Tweezers Sandpaper Instant adhesive Cut the brass wire into four roughly equal lengths. Place the number plate upside down and test-fit the four lengths of wire in the holes in the corners. Adjust the fit if necessary, and apply instant adhesive to secure the four lengths in place. Smooth the ends of the lengths of wire with sandpaper to remove any rough or sharp edges. 3


4 2 3 The instant adhesive can take a few minutes to set, so leave the number plate to one side. When dry, insert the four lengths of wire on the back of the number plate into the four holes on the smokebox door, as shown. Insert the mounting jig between the number plate and the door, at the top. Turn the smokebox door over and apply instant adhesive to the holes where the lengths of wire are coming through. Tips 4 Complete Instead of cutting the brass wire into four equal lengths, you can cut two long and two shorter pieces, as shown. You can also cut the ends of the wire at an angle, to make it easier to insert them into the holes. Once the adhesive has dried, remove the mounting jig and cut away the protruding lengths of wire from the back of the smokebox door. 4


5 Step by step: Stage 02 The smokebox Where your parts fit Smokebox front plate Chimney Boiler joint Your parts 1 Close the other hinge into the smokebox door as well. Smokebox front plate Boiler joint Chimney 9 screws 2 4mm Tools Phillips screwdriver Instant adhesive Multi-purpose adhesive Masking tape Place the smokebox door onto the smokebox front plate. Close one of the hinges, inserting the pins into the corresponding holes in the smokebox door. Open the smokebox door, and apply a small amount of instant adhesive to the holes housing the hinge pins (circled). 5


.")


6 2 3 Rivets Note the position of the holes Hold the boiler joint as shown, and place it into the riveted end of the smokebox. Align the other two holes of the smokebox with those in the boiler joint, and secure with another two 2 4mm screws. Fasten the smokebox door closed with some masking tape. Apply some multipurpose adhesive around the inside of the front of the smokebox (yellowshaded area). Push the smokebox door into place at the front of the smokebox, and secure it with four 2 4mm screws (circled). Align the circled screw holes and tighten two 2 4mm screws into them. Complete Tips Use a toothpick to remove any excess multi-purpose adhesive from the smokebox before it dries. Fold one end of the masking tape securing the door over on itself, so it is easier to remove when needed. Don t force the screws, as you may damage the paint. Tighten them in turn, a little at a time, easing them in. 6


7 Step by step: Stage 03 The first driving wheels and coupling rods Where your parts fit First driving wheel Coupling rod Your parts A B 1 Check along the length of each coupling rod for any burrs or flash left over from the casting process. ❺ First driving wheels Coupling rod A Coupling rod B Rod pins 2 Bushes 2 Tools Tweezers Phillips screwdriver Flat file Sandpaper Use a flat file to remove the burrs or flash, then smooth over the surface with sandpaper. 7


8 2 3 Recess No recess The outsides of the coupling rods have recesses around the holes. Connecting rod A Align the hole at the end of coupling rod A with the circled hole in the wheel. Insert a rod pin through the bush at the end of the rod, and screw it into the wheel. This will secure the coupling rod to the wheel. Check that the rod rotates smoothly around the pin. Insert a bush into the hole in the coupling rod. Tip 4 Complete The projection on the square top of the end of the connecting rod is called the oil pot, and it supplies lubricating oil to the moving parts. Coupling rod B Repeat Steps 2 and 3 to fit coupling rod B to the other side of the wheels. 8


9 Step by step: Stage 04 The chimney, spark arrester and blast pipe Where your parts fit Pivot handle Spark arrester Your parts 1 Take the chimney from Stage 2 and apply multi-purpose adhesive around the mid section just below the step, as shown. Place the chimney lip onto the chimney, pushing it up to the step. Chimney lip Spark arrester lip Spark arrester mesh (flared) Spark arrester ring Spark arrester mesh (cylinder) Blast pipe Pivots 2 Pivot handle Tools Tweezers Multi-purpose adhesive Apply multi-purpose adhesive to the part of the chimney, below the lip, and insert the base of the chimney into the hole in the smokebox. Look at the smokebox from the front, and adjust the position of the chimney to ensure that it is aligned as shown. 9


 of the")


10 2 3 Thin edge Thick edge Before assembling the spark arrester, you need to identify the differences between the two sides of the ring. On one side, the outer edge is thin and on the other side it is thick. The ring fits between the flared and cylindrical spark arrester meshes. Glue the flared mesh onto the other side of the ring. Step The spark arrester fits onto the bottom of the chimney, up against the step indicated here. Apply multi-purpose adhesive to the inside of the spark arrester lip. Glue the thick edge (bottom) of the ring onto the cylindrical mesh. Place the spark arrester onto the bottom of the chimney. Glue the blast pipe onto the other end of the cylindrical mesh. 4 Glue the spark arrester lip into the end of the flared mesh. Make sure the spark arrester stays in position as the glue dries. Complete The pivots have a thin end and a thick end. Glue the thick ends of the pivots into the central holes towards the rear of the smokebox, one on either side. Glue the pivot handle onto the pivot on the right-hand side of the smokebox. 10
BUILD YOUR OWN. Pack 16
 BUILD YOUR OWN TM Pack 6 0 CONTENTS Assembly Guide 43 Stage 5: The left fuel tank base Stage 5: The engine cables Stage 53: The LED tester Editorial and design by Continuo Creative, 39-4 North Road, London
Build your own THUNDERBIRD 2
 PACK 03 PAGE 12 Pod 3 front hatch and Elevator Car 2 43 13 Pod 3 rear hatch and Elevator Car 2 46 14 Pod 3 floor and Elevator Car 2 49 15 Pod 3 frames and FAB 1 52 16 Pod 3 frames and FAB 1 55 17 Pod 3
Build the legendary PORSCHE RS 2.7. Pack 5
 Build the legendary PORSCHE RS 2.7 Pack 5 Build the legendary P O R S C H E RS 2.7 Contents PAGE STAGE 29 Rear disc brake 120 30 Rear wheel 123 31 Rear disc brake 126 32 Rear wheel 129 33 The crankcase
Build your own THUNDERBIRD 2
 PACK 06 PAGE 33 Telescopic legs C and I.R.3 112 34 Telescopic legs D and I.R.3 115 35 Leg bases and Thunderizer 118 36 Landing feet and Elevator Car 3 121 37 Leg rail-gear racks and Elevator Car 3 124
The front wheel and mirror
 Pack 01 1 The fuel tank 3 2 The front wheel and mirror 5 3 The headlight 6 Editorial and design by Continuo Creative, 39-41 North Road, London N7 9DP. Published in the UK by De Agostini UK Ltd, Battersea
Build your own THUNDERBIRD 2
 PACK 04 PAGE 19 Pod 3 base 66 20 Pod 3 details and Firefly 69 21 Pod 3 laboratory and Firefly 72 22 Pod 3 floor details and Firefly 75 23 Pod 3 inspection walkways 78 24 Pod 3 right inner wall 81 25 Pod
Build the legendary PORSCHE RS 2.7. Pack 12
 Build the legendary PORSCHE RS 2.7 Pack 12 Build the legendary P O R S C H E RS 2.7 Contents PAGE STAGE 92 The rear shelf 368 93 The engine cover 372 94 The engine cover hinges 376 95 The rear panel 380
Build your own THUNDERBIRD 2
 PACK 12 STAGE PAGE 74 Tailwing ramjets and Cobra Half-track 247 75 Tailwing intakes 250 76 Tailwing fins 253 77 T2 control board 255 78 T2 wings and Mobile Crane 258 79 T2 side frames and Mobile Crane
Build your own THUNDERBIRD 2
 PACK 01 STAGE PAGE 01 Nose assembly and Elevator Car rear wheels 3 02 Cockpit interior and Elevator Car 1 completion 7 03 Missile launcher and Thunderbird 4 11 04 Nose assembly and the Tracy brothers 15
Build your own THUNDERBIRD 2
 PACK 11 PAGE 67 Pod 4 ramp tracks and Jet Air Transporter 224 68 Left rear booster and Alan s Racing Car 227 69 Right rear booster and Alan s Racing Car 230 70 Left booster speaker 233 71 Right rear booster
Build the legendary PORSCHE RS 2.7. Pack 3
 Build the legendary PORSCHE RS 2.7 Pack 3 Build the legendary P O R S C H E RS 2.7 Contents PAGE STAGE 13 The rear engine cover 55 14 The left intake manifolds and throttle bodies 59 15 The right intake
Build your own. Pack. Stages 39-42: Receive more of Robi s electrical components
 Build your own Pack 11 Stages 39-42: Receive more of Robi s electrical components Build your own All rights reserved 2016 CONTENTS Published in the UK by De Agostini UK Ltd, Battersea Studios 2, 82 Silverthorne
INSTRUCTIONS FOR NYC K-11 PACIFIC KIT #100200
 INSTRUCTIONS FOR NYC K-11 PACIFIC 4-6-2 KIT #100200 These instructions provide photographs of completed model, exploded-view drawings, diagrams, step-by-step instructions and an itemized parts list. If
3D PRINTER. Pack 09. Anything you can imagine, you can make! 3D technology is now available for you at home! BUILD YOUR OWN
 BUILD YOUR OWN Pack 09 Anything you can imagine, you can make! 3D PRINTER Compatible with Windows 7 & 8 Mac OS X 3D technology is now available for you at home! www.model-space.com BUILD YOUR OWN 3D PRINTER
3D PRINTER. Pack 10. Anything you can imagine, you can make! 3D technology is now available for you at home! BUILD YOUR OWN
 BUILD YOUR OWN Pack 10 Anything you can imagine, you can make! 3D PRINTER Compatible with Windows 7 & 8 Mac OS X 3D technology is now available for you at home! BUILD YOUR OWN 3D PRINTER CONTENTS PACK
Mamod SL1K Locomotive Assembly Instructions
 Mamod SL1K Locomotive Assembly Instructions LOCOMOTIVE ASSEMBLY INSTRUCTIONS To ensure ease of construction reference to these instructions are essential. All the major parts are in the front of the box
$1.00 FOR THE TQIO/RCIO
 $1.00 FOR THE TQIO/RCIO m mm HDBBYSHOP Champion Jay Halsey has an impressive track record. One of Jay's advantages is a whisper smooth tranny thanks to his dad, Jim. Now you can build a Halsey transmission!
2011 Cadillac CTS Coupe EGX Exhaust Tip & Rear Valance Mesh Accent Kit Part #: Complete E
 BILLET GRILLS IMPORTANT: PLEASE KEEP THIS INSTRUCTION MANUAL FOR FUTURE REFERENCE! 2011 Cadillac CTS Coupe EGX Exhaust Tip & Rear Valance Mesh Accent Kit Part #: Complete 5122-1900-11E TOOLS REQUIRED Automotive
1:8 scale Koban Model Documentation
 1:8 scale Koban Model Documentation Gear-foot assembly The gear foot consists of three parts, the gear-foot, prop shaft, and propeller. Clean flash from castings being careful to keep the mating surfaces
FINNEY7. 24 Jul 18 A3-4 LNER A3. Fig 1. General Arrangement
 Fig 1. General Arrangement - 4 COUPLING RODS. The coupling rods are now made so that they can be used as a jig to align the hornguides accurately. First drill out all the crankpin holes to a convenient
SEARAILS RR-XXX STEAM LOCOMOTIVES ASSEMBLY MANUAL
 SEARAILS RR-XXX 0-4-0 STEAM LOCOMOTIVES ASSEMBLY MANUAL 30 March 2015 T R Knapp Model Engineering 1 This diagram shows basic assembly of Nn3/Z Porter 0-4-0T 2 This diagram shows basic assembly of Baldwin
Tip: LED Lighting for the 4367 SBB Euro City Set, 4366 and 4368 Cars Date: , Corrections Modified , Photos
 Hi All, I have had the 4367 SBB Euro City set with extra cars 4366 and 4368 since 1998, apart from a test run on the layout they have stayed in storage ever since. I decided to change some rolling stock
SAN FELIPE: Step by Step Pack 8
 Pack 8 Your parts Gun port frames Complete gun ports Tools and equipment Tweezers Superglue Pliers Hammer Sandpaper Wood stain Paintbrushes Black pen a Glue gun port frames to the gun ports of the main
GET WIRED FOR SUCCESS WITH NEW NORTON WIRE BRUSHES
 GET D FOR SUCCESS WITH NEW BRUSHES When you need the perfect low-impact solution for refining surfaces without removing any base material, try our new line of Norton wire brushes. This new, economically
deutsch Taifun GT II Bedienungsanleitung User Manual english
 Taifun GT II Bedienungsanleitung deutsch User Manual english english Taifun GS II User Manual IMPORTANT Please read these instructions carefully, before using your Taifun GT II rebuildable tank atomizer.
RedlineGoods Tacoma Installation Manual
 RedlineGoods 2016+ Tacoma Installation Manual AUTOMATIC SHIFT BOOT AND EBRAKE BOOT Press down on the factory shift boot collar to disconnect it from the shift knob. Unscrew shift knob Pull up on the rear
In area - A -, a proper seal must be made against the top of the window glass.
 Door window, adjusting Page 1 of 3 Audi > B3 > 1994-1998 Body Exterior, Interior 61 - Convertible top, checking and adjusting Door window, adjusting Sections C-C and D-D. Adjust door window so that window
Lexus ES Fine Mesh and Adaptive Cruise Control Fine Mesh Grilles Upper and Lower Replacements
 IMPORTANT: PLEASE KEEP THIS INSTRUCTION MANUAL FOR FUTURE REFERENCE! 2013-15 Lexus ES Fine Mesh and Adaptive Cruise Control Fine Mesh Grilles Upper and Lower Replacements Part #1372-0102-13 / Black Ice
deutsch Taifun GSL Bedienungsanleitung User Manual english
 Taifun GSL Bedienungsanleitung deutsch User Manual IMPORTANT Please read these instructions carefully, before using your Taifun GSL rebuildable tank atomizer. Thank you for purchasing a Taifun GSL. With
Chiltern Model Steam Engines
 Chiltern Model Steam Engines Mill Twin Cylinder Model Steam Engine Assembly Instructions v1.2 Notes: 1. In overview the engine should first be assembled "dry" with no oil/lubricants, thread lock or gasket
 INSTALLATION INSTRUCTIONS Accessory Application Publications No. AII 33173 UNDER 2007 ODYSSEY Issue Date JULY 2006 PART LIST Front under spoiler 5 Stepped bolts TOOLS AND SUPPLIES REQUIRED Phillips screwdriver
Walthers/Life-Like USRA Steam Locomotive
 North Raleigh Model Railroad Club Installing Decoders in N Scale Locomotives Detailed Instructions Walthers/Life-Like USRA 2-8-8-2 Steam Locomotive by David Derway May 17, 2010 Table of Contents Introduction...
LAND ROVER DISCOVERY 3/ SPARE WHEEL CARRIER
 LAND ROVER DISCOVERY 3/ 4 SPARE WHEEL CARRIER RBLD007 INSTALL TIME: 4.5 Hours NOTE: Park Distance Control will be affected by this fitment and the customer should be informed. IMPORTANT WARNING! IT IS
Bag 1. Bag 1. Center Pivot. Center Pivot
 8 00734 01901 5 Center Pivot Bag 1 3374 - Center Pivot Socket 4019 - Alum Pivot ball 3254-2-56 Button Head *Note - Sometimes it is helpful to slightly over-tighten the top clamp screws, then work the ball
NSWGR Z Tank Locomotive
 Australian Railway Kits ABN: 27 416 246 418 Incorporating Main West Models Manufacturers, Wholesalers and Retailers of Quality Australian Model Railways PO Box 252 Warwick, Queensland, 4370 Australia Phone/Fax:
SS1135HF Jeep KJ Cherokee CRDI4 2.8Litre-I4 Diesel Engine
 SS1135HF Jeep KJ Cherokee CRDI4 2.8Litre-I4 Diesel Engine Parts List 23/2/2010 ITEM PART NO DESCRIPTION QTY 1 965-133-000 BODY - SNORKEL (SS1130HF) 1 2 000-135-800 3 ½" AIR RAM ASSEMBLY 1 3 965-032-000
 INSTALLATION INSTRUCTIONS Accessory Application Publications No. 2009 CIVIC HYBRID All 40191 Issue Date AUG 2008 PARTS LIST Rear under spoiler 2 Step bolts 4 Self-tapping screws TOOLS REQUIRED Phillips
Lightning Ball Tools Required: ø 2 ø 3,5 ø 4 Pencil. Drill. Ruler. Fretsaw. Handsaw with Metal Saw Blade. Hot Glue Gun.
 113.185 Tools Required: ø 2 ø 3,5 ø 4 Pencil Ruler Drill Fretsaw Handsaw with Metal Saw Blade Sandpaper Hot Glue Gun Soldering Iron Please note: The OPITEC handicraft packs are not toys in a typical off-the-shelf
RT Models. 4mm scale, 00/EM/P4 Manning Wardle, class K 0-6-0ST loco kit
 1 RT Models 4mm scale, 00/EM/P4 Manning Wardle, class K 0-6-0ST loco kit History The first of Manning Wardle s Class K was built in 1864. Many of these locos were mainly built for contractors with only
Assembly Manual. 1/10th Formula 1 Car
 Assembly Manual 1/10th Formula 1 Car Center Pivot Bag 1 3374 - Center Pivot Socket 40194 - Hard Anodized Alum Pivot ball 3254-2-56 *Note - Sometimes it is helpful to slightly over-tighten the top clamp
SS1066HF Jeep JK Wrangler Left Hand Drive CRDI4 2.8Litre-I4 Diesel Engine and EGHV6 3.8Litre V6 Gasoline Engine
 SS1066HF Jeep JK Wrangler Left Hand Drive CRDI4 2.8Litre-I4 Diesel Engine and EGHV6 3.8Litre V6 Gasoline Engine Installation Guide Safari SS1066HF Page - 1 of 12 6/10/2009 ITEM PART NO DESCRIPTION QTY
Modeling Ideas and techniques, by Bob Rohwer What is the right DCC Decoder for my Locomotive?
 Modeling Ideas and techniques, by Bob Rohwer What is the right DCC Decoder for my Locomotive? I hear this question a lot. Fortunately there are a lot of resources to answer the question. The best I have
Installation Instructions: Swing Mounted Units BDS-2575
 Installation Instructions: Swing Mounted Units BDS-2575 X-Calibur Units Installation Instructions for BDS-2575 X-Calibur Dental Units 8-23-10 BDS Swing Mounted Units Installation Time: Approximately 2
Application Note. Atlas RS-3 Tsunami Digital Sound Decoder Installation Notes
 Application Note Atlas RS-3 Tsunami Digital Sound Decoder Installation Notes Overview This application note describes how to install a TSU-AT1000 digital sound decoder into an HO Atlas RS-3. Skill Level
Contents. Preparing the motor Winding the rotating secondary Winding the primary... 8
 120732-130389 Propeller Clock Construction Notes Revision E, December 2, 2013 Contents Preparing the motor... 2 Winding the rotating secondary... 5 Winding the primary... 8 UltiProp Clock (Elektor Dec.
LGT-306L / LB Club Car Precedent LED Light Bar Bumper Kit Installation Instructions
 LGT-306L / LB Club Car Precedent LED Light Bar Bumper Kit Installation Instructions Caution: Please read through the instructions carefully. Before starting this project, remove the system s positive and
INSTALLATION INSTRUCTIONS
 INSTALLATION INSTRUCTIONS Accessory Application Publications No. BII 33322-36889 UNDER 2007 TL Issue Date MAY 2007 PARTS LIST Front under spoiler Left bracket (Marked L ) Right bracket (Marked R ) 8 Self-tapping
Shay Engine. Nelson Riedel, 1/14/2003, last updated 06/05/2004. Shay Engine
 Shay Engine Nelson Riedel, Nelson@NelsonsLocomotive.com 1/14/2003, last updated 06/05/2004 The following shows the various parts of the engine for the Shay locomotive. Rough Castings: I started with the
BRL CLASS 66 LOCOMOTIVE. Building Instructions
 Tel 07807225801 prmrp@fsmail.net www.prmrp.com BRL - 066 CLASS 66 LOCOMOTIVE Building Instructions SCALE MODEL PRODUCT FOR ADULT MODELLERS ONLY. WHITE METAL CONTAINS LEAD WASH HANDS AFTER USE. MAY CONTAIN
Rev TOOLS & MATERIALS REQUIRED QTY 3D PART NO. DESCRIPTION
 Rev. 04-10 QTY 3D PART NO. DESCRIPTION 1 691609 FRONT BUMPER REPLACEMENT 1 691610 RIGHT SIDE SKIRT 1 691611 LEFT SIDE SKIRT 1 691612 REAR LOWER SKIRT 4 3M 94 3M ADHESION PROMOTER 16 #8 X ¾ SELF DRILLING
for spiral staircases
 Installation instructions Step by Step Instructions for spiral staircases Packing List A. 10 Gauge Track Wire B. 110V AC/12V DC Power Supply C. Tongue Depressor D. Rechargeable Batteries E. LED Light Assemblies
Motorising Set for Corgi Feltham Tram BEC-KITS) Fitting instructions
 Fitting instructions") Motorising Set for Corgi Feltham Tram The KW Trams (ex BEC-KITS) motorising set for the Corgi Feltham tram contains 2 motorised maximum traction bogies, with link wiring, and 2 bolsters. The following
Motorising Set for Corgi Feltham Tram The KW Trams (ex BEC-KITS) motorising set for the Corgi Feltham tram contains 2 motorised maximum traction bogies, with link wiring, and 2 bolsters. The following
Installation handbook
 Installation handbook INDEX SAFETY INSTRUCTIONS 4 5 GENERAL INSTALLATION DETAILS 6 10 Installation Information 6 Planning 7 10 Tools 10 PIPE INSTALLATION 11 16 Working with PVC 11 12 Important Pipe Installation
INSTALLATION INSTRUCTIONS
 INSTALLATION INSTRUCTIONS Accessory Application Publications No. FENDER FLARES P/N 08P21-S3V-200 2003 MDX BII 24553 Issue Date SEP 2002 PARTS LIST Right rear fender flare Left front fender flare Right
Bachmann GWR Earl (Dukedog) EM Finescale Conversion
 EM Finescale Conversion") Bachmann GWR Earl (Dukedog) EM Finescale Conversion Before you start, it is a good idea to have some small containers or snap top poly bags to put screws and components in for safe keeping...much better
Bachmann GWR Earl (Dukedog) EM Finescale Conversion Before you start, it is a good idea to have some small containers or snap top poly bags to put screws and components in for safe keeping...much better
Gearbox Assembly 101. Introduction. Before Beginning. By Mark Schutzer 4/13/06
 Gearbox Assembly 101 By Mark Schutzer 4/13/06 Introduction If you are planning to re-motor an old brass locomotive you may want to upgrade to a new gearbox at the same time. The early 60 s and 70 s gearboxes
GENUINE PARTS INSTALLATION INSTRUCTIONS
 GENUINE PARTS INSTALLATION INSTRUCTIONS DESCRIPTION: APPLICATION: PART NUMBER: KIT CONTENTS: Item Qty. A B C D E F G H 1 Bedliner Under Rail Bedliner Titan Crew Cab/King Cab/Single Cab 999T1 W3700, 999T1
Heljan EM Finescale Conversion.
 Heljan 02 2-8-0 EM Finescale Conversion. Before you start, it is a good idea to have some small containers or snap top poly bags to put screws and components in for safe keeping...much better than crawling
Hornby GWR Star Class EM Finescale Conversion.
 Hornby GWR Star Class EM Finescale Conversion. Before you start, it is a good idea to have some small containers or snap top poly bags to put screws and components in for safe keeping...much better than
Please try our way first.
 1958-1962 Corvette Raingear installation instructions Designer s Note: The 1958-1962 Corvette RainGear wiper system that you have purchased is complex and will require patient fitting. Complete Instructions
Thank you for purchasing the Blackstone Models K-27!
 Operations Manual Thank you for purchasing the Blackstone Models K-27! Before your Mudhen whistles off, we want to tell you about a few things that will enhance your operating experience and ensure that
Maintenance Information
 16573370 Edition 2 February 2014 Air Grinder 99V Series Maintenance Information Save These Instructions Product Safety Information WARNING Failure to observe the following warnings, and to avoid these
Carapace. an organic motion sculpture. sample. Important information:
 Carapace an organic motion sculpture sample Important information: McMaster Carr, a supplier whose part numbers are referenced throughout this document, can only ship within the United States. Builders
Installing a genuine HoodLift on a Jeep JK with an AEV hood
 Installing a genuine HoodLift on a Jeep JK with an AEV hood (to print a full-color version of these instructions go to www.hoodlift.com/products.html. Scroll down to the JK HoodLift and click on the AEV
Furness Railway Wagon Co.
 Furness Railway Wagon Co. The Parts. S&DJR/LMS/BR 20ton 6-Wheel Brake van Wheels, paint and transfers required to complete. Parts 13/15 Bolts/nuts/ washers Part 22 Part 5 Parts 10/19/20/21/ 23/24/25 Part
Drag Race Roll Bar (MMRB-6, -7)
") 3430 Sacramento Dr., Unit D San Luis Obispo, CA 93401 Telephone: 805/544-8748 Fax: 805/544-8645 www.maximummotorsports.com 1994-04 Drag Race Roll Bar (MMRB-6, -7) The Maximum Motorsports 6-point Drag Race
3430 Sacramento Dr., Unit D San Luis Obispo, CA 93401 Telephone: 805/544-8748 Fax: 805/544-8645 www.maximummotorsports.com 1994-04 Drag Race Roll Bar (MMRB-6, -7) The Maximum Motorsports 6-point Drag Race
2015 Chevrolet Silverado HD E-Power & Fine Mesh Grilles
 IMPORTANT: PLEASE KEEP THIS INSTRUCTION MANUAL FOR FUTURE REFERENCE! 2015 Chevrolet Silverado HD E-Power & Fine Mesh Grilles Upper Black Mesh Part #1415-010U-15EP / Upper Chrome Mesh Part #1415-010U-15EPC
Kevin O Neill. Kevin O Neill 2008
 By Kevin O Neill Kevin O Neill 2008 Rules:...2 Inspection Checklist:... 3 Simple Steps:... 4 Who Am I... 8 Design Templates:... 9 The pinewood derby is the pinnacle of most scouts year however the derby
Finney7 PC May17 PRINCESS CORONATION. Fig 1. GA Curved Footplate
 Fig 1. GA Curved Footplate PC - 5 Fig 2. GA Utility Footplate PC - 6 COUPLING RODS & FRAME ASSEMBLY COUPLING RODS. The coupling rods are now made so that they can be used as a jig to align the remaining
THE WAHTZ WAH (K-985)
") THE WAHTZ WAH (K-985) Output Jack Unplug from the Wahtz input jack (other side) when not in use to save battery life. 9 VDC CENTER (-) ADAPTER Use these instructions to learn: How to build a wah-wah pedal
THE WAHTZ WAH (K-985) Output Jack Unplug from the Wahtz input jack (other side) when not in use to save battery life. 9 VDC CENTER (-) ADAPTER Use these instructions to learn: How to build a wah-wah pedal
INSTALLATION INSTRUCTIONS
 INSTALLATION INSTRUCTIONS Accessory REAR SPOILER Application 2011 CR-Z MUGEN Publications No. AII 45919 Issue Date APRIL 2011 PARTS LIST Right wing bracket Rear wing Left wing bracket Right wing base Right
Finney7 BEYER PEACOCK BUILT LOCOMOTIVE
 BEYER PEACOCK BUILT LOCOMOTIVE Fig 1. Beyer, Peacock Built Locomotive Nos. 415-426 Depicted as built with short tanks, blower valve on the left, small dome, low tank front, 3 0 trailing wheels, snap head
Furness Railway Wagon Co. NER/LNER/BR C1 5ton Fitted Open Fish
 Furness Railway Wagon Co. NER/LNER/BR C1 5ton Fitted Open Fish Wheels, paint and transfers required to complete. Please note that to aid the folding of the various parts score all the halfetched foldlines
Working Stirling-Motor
 PARTS LIST 113.174 Working Stirling-Motor Please Note The OPITEC range of projects is not intended as play toys for young children.they are teaching aids for young people learning the skills of Craft,
CLEANING, INSPECTION AND REPAIR. Valve Spring Compressor (Part No. HD-34736B) Figure Compressing Valve Springs
 Figure Compressing Valve Springs") b0134x3x 5694 8 7 12 10 1 6 13 11 Valve Spring Compressor (Part No. HD-34736B) 9 Figure 3-11. Compressing Valve Springs 5 14 4 3 2 15 2767a 1. Right crankcase half 2. Pin (2) 3. O-ring (2) 4. Plate 5.
b0134x3x 5694 8 7 12 10 1 6 13 11 Valve Spring Compressor (Part No. HD-34736B) 9 Figure 3-11. Compressing Valve Springs 5 14 4 3 2 15 2767a 1. Right crankcase half 2. Pin (2) 3. O-ring (2) 4. Plate 5.
THE GHOST TRAIN. - Assembly Instructions Page 1.
 - Assembly Instructions Page 1. - Assembly Instructions Page 2. - Assembly Instructions Page 3. WHAT YOU'LL NEED: Scissors, Elmer's glue (or a glue stick), a ruler or other straight-edge, 11 toothpicks
FEATURES OF THE EXPEDITION LUGGAGE - ADVENTURE PANNIER MOUNT SET:
 E XPEDITION LUGGAGE ADVENTURE PANNIER MOUNT SET INCLUDES EVERYTHING YOU NEED TO ADD MOUNTS TO YOUR MOTORCYCLE 3501-0907 [Husqvarna TR650 Strada & Terra 2012-2013] FEATURES OF THE EXPEDITION LUGGAGE - ADVENTURE
MacBook Pro 13" Unibody Mid 2009 LCD Replacement
 MacBook Pro 13" Unibody Mid 2009 LCD Replacement Written By: Walter Galan ifixit CC BY-NC-SA www.ifixit.com Page 1 of 25 INTRODUCTION Save money by replacing just the LCD rather than the whole display
I n s t r u c t i o n M a n u a l. Instruction Manual SPECIFICATION
 I n s t r u c t i o n M a n u a l Instruction Manual SPECIFICATION - Wingspan: 3200mm (125,9 in) - Length: 1650mm (64,9 in) - Flying weight: 3000gr 3200gr - Wing area: 64.5 dm2 - Wing loading: 46g/dm2
One Piece Products. Series XI Ford F SERIES TRUCKS One Piece Door Glass Conversion Manual.
 *Registered Trademark One Piece Products *Patent Pending Series XI 1980-1996 Ford F SERIES TRUCKS One Piece Door Glass Conversion Manual www.onepieceproducts.com (888)One Products (888)663-7763 1 Installation
WifiTrax WMR-10 in Atlas RS-3
 WifiTrax WMR-10 in Atlas RS-3 How to Install the WifiTrax WMR -10 Board Replacement Wi-Fi Controller in Atlas RS-3 Locomotive Practical notes by Steve Shrimpton Back to Web Site In my opinion the Alco
Legacy Installation Manual
 Staying Home Corporation 1503 Vine Street P.O. Box 37 Harrisonville, MO 64701 816.380.2427 www.stayinghome.com A. INSTALLATION SITE REQUIREMENTS Legacy Installation Manual I. PRELIMINARY CHECKS 115 VAC,
GMC Mesh Grille
 921701880 GMC 2014-15 1500 Mesh Grille Thank you for choosing Rough Country for all your lighting needs. Please read instructions before beginning installation. Check the kit hardware against the kit contents
Sunroof Repair. Sunroof Repair TSB. The sunroof repair kit available for the J30 is part number Y20. See images at bottom of document.
 Sunroof Repair This document is the text/images from the TSB (technical service bulletin) issued by Infiniti concerning the repair procedure for sunroof issues. Be advised that this is a LARGE, TIME-CONSUMING
Roll Bar (MMRB-6.1 to -6.7)
") 3430 Sacramento Dr., Unit D San Luis Obispo, CA 93401 Telephone: 805/544-8748 Fax: 805/544-8645 www.maximummotorsports.com 1994-04 Roll Bar (MMRB-6.1 to -6.7) NOTE: These instructions cover Roll Bars with
3430 Sacramento Dr., Unit D San Luis Obispo, CA 93401 Telephone: 805/544-8748 Fax: 805/544-8645 www.maximummotorsports.com 1994-04 Roll Bar (MMRB-6.1 to -6.7) NOTE: These instructions cover Roll Bars with
JK8 Body Kit KIT CONTENTS 1 K
 JK8 Body Kit KIT CONTENTS A B C 1 K6861352 D E G F H 2 K6861352 I M N J K L O P Q R S 3 K6861352 T U V W X Y CALL OUT PART NUMBER DESCRIPTION QUANTITY A P5156021 HARDTOP 1 B P5155997 BULKHEAD 1 C 1PH98/9TZZAE
HC-11 Programmer (optional)
") A qualified technician must perform the installation. To avoid electrical shock or property damage, disconnect power before starting installation. Do not drop the sensor. If dropped, malfunctioning of
A qualified technician must perform the installation. To avoid electrical shock or property damage, disconnect power before starting installation. Do not drop the sensor. If dropped, malfunctioning of
Wildcat System Instructions
 Wildcat System Instructions NOTE: Most steps contained in these instructions will need to be repeated on the other side of the vehicle. Prior to assembly of windshield it is necessary to establish what
ALAN GIBSON, THE BUNGALOW CHURCH ROAD, LINGWOOD, NORWICH, NORFOLK. MIDLAND/L.M.S. Class 4F.
 ALAN GIBSON, THE BUNGALOW CHURCH ROAD, LINGWOOD, NORWICH, NORFOLK MIDLAND/L.M.S. Class 4F. These instructions and history should be carefully studied BEFORE starting on any assembly. The standard kit is
Solar Trike w i t h A C C U b a t t e r y d r i v e a n d LED lighting
 1.693 Solar Trike w i t h A C C U b a t t e r y d r i v e a n d LED lighting Necessary materials Fretsaw with metalworking blade drills. dia. 3,, 6, 7, Machine vice with soft jaws Soldering iron, solder
Furness Railway Coach Co.
 Furness Railway Coach Co. Outside Framed Coaches Paint and transfers required to complete. Part 32 Part 7/8 Part 9 Part 6 Part 31 Part 14 The Parts. Part 19 Parts 20/21/22 Part 5 Part 4 Part 1 Part 3 Part
LOW MOUNT SPA COVERLIFT Installation Instructions
 LOW MOUNT SPA COVERLIFT Installation Instructions IMPORTANT!! READ ALL INSTRUCTIONS CAREFULLY BEFORE BEGINNING INSTALLATION ITEM NUMBER: NP5022 Mfg#3200103 (Spa and Spa Cover Not Included)!! CAUTION!!
Legacy Installation Manual
 Staying Home Corporation 1503 Vine Street P.O. Box 37 3823 Harrisonville, MO 64701 816.380.2427 Asheville Hwy. Hendersonville, www.stayinghome.com NC 28791 Precision Stairlifts Mailing Address: 306 Number
STAY ON TRACK WITH THIS LINE FOLLOW BUGGY WITH :MOVE LINE FOLLOW BOARD FOR BBC MICRO:BIT
 STAY ON TRACK WITH THIS LINE FOLLOW BUGGY WITH :MOVE LINE FOLLOW BOARD FOR BBC MICRO:BIT BUILD INSTRUCTIONS LIST OF FIXINGS M3 BOLTS M3 NUTS STANDOFFS 6mm x12 x4 x4 10mm x4 x12 12mm x2 30mm x2 20mm M-F
Fluid-O-Tech ROTOFLOW ROTARY VANE PUMP REBUILD MANUAL
 Fluid-O-Tech PUMP TECHNOLOGY AT ITS BEST WWW.FLUID-O-TECH.COM Office: 161 Atwater St., Plantsville, CT 06479 Phone: (860) 276-9270 Fax: (860) 620-0193 ROTOFLOW ROTARY VANE PUMP REBUILD MANUAL 08/09 Ed.,
Budget Robotics Scooterbot Assembly Instructions
 Budget Robotics Scooterbot Assembly Instructions The Budget Robotics Scooterbot kit is a low-cost 7" diameter servo-driven robot base, ready for expansion. Assembly is simple, and takes less than 15 minutes.
INSTALLATION INSTRUCTIONS
 INSTALLATION INSTRUCTIONS Accessory Application Publications No. All 30482 S 2006 PILOT Issue Date P/N 08F23-S9V-100A SEP 2005 PARTS LIST Left front trim piece Right front trim piece Left rear trim piece
PRELIMINARY INSTALLATION INSTRUCTIONS. PARTS LIST Left front trim piece
 INSTALLATION INSTRUCTIONS Accessory Application Publications No. All 30482 S 2006 PILOT Issue Date P/N 08F23-S9V-100A SEP 2005 PARTS LIST Left front trim piece Right front trim piece Left rear trim piece
Installation Guide. Keypad & RFID Shared & Assigned Use Standard, Vertical, & Horizontal Body
 Installation Guide Keypad & RFID Shared & Assigned Use Standard, Vertical, & Horizontal Body Before Lock Installation 3 Surface Mount Installation 4 For door thickness measuring between.01 -.480 (0.01mm
SunFlower Helicopter Rocket LUNAR Build Session: 9/25/08 By Tom Desmarais
 SunFlower Helicopter Rocket LUNAR Build Session: 9/25/08 By Tom Desmarais Contents of Kit: A. 3 1/16 x1 x11 basswood rotors B. 3 1/16 x2 x2 basswood fins C. 3 1/16 x5/16 x1/2 basswood hold spacer D. 3