Build your own. Pack. Stages 39-42: Receive more of Robi s electrical components
|
|
|
- Jocelyn Parks
- 5 years ago
- Views:
Transcription


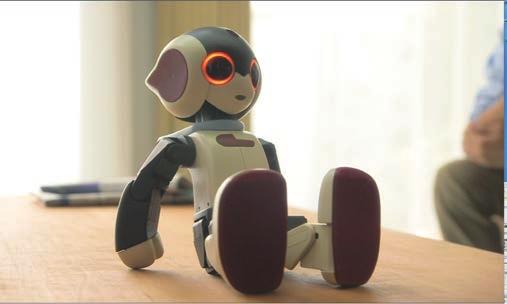


1 Build your own Pack 11 Stages 39-42: Receive more of Robi s electrical components


2 Build your own All rights reserved 2016 CONTENTS Published in the UK by De Agostini UK Ltd, Battersea Studios 2, 82 Silverthorne Road, London SW8 3HE Published in the USA by De Agostini Publishing USA, Inc., 121 E. Calhoun Street Woodstock, IL Assembly Guide Stage 39: Robi s charger p191 p191 Packaged by Continuo Creative, North Road, London N7 9DP Printed in EU The names and likenesses of all Robi characters, artwork and distinctive lettering are protected under the copyright and trademark laws of the United States and all foreign countries. Stage 40: The power distribution board p192 Stage 41: Mount the battery p194 Stage 42: The test SD card p198 NOT SUITABLE FOR CHILDREN UNDER THE AGE OF 14. THIS PRODUCT IS NOT A TOY AND IS NOT DESIGNED FOR USE IN PLAY. ITEMS MAY VARY FROM THOSE SHOWN. THERE MAY BE COLOUR VARIATIONS OWING TO THE MATERIALS USED.


3 ASSEMBLY GUIDE STAGE 39: ROBI S CHARGER The charger supplied with this stage will be used to deliver power to the battery received with the previous pack. The charger, or adapter, will transfer mains power to Robi s battery, but it is important that it not be used or connected to Robi until the power distribution board is installed. It is also important that you read the safety instructions before using it for the first time, and that the charger is stored safely until then. There are no assembly steps in this stage. 1* *The charger shown in the step photos throughout the Assembly Guide is a two-pronged European model but the one you will have received is specific to your region. YOUR PARTS 1 Region-specific charger INSTRUCTIONS There are no assembly steps in this stage, but remember to read the safety warnings carefully when you receive the charger. 191


4 ASSEMBLY GUIDE STAGE 40: THE POWER DISTRIBUTION BOARD In this stage, you have received the power distribution board that will deliver power to Robi s various electronic components on completion, along with the rear hip panel that accommodates the charging socket. The power distribution board will divide power between the battery, switch and charging cables as required, and is an essential component for the smooth running of Robi on completion although it will also be used in the testing of Robi s arms and legs in coming stages. Until then, the power distribution board, along with the rear hip panel also received with this stage, should be stored away safely. Again, there are no assembly steps in this stage. 1 YOUR PARTS 2 1 Power distribution board 2 Rear hip panel SAFE STORAGE The power distribution board is small and delicate, so has been delivered in bubble-wrap packaging. Keep the part in this wrapping and store it away until it is needed. 192


5 SERVO ID NUMBERS As you will be well aware of by now, each of Robi s servo motors has a unique ID number, which you have been setting using the test board over the previous stages. If one is set with the wrong ID number, Robi will not work properly, and you will have to go back and disassemble the parts holding the servo, disconnect it and then reset it which can be a fiddly and timeconsuming process! The diagram below (also found in Stage 8) will serve as a quick-reference point to help you remember exactly which servo goes where. Head forward tilt ID=15 Neck sideways turn ID=13 Head sideways tilt ID=14 Right shoulder ID=16 Left shoulder ID=19 Right upper arm ID=17 Left upper arm ID=20 Right forearm ID=18 Left forearm ID=21 Right hip ID=2 Back ID=12 Left hip ID=7 Right thigh ID=3 Left thigh ID=8 Right knee ID=4 Left knee ID=9 Right ankle ID=5 Left ankle ID=10 Right foot ID=6 Left foot ID=11 193


 4 M2 x 4mm pan-head")

6 ASSEMBLY GUIDE STAGE 41: MOUNT THE BATTERY In this stage you have received the CPU board support, which will hold Robi s Central Processing Unit on completion, along with the power cord that will carry mains power from the charger to the battery pack. The CPU board support will hold the Central Processing Unit neatly within Robi s body, and will feed electronic messages to each of the electronic components, such as his limbs, via servo cables to tell these how to operate. There is a slot on the support to hold the battery pack, which will power Robi. Once you have fitted the power cord to the rear hip panel, you will charge the battery for the first time. 1 2 YOUR PARTS CPU board support 2 Servo removal tool 3 M2 x 5mm pan-head screws x 3 (one is a spare) 4 M2 x 4mm pan-head screws x 3 (one is a spare) 5 Power cord SAVED PARTS You will be using parts from the previous stages, so be sure to have these to hand before beginning. Protective pads (Stage 3) Rear hip panel and power distribution board (Stage 40) Battery (Stage 38) Charger (Stage 39) 194


7 FITTING THE POWER CORD Line up the power cord s connector to the hole in the rear hip panel, from the inside. 1 2 Press the connector into the hole so that it sits flush with the inside face of the hip panel. 3 The jack inside the power cord s connector must be set straight and in the centre of the hole, as shown. 4 Secure the connector using two M2 x 5mm pan-head screws. FITTING PROTECTIVE PADS 5 Hold the power distribution board as shown, then peel off a protective pad from the sheet and line it up to the first of the circled metal solder joints, on the underside of the board. 6 Repeat for the other two sets of solder joints, so that all are covered. The pads should remain neatly within the board, without any part of them sticking out beyond it. 195


 and line this up to the indicated socket on the power")


8 JOINING THE POWER CORD AND BATTERY Fit the connector s tip into the socket, then, making sure it is perfectly straight, press it into place. The part should be securely held within the socket when this is done, as shown in the right photo. 7 Take the white connector at the end of the power cord (leading to the rear hip panel) and line this up to the indicated socket on the power distribution board. 9 Now line up the white connector at the end of the cables leading from the battery to the socket at the far side of the power distribution board Press this securely into place as you did in Step 8. The battery and power cord are now connected. 12 Push this into the socket it is OK if a few millimetres of metal can still be seen. CHARGING THE BATTERY 11 Plug the charger supplied with Stage 39 into the charging port in the rear hip panel, leading to the power cord s connector within. 196


9 ATTENTION! 13 Plug the charger into a mains socket. The LED should light up red. 14 When the battery is fully charged, the LED will turn green. Turn off the power and remove the charger at this point. As with any electrical item, care must be taken when connecting to mains electricity. Never handle the charger with wet hands, and only switch the socket on when the charger is installed. This charger should only be used in a single socket, rather than a multiple or split one, such as those on a 4-way extension lead. Once the charge is complete, remove from the power immediately this will be after approx. 20 minutes for the first charge, and roughly an hour thereafter. DISCONNECTING THE CHARGER 15 Unplug the charger from the charging port in the rear hip panel. 16 Pinch the power cord connector to release it from the board, then do the same for the battery's one. Completed rear hip panel 17 The rear hip panel that holds the charging port is now prepared, you have seen how the power distribution board is used and the battery has had its first full charge. Put the power distribution board back in its protective bubble wrap bag for safe-keeping. 197
10 ASSEMBLY GUIDE STAGE 42: THE TEST SD CARD In this stage, you have received the SD card that will be used to test Robi s movement, which will begin in the coming stages. The micro SD card supplied with this stage is not the one that will control Robi when he is completed, but is specifically programmed to run a series of actions to test the movement of Robi s arms, legs, hip and neck. This is an important process, as it is vital that all the various servos that give Robi his movement are programmed correctly before any further assembly work takes place. The motion test will take place over a number of assembly stages (starting in the next pack), and will begin with you testing the alreadybuilt right arm, left arm and right leg, before completing the process by testing the left leg, hip and neck as these are assembled. The test SD card is very small and easily lost, so be very sure to keep it safely until it is needed. YOUR PARTS 1 Test SD card 1 198


11 COMING IN PACK 12 Your next FOUR complete Stages, as Robi starts to come to life! Stage 43 Receive Robi s CPU board and begin the movement test PARTS PROVIDED The CPU that will control Robi s movements on completion. Stage 44 Prepare Robi s left foot servo and test the left arm PARTS PROVIDED Another of Robi s servos. Stage 45 Build up Robi s left foot and test its servos PARTS PROVIDED The left foot cover and sole, along with fixing screws. Stage 46 Assemble Robi s left lower leg then test his right leg PARTS PROVIDED Left lower leg panels, a servo cable and fixing screws.
BUILD YOUR OWN. Pack 16
 BUILD YOUR OWN TM Pack 6 0 CONTENTS Assembly Guide 43 Stage 5: The left fuel tank base Stage 5: The engine cables Stage 53: The LED tester Editorial and design by Continuo Creative, 39-4 North Road, London
Build your own THUNDERBIRD 2
 PACK 03 PAGE 12 Pod 3 front hatch and Elevator Car 2 43 13 Pod 3 rear hatch and Elevator Car 2 46 14 Pod 3 floor and Elevator Car 2 49 15 Pod 3 frames and FAB 1 52 16 Pod 3 frames and FAB 1 55 17 Pod 3
Build your own THUNDERBIRD 2
 PACK 11 PAGE 67 Pod 4 ramp tracks and Jet Air Transporter 224 68 Left rear booster and Alan s Racing Car 227 69 Right rear booster and Alan s Racing Car 230 70 Left booster speaker 233 71 Right rear booster
The front wheel and mirror
 Pack 01 1 The fuel tank 3 2 The front wheel and mirror 5 3 The headlight 6 Editorial and design by Continuo Creative, 39-41 North Road, London N7 9DP. Published in the UK by De Agostini UK Ltd, Battersea
Build the legendary PORSCHE RS 2.7. Pack 5
 Build the legendary PORSCHE RS 2.7 Pack 5 Build the legendary P O R S C H E RS 2.7 Contents PAGE STAGE 29 Rear disc brake 120 30 Rear wheel 123 31 Rear disc brake 126 32 Rear wheel 129 33 The crankcase
Build your own THUNDERBIRD 2
 PACK 04 PAGE 19 Pod 3 base 66 20 Pod 3 details and Firefly 69 21 Pod 3 laboratory and Firefly 72 22 Pod 3 floor details and Firefly 75 23 Pod 3 inspection walkways 78 24 Pod 3 right inner wall 81 25 Pod
Build your own THUNDERBIRD 2
 PACK 06 PAGE 33 Telescopic legs C and I.R.3 112 34 Telescopic legs D and I.R.3 115 35 Leg bases and Thunderizer 118 36 Landing feet and Elevator Car 3 121 37 Leg rail-gear racks and Elevator Car 3 124
Build the legendary PORSCHE RS 2.7. Pack 12
 Build the legendary PORSCHE RS 2.7 Pack 12 Build the legendary P O R S C H E RS 2.7 Contents PAGE STAGE 92 The rear shelf 368 93 The engine cover 372 94 The engine cover hinges 376 95 The rear panel 380
3D PRINTER. Pack 09. Anything you can imagine, you can make! 3D technology is now available for you at home! BUILD YOUR OWN
 BUILD YOUR OWN Pack 09 Anything you can imagine, you can make! 3D PRINTER Compatible with Windows 7 & 8 Mac OS X 3D technology is now available for you at home! www.model-space.com BUILD YOUR OWN 3D PRINTER
Build your own THUNDERBIRD 2
 PACK 01 STAGE PAGE 01 Nose assembly and Elevator Car rear wheels 3 02 Cockpit interior and Elevator Car 1 completion 7 03 Missile launcher and Thunderbird 4 11 04 Nose assembly and the Tracy brothers 15
3D PRINTER. Pack 10. Anything you can imagine, you can make! 3D technology is now available for you at home! BUILD YOUR OWN
 BUILD YOUR OWN Pack 10 Anything you can imagine, you can make! 3D PRINTER Compatible with Windows 7 & 8 Mac OS X 3D technology is now available for you at home! BUILD YOUR OWN 3D PRINTER CONTENTS PACK
Build your own THUNDERBIRD 2
 PACK 12 STAGE PAGE 74 Tailwing ramjets and Cobra Half-track 247 75 Tailwing intakes 250 76 Tailwing fins 253 77 T2 control board 255 78 T2 wings and Mobile Crane 258 79 T2 side frames and Mobile Crane
Build the legendary PORSCHE RS 2.7. Pack 3
 Build the legendary PORSCHE RS 2.7 Pack 3 Build the legendary P O R S C H E RS 2.7 Contents PAGE STAGE 13 The rear engine cover 55 14 The left intake manifolds and throttle bodies 59 15 The right intake
Build the. Steam Locomotive. Pack 01
 Build the Steam Locomotive Pack 01 Build the Steam Locomotive Contents Step by step Stage 01: The smokebox door Stage 02: The smokebox Stage 03: The first driving wheels and coupling rods Stage 04: The
User Guide Zenki. Zenki Chair. Congratulations on the purchase of your new
 Congratulations on the purchase of your new Zenki Chair. All Zenki products are designed to help users achieve stress free working postures but even the best ergonomic chair in the world can t do everything
rh logic 400/300 The neckrest can be adjusted by height and depth, providing support for the neck and comfort for the rest of the body.
 rh logic 400/300 The RH Logic 400/300 is one of our most popular chair ranges thanks to its ergonomic features and outstanding durability. The RH Logic 400 has a high back, the RH Logic 300 a lower back.
ASSEMBLY AND USER GUIDE
 ASSEMBLY AND USER GUIDE "DESIGNED FOR THE OPTIMAL GAMING EXPERIENCE AND UNPARALLELED COMFORT" Congratulations on purchasing your EDGE GX1 gaming chair. The chair has several important adjustments. Spending
One- Touch Installation Instructions
 One- Touch Installation Instructions 1 1 Height Adjustable Pivot w/ screws 9 Upper Work Surface 2 Rail Mount Knobs 10 Back Cover 3 Transformer 11 Center Pivot w/ screws 4 Support Legs 12 Left Monitor Arm
Aspen Lift Part Number Spectrum Lane ~ Missoula MT ~
 Aspen Lift Part Number 26010 7100 Spectrum Lane ~ Missoula MT 59808 800.791.8056 ~ www.spectrumproducts.com 26010 Man Rev H You have purchased a Spectrum Products Aspen II BP350 assisted access lift. Providing
TRACER. User Manual. Model: PFBD97
 TRACER User Manual Model: PFBD97 Thank you for choosing ProFlight. Please read this user manual before using this drone and keep it safe for future reference. CONTENTS Safety 3 Battery Charging 4 Fitting
Micro Remote Control UFO Quadcopter KARCTUFOMNA Quick Start Guide Please read this guide carefully before use.
 Micro Remote Control UFO Quadcopter KARCTUFOMNA Quick Start Guide Please read this guide carefully before use. Product Layout Battery Installation To load the batteries: Open the battery cover on the back
Eazidraw Cordless. Installation & Set Up Instructions. Electric Blinds & Curtains
 Eazidraw Cordless Installation & Set Up Instructions Electric Blinds & Curtains Features Quiet, DC battery motor with low power consumption. Rechargeable battery with up to 500 uses between charges Fully
PORTABLE ASPEN. Part Number 42643
 PORTABLE ASPEN Part Number 42643 You have purchased a Spectrum Products Portable Aspen Lift. Providing the unit is installed correctly and properly maintained, it will furnish you with many years of trouble
S6 BATTERY REPLACEMENT
 S6 BATTERY REPLACEMENT Supplemental Instruction Guide P/N 108304 Battery Pack Removal Tools Required: S6 Operation & Parts Manual, Phillips Head Screwdriver, Needle Nose Pliers, Wire Stripping / Crimping
Seatpan and backrest angles can be adjusted independently, usually with two separate levers
 Feature Explanation Considerations Standard Features & Options Synchronous Mechanism Relationship between seatpan and backrest is linked so that the angles adjust in a fixed ratio. Typically, the backrest
INSTRUCTIONS, (FORD) SUPER DUTY INSTALLATION KIT (C2 PICKUP LIFTGATES)
 SUPER DUTY INSTALLATION KIT (C2 PICKUP LIFTGATES)") LIFT CORPORATION Sht. 1 of 22 DSG# M-16-32 Rev. - Date: 12/13/16 INSTRUCTIONS, (FORD) SUPER DUTY INSTALLATION KIT (C2 PICKUP LIFTGATES) FORD SUPER DUTY F-250, F-350 & F-450 PICKUP TRUCKS, 2017 MODEL KIT
LIFT CORPORATION Sht. 1 of 22 DSG# M-16-32 Rev. - Date: 12/13/16 INSTRUCTIONS, (FORD) SUPER DUTY INSTALLATION KIT (C2 PICKUP LIFTGATES) FORD SUPER DUTY F-250, F-350 & F-450 PICKUP TRUCKS, 2017 MODEL KIT
7.0 Aspen Pine SYLVANIA Power-Lit TM M5 Warm White LED Pre-Lighted Tree V
 7.0 Aspen Pine SYLVANIA Power-Lit TM M5 Warm White LED Pre-Lighted Tree V68035-56 INSTRUCTION MANUAL Thank you for purchasing a SYLVANIA Power-Lit TM Pre-lighted Tree. This tree assembles in minutes and
VHX-69C-CAC Dakota Digital VHX Instrument Installation For 69 Chevy Camaro systems with Console Gauges
 Your new VHX-69C-CAC kit will include: VHX-69C-CAC Dakota Digital VHX Instrument Installation For 69 Chevy Camaro systems with Console Gauges VHX Displays Universal Sensor Pack Installation Manuals (2X)
Jupiter. Uncompromised comfort and postural support in keeping with a contemporary home setting
 Jupiter Uncompromised comfort and postural support in keeping with a contemporary home setting Jupiter Jupiter is the ideal home use chair for children through to adults, that combines comfort with superior
Freedom Lift. Part Number 57961
 Freedom Lift Part Number 57961 You have purchased a Spectrum Products Freedom assisted access lift. Providing the unit is installed correctly and properly maintained, it will furnish you with many years
Final Assembly Instructions Portside Cruiser
 Final Assembly Instructions Portside Cruiser Thank you for buying your new bicycle from L.L.Bean. Read these instructions carefully before beginning the final assembly. Prior to shipping, our expert cycling
INSTRUCTIONS, NISSAN TITAN TRUCK INSTALLATION KIT (C2 PICKUP LIFTGATES)
") LIFT CORPORATION Sht. 1 of 18 DSG# M-14-33 Rev. A Date: 05/31/2017 INSTRUCTIONS, NISSAN TITAN TRUCK INSTALLATION KIT (C2 PICKUP LIFTGATES) NISSAN TITAN PICKUP TRUCKS, 2004-2015 KIT P/N 295040-01 MOUNTING
LIFT CORPORATION Sht. 1 of 18 DSG# M-14-33 Rev. A Date: 05/31/2017 INSTRUCTIONS, NISSAN TITAN TRUCK INSTALLATION KIT (C2 PICKUP LIFTGATES) NISSAN TITAN PICKUP TRUCKS, 2004-2015 KIT P/N 295040-01 MOUNTING
EP1260-W7 MASSAGE LOUNGER SPECIFICATIONS ORDER NO.HPD0309W02C7
 ORDER NO.HPD0309W02C7 EP1260-W7 MASSAGE LOUNGER SPECIFICATIONS 2003 Matsushita Electric Industrial Co., Ltd. All rights reserved. Unauthorized copying and distribution is a violation of law. CONTENTS Page
BUMP AND SPIN KIT ESSENTIAL INFORMATION. Version 1.0 PROGRAM AND DESIGN YOUR OWN BUGGY WITH THIS
 ESSENTIAL INFORMATION BUILD INSTRUCTIONS CHECKING YOUR PCB & FAULT-FINDING MECHANICAL DETAILS HOW THE KIT WORKS PROGRAM AND DESIGN YOUR OWN BUGGY WITH THIS BUMP AND SPIN KIT Version 1.0 Build Instructions
Amtryke Model AM-12 & AM-16
 Amtryke Model AM-12 & AM-16 Carton Contents Carefully remove and lay out all parts from the carton so as not to scratch or lose any parts or pieces. The shipping carton should contain the pictured items
Large Activity Chair (R870)
") Large Activity Chair (R870) Activity Chair We knew we had a good chair when we first introduced the medium Activity Chair. After all, our product designers had collected input from hundreds of therapists.
Large Activity Chair (R870) Activity Chair We knew we had a good chair when we first introduced the medium Activity Chair. After all, our product designers had collected input from hundreds of therapists.
Switchback Carrier Rack System
 Switchback Carrier Rack System Installation Instructions 1 Rocky Mountain Westy Ph. (970)310-3441 Introduction Thank you for purchasing the Rocky Mountain Westy Switchback Carrier Rack System. We pride
Basic price 2.250,- Excl. VAT
 Date Invoice address Invoice address = delivery address Customer code C- Contact person Reference Other delivery address Quote Seat width D64035 35 cm D64040 40 cm D64045 45 cm D64050 50 cm = Standard
Prusa i3 Printer Assembly Guide
 Prusa i3 Printer Assembly Guide Special thanks to Carlos Sanchez and Miguel Sanchez for the graphics. All graphics captured from their great animation: http://www.carlos-sanchez.com/ Prusa3/ For copyright
Micro USB Lamp Kit ESSENTIAL INFORMATION. Version 2.1 DESIGN A STYLISH LAMP WITH THIS
 ESSENTIAL INFORMATION BUILD INSTRUCTIONS CHECKING YOUR PCB & FAULT-FINDING MECHANICAL DETAILS HOW THE KIT WORKS DESIGN A STYLISH LAMP WITH THIS Micro USB Lamp Kit Version 2.1 Build Instructions Before
Rostra Electronic Cruise Control Install On a Stratoliner or Roadliner
 Rostra Electronic Cruise Control Install On a Stratoliner or Roadliner MATERIALS LIST: 1 - Rostra Part # 250-1223 (www.brandondist.com/products/cruise1223.htm) 1 - Signal Splitter part # 250-4369 1 - Engagement
Customer code C- Invoice address. Max. 90 kg See page 5 Side upholstery (reduces SW with 2 x 2 cm) = Standard equipment
 = Standard equipment") Date Customer code C- Invoice address Contact person Reference Other delivery address Quote Invoice address = delivery address Basic price: 3.495,- excl. VAT Seat width D2025 D2030 D2035 25 cm 30 cm 35
Date Customer code C- Invoice address Contact person Reference Other delivery address Quote Invoice address = delivery address Basic price: 3.495,- excl. VAT Seat width D2025 D2030 D2035 25 cm 30 cm 35
7.5 Oregon Fir With SYLVANIA Multi Color Mini Lights and Multi Color G50 Soft Glow Lights Pre-Lighted Tree V69139 INSTRUCTION MANUAL
 7.5 Oregon Fir With SYLVANIA Multi Color Mini Lights and Multi Color G50 Soft Glow Lights Pre-Lighted Tree V69139 INSTRUCTION MANUAL Thank you for purchasing a SYLVANIA pre-lighted tree. This tree assembles
A S S E M B L Y G U I D E
 MODEL SOLAR ELECTRIC POWER BOAT PLUGGING into the sun DRAFT COPY ONLY - SEND US YOUR COMMENTS A S S E M B L Y G U I D E Two flexible solar cells turn sunlight into electricity that flows through the solar
WARNING. Part Number: Description: Suited to TOYOTA FJ CRUISER ALSO, NOTE THE FOLLOWING:
 Part Number: 5620010 Product ARB REAR BAR Description: Suited to TOYOTA FJ CRUISER vehicle/s: ALSO, NOTE THE FOLLOWING: WARNING This product must be installed exactly as per these instructions using only
Adjustable Angled Incline Conveyor Owners Manual with Operating Instructions
 Adjustable Angled Incline Conveyor Owners Manual with Operating Instructions Revision 012211 Table of Contents Basic Conveyor Features 3 Getting Started 4 Setting Up the Incline Conveyor 5 Belt Removal
Compact Solar Charger. Model Number ACSC-116 INSTRUCTION MANUAL
 Compact Solar Charger Model Number ACSC-116 INSTRUCTION MANUAL AUS 1300 886 649 Model: ACSC-116 Product Code: 45276 03/2016 Welcome Congratulations on choosing to buy a Bauhn product. All products brought
P44 Stepper. User Manual
 P44 Stepper User Manual Table of Contents Introduction 1 Safety Warning 2 Overview of Parts 2 Attaching to Chair 3 Manoeuvring Around 4 Setting Pedal Stops 4 Getting On 5 Setting the Resistance (models
Compact Solar Charger. Model Number ACSC-114 INSTRUCTION MANUAL
 Compact Solar Charger Model Number ACSC-114 INSTRUCTION MANUAL AUS 1300 886 649 Model: ACSC-114 Product Code: 45276 03/2015 Welcome Congratulations on choosing to buy a Bauhn product. All products brought
Motion Trek Spectrum Lane ~ Missoula MT ~ Rev A
 Motion Trek 350 153121 7100 Spectrum Lane ~ Missoula MT 59808 800.791.8056 ~ www.spectrumproducts.com 153121 Rev A You have purchased a Spectrum Products Motion Trek 350 assisted access lift. Providing
DARK ACTIVATED COLOUR CHANGING NIGHT LIGHT KIT
 ESSENTIAL INFORMATION BUILD INSTRUCTIONS CHECKING YOUR PCB & FAULT-FINDING MECHANICAL DETAILS HOW THE KIT WORKS CREATE SOOTHING LIGHTING EFFECTS WITH THIS DARK ACTIVATED COLOUR CHANGING NIGHT LIGHT KIT
All images and other materials are protected by United States copyright law and may not be reproduced, distributed, transmitted, displayed, published
 All images and other materials are protected by United States copyright law and may not be reproduced, distributed, transmitted, displayed, published or broadcast without the prior written permission from
CYCLONE X Bolt PP-600 Power Pack for Portable Flashes
 Inspiration strikes CYCLONE X Bolt PP-600 Power Pack for Portable Flashes User s Manual Copyright 2013 Gradus Group. Bolt and other names of Bolt products are trademarks of Gradus Group. Other product
Simple Eurorack Row. Kit Builder's Guide. 4mspedals.com
 Simple Eurorack Row Kit Builder's Guide 4mspedals.com ' Simple Eurorack Row This guide is for building a single-row eurorack case with a power supply. When completed, the case is ready to accept eurorack
Quick Install Lift AL065 Installation Guide & Owners Manual
 Quick Install Lift AL065 Installation Guide & Owners Manual Congratulations on your new lift purchase. The Quick Install Lift line is one of the easiest and most trouble free ways to transport your scooter
FD 120 Card Cutter MAINTENANCE MANUAL. MyBinding.com 5500 NE Moore Court Hillsboro, OR Toll Free: Local: /2011
 FD 120 Card Cutter 5/2011 MAINTENANCE MANUAL SAFETY PRECAUTIONS Always observe the cautions and warnings given below to prevent personal injury or property damage. The degree of danger and damage that
PORTABLE KEY SAFE OPERATING INSTRUCTIONS
 PORTABLE KEY SAFE OPERATING INSTRUCTIONS 39 Mission Oaks Blvd., Camarillo, CA 930 Visit our Web site at http://www.harborfreight.com Copyright 2003 by Harbor Freight Tools. All rights reserved. No portion
Operations Manual Eagle 1000 Series Stretch Wrapper
 Operations Manual Eagle 1000 Series Stretch Wrapper Models A & B - 1 - READ ALL INSTRUCTIONS CONTAINED IN THIS MANUAL PRIOR TO MACHINE INSTALLATION! - 2 - Contents page 1. Machine Safety Information 1.1
M4 x 14mm (x1) Silver Phillips Head Security Screw. Bolt Through Washers (x3)
 Silver Phillips Head Security Screw. Bolt Through Washers (x3)") SSKS SSKPB SSKW Component Checklist Installation Instructions SYSTEMA Systema Monitor Spring Arm Desk Mount HARDWARE 3/4/s Display Mounting s Desk Clamp VESA monitor head Arm Assembly M4 x 12/16/25mm (x4)
SSKS SSKPB SSKW Component Checklist Installation Instructions SYSTEMA Systema Monitor Spring Arm Desk Mount HARDWARE 3/4/s Display Mounting s Desk Clamp VESA monitor head Arm Assembly M4 x 12/16/25mm (x4)
The Lost Art of Techniques
 The Lost Art of Techniques Dennis Bowman RT(R) Clinical Instructor Community Hospital of the Monterey Peninsula (CHOMP) Cabrillo College AEC Technique Strategy or The Phototimer Technique Game Best way
CANOPY WIRING PATCH KIT INSTALLATION INSTRUCTIONS Holden Colorado RG
 CANOPY WIRING PATCH KIT INSTALLATION INSTRUCTIONS Holden Colorado RG IMPORTANT! Read instructions carefully before installation. It is strongly recommended that installation is conducted by an authorized
Anthro Mobile Device Charging Carts and Cabinets Owners Manual
 Anthro Mobile Device Charging Carts and Cabinets Owners Manual TECHNOLOGY FURNITURE Hello! Thank you for choosing Anthro. Anthro's Tablet Charging Carts and Cabinets are designed to automatically charge
Installation Example and Guide
 Installation Example and Guide Author: Road Angel Group Date: May 2016 Version: 1.00 Version 1.00 Page 1 of 12 Contents CONTENTS... 2 INTRODUCTION... 3 SCOPE... 3 ITEMS REQUIRED FOR HARDWIRE INSTALLATION...
1. Connect the Tester to the L300 FS Cuff plug holes. See Figure Figure 11-1: Tester connected to the L300 FS Cuff.
 Troubleshooting 11 Using the Tester The Tester is used to troubleshoot if there is a disconnection in one of the FS Cuffs or a faulty RF Stim Unit. The Tester provides audio feedback when connected to
Soldering Pi2Go Lite. Soldering the Line-Follower PCB
 Soldering Pi2Go Lite First check which version of the main PCB you have. It is marked above the left motor "Pi2Go-Lite v1.x". There are minor changes to some parts of the build. v1.0 (initial release)
THE ENGINE & INTERIOR Completing this section of your Aston Martin DB5 model.
 THE PARTS YOU WILL NEED: READER-ASSEMBLED SECTIONS: Bulkhead Speaker 081-a Floor panel Dashboard Engine and fan belt Bulkhead Front wheels Speaker NUMBERED PARTS: 078-A : Left spring retainer 078-B : Right
INSTRUCTIONS, (FORD) SUPER DUTY INSTALLATION KIT (C2 PICKUP LIFTGATES)
 SUPER DUTY INSTALLATION KIT (C2 PICKUP LIFTGATES)") LIFT CORPORATION Sht. 1 of 20 DSG# M-14-32 Rev. B Date: 05/31/2017 INSTRUCTIONS, (FORD) SUPER DUTY INSTALLATION KIT (C2 PICKUP LIFTGATES) FORD SUPER DUTY F-250 PICKUP TRUCKS, 1999-2016 FORD SUPER DUTY
LIFT CORPORATION Sht. 1 of 20 DSG# M-14-32 Rev. B Date: 05/31/2017 INSTRUCTIONS, (FORD) SUPER DUTY INSTALLATION KIT (C2 PICKUP LIFTGATES) FORD SUPER DUTY F-250 PICKUP TRUCKS, 1999-2016 FORD SUPER DUTY
Fitting instructions for Lynx R Fairing - KTM 690
 Fitting instructions for Lynx R Fairing - KTM 690 Thank you for purchasing the Lynx R fairing. Your fairing kit comes largely completed, with most of the fitting time involved with the attachment of your
Paediatric seating for the Bingo OT. Designed and manufactured by
 Designed and manufactured by Paediatric seating for the Bingo OT A breakthrough in rehabilitative stroller seating Introducing the latest innovation from the designers of the revolutionary SPEX seating
IMPORTANT! KEEP INSTRUCTIONS FOR FUTURE REFERENCE.
 T1838 IMPORTANT! KEEP INSTRUCTIONS FOR FUTURE REFERENCE. www.fisher-price.com.au Consumer Information WARNING Prevent serious injury or death from falls or sliding out: Always use the restraint system
SW20 Coolant System Maintenance.
 SW20 Coolant System Maintenance. This article contains information on how to change and bleed the coolant, as well as flushing the system. It is based on information in the service manual, tips gathered
Fitting instructions for Lynx R Fairing - KTM 690
 Fitting instructions for Lynx R Fairing - KTM 690 Thank you for purchasing the Lynx R fairing. Your fairing kit comes largely completed, with most of the fitting time involved with the attachment of your
Final Assembly Instructions: Runaround Cruiser
 Final Assembly Instructions: Runaround Cruiser Thank you for buying your new bicycle from L.L.Bean. Read these instructions carefully before beginning the final assembly. Prior to shipping, our expert
TECHNICAL SPECIFICATIONS. CAPACITY per slot width 1ʺ 1.25ʺ 1.5ʺ HKPX2VC/A 2 modules devices HKPY2VC/A 3 modules devices
 USER GUIDE Mobility MiX Cart HKPX2VC/A Mobility MiX Cart 30 HKPY2VC/A Mobility MiX Cart 45 TECHNICAL SPECIFICATIONS CAPACITY per slot width 1ʺ 1.25ʺ 1.5ʺ HKPX2VC/A 2 modules 30 24 20 devices HKPY2VC/A
Powerslot Mustang Rotors (Rear Pair GT/V6) - Installation Instructions
 - Installation Instructions") Powerslot Mustang Rotors (Rear Pair 94-04 GT/V6) - Installation Instructions The below installation instructions work for the following products: Powerslot Mustang Rotors (Rear Pair 94-04 GT/V6) Please
Powerslot Mustang Rotors (Rear Pair 94-04 GT/V6) - Installation Instructions The below installation instructions work for the following products: Powerslot Mustang Rotors (Rear Pair 94-04 GT/V6) Please
WARNING. This product uses High Brightness LEDs. Direct viewing of the SMD LEDs at close range should be avoided. Keep product away from children.
 WARNING Before use please remove the LED Tape from its bag and allow the odour to dissipate in an unused room or outdoor building. Wash Hands after handling. This product uses High Brightness LEDs. Direct
TRAVEL-PAK BW TRAVEL-PAK INSTRUCTIONS BWL-0375/ Old Road Clacton on Sea Essex CO15 3RH UK
 TRAVEL-PAK BW-760 55 Old Road Clacton on Sea Essex CO15 RH UK Tel: +44 (0)155 4807 Fax: +44 (0)155 464 GUIDE TRAVEL-PAK INSTRUCTIONS BWL-075/1 USER Table of Contents Specifications Description Page Introduction
Important safety Instructions CUTION: Before you begin any of the Installation procedures on page 3, read and follow the warnings and safety instructi
 Mounting Instructions Item No.: 421.68.440 TV Lift Parts included with your TV Lift Lift unit (#1 ) Power supply + bracket (#2 ) R.F. Module (#3 ) Rocker switch (#4 ) Remote Control (not shown) Plasma
Safe Transportation of Youth
 Safe Transportation of Youth This guide is designed to provide an overview of best practices related to the safe transportation of youth. The items described below shall be customized to each organizations
Grab-and-Go Booster. Grab-and-Go Booster
 Grab-and-Go Booster Grab-and-Go Booster Model Number: MF01-CA For Children: at least 4 years of age 18 to 45 kg (40 to 100 lbs.) 102 cm to 145 cm (40 to 57 inches) This child restraint conforms to CMVSS
MODEL T TON FLOOR JACK w/led LIGHT INSTRUCTIONS
 MODEL T25938 2 1 4 TON FLOOR JACK w/led LIGHT INSTRUCTIONS For questions or help with this product contact Tech Support at (570) 546-9663 or techsupport@grizzly.com Introduction This floor jack has a 2
Seat Cover Installation for Bucket Seats
 for Bucket Seats Step 1 Headrest Removal Headrests need to be removed prior to installation of the seat cover. Most headrests remove by pressing the adjustment button located at the base of the post (Figure
Important notice Upper supports for Z axis Pulley Corner for Y axis Right X axis and left X axis Chain coupling for left X axis
 Warranty and FAQ G004260 Important notice You can personalise your Prusa i3 HEPHESTOS and update it with the latest innovations that appear in the community. However, it is important that you understand
Electrical TV Lift mechanism TS750. Parts included with your TV Lift
 Electrical TV Lift mechanism TS750 Parts included with your TV Lift Lift unit ( #1 ) Power supply + bracket ( #2 ) R.F. Module ( #3 ) Rocker switch ( #4 ) Remote Control (not shown) Plasma screen brackets
SCIFIT Seat System Owner s Operation Manual
 SCIFIT Seat System Owner s Operation Manual STANDARD BARIATRIC PREMIUM Before using this product, read this manual and follow all safety rules and operating instructions. PAGE LEFT BLANK table of contents
INSTRUCTION MANUAL FOR THE SHARK SLIDER MINI SERIES
 INSTRUCTION MANUAL FOR THE SHARK SLIDER MINI SERIES DK0801001 Thank you for purchasing this ifootage product, The Shark Slider Mini is compact, lightweight, easy to carry and is ideal for all types of
RISER PIPE, SHOWER ARM, ADJUSTABLE BRACKET & 2 WAY RISER DIVERTER ASSEMBLIES INSTALLATION GUIDE
 RISER PIPE, SHOWER ARM, ADJUSTABLE BRACKET & 2 WAY RISER DIVERTER ASSEMBLIES INSTALLATION GUIDE DIMENSIONS Riser pipes for wall mounted bath shower mixers The pipes are Ø19mm and connections are made
Make Your Own Electricity
 Make Your Own Electricity Topic Electromagnetic induction Introduction Electromagnetic induction the creation of a difference in electric potential between the ends of a conductor moving in a magnetic
Check what you have received against the component checklist and hardware above.
 SSS SSPW SSW SSPB SSB Component Checklist Installation Instructions SYSTEMA Systema Monitor Spring Arm HARDWARE Display Mounting Spacers (x4) 3/4mm Allen Keys Display Mounting Screws Arm Assembly VESA
Your G3 buggy is fitted with three switches on the front part of the body:
 CONTENTS Buggy operation... 3 General Maintenance... 5 Technical Maintenance... 6 Front wheel bearing replacement... 6 Rear wheel bearing replacement... 7 Chain replacement... 8 Chain Adjustment... 9 Brake
TURBOBOOSTER
 www.gracobaby.ca TURBOBOOSTER PD349130E 11/18 Do not install or use this child restraint until you read, understand and follow the instructions in this manual and the warnings on the car seat. FAILURE
SMARTSTRINGSTM. Owner's Manual
 SMARTSTRINGSTM Owner's Manual Welcome! Thank you for purchasing our SmartStrings alignment kit. You are now the owner of what we believe to be the best and most universal way to quickly perform accurate
Check what you have received against the component checklist and hardware above.
 SSS SSPW SSW SSPB SSB Component Checklist Installation Instructions SYSTEMA Systema Monitor Spring Arm HARDWARE Display Mounting Spacers (x4) 3/4mm Allen Keys Display Mounting Screws Arm Assembly VESA
PARTS LIST CHARGER 2022 AB
 PARTS LIST CHARGER 2022 AB ITEM PART NO. PART DESCRIPTION QTY. 101 6497261 AXLE / PIVOT MOUNT 2 102 6495891 PIVOT 1 103 2691181 PIVOT SPACER, STABILIZER BAR 2 104 9122180 13/32 X 13/16 X.051 THICK WASHER
CHESTERTON FLOW GUARDIAN S50 AND SP50 SINGLE FLOWMETER INSTALLATION INSTRUCTIONS
 INSTALLATION INSTRUCTIONS CHESTERTON FLOW GUARDIAN S50 AND SP50 SINGLE FLOWMETER INSTALLATION INSTRUCTIONS GENERAL The function of the FLOW GUARDIAN Single S50 (Item # 199801 compression fitting, 199804
HALOGEN FLOODLIGHTS Models CHL1260C & 1260T Part Nos: &
 HALOGEN FLOODLIGHTS Models CHL1260C & 1260T Part Nos: 5460600 & 5460595 OPERATING & MAINTENANCE INSTRUCTIONS GC0610 INTRODUCTION Thank you for purchasing this CLARKE Halogen Floodlight. Before attempting
Installation and Operation
 HQ Installation and Operation Copyright 2013 Handi Quilter, Inc. All rights reserved. Printed in the U.S.A. 08/2013 Table of Contents Contents of the HQ HighRise kit 3 Installation 6 Operation of the HQ
EAT116SY. 5. Remove three 10mm head bolts from inner guards and pull rearward to clear bumper side.
 EAT116SY REPLACES: 30.05.12 REVISED: 22.08.12 FITTING INSTRUCTIONS TOYOTA PRADO 11/09on ARC PROTECTION BAR WITH PARKING SENSORS AND HID HEADLIGHTS VEHICLE FRONTAL PROTECTION SYSTEM (VFPS) FOR AIR BAG &
Margolis Summer Special Offer Ergo Human Chairs. Only vat!!! Margolis Office Interiors Ltd, 341 Euston Road, London NW1 3AD
 Margolis Summer Special Offer Ergo Human Chairs Only 360 + vat!!! Margolis Office Interiors Ltd, 341 Euston Road, London NW1 3AD Tel: 020 7504 3460, Fax: 020 7388 0625 www.margolisfurniture.co.uk Ergonomic
INSTALLATION INSTRUCTIONS
 INSTALLATION INSTRUCTIONS REAR DISC BRAKE CONVERSION KIT A126-3 1988-98 CHEVY K1500 4WD 10" DRUMS Thank you for choosing STAINLESS STEEL BRAKES CORPORATION for your braking needs. Pleases take the time