Instructions: Pullman-Standard PS-3 Coal Hopper Kit Tangent Part Numbers: through /2015
|
|
|
- Damon Tyler
- 5 years ago
- Views:
Transcription


1 Instructions: Pullman-Standard PS-3 Coal Hopper Kit Tangent Part Numbers: through /2015 Thank you for purchasing the Tangent Scale Models Pullman-Standard PS-3 Coal Hopper Kit! A few quick notes before starting: Instructions have many large images: Because some model builders are visually oriented, while others prefer written instructions, we have included both text and photos within these instructions. As you can see, many of the images are rather large, to aid in your model building. There are more images at the end: If you want to see more views of a completed model as a reference for your building, scroll to the end of this document. This is another advantage of a digital download over a printed instruction sheet. Modeling from computer screen is ideal: If possible we recommend modeling from your monitor. You can then enlarge the images as you see fit, and you save ink and paper at the same time. There are several ways to complete your kit: While there are multiple sequence steps possible to build this car, we believe the sequence included here yields the best results. Prototype photos: While you likely have your own sources of prototype photos, please recall that for each RTR scheme that Tangent releases, we include a prototype photo on our website. You can use these as references in addition to your own sources. We want feedback: If you find something missing from our text instructions, or an error within these instructions, please let us know by submitting a comment to us on our website or sending an to support@tangentscalemodels.com Thank you! Instructions for Tangent Scale Models Pullman-Standard PS-3 Coal Hopper Kit Page 1


2 This kit is meant for adults: While we applaud bringing younger modelers into our hobby, this model includes many small parts, some of which are sharp and/or delicate. Therefore, this kit is recommended for those 14 years of age and older. We offer semi-scale wheels separately: We offer semi-scale wheels separately in 12 or 100 axle packs in either 33 or 36 diameters - to fit all of our trucks and those from other brands! Instructions for Tangent Scale Models Pullman-Standard PS-3 Coal Hopper Kit Page 2

3 Overview of this kit s contents: Standalone parts included: Part 1 Hopper Body (2 versions with heap shields of without heap shields) Part 2 Underframe Part 3 Car Weights on top of slope sheet Part 4 Car Weights between bolster and body Part 5 Tangent Coal Load Part sprues included: Sprue #6 contains slope sheets Sprue #7 contains coupler boxes Sprue #8 contains the two vertical end sheets Sprue #9 contains brake parts Sprue #10 contains brakewheels and brake reservoir Sprue #11 contains the underbody air line and end of car air hoses Instructions for Tangent Scale Models Pullman-Standard PS-3 Coal Hopper Kit Page 3
4 Sprue #12 contains side of car train air line and end of car brake housings Sprue #13 contains 3 different types of bottom outlet gates (times 3 of each design) Sprue #14 contains 2 more end of car brake housings (different designs) Sprue #15 contains the truck bolsters and coupler box lids Sprue #16 contains Tangent s 70-ton ASF ride Control Plain Bearing trucks with 33 CNCmachined wheelsets Parts bags included: Bag #17 contains all of the screws necessary to build this kit Bag #18 contains all wire parts, and the etched metal see-through brake step Parts needed/recommended: Couplers. The coupler boxes for this car are designed for Kadee whisker shank couplers - #158. Tools needed/recommended: Liquid styrene cement CA-type cement or cyanpoxy for wire to plastic joins Canopy cement for running board to plastic roof joins (made by Pacer and other brands) Hobby knives - #11 and #17 are ideal #78/#79 drill bit in a pin vise is useful, although a #11 blade can be used gingerly Small Phillips head screwdrivers Tweezers PREAMBLE THINGS YOU SHOULD KNOW This kit is NOT recommended for children aged 14 and under. Small parts: there are many very small parts included in this kit. The assembly sequence requires you to have access to multiple parts at a time, so we recommend a clean and open work surface so that you can keep all of the parts in the open and accessible. Let s get started! Kit variations: When you ordered this kit, there were 2 different prototype-based configurations to choose from a body with heap shields or a body without heap shields. If you want to change the configuration of your kit, you can order all of our parts here: or simply go to and click on View & Buy Models and then Parts. Body Assembly: 1. Install the weights to the carbody. There are two weights on each of the ends of the car. These should be installed into the interior of the car and covered with the slope sheets. The first weight goes in flat against the slope and rests on the center sill of the car. The second weight rests on top of the first, but it is pushed up so that the top edge of the weight Instructions for Tangent Scale Models Pullman-Standard PS-3 Coal Hopper Kit Page 4


5 contacts the end of the car. Secure both with CA (or some form of plastic-safe epoxy glue). Repeat with the other two weights on the other end of the car. Install the slope sheets by putting the notch over the center sill and resting the sheet on the weights just installed. Push slope sheet up until the top edge makes contact with the end of the car and it is sitting flat on the weights. Glue in place. Instructions for Tangent Scale Models Pullman-Standard PS-3 Coal Hopper Kit Page 5

.")
6 2. Add the two smaller weights to the bottom of the carbody. The other two weights with the one hole in each go on the underside of the car. Orient the weights so that the flat vertical face is toward the end of the car. Secure with CA. 3. Add the vertical end sheets. The one that has two raised castings and two mounting holes is for the B end (brakewheel end) of the car. Orient this panel so that the raised castings are toward the left side as you are looking at the end of the car (there is also a beveled edge on these parts to ensure correct placement). The top edge of these parts fits flush against the inside edge of a raised ridge at the base of the slope sheet. Glue in place making sure that they are both vertical. Instructions for Tangent Scale Models Pullman-Standard PS-3 Coal Hopper Kit Page 6


7 4. Remove the mold pins from the underframe. There are two mold release pins on the underframe casting that need to be removed, one on each end. Be careful not to damage the raised rail next to these pins when removing them, and make sure that the surface is flat when you re done. 5. Orient the underframe so you know which end is the B end. One side of the underframe has four mounting holes on it and the other end has two. The one with four holes is the brakewheel end. Instructions for Tangent Scale Models Pullman-Standard PS-3 Coal Hopper Kit Page 7


8 6. Prepare the brake parts for assembly. Remove the triple valve, cylinder assembly, and reservoir from the sprues, while also removing all mold release pins in the process. When done, the parts should look like this. 7. Glue the cylinder assembly in place. Make sure that the lower strut goes below the end rail. Locate the wire part that goes from the cylinder to the triple valve. It looks like a C for the most part. Orient it so that the longer leg of the part goes into the back of the cylinder and the shorter goes toward the triple valve. Glue in place. Instructions for Tangent Scale Models Pullman-Standard PS-3 Coal Hopper Kit Page 8


9 8. Install the coupler pockets. The pocket that goes on the B end of the car has a small indentation for the triple valve. Glue both coupler pockets in place. Instructions for Tangent Scale Models Pullman-Standard PS-3 Coal Hopper Kit Page 9


10 9. Add the triple valve. Orient it so that the dirt collector pipe is on the right hand side as you face the end of the car. Instructions for Tangent Scale Models Pullman-Standard PS-3 Coal Hopper Kit Page 10


11 10. Install the brake reservoir. Finally, install the reservoir, gluing the two pipes to the triple valve. Let everything dry for a bit before proceeding. 11. Glue the slope sheet supports in place. The next step is to install the slope sheet supports. This part is basically three L-angles assembled into a T shape. When installing it into the carbody, orient it so that the back side of the channel (the flat side) faces up, or toward the top of the car. See photo for clarity. The casting has a locating tab that fits into a slot in the carbody. Glue in place. 12. Install underframe assembly into the body. This will take a bit of fiddling on the B end since there are some things that need to be maneuvered around to get it installed properly. The best way to install it is to feed it into the B end by angling the frame slightly as you put it into Instructions for Tangent Scale Models Pullman-Standard PS-3 Coal Hopper Kit Page 11


12 position, then drop it into the channel in the carbody. The most crucial part is to make sure the fulcrum clears the end sill. After the underframe is in place, make sure that the fulcrum fits into the slot in the two vertical end channels. Also insert the slope sheet supports into the locating holes on the coupler pockets. Glue all in place. Instructions for Tangent Scale Models Pullman-Standard PS-3 Coal Hopper Kit Page 12


13 13. Install the retainer valve. We will now begin the carbody detail. Locate the retainer valve. It is the very small casting on the sprue that has the brakewheel housing/chain parts. It has a small pin for locating on the car end. Orient it so that the two small pins on the casting are upright. Glue in place. 14. Install the retainer pipe. Locate the retainer pipe in the wire parts bag. It is the largest wire part and has several bends in it as seen in this photo: Instructions for Tangent Scale Models Pullman-Standard PS-3 Coal Hopper Kit Page 13


14 The shorter leg of this part goes into the retainer valve and the longer one with the small bend at the end goes toward the triple valve. This part is a bit tricky to maneuver in place, but be patient and it should fit in with no problem. It needs to fit behind the two vertical end supports and above the brake lever bracket, then to the triple valve. Feed the longer leg in from just below the retainer and maneuver it into final position with the top end fitting into a small notch under the retainer. Secure at both ends with CA. Instructions for Tangent Scale Models Pullman-Standard PS-3 Coal Hopper Kit Page 14
15 15. Install the brakewheel housing. There are three types of brakewheel housing castings provided. Consult photos of your prototype to determine which one to use. There are also two different brakewheels provided as well. Install the brakewheel into the brakewheel housing. The end of the brakewheel pin will be used to locate the housing assembly to the carbody. Glue the assembly in place and also glue the end of the chain/rod to the fulcrum. Instructions for Tangent Scale Models Pullman-Standard PS-3 Coal Hopper Kit Page 15

16 16. Install the ladder grab irons to the side and ends of the car. Empty the remaining contents of the wire parts and set aside the etched metal brake platform, wire cut levers, and Instructions for Tangent Scale Models Pullman-Standard PS-3 Coal Hopper Kit Page 16

17 eyebolts. There are several different sizes of grabirons so separate them into different piles to make it easier to install on the car. The grabs for the ladders all have a long leg and a short leg. When installing these, the long leg always goes in the corner and the short leg goes inward. The four grabs that go on the end sill have legs of the same length, so make sure you identify them before installing. Also, the bottom rung on the car sides has one drop side and one straight side. The top four rungs of the end ladders are shorter than the rest as well. Glue all grabs in place with CA. Instructions for Tangent Scale Models Pullman-Standard PS-3 Coal Hopper Kit Page 17

18 17. Install the brake platform to the end of the car. Secure with CA. 18. Install the train line to the bottom of the underframe. Carefully de-sprue the train line. The straight part has a cylinder on one end that goes toward the B end of the car. It also has small ridges on one side of the support castings that fit between the center sill of the car to aid in positioning. Locate and glue in place. Instructions for Tangent Scale Models Pullman-Standard PS-3 Coal Hopper Kit Page 18


19 19. Install the train air line to the side of the carbody. The angled part has three locating pins that fit into small holes below the side sill of the car. Insert and glue in place. 20. Install the outlet gats to the bottom of the hopper body. There are three different types of hopper gates provided. Again, consult photos of your prototype to determine which you need. Glue in place. Instructions for Tangent Scale Models Pullman-Standard PS-3 Coal Hopper Kit Page 19

20 21. Install the screws to attach the underframe to the hopper body. Open the bag of screws. You will find three pairs of screws; one long, one short, and one in between. The shortest pair is for the coupler pockets, the middle pair is to secure the underframe to the car body, and the longest ones are for the trucks. Insert the middle size screws into the furthest inboard holes of the center sill and secure. 22. Install the coupler box screws. Install the bolster cap/coupler cover plate with the remaining screws (do not glue this part), but we typically recommend that you wait to install the trucks and couplers until after painting. Instructions for Tangent Scale Models Pullman-Standard PS-3 Coal Hopper Kit Page 20


21 23. Install the wire eyebolts for the coupler lift bars. Insert the eyebolts into the coupler cut lever brackets on the car ends. Fish the cut levers through the eyebolts and glue the end into the locating hole on the bottom side of the coupler box cover. Leave the end by the eyebolt floating so that you can remove the coupler cover to insert the couplers after painting. Instructions for Tangent Scale Models Pullman-Standard PS-3 Coal Hopper Kit Page 21

22 24. Install the air hoses to the carbody. Add the air hoses to the carbody by inserting the long, unobstructed end, into the mounting hole on the carbody end. Instructions for Tangent Scale Models Pullman-Standard PS-3 Coal Hopper Kit Page 22

23 Instructions for Tangent Scale Models Pullman-Standard PS-3 Coal Hopper Kit Page 23

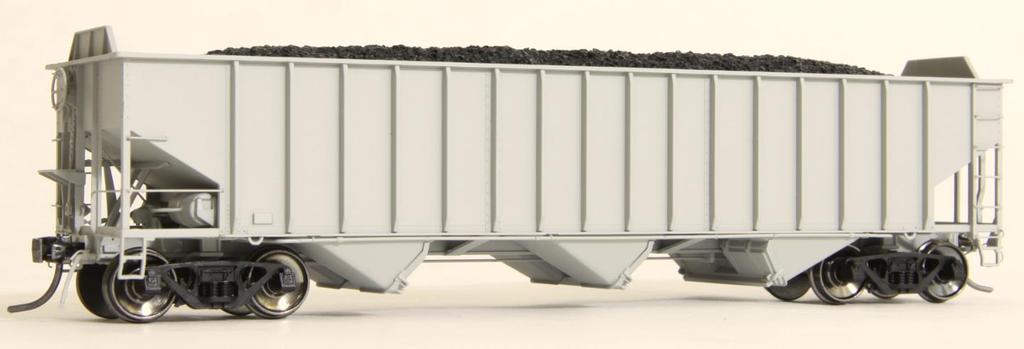
24 FINISHING UP: 25. Paint the car. Refer to prototype photos for the exact car color. And don t forget: if you added couplers already, mask them off so they will not get sticky from the paint. 26. Install couplers and trucks with screws provided. As noted at the beginning of this document, the couplers needed are Kadee Whisker type. This concludes the assembly of your kit. We hope you have enjoyed building our PS-3 hopper kit, and we thank you for your support of Tangent Scale Models! Your hard-earned dollars allow us to continue to bring you more models in the future. Want to share your creation with the world? Please feel free to upload an image of your customized Tangent model to: More images of finished cars are below and on the following pages. Instructions for Tangent Scale Models Pullman-Standard PS-3 Coal Hopper Kit Page 24


25 Instructions for Tangent Scale Models Pullman-Standard PS-3 Coal Hopper Kit Page 25


26 Instructions for Tangent Scale Models Pullman-Standard PS-3 Coal Hopper Kit Page 26
Instructions: PRR Sam Rea Shops X58 Class Box Car Kit Tangent Part Numbers: XX through XX 9/2015
 Instructions: PRR Sam Rea Shops X58 Class Box Car Kit Tangent Part Numbers: 14000-XX through 14002-XX 9/2015 Thank you for purchasing the Tangent Scale Models PRR Sam Rea Shops X58 Class Box Car Kit! A
Instructions: PRR / PC Shops G43 Series Gondola Kit Tangent Part Numbers: through /2016
 Instructions: PRR / PC Shops G43 Series Gondola Kit Tangent Part Numbers: 17000-01 through 17002-02 8/2016 Thank you for purchasing the Tangent Scale Models PRR / PC Shops G43 Series Gondola Kit! A few
Instructions: General American 6,000 Gallon, 3-Compartment Tank Car Kit 11/2013
 Instructions: General American 6,000 Gallon, 3-Compartment Tank Car Kit 11/2013 Thank you for purchasing the Tangent Scale Models General American 6,000 Gallon, 3- Compartment Tank Car Kit! A few quick
PLEASE NOTE! ALL Roofwalk / Running Board parts are VERY SHARP! Please take GREAT CARE when handling!!!!
 PLEASE NOTE! ALL Roofwalk / Running Board parts are VERY SHARP! Please take GREAT CARE when handling!!!! 0 Instructions: Pullman-Standard 4750 Covered Hopper Kits August 2012 History Think of this Tangent
Application Note. Atlas RS-3 Tsunami Digital Sound Decoder Installation Notes
 Application Note Atlas RS-3 Tsunami Digital Sound Decoder Installation Notes Overview This application note describes how to install a TSU-AT1000 digital sound decoder into an HO Atlas RS-3. Skill Level
2018 RPM Chicagoland Mini-Kit FGEX Truss-Rod Reefer Series and 20000
 2018 RPM Chicagoland Mini-Kit FGEX Truss-Rod Reefer Series 14000 and 20000 Introduction All Model and Construction Photos by Frank Hodina Thank you for your interest in Resin Car Works and this kit. Resin
Figure 6 - This photo shows the two types of rods; the top one simulates the brake rod that connects to the brake equipment in the truck while the
 These two segments appeared as sidebars to two installments of Essential Freight Cars in the August and September, 2003 issues of Railroad Model Craftsman. Text and photos Ted Culotta. Distribution for
Build your own THUNDERBIRD 2
 PACK 03 PAGE 12 Pod 3 front hatch and Elevator Car 2 43 13 Pod 3 rear hatch and Elevator Car 2 46 14 Pod 3 floor and Elevator Car 2 49 15 Pod 3 frames and FAB 1 52 16 Pod 3 frames and FAB 1 55 17 Pod 3
Build your own THUNDERBIRD 2
 PACK 06 PAGE 33 Telescopic legs C and I.R.3 112 34 Telescopic legs D and I.R.3 115 35 Leg bases and Thunderizer 118 36 Landing feet and Elevator Car 3 121 37 Leg rail-gear racks and Elevator Car 3 124
Build your own THUNDERBIRD 2
 PACK 04 PAGE 19 Pod 3 base 66 20 Pod 3 details and Firefly 69 21 Pod 3 laboratory and Firefly 72 22 Pod 3 floor details and Firefly 75 23 Pod 3 inspection walkways 78 24 Pod 3 right inner wall 81 25 Pod
Sunroof Repair. Sunroof Repair TSB. The sunroof repair kit available for the J30 is part number Y20. See images at bottom of document.
 Sunroof Repair This document is the text/images from the TSB (technical service bulletin) issued by Infiniti concerning the repair procedure for sunroof issues. Be advised that this is a LARGE, TIME-CONSUMING
The September, 1997 issue of Railroad Model Craftsman has an excellent article on these cars.
 TTX 60 flat cars The prototypes Pre-Size Model Specialties TTX is best known for it s fleets of intermodal and auto rack cars. The company started building a fleet of 60 flat cars in 1964. They purchased
22 SCALED SPINE BOOSTER BUILDERS GUIDE THIS EPISODE:
 22 SCALED SPINE BOOSTER BUILDERS GUIDE THIS EPISODE: This is not a kit. It is intended as a guide to help those interested in creating their own build. SPACE:1999 is Carlton Media. No infringement is intended
Building a 3-D Printed Coach by Al Mueller
 Gerry Dykstra has created an antebellum/civil War era coach on the Shapeways web site. Gerry used Inventor software to design the car. His finished product, in my opinion, is a much more accurate rendition
UTLX Class X 6,500 Gallon Tank Car
 UTLX Class X 6,500 Gallon Tank Car UTLX 16285 shows the appearance of one of these 6500 gallon Class X cars after the addition of AB brakes. It s original arch bar trucks have been replaced with cast steel
MKD 08 BR 21.5 TON FLYASH HOPPER. Wagon Kit To cover Vacuum (CSV) and air braked types (CSA)
 and air braked types (CSA)") 1 MKD 08 BR 21.5 TON FLYASH HOPPER. Wagon Kit To cover Vacuum (CSV) and air braked types (CSA) History. Pulverised fuel ash (PFA), know as fly ash which is a by-product from the combustion process in coal
1 MKD 08 BR 21.5 TON FLYASH HOPPER. Wagon Kit To cover Vacuum (CSV) and air braked types (CSA) History. Pulverised fuel ash (PFA), know as fly ash which is a by-product from the combustion process in coal
Micro-Trains #1021/#1022 Low short profile coupler
 1 Micro-Trains #1021/#1022 Low short profile coupler Low short profile coupler, for locomotives and cars with limited mounting area, makes 2 pair of either (1021) Life-Like E8A Pilot or Bachmann 4-8-4
Thank you for purchasing the Blackstone Models K-27!
 Operations Manual Thank you for purchasing the Blackstone Models K-27! Before your Mudhen whistles off, we want to tell you about a few things that will enhance your operating experience and ensure that
CONCEPT MODELS WESTINGHOUSE SCHNABEL CAR 102/ Sheep Ranch Rd. Mountain Ranch, CA 95246
 CONCEPT MODELS http://www.con-sys.com//index.htm email:concept_models@con-sys.com 8331 Sheep Ranch Rd. Mountain Ranch, CA 95246 WESTINGHOUSE SCHNABEL CAR 102/301 2 CONCEPT MODELS Foreword As our name implies
VW SCIROCCO TWINTERCOOLER INSTALLATION INSTRUCTIONS
 VW SCIROCCO TWINTERCOOLER INSTALLATION INSTRUCTIONS Tools needed: T25 torx driver Small flat head screwdriver 12mm & 13mm socket, with ratchet Dremel or similar with cut off disc Large Phillips screwdriver
<THESE INSTRUCTIONS MUST BE GIVEN TO THE END USER> B&W
 B&W Trailer Hitches 6 Hawaii Rd / PO Box 86 Humboldt, KS 66748 P:60.473664 F:60.869.903 Turnoverball Gooseneck Hitch Installation Instructions MODEL 08
Dry Creek Models Historic Designs for California Railroads
 Dry Creek Models Historic Designs for California Railroads SP W-50-3 Hart Convertible Gondola Modified, 1926 and later Model 102: Open hopper doors. Model 103: Closed hopper doors. Contents: freight car
Build your own THUNDERBIRD 2
 PACK 11 PAGE 67 Pod 4 ramp tracks and Jet Air Transporter 224 68 Left rear booster and Alan s Racing Car 227 69 Right rear booster and Alan s Racing Car 230 70 Left booster speaker 233 71 Right rear booster
Bachmann Digital Sound Decoder Installation Notes
 New Dimensions in Digital Sound Technology TM APPLICATION NOTE Bachmann 2-6-6-2 Digital Sound Decoder Installation Notes Overview This application note describes the installation of a DSD-090LC Digital
S SCALE CONCEPT MODELS INSTRUCTIONS FOR PRODUCT S SCALE IAPX CRYOGENIC TANK CAR El Toro Way Stockton, CA 95210
 CONCEPT MODELS Web Address: http://www.con-sys.com Email: concept_models@con-sys.com 8810 El Toro Way Stockton, CA 95210 S SCALE INSTRUCTIONS FOR PRODUCT S SCALE IAPX 1028-37 CRYOGENIC TANK CAR 2 CONCEPT
Mustang CDC Lightbar (94-04) - Installation Instructions
 - Installation Instructions") Mustang CDC Lightbar (94-04) - Installation Instructions The below installation instructions work for the following products: Classic Design Concepts Mustang Convertible Lightbar (94-04 Carbon Fiber) Classic
Mustang CDC Lightbar (94-04) - Installation Instructions The below installation instructions work for the following products: Classic Design Concepts Mustang Convertible Lightbar (94-04 Carbon Fiber) Classic
M7 R52S & R53 Cold Air Intake Installation Guide 53-3M7301
 M7 R52S & R53 Cold Air Intake Installation Guide 53-3M7301 M7 Speed engineers and manufactures the highest quality MINI COOPER accessories and performance parts available anywhere on Planet Earth! Please
VW SCIROCCO R TWINTERCOOLER INSTALLATION INSTRUCTIONS
 VW SCIROCCO R TWINTERCOOLER INSTALLATION INSTRUCTIONS Tools needed: T25 torx driver Small flat head screwdriver 12mm & 13mm socket, with ratchet Dremel or similar with cut off disc Large Phillips screwdriver
PARTS IDENTIFICATION AND ASSEMBLY INSTRUCTIONS
 The U.S. M10 ammunition trailer was used mostly by armored units to transport additional ammunition. It could be towed by many different vehicles, including 2 ½ ton trucks, half tracks, armored cars, self-propelled
Prusa i3 Printer Assembly Guide
 Prusa i3 Printer Assembly Guide Special thanks to Carlos Sanchez and Miguel Sanchez for the graphics. All graphics captured from their great animation: http://www.carlos-sanchez.com/ Prusa3/ For copyright
PENNSYLVANIA X29D PARTS HISTORY RECOMMENDED TOOLS
 PENNSYLVANIA X29D Thank you for purchasing our WrightTRAK X29D boxcar kit. We hope that you find building this kit to be an enjoyable experience. If you find any pieces broken or missing please feel free
Scratchbuilding PRR Class Gd, Gn and Gg Wooden Hoppers By David J. Vinci
 Scratchbuilding PRR Class Gd, Gn and Gg Wooden Hoppers By David J. Vinci During the first 25 years of the 20 th century, the rolling stock mixture on the Pennsy was really interesting to
MARDER II ENGINE COMPARTMENT
 TWS 353048 MARDER II ENGINE COMPARTMENT Congratulations on purchasing one of the finer aftermarket resin conversion sets available. This kit was Mastered by Tom Kondziolka. This kit is intended to be used
Bachmann 38 Ton Shay
 Bachmann 38 Ton Shay Phoenix Sound Systems, Inc. 3514 West Liberty Road Ann Arbor MI 48103 www.phoenixsound.com phone: 800-651-2444 fax: 734-662-0809 e-mail: phoenixsound@phoenixsound.com 2005-2008 Phoenix
Athearn Pacific Digital Sound Decoder Installation Notes
 New Dimensions in Digital Sound Technology TM APPLICATION NOTE Overview This application note describes how to install a DSD-100LC Digital Sound Decoder into the Athearn Pacific Locomotive. All of the
INSTRUCTIONS FOR PRODUCT: CAPX
 CONCEPT MODELS Web Address: http://www.con-sys.com Email: concept_models@con-sys.com 8331 Sheep Ranch Rd. Mountain Ranch, CA 95246 INSTRUCTIONS FOR PRODUCT: CAPX 1001 2 CONCEPT MODELS CAPX 1001 PARTS No.
Dry Creek Models Historic Designs for California Railroads
 Dry Creek Models Historic Designs for California Railroads SP W-50-3 Hart Convertible Gondola As-Built, 1910-1926 and later Model 100: Open center doors. Model 101: Closed center doors. Contents: freight
pg 2 Disassembly, Wire and Amplifier Plate Installation pg 9 Glovebox Subwoofer Installation pg 13 Kick Panel Speakers Installation
 RZ3-5KRC RZR XP1000 & 2015+ RZR900 with Ride Command SSV Works 5 Speaker Audio Kit pg 2 Disassembly, Wire and Amplifier Plate Installation pg 9 Glovebox Subwoofer Installation pg 13 Kick Panel Speakers
Building Tips by PMD For Wedico Trucks
 Building Tips by PMD For Wedico Trucks These are in no particular order but will help you with building! Below are some methods we have found to ease the assembly of these models. If you have any ideas
HASEGAWA: P-40E/K~1/48 th scale SuperScale Decals: Curtiss P-40K 64 th, 16 th & 25 th FS
 HASEGAWA: P-40E/K~1/48 th scale SuperScale Decals: Curtiss P-40K 64 th, 16 th & 25 th FS Norris Graser I built this model for the IPMS McKinstry September 2012 theme night for P-40 s. It s an easy enough
A B C D E F. b.tools Required (supplied by others) 3/16" Drill Bit 3/8" Wrench Phillips Head Screwdriver
 3/16 Drill Bit 3/8 Wrench Phillips Head Screwdriver") Page 1 of 13 5E.1 Parts List a. Below Deck Automatic Retractable Security Cover Kit (1) Tube End Bearing Plate (A) (1) Rope Reel with Motor Attached (B) (1) Rope Reel Cover (C) (1) Cover Drum (1) Cover
Page 1 of 13 5E.1 Parts List a. Below Deck Automatic Retractable Security Cover Kit (1) Tube End Bearing Plate (A) (1) Rope Reel with Motor Attached (B) (1) Rope Reel Cover (C) (1) Cover Drum (1) Cover
One- Touch Installation Instructions
 One- Touch Installation Instructions 1 1 Height Adjustable Pivot w/ screws 9 Upper Work Surface 2 Rail Mount Knobs 10 Back Cover 3 Transformer 11 Center Pivot w/ screws 4 Support Legs 12 Left Monitor Arm
51in Aerobatic Series Sukhoi SU-26M Almost-Ready-to-Fly. Instruction Manual. Specifications
 51in Aerobatic Series Sukhoi SU-26M Almost-Ready-to-Fly Instruction Manual Specifications Wingspan: 51.2 in (1300mm) Length: 51.2 in (1300mm) Wing Area: 581 sq in (37.5sq dm) Flying Weight: 3.5 lb (1600g)
C15C C15C. Page 1 of 20
 2 x Lid Front Hinge 1135 8 x M8 Bolt 8 x M8 Washer (3mm Thick) 4 x M6 Large washers 4 x M6 Spring washers 4 x M6 x 40mm Bolts 6 x M6 20mm Bolts 6 x M6 Washers 20 x Screws 2 x Lid mount gas strut bracket
CONCEPT MODELS CPOX 820 SCHNABEL CAR W. Canyon Creek Dr. Maricopa, AZ Web Address:
 CONCEPT MODELS Web Address: http://www.con-sys.com 44609 W. Canyon Creek Dr. Maricopa, AZ 85239-5019 CPOX 820 SCHNABEL CAR 2 CONCEPT MODELS PARTS Item No. PAR T NO. DESCRIPTION QTY. 1 6519-1 Right Girder
Instructions Texas & Pacific 10' 6" and Wabash 10' 4" Steel Rebuilds
 Ii... Instructions Texas & Pacific 10' 6" and Wabash 10' 4" Steel Rebuilds Snap off any protruding bubbles. If you find a warped piece, heat an oven to 150 degrees, turn it off and place piece on a tray
Scratchbuilding a Class Fk Flat Car
 Scratchbuilding a Class Fk Flat Car The Class Fk flat car is apparently the last all wood flat car design adopted by the Pennsylvania. The design dates to 1898 and it appears to be the last all wooden
Scratchbuilding an F25 Well Flat Car
 Scratchbuilding an F25 Well Flat Car By David J. Vinci (Flat Figure 1) Well flats are a pretty rare car type generally, but the Pennsy seems to have had the lion s share of variety. Most of these cars
Right On Replicas, LLC Step-by-Step Review * Mack Fire Pumper 1:32 Scale Revell Model Kit # Review
 Right On Replicas, LLC Step-by-Step Review 20150915* Mack Fire Pumper 1:32 Scale Revell Model Kit #85-1945 Review The Mack CF600 Pumper is a familiar fire truck that is still widely used in firehouses
EXPRESS/SAVANNA 155 WHEELBASE. Installation Instructions Van: VNGM96EXSV65 TOOLS REQUIRED 1996-CURRENT. follow us : CHEVROLET & GMC
 Installation Instructions Van: VNGM96EXSV65 CHEVROLET & GMC EXPRESS/SAVANNA 155 WHEELBASE 1996-CURRENT TOOLS REQUIRED Adjustable wrench (that opens to about 1 ), 1/2 open end wrench, Phillips screwdriver,
Build your own THUNDERBIRD 2
 PACK 12 STAGE PAGE 74 Tailwing ramjets and Cobra Half-track 247 75 Tailwing intakes 250 76 Tailwing fins 253 77 T2 control board 255 78 T2 wings and Mobile Crane 258 79 T2 side frames and Mobile Crane
Simple Eurorack Row. Kit Builder's Guide. 4mspedals.com
 Simple Eurorack Row Kit Builder's Guide 4mspedals.com ' Simple Eurorack Row This guide is for building a single-row eurorack case with a power supply. When completed, the case is ready to accept eurorack
INSTALLATION INSTRUCTIONS
 INSTALLATION INSTRUCTIONS Document# 19-0038 2004+ Lotus Elise (Series 2) Rear Clamshell Removal Kit Safely support the vehicle. This is a two-person job. Allow 1 to 2 hours for initial disassembly. Have
Unusual Prototypes and Core Kits. How to build that model that just isn t available in Plastic!
 Unusual Prototypes and Core Kits How to build that model that just isn t available in Plastic! BP1 Why do manufacturers choose their prototypes? Popularity numerous The Standard Railroad of The World UP
A B C D E F. Tools Required (supplied by others)
") Page 1 of 17 Parts List Below Deck Automatic Retractable Security Cover Kit (1) Tube End Bearing Plate (A) (1) Rope Reel and Cover Drum Motor Assembly (B) (1) Cover Drum (1) Pulley Support Channel (2)
Page 1 of 17 Parts List Below Deck Automatic Retractable Security Cover Kit (1) Tube End Bearing Plate (A) (1) Rope Reel and Cover Drum Motor Assembly (B) (1) Cover Drum (1) Pulley Support Channel (2)
Bag 1. Bag 1. Center Pivot. Center Pivot
 8 00734 01901 5 Center Pivot Bag 1 3374 - Center Pivot Socket 4019 - Alum Pivot ball 3254-2-56 Button Head *Note - Sometimes it is helpful to slightly over-tighten the top clamp screws, then work the ball
Bachmann Spectrum Peter Witt in HO
 Bachmann Spectrum Peter Witt in HO By Bob Dietrich This is my impression of an unpainted Peter Witt from Bachmann Spectrum. The packaging of the car was impressive a large red box with a clear cover showing
RS-2 SINGLE ACTION REAR BUMPER WITH TIRE CARRIER INSTALL MANUAL FOR JEEP WRANGLER ALL MODELS.
 RS-2 SINGLE ACTION REAR BUMPER WITH TIRE CARRIER INSTALL MANUAL FOR 2007-2016 JEEP WRANGLER ALL MODELS. Rear Bumper Installation Instructions 1) Remove factory rear bumper, (this includes all tow hitch
Kit1 300B Edition. Single Ended Triode 8 Watt. Construction Manual & User Guide Volume One
 Kit1 300B 2014 Edition Single Ended Triode 8 Watt Construction Manual & User Guide Volume One Contents Section 1: Receiving your kit...2 Section 2: The Mechanical section Preparation... 3 Tang Strips...
This year Märklin have released a coach which has included LED lighting with a currentconducting close coupler (single pole)
") Hi All, Over the past few months I have been working at a steady pace to install LED lighting in my passenger coaches. The coach lighting must have LED lights to reduce power consumption on the layout
Hi All, Over the past few months I have been working at a steady pace to install LED lighting in my passenger coaches. The coach lighting must have LED lights to reduce power consumption on the layout
STAY ON TRACK WITH THIS LINE FOLLOW BUGGY WITH :MOVE LINE FOLLOW BOARD FOR BBC MICRO:BIT
 STAY ON TRACK WITH THIS LINE FOLLOW BUGGY WITH :MOVE LINE FOLLOW BOARD FOR BBC MICRO:BIT BUILD INSTRUCTIONS LIST OF FIXINGS M3 BOLTS M3 NUTS STANDOFFS 6mm x12 x4 x4 10mm x4 x12 12mm x2 30mm x2 20mm M-F
AVIATOR 25 ARF Almost Ready-to-Fly
 AVIATOR 25 ARF Almost Ready-to-Fly Instruction Manual Specifications Wingspan: 54.3 in (1380mm) Length: 45.2 in (1150mm) Wing Area: 438 sq in (34sq dm) Flying Weight: 3.8 b (1700g) Dear Customer, Congratulations
NOTE: The process described below is for removing the seat FRAME. The seat PLATFORM is welded to the bottom of the cab and cannot be removed.
 Removing the seat frame on an Advance Design pickup NOTE: The process described below is for removing the seat FRAME. The seat PLATFORM is welded to the bottom of the cab and cannot be removed. STEP 1..
BRL-142/143 Class 142/143. Building Instructions
 Peter Besant Tel 07807225801 prmrp@fsmail.net www.prmrp.com BRL-142/143 Class 142/143 Building Instructions SCALE MODEL PRODUCT FOR ADULT MODELLERS ONLY. WHITE METAL CONTAINS LEAD WASH HANDS AFTER USE.
GM TRUCK Double Din Head Unit Install Kit
 www.thedetailss.com 95-99 GM TRUCK Double Din Head Unit Install Kit Please read all instructions including the *install tips* first! 1. Disconnect the vehicle s battery. 2. Remove the dash panel; Lower
Chicago Great Western General Purpose Gondolas HO Scale Model by Jason Klocke
 Chicago Great Western General Purpose Gondolas HO Scale Model by Jason Klocke The Chicago Great Western bought 300 50 6 gondolas with an inside height of 4 8 from Pullman Standard in 1952. These cars had
Steeda Sport Mustang Lowering Springs (2005+) - Installation Instructions
 - Installation Instructions") Steeda Sport Mustang Lowering Springs (2005+) - Installation Instructions The below installation instructions work for the following products: Steeda Sport Mustang Lowering Springs (2005+) Please read
Steeda Sport Mustang Lowering Springs (2005+) - Installation Instructions The below installation instructions work for the following products: Steeda Sport Mustang Lowering Springs (2005+) Please read
Hornby Railroad Crosti 9F EM Finescale Conversion.
 Hornby Railroad Crosti 9F EM Finescale Conversion. Before you start, it is a good idea to have some small containers or snap top poly bags to put screws and components in for safe keeping...much better
Stand Alone Fog Lights Installation Instructions
 Tools Required: 1. Trim Removal tool or protected flat screwdriver 2. #2 Phillips Screwdriver 3. 10mm socket 4. 10mm wrench 5. 8mm or 5/16 socket 6. Adjustable Pliers 7. Electrical Tape WARNING!!! Disconnect
CorkSport ort Mazda 3 Adjustable Shifter Mazdaspeed 3, Mazda 3 6-speed and Mazda3 SkyActiv 6-speed
 Part # Axl-6-963 CorkSport ort Mazda 3 Adjustable Shifter 2010-2013 Mazdaspeed 3, 2010-2013 Mazda 3 6-speed and 2012-2013 Mazda3 SkyActiv 6-speed Pre-Installation Notes: The CorkSport Adjustable Short
One Piece Products. Series XI Ford F SERIES TRUCKS One Piece Door Glass Conversion Manual.
 *Registered Trademark One Piece Products *Patent Pending Series XI 1980-1996 Ford F SERIES TRUCKS One Piece Door Glass Conversion Manual www.onepieceproducts.com (888)One Products (888)663-7763 1 Installation
Scratchbuilding PRR Class FL Flat Cars By David J. Vinci
 Scratchbuilding PRR Class FL Flat Cars By David J. Vinci If you have been following the scratchbuilding freight car series I have been doing, you probably have noticed that most of the time
Cleveland Quickie Piper Cub
 Cleveland Quickie Piper Cub This plan package is not a 100% copy of the original kit. As you make your way through the instructions you will see the differences. Here s just a few of them: The one thing
DrVanos.com Stage II Installation Instructions. Tool rental is available with the purchase of a vanos kit *See website for more info*
 DrVanos.com Stage II Installation Instructions Special Tools Needed: Camshaft locking tool TDC Crank pin Sprocket turning tool Tool rental is available with the purchase of a vanos kit *See website for
Installation Instructions
 Equipment Required: Fastener Kit: F Wrenches: 15/16, 10 mm Drill Bits: 1/4 Other Tools: Drill, Reciprocating Saw 9464/9474 HIDE-A-GOOSE HITCH All Fasteners Typical, Both Sides WARNING: Under no circumstances
Application Note. Athearn RTR SW-1000/SW-1500 Tsunami Digital Sound Decoder Installation Notes
 Application Note Athearn RTR SW-1000/SW-1500 Tsunami Digital Sound Decoder Installation Notes Overview This application note describes how to install a TSU-AT1000 Digital Sound Decoder into the HO Athearn
SPACESAVER EC-300 A ELECTRICS
 INSTALLATION INSTRUCTIONS SPACESAVER EC-300 A ELECTRICS SECTION I TOP MOUNTED ELECTRICS SECTION II FACE PANEL MOUNTED ELECTRICS SECTION III ZFS INSTALLATION INSTRUCTIONS This symbol indicates a connection
Kodak 750H Carousel Projector Repair
 Kodak 750H Carousel Projector Repair An AT YOUR OWN RISK PROJECT by Klaus Wolter, Rev B, 3-26-2016 Here I documen the repair of my 750H carousel. A common problem with this projector, and all of the projectors
Houstoun Gate Locomotive Works Gordon 4-Wheel Drive Chassis Assembly Instructions
 Houstoun Gate Locomotive Works Gordon 4-Wheel Drive Chassis Assembly Instructions It is suggested that you read these instructions through before commencing construction. A minimum of tools are needed
VTCM Installation Manual Table of Contents
 VTCM Installation Manual Table of Contents 1. Introduction:... 2 2. Disclaimer:... 2 3. Software / Drivers:... 2 a. Plugging in the controller:... 2 b. Install 4.0.NET Frame work:... 3 c. Install COM port
In-Wall Slide-Out REPAIR KIT MANUAL. Rev: Page 1 In-Wall Repair Kits Manual
 In-Wall Slide-Out REPAIR KIT MANUAL Rev: 02.16.2017 Page 1 In-Wall Repair Kits Manual TABLE OF CONTENTS Safety Information 2 Introduction 2 Preliminary Visual Inspection 3 Assembly Removal Procedure 4
Van Rack Installation Manual Dodge ProMaster
 1.888.772.8400 Big to small... We do it all Van Rack Installation Manual Dodge ProMaster Thank you for your purchase of an Unruh Fab Van rack. We have designed and built this rack so that you can easily
<THESE INSTRUCTIONS MUST BE GIVEN TO THE END USER> B&W
 B&W Trailer Hitches 1216 Hawaii Rd / PO Box 186 Humboldt, KS 66748 P:620.473.3664 F:620.869.9031 Turnoverball Gooseneck Hitch Installation Instructions
Installation Instructions
 Equipment Required: Fastener Kit: F Wrenches: 3/4, 15/16 Drill Bits: 1/4 Other Tools: Drill WARNING: Under no circumstances do we recommend exceeding the towing vehicle manufacturers recommended vehicle
Hornby 08 Diesel Shunter EM Finescale Conversion.
 Hornby 08 Diesel Shunter EM Finescale Conversion. Before you start, it is a good idea to have some small containers or snap top poly bags to put screws and components in for safe keeping...much better
instructions 1:48 O-SCALE THROUGH PLATE GIRDER BRIDGE IN DURANGO CO 2017 John Palecki Structures rev 1.1
 instructions 1:48 O-SCALE THROUGH PLATE GIRDER BRIDGE IN DURANGO CO 2017 John Palecki Structures rev 1.1 CONGRATULATIONS ON YOUR BRIDGE PURCHASE! YOU ARE about to assemble a 1:48 O scale model kit of a
Evo X Walbro 450 Pump System
 Evo X Walbro 450 Pump System Installation Guide Please contact us at sales@wtftuned.com with any additional questions Tools required: 8 mm socket and wrench, needle-nose pliers, razor, drill w/ 5/64 bit,
2014-Current. Adjustable wrench (that opens to about 1 ), 1/2 open end wrench, Phillips screwdriver, 3/8 socket, 7/16 socket, 7/32 Allen wrench
, 1/2 open end wrench, Phillips screwdriver, 3/8 socket, 7/16 socket, 7/32 Allen wrench") Installation Instructions Van: VNFD13TRAN65 FORD TRANSIT 148 WHEELBASE 2014-Current TOOLS REQUIRED Adjustable wrench (that opens to about 1 ), 1/2 open end wrench, Phillips screwdriver, 3/8 socket, 7/16
Installation Instructions Van: VNFD13TRAN65 FORD TRANSIT 148 WHEELBASE 2014-Current TOOLS REQUIRED Adjustable wrench (that opens to about 1 ), 1/2 open end wrench, Phillips screwdriver, 3/8 socket, 7/16
Bachmann. Climax. Phoenix Sound Systems, Inc West Liberty Road Ann Arbor MI
 Bachmann Climax Phoenix Sound Systems, Inc. 3514 West Liberty Road Ann Arbor MI 48103 www.phoenixsound.com phone: 800-651-2444 fax: 734-662-0809 e-mail: phoenixsound@phoenixsound.com 2004-2007 Phoenix
Welcome Wagons WW ton Mineral (2 & 4 shoe brake)
") Welcome Wagons WW13 16 ton Mineral (2 & 4 shoe brake) HISTORY The 16T open mineral wagon was the most numerous type built by BR from 1950 to 1957, the first diagram being 108, although there was 16T steel
Welcome Wagons WW13 16 ton Mineral (2 & 4 shoe brake) HISTORY The 16T open mineral wagon was the most numerous type built by BR from 1950 to 1957, the first diagram being 108, although there was 16T steel
DC Series Installation Manual (# )
") DC Series Installation Manual (# 101630) Page 1 of 33 In this booklet you will find: TOWER INSTALLATION... 3 U-Bolt Style mount... 4 Side Frame Style mount... 4 PIVOT INSTALLATION... 5 External Pivot Installation:
DC Series Installation Manual (# 101630) Page 1 of 33 In this booklet you will find: TOWER INSTALLATION... 3 U-Bolt Style mount... 4 Side Frame Style mount... 4 PIVOT INSTALLATION... 5 External Pivot Installation:
Rusty's XJ Competition 4-Link Suspension System RK-CS10-XJ INSTALLATION INSTRUCTIONS
 Rusty's XJ Competition 4-Link Suspension System RK-CS10-XJ INSTALLATION INSTRUCTIONS Last Revised: 5/24/2017 Introduction: Rusty s recommends that this installation be performed by a certified automotive
Down South Vettes Leather Sun visor Installation Instructions.
 Down South Vettes Leather Sun visor Installation Instructions. Difficulty: 3 out of 5. Time: Plan on about 30 minutes. The tools used are:? A medium blade screw driver? A small flashlight may help get
Subaru SVX 1/43 Scale Model Assembly Instructions
 Subaru SVX 1/43 Scale Model Assembly Instructions Congratulations on your purchase of an unassembled 1/43 scale Subaru SVX! You now own a model that is even more rare than the car it represents. Currently
I64 I65. Indian 741B. suitable rod, pen, pencil with flat end or so. PE wiring. Front wheel
 Indian 741B Indian motorcycles were manufactured from 1901 to 1953 by a company in Springfield, Massachusetts, USA. Indian's most popular models were the Scout, made from 1920 to 1946, and the Chief, made
What s in the Box? AMT Motorsport C5/C6 Corvette Steel Frame Camber Kit User s Guide
 AMT Motorsport C5/C6 Corvette Steel Frame Camber Kit User s Guide Thank you for purchasing the AMT Motorsport Camber Kit. We believe this is the most versatile camber kit available on the market, but with
2005+ Roll Bar (Mm5RB-20.1 to -20.6) Recommended Center punch 1/8" pilot drill 1-3/4" Hole saw 2" Hole saw
 Recommended Center punch 1/8 pilot drill 1-3/4 Hole saw 2 Hole saw") 3430 Sacramento Dr., Unit D San Luis Obispo, CA 93401 Telephone: 805/544-8748 Fax: 805/544-8645 www.maximummotorsports.com 2005+ Roll Bar (Mm5RB-20.1 to -20.6) Recommended Center punch 1/8" pilot drill
3430 Sacramento Dr., Unit D San Luis Obispo, CA 93401 Telephone: 805/544-8748 Fax: 805/544-8645 www.maximummotorsports.com 2005+ Roll Bar (Mm5RB-20.1 to -20.6) Recommended Center punch 1/8" pilot drill
INSTALLATION INSTRUCTIONS
 HIGH FLOW AIRFLOW METER INSTALLATION INSTRUCTIONS PART NUMBER D763-1600A APPLICATION: 2001-06 E46 M3 Parts List: Hose clamp 64Z (7) Plastic Rivets Air Filter Temp Sensor & Harness (2) Button Head Screws
LPE C5 Battery Relocation Kit
 LPE C5 Battery Relocation Kit The LPE C5 Corvette battery relocation kit improves vehicle weight distribution by moving weight to the rear of the vehicle. The improved weight distribution increases traction
Healthy Care High Chair
 Healthy Care High Chair Product features and decoration may vary from the photo above. Model Number: 79638, 79639, 79640, 79641, B2875 Please keep this instruction sheet for future reference, as it contains