MKD 08 BR 21.5 TON FLYASH HOPPER. Wagon Kit To cover Vacuum (CSV) and air braked types (CSA)
|
|
|
- Frank Reeves
- 6 years ago
- Views:
Transcription
, know as fly ash which is a by-product from the combustion process in coal fired power stations, and is also a useful product in the construction industry.")
1 1 MKD 08 BR 21.5 TON FLYASH HOPPER. Wagon Kit To cover Vacuum (CSV) and air braked types (CSA) History. Pulverised fuel ash (PFA), know as fly ash which is a by-product from the combustion process in coal fired power stations, and is also a useful product in the construction industry. So when the new power stations at Ratcliffe and West Burton were built the ash disposal system was built in and this necessitated the construction of a fleet of wagons to convey the fly ash in, so these special rail wagons were based on the Presflos of the 1950 s so the CSV and CSA wagon was born. These wagons are essentially a sealed pressurised vessel on wheels, the ash is loaded in through the top hatches using gravity and out through the bottom using pressurised air. They were longer than the Presflos and could carry 22T and the discharge was now on the side of the hopper which meant that on one side of the wagon they had Morton type brakes and on the discharge side they were fitted with clasp brakes. The first batches of wagons were vacuum braked (late 64) then latter batches were air braked ( ). All of the vacuum braked wagons were condemned in 1986 and the air brakes ones have now all gone (2012). One of the problems with the fly ash wagon was a loss of pressure upon discharge which was caused by the tank hatch seals failing, so to identify which hatch had failed they painted a red and yellow square on the discharge side.
2 2 Ref. Books:- British Railway Wagons the First Half million By Don Rowan ISBN British railway Goods wagons in Colour By Robert Hendry. British Railway Wagons, opens and hoppers. By G. Gamble ISBN British railway Wagons No.1, Open & Hoppers ISBN Lots of pictures on Paul Bartlett s website. Good article in a Rail Magazine August issue in the 90 s,?, Called Ashes to Ashes. Running numbers and Lots:- Dia. 1/281 Prototype converted from Presflo Lot built B Shildon Dia. 1/278 Lot built B Shildon The above Presflo conversions 17 tonne capacity Dia. 1/279 Lot built B prototype 1964 Darlington Lot built B /65 Shildon Lot built B Ashford Total built 85, All Vacuum braked all condemned by September 1986 Dia. 1/280 design code CS002B hydraulic buffers Lot built B /66 Ashford Dia. 1/282 design code CS002C pneumatic Lot built B Ashford Total build 206 all air braked.
 DW52 2 x Coupling sets DW03 4 x Oleo buffer DW25 2 x Air Pipes DW123 2 x Vac pipe DW33 1 x Discharge pipe DW122 1 x Body gauge DW130 2 x Tank hatches")
3 3 Parts List. Etch, 2 x Coupling springs. 2 x split pins 4 x Coupling links. 20mm of.5mm wire 200mm of.7mm wire. 50mm of 1.2mm wire W/M castings, 4 x Axle box (roller) DW52 2 x Coupling sets DW03 4 x Oleo buffer DW25 2 x Air Pipes DW123 2 x Vac pipe DW33 1 x Discharge pipe DW122 1 x Body gauge DW130 2 x Tank hatches (LWB) DW129 1 x Body Vac/air pipe DW125 1 x Vac pipe lower DW124 1 x Air supply pipe DW126 1 x Vac control valve DW114 2 x Clasp brake post DW128a 2 x Clasp brake DW128b 1 x Presflo Top Pipe DW46 2 x Wheel inserts DW127
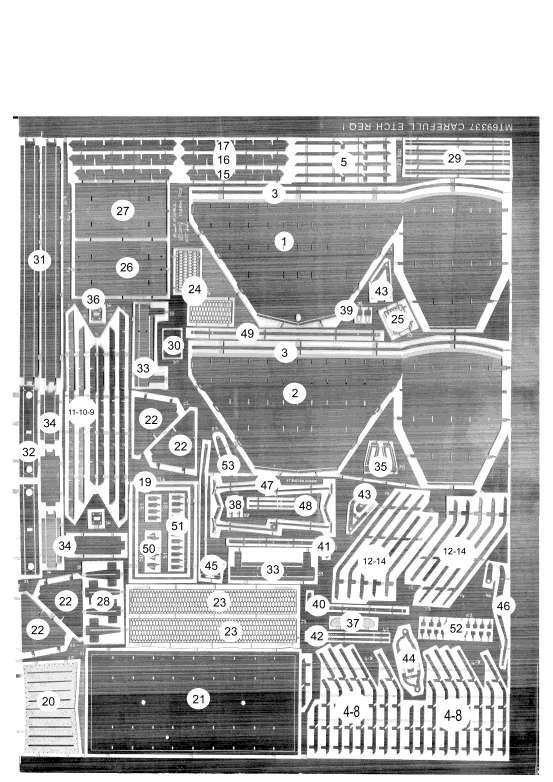
4 4 Items needed to complete this kit, Wheels 3 1 three hole disc Slater s ref 7122 or 3 1 three hole disc Welcome Wheels with ball races, ref WH3-1 (M&M can supply these if required, order online on the website ) or contact direct using the enclosed card. Fly Ash Etch Parts List. 1, Body side-end discharge 2, Body side-end 3 Tank top beading 4-8, Body vertical ribs 9, Body side horizontal rib (lower) 10, Body side rib (middle) 11, Body side rib (upper) 12, Body end vertical ribs (outer) 13, Body end vertical ribs (middle) 14, Body end vertical ribs (centre) 15, Body end horizontal (lower) 16, Body end horizontal (middle) 17, Body end horizontal (upper) 19, Tank lower strap 20, Tank base 21, Tank roof 22, Tank end supports (handed) 23, Top walk way long 24, Top walkway short 25, Top walkway step 26, Chassis floor step end 27, Chassis floor other end 28, Lower rib 5 to solebar bracket 29, Rib 5 outer overlay 30, Info board 31, Solebar 32, Buffer beam 33, Inner chassis member (with brake support) 34, Inner solebars 35, Chassis end steps (handed) 36, coupling pocket overlay 37, Makers plat backing 38, Lamp bracket 39, Load clip 40, Ladder side (R/H) 41, Ladder side (L/H) 42, Brake pin down bars 43, V hanger off set 44, V hanger (non discharge side) 45, Long brake lever (non discharge side) 46, Brake lever (discharge side) 47, Brake shoe-rig set (non discharge side) 48, Brake shoe-rig safety straps 49, axle box tie strip (non discharge side) 50, Walkway supports long (ends handed) 51, Walkway supports long 52, Walkway supports short 53, Brake hanger off set (not used only on prototype)
5 5
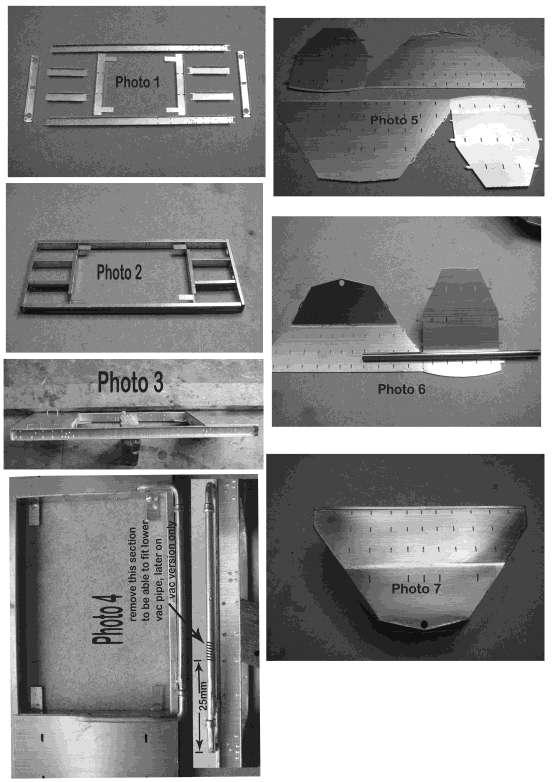
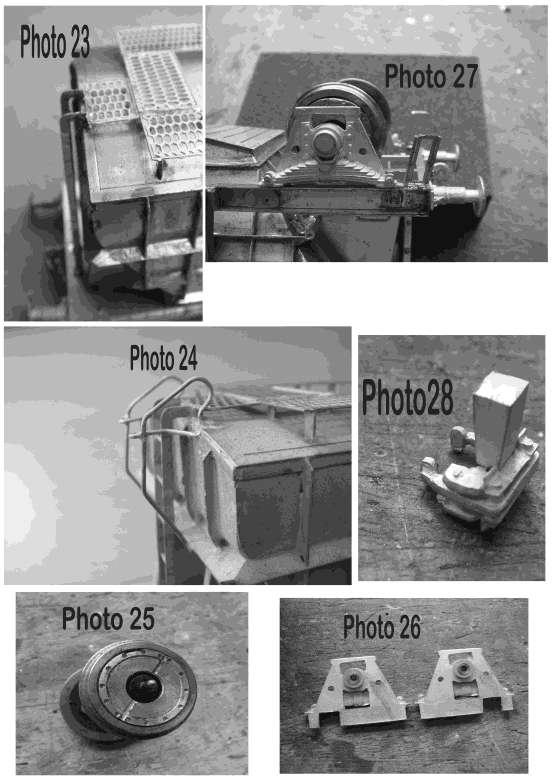
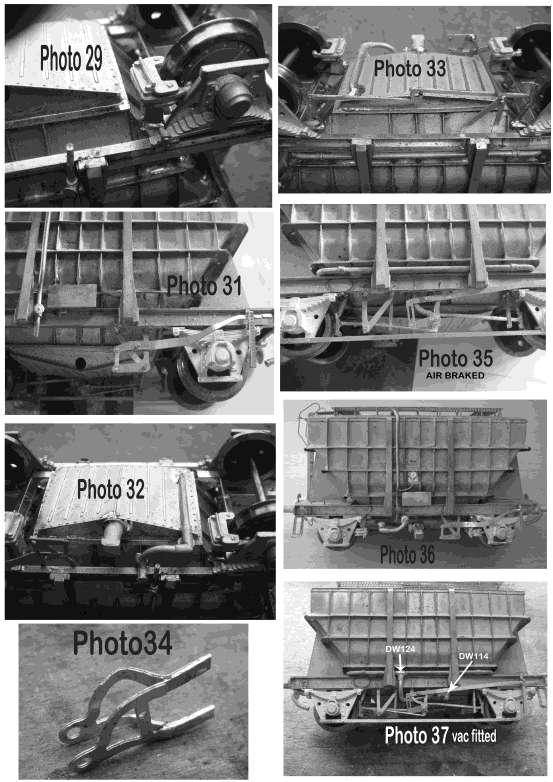
6 6 Hints and tips. In order to build this kit you may find the following tools useful. A pair of tin snips or a Stanley knife to cut out the brass parts; Flat and round files and a centre punch or riveting tool; a bending jig or steel rules; a pair of parallel flat nosed pliers; a good soldering iron; solder and flux. You will find that the use of a low melting point solder and the use of Carr s fluxes is recommended. When cutting out the etched parts please do not cut of the tabs or the slots, the holding tabs are all half etched. Before construction, please refer to as many photos as possible. Building instructions. Chassis 1. Cut from the etch the two sole bars (31) and push out the rivet detail, two buffer beams (32), four inner solebar s (34),and the two cross beams (33) and clean up. Fold up to form a shallow U-shape, Photo 1. Note:- The solebar with the extra rivet detail in the centre section goes on the non discharge side and the bottom of the solebar has extra rivets. 2. Take solebars and fit into buffer beams twist tabs to retain. Make sure all is square, solder up, cut off excess tabs and clean off flush. 3. Take the inner solebar (34) and fit into (33) solder up and remove tabs, then solder this assemble into the chassis assemble. 4. Bend down the tags on the inner cross members (33) solder bend line to strengthen as this will hold the brake shoe s later. Photo2. 5. Now take the end platforms (26 & 27), these fit to the chassis frame top with the ends level with the outside face of the buffer beam and make sure that the discharge solebar is towards you and the handrail platform end (26) is to the left when viewed from above and add the hand rails from.7mm wire. Photo Take the vac/air pipe casting (DW125), and fit to chassis top, between the inner ends of the end platforms, with the pipe on the non discharge side Photo 4. Now set this aside until you have built the body. If you are building the vac fitted version then you will have to cut a gap in the above pipe 25mm from the Left hand end to be able to insert the lower vac pipe (DW124) later on. Photo 4.
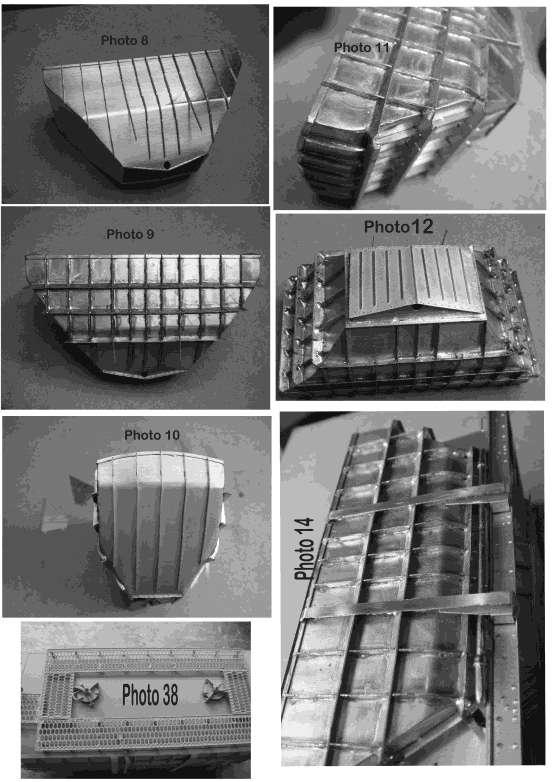
7 7 7. Cut out the main tank sides (1) & (2) from the etch, be careful not to cut off the tabs and slots. 8. Bend the bottom lips through to about 120. Photo Bend body sides to shape, bend to a curve around a small dia. Bar. Photo Locate tabs into slots twist tabs to retain; now you should have a basic box. 11. Make sure body is square and solder up seems, then cut of tabs and slots, clean up edges. Photo Now add to body side top / end strips (3) to the top of the body side in the half etched recesses. Photo7. Tip; - when soldering start at the bend and work outwards towards the ends and fill any gaps at ends. 13. Next, take the side vertical ribs (4-8) and fit into slots in tank side, twist tabs on inside to retain. Photo 8. Now fit the horizontal side ribs (9-11), these fit into the slots in (4-8). Photo 9. Now solder up the complete side then repeat with the other side. Photo Take the end vertical ribs (12-14), fit these into the slots in the wagon ends, twist to retain. Photo10. Now add the end horizontal ribs ( ), (to get a snug fit you may need to trim at an angle some of the ends of the horizontal side ribs so as to get a nice corner). Check the fit of the tank end supports (22) (you will have to bend them to shape) into the bottom two ribs, now solder up the end, and then repeat with other end. When done dress the strapping at the corners to get a nice finish. Photo Take tank lower strap (19) and fit at tank base up against ribs, you may have to trim the ribs to length, best done with a slitting disk. Photo 13. Now take the tank base plate (20), bend along the centre line and solder to the flanges of the hopper bottom. Photo Now roll/bend the roof (21) to match the curve of the ends, Tin the underside edge of the roof all round, and then solder it to the tank body. Make sure that you fit it the correct way round with the roof hole towards you and the discharge hole towards you. 17. Take the four tank supports (22) and fit into the end ribs (15 & 16), Fit the tank assay into the chassis assay, the tabs should fit into the slots in the floors (26 & 27) twist tabs to retain and solder in place. Photo Take the side rib supports (28), bend these to shape and fit into the solebars and they go behind the long side ribs, solder in place. Photo 14.
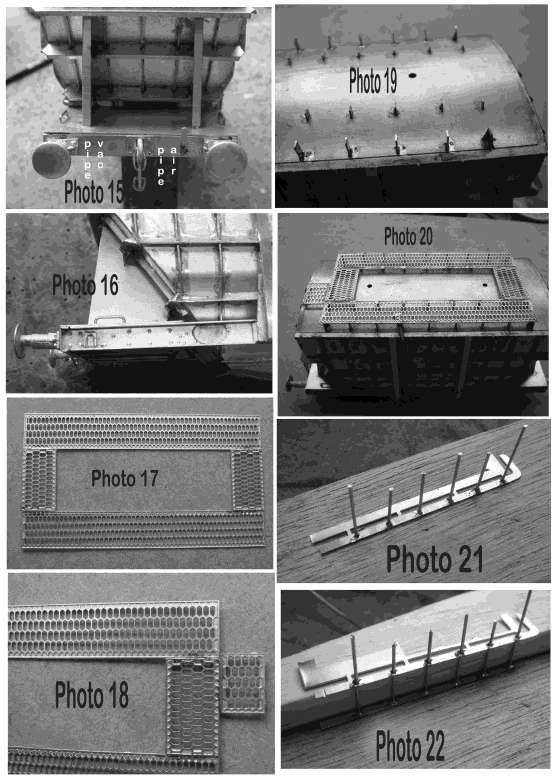
8 8 19. Now add the rib overlays (29), these go onto the outside of the of the long side ribs, bend to shape and solder on, trim any excess at ends. Photo Take the coupling pocket overlays (36) push out rivet detail and fit to the buffer beams, Fold up and fit the lamp brackets (38) to buffer beams, Also fit the oleo buffers, also fit the couplings (DW03 and links) to the buffer beams. Photo Next bend up and fit load clip (39), and makers plate back (37), to sole bar (check with photos as these varied in position). Photo Walkways, take the long (23) and short (24) walkways, lay on a flat surface in a rectangle and solder up. Photo 17. Now add step platform (25) to one of the ends, (do not cut of the two stubs as these bend down which provide it s legs), this solders under the walkways. Photo Now set the walk ways to one side while you fit all the supports to the tank top, Take the supports (note that they all have angled bases to match the roof profile), fit the short supports (52) into the inner rows of slots on the tank top. Next fit the 4 long corner posts (50) these are handed, bend to shape and fit in corners with the angle slopping inwards. Now fit the remaining post (51) to the remaining slots. Photo Now fit the top pipe casting into the hole in the roof and down the side. Now fit the walkway assemble to the roof fitting it on top of the supports, with the step platform to your left with the top pipe towards you. Photo Ladders ;- Tip to easy build, Take R/H ladder side (40) place on a scrap piece of wood and drill though rung holes with a.8mm drill into the wood fit.7mm wire in holes and solder up. Photo21. Now fit the ladder L/H side (41) over the wire rungs and spaced apart by 6mm and solder up. Photo22. Now cut of excess wire and clean up, bend the feet out and fit to wagon top and to platform, you may have to trim the length of the ladder supports to fit up against the platform. Photo Now fit ladder handrails to wagon end, (check with photos as these varied with builds) these are bent up from.7mm wire. Photo Now take the chassis steps (35) (note these are handed), bend to shape and fit to the underside of the solebars at ladder end. Photo Glue the wheel insert casting (DW127) into one face of each wheel set and put aside to dry. Photo25.
9 9 29. Next take the axlebox castings (DW52) and drill out for your chosen bearings, also cut a slot in the back plate to clear the chassis cross member. Photo26. Now fit the wheel sets into the axleboxes then add to the chassis aligning with the rivet detail, with the flange of the wheel touching the x member, fix axle box in place, then bend down slightly the x member to clear the wheels. Also making sure that the wheel inserts are on the discharge side. Photo Take clasp posts (DW128a) and fix to clasp brakes (DW128b) the tab slots into the brake clasp, Photo 28, then fit to chassis on the discharge side with the brake pads each side of the wheel sets, Photo Add info board (30) bend bottom lip and this fits on to top lip of solebar channel to body side, or to the underside of the channel lip, as in some photos the board is vertical and some the board is on a slope. Bend up the brake pin down bar (42) and fit to sole bars. Next take the V hanger with cross bar (43) and fit behind sole bar discharge side aligning with the rivet detail, then add the brake lever assy (46) from v hanger to brake pin down bar. Photo Now fit the discharge pipe casting (DW122) and the air supply pipe (DW126) to discharge side and air pressure gauge (DW130) the short pipe is made from.5mm wire, as per Photo32 & Now take the brake etch (47) and fold on it s self solder together and fit to chassis on the mounting pads, Next add the off set V hanger (43) and fit behind sole bar to the left aligning with rivet detail. Add cross shaft between off set V hangers from 1.2mm wire. Photo Take central V hanger (44) bend on it self and then bend the rear part back so the holes align, Photo 34. Fit behind sole bar aligning with rivet detail, next take brake handle (45) and fit to v hanger and pin down bar, (note that the bottom link of the lever goes behind the front part of the V hanger), make pins from.7 &1.2mm wire and add wire link in.7mm wire, from brake lever link to off set V hanger. Also fold up the two brake safety straps and fit over brakes as per, Photo If building the vacuum fitted version now fit the vac pipe lower (DW124) in the gap in the body vac air pipe and the tail goes behind the brake lever and in between the V hanger, Also add the vac control valve (DW114) at end of pipe and behind sole bar, (remove most of the curly pipe on the casting) Photo Now fit the vac pipes (DW33) or the air pipes (DW123) to the wagon ends and last but not least fit the two tank hatches (DW129) in the holes in the tank tops. Photo This completes the model for painting, the livery is just BR Bauxite with a red square to left and a yellow square to right painted on the discharge side of the wagon.
10 10
11 11
12 12
13 13
14 14
(WW03f) BR PIPE WAGON 4 shoe brake
 BR PIPE WAGON 4 shoe brake") (WW03f) BR PIPE WAGON 4 shoe brake History. The pipe wagons were built to four basic diagrams sharing the same basic dimensions. The first 300 pipe wagons were built at Derby works to diagram 460, and
(WW03f) BR PIPE WAGON 4 shoe brake History. The pipe wagons were built to four basic diagrams sharing the same basic dimensions. The first 300 pipe wagons were built at Derby works to diagram 460, and
Welcome Wagons WW ton Mineral (2 & 4 shoe brake)
") Welcome Wagons WW13 16 ton Mineral (2 & 4 shoe brake) HISTORY The 16T open mineral wagon was the most numerous type built by BR from 1950 to 1957, the first diagram being 108, although there was 16T steel
Welcome Wagons WW13 16 ton Mineral (2 & 4 shoe brake) HISTORY The 16T open mineral wagon was the most numerous type built by BR from 1950 to 1957, the first diagram being 108, although there was 16T steel
WW03e Welcome Wagons 8 Shoe Brake Pipe Wagon
 WW03e Welcome Wagons 8 Shoe Brake Pipe Wagon History The pipe wagons were built to four basic diagrams sharing the same basic dimensions. The first 300 pipe wagons were built at Derby works to diagram
Furness Railway Wagon Co.
 Furness Railway Wagon Co. Great Eastern Railway/LNER/BR 1900 Diagram 7 10ton Cattle Van Steel Under-Frame Wheels, paint and transfers required to complete. Please note that to aid the folding of the various
Furness Railway Wagon Co. Great Eastern Railway/LNER/BR Diagram 18 10ton 3 Plank General Merchandise Wagon Steel Under-Frame
 Furness Railway Wagon Co. Great Eastern Railway/LNER/BR Diagram 18 10ton 3 Plank General Merchandise Wagon Steel Under-Frame Wheels, paint and transfers required to complete. The Parts. Part 1 Part 5 Part
Wheels, paint and transfers required to complete. Please note that to aid the folding of the various parts score all the halfetched fold lines.
 Furness Railway Wagon Co. Furness Railway/LMS 45ton All Steel Bogie Iron Ore Hopper Wagon Built by The Pressed Steel Car Co. Pittsburgh, Pennsylvania, USA Circ. 1899 Wheels, paint and transfers required
Furness Railway Wagon Co.
 Furness Railway Wagon Co. The Parts. S&DJR/LMS/BR 20ton 6-Wheel Brake van Wheels, paint and transfers required to complete. Parts 13/15 Bolts/nuts/ washers Part 22 Part 5 Parts 10/19/20/21/ 23/24/25 Part
Furness Railway Wagon Co. Glasgow & South Western Railway/LMS/BR 12ton Mineral Steel Under-Frame
 Furness Railway Wagon Co. Glasgow & South Western Railway/LMS/BR 12ton Mineral Steel Under-Frame Wheels, paint and transfers required to complete. Please note that to aid the folding of the various parts
Furness Railway Wagon Co.
 Furness Railway Wagon Co. The Parts. S&DJR/LMS/BR 10ton 4-Wheel Brake van Wheels, paint and transfers required to complete. Part 3 Part 2a Part 2b Part 5 Parts 8/9/10 Part 15 Part 15 Part 6 Part 4 Part
Caley Coaches True Line kits in etched brass
 Caley Coaches True Line kits in etched brass 0141-772 37 Jim Smellie, 1 Tay Crescent, Bishopbriggs, Glasgow, G64 1EU. Jim Smellie Nov. 1992 10' Building Instructions for kit CC20 Caledonian Railway 1 Ton
Furness Railway Wagon Co. NBR/LNER 8ton 3PLK General Merchandise Wagon
 Furness Railway Wagon Co. General Merchandise Wagon Wheels, paint and transfers required to complete. Please note that to aid the folding of the various parts score all the halfetched foldlines that are
Furness Railway Wagon Co. NER/LNER/BR Box Van
 Furness Railway Wagon Co. NER/LNER/BR G1 Box Van Wheels, paint and transfers required to complete. The Parts. Parts 8/9/10 12/13/15/16 Part Part 11 Part 6 Part 2 Part 3 Part 14 Part 1 Part 4 Parts 5/7
Furness Railway Wagon Co. NER/LNER/BR Cattle Van
 NER/LNER/BR Medium Cattle Van Wheels, paint and transfers required to complete. Part 1 The Parts. Part 4 Part 3 Part 2 Part 17 Part 5 Part 12/16 Part 11 Part 13/14/15 Part 6/7 Parts 8/9/10 not shown Assembly
Furness Railway Wagon Co. CR/HR/LMS/PO 8ton 4PLK General Merchandise Wagon
 Furness Railway Wagon Co. CR/HR/LMS/PO 8ton 4PLK General Merchandise Wagon Wheels, paint and transfers required to complete. Please note that to aid the folding of the various parts score all the halfetched
Furness Railway Wagon Co.
 Furness Railway Wagon Co. S&DJR/LSWR/Midland Railway/LMS/SR/BR 1898/1904 8ton 2 Plank Wagon Wheels, paint and transfers required to complete. The Parts. Part 1 Part 4 Part 5 Part 10 Parts 7/8/9 Parts 13/14
Furness Railway Wagon Co. NER/LNER/BR C1 5ton Fitted Open Fish
 Furness Railway Wagon Co. NER/LNER/BR C1 5ton Fitted Open Fish Wheels, paint and transfers required to complete. Please note that to aid the folding of the various parts score all the halfetched foldlines
Furness Railway Coach Co.
 Furness Railway Coach Co. Outside Framed Coaches Paint and transfers required to complete. Part 32 Part 7/8 Part 9 Part 6 Part 31 Part 14 The Parts. Part 19 Parts 20/21/22 Part 5 Part 4 Part 1 Part 3 Part
4mm scale 009 gauge Lodge Hill & Upnor railway Chattenden Drewry loco body kit.
 RT Models 4mm scale 009 gauge Lodge Hill & Upnor railway Chattenden Drewry loco body kit. HISTORY The loco was supplied by the Drewry car co. to the Lodge Hill & Upnor Railway in 1949, works number 2263.
BRL CLASS 66 LOCOMOTIVE. Building Instructions
 Tel 07807225801 prmrp@fsmail.net www.prmrp.com BRL - 066 CLASS 66 LOCOMOTIVE Building Instructions SCALE MODEL PRODUCT FOR ADULT MODELLERS ONLY. WHITE METAL CONTAINS LEAD WASH HANDS AFTER USE. MAY CONTAIN
Furness Railway Wagon Co.
 Furness Railway Wagon Co. S&DJR/LSWR/Midland Railway/LMS/SR 1883 8ton 5 Plank Raised End Wagon And S&DJR/Midland Rly/LSWR/SECR/PD&SWJR/ H&BR/LMS/SR/LNER 1883 8ton 5 Plank Wagon Wheels, paint and transfers
Furness Railway Wagon Co.
 Furness Railway Wagon Co. The Parts. SE&CR/LB&SCR/W^D/GNR/SR/LNER/BR 1909 RCH 12ton 7 Plank Coal Wagon Wheels, paint and transfers required to complete. Part 1 Part 2 Part 9 Part 5 Part 12 Part 10 Part
Brake Blocks Product Code BB_7. Brake Blocks Product Code BB_7. A product from: A product from:
 Brake Blocks Product Code BB_7 The brake block types provided by these etchings are: Early sin gle sided brakes (three 4 shoe Early ei ther sided brakes ( one 4 shoe set) Later ei ther sided brakes ( three
BRL-142/143 Class 142/143. Building Instructions
 Peter Besant Tel 07807225801 prmrp@fsmail.net www.prmrp.com BRL-142/143 Class 142/143 Building Instructions SCALE MODEL PRODUCT FOR ADULT MODELLERS ONLY. WHITE METAL CONTAINS LEAD WASH HANDS AFTER USE.
Finney7 BEYER PEACOCK BUILT LOCOMOTIVE
 BEYER PEACOCK BUILT LOCOMOTIVE Fig 1. Beyer, Peacock Built Locomotive Nos. 415-426 Depicted as built with short tanks, blower valve on the left, small dome, low tank front, 3 0 trailing wheels, snap head
FINNEY7. 24 Jul 18 4 LNER A4. Fig 1. A4 GA Drawing
 Fig 1. A4 GA Drawing 24 Jul 18 4 COUPLING RODS & FRAME PREPARATION Coupling rods. The coupling rods are made so that they can be used as a jig to align the horn blocks accurately. First drill out all the
RT Models. 4mm scale, 00/EM/P4 Manning Wardle, class K 0-6-0ST loco kit
 1 RT Models 4mm scale, 00/EM/P4 Manning Wardle, class K 0-6-0ST loco kit History The first of Manning Wardle s Class K was built in 1864. Many of these locos were mainly built for contractors with only
FINNEY7. 24 Jul 18 A3-4 LNER A3. Fig 1. General Arrangement
 Fig 1. General Arrangement - 4 COUPLING RODS. The coupling rods are now made so that they can be used as a jig to align the hornguides accurately. First drill out all the crankpin holes to a convenient
7mm Axleguards AX1_7 RCH/MR Standard Axleguards
 AX1_7 RCH/MR Standard Axleguards Exhibitions, or through selected retailers. GX1_7 GWR Standard 4 bolt Axleguards Exhibitions, or through selected retailers. AX2/7 Pre Group General Axleguards (Includes
Brassmasters Scale Models
 Brassmasters Scale Models www.brassmasters.co.uk Cleminson 6-wheel underframe kit PO Box 1137 Sutton Coldfield B76 1FU Copyright Brassmasters 2016 1 Introduction 1.1 The purpose of this booklet is to guide
NSWGR C30T LOCOMOTIVE AND TENDER KIT
 Australian Railway Kits ABN: 27 416 246 418 Incorporating Main West Models Manufacturers, Wholesalers and Retailers of Quality Australian Model Railways PO Box 252 Warwick, Queensland, 4370 Australia Phone/Fax:
Finney7 PC May17 PRINCESS CORONATION. Fig 1. GA Curved Footplate
 Fig 1. GA Curved Footplate PC - 5 Fig 2. GA Utility Footplate PC - 6 COUPLING RODS & FRAME ASSEMBLY COUPLING RODS. The coupling rods are now made so that they can be used as a jig to align the remaining
GWR 4 Wheel Parcel Van, Diagram W1
 GWR 4 Wheel Parcel Van, Diagram W1 From a Colin Waite bodyline kit with a scratch built underframe April 2013. While recovering from a very nasty cold and not feeling much like doing anything I was idly
BRL-007 Detailing and Conversion Kit for NOVO/Triang Class 35 Hymek. Building Instructions
 Peter Besant Tel 07807225801 prmrp@fsmail.net www.prmrp.com BRL-007 Detailing and Conversion Kit for NOVO/Triang Class 35 Hymek Building Instructions SCALE MODEL PRODUCT FOR ADULT MODELLERS ONLY. WHITE
Chopper Couplings. Assembly. Fitting
 Chopper Couplings Unlike most model chopper couplings, these will work with two opposing hooks, which looks so much better and allows you to turn stock at will. They are still compatible with most other
Instructions: Pullman-Standard PS-3 Coal Hopper Kit Tangent Part Numbers: through /2015
 Instructions: Pullman-Standard PS-3 Coal Hopper Kit Tangent Part Numbers: 15000-01 through 15001-01 10/2015 Thank you for purchasing the Tangent Scale Models Pullman-Standard PS-3 Coal Hopper Kit! A few
The 2mm Scale Association etched replacement chassis for RTR loco bodies
 The 2mm Scale Association etched replacement chassis for RTR loco bodies Required Parts List Chassis etch (supplied) Motor - for all designs the Association can motor is suitable, alternatives are shown
Dinorwic Quarry Hunslet `Alice Class with cab 7mm Scale kit for 16.5mm or 14mm Gauge
 EDM Models 19 Briar Avenue, Acomb, York. Y026 5BX Dinorwic Quarry Hunslet `Alice Class with cab 7mm Scale kit for 16.5mm or 14mm Gauge Introduction This kit, which has been researched by Jonathan Matthews
Jabiru J170/230/430/250/450 Constructors Manual. Pre-Paint>Fuselage>Undercarriage>Assemble main gear
 Objectives of this task: In this task you will assemble the main undercarriage legs, which includes fitting the axles, disc brakes and wheels and adjusting the brakes. Materials required: Cards # J8 Dual
3 mm wagon_parksidekits.doc 1 of 18
 3mm Society Illustrated Catalogue Page 1 [01/August/2011] Parkside Dundas Complete Plastic Wagon Kits Less Wheels & Couplings, GWR PP17 GWR 16' ventilated van with PP18 (or PP30) 9' steel under frame and
NSWGR C LOCOMOTIVE AND TENDER KIT
 Australian Railway Kits ABN: 27 416 246 418 Incorporating Main West Models Manufacturers, Wholesalers and Retailers of Quality Australian Model Railways PO Box 252 Warwick, Queensland, 4370 Australia Phone/Fax:
ALAN GIBSON, THE BUNGALOW CHURCH ROAD, LINGWOOD, NORWICH, NORFOLK. MIDLAND/L.M.S. Class 4F.
 ALAN GIBSON, THE BUNGALOW CHURCH ROAD, LINGWOOD, NORWICH, NORFOLK MIDLAND/L.M.S. Class 4F. These instructions and history should be carefully studied BEFORE starting on any assembly. The standard kit is
- 0 Gauge - Southern Railway Class 02 Chassis Construction & Parts Identification
 - 0 Gauge - Southern Railway Class 02 Chassis Construction & Parts Identification I would recommend constructing the body to the fitting of parts 42 before starting chassis construction. As the basic body
NSWGR Z Tank Locomotive
 Australian Railway Kits ABN: 27 416 246 418 Incorporating Main West Models Manufacturers, Wholesalers and Retailers of Quality Australian Model Railways PO Box 252 Warwick, Queensland, 4370 Australia Phone/Fax:
Chevrolet 3100 IFS Kit
 1947-54 Chevrolet 3100 IFS Kit Congratulations on your purchase on what we believe is the finest IFS kit available for 1947-54 Chevrolet pickups with stock frames. We have invested many hours into designing
WARNING. When installed in accordance with these instructions, the front protection bar does not affect operation of the SRS airbag.
 Part Number: 343870 F/Kit 17557 Product Deluxe Combination Winch and Non Winch Bull Bar Description: Suited to Nissan XTERRA 05ON USA Only vehicle/s: WARNING REGARDING VEHICLES EQUIPPED WITH SRS AIRBAG;
Bachmann GWR Earl (Dukedog) EM Finescale Conversion
 EM Finescale Conversion") Bachmann GWR Earl (Dukedog) EM Finescale Conversion Before you start, it is a good idea to have some small containers or snap top poly bags to put screws and components in for safe keeping...much better
Bachmann GWR Earl (Dukedog) EM Finescale Conversion Before you start, it is a good idea to have some small containers or snap top poly bags to put screws and components in for safe keeping...much better
Instructions: PRR Sam Rea Shops X58 Class Box Car Kit Tangent Part Numbers: XX through XX 9/2015
 Instructions: PRR Sam Rea Shops X58 Class Box Car Kit Tangent Part Numbers: 14000-XX through 14002-XX 9/2015 Thank you for purchasing the Tangent Scale Models PRR Sam Rea Shops X58 Class Box Car Kit! A
Bowaters cab. Rear half of tropical cab frame. Cab door 82. Bend tags and solder to cab rear in open or closed position.
 Bowaters cab 29 32 44 31 Rear half of tropical cab frame 22 27 Cab door 82. Bend tags and solder to cab rear in open or closed position. 20 21 33 Side rod fitting and valve gear - Stephensons 44 0.7mm
10. Lower Fuselage Assembly Undercarriage
 10. Lower Fuselage Assembly Undercarriage Undercarriage 10.27 2 230399 0 Jabiru Undercarriage Configurations There are four combinations of tyres available, utilising two sets of hubs (standard and heavy
AA TRUCK TALK EQUIPMENT FOR THE 88-A PLATFORM
 AA TRUCK TALK EQUIPMENT FOR THE 88-A PLATFORM By Neil Wilson of Boulder, Colorado April 1998 (revised 12/24/99) revised 11/9/14 for aafords.com - "component" changed to "equipment" Illustration #1: 134-B
ALLDATA Online Toyota Camry L4-2.4L (2AZ-FE) - Rear Strut Assembly. Rear Strut Assembly
 - Rear Strut Assembly. Rear Strut Assembly") Page 1 of 11 Home Account Contact ALLDATA Log Out Help PAUL REDEHOFT Select Vehicle New TSBs Technician's Reference Component Search: OK 2004 Toyota Camry L4-2.4L (2AZ-FE) Conversion Calculator Vehicle
Page 1 of 11 Home Account Contact ALLDATA Log Out Help PAUL REDEHOFT Select Vehicle New TSBs Technician's Reference Component Search: OK 2004 Toyota Camry L4-2.4L (2AZ-FE) Conversion Calculator Vehicle
Installation instructions, accessories - Rear Seat Entertainment
 XC90 Section Group Weight(Kg/Pounds) Year Month 3 39 2004 10 XC90 2003, XC90 2004, XC90 2005, XC90 2006, XC90 2007, XC90 2008 Replaces issue: 2003 12 J3904620 Page 1 of 18 Required tools A0000162 A0000163
TECHNICAL DESCRIPTION
 TRAILER, LIGHTWEIGHT, CARGO, 750 KG (HAULMARK), MC2 TECHNICAL DESCRIPTION This instruction is authorised for use by command of the Chief of Army. It provides direction, mandatory controls and procedures
TOYOTA LANDCRUISER 200 SERIES 2007 ON NO HLC & WITH HLC (SAHARA) WARNING
 WARNING") Part Number: 3915040/050 F/Kit 6172323 Product Description: Suited to vehicle/s: ARB SAHARA BAR TOYOTA LANDCRUISER 200 SERIES 2007 ON 3915040 NO HLC & 3915050 WITH HLC (SAHARA) WARNING REGARDING VEHICLES
Part Number: 3915040/050 F/Kit 6172323 Product Description: Suited to vehicle/s: ARB SAHARA BAR TOYOTA LANDCRUISER 200 SERIES 2007 ON 3915040 NO HLC & 3915050 WITH HLC (SAHARA) WARNING REGARDING VEHICLES
MANNING WARDLE ex-penrhyn Quarry Railway Narrow Gauge `Jubilee mm Scale kit for 16.5mm or 14mm Gauge
 EDM Models 19 Briar Avenue, Acomb, York. Y026 5BX MANNING WARDLE ex-penrhyn Quarry Railway Narrow Gauge 0-4-0 `Jubilee 1897 7mm Scale kit for 16.5mm or 14mm Gauge Introduction This kit, which was researched
1. Invert the tender, and hold in a suitable device. We use a foam cradle the Peco loco service cradle being ideal.
 Bachmann J11 EM Finescale Conversion Before you start, it is a good idea to have some small containers or snap top poly bags to put screws and components in for safe keeping...much better than crawling
Tip: LED Lighting for the 3098 Locomotive and 4392 Coach Set Date: , ,
 Hi All, Over the past few months I have been working at a steady pace to install LED lighting in my passenger coaches. The coach lighting must have LED lights to reduce power consumption on the layout
SUT-450-I ASSEMBLY REQUIREMENTS
 SUT-450-I Torque wrench, carpenters square, wire cutters, Phillips screwdriver, 7/16, 9/16, and 3/4 combination wrenches, ratchet, 9/16,3/4,13/16, and 7/8 sockets. ASSEMBLY REQUIREMENTS *Torque all T-bolt
Build your own THUNDERBIRD 2
 PACK 04 PAGE 19 Pod 3 base 66 20 Pod 3 details and Firefly 69 21 Pod 3 laboratory and Firefly 72 22 Pod 3 floor details and Firefly 75 23 Pod 3 inspection walkways 78 24 Pod 3 right inner wall 81 25 Pod
Stephenson's Valve Gear: 7mm cast white-metal kit 19 th Century swing-link version - non-working, cosmetic only. Instructions
 SER-Kits Stephenson's Valve Gear: 7mm cast white-metal kit 19 th Century swing-link version - non-working, cosmetic only Page 1 of 5 Instructions HEALTH & SAFETY: The castings contain some lead. Dispose
PLEASE NOTE! ALL Roofwalk / Running Board parts are VERY SHARP! Please take GREAT CARE when handling!!!!
 PLEASE NOTE! ALL Roofwalk / Running Board parts are VERY SHARP! Please take GREAT CARE when handling!!!! 0 Instructions: Pullman-Standard 4750 Covered Hopper Kits August 2012 History Think of this Tangent
Build your own THUNDERBIRD 2
 PACK 03 PAGE 12 Pod 3 front hatch and Elevator Car 2 43 13 Pod 3 rear hatch and Elevator Car 2 46 14 Pod 3 floor and Elevator Car 2 49 15 Pod 3 frames and FAB 1 52 16 Pod 3 frames and FAB 1 55 17 Pod 3
RTS518 - Rhino Heavy Duty 2 & 3 Crossbar System Hyundai iload, imax, i800, H-1.
 RTS518 - Rhino Heavy Duty 2 & 3 Crossbar System Hyundai iload, imax, i800, H-1. NOTE: Please read these instructions carefully prior to installation. Check the contents of kit before commencing fi tment
Instructions: General American 6,000 Gallon, 3-Compartment Tank Car Kit 11/2013
 Instructions: General American 6,000 Gallon, 3-Compartment Tank Car Kit 11/2013 Thank you for purchasing the Tangent Scale Models General American 6,000 Gallon, 3- Compartment Tank Car Kit! A few quick
Bob's Card Model and [Resources]
![Bob's Card Model and [Resources]](/thumbs/89/98424237.jpg "Bob's Card Model and [Resources]") Bob's Card Model www.bobscardmodels.altervista.org and www.zealot.com [Resources] Conair C S 2F (Tracker) water-bomber(1:144) Securité Civile's converted Tracker, used for patrol duty, but also for water-bombing
Bob's Card Model www.bobscardmodels.altervista.org and www.zealot.com [Resources] Conair C S 2F (Tracker) water-bomber(1:144) Securité Civile's converted Tracker, used for patrol duty, but also for water-bombing
AIRCRAFT LANDING GEAR CONSTRUCTION MANUAL
 APPENDIX AI KITPLANES FOR AFRICA AIRCRAFT LANDING GEAR CONSTRUCTION MANUAL Revision: C September 2008 Page L1 of 20 NOTE: Please read the General Manual before proceeding. Please read through the entire
WARNING TAKE NOTE OF THE FOLLOWING: THIS PRODUCT MUST BE INSTALLED EXACTLY AS PER THESE INSTRUCTIONS USING ONLY THE HARDWARE SUPPLIED.
 ARB WINCH/NONWINCH BUMPER TO SUIT TOYOTA HJ100 IFS PRODUCT No. 3913140 5100050 Top Tube Kit 5100160 Buffer Kit With hole (required when fitting Top Tube) 5100170 Buffer Kit With no hole Fitting Kit No.
ARB TOYOTA 80 SERIES REAR STEP TOW BAR
 ARB TOYOTA 80 SERIES REAR STEP TOW BAR Product number: 5611010 Optional Jerry Can Carrier Optional Wheel Carrier Left Hand Side of vehicle (LHS) Rear Step Tow Bar Right Hand Side of vehicle (RHS) READ
COLD AIR INTAKE INSTALLATION INSTRUCTIONS
 COLD AIR INTAKE INSTALLATION INSTRUCTIONS # D760-0033 Fits: 2013-15 F01 B7, 750i & xdrive (N63TU engine) 2013-15 F02 B7L, 750Li & xdrive (N63TU engine) PARTS LIST Left and right carbon fiber air box lids
#GL18006-L2 Honda Gold Wing 1800 & F6B models - All Years Lower Cowl LED Driving Lights INSTALLATION INSTRUCTIONS
 #GL18006-L2 Honda Gold Wing 1800 & F6B models - All Years Lower Cowl LED Driving Lights INSTALLATION INSTRUCTIONS 1. Lay out and familiarize yourself with the parts included in the set. Remove the left
Mamod SL1K Locomotive Assembly Instructions
 Mamod SL1K Locomotive Assembly Instructions LOCOMOTIVE ASSEMBLY INSTRUCTIONS To ensure ease of construction reference to these instructions are essential. All the major parts are in the front of the box
WH/WK JEEP GRAND CHEROKEE 2005 ON WARNING
 Part Number: 3450130 F/KIT: 6172092 Product Description: Suited to vehicle/s: COMBINATION BULL BAR WH/WK JEEP GRAND CHEROKEE 2005 ON WARNING REGARDING VEHICLES EQUIPPED WITH SRS AIRBAG; When installed
Tip: and Orient Express LED Light Upgrade Date: Correction
 Hi All, I have since inherited my friend Rudolf s 42755 Orient Express with the extra 42760 car set and wanted to complete the LED light upgrade as we had planned. Side view of the Restaurant car with
INTERCOOLER UPGRADE INSTALLATION INSTRUCTIONS PART NUMBER D
 INTERCOOLER UPGRADE INSTALLATION INSTRUCTIONS PART NUMBER D330-0021 APPLICATION: 2014-16 F22 228i & xdrive coupe (see restrictions below) 2015-16 F23 228i & xdrive convertible 2012-16 F30 328i & xdrive
Window Regulator: Service and Repair Front Door Trim. Armrests. With Power Windows. Front Door Arm Rest. Remove or Disconnect
 1995 Oldsmobile Cutlass Ciera V6-3100 3.1L VIN M SFI Page 1 Window Regulator: Service and Repair Front Door Trim Armrests 1. Plugs from upper and lower armrest openings. 2. Screws from upper and lower
SAN FELIPE: Step by Step Pack 8
 Pack 8 Your parts Gun port frames Complete gun ports Tools and equipment Tweezers Superglue Pliers Hammer Sandpaper Wood stain Paintbrushes Black pen a Glue gun port frames to the gun ports of the main
Product Deluxe Combination Winch and Non Winch Bull Bar, Flare and Non Flare Description: Suited to Nissan D40T Navara XC DC SC 2008 ON WARNING
 Part Number: 343840 & 343850 F/Kit 617501 Product Deluxe Combination Winch and Non Winch Bull Bar, Flare and Non Flare Description: Suited to Nissan D40T Navara XC DC SC 008 ON vehicle/s: WARNING REGARDING
This year Märklin have released a coach which has included LED lighting with a currentconducting close coupler (single pole)
") Hi All, Over the past few months I have been working at a steady pace to install LED lighting in my passenger coaches. The coach lighting must have LED lights to reduce power consumption on the layout
Hi All, Over the past few months I have been working at a steady pace to install LED lighting in my passenger coaches. The coach lighting must have LED lights to reduce power consumption on the layout
INTERCOOLER UPGRADE INSTALLATION INSTRUCTIONS PART NUMBER D
 INTERCOOLER UPGRADE INSTALLATION INSTRUCTIONS PART NUMBER D330-0021 APPLICATION: 2014-16 F22 228i & xdrive coupe (see restrictions below) 2012-16 F30 328i & xdrive sedan 2014-16 F31 328i xdrive wagon 2014-16
Rumney Models Price List July 2016
 Rumney Models Price List July 2016 New Items www.rumneymodels.co.uk Rumney Models, 7 Hurlingham Road, Bristol, BS7 9BA justinnewitt@gmail.com This list replaces all previous lists. Items are 4mm scale
Bachmann D11 EM/S4 Finescale Conversion
 Bachmann D11 EM/S4 Finescale Conversion Before you start, it is a good idea to have some small containers or snap top poly bags to put screws and components in for safe keeping...much better than crawling
Tip: 3425 Kittle Loco with LP4.0 Micro Conversion and LED Lighting Date: , Corrections Addition Link added
 Hi All, This is the last of Rudolf s LokPilot Micro V4.0 decoder conversions. He asked me to convert his Märklin Delta 3425 steam locomotive and wanted to improve the lighting effects for the cabin, change
2014 Subaru of America, Inc. All rights reserved. SERVICE BULLETIN. Service Procedure to Address a Wind Rushing Sound from the Front Door Sash Area
 ATTENTION: GENERAL MANAGER q PARTS MANAGER q CLAIMS PERSONNEL q SERVICE MANAGER q IMPORTANT - All Service Personnel Should Read and Initial in the boxes provided, right. 2014 Subaru of America, Inc. All
Instructions: PRR / PC Shops G43 Series Gondola Kit Tangent Part Numbers: through /2016
 Instructions: PRR / PC Shops G43 Series Gondola Kit Tangent Part Numbers: 17000-01 through 17002-02 8/2016 Thank you for purchasing the Tangent Scale Models PRR / PC Shops G43 Series Gondola Kit! A few
Figure 1. A CheapBot Robot
 A CheapBot controller needs a robot body to function. An ideal robot body for the beginner consists of two sheets of Syntra plastic, separated by four bolts. The bottom deck contains the robot controller
60-65 Falcon, Comet & Ranchero Coil Spring IFS
 60-65 Falcon, 62-65 Comet & 62-65 Ranchero Coil Spring IFS All engine installations with this front end will require a rear sump oil pan. 289-302 Small Block Ford Motors Milodon rear sump pan holds 7 quarts
Installation Manual. For. Trident Boat Lifts
 Installation Manual For Trident Boat Lifts Page 2 Safety Precautions 1. Your boat lift is a heavy duty piece of equipment. It is important that all persons that may operate this unit have read and understood
Removing fixtures and fittings. Work description. Seats. BeGe. Seat assembly. Seat base, G and P cabs Remove the parts as follows:
 Seats BeGe Seat assembly 1. Tap down the lock tabs on the seat base and turn the pins 90 degrees, pull out the pins. 2. Remove the electrical connections to the seat base and backrest heaters. 1 3. Lift
Safe-T-element Installation Instructions
 Safe-T-element Installation Instructions For: PTI STEZA (2x2 Burner Configuration) & PTI STEZB (3x1 Burner Configuration) Revision K (May. 3 2012) TABLE OF CONTENTS 1. PREPARATION... 3 1.1 General Safety
Build an electric Scoot-car
 513 Build an electric Scoot-car Designed by ROBERT W O O L S O N Here's a sidewalk special for young hot rodders that safely takes the corner on two wheels, has two forward speed and brakes that stop on
fix AA-82160?? AA TRUCK TALK AA FLOOR BOARDS & MATS By Neil Wilson of Boulder, Colorado April 2007
 fix AA-82160?? AA TRUCK TALK AA FLOOR BOARDS & MATS By Neil Wilson of Boulder, Colorado April 2007 7 1/2" 2 3/8" 4 3/4" 9 15/16" CL 3/4 plywood (with 5 plies) AA-82162 Floor Board #2 Assembly AA Chassis
The Go Baby Go Build Manual
 The Go Baby Go Build Manual The step-by-step guide to creating your own Go Baby Go Car 4488 Shockwave Robotics and Pacific University Index 1. List of Mat erials 2. Mechanical Assembly a. Installing the
RTS528 - Holden Colorado/ Isuzu D-MAX Space Cab Track Mount System
 RTS528 - Holden Colorado/ Isuzu D-MAX Space Cab Track Mount System Important: Please read these instructions carefully prior to installation. Please refer to your fi tting instruction to ensure that the
Product ARB SAHARA BAR (suitable for up 12000lb winch) Suited to TOYOTA LANDCRUISER LC200 SERIES 2012 ON WARNING
 Suited to TOYOTA LANDCRUISER LC200 SERIES 2012 ON WARNING") Part Number: 39550 F/Kit 67347 Product ARB SAHARA BAR (suitable for up 000lb winch) Description: Suited to TOYOTA LANDCRUISER LC00 SERIES 0 ON vehicle/s: Optional Fitting kits: For vehicles fitted with
Part Number: 39550 F/Kit 67347 Product ARB SAHARA BAR (suitable for up 000lb winch) Description: Suited to TOYOTA LANDCRUISER LC00 SERIES 0 ON vehicle/s: Optional Fitting kits: For vehicles fitted with
J & D Machine / Hyperdrive / MSA 3711 Moon Bend Rd. Chapel Hill, TN 37034
 J & D Machine / Hyperdrive / MSA 3711 Moon Bend Rd. Chapel Hill, TN 37034 www.hyperdriveracing.com 1 You now own a state of the art 1/10 scale oval race car. The Hyperdrive Assault has gone through months
One- Touch Installation Instructions
 One- Touch Installation Instructions 1 1 Height Adjustable Pivot w/ screws 9 Upper Work Surface 2 Rail Mount Knobs 10 Back Cover 3 Transformer 11 Center Pivot w/ screws 4 Support Legs 12 Left Monitor Arm
Norden. A Lancashire Mill Engine. Scale: 1:12
 Scale: 1:12 Neil M. Wyatt February 2009 Fig. 1: General Arrangement General Arrangement Sheet: 1 An Old Steam Engine DEAR SIR, In the ruins of an old mill at, near Rochdale, there is an old steam engine
FITTING KIT No s : BULL BAR WINCH ( P/No ) BULL BAR NON WINCH ( P/No )
 BULL BAR NON WINCH ( P/No )") ARB WINCH / NON WINCH BULL BAR TO SUIT LANDROVER DISCOVERY 2003 ONWARD. FITTING KIT No s :- 617 1793 BULL BAR WINCH ( P/No 343 2120 ) 617 1794 BULL BAR NON WINCH ( P/No 323 2120 ) WARNING FOR VEHICLES
ARB WINCH / NON WINCH BULL BAR TO SUIT LANDROVER DISCOVERY 2003 ONWARD. FITTING KIT No s :- 617 1793 BULL BAR WINCH ( P/No 343 2120 ) 617 1794 BULL BAR NON WINCH ( P/No 323 2120 ) WARNING FOR VEHICLES
MC2 BOWLING Pin-Setter
 MC2 BOWLING Pin-Setter File No.: M200509-01 COPYRIGHT 2005, VIA BOWLING PRODUCTS Content I. Installation of Front-End Assembly --------------------------------------- 1 II. Installation of Back-End Assembly
SUT-250-S (These instructions are used for SUT-250-SCLC also)
") SUT-250-S (These instructions are used for SUT-250-SCLC also) Torque wrench, carpenters square, wire cutters, Phillips screwdriver, 7/16, 9/16, and 3/4 combination wrenches, ratchet, 9/16, 3/4, 13/16,
SUT-250-S (These instructions are used for SUT-250-SCLC also) Torque wrench, carpenters square, wire cutters, Phillips screwdriver, 7/16, 9/16, and 3/4 combination wrenches, ratchet, 9/16, 3/4, 13/16,