Sound Install Steam. Presented by Tim s Trains
|
|
|
- Pearl Robbins
- 6 years ago
- Views:
Transcription
1 Presented by Tim s Trains
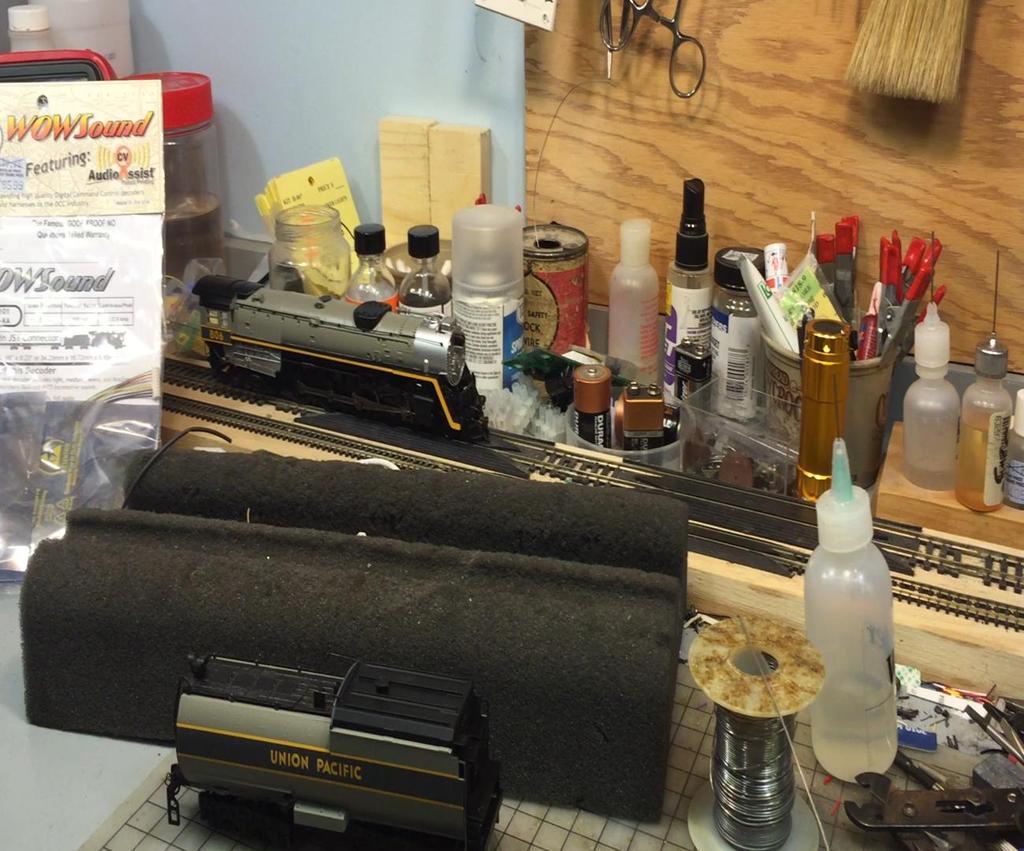
2 This presentation will show you the basic steps required to install a sound decoder and speaker in a steam locomotive. This particular locomotive is a Bachmann with a Vanderbilt tender. I will show the basic thought process and techniques I generally use doing sound installs. Obviously there are hundreds of types and brands of locomotives and decoders/speakers available. These ideas and techniques can be adapted for similar installs.


3 This install involves a TCS (Train Control Systems) WOWSound decoder with a KA-2 keep-alive. I generally try to fit the largest speaker and enclosure possible into the available space. This install will use a Tony s Dream Speaker and enclosure 1 in diameter.
4 FIRST and foremost How does it run? If it jerks and stutters or waddles down the track, DCC will NOT FIX it. Take the loco apart and repair any problems with the mechanics of operation before you start!! This loco runs very smoothly
5
6 Next step.. Let s take the loco apart to see what type motor and mechanism, and space we have to work with. This one took about ten minutes to locate all the screws to separate the drive mechanism from the locomotive.

7 Look over the chassis and verify what parts do what. Light? Motor Connections? Track Pickup? Smoke Unit? What is all this stuff attached to the motor?

8 Okay. Motor is all cleaned up and ready to go. Next?

9 What does this do.?

10 This a board that brings track power, motor leads, headlight, and the smoke unit all together. I left it in place to ID the different wires later.

11 Alright, we are pretty much down to bare bones. Let s see how the decoder, keep-alive, and speaker will fit in the locomotive. If at all.

12 The top of the motor at left is very near the top of the boiler cavity. Not looking too good. Let s look in the tender for additional space.

13 Uh oh. Tender without trucks reveals no screws to open it any further. It is a solid tube and the two weight plates inside are loose and rolling around. There is a tab up front. Hmmm.

14 A little gentle tugging and prying gets the front of the tender off and we have access to the inside!! Removed the block of styrofoam and both the weight plates. Sound Install Steam

15 The plates are secured to each other with double stick tape. However they are not secured in the tender. We ll address that later. They will make a great platform for all the decoder and sound equipment. Sound Install Steam


16 Perfect fit, everything is tied and soldered together and fixed in place with double sided tape. Sound Install Steam However there are no track power pickups or connections to the locomotive.

17 Now we have to establish the connections between the tender and the locomotive. Train Control Systems has a great tether solution with their JST6/7. We are going to need all seven wires!! Sound Install Steam


18 Now we are going to have to create a pathway from the tender to the locomotive while maintaining the ability to unplug the connector. The tender is completely closed! Thank goodness for Dremel tools and steady hands. Sound Install Steam

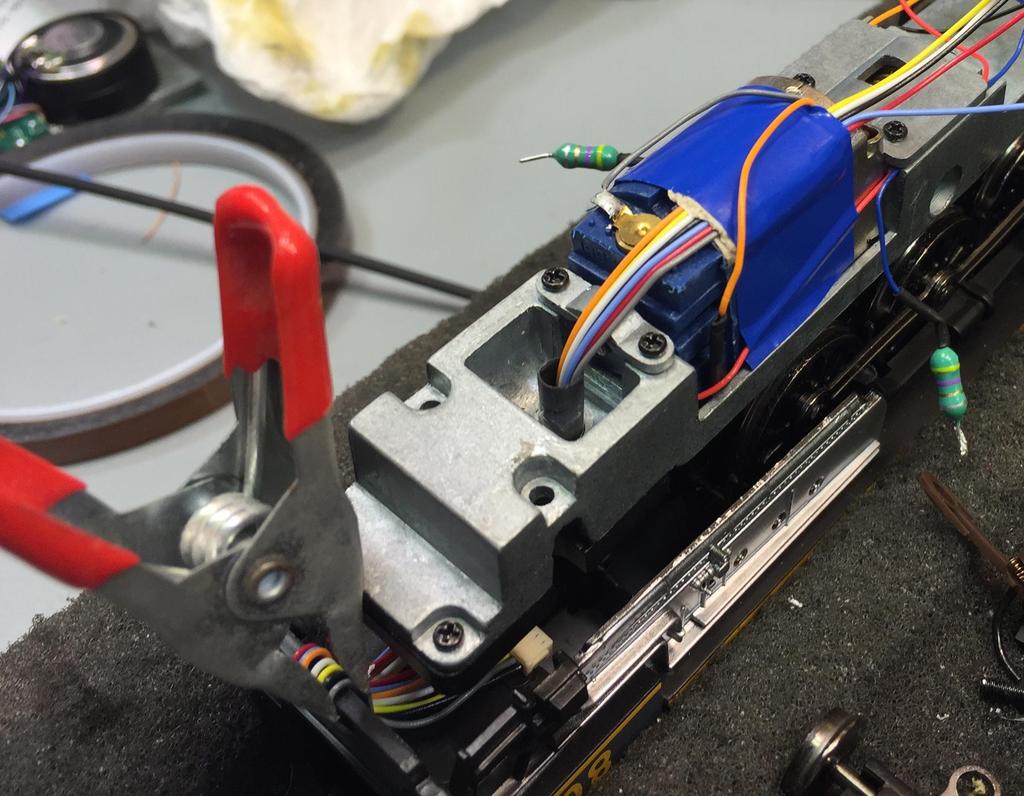
19 Once the opening and the female end of the connector fit snuggly together it is time to epoxy the connector into the opening and set it aside to harden. This is also a great time for a nap or snack to keep you going Sound Install Steam

20 When it has hardened completely, place the decoder assembly and the tether next to each other and connect all seven wires, color for color. Twist and solder, then heat shrink for protection. Sound Install Steam

21 There s the finished tender. There s a nice opening for the sound to get out directed right at the locomotive. A little black paint or permanent marker and it will hardly be noticeable. Sound Install Steam

22 Ok, I think this is where we left the locomotive half of the install. What s next? Well, we need to find a way to get this end of the tether up and into the loco to pick off all the existing wiring.

23 Sometimes I just plain get lucky. See the square opening in the bottom of the frame? There is nothing above it and it comes out right behind the motor!!

24 Some quick work with a drill and I have the perfect path for the tether!
25
26 Just like the tender it is now time to connect wires to their counterparts in the loco. Track power is black and red same as the tender connections.

27 Motor leads are orange and grey, same as the tether connections in the tender. Solder and shrink for protection. ALWAYS test the motor for direction.

28 Here I have already connected the function wires to the function they will control. White to the - of the LED and yellow to the left side of the smoke unit.
29 Remember, BLUE is always + 12volts from the decoder. I have both positive function wires soldered to the blue lead. The 12 volt feed for the LED has a resistor in line to take the 12 volts down to about 4 volts.

30 Solder and heat shrink for protection. The large diameter heat shrink on the left will cover the resistor and all the associated connections. Try to leave a little bit of slack for some wiggle room or corrections.

31 Finished with all the connections. Now we need to pack it all in without fouling any moving parts and/or gears.

32 This should eliminate any loose wire issues. Time to test our work!!

33 Remember how carefully I clipped the tether from the loco to the back of the cab so I would have plenty of wire to plug it in? Yep, it happens. I forgot the chassis fits snuggly about 1.25 from the back of the loco..75 isn t enough to reach the tender connector!!

34 The slack I had left for just a reason like this wasn t enough. I had to go back and reconnect the headlight and smoke unit for the extra wire necessary.

35 But, the extra wire allows for a nice relaxed connection between the locomotive and the tender. Too much wire might drag along the track. Not enough might cause restrictions while turning.

36 I have the loco setup to run on my test track up here. It has not had any adjustments made for operation or sound levels. It s pretty loud in my opinion. Questions and comments are always welcomed..tjl
By Mark Schutzer PCR Regional Convention, San Luis Obispo May 2014 Copies of this presentation can be found at
 A Beginners Guide to Installing DCC Decoders By Mark Schutzer PCR Regional Convention, San Luis Obispo May 2014 Copies of this presentation can be found at http://www.markschutzer.com Clinic Overview Installing
Modeling Ideas and techniques, by Bob Rohwer What is the right DCC Decoder for my Locomotive?
 Modeling Ideas and techniques, by Bob Rohwer What is the right DCC Decoder for my Locomotive? I hear this question a lot. Fortunately there are a lot of resources to answer the question. The best I have
DCC Decoders for Brass Steam Locomotives
 DCC Decoders for Brass Steam Locomotives By Mark Schutzer PCR Regional Convention, Concord, CA May 2005 Copies of this presentation can be found at http://www.markschutzer.com Clinic Overview Part 3 Installing
Walthers/Life-Like USRA Steam Locomotive
 North Raleigh Model Railroad Club Installing Decoders in N Scale Locomotives Detailed Instructions Walthers/Life-Like USRA 2-8-8-2 Steam Locomotive by David Derway May 17, 2010 Table of Contents Introduction...
5 Amp Dual Mode Sound Decoder by Frank T.Verrico
 5 Amp Dual Mode Sound Decoder by Frank T.Verrico Model Rectifier Corp. s latest venture into O scale is a 5 amp. dual mode, [DC/DCC], sound decoder. This full featured N.M.R.A. compatible sound decoder
Bachmann Digital Sound Decoder Installation Notes
 New Dimensions in Digital Sound Technology TM APPLICATION NOTE Bachmann 2-6-6-2 Digital Sound Decoder Installation Notes Overview This application note describes the installation of a DSD-090LC Digital
Tip: LED Lighting for the 3098 Locomotive and 4392 Coach Set Date: , ,
 Hi All, Over the past few months I have been working at a steady pace to install LED lighting in my passenger coaches. The coach lighting must have LED lights to reduce power consumption on the layout
Tip: Difficult Conversions for F800 (3026) and 3111 Date: Led lighting added, LED Addition 3111
 and 3111 Date: Led lighting added, LED Addition 3111") Hi All, It s good to revisit previous conversions and see if you can improve on what has been done before. I decided to add LED lighting to my F800 (3026) and 3111. This document update shows how it was
Hi All, It s good to revisit previous conversions and see if you can improve on what has been done before. I decided to add LED lighting to my F800 (3026) and 3111. This document update shows how it was
This year Märklin have released a coach which has included LED lighting with a currentconducting close coupler (single pole)
") Hi All, Over the past few months I have been working at a steady pace to install LED lighting in my passenger coaches. The coach lighting must have LED lights to reduce power consumption on the layout
Hi All, Over the past few months I have been working at a steady pace to install LED lighting in my passenger coaches. The coach lighting must have LED lights to reduce power consumption on the layout
Installing a TCS FL4 into the Eureka CTH Ben O Malley
 Please note, this modification requires soldering skill at board level and involves removing surface mount components. This modification will also void your warranty and all responsibility resides with
Triumph Street Triple VSM Grip Heater Install
 Triumph Street Triple VSM Grip Heater Install Introduction: With winter fast approaching and with painful memories of last winter riding with the club it was time to do something about getting some grip
Trouble Shooting Guide for Hubbell Systems
 Trouble Shooting Guide for Hubbell Systems NOTE: Hubbell Special Products discontinued operations in 2008, so there is a very limited number of repair parts available for motor repair. In some ways, this
Troubleshooting Guide for Okin Systems
 Troubleshooting Guide for Okin Systems More lift chair manufacturers use the Okin electronics system than any other system today, mainly because they re quiet running and usually very dependable. There
Application Note. Atlas RS-3 Tsunami Digital Sound Decoder Installation Notes
 Application Note Atlas RS-3 Tsunami Digital Sound Decoder Installation Notes Overview This application note describes how to install a TSU-AT1000 digital sound decoder into an HO Atlas RS-3. Skill Level
These instructions show how to build the Remote Controlled Fart machine Sound Kit.
 Remote Controlled Fart Machine Assembly Instructions These instructions show how to build the Remote Controlled Fart machine Sound Kit. Tools Required Drill with 7/64, 3/16, and ¼ drill bits. Holt melt
Fabricating and Installing Headlight Relays. Mike Graham
 Fabricating and Installing Headlight Relays Mike Graham For some time I had been reading about the benefits of installing headlight relays. As I understand it, there are two principal benefits: the load
X-Type w/ non-premium sound amplifier installation instructions
 X-Type w/ non-premium sound amplifier installation instructions 1. Pull radio from dash (see Radio Removal Instructions ) 2. Disconnect wiring harness from back of radio by pushing in tab on plug and pulling
Application Note. Walthers/Proto 2000 E7A Tsunami Digital Sound Decoder Installation Notes
 Application Note Overview This application note describes how to install a TSU-1000 digital sound decoder into a Walthers/ Proto 2000 E7A. Skill Level 2: The entire installation can be completed in one
Atlas HO MP-15 Tsunami Digital Sound Decoder Installation Notes
 Atlas HO MP-15 Tsunami Digital Sound Decoder Installation Notes Overview This application note describes how to install a TSU-AT1000 digital sound decoder into an Atlas HO MP-15. Skill Level 2: The entire
INSTALLATION INSTRUCTIONS
 Rear Vision System Tailgate Handle Camera Mirror Display 2004-2014 Ford F-150 and 2008-2015 Ford Super Duty (Kit part numbers 9002-9521) Kit Contents: Mirror Tailgate Handle with camera and harness Interior
Troubleshooting Guide for Limoss Systems
 Troubleshooting Guide for Limoss Systems NOTE: Limoss is a manufacturer and importer of linear actuators (motors) hand controls, power supplies, and cables for motion furniture. They are quickly becoming
DIY Synth Kit - Manual STUTTER SYNTH
 DIY Synth Kit - Manual STUTTER SYNTH Welcome to the DIY Synth - Manual This is a step-by-step guide to making your own electronic Synth. All you will need is your hands and your DIY Synth kit which includes
Building a Battery Car and other technical concerns
 Building a Battery Car and other technical concerns Presented by The Tucson Garden Railway Society, The Tucson Botanical Garden Nick C. Buchholz presenting 1 Where to start. Decisions- What Locomotive?
Another CJ picture guide to replacing the key cylinder in a non-tilt steering column
 Another CJ picture guide to replacing the key cylinder in a non-tilt steering column by John Strenk Well I'm sure it's happened to all of us one time or another. You park your jeep and go to turn off your
Another CJ picture guide to
 Another CJ picture guide to replacing the key cylinder in a non-tilt steering column by John Strenk Well I'm sure it's happened to all of us one time or another. You park your jeep and go to turn off your
How to Repair an Apple AC Adapter Broken
 How to Repair an Apple AC Adapter Broken Cable Learn how to repair a damaged AC Adapter cable. Written By: Angela Penaherrera ifixit CC BY-NC-SA www.ifixit.com Page 1 of 11 INTRODUCTION Sometimes the cable
Tailgate Light Bar Installation by Flopster Feb 2015
 Tailgate Light Bar Installation by Flopster843 23 Feb 2015 If you ever looked at the rear of a 3rd generation Dodge Ram dually pickup truck, you'll notice that there is a light bar with 3 red marker lights
The speaker soundbox improves the performance of the speaker in locos which have no purpose designed speaker cradle.
 1 1.OVERVIEW 8 pin DCC sound decoder with adjustable back-emf loco control. Fully adjustable sounds to match the chuff and whistle to the prototype loco. Provides a chuff which matches the loco speed and
Application Note. Bachmann F40PH Tsunami Digital Sound Decoder Installation Notes
 Application Note Bachmann F40PH Tsunami Digital Sound Decoder Installation Notes Overview This application note describes how to install a TSU-AT1000 Digital Sound Decoder into a Bachmann HO F40PH. Skill
Speakers and Motors. Three feet of magnet wire to make a coil (you can reuse any of the coils you made in the last lesson if you wish)
") Speakers and Motors We ve come a long way with this magnetism thing and hopefully you re feeling pretty good about how magnetism works and what it does. This lesson, we re going to use what we ve learned
Speakers and Motors We ve come a long way with this magnetism thing and hopefully you re feeling pretty good about how magnetism works and what it does. This lesson, we re going to use what we ve learned
Bachmann 38 Ton Shay
 Bachmann 38 Ton Shay Phoenix Sound Systems, Inc. 3514 West Liberty Road Ann Arbor MI 48103 www.phoenixsound.com phone: 800-651-2444 fax: 734-662-0809 e-mail: phoenixsound@phoenixsound.com 2005-2008 Phoenix
Pictorial Guide How to install a Innovate Wideband O2 Sensor in a Clio 2 RS
 Pictorial Guide How to install a Innovate Wideband O2 Sensor in a Clio 2 RS I installed my LC-1 wide band 02 sensor purchased from Fastchip. Here's a quick summary with pictures of the install. I am pleased
Connecting the rear fog light on the A4 Jetta, while keeping the 5 Light Mod
 Connecting the rear fog light on the A4 Jetta, while keeping the 5 Light Mod DISCLAIMER: I'm human and make mistakes. If you spot one in this how to, tell me and I'll fix it This was done on my 99.5 Jetta.
Gentex Autodim Homelink Compass Temperature Mirror Installation in 2014 Tacoma Purchased from Bob s Automotive Mirrors & More LLC (Robert Prim)
") Gentex Autodim Homelink Compass Temperature Mirror Installation in 2014 Tacoma Purchased from Bob s Automotive Mirrors & More LLC (Robert Prim) This is my 50-GENK51A Gentex mirror kit and instructions.
Gentex Autodim Homelink Compass Temperature Mirror Installation in 2014 Tacoma Purchased from Bob s Automotive Mirrors & More LLC (Robert Prim) This is my 50-GENK51A Gentex mirror kit and instructions.
BMW F10 Premium / Professional Audio system - adding a sub woofer part two
 BMW F10 Premium / Professional Audio system - adding a sub woofer part two I accept no liability for any work carried out as a result of this guide. Any damage caused to equipment or your car (or you)
INSTALLING RCS INTO THE BACHMANN 3 TRUCK SHAY.
 P.O Box 578 Casino, NSW, 2470 Australia Phone: International ++614 2902 9083 Australia (04) 2902 9083 Website http://rcs-rc.com E mail: Info@rcs-rc.com INSTALLING RCS INTO THE BACHMANN 3 TRUCK SHAY. I
4TH GEN SEATS IN A 3RD GEN TRUCK
 4TH GEN SEATS IN A 3RD GEN TRUCK by Flopster843 02 Oct 2016 If you drive a 3rd generation Dodge Ram truck, I am sure you have discovered that the OEM seats are not the greatest (Figure 1.) They are extremely
Shay - Painting The Trucks & Frames
 Shay - Painting The Trucks & Frames Nelson Riedel Nelson@NelsonsLocomotive.com Initial:2/23/04 Last Revised: 06/06/2004 Painting of the locomotive trucks and frame are described in this page. The tender
PN R CHEVY CAMARO w/reverse Two panel Sequential LED Taillight kit installation guide. Kit Contents:
 Two panel Sequential LED Taillight kit installation guide Kit Contents: 2 LED panels 4 rubber grommets 1 power wire with t-tap 1 driver side LED harness, 24 1 passenger side LED harness, 48 2 LED extension
MODELING MARS LIGHTS ON CGW F-UNITS. David Webb
 MODELING MARS LIGHTS ON CGW F-UNITS David Webb In the pre-ditch light diesel era, the Chicago Great Western, as did many other, but not all, roads, specified dual headlights on its cab units. I gather
Installation Instructions for Chevrolet Colorado, GMC Canyon, LT, Z71, With Factory Fog Lights
 Installation Instructions for 2015-2018 Chevrolet Colorado, GMC Canyon, LT, Z71, With Factory Fog Lights This kit is designed to allow use of your factory fog light operation along with an addition auxiliary
Installing the Wireless Charging upgrade kit in a 2018 XT5 (Platinum version)
") Installing the Wireless Charging upgrade kit in a 2018 XT5 (Platinum version) September 2, 2018 Tools needed: Wireless charger upgrade kit Plastic trim tools 7 mm nut driver Background: I purchased the
Installing the Wireless Charging upgrade kit in a 2018 XT5 (Platinum version) September 2, 2018 Tools needed: Wireless charger upgrade kit Plastic trim tools 7 mm nut driver Background: I purchased the
Print Page Close Window
 Page 1 of 14 Print Page Close Window Battery R/C into a USAT GP-9 Printed from: mylargescale.com Forums Topic URL: http://www.mylargescale.com/forum/topic.asp?topic_id=35848 Printed on: 01 Jan 2006 Topic:
2010 Toyota Prius model II Head Unit Upgrade
 2010 Toyota Prius model II Head Unit Upgrade Monday, December 21, 2009 Disclaimer: Use this document and its contents at your own risk. Forward: Huge thanks to those members on Priuschat.com that forged
INSTRUCTIONS ASSEMBLY. CONNECT the RESISTOR. The resistor (re-zis-ter) is the tube-shaped piece with two purple legs. Here we go!
 is the tube-shaped piece with two purple legs. Here we go!") BEFORE YOU BEGIN ASSEMBLING YOUR VOICE CHANGER You will need One 9-volt battery Masking tape or clear tape Adult help (if you re under 10) Now remove the parts from the plastic tray. 1 CONNECT the RESISTOR
BEFORE YOU BEGIN ASSEMBLING YOUR VOICE CHANGER You will need One 9-volt battery Masking tape or clear tape Adult help (if you re under 10) Now remove the parts from the plastic tray. 1 CONNECT the RESISTOR
Door Panel Removal & Window Stop Adjustment
 Door Panel Removal & Window Stop Adjustment By: Jeff Wolford Disclaimer: This is simply an article of how I fixed my car. I m not responsible if you break, scratch, or mess up anything following my example.
Air Compressor/Water Pump IV - Pilot Valve Stem, Test & Installation
 Page 1 of 8 Air Compressor/Water Pump Part IV Pilot Valve Stem, Test & Installation Nelson Riedel Nelson@NelsonsLocomotive.com Initial: 1/13/04 Last Revised: 0 Valve Test: I decided to test the steam valves
750 Paso Wiring Upgrade
 750 Paso Wiring Upgrade Supplies required: 2 Bosch 30A/12V Relays # #0 332 209 150 (with mounting tab) 1 30 Amp fuse holder 1 10 Amp fuse holder 12 inches of brown 12 gauge wire 60 inches of red 14 gauge
HO Scale AC-12 Gear Box Replacement Instructions
 HO Scale AC-12 Gear Box Replacement Instructions Introduction Thank you for your purchase of the HO Scale AC-12 from InterMountain Railway Company. The enclosed gear box kit will increase the speed of
Bachmann Spectrum Peter Witt in HO
 Bachmann Spectrum Peter Witt in HO By Bob Dietrich This is my impression of an unpainted Peter Witt from Bachmann Spectrum. The packaging of the car was impressive a large red box with a clear cover showing
Troubleshooting Guide for Dewert Systems
 Troubleshooting Guide for Dewert Systems Dewert electronics aren t as common as Okin systems as they re mainly used by one manufacturer (Pride). However, Pride is the largest lift chair manufacturer in
Plumbing Part VI - Blowdown Valve Nelson Riedel Initial: 9/28/03 Last Revised: 04/24/2006
 Page 1 of 8 Plumbing Part VI - Blowdown Valve Nelson Riedel Nelson@NelsonsLocomotive.com Initial: 9/28/03 Last Revised: 0 When I started to think about the blowdown I realized that I'd never seen the actual
UNIVERSAL GAUGE WIRE HARNESS
 2650-1797-00 UNIVERSAL GAUGE WIRE HARNESS For Installing Auto Meter Electric Speedometer, Tachometer, And Short Sweep Electric Oil Pressure, Water Temperature, Fuel Level, and Volt Meter Gauges. This harness
Please read thoroughly before starting installation and check that kit contents are complete.
 Rear Vision System Mirror Display 2013-Current Ram (Kit part number 1009-9518) Please read thoroughly before starting installation and check that kit contents are complete. Items Included in the Kit: Rear
Biasing the Vintage Series (Nomad, BelAir, VT50, Vintage 33)
") Biasing the Vintage Series (Nomad, BelAir, VT50, Vintage 33) This chapter will outline and guide you through the procedures of biasing the Vintage series amplifier. The procedures are broken down in a
Biasing the Vintage Series (Nomad, BelAir, VT50, Vintage 33) This chapter will outline and guide you through the procedures of biasing the Vintage series amplifier. The procedures are broken down in a
Improving the casting performance on old Ambassadeurs for free!
 Improving the casting performance on old Ambassadeurs for free! Whenever I acquire a fishing reel I will always strip it down and give it a service-it doesn t matter if the reel is new or old. Sometimes
The Mysteries of DCC Consisting. Presented by Tims Trains and Hobbies
 The Mysteries of DCC Consisting Presented by Tims Trains and Hobbies What is CONSISTING?? Consisting or MU ing is the process of running two, or more, locomotives as one unit, on any given throttle, on
O ring installation guide
 AtomicRice.com O ring installation guide Tools and materials needed: 1) Phillips Screwdriver ( one medium and one large head) 2) Small or Medium sized flathead screwdriver or thin rigid shim 3) Vaseline
How To: Fit an enclosed induction kit to the V6
 How To: Fit an enclosed induction kit to the V6 As a couple have done this I thought I'd have a go, but do a write up at the same time. Here's a quick summary of the equipment you'll be needing: 1 x Universal
Hornby Railroad Crosti 9F EM Finescale Conversion.
 Hornby Railroad Crosti 9F EM Finescale Conversion. Before you start, it is a good idea to have some small containers or snap top poly bags to put screws and components in for safe keeping...much better
How to Replace the Main Axle Gear on the Bachmann Spectrum GScale using the NWSL # upgrade gear.
 How to Replace the Main Axle Gear on the Bachmann Spectrum GScale 4-4-0 and 2-6-0 Mogul (2001era), using the NWSL #2223-6 upgrade gear. By Paul M. Newitt (all text and photos Copyright Paul M. Newitt,
GVW AGM Auxiliary Battery Kit for Vanagon Westfalia Full Camper
 GVW-253-700AGM Auxiliary Battery Kit for 1983-1991 Vanagon Westfalia Full Camper The purpose of this kit is to add an Interstate SLA1161 as an auxiliary battery under the driver's seat of 1983 to 1991
Lenz Gold Maxi DCC Decoder Install for DCC operation with Sound for Bachmann s K27 Large Scale Steam Locomotive
 Lenz Gold Maxi DCC Decoder Install for DCC operation with Sound for Bachmann s K27 Large Scale Steam Locomotive Lenz produces a DCC decoder that easily installs in the Bachmann K-27. The following installation
Hasse Mods for the Ampeg J20 Guitar Amp
 Hasse Mods for the Ampeg J20 Guitar Amp The following is adapted from a post I put up on The Gear Page, in the Amp Techincal forum. It shows the mods I did to my Ampeg J20. Okay, here s my mods for this
PLEASE READ THROUGH THE WHOLE WRITE UP BEFORE ACTUALLY USING IT!!!!
 JDM power folding mirror switch install into stock USDM harness. By: Greg L., Zeke21 on twinturbo.net PLEASE READ THROUGH THE WHOLE WRITE UP BEFORE ACTUALLY USING IT!!!! This is how I was able to get the
Broadway Limited (and Blueline) SD40-2 Tsunami Digital Sound Decoder Installation Notes
 SD40-2 Tsunami Digital Sound Decoder Installation Notes") Broadway Limited (and Blueline) SD40-2 Tsunami Digital Sound Decoder Installation Notes Overview This application note describes how to install a TSU-AT1000 digital sound decoder into a HO Broadway Limited
Broadway Limited (and Blueline) SD40-2 Tsunami Digital Sound Decoder Installation Notes Overview This application note describes how to install a TSU-AT1000 digital sound decoder into a HO Broadway Limited
Bill Conkling July 2012
 Bill Conkling July 2012 Introduction: For any ham, there are moments that are priceless, like snagging that elusive rare DX station on a deserted island that hasn t been activated in 52 years. And certainly,
Bachmann GWR Earl (Dukedog) EM Finescale Conversion
 EM Finescale Conversion") Bachmann GWR Earl (Dukedog) EM Finescale Conversion Before you start, it is a good idea to have some small containers or snap top poly bags to put screws and components in for safe keeping...much better
Bachmann GWR Earl (Dukedog) EM Finescale Conversion Before you start, it is a good idea to have some small containers or snap top poly bags to put screws and components in for safe keeping...much better
We will be upgrading from the factory, paper-cone disgrace to an Infinity Kappa 62.9i:
 In order to fully round out your stereo upgrade, the factory rear speakers must go. This is another easy job to tackle, but the fitment of the package tray and being hunched over in the rear glass area
Conversion to Battery Power Del Tapparo
 Conversion to Battery Power Del Tapparo Converting a track powered locomotive to battery power eliminates all of the electrical continuity problems associated with track power. However, the process of
Installation of Auto Meter Cobalt Boost/Vacuum Gauge:
 Installation of Auto Meter Cobalt Boost/Vacuum Gauge: Fitment: All 79-14 models. This installation was completed on a 2004 Mustang GT, and should be identical for all 1999-2004 model Mustangs. Time needed:
Application Note. Athearn RTR SW-1000/SW-1500 Tsunami Digital Sound Decoder Installation Notes
 Application Note Athearn RTR SW-1000/SW-1500 Tsunami Digital Sound Decoder Installation Notes Overview This application note describes how to install a TSU-AT1000 Digital Sound Decoder into the HO Athearn
INSTALLATION INSTRUCTIONS
 Rear Vision System Liftgate Emblem Camera Mirror Display 2009-2012 Ford Flex (Kit part number 1008-9527) Kit Contents: Mirror Liftgate Emblem Mount with Camera Interior (shorter) Harness Chassis (longer)
Installing Ignition Coil relay
 Installing Ignition Coil relay Above is a schematic diagram of the coil relay modification. All it really does is, it uses the existing 12 Volt positive that normally powers the coils, to power a relay,
Upgrading Proto axle Geeps with Stewart Trucks. November 27, 2010 Mark Schutzer
 Upgrading Proto 2000 4 axle Geeps with Stewart Trucks November 27, 2010 Mark Schutzer Introduction Several years ago Proto 2000 made a bunch of 4 axle locomotives that used trucks that were a copy of an
INSTALL A DIMMER SWITCH
 PROJECT 7 INSTALL A DIMMER SWITCH AH, DIMMER SWITCHES ONE OF OUR favorite little tricks to add ambiance to any room. Installing a dimmer switch allows you to adjust the degree of lighting in the room.
OEM Cruise Control Installation in GMC/Chevy NBS trucks
 OEM Cruise Control Installation in 99-02 GMC/Chevy NBS trucks May 2008 ~ Rampage_Rick Having just installed factory cruise control in my 00 Sierra, I thought I d share the fun. I followed the steps outlined
Mark Davidson s WOBBLE HEAD. An upgrade for Bally s 1992 Doctor Who Pinball Machine. Documentation 2002 by Al Warner in association with BA Associates
 Mark Davidson s WOBBLE HEAD An upgrade for Bally s 1992 Doctor Who Pinball Machine Documentation 2002 by Al Warner in association with BA Associates Notice Regarding this Upgrade WARNING! Although this
Fog Light setup for a 2003 XL F250 Super Duty using the OEM kit.
 Fog Light setup for a 2003 XL F250 Super Duty using the 2005-2007 OEM kit. Since the kit (1C3Z15200BB) for the 2001-2004 series truck was not available anymore, I explored options to put a set of OEM fog
Desire Streetcar Installation Guide
 Desire Streetcar Installation Guide 2004 Phoenix Sound Systems, Inc. All Rights Reserved. Page 1 1 Mar 04 Overview The LGB Streetcar is one of the more interesting (e.g. difficult, challenging) installations.
Prius XM Radio Installation Instructions. Eddie Bell
 2004-2005 Prius XM Radio Installation Instructions By Eddie Bell www.metrotpn.com 1 Let me begin by saying this is an easy but time consuming job. Set aside a few hours of your time for the install. If
Bachmann D11 EM/S4 Finescale Conversion
 Bachmann D11 EM/S4 Finescale Conversion Before you start, it is a good idea to have some small containers or snap top poly bags to put screws and components in for safe keeping...much better than crawling
Wiring Harness Relocation by Flopster Mar 2012
 Wiring Harness Relocation by Flopster843 21 Mar 2012 On my 2008 Ram, there is a gigantic blob of electrical wiring that Dodge decided to put between the engine and the brake master cylinder, just behind
INSTALL/REMOVAL INSTRUCTIONS: WINDOW REGULATOR
 REMOVAL/INSTALL OF WINDOW REGULATOR (665-2542) Ford F-Series Pickup & Bronco 1980 96 General Tech Tips: Use painter s tape rather than duct tape to secure window. It will not damage paint or leave sticky
Revision Date: Building a dual pump system for an open boat. Description:
 Disclaimer: The information is provided as-is. The author(s) accepts no liability for the accuracy, availability, suitability, reliability and usability. The following information is in the public domain
OpenROV. Tether Reel from Cheap Extension Cord Reel
 OpenROV Tether Reel from Cheap Extension Cord Reel In this guide I will show you the steps I took to modify a cheap extension cord reel into a tether reel. Written By: Brett Forsyth 2017 openrov.dozuki.com
INSTALLATION INSTRUCTIONS
 INSTALLATION INSTRUCTIONS FUEL SURGE TANK INSTALLATION KIT 1999-2006 BMW E46 COUPE Document# 19-0056 Support: info@radiumauto.com Note: This kit wasn t designed for a FST-R, but can be accomplished. 1.
Rear Wheel Removal (by BassCliff)
") Rear Wheel Removal (by BassCliff) Hello to my GS riding friends! After picking up a nail in my rear tire (while on the freeway at 75mph!) I thought I would take a few pictures to help illustrate the rear
Rear Wheel Removal (by BassCliff) Hello to my GS riding friends! After picking up a nail in my rear tire (while on the freeway at 75mph!) I thought I would take a few pictures to help illustrate the rear
Detroit Speed, Inc. Electric Headlight Door Kit Corvette P/N: &
 Detroit Speed, Inc. Electric Headlight Door Kit 1968-82 Corvette P/N: 122006 & 122007 The Detroit Speed Inc. Electric Headlight Door Kit replaces the stock vacuum actuated system on all 1968-82 Corvettes.
AIRWIRE 900. F3 Drop-In Decoder Installation Guide. Drop-In Frequency Setting Using Older Throttles
 B Drop-In Frequency Setting Using Older Throttles T9000 Throttle Drop-In decoder uses frequencies numbered from 0 to 16 and these are the numbers used when setting the Drop-In to the desired frequency.
Nissan GTR Alpha Fuel System
 Nissan GTR Alpha Fuel System Instructions V5 The goal of AMS is to provide the highest quality, best performing products available. By utilizing research and development, and rigorous testing programs
AIRWIRE 900. GP30 Drop-In Decoder Installation Guide. Resetting Drop-In Decoder To Original Factory Settings. Using The T9000 Throttle
 Resetting Drop-In Decoder To Original Factory Settings November 2010 r1 AirWire900 Using The T9000 Throttle Follow these steps to reset your AirWire Decoder to its original factory settings. Remember that
Athearn Pacific Digital Sound Decoder Installation Notes
 New Dimensions in Digital Sound Technology TM APPLICATION NOTE Overview This application note describes how to install a DSD-100LC Digital Sound Decoder into the Athearn Pacific Locomotive. All of the
Thank you for purchasing the Blackstone Models K-27!
 Operations Manual Thank you for purchasing the Blackstone Models K-27! Before your Mudhen whistles off, we want to tell you about a few things that will enhance your operating experience and ensure that
THE MOTOR. Page 1 of 9
 Page 1 of 9 The Bachmann HO Old Time 4-4-0 has been around a long time and suffers from two problems: the latest motor will burnout with a frying of the added DCC decoder and the pickup system is very
Repairing a Loose Headlight Reflector Volvo V70XC ? Mark Pilant
 Repairing a Loose Headlight Reflector Volvo V70XC 2001 200? Mark Pilant If you find yourself in a position where the headlight adjusters do not change the aiming of your headlight, it is possible one of
Lionel Hot Box Car Mini Commander Installation Guide
 Lionel Hot Box Car Mini Commander Installation Guide Revised: October, 2008 OVERVIEW: The Hot Box Car is normally active when powered on, and may be switched off by an extended press of the horn button.
A Cheap Speedometer for Touring by Tony Cimorelli
 A Cheap Speedometer for Touring by Tony Cimorelli How many times have you been out touring and wanted to know the distance between point A and B? Maybe you want to know the distance that a tour takes or
My Hawk build part 24 by Stuart Clarke. Getting ready to turn the key.
 My Hawk build part 24 by Stuart Clarke Getting ready to turn the key. Things had moved on quite nicely now and the end was virtually in sight. It was getting to that do or die moment when I find out if
INSTALLATION INSTRUCTIONS
 Rear Vision System Tailgate Emblem Camera Mirror Display 2009-Current Ford F-150 and 2010-Current Super Duty (Kit part number 1008-9527) Kit Contents: Mirror Tailgate Emblem Mount with Camera Interior