O ring installation guide
|
|
|
- Adela Holland
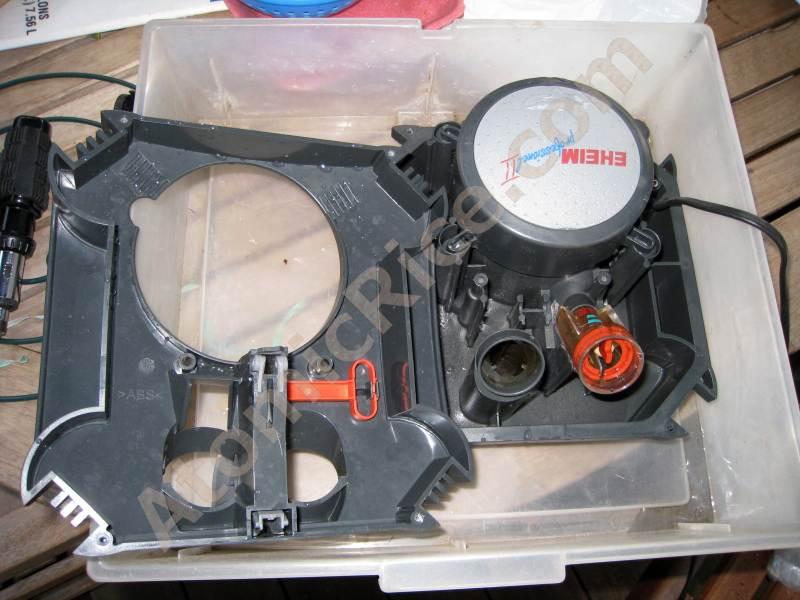
- 5 years ago
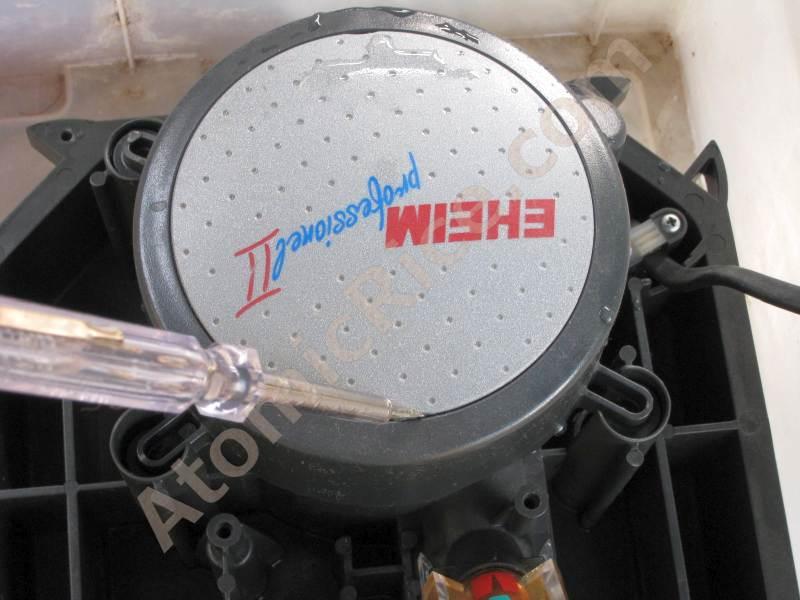
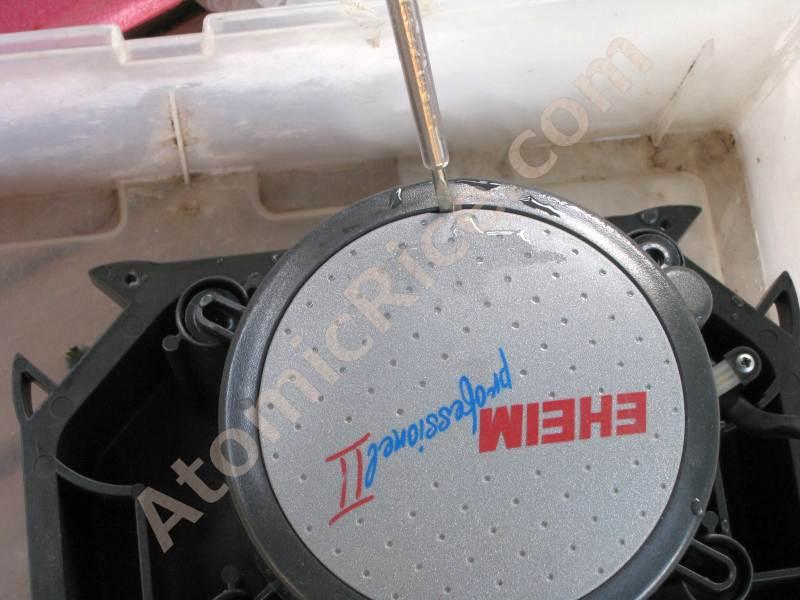
- Views:
Transcription
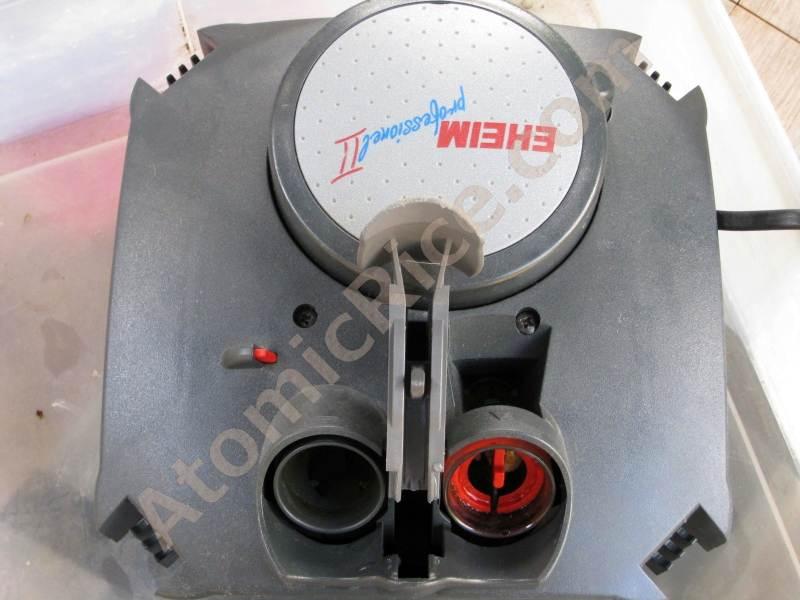
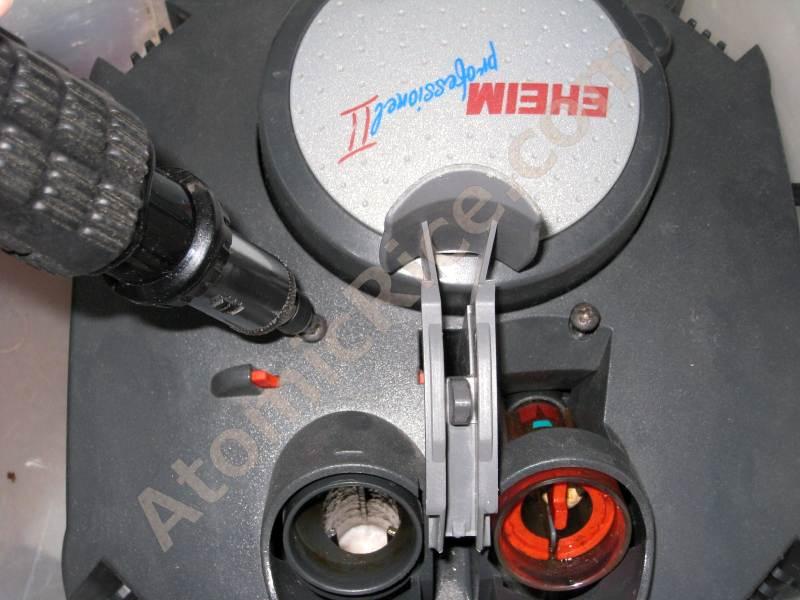
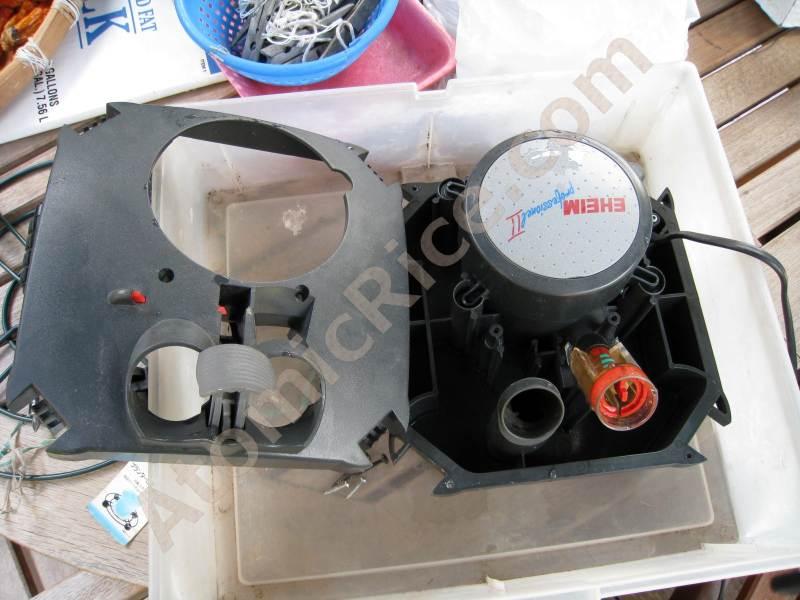
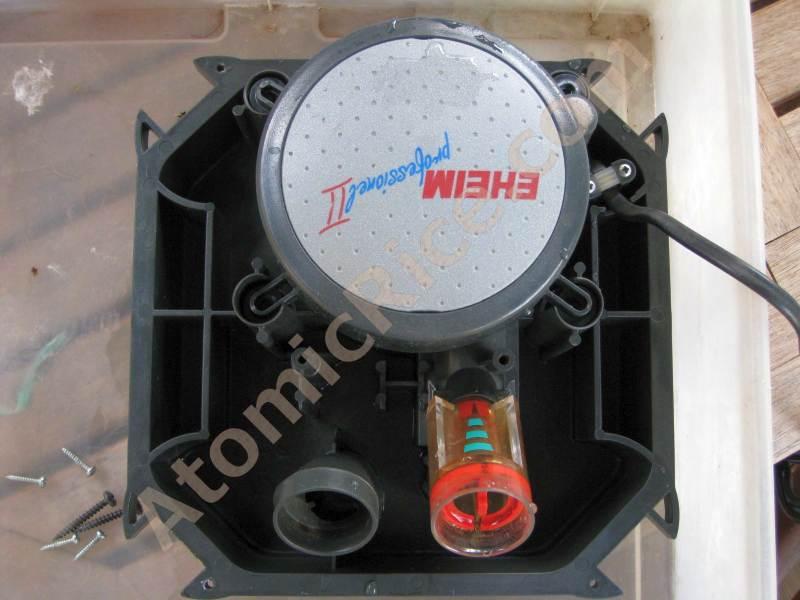
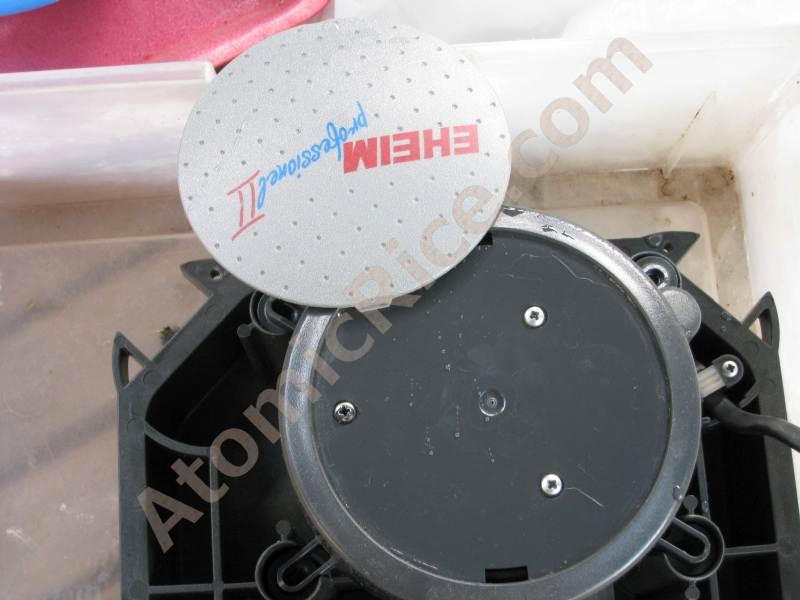
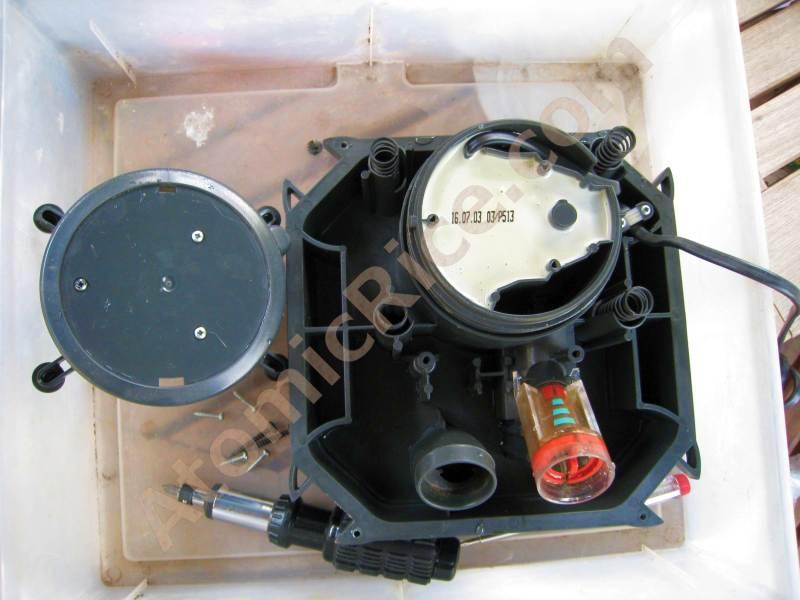
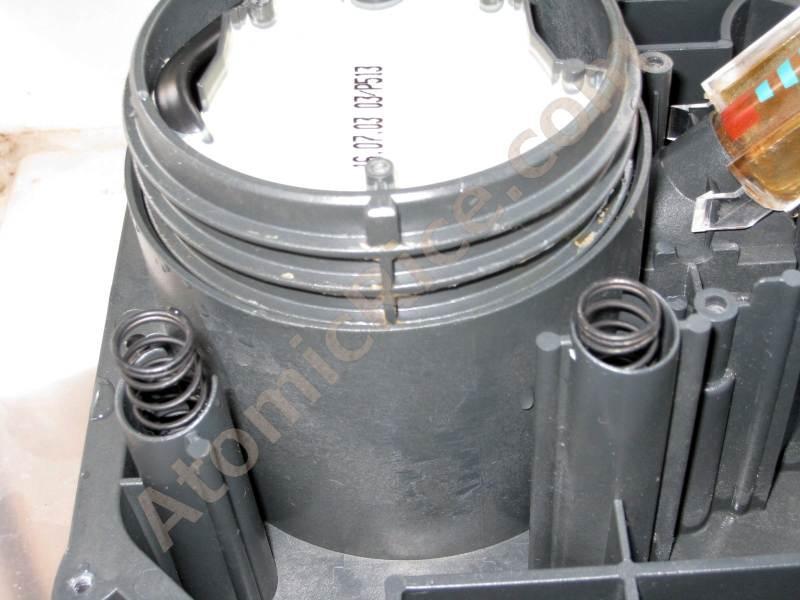
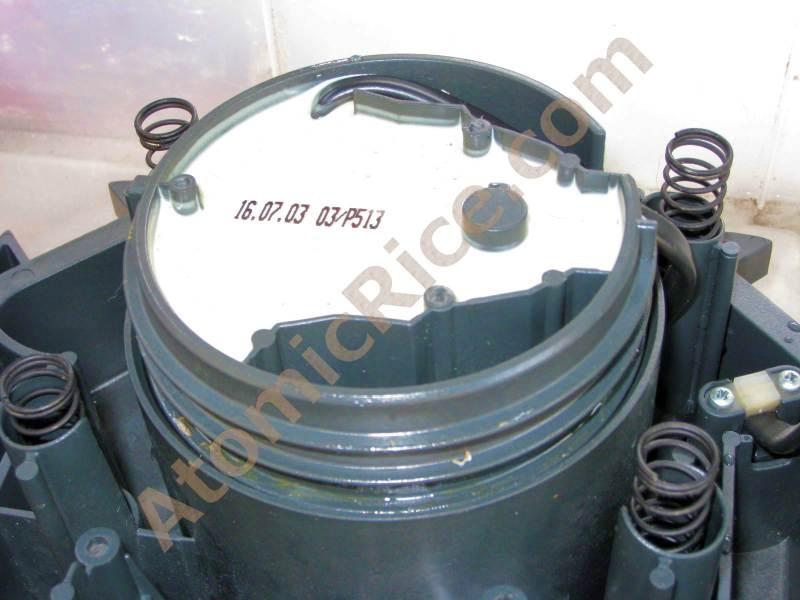
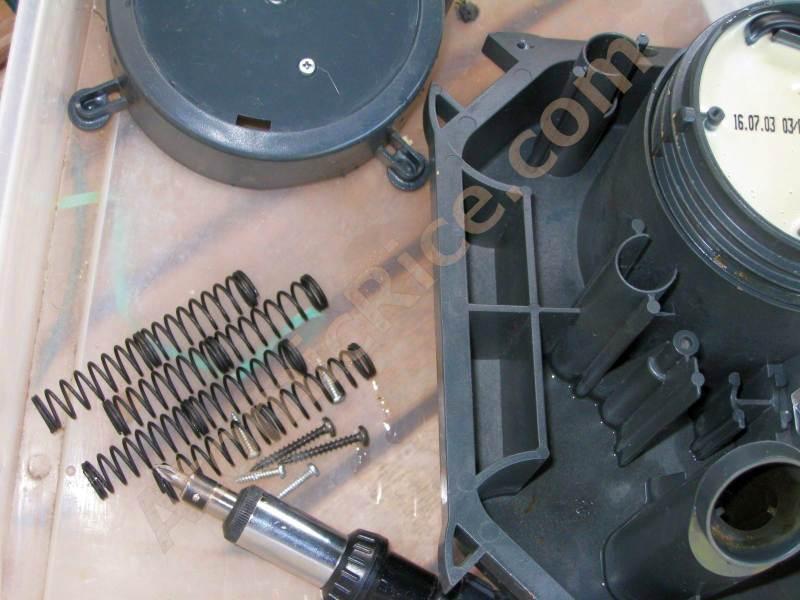
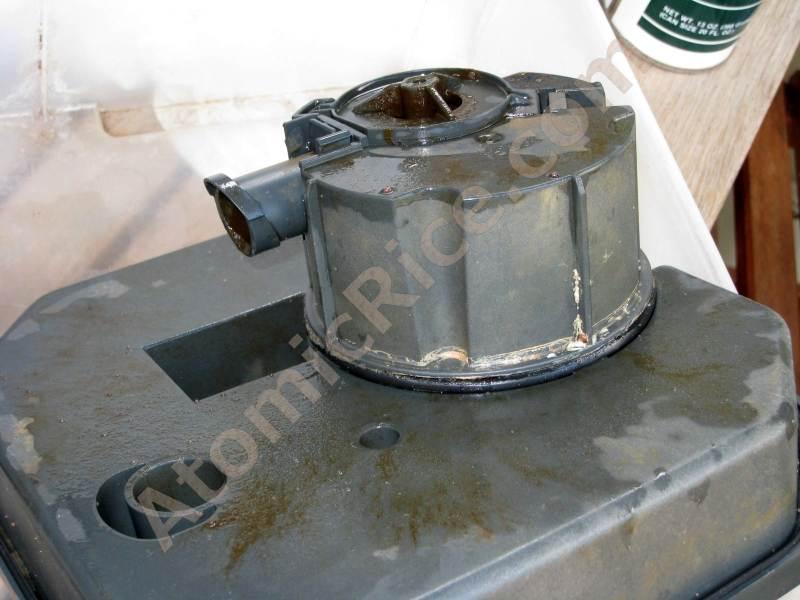
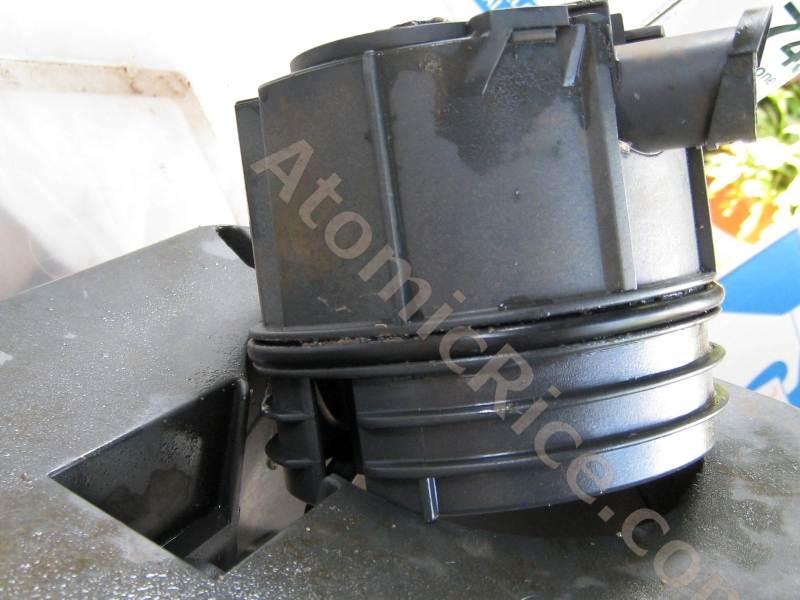
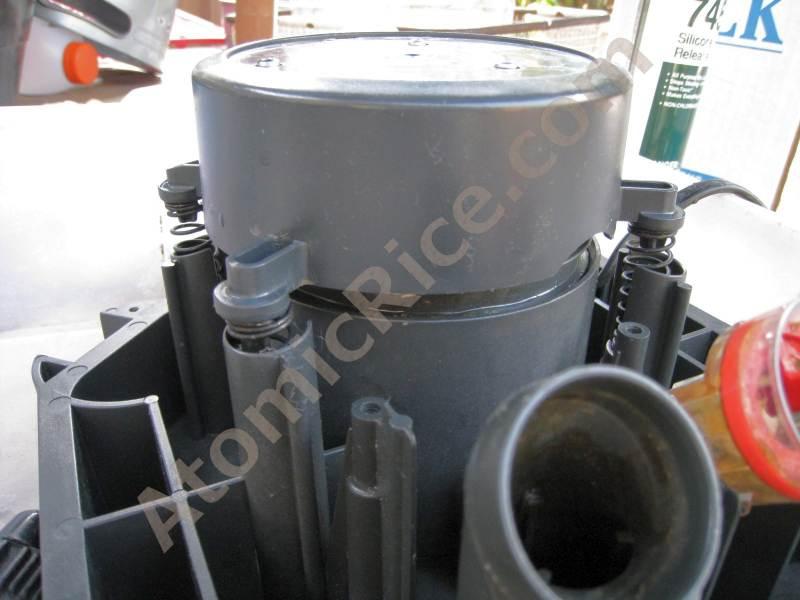
1 AtomicRice.com O ring installation guide Tools and materials needed: 1) Phillips Screwdriver ( one medium and one large head) 2) Small or Medium sized flathead screwdriver or thin rigid shim 3) Vaseline or any type of Non toxic lubricant (Water or Oil based is okay). Installation: 1. Unplug all electrical connections from filter canister. 2. Remove Pump head unit from filter canister main body. 3. Using a Phillips screwdriver, unscrew the two (2) screws located on top of the pump head next to the intake and exhaust ports. 4. Turn over the pump head unit and underneath you should see 4 small screws on each corner of the pump head. Remove these screws and put the screws in a safe location. When done, turn over the pump head. 5. Carefully remove the pump head top cover. 6. Using the flathead screwdriver, carefully pry off the grey top cover plate of the priming button. The priming button top cover plate has the logo Eheim Professional written on it. There should be a couple small slits along the outside perimeter of the cover plate that you can carefully wedge the head of your flathead screwdriver into to pry off the plate. 7. Once you have removed the priming button cover plate, you should see three (3) small silver screws. One of the silver screws might have a plastic or some type of glue on top of it. This I believe is used to indicate if any tampering has been done to the motor unit. Using a Phillips screwdriver carefully unscrew these screws. Caution: The screws are holding down the plastic priming button housing which sits under spring tension. Please be careful and unscrew the screws a little at a time going from one screw to the next to keep the tension balanced. 8. Behind the priming button cover is the actual motor of the filter. The motor is sealed unit which cannot be opened. The motor is also part of the priming unit which is what some call the push button primer.
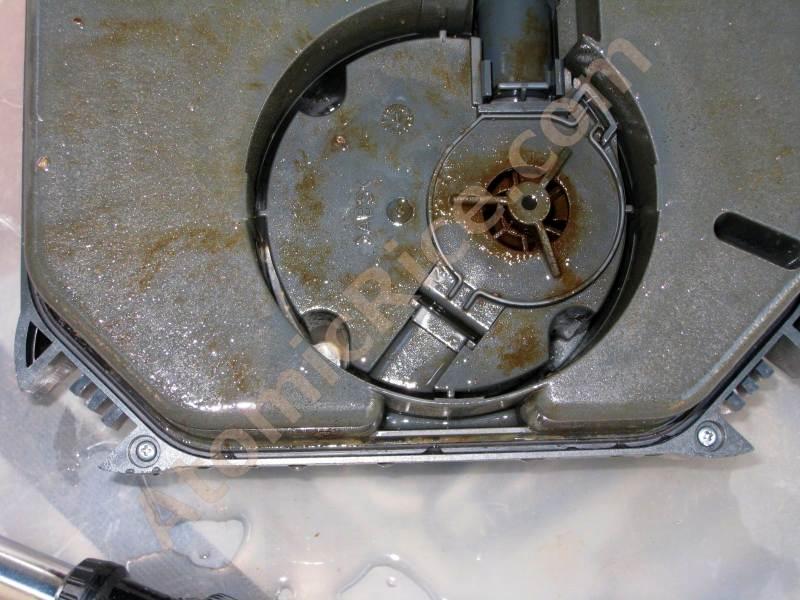
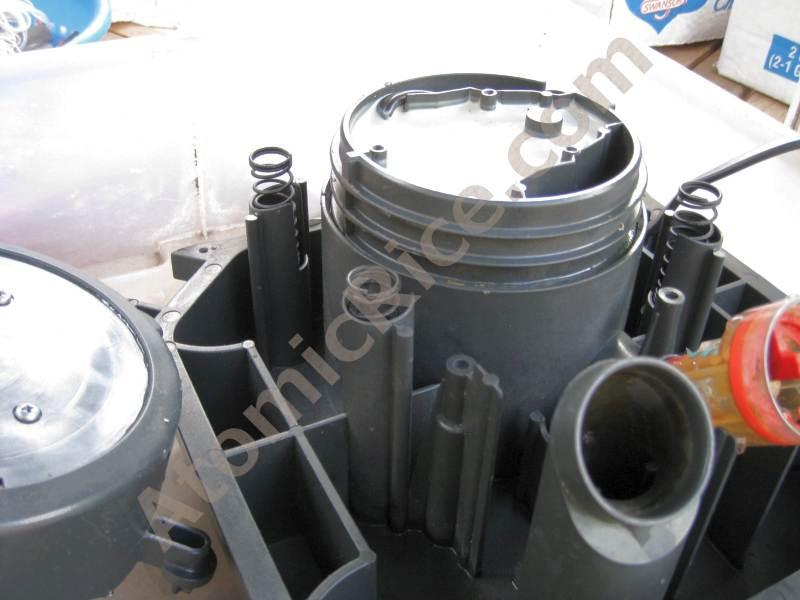
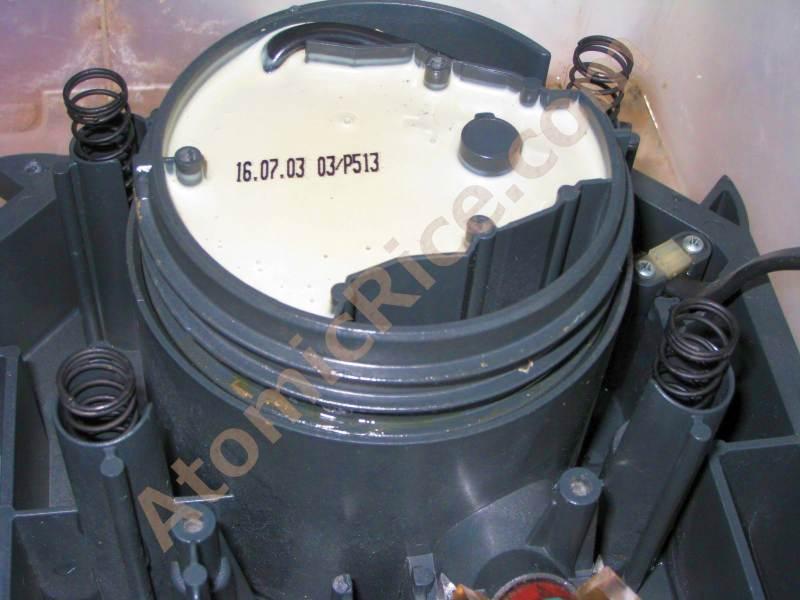
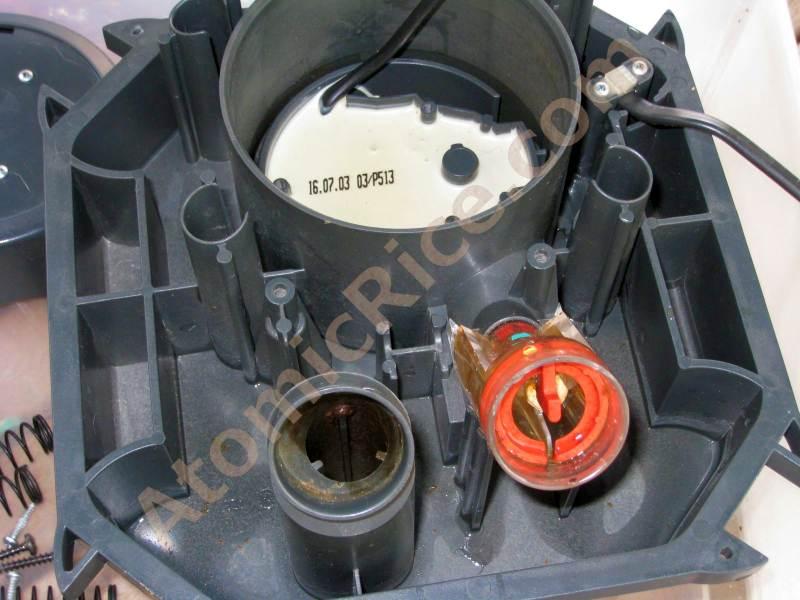
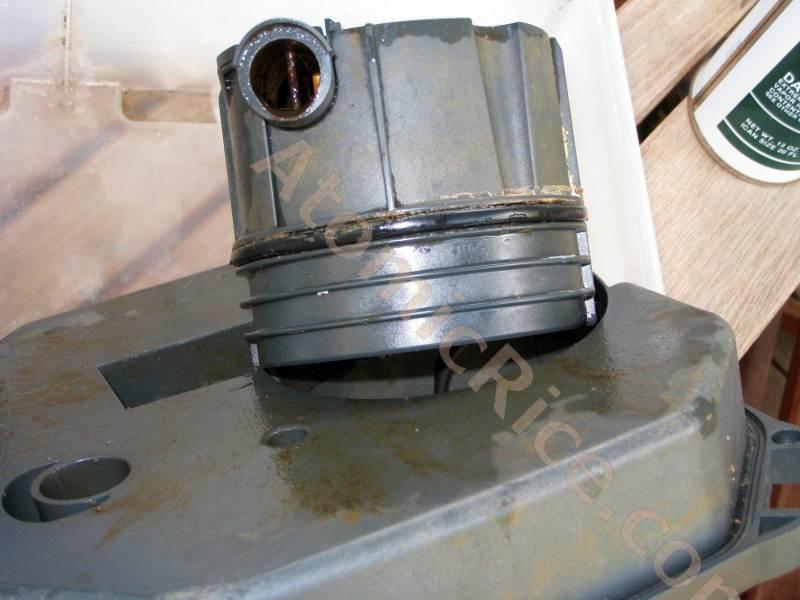
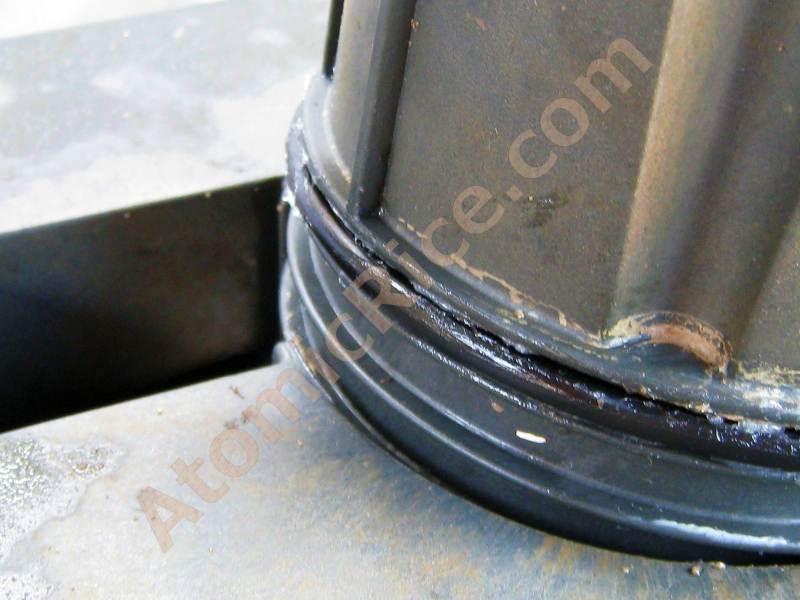
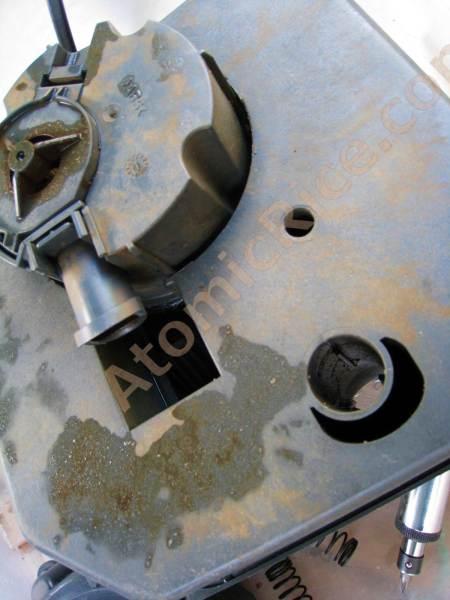
2 9. Take out the springs inside each corner post and put it away someplace. Carefully and slowly push the priming unit down until the unit emerges from below. You will see the o ring (orange color?) surrounding the priming unit. 10. At this point you may take out the o ring and clean the entire priming unit with water to rid of detritus and other gunk that has accumulated there. 11. Once cleaned, take your brand new AtomicRice.com o ring and liberally coat the entire o ring with Vaseline or some other lubricant. Make sure you don t use a toxic lubricant that can harm your fish. Vaseline and its generic brands work pretty well and are very cheap. Don t worry about the petroleum in the Vaseline harming your new o ring. The o ring you bought from AtomicRIce.com is custom formulated and made to withstand petroleum based oils and most other rubber eating chemicals. One word of caution, don t mix Vaseline type lubricants with silicone spray lubricants because they tend to mix together and dissolve their lubricating abilities. 12. Once you have lubed the o ring, rub a little bit of lubricant into the slot the o ring is going to occupy. 13. Next you may want to take some of your lubricant and rub it around inside the well walls that the priming unit goes up and down along. This will help you slide the priming unit easier back into position and into the shaft. 14. When pushing the priming unit back into the shaft, you will notice that the priming unit will get stuck midway down the shaft. Unfortunately because of the way the filter is designed, the tolerance in space calls it to be very watertight. In this case, you will need to push a bit hard to slide the rest of the way through. CAUTION: don t push too hard otherwise you will cause the o ring to get pinched. Try this method; push the priming unit hard enough that you still have control of its descent. When you have passed the stoppage area, you will see that the o ring may have bulged out a little bit. 15. If you see that the o ring has bulged out a bit or a lot, get a flat head screwdriver and with the flat side of the screwdriver, try to push the bulged out area back into the groove. This might take a few tries. If you still can t get the bulged area back in, you may want to pull the priming unit back out and start over by pushing it back in, but this time give it a few small twists (left, right) while pushing down to get the o ring settled in place. Continue pushing the priming unit in and if it helps, use a flathead screw driver to help guide the o ring past the pinching area (where the valve meets the motor s valve). If you don t see the o ring being pinched, you should be okay. 16. Finally, you are done installing the o ring. Now just put all the pieces back together starting with the springs and the priming unit cover. Again, make sure you put even pressure on the cap when screwing it back down. Before putting the pump head cover back on, test the push button priming unit by pushing the priming unit down and letting the springs bring it back up. You should feel the ease of its slide down and up. You should not encounter much of any resistance other than the force of the springs pushing back at you. If you feel the movement getting stuck along the way or the springs not pushing back instantly, you may have not put enough lubricant. If you try to push the priming unit down and you have a hard time doing it. The o ring may be pinched, if this happens, you need to take the unit apart again and lubricate better and try to guide the o ring in and make sure you don t see any part of the o ring being pinched near the
3 valve area. Just remember, don t force anything, if you feel a lot of resistance, something is wrong. If you keep fighting it, you will ultimately damage the o ring by pinching it and cutting the material. 17. When everything is put back, put the filter through back inline and test the priming function. Again, this action should be smooth with no resistance other than from the springs. Once the filter is primed, turn on the filter and observe the filter to see if any leaks occur. To be safe, I would check up on it every 15 minutes and then go up to 30 minutes and then check once every hour for at least 4 6 hours. Why so long? You want the filter to be rid of all the trapped air inside the canister. If you look at the water flow gauge you will see that the flow of water is either very low or medium, this is because of the air that s still inside the canister. By giving the filter 4 6 hours, you are letting it get rid of the air naturally. By the time the filter is ready, water flow should be greatly increased and water flow should be at its max. After 6 hours, you should be safe to assume that the o ring is doing its job of keeping the filter air and water tight. Congratulations, you have just successfully installed the AtomicRice.com o ring into your Eheim filter. With proper maintenance (lubricating it periodically) your o ring will last many years. If you have any questions feel free to contact us by going to and click on the Contact Us link.
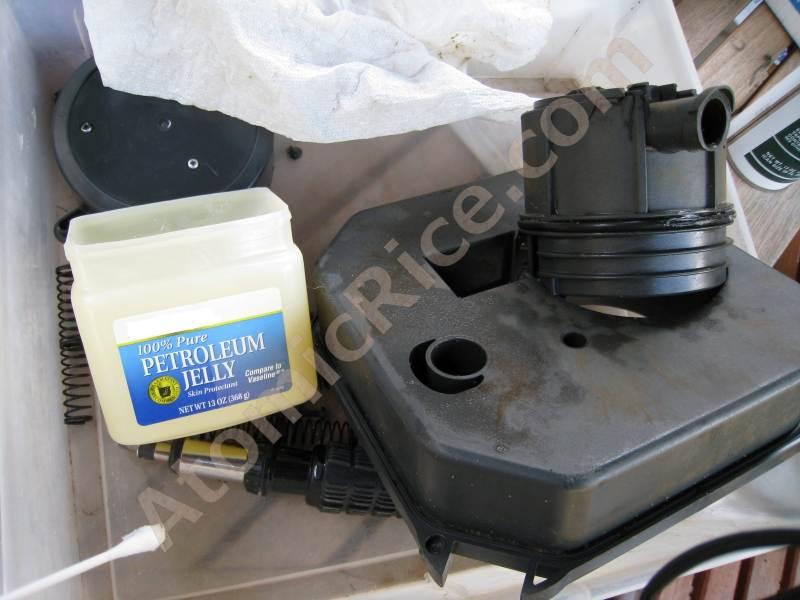
4
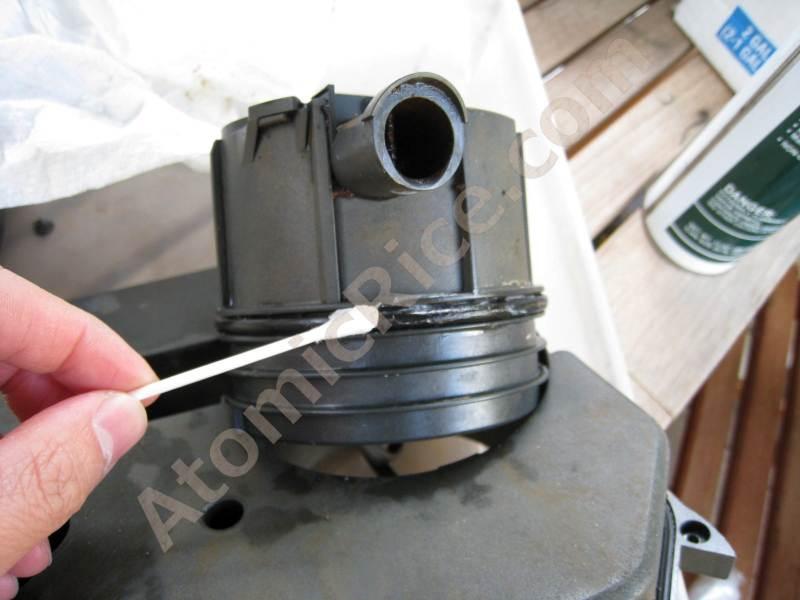
5
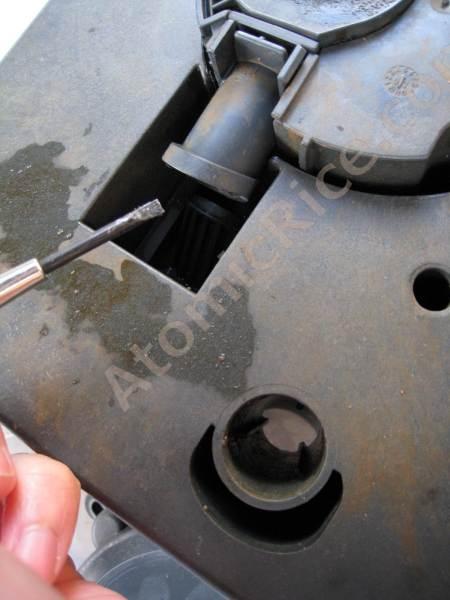
6
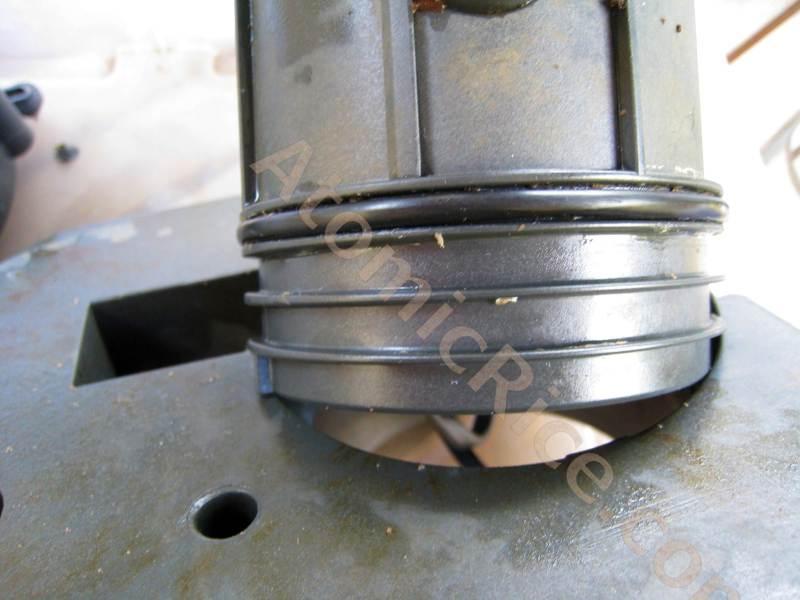
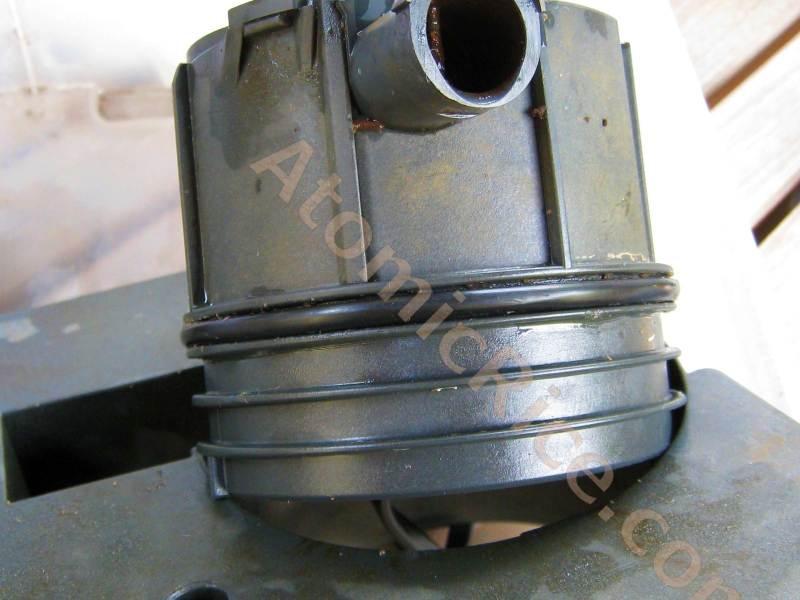
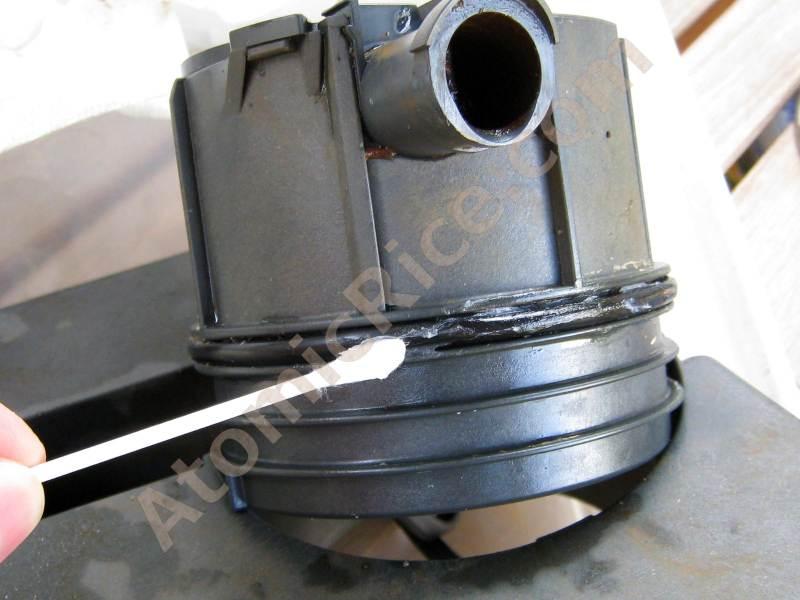
7
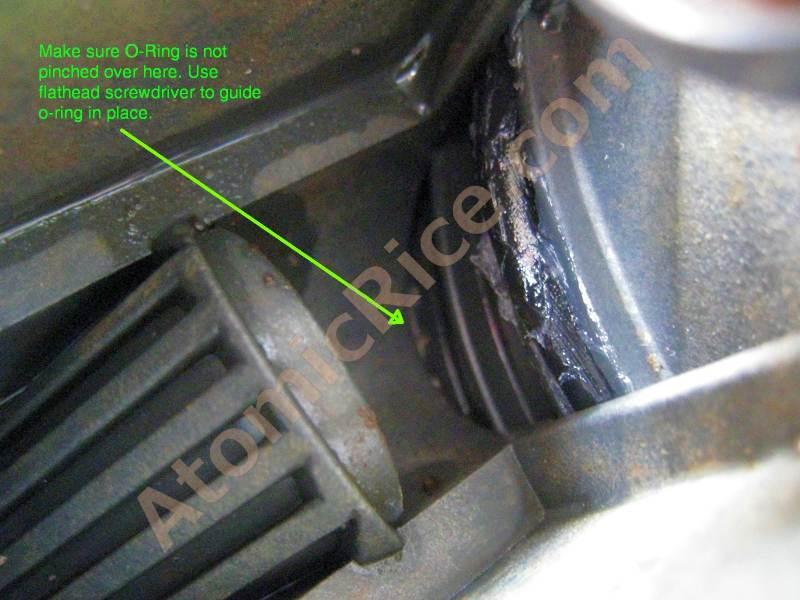
8
9
10
11
12
13
14
15
16
17
18
19
20
21
22
23
24

25
26
27
28

29
30
31
32
33

34
35
CP3 Retrofit Pump Install:
 CP3 Retrofit Pump Install: 2A 4 2 5 3 6 1.) Clean this area very well. No dirt = No troubles!!!!! Lay lots of Rags under and around the pumps, alternator and belts!!!!! This will save dropped tools, parts,
Fitting Instructions For The TDV6 EGR Blanking Kit To A 2006 Model Discovery 3 TDV6 GHSE
 Part Number DA1112 Fitting Instructions For The TDV6 EGR Blanking Kit To A 2006 Model Discovery 3 TDV6 GHSE You do this modification at your own risk. Britpart won t be held responsible for what is written
Changing the Struts on a WK Jeep CRD
 Changing the Struts on a WK Jeep CRD Step by Step By Chirpz Disclaimer: I do not claim that this procedure is the right way or even the best way to change your struts. This is what I did after reading
JRSC + BBK Install on SVTF. Neil A. Shah medicnas on focaljet September 2006
 JRSC + BBK Install on SVTF Neil A. Shah medicnas on focaljet September 2006 ECU up here. When removing make sure the smaller bundles of wires don t get wrapped around the bottom edge and break - this almost
Ford Racing BOSS 302 Engine Oil Cooler (11-14 GT)
") Tools needed: 14mm hex socket 7mm socket/wrench 8mm socket/wrench Ford Racing BOSS 302 Engine Oil Cooler (11-14 GT) 10mm socket (for airbox removal) ¾ inch or 19mm wrench Torque wrench Appropriate ratchets
Tools needed: 14mm hex socket 7mm socket/wrench 8mm socket/wrench Ford Racing BOSS 302 Engine Oil Cooler (11-14 GT) 10mm socket (for airbox removal) ¾ inch or 19mm wrench Torque wrench Appropriate ratchets
Fitting the Bell Auto Services (B-A-S) TDV6 EGR Blanking Kit to a 2006 model Discovery 3 TDV6 HSE
 TDV6 EGR Blanking Kit to a 2006 model Discovery 3 TDV6 HSE") Fitting the Bell Auto Services (B-A-S) TDV6 EGR Blanking Kit to a 2006 model Discovery 3 TDV6 HSE Before I describe how I did this, I must first thank other members of the Disco3.co.uk forum (namely J,moore
Fitting the Bell Auto Services (B-A-S) TDV6 EGR Blanking Kit to a 2006 model Discovery 3 TDV6 HSE Before I describe how I did this, I must first thank other members of the Disco3.co.uk forum (namely J,moore
PT 709 firing pin and extractor removal. Disclaimer: My Taurus manual says not to take this apart (just flush it with cleaner).
.") PT 709 firing pin and extractor removal. Disclaimer: My Taurus manual says not to take this apart (just flush it with cleaner). But several list members have done this without ill effect. So here goes:
PT 709 firing pin and extractor removal. Disclaimer: My Taurus manual says not to take this apart (just flush it with cleaner). But several list members have done this without ill effect. So here goes:
RZR 900 spring/shock installation
 RZR 900 spring/shock installation Thank you for purchasing the Shock Therapy Dual Rate Spring Kit for your RZR 900. Your item list: 2 Front upper coil springs, 2 Front lower coil springs, 2 Rear upper
Installation Manual TWM Performance Short Shifter Cobalt SS/SC, SS/TC, HHR SS, Ion Redline and Saab 9-3
 Page 1 Installation Manual TWM Performance Short Shifter Cobalt SS/SC, SS/TC, HHR SS, Ion Redline and Saab 9-3 Please Note: It is preferable to park on a flat surface, as you will have to engage and disengage
iphone 5s Upper Component Cable Replacement
 iphone 5s Upper Component Cable Replacement Use this guide to replace the upper component cable containing the flash, microphone and sleep/power button cable. Written By: Sam Lionheart ifixit CC BY-NC-SA
MAX FLOW FUEL KIT KIA FORTE SX HYUNDAI VELOSTER TURBO INSTALLATION INSTRUCTIONS
 MAX FLOW FUEL KIT KIA FORTE SX 2014+ HYUNDAI VELOSTER TURBO INSTALLATION INSTRUCTIONS Installation: Tools needed: 1/4 or 3/8 drive ratchet Different length extensions 8mm socket / 10mm socket / 12mm socket
Mikuni RS Carburetor Conversion
 Mikuni RS Carburetor Conversion After putting your carbies on the bench or the kitchen table if the wife is out, you will see that the linkages may be in different positions depending on which brand of
HOW TO REPLACE THE SPOILER ON YOUR GEN 3 PRIUS
 HOW TO REPLACE THE SPOILER ON YOUR GEN 3 PRIUS Yup, it happened. The spoiler on your beloved Prius has departed this earth and now is in the great junkyard in the sky. This is how you make it all better
YOU MAY WANT TO FIRST TRY TO LOOSEN THE FILTER HOUSING
 2005 XC90 Tune-up (5-cyl) Including: Oil Change - Spark Plugs - Fuel Filter - Cabin Filter First off - let me say that I am an amateur (at best) mechanic, and I claim no responsibility for whatever you
RedlineGoods Tacoma Installation Manual
 RedlineGoods 2016+ Tacoma Installation Manual AUTOMATIC SHIFT BOOT AND EBRAKE BOOT Press down on the factory shift boot collar to disconnect it from the shift knob. Unscrew shift knob Pull up on the rear
BEW engine timing belt replacement procedure from MOGolf (as demonstrated on a 2004 Jetta).
.") BEW engine timing belt replacement procedure from MOGolf (as demonstrated on a 2004 Jetta). Based on the procedure published by Volkswagen, but modified for the "average" shadetree mechanic. Some special
BEW engine timing belt replacement procedure from MOGolf (as demonstrated on a 2004 Jetta). Based on the procedure published by Volkswagen, but modified for the "average" shadetree mechanic. Some special
M62 Alternator Removal / Replacement (Water Cooled)
") M62 Alternator Removal / Replacement (Water Cooled) Pre-Steps 1. Disconnect Battery Positive lead 2. Charge Your Battery with battery charger to full charge (So you new alternator wont have to work as
M62 Alternator Removal / Replacement (Water Cooled) Pre-Steps 1. Disconnect Battery Positive lead 2. Charge Your Battery with battery charger to full charge (So you new alternator wont have to work as
Disco 3 Clock Spring / Rotary Coupler replacement
 Disco 3 Clock Spring / Rotary Coupler replacement I recently had to change my Clock spring and thought some folks may find it helpful to see what it entailed. I did lots of reading around but couldn t
CARE AND FEEDING OF YOUR XJ GAS CAP
 CARE AND FEEDING OF YOUR XJ GAS CAP Do you smell gas even when the cap is latched shut? Does your tank not want to drain even with the petcock set to prime? Does your key not want to turn in the lock?
Fluid-O-Tech ROTOFLOW ROTARY VANE PUMP REBUILD MANUAL
 Fluid-O-Tech PUMP TECHNOLOGY AT ITS BEST WWW.FLUID-O-TECH.COM Office: 161 Atwater St., Plantsville, CT 06479 Phone: (860) 276-9270 Fax: (860) 620-0193 ROTOFLOW ROTARY VANE PUMP REBUILD MANUAL 08/09 Ed.,
E46 FUEL FILTER CHANGE Pics from CI
 1 of 10 5/3/2010 1:48 PM E46 FUEL FILTER CHANGE Pics from 2001 330CI Bellows Expansion Joints Metal Bellows Expansion Joints in Every Style from Flexicraft www.flexicraft.com/metal_bellows Ask a BMW Mechanic
Prerequisites: Shop Manual (recommended) pages 3-9 through 3-13.
 pages 3-9 through 3-13.") Prerequisites: Order your gaskets average about $25.00 bucks X 2 so $50.00 4NK-11193-00-00 Obtain a shim kit (Should have several 265 and 270s) (Some dealers will exchange) Obtain a Valve Bucket Tool YM-33961
Prerequisites: Order your gaskets average about $25.00 bucks X 2 so $50.00 4NK-11193-00-00 Obtain a shim kit (Should have several 265 and 270s) (Some dealers will exchange) Obtain a Valve Bucket Tool YM-33961
Replacing MK4 Golf/Jetta radiator mounts in-car
 Replacing MK4 Golf/Jetta radiator mounts in-car This is a guide to replacing the radiator mounts in a MK4 Golf/Jetta. This involves moving the core support to the service position which allows you to do
Honda Super Cub Etc. Frame & Forks
 Honda Super Cub Etc. Frame & Forks Introduction This section is all about how to strip, servioce and rebuild the frame and forks of the Honda Super Cub and other bikes using the same frames, plus all the
Rear End Installation and Bearing Kit - 8.8in (86-12 V8; V6)
") Rear End Installation and Bearing Kit - 8.8in (86-12 V8; 11-13 V6) Tools Required: Jack Stands 5 Floor Jack 2 Oil Pans 1 Wheel Blocks 2 Differential Oil 3 qts Friction Modifier 3 bottles Tube of Black
Rear End Installation and Bearing Kit - 8.8in (86-12 V8; 11-13 V6) Tools Required: Jack Stands 5 Floor Jack 2 Oil Pans 1 Wheel Blocks 2 Differential Oil 3 qts Friction Modifier 3 bottles Tube of Black
2001 BMW X5 4.4i. Fuel Filter Replacement
 P P 2001 BMW X5 4.4i Fuel Filter Replacement Symptoms for Replacement: OBDII code P0171, Lean Bank1, which could be a bad or dirty MAF sensor Sluggish engine performance including hesitation with Wide
Brake Caliper Rebuild - Part Numbers & Tips Per Jim Millet, 3/15/2005
 Per Jim Millet, 3/15/2005 Not too difficult a job. Rears are easier than fronts to access. You ll need the following gasket sets: Front caliper gasket set, P/N 34 11 1 157 037, MSRP $13.58 Rear caliper
Replace front brake pads and discs * (Ford Galaxy )
") Replace front brake pads and discs * (Ford Galaxy 2006-2015) *Caution! This instructions are created by random users and must be used as a reference only! Please, take all safety precautions, and if you're
Replace front brake pads and discs * (Ford Galaxy 2006-2015) *Caution! This instructions are created by random users and must be used as a reference only! Please, take all safety precautions, and if you're
Written By: Tarun. This guide shows how to remove and replace the battery. AirPort Extreme A1521 Battery Replacement
 This guide shows how to remove and replace the battery. Written By: Tarun ifixit CC BY-NC-SA www.ifixit.com Page 1 of 7 INTRODUCTION The battery gives the device enough power to save the settings when
How I installed new brake pads on my i with Sport Package (should be fine for other E39 s) By Robert B.
 By Robert B.") How I installed new brake pads on my 1999 528i with Sport Package (should be fine for other E39 s) How I installed new brake pads on my 1999 528i with Sport Package (should be fine for other E39 s) By
How I installed new brake pads on my 1999 528i with Sport Package (should be fine for other E39 s) How I installed new brake pads on my 1999 528i with Sport Package (should be fine for other E39 s) By
Sunroof Repair. Sunroof Repair TSB. The sunroof repair kit available for the J30 is part number Y20. See images at bottom of document.
 Sunroof Repair This document is the text/images from the TSB (technical service bulletin) issued by Infiniti concerning the repair procedure for sunroof issues. Be advised that this is a LARGE, TIME-CONSUMING
Appendix B A Step-by-Step Guide to Changing the Front Oil Seals on the Volvo B-230 Engine
 Appendix B A Step-by-Step Guide to Changing the Front Oil Seals on the Volvo B-230 Engine When replacing the timing belt, check to see that there are no oil leaks around any of the pulleys. If no leaks,
Trouble Shooting Guide for Hubbell Systems
 Trouble Shooting Guide for Hubbell Systems NOTE: Hubbell Special Products discontinued operations in 2008, so there is a very limited number of repair parts available for motor repair. In some ways, this
M1A1 Thompson Upgrade
 M1A1 Thompson Upgrade If you are mechanically inclined at all. This should be no problem. I'll start off with a list of things you will need. Thompson M1A1 Whisky Cigarettes Tools: Flat screwdriver No.
COLD AIR INTAKE INSTALLATION INSTRUCTIONS PART NUMBER D A. APPLICATION: E36/7 M-Roadster or M-Coupe 3.
 COLD AIR INTAKE INSTALLATION INSTRUCTIONS PART NUMBER D760-0323A APPLICATION: 1998-00 E36/7 M-Roadster or M-Coupe 3.2 Liter PARTS LIST Air Filter Assembly 3 1/2" Tube Intake Shield Silicone Hose Airflow
Fog Lamp Instructions
 Fog Lamp Instructions 2011+ Ford Super Duty Congratulations on your purchase of a high quality PUTCO product. Should you need any application or technical assistance feel free to call us at: 1-800-247-3974
Installing the Wireless Charging upgrade kit in a 2018 XT5 (Platinum version)
") Installing the Wireless Charging upgrade kit in a 2018 XT5 (Platinum version) September 2, 2018 Tools needed: Wireless charger upgrade kit Plastic trim tools 7 mm nut driver Background: I purchased the
Installing the Wireless Charging upgrade kit in a 2018 XT5 (Platinum version) September 2, 2018 Tools needed: Wireless charger upgrade kit Plastic trim tools 7 mm nut driver Background: I purchased the
*Some speedometers have these additional electronic connections. If yours does, then remove the smaller slotted screws shown.
 www.odometergears.com 1981-1985 240 Cable-Driven Speedometers (NOT for 1986 and later electronic units) http://www.davebarton.com/240-odometer-repair.html For this set of instructions below, I will not
Automatic trunk lid retrofit BMW F10 Bj.2011 by laser21 bimmerfest.com
 Automatic trunk lid retrofit BMW F10 Bj.2011 by laser21 bimmerfest.com lukasko@gmail.com This is a short guide to help you retrofit the option SA316 - automatic trunk lid mechanism into your F10. That
The Sands Mechanical Museum
 The Sands Mechanical Museum How to Change Your Oil It is more difficult to change the oil in a Lotus Elise because the oil plug and filter are difficult to access. They are located behind an access panel.
Bag 1. Bag 1. Center Pivot. Center Pivot
 8 00734 01901 5 Center Pivot Bag 1 3374 - Center Pivot Socket 4019 - Alum Pivot ball 3254-2-56 Button Head *Note - Sometimes it is helpful to slightly over-tighten the top clamp screws, then work the ball
Fanatec GT3RS V1 to GT3RS V2 Tutorial
 Fanatec GT3RS V1 to GT3RS V2 Tutorial by Roy Visser 1 How to update your Fanatec GT3RS V1 wheel to a GT3RS V2 wheel Welcome to this guided and detailed tutorial for upgrading your Fanatec GT3RS V1 wheel
Ford Mustang V6 OEM-Style Fog Light Kit Parts List: Quantity: Tool List:
 2015-2017 Ford Mustang V6 OEM-Style Fog Light Kit Parts List: Quantity: Tool List: LED Foglights/ Bezels 2 Flat head & Phillips screwdriver (if you ordered part#3600) Ratchet & Socket set OR Wiring harness
How to Replace the B2 Piston Bore Seal
 Page 1 Home Cars for sale Trucks for sale Where we are Links to other diesel sites About us Why diesel? Diesel Videos How they work How they sound FAQ Dodge Diesel Maintenance tips, parts and DIY DVD's
Page1. ISF Stainless Steel Headers // Part# HDR-004
 Congratulations on the purchase of your ISF Stainless Steel Headers and thank you for choosing Sikky Manufacturing. This installation manual is intended to guide you through the removal of the factory
These instructions were written for a North American specification MkVI Golf R. Other models are similar.
 Notes: These instructions were written for a North American specification MkVI Golf R. Other models are similar. When disassembling the car, be sure to keep all fasteners so they can be reused. It is recommend
Speakers and Motors. Three feet of magnet wire to make a coil (you can reuse any of the coils you made in the last lesson if you wish)
") Speakers and Motors We ve come a long way with this magnetism thing and hopefully you re feeling pretty good about how magnetism works and what it does. This lesson, we re going to use what we ve learned
Speakers and Motors We ve come a long way with this magnetism thing and hopefully you re feeling pretty good about how magnetism works and what it does. This lesson, we re going to use what we ve learned
VW & Audi TDI CR140 ECO KIT Installation Guide
 VW & Audi TDI CR140 ECO KIT Installation Guide This guide is to help you install your new Rawtek DPF, EGR & Adblue Delete Exhaust ECO Kit on your (2009-2014) VW / Audi with 2.0l CR140 Diesel Engine. Note:
Porsche 928 with 16v LH-Jetronic Fuel System
 Porsche 928 with 16v LH-Jetronic Fuel System Toll-Free Tech Hot Line: 877-FOR-928M 877-367-9286 Please do not copy this manual and give copies to your friends. Our ability to bring you this supercharger
INSTALLATION INSTRUCTIONS
 INSTALLATION INSTRUCTIONS BIG ROTOR / CALIPER RELOCATION REAR KIT SUM-BK1423 1999-2009 GM 1/2 Ton Trucks & SUVs Thank you for choosing SUMMIT RACING for your braking needs. Pleases take the time to read
Written By: Arthur Shi
 iphone 5 Speaker Enclosure Replacement Remove the speaker enclosure from the bottom of your iphone 5 Written By: Arthur Shi ifixit CC BY-NC-SA www.ifixit.com Page 1 of 17 INTRODUCTION Bring back the beats
GrimmSpeed Install Guide Series Installing the GrimmSpeed WRX Boost Control Solenoid Updated 4/14/15
 GrimmSpeed Install Guide Series Installing the GrimmSpeed 2015+ WRX Boost Control Solenoid Updated 4/14/15 Introduction: This guide will illustrate the installation of the GrimmSpeed 2015+ WRX Boost Control
N62 & N62-TU Valve Stem Seal Tool Kit
 N62 & N62-TU Valve Stem Seal Tool Kit Part #: AGA-N62-VST-K Problem: You have a smoking BMW due to bad valve stem seals. The valve stem seal problem is that the old valve stem seal becomes hard over time
4.2 Friction. Some causes of friction
 4.2 Friction Friction is a force that resists motion. Friction is found everywhere in our world. You feel the effects of when you swim, ride in a car, walk, and even when you sit in a chair. Friction can
Spring manual V3.1 ENGLISH
 Spring manual V3.1 ENGLISH HYPERPRO TOOLS, used in this manual: Tool Description Part no. A, B, C Cartridge fork spring removal tool kit HP-T01 D Big Piston Fork end cap socket 45mm HP-T102 E Big Piston
XD Aussie Locker XD Installation Supplement Dana 35 Ford TTB
 XD-13527 Aussie Locker XD-13527 Installation Supplement Dana 35 Ford TTB Thank you for your purchase of the XD-13527 Aussie Locker for Dana 35 Ford TTB The following installation review is from username
STEPS FOR REMOVING REAR ASHTRAY & CUP HOLDER, CENTER ARMREST, E- BRAKE CONSOLE, FRONT ASHTRAY, LOWER CENTER CONSOLE AND GLOVE BOX
 Please give credit where credit is due! This DIY was completed ENTIRELY by the hardest working VW Vortex moderator on the site!! Gary Thompson, Ph.D. - vortex ID VGRT6, email address vgrt6@yahoo.com. Please
Slingshot Rotrex Supercharger Kit
 Slingshot Rotrex Supercharger Kit This supercharger kit improves on the Slingshot by forcing more dense air into the engine and creating more power. Installation time of the supercharger depends on you
Installation Instructions
 Instructions Created by an: Samurai Rear Diamond Plate Corners (Pre-bent) (SKU# SEB-RDP) Installation Instructions CAUTION: Safety glasses should be worn at all times when working with vehicles and related
Troubleshooting Guide for Okin Systems
 Troubleshooting Guide for Okin Systems More lift chair manufacturers use the Okin electronics system than any other system today, mainly because they re quiet running and usually very dependable. There
2008 Toyota Tundra 4WD Brake Job: A Quick Job and Even Quicker Write-Up.
 FRONT BRAKES: 2008 Toyota Tundra 4WD Brake Job: A Quick Job and Even Quicker Write-Up. 1. Remove this bolt holding brake line bracket to the suspension. 2. I had to replace all 4 rotors at 60K miles, so
Detroit Tuned R56 Oil Service How-To
 Detroit Tuned R56 Oil Service How-To Welcome to Detroit Tuned s how-to guide for an oil service for an R56 MINI Cooper. It s always best to do an oil change on a hot engine as the hot oil will drain better
CLASSIC MOTORCYCLE RESTORATION
 2.6 A good hammer helps with tasks such as knocking out rusted-in spindles, bushes, and shafts, gently easing in or out bolts or bushes, or gently tapping the end of the screwdriver to help split mating
The M7 Direct Flow Intercooler (DFIC) Installation Guide
 Installation Guide") The M7 Direct Flow Intercooler (DFIC) Installation Guide This information is meant only as a guide. The author of this information,, or any M7 Tuning employees assumes no liabilities for any outcomes resulting
The M7 Direct Flow Intercooler (DFIC) Installation Guide This information is meant only as a guide. The author of this information,, or any M7 Tuning employees assumes no liabilities for any outcomes resulting
Installation Directions for FINGER STICK and Blocker Plate
 Installation Directions for FINGER STICK and Blocker Plate What is a Finger Stick? A Finger Stick is a simple circuit that modifies the MAF signal on LLY and LBZ engines (not LB7 engines) to expected levels
Peugeot 406 Coupe: Delocking your boot V.1 April 2005
 This is a first stab at a DIY guide to de-locking your 406 Coupe. It isn t a hard modification to do yourself, but you do need to be confident working on your cars electrics and removing and refitting
Z1 Motorsports 300zx 2.5 Upgraded piping & BA SMIC Install Guide
 Z1 Motorsports 300zx 2.5 Upgraded piping & BA SMIC Install Guide Congratulations on your new upgraded piping and intercooler kit, this kit has proven to provide the lowest intake air temps to date on our
Gearbox Assembly 101. Introduction. Before Beginning. By Mark Schutzer 4/13/06
 Gearbox Assembly 101 By Mark Schutzer 4/13/06 Introduction If you are planning to re-motor an old brass locomotive you may want to upgrade to a new gearbox at the same time. The early 60 s and 70 s gearboxes
The Magazine For Slot Car Enthusiasts
 The Magazine For Slot Car Enthusiasts Building the Tomy Super G+ By Milt Surratt Tomy Super G+ slot cars have been around in the current form for about 12 years. Out of the package, the Tomy HO slot car
Instructions for Front Midrange / Tweeter Installation in BMW 3 Series/M3 (E36)
") Disclaimer: Bavarian Soundwerks highly recommends professional installation of the products we sell. We provide these installation instructions free of charge as a guide to assist those customers who choose
Disclaimer: Bavarian Soundwerks highly recommends professional installation of the products we sell. We provide these installation instructions free of charge as a guide to assist those customers who choose
Ford F-150 Speaker Replacement Instructions
 Ford F-150 Speaker Replacement Instructions This article was downloaded from http://www.fordf150.net Be sure to go there to view and download the other how-to articles. Thanks to John Meyer for contributing
This is what we are trying to create in the steps below
 You will need: (1) Some 3/4 aluminium or steel flat bar (+/- 1 foot) (2) About 12 of 3 Aluminium or steel tubing. (2) Piece of 3X3 silicone hose and 2 hose clamps (3) 1 K&N (or similar) high flow filter
Installation Instructions Diesel Nitrous System (#82028)
") Installation Instructions Diesel Nitrous System (#82028) Thank you for choosing ZEX. If at any time you have questions regarding this or any of our products, please call our Nitrous Help support line at
Installation Instructions Diesel Nitrous System (#82028) Thank you for choosing ZEX. If at any time you have questions regarding this or any of our products, please call our Nitrous Help support line at
Peg-Harness installation instructions
 Peg-Harness installation instructions I know it s not the easiest thing to do, but PLEASE READ THESE INSTRUCTIONS COMPLETELY so you will understand what you are trying to accomplish before you start drilling
AIR BRAKES THIS SECTION IS FOR DRIVERS WHO DRIVE VEHICLES WITH AIR BRAKES
 Section 5 AIR BRAKES THIS SECTION IS FOR DRIVERS WHO DRIVE VEHICLES WITH AIR BRAKES AIR BRAKES/Section 5 SECTION 5: AIR BRAKES THIS SECTION COVERS Air Brake System Parts Dual Air Brake Systems Inspecting
Thompson Automotive Products
 Installation instructions for Quick-Change Oil Filter relocator for NB (1999+) Miatas (MX-5) Before beginning, get your car up where you have access to the undercarriage (Rhino Ramps work well). Tools
Spark Plug replacement on VW 2.0L engine with AEG code
 Spark Plug replacement on VW 2.0L engine with AEG code This is document is an attempt to describe and illustrate to some extent the process of replacing the spark plugs on a Volkswagen 2.0L engine with
Mercedes Diesel Valve Adjustment Procedure
 1 of 30 5/30/2008 12:58 PM Home Cars for sale Trucks for sale Where we are Links to other diesel sites About us Why diesel? Diesel Videos How they work How they sound FAQ Dodge Diesel Maintenance tips,
MK5/MK6 Panzer Plate Install Instructions
 MK5/MK6 Panzer Plate Install Instructions This is the install procedure for the dieselgeek.com MK5/MK6 Panzer Plate Skid Plate Kits. These instructions are for the following vehicles, regardless of engine
Rebuilding the Power Steering Pump for a 2007 Honda Accord 4CYL
 Rebuilding the Power Steering Pump for a 2007 Honda Accord 4CYL Disclaimer: I have benefited greatly from others who have taken the time to post auto repair videos/tutorials online. To try and return the
1967 (Late) CORVETTE STANDARD (NON-ADJUSTABLE) STEERING COLUMN DISASSEMBLY & REPAIR INSTRUCTIONS PAPER #2
 CORVETTE STANDARD (NON-ADJUSTABLE) STEERING COLUMN DISASSEMBLY & REPAIR INSTRUCTIONS PAPER #2") Last Revision: 03SE2012 1967 (Late) - 1968 CORVETTE STANDARD (NON-ADJUSTABLE) STEERING COLUMN DISASSEMBLY & REPAIR INSTRUCTIONS PAPER #2 Disassembly and Repair Instructions Addressed in this Paper Degree
Last Revision: 03SE2012 1967 (Late) - 1968 CORVETTE STANDARD (NON-ADJUSTABLE) STEERING COLUMN DISASSEMBLY & REPAIR INSTRUCTIONS PAPER #2 Disassembly and Repair Instructions Addressed in this Paper Degree
Note: Please read through the entire guide before attempting any kind of installation.
 KIT-RSP Installation Guide Version 1.3 Auber Instruments, 730 Culworth Manor, Alpharetta, GA 30022 e-mail: info@auberins.com Tel: 770-569-8420 www.auberins.com This is a PID controller kit installation
Written By: Kishan Patel
 Fluke 77 Series III Back Panel Replacement Replacing the Back Panel of the Fluke 77 Series III Multimeter. Written By: Kishan Patel ifixit CC BY-NC-SA www.ifixit.com Page 1 of 9 INTRODUCTION This guide
05/06 Gsxr 1000 Clutch Mod
 By: Ali (Jetspeedz) 05/06 Gsxr 1000 Clutch Mod Parts: 21472-41G10 - WASHER, CLUTCH - $10.09 From 06 Gsxr 750 Opt: 11482-40F00 - GASKET, CL COVER - $8.29 Tools: 13/64 Drill bit, 30mm, 12mm, 10mm, 8mm sockets,
Note: Please read through the entire guide before attempting any kind of installation.
 KIT-RSRTD Installation Guide Version 1.5 Auber Instruments, 730 Culworth Manor, Alpharetta, GA 30022 e-mail: info@auberins.com Tel: 770-569-8420 www.auberins.com This is a PID controller kit installation
POWER STEERING PUMP REBUILDING SPK101 Read instructions completely before removal & disassembly
 POWER STEERING PUMP REBUILDING SPK101 Read instructions completely before removal & disassembly DISASSEMBLY: 1. Remove pump from car and allow to drain. 2. Remove pulley from front of pump. This requires
Figure 1: Valve housing smooth vs. o-ring groove
 If you are driving an older Corvette, and by that I mean a C2 or C3, it will eventually get to a point where the Power Steering Control Valve (PSCV) will leak and require attention. In 2002, I had to repair
Installation Manual v1.0: RPM Governor Spring Installation Dodge. Please read all instructions before installation.
 Installation Manual v1.0: 705-940-2164 4000 RPM Governor Spring Installation 1994-98 Dodge Please read all instructions before installation. The stock governor springs begin to restrict fuel rack travel
Presented at GMC Motorhomes International Fall Convention 9/28/06. By Richard Sowers
 Presented at GMC Motorhomes International Fall Convention 9/28/06 By Richard Sowers Tools needed to work on the column In addition to the normal tools for such a job as this, some special ones are required:
PLEASE READ THROUGH THE WHOLE WRITE UP BEFORE ACTUALLY USING IT!!!!
 JDM power folding mirror switch install into stock USDM harness. By: Greg L., Zeke21 on twinturbo.net PLEASE READ THROUGH THE WHOLE WRITE UP BEFORE ACTUALLY USING IT!!!! This is how I was able to get the
OMIX-ADA EXHAUST MANIFOLD
 OMIX-ADA EXHAUST MANIFOLD Installation Time: 240 Minutes Tools Required: 3/8 ratchet 3/8 3 extension 10 mm socket 13mm socket 9/16 socket Flashlight 9/16 box end wrench Pocket screw driver Can of brake
Ford Focus Zetec SVT Timing Belt
 2000-2004 Ford Focus Zetec SVT Timing Belt Replacement This guide will show you how to replace the timing belt on the 2.0L DOHC Zetec with VCT on a 2002 Ford Focus SVT. This is an interference motor. Written
Team Z Motorsports. K-Member installation instructions
 Team Z Motorsports K-Member installation instructions Parts Included: 1-Tubular K-Member Needed Items-Solid Steering Shaft Offset Steering Rack Bushings Optional-Heavy Duty Bolt Kit Tubular Front Lower
OIL COOLER KIT INSTALLATION INSTRUCTIONS PART NUMBER D
 OIL COOLER KIT INSTALLATION INSTRUCTIONS PART NUMBER D570-0904 APPLICATION: 2011-2012 E90 335i/xi (N55 engine) with BMW standard bumper and with stock oil cooler Congratulations for being selective enough
Troubleshooting Guide for Limoss Systems
 Troubleshooting Guide for Limoss Systems NOTE: Limoss is a manufacturer and importer of linear actuators (motors) hand controls, power supplies, and cables for motion furniture. They are quickly becoming
Written By: Paige Reisman
 iphone 7 Battery Replacement Replace the battery in an iphone 7. Written By: Paige Reisman ifixit CC BY-NC-SA www.ifixit.com Page 1 of 19 INTRODUCTION Use this guide to bring life back to your iphone 7
IPS INSTRUCTION MANUAL
 IPS INSTRUCTION MANUAL CAUTIONS 1. PLEASE READ THE INSTRUCTION MANUAL CAREFULLY BEFORE USING THE IPS SELF BALANCING UNICYCLE; 2. PLEASE KEEP THE SPEED IN THE SAFE RANGE WHICH IS UNDER 10km/h; 3. THE PEDALS
FOUR POST LIFT STRONGMAN TOOLS. Manual to be used with only Strongman Tools Ltd 4 Post Lift
 FOUR POST LIFT STRONGMAN TOOLS Manual to be used with only Strongman Tools Ltd 4 Post Lift 2. SAFETY WARNINGS Thoroughly read this manual before operating the lift and comply with the instructions. Always
INSTRUCTIONS. #82028 Diesel Nitrous System. Thank you for choosing ZEX products; we are proud to be your manufacturer of choice.
 1 INSTRUCTIONS #82028 Diesel Nitrous System Thank you for choosing ZEX products; we are proud to be your manufacturer of choice. Why our nitrous system is better: 2 Performance enthusiasts know the potential
OVERHAULING BRAKE CALIPERS GUIDE by Mr. Stefnwolf. This guide is for a 1982 GSX750ET but I expect most of the GS series to be similar if not the same.
 OVERHAULING BRAKE CALIPERS GUIDE by Mr. Stefnwolf This guide is for a 1982 GSX750ET but I expect most of the GS series to be similar if not the same. Badly corroded calipers (caused by moisture in the