4TH GEN SEATS IN A 3RD GEN TRUCK
|
|
|
- Camilla White
- 6 years ago
- Views:
Transcription
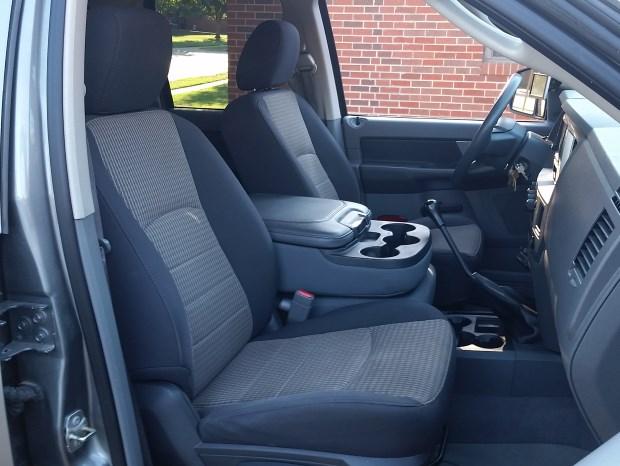
 They are extremely uncomfortable for long trips and the seat foam is known to disintegrate and literally fall out.")

1 4TH GEN SEATS IN A 3RD GEN TRUCK by Flopster Oct 2016 If you drive a 3rd generation Dodge Ram truck, I am sure you have discovered that the OEM seats are not the greatest (Figure 1.) They are extremely uncomfortable for long trips and the seat foam is known to disintegrate and literally fall out. The seats out of a 4th generation Dodge Ram truck are vastly superior and are almost a direct bolt in swap. I acquired a set of seats from a 2011 Ram 1500 Quad Cab truck and the center jump seat out of a 2013 Ram 2500 Crew Cab truck to install in my 2008 Ram. I opted for the 13+ center jump seat because it had the three cup holders on the front and I can't use a full console with a manual transmission. Keep in mind that there is a difference between the seat mounting brackets of a 4th gen Quad Cab, Crew Cab, and Mega Cab truck; the quad cab is the closest to a direct bolt in. Figure 1: OEM 3rd Gen Front Sets (Left) and Rear Seats (Right) 1
 are identical between a 3rd gen 60/40 rear seat and a 4th gen 60/40 rear seat, one side on each seat has an alignment")
")
 Seat Brackets Start by removing the rear seats completely from the truck.")

2 REAR SEAT INSTALLATION I started with the rear seats. They looked like the closest thing to a direct bolt in because they had no wiring. The bottom brackets (Figure 2) are identical between a 3rd gen 60/40 rear seat and a 4th gen 60/40 rear seat, one side on each seat has an alignment dowel that you can see in the picture. The brackets that attach the seats to the back of the cab are slightly different and are spaced differently (the 4th gen brackets are further apart,) but they use the same cab mount. Figure 2: 3rd Gen (Left in image) vs. 4th Gen (Right in image) Seat Brackets Start by removing the rear seats completely from the truck. There are eight bolts (2 per bracket, 2 brackets per seat) holding the seats to the bottom of the cab. If you have the fold flat under seat storage racks, remove them now. If you need help removing the fold flat storage racks, see my "Fold Flat Install" on CarboniteCummins.com. Disconnect the upper rear brackets by lifting the seat upwards to slide them out of their mounts (Figure 3.) The center seatbelt runs through the passenger side seat and will need to be unbolted from the floor in order to remove the seat. Figure 3: Rear Seat Upper Brackets and Center Seat Belt


3 Set the new seats into position and align the lower mounting bolts. This will allow you to look behind the rear seats and see how far you have to move the OEM upper rear brackets for them to engage the new seats. Mark this location with some masking tape and a marker (Figure 4); then remove the seats from the truck. Figure 4: Upper Rear Seat Bracket Misalignment With the location marked, you can start the upper rear bracket modification; it simply unbolts from the back of the cab. The brackets must move towards the outside of the seat. I re-used one of the original bracket mounting holes and drilled a new hole for each bracket. I had to create a second hole for some of the brackets to allow room for the clip-on nut-plate to attach (Figure 5.) Trim back the rear wall insulation as necessary to clear the bracket. Try to keep as much of it in place as possible, it helps a lot to reduce the in-cab noise level. Figure 5: Rear Bracket Relocation There is a slight obstacle to simply moving the brackets; the cab is actually molded around the original mounting bracket locations, and the new hole I drilled is on a raised ridge in the back of the cab. This means the bracket will not simply bolt into place because it will not be square with the cab. To remedy this issue, you need to slightly adjust the rear cab wall with a hammer or remove approximately 1/4 inch


4 from one side of the bracket. Since I have some basic metal working tools, I opted to modify the bracket (Figure 6) instead of my cab. I cut the bracket apart with a hacksaw, and then re-weld the bracket back together. A little sanding and a light coat of rust inhibiting compound (paint) and it is as good as new. The bracket can then be reinstalled into its new location. I also applied some duct tape over the insulation where it was cut in hopes of keeping it together longer. Repeat this for the other three upper rear seat brackets. Figure 6: Rear Bracket Modification After all four upper rear seat brackets have been modified; the new rear seats can be permanently installed. You must lift the seats off the floor while pushing rearward on the seat backs and gently set them back down to engage the latches onto the modified brackets. Once the upper rear brackets are fully engaged, line up the lower brackets and reinstall the bolts holding the seats to the cab floor. Do not forget to reinstall the center seat belt and the seat belt latches. See Figure 7 for a comparison between the 3rd gen and 4th gen rear seats. The 4th gen seats have a taller back, but the seat bottom is the same height, width, and length as the OEM seats. Do you notice how much thicker the foam is in the 4th gen seats?
 Comparison FOLD FLAT STORAGE RACKS")

 and seem to")

5 Figure 7: 3rd Gen Seat (Light Gray) vs. 4th Gen Seat (Dark Gray) Comparison FOLD FLAT STORAGE RACKS The fold flat storage racks under the rear seats are interchangeable between a 3rd gen and a 4th gen truck. I opted to keep the 3rd gen fold flats instead of the 4th gens. The 3rd gens are made of metal (Figure 8) and seem to be quite a bit stronger, and the ones I had in my truck were already coated with Line-X. The 4th gen fold flats are made entirely of plastic and feel weak to me.


6 Figure 8: 3rd gen (Short Side) vs. 4th gen (Long Side) Fold Flat Storage Racks FRONT SEAT ELECTRICAL After the rear seats were completed, I turned my attention to the front seats. The seats currently in my truck are power driver's side and manual passenger side with the center jump seat. I am installing the exact same setup with the new seats. I started with the power for the driver's seat. The 4th gen basic power seat only needs a hot wire and a ground to function and two wires for the seat belt warning chime, but the wiring harnesses are very different between the two styles of seats. Instead of cutting the connector off the truck's body harness, I decided to modify the new seats to fit my old power plug. To do this, I ordered a new under seat harness (Part Number AA) for my 3rd generation truck. I cut the main power connector off the new harness, leaving plenty of extra wire, and cut the main power connector off the 4th gen front seat. Utilizing the connector pin-out diagrams from the service manual with some solder and heat shrink, I mated the two harnesses together (Figure 9.) My 4th gen front seat now has a 3rd gen power plug and I left a +12V accessory wire for the center jump seat power outlet. You will have to modify this process a little to fit seats with different features, such as heating and cooling.

 first remove the four bolts from each of the main")


7 Figure 9: Wiring Harness Modification FRONT SEAT INSTALLATION Each of the front seats are secured with four bolts going into the floor of the cab. The center jump seat is secured to brackets that are part of the main seat base. To get the front seats out of the truck (Figure 10,) first remove the four bolts from each of the main seats. Carefully lean the entire front seat set backwards onto the rear seat. Disconnect the electrical connectors, and then remove the four nuts holding the center jump seat. When you disconnect the center jump seat, the other seats will move and might try to fall forward depending on how you positioned them. After everything is unbolted, carefully remove each seat from the truck. Use extreme caution when removing and installing the seats in the truck, it is extremely easy to scratch your paint with the seat brackets.


 and hardware.")


8 Figure 10: Front Seat Removal The new front seats will bolt directly in place using the old seat mounting points (Figure 11) and hardware. The newly modified power harness will also plug directly into the original truck wiring harness. Figure 11: New vs. Old Front Seat and New Seat Mounting Points


9 CENTER JUMP SEAT INSTALLATION On a 3rd gen truck, the center jump seat is held in place with 4 brackets that are made into the bases of the front seats. On a 4th gen truck, the center jump seat utilizes similar brackets on the passenger seat, but bolts to the floor on the driver's side. You could choose to secure the jump seat on the passenger side only, but it will not be stable and will wobble when you drive the truck (I tried it and it bothered me). You also do not have a place to attach the center seatbelt latch and will not be able to legally use the center seat for a passenger. Rather than drill holes in the cab floor to attach the 4th gen center seat brackets, I opted to fabricate a 3rd gen style mount for the center seat. Since the 4th gen passenger side brackets actually bolt to the seat base, I thought I could fasten it to the driver's side seat bracket in a similar fashion. I ordered the rear bracket (Part Number AA) because the front of the driver's seat base did not have enough material in the correct location to affix a bracket properly. With the new bracket in hand, I removed the driver's seat again, drilled two holes in the seat base, bolted it together (Figure 12,) and reinstalled the front seat. Figure 12: New Bracket On Driver's Seat After I got it all back in the truck, I realized I did not have a hole to bolt the seat belt latch to, so I had to drill a hole in the center seat bracket (Figure 13) and attach the seat belt latch. I then bolted the center jump seat to the three brackets in the truck. I had to bend the brackets around a little to get the center seat to set level. The center seat is stable, and I have a working seat belt for a passenger.


10 Figure 13: Custom Driver's Side Seat Center Bracket THE LITTLE THINGS Now that we have a majority of the work completed, we can focus on the little things to finish it. First up, the front seats will hit the lower trim panel on the B pillar when they are in the rearmost position. Sticking with my original goal of not modifying the truck at all, I decided to modify the plastic trim piece on the seat to gain the necessary clearance. I utilized a heat gun to soften the plastic enough to massage it out of the way so it does not hit anymore. It is not perfect, but it is hardly noticeable in the truck because the B pillar blocks nearly all of it. Figure 14: Front Seat Clearance Issues The 2013 center console I installed has a 12V power outlet, a USB connector, and an AUX input. The wiring harness for the 2013 center seat does not match up with the 2011 seat harness, so it will require some more custom wiring. I acquired a 2-wire Weather Pack connector to run power and ground to the center seat from the +12V accessory wire I left open in my driver's side harness. The 2013 jump seat has a red/black set of wires for the 12V outlet and a blue/black set for the USB connector (Figure 15). To supply power to both points, I soldered the blue/red wires together and connected them to the +12V source and both black wires were grounded.
 in the console. Three of these wires can be soldered to a female 3.")


11 Figure 15: Power Wires for Center Jump Seat Coming from the center seat, there are four green wires with stripes on them. These four wires are for the aux input (headphone jack) in the console. Three of these wires can be soldered to a female 3.5mm jack to allow you to run a 3.5mm extension cable to an aftermarket head unit. The light green wire with the light blue stripe is the right signal, light green/tan is the left signal, and light green/dark blue is the common (Figure 16). The light green wire with yellow stripe is for the device auto-detect feature and will not be used. The OEM head unit does not have provisions for a rear Aux input, so this connection will probably not do much good for most people. If you have an aftermarket radio, you can connect this new jack to your radio to gain an extra aux input.


12 Figure 16: Audio Wires for Aux Input Connection The USB port has a standard mini-usb connector on the bottom, which allows the use of any standard mini-usb cable. The 3rd gen OEM head unit doesn't have provisions for USB in it either. A USB cable needs both +12V and a +5v signal to work. It got a +12V signal when I connected power to the power outlet, but it needs radio with a USB port to give it the +5V signal before it will charge your cell phone. Lastly, these seats are a different color than the interior of the truck and they do not match the center jump seat because it came out of a different truck. I was intending to get some nice leather seat covers to make everything match, but I actually like the color variation. If you want something that will match the OEM light gray interior, look for a set of seats that are the "Diesel Gray" color like my center jump seat. It matches the carpet and the trim almost perfectly. I can honestly tell you that these seats are one of my top modifications ever. I cannot even begin to describe how much better they made the truck. The old seats were so bad that we did not drive it more than an hour at a time if we could help it, now the truck is our primary trip vehicle again. If you ever mod anything on your truck, 4th gen seats should be at the top of your list.

13
X-Type w/ non-premium sound amplifier installation instructions
 X-Type w/ non-premium sound amplifier installation instructions 1. Pull radio from dash (see Radio Removal Instructions ) 2. Disconnect wiring harness from back of radio by pushing in tab on plug and pulling
Speakers and Motors. Three feet of magnet wire to make a coil (you can reuse any of the coils you made in the last lesson if you wish)
") Speakers and Motors We ve come a long way with this magnetism thing and hopefully you re feeling pretty good about how magnetism works and what it does. This lesson, we re going to use what we ve learned
Speakers and Motors We ve come a long way with this magnetism thing and hopefully you re feeling pretty good about how magnetism works and what it does. This lesson, we re going to use what we ve learned
Front Axle Pinion Seal Replacement
 Front Axle Pinion Seal Replacement by Flopster843 10 Apr 2016 The AAM 925 axle used on the front of Dodge Ram trucks is a decent unit, but it does have its flaws. This axle lacks lockout hubs on the front
Connecting the rear fog light on the A4 Jetta, while keeping the 5 Light Mod
 Connecting the rear fog light on the A4 Jetta, while keeping the 5 Light Mod DISCLAIMER: I'm human and make mistakes. If you spot one in this how to, tell me and I'll fix it This was done on my 99.5 Jetta.
Tailgate Light Bar Installation by Flopster Feb 2015
 Tailgate Light Bar Installation by Flopster843 23 Feb 2015 If you ever looked at the rear of a 3rd generation Dodge Ram dually pickup truck, you'll notice that there is a light bar with 3 red marker lights
PLEASE READ THROUGH THE WHOLE WRITE UP BEFORE ACTUALLY USING IT!!!!
 JDM power folding mirror switch install into stock USDM harness. By: Greg L., Zeke21 on twinturbo.net PLEASE READ THROUGH THE WHOLE WRITE UP BEFORE ACTUALLY USING IT!!!! This is how I was able to get the
Tools & Parts I Used. Here's everything that comes with the kit.
 Ford Super Duty Power Tailgate Lock Install 2004 F250 4x4 XLT Sport Crew Cab Back to 2004 F250 Main Page This page describes the steps to install the Pop & Lock PL8250 power tailgate lock kit. This kit
Fly Rocket Fly: Design Lab Report. The J Crispy and The Airbus A
 Fly Rocket Fly: Design Lab Report The J Crispy and The Airbus A380 800 Rockets: Test 1 Overall Question: How can you design a water, bottle rocket to make it fly a maximum distance. It needs to be made
Deuce/Ace Installation Instructions
 HARDWARE KIT: Upper Mounting Plate: 2-7/16" (11mm) X 3.5" bolts 2-7/16" flange nuts 2-2" spacers 2-7/16" trim cap mounting washers 2 - plastic trim caps TOOLS NEEDED: safety glasses wrenches 16mm or 5/8"
05/06 Gsxr 1000 Clutch Mod
 By: Ali (Jetspeedz) 05/06 Gsxr 1000 Clutch Mod Parts: 21472-41G10 - WASHER, CLUTCH - $10.09 From 06 Gsxr 750 Opt: 11482-40F00 - GASKET, CL COVER - $8.29 Tools: 13/64 Drill bit, 30mm, 12mm, 10mm, 8mm sockets,
We will be upgrading from the factory, paper-cone disgrace to an Infinity Kappa 62.9i:
 In order to fully round out your stereo upgrade, the factory rear speakers must go. This is another easy job to tackle, but the fitment of the package tray and being hunched over in the rear glass area
B&W Turnover Ball Installation
 B&W Turnover Ball Installation by Flopster843 02 Jan 2012 I wanted to start this article out by stating one very important thing. Installing a gooseneck hitch is not a task to be taken lightly. If you
Installing the Wireless Charging upgrade kit in a 2018 XT5 (Platinum version)
") Installing the Wireless Charging upgrade kit in a 2018 XT5 (Platinum version) September 2, 2018 Tools needed: Wireless charger upgrade kit Plastic trim tools 7 mm nut driver Background: I purchased the
Installing the Wireless Charging upgrade kit in a 2018 XT5 (Platinum version) September 2, 2018 Tools needed: Wireless charger upgrade kit Plastic trim tools 7 mm nut driver Background: I purchased the
84-86 Ford SVO Mustang AC Installation Guide
 84-86 Ford SVO Mustang AC Installation Guide This installation guide is for the AC installation kit from Late Model Restoration. The Vendor is Hose Wizards that manufactures this great kit that provides
BMW F10 Premium / Professional Audio system - adding a sub woofer part two
 BMW F10 Premium / Professional Audio system - adding a sub woofer part two I accept no liability for any work carried out as a result of this guide. Any damage caused to equipment or your car (or you)
Here I Will Explain How To Install Recon Cab Lights In A 3rd Gen Dodge Ram.
 1 P age Here I Will Explain How To Install Recon Cab Lights In A 3rd Gen Dodge Ram. *Now, There Are Many Ways of Installing Them, Including Wiring Methods, Wiring Connectors, And Other Variables - In This
Roll Bar (MMRB-6.1 to -6.7)
") 3430 Sacramento Dr., Unit D San Luis Obispo, CA 93401 Telephone: 805/544-8748 Fax: 805/544-8645 www.maximummotorsports.com 1994-04 Roll Bar (MMRB-6.1 to -6.7) NOTE: These instructions cover Roll Bars with
3430 Sacramento Dr., Unit D San Luis Obispo, CA 93401 Telephone: 805/544-8748 Fax: 805/544-8645 www.maximummotorsports.com 1994-04 Roll Bar (MMRB-6.1 to -6.7) NOTE: These instructions cover Roll Bars with
Wiring Harness Relocation by Flopster Mar 2012
 Wiring Harness Relocation by Flopster843 21 Mar 2012 On my 2008 Ram, there is a gigantic blob of electrical wiring that Dodge decided to put between the engine and the brake master cylinder, just behind
I. Before starting installation
 5. Park the vehicle on a clean, dry, flat, level surface and block the tires so the vehicle cannot roll in either direction. A. Disconnect battery cables 1. Disconnect the negative cable first, then the
Tutorial:Head Unit Installation
 Tutorial:Head Unit Installation From Tech Wiki : Nissan 350Z : Infiniti G35 : Nissan GT-R Here, I installed the Kenwood DDX7015 touch screen DVD system. I made this step-by-step tutorial to help those
Revision Date: Building a dual pump system for an open boat. Description:
 Disclaimer: The information is provided as-is. The author(s) accepts no liability for the accuracy, availability, suitability, reliability and usability. The following information is in the public domain
Timing the 9N/2N Steering Sector Gears
 Timing the 9N/2N Steering Sector Gears by John Korschot - www.johnsoldiron.com (May 2010) The procedure for timing a set of steering gears in the 9/2n tractors is published in the I&T FO4 shop manual.
Installation Instructions Harley-Davidson Saddlebag Lids
 Installation Instructions Harley-Davidson Saddlebag Lids Thank you for your purchase of Bagger Audio Saddlebag Lids for your Harley- Davidson motorcycle. We have carefully engineered these products to
Drag Race Roll Bar (MMRB-6, -7)
") 3430 Sacramento Dr., Unit D San Luis Obispo, CA 93401 Telephone: 805/544-8748 Fax: 805/544-8645 www.maximummotorsports.com 1994-04 Drag Race Roll Bar (MMRB-6, -7) The Maximum Motorsports 6-point Drag Race
3430 Sacramento Dr., Unit D San Luis Obispo, CA 93401 Telephone: 805/544-8748 Fax: 805/544-8645 www.maximummotorsports.com 1994-04 Drag Race Roll Bar (MMRB-6, -7) The Maximum Motorsports 6-point Drag Race
INSTALLATION INSTRUCTIONS DODGE DAKOTA 2 KIT # 682 (2WD), 692 (4WD) 3 KIT # 683 (2WD), 693 (4WD)
, 692 (4WD) 3 KIT # 683 (2WD), 693 (4WD)") INSTALLATION INSTRUCTIONS 1997-1999 DODGE DAKOTA 2 KIT # 682 (2WD), 692 (4WD) 3 KIT # 683 (2WD), 693 (4WD) Installation of a Performance Accessories body lift kit will change the vehicle s center of gravity
INSTALLATION INSTRUCTIONS 1997-1999 DODGE DAKOTA 2 KIT # 682 (2WD), 692 (4WD) 3 KIT # 683 (2WD), 693 (4WD) Installation of a Performance Accessories body lift kit will change the vehicle s center of gravity
Hard Bar Sport, M1/M2 Hard Core Hardtop, M2 Sport, and Xtreme Installation Instructions
 HARDWARE KIT: Hard Bar Sport, M1/M2 Hard Core Shoulder Harness Guide Relocation Assemblies: 2-3/8" X 1" grade 8 bolts 4-3/8" flat washers 2-3/8" lock nuts 2 - brass bushings 2 - plastic trim caps 2-3/8"
Mustang Radiator Conversion DIY. By GearHeadPeter. January 27, 2011
 1964-1966 Mustang Radiator Conversion DIY By GearHeadPeter January 27, 2011 We all know that the radiators in our cars are not the best, especially if you have done any customization to the engine, which
Installation Instructions
 Installation Instructions Jeep JK 2-Door (2011 Present) Mounting Bracket and Air Line System Kit for ARB On-Board Twin Air Compressor (CKMTA12) Made in the USA Kit Contents: 1 Flat Bracket 1 Formed Bracket
STEPS FOR REMOVING REAR ASHTRAY & CUP HOLDER, CENTER ARMREST, E- BRAKE CONSOLE, FRONT ASHTRAY, LOWER CENTER CONSOLE AND GLOVE BOX
 Please give credit where credit is due! This DIY was completed ENTIRELY by the hardest working VW Vortex moderator on the site!! Gary Thompson, Ph.D. - vortex ID VGRT6, email address vgrt6@yahoo.com. Please
Rear Speaker replacement.
 Rear Speaker replacement. First off you need the right rear speakers. The easy bit is 6x9 and better than a 15W paper cone, the difficult bit is getting a mounting depth under 74mm. Or to be more precise,
MGB V8 Roadster restoration project Report 138
 24th May 2017. FITTING THE CARPETS - continued I have included quite a lot of detail and photographs on the carpet and trim fitting, as it may help those who decide to do this job on their own car. The
A guide to Fabricating and Installing a Height-Adjustable seat in a Toyota Prius
 A guide to Fabricating and Installing a Height-Adjustable seat in a 2004-2006 Toyota Prius Please note, this document is a guide, not step-by-step instructions. Nor will this document be expanded to become
2005+ Roll Bar (Mm5RB-20.1 to -20.6) Recommended Center punch 1/8" pilot drill 1-3/4" Hole saw 2" Hole saw
 Recommended Center punch 1/8 pilot drill 1-3/4 Hole saw 2 Hole saw") 3430 Sacramento Dr., Unit D San Luis Obispo, CA 93401 Telephone: 805/544-8748 Fax: 805/544-8645 www.maximummotorsports.com 2005+ Roll Bar (Mm5RB-20.1 to -20.6) Recommended Center punch 1/8" pilot drill
3430 Sacramento Dr., Unit D San Luis Obispo, CA 93401 Telephone: 805/544-8748 Fax: 805/544-8645 www.maximummotorsports.com 2005+ Roll Bar (Mm5RB-20.1 to -20.6) Recommended Center punch 1/8" pilot drill
(1) Remote Control with (2) AAA Batteries
 Remote Control with (2) AAA Batteries") TOOLS REQUIRED: KIT CONTENTS: E14 Torx (1) Remote Control with (2) AAA Batteries (2) Wireless Headphones with (4) AAA Batteries (2) DVD Headrest Units Owner s Manual (1) Owner s Manual (1) Power / Audio
TOOLS REQUIRED: KIT CONTENTS: E14 Torx (1) Remote Control with (2) AAA Batteries (2) Wireless Headphones with (4) AAA Batteries (2) DVD Headrest Units Owner s Manual (1) Owner s Manual (1) Power / Audio
K6JRF's Page formerly W6FZC
 K6JRF's Page formerly W6FZC My Mercedes Benz S500 Coupe (Updated: Nov 9, 2004) Analyze and Troubleshoot "Check Engine" MIL and Electronic Control Units (ECU)! Seat Belt Extender About one month ago, the
Raxiom Factory GPS Rear Back-up Camera Kit (07-17 Wrangler)
") Raxiom Factory GPS Rear Back-up Camera Kit (07-17 Wrangler) Installation Time: 2.5-3Hrs Tools Required: 7mm Socket & Driver 10mm Socket 10mm Open end wrench Knife / Razor blade Zip-ties Wire Cutters Needle
Raxiom Factory GPS Rear Back-up Camera Kit (07-17 Wrangler) Installation Time: 2.5-3Hrs Tools Required: 7mm Socket & Driver 10mm Socket 10mm Open end wrench Knife / Razor blade Zip-ties Wire Cutters Needle
Installation of Cold Case Aluminum Performance Radiator in 2005 GTO. Performed October By: Chris Gray. Indianapolis, IN
 Installation of Cold Case Aluminum Performance Radiator in 2005 GTO Performed October 2015 By: Chris Gray Indianapolis, IN Car is one owner, 90,000 miles, manual transmission Factory radiator failed by
Part Name/Description Part No. PF3000 PF 3000 Pro U-Bracket Short Bracket PF3000 Pro
 Note: Indented items indicate parts included in an assembly listed above Part Name/Description Part No. PF3000 PF 3000 Pro U-Bracket Short 2000105-2 1 PFadvantage Bracket PF3000 Pro 2000773 1 Cable Kit
Mo- Doors Garage Door Opener Installation Victory Vision
 Mo- Doors Garage Door Opener Installation Victory Vision Your Mo- Door opener is the best garage door opener system out there for your Victory Vision. We hope you enjoy your opener as much as we do designing
E90 AVIN Non-iDrive Head Unit Install with Logic 7 Integration
 E90 AVIN Non-iDrive Head Unit Install with Logic 7 Integration Option 1: If you prefer to go an easier route you can order our BMW MOST interface. It would make the install a lot easier and will not require
Volvo 1800 Dash Pad Replacement
 Volvo 1800 Dash Pad Replacement (courtesy of John Garden State Chapter Volvo Club America) Reupholstering the dash Well it has been some time since I have been online in the forum. Winter is a quite time
INTERIOR > CONSOLE, FLOOR > REMOVAL > REMOVAL > BASE FLOOR CONSOLE
 Page 1 of 18 2016 Dodge Grand Caravan 3.6L Eng VIN G SE Service Manual: BODY - INTERIOR & EXTERIOR Print Date: INTERIOR > CONSOLE, FLOOR > REMOVAL > REMOVAL > BASE FLOOR CONSOLE Fig 1: Base Floor Console
Convenience Lighting
 Convenience Lighting by Flopster843 19 Dec 2011 In order to cut costs and make a larger profit, many automobile manufacturers decided to cut several minor items from the production line. Chrysler removed
ADVANCE ADAPTERS INC. P/N: VORTEC GEN. III V8 SQ. BOLT TJ WRANGLER MOTOR MOUNTS (WITH A/C)
") Paso Robles, CA 93447 PAGE 1 OF 6 Telephone: (800) 350-2223 Fax: (805) 238-4201 Page Rev. Date: 04-16-14 KIT CONSISTS OF: No. Qty Part No. Description 1. 2 713092A BOLT SLEEVE 2. 4 713092B GEN 3 MOTOR
Paso Robles, CA 93447 PAGE 1 OF 6 Telephone: (800) 350-2223 Fax: (805) 238-4201 Page Rev. Date: 04-16-14 KIT CONSISTS OF: No. Qty Part No. Description 1. 2 713092A BOLT SLEEVE 2. 4 713092B GEN 3 MOTOR
BMW 2002 M42 Swap Notes-THIS IS NOT FINISHED
 BMW 2002 M42 Swap Notes-THIS IS NOT FINISHED This document is to help those that want to install an m42 into a BMW 2002. It is based around an e30 engine, trans, and wiring. You can use the e36 block/head/wiring
Optima K Badge Removal & Installation Tutorial
 P.1 2014-2015 BADGE INSTALLATION & REMOVAL HOOD, TRUNK, AND STEERING WHEEL ***Modification to the rear K Badge emblem of 2011-2013 Optima models as directed in this tutorial is not necessary*** Tools and
Installation Instructions and Suggestions For Jeep YJ Fiberglass Replacement Bodies
 Installation Instructions and Suggestions For Jeep YJ Fiberglass Replacement Bodies Getting started with the removal of your existing Jeep body. Trust nothing to memory; take photos of everything at different
Jeep Roof Rack. Part No. J029T. PARTS LIST: Qty Part Description Qty Part Description
 Fits: 2007 - Current ` Jeep Roof Rack JEEP ROOF RACK Part No. J029T REMOVE CONTENTS FROM BOX. VERIFY ALL PARTS ARE PRESENT. 120-340 min Cutting Required Drilling Required READ INSTRUCTIONS CAREFULLY BEFORE
How to Make a Solid State Instrument Voltage Regulator
 Taken from the web page: http://chris66dad.tripod.com/id29.html How to Make a Solid State Instrument Voltage Regulator Note: Although this description was intended for a Ford Mustang, it also works for
Your Legal Fuel Tank Source.
 February 23, 2015 IS# 808 Page 1 of 13 THANK YOU FOR PURCHASING A TRANSFER FLOW 40 GALLON TOOLBOX REFUELING SYSTEM. PLEASE READ THE FOLLOWING PROCEDURES CAREFULLY BEFORE STARTING THE INSTALLATION. CAUTION:
2000 Mr2 Spyder Seat Cover Replacement Project
 2000 Mr2 Spyder Seat Cover Replacement Project Tool List: Plastic Trim Tool, Hog Ring Pliers, Medium or Heavy Duty Wire Cutters, 12mm socket, 14mm Socket, Ratchet, Extension, Flat Head Screwdriver & Gloves
Dodge Ram 09-Current CS-DTR SERIES BACKUP CAMERA INSTALLATION
 Dodge Ram 09-Current CS-DTR SERIES BACKUP CAMERA INSTALLATION Thank you for your purchase! These instructions cannot possibly cover every option group for every model year of RAM trucks so you may find
Multi-tool 2CV / Visa
 Multi-tool 2CV / Visa For the professional 2CV specialist / perfectionist: The heart of the engine, the crankshaft and camshaft often needs a (partial) revision. There are many new 2CV parts, but for these
INSTALLATION INSTRUCTIONS JEEP 2011-UP JK SECURITY FULL CONSOLE #274
 INSTALLATION INSTRUCTIONS JEEP 2011-UP JK SECURITY FULL CONSOLE #274 PARTS CHECKLIST Tuffy Console #9 Left Front Mounting Bracket #10 Right Front Mounting Bracket #11 Electronics mounting bracket #12 Divider
Replacement Tach Board Manual
 Replacement Tach Board Manual 67-74 Dodge and Plymouth Cars that use electronics Internal to the tachometer. Real Time Engineering 19352 Hilton Rd. Springdale, AR 72764 (479) 756-3917 fax Rev8 www.rt-eng.com
How I installed new brake pads on my i with Sport Package (should be fine for other E39 s) By Robert B.
 By Robert B.") How I installed new brake pads on my 1999 528i with Sport Package (should be fine for other E39 s) How I installed new brake pads on my 1999 528i with Sport Package (should be fine for other E39 s) By
How I installed new brake pads on my 1999 528i with Sport Package (should be fine for other E39 s) How I installed new brake pads on my 1999 528i with Sport Package (should be fine for other E39 s) By
Installation Manual TWM Performance Short Shifter Nissan 350Z, 370Z Infiniti G35, G37
 Installation Manual TWM Performance Short Shifter Nissan 350Z, 370Z Infiniti G35, G37 It is preferable to park on a flat surface, as you will have to engage and disengage the hand brake and shift from
INSTALLATION INSTRUCTIONS
 INSTALLATION INSTRUCTIONS Document# 19-0038 2004+ Lotus Elise (Series 2) Rear Clamshell Removal Kit Safely support the vehicle. This is a two-person job. Allow 1 to 2 hours for initial disassembly. Have
2005+ Mustang Trunk Lid Release and Trunk Lights Installation
 There is no warranty expressed or implied by this document, you follow these instructions at your own risk. These instructions worked for me, but your experience may vary. The final product of these instructions
what you need to do is hit the taper housing as hard as you can with your hammers AT THE SAME TIME and at a slight angle, what will happen is you
 first things first, get the car on axle stands and the wheels off. Open the bonnet to let more light through to the area in which you'll be working. The following guide shows the passenger side being done
BMW E61 Hydraulic Pump replacement instructions
 BMW E61 Hydraulic Pump replacement instructions This DIY will guide you through the tasks needed to successfully replace your defective tailgate hydraulic pump Difficulty 3 of 10. The most difficult part
Conflicts: Highlander without sunroof
 Toyota Highlander (Sunroof) 2011-8.5 Overhead Video Part Number: 00016-00125; Fit Kit-00016-00125-02 Accessory Code: ED9 Conflicts: Highlander without sunroof Kit Contents: Item # Qty. Component Description
---Optional Items---
 1 2 3 4 5 6 ---Optional Items--- 10 9 11 7 8 12 This package should contain: 1. One (1) CorkSport Crashbar Weldment 2. Eight (8) M8x1.25x20 mm Bolts 3. Eight (8) M8x1.25mm Nyloc Nuts 4. Sixteen (16) M8
Ford F-150 Speaker Replacement Instructions
 Ford F-150 Speaker Replacement Instructions This article was downloaded from http://www.fordf150.net Be sure to go there to view and download the other how-to articles. Thanks to John Meyer for contributing
Install: Part A. First things first: Running the wiring for the Neo-Pod
 Install: Part A First things first: Running the wiring for the Neo-Pod These instructions follow installation of #31649KL Neo-Pod (the fully loaded version with amp, sub, etc.) in a factory Wrangler sound
In This DIY We Will Show You How To Install Recon Backup Lamps (part # To Run On A Separate Switch & In Reverse.
 In This DIY We Will Show You How To Install Recon Backup Lamps (part # 264150 To Run On A Separate Switch & In Reverse. Please Note, There Are Many Ways of Installing These Lights, Including Wiring Methods,
Subaru Front Mount Intercooler Kit STI Subaru Front Mount Intercooler Kit STI
 Subaru Front Mount Intercooler Kit STI 2008-2014 715500 Subaru Front Mount Intercooler Kit STI 2008-2014 Congratulations on your purchase of the Subaru Front Mount Intercooler Kit STI 2008-2014. The following
Installation Directions for FINGER STICK and Blocker Plate
 Installation Directions for FINGER STICK and Blocker Plate What is a Finger Stick? A Finger Stick is a simple circuit that modifies the MAF signal on LLY and LBZ engines (not LB7 engines) to expected levels
The gauges selected for my installation were the following: Part Application
 This write up documents the installation of Autometer Sport Comp II gauges into a 1971 Camaro with original full factory instrumentation. The Autometer gauges completely replace the original factory instrumentation,
INSTALLATION INSTRUCTIONS
 Jeep Wrangler Rear Vision Camera, 2007 Current (Kit # 9002-8838) Items Included in the Kit Camera Chassis Harness Zip lock bag with 15 Wire Ties & 3 Push Nuts These Instructions Required Tools & Supplies
2005+ Drag Race Roll Bar (Mm5RB-20)
") 3430 Sacramento Dr., Unit D San Luis Obispo, CA 93401 Telephone: 805/544-8748 Fax: 805/544-8645 www.maximummotorsports.com 2005+ Drag Race Roll Bar (Mm5RB-20) Note that the NHRA DOES allow the door bars
3430 Sacramento Dr., Unit D San Luis Obispo, CA 93401 Telephone: 805/544-8748 Fax: 805/544-8645 www.maximummotorsports.com 2005+ Drag Race Roll Bar (Mm5RB-20) Note that the NHRA DOES allow the door bars
VTCM Installation Manual Table of Contents
 VTCM Installation Manual Table of Contents 1. Introduction:... 2 2. Disclaimer:... 2 3. Software / Drivers:... 2 a. Plugging in the controller:... 2 b. Install 4.0.NET Frame work:... 3 c. Install COM port
Mustang CDC Lightbar (94-04) - Installation Instructions
 - Installation Instructions") Mustang CDC Lightbar (94-04) - Installation Instructions The below installation instructions work for the following products: Classic Design Concepts Mustang Convertible Lightbar (94-04 Carbon Fiber) Classic
Mustang CDC Lightbar (94-04) - Installation Instructions The below installation instructions work for the following products: Classic Design Concepts Mustang Convertible Lightbar (94-04 Carbon Fiber) Classic
Installation Instructions
 Installation Instructions Jeep JK Unlimited (2007 Present) Mounting Bracket and Air Line System Kit for ARB On-Board Twin Air Compressor (CKMTA12) Made in the USA Kit Contents: 1 Bracket for ARB Compressor
ML63AMG appartiens à un membre de mbworld.org merci. W210 E Class Folding Mirror Modification
 ML63AMG appartiens à un membre de mbworld.org merci W210 E Class Folding Mirror Modification Originally installed in 2002. Revised write up completed September 5, 2013. Step 1 - New Switch and Wiring Harness
GM TRUCK BACKUP CAMERA INSTALLATION
 GM TRUCK 07-13 BACKUP CAMERA INSTALLATION Thank you for your purchase! These instructions are intended for the do-it-yourselfer who decides to install the camera without professional assistance. Keep in
This is what we are trying to create in the steps below
 You will need: (1) Some 3/4 aluminium or steel flat bar (+/- 1 foot) (2) About 12 of 3 Aluminium or steel tubing. (2) Piece of 3X3 silicone hose and 2 hose clamps (3) 1 K&N (or similar) high flow filter
UP1 PT01 Scratch Ultra-Pitch Kit Installation Guide
 UP1 PT01 Scratch Ultra-Pitch Kit Installation Guide The kit should contain: x1 Motor Control Board (MCB) with connector x2 ConnexEasi TTM prepared cables x4 Sticky Feet 1 Ensure PT01 is powered off and
Please read thoroughly before starting installation and check that kit contents are complete.
 Rear Vision System Mirror Display 2013-Current Ram (Kit part number 1009-9518) Please read thoroughly before starting installation and check that kit contents are complete. Items Included in the Kit: Rear
U L T I M A T E R A D A R / L A S E R D E F E N S E S Y S T E M
 S m a r t e r Q u i e t e r M o r e A c c u r a t e U L T I M A T E R A D A R / L A S E R D E F E N S E S Y S T E M Installation Manual PASSPORT 9500ci Comes Complete Front Radar Receiver Miniature weatherproof
Projector39/Umnitza BMW Headlight & Re-Installation for E39s Predator Angel Eyes, and Lamin-X Installation
 Projector39/Umnitza BMW Headlight & Re-Installation for E39s Predator Angel Eyes, and Lamin-X Installation Now it is time to remove the headlights! Obviously you have to open the hood to do this. 100_3630.jpg
 Installing Seat Belts in my Tudor August 2009 My '29 Tudor was restored about 25 years ago by my brother-in-law. He restored it to close to original, but made a few changes that many will claim are for
Improving the gearshift feel in an SW20.
 Improving the gearshift feel in an SW20. Part one In 3 parts. The SW20 gearshift can be often be greatly improved by eliminating play in the shift linkages, and this article covers three areas that need
Smart Opener Retrofit by Richard Bevan (bimmerfest riku2)
") Smart Opener Retrofit by Richard Bevan (bimmerfest riku2) Document history V 1.0 02.04.2015 Document created. Introduction This document tells how to retrofit the smart opener to a 2011 BMW 5 series (F10).
Smart Opener Retrofit by Richard Bevan (bimmerfest riku2) Document history V 1.0 02.04.2015 Document created. Introduction This document tells how to retrofit the smart opener to a 2011 BMW 5 series (F10).
Some tips and tricks I learned from getting clutch out of vehicle Skoda Octavia year 2000
 Some tips and tricks I learned from getting clutch out of vehicle Skoda Octavia year 2000 Last change 2013-Oct-11 I bought Haynes manual for a starter. That s something well worth it s cost I believe.
VOH681A Drop Down Video Monitor VOH682A Drop Down TV / Video Monitor OPEN. Installation Guide
 VOH681A Drop Down Video Monitor VOH682A Drop Down TV / Video Monitor ON OFF AUTO OPEN Installation Guide Important Notice It is unlawful in most jurisdictions for a person to drive a motor vehicle which
UMBAUANLEITUNG FÜR DAS RADIO GOLD WING GL1500SE
 UMBAUANLEITUNG FÜR DAS RADIO GOLD WING GL1500SE Using a mini-dpdt 12V. Relay, run by SPST mini (or micro) switch, to operate the relay. To add an AUX input for my Ipod or CD Changer or DVD. I still have
2010 Toyota Prius model II Head Unit Upgrade
 2010 Toyota Prius model II Head Unit Upgrade Monday, December 21, 2009 Disclaimer: Use this document and its contents at your own risk. Forward: Huge thanks to those members on Priuschat.com that forged
4x4 actuator "Cable Froze" 1988 s S-10 Forum
 Page 3 of 17 Converting a vacuum actuator to a locking cable system on a 1995 Chevy S10 Blazer 4x4 Many call this a posi-lock system. I spent a total of only $25.50 USD on this project. Other comparable
Curt Mfg. Trailer Hitch and Hoppy Wiring Kit Installation Instructions
 Curt Mfg. Trailer Hitch and Hoppy Wiring Kit Installation Instructions The Curt trailer hitch replaces the stock rear cross member in the Touareg. It attaches with 8 bolts just like the factory VW hitch.
TOYOTA im NAVIGATION UPGRADE Preparation
 Preparation Part Number: PT296-00170 PT296-12170 (Extension Module w/ AHA) Kit Contents Item # Quantity Reqd. Description 1 1 Extension Module 2 1 BT cable 3 1 DA/Ext Harness 4 1 GPS Antenna kit 5 6 Bolt
E31 Battery Replacement Procedure
 E31 Battery Replacement Procedure After over four years of service, the BMW batteries I installed shortly after bringing my car home from the federalizer finally signaled they were ready to pack it in
Door Panel Removal & Window Stop Adjustment
 Door Panel Removal & Window Stop Adjustment By: Jeff Wolford Disclaimer: This is simply an article of how I fixed my car. I m not responsible if you break, scratch, or mess up anything following my example.
JEEP JK WRANGLER UNLIMITED 4-DOOR Pro-Series Front Replacement Fenders
 PSFF001 2007-2016 JEEP JK WRANGLER UNLIMITED 4-DOOR Pro-Series Front Replacement Fenders HARDWARE INCLUDED 4 6mm x 25mm Hex Bolts 16 10mm x 20mm Button Head Bolts 8 6mm x 12mm x 1.6mm Flat Washers 16 10mm
VW & Audi TDI CR140 ECO KIT Installation Guide
 VW & Audi TDI CR140 ECO KIT Installation Guide This guide is to help you install your new Rawtek DPF, EGR & Adblue Delete Exhaust ECO Kit on your (2009-2014) VW / Audi with 2.0l CR140 Diesel Engine. Note:
HOW TO REPLACE THE SPOILER ON YOUR GEN 3 PRIUS
 HOW TO REPLACE THE SPOILER ON YOUR GEN 3 PRIUS Yup, it happened. The spoiler on your beloved Prius has departed this earth and now is in the great junkyard in the sky. This is how you make it all better
Roll Bar (MMRB-1.1 to 1.7)
") 3430 Sacramento Dr., Unit D San Luis Obispo, CA 93401 Telephone: 805/544-8748 Fax: 805/544-8645 www.maximummotorsports.com 1979-93 Roll Bar (MMRB-1.1 to 1.7) The Maximum Motorsports RB-1.1 to -1.7 Roll
3430 Sacramento Dr., Unit D San Luis Obispo, CA 93401 Telephone: 805/544-8748 Fax: 805/544-8645 www.maximummotorsports.com 1979-93 Roll Bar (MMRB-1.1 to 1.7) The Maximum Motorsports RB-1.1 to -1.7 Roll
These instructions show how to build the Remote Controlled Fart machine Sound Kit.
 Remote Controlled Fart Machine Assembly Instructions These instructions show how to build the Remote Controlled Fart machine Sound Kit. Tools Required Drill with 7/64, 3/16, and ¼ drill bits. Holt melt
Jazzy Engineering Aux-in Accessory for 2005/06 Subaru WRX, Outback Sport & Impreza Radios Installation Instructions
 Jazzy Engineering Aux-in Accessory for 2005/06 Subaru WRX, Outback Sport & Impreza Radios Installation Instructions First check that your package includes everything listed below for proper installation.
Contents. TCS/ Driver Mod Installation Manual
 Contents Introduction... 1 TCS Packing List... 3 Tools Needed for Installation... 4 How to Properly Solder... 5 Soldering Standard Butt Connection... 5 Soldering T Connection... 6 How to Properly Crimp...