Another CJ picture guide to replacing the key cylinder in a non-tilt steering column
|
|
|
- Lewis Heath
- 6 years ago
- Views:
Transcription

1 Another CJ picture guide to replacing the key cylinder in a non-tilt steering column by John Strenk Well I'm sure it's happened to all of us one time or another. You park your jeep and go to turn off your engine only to find that your keys are not in the ignition anymore. If your lucky enough to have a CJ in good shape, the keys are probably laying under your foot. If not it's probably on the road somewhere behind you. In my case it was buried in a 4' pile of snow when they fell through a rusted section of the floor during plowing. Also you may find you can start the jeep without the key. This is not a very effective way to prevent your jeep from being stolen or having your little kid start the jeep with it in gear. Can be very dangerous. So you decide to replace your key cylinder and go to the catalog to order a new one. First thing you find out is that there are two different cylinders mentioned. Hopefully they mention a year or maybe they don't and then your in a little trouble. They made a little change around You see there are two ways to ways AMC held the lock cylinder in place, With a clip or a screw.
2 Notice the slot in the top cylinder for a screw. These are usually found on steering columns with plastic housings. We will cover the difference a little later on in the article. But some plastic housing I've seen also has just the clip. I can't figure out any external way to determine which one you might have. But at least 84 and later have the screw type. If you have a metal housing, you can be pretty sure you have the clip style. Well so much about buying the correct lock cylinder. Lets get on to pulling stuff apart. As you might suspect, there area couple of special tools you need. A Steering wheel puller, I made my own. And a lock ring compressor tool.
3 You can get these at just about any Auto Part store and they are very inexspensive. And will save you tons of time. First remove the horn button.
4 Just get your fingers under the lip of the button and pull up on one side. If you haven't disconnected your battery the horn will remind you quickly. Nothing you could damage but just play it safe and remove the battery cable. Now get a 13/16 Socket and loosen and remove the nut.

5 If you have an impact wrench this step is pretty easy. If not just lock the steering wheel by putting the lock in the Lock position. Then get a breaker bar and while holding the wheel firmly, loosen and remove the nut and washer.

6 Now you can remove the swivel plate that holds the button on. Note the position it is in and remove the 3 screws. Remove the swivel and insulators Now remove the horn contact spring.
7 Now your left with the bare steering wheel mount.
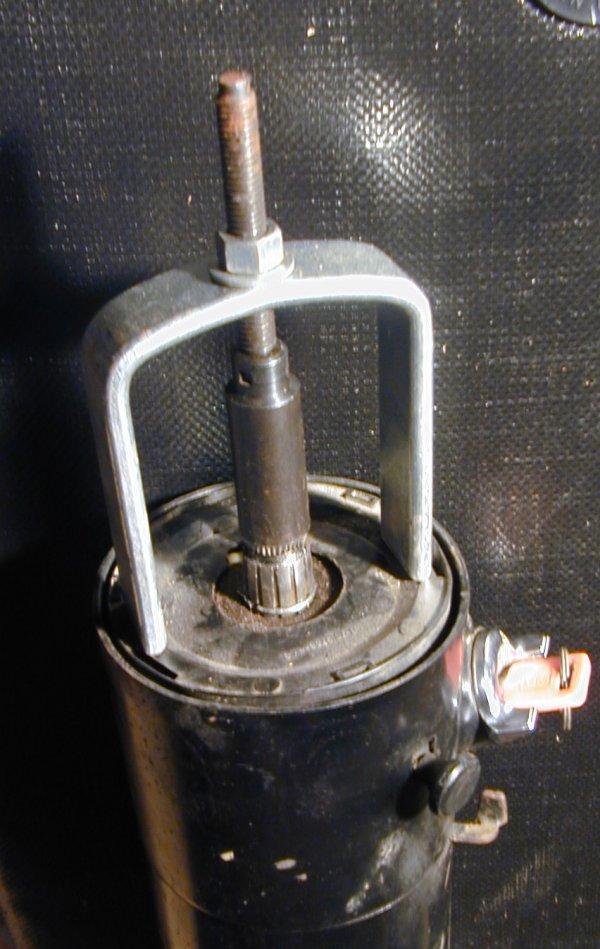
8 Now attach your steering wheel puller:
9 And remove the steering wheel.
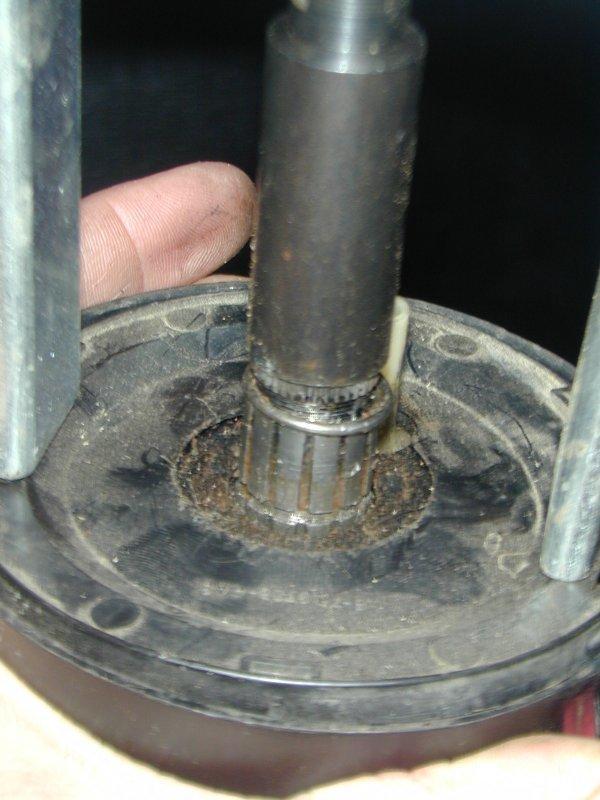
10 Yeah!!! Now we are down to the Lock Plate. This is to lock your steering wheel into position to prevent someone stealing your jeep. This one still has it's plastic cover in place. Notice the that one of the splines on the steering shaft is missing. This is important a little later in assembly. Attach the lock plate press by screwing the center section onto the steering shaft.
11

12 Then tighten the press by the little nut on top until the snap ring is visible.

13 The tricky part. Insert a screw driver under one end of the snap ring and pry it out.

14 Then with another screw driver, pry it up.
15
16 Now you can remove the snap ting all the way and remove the lock ring. Now remove the horn ring. Note it's position also. Important to install it the same way. Remove that spring that was causing you all the problem with the lock plate
17 Remove the one screw holding in the turn signal arm.
18 And remove the hazard button by turning the knob counter clockwise
19 Remove the 3 screws from the turn signal switch.
20 If you have enough slack you should be able to move the turn signal switch over the steering shaft. Remove the harness plug on the column mount if you have any problems to give you a little more slack.

21 Now your finally down to were you can get to the little hidden clips to remove the lock cylinder. There are two places to look fore that will help you remoce the cylinder. In the square area below, you can see the little clip you have to push down on to remove the cylinder. On some columns I have found there is some flashing left over the square opening that you will have to break through to get the cylinder out. Some later columns have a screw in the location designated with the circle.
22 If there is a screw were the the yellow CIRCLE is located then simply remove this screw and put the key in the ON position and remove the lock cylinder. If you lost your key, pull hard. It will come out. Sometimes a screw driver under the tangs will help.

23 This screw goes through the slot in the key cylinder like this:
24 If there is not a screw in the yellow circle, then insert a screw driver into the slot by the yellow SQUARE and push down on the little clip you see in there.

25 Put the key in the ON position and pull out on the lock. A little screw driver also helps. Check inside to make sure the rack and pinion gear are OK.

26 Clean it all out with WD-40 or something. Then insert the the new lock cylinder into place until it snaps or if you have the screw hold down then replace the screw. Check the action of the new cylinder to make sure it moves the rack and pinion smoothly. OK Now it goes back together. Put the turn signal switch back into position and tighten the 3 screws. There is not much to worry about as it can only go into place one way.it helps to have the Turn Signal in the Right turn position to get access to the top screw.

27 Don't forget to put the turn signal lever back in.

28 Put the lock plate spring back in if you took it out.

29 This will be a good time to screw the hazard button back into place. Check to make sure it pushes in and pulls out freely.

30 Now put in the horn contact plate. Be sure to put it in the correct position or you can break the tower off the contact when your trying to figure out why nothing goes back together correctly.

31 It's position will depend upon the position of the steering shaft but just look at the splines on the shaft and look for the spline that is missing as you can see in the picture above. You will need to know this when you reinstall the lock plate in the next step also. there is a slot on the top of the lock plate that the horn contact passes through AND it is splined in a certain way that one spline is missing so be sure to install it this way.

32 Now put the snap ring back on and pushed down a little.

33 Now attach the lock ring compression tool again.
34

35 Turn the nut on the compression tool until the snap ring groove is exposed. And push the snap ring into position.

36 Go get a drink and come back for putting on the steering wheel. When you put the steering wheel on there are alignment marks on the shaft and the wheel. There is also a hole in the wheel were the horn contact tower passes through. There is a little adjustment in the horn button tower but it should pass through the hole in the steering wheel when the wheel is aligned with the steering shaft. Put the wheel on paying attention the the alignment marks and horn contact post. You can push it down quite a bit but you will have to tighten the nut down later to be sure it's fully seated.

37 Now put the horn spring contact plate into position. It's not flat so be sure the high part in the center is up. If not, your horn will sound off randomly as you go over bumps.align it so you can ut the screw and horn ring insulators through the holes freely.

38 Now put the 3 screws through the plastic isolators and put it inside the horn ring.

39 Now put the horn ring into position over the steering wheel. Make sure the notch in the ring aligns with the alignment marks on the wheel. This is to put the horn button on correctly.

40 Put the nut on washer on and tight to ft-lbs. Don't go to tight. I've seen the threaded part get stretched out of shape on the steering shaft. Now put the button on making sure it's also aligned correctly.
41 Now connect the battery. Make sure the turn signals work and cancel when you turn the wheel. Check the horn to see if it works and pull the hazard switch out to be sure it works also. Check the key cylinder to make sure it operates correctly. Now your done and you can stop worrying about losing the keys or having someone start your jeep without being around.
42
Another CJ picture guide to
 Another CJ picture guide to replacing the key cylinder in a non-tilt steering column by John Strenk Well I'm sure it's happened to all of us one time or another. You park your jeep and go to turn off your
The drawings are all available from the author or from the host websight. You will find these pictures and descriptions to be most helpful.
 Last Revision: 10JA2010 1969 THRU 1976 GM A & F-CAR STANDARD (NON-ADJUSTABLE) STEERING COLUMN DISASSEMBLY & REPAIR INSTRUCTIONS PAPER #1 Disassembly and Repair Instructions Addressed in this Paper Degree
*Some speedometers have these additional electronic connections. If yours does, then remove the smaller slotted screws shown.
 www.odometergears.com 1981-1985 240 Cable-Driven Speedometers (NOT for 1986 and later electronic units) http://www.davebarton.com/240-odometer-repair.html For this set of instructions below, I will not
The drawings are all available from the author or from the host websight. You will find these pictures and descriptions to be most helpful.
 Last Revision: 09JA2010 1969 THROUGH 1976 GM A & F-CAR TILT STEERING COLUMN DISASSEMBLY & REPAIR INSTRUCTIONS PAPER #1 Disassembly and Repair Instructions Addressed in this Paper Degree of Difficulty Page
OEM Cruise Control Installation in GMC/Chevy NBS trucks
 OEM Cruise Control Installation in 99-02 GMC/Chevy NBS trucks May 2008 ~ Rampage_Rick Having just installed factory cruise control in my 00 Sierra, I thought I d share the fun. I followed the steps outlined
The drawings are all available from the author or from the host websight.
 Last Revision: 15OC2013 1969 THRU 1979 CORVETTE C3 STANDARD (NON-ADJUSTABLE) STEERING COLUMN DISASSEMBLY & REPAIR INSTRUCTIONS PAPER #1 Disassembly and Repair Instructions Addressed in this Paper Difficulty
Fitting Instructions For The TDV6 EGR Blanking Kit To A 2006 Model Discovery 3 TDV6 GHSE
 Part Number DA1112 Fitting Instructions For The TDV6 EGR Blanking Kit To A 2006 Model Discovery 3 TDV6 GHSE You do this modification at your own risk. Britpart won t be held responsible for what is written
Retro it Steering Column
 Retro it Steering Column INSTALLATION INSTRUCTIONS for 1976-86 CJ5 & CJ7 FOR PART NUMBER S: 1520800010, 1520800020, 1520800051, 1526800010, 1526800020, 1526800051 S I NCE 1986 Instruction # 8000000010
Fitting the Bell Auto Services (B-A-S) TDV6 EGR Blanking Kit to a 2006 model Discovery 3 TDV6 HSE
 TDV6 EGR Blanking Kit to a 2006 model Discovery 3 TDV6 HSE") Fitting the Bell Auto Services (B-A-S) TDV6 EGR Blanking Kit to a 2006 model Discovery 3 TDV6 HSE Before I describe how I did this, I must first thank other members of the Disco3.co.uk forum (namely J,moore
Fitting the Bell Auto Services (B-A-S) TDV6 EGR Blanking Kit to a 2006 model Discovery 3 TDV6 HSE Before I describe how I did this, I must first thank other members of the Disco3.co.uk forum (namely J,moore
Rebuilding the Power Steering Pump for a 2007 Honda Accord 4CYL
 Rebuilding the Power Steering Pump for a 2007 Honda Accord 4CYL Disclaimer: I have benefited greatly from others who have taken the time to post auto repair videos/tutorials online. To try and return the
 www.odometergears.com Mercedes-Benz Mechanical Odometer Repair This how to can be used for all mechanical repairs as the only difference will be the removal of the instrument cluster. http://www.dieselgiant.com/repairyourodometer.htm
Prerequisites: Shop Manual (recommended) pages 3-9 through 3-13.
 pages 3-9 through 3-13.") Prerequisites: Order your gaskets average about $25.00 bucks X 2 so $50.00 4NK-11193-00-00 Obtain a shim kit (Should have several 265 and 270s) (Some dealers will exchange) Obtain a Valve Bucket Tool YM-33961
Prerequisites: Order your gaskets average about $25.00 bucks X 2 so $50.00 4NK-11193-00-00 Obtain a shim kit (Should have several 265 and 270s) (Some dealers will exchange) Obtain a Valve Bucket Tool YM-33961
BODY-24, Late Model 944 ( and Newer) Dash Replacement
 Dash Replacement") BODY-24, Late Model 944 (1985.5 and Newer) Dash Replacement Introduction Replacing the dash in a late model 944 is not overly difficult. However, it is very tedious and a lot of patience is required. It's
BODY-24, Late Model 944 (1985.5 and Newer) Dash Replacement Introduction Replacing the dash in a late model 944 is not overly difficult. However, it is very tedious and a lot of patience is required. It's
Adjusting brake shoes for AutoPark parking brake
 Adjusting brake shoes for AutoPark parking brake This document is a compilation of several separate writeups. What we're trying to do here is consolidate the necessary information needed for you to make
M1A1 Thompson Upgrade
 M1A1 Thompson Upgrade If you are mechanically inclined at all. This should be no problem. I'll start off with a list of things you will need. Thompson M1A1 Whisky Cigarettes Tools: Flat screwdriver No.
PLEASE READ THROUGH THE WHOLE WRITE UP BEFORE ACTUALLY USING IT!!!!
 JDM power folding mirror switch install into stock USDM harness. By: Greg L., Zeke21 on twinturbo.net PLEASE READ THROUGH THE WHOLE WRITE UP BEFORE ACTUALLY USING IT!!!! This is how I was able to get the
STEERING COLUMN - TILT
 STEERING COLUMN - TILT 1993 Toyota Celica 1993 STEERING Toyota - Steering Columns - Tilt Wheel Celica DESCRIPTION & OPERATION Tilt steering wheels incorporate an upper steering shaft, attached by a "U"
Installation Instructions Jeep CJ-7
 Retrofit Steering Column Installation Instructions 1976-86 Jeep CJ-7 For Part # s 1520800010, 152800020, 1520800051 www.ididitinc.com 610 S. Maumee St., Tecumseh, MI 49286 (517) 424-0577 (517) 424-7293
1989 Jeep Cherokee. STEERING COLUMN' '1989 STEERING Jeep Steering Columns STEERING COLUMN STEERING Jeep Steering Columns
 STEERING COLUMN 1989 STEERING Jeep Steering Columns DESCRIPTION All models use collapsible steering columns. All columns have integral ignition switch and locking device. Optional tilt wheel is available
Installation instructions for the FC6 Forward Controls for Suzuki Marauder 800
 Installation instructions for the FC6 Forward Controls for Suzuki Marauder 800 It is highly recommended that you use a thread lock compound such as Loctite on all threads to keep them from vibrating loose.
Rear Wheel Removal (by BassCliff)
") Rear Wheel Removal (by BassCliff) Hello to my GS riding friends! After picking up a nail in my rear tire (while on the freeway at 75mph!) I thought I would take a few pictures to help illustrate the rear
Rear Wheel Removal (by BassCliff) Hello to my GS riding friends! After picking up a nail in my rear tire (while on the freeway at 75mph!) I thought I would take a few pictures to help illustrate the rear
what you need to do is hit the taper housing as hard as you can with your hammers AT THE SAME TIME and at a slight angle, what will happen is you
 first things first, get the car on axle stands and the wheels off. Open the bonnet to let more light through to the area in which you'll be working. The following guide shows the passenger side being done
Changing the Struts on a WK Jeep CRD
 Changing the Struts on a WK Jeep CRD Step by Step By Chirpz Disclaimer: I do not claim that this procedure is the right way or even the best way to change your struts. This is what I did after reading
Spikes-Spider Hub Installation
 Spikes-Spider Hub Installation The instructions that are provided with the Spikes Spiders are pretty good. I've created this page for two reasons: to show those that are thinking of buying a set exactly
Troubleshooting Guide for Okin Systems
 Troubleshooting Guide for Okin Systems More lift chair manufacturers use the Okin electronics system than any other system today, mainly because they re quiet running and usually very dependable. There
Looking up the front of the engine from under the radiator. (Picture taken with belt under tension.)
") 8. If you re replacing the AC compressor drive belt as well, it s time to loosen its belt tensioner. The AC compressor belt tensioner is very obvious under the front of the car. Loosen the 13mm bolt, then
8. If you re replacing the AC compressor drive belt as well, it s time to loosen its belt tensioner. The AC compressor belt tensioner is very obvious under the front of the car. Loosen the 13mm bolt, then
Presented at GMC Motorhomes International Fall Convention 9/28/06. By Richard Sowers
 Presented at GMC Motorhomes International Fall Convention 9/28/06 By Richard Sowers Tools needed to work on the column In addition to the normal tools for such a job as this, some special ones are required:
1986 Rear Disk Brake Upgrade. All hard lines mounted to the rear axle with mounting screws. 1/4" fittings
 1986 Rear Disk Brake Upgrade Being well prepared for a project of this size is the key to success. I thought I was well prepared by doing a lot of research and getting all of the required parts before
Installing the Wireless Charging upgrade kit in a 2018 XT5 (Platinum version)
") Installing the Wireless Charging upgrade kit in a 2018 XT5 (Platinum version) September 2, 2018 Tools needed: Wireless charger upgrade kit Plastic trim tools 7 mm nut driver Background: I purchased the
Installing the Wireless Charging upgrade kit in a 2018 XT5 (Platinum version) September 2, 2018 Tools needed: Wireless charger upgrade kit Plastic trim tools 7 mm nut driver Background: I purchased the
How to replace your Turbo Actuator Step by Step
 How to replace your Turbo Actuator Step by Step Special thanks to other forum members who have previously dealt with this problem! Old By Chirpz New Your Turbo is a lot tougher than the electric actuator
Installation Instructions INDY SHIFTER Fits: Mustang Fastback & Convertible with MT-82 Transmission Catalog #
 Installation Instructions INDY SHIFTER Fits: 2015-2018 Mustang Fastback & Convertible with MT-82 Transmission Catalog # 3916036 Watch our installation video on YouTube WORK SAFELY! For maximum safety,
DIY: Shiver Valve Check, Illustrated
 DIY: Shiver Valve Check, Illustrated By Petemoss, AF1 Forum Tools needed: 4mm allen wrench to remove all the fairing pieces 2.5mm allen wrench to remove battery holder 5mm allen wrench for valve cover
Rebuilding the Alternator for a 2007 Honda Accord 4CYL. Honda CYL Alternator (Denso)
") Rebuilding the Alternator for a 2007 Honda Accord 4CYL Honda 2007 4CYL Alternator (Denso) The OEM brushes and bearings for this alternator are available for purchase online. On my vehicle with ~240k miles,
Rebuilding the Alternator for a 2007 Honda Accord 4CYL Honda 2007 4CYL Alternator (Denso) The OEM brushes and bearings for this alternator are available for purchase online. On my vehicle with ~240k miles,
Corvette Set Separator (Glove Box) Lock Removal
 Lock Removal") 1956-62 Corvette Set Separator (Glove Box) Lock Removal The materials here were gathered from several Corvette Forum Threads as well as from the Web Pages of Rich Mozzetta (rich5962 on the CF). Our colleagues
1956-62 Corvette Set Separator (Glove Box) Lock Removal The materials here were gathered from several Corvette Forum Threads as well as from the Web Pages of Rich Mozzetta (rich5962 on the CF). Our colleagues
Tools needed: Here is a pic of the shift kit I used. It is a Transgo brand and as you can see, it just a bag full of springs and one valve.
 Before installing a shift kit, be sure the transmission is in good operating order. If your transmission is making noises, slipping, shifting bad or the fluid looks brown or smells burnt, take the transmission
How to Fix the Altitude Clutch Problem in the Meade DS Mount By John Zimmerman September 2005
 How to Fix the Altitude Clutch Problem in the Meade DS Mount By John Zimmerman September 2005 Note: I claim no personal credit for the solution described here. Other DSX owners, whose real names I do not
Kodak 750H Carousel Projector Repair
 Kodak 750H Carousel Projector Repair An AT YOUR OWN RISK PROJECT by Klaus Wolter, Rev B, 3-26-2016 Here I documen the repair of my 750H carousel. A common problem with this projector, and all of the projectors
LAMBO VERTICAL DOOR HOW TO GUIDE
 -1 LAMBO VERTICAL DOOR HOW TO GUIDE Despite what you may believe, scissor doors are not that difficult to install. There are plenty of body shops out there that will charge you $2,000 - $10,000 for this
M52tu-M54 VANOS Assembly & Timing Using G.A.S. Professional Cam Tool Kit
 Home BMW Solutions Porsche Solutions DIY Tech Engine Services Dyno Services Machining About Contact Store Tool Rental M52tu-M54 VANOS Assembly & Timing Using G.A.S. Professional Cam Tool Kit This procedure
Retrofit Steering Column Installation Instructions
 Retrofit Steering Column Installation Instructions for 1965-66 Mustangs www.ididitinc.com 610 S. Maumee St., Tecumseh, MI 49286 PH: (517) 424-0577 FAX: (517) 424-7293 Revised 3/22/2010 Instruction #: 8000000011
VWvortex Forums > Golf IV & Jetta IV > DIY: Timing Belt And Coolant Pump Replacement on 2.0 AEG! Pics Inside! (Printable Version)
") VWvortex Forums > Golf IV & Jetta IV > DIY: Timing Belt And Coolant Pump Replacement on 2.0 AEG! Pics Inside! (Printable Version) Click here to print this topic. Post Title: DIY: Timing Belt And Coolant
VWvortex Forums > Golf IV & Jetta IV > DIY: Timing Belt And Coolant Pump Replacement on 2.0 AEG! Pics Inside! (Printable Version) Click here to print this topic. Post Title: DIY: Timing Belt And Coolant
Ignition Timing - Honda 180-Degree Twins
 Ignition Timing - Honda 180-Degree Twins First thing to do is make a quick test light - I used a 12 volt indicator bulb from a speedo. Test leads with alligator clips make hookup easy... The point plate
DrVanos.com Stage II Installation Instructions. Tool rental is available with the purchase of a vanos kit *See website for more info*
 DrVanos.com Stage II Installation Instructions Special Tools Needed: Camshaft locking tool TDC Crank pin Sprocket turning tool Tool rental is available with the purchase of a vanos kit *See website for
BMW 528i E39 Sunroof Repair
 These instructions will help guide you through the repair process for broken sunroof control rails on an E39 chassis. Before I get started, I want to give a shout-out to a couple people who also posted
Replacing the hub oil seal.
 Replacing the hub oil seal. The most common reason for hub oil seal failure is a blocked axle breather, so check this first before you start. Remove the brass bell-shaped fitting on the top of the axle,
Installation Guide for Rough Country 2.5 inch Lift Kit w/o Shocks (07-15 Wrangler JK) Item # J10212
 Item # J10212") Installation Guide for Rough Country 2.5 inch Lift Kit w/o Shocks (07-15 Wrangler JK) Item # J10212 Installation Time: 3 Hours Tools Required: Jack (2 helps, but not needed) Jack stands(2 3-ton, 2 2-ton)
Installation Guide for Rough Country 2.5 inch Lift Kit w/o Shocks (07-15 Wrangler JK) Item # J10212 Installation Time: 3 Hours Tools Required: Jack (2 helps, but not needed) Jack stands(2 3-ton, 2 2-ton)
Installation Instructions COMPETITION/PLUS SHIFTER Ford Mustang MT82 6-Speed Manual Transmission Catalog#
 Installation Instructions COMPETITION/PLUS SHIFTER 2015-2017 Ford Mustang MT82 6-Speed Manual Transmission Catalog# 3916037 Rev. 00 WORK SAFELY! For maximum safety, perform this installation on a clean,
Troubleshooting Guide for Limoss Systems
 Troubleshooting Guide for Limoss Systems NOTE: Limoss is a manufacturer and importer of linear actuators (motors) hand controls, power supplies, and cables for motion furniture. They are quickly becoming
Installation Instructions for BMR Lowering Springs Performance ( Mustang GT)
") Installation Instructions for BMR Lowering Springs Performance (2015-2017 Mustang GT) Time Required: 3+ hours Notes: This install was done with the performance springs from BMR, but install should be the
Installation Instructions for BMR Lowering Springs Performance (2015-2017 Mustang GT) Time Required: 3+ hours Notes: This install was done with the performance springs from BMR, but install should be the
How to install the Barnett clutch and the stronger Oil Pump Drive Gear
 How to install the Barnett clutch and the stronger Oil Pump Drive Gear Written by WildFred I m from Germany so please excuse my English and the spelling. The following procedure is a combination of the
Lowering Spring Installation on a Mustang GT
 Lowering Spring Installation on a 99-04 Mustang GT This installation is very the same installation that many of the 79-04 Mustangs excluding Cobra require. Time to install: 2-3 hours to do alone with a
Trouble Shooting Guide for Hubbell Systems
 Trouble Shooting Guide for Hubbell Systems NOTE: Hubbell Special Products discontinued operations in 2008, so there is a very limited number of repair parts available for motor repair. In some ways, this
Aamir_bt The legend..
 Aamir_bt The legend.. How to do timing on a 4XE1-W (DOHC) engine. well i decided to to a write up for DOHC timing since there was only the SOHC written up, and i had to do a timing belt on my stylus anyways,
Installation Manual TWM Performance Short Shifter Cobalt SS/SC, SS/TC, HHR SS, Ion Redline and Saab 9-3
 Page 1 Installation Manual TWM Performance Short Shifter Cobalt SS/SC, SS/TC, HHR SS, Ion Redline and Saab 9-3 Please Note: It is preferable to park on a flat surface, as you will have to engage and disengage
Last Revision: 15OC THROUGH 1982 CORVETTE TILT & TELESCOPING STEERING COLUMN DISASSEMBLY & REPAIR INSTRUCTIONS PAPER #1
 Last Revision: 15OC2013 1969 THROUGH 1982 CORVETTE TILT & TELESCOPING STEERING COLUMN DISASSEMBLY & REPAIR INSTRUCTIONS PAPER #1 Disassembly and Repair Instructions Addressed in this Paper Difficulty Page
Jaguar Update. Adjustable Reaction Plate
 Jaguar Update Adjustable Reaction Plate Home January 7, 2008 I recently installed an adjustable reaction plate from CoolCat Express Corp. I've included some notes from that experience. I'm not affiliated
1999 BMW K1200 LT: Plastic Removal
 1999 BMW K1200 LT: Plastic Removal Well, it had to happen. While removing the plastic that covers the handle bars to see where to route power for GPS and/or radar detector the tip of the torx driver fell
PLEASE READ THESE INSTRUCTIONSFULLY BEFORE STARTING TO ASSEMBLE YOUR DIDICAR PLEASE PAY SPECIAL ATTENTION TO THE NOTES AND HINTS
 PLEASE READ THESE INSTRUCTIONSFULLY BEFORE STARTING TO ASSEMBLE YOUR DIDICAR PLEASE PAY SPECIAL ATTENTION TO THE NOTES AND HINTS ASSEMBLY INSTRUCTIONS Parts List iv) i) v) ii) iiib) iiia) vii) i) Car Body
Mercedes Diesel Valve Adjustment Procedure
 1 of 30 5/30/2008 12:58 PM Home Cars for sale Trucks for sale Where we are Links to other diesel sites About us Why diesel? Diesel Videos How they work How they sound FAQ Dodge Diesel Maintenance tips,
CALDERA 10E Spur Gear Change
 CALDERA 10E Spur Gear Change www.thirdcoastrc.com ebay handle - little*oak Click Below to Visit our Ebay Store EBAY STORE (Please take a moment and bookmark my website, ebay store, and save me as an ebay
Eurocompulsion Camshaft Installation
 Eurocompulsion Camshaft Installation Introduction, please read. The purpose of this article is too assist our customers with installation of a performance camshaft in the Fiat Multiair 1.4 Turbo. The operation
BMW E61 Hydraulic Pump replacement instructions
 BMW E61 Hydraulic Pump replacement instructions This DIY will guide you through the tasks needed to successfully replace your defective tailgate hydraulic pump Difficulty 3 of 10. The most difficult part
Last Revision: 07SE2009
 Last Revision: 07SE2009 1967 (Late) and 1968 CORVETTE STANDARD (NON-ADJUSTABLE) STEERING COLUMN DISASSEMBLY & REPAIR INSTRUCTIONS PAPER #1 Disassembly and Repair Instructions Addressed in this Paper Difficulty
Ford F-150 Speaker Replacement Instructions
 Ford F-150 Speaker Replacement Instructions This article was downloaded from http://www.fordf150.net Be sure to go there to view and download the other how-to articles. Thanks to John Meyer for contributing
1 of 2 9/4/ :27 AM
 Ford Mustang IAC IAB - Solving your idle problems http://www.muscularmustangs.com/iac.php 1 of 2 9/4/2010 10:27 AM Solving idle problems part 1 - Cleaning your IAC Does your idle rise and fall over and
RedlineGoods Tacoma Installation Manual
 RedlineGoods 2016+ Tacoma Installation Manual AUTOMATIC SHIFT BOOT AND EBRAKE BOOT Press down on the factory shift boot collar to disconnect it from the shift knob. Unscrew shift knob Pull up on the rear
Ford Super Duty 5.4L Spark Plug Change F250 4x4 XLT Sport Crew Cab
 1 of 32 Ford Super Duty 5.4L Spark Plug Change 2004 F250 4x4 XLT Sport Crew Cab Back to 2004 F250 Main Page Click Here for a PDF version of this article At close to 100k miles, I figured it was time for
STEERING COLUMN - TILT
 STEERING COLUMN - TILT 1994 Toyota Celica 1994 STEERING Toyota - Steering Column - Tilt Wheel Celica DESCRIPTION & OPERATION Tilt steering wheels incorporate a mainshaft, attached by a "U" joint to an
1967 (Late) and 1968 CORVETTE TELESCOPING STEERING COLUMN DISASSEMBLY & REPAIR INSTRUCTIONS - PAPER #1
 and 1968 CORVETTE TELESCOPING STEERING COLUMN DISASSEMBLY & REPAIR INSTRUCTIONS - PAPER #1") Last Revision: 03SE2012 1967 (Late) and 1968 CORVETTE TELESCOPING STEERING COLUMN DISASSEMBLY & REPAIR INSTRUCTIONS - PAPER #1 Disassembly and Repair Instructions Addressed in this Paper Difficulty Page
Last Revision: 03SE2012 1967 (Late) and 1968 CORVETTE TELESCOPING STEERING COLUMN DISASSEMBLY & REPAIR INSTRUCTIONS - PAPER #1 Disassembly and Repair Instructions Addressed in this Paper Difficulty Page
Removing Original Rod
 Congratulations on your purchase of the Golden Rod tm. We wish you many miles of crisper, more precise shifting. Everything is done via the underside of the car; nothing inside the car needs to be touched.
Brake Caliper Rebuild - Part Numbers & Tips Per Jim Millet, 3/15/2005
 Per Jim Millet, 3/15/2005 Not too difficult a job. Rears are easier than fronts to access. You ll need the following gasket sets: Front caliper gasket set, P/N 34 11 1 157 037, MSRP $13.58 Rear caliper
Re-building a Caliper
 Re-building a Caliper by Leslie Henson The pistons in the calipers on the 90 are in very poor condition, and although the brakes work ok, it plays on our mind that the pistons are badly corroded, and it
FlexJet - Flex Cable Replacement
 P/N: 109515R0 14140 NE 200th St. Woodinville, WA. 98072 PH: (425) 398-8282 FX: (425) 398-8383 FlexJet - Flex Cable Replacement Notices: Warning! Ensure that all AC power cables are removed from the printer
Disco 3 Clock Spring / Rotary Coupler replacement
 Disco 3 Clock Spring / Rotary Coupler replacement I recently had to change my Clock spring and thought some folks may find it helpful to see what it entailed. I did lots of reading around but couldn t
Combine Cover Manual
 Combine Cover Manual Installation Instructions Page 26 Operating Instructions Page 7 Warranty Page 7 Trouble Shooting Page 8 10 For Big Top Extension Model s: Case I.H. 8010, 8120 Please forward onto Customer
BEW engine timing belt replacement procedure from MOGolf (as demonstrated on a 2004 Jetta).
.") BEW engine timing belt replacement procedure from MOGolf (as demonstrated on a 2004 Jetta). Based on the procedure published by Volkswagen, but modified for the "average" shadetree mechanic. Some special
BEW engine timing belt replacement procedure from MOGolf (as demonstrated on a 2004 Jetta). Based on the procedure published by Volkswagen, but modified for the "average" shadetree mechanic. Some special
How To: Thermostat change - D8 V6 194bhp
 How To: Thermostat change - D8 V6 194bhp Firstly, take off the Air Filter hoses and connectors and lift off. This leaves you with this workable space... I started with taking the two bolts out of the cable
G.A.S. M54 DISA Repair Kit D.I.Y. Instructions
 Home BMW Solutions Porsche Solutions DIY Tech Engine Services Dyno Services Machining About G.A.S. Contact G.A.S. M54 DISA Repair Kit D.I.Y. Instructions The installation of the German Auto Solutions DISA
Днепр) Russian Motorcycle Carburetors Part 2B: PZ-24 and PZ-28 Carburetor Assembly and Jet Drilling
 Russian Motorcycle Carburetors Part 2B: PZ-24 and PZ-28 Carburetor Assembly and Jet Drilling") Ural (Урал( Урал) - Dnepr (Днепр( Днепр) Russian Motorcycle Carburetors Part 2B: PZ-24 and PZ-28 Carburetor Assembly and Jet Drilling (applies also to K-37 K and K-38 K carbs) Ernie Franke eafranke@tampabay.rr.com
Ural (Урал( Урал) - Dnepr (Днепр( Днепр) Russian Motorcycle Carburetors Part 2B: PZ-24 and PZ-28 Carburetor Assembly and Jet Drilling (applies also to K-37 K and K-38 K carbs) Ernie Franke eafranke@tampabay.rr.com
The steering column is of a modular construction and features easy to service electrical switches.
 file://c:\tso\tsocache\vdtom_5368\svk~us~en~file=svkb4a01.htm~gen~ref.htm Page 1 of 3 Section 11-04A: Steering Column, Ranger DESCRIPTION AND OPERATION 1997 Ranger Workshop Manual Steering Column NOTE:
Troubleshooting Guide for Dewert Systems
 Troubleshooting Guide for Dewert Systems Dewert electronics aren t as common as Okin systems as they re mainly used by one manufacturer (Pride). However, Pride is the largest lift chair manufacturer in
BBK Ceramic Long Tube Headers (99-04 Cobra and Mach 1) - Installation Instructions
 - Installation Instructions") BBK Ceramic Long Tube Headers (99-04 Cobra and 03-04 Mach 1) - Installation Instructions The below installation instructions work for the following products: BBK Ceramic Long Tube Headers (99-04 Cobra
BBK Ceramic Long Tube Headers (99-04 Cobra and 03-04 Mach 1) - Installation Instructions The below installation instructions work for the following products: BBK Ceramic Long Tube Headers (99-04 Cobra
2012 SLK V6 (M276 Engine) Spark Plug Replacement
 Spark Plug Replacement") 2012 SLK 350 3.5 V6 (M276 Engine) Spark Plug Replacement Proceed at your own risk. I read the Mercedes repair documents pertaining to changing the R172 SLK M276 V6 engine s spark plugs that I could find
2012 SLK 350 3.5 V6 (M276 Engine) Spark Plug Replacement Proceed at your own risk. I read the Mercedes repair documents pertaining to changing the R172 SLK M276 V6 engine s spark plugs that I could find
S1 Sequential. T56 Magnum. Sequential shifter. Contents and assembly instructions
 S1 Sequential Sequential shifter T56 Magnum Contents and assembly instructions Parts List Sequential shifter x1 Base plate x1 Base spacer x1 Drill Square x1 Shaft fitting x1 Square washer x1 8mm Aluminium
Volvo 1800 Dash Pad Replacement
 Volvo 1800 Dash Pad Replacement (courtesy of John Garden State Chapter Volvo Club America) Reupholstering the dash Well it has been some time since I have been online in the forum. Winter is a quite time
Installation Instructions. QuickSilver Shifter. Fits: GM, Ford, Chrysler Transmissions See Application Guide for Specific Applications Part # 80683
 Installation Instructions QuickSilver Shifter Fits: GM, Ford, Chrysler Transmissions See Application Guide for Specific Applications Part # 80683 WORK SAFELY! For maximum safety, perform this installation
RHINO SUSPENSION SYSTEM INSTALLATION INSTRUCTIONS
 PARTS INCLUDED: 2 FRONT UPPER A-ARMS 2 FRONT LOWER A-ARMS 2 UNI-BALL JOINTS 2 UNI-BALL JOINT STUDS 2 UNI-BALL JOINT CAPS 2 RETAINING RINGS 1 FRONT SHOCK ASSEM. 2 DELRON STEERING STOPS 2 SHOCK MOUNT SPACERS
Written By: David Hodson
 2008-Present Scion xb Oil Change Second generation Scion xb oil change. Written By: David Hodson ifixit CC BY-NC-SA www.ifixit.com Page 1 of 19 INTRODUCTION Change the oil in your 2008 or newer Scion xb
How to Change Front Brake Pads on a Toyota Corolla
 How to Change Front Brake Pads on a Toyota Corolla Link to this article on (All other links in this document are disabled) Follow this picture guide to change the front brake pads on a 2003-2008 Toyota
Tailgate Light Bar Installation by Flopster Feb 2015
 Tailgate Light Bar Installation by Flopster843 23 Feb 2015 If you ever looked at the rear of a 3rd generation Dodge Ram dually pickup truck, you'll notice that there is a light bar with 3 red marker lights
Connecting the rear fog light on the A4 Jetta, while keeping the 5 Light Mod
 Connecting the rear fog light on the A4 Jetta, while keeping the 5 Light Mod DISCLAIMER: I'm human and make mistakes. If you spot one in this how to, tell me and I'll fix it This was done on my 99.5 Jetta.
Retrofit Steering Column Installation Instructions
 Retrofit Steering Column Installation Instructions for 1967 Mustangs www.ididitinc.com 610 S. Maumee St., Tecumseh, MI 49286 PH: (517) 424-0577 FAX: (517) 424-7293 Revised 9/29/2009 Instruction #: 8000000014
The Zenith Stromberg Water Choke
 Page 1 of 16 The Zenith Stromberg Water Choke Rick Jaskowiak Bemidji, MN 11/24/2001 Click here to email me. Return to my home page When my last Midget project ran poorly after an engine rebuild due to
Installation Manual Lock-Switch KIA Sorento V3 Installation Manual Lock-Switch V3 for KIA Sorento (02-06) and KIA Sorento (07-09)
 and KIA Sorento (07-09)") Installation Manual Lock-Switch V3 for KIA Sorento (02-06) and KIA Sorento (07-09) Note: A any work on the electrical system of a car before should the battery be disconnected at the negative terminal
Installation Manual Lock-Switch V3 for KIA Sorento (02-06) and KIA Sorento (07-09) Note: A any work on the electrical system of a car before should the battery be disconnected at the negative terminal
Bendix Hydroboost Repair
 Bendix Hydroboost Repair Report this image Pic 1 the leaky power piston seal... (probably master cyl too.) Pic 2 PS fluid after spider removal and MC actuator rod Pic 3 Removing the accumulator (note 1/8
INSTALLATION INSTRUCTIONS
 INSTALLATION INSTRUCTIONS Accessory Application Publications No. BII 23302 2002 MDX Issue Date PN 08U97-S3V-210 (BLACK) P/N 08U97-S3V-270 (SADDLE) NOV 2001 PARTS LIST Wood trim steering wheel 1. Make sure
WH Ford 2WD Steering System #2013/2015 Date 02/15/04 rev. 1
 Phone (209) 400-7200 Fax (209) 943-7923 www.wildhorses4x4.com WH Ford 2WD Steering System #2013/2015 Date 02/15/04 rev. 1 Basic system notes: This system works on 1966-1977 Broncos with manual steering
Heater Core Replacement
 Heater Core Replacement Ok, I just finished replacing the heater core in my dad's '94 840Ci. While this is fresh in my mid I thought I would outline the procedure, I'm going from memory here, so I will
2005 and 09 Mustang install instructions Sequential / Chase Unit Partial Plug-N-Play Kit Meter4it Eng. Updated: 3/28/09
 Updated: 3/28/09 Verify content of kit: 1- Unit with wiring harness 1- Red power wire with 15 amp fuse 1- Color instruction 2- Velcro for mounting 1-Driver taillight harness 1- Passenger taillight harness
HPFP DIY. Warning: The injector fuel lines, the rail, and the HPFP are pressurized long after you turn off the car, I recommend
 HPFP DIY Warning: The injector fuel lines, the rail, and the HPFP are pressurized long after you turn off the car, I recommend disconnecting the battery and letting the car sit over night before performing