Right On Replicas, LLC Step-by-Step Review * 1966 Chevy Fleetside Pickup Truck 1:25 Scale Revell Model Kit # Review
|
|
|
- Blanche Amie Bond
- 5 years ago
- Views:
Transcription

1 Right On Replicas, LLC Step-by-Step Review * 1966 Chevy Fleetside Pickup Truck 1:25 Scale Revell Model Kit # Review The first Chevrolet pickup truck came out in 1924, through in-house designs but did not appear until From 1957, trucks were available from the factory as 4-wheel drive, and the new class scheme would make this known. A C in front of the series number would indicate 2-wheel rear drive while a K would denote 4-wheel drive. Actual badging on trucks still carried the series name system from the previous generation. The 1960 model year introduced a new body style of light pick-up truck that featured many firsts. Most important of these were a drop-center ladder frame, allowing the cab to sit lower and independent front suspension, giving an almost car-like ride in a truck. Also new for 1960 was a new designation system for trucks made by GM. Gone was the 3100, 3200, and 3600 designations for short 1/2, long 1/2 and 3/4-ton models. Instead, a new scheme would assign a 10, 20, or 30 for 1/2, 3/4, and 1-ton models. The cab was changed for 1964, with elimination of the "wraparound" windshield and a new front grille design, along with various interior changes. Air conditioning and a 327 V8 came in A new base engine finished the model in 1966 with a 250 c.i.d Inline Six. For the Modeler: This review covers the Revell release of the 66 Fleetside Pickup in 1/25 scale. This is Kit # in the current catalog. The kit represents a 1966 version and is a New Release for Revell but the kit is a Re-package of the 1964 and 1965 kits. The Copyright on the parts is Under Revell s new Revell of Germany Skill Ratings on US kits this is a Skill Level 4. The kit has 112 parts and comes molded in White, Chrome, Clear and Clear Red with Vinyl tires. You get Waterslide decals and the typical book format instructions. This build has only the V8 engine option and it is quite detailed. The interior is multiple parts with dash decals and seat decals. The chassis is detailed and the suspension is all separate multiple parts. The body is multiple parts and must be partially assembled for painting. The tires are Tampo-print wide Whitewalls. This kit only has parts for a stock build without options for customization. Overall dimensions are: Length: 7-5/8, Width: 3, Height 2-1/2.

2 BUILDING CAVIATS: Having organization and a proper work area is important if you want to build a model properly. But even without dedicated space a place to leave your build while you work is necessary. Being able to lay out your parts organized helps the build as you are not digging for parts in the box possibly losing or damaging them. Also you really should have a place to let painted parts cure. Throughout the review you will find OPTIONAL IDEAS that I suggest. These are completely your choice. Not doing these steps will in no way affect the build, they are just ways to offer some personal and custom touches to your builds. OPTIONS will be noted. One of the best parts of model building is using your imagination to create the build YOU want! Unless you are building a Factory Stock or a Replica your choices of color and build options are completely up to you. The instruction give recommendations but you are free to substitute whatever options you want. There is no Wrong way to build your kit! Have fun and enjoy your hobby. Review the instruction sheet thoroughly to get familiar with the assembly sequence. Decide your color scheme in advance and your custom options so you can build accordingly. PIC 1 This is the box art for this kit as released in the Trucks version. Unless otherwise stated I use Testors Tube Glue (Orange Tube) for assembly of the parts. Other adhesives used in the construction are Superglue and Elmer s White Glue. Paints consist of Testors Enamel or Tamiya Acrylic bottle paints and different brands of Rattle can spray paints. Many parts are finished using 1:1 automotive use paint products shot with an airbrush. One of the major benefits of using automotive paint is a very fast drying time. You can get just as good results using Spray can products but they require a longer drying time. Automotive paint is FULLY cured in less than a half an hour and clear about 6 hours. Use a good quality airbrush to paint automotive products because Lacquer Thinner will destroy the cheaper ones quickly. Assembly paint colors may vary from instructions as I use simplified colors that most model builders should have on hand. Before beginning your build soak and wash your parts with a mild detergent like DAWN to remove any mold release agents and help with paint adhesion.


3 Note to remember: Always follow the Manufacturer s Safety and Use Guidelines when using any of the products mentioned in the review for your own protection. PIC 2 PIC 3 Here are the decals for this build. The quality is very high and color registry is good. There is a small carrier around each decal. These decals float easily and will set quickly. Normally it is preferable to use a setting solution to help move the decals in place on your build and to allow extra time to place them. I personally have found Microscale Industries products to be the most compatible with all the different manufacturers of decals. PIC 4 Assemble most of the motor prior to paint. The block, heads, valve covers, intake, oil filler tube, timing cover and oil pan are installed. The block is Orange with an Aluminum transmission. The starter is Black with a Copper solenoid. The oil filter is Blue. I used Slixx Decals Oil Filter decals for details on the oil filter. The fan is Black with Flat Black belt. The alternator is Aluminum. The carb is Copper. Install these parts.


4 PIC 5 Paint the manifolds Steel. I did not use the kit supplied distributor or coil. PIC 6 OPTIONAL: I wanted to do a little extra detail so I will wire this motor. I used a prewired distributor and coil for this add on. While there are many different brands I use home-made ones that I have. Using a distributor wiring diagram I will wire the motor. First drill out the hole for the shaft and install it with superglue. Drill out the locations on the heads. Cut a small part of the Black wire for boots and slide it on each wire. Match the wires up to the diagram and cut to fit. PIC 7 Slide each wire into place with the boot at the hole to make it look correct. Superglue all the wires in place. Add the coil to the center wire with it cut to fit sitting it on the motor.

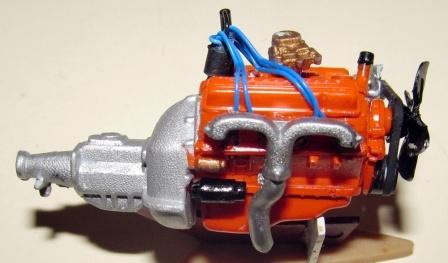
5 PIC 8 PIC 9 Add the manifolds.


6 PIC 10 PIC 11 Start the interior. I painted mine Flat Tan. Paint the floor and underside of the floor pan Flat Black. Paint the door panels and detail the cranks and latches with Silver. The seat is Tan with DECAL 17 and 18. The pedals are Black. Install the seat, pedals and door panels. To get these seat cover decals to conform to the contours of the seat you ll need to use several coats of decal setting solution. There s a full explanation on usage in the section below that explains decal preparation and installation that applies here as well. PIC 12 Assemble the parts to build the dash and steering column. PIC 13 The dash and column are Tan. DECALS 8, 9 and 10 go on the dash and the rest is Silver highlights. The shifters are Silver and Black. The wheel is Silver and Black. Add the Clear instrument panel.


7 PIC 14 Install the wheel onto the column and the column to the dash. Install the dash into the interior. PIC 15 PIC 16 NOTE: the body needs to be assembled prior to painting. This is a multiple step process in the instructions. We will go back later and add the details and trim after paint. But to ease painting and benefit the final look, assemble the cab now and paint it as a unit. Add the over-roof. Add the firewall and cab back. Add the front header panel. The radiator will be painted and installed later.


8 PIC 17 PIC 18 Assemble the bed rear corners and glue the tail gate in place. PIC 19 PIC 20 Assemble the hood sides and front on to the top. NOTE: in PIC 20 the hood does not fit properly. This has been an issue with this kit for the lifespan of the kit in previous releases. To repair it you need to sand and fit the sides slowly and test fit the hood often until you get the proper fitment. For this build I left the hood as released by Revell. PIC 21 Wet sand all of the body parts with 800 grit paper and wash them thoroughly. When fully dried, use a high quality Primer and paint the inside and outside of the cab, hood, and bed with Primer.


9 PIC 22 PIC 23 This is a Two-tone paint job. The roof is White with the remainder of the body done in Green. Paint the White first on just the roof and pillars down to the tops of the doors. Using 3M Vinyl Fineline tape, mask off the paint line. Cover the remainder of the roof with a Low-tack masking tape. Sand the cab area again to smooth it out. PIC 24 PIC 25 For this paint job I will be using Gravity Colors Hobby Paint. Bullitt Highland Green is the color name and it is Item #GC-225. This is a MULTIPLE STAGE paint color meaning there is a Base color and then the Clear Coat. Gravity is an airbrush ready product that is automotive quality paints produced in model car sized pigments. The metal flakes and pearls are more correctly sized than using just automotive paint. Gravity sprays very smoothly from the airbrush and lays very nice. It is quite easy to get a perfect paintjob with their product. It does not orange peel like some of the other brands that dry too fast. But this is a fast dry product and can be worked with in a reasonable time. Their site is: PIC 26 Body Decaling and Finishing: After you have your base coat on you are ready to decal it. Remember decals lay better on a GLOSS surface and will not adhere properly on a FLAT surface. If you decal a flat surface you get what is called SILVERING of the decals, or the look that they are not adhered, as air is trapped under the decal. Clean your work area good so no dust or grunge from building and sanding gets under your decals. Pick the decals you want to work with and plan out how the best way to lay them out without handling previously laid decals will be. I try either a Front to Back or Top to Bottom approach doing one side at a time then the front and rear of the car in steps giving the decals time to set and dry in place before handling it again. Once you


10 have a plan of action cut your first decal as close to the edge of the outermost color as possible. Once trimmed place the decal into warm water and let it get soft until it Floats loosely on the carrier paper. Microscale Industries has a product set called Micro-Set and Micro-Sol. The purpose is to soften the decals to help them conform to the contours of the body and lay smooth. To apply Micro Set, use a soft brush and apply Micro Set to the part where you are going to apply the decal. Next apply the decal as normal. Use a small pointed tip synthetic bristle brush and carefully position the decal. Blot the decal carefully with a Q-tip or paper towel so as not to move it and allow it to dry. For a tougher decals apply Micro-Sol with a small flat brush on to the decal. Apply with as few strokes as possible so as not to disturb the decal. As the decal dries slowly work any creases or blemishes in the decal out with a Q-tip or damp paper towel. Work slowly as not to damage the decal. A second coat of Micro-Sol can be added if needed. Now continue this process until all the decals for that area are done, wait for them to set and continue the rest of the car. Let the decals cure at least overnight before applying your clear coat. PIC 27 PIC 28 OPTIONAL: Bare Metal Foil Application is a little on the tricky side if not done slowly. Here is a method I use: It is VERY IMPORTANT that you use a BRAND NEW #11 blade in your hobby knife, and keep a few extras handy as all you are using is the very end of the tip point. From the foil sheet cut a strip twice the width and about ¼ inch longer than the detail you intend to cover using a sharp set of regular scissors. I then peel the foil off of the backer sheet and lightly lay it on the detail area. Using my finger I will slowly slide along the detail area smoothing the foil lightly, then a second time more firmly to press it into place. Using a Q-Tip I burnish the foil onto the detail area only. I then use a toothpick that has been tapped on the table to dull the tip and run that along the outside edge of the details I intend to cut the foil around. After the detail area is defined and the foil is smooth and burnished on I slowly cut around the edge with the hobby knife. If you feel the knife snag or grab the foil CHANGE THE BLADE, it will rip your foil very easily. Now you can strip all excess foil away. You can peel the excess loose leaving just your detailed part covered. I then burnish it again with a Q-Tip. You can do foil work in sections as it is thin enough that when burnished it will mold itself into looking like one piece. Most people Bare Metal Foil AFTER clear coating the car, I prefer to clear coat over the foil so it will never move as my cars tend to get handled. PIC 29 OPTIONAL: Prior to assembly I want to give the glass a thinner crisper look. I will dip the parts into Pledge Floor Care. When applied to both side of a piece of clear polystyrene, it will make glass appear thinner and clearer. It will help to hide minor scratches also. Simply pour some Pledge into a small container and dip your clear glass into it. It will self-level and make the part look clearer. Place the parts on a sheet of paper towel to cure, the paper towel will draw out the excess Pledge and Wick it off the parts so it does not accumulate at the edges leaving an unwanted build up. After you dip the part, be sure to place a cover over it to prevent dust from collecting on it.


11 PIC 30 Paint the radiator Flat Black as well as the shroud. Assemble the shroud onto the radiator and insert that into the cab. Use a black marking pen around the window to replicate the rubber trim. PIC 31 Install the glass into the cab with White Glue. PIC 32 Paint the battery Black with Steel posts. The brake booster is Black with a Steel master cylinder. The overflow tank is White with a Black cap. The emblems are Red with Black.


12 PIC 33 Attach the door handles, emblems and gas cap with Superglue. Install the battery, assemble and install the brake booster and master cylinder and add the overflow tank. PIC 34 Install the interior into the cab. If this is a contest build just scrape off the copyright script with a blade and smooth it over with some sandpaper.


13 PIC 35 OPTIONAL: License Plates: I decided to do custom license plates and personalize this kit a little. You can go to and create any custom plate you want for any State. Also, you can search photos online for designer license plates. You can save the photo and resize it to fit a model. Just print it on photo paper and you have a plate of your own. To print your plate for 1/25 or 1/24 scale kit, open your photo program and crop the plate so you just have the plate only. Re-size the image size to make the Width.5 inches and make sure CONSTRAIN PROPORTIONS is on. Use 300 DPI for a crisp print. Save that and Print it on White Photo paper printing on High Quality Print Setting. You now have a proper sized plate to glue on your car. I used the kit supplied plate even though it says 1964 because it was the same color in 66. PIC 36 PIC 37 Paint the chains Flat Black with Steel hasps and the tag holder Flat Black. Install the tail and backup lights with Elmer s Glue. Add the hasps to the tailgate. Add the tag to the tag holder and glue that in place.


14 PIC 38 Paint the chassis parts Flat Black, the chassis, front and rear suspension, tire mount, tie rods and sway bar. Assemble and paint the rim Flat Black. The exhaust is Steel with an Aluminum muffler. The shocks are Red. PIC 39 Attach the tie rods to the front suspensions and install that to the chassis with the front shocks. Add the exhaust. Install the rear suspension and shocks and sway bar. Assemble the tire and rim onto the tire holder and attach that to the chassis. Attach the rear bumper in place. PIC 40 PIC 41 Paint the driveshaft Gunmetal and install that with the motor in place in the chassis.


15 PIC 42 PIC 43 To give the tires a used look press and roll the tread on a sheet of 220 grit sandpaper. This will rough up the tire removing the smooth glossy surface. Assemble the rim fronts and backs and paint them Black. Add the hubcap. The tires are non-directional so location is not important. Add the rims to the tires either White or Black wall out. PIC 44 PIC 45 Snap a tire on to each axle.


16 PIC 46 The rolling chassis is completed. PIC 47 Install the cab in place and add the bed to the chassis. The decal for the bed is really nice and looks great. Just remember to use some setting solution on it for good conformance. PIC 48 Paint the heater and air cleaner Black. The hood latch and hoses are Flat Black.


17 PIC 49 Install the lower and upper hoses from the radiator to the motor. Add the hood latch in place. DECAL 5 goes on the heater and it is installed. DECAL 6 goes on the air cleaner and it is installed. Add the wipers and mirrors with Superglue. PIC 50 The front end is completed by using a wash of 50/50 Flat Black and thinner in the grille and installing the headlights.


18 PIC 50 PIC 51 The front end is completed by using a wash of 50/50 Flat Black and thinner in the grille and installing the headlights. Add the grille and bumper to the front end and slide the hood in place. PIC 52 The rear is already completed.

19 OVERALL: This build overall has a good fit and finish and the details are nice. The motor looks good and with some aftermarket parts can be nicely detailed. The chassis is basic but looks good. The lines were straight and the fit was correct without any tweaking. The interior is basic but decals help the look of the dash greatly. Fit of the interior is not the best but it does go together in the truck good. The body is straight and aside from the poor hood design is nice. The hood has been a complaint with every release of this kit in all incarnations. Revell has done a good job with releasing this as a Stock build and it has nothing extra to customize it. We may see this later as a Street version with custom parts? Overall the build went together quite easily and there were no issues. Fit and finish was good and the built kit is a nice shelf sitter. With some basic work and detailing you can have a contest quality kit quite easily. On a scale of 1 to 10 I give this an 8.5.
Right On Replicas, LLC Step-by-Step Review * 2013 Camaro ZL1 1:25 Scale Revell Model Kit # Review
 Right On Replicas, LLC Step-by-Step Review 20160301* 2013 Camaro ZL1 1:25 Scale Revell Model Kit #85-4370 Review The Camaro, manufactured by Chevrolet, is classified as a pony car and some versions also
Right On Replicas, LLC Step-by-Step Review * Acura Integra Type R 1:25 Scale Revell Model Kit # Review
 Right On Replicas, LLC Step-by-Step Review 20150320* Acura Integra Type R 1:25 Scale Revell Model Kit #85-4311 Review The muscle cars of the sixties and seventies are great for the drag strip, but for
Right On Replicas, LLC Step-by-Step Review * Royal Rail Show Rod 1:24 Scale AMT Model Kit #630 Review
 Right On Replicas, LLC Step-by-Step Review 20150630* Royal Rail Show Rod 1:24 Scale AMT Model Kit #630 Review First released in 1972, AMT's zany Royal Rail show rod is back! It's a wild ride for all the
Right On Replicas, LLC SnapShot Review * Auto Transport Trailer 1:25 Scale Revell Model Kit # Review
 Right On Replicas, LLC SnapShot Review 20150717* Auto Transport Trailer 1:25 Scale Revell Model Kit #85-1509 Review An auto transport trailer is a type of semi-trailer designed to efficiently transport
Right On Replicas, LLC Step-by-Step Review * Ferrari Superamerica 1:24 Scale Revell Model Kit # Review
 Right On Replicas, LLC Step-by-Step Review 20150112* Ferrari Superamerica 1:24 Scale Revell Model Kit #85-2034 Review The history of the Ferrari Superamerica dates back to 1956-1961 when this unique convertible
Right On Replicas, LLC Step-by-Step Review * Mack Fire Pumper 1:32 Scale Revell Model Kit # Review
 Right On Replicas, LLC Step-by-Step Review 20150915* Mack Fire Pumper 1:32 Scale Revell Model Kit #85-1945 Review The Mack CF600 Pumper is a familiar fire truck that is still widely used in firehouses
Right On Replicas, LLC Step-by-Step Review * Race Car Hauler Ford LN :25 Scale AMT Model Kit #758 Review
 Right On Replicas, LLC Step-by-Step Review 20160326* Race Car Hauler Ford LN 8000 1:25 Scale AMT Model Kit #758 Review The Ford L-Series trucks are a range of heavy-duty trucks that were built by Ford
Right On Replicas, LLC Step-by-Step Review * Motorcraft T-Bird Pro-Stock 1:25 Scale Revell Model Kit # Review
 Right On Replicas, LLC Step-by-Step Review 20150109* Motorcraft T-Bird Pro-Stock 1:25 Scale Revell Model Kit #85-4098 Review Bob Glidden is an American drag racer who first retired from Pro Stock racing
Right On Replicas, LLC Step-by-Step Review * Stingaree 1:25 Scale AMT Model Kit #AMT38664 Review
 Right On Replicas, LLC Step-by-Step Review 20150120* Stingaree 1:25 Scale AMT Model Kit #AMT38664 Review In 1971 AMT created a group of show rod dragster kits that were custom models loosely based on rail
Right On Replicas, LLC Step-by-Step Review * Alpine Renault A110 (Monte-Carlo 1971) 1:24 Scale Tamiya Model Kit #24278 Review
 1:24 Scale Tamiya Model Kit #24278 Review") Right On Replicas, LLC Step-by-Step Review 20141112* Alpine Renault A110 (Monte-Carlo 1971) 1:24 Scale Tamiya Model Kit #24278 Review Shortly after World War II most of the European car manufacturers were
Right On Replicas, LLC Step-by-Step Review 20141112* Alpine Renault A110 (Monte-Carlo 1971) 1:24 Scale Tamiya Model Kit #24278 Review Shortly after World War II most of the European car manufacturers were
Right On Replicas, LLC Step-by-Step Review * Nestle Crunch Monster Truck 1:32 Scale AMT Model Kit #911 Review
 Right On Replicas, LLC Step-by-Step Review 20150730* Nestle Crunch Monster Truck 1:32 Scale AMT Model Kit #911 Review Nestlé Crunch is the name of a chocolate bar made of milk chocolate with crisped rice
Right On Replicas, LLC Step-by-Step Review * Peterbilt Cabover Pacemaker 352 1:25 Scale AMT Model Kit #759 Review
 Right On Replicas, LLC Step-by-Step Review 20160414* Peterbilt Cabover Pacemaker 352 1:25 Scale AMT Model Kit #759 Review Peterbilt Motors Company was founded in 1939. They are an American manufacturer
Right On Replicas, LLC Step-by-Step Review * Ed Roth 57 Chevy Bel Air 1:25 Scale Revell Model Kit # Review
 Right On Replicas, LLC Step-by-Step Review 20140725* Ed Roth 57 Chevy Bel Air 1:25 Scale Revell Model Kit #85-4306 Review Review and Photos by Alan Mann The 1957 Chevy was introduced by the Chevrolet division
Right On Replicas, LLC Step-by-Step Review * 1937 Ford Coupe Street Rod 1:24 Scale Revell Model Kit # Review
 Right On Replicas, LLC Step-by-Step Review 20140227* 1937 Ford Coupe Street Rod 1:24 Scale Revell Model Kit #85-4097 Review The Ford line of cars was updated in 1937 with one major change, the introduction
Right On Replicas, LLC Step-by-Step Review * Dodge Raminator Monster Truck 1:24 Scale Lindberg Model Kit #73014 Review
 Right On Replicas, LLC Step-by-Step Review 20160521* Dodge Raminator Monster Truck 1:24 Scale Lindberg Model Kit #73014 Review The Raminator is a monster truck that races on the Special Events, Monster
Right On Replicas, LLC Step-by-Step Review * Cherry Bomb Show Car by Tom Daniel 1:24 Scale Revell Model Kit # Review
 Right On Replicas, LLC Step-by-Step Review 20140828* Cherry Bomb Show Car by Tom Daniel 1:24 Scale Revell Model Kit #85-4191Review Review and Photos by Alan Mann Tom Daniel, the Guru of all designers has
Right On Replicas, LLC Step-by-Step Review * Thames Panel Truck Gasser 1:25 Scale Revell Model Kit # Review
 Right On Replicas, LLC Step-by-Step Review 20140422* Thames Panel Truck Gasser 1:25 Scale Revell Model Kit #85-4199 Review Review and Photos by Alan Mann London has long been one of the most busy and populous
Right On Replicas, LLC Step-by-Step Review * Diamond Reo Tractor 1:25 Scale AMT Model Kit #719 Review
 Right On Replicas, LLC Step-by-Step Review 20151118* Diamond Reo Tractor 1:25 Scale AMT Model Kit #719 Review Diamond Reo Trucks was an American truck manufacturer from 1967 until 2010. Diamond T and Reo
Right On Replicas, LLC Step-by-Step Review * Fruehauf Flatbed Trailer 1:25 Scale AMT Model Kit #617 Review
 Right On Replicas, LLC Step-by-Step Review 20160330* Fruehauf Flatbed Trailer 1:25 Scale AMT Model Kit #617 Review A semi-trailer is a trailer without a front axle. A large proportion of its weight is
Right On Replicas, LLC Step-by-Step Review * Garbage Truck by Tom Daniel 1:24 Scale Revell Model Kit # Review
 Right On Replicas, LLC Step-by-Step Review 20140515* Garbage Truck by Tom Daniel 1:24 Scale Revell Model Kit #85-4198 Review Review and Photos by Alan Mann Most garbage trucks are bent, dirty and...full
Right On Replicas, LLC Step-by-Step Review * Kenworth K-123 Cabover 1:25 Scale AMT Model Kit #687 Review
 Right On Replicas, LLC Step-by-Step Review 20150328* Kenworth K-123 Cabover 1:25 Scale AMT Model Kit #687 Review Review and Photos by Alan Mann Kenworth began its history in Portland, Oregon in 1912, the
For the Modeler: BUILDING CAVIATS: Note to remember:
 Right On Replicas, LLC Step-by-Step Review 20150921* Time Machine Mk I (Original - Back To The Future) 1:25 Scale Polar Lights Model Kit #POL911 Review Marty: "Wait a minute. Wait a minute. Doc, uh...
Right On Replicas, LLC Step-by-Step Review * 1970 Plymouth HEMI Cuda 1:25 Scale Revell Model Kit # Review
 Right On Replicas, LLC Step-by-Step Review 20140923* 1970 Plymouth HEMI Cuda 1:25 Scale Revell Model Kit #85-4268 Review Review and Photos by Will Emerson In 1964 Plymouth developed the Barracuda from
Right On Replicas Step-by-Step Review * 1950 Olds Custom 1:25 Scale Revell Model Kit # Review
 Right On Replicas Step-by-Step Review 20140113* 1950 Olds Custom 1:25 Scale Revell Model Kit #85-4022 Review The Oldsmobile 88 was a full-size car sold by the Oldsmobile division of General Motors and
Right On Replicas, LLC Step-by-Step Review * 1959 Cadillac Eldorado Hardtop 1:25 Scale Revell Model Kit # Review
 Right On Replicas, LLC Step-by-Step Review 20150608* 1959 Cadillac Eldorado Hardtop 1:25 Scale Revell Model Kit #85-4361Review With the dawn of the space age the styling cues in Detroit took to the skies
Right On Replicas, LLC Step-by-Step Review * 1969 Camaro Z-28 Foose Design 1:12 Scale Revell Model Kit # Review
 Right On Replicas, LLC Step-by-Step Review 20140623* 1969 Camaro Z-28 Foose Design 1:12 Scale Revell Model Kit #85-2811 Review Review and Photos by Alan Mann The Car: In 1967 Chevrolet designed the Camaro
Right On Replicas, LLC Step-by-Step Review * Honda Super Hawk Motorcycle 1:8 Scale Revell Model Kit #H-1233 Review
 Right On Replicas, LLC Step-by-Step Review 20151205* Honda Super Hawk Motorcycle 1:8 Scale Revell Model Kit #H-1233 Review The Honda CB77, or Super Hawk, was a 305 cc straight-twin motorcycle produced
RoR Step-by-Step Review * 1967 Dodge Coronet R/T Foose Design Revell Review
 RoR Step-by-Step Review 20130112* 1967 Dodge Coronet R/T Foose Design Revell 85-4906 Review Having been a long time fan of Chip Foose I could hardly wait to get this kit and with it being a MoPar with
Right On Replicas, LLC Step-by-Step Review * Hawaiian Charger Funny Car 1:16 Scale Revell Model Kit # Review
 Right On Replicas, LLC Step-by-Step Review 20140519* Hawaiian Charger Funny Car 1:16 Scale Revell Model Kit #85-4082 Review Review and Photos by Alan Mann Roland Leong owned and maintained a stable of
Part One of Two - RoR Step-by-Step Review * K.S. Pittman Willys Drag Coupe Revell # :25 Scale Review Click Here to Buy This Kit
 Part One of Two - RoR Step-by-Step Review 20120607* K.S. Pittman Willys Drag Coupe Revell #85-4990 1:25 Scale Review Click Here to Buy This Kit 000 This review is of the reissued Revell 1941 Willys Drag
Subaru SVX 1/43 Scale Model Assembly Instructions
 Subaru SVX 1/43 Scale Model Assembly Instructions Congratulations on your purchase of an unassembled 1/43 scale Subaru SVX! You now own a model that is even more rare than the car it represents. Currently
RoR Step-by-Step Review * 1967 Corvette Convertible 1:25 Scale Revell Model Kit # Review
 RoR Step-by-Step Review 20131209* 1967 Corvette Convertible 1:25 Scale Revell Model Kit #85-4087 Review 1967 was to be the unveiling of the third generation "MAKO" styling. However design problems showed
RoR Step-by-Step Review * 1967 Chevelle Pro Street review
 RoR Step-by-Step Review 20121114* 1967 Chevelle Pro Street 1-25 85-4923 review In the world of Chevrolet muscle cars, it is hard to beat the power and sleek lines of the late 60 s vehicles. These characteristics
RoR Step-by-Step Review * 1977 Jeep CJ-7 Renegade 1-24 Revell Kit Review
 RoR Step-by-Step Review 20130120* 1977 Jeep CJ-7 Renegade 1-24 Revell 85-2180 Kit Review Being a Jeep owner, you tend to get a little fanatical about them. I ve been an avid off-roader for about 15 years;
RoR Step-by-Step Review * 68 Dodge Dart Hemi 1:25 Scale Revell Kit #
 RoR Step-by-Step Review 20110701* 68 Dodge Dart Hemi 1:25 Scale Revell Kit #85-4217 Click the Buy Now link below to purchase the Step-by-Step review by Pat Ackerson It s hard to believe that you could
Right On Replicas, LLC Step-by-Step Review * 1953 Chevy Panel Truck Gasser 1:25 Scale Revell Model Kit # Review
 Right On Replicas, LLC Step-by-Step Review 20140410* 1953 Chevy Panel Truck Gasser 1:25 Scale Revell Model Kit #85-4189 Review Review and Photos by Tom Schaefer Retro drag racing seems to be all the rage
Right On Replicas, LLC Step-by-Step Review * HUMVEE 1:25 Scale Revell SnapTite Model Kit # Review
 Right On Replicas, LLC Step-by-Step Review 20150820* HUMVEE 1:25 Scale Revell SnapTite Model Kit #85-1970 Review This is a replica of the Humvee which is also known as the Hummer and the High Mobility
Ferrari 250 GTO. Building the Gunze Sangyo. by Alex Kustov
 Building the Gunze Sangyo Ferrari 250 GTO by Alex Kustov F errari. The cars from Maranello are staying on top of autiomotive world for more than 50 years, due to the unique combination of beautiful design,
RoR Step-by-Step Review * 1950 Oldsmobile Club Coupe 2n Kit Review
 RoR Step-by-Step Review 20130210* 1950 Oldsmobile Club Coupe 2n1 1-25 65-4254 Kit Review The 1950 Oldsmobile 88 is widely considered to be the first factory hot rod produced. With its powerful overhead
SECTION 6 5 SERVICE PROCEDURES AND SPECIFICATIONS. Body
 SECTION 6 5 SERVICE PROCEDURES AND SPECIFICATIONS Body Specifications 236 Protecting your vehicle from corrosion 237 Washing and waxing 238 Cleaning the interior 239 235 SPECIFICATIONS DIMENSIONS AND WEIGHT
Installation Instructions and Suggestions For Jeep YJ Fiberglass Replacement Bodies
 Installation Instructions and Suggestions For Jeep YJ Fiberglass Replacement Bodies Getting started with the removal of your existing Jeep body. Trust nothing to memory; take photos of everything at different
Hot Rod Pick-up Orange Peel
 Hot Rod ick-up Orange eel Vehicles like the ick-up, the commercial work trucks of their era, were found to be ideal hot rods presenting unique features and plenty of room. The same talents used to soup
RoR Step-by-Step Review Tijuana Taxi Revell 1:24 Kit Review
 RoR Step-by-Step Review 20100424 Tijuana Taxi Revell 1:24 Kit 85-4261 Review A Tom Daniel classic, the Tijuana Taxi, has been reissued by Revell in kit #85-4261 under the Monogram label. This 1/24 scale
Installation Instructions for TJ Jeep s Fiberglass Replacement Bodies and Parts
 Installation Instructions for 1997-2006 TJ Jeep s Fiberglass Replacement Bodies and Parts Getting started: We recommend that you take pictures as you dismantle your Jeep. These pictures will help you when
HOW - TO SCRATCH & DENT REPAIRS
 HOW - TO SCRATCH & DENT REPAIRS Tool And Material Checklist Wax and Grease Remover Sandpaper Assortment and Sanding Block Tack Cloth and Lint-free Cloths Glazing Putty Rubber Contour Squeegee Body Filler
Appendix B Day of Event Check List
 Appendix B Day of Event Check List Page 38 of 68 Note: I firstly dust the car down with a California Duster and then follow with Meguiar s Final Inspection. I avoid spraying anything direct on the car.
Right On Replicas, LLC Step-by-Step Review * M-50 Ontos 1:32 Scale Renwal/Revell Model Kit # Review
 Right On Replicas, LLC Step-by-Step Review 20150429* M-50 Ontos 1:32 Scale Renwal/Revell Model Kit #85-7823 Review Here s a fun fact: Ontos is the Greek word for thing. The M50 Ontos is a U.S. Light Armored
TORCH Main Grille Main grille INSERT - # / # Chevrolet Silverado
 Parts included (1) TORCH Grille - Main (1) 40 LED - Part #6311271 OR Stealth - Part #6311271-BR OR (1) 30 LED - Part #6311281 OR Stealth - Part #6311281-BR Hardware included (1) - Large Bottom Mounting
FRONT BUMPER REMOVAL. 1) Turn off engine and chalk tires with stop block. Open Hood. Disconnect Battery.
 Turn off engine and chalk tires with stop block. Open Hood. Disconnect Battery.") Parts included (1) - Main Full Opening - Polished - Part #6202130 Full Opening - Black - Part #6202131 OR GRILLE REMOVAL & Grille Installation Guide Hardware included (5) - Trim Retainer (4) - 1/2 x 1/2-3/16
Parts included (1) - Main Full Opening - Polished - Part #6202130 Full Opening - Black - Part #6202131 OR GRILLE REMOVAL & Grille Installation Guide Hardware included (5) - Trim Retainer (4) - 1/2 x 1/2-3/16
RoR Step-by-Step Review * Ferrari 458 Italia 1:24 Scale Revell Kit # Review
 RoR Step-by-Step Review 20111016* Ferrari 458 Italia 1:24 Scale Revell Kit #85-4912 Review The Ferrari 458 Italia combines the power and performance of a Formula One race car with an ultramodern design
PRICE LIST ITEM PRICE $ CORE
 A/C Clutch $20.00 A/C Compressor $35.00 $10.00 A/C Condenser $25.00 $5.00 A/C Evaporator $15.00 A/C Hose(S) $15.00 Accelerator Cable $10.00 Air Bag $30.00 Air Bag Sensor $10.00 Air Cleaner $15.00 Air Filter
TOYOTA SUPRA JZA80 HEADLIGHT LENS TUTORIAL
 TOYOTA SUPRA JZA80 HEADLIGHT LENS TUTORIAL Disclaimer: Original Motorsports takes no responsibility for any errors which may occur in your DIY project. This is simply a guide. If you are not confident
SHARK UPPER WINDSHIELD FRAME & WINDSHIELD REPLACEMENT. Text and Photos by TOM BENFORD
 Text and Photos by TOM BENFORD I purchased a fathom green 69 big-block tri-power T-top coupe with only 42,000 original miles on it recently. I'm the third owner of the car, and I got it for a very good
Upper Class Grille Main grille INSERT - #54127 / #54131 / #54133 / #51127 / #51131 / 51133
 Parts included (1) - Main Full Opening - Polished - Part #54127 OR 1 Bar - Polished - Part #54131 OR 2 Bar - Polished - Part #54133 OR Full Opening - Black - Part #51127 OR 1 Bar - Black - Part #51131
Model A 2-Door Sedan
 Model A -oor Sedan The Model A was designed to replace the very successful ord Model T series of automobiles. espite the fact that the Model A ord was released just as the United States entered the Great
Right On Replicas, LLC Step-by-Step Review * F-86D Sabre Dog 1:48 Scale Revell Model Kit # Review
 Right On Replicas, LLC Step-by-Step Review 20150410* F-86D Sabre Dog 1:48 Scale Revell Model Kit #85-5868 Review Further development of the F-86 led to the radar-guided, rocket armed F-86D or Dog Sabre.
START HERE FRONT BUMPER REMOVAL. 1) Turn off engine and chalk tires with stop block. Open Hood. Disconnect Battery.
 Turn off engine and chalk tires with stop block. Open Hood. Disconnect Battery.") Parts included (1) - Main Full Opening - Polished - Part #54213 OR Full Opening - Black - Part #51213 Hardware included (10) - #10 Screws (10) - #10 Flat Nuts (2) - Thread Cutting Nuts OR START HERE PLEASE
Parts included (1) - Main Full Opening - Polished - Part #54213 OR Full Opening - Black - Part #51213 Hardware included (10) - #10 Screws (10) - #10 Flat Nuts (2) - Thread Cutting Nuts OR START HERE PLEASE
Build a better Buick. The buick regal was one of the more-popular 1980s body SPECIAL! STOCK CAR. How to detail Tim Richmond s Riverside Regal
 Build a better Buick STOCK CAR SPECIAL! How to detail Tim Richmond s Riverside Regal by DREW HIERWARTER Drew s Tim Richmond Buick Regal is a fitting tribute to a great driver and a nice commemoration of
SECTION 6 5 SERVICE PROCEDURES AND SPECIFICATIONS. Body
 SERVICE PROCEDURES AND SPECIFICATIONS Body SECTION 6 5 Specifications........................................... 208 Protecting your vehicle from corrosion...................... 209 Washing and waxing.....................................
* APPLICATION MODELS VARY. WE RECOMMEND TO VERIFY FITMENT BEFORE BEGINNING INSTALLATION PROCESS.
 Parts included (1) Main Grille Polished - Part #6214760 OR Black - Part #6214761 Hardware included (8) - #8 x 3/4 Black Screws (8) - #8 Flat Nuts (3) Push Nut Retainer Clips START HERE PLEASE READ AND
1464. Interior Installation. Cover Rear Seat Support Cut the vinyl to approximately the size of the rear seat support.
 Chapter 37 (Video Clip 37) - Interior Installation 1464. Interior Installation Cover Rear Seat Support 1465. Cut the vinyl to approximately the size of the rear seat support. 1466. Make a dry fit of the
REVOLVER SERIES GRILLES - INSTALLATION GUIDE
 REVOLVER SERIES GRILLES - INSTALLATION GUIDE Depending on your style and your preferred look of the vehicle, you have the option to install the Raw Aluminum Trim Piece, Color Match, or just opt to leave
HURST COMP STICK KIT 2008 and up DODGE CHALLENGER (with AUTO-STICK) Catalog # &
 Catalog # &") FORM 159 0402 03/09 HURST COMP STICK KIT 2008 and up DODGE CHALLENGER (with AUTO-STICK) Catalog #538 0402 & 538 0403 2009 by Hurst Perfomance Thank you for purchasing the Hurst Comp Stick Kit for your
FORM 159 0402 03/09 HURST COMP STICK KIT 2008 and up DODGE CHALLENGER (with AUTO-STICK) Catalog #538 0402 & 538 0403 2009 by Hurst Perfomance Thank you for purchasing the Hurst Comp Stick Kit for your
Vehicle Information. Inspection Date : 22 Sep :02 PM. Inspection ID : Inspector : 4948
 Vehicle Information Year : 1967 Mileage : 46 Brand : Chevrolet Exterior Color : Blue Model : Camaro Series : Trim Color : Trim Type : Other Vinyl Body Type : Convertible Drive Type : Rear Wheel Drive Engine
Installation Instructions HURST COMP STICK KIT Dodge Challenger (with AUTO-STICK)
") Installation Instructions HURST COMP STICK KIT 2008-2012 Dodge Challenger (with AUTO-STICK) 1590402 REV01 08/17/15 Catalog# 538 0402 & 538 0403 2009, 2015 Hurst Performance WORK SAFELY! For maximum safety,
Installation Instructions HURST COMP STICK KIT 2008-2012 Dodge Challenger (with AUTO-STICK) 1590402 REV01 08/17/15 Catalog# 538 0402 & 538 0403 2009, 2015 Hurst Performance WORK SAFELY! For maximum safety,
How I installed new brake pads on my i with Sport Package (should be fine for other E39 s) By Robert B.
 By Robert B.") How I installed new brake pads on my 1999 528i with Sport Package (should be fine for other E39 s) How I installed new brake pads on my 1999 528i with Sport Package (should be fine for other E39 s) By
How I installed new brake pads on my 1999 528i with Sport Package (should be fine for other E39 s) How I installed new brake pads on my 1999 528i with Sport Package (should be fine for other E39 s) By
SECTION 6 CORROSION PREVENTION AND APPEARANCE CARE. Corrosion prevention and appearance care
 CORROSION PREVENTION AND APPEARANCE CARE SECTION 6 Corrosion prevention and appearance care Protecting your Toyota from corrosion......................... 382 Washing and waxing your Toyota.............................
BILLET SERIES Grille Main grille - #20371 / #20371B
 NOTE BEFORE INSTALL: Your factory grille components and other vehicle front end features may be visible once your new grille is fully installed. To counter this visual element, we have found that you can
RoR Step-by-Step Review * Corvette C5-R 2001 Daytona Racer 1:25 Scale Revell Kit # Review
 RoR Step-by-Step Review 20130607* Corvette C5-R 2001 Daytona Racer 1:25 Scale Revell Kit #85-2376 Review In 2001, Dale Earnhardt Sr. strode out of his comfort zone of Twin 125, Grand National Series, IROC,
RoR Step-by-Step Review * B-17G Flying Fortress 1-72 Revell Kit Review
 RoR Step-by-Step Review 20120327* B-17G Flying Fortress 1-72 Revell 85-5861Kit Review The Revell Pro Modeler Series has created a very well detailed 1/72 version of the Boeing B-17G Bomber. The kit covers
TLC Classic and Antique Vehicle Appraisal
 Appraisal Report As of June XX, 20XX Make Dodge Model Coronet Super Bee Year 1970 Body Style 2 Door VIN WM2XXXXXXXXXXXXX Mileage XX,XXX Miles Exterior Paint Light lime green. The vehicle was painted approximately
Code 0 Description Pic Link # Used Diameter Thread Pitch Length Washer 1 Washer2 Nut size Class Notes F Alternator bracket mounting bolts
 Code 0 Description Pic Link # Used Diameter Thread Pitch Length Washer 1 Washer2 Nut size Class Notes 1 15 1 2F Alternator bracket mounting bolts (Engine Lift Hook) 3 10 1.25 30 split washer flat 4 14mm
1128 W. Tuscarawas St. Canton, OH
 1128 W. Tuscarawas St. Canton, OH 44702 800.321.8884 www.ohioautosupply.com Detail Guide This detailing manual is intended for use as a guide to show you the steps involved in automobile detailing. It
MARDER II ENGINE COMPARTMENT
 TWS 353048 MARDER II ENGINE COMPARTMENT Congratulations on purchasing one of the finer aftermarket resin conversion sets available. This kit was Mastered by Tom Kondziolka. This kit is intended to be used
1941 CHEVROLET PICK-UP
 Ontario Independent Appraisers Reg. #MF001676 44 Valley Rd. Nanticoke, Ontario N0A 1L0 Email: bryan@classicandrod.com TEL: 905-808-9997 1941 CHEVROLET PICK-UP Insurance Appraisal Reports Ministry of Transportation
PART #137 & # DODGE DAKOTA HOODS
 Rev. 11/03 PART #137 & #138 97-04 DODGE DAKOTA HOODS Prefit Before Painting! STEP 1: Adjust hood until proper alignment with matching panels is achieved. STEP 2: Adjust primary latch until it fits into
Hot Rod Delivery Sedan Dave s Speed Shop
 Hot Rod Delivery edan Dave s peed hop Vehicles like the edan Delivery, the commercial work trucks of their era, were found to be ideal hot rods presenting unique features and plenty of interior room. The
HP10207 KIT. Ram WD*
 HP10207 KIT Ram 1500 4WD* (For 2WD call customer service 800.663.0096 for assistance) * See application guide for proper fitment. Use the most advanced air springs on the market to eliminate your vehicle
S SCALE CONCEPT MODELS INSTRUCTIONS FOR PRODUCT S SCALE IAPX CRYOGENIC TANK CAR El Toro Way Stockton, CA 95210
 CONCEPT MODELS Web Address: http://www.con-sys.com Email: concept_models@con-sys.com 8810 El Toro Way Stockton, CA 95210 S SCALE INSTRUCTIONS FOR PRODUCT S SCALE IAPX 1028-37 CRYOGENIC TANK CAR 2 CONCEPT
Tamiya s P-47M By Dick Smith
 Tamiya s P-47M By Dick Smith If you re building a 1/48th scale P-47, razorback or bubble top, you can t do much better than choosing one of Tamiya s kits. The detail is excellent. The fit is excellent.
Renault A442A Conversion By Evan Jones Table of Contents. Introduction:... 2 Frame/Bodywork:... 2.
 Renault A442A Conversion By Evan Jones www.eajonesgue.com/scalemodels Table of Contents Introduction:... 2 Frame/Bodywork:... 2 Page 1 of 10 Introduction: I wanted to do a collection theme in 2008 of a
Flight Compartment. 1. General
 CIRRUS AIRPLANE MAINTENANCE MANUAL Flight Compartment CHAPTER 56-10: FLIGHT COMPARTMENT GENERAL 56-10: FLIGHT COMPARTMENT 1. General The windshield is manufactured of acrylic and is adhesive bonded to
How to Make Realistic Roads & Parking Lots
 How to Make Realistic Roads & Parking Lots Presented by Jeffrey Jarr Using Lightweight Spackling! Tools & Materials: Roads & Highways Red Devil Onetime Lightweight Spackling 3M All Purpose Sanding Sponge
INSTRUCTIONS FOR PRODUCT: CAPX
 CONCEPT MODELS Web Address: http://www.con-sys.com Email: concept_models@con-sys.com 8331 Sheep Ranch Rd. Mountain Ranch, CA 95246 INSTRUCTIONS FOR PRODUCT: CAPX 1001 2 CONCEPT MODELS CAPX 1001 PARTS No.
Jeep Roof Rack. Part No. J029T. PARTS LIST: Qty Part Description Qty Part Description
 Fits: 2007 - Current ` Jeep Roof Rack JEEP ROOF RACK Part No. J029T REMOVE CONTENTS FROM BOX. VERIFY ALL PARTS ARE PRESENT. 120-340 min Cutting Required Drilling Required READ INSTRUCTIONS CAREFULLY BEFORE
RoR Step-by-Step Review * M47 Patton Tank 1:35 Scale Italeri Kit #6447 Review
 RoR Step-by-Step Review 20130603* M47 Patton Tank 1:35 Scale Italeri Kit #6447 Review The M47 started production in 1951 but wasn t fielded until 1952 due to technical issues. This was the first new tank
PINEWOOD DERBY PACK 98. Official District Rules and Tips
 PINEWOOD DERBY PACK 98 Official District Rules and Tips Dear Parents, Welcome to the world of Pinewood Derby. Your scout and you should make the car together as a project! It is not the intent that the
Hood stripes Tools needed from AutoZone or any auto parts store: bottle spray, squeegee, a towel that you re using to clean you car up after washing,
 WARNING These following pages are instruction for C5 CE stripes; however, it is the same method applying vinyl. Please spend time to read thru these pages. At the end, it is your C5 GS1 stripes instruction.
810 Industry S. Road Cocoa, FL 32926
 810 Industry S. Road Cocoa, FL 32926 U-PULL-IT PRICE SHEET Even though we do our best to keep our prices competitive and updated, they are subject to change without notice. If you have any questions regarding
Pre-Purchase Inspection Report
 Inspecting Shop Name Address Phone Shop Foreman Mechanic Year Make Model Vin Color Miles Engine ECM Horsepower Torque Transmission Engine Brake 3 stage Rear Ends Model Ratio Differential Lock Steering
GM TRUCK BACKUP CAMERA INSTALLATION
 GM TRUCK 07-13 BACKUP CAMERA INSTALLATION Thank you for your purchase! These instructions are intended for the do-it-yourselfer who decides to install the camera without professional assistance. Keep in
TEST DRIVE TECHNOLOGIES VEHICLE INSPECTION SERVICES
 17715 St Rose Road St Rose, Illinois 62230 www.testdrivetech.com Phone: 636-388-8378 Email: info@testdrivetech.com TEST DRIVE TECHNOLOGIES VEHICLE INSPECTION SERVICES Vehicle Identification Inspection
WARNING These following pages are instruction for C5 CE stripes; however, it is the same method applying vinyl. Please spend time to read thru these
 WARNING These following pages are instruction for C5 CE stripes; however, it is the same method applying vinyl. Please spend time to read thru these pages. At the end, it is your C5/C6 ME stripes' instruction.
P.O. Box 9 Conowingo, MD Phone:
 Street Gas: *6800lbs. Maximum weight. 1. Ballast is permitted. Ballast may be added. Added weight must be secured within the body of the truck. No weights allowed in the cab. No front weights or weight
RoR Step-by-Step Review * Ghostbusters ECTO-1A 1:25 Scale Model Kit AMT750 Review
 RoR Step-by-Step Review 20130503* Ghostbusters ECTO-1A 1:25 Scale Model Kit AMT750 Review Click the Buy Now link below to purchase the 13 page, full-color Step-by-Step review by Dave Seadorf What could
Mustang Radiator Conversion DIY. By GearHeadPeter. January 27, 2011
 1964-1966 Mustang Radiator Conversion DIY By GearHeadPeter January 27, 2011 We all know that the radiators in our cars are not the best, especially if you have done any customization to the engine, which
TEST DRIVE TECHNOLOGIES VEHICLE INSPECTION SERVICES
 17715 St Rose Road St Rose, Illinois 62230 www.testdrivetech.com Phone: 636-388-8378 Email: info@testdrivetech.com TEST DRIVE TECHNOLOGIES VEHICLE INSPECTION SERVICES Vehicle Identification Inspection
and Original Series Pickup Lift Mounting Instructions Fullsize Nissan Titan Trucks present T-420 BOLT-ON GUSSET PART#5257
 and Original Series Pickup Lift Mounting Instructions Fullsize Nissan Titan Trucks- 2004-present Preparing the Gate 1. Remove the mounting hardware which is banded to the liftgate. 2. Verify mounting bracket
Front plate before plating and painting. Shifter plate with hole for exhaust cutout lever
 Jan 3: I had to make a mounting plate for the choke cable, which goes under the dash. Worked on the wires to route them to the gauges, it had been a challenge to determine where everything goes. Cleaned
MGB V8 Roadster restoration project Report 67
 19th August 2016. This report jumps a bit from one subject to another. If I need to put some thought into a certain aspect of the rebuild I tend to get on with another job and sleep on the problem until