TRIPODMAKER BLACK EDITION USER MANUAL
|
|
|
- Sibyl Phelps
- 5 years ago
- Views:
Transcription

1 TRIPODMAKER BLACK EDITION USER MANUAL

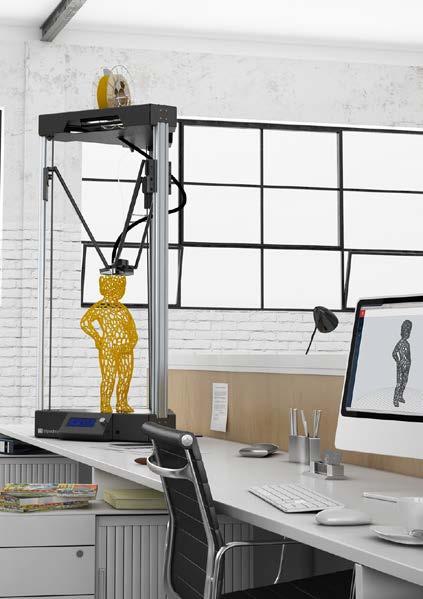
2 TABLE OF CONTENT Specifications and box content 1. Specifications of the Tripodmaker Box content Terminology Attentions and warnings...8 Unboxing 1. Preparations Load filament Calibration Plexi covers...15 Menu 1. Info screen Quick settings Print file Extruder SD card Configuration...22 THANK YOU MAINTENANCE & TROUBLESHOOTING 1. General Extruder drive cleaning Cart alignment Clogged nozzle - Cold pull Troubleshooting and easy fixes...36 for your purchasing a Tripodmaker! This is the user manual for your Tripodmaker Black Edition. In this manual, you will be guided through the printing process. Read this manual carefully and take the needed time to get familiar with your new product. This is a manufacturing device that requires thorough understanding. If for any reason something would be unclear or wrong, feel free to contact us at: info@tripodmaker.com 2 3
 dimensions 42 cm x 53 cm x 101")


 2X Spool holders 1X Blue tape")


3 SPECIFICATIONS OF THE TRIPODMAKER HARDWARE technology FDM (Fused Deposition modeling) dimensions 42 cm x 53 cm x 101 cm shipping dimensions 45 cm x 55 cm x 110 cm weight 23 kg shipping weight 25 kg print area Ø 30 cm x 45 cm nozzle Ø 0.4 mm; full metal - up to 295 C heated bed up to 95 C power V; Hz; 5A connectivity Stand alone printing from SD card casing plexi cover (optional) BOX CONTENT Next to your Tripodmaker, which had the SD-card inserted, there are other components in the box. Here the list: MATERIALS diameter plastics 1.75 mm PLA; PETG; HIPS; ABS; Polycarbonate 1X Filament spool (can be in any color) 2X Spool holders 1X Blue tape SOFTWARE software printable files supported PRISMA cloud platform.stl Chrome - Safari - Firefox PERFORMANCE 1X Power cable 1X USB cable 1X Test print bed leveling layer thickness / resolution machine tolerance full automatic / manual screw assisted 75 micron micron 0.1 mm 1X Power source 1X Filament guidance tube 1X User manual 4 Tripodmaker // Specifications Tripodmaker // Specifications 5
 12. Vertical slides 1. Nozzle 2. Probe 3.")
4 TERMINOLOGY PRINT HEAD / HOT-END Display 2. SD-card slot 3. Push and rotate button 4. USB Socket 5. Build plate 6. Spool holder mount location 7. Filament guide tube 8. Print head cables 9. Filament driver 10. Rods 11. Carts (wheels or linear sliders) 12. Vertical slides 1. Nozzle 2. Probe 3. Cooling fans 6 Tripodmaker // Specifications Tripodmaker // Specifications 7


5 ATTENTIONS AND WARNINGS Please read this attentions carefully and keep them in mind while unboxing and operating the device. ATTENTION! During the printing process, the hot-end and print bed can get hot. Do not touch these until printing is done. ATTENTION! Make sure your power switch is in the OFF [o] position before you attach or detach the power cable. ATTENTION! When storing your spool, make sure your filament doesn t get tangled as this might block the unwinding of the spool in a next print ATTENTION! Turning the -Tripodmaker ON lights up the LCD screen and the LED lights. -Switching OFF can be done at any time, however it is recommended to only turn it of when not in use. -Turning the Tripodmaker OFF extinguishes the LCD screen. ATTENTION! make sure your plate is free of objects. ATTENTION! Using a glass or wooden sheet to cover the original aluminum build plate will make the nozzle crash. The sensor is unable to sense the aluminum through these sheets of glass or wood. The TripodMaker is an electrical device and contains motors and hot elements. During operation of the printer, be always aware of possible hazards. WARNING! Age Warning User under the age of 18 are recommended adult supervision. The printer includes small parts that can lead to choking. WARNING! Burn Hazard The extruder nozzle or heated building platform might be hot during operation. Never touch these before they cooled down. This can take more than 20 minutes. Also the extruded plastic is hot and should not be touched. WARNING! Electric Shock Hazard When the printer powered, touching the electronics may result in an electric shock. Make sure you disconnected the power source and power supply when opening the electronics. Wait at least one minute before opening the box to allow the power supply to discharge. WARNING! Fire Hazard Keep flammable liquids and/or materials away from the printer when powered or in operation. WARNING! Pinch Hazard During operation, keep fingers, hair and loose clothing away from moving parts like belts, pulleys, gears or fans. WARNING! Static Charge Ground yourself before touching the printer electronics. Electrostatic charge can damage electronic components. Ground yourself by touching a grounded source. 8 Tripodmaker // Attentions and warnings Tripodmaker // Attentions and warnings 9


6 UNBOXING Put blue tape on the printbed. Go to prisma.tripodmaker.com and enter your device ID. The setup process will guide you with a series of instruction videos until your first test print. The steps are also covered in this manual. STEP 1. PREPERATIONS Place the Tripodmaker box on a stable surface with great access on all sides. Install the spoolholders. Note that some forces might be needed. Open the top and take out all accessories (Spool/cables/etc) Now tilt the box on its side and open the bottom Tilt the box back in it s upright position. Now you can lift the box while the printer remains on the floor. Position your Tripodmaker on a sturdy table. Now cut the zipties around the 3 belts so the catridges can move freely. STEP 2. LOAD FILAMENT Navigate to the change filament menu quick settings/change filament Wait for the printer to heat up and stop retracting. An insert filament message will appear Cut the filament to have a sharp tip Push the filament through the small bowden tube Plug it in the electrical outlet and turn your device on. Make sure the fan on the back of the printhead is on. Place the spool on top of the printer like in the picture Push down the extruder drive screw and insert the filament. The filament should be visible in the bowden tube for 1 cm. 10 Tripodmaker // Unboxing Tripodmaker // Unboxing 11


 MANUAL CALIBRATION In case there are still difficulties with your print adhesion in some")


7 Push the short bowden tube in the frame. A correct installed filament spool looks like this Initiate the filament loading by rotating the button. After the filament stops loading, rotate the button untill filaments starts oozing out of the nozzle. Click when done. STEP 4. (OPTIONAL) MANUAL CALIBRATION In case there are still difficulties with your print adhesion in some areas you can perform a manual calibration. First perform the Home all step to make sure the printer is homed correctly. NOTE: make sure the printbed is covered with blue tape except for the 3 screws STEP 3. CALIBRATION This will make sure the printer is completely level after transport. Before proceeding remove any remaining filament from the nozzle Now perorm the set Nozzle Height step from the menu. Navigate to the Set probe offset menu item and initiate it: Configuration/Set probe offset Similar to the first step in auto calibration you have to bring the nozzle down to the buildplate until it touches the blie tape. Click to save NOTE: This will erase the auto calibration results Turn the knob to move the nozzle towards the printbed until it touches the blue tape. Now click to save and start the calibration. Wait for the calibration to complete. Now execute the Front left tower command. The print head will move to the front left tower. You are now ready to print 12 Tripodmaker // Unboxing Tripodmaker // Unboxing 13

 INSTALL PLEXI COVERS If you gor you")


8 Adjust the screw with a size 3 allen wrench until the nozzle touches the blue tape on the printbed. STEP 5. (OPTIONAL) INSTALL PLEXI COVERS If you gor you Tripodmaker Black Edition with plexi covers follow the diagram to install the covers. Connect bolts as in the picture Repeat this for each door. Continue by performing this same procedure on the front right tower. Install the lock on the left side when facing the front of the printer. Continue by performing this same procedure on the back tower. You are now ready to print 14 Tripodmaker // Unboxing Tripodmaker // Unboxing 15


9 >section 1: Temperature nozzle / B= Temperature bed Z= Current print height Buf: Buffer value Mul: Speed multiplier 100% by default E= Extruded lenght NOTE: values will change during print >section 2: XYZ coordinates NOTE: values will change during print >section 3: Extruder and bed temperature NOTE: values will change during print >section 4: Printing time and filament printed in meters. MENU Access the main menu by pushing the button The menu on you Tripodmaker Black Edition can be navigated through the push and rotate button next to the display. After turning your Tripodmaker on the info screen will appear. You can scroll through 4 sections by rotating the button. 16 Tripodmaker // Menu Tripodmaker // Menu 17


10 Navigate by rotating the button. Click to access > Quick settings > Quick settings > Preheat PLA/ABS: This setting will preheat the nozzle and buildplate to the right temperatures for PLA and ABS. Prints will start imidiately with a pre-heated printer. > Quick settings >Home all This wil home the printhead to the top of the printer. > Quick settings > Fan speed: Here you can turn the fans on or off. > Quick settings >Z babystep: Adjust the z height of the printhead. Do not perform this setting unless you suffer from bad bed adhesion. > Quick settings >Cooldown This will boost all fans to cool the print head rapidly. > Quick settings >Lights: Turn the led lights on or off > Quick settings > Disable stepper This will disable the stepper motors. Now you can move the carts and the print-head by hand. > Quick settings > Change filament: Use this function to load or unload filament. > Print file This will navigate to your SD card. Now you can select the file you want to print. 18 Tripodmaker // Menu Tripodmaker // Menu 19


11 Navigate by rotating the button. Click to access > Extruder > SD card: This menu gives access to your SD card. While printing this menu gives access to the pause and resume functions. > Extruder > Bed temp: Click to access and rotate to adjust the bed temperature > Extruder > Temp1: Click to access and rotate to adjust the nozzle temperature > Extruder > Tuen extr. 1 off: This will turn the nozzle off > Extruder > Extr. position Access this menu to perform manual extrusion of the filament. > SD card > Print file: This will navigate to the files on your SD card. Navigate by rotating the button. Click to access > Configuration > Extruder > Extr. position Rotate the button clockwise to push the filament through the nozzle. NOTE: the nozzle must be heated otherwise nothing will happen. > Configuration > language: Printer menu language is available in english only. > Extruder > Set Origin This menu has to be executed if instructed by our support team. > Configuration > Manual Calibration: This will enter the manual calibration menu. See page 13 step 4 20 Tripodmaker // Menu Tripodmaker // Menu 21


12 > Configuration > Manual Calibration: home all - printer needs to be homed before starting manual calibration > Configuration > Manual Calibration: Set nozzle height - sets nozzle height Note: this will erase results from auto calibration Right/left/back tower - nozzle moves to choosen tower > Configuration > auto calibration: This will initiate the calibration program. See page 11 step 8 > Configuration > Factory Reset Please contact info@tripodmaker. com for further troubleshooting. If a factory reset is necessary our support team will provide the reset code. > Configuration > Factory Reset Proceed with instructions received by our support team. YOU ARE ALL SET NOW! Note that during the print the Tripodmaker shows the completions percentage of your print. Menus that are accessible during print can be modified (ex. temperature/fans etc) Use these features on your own risk during a print. 22 Tripodmaker // Menu Tripodmaker // Menu 23

13 2. MOVING PARTS MAINTENANCE & TROUBLESHOOTING 1. EXTRUDER DRIVE Check the extruder on a regular base for accumulated filament dust. We recommend cleaning the extruder drive every 3 months or after periods of intensive usage. How to clean your extruder is explained from page 16 onwards. Check your carts on wobble after a while. If the carts are loose on the track, you can tighten the eccentric nut in order to remove the cart wobble. The carts must run smooth. If you over tighten the eccentric nut, you will need to use allot of force to move the cart and it will seem you have hick-ups during the sliding maneuver. How to tighten your carts is explained on page 21 step NOZZLE AND HOT-END Make sure that the nozzle and hot-end are cleaned when covered with plastic residues. To clean of the nozzle, simply heat it until the plastic gets sticky, and use a printed cube to peel of the sticky plastic. 24 Tripodmaker // Maintenance Tripodmaker // Maintenance 25


14 MAINTENANCE & TROUBLESHOOTING 1. EXTRUDER DRIVE CLEANING Problem: Filament is slipping or extrusion problems. Solution: Clean the extruder drive We recommend cleaning the extruder drive every 3 months. To remove the Nylon tube, push the movable piece in the direction of the white arrow. Once squeezed inward, the nylon tube can be retracted. remove the two screws that hold the extruder drive motor Remove the extruder drive tension screw remove the extruder drive from the top frame through one of the openings. Compress the spring mechanism to squeeze it through. Unplug the motor cable. Remove circlips that clamps the tube holder remove the extruder drive gear with a small Allen wrench. In order to remove the extruder drive gear from the axe, squeeze the mechanism. To remove the Nylon tube, push the movable piece in the direction of the white arrow. Once squeezed inward, the nylon tube can be retracted. Clean the extruder drive gear with a knife. The small blade fits inside the slots of the extruder drive gear. 26 Tripodmaker // Maintenance Tripodmaker // Maintenance 27


15 Remount the complete assembly. Pay attention that the extruder drive gear is positioned flush with the front of the black anodized components. The screw rests on the flat surface of the motor axe. Pay attention to the orientation of the extruder drive gear! Plug the cable and squeeze the extruder drive back in its position. Make sure to plug the extruder drive cable so the colors match when the plug is plugged in! Retighten the screws for positioning the extruder drive motor. Insert the pneufit coupling. Make sure it is hand tight, do not over tighten it! Slide in the white tube and make sure it is deep enough. Push-pullpush-pull to be sure it is deep enough. Insert the extruder drive tension screw and retighten it. Done! 28 Tripodmaker // Maintenance 29

 Set temperature to 0 degrees C (click to confirm) 1.")


 and pulling the tube out. 7.")

 filament in the print head by bypassing the bowden")
16 3. CLOGGED NOZZLE CLEANING Problem: No filament is coming through the heated nozzle Solution: Clean the nozzle wiith the cold-pull method 5. Cool down the hot end Go to Menu > Extruder > Temp.1 (click) Set temperature to 0 degrees C (click to confirm) 1. Remove the filament from the printer through thhe menu: quick settings>change filament 6. Wait until hot-end temperature is 110 degrees C and pull firmly the filament back. You should hear a plopping sound. 2. Remove bowden tube from the print head by pushing the black clip downards (with a screwdriver) and pulling the tube out. 7. Check if black residue is stuck on the outer end of the filament you just pulled out of the hot-end 3. Heat up the print head Go to Menu > Extruder > Temp.1 (click) Set temperature to 180 degrees C (click to confirm) 4. Insert (light preferably colored) filament in the print head by bypassing the bowden tube Make sure filament oozes out of the nozzle 8. In case allot of residue was found, go back to step 3 and repeat the operation. Else, put back the bowden tube. Make sure the bowden is inserted deep enough until the point it can t go any further. 30 Tripodmaker // Maintenance Tripodmaker // Maintenance 31

17 TROUBLESHOOTING AND EASY FIXES PRINT DOESN T STICK TO THE PRINTER BED OR DETACHES ON CERTAIN SPOTS. Cause: - Build plate is not leveled properly. Solution: 1. Try to use new tape 2. Try to level the build plate by re-calibrating the device THE FILAMENT IS STUCK IN THE TUBE Cause: Filament is stuck in the nylon tube due to a blob that is retracted in the tube. Solution: Remove the tube out of its couplings and remove the filament. The tube can be removed by pushing in the couplings in the opposite direction you want to pull out the tube. THE PRINT IS STUCK ON THE BUILD PLATE. Cause: This can happen with prints that have a large area touching the buildplate. Solution: Use a putty knife to get the pieces from the build plate. WARNING! Make sure your other hand is not in the path of the knife as the print migh come loose all of a sudden. CLOGGED NOZZLE Solution: Try manually feeding the nozzle while setting the temperature on 245 degrees. See on page 32 how to manually feed the nozzle. Try different temperatures between 245 and 180 degrees. If no filament is getting through try the following: 1. Heat the extruder to 215 degrees. Take a short piece of clear/white PLA (1/2 meter) and push it in the nozzle from top like on page 32 of this manual. Push it inside until you can t get any further. Then pull it out. Cut the dirty tip off with pliers and re-insert. Keep doing this until the filament is clear and the clog is eventually gone. 2. To improve results with this process it might help to push a neelde of <0.4 (specialised 3D printing needles or the classic needles from your local pharmacy) in the bottom of the nozzle and then pull it out again. Perform step 1 again. Alternate step 1 and 2 a few times until the clog is gone. In case this doens t solve the problem, contact support: info@tripodmaker.com. 32 Tripodmaker // Maintenance Tripodmaker // Maintenance 33
18 34 Tripodmaker
TL4076 Top 5 Tips Get to know your TL4076
 TL4076 Top 5 Tips Get to know your TL4076 Thermal Break with Teflon liner (behind fan) Hot End Assembly Fan Heat Block Extruder with toothed gear(brass) and idler (steel) Filament Guide Tube Nozzle Cable
3D PRINTER USER MANUAL
 3D PRINTER USER MANUAL Table of contents page: 1. Introduction 2. Table of contents 3. Basic informations 4. General information 5. Glossary 6. Starter pack s content 7. Technical parameters 8. Device
JGAURORA 3D PRINTER MODEL: A5 USER GUIDE
 JGAURORA 3D PRINTER MODEL: A5 USER GUIDE Contents ----3D Printer User Guide 1. Preface... 2 1.1 Introduction...2 1.2 Safety advice... 2 1.3 Filament requirements...2 1.4 Environmental requirements...2
NWA3D A5 User Manual
 1. NWA3D A5 3D Printer Part Diagrams 2. Assembling the Spool Holder 3. Leveling the Build Plate 4. Loading and Unloading Filament 5. Operation: The Four Steps in 3D Printing 6. Troubleshooting 7. Additional
WANHAO Duplicator i3. User Manual V1.2. Wanhao USA
 WANHAO Duplicator i3 User Manual V1.2 Wanhao USA 2015 www.wanhaousa.com Safety WARNING: The components on the Duplicator i3 generate high temperatures and move extremely fast. Reaching inside of the Duplicator
Customer Name: Serial Number: Y-Axis Stall
 Technician Name: Date: Technician Name: Date: Customer Name: Serial Number: Y-Axis Stall Issue Explanation and Background Each drive motor on the machine (the x, y and z axes motors) has a sensor called
Introduction to 3D Printing
 TAKE HOME LABS OKLAHOMA STATE UNIVERSITY Introduction to 3D Printing by Sean Hendrix 1 OBJECTIVE The objective of this experiment is to introduce you to 3D printing, by having you print some simple parts
Prusa i3 Printer Assembly Guide
 Prusa i3 Printer Assembly Guide Special thanks to Carlos Sanchez and Miguel Sanchez for the graphics. All graphics captured from their great animation: http://www.carlos-sanchez.com/ Prusa3/ For copyright
6. Pre-print checks. 3D Touch
 Page 1 1. 6. Pre-print checks........................................................................................... 1.1 a. Clearing the print bed..................................................................................
5. E-axis assembly. 5. E-axis assembly. Written By: Jakub Dolezal manual.prusa3d.com/ Page 1 of 40
 5. E-axis assembly Written By: Jakub Dolezal 2018 manual.prusa3d.com/ Page 1 of 40 Step 1 Tools necessary for this chapter Needle-nose pliers for zip tie trimming. 2.5mm Allen key for M3 screws 2mm Allen
Upgrade v3 to v3.2. SeeMeCNC Guides. Upgrade v3 to v3.2. Rostock Max v3 Uprgade to v3.2. Written By: SeeMeCNC seemecnc.dozuki.
 SeeMeCNC Guides Upgrade v3 to v3.2 Rostock Max v3 Uprgade to v3.2 Written By: SeeMeCNC 2018 seemecnc.dozuki.com/ Page 1 of 34 INTRODUCTION This guide is intended to Upgrade a Rostock Max v3 to a Rostock
Maintenance Manual. Hephestos
 Hephestos 2016 Mundo Reader SL. All rights reserved. The reproduction, copying, distribution, publication or modification of this material is strictly prohibited unless carried out with the express prior
Ultimaker 2 Extended THINK LARGE, PRINT BIG USER MANUAL V2.1
 Ultimaker 2 Extended THINK LARGE, PRINT BIG USER MANUAL V2.1 2 TABLE OF CONTENTS 1. ULTIMAKER 2 EXTENDED 4 Ultimaker 2 Extended at a glance 5 Specifications 7 2. GETTING STARTED 8 Unboxing 9 Installation
Quick Starter Manual for PrusaM201
 Quick Starter Manual for PrusaM201 Copyright Declaration The copyright of this specification belongs to the Shenzhen GETECH CO., LTD. (hereinafter referred to as the "Geeetech"), and all rights reserved.
Witbox 2. Quick start guide
 Witbox 2 Quick start guide Welcome. Thank you for choosing us. This manual will help you to use your new 3D printer correctly. Welcome to the world of Witbox 2. How do I use this manual? To make sure that
NWA3D A31 User Manual
 1. 3D Printer Parts Diagram 2. Assembly 3. Fine-Tuning 4. Leveling the Build Plate 5. Loading and Unloading Filament 6. Operation: The Four Steps in 3D Printing 7. Troubleshooting Version 2.0 8. Additional
5. Extruder Assembly
 5. Extruder Assembly Guide for the assembly of the Extruder. Written By: Josef Prusa 2018 manual.prusa3d.com/ Page 1 of 24 Step 1 Get the necessary tools 2.5 and 1.5 mm Allen key Needle-nose pliers 2018
Installation Instruction of CTC DIY 3D Printer
 Installation Instruction of CTC DIY 3D Printer Focus on high-end science and technology,focus on 3D printing Zhuhai CTC Electronics Co.,Ltd. www.ctcprinter.com 1 Introduction This DIY 3D printer can be
To be the Chief Evangelist CR-10S Pro Printer Guide Book To make Top-quality 3D printer
 To be the Chief Evangelist CR-0S Pro Printer Guide Book To make Top-quality 3D printer This guide book is for standard CR-0S Pro. Please plug the power cord into a three-hole power jack. Detailed instructions
MP Maker Pro Mk.1 P/N User's Manual
 MP Maker Pro Mk.1 P/N 33013 User's Manual CONTENTS SAFETY WARNINGS AND GUIDELINES... 3 INTRODUCTION... 5 FEATURES... 5 CUSTOMER SERVICE... 5 PACKAGE CONTENTS... 6 PRODUCT OVERVIEW... 7 Front View... 7
Documentation version 1.42 ASSEMBLY INSTRUCTIONS REV 1.1
 Documentation version 1.42 ASSEMBLY INSTRUCTIONS REV 1.1 / 2 INTRODUCTION / 3 INTRODUCTION Target : Prupose a visual guide of the differents steps to build and use a µdelta printer Designers : Hugo Flye
3. Extruder Assembly
 3. Extruder Assembly Guide for the assembly of the Extruder. Written By: Josef Prusa 2017 manual.prusa3d.com Page 1 of 22 Step 1 Get the necessary tools 2.5 and 1.5 mm Allen key Needle-nose pliers Step
Trifecta 800 3D Printer. User s Guide
 Trifecta 800 3D Printer User s Guide Table of Contents 3 SAFETY WARNINGS 4 WARRANTY 5 SPECIFICATIONS 6 PRINTER OVERVIEW 7 UNBOXING 9 10 11 12 13 14 15 17 18 20 22 25 26 FILAMENT INSTALLATION PRINT BED
Heated Bed Installation Instructions
 Heated Bed Installation Instructions Overview The glass panel is heated by way of a heater element which is bonded to the glass panel and controlled by a digital temperature controller. The temperature
Ultimaker 2+ OUR MOST ADVANCED 3D PRINTER JUST GOT EVEN BETTER
 Ultimaker 2+ OUR MOST ADVANCED 3D PRINTER JUST GOT EVEN BETTER INSTALLATION AND USER MANUAL Original manual V1.0 2015 DISCLAIMER Please read and understand the contents of this installation and user manual.
Installation and service instructions, warranty terms & conditions. DeeGreen. User Guide. Version 2.6
 Installation and service instructions, warranty terms & conditions DeeGreen User Guide Version 2.6 - 2 - Contents 1. Contents...- 3-2. Technical parameters...- 4-3. Safety instructions...- 4-4. Package
Assembly Instructions of Geeetech Aluminum Prusa I3
 Assembly Instructions of Geeetech Aluminum Prusa I3 CONTENT Safety Instructions... 3 Preparation... 4 1. Unfold the box and check the package... 1 2. Assemble Y axis... 1 3. Build the printing platform...
Modix Big-60 Assembly Manual Part 2
 Modix Big-60 Assembly Manual Part 2 Version 1.0, October 2017 Menu 1. Motors & End Stop Wiring... 3 2. Controller Wiring Check... 6 3. Extruder Wiring... 7 4. Electronic Box Cover... 9 5. Filament Sensor...
Documentation version ASSEMBLY INSTRUCTIONS
 Documentation version 1.1.0 ASSEMBLY INSTRUCTIONS / 2 INTRODUCTION / 3 INTRODUCTION Target : Provide a visual guide of the various steps required to assemble the «i3 Metal Motion» 3D printer. Designers
LS10.0T Service Manual
 LS10.0T Service Manual 1 TABLE OF CONTENTS CHAPTER 1: SERIAL NUMBER LOCATION...3 CHAPTER 2: PREVENTATIVE MAINTENANCE 2.1 Preventative Maintenance. 4 2.2 Tension and Centering the Running Belt....6 CHAPTER
Using 1.75mm Filament on Ultimaker 2
 Using 1.75mm Filament on Ultimaker 2 Created by Ruiz Brothers Last updated on 2016-07-01 10:58:07 PM EDT Guide Contents Guide Contents Overview Why should I use 1.75mm filament? What do I need? TLDR User
IMPORTANT! DO NOT THROW AWAY THE SHIPPING CARTON AND PACKING MATERIAL
 Operator s Manual IMPORTANT! DO NOT THROW AWAY THE SHIPPING CARTON AND PACKING MATERIAL ii Table of Contents Operator Safety... 1 Introduction... 2 Unpacking and Setup... 3 Unpacking... 3 Setup... 4 ROCKET
Building Instructions of Geeetech Prusa I3 M201
 Building Instructions of Geeetech Prusa I3 M201 (Version 11-25-2016) CONTENT Safety Instructions... 1 Preparation... 2 1. Assemble the threaded rods of Y axis... 3 2. Assemble the front and back support
AU DU PONT DE LUTTRE BRUSSELS BELGIUM PHONE: FAX: OPERATING MANUAL. Electric Fully Automatic Floor Saw FS 1218 EX
 AU DU PONT DE LUTTRE 74-1190 BRUSSELS BELGIUM PHONE: 322 34 83 162 FAX: 322 34 83 136 OPERATING MANUAL Electric Fully Automatic Floor Saw FS 1218 EX 2 Important information before you start! When the machine
MMU2 filament jam. MMU2 filament jam. Written By: Jakub Dolezal manual.prusa3d.com/ Page 1 of 7
 Written By: Jakub Dolezal 2018 manual.prusa3d.com/ Page 1 of 7 Step 1 Filament jam During filament loading or unloading the filament can get stuck (jammed). The printer will try several times to fix it
Building Instructions of Geeetech Prusa I3 M201
 Building Instructions of Geeetech Prusa I3 M201 (Version 04-11-2016) CONTENT Safety Instructions... 1 Preparation... 2 1. Assemble the threaded rods of Y axis... 3 2. Assemble the front and back support
FlexJet - Flex Cable Replacement
 P/N: 109515R0 14140 NE 200th St. Woodinville, WA. 98072 PH: (425) 398-8282 FX: (425) 398-8383 FlexJet - Flex Cable Replacement Notices: Warning! Ensure that all AC power cables are removed from the printer
Documentation version ASSEMBLY INSTRUCTIONS
 Documentation version 1.6.30 ASSEMBLY INSTRUCTIONS / 2 INTRODUCTION / 3 INTRODUCTION Target : Propose a visual assembly instruction guide of the MicroDelta Rework. Designers of the MicroDelta Rework :
Quick Start Guide. Caution. Warning. This guide only applies to Dreamer 3D printer of Flashforge
 Quick Start Guide Caution Warning. Do not peel the yellow film from the build plate. It is heat-resistant tape, which makes objects stick to the build plate easily.. Do not remove the wrapping around the
8. Electronics assembly (B3/R2 design)
") 8. Electronics assembly (B3/R2 design) Written By: Jakub Dolezal 2018 manual.prusa3d.com/ Page 1 of 31 Step 1 Tools necessary for this chapter Needle-nose pliers for zip tie trimming. 2.5mm Allen key for
8. Electronics assembly (B3/R2 design) Written By: Jakub Dolezal 2018 manual.prusa3d.com/ Page 1 of 31 Step 1 Tools necessary for this chapter Needle-nose pliers for zip tie trimming. 2.5mm Allen key for
Service menu - Individual Filament Calibration
 Service menu - Individual Filament Calibration Written By: Jakub Dolezal 2018 manual.prusa3d.com/ Page 1 of 8 Step 1 Introduction This guide will take you through the calibration of the Bowden length on
Modix Big-60 Assembly Instructions Part 1
 Modix Big-60 Assembly Instructions Part 1 Version 1.0, October 2017 Menu 1. X Idler Pulley Assembly... 3 2. Connecting X Axis Brackets to Z Profiles... 4 3. Assemble X Rails on X Top Profiles... 6 4. Assemble
Assembly Manual FELIX One
 Assembly Manual FELIX One Version 1.0 2018 www.felixprinters.com support@felixprinters.com Zeemanlaan 15 3401 MV IJsselstein The Netherlands Introduction Table of Content Dear Customer, Thank you for choosing
3DPrint Quality. Troubleshooting Guide
 ALUNAR 3D PRINTER Print Quality Troubleshooting Guide Print Quality Troubleshooting Guide... 1 Overview...1 1. Not Extruding at Start of Print...3 1.1 Filament was not loaded into extruder before printing...3
VALVE ADJUSTMENT. To perform a valve adjustment, the engine must be cold: minimum of 4 hours after shutoff, overnight is preferable.
 VALVE ADJUSTMENT The following instructions cover valve adjustment on nonhydraulic (solid lifter) engines. Check the specification sheet on your vehicle to establish your specific engine. If not available,
3 D Print Quality Troubleshooting Guide
 3 D Print Quality Troubleshooting Guide Shenzhen Anet Technology Co,. Ltd. Print Quality Troubleshooting Guide... 1 Overview... 1 1. Not Extruding at Start of Print... 4 1.1 Filament was not loaded into
3 D Print Quality Troubleshooting Guide
 3 D Print Quality Troubleshooting Guide Shenzhen Anet Technology Co,. Ltd. Print Quality Troubleshooting Guide... 1 Overview... 1 1. Not Extruding at Start of Print... 3 1.1 Filament was not loaded into
Please read the safety instructions carefully before get started.
 Safety Instructions Please read the safety instructions carefully before get started. ANYCUBIC 3D printer generates high temperature. Do not reach inside of the printer during operation. Allow time for
Quick Start Guide INVENTOR II SZ15-EN-A02
 Quick Start Guide INVENTOR II SZ15-EN-A02 WARNING 1. Hot! Avoid touching the heating nozzle in operation. 2. Moving parts in printer may cause injury. Do not wear gloves or other sources of entanglement
Unpacking Instructions
 Unpacking Instructions by Revolution 3D Printers Infinity3D_Unpacking_Instructions_V1.1 1 Copyright 2016, Revolution 3D Printers Copyright 2016 Revolution 3D Printers, Victoria, BC File version Infinity3D_V1.0,
READ BEFORE STARTING PLEASE INSTALLATION! User Manual
 PLEASE READ BEFORE STARTING INSTALLATION! User Manual Contents 1 Scope of delivery3 2 Overview of the RaceChip 4 3 Installation 5 4 Fine tuning 14 5 Trouble Shooting 16 6 Contact 20 Overview and explanation
SERVICING MANUAL FOR SPINALIS CHAIRS Outline of Servicing Procedures
 SERVICING MANUAL FOR SPINALIS CHAIRS Outline of Servicing Procedures Individual steps of servicing procedures for repairs of SpinaliS chairs are outlined below. All steps can be performed by a single person
EB Conveyor Maintenance Guide
 EB Conveyor Maintenance Guide EN-0037 Rev A EB Conveyor Maintenance Guide www.qdraw.com Table of Contents Overview Page 3 Exploded View Of A Standard EB Conveyor Page 4 Preventative Maintenance Page 5
Galaxy Note 5 Glass/Lcd REPAIR GUIDE. Version Edition
 Galaxy Note 5 Glass/Lcd REPAIR GUIDE Version 1 2016 Edition Samsung Galaxy Note 5 Glass/LCd REPAIR GUIDE RiAna Soto Repair Training Specialist rsoto@cellairis.com FOR EVERY REPAIR MAKE SURE TO COMPLETE,
Assembly Manual FELIX Tec 4
 Assembly Manual FELIX Tec 4 Version 5.2 2018 www.felixprinters.com support@felixprinters.com Zeemanlaan 15 401 MV IJsselstein The Netherlands Introduction Table of Content Dear Customer, Thank you for
INSTRUCTION MANUAL VERSION 1 ISSUED 23/11/17 MODEL NUMBER: HE161192
 INSTRUCTION MANUAL VERSION 1 ISSUED 23/11/17 MODEL NUMBER: HE161192 IMPORTANT Getting the most out of your 3D Printer Touch: Read the manual carefully It will help you set up with ease Visit wwwcocoonproductscomau
POWER STEERING PUMP REBUILDING SPK101 Read instructions completely before removal & disassembly
 POWER STEERING PUMP REBUILDING SPK101 Read instructions completely before removal & disassembly DISASSEMBLY: 1. Remove pump from car and allow to drain. 2. Remove pulley from front of pump. This requires
Building Instruction of Geeetech Prusa I3 pro W. 3D Printer
 Building Instruction of Geeetech Prusa I3 pro W 3D Printer Version 05-31-2017 Contents Safety Instructions... 2 Preparations... 3 1.Unfold the box and check the package... 4 2 Assemble the rods of a Y
CreatBot 3D Printer. User manual. English V Henan Suwei Electronics Technology Co., Ltd.
 CreatBot 3D Printer User manual English V7.2 Henan Suwei Electronics Technology Co., Ltd. - 1 - CONTENTS Notice 3 Machine Diagram Front 4 Back/Hotend 5 New Feeder / Feeder 6 Hardware Installation Unpacking
Maker's Tool Works. Written By: Micro. Wiring methods used by MTW Printers using the Rambo Electronics. Wiring Rambo Electronics & Power Supply
 Maker's Tool Works Wiring Rambo Electronics & Power Supply Wiring methods used by MTW Printers using the Rambo Electronics. Written By: Micro 2017 mtw.dozuki.com Page 1 of 10 TOOLS: Screw Drivers (1) Wire
Quick user guide for the DM dispenser
 Quick user guide for the DM dispenser READ FIRST! Use the shortest/thickest USB cable possible, if the screen dims too much during operation (to the point where it s hard to read the text) your cable or
Remote Control Electric Curtain Track User Manual
 User Manual A. Over View Thank you for purchasing the Remote Electric Curtain Track from Y2SHOP. The curtain tracks are widely used in window treatments, home theatres, projector screen covers, room dividers,
Cubicon Single (3DP-110F)
") Cubicon Single (3DP-110F) Operation Manual Please read the safety cautions carefully before using the product, and use the product appropriately. This document is provided to ensure the safety of users
Cubicon Single (3DP-110F) Operation Manual Please read the safety cautions carefully before using the product, and use the product appropriately. This document is provided to ensure the safety of users
Desktop 5.5 Z Axis Retrofit
 Page 1 Kit parts Desktop 5.5 Z Axis Retrofit Carriage plate with stop bolt and Z proximity switch installed Zip ties Spare bolts Spindle mounting plate with stop bolt, spring mount, and rail Z proximity
Assembly Instructions of Geeetech Prusa I3 A pro
 Assembly Instructions of Geeetech Prusa I3 A pro (Version 04-11-2016) CONTENT Safety Instructions... 3 Preparation... 4 1. Unfold the box and check the package... 1 2. Assemble Y axis... 1 3. Build the
Important notice Upper supports for Z axis Pulley Corner for Y axis Right X axis and left X axis Chain coupling for left X axis
 Warranty and FAQ G004260 Important notice You can personalise your Prusa i3 HEPHESTOS and update it with the latest innovations that appear in the community. However, it is important that you understand
2013 Elite T4000 (TM461C) Service Manual
 Service Manual") 2013 Elite T4000 (TM461C) Service Manual 1 TABLE OF CONTENTS CHAPTER 1: SERIAL NUMBER LOCATION...3 CHAPTER 2: PREVENTATIVE MAINTENANCE 2.1 Preventative Maintenance. 4 2.2 Tension and Centering the Running
2013 Elite T4000 (TM461C) Service Manual 1 TABLE OF CONTENTS CHAPTER 1: SERIAL NUMBER LOCATION...3 CHAPTER 2: PREVENTATIVE MAINTENANCE 2.1 Preventative Maintenance. 4 2.2 Tension and Centering the Running
TeeBox. The Suitcase 3D printer. BY:
 TeeBox The Suitcase 3D printer. BY: Eindhoven The Netherlands Contents Liability... 2 Returns... 2 WARNING... Error! Bookmark not defined. TRICKS AND TIP... 4 PART 1 ---Y AXIS (PRINT BED)... 7 Fasten heatbed
SeeMeCNC Guides. Orion Delta HE280 Hotend Upgrade. This How-to Guide will walk you through the steps of upgrading to the HE280 Hotend
 SeeMeCNC Guides Orion Delta HE280 Hotend Upgrade This How-to Guide will walk you through the steps of upgrading to the HE280 Hotend Written By: JJ Johnson 2017 seemecnc.dozuki.com Page 1 of 18 INTRODUCTION
Type 2 Push-Through 37 Ton Log Splitter. Assembly Manual
 Type 2 Push-Through 37 Ton Log Splitter Assembly Manual Refer to this manual for the following models: RS37PT-LF09PC-16-1 RS37PT-LF09EC-16-1 RS37PT-LF09EC-16-2 RS37PT-LF13EC-22-1 RS37PT-LF13EC-22-2 RS37PT-LF15EC-22-1
Service Manual Gulf Stream Electronic Full Wall Slide Systems
 Service Manual Gulf Stream Electronic Full Wall Slide Systems CONTENTS Page Before you operate the slide system 2 Operating Instructions 3 Preventive maintenance 3 Manually overriding your slide system
XR Conveyor Maintenance Guide
 XR Conveyor Maintenance Guide EN-0035 Rev. A XR Conveyor Maintenance Guide www.qdraw.com Table of Contents 05/20/2009 Overview Page 3 XR Conveyor Assembly Page 4 General Information Exploded View of an
T & T Service Manual
 T101-04 & T202-03 Service Manual 1 2 3 Contents CHAPTER 1: SERIAL NUMBER LOCATION... 6 CHAPTER 2: PREVENTATIVE MAINTENANCE 2.1 Preventative Maintenance... 8 2.2 Tension and Centering the Running Belt...
JEEVES. JEEVES Installation Manual. Installation Manual The Easiest Do-It-Yourself Dumbwaiter on the Market
 1 888-323-8755 www.nwlifts.com JEEVES Installation Manual The Easiest Do-It-Yourself Dumbwaiter on the Market This manual will cover the installation procedure step-by-step. The installation of this dumbwaiter
CONTENT. User manual. Building the 3Dsimo KIT. First start. Filament usage and filament change
 MANUAL CONTENT User manual Building the 3Dsimo KIT First start Filament usage and filament change 4 6 18 22 USER MANUAL ٱٱ ٱٱ ٱٱ ٱٱ ٱٱ ٱٱ You have obtained multimaterial building kit, the 3Dsimo KIT.
INSTALLATION INSTRUCTIONS RATTLER STEEL RUNNING BOARDS FORD TRANSIT VAN (FULL SIZE)
") INSTALLATION INSTRUCTIONS PARTS LIST: 1 32-inch Steel Running Board 1 8-1.25mm x 35mm Hex Bolt 1 96-inch Steel Running Board 13 8-1.25mm x 25mm Hex Bolt 5 Passenger Side/Driver Side Mounting Brackets 20
INSTALLATION INSTRUCTIONS PARTS LIST: 1 32-inch Steel Running Board 1 8-1.25mm x 35mm Hex Bolt 1 96-inch Steel Running Board 13 8-1.25mm x 25mm Hex Bolt 5 Passenger Side/Driver Side Mounting Brackets 20
INSTALLATION GUIDE Car Show Dual DVD Headrest Replacement System
 INSTALLATION GUIDE Car Show Dual DVD Headrest Replacement System NOTICE OF INTENDED INSTALLATION AND USE CAR SHOW VIDEO PRODUCTS ARE NOT INTENDED FOR VIEWING BY THE DRIVER, AND ARE TO BE INSTALLED ONLY
LS8.0T Service Manual
 LS8.0T Service Manual 1 TABLE OF CONTENTS CHAPTER 1: SERIAL NUMBER LOCATION...3 CHAPTER 2: PREVENTATIVE MAINTENANCE 2.1 Preventative Maintenance. 4 2.2 Tension and Centering the Running Belt....6 CHAPTER
CHEMINSTRUMENTS HOT ROLL LAMINATOR MODEL HL-100, HL-101 OPERATING INSTRUCTIONS
 CHEMINSTRUMENTS HOT ROLL LAMINATOR MODEL HL-100, HL-101 OPERATING INSTRUCTIONS PRODUCT DESCRIPTION...2 SPECIFICATIONS...3 UNPACKING...3 ASSEMBLY...3 Key Components...5 SAFETY FEATURES...7 Trip Wire...7
Assembly & Installation Guide Makerbot Rep2X and clones
 Assembly & Installation Guide Makerbot Rep2X and clones The Bondtech extruder upgrade kit for Makerbot and clones uses high-quality industrial pneumatic push-fit fittings for attaching the bowden tube.
GETINGE ProSeal Classic/Plus/ Premium SERVICE MANUAL
 GETINGE ProSeal Classic/Plus/ Premium SERVICE MANUAL EN P/N: V.9 Service manual Getinge ProSeal V.9 V.9 History Name Version Date Comment Coen van de Laar.8 26-02-204 Manual adjusted after first review
INSTRUCTION MANUAL_1219_ENGLISH SUPER ELF X3. Operating Instructions for DORNIER looms. Robustness Reliability Quality Productivity Versatility
 INSTRUCTION MANUAL_1219_ENGLISH SUPER ELF X3 Operating Instructions for DORNIER looms Robustness Reliability Quality Productivity Versatility WARNING! - Condensation could form on the Weft Feeder when
920 Remote Control Switches
 920 Remote Control Switches REMOTE CONTROL SWITCHES Service Bulletin This service bulletin for ASCO 920 Remote Control Switches explains how to replace the main s, operator coil, control s, and how to
Assemble Manual of Geeetech Acrylic Prusa I3 (8mm)
") Assemble Manual of Geeetech Acrylic Prusa I3 (8mm) Warning: Shenzhen GETECH CO.,LTD. This kit contains tiny parts; please keep them away from kids under 3.. Building and operating 3D printer involves electricity,
Assemble Manual of Geeetech Acrylic Prusa I3 (8mm) Warning: Shenzhen GETECH CO.,LTD. This kit contains tiny parts; please keep them away from kids under 3.. Building and operating 3D printer involves electricity,
2018 QOD TROUBLE SHOOTING MANUAL
 2018 QOD TROUBLE SHOOTING MANUAL TROUBLE-SHOOTING ISSUES WITH YOUR QOD 1. NO POWER OR INTERMITTENT POWER: STEPS TO ISOLATE PROBLEM AREA 1. Check USB Port: If you have lost power completely and are staring
DUETTE POWERRISE SHADES
 DUETTE POWERRISE SHADES A B OPEN CLOSE INSTALLATION OPERATION CARE PRODUCT VIEW Spacer Blocks Installation Brackets End Cap Sensor Eye and Manual Button Fabric-Covered Valance PowerRise with Platinum Technology
BE AWARE: ESD Sensitive Components!
 Cutdown Assembly 1 BE AWARE: ESD Sensitive Components! ESD Electrostatic discharge Electrostatic discharge (ESD) is the sudden flow of electricity between two electrically charged objects caused by contact,
Written By: Sam Lionheart
 iphone 5s Battery Replacement Replace the battery in your iphone 5s. Written By: Sam Lionheart ifixit CC BY-NC-SA www.ifixit.com Page 1 of 23 INTRODUCTION Use this guide to bring life back to your iphone
AmTryke Adult Recumbent Model HP1000 #50-HC-1000
 AmTryke Adult Recumbent Model HP1000 #50-HC-1000 TOOLS Needed for Assembly 5 mm Allen Wrench 8 mm Socket or Wrench 10 mm Socket or Wrench 14 mm Socket or Wrench 15 mm Socket or Wrench 22 mm Socket or Adjustable
ADHESION/RELEASE TESTER
 ADHESION/RELEASE TESTER MODEL AR-2000 OPERATING INSTRUCTIONS CHEMINSTRUMENTS 510 COMMERCIAL DRIVE FAIRFIELD, OHIO 45014 (513) 860-1598 www.cheminstruments.com Revision 1.0 December 13, 2016 CONTENTS PRODUCT
Assembly instructions. Veranda sunblind VZ510. art.nr
 Assembly instructions Veranda sunblind VZ510 art.nr. 27807 A. Introduction: Assembly instructions Veranda sunblind VZ510 This assembly guide is available from 15-11-00 and is directed to qualified assemblers.
Written By: Josef Prusa
 7. PSU & Heatbed assembly PSU and Heatbed guide Written By: Josef Prusa 2017 manual.prusa3d.com/ Page 1 of 17 Step 1 Getting the necessary tools 2 and 2.5 mm allen key Needle-nose pliers Step 2 3D printed
TBI /2012 TRAUMATIC BRAIN INJURY DEVICE
 USER MANUAL TBI 0310 6/2012 TRAUMATIC BRAIN INJURY DEVICE Page 1 of 26 Setting up the TBI 0310 Head Impactor The TBI 0310 Head Impactor when fully assembled has the following components: 1. Control box
1 COPPERHEAD 3D PRINTER ASSEMBLY GUIDE WELCOME
 1 COPPERHEAD 3D PRINTER ASSEMBLY GUIDE WELCOME Thank you for choosing the Copperhead 3D printer from Acadian Robotics. Please read through this manual first before setting up your machine. If you have
Mobtown Offroad Toyota Tacoma Bolt On Rock Slider Installation Instructions
 Mobtown Offroad 2005+ Toyota Tacoma Bolt On Rock Slider Installation Instructions Tools Needed: 9/16 Box Wrench 9/16 Standard and Deep Well Socket, 3/8 Drive Ratchet, 3/8 Drive 3/4 Standard Socket 3/4
Desktop 3D Printer. User Manual
 Desktop 3D Printer User Manual TM Contents WELCOME 1 Safty 2 Specifications 3 How it Works 4 SETUP 5 Unpacking 6 Accessory 9 Tool Box 10 Setting Up Mankati Fullscale XT Plus 11 Fullscale XT Plus Outlook
QuickTrick Alignment Tools
 QuickTrick Alignment Tools QuickTrick Alignment Kits are Professional quality tools designed for a lifetime of reliable service. QuickTrick Kits can be used on any vehicle for measurement of the alignment
DLF-220L Digital Label Finishing System
 USER MANUAL DLF-220L Digital Label Finishing System this product is certified: IMPORTANT: Please keep the original packaging in case of return. If we receive the system in non-original packaging, the warranty
MDX-300 Series. For 12-volt automotive starting batteries and starting/charging systems INSTRUCTION MANUAL
 For 12-volt automotive starting batteries and starting/charging systems INSTRUCTION MANUAL Blank page Contents Caution... 4 Capabilities... 4 Display and Keypad... 4 Preparations Before the Test... 6 Connecting
User and Fitting Manual June 2008
 User and Fitting Manual June 2008 Electric Curtain Track System Silent Gliss 5090 User and fitting Manual Silent Gliss 5090 Page Copyright June 2008 by Silent Gliss International Ltd., 3073 Gümligen/Berne