NWA3D A5 User Manual
|
|
|
- Edgar Matthews
- 6 years ago
- Views:
Transcription

1 1. NWA3D A5 3D Printer Part Diagrams 2. Assembling the Spool Holder 3. Leveling the Build Plate 4. Loading and Unloading Filament 5. Operation: The Four Steps in 3D Printing 6. Troubleshooting 7. Additional Resources Version 3.0


2 1. NWA3D A5 3D Printer Part Diagrams 2


3 2. Assembling the Spool Holder 1. Loosen the nuts on the two bolts installed on the spool holder side pieces until they are near the end of the bolt threads but don t remove them completely. 2. Slide the base of the spool holder into the side piece while at the same time sliding the nut into the small groove in the base. 3. Attach the side piece to the base by tightening the bolt with a 3mm hex key (Allen) wrench. Do not over-tighten. 4. Repeat Steps 2 and 3 to attach the other side piece. 3
4 3. Leveling the Build Plate Click here to watch the video on how to level the build plate To build good parts, the build plate needs to be level, and the nozzle needs to be about mm from the build plate in all locations. If you have a LokBuild print surface, we recommend a distance of 0.2mm. This is about the thickness of two pieces of printer paper (or one piece folded in half to double its thickness). If you use painter s tape as your print surface, we recommend a distance of 0.1mm. This is about the thickness of a single piece of printer paper. You want to adjust the height of the build plate so that you can barely slide the paper between the nozzle and the build plate with only a little resistance. 1. Select Setup > Preheat PLA. This will heat the nozzle to melt any hardened plastic that might be on the nozzle and affect the leveling process. 2. Select Setup > Auto home. This will move the X, Y, and Z axis stepper motors to to their home positions (0,0,0). 3. When the motors stop, select Setup > Disable steppers. This will allow you to move the hot end of the extruder assembly (X axis) and build plate (Y axis) by hand. 4. Pro Tip : The Z axis stepper is also disabled, and you don t want it to move at all. So you should handle the printer gently during the leveling process. Keep it on a flat surface and don t tip it while leveling. 5. Slide a piece of paper between the nozzle and the build plate. For LokBuild print surfaces, first fold the paper in half to double its thickness to about 0.2mm. 6. Move the hot end (X axis) and build plate (Y axis) so that the nozzle is directly above one of the three wingnuts under the bed. Adjust each of the wingnuts under the bed until the paper slides with just a tiny bit of drag. We recommend adjusting the wingnut on the left first, then the two on the right, then repeating the adjustment at all three locations at least once more. 7. Make sure the paper slides with just a bit of drag at all locations on the build plate, including the center of the build plate. Try and get the amount of tension on the paper to be consistent at all locations. 8. Select Setup > Auto home, then Setup > Disable steppers, and recheck in several places. This is to make sure the Z axis lead screw didn t rotate during the leveling process. 4


5 9. The first layer of the print will show whether the distance between the nozzle and build plate is correct. Refer to the following graphic for clarity: a. If the bed is too high, the extruded plastic will squeeze out the sides of the nozzle. The nozzle will plow the plastic and leave a first layer that is too thin. b. If the bed is too low, the extruded plastic may not stick to the build plate. Parallel lines of filament on the first layer will look rough, with high tracks and low valleys. c. After you have fine-tuned the bed level during the first layer, you may want to stop the build, clear the build plate, and restart the build. 5


6 4. Loading and Removing Filament 1. Loading filament a. Load a spool of filament into the spool holder. Slide the bolt through the spool s center hole, and then place the bolt into the recessed grooves on the spool holder. b. Cut the end of the filament at an angle so the irregular melted plastic at the end doesn t cause a clog. It will also be easier to feed into the extruder and Bowden tube. c. Feed the end of the filament into the extruder by hand as you squeeze the extruder release lever. d. Push the filament all the way through the white Bowden tube until it stops when it hits the back of the nozzle. e. Select Setup > Preheat PLA. 6

7 f. When the printer is fully heated, you may want to remove all of the filament color left in the printer from previous prints before you start a new print. To do this, manually push filament through the extruder as you squeeze the extruder release lever until the new color starts coming out of the nozzle. g. Pro Tip : Never leave the printer preheated with material inside of it for long periods of time. The filament will bake inside of the extruder assembly and create a clogged hot end. 2. Removing filament To remove the filament cleanly, you should do a soft pull. This involves heating the nozzle to 100 C, then pulling the filament out of the printer. a. Select Setup > Preheat soft pull and wait until the nozzle temperature reaches 100 C. b. Wait for the nozzle to reach the set temperature. c. When the nozzle temperature is about 100 C, squeeze the extruder release lever and pull the filament out of the extruder. d. Cut the end of the filament to remove the irregular melted plastic at the end. e. Pro Tip : Feed the end of the filament into the hole on the side of the spool. This will insure it doesn t get tangled and cause a build to fail the next time you use it. 7
8 5. Operation: The Four Steps of 3D Printing 3D printing involves these four steps: 1. Create a 3D file (Make) 2. Slice the file for 3D printing (Slice) 3. Send the file to the printer (Transfer) 4. Select the file on the printer (Print) 1. Create or find a 3D file a. You can create a 3D model a digital geometry using any CAD (computer-aided design) software program. We recommend free programs, such as TinkerCAD, OnShape, and Blender. Another is SketchUp, which has free licenses available for schools. These programs take some time to learn, and can be challenging. But they are also rewarding, especially when you see your own creation being printed on your 3D printer! Every CAD program allows users to save or export digital files for 3D printing. You want to save your file as an STL file ( filename.stl ). The STL file is the standard file format for 3D printing. In some programs, it s as easy as the Save command. In others, you need to select the File > Export option, and choose the STL format. OBJ files can also be sliced and 3D printed. b. You can find 3D models in many online libraries of digital content. Thingiverse.com, GrabCAD.com, and Instructables.com are examples, and many other sites exist. 2. Slice the file for 3D printing Click here to learn how to setup and use Cura for the NWA3D A5 Slicing is the process of converting your 3D model into the layered print language your printer can understand, called G-Code. We recommend using free, open-source slicer programs. Our favorite slicers are Cura and Repetier Host. Both are free and easy to use. We ve included Cura and its setup.ini file on your printer s SD card because it s easier for beginners. We recommend that you install Cura on a PC or Mac and use it to do your slicing. There are a lot of slicers that will create G-Code automatically for your printer. All you have to do is input the correct settings for your printer (using the files we included), import your 3D model, and save the G-Code. It s that easy! 8
 G-Code Flavor,")
9 a. Install Cura on a PC or Mac (both the.exe and.dmg versions are included on your microsd card). b. Open the Cura application. You ll be given several options. In the Add new machine wizard, choose Other in the Select your machine step, and then Mendel in the Other machine information step (RepRap (Marlin/Sprinter) G-Code Flavor, if it asks). 9


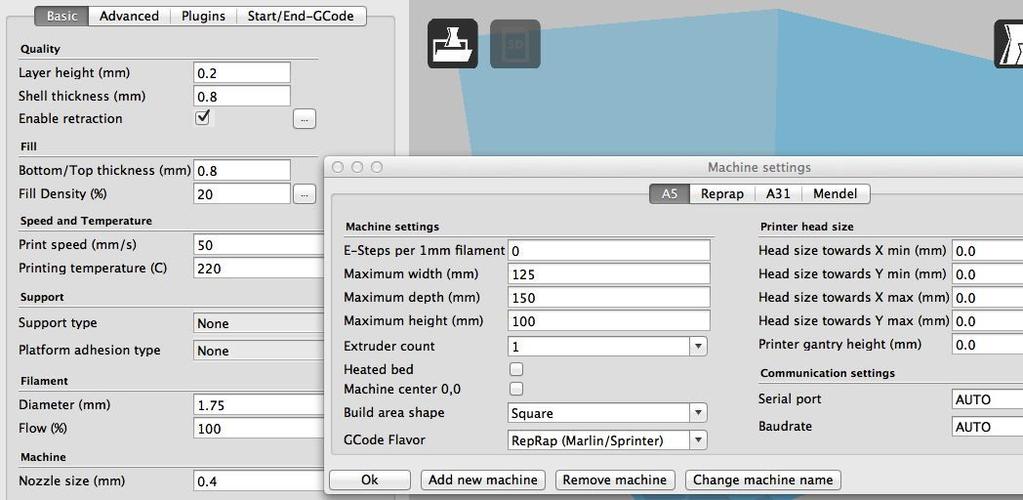
10 c. Once you add the new machine, click Machine > Machine settings and change the machine settings to: Max width 125, Max depth 150, Max height 100, Extruder count 1, and Heated bed unchecked. You can also rename the machine to A5 or Our A5 if you d like. Click OK. d. Select File > Open Profile and select NWA3D A5 Printer Profile.ini from the microsd card. This is the medium-quality settings for the A5 printer. e. The A5 Printer Profile.ini settings in Cura for the A5 are shown on a screen capture on the microsd card. They are also shown in the following image: 10

11 f. Use these default settings for printing. You may need to change the support type to Everywhere depending on the shape of the part you are printing. Also, you can change the layer height from 0.2mm to 0.1mm for a smoother part, although the print will take longer. As you become more advanced with 3D printing, you may want to experiment with many settings. But remember that you can always revert to these default settings at any time by reloading the.ini file on your microsd card, or ask us for help by filling out a Troubleshooting Request. g. Load the model file in Cura. Rotate the file to the best orientation for printing. You may want to scale the file at this point as well. 11

 file. d.")
12 h. When you are satisfied with the Cura settings and the position, orientation, and scale of the model, select the Save toolpath (or SD if the microsd card is inserted) icon or File > Save GCode. Save the file to the microsd card that came with your printer. 3. Send the file to the printer a. Remove the microsd card from the computer. b. Insert the microsd card into the slot on the front of the A5 control board, underneath the knob. c. By using this method, no computer needs to be plugged into your printer and it will run autonomously until the print is finished. 4. Print! a. On the NWA3D A5 control screen, select Refresh SD card, the last selection on the bottom of the main screen. b. Select Print from SD. c. Select your print (.gcode) file. d. Watch the 3D printer create your model! 12
13 6. Troubleshooting This section covers the most common printing problems and how to fix them. Because 3D printing is still an emerging technology, a small level of tinkering and troubleshooting is needed. But if this section doesn t solve your printing problems, then contact us by filling out the Troubleshooting Request on our website. We re here to help you every step of the way to get you 3D printing! 1. Step-by-Step Troubleshooting a. Step 1: Diagnose the problem. This may seem obvious, but many problems can be solved if you take a step back and see exactly what the printer is doing incorrectly. b. Step 2: Determine if the problem is mechanical or digital. Mechanical problems are in the actual operation of the printer, such as the motors that drive the X, Y, and Z axes, the motor that pushes the filament, the nozzle heater, and the level of the build plate. The most common mechanical problems are caused by a build plate that is not adjusted correctly, a clogged nozzle, or an unplugged connector on a motor or limit switch. Digital problems are in the slice file that you prepare in Cura or other slicing program. Important slice file settings include layer height, print (nozzle) temperature, and print speed. c. Step 3: Fix the problem. Once you ve discovered what the actual problem is, you can fix it with the following procedures. (If none of these fix the problem, contact us!) 2. Mechanical problem #1: Leveling the build plate Click here to watch how to level the build plate a. If the nozzle is digging into the build plate or is so close that no filament can extrude, you ll know the build plate is too close. b. If your print looks like spaghetti or the nozzle knocked the model off of the build plate, then you ll know the build plate is too far away. c. Many of the failures in 3D printing are caused by a build plate that is not level or is not the correct distance from the nozzle. See the section Leveling the Build Plate in this manual. 13

14 3. Mechanical problem #2: Filament is not coming out of the nozzle Click here to watch the three ways to unclog a nozzle When filament is not coming out of the nozzle, the nozzle may be clogged. You have three good options for clearing a clogged nozzle: You can pull the clog out of the nozzle using the soft pull method. You can floss the clog out of the nozzle using a nozzle cleaner. You can heat the nozzle and push the clog through the nozzle. NOTE: Never leave your printer nozzle at build temperature (220 C) while the printer is idle. The melted plastic remaining in the nozzle will bake onto the nozzle and become a hard carbon blockage. a. Try to pull the clog out of the nozzle using the soft pull method: Turn the machine on, select Setup > Preheat soft pull, and wait until the temperature reaches 100 C. When the nozzle temperature reaches 100 C, squeeze the extruder release lever with one hand and pull the filament out of the extruder with your other hand. Inspect the end of the filament. If the end of the filament has the shape of interior of the nozzle a thicker cone-shaped plug you have successfully pulled all of the filament out of the nozzle, including the clog. If the clog did not clear using the soft pull method, clip the melted end of the filament off, reload it, and select Setup > Cooldown and wait five minutes for the hot end to cool down. Then repeat the process. 14
15 NOTE: Every time you change filament on your 3D printer, remove the filament with the nozzle at around 100 C. This soft pull method usually removes all the old color of filament from the hot end, so when you begin printing again, the new color will begin printing immediately. b. Use a nozzle cleaner to clear the nozzle: Remove the filament using the soft pull method. Select Setup > Preheat PLA. Wait for the nozzle to reach the set temperature of 220 C for PLA. Raise the Z axis carriage by selecting Controls > Move axis > Move 1mm > Move Z and spinning the knob. (You can also manually rotate the lead screw to move the carriage up.) When the nozzle has reached 220 C, use pliers to carefully insert the nozzle cleaner up into the tip of the nozzle. IT IS VERY HOT, SO BE CAREFUL NOT TO BURN YOURSELF! Squeeze the extruder release lever with one hand and push the filament into the extruder manually. Alternate flossing with the nozzle cleaner and pushing the filament through the extruder until a consistent bead of filament is extruded through the nozzle. Remove the filament using the soft pull method. c. Try to push the clog through the nozzle: Select Setup > Preheat PLA. Wait for the nozzle to reach the set temperature of 220 C for PLA. When the nozzle has reached 220 C, squeeze the extruder release lever and load the filament. When the filament would normally stop, keep pushing to manually push the filament out of the hot end nozzle of the extruder assembly. Watch the filament to ensure it is not curling as it comes out of the nozzle. After pushing several inches of filament through, it should be going relatively straight. If it isn t, turn off the printer and do another soft pull (step a). 15
16 4. Digital problems: Slicer settings Click here to learn how to set up Cura for the NWA3D A5 Sometimes, models don t print correctly because the settings in the G-Code are wrong. Here are some steps to make sure your Cura settings are correct. a. Check your slice file in Cura. Make sure the print is centered in the build area, making good contact with the build surface, and isn t too big for the build envelope. b. Check the slice settings. Make sure that the layer height is between 0.1mm (high-quality prints) and 0.3mm (low-quality prints). c. Check the speed and temperature. For PLA, they should be set to 30 50mm/s and C. d. Make sure the filament diameter is 1.75mm and the flow rate is 100%. e. Make sure the Heated bed checkbox is unchecked in the Machine settings window (the NWA3D A5 does not have a heated bed). f. Check the Fill Density (infill) and make sure it is at least 5%. You may need to adjust this value to your liking for your model. g. Your part may need supports. If it s rounded you may need to select Everywhere for the support type. If it s intricate, it may need to select Raft for the Platform adhesion type. (A raft is a hatch pattern on the build plate that the model will print on.) If the part warps when you begin to build it, you may need to select Brim Adhesion support type and reslice the file. (A brim will help the part stick so it doesn t curl up at the edges.) h. If your slice settings are really messed up, try re-loading the Printer Profile.ini file from the microsd card. The profile will configure medium quality settings that will automatically reset all the values to ones that will work well. Click File > Open Profile to navigate to the printer profile NWA3D A5 Printer Profile.ini that came on the microsd card in the Cura folder. Your settings should look like this: 16
17 17
18 nwa3d.com NWA3D Troubleshooting Request How to unclog a nozzle video How to level the build plate video 7. Additional Resources How to set up Cura for the NWA3D A5 video The Simplify3D Troubleshooting page provides good explanations and photographs of common problems in 3D printing: 18
NWA3D A31 User Manual
 1. 3D Printer Parts Diagram 2. Assembly 3. Fine-Tuning 4. Leveling the Build Plate 5. Loading and Unloading Filament 6. Operation: The Four Steps in 3D Printing 7. Troubleshooting Version 2.0 8. Additional
TL4076 Top 5 Tips Get to know your TL4076
 TL4076 Top 5 Tips Get to know your TL4076 Thermal Break with Teflon liner (behind fan) Hot End Assembly Fan Heat Block Extruder with toothed gear(brass) and idler (steel) Filament Guide Tube Nozzle Cable
MP Maker Pro Mk.1 P/N User's Manual
 MP Maker Pro Mk.1 P/N 33013 User's Manual CONTENTS SAFETY WARNINGS AND GUIDELINES... 3 INTRODUCTION... 5 FEATURES... 5 CUSTOMER SERVICE... 5 PACKAGE CONTENTS... 6 PRODUCT OVERVIEW... 7 Front View... 7
JGAURORA 3D PRINTER MODEL: A5 USER GUIDE
 JGAURORA 3D PRINTER MODEL: A5 USER GUIDE Contents ----3D Printer User Guide 1. Preface... 2 1.1 Introduction...2 1.2 Safety advice... 2 1.3 Filament requirements...2 1.4 Environmental requirements...2
3D PRINTER USER MANUAL
 3D PRINTER USER MANUAL Table of contents page: 1. Introduction 2. Table of contents 3. Basic informations 4. General information 5. Glossary 6. Starter pack s content 7. Technical parameters 8. Device
Ultimaker 2 Extended THINK LARGE, PRINT BIG USER MANUAL V2.1
 Ultimaker 2 Extended THINK LARGE, PRINT BIG USER MANUAL V2.1 2 TABLE OF CONTENTS 1. ULTIMAKER 2 EXTENDED 4 Ultimaker 2 Extended at a glance 5 Specifications 7 2. GETTING STARTED 8 Unboxing 9 Installation
6. Pre-print checks. 3D Touch
 Page 1 1. 6. Pre-print checks........................................................................................... 1.1 a. Clearing the print bed..................................................................................
Witbox 2. Quick start guide
 Witbox 2 Quick start guide Welcome. Thank you for choosing us. This manual will help you to use your new 3D printer correctly. Welcome to the world of Witbox 2. How do I use this manual? To make sure that
Prusa i3 Printer Assembly Guide
 Prusa i3 Printer Assembly Guide Special thanks to Carlos Sanchez and Miguel Sanchez for the graphics. All graphics captured from their great animation: http://www.carlos-sanchez.com/ Prusa3/ For copyright
Introduction to 3D Printing
 TAKE HOME LABS OKLAHOMA STATE UNIVERSITY Introduction to 3D Printing by Sean Hendrix 1 OBJECTIVE The objective of this experiment is to introduce you to 3D printing, by having you print some simple parts
INSTRUCTION MANUAL VERSION 1 ISSUED 23/11/17 MODEL NUMBER: HE161192
 INSTRUCTION MANUAL VERSION 1 ISSUED 23/11/17 MODEL NUMBER: HE161192 IMPORTANT Getting the most out of your 3D Printer Touch: Read the manual carefully It will help you set up with ease Visit wwwcocoonproductscomau
Quick Starter Manual for PrusaM201
 Quick Starter Manual for PrusaM201 Copyright Declaration The copyright of this specification belongs to the Shenzhen GETECH CO., LTD. (hereinafter referred to as the "Geeetech"), and all rights reserved.
TRIPODMAKER BLACK EDITION USER MANUAL
 TRIPODMAKER BLACK EDITION USER MANUAL TABLE OF CONTENT Specifications and box content 1. Specifications of the Tripodmaker...4 2. Box content...5 3. Terminology...6 4. Attentions and warnings...8 Unboxing
To be the Chief Evangelist CR-10S Pro Printer Guide Book To make Top-quality 3D printer
 To be the Chief Evangelist CR-0S Pro Printer Guide Book To make Top-quality 3D printer This guide book is for standard CR-0S Pro. Please plug the power cord into a three-hole power jack. Detailed instructions
Modix Big-60 Assembly Manual Part 2
 Modix Big-60 Assembly Manual Part 2 Version 1.0, October 2017 Menu 1. Motors & End Stop Wiring... 3 2. Controller Wiring Check... 6 3. Extruder Wiring... 7 4. Electronic Box Cover... 9 5. Filament Sensor...
WANHAO Duplicator i3. User Manual V1.2. Wanhao USA
 WANHAO Duplicator i3 User Manual V1.2 Wanhao USA 2015 www.wanhaousa.com Safety WARNING: The components on the Duplicator i3 generate high temperatures and move extremely fast. Reaching inside of the Duplicator
Trifecta 800 3D Printer. User s Guide
 Trifecta 800 3D Printer User s Guide Table of Contents 3 SAFETY WARNINGS 4 WARRANTY 5 SPECIFICATIONS 6 PRINTER OVERVIEW 7 UNBOXING 9 10 11 12 13 14 15 17 18 20 22 25 26 FILAMENT INSTALLATION PRINT BED
3DPrint Quality. Troubleshooting Guide
 ALUNAR 3D PRINTER Print Quality Troubleshooting Guide Print Quality Troubleshooting Guide... 1 Overview...1 1. Not Extruding at Start of Print...3 1.1 Filament was not loaded into extruder before printing...3
3 D Print Quality Troubleshooting Guide
 3 D Print Quality Troubleshooting Guide Shenzhen Anet Technology Co,. Ltd. Print Quality Troubleshooting Guide... 1 Overview... 1 1. Not Extruding at Start of Print... 4 1.1 Filament was not loaded into
3 D Print Quality Troubleshooting Guide
 3 D Print Quality Troubleshooting Guide Shenzhen Anet Technology Co,. Ltd. Print Quality Troubleshooting Guide... 1 Overview... 1 1. Not Extruding at Start of Print... 3 1.1 Filament was not loaded into
Heated Bed Installation Instructions
 Heated Bed Installation Instructions Overview The glass panel is heated by way of a heater element which is bonded to the glass panel and controlled by a digital temperature controller. The temperature
Ultimaker 2+ OUR MOST ADVANCED 3D PRINTER JUST GOT EVEN BETTER
 Ultimaker 2+ OUR MOST ADVANCED 3D PRINTER JUST GOT EVEN BETTER INSTALLATION AND USER MANUAL Original manual V1.0 2015 DISCLAIMER Please read and understand the contents of this installation and user manual.
CreatBot 3D Printer. User manual. English V Henan Suwei Electronics Technology Co., Ltd.
 CreatBot 3D Printer User manual English V7.2 Henan Suwei Electronics Technology Co., Ltd. - 1 - CONTENTS Notice 3 Machine Diagram Front 4 Back/Hotend 5 New Feeder / Feeder 6 Hardware Installation Unpacking
Please read the safety instructions carefully before get started.
 Safety Instructions Please read the safety instructions carefully before get started. ANYCUBIC 3D printer generates high temperature. Do not reach inside of the printer during operation. Allow time for
BFB-3000 Set Up and Operations Manual [Version 3.0]
![BFB-3000 Set Up and Operations Manual [Version 3.0]](/thumbs/75/72577978.jpg "BFB-3000 Set Up and Operations Manual [Version 3.0]") BFB-3000 Set Up and Operations Manual [Version 3.0] Document No: D100253 1 Introduction Thank you for purchasing your BFB-3000. Before first use, the BFB-3000 needs careful setting up. The list below illustrates
BFB-3000 Set Up and Operations Manual [Version 3.0] Document No: D100253 1 Introduction Thank you for purchasing your BFB-3000. Before first use, the BFB-3000 needs careful setting up. The list below illustrates
USER GUIDE print your own plane
 USER GUIDE print your own plane 3DLabPrint Landing Gear conversion for Messerschmitt Bf 109T ver 1.1 6/2016 Contents Table of contents...1-2 Introduction...2 Tech. spec....3 Drawnings...4 Step by step
BFB-3000 BFB-3000 Plus Set Up and Operations Manual [Version 3.3]
![BFB-3000 BFB-3000 Plus Set Up and Operations Manual [Version 3.3]](/thumbs/77/74531070.jpg "BFB-3000 BFB-3000 Plus Set Up and Operations Manual [Version 3.3]") BFB-3000 BFB-3000 Plus Set Up and Operations Manual [Version 3.3] Document No: D100253 1 Introduction Thank you for purchasing your BFB-3000. Before first use, the BFB-3000 needs careful setting up. The
BFB-3000 BFB-3000 Plus Set Up and Operations Manual [Version 3.3] Document No: D100253 1 Introduction Thank you for purchasing your BFB-3000. Before first use, the BFB-3000 needs careful setting up. The
Quick Start Guide. Caution. Warning. This guide only applies to Dreamer 3D printer of Flashforge
 Quick Start Guide Caution Warning. Do not peel the yellow film from the build plate. It is heat-resistant tape, which makes objects stick to the build plate easily.. Do not remove the wrapping around the
Using 1.75mm Filament on Ultimaker 2
 Using 1.75mm Filament on Ultimaker 2 Created by Ruiz Brothers Last updated on 2016-07-01 10:58:07 PM EDT Guide Contents Guide Contents Overview Why should I use 1.75mm filament? What do I need? TLDR User
Creatr HS Flexible filament modification V01-04
 Creatr HS Flexible filament modification V0-04 Summary This document describes the modification of the Creatr HS D printer of Leapfrog BV to print flexible filament and written with the intention of use
TeeBox. The Suitcase 3D printer. BY:
 TeeBox The Suitcase 3D printer. BY: Eindhoven The Netherlands Contents Liability... 2 Returns... 2 WARNING... Error! Bookmark not defined. TRICKS AND TIP... 4 PART 1 ---Y AXIS (PRINT BED)... 7 Fasten heatbed
Installation and service instructions, warranty terms & conditions. DeeGreen. User Guide. Version 2.6
 Installation and service instructions, warranty terms & conditions DeeGreen User Guide Version 2.6 - 2 - Contents 1. Contents...- 3-2. Technical parameters...- 4-3. Safety instructions...- 4-4. Package
infinite possibilities Industrial 3D Printing, Affordable Prices SHANGHAI INTAMSYS TECHNOLOGY CO. LTD.
 infinite possibilities Industrial 3D Printing, Affordable Prices FUNMAT Industrial Quality Desktop 3D Printer Insulated Chamber Able to print standard filaments without warping and cracking issues Filament
Assembly Manual FELIX One
 Assembly Manual FELIX One Version 1.0 2018 www.felixprinters.com support@felixprinters.com Zeemanlaan 15 3401 MV IJsselstein The Netherlands Introduction Table of Content Dear Customer, Thank you for choosing
Desktop 3D Printer. User Manual
 Desktop 3D Printer User Manual TM Contents WELCOME 1 Safty 2 Specifications 3 How it Works 4 SETUP 5 Unpacking 6 Accessory 9 Tool Box 10 Setting Up Mankati Fullscale XT Plus 11 Fullscale XT Plus Outlook
Upgrade v3 to v3.2. SeeMeCNC Guides. Upgrade v3 to v3.2. Rostock Max v3 Uprgade to v3.2. Written By: SeeMeCNC seemecnc.dozuki.
 SeeMeCNC Guides Upgrade v3 to v3.2 Rostock Max v3 Uprgade to v3.2 Written By: SeeMeCNC 2018 seemecnc.dozuki.com/ Page 1 of 34 INTRODUCTION This guide is intended to Upgrade a Rostock Max v3 to a Rostock
Assembly Instructions of Geeetech Aluminum Prusa I3
 Assembly Instructions of Geeetech Aluminum Prusa I3 CONTENT Safety Instructions... 3 Preparation... 4 1. Unfold the box and check the package... 1 2. Assemble Y axis... 1 3. Build the printing platform...
Maintenance Manual. Hephestos
 Hephestos 2016 Mundo Reader SL. All rights reserved. The reproduction, copying, distribution, publication or modification of this material is strictly prohibited unless carried out with the express prior
Operation Guide F306 Generation I
 Operation Guide F306 Generation I Revision 4 08-27-2014 Table of Contents 1. Introduction... 2 1.1. Warnings... 2 2. General Info Software... 2 2.1. Software toolchain overview... 2 2.2. Simplify3D Tutorials...
Assembly Manual FELIX Tec 4
 Assembly Manual FELIX Tec 4 Version 5.2 2018 www.felixprinters.com support@felixprinters.com Zeemanlaan 15 401 MV IJsselstein The Netherlands Introduction Table of Content Dear Customer, Thank you for
IMPORTANT! DO NOT THROW AWAY THE SHIPPING CARTON AND PACKING MATERIAL
 Operator s Manual IMPORTANT! DO NOT THROW AWAY THE SHIPPING CARTON AND PACKING MATERIAL ii Table of Contents Operator Safety... 1 Introduction... 2 Unpacking and Setup... 3 Unpacking... 3 Setup... 4 ROCKET
How I installed new brake pads on my i with Sport Package (should be fine for other E39 s) By Robert B.
 By Robert B.") How I installed new brake pads on my 1999 528i with Sport Package (should be fine for other E39 s) How I installed new brake pads on my 1999 528i with Sport Package (should be fine for other E39 s) By
How I installed new brake pads on my 1999 528i with Sport Package (should be fine for other E39 s) How I installed new brake pads on my 1999 528i with Sport Package (should be fine for other E39 s) By
Assembly Instructions of Geeetech Prusa I3 A pro
 Assembly Instructions of Geeetech Prusa I3 A pro (Version 04-11-2016) CONTENT Safety Instructions... 3 Preparation... 4 1. Unfold the box and check the package... 1 2. Assemble Y axis... 1 3. Build the
Important notice Upper supports for Z axis Pulley Corner for Y axis Right X axis and left X axis Chain coupling for left X axis
 Warranty and FAQ G004260 Important notice You can personalise your Prusa i3 HEPHESTOS and update it with the latest innovations that appear in the community. However, it is important that you understand
Help Guide with assembly, tuning, and troubleshooting tutorials.
 Help Guide with assembly, tuning, and troubleshooting tutorials. For Creality3d Aluminum framed printers, and similar copy s Author: Luke Hatfield Editor: Maikel Blewanus Special thank s to all the contributors
Baxter 6201 and 6301 Tips to Avoid Nuisance Alarms Call x 335 for troubleshooting assistance.
 P a g e 1 Baxter 6201 and 6301 Tips to Avoid Nuisance Alarms Call 1-708-449-7600 x 335 for troubleshooting assistance. Tip #1: To Ensure Door is Closed Correctly You should hear 2 clicks when closing the
Building Instructions of Geeetech Prusa I3 M201
 Building Instructions of Geeetech Prusa I3 M201 (Version 11-25-2016) CONTENT Safety Instructions... 1 Preparation... 2 1. Assemble the threaded rods of Y axis... 3 2. Assemble the front and back support
3. Extruder Assembly
 3. Extruder Assembly Guide for the assembly of the Extruder. Written By: Josef Prusa 2017 manual.prusa3d.com Page 1 of 22 Step 1 Get the necessary tools 2.5 and 1.5 mm Allen key Needle-nose pliers Step
Installation Instructions: Epson 1400 CFS
 Installation Instructions: Epson 1400 CFS Epson 1400 with MIS CFS Installed *A perfect print with OEM cartridges is a must* Prerequisite - Before starting this installation, you MUST test your printer
Bondtech for Prusa i3
 Bondtech for Prusa i3 Assembly and installation manual This work is licensed under a GNU General Public License v3.0 Table of Contents Acknowledgements 1 Introduction 1 Compatibility 2 What s in the box?
Quick Start Guide INVENTOR II SZ15-EN-A02
 Quick Start Guide INVENTOR II SZ15-EN-A02 WARNING 1. Hot! Avoid touching the heating nozzle in operation. 2. Moving parts in printer may cause injury. Do not wear gloves or other sources of entanglement
Assembly & Installation Guide Makerbot Rep2X and clones
 Assembly & Installation Guide Makerbot Rep2X and clones The Bondtech extruder upgrade kit for Makerbot and clones uses high-quality industrial pneumatic push-fit fittings for attaching the bowden tube.
Documentation version ASSEMBLY INSTRUCTIONS
 Documentation version 1.6.30 ASSEMBLY INSTRUCTIONS / 2 INTRODUCTION / 3 INTRODUCTION Target : Propose a visual assembly instruction guide of the MicroDelta Rework. Designers of the MicroDelta Rework :
Oshkosh MATV 1. generation
 Oshkosh MATV 1. generation MATV stands for Mine Resistant Ambush Protected All Terrain Vehicle (MRAP- ATV) developed by Oshkosh Corporation and used by US Army and other armies in NATO. It is replacing
How to Change Front Brake Pads on a Toyota Corolla
 How to Change Front Brake Pads on a Toyota Corolla Link to this article on (All other links in this document are disabled) Follow this picture guide to change the front brake pads on a 2003-2008 Toyota
Documentation version 1.42 ASSEMBLY INSTRUCTIONS REV 1.1
 Documentation version 1.42 ASSEMBLY INSTRUCTIONS REV 1.1 / 2 INTRODUCTION / 3 INTRODUCTION Target : Prupose a visual guide of the differents steps to build and use a µdelta printer Designers : Hugo Flye
Building Instructions of Geeetech Prusa I3 M201
 Building Instructions of Geeetech Prusa I3 M201 (Version 04-11-2016) CONTENT Safety Instructions... 1 Preparation... 2 1. Assemble the threaded rods of Y axis... 3 2. Assemble the front and back support
How this (and most) 3D Printers work. Forward
 3D Printers work. Forward") Build Manual Contents Contents Contents 2 Forward 4 How this (and most) 3D Printers work. 5 3D Printing Workflow 6 Space to work 7 Tools / Parts Required 7 Build Time 8 How To Use This Manual 8 Acrylic
Build Manual Contents Contents Contents 2 Forward 4 How this (and most) 3D Printers work. 5 3D Printing Workflow 6 Space to work 7 Tools / Parts Required 7 Build Time 8 How To Use This Manual 8 Acrylic
Assembly of the Electronics
 6 ssembly of the Electronics List of components for the Electronics Ramps 1.4 (with 4 x mounted Stepstick Drivers 4988) 3 x Endstop LD control panel 1.8 m type US cable 4 x Nema 17 motor cable 2 x 40 cm
Setup, Assembly, & Adjustment
 Setup, Assembly, & Adjustment 34877 Rev. B 1 of 8 Melco Fast Clamp Instructions The Melco Fast Clamp is a versatile clamping system for your embroidery machine. This document will walk you through the
Maker's Tool Works. Written By: Micro. Wiring methods used by MTW Printers using the Rambo Electronics. Wiring Rambo Electronics & Power Supply
 Maker's Tool Works Wiring Rambo Electronics & Power Supply Wiring methods used by MTW Printers using the Rambo Electronics. Written By: Micro 2017 mtw.dozuki.com Page 1 of 10 TOOLS: Screw Drivers (1) Wire
Zesty Technology Documentation
 Zesty Technology Documentation Release 0.1 Brian Gilbert Sep 23, 2018 Nimble Documentation: 1 Nimble 1 2 Sidewinder 13 3 Printer specific instructions 25 4 Nimble Adapters 47 5 Maintenance of your Nimble
FlexJet Carriage Circuit Board (PCB) Replacement
 Replacement") P/N: 111484 R0 14140 NE 200th St. Woodinville, WA. 98072 PH: (425) 398-8282 FX: (425) 398-8383 ioline.com FlexJet Carriage Circuit Board (PCB) Replacement Notices: Warning! Ensure that all AC power cables
P/N: 111484 R0 14140 NE 200th St. Woodinville, WA. 98072 PH: (425) 398-8282 FX: (425) 398-8383 ioline.com FlexJet Carriage Circuit Board (PCB) Replacement Notices: Warning! Ensure that all AC power cables
Customer Name: Serial Number: Y-Axis Stall
 Technician Name: Date: Technician Name: Date: Customer Name: Serial Number: Y-Axis Stall Issue Explanation and Background Each drive motor on the machine (the x, y and z axes motors) has a sensor called
Installation Instruction of CTC DIY 3D Printer
 Installation Instruction of CTC DIY 3D Printer Focus on high-end science and technology,focus on 3D printing Zhuhai CTC Electronics Co.,Ltd. www.ctcprinter.com 1 Introduction This DIY 3D printer can be
Disco 3 Clock Spring / Rotary Coupler replacement
 Disco 3 Clock Spring / Rotary Coupler replacement I recently had to change my Clock spring and thought some folks may find it helpful to see what it entailed. I did lots of reading around but couldn t
The H-MAC Heavy Metal Articulating Chassis Construction Guide
 The H-MAC Heavy Metal Articulating Chassis Construction Guide The Heavy Metal Chassis is constructed with two identical drive modules built using 10 mechanical sub-assemblies. The drive modules are integrated
Modix Big-60 Assembly Instructions Part 1
 Modix Big-60 Assembly Instructions Part 1 Version 1.0, October 2017 Menu 1. X Idler Pulley Assembly... 3 2. Connecting X Axis Brackets to Z Profiles... 4 3. Assemble X Rails on X Top Profiles... 6 4. Assemble
Motorcycle Suspension, How They Work, Install and Set Up
 Motorcycle Suspension, How They Work, Install and Set Up Presenters: Klaus Huenecke and Duane Kerzic of Wilbers USA Time: Place: Audience: Beginner to Advanced Street Riders who want to know more about
5. Extruder Assembly
 5. Extruder Assembly Guide for the assembly of the Extruder. Written By: Josef Prusa 2018 manual.prusa3d.com/ Page 1 of 24 Step 1 Get the necessary tools 2.5 and 1.5 mm Allen key Needle-nose pliers 2018
Fanatec GT3RS V1 to GT3RS V2 Tutorial
 Fanatec GT3RS V1 to GT3RS V2 Tutorial by Roy Visser 1 How to update your Fanatec GT3RS V1 wheel to a GT3RS V2 wheel Welcome to this guided and detailed tutorial for upgrading your Fanatec GT3RS V1 wheel
Content. Preface Notice Terms. Components Introduce / Reference. Unpacking / Accessories / First Print
 Content Preface Notice Terms Chapter 1:About ADVENTURER 3 Components Introduce / Reference 06 Chapter 2: ADVENTURER 3 Operating Unpacking / Accessories / First Print 07 Load Filament / Communication /
PRSalpha Air Drill (Double Valve)
") 888-680-4466 ShopBotTools.com PRSalpha Air Drill (Double Valve) Copyright 2016 ShopBot Tools, Inc. page 1 Copyright 2016 ShopBot Tools, Inc. page 2 Table of Contents Overview...5 Spindle Mounting Plate...6
888-680-4466 ShopBotTools.com PRSalpha Air Drill (Double Valve) Copyright 2016 ShopBot Tools, Inc. page 1 Copyright 2016 ShopBot Tools, Inc. page 2 Table of Contents Overview...5 Spindle Mounting Plate...6
SOP Instructions & Check Sheet for MATRIX X Bike Installation
 1000390 Rev 2 SOP Instructions & Check Sheet for MATRIX X Bike Installation Tools Needed 1. 13mm, 15mm (for pedals) and 17mm wrenches 2. Metric Hex Keys (long) set including 3mm, 4mm, 5mm, and 6mm. 3.
Documentation version ASSEMBLY INSTRUCTIONS
 Documentation version 1.1.0 ASSEMBLY INSTRUCTIONS / 2 INTRODUCTION / 3 INTRODUCTION Target : Provide a visual guide of the various steps required to assemble the «i3 Metal Motion» 3D printer. Designers
POWERED BY WANHAO INSTRUCTION MANUAL MODEL NUMBER:DUPLICATOR I3 MINI
 POWERED BY WANHAO INSTRUCTION MANUAL MODEL NUMBER:DUPLICATOR I3 MINI POWERED BY WANHAO 3D Printer Warranty Details The product is guaranteed to be free from defects in workmanship and mother board for
X.L. BAND W/ SPRING ASSIST INSTRUCTION MANUAL
 PARTS LIST X.L. BAND W/ SPRING ASSIST INSTRUCTION MANUAL (2) Bands (1) Handle assembly (2) Side hinge assemblies (1) Left rear hinge assembly (1) Right rear hinge assembly (2) front spring s (2) rear spring
Ignition Timing - Honda 180-Degree Twins
 Ignition Timing - Honda 180-Degree Twins First thing to do is make a quick test light - I used a 12 volt indicator bulb from a speedo. Test leads with alligator clips make hookup easy... The point plate
Lockpicking Tools: User Guide
 Lockpicking Tools: User Guide Tips & Tricks for using Lockpicking Tools Contents Introduction..3 Padlock Shims..5 Comb Picks....7 Jiggler Keys...9 The Lock Gun..11 Bypass Sheets....13 Bump Keys...14 Other
S1 Sequential. T56 Magnum. Sequential shifter. Contents and assembly instructions
 S1 Sequential Sequential shifter T56 Magnum Contents and assembly instructions Parts List Sequential shifter x1 Base plate x1 Base spacer x1 Drill Square x1 Shaft fitting x1 Square washer x1 8mm Aluminium
Assembly of the Electronics
 6 ssembly of the Electronics List of components for the Electronics Ramps 1.4 (with 4 x Stepstick Drivers 4988 mounted) 3 x Endstop LD control Panel US cable, type, 1.8 metres 4 x Nema 17 motor cable 2
Assembly Manual. 1/10th Formula 1 Car
 Assembly Manual 1/10th Formula 1 Car Center Pivot Bag 1 3374 - Center Pivot Socket 40194 - Hard Anodized Alum Pivot ball 3254-2-56 *Note - Sometimes it is helpful to slightly over-tighten the top clamp
Troubleshooting: Installation 8. Troubleshooting: Door Jamming and Door Handing 9. Troubleshooting: Keypad 13. Troubleshooting: Smart Home Systems 14
 Programming and Troubleshooting Guide 1 2 3 4 5 6 7 Mastercode 2 Troubleshooting: Installation 8 Troubleshooting: Door Jamming and Door Handing 9 Troubleshooting: Keypad 13 Troubleshooting: Smart Home
Quick user guide for the DM dispenser
 Quick user guide for the DM dispenser READ FIRST! Use the shortest/thickest USB cable possible, if the screen dims too much during operation (to the point where it s hard to read the text) your cable or
CurveMaker DFS v2.0 Dyna FS Ignition Programming Software
 CurveMaker DFS v2.0 Dyna FS Ignition Programming Software Contents Dynatek 164 S. Valencia St. Glendora, CA 91741 phone (626)963-1669 fax (626)963-7399 page 1) Installation 1 2) Overview 1 3) Introduction
The HMC Heavy Metal Chassis Construction Guide using Timing Pulleys and Belts
 The HMC Heavy Metal Chassis Construction Guide using Timing Pulleys and Belts The Heavy Metal Chassis is constructed using two identical drive modules. Power can be transmitted from the motors to the wheels
Nissan GTR Alpha Fuel System
 Nissan GTR Alpha Fuel System Instructions V5 The goal of AMS is to provide the highest quality, best performing products available. By utilizing research and development, and rigorous testing programs
Audi A8 ( ) MMI swivelling unit repair manual
 MMI swivelling unit repair manual") Audi A8 (2003-2007) MMI swivelling unit repair manual Tools which you will need: two pcs screwdriver (any kind, for vent removing ) (you can cover the metal part with any tape to prevent making scratches
Audi A8 (2003-2007) MMI swivelling unit repair manual Tools which you will need: two pcs screwdriver (any kind, for vent removing ) (you can cover the metal part with any tape to prevent making scratches
Troubleshooting: Installation 10. Troubleshooting: Door Jamming and Door Handing 11. Troubleshooting: Touchscreen 14
 Programming and Troubleshooting Guide 1 2 3 4 5 6 7 Mastercode 2 Troubleshooting: Installation 10 Troubleshooting: Door Jamming and Door Handing 11 Troubleshooting: Touchscreen 14 Troubleshooting: Smart
OWNER S MANUAL. ROTARY SURFACE CLEANER Models 105C, 105F, 105CW, & 105FW. Revision 2.01
 OWNER S MANUAL ROTARY SURFACE CLEANER Models 105C, 105F, 105CW, & 105FW Revision 2.01 ROTARY SURFACE CLEANER WARNING HIGH PRESSURE CAN CAUSE SERIOUS INJURY, MAXIMUM WORKING PRESSURE IS 4000 P.S.I. Any
ERROR RECOVERY ERR R O C D O ES / REC V O E Y R PR C O EDURES E
 ERROR RECOVERY ERROR CODES / RECOVERY PROCEDURES Error Code TDM 00/50 Mech 0 (MiniMech) Meaning Recovery Procedure X Feed failure 4 X Mistracked note at feed 5 X Mistracked note at double detect X Mistracked
Building Instruction of Geeetech Prusa I3 pro W. 3D Printer
 Building Instruction of Geeetech Prusa I3 pro W 3D Printer Version 05-31-2017 Contents Safety Instructions... 2 Preparations... 3 1.Unfold the box and check the package... 4 2 Assemble the rods of a Y
MMU2 filament jam. MMU2 filament jam. Written By: Jakub Dolezal manual.prusa3d.com/ Page 1 of 7
 Written By: Jakub Dolezal 2018 manual.prusa3d.com/ Page 1 of 7 Step 1 Filament jam During filament loading or unloading the filament can get stuck (jammed). The printer will try several times to fix it
Note: Please read through the entire guide before attempting any kind of installation.
 KIT-RSP Installation Guide Version 1.3 Auber Instruments, 730 Culworth Manor, Alpharetta, GA 30022 e-mail: info@auberins.com Tel: 770-569-8420 www.auberins.com This is a PID controller kit installation
Written By: Josef Prusa
 7. PSU & Heatbed assembly PSU and Heatbed guide Written By: Josef Prusa 2017 manual.prusa3d.com/ Page 1 of 17 Step 1 Getting the necessary tools 2 and 2.5 mm allen key Needle-nose pliers Step 2 3D printed
DynoTune Wideband Gauge
 DISPLAY: RED GREEN BLUE DynoTune Wideband Gauge FACE: BLACK WHITE BEZEL: BLACK SILVER PACKAGE: ROUND SQUARE The DynoTune A/F Gauge will display the air/fuel ratio output from the LC-1 Wide-Band controller.
Troubleshooting Guide for Okin Systems
 Troubleshooting Guide for Okin Systems More lift chair manufacturers use the Okin electronics system than any other system today, mainly because they re quiet running and usually very dependable. There
Welcome to VBar Express 5.3
 Bar Express Welcome to VBar Express 5.3 The VBar with V 5.3 Express software is an innovative product setting new standards for model helicopters in terms of flight performance and programming capacity.
The Sands Mechanical Museum
 The Sands Mechanical Museum How to Change Your Oil It is more difficult to change the oil in a Lotus Elise because the oil plug and filter are difficult to access. They are located behind an access panel.
FD 342 Document Folder
 FD 342 Document Folder 6/2010 OPERATOR MANUAL FIRST EDITION TABLE OF CONTENTS SUBJECT PAGE DESCRIPTION 1 SPECIFICATIONS 1 UNPACKING 2 SETUP 2 CONTROL PANEL 3 OPERATION 4 SETTING CUSTOM FOLDS 5 BATCH COUNTING