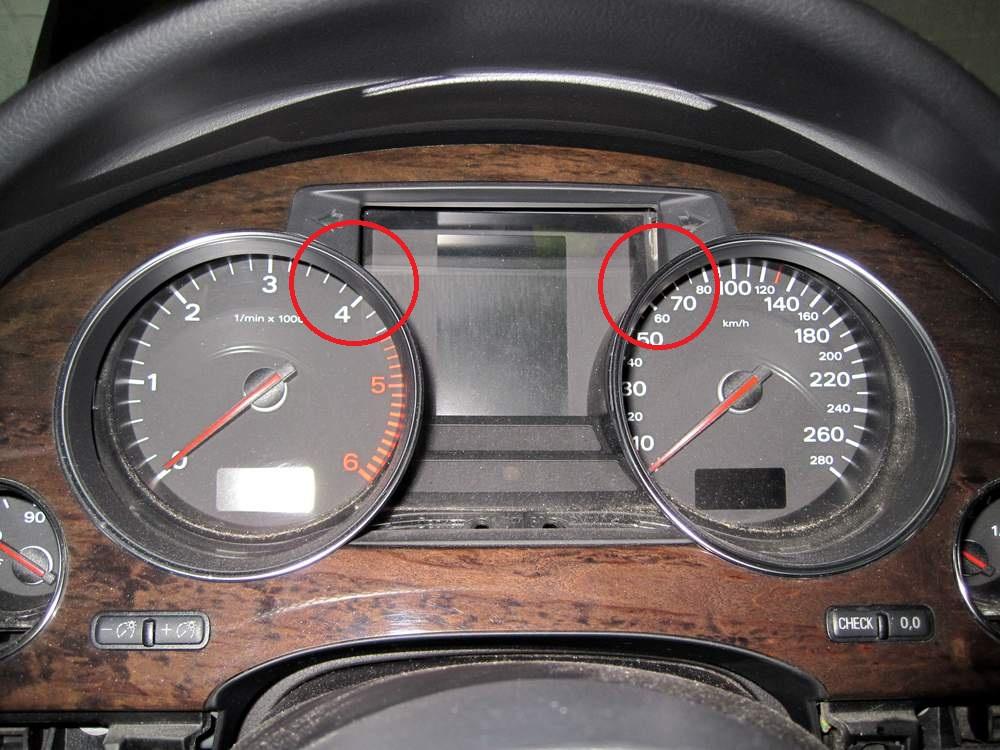
Audi A8 ( ) MMI swivelling unit repair manual
|
|
|
- Hortense Carpenter
- 5 years ago
- Views:
Transcription
 (you can cover the")

1 Audi A8 ( ) MMI swivelling unit repair manual Tools which you will need: two pcs screwdriver (any kind, for vent removing ) (you can cover the metal part with any tape to prevent making scratches on the vents plastic) flat screwdriver torx 9 torx 15 torx 20 hex 4 cutter pliers two plastic tie strap

, after you opened the MMI, so it will stay opened the whole time")
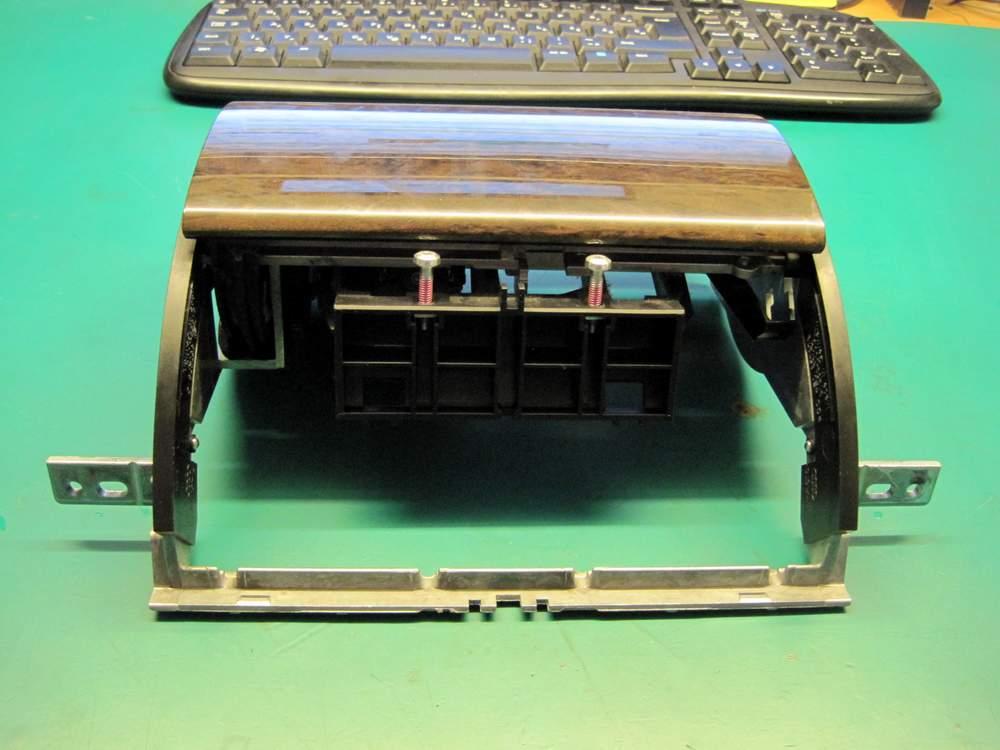
2 Please follow the steps in order as you see in the manual! Display must be open to remove the swivelling unit. You have to open it by the open/close button, or switching ignition on. If your MMI doesn t open fully, don t worry, you can also get it out. If your MMI doesn t open at all, you have to try push up by hand while you push the open/close button. You can remove the display and the unit with ignition on, and switch ignition off, when you removed it, so you can close the car if you need to, while you are changing the gears. If you are working in a garage so you dont have to close the car,you can also remove the battery negative terminal (10 size wrench), after you opened the MMI, so it will stay opened the whole time when you working on the unit. First you have to remove all the dash panel vents Turn knurled wheel -3- of air vent fully up. Above bottom slat -2-, insert the two small screwdriver -1- in each of the two air vent clips. Alternating between left and right side, pull air vent out of opening, taking care to ensure that screwdrivers remain in position. Unplug connector at air vent. Repeat the process for all vents! Remove the coin holder trim Open coin holder. Slide trim for coin holder to left out of fastener and detach and close the holder.


3 Remove the right and left side trims Open glove box. Starting from above glove box, carefully separate trim panel with switch panel -1- from dash panel using a tape covered flat srewdriver, or a plastic visa card, or any flat tool which will not scratch the surface. Detach trim panel with switch panel in -direction of arrow-. Be carefull when removing, there is a connector which you will need to detach before you can fully remove. Take particular care when unfastening clip at end of trim panel closest to driver. Remove the coin holder To remove the coin holder you have to push down the two clips ( marked with red arrows on the second picture), while pulling the holder out.

, and hex 4 for the")
4 Remove the right side trim bolts marked by the arrows Use torx 25 screwdriver for the bolts under the vents (5pcs), and hex 4 for the upper right!


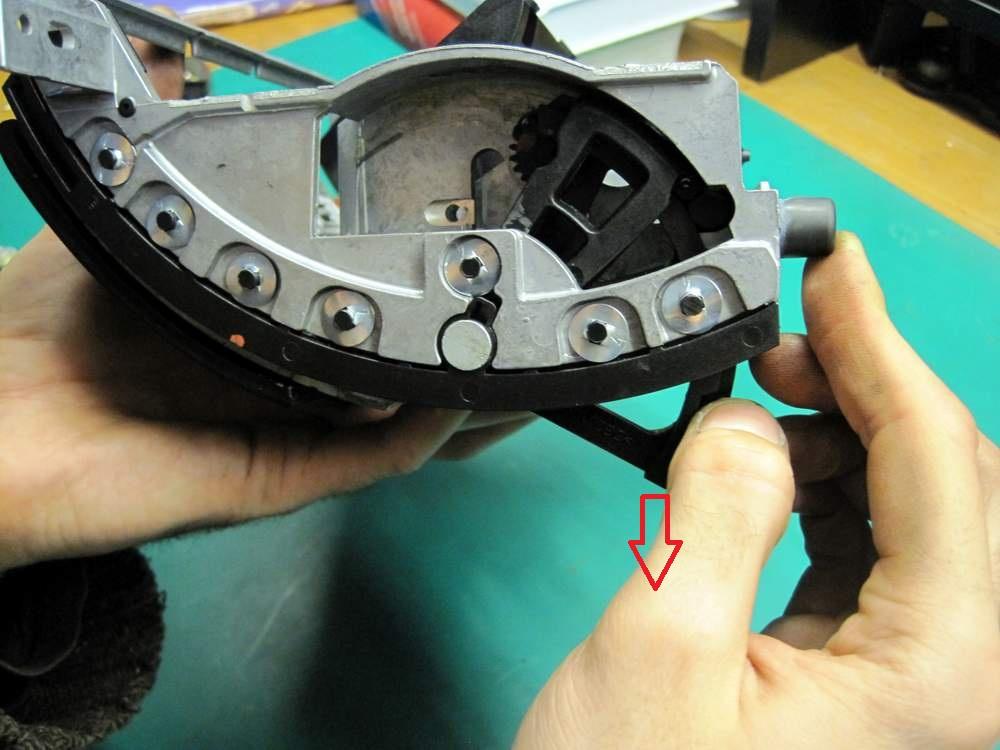
5 When you removed the bolts, detach the clip which is located at the left upper side. You can use a flat srew driver to pull up the plastic clip marked with the red arrow, while you can carefully start to pull the whole trim toward yourself. Be carefull do not brake it! Remove the bolts marked with the arrows on the driver side Use torx 25 for the bottom bolts 4 pcs, and hex 4 for the upper left. Hold the instrument cluster cover at the marked area, and pull it carefully toward yourself around 2-3cm as you can see the second picture! Just enough to make space for the MMI unit metal housing to get out.

6


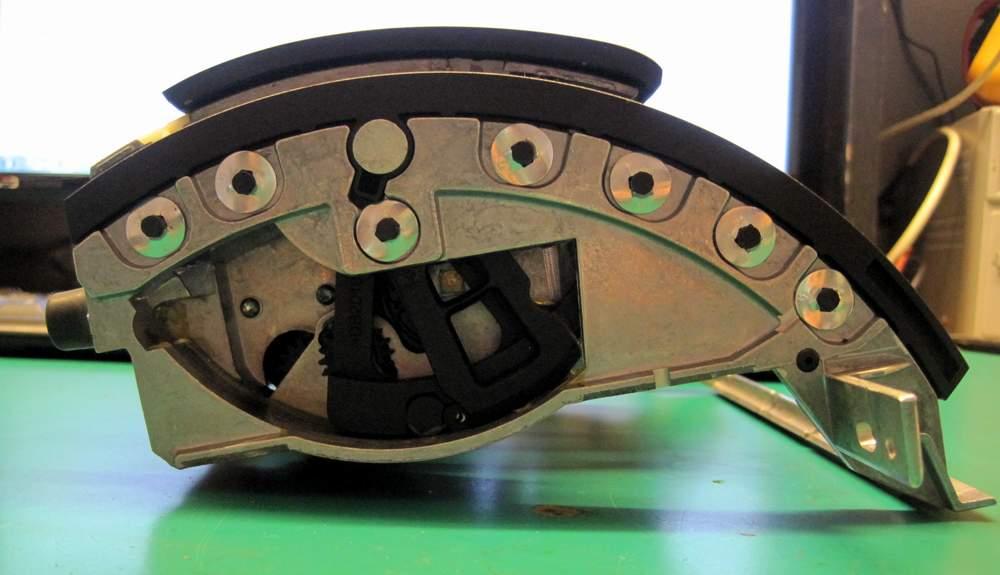
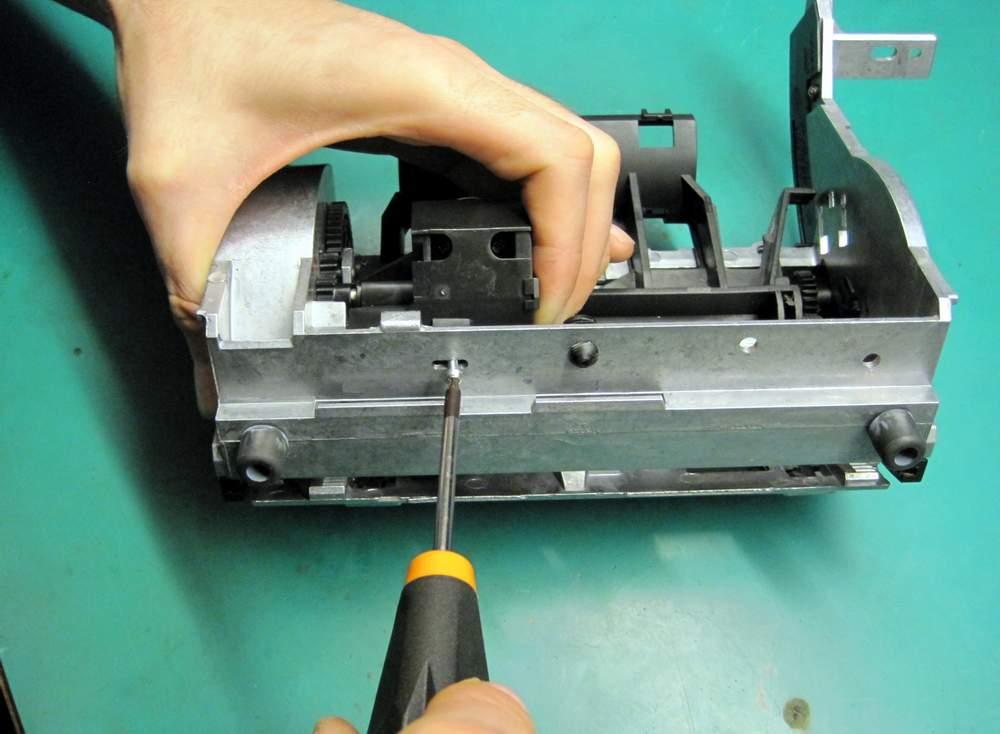
7 Unclip the display cable protection clamp, by pushing it down at the marked area with a flat screwdriver Hold the unit at the marked areas, and pull slightly toward yourself, until you see the bolts at the back of the LCD


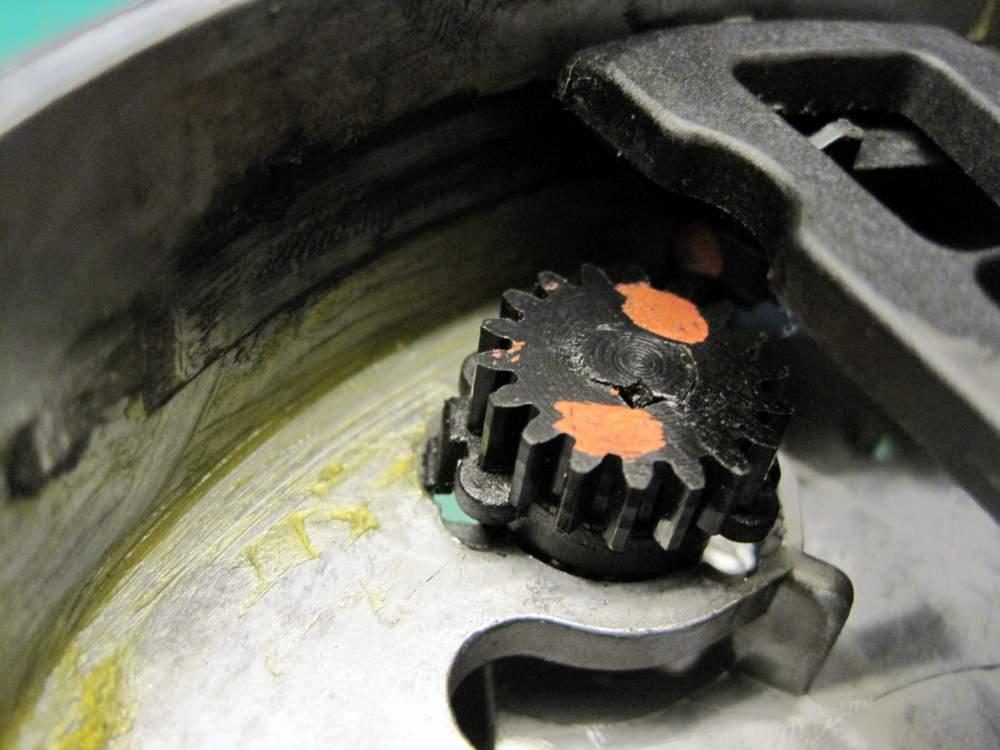
8 Unscrew the bolts with torx 15 screwdriver, just about same height as you can see in the picture. You don t have to remove the bolts, only loosen them up enough to allow the display to move up. If ready, move the display slightly up, and carefully pull towards the arrows direction and take it out!. Detach the connector at the bottom of the lcd! Pulling towards yourself, and slightly downwards carefully remove the MMI mechanic from the dashboard! Be carefull with the instrument cluster side! You cannot remove it fully, hence there are cables and connector attached to it!


9 As you can see as in the pictures there are cables and switches fitted to the housing, which you need to remove, before you can remove the unit fully from the dashboard. Use a pliers to detach the white cables holders. Two backside, and one at the side!


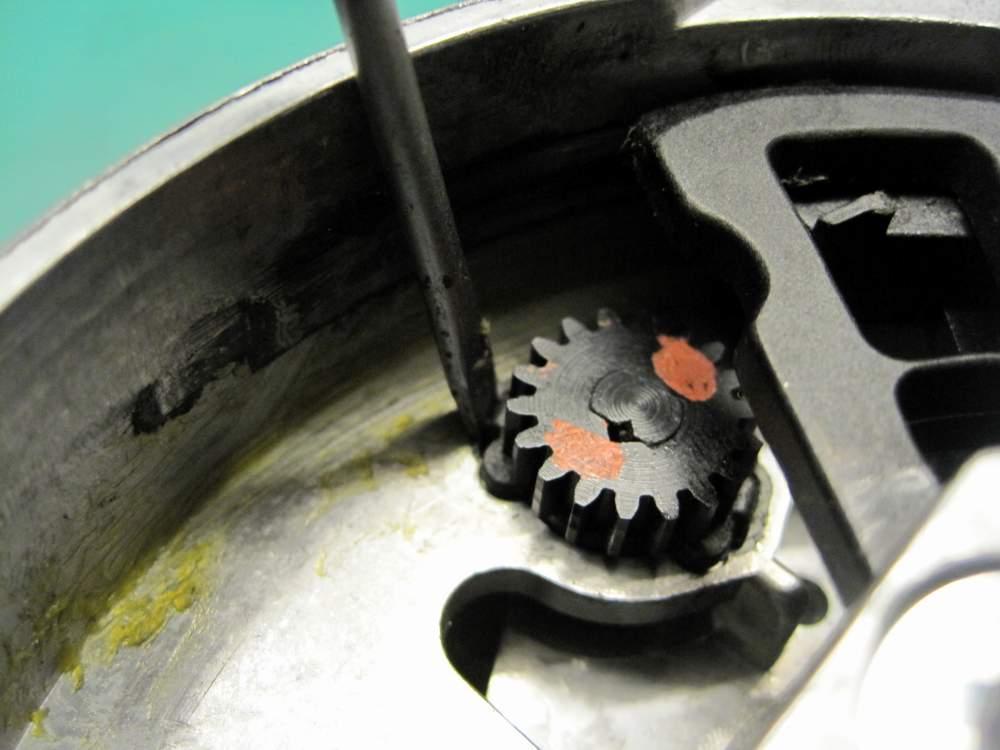
10 Cut down the black plastic tie straps!


11 There are two switches which you need to detach from the housing. Remove the upper one first by detaching the switch plastic housing at the marked areas. Remove the plastic house from the switch, and route back the cables with the switch out of the unit.


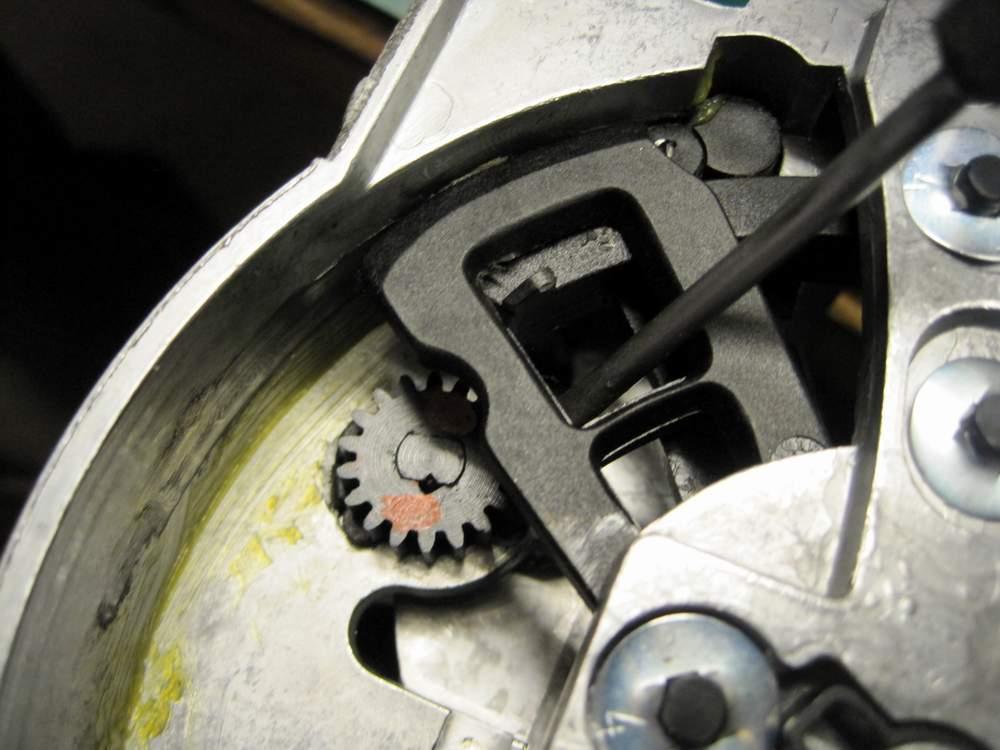
12 Unclip the second switch plastic housing in the same way, and remove it.

13 Detach the power cable from the motor (red arrow), and remove the cables from the housing. If you have done every step right, you can now remove the unit from the car!
14


15 First you need to remove the electric motor. Unscrew the bolts!


16 Remove the motor plastic gear, and install the new one. The original one was loosy, easy to remove, however the new one need quite a bit of force to install. Put the gear to the axis, and insert it to the table, and push the motor down in the arrow direction!


17 That s is how it should look like, when installed!


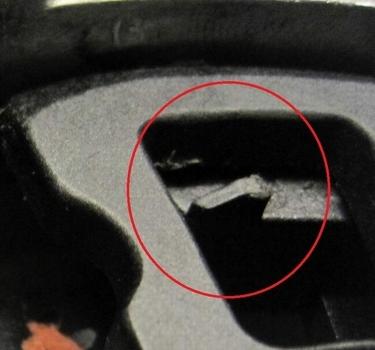
18 You need to remove the big black gear! First remove the small zeger ring with a flat srewdriver! Put the removed zeger ring in a secure place. don t loose it!

, and")
19 You have to close the unit now,and push down the gear axis (marked by red arrow), and remove it.


20 If the axis removed, you have to remove the gear itself! Watch the video named remove_gear.wmv!
 to the right!")
21 To remove the gears, you must move the swivelling arm (1) to the another arm s(2) slot. Use a flat screwdriver, push slightly inside, and rotate the srewdriver anti clockwise 90 degree, while pushing the arm (1) to the right! The swivelling arm should have enough room to move to the right! Don t worry about the arm (2), it can flex enough without braking.

22 It should look like this!


23 With a flat srewdriver detach the gear holder clips! Push down the gears axis, and remove them!


24 Seperate the two gears with a flat screwdriver!


25 Assembly the new gears, with the gear holder!


26 Marked side up! Push the gears together!

27 Install the gear set back!
28


29 Gears installed! You have to move back the swivelling arm to the original position. Use a flat screwdriver again, and flex up the black plastic, while you pushing the swivelling arm in the arrow s direction. The teeth in the arm should stick to the gear teeth. It will be hard, use enough force, until the gears and the arm got back to the original position.

30 Be carefull do not brake anything. If done right, the swivelling arm should move freely, while the gears rotate with it. Now you have to install back the big black gear! Before watching the video named: install_gear.wmv, check the pictures belove. You should move swivelling arm to the end position, and make sure during the gear installation, the arm must be in that position! Use one hand to hold there. In the second picture you see, you have to open the MMI cover/trim 5mm wide! This will be the position where you can insert back the big gear. NOW watch the video carefully, and install back the gear

31


32 If you installed the big gear right, you should able to insert back the axis!


33 Install back the zeger-ring! Open and close the unit, and check the closed position clearance! The white plastic should be in that position when the unit is closed. If it s not there,the gear timing is not right,and you have to remove the big gear again, and install it again, until the clearance is right!


34 Install back the string, like in the picture! Insert back the motor loosly like in the picture!


35 Hold the unit in your hand, just like me, and move/stress back the cover in the direction of arrow, while you insert back the motor to the original position. This is needed to get back the motor gears to the original position! Hold the motor in place, while you screw back the bolts!

36


37 If necessary stretch the string!


38 Insert a bigger tie strap to the holder, and install back the unit to the dashboard in reverse order. Make sure you install back the cables in the original position, attach back cable holders, and switches, and the motor power connector! If everything done, install back trims, vents in reverse order! If you don t understand something, or you need more help, or any other Audi part, just contact me by . Peter Konyha info@tizenharmas.hu
INSTALLATION INSTRUCTIONS
 INSTALLATION INSTRUCTIONS Accessory Application Publications No. AUTOMATIC AII 27160 2005 CR-V Issue Date ATTACHMENT KIT SEP 2004 PARTS LIST Automatic Day/Night Mirror Attachment Kit (sold separately)
OIL COOLER KIT INSTALLATION INSTRUCTIONS PART NUMBER D E92 335i/xi (N55 engine) with M-Technic bumper and without stock oil cooler
 with M-Technic bumper and without stock oil cooler") OIL COOLER KIT INSTALLATION INSTRUCTIONS PART NUMBER D570-0925 APPLICATION 2011-12 E92 335i/xi (N55 engine) with M-Technic bumper and without stock oil cooler Congratulations for being selective enough
OIL COOLER KIT INSTALLATION INSTRUCTIONS PART NUMBER D570-0925 APPLICATION 2011-12 E92 335i/xi (N55 engine) with M-Technic bumper and without stock oil cooler Congratulations for being selective enough
OIL COOLER KIT INSTALLATION INSTRUCTIONS PART NUMBER D
 OIL COOLER KIT INSTALLATION INSTRUCTIONS PART NUMBER D570-0904 APPLICATION: 2011-2012 E90 335i/xi (N55 engine) with BMW standard bumper and with stock oil cooler Congratulations for being selective enough
Prusa i3 Printer Assembly Guide
 Prusa i3 Printer Assembly Guide Special thanks to Carlos Sanchez and Miguel Sanchez for the graphics. All graphics captured from their great animation: http://www.carlos-sanchez.com/ Prusa3/ For copyright
OIL COOLER KIT INSTALLATION INSTRUCTIONS PART NUMBER D E92 335i/xi (N55 engine) with BMW Standard bumper and with stock oil cooler
 with BMW Standard bumper and with stock oil cooler") OIL COOLER KIT INSTALLATION INSTRUCTIONS PART NUMBER D570-0924 APPLICATION: 2011-12 E92 335i/xi (N55 engine) with BMW Standard bumper and with stock oil cooler Congratulations for being selective enough
OIL COOLER KIT INSTALLATION INSTRUCTIONS PART NUMBER D570-0924 APPLICATION: 2011-12 E92 335i/xi (N55 engine) with BMW Standard bumper and with stock oil cooler Congratulations for being selective enough
PART NUMBER: H630SSJ000. Kit Contents: A. Amplifier with Bracket (1) D. Badge (2) with push nuts (4)
 D. Badge (2) with push nuts (4)") Kit Contents: A. Amplifier with Bracket (1) D. Badge (2) with push nuts (4) E. Clip B. Harness (1) C. Cable tie (8) F. Mounting Hardware (2) G. Replacement Speaker (2) H. HVAC Duct extension (2) IMPORTANT:
Kit Contents: A. Amplifier with Bracket (1) D. Badge (2) with push nuts (4) E. Clip B. Harness (1) C. Cable tie (8) F. Mounting Hardware (2) G. Replacement Speaker (2) H. HVAC Duct extension (2) IMPORTANT:
JHP 04 GTO SPORTS BINNACLE KIT INSTALL GUIDE
 JHP 04 GTO SPORTS BINNACLE KIT INSTALL GUIDE NOTE: If you don't feel comfortable with any of the following steps, you should find a professional to do the installation. 1) Use a piece of tape as shown
INSTALLATION INSTRUCTIONS
 INSTALLATION INSTRUCTIONS Accessory Application Publications No. BII 23302 2002 MDX Issue Date PN 08U97-S3V-210 (BLACK) P/N 08U97-S3V-270 (SADDLE) NOV 2001 PARTS LIST Wood trim steering wheel 1. Make sure
OIL COOLER KIT INSTALLATION INSTRUCTIONS PART NUMBER D
 OIL COOLER KIT INSTALLATION INSTRUCTIONS PART NUMBER D570-0907 APPLICATION: 2011-12 E90 335i/xi (N55 engine) with BMW M-Technic bumper and without stock oil cooler Congratulations for being selective enough
INSTALL INSTRUCTIONS C-VS-1500-DUR-1 15 VEHICLE SPECIFIC CONSOLE for Dodge Durango with OEM Center Shifter
 INSTALL INSTRUCTIONS C-VS-1500-DUR-1 15 VEHICLE SPECIFIC CONSOLE for 2011-2013 Dodge Durango with OEM Center Shifter TOOLS NEEDED: Phillips Screw Driver Standard Socket set Metric Socket set 90 Phillips
INSTALLATION INSTRUCTIONS
 INSTALLATION INSTRUCTIONS Accessory Application Publications No. SECURITY SYSTEM P/N 08E49-SDA-100 ACCORD 2- AND 4-DOOR AII 30666 Issue Date AUG 2005 PARTS LIST Hood switch harness Illustration of the
FlexJet Carriage Circuit Board (PCB) Replacement
 Replacement") P/N: 111484 R0 14140 NE 200th St. Woodinville, WA. 98072 PH: (425) 398-8282 FX: (425) 398-8383 ioline.com FlexJet Carriage Circuit Board (PCB) Replacement Notices: Warning! Ensure that all AC power cables
P/N: 111484 R0 14140 NE 200th St. Woodinville, WA. 98072 PH: (425) 398-8282 FX: (425) 398-8383 ioline.com FlexJet Carriage Circuit Board (PCB) Replacement Notices: Warning! Ensure that all AC power cables
Depress each tab as you pull the bezel off. The bezels are tight. L.H. shown.
 2013-2014 Ford Mustang V6 & Boss 302 Lower Valance Fog Light Kit Parts List: Quantity: Tool List: Fog light & bulb with bracket 2 Flat head & Phillips screwdriver Black bezels 2 Ratchet & Socket set OR
Installation instruction do88 performance Intercooler for Volvo S60/V60 T6 MY10-
 Installation instruction do88 performance Intercooler for Volvo S60/V60 T6 MY10-1. This instruction shows how to replace the OEM intercoolers with do88 performance intercoolers. At this type of installation
OIL COOLER KIT INSTALLATION INSTRUCTIONS PART NUMBER D E92/E93 335i/xi with stock oil cooler
 OIL COOLER KIT INSTALLATION INSTRUCTIONS PART NUMBER D570-0920 APPLICATION 2007-10 E92/E93 335i/xi with stock oil cooler Congratulations for being selective enough to use a Dinan Engineering Oil Cooler
INSTALLATION INSTRUCTIONS
 INSTALLATION INSTRUCTIONS Accessory Application Publications No. SYSTEM 2005 ACCORD All 27511 (DX, LX) 2-AND 4-DOOR Issue Date AUG 2004 PARTS LIST Security System Attachment (LX): P/N 08E55-SDA-100A Unit
INSTALLATION INSTRUCTIONS
 INSTALLATION INSTRUCTIONS Accessory TRIM Application 2009 ACCORD 4-DOOR Publications No. AII 40008 Issue Date JULY 2008 PARTS LIST Steering Wheel Trim (Without Navigation) P/N 08Z13-TA0-100 Right steering
OIL COOLER KIT INSTALLATION INSTRUCTIONS PART NUMBER D E92 335is (N54 engine) with BMW M-Technic bumper and with stock oil cooler
 with BMW M-Technic bumper and with stock oil cooler") OIL COOLER KIT INSTALLATION INSTRUCTIONS PART NUMBER D570-0923 APPLICATION: 2011 E92 335is (N54 engine) with BMW M-Technic bumper and with stock oil cooler Congratulations for being selective enough to
OIL COOLER KIT INSTALLATION INSTRUCTIONS PART NUMBER D570-0923 APPLICATION: 2011 E92 335is (N54 engine) with BMW M-Technic bumper and with stock oil cooler Congratulations for being selective enough to
Audi S4 SMIC Installation. B5 Audi S4 Side Mount Intercooler installation
 Audi S4 SMIC Installation B5 Audi S4 Side Mount Intercooler installation Disclaimer: These installation instructions are to be used as a guide only. It is at the reader and/or installer s discretion to
Automatic trunk lid retrofit BMW F10 Bj.2011 by laser21 bimmerfest.com
 Automatic trunk lid retrofit BMW F10 Bj.2011 by laser21 bimmerfest.com lukasko@gmail.com This is a short guide to help you retrofit the option SA316 - automatic trunk lid mechanism into your F10. That
OIL COOLER KIT INSTALLATION INSTRUCTIONS PART NUMBER D E92 335i/xi without stock oil cooler
 OIL COOLER KIT INSTALLATION INSTRUCTIONS PART NUMBER D570-0921 APPLICATION 2007-08 E92 335i/xi without stock oil cooler Congratulations for being selective enough to use a Dinan Engineering Oil Cooler
INSTALLATION INSTRUCTIONS
 INSTALLATION INSTRUCTIONS Accessory Application Publications No. AUTOMATIC WITH COMPASS 2006 CIVIC HYBRID AII 30315-32247 Issue Date MAY 2006 PARTS LIST Automatic Day/Night Mirror With Compass P/N 08V03-SDA-100B
SDHQ F-150 Winch Mount System Installation
 SDHQ 2015+ F-150 Winch Mount System Installation Recommended Tools: Door panel removal tool Needle Nose Pliers 10mm Socket or Wrench 13 mm or ½ Socket (⅜ Drive) 14 mm or 9/16 Socket (⅜ Drive) 21 mm or
Push Start Ignition (05-10 All) Installation
 Installation") Tools Required: Phillips head screwdriver Flat head screwdriver Ratchet 7mm Socket Torx T20 bit Wire strippers/cutters Hand file Needle nose pliers Installation Instructions: Push Start Ignition (05-10
Tools Required: Phillips head screwdriver Flat head screwdriver Ratchet 7mm Socket Torx T20 bit Wire strippers/cutters Hand file Needle nose pliers Installation Instructions: Push Start Ignition (05-10
Fanatec GT3RS V1 to GT3RS V2 Tutorial
 Fanatec GT3RS V1 to GT3RS V2 Tutorial by Roy Visser 1 How to update your Fanatec GT3RS V1 wheel to a GT3RS V2 wheel Welcome to this guided and detailed tutorial for upgrading your Fanatec GT3RS V1 wheel
Upgrade v3 to v3.2. SeeMeCNC Guides. Upgrade v3 to v3.2. Rostock Max v3 Uprgade to v3.2. Written By: SeeMeCNC seemecnc.dozuki.
 SeeMeCNC Guides Upgrade v3 to v3.2 Rostock Max v3 Uprgade to v3.2 Written By: SeeMeCNC 2018 seemecnc.dozuki.com/ Page 1 of 34 INTRODUCTION This guide is intended to Upgrade a Rostock Max v3 to a Rostock
Cost - 41 ($68 approx) Time 2.5 hours approx
 Time 2.5 hours approx") Cost - 41 ($68 approx) Time 2.5 hours approx The early X3 (E83) from the first build to September 2004 was fitted with nasty black plastic door opener handles which were quickly superseded by a matt chrome
Cost - 41 ($68 approx) Time 2.5 hours approx The early X3 (E83) from the first build to September 2004 was fitted with nasty black plastic door opener handles which were quickly superseded by a matt chrome
How to change Swirl Flaps, on Diesel BMW
 How to change Swirl Flaps, on Diesel BMW I am now going to show you how i did it on my car. May'sedition of Total BMW (still in WHSmiths) did a cover on how to change and modify Swirl flaps on a 330d engine,
Installation Instructions For The O.CT S4 Boost Gauge
 Installation Instructions For The O.CT S4 Boost Gauge The ultimate power display FROM AND Stratmosphere 28 Boulder Creek Drive Rush, NY 14543 585-533-1777 O.CT Tuning Oberscheider O.CT-Tuning, Reichsstr.
Workshop manual for removing and installing rear spoiler and pump unit Porsche 997 Turbo
 Workshop manual for removing and installing rear spoiler and pump unit Porsche 997 Turbo 3-different possibility to remove the upper spoiler part! -1 + 2 with drive module intact or half function + (2)emergency
Connecting the rear fog light on the A4 Jetta, while keeping the 5 Light Mod
 Connecting the rear fog light on the A4 Jetta, while keeping the 5 Light Mod DISCLAIMER: I'm human and make mistakes. If you spot one in this how to, tell me and I'll fix it This was done on my 99.5 Jetta.
Prerequisites: Shop Manual (recommended) pages 3-9 through 3-13.
 pages 3-9 through 3-13.") Prerequisites: Order your gaskets average about $25.00 bucks X 2 so $50.00 4NK-11193-00-00 Obtain a shim kit (Should have several 265 and 270s) (Some dealers will exchange) Obtain a Valve Bucket Tool YM-33961
Prerequisites: Order your gaskets average about $25.00 bucks X 2 so $50.00 4NK-11193-00-00 Obtain a shim kit (Should have several 265 and 270s) (Some dealers will exchange) Obtain a Valve Bucket Tool YM-33961
2015+ HELLCAT 6.2L HEMI System vehicle specific plate system xx
 These installation instructions will guide you through installing the Nitrous Outlet 2015+ Hellcat 6.2L Hemi Vehicle Specific Plate System on your vehicle. Before you get started, remember to never use
INSTALLATION INSTRUCTIONS
 INSTALLATION INSTRUCTIONS Accessory Application Publications No. in- ENTERTAINMENT SYSTEM 2004 TSX BII 24811 Issue Date APRIL 2003 PARTS LIST Attachment Kit P/N 08B23-SDA-101A Monitor bracket harness FM
Remove the 3-11mm nuts holding mirror on. Don t drop the nuts!
 2005-2012 Ford Mustang Puddle Lamp Kit Parts List: Quantity: Tool List: LED Lamps 2 Flat head screwdriver Seals 2 Ratchet & Socket set OR Nuts 2 Adjustable Wrench Wiring harness 1 Drill & 11/16 th bit
Installation Directions for FINGER STICK and Blocker Plate
 Installation Directions for FINGER STICK and Blocker Plate What is a Finger Stick? A Finger Stick is a simple circuit that modifies the MAF signal on LLY and LBZ engines (not LB7 engines) to expected levels
INSTALLATION INSTRUCTIONS
 INSTALLATION INSTRUCTIONS Accessory Application Publications No. AUTOMATIC PILOT AII 23597 Issue Date MAY 2002 PARTS LIST Automatic Day/Night Mirror Attachment Kit P/N 08V03-S9V-100A Day/night mirror Upper
TOYOTA im INTERIOR LIGHT KIT Preparation
 Preparation Part Number: PT922-12170 Kit Contents Item # Quantity Reqd. Description 1 1 Main Wire Harness 2 1 Switch 3 1 Switch Header 4 1 ECU 5 1 ECU Bracket 6 1 Hardware Kit 7 1 Instruction Card 8 1
INSTALLATION INSTRUCTIONS C-VS-2000-DUR-1 20 VEHICLE SPECIFIC CONSOLE for 2018 Dodge Durango with Standard Shifter
 INSTALLATION INSTRUCTIONS C-VS-2000-DUR-1 20 VEHICLE SPECIFIC CONSOLE for 2018 Dodge Durango with Standard Shifter TOOLS REQUIRED: Phillips Screw Driver T-20 Torx bit Standard Socket set 9/64 Allen wrench
INSTALLATION INSTRUCTIONS
 INSTALLATION INSTRUCTIONS Accessory Application 2011 CR-Z Publications No. AII 43553 Issue Date AUG 2010 PARTS LIST Attachment Kit P/N 08V03-SZT-100 Automatic day/night mirror harness Automatic Day/Night
I. Before starting installation
 5. Park the vehicle on a clean, dry, flat, level surface and block the tires so the vehicle cannot roll in either direction. A. Disconnect battery cables 1. Disconnect the negative cable first, then the
Slave Cylinder Weep Hole Drilling Procedure
 Slave Cylinder Weep Hole Drilling Procedure Tools Required: T20 Torx Driver T25 Torx Driver T25 Torx Bit with ¼ Ratchet Wrench 4mm Hex Key (Allen wrench) 5mm Hex Key 6mm Hex Key 8mm Hex Key 12mm Hex Key
BODY-24, Late Model 944 ( and Newer) Dash Replacement
 Dash Replacement") BODY-24, Late Model 944 (1985.5 and Newer) Dash Replacement Introduction Replacing the dash in a late model 944 is not overly difficult. However, it is very tedious and a lot of patience is required. It's
BODY-24, Late Model 944 (1985.5 and Newer) Dash Replacement Introduction Replacing the dash in a late model 944 is not overly difficult. However, it is very tedious and a lot of patience is required. It's
Detroit Speed, Inc. Electric Headlight Door Kit Corvette P/N: &
 Detroit Speed, Inc. Electric Headlight Door Kit 1968-82 Corvette P/N: 122006 & 122007 The Detroit Speed Inc. Electric Headlight Door Kit replaces the stock vacuum actuated system on all 1968-82 Corvettes.
Conflicts: Vehicles without a sunroof Vehicles with a single sunroof
 Toyota Sienna (Dual Sunroof) 2011-10.2 Overhead Video Part Number: 00016-00110 00016-00110-17 Fit Kit 00016-00120 00016-00120-17 Fit Kit Accessory Code: ED5 Conflicts: Vehicles without a sunroof Vehicles
Mini Cooper Mini Cooper. Vehicle Type: Two-Door Hatchback. Windshield. AutoGlass Field Guide 53
 Vehicle Type: Two-Door Hatchback NAGS number:* FW02305GTY (Heat) (Rain Sensor) or FW02304GTY. Original-equipment-manufacturer part numbers are 51311505850 (Heat) (Rain Sensor), or 51311505875. FD21652-53
Removing and installing trim panel
 Removing and installing trim panel vw-wi://rl/a.en-gb.a03.5106.29.wi::31914802.xml?xsl=3 1. oldal, összesen: 1 oldal Removing and installing trim panel Removing Carefully prise out trim panel -1- in direction
Z8 Engine Start Button Install for the BMW E46 3 Series
 Z8 Engine Start Button Install for the BMW E46 3 Series This write up is a specific installation of a Z8 engine start button on the E46, but it can be used as a general guide for an engine start button
INSTALLATION INSTRUCTIONS
 INSTALLATION INSTRUCTIONS Accessory Application 2015 CR-Z Publications No. VERSION 1 Issue Date SEP 2014 PARTS LIST Attachment Kit P/N 08V03-SZT-100A Automatic Day/Night Mirror Kit P/N 08V03-TA0-100A Automatic
*Enclosed pictures and devices are for reference only. Individual vehicles and devices may vary.
 Dash Strap Mount Product Number AS5.S500.001 *Enclosed pictures and devices are for reference only. Individual vehicles and devices may vary. The Dash Strap Mount is held tight against the vehicle dash
Installation Instructions INDY SHIFTER Fits: Mustang Fastback & Convertible with MT-82 Transmission Catalog #
 Installation Instructions INDY SHIFTER Fits: 2015-2018 Mustang Fastback & Convertible with MT-82 Transmission Catalog # 3916036 Watch our installation video on YouTube WORK SAFELY! For maximum safety,
2017 Current Ford Raptor Bump Stop Kit Installation Instructions
 2017 Current Ford Raptor Bump Stop Kit Installation Instructions PREPARATION 1. Disconnect the negative terminal on the battery. Park the vehicle on level ground and set the emergency brake. 2. We recommend
Accessory Fuse Block. Please read this entire manual before proceeding with installation.
 Accessory Fuse Block Please read this entire manual before proceeding with installation. Kit Components: (1) Fuse Block Assembly (1) Harness (1) Positive power cable (1) Negative power cable (5) Pigtails
INSTALLATION INSTRUCTIONS
 INSTALLATION INSTRUCTIONS Accessory Application Publications No. AII 37978 XM RADIO SYSTEM 2008 CIVIC HYBRID Issue Date SEP 2007 PARTS LIST XM Radio Attachment (sold separately): P/N 08B15-SNA-100B 7 Wire
INSTALLATION INSTRUCTIONS
 INSTALLATION INSTRUCTIONS Accessory USB ADAPTER Application 2014 INSIGHT Publications No. AII 50655 Issue Date OCT 2013 PARTS LIST USB Adapter Attachment Kit P/N 08B28-TM8-100A 6 mm Flange nut Control
INSTALLATION INSTRUCTIONS JEEP 2011-UP JK SECURITY FULL CONSOLE #274
 INSTALLATION INSTRUCTIONS JEEP 2011-UP JK SECURITY FULL CONSOLE #274 PARTS CHECKLIST Tuffy Console #9 Left Front Mounting Bracket #10 Right Front Mounting Bracket #11 Electronics mounting bracket #12 Divider
Installation Instructions
 Installation Instructions Periscope - Version A.3 Stelvio 8V Gimpo Garage UG, all rights reserved Table of Contents Introduction...3 Before you start...3 Mounting...7 Step 1/15: remove the windscreen...7
Part Number: TAV-713 TOYOTA AVALON LED DRL
 Part Number: TAV-713 Kit Contents Item # Quantity Reqd. Description 1 2 DRL s bezels w/led DRL 2 1 Driver Box 3 1 Harness bag 4 1 User s card 5 1 Cushion pad 6 1 Switch 7 2 Drill Jigs Hardware Bag Contents
Page 1. File: Motolight caliper one-piece Harley Date: 8/15/2006
 Page 1 Harley-Davidson FL Caliper Mount Installation One-piece mounting brackets You should allow about two to three hours for installation. We suggest you use a well-lighted space for installation. PLEASE
OEM Cruise Control Installation in GMC/Chevy NBS trucks
 OEM Cruise Control Installation in 99-02 GMC/Chevy NBS trucks May 2008 ~ Rampage_Rick Having just installed factory cruise control in my 00 Sierra, I thought I d share the fun. I followed the steps outlined
FOG LAMPS INSTALL KIT
 FOG LAMPS INSTALL KIT PT CRUISER INSTALLATION INSTRUCTIONS Read entire instructions thoroughly before starting. For proper aiming of fog lamps, follow procedures in the service manual. NOTES: Left and
INSTALLATION INSTRUCTIONS DODGE DAKOTA 2 KIT # 682 (2WD), 692 (4WD) 3 KIT # 683 (2WD), 693 (4WD)
, 692 (4WD) 3 KIT # 683 (2WD), 693 (4WD)") INSTALLATION INSTRUCTIONS 1997-1999 DODGE DAKOTA 2 KIT # 682 (2WD), 692 (4WD) 3 KIT # 683 (2WD), 693 (4WD) Installation of a Performance Accessories body lift kit will change the vehicle s center of gravity
INSTALLATION INSTRUCTIONS 1997-1999 DODGE DAKOTA 2 KIT # 682 (2WD), 692 (4WD) 3 KIT # 683 (2WD), 693 (4WD) Installation of a Performance Accessories body lift kit will change the vehicle s center of gravity
TOYOTA COROLLA ILLUMINATED DOOR SILLS Preparation
 Preparation Part Number: PT942-02140 Kit Contents Item # Quantity Reqd. Description 1 1 Illuminated Scuff plate, Front Right Hand 2 1 Illuminated Scuff plate, Front Left Hand 3 1 Door Scuff plate, Rear
INSTALLATION INSTRUCTIONS
 INSTALLATION INSTRUCTIONS Accessory Application 2014 CR-V Publications No. AII 49958 Issue Date JULY 2013 PARTS LIST Attachment Kit P/N 08V03-T0A-100 Automatic day/night mirror harness Automatic Day/Night
Detroit Speed, Inc. Selecta-Speed Wiper Kit Corvette P/N:
 Detroit Speed, Inc. Selecta-Speed Wiper Kit 1968-72 Corvette P/N: 121621 A downpour of rain will no longer hinder your ability to clearly see the road. The Detroit Speed Selecta-Speed Wiper Kit provides
Conflicts: Vehicles with a sunroof
 Toyota 4Runner Non/MR 2010-10.2 Overhead Video Part Number: 00016-00110; Fit Kit -00110-15, Beige 00016-00120; Fit Kit -00120-15, Gray Accessory Code: ED6 Conflicts: Vehicles with a sunroof Kit Contents:
Peugeot 406 Coupe: Delocking your boot V.1 April 2005
 This is a first stab at a DIY guide to de-locking your 406 Coupe. It isn t a hard modification to do yourself, but you do need to be confident working on your cars electrics and removing and refitting
PART NUMBER: H630SXC001. Kit Contents: A. Amplifier with Bracket (1) D. Badge (2) with push nuts (4)
 D. Badge (2) with push nuts (4)") Kit Contents: A. Amplifier with Bracket (1) D. Badge (2) with push nuts (4) E. Clip B. Interface / Power Harness (1) C. Cable tie (8) F. Mounting Nuts (2) G. Replacement Front Speaker (2) H. Badge mounting
Kit Contents: A. Amplifier with Bracket (1) D. Badge (2) with push nuts (4) E. Clip B. Interface / Power Harness (1) C. Cable tie (8) F. Mounting Nuts (2) G. Replacement Front Speaker (2) H. Badge mounting
INSTALLATION INSTRUCTIONS AIR/OIL SEPARATOR KIT
 INSTALLATION INSTRUCTIONS AIR/OIL SEPARATOR KIT 2015+ SUBARU WRX (LHD ONLY) Document: 19-0136 Support: info@radiumauto.com This document covers the installation of the Radium brake master cylinder brace
GENUINE PARTS INSTALLATION INSTRUCTIONS
 GENUINE PARTS INSTALLATION INSTRUCTIONS DESCRIPTION: APPLICATION: PART NUMBER: Electronic Tailgate Lock Kit Nissan Titan 999M2-W3005 KIT CONTENTS: Item Qty. Part Description Service Part Number A 1 Electronic
BMW 7 Series (E38) Installation Guide StealthOne Version 1.6
 Installation Guide StealthOne Version 1.6") BMW 7 Series (E38) Installation Guide StealthOne Version 1.6 Copyright Fontana Enterprises, 2008 All rights reserved. Product Information Copyright Copyright Fontana Enterprises 2008 All rights reserved.
BMW 7 Series (E38) Installation Guide StealthOne Version 1.6 Copyright Fontana Enterprises, 2008 All rights reserved. Product Information Copyright Copyright Fontana Enterprises 2008 All rights reserved.
DVD REAR SEAT VIDEO SYSTEM
 Read entire instructions thoroughly before starting. TOOLS REQUIRED: DVD REAR SEAT VIDEO SYSTEM MINIVANS WITH ROOF RAILS INSTALLATION INSTRUCTIONS Non-metal trim stick Phillips screwdriver T15, T20, T25
INSTALLATION INSTRUCTIONS
 INSTALLATION INSTRUCTIONS Accessory Application 2013 ACCORD 2 AND 4-DOOR Publications No. AII 13003 Issue Date AUG 2012 PARTS LIST Attachment Kit P/N 08V03-T2A-100 Automatic day/night mirror harness Operating
RMK HANDLEBAR KIT P/N ; ; APPLICATION BEFORE YOU BEGIN KIT CONTENTS. Verify accessory fitment at Polaris.com.
 RMK HANDLEBAR KIT P/N 2883835; 2883836; 2883837 APPLICATION Verify accessory fitment at Polaris.com. BEFORE YOU BEGIN Read these instructions and check to be sure all parts and tools are accounted for.
INSTALLATION INSTRUCTIONS
 INSTALLATION INSTRUCTIONS Accessory Application Publications No. BII 24570 P/N 08U97-S3V-210A (BLACK) P/N 08U97-S3V-220A(SADDLE) 2003 MDX Issue Date OCT 2002 PARTS LIST Wood steering wheel 1. Make sure
Fitting Instructions For The TDV6 EGR Blanking Kit To A 2006 Model Discovery 3 TDV6 GHSE
 Part Number DA1112 Fitting Instructions For The TDV6 EGR Blanking Kit To A 2006 Model Discovery 3 TDV6 GHSE You do this modification at your own risk. Britpart won t be held responsible for what is written
Toyota 4RUNNER With/MR Overhead Video
 Toyota 4RUNNER With/MR 2010-10.2 Overhead Video Part Number: 00016-00110; Fit Kit-00110-14, Beige 00016-00120; Fit Kit-00120-14, Gray Accessory Code: ED7 Conflicts: Vehicles without a sunroof Kit Contents:
Raxiom Factory GPS Rear Back-up Camera Kit (07-17 Wrangler)
") Raxiom Factory GPS Rear Back-up Camera Kit (07-17 Wrangler) Installation Time: 2.5-3Hrs Tools Required: 7mm Socket & Driver 10mm Socket 10mm Open end wrench Knife / Razor blade Zip-ties Wire Cutters Needle
Raxiom Factory GPS Rear Back-up Camera Kit (07-17 Wrangler) Installation Time: 2.5-3Hrs Tools Required: 7mm Socket & Driver 10mm Socket 10mm Open end wrench Knife / Razor blade Zip-ties Wire Cutters Needle
RAINGEAR 1955/ 1956 Chevrolet
 RAINGEAR 1955/ 1956 Chevrolet GETTING STARTED: SOME RECOMMENDATIONS PLEASE TRY OUR WAY FIRST! Note: This system is designed with built in adjustments to fit in your car. If, as you are installing it, you
Remote engine start INSTALLATION INSTRUCTIONS
 GENUINE Remote engine start INSTALLATION INSTRUCTIONS Thank you for purchasing a genuine Mazda accessory. efore removal and installation, be sure to thoroughly read these instructions. Please read the
Installation MKIV Headlight Housings with Fog Lamps (Procedures apply to both MKIV Jetta and Golf)
") Page 1 This tutorial is provided as a courtesy by ECS Tuning. Service Procedure Installation Proper service and repair procedures are vital to the safe, reliable operation of all motor vehicles as well
Page 1 This tutorial is provided as a courtesy by ECS Tuning. Service Procedure Installation Proper service and repair procedures are vital to the safe, reliable operation of all motor vehicles as well
CERTAIN TRANSIT VEHICLES EQUIPPED WITH A TRAILER MODULE TRAILER MODULE FUSE AND FOOTWELL DRAINAGE HOLE
 PAGE 1 OF 19 CERTAIN 2015-2017 TRANSIT VEHICLES EQUIPPED WITH A TRAILER MODULE TRAILER MODULE FUSE AND FOOTWELL DRAINAGE HOLE OVERVIEW In the affected vehicles, it may be possible for water to pool and
Detroit Speed, Inc. Electric Headlight Door Kit Corvette P/N: &
 Detroit Speed, Inc. Electric Headlight Door Kit 1968-82 Corvette P/N: 122006 & 122007 The Detroit Speed Inc. Electric Headlight Door Kit replaces the stock vacuum actuated system on all 1968-82 Corvettes.
INSTALLATION INSTRUCTIONS
 INSTALLATION INSTRUCTIONS Accessory XM RADIO SYSTEM Application 2009 CIVIC 2-AND 4-DOOR (Si) Publications No. AII 40186 Issue Date AUG 2008 PARTS LIST XM Radio Attachment (sold separately): P/N 08B15-SNA-100B
TOYOTA SOLARA EC REARVIEW MIRROR Section I - Installation Preparation
 Section I - Installation Preparation Part Number: PT374-33020 Section I - Installation Preparation Kit Contents Item # Quantity Reqd. Description 1 1 AD Mirror Assembly w/compass 2 1 Hardware Bag 3 1 Installation
INSTALLATION INSTRUCTIONS
 INSTALLATION INSTRUCTIONS Accessory Application Publications No. AII 26031 2004 ODYSSEY Issue Date AUG 2003 NOTE: You cannot install the subwoofer in a vehicle equipped with both an under seat Navigation
VECTRIX VX-2 SERVICE MANUAL. Version 1.0/May 2011 VECTRIX, LLC
 www.vectrix.com CONTENTS SECTION A: Tools 1 Tools Needed SECTION B: Mechanical Parts 1 Front Fairing 2 Front Console Cover 3 Speedometer Cover 4 Front Vertical Panel Cover-Lower 5 Front Vertical Panel
Headlight Removal & Installation: VW Jetta Mk.4 / Bora
 Headlight Removal & Installation: 99-04 VW Jetta Mk.4 / Bora Disclaimer: Buyer assumes any and all risk and liability from the installation and use of this product. Seller, author, or any of their affiliates
FlexJet - Flex Cable Replacement
 P/N: 109515R0 14140 NE 200th St. Woodinville, WA. 98072 PH: (425) 398-8282 FX: (425) 398-8383 FlexJet - Flex Cable Replacement Notices: Warning! Ensure that all AC power cables are removed from the printer
INSTALLATION INSTRUCTIONS
 INSTALLATION INSTRUCTIONS Accessory Application Publications No. BII 25831-26975 P/N 08U97-S3V-210A (BLACK) P/N 08U97-S3V-220A(SADDLE) 2004 MDX Issue Date MARCH 2004 PARTS LIST Wood steering wheel 1. Make
Installation Manual Lock-Switch KIA Sorento V3 Installation Manual Lock-Switch V3 for KIA Sorento (02-06) and KIA Sorento (07-09)
 and KIA Sorento (07-09)") Installation Manual Lock-Switch V3 for KIA Sorento (02-06) and KIA Sorento (07-09) Note: A any work on the electrical system of a car before should the battery be disconnected at the negative terminal
Installation Manual Lock-Switch V3 for KIA Sorento (02-06) and KIA Sorento (07-09) Note: A any work on the electrical system of a car before should the battery be disconnected at the negative terminal
INSTALLATION INSTRUCTIONS
 INSTALLATION INSTRUCTIONS Accessory Application Publications No. All 12035 SYSTEM 2012 RIDGELINE Issue Date NOV 2011 PARTS LIST Security System Attachment Kit: P/N 08E55-SJC-101 Flange bolt Unit bracket
Genuine Corvette Accessories Carbon Fiber Radio Surround Installation Instructions for Corvettes.
 Genuine Corvette Accessories Carbon Fiber Radio Surround Installation Instructions for 2005-2007 Corvettes. Difficulty: 3 out of 5. Time: Plan on about 1 hour. The tools used are: A small flashlight A
Made in USA with U.S. PATENT #6,808,223; #6,845,547; #7,140,075; #7,059,655 and other patents pending.
 Made in USA with U.S. PATENT #6,808,223; #6,845,547; #7,140,075; #7,059,655 and other patents pending. Page 1 of 12 CHEVROLET CAMARO 1993-2002 Vertical Doors Canada, Inc / Lambo Doors Canada, Inc. 1 888
INSTALLATION INSTRUCTIONS
 INSTALLATION INSTRUCTIONS Accessory Application Publications No. BII 30230 2006 RSX P/N 08U96-S6M-200 Issue Date JULY 2005 PARTS LIST Cigarette lighter 3. Turn the two knobs counterclockwise, and remove
Mo- Doors Garage Door Opener Installation Victory Vision
 Mo- Doors Garage Door Opener Installation Victory Vision Your Mo- Door opener is the best garage door opener system out there for your Victory Vision. We hope you enjoy your opener as much as we do designing
Remote Control Electric Curtain Track User Manual
 User Manual A. Over View Thank you for purchasing the Remote Electric Curtain Track from Y2SHOP. The curtain tracks are widely used in window treatments, home theatres, projector screen covers, room dividers,
Air Conditioner for M915 A0/A1 Truck
 RD-2-4530-0 Air Conditioner for M915 A0/A1 Truck INSTALLATION INSTRUCTIONS Install refrigerant compressor per instructions provided with compressor mount kit. CAUTION: Edges of sheet metal can be sharp!
SCION FR-S FOG LIGHTS
 Part #: PT413-18130 Conflicts: Lowering Springs PTR07-18130-LL (California only) Kit Contents: For Anniversary Edition, Monogram & RS 2.0 vehicles, additional parts need to be ordered (PT413-18130-LL)
8. Electronics assembly (B3/R2 design)
") 8. Electronics assembly (B3/R2 design) Written By: Jakub Dolezal 2018 manual.prusa3d.com/ Page 1 of 31 Step 1 Tools necessary for this chapter Needle-nose pliers for zip tie trimming. 2.5mm Allen key for
8. Electronics assembly (B3/R2 design) Written By: Jakub Dolezal 2018 manual.prusa3d.com/ Page 1 of 31 Step 1 Tools necessary for this chapter Needle-nose pliers for zip tie trimming. 2.5mm Allen key for