CONTENT. User manual. Building the 3Dsimo KIT. First start. Filament usage and filament change
|
|
|
- Fay Wilson
- 5 years ago
- Views:
Transcription


1 MANUAL
2
3 CONTENT User manual Building the 3Dsimo KIT First start Filament usage and filament change
4 USER MANUAL ٱٱ ٱٱ ٱٱ ٱٱ ٱٱ ٱٱ You have obtained multimaterial building kit, the 3Dsimo KIT. This kit is fully open source and uses fully programable Arduino Nano. Time needed for the build: min. Before you begin with completing the 3Dsimo KIT, lay out all the parts on your work desk and make sure you have all the parts from the list. At the bottom of the package you can find small parts (screws, nuts, Teflon tubes), as well as 5 m of ABS printing filament. Filament compatible with 3Dsimo KIT is standard 3D printer filament, 1,75 mm in diameter. 4

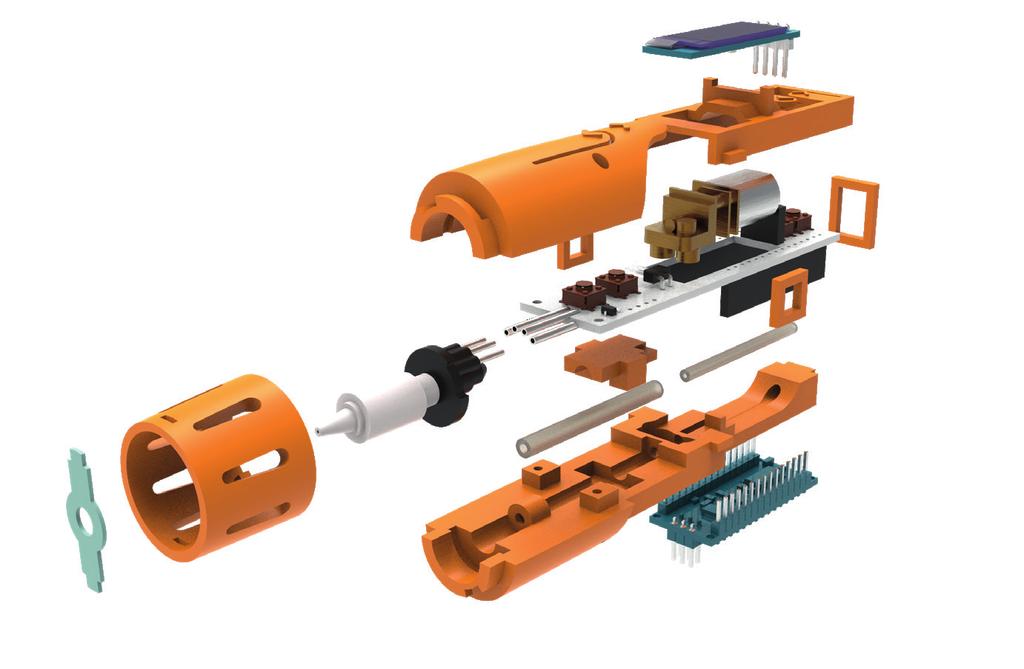
5 3Dsimo KIT consists of those parts: 5B 3B 4B 6A 1B 2B 3C 1C 2C 1A 4A 2A 5A 3A 5
6 BUILDING THE 3DSIMO KIT 01 Find this part [Pic. 1.]. 1 6
![02 Insert Teflon tubes. First, tube with diameter 3 mm (1C) insert into the back of the part [Pic. 1].](/docs-images/91/106911244/images/7-0.jpg "This tube guides the filament to the extruder (motor with gear).")
7 02 Insert Teflon tubes. First, tube with diameter 3 mm (1C) insert into the back of the part [Pic. 1]. This tube guides the filament to the extruder (motor with gear). Insert tube (2C, 4 mm diameter) into the frontal part. 1C 2 2C 7
![03 Find part (2A). Insert part (2A) [Pic. 3]. This part holds the Teflon tube in place.](/docs-images/91/106911244/images/8-0.jpg "Test the placement of the tubes by pushing filament through both tubes. Make sure the filament goes through freely.")
8 03 Find part (2A). Insert part (2A) [Pic. 3]. This part holds the Teflon tube in place. Test the placement of the tubes by pushing filament through both tubes. Make sure the filament goes through freely. If not, the filament needs to be straightened and tubes adjusted. 2A 3 8
9 04 Find the main circuit board (1B) and the nozzle (2B). Insert the 4 metal tubes (nozzle) inside the 4 metal tubes (circuit board) [Pic. 4]. Find the motor (3B) and connect it to connector (P1). 4 1B 2B 9


10 05 Insert the motor (3B) to the chassis (part from first step), [Pic. 4.1], it is necessary to place the motor into the chassis properly. Lead the motor cables through the big opening in the circuit board [Pic. 4.2] and place the circuit board onto the chassis [Pic. 5]. Connect the motor to the circuit board (P1). 3B 1A
11 06 Attach the front cover (3A) to the bottom part (1A) using 2 bolts and 2 nuts. First insert nuts, secondly insert bolts. Tighten the bolts while holding the device upside down, so the nut doesn t fall out. Tighten the bolts carefully, finger tight is enough
 into nozzle cover")

![1]. Insert the narrow part](/docs-images/91/106911244/images/12-2.jpg "into the nozzle cover s")

![2], after that push the](/docs-images/91/106911244/images/12-4.jpg "fiberglass part to the")

12 07 Insert fiberglass part (3C) into nozzle cover (4A). Fiberglass part has one side narrower [Pic. 7.1]. Insert the narrow part into the nozzle cover s slit first, all the way possible [Pic. 7.2], after that push the fiberglass part to the other slit. Make sure the fiberglass part is centred [Pic. 7]
13 08 Mount the nozzle cover onto the assembly and turn (about 30 ). The nozzle cover is locked by bayonet lock. 8 13
14 09 Mount the part (5A), [Pic. 9]. Make sure the motor is held firmly in place. It is necessary to position the wires, so they do not obstruct the kit building. 5A 9 14
15 10 Using parts (6A) connect the top and bottom parts by simply pushing on [Pic. 10] and [Pic. 11]
16 11 Insert the LCD display s (5B) 4 pin connectors into the circuit board and click the display in position [Pic. 12 and 13]. 5B


17 12 Connect the Arduino Nano. Be careful with positioning the Arduino Nano, notice the position of the USB connector [Pic. 13]. Arduino Nano has pre-installed basic configurations for correct function
18 FIRST START 01 Connect the cable (included in the package) to electricity (USB port on PC, power bank with 5V output or phone charger with 1.5A output minimum) and connect the cable to the 3Dsimo KIT. LCD display will turn on after few seconds, showing gradual heating of the nozzle, depending on chosen material heat profile. Material heat profiles can be changed using the buttons on the back of the 3Dsimo KIT [Pic. 15]. 18


19 15 19
20 02 When the nozzle is heated up to a temperature, filament feeding motor will be activated. The motor is operated via front two buttons [Pic. 16]. Button closer to the nozzle feeds the filament forward, the other button pulls out the filament after one click. If the buttons work the other way, the motor is plugged the wrong way and you have to unplug the motor, turn around the connector and plug again. 20
21 16
22 FILAMENT USAGE AND FILAMENT CHANGE 01 Using the filament: Always use straightened filament without any deformations and with straight cut end. Push the filament into the opening on the back of 3Dsimo KIT, keep pushing as far as possible. Push the front button and gently push the filament in, the feeding mechanism will do the rest. In about 10 seconds, the filament will start to come out of the 3Dsimo KIT. 22

![filament out [Pic. 17].](/docs-images/91/106911244/images/23-2.jpg "ALWAYS pull out filament after heating up the")
23 02 Changing/removing filament:! Push the return button and lightly pull the filament out [Pic. 17]. ALWAYS pull out filament after heating up the nozzle to working temperature! 17 23
24 WARNING 1. Danger of burns. The nozzle heats up to 250 C. Never touch the nozzle or plastic parts near it. 2. Avoid contact of the nozzle and flammable substances. 3. This product is NOT a toy, children must be supervised when using 3Dsimo KIT. 4. Never use this product without the fiberglass part, danger of damage to the nozzle. 5. 3Dsimo KIT must be stored in dry environment, any contact with fluids can damage 3Dsimo KIT. 24
25 6. Never use damaged power cable, danger of fire or/and electrocution. 7. Some parts of 3Dsimo KIT have exposed electric components, avoid contact with conductive surfaces. 25
26 WARRANTY Warranty applies only to individual components for duration of 12 months after purchase. In case of warranty claim, contact our customer support: For more information visit: 26
27
28 Assemble Program Upgrade Have Fun
Modix Big-60 Assembly Manual Part 2
 Modix Big-60 Assembly Manual Part 2 Version 1.0, October 2017 Menu 1. Motors & End Stop Wiring... 3 2. Controller Wiring Check... 6 3. Extruder Wiring... 7 4. Electronic Box Cover... 9 5. Filament Sensor...
3D PRINTER USER MANUAL
 3D PRINTER USER MANUAL Table of contents page: 1. Introduction 2. Table of contents 3. Basic informations 4. General information 5. Glossary 6. Starter pack s content 7. Technical parameters 8. Device
Usage Instructions Product # Instructions #
 Usage Instructions Product #397488 Instructions #1037363 B. CONTENT C. A. F. A. Mag Charger B. Plunger C. Ammo Carrier Tray D. Transfer Tray F. Mag Charger Lid D. CALDWELL MAG CHARGER The Mag Charger is
Instruction Manual. Model #: MPEN. 80 Little Falls Road, Fairfield, NJ Never-Ending Learning Innovation
 Instruction Manual Model #: MPEN Never-Ending Learning Innovation 80 Little Falls Road, Fairfield, NJ 07004 1-800-631-0868 www.hamiltonbuhl.com Filament loading hole DC socket OLED screen Temperature +
Installation and service instructions, warranty terms & conditions. DeeGreen. User Guide. Version 2.6
 Installation and service instructions, warranty terms & conditions DeeGreen User Guide Version 2.6 - 2 - Contents 1. Contents...- 3-2. Technical parameters...- 4-3. Safety instructions...- 4-4. Package
JGAURORA 3D PRINTER MODEL: A5 USER GUIDE
 JGAURORA 3D PRINTER MODEL: A5 USER GUIDE Contents ----3D Printer User Guide 1. Preface... 2 1.1 Introduction...2 1.2 Safety advice... 2 1.3 Filament requirements...2 1.4 Environmental requirements...2
TL4076 Top 5 Tips Get to know your TL4076
 TL4076 Top 5 Tips Get to know your TL4076 Thermal Break with Teflon liner (behind fan) Hot End Assembly Fan Heat Block Extruder with toothed gear(brass) and idler (steel) Filament Guide Tube Nozzle Cable
LG G5 REPAIR GUIDE. Version Edition
 LG G5 REPAIR GUIDE Version 1 2016 Edition LG G5 REPAIR GUIDE LCD AND DIGITIZER REPLACEMENT RiAna Soto Repair Training Specialist rsoto@cellairis.com FOR EVERY REPAIR MAKE SURE TO COMPLETE, INITIAL, AND
Modix Big-60 Assembly Instructions Part 1
 Modix Big-60 Assembly Instructions Part 1 Version 1.0, October 2017 Menu 1. X Idler Pulley Assembly... 3 2. Connecting X Axis Brackets to Z Profiles... 4 3. Assemble X Rails on X Top Profiles... 6 4. Assemble
WANHAO Duplicator i3. User Manual V1.2. Wanhao USA
 WANHAO Duplicator i3 User Manual V1.2 Wanhao USA 2015 www.wanhaousa.com Safety WARNING: The components on the Duplicator i3 generate high temperatures and move extremely fast. Reaching inside of the Duplicator
3D PRINTER. Pack 09. Anything you can imagine, you can make! 3D technology is now available for you at home! BUILD YOUR OWN
 BUILD YOUR OWN Pack 09 Anything you can imagine, you can make! 3D PRINTER Compatible with Windows 7 & 8 Mac OS X 3D technology is now available for you at home! www.model-space.com BUILD YOUR OWN 3D PRINTER
SeeMeCNC Guides. Orion Delta HE280 Hotend Upgrade. This How-to Guide will walk you through the steps of upgrading to the HE280 Hotend
 SeeMeCNC Guides Orion Delta HE280 Hotend Upgrade This How-to Guide will walk you through the steps of upgrading to the HE280 Hotend Written By: JJ Johnson 2017 seemecnc.dozuki.com Page 1 of 18 INTRODUCTION
6. Pre-print checks. 3D Touch
 Page 1 1. 6. Pre-print checks........................................................................................... 1.1 a. Clearing the print bed..................................................................................
To be the Chief Evangelist CR-10S Pro Printer Guide Book To make Top-quality 3D printer
 To be the Chief Evangelist CR-0S Pro Printer Guide Book To make Top-quality 3D printer This guide book is for standard CR-0S Pro. Please plug the power cord into a three-hole power jack. Detailed instructions
nano drone for beginners
 nano drone for beginners www.axisdrones.com By operating this device you acknowledge and accept all risks and responsibilities of the use, storage and proper disposal of any and all included lithium batteries.
Electronics. Electronics docs.imade3d.com/ Page 1 of 15
 Electronics 2018 docs.imade3d.com/ Page 1 of 15 Step 1 Wire Comb 4" zip ties Wire comb Step 2 Align the wire comb with the corresponding annotations (ie. filament fan, heat block, etc.), and secure it
EAM109SY FITTING INSTRUCTIONS
 EAM109SY FITTING INSTRUCTIONS REPLACES: 17.12.12 REVISED: 28.04.16 NX PAJERO MY15 11/14- ARC BAR PROTECTION BAR With fog lights VEHICLE FRONTAL PROTECTION SYSTEM (VFPS) FOR AIR BAG & ADR COMPLIANT VEHICLES
create Model Number: HE INSTRUCTION MANUAL
 create Model Number: HE150277 INSTRUCTION MANUAL . Important Getting the most out of your 3D Pen: Read the manual carefully It will help you get set up with ease Visit www.cocooncreate.com.au We ve got
Unpacking Instructions
 Unpacking Instructions by Revolution 3D Printers Infinity3D_Unpacking_Instructions_V1.1 1 Copyright 2016, Revolution 3D Printers Copyright 2016 Revolution 3D Printers, Victoria, BC File version Infinity3D_V1.0,
Heated Bed Installation Instructions
 Heated Bed Installation Instructions Overview The glass panel is heated by way of a heater element which is bonded to the glass panel and controlled by a digital temperature controller. The temperature
Prusa i3 Printer Assembly Guide
 Prusa i3 Printer Assembly Guide Special thanks to Carlos Sanchez and Miguel Sanchez for the graphics. All graphics captured from their great animation: http://www.carlos-sanchez.com/ Prusa3/ For copyright
FTX Banzai RTR Brushed 2.4GHz 4WD Drift Car
 FTX Banzai-Manual_Banzai 11/12/2013 16:12 Page 1 FTX Banzai-Manual_Banzai 11/12/2013 16:12 Page 2 FTX Banzai RTR Brushed 2.4GHz 4WD Drift Car Congratulations on your purchase of the FTX Banzai electric
K Wiring and Electronics
 HKBay.com K Wiring and Electronics Written By: HKBay 2017 hkbay.dozuki.com Page 1 of 12 TOOLS: Hex key; ball ended, long arm, 2.5mm (1) PARTS: Arduino Mega (blue) (1) RAMPS board (red) (1) glass tabs (3)
8000mAh Jump Starter User Manual
 U3 8000mAh Jump Starter User Manual Web: www.suaoki.com E-mail: support@suaoki.com Thank you for choosing Suaoki. Suaoki U3 is a 3-in-1 device, functioning as a jump starter to boost flat car battery,
Important notice Upper supports for Z axis Pulley Corner for Y axis Right X axis and left X axis Chain coupling for left X axis
 Warranty and FAQ G004260 Important notice You can personalise your Prusa i3 HEPHESTOS and update it with the latest innovations that appear in the community. However, it is important that you understand
Galaxy Note 5 Glass/Lcd REPAIR GUIDE. Version Edition
 Galaxy Note 5 Glass/Lcd REPAIR GUIDE Version 1 2016 Edition Samsung Galaxy Note 5 Glass/LCd REPAIR GUIDE RiAna Soto Repair Training Specialist rsoto@cellairis.com FOR EVERY REPAIR MAKE SURE TO COMPLETE,
TRIPODMAKER BLACK EDITION USER MANUAL
 TRIPODMAKER BLACK EDITION USER MANUAL TABLE OF CONTENT Specifications and box content 1. Specifications of the Tripodmaker...4 2. Box content...5 3. Terminology...6 4. Attentions and warnings...8 Unboxing
What s in the box? 1 Contents/what s in the box? B Turbine blades. 2 Setting up and powering the wind turbine C Generator motor
 1 User Manual/Operating Instructions D B E A What s in the box? Contents A Turbine hub 1 Contents/what s in the box? B Turbine blades 2 Setting up and powering the wind turbine C Generator motor 3 Fitting
5. Extruder. 5. Extruder. Extruder guide. Written By: Dozuki System manual.prusa3d.com Page 1 of 16
 5. Extruder Extruder guide Written By: Dozuki System 2017 manual.prusa3d.com Page 1 of 16 Step 1 Get the necessary tools 2.5, 2 and 1.5 mm hex spanner Needle-nose pliers Step 2 3D printed parts Extruder
EAT116SY. 5. Remove three 10mm head bolts from inner guards and pull rearward to clear bumper side.
 EAT116SY REPLACES: 30.05.12 REVISED: 22.08.12 FITTING INSTRUCTIONS TOYOTA PRADO 11/09on ARC PROTECTION BAR WITH PARKING SENSORS AND HID HEADLIGHTS VEHICLE FRONTAL PROTECTION SYSTEM (VFPS) FOR AIR BAG &
9 Replacing the routine maintenance parts
 9 Replacing the routine maintenance parts Daily maintenance or replacement of parts at an early stage can prevent the machine from being damaged, and keeps the machine at the optimum condition. Replace
Power Beam 20MCP Searchlight with 12 LED Area Light and Vehicle Jump Starter. Instruction Manual
 Power Beam 20MCP Searchlight with 12 LED Area Light and Vehicle Jump Starter Instruction Manual MobilePower, LLC. Bluffton, SC 29910 www.mobilepower-us.com Customer Support: (800) 708-8550 customerservice@mobilepower-us.com
Bag 1. Bag 1. Center Pivot. Center Pivot
 8 00734 01901 5 Center Pivot Bag 1 3374 - Center Pivot Socket 4019 - Alum Pivot ball 3254-2-56 Button Head *Note - Sometimes it is helpful to slightly over-tighten the top clamp screws, then work the ball
The front wheel and mirror
 Pack 01 1 The fuel tank 3 2 The front wheel and mirror 5 3 The headlight 6 Editorial and design by Continuo Creative, 39-41 North Road, London N7 9DP. Published in the UK by De Agostini UK Ltd, Battersea
U10 Jump Starter. User Manual
 U10 Jump Starter User Manual Thank you for choosing Suaoki. Suaoki U10 is a 3-in-1 device, functioning as a jump starter to boost flat car battery, as a portable power bank to charge your electronic devices
USER GUIDE EMERGENCY JUMP STARTER PORTABLE POWER SUPPLY INTELLIBOOST ULTRA RG600 12V 600A REV 1.16B
 WWW.RUGGEDGEEK.COM USER GUIDE EMERGENCY JUMP STARTER PORTABLE POWER SUPPLY INTELLIBOOST ULTRA RG600 12V 600A REV 1.16B IMPORTANT THE RG600 IS AN EMERGENCY TOOL AND SHOULD BE KEPT FULLY CHARGED, IN CASE
XS400 Load Bank. Read all instructions before using the load bank. Contents
 Read all instructions before using the load bank Contents 1) Components... 3 Total Assembly... 3 2) Specifications... 4 3) Receiving... 4 4) Safety... 5 a) Grounding cam... 6 b) Power connections... 6
BJ74SY FITTING INSTRUCTIONS
 BJ74SY FITTING INSTRUCTIONS REPLACES: 00.00.00 REVISED: 05.08.13. Check installation hardware before commencing. 1. Lift bonnet. JEEP GRAND CHEROKEE OVERLAND WK MY14 6/13on BIG TUBE PROTECTION BAR WITH
Where There is Miboxer There is Power. User Manual. Model No.: C2-6000
 Where There is Miboxer There is Power User Manual Model No.: C2-6000 Introduction C2-6000 is a highly advanced battery charger, that includes a power bank function. The charger automatically adapts the
Where There is Miboxer There is Power. User Manual. Model No.: C4-12
 Where There is Miboxer There is Power User Manual Model No.: C4-12 Introduction C4-12 Is a highly advanced battery charger, that includes a power bank function. The charger automatically adapts the charge
Revision Date: 07/28/2015. Electrical Operated Stand Up Desk Assembly Guide for 60 & 48 Wide Flat Top Desks
 Revision Date: 07/8/0 Electrical Operated Stand Up Desk Assembly Guide for 60 & 48 Wide Flat Top Desks Table of Contents Table of Contents........................................ 3 Warnings & Guidelines....................................
Patent Pending EXTENDED-DUTY PISTON PUMP
 TM Patent Pending EXTENDED-DUTY PISTON PUMP O p e r a t i o n & I n s t a l l a t i o n M a n u a l P/N 95222 Rev. 9-29-9 4 2 6 psi 9 1 12 16 14 2 4 6 8 1 INCHES W.C. 4 2 6 N psi IN 1 12 16 14 EXTENDED-DUTY
Maker's Tool Works. Written By: Micro. Wiring methods used by MTW Printers using the Rambo Electronics. Wiring Rambo Electronics & Power Supply
 Maker's Tool Works Wiring Rambo Electronics & Power Supply Wiring methods used by MTW Printers using the Rambo Electronics. Written By: Micro 2017 mtw.dozuki.com Page 1 of 10 TOOLS: Screw Drivers (1) Wire
A B C D E F. Tools Required (supplied by others)
") Page 1 of 17 Parts List Below Deck Automatic Retractable Security Cover Kit (1) Tube End Bearing Plate (A) (1) Rope Reel and Cover Drum Motor Assembly (B) (1) Cover Drum (1) Pulley Support Channel (2)
Page 1 of 17 Parts List Below Deck Automatic Retractable Security Cover Kit (1) Tube End Bearing Plate (A) (1) Rope Reel and Cover Drum Motor Assembly (B) (1) Cover Drum (1) Pulley Support Channel (2)
K mAh Jump Starter
 K12 8000mAh Jump Starter User Manual Thank you for choosing Suaoki. Suaoki K12 is a 3-in-1 device, functioning as a jump starter to boost flat car battery, as a portable power bank to charge your electronic
Build your own THUNDERBIRD 2
 PACK 11 PAGE 67 Pod 4 ramp tracks and Jet Air Transporter 224 68 Left rear booster and Alan s Racing Car 227 69 Right rear booster and Alan s Racing Car 230 70 Left booster speaker 233 71 Right rear booster
Uplift Premium Power Lifting Seat
 Uplift Premium Power Lifting Seat User Guide Read all instructions before using the Uplift Power Seat DANGER - To reduce the risk of electric shock: IMPORTANT SAFETY INSTRUCTIONS Always unplug the Uplift
1.1 Quad Valve and Tri-Valve. Contents WATER DUMP BODY O-RING EXHAUST VALVE QUAD VALVE TIE WRAP EXHAUST MAIN BODY O-RING
 Quad Valve and Tri-Valve Exhaust Assembly on Fiberglass Helmets Quad Valve and Tri-Valve Exhaust Contents QUAD-1 QUAD-2 QUAD-2 QUAD-2 QUAD-6 QUAD-7 1.1 Quad Valve and Tri- Valve Exhaust Assembly on Fiberglass
Introduction to 3D Printing
 TAKE HOME LABS OKLAHOMA STATE UNIVERSITY Introduction to 3D Printing by Sean Hendrix 1 OBJECTIVE The objective of this experiment is to introduce you to 3D printing, by having you print some simple parts
Questions - usage (EN) ENGLISH. - How can I avoid getting the headband cords tangled? Stow your lamp as indicated in the drawing below.
 ENGLISH. - How can I avoid getting the headband cords tangled? Stow your lamp as indicated in the drawing below.") NAO support (EN) ENGLISH Questions - usage - Can I tell which mode I m in (REACTIVE LIGHTING or constant) when the lamp is on my head? Yes, just put a finger over the sensor. If the brightness changes,
NAO support (EN) ENGLISH Questions - usage - Can I tell which mode I m in (REACTIVE LIGHTING or constant) when the lamp is on my head? Yes, just put a finger over the sensor. If the brightness changes,
Power Beam 20MCP Searchlight with 12 LED Area Light and Vehicle Jump Starter. Instruction Manual
 Power Beam 20MCP Searchlight with 12 LED Area Light and Vehicle Jump Starter Instruction Manual MobilePower, LLC. Bluffton, SC 29910 www.mobilepower-us.com Customer Support: (800) 708-8550 customerservice@mobilepower-us.com
A B C D E F. b.tools Required (supplied by others) 3/16" Drill Bit 3/8" Wrench Phillips Head Screwdriver
 3/16 Drill Bit 3/8 Wrench Phillips Head Screwdriver") Page 1 of 13 5E.1 Parts List a. Below Deck Automatic Retractable Security Cover Kit (1) Tube End Bearing Plate (A) (1) Rope Reel with Motor Attached (B) (1) Rope Reel Cover (C) (1) Cover Drum (1) Cover
Page 1 of 13 5E.1 Parts List a. Below Deck Automatic Retractable Security Cover Kit (1) Tube End Bearing Plate (A) (1) Rope Reel with Motor Attached (B) (1) Rope Reel Cover (C) (1) Cover Drum (1) Cover
SPECTRE DRONE USER MANUAL
 SPECTRE DRONE USER MANUAL PRODUCT CODE: ZXSPT www.zero-x.com.au www.zero-x.co.nz v2 Thanks for purchasing a Zero-X Spectre Drone, get ready to have the time of your life! We re sure your Zero-X Spectre
V3700UK OWNER S GUIDE.
 V3700UK OWNER S GUIDE IMPORTANT SAFETY INSTRUCTIONS For Household Use Only WHEN USING YOUR SHARK CORDLESS SWEEPER, BASIC SAFETY PRECAUTIONS SHOULD ALWAYS BE FOLLOWED, INCLUDING THE FOLLOWING: READ ALL
PROLUX ProShine Waterproof, Cordless, Floor Buffer/Scrubber MODEL: ProShine Operation Instructions
 PROLUX ProShine Waterproof, Cordless, Floor Buffer/Scrubber MODEL: ProShine Operation Instructions Read all instructions before using this appliance - 1 - For your safety please read owners manual in its
AirTMCordless HANDHELD
 AirTMCordless HANDHELD PERFECT FOR QUICK SPILLS AND SPOT CLEANING LET S GET STARTED. H85-ACH-B H85-ACH-BD H85-ACH-BA Let s talk safety Basic safety precautions This handheld cleaner is intended for household
Fanatec GT3RS V1 to GT3RS V2 Tutorial
 Fanatec GT3RS V1 to GT3RS V2 Tutorial by Roy Visser 1 How to update your Fanatec GT3RS V1 wheel to a GT3RS V2 wheel Welcome to this guided and detailed tutorial for upgrading your Fanatec GT3RS V1 wheel
TeeBox. The Suitcase 3D printer. BY:
 TeeBox The Suitcase 3D printer. BY: Eindhoven The Netherlands Contents Liability... 2 Returns... 2 WARNING... Error! Bookmark not defined. TRICKS AND TIP... 4 PART 1 ---Y AXIS (PRINT BED)... 7 Fasten heatbed
Uninterruptible Power Supply ERA LCD 0.65 ERA LCD 0.85 ERA LCD 1.1. User s manual
 Uninterruptible Power Supply ERA LCD 0.65 ERA LCD 0.85 ERA LCD 1.1 User s manual Index Safety Warnings...2 1 Introduction...3 2 General Characteristics...4 3 Receipt and site selection...4 4 EXTERNAL
ENGLISH (Original instructions) INSTRUCTION MANUAL. Cordless Cleaner DCL140 DCL180. IMPORTANT: Read Before Using.
 INSTRUCTION MANUAL. Cordless Cleaner DCL140 DCL180. IMPORTANT: Read Before Using.") ENGLISH (Original instructions) INSTRUCTION MANUAL Cordless Cleaner DCL40 DCL80 009983 IMPORTANT: Read Before Using. ENGLISH (Original instructions) SPECIFICATIONS Model DCL40 DCL80 Capacity 650 ml Continuous
ENGLISH (Original instructions) INSTRUCTION MANUAL Cordless Cleaner DCL40 DCL80 009983 IMPORTANT: Read Before Using. ENGLISH (Original instructions) SPECIFICATIONS Model DCL40 DCL80 Capacity 650 ml Continuous
SAFETY AND OPERATING MANUAL. 3 in 1 Grass Trimmer/Edger WG160E.5
 SAFETY AND OPERATING MANUAL 3 in 1 Grass Trimmer/Edger WG160E.5 2 General Power Tool Safety Warnings WARNING: Read all safety warnings and all instructions. Failure to follow the warnings and instructions
P-600. Technical Manual. Troubleshooting Repairs Replacements
 P-600 Technical Manual Troubleshooting Repairs Replacements Table of Contents P-600 Lift Symptoms and Problems Finding the Problem Before Getting Inside 3 Pneumatic Systems 4 Electrical Systems 5 Mechanical
Operations and Service Manual. XE400D-SB Load Bank
 Operations and Service Manual XE400D-SB Load Bank Read all instructions before using the load bank Contents 1. Components... 3 Total Assembly... 3 2) Specifications... 4 a) XE400D-SB Load Bank... 4 3)
BRING YOUR IDEA TO LIFE HOW TO CREATE YOUR OWN BATTERY POWERED MODEL RACING CAR
 BRING YOUR IDEA TO LIFE HOW TO CREATE YOUR OWN BATTERY POWERED MODEL RACING CAR WHAT YOU WILL NEED TO MAKE YOUR MASTERPIECE... Here s a basic set of components and tools that you will need to bring your
Electrical Operated Stand Up Desk Assembly Guide for 60 & 48 Wide Split Top Desks
 Electrical Operated Stand Up Desk Assembly Guide for 60 & 48 Wide Split Top Desks Table of Contents Table of Contents... 2 Warnings & Guidelines... 3 Parts List & Hardware.... 5 Assembly and Installation
EAIZ66SY FITTING INSTRUCTIONS
 EAIZ66SY FITTING INSTRUCTIONS REPLACES: 00.00.00 REVISED: 09.10.12 Check installation hardware before commencing. 1. Lift bonnet ISUZU DMAX 6-12 on ECB ARC BAR WINCH COMPATIBLE VEHICLE FRONTAL PROTECTION
Build your own THUNDERBIRD 2
 PACK 06 PAGE 33 Telescopic legs C and I.R.3 112 34 Telescopic legs D and I.R.3 115 35 Leg bases and Thunderizer 118 36 Landing feet and Elevator Car 3 121 37 Leg rail-gear racks and Elevator Car 3 124
Logo/Company Name 4 w x.75 h. Assembly Instructions. 1) Remove base, back/back bar, pneumatic cylinder, casters/glides, and seat from box.
 Remove base, back/back bar, pneumatic cylinder, casters/glides, and seat from box.") w x. h ) Remove base, back/back bar, pneumatic cylinder, casters/glides, and seat from box. ) Put casters or glides on base. Use pressure to push in (). ) Slide optional foot ring () over pneumatic cylinder
w x. h ) Remove base, back/back bar, pneumatic cylinder, casters/glides, and seat from box. ) Put casters or glides on base. Use pressure to push in (). ) Slide optional foot ring () over pneumatic cylinder
Nature Power Inverters. True Sinewave Inverter Modified Sinewave Inverter. Owner s Manual
 Version 1.1 Version 2 Nature Power Inverters True Sinewave Inverter Modified Sinewave Inverter Owner s Manual!!!!!!!!!!! 38304 38204 For safe and optimum performance, the Power Inverter must be used properly.
Owner s Manual and Assembly Instructions
 Owner s Manual and Assembly Instructions Please read and retain this document as it contains important operational and safety information. Meets or Exceeds ASTM F963; GB6675; EN 62115 Safety Standards.
Register your product and get support at Philips Sonicare DiamondClean
 Register your product and get support at www.philips.com/welcome Philips Sonicare DiamondClean 300 series 1 Important Safeguards... 3 2 What s in the box... 6 3 Before first use... 7 4 Using your Sonicare...
Desktop 5.5 Z Axis Retrofit
 Page 1 Kit parts Desktop 5.5 Z Axis Retrofit Carriage plate with stop bolt and Z proximity switch installed Zip ties Spare bolts Spindle mounting plate with stop bolt, spring mount, and rail Z proximity
Gator Pet 18V Let s get started
 Gator Pet 18V Let s get started VX35 vax.com.au vax.co.nz Let s talk safety Basic safety precautions This handheld is intended for household use only and NOT for commercial or industrial use. This handheld
MULTI FUNCTION POWER PAK PLUS
 MULTI FUNCTION JUMP START UP TO V8 PETROL & DIESEL 600A PEAK CURRENT RECHARGE USB POWER TOOLS TABLETS LAPTOPS MOBILE PHONES RECHARGE DEVICES ON-SITE VEHICLE JUMP STARTER KP1404 ED2 (June 15) Table of Contents
Criccieth Castle Owners Handbook
 Criccieth Castle Owners Handbook For the Criccieth Castle Diesel Locomotive Operating Instructions IMPORTANT: Please read these instructions carefully before operating the locomotive SAFETY PRECAUTIONS
USER MANUAL Please read and understand this user manual carefully before each use. Model: X-10
 USER MANUAL Please read and understand this user manual carefully before each use. Model: X-10 This model is designed as an external battery pack to recharge your 5V and 12V electronic devices, and as
USER'S GUIDE 9151 SERIES V
 USER'S GUIDE 9151 SERIES 220-240 V 2 Thank You 3 Safety Instructions 4 Product View 4-5 Assembly 5 Operations 6 Maintenance and Care 7 Troubleshooting 7 Replacement Parts 8 Warranty 8 Consumer Care Thanks
Carousel Unit User Manual Replacing the Check Stand Motor
 Carousel Unit User Manual Replacing the Check Stand Motor 02/01/2017 1 Table of Contents Tools:... 3 Turn Off Power to the Unit:... 4 Remove Power Switch... 5 Remove Electric Eyes:... 6 Remove POS (Point-Of-Sale)
5. Extruder Assembly
 5. Extruder Assembly Guide for the assembly of the Extruder. Written By: Josef Prusa 2018 manual.prusa3d.com/ Page 1 of 24 Step 1 Get the necessary tools 2.5 and 1.5 mm Allen key Needle-nose pliers 2018
Electrical Operated Stand Up Desk Assembly Guide for 60 & 48 Wide Flat Top Desks
 Electrical Operated Stand Up Desk Assembly Guide for 60 & 48 Wide Flat Top Desks American Filing Solutions P.O. Box 891719, Temecula CA 9589 Tel: 1-951-694-4150 1-888-891-1970 Fax: 1-951-506-7717 1-888-891-9970
OWNER S MANUAL REMOTE CONTROL, DUAL HEAD FOGGING SYSTEMS
 OWNER S MANUAL Sentinel II 5500 REMOTE CONTROL, DUAL HEAD FOGGING SYSTEMS Read all instructions carefully before starting the installation. Save this manual for future use. 2 OWNER S MANUAL SAFETY Always
3D PRINTER. Pack 10. Anything you can imagine, you can make! 3D technology is now available for you at home! BUILD YOUR OWN
 BUILD YOUR OWN Pack 10 Anything you can imagine, you can make! 3D PRINTER Compatible with Windows 7 & 8 Mac OS X 3D technology is now available for you at home! BUILD YOUR OWN 3D PRINTER CONTENTS PACK
User Manual EN FIRE STICK
 User Manual EN FIRE STICK 1 V V I Thank you for purchasing one of our products! We are truly honored to be able to serve you and provide you with the best Experience possible. If you ve enjoyed our product,
Build your own omni robot
 Build your own omni robot Copyright C 2014 by DAGU Hi-tech Electronic Co., Ltd. All rights reserved. No portion of this instruction sheet or any artwork contained herein may be reproduced in any shape
Lemania/EnergyFlo Start booster X7
 Lemania/EnergyFlo Start booster X7 User Manual Always follow basic safety precautions and wear appropriate safety equipment when using electrical appliances and batteries. Read all instructions carefully.
Building Instructions of Geeetech Prusa I3 M201
 Building Instructions of Geeetech Prusa I3 M201 (Version 11-25-2016) CONTENT Safety Instructions... 1 Preparation... 2 1. Assemble the threaded rods of Y axis... 3 2. Assemble the front and back support
NWA3D A31 User Manual
 1. 3D Printer Parts Diagram 2. Assembly 3. Fine-Tuning 4. Leveling the Build Plate 5. Loading and Unloading Filament 6. Operation: The Four Steps in 3D Printing 7. Troubleshooting Version 2.0 8. Additional
Problems? PLEASE DO NOT TAKE YOUR AIR HOGS INTRUDER TO THE STORE! Call our Flight Technicians at: INTRUDER RADIO-CONTROLLED AIRPLANE
 AIR HOGS INTRUDER INSTRUCTION SHEET TM Get Ready to Rule the Skies! AIR HOGS Intruder can fly through the skies at over 4MPH scale speed. Featuring an onboard computer, Intruder provides you with maximum
ft. ft Signature Balsam Fir Tree ITEM Item 68607
 7.5 7.5 ft. ft Signature Balsam Fir Tree ITEM Item 68607 PARTS LIST A. BOTTOM B. MIDDLE C. TOP D. TREE STAND NUMBER OF PERSONS RECOMMENDED FOR ASSEMBLY: 2 SKU 68607 7.5 Signature Balsam Fir 2114 TIPS STANDARD
FlexJet - Flex Cable Replacement
 P/N: 109515R0 14140 NE 200th St. Woodinville, WA. 98072 PH: (425) 398-8282 FX: (425) 398-8383 FlexJet - Flex Cable Replacement Notices: Warning! Ensure that all AC power cables are removed from the printer
Please read the operating instructions carefully before use and keep for future reference.
 GB OPERATING INSTRUCTION LEISTER Electric Hot Air Tool Please read the operating instructions carefully before use and keep for future reference. USAGE The LEISTER hot air tool Mini sensor is suitable
FlexJet Carriage Circuit Board (PCB) Replacement
 Replacement") P/N: 111484 R0 14140 NE 200th St. Woodinville, WA. 98072 PH: (425) 398-8282 FX: (425) 398-8383 ioline.com FlexJet Carriage Circuit Board (PCB) Replacement Notices: Warning! Ensure that all AC power cables
P/N: 111484 R0 14140 NE 200th St. Woodinville, WA. 98072 PH: (425) 398-8282 FX: (425) 398-8383 ioline.com FlexJet Carriage Circuit Board (PCB) Replacement Notices: Warning! Ensure that all AC power cables
Assembly & Installation Guide Makerbot Rep2X and clones
 Assembly & Installation Guide Makerbot Rep2X and clones The Bondtech extruder upgrade kit for Makerbot and clones uses high-quality industrial pneumatic push-fit fittings for attaching the bowden tube.
QuickBoost Instruction Manual
 Sheet 1 of 12 QuickBoost Instruction Manual MobilePower, LLC. Bluffton, SC 29910 www. Mobilepower-us.com Office: (800) 708-8550 support@mobilepower-us.com customerservice@mobilepower-us.com Sheet 2 of
VBK 2596/12E/RSF. Thickness and Width Gauge for Strip and Profile. Operating- & Service Instructions. (with lateral guide rollers)
") Thickness and Width Gauge for Strip and Profile (with lateral guide rollers) VBK 2596/12E/RSF Operating- & Service Instructions erstellt am 5.2.1998 freigegeben am Bemerkungen Rev.01 Seiten:16 Name: Rietdorf
Thickness and Width Gauge for Strip and Profile (with lateral guide rollers) VBK 2596/12E/RSF Operating- & Service Instructions erstellt am 5.2.1998 freigegeben am Bemerkungen Rev.01 Seiten:16 Name: Rietdorf
#1 PROVIDER OF HID KITS.
 Please read the reference handbook carefully before removing original car lighting from the vehicle. Please read through the entire handbook carefully before installing the HID system. Following this guide
NBMB49SY REPLACES: REVISED:
 NBMB49SY REPLACES: 00.00.00 REVISED: 14.03.12 FITTING INSTRUCTIONS MERCEDES VITO 02-11 ON NUDGE BAR VEHICLE FRONTAL PROTECTION SYSTEM (VFPS) FOR AIR BAG & ADR COMPLIANT VEHICLES Check installation hardware
HOME CHARGER MODE 2. Series to /32A single phase CONTENTS. Manual IMPORTANT SAFETY INSTRUCTIONS 3 SAFETY INFORMATION 4 INSTALLATION 5
 CONTENTS IMPORTANT SAFETY INSTRUCTIONS 3 SAFETY INFORMATION 4 INSTALLATION 5 OPERATION 8 SPECIFICATIONS 8 MAINTENANCE 9 HOME CHARGER MODE 2 Series 31328 to 31340 16/32A single phase FCC INFORMATION 9 WARRANTY
Ultimaker 2 Extended THINK LARGE, PRINT BIG USER MANUAL V2.1
 Ultimaker 2 Extended THINK LARGE, PRINT BIG USER MANUAL V2.1 2 TABLE OF CONTENTS 1. ULTIMAKER 2 EXTENDED 4 Ultimaker 2 Extended at a glance 5 Specifications 7 2. GETTING STARTED 8 Unboxing 9 Installation
User Manual EN. White LED Headlight & Red Tail Bolt COMBO
 User Manual EN White LED Headlight & Red Tail Bolt COMBO 1 V I Thank you for purchasing one of our products!!! We are truly honored to be able to serve you and provide you with the best Experience possible.