LG G5 REPAIR GUIDE. Version Edition
|
|
|
- Teresa Stewart
- 6 years ago
- Views:
Transcription

1 LG G5 REPAIR GUIDE Version Edition

2 LG G5 REPAIR GUIDE LCD AND DIGITIZER REPLACEMENT RiAna Soto Repair Training Specialist

3 FOR EVERY REPAIR MAKE SURE TO COMPLETE, INITIAL, AND HAVE CUSTOMER SIGN THE CELLAIRIS REPAIR LIABILITY WAIVER FORM
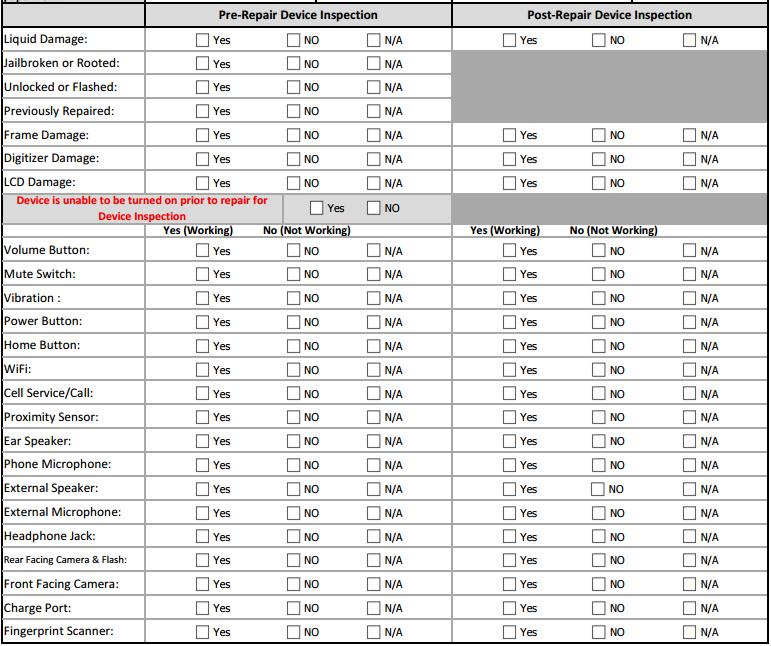

4 PRE-REPAIR DEVICE CHECK-IN

5 TOOLS NEEDED Philips screwdriver Spudger Tweezers Isesamo Pentalobe screwdriver Magnetic Mat LG G5 Digitizer/LCD

6 HEAT-GUN PRECAUTIONS Always operate the heat gun on the lowest setting. Keep face, hands, hair, and clothing away from the air stream. The air nozzle also becomes extremely hot. Never grab the heat gun by the nozzle. Never operate the heat gun by laying it on its side on a table. It should be firmly grasped in one hand at all times during usage. Never operate near flammable or explosive liquids and vapors. Cleaning supplies and the 3M #94 Primer are of concern. Make sure fumes are absent from the work area before operating the heat gun The heat gun nozzle should never get closer than 2 to the object being heated. Keep heat gun moving. Never stay in one spot.


7 ADDITIONAL PRECAUTIONS Magnetic Pad: During the repair, you will be utilizing a magnetic pad to organize the plethora of differing screws that you will be pulling out of the iphone 6S. Below is a list of several internal components of the iphone 6S that should never be placed on the pad, or you risk damaging the hardware or erasing client data: LCD/Digitizer Assembly Cameras Motherboard Battery Speaker
8 ADDITIONAL PRECAUTIONS Power on/off: To avoid any damage to the hardware during the repair, it is best to have the device powered off until you can get to and disconnect the battery. Battery: Never unplug any flex cables unless the battery has been completely disconnected to avoid frying your hardware. Do not plug the battery back until all cables have been reconnected. Release Screws: Apply pressure on the screw and twist counterclockwise to initially loosen it, then lighten the pressure and continue twisting until the screw is gently released. Make sure you have properly sized screwdrivers available for the repair. Pin Connectors: extremely fragile and must be plugged or unplugged with extreme caution. Battery connector: held down by light adhesive and solder. If not cautious it will come off the motherboard. Very time consuming to be repaired. Do not break it in the first place. Motherboard: small surface mount components can be easily damaged if they are nicked by the spudger. Always take your time and never touch the surface of the motherboard.


9 STEP 1 Disassemble the device Tools: Pentalobe screwdriver Remove the battery by holding battery release button (located on the bottom left side of the device) and pull the bottom of device from the phone. This will expose the battery.


 Philips")

10 STEP 2 Tools: Isesamo Next, remove the sim card by using sim card remover. The sim card is located on the right side of the device. Remove the two (2) Philips screws located on the bottom portion of the phone exposed after removing the battery.


11 STEP 3 Tools: Philips screwdriver, spudger Once those two screws are removed we can now lift open the glass display from the metal frame. This will require you to slide the pry tool all the way around the frame and flex up and in to separate. Take the isesamo or painters knife take the tip of tool and slide it in between the glass and frame of phone. Flex the tool up from left to right to separate. Might have to push in with tool as you separate. It s helpful to slide guitar picks or plastic cards between the areas that are already lifted so it doesn t adhere or snap into place again.


12 STEP 4 Tools: Spudger, fingers The display should be separated at this point. Then begin disconnecting all cables holding down the motherboard. The lcd flex cable can be disconnected. Followed by unscrewing and removing the six (6) Philips screws.


13 STEP 5 Tools: spudger After releasing all components attached to the motherboard you will be able to pull the motherboard off of the frame. Put motherboard to the side in a safe area. Use flat end of spudger to remove back camera.


14 STEP 6 Tools: Philips screwdriver, spudger Next, use your pry tool to lift the screen off the frame so you will be able to put replacement part on the frame. Slide the pry tool in between plastic black frame and the glass. Try to get underneath the lcd as well. Might want to heat for 5 to 6 seconds around frame one time to help separate the adhesive. If so, Make sure to move heat gun in a constant motion. Make sure to peel Digitizer/lcd cables up off the frame using flat end of


15 STEP 6 Tools: Philips screwdriver, spudger Next, you will want to remove the ear speaker. New full assembly G5 parts come with the housing and lcd all together. Because of that the only the camera and ear speaker will need to be transferred over to the new assembly from the old.

16 STEP 1 Reassemble of device Assuming you are using the full assembly part you will have to transfer a few components over to new part. First, transfer over the camera and ear speaker. Tools: Philips screwdriver, spudger


 Philips screws at the bottom of the")
17 STEP 2 Reassemble of Device Tools: Philips screwdriver, spudger The components are transferred over so it is now time for reassembly. Place the motherboard into the replacement part frame. After that is in place reconnect the flex cables. Then take the display and place it into the back part of the phone this may require you to use a isesamo to slide the side of the display into place starting at the top of the device. Once it is positioned and laying flush, screw in the two (2) Philips screws at the bottom of the display. Slide the battery into the phone and power on. Put sim card back into the phone.

18 STEP 3 Reassemble the device Tools: Pentalobe screwdriver Do Post test actions.
19 STEP 4 Troubleshooting If you notice the charger won t snap all the way into the connector most likely the charging port isn t all the way in. This will result in you opening the phone back up and adjusting the port push all the way in. If it does not charger at all make sure the flex cable is connected to motherboard properly. Now, if the replacement part doesn t work at all possibly be defective try a new part.

20 C O N T A C T REPAIR TRAINING Riana Soto x400 rsoto@cellairis.com
Galaxy Note 5 Glass/Lcd REPAIR GUIDE. Version Edition
 Galaxy Note 5 Glass/Lcd REPAIR GUIDE Version 1 2016 Edition Samsung Galaxy Note 5 Glass/LCd REPAIR GUIDE RiAna Soto Repair Training Specialist rsoto@cellairis.com FOR EVERY REPAIR MAKE SURE TO COMPLETE,
Written By: Andrew Optimus Goldberg
 Remove the logic board from your iphone 5 Written By: Andrew Optimus Goldberg ifixit CC BY-NC-SA www.ifixit.com Page 1 of 27 INTRODUCTION Resurrect your iphone 5 with a new logic board. TOOLS: P2 Pentalobe
Written By: Evan Noronha
 iphone 6s Battery Replacement Replace the battery in an iphone 6s. Written By: Evan Noronha ifixit CC BY-NC-SA www.ifixit.com Page 1 of 18 INTRODUCTION Use this guide to bring life back to your iphone
iphone 5s Front Panel Replacement
 iphone 5s Front Panel Replacement Replace the cracked or broken screen on your iphone 5s. Note: DIY at your own risk. New beginner must be careful, screens got problems mostly due to wrong installation
Written By: Sam Lionheart
 iphone SE Battery Replacement Replace the battery in your iphone SE. Written By: Sam Lionheart ifixit CC BY-NC-SA www.ifixit.com Page 1 of 24 INTRODUCTION Use this guide to bring life back to an iphone
Written By: Sam Lionheart
 iphone 5s Front Panel Replacement Replace the cracked or broken screen on your iphone 5s. Written By: Sam Lionheart ifixit CC BY-NC-SA www.ifixit.com Page 1 of 33 INTRODUCTION For an easier repair, use
Written By: Evan Noronha
 iphone 6s Plus Battery Replacement Replace the battery in an iphone 6s Plus. Written By: Evan Noronha ifixit CC BY-NC-SA www.ifixit.com Page 1 of 18 INTRODUCTION Use this guide to bring life back to your
Written By: Sam Lionheart
 iphone 5s Battery Replacement Replace the battery in your iphone 5s. Written By: Sam Lionheart ifixit CC BY-NC-SA www.ifixit.com Page 1 of 23 INTRODUCTION Use this guide to bring life back to your iphone
Written By: Sam Lionheart
 iphone 5s Volume Controls Replacement Replace the volume buttons and ringer switch in your iphone 5s. Written By: Sam Lionheart ifixit CC BY-NC-SA www.ifixit.com Page 1 of 26 INTRODUCTION Use this guide
ipod Touch 5th Generation Display Assembly Replacement
 ipod Touch 5th Generation Display Assembly Replacement Remove the display assembly from your ipod Touch 5th Generation. Written By: Andrew Optimus Goldberg ifixit CC BY-NC-SA www.ifixit.com Page 1 of 23
Written By: Arthur Shi
 iphone 5 Speaker Enclosure Replacement Remove the speaker enclosure from the bottom of your iphone 5 Written By: Arthur Shi ifixit CC BY-NC-SA www.ifixit.com Page 1 of 17 INTRODUCTION Bring back the beats
iphone 5c Lightning Connector Assembly Replacement
 iphone 5c Lightning Connector Assembly Replacement Replace the Lightning connector assembly in your iphone 5c. Written By: Andrew Optimus Goldberg ifixit CC BY-NC-SA www.ifixit.com Page 1 of 28 INTRODUCTION
Written By: Walter Galan
 iphone 6 Battery Replacement Replace the battery in your iphone 6. Written By: Walter Galan ifixit CC BY-NC-SA www.ifixit.com Page 1 of 20 INTRODUCTION Use this guide to bring life back to your iphone
iphone 6s Plus Volume Control Cable Replacement
 iphone 6s Plus Volume Control Cable Replacement Replace the volume control flex cable in your iphone 6s Plus. Написал: Dante Mazzanti ifixit CC BY-NC-SA ru.ifixit.com Ð Ñ Ñ Ð Ð½Ð Ñ Ð 1 Ð Ð 23 ВВЕДЕНИЕ
iphone 5s Upper Component Cable Replacement
 iphone 5s Upper Component Cable Replacement Use this guide to replace the upper component cable containing the flash, microphone and sleep/power button cable. Written By: Sam Lionheart ifixit CC BY-NC-SA
Written By: Arthur Shi
 Google Pixel XL Battery Replacement A guide showing how to replace a non-functional battery in the Google Pixel XL. Written By: Arthur Shi ifixit CC BY-NC-SA www.ifixit.com Page 1 of 21 INTRODUCTION Follow
Written By: Tarun. This guide shows how to remove and replace the battery. AirPort Extreme A1521 Battery Replacement
 This guide shows how to remove and replace the battery. Written By: Tarun ifixit CC BY-NC-SA www.ifixit.com Page 1 of 7 INTRODUCTION The battery gives the device enough power to save the settings when
Written By: Paige Reisman
 iphone 7 Battery Replacement Replace the battery in an iphone 7. Written By: Paige Reisman ifixit CC BY-NC-SA www.ifixit.com Page 1 of 19 INTRODUCTION Use this guide to bring life back to your iphone 7
Написал: Sam Lionheart
 iphone 6 Volume Control Cable Replacement Replace the volume control switches in an iphone 6. Написал: Sam Lionheart ifixit CC BY-NC-SA ru.ifixit.com Ð Ñ Ñ Ð Ð½Ð Ñ Ð 1 Ð Ð 24 ВВЕДЕНИЕ Use this guide to
Written By: Jeff Suovanen
 iphone 6s Display Assembly Replacement Replace the entire display assembly on your iphone 6s. Written By: Jeff Suovanen ifixit CC BY-NC-SA www.ifixit.com Page 1 of 19 INTRODUCTION Use this guide if your
Written By: Sam Lionheart
 iphone 6 LCD Shield Plate Replacement Replace the LCD shield plate in an iphone 6. Written By: Sam Lionheart ifixit CC BY-NC-SA www.ifixit.com Page 1 of 20 INTRODUCTION Use this guide to remove or replace
Geschreven door: Walter Galan
 Replacing the battery in your iphone 6 is something you can do yourself with a few tools. Geschreven door: Walter Galan ifixit CC BY-NC-SA nl.ifixit.com Pagina 1 van 20 INTRODUCTIE Bring life back to your
Motorola Moto Z Force Droid Battery
 Motorola Moto Z Force Droid Battery Replacement Replace a dead or faulty battery in the Motorola Moto Z Force Droid. Written By: Kenji Fong ifixit CC BY-NC-SA www.ifixit.com Page 1 of 16 INTRODUCTION Use
Written By: pollytintop
 Repairing iphone Liquid Damage This guide helps assess damage to an iphone that has been submerged or splashed with a liquid, and suggest methods to prevent further damage and corrosion. Written By: pollytintop
Written By: Walter Galan
 Replace the battery in your iphone 5c. Written By: Walter Galan ifixit CC BY-NC-SA www.ifixit.com Page 1 of 21 INTRODUCTION Power draining too quickly? Won't hold a charge like it used to? Use this guide
Escrito por: Walter Galan
 Replace the battery in your iphone 5c. Escrito por: Walter Galan ifixit CC BY-NC-SA es.ifixit.com Página 1 de 21 INTRODUCCIÓN Power draining too quickly? Won't hold a charge like it used to? Use this guide
Written By: Andrew Optimus Goldberg
 Remove the battery from your iphone 5. Written By: Andrew Optimus Goldberg ifixit CC BY-NC-SA www.ifixit.com Page 1 of 17 INTRODUCTION Bring life back to your iphone 5 with a new battery. If your battery
Written By: Arthur Shi
 Remove and replace a worn out battery in the ipad Pro 9.7". Written By: Arthur Shi ifixit CC BY-NC-SA www.ifixit.com Page 1 of 42 INTRODUCTION Follow this guide to remove and replace the battery for the
Written By: Sam Lionheart
 iphone 5c Speaker Replacement Use this guide to replace the speaker assembly in your iphone 5c. Written By: Sam Lionheart ifixit CC BY-NC-SA www.ifixit.com Page 1 of 18 INTRODUCTION Replace a broken speaker
Written By: Walter Galan
 Replace the battery on your iphone 4S. Written By: Walter Galan ifixit CC BY-NC-SA www.ifixit.com Page 1 of 10 INTRODUCTION Replacing the battery on the iphone 4S requires minimal disassembly. If your
Written By: Jake Devincenzi
 iphone 3GS Earpiece Speaker Replacement Replace your iphone 3GS's earpiece speaker. Written By: Jake Devincenzi ifixit CC BY-NC-SA www.ifixit.com Page 1 of 8 INTRODUCTION Has your ear speaker stopped working?
Написал: Sam Lionheart
 iphone 5c Home Button Replacement Replace the home button in your iphone 5c. Написал: Sam Lionheart ifixit CC BY-NC-SA ru.ifixit.com Ð Ñ Ñ Ð Ð½Ð Ñ Ð 1 Ð Ð 19 ВВЕДЕНИЕ Use this guide to replace the home
Written By: Andrew Optimus Goldberg
 iphone 5 LCD Shield Plate Replacement Replace the LCD shield plate on your iphone 5. Written By: Andrew Optimus Goldberg ifixit CC BY-NC-SA www.ifixit.com Page 1 of 16 INTRODUCTION Use this guide to replace
Signal Mirror Installation Instructions
 Signal Mirror Installation Instructions Ford F-250 to F-750 Pick-Up, Super-Duty 1998-2007 Trailer Tow Mirror Ford Excursion XLT/Limited 2000-2002 Trailer Tow Mirror Ford Excursion (all models) 2003-2005
MacBook Pro 15" Core 2 Duo Model A1211 Front Display Bezel Replacement
 MacBook Pro 15" Core 2 Duo Model A1211 Front Display Bezel Replacement Written By: Ben Eisenman ifixit CC BY-NC-SA www.ifixit.com Page 1 of 25 INTRODUCTION Use this guide to replace a damaged front display
MacBook Pro 13" Unibody Mid 2009 LCD Replacement
 MacBook Pro 13" Unibody Mid 2009 LCD Replacement Written By: Walter Galan ifixit CC BY-NC-SA www.ifixit.com Page 1 of 25 INTRODUCTION Save money by replacing just the LCD rather than the whole display
MacBook Unibody Model A1342 Clutch Cover
 MacBook Unibody Model A1342 Clutch Cover Replacement Replace a damaged clutch cover. Scritto Da: Andrew Bookholt ifixit CC BY-NC-SA it.ifixit.com Pagina 1 di 16 INTRODUZIONE Remove the clutch cover to
Xbox One Wireless Controller Model 1708
 Xbox One Wireless Controller Model 1708 Button Replacement This guide will teach you how to access and replace the Front Buttons on your Xbox One Wireless Controller Model 1708. Written By: Dylan Gross
Xbox One Elite Controller (Model 1698) Buttons Replacement
 Buttons Replacement") Xbox One Elite Controller (Model 1698) Buttons Replacement A guide to help you replace the buttons on the Xbox One Elite Wireless Controller. Written By: Cara Steinke ifixit CC BY-NC-SA www.ifixit.com
Xbox One Elite Controller (Model 1698) Buttons Replacement A guide to help you replace the buttons on the Xbox One Elite Wireless Controller. Written By: Cara Steinke ifixit CC BY-NC-SA www.ifixit.com
MacBook Pro 15" Unibody Late 2008 and Early 2009 Display Data Cable Replacement
 MacBook Pro 15" Unibody Late 2008 and Early 2009 Display Data Cable Replacement Replace the display data cable in you MacBook Pro 15" Unibody Late 2008 and Early 2009. Written By: Walter Galan ifixit CC
MacBook Unibody Model A1278 LVDS Display Cable Replacement
 MacBook Unibody Model A1278 LVDS Display Cable Replacement Replace the LVDS display cable in your MacBook Unibody Model A1278. Written By: Walter Galan ifixit CC BY-NC-SA www.ifixit.com Page 1 of 28 INTRODUCTION
Tutorial:Head Unit Installation
 Tutorial:Head Unit Installation From Tech Wiki : Nissan 350Z : Infiniti G35 : Nissan GT-R Here, I installed the Kenwood DDX7015 touch screen DVD system. I made this step-by-step tutorial to help those
Written By: Walter Galan
 ipad Wi-Fi Battery Replacement Replace your ipad Wi-Fi's internal lithium battery. Written By: Walter Galan ifixit CC BY-NC-SA www.ifixit.com Page 1 of 16 INTRODUCTION Use this guide to replace your ipad's
PowerBook G4 Aluminum 17" GHz Clutch Hinges Replacement
 PowerBook G4 Aluminum 17" 1-1.67 GHz Clutch Hinges Replacement Written By: Andrew Bookholt ifixit CC BY-NC-SA www.ifixit.com Page 1 of 20 INTRODUCTION Replacing the clutch hinges also provides a new attached
Athearn Pacific Digital Sound Decoder Installation Notes
 New Dimensions in Digital Sound Technology TM APPLICATION NOTE Overview This application note describes how to install a DSD-100LC Digital Sound Decoder into the Athearn Pacific Locomotive. All of the
Tru-Billet Climate Control Knob Installation Instructions
 P/N S197-525-07 2007-08 Tru-Billet Climate Control Knob Installation Instructions Thank you for your purchase of SilverHorse Racing products. Please read all directions before beginning the installation.
Z-Truck (Vertical Moving) Z-truck Flag. Y-Truck (Horizontal Moving) FIGURE 1: VIEW OF THE Z-TRUCK. Flexshaft Assembly
 Z-truck Flag. Y-Truck (Horizontal Moving) FIGURE 1: VIEW OF THE Z-TRUCK. Flexshaft Assembly") Checking and Replacing the AC Motor To remove and replace the AC Motor you will need the following tools: #2 Phillips screwdriver (magnetic tip preferred) Removing the AC Motor 1. Ready the machine by
Checking and Replacing the AC Motor To remove and replace the AC Motor you will need the following tools: #2 Phillips screwdriver (magnetic tip preferred) Removing the AC Motor 1. Ready the machine by
5 Removal and replacement
 5 Removal and replacement This chapter describes the removal and replacement of field-replaceable units (FRUs) only. Removal and replacement strategy User-replaceable parts Covers Internal assemblies ENWW
INSTALLATION INSTRUCTIONS INFINITI CELLPORT UNIVERSAL HANDS FREE SYSTEM
 INSTALLATION INSTRUCTIONS 1. DESCRIPTION: INFINITI CELLPORT UNIVERSAL HANDS FREE SYSTEM 2. APPLICATION: 2002 Q45 3. PART NUMBER: 948T3CELLR95 (VPC) or 999Q2TN000 (PDC) 4. TOOLS REQUIRED: a. Loctite 242
Remove the 3-11mm nuts holding mirror on. Don t drop the nuts!
 2005-2012 Ford Mustang Puddle Lamp Kit Parts List: Quantity: Tool List: LED Lamps 2 Flat head screwdriver Seals 2 Ratchet & Socket set OR Nuts 2 Adjustable Wrench Wiring harness 1 Drill & 11/16 th bit
ALU-29CF Portable Light NSN:
 ALU-29CF Portable Light NSN: 6520-01-446-4170 COMMAND l AIR OPERATION / MAINTENANCE MANUAL & PARTS LIST TABLE OF CONTENTS Introduction................................................................3 Purpose.............................................................3
Carousel Unit User Manual Replacing the Check Stand Motor
 Carousel Unit User Manual Replacing the Check Stand Motor 02/01/2017 1 Table of Contents Tools:... 3 Turn Off Power to the Unit:... 4 Remove Power Switch... 5 Remove Electric Eyes:... 6 Remove POS (Point-Of-Sale)
MacBook Unibody Model A1278 LCD Panel Replacement
 MacBook Unibody Model A1278 LCD Panel Replacement Escrito por: Walter Galan ifixit CC BY-NC-SA es.ifixit.com Página 1 de 27 INTRODUCCIÓN Save money by replacing just the LCD rather than the whole display
SSUTAYU15. Designed for 2015 and newer Chevrolet Tahoe/Suburban and GMC Yukon/Yukon XL vehicles
 SSUTAYU15 Designed for 2015 and newer Chevrolet Tahoe/Suburban and GMC Yukon/Yukon XL vehicles Subwoofer Assembly Subwoofer Harness Subwoofer Power Harness 2018 Stillwater Designs SSUTAYU15-20180313 Wire
Second Stage Regulator - 1/4 Turn
 Second Stage Regulator - 1/4 Turn MAINTENANCE AND REPAIR TAL 806 (L) Rev. 6 MSA 2008 Prnt. Spec. 10000005389 (I) Mat. 10042827 Doc. 10000015245 1/4 TURN SECOND STAGE REGULATOR SECOND STAGE REGULATOR COMPONENTS
ipad Air 2 Wi-Fi Home Button Assembly Replacement
 ipad Air 2 Wi-Fi Home Button Assembly Replacement Replace the home button assembly, including the TouchID sensor, in your ipad Air 2 Wi-Fi. Written By: Evan Noronha ifixit CC BY-NC-SA www.ifixit.com Page
Instructions for Front Midrange / Tweeter Installation in BMW 3 Series/M3 (E36)
") Disclaimer: Bavarian Soundwerks highly recommends professional installation of the products we sell. We provide these installation instructions free of charge as a guide to assist those customers who choose
Disclaimer: Bavarian Soundwerks highly recommends professional installation of the products we sell. We provide these installation instructions free of charge as a guide to assist those customers who choose
MacBook Pro 15" Core 2 Duo Models A1226 and A1260 Antenna Cables Replacement
 MacBook Pro 15" Core 2 Duo Models A1226 and A1260 Antenna Cables Replacement Written By: Walter Galan ifixit CC BY-NC-SA www.ifixit.com Page 1 of 25 INTRODUCTION Use this guide to replace your MacBook's
Firehawk Second Stage Regulator Fire Service
 Firehawk Second Stage Regulator Fire Service MAINTENANCE AND REPAIR TAL 1701 (L) Rev. 2 MSA 2017 Prnt. Spec. 10000005389(I) Mat. 10147454 Doc. 10147454 TAL 1701 (L) Rev. 2-10147454 2 NON-CBRN FIREHAWK
How to remove and replace the Foonf/Fllo fabric
 How to remove and replace the Foonf/Fllo fabric Remove Headrest Locate the Troubleshooting Tool behind the manual on the back of the car seat, as shown in Figure 1. Raise Headrest to highest position by
* * APPLICABLE MODELS: 2017 > CX-5
 PART NUMBER: 0000 8C R06(DIO) / 0000 89 R28(PIO) GENUINE ACCESSORIES INSTALLATION INSTRUCTIONS Rev. AAA *550-0681-000* APPLICABLE MODELS: 2017 > CX-5 REQUIRED COMPONENTS: ITEM QTY DESCRIPTION Usage Chart
Changing Sleeves Twist and pull to remove the sleeve from the nozzle. Slide on a new sleeve so that it completely covers the barb and the nozzle.
 SE846-V AMEU Shure Earphones Sound Isolating Earphones Shure Sound Isolating Earphones, built with balanced armature speakers, deliver a detailed soundstage free from outside noise. The powerful and stylish
GoCartVac Service Manual
 GoCartVac Service Manual Table of Contents ATTENTION Before servicing any part or proceeding with any repair procedure on any ProTeam vacuum, ALWAYS disconnect the vacuum from the power source. Battery
BMW X5 Customer Service Guide. 6V BMW X5 (5F60E99) Customer Service Guide
 Customer Service Guide") 6V BMW X5 (5F60E99) Customer Service Guide 1 TABLE OF CONTENTS 1. Battery Connection...3-5 2. Steering Wheel & Sound Troubleshooting...6-7 3/4. Wiring & Sound Troubleshooting...8-12 5. Foot Pedal Troubleshooting...13-14
6V BMW X5 (5F60E99) Customer Service Guide 1 TABLE OF CONTENTS 1. Battery Connection...3-5 2. Steering Wheel & Sound Troubleshooting...6-7 3/4. Wiring & Sound Troubleshooting...8-12 5. Foot Pedal Troubleshooting...13-14
Oreck Magnesium Series Service Manual. The Oreck Manufacturing Company
 Oreck Magnesium Series Service Manual The Oreck Manufacturing Company 08/2012 10/2011 The Oreck Manufacturing Company Contents Covering all Magnesium Upright Models Including: LW100, LW125, LW1000, AND
Written By: Andrew Bookholt
 ipad Wi-Fi Ambient Light Sensor Replacement ipad Wi-Fi Ambient Light Sensor Replacement Written By: Andrew Bookholt ifixit CC BY-NC-SA www.ifixit.com Page 1 of 9 INTRODUCTION Use this guide to replace
INSTALLATION INSTRUCTIONS REPAIR SEAL KIT PowerSurvivor 40E
 INSTALLATION INSTRUCTIONS REPAIR SEAL KIT PowerSurvivor 40E PURPOSE OF THE KIT The Repair Seal Kit should be installed after 1000 hours of operation. It should be installed regardless of whether or not
DISPLACEMENT PUMP INSTRUCTIONS-PARTS LIST Rev. K. Model , Series A Model , Series B Model , Series A
 INSTRUCTIONS-PARTS LIST INSTRUCTIONS This manual contains important warnings and information. READ AND KEEP FOR REFERENCE. DISPLACEMENT PUMP 308190 Rev. K 3000 psi (210 bar) MAXIMUM WORKING PRESSURE Model
P-600. Technical Manual. Troubleshooting Repairs Replacements
 P-600 Technical Manual Troubleshooting Repairs Replacements Table of Contents P-600 Lift Symptoms and Problems Finding the Problem Before Getting Inside 3 Pneumatic Systems 4 Electrical Systems 5 Mechanical
CONSTANT TENSION KIT UNINSTALLING
 CONSTANT TENSION KIT UNINSTALLING Restoration of the Capstan Servo PWA Remove the piggyback board, and de-solder the six wires which connect it to the Capstan Servo PWA. Restoration of the Transport Control
ibook G3 12" Clutch Cover Replacement
 Redigido por: Ben Eisenman ifixit CC BY-NC-SA pt.ifixit.com Página 1 de 32 INTRODUÇÃO Use this guide to replace a damaged cosmetic clutch cover. FERRAMENTAS: 1.5mm Hex Screwdriver (1) Coin (1) Phillips
3 Scotch-Weld. User s Manual. Polyurethane Reactive (PUR) Easy Adhesive Applicator
 Easy Adhesive Applicator") 3 Scotch-Weld Polyurethane Reactive (PUR) Easy Adhesive Applicator 120V. USA 100V. JAPAN 120V. USA REFURB User s Manual Use only with 3M Scotch-Weld Polyurethane Reactive (PUR) Easy Adhesives Please read
3 Scotch-Weld Polyurethane Reactive (PUR) Easy Adhesive Applicator 120V. USA 100V. JAPAN 120V. USA REFURB User s Manual Use only with 3M Scotch-Weld Polyurethane Reactive (PUR) Easy Adhesives Please read
1200W CaR PoliSheR en RS4900
 1200W Car Polisher RS4900 RS4900 8 1 2 7 3 4 5 6 A B flat nozzle C D E F 1200W Car Polisher RS4900 G H flat nozzle I J K L 4 1200W Car Polisher COMPONT LIST 1 2 3 4 5 6 7 Variable speed control Switch
FD Conveyor for FD 260 Tabber
 FD 260-20 Conveyor for FD 260 Tabber Operator Manual 1/2011 First Edition TABLE OF CONTENTS 1. INTRODUCTION... 1 1.1 FD 260-20 DESCRIPTION... 1 1.2 ITEMS INCLUDED... 1 1.3 OPERATING MANUAL SAFETY TERMS...
Model TC-20. Tube Cut-Off Machine. Operator s Manual REV H
 Model TC-20 Tube Cut-Off Machine Operator s Manual 90-2333 REV H Scientific Systems, Inc. 349 N. Science Park Road State College, PA 16803 www.ssihplc.com Phone: 800-441-4752 Fax: 814-238-7532 Email: sales@ssihplc.com
AirTMCordless HANDHELD
 AirTMCordless HANDHELD PERFECT FOR QUICK SPILLS AND SPOT CLEANING LET S GET STARTED. H85-ACH-B H85-ACH-BD H85-ACH-BA Let s talk safety Basic safety precautions This handheld cleaner is intended for household
30,000mWh LITHIUM-POLYMER CAR JUMP STARTER USER S MANUAL PLEASE READ THIS MANUAL CAREFULLY BEFORE OPERATION
 Lithium Battery Disposal: This product contains a lithium battery. A lithium battery should not be thrown away in the trash. Please dispose of the battery at an authorized disposal or recycle center. Check
EXT DUCTLESS FUME HOOD
 EXT DUCTLESS FUME HOOD POLYPROPYLENE Installation and Operations Manual EXT DUCTLESS FUME HOOD Installation and Operations Manual Revision: 1-Feb-16 Page 2 of 12 EXT DUCTLESS FUME HOOD Installation and
Installation Guide. Kennedy Technology Group, Inc.
 Installation Guide Harley-Davidson Amp Module - Base Kit Kennedy Technology Group, Inc. 614 Ridgeway, Rose Hill, Kansas 67133 - USA voice 316.776.1111 fax 316.776.9035 email:kennedy@cellset.com www.cellset.com
Iso-Flo Coupling Repair
 Instruction Sheet P/N 229782C Iso-Flo Coupling Repair Introduction This instruction sheet covers the repair of the male and female couplings used in the Automatic and Manual Iso-Flo HD Voltage Block Systems,
EXT HEPA/CARBON FUME HOOD
 EXT HEPA/CARBON FUME HOOD POLYPROPYLENE Installation and Operations Manual EXT HEPA/CARBON FUME HOOD Installation and Operations Manual Revision: 28-Jun-18 Page 2 of 12 EXT HEPA/CARBON FUME HOOD Installation
ADF pickup roller assembly
 ADF pickup roller assembly 1. Open the ADF cover. 2. Disconnect one spring (callout 1). Figure 6-15 Remove the ADF pickup roller assembly (1 of 2) 1 3. Lift up on the end of the assembly, and then slide
OWNER'S MANUAL. Review this manual before operating your PRESTIGE PRO Powerhead P/N /17
 OWNER'S MANUAL Review this manual before operating your PRESTIGE PRO Powerhead P/N 80255 11/17 PRESTIGE PRO POWERHEAD TABLE OF CONTENTS: SUBJECT PAGE Safety Instructions...3 Using your Prestige Pro Powerhead
CONTENT. User manual. Building the 3Dsimo KIT. First start. Filament usage and filament change
 MANUAL CONTENT User manual Building the 3Dsimo KIT First start Filament usage and filament change 4 6 18 22 USER MANUAL ٱٱ ٱٱ ٱٱ ٱٱ ٱٱ ٱٱ You have obtained multimaterial building kit, the 3Dsimo KIT.
Mini Cooper Mini Cooper. Vehicle Type: Two-Door Hatchback. Windshield. AutoGlass Field Guide 53
 Vehicle Type: Two-Door Hatchback NAGS number:* FW02305GTY (Heat) (Rain Sensor) or FW02304GTY. Original-equipment-manufacturer part numbers are 51311505850 (Heat) (Rain Sensor), or 51311505875. FD21652-53
Installation Instructions
 Preparing your vehicle to install your brake system upgrade 1. Rack the vehicle. 2. If you don t have a rack, then you must take extra safety precautions. 3. Choose a firmly packed and level ground to
TOYOTA TACOMA EC REARVIEW MIRROR Preparation
 Preparation Part Number: PT374-35052 Kit Contents Item # Quantity Reqd. Description 1 1 AD Mirror Assembly 2 1 Hardware bag Hardware Bag Contents Item # Quantity Reqd. Description 1 1 T-tap Connectors,
COMPONENT WORK SAMPLE 15 Electrical Circuitry & Print Reading MAINTENANCE MANUAL
 COMPONENT WORK SAMPLE 15 Electrical Circuitry & Print Reading MAINTENANCE MANUAL TABLE OF CONTENTS SECTION TITLE PAGE 1A CHECKING THE BATTERIES, METER AND PROBES... 1 1B SECTION A: CHECKING THE COUNTER...
Removing and Reinstalling a Circuit Board
 Removing and Reinstalling a Circuit Board Written By: Mary Poppins 2017 boxzy.dozuki.com Page 1 of 7 Step 1 Removing Cover and Disconnecting Fan The circuit board is located beneath the fan cover on the
ELECRAFT KX3 Application Note
 ELECRAFT KX3 Application Note Installing the Speaker Grille Cloth Revision A, July 30, 2012 Copyright 2012, Elecraft, Inc., All Rights Reserved Background Some KX3 owners have reported issues with the
PT 709 firing pin and extractor removal. Disclaimer: My Taurus manual says not to take this apart (just flush it with cleaner).
.") PT 709 firing pin and extractor removal. Disclaimer: My Taurus manual says not to take this apart (just flush it with cleaner). But several list members have done this without ill effect. So here goes:
PT 709 firing pin and extractor removal. Disclaimer: My Taurus manual says not to take this apart (just flush it with cleaner). But several list members have done this without ill effect. So here goes:
INSTALL/REMOVAL INSTRUCTIONS: WINDOW LIFT MOTOR
 REMOVAL/INSTALL OF WINDOW REGULATOR (742-269) Ford Mustang 1996 2004 General Tech Tips: Use painter s tape rather than duct tape to secure window. It will not damage paint or leave sticky residue. A plastic
2007 Toyota FJ Cruiser By Gilbert R. Gutierrez
 2007 Toyota FJ Cruiser By Gilbert R. Gutierrez Vehicle information Vehicle type: Four-door utility vehicle NAGS numbers*: Windshield part number FW02652GTY; front door glass FD23053-54GTY R-L; rear door
Trouble Shooting Guide for Hubbell Systems
 Trouble Shooting Guide for Hubbell Systems NOTE: Hubbell Special Products discontinued operations in 2008, so there is a very limited number of repair parts available for motor repair. In some ways, this
PRODUCT MANUAL Gecko Wireless One Zone LED Dimmer and Receiver
 Product Description The Gecko Wireless One Zone Wall LED Dimmer has been designed to bring light control easily. No wires or switch box locations are needed, just stick or mount the Gecko to any flat location
SOLUTION STATION Instruction Manual
 SOLUTION STATION Instruction Manual WAXIE Sanitary Supply 9353 WAXIE Way San Diego, CA 92123 Phone: 800.995.4466 www.waxie.com TABLE OF CONTENTS Unpacking Instructions Disclaimer..... Warranty... Introduction...
* * APPLICABLE MODELS: 2014 > Mazda 3
 PART NUMBER: 0000 8C L48 (DIO) / 0000 89 L84 (PIO) GENUINE ACCESSORIES INSTALLATION INSTRUCTIONS Rev. AAA *550-0700-000* APPLICABLE MODELS: 2014 > Mazda 3 REQUIRED COMPONENTS: ITEM QTY DESCRIPTION Usage
THIS GUIDE IS INTENDED FOR DEALERS AND SOLAR COMFORT TECHNICIANS ONLY AND IS NOT MEANT OR INTENDED TO BE REPRODUCED OR DISTRIBUTED TO THE CONSUMER
 THIS GUIDE IS INTENDED FOR DEALERS AND SOLAR COMFORT TECHNICIANS ONLY AND IS NOT MEANT OR INTENDED TO BE REPRODUCED OR DISTRIBUTED TO THE CONSUMER Table of Contents Page Tools Needed (A) 3 Replacement
AOYUE INT. Advanced Repairing System NT 701A++ INSTRUCTION MANUAL
 AOYUE NT 701A++ INT Advanced Repairing System INSTRUCTION MANUAL Thank you for purchasing Aoyue Int701A++ Repairing System. It is important to read the manual before using the equipment. Please keep manual
Installation. Tools. Single Handle Kitchen Faucet With Optional Spray. Maintenance. Safety Tips. Important Points. Need Help? For Model:
 Installation Tools - Basin Wrench - Adjustable Wrenches - Pipe Wrench - Screwdriver - Thread Seal Tape - Supply Lines - Protective Goggles - Silicone Sealant - Pliers - Soft Cloth For Model: 673-6809 Single