1. Find the entire rear e-brake/hub assembly of a 330 and transplant it, which is expensive and not worth it imo.
|
|
|
- Elinor Harmon
- 5 years ago
- Views:
Transcription

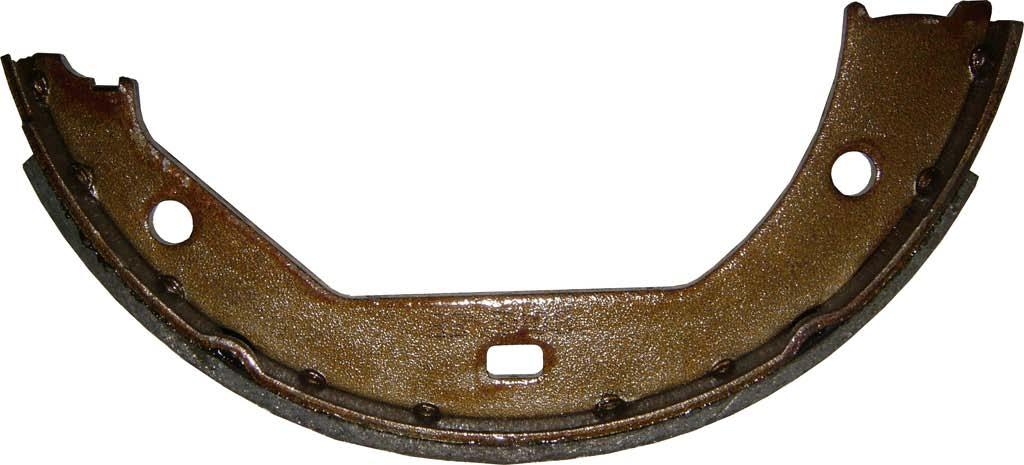
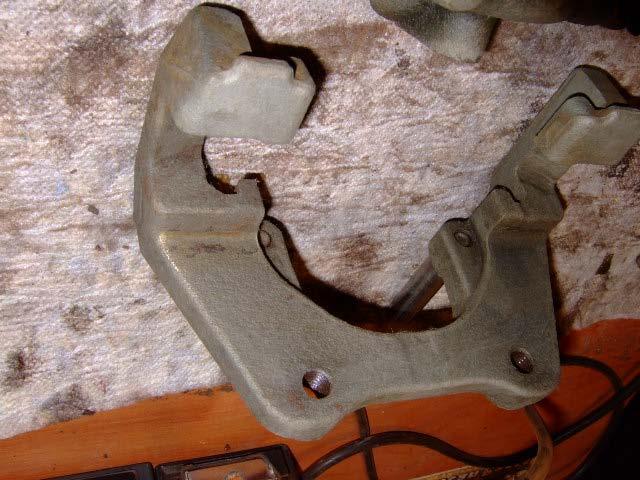
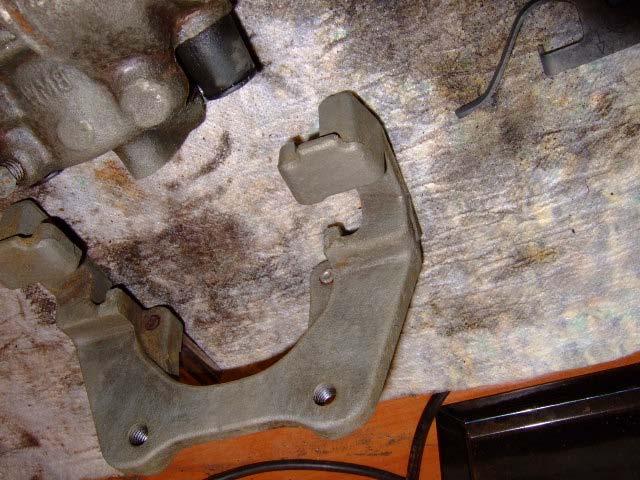
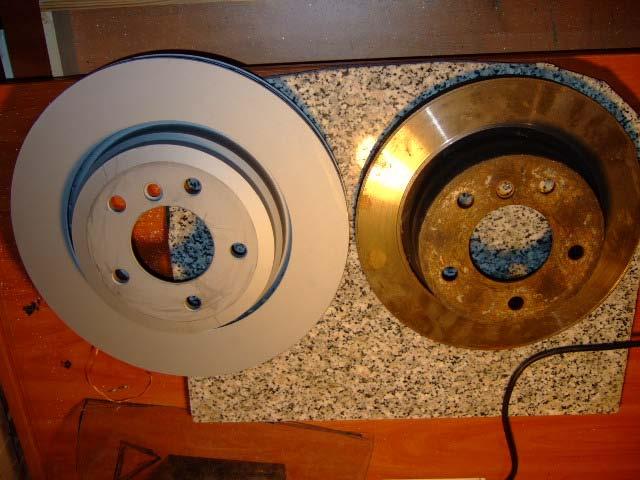
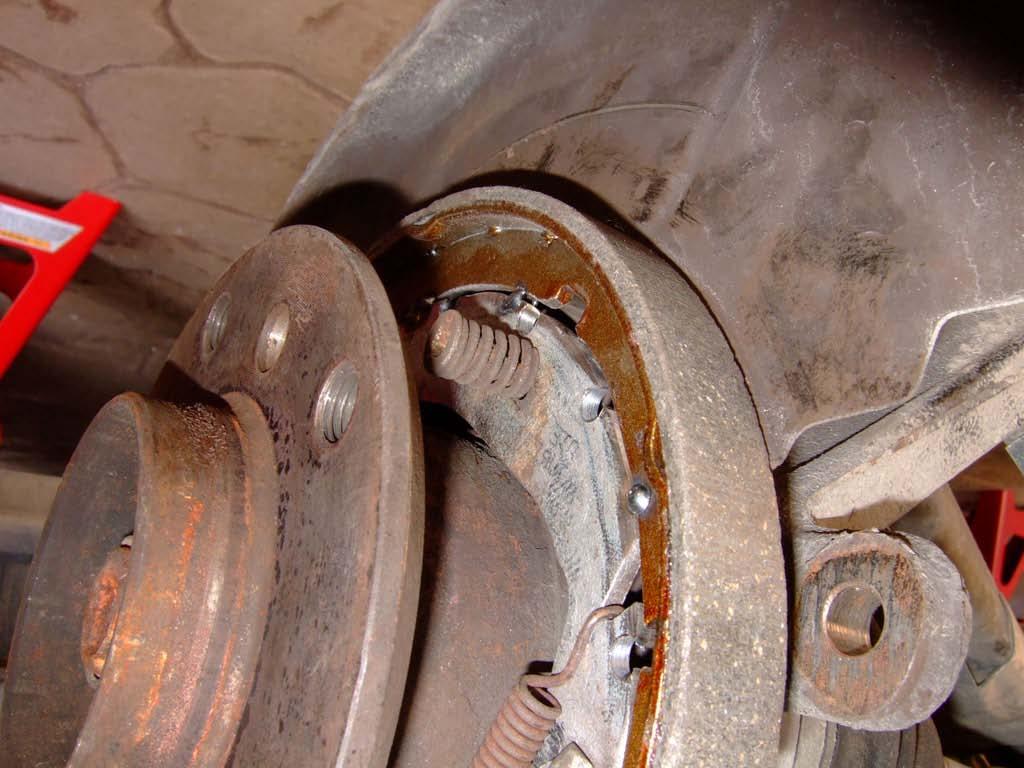
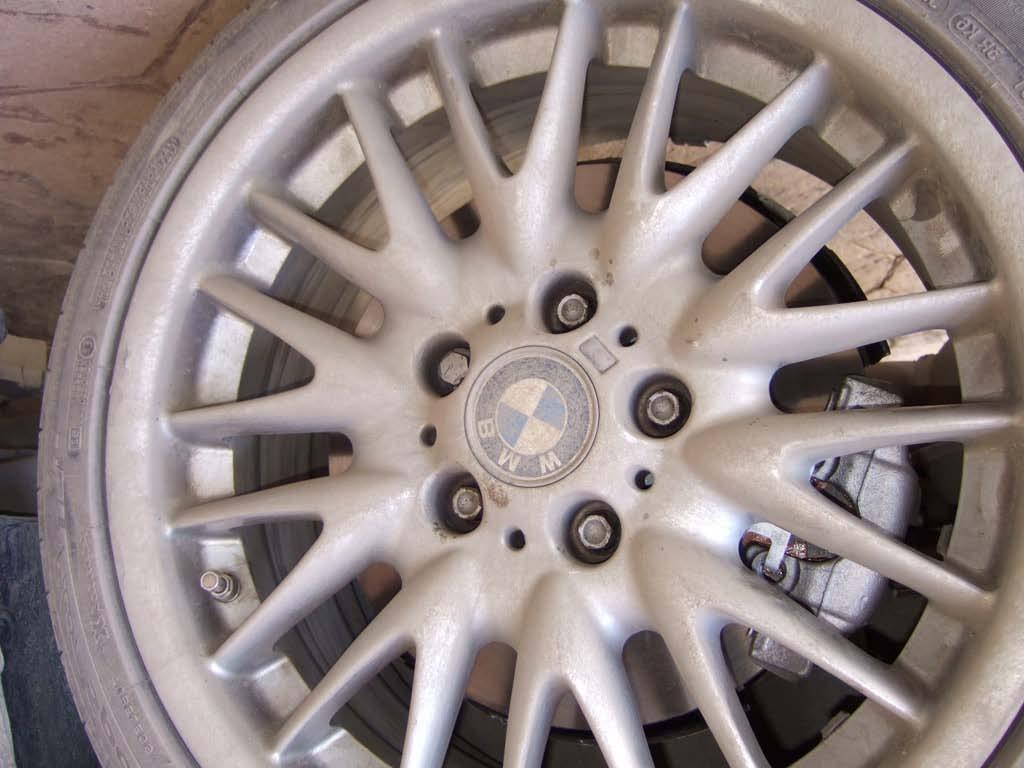
1 E Rear Brake Conversion DIY After completing the front brake conversion it was time for the rear ones. Good upgrade but no as simple or straightforward as the front one. Researching, I came to the conclusion that the only limitation for a direct bolt on upgrade, is the inner diameter of the 330 rotor, which is larger, requiring the e-brake assembly from a 330 to be transplanted to the lower model cars in order to work properly. There are 3 solutions available for this retrofit. 1. Find the entire rear e-brake/hub assembly of a 330 and transplant it, which is expensive and not worth it imo. 2. Fabricate a spacer and press it/weld it inside the 330 rotor to create a smaller drum diameter so that the original e-brake can work. Not good because it will add more weight to the already heavy rotor, it will throw rotor off balance, and each time a rotor will need replacing, a new spacer must be manufactured. Also, difference in materials used will probably create a problem with heat expansion. 3. Fabricate custom brake shoes, with the mounting base of a 320/23/25/28 and the proper length to reach the standard 330 rotor drum diameter. I chose to follow this method for the following reasons: a. I have access to laser cutting / waterjet equipment, and I will be able to manufacture the brake shoes with the proper dimensions. b. I have access to brake shoe manufacturer therefore I will have no problem making the design I want. c. Once the original design works, I will be able to fabricate virtually any kind of brake shoe, enabling anybody with a 320/25/28 to upgrade to rear 330 brake setup with the lowest cost. The advantage of this method is that, reversing to OEM will be as easy as just putting oem rotors back with oem brake shoes. This is the current 320 rear e-brake setup. The inner diameter is 160mm According to the measurement a fellow forum member took, the inner 330 diameter is 184mm =24mm (About an inch). So each brake shoe must increase by only 12mm to compensate for the rotor diameter increase. That's not too bad. Rear parking shoes below. Manufactured by Meyle. It seems that the shoe part is spot welded on the bracket I want to manufacture. Which

2 makes life much easier, as I will just create a bracket that will fit the 320 handbrake assembly and just weld the rest shoe on it. The 330 shoe is almost identical with the 320 one, so I think I will weld a piece of metal to the 330 shoe and grind until I get the correct size. Then I'll make the CAD prototype. 320 With cutout line

3 330 Compared:
4
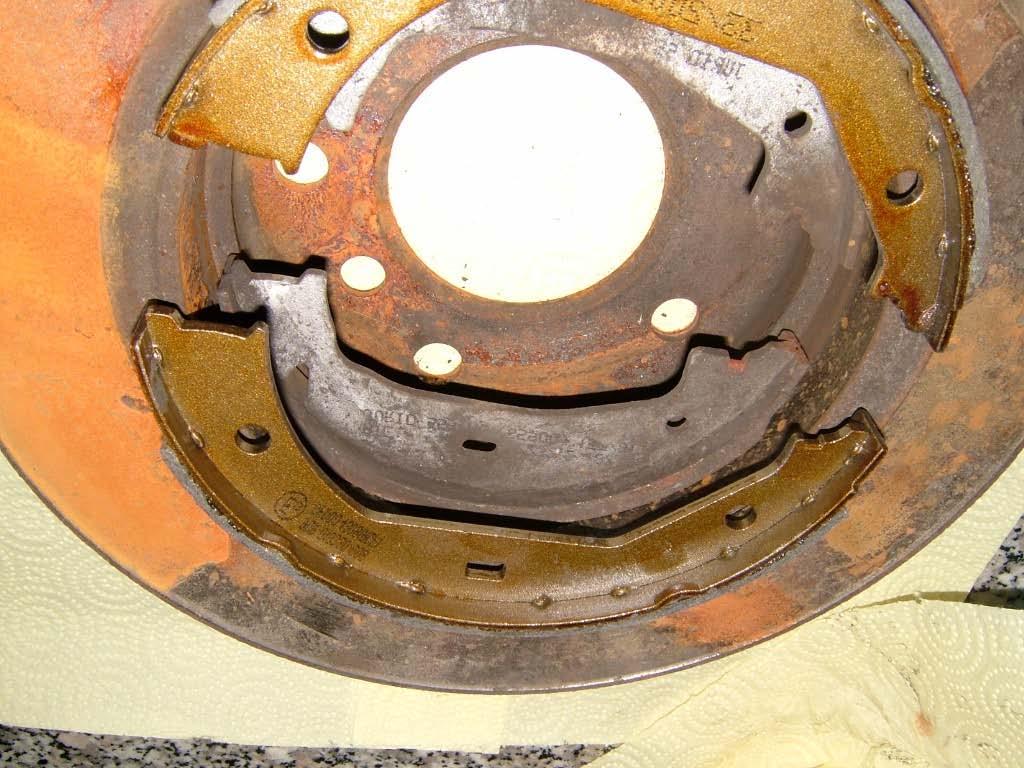
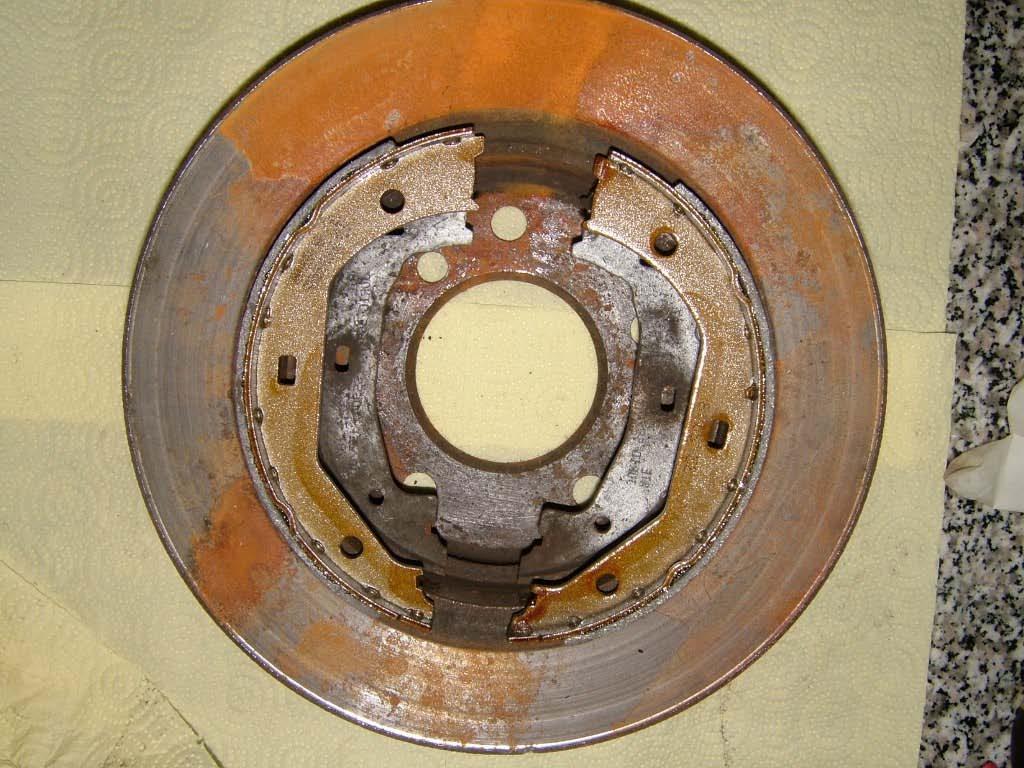
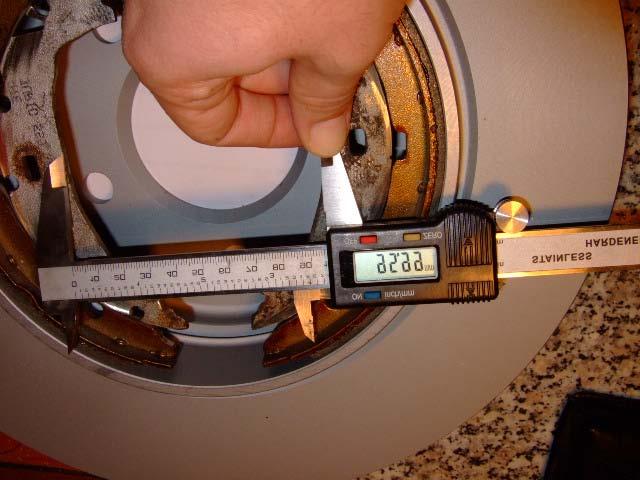
5 Getting dimensions:

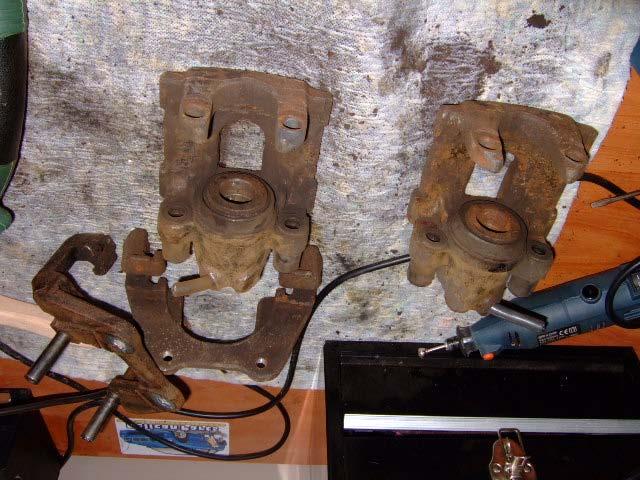
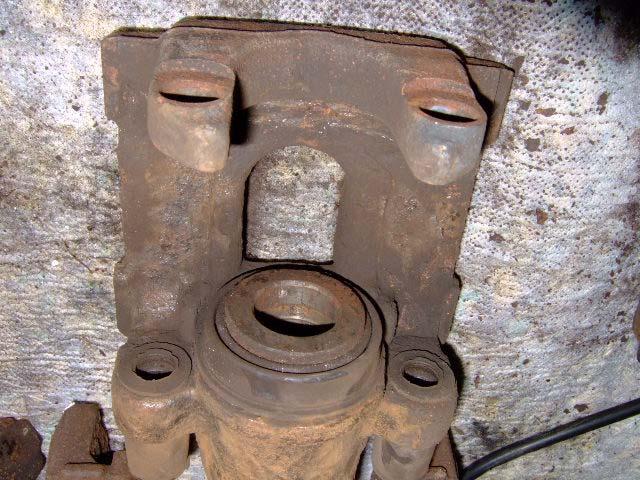
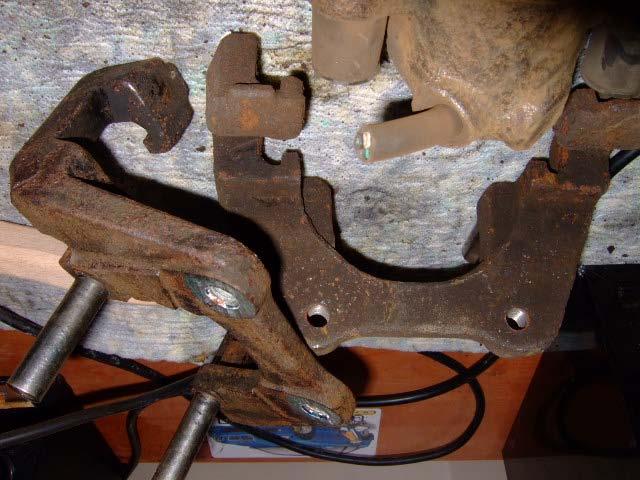
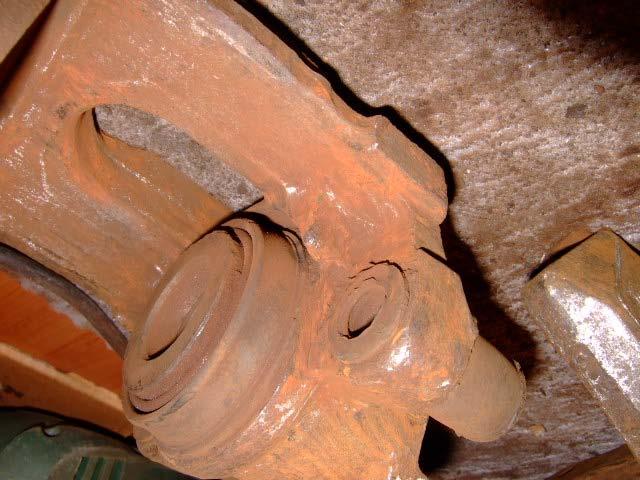
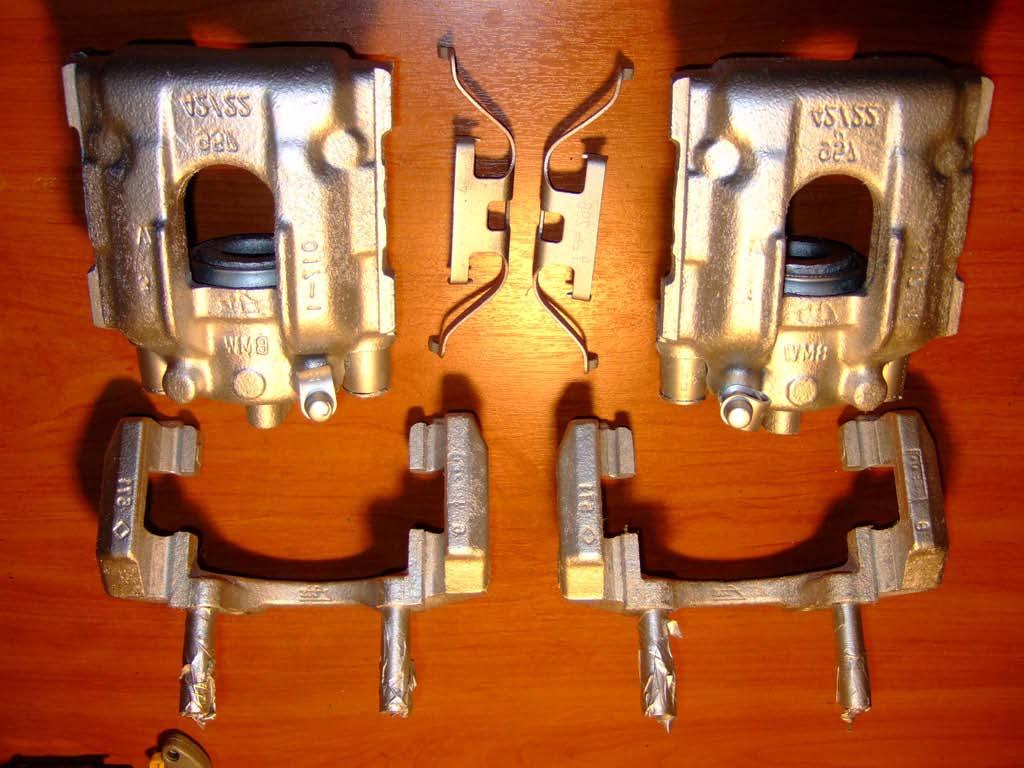
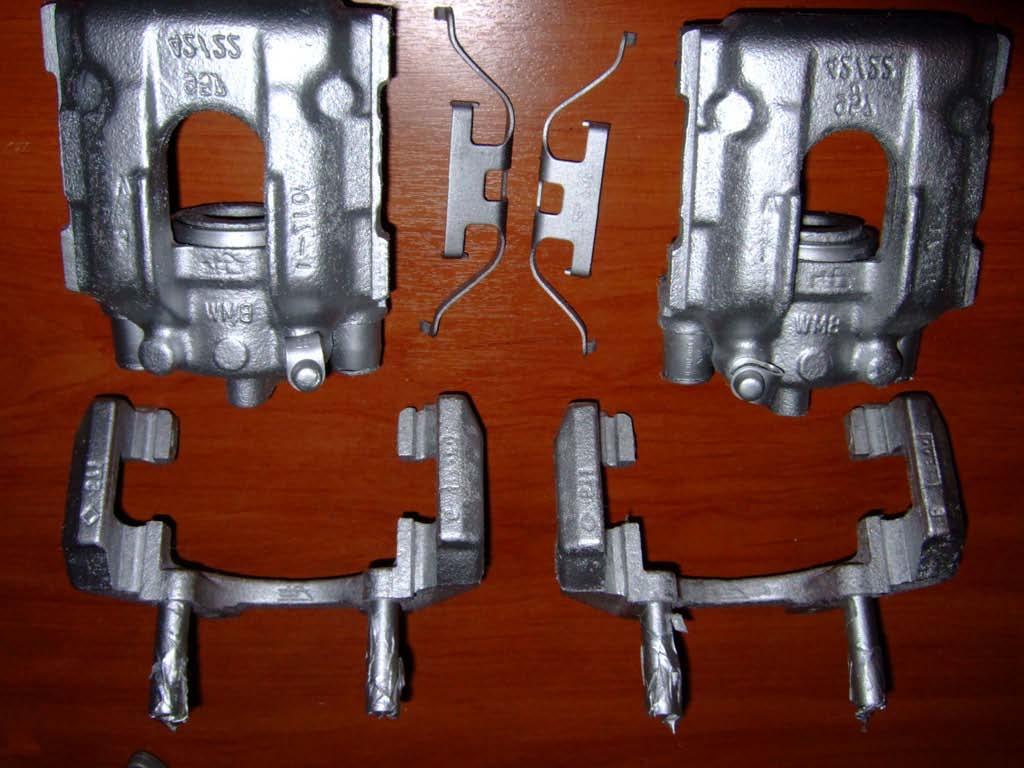
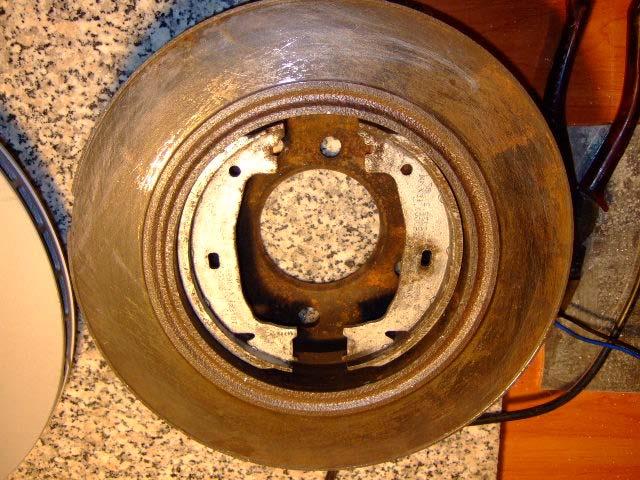
6 Rear calipers, rusted, ready for their transformation
7
8

9


10 After 2 days in rust inhibitor and more cleaning:
11

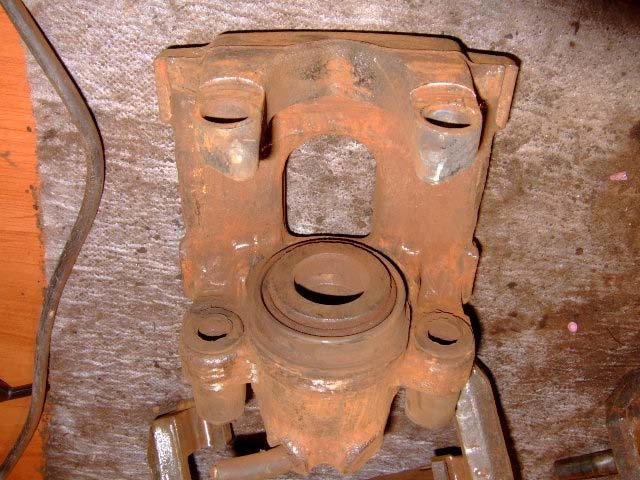
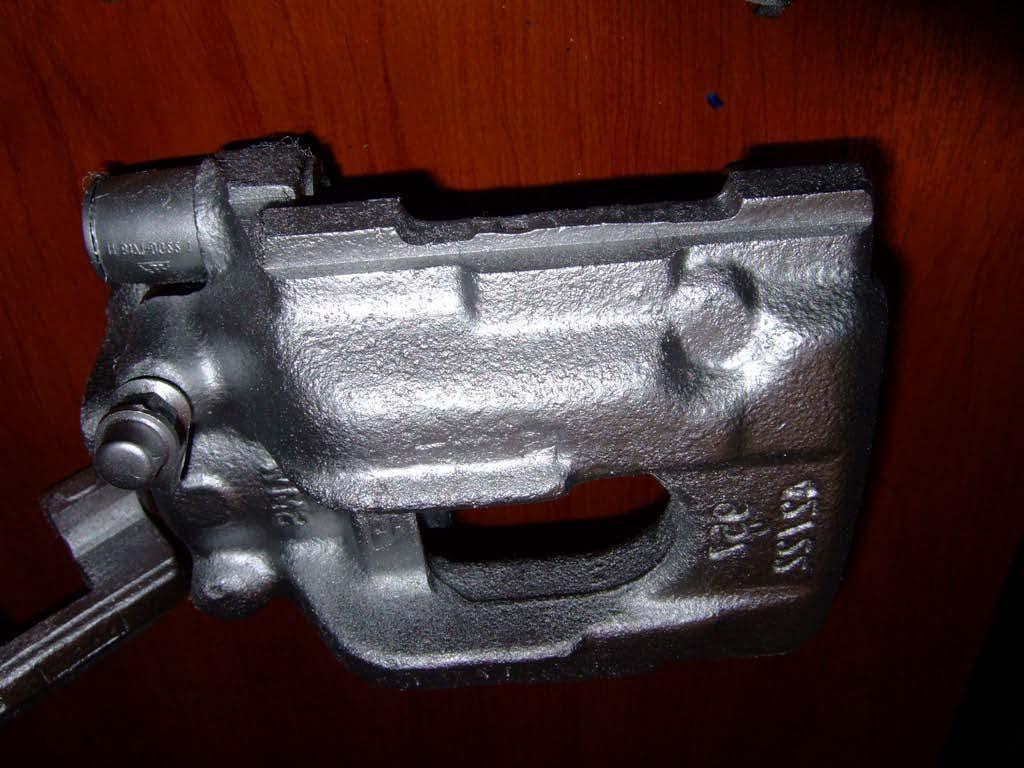
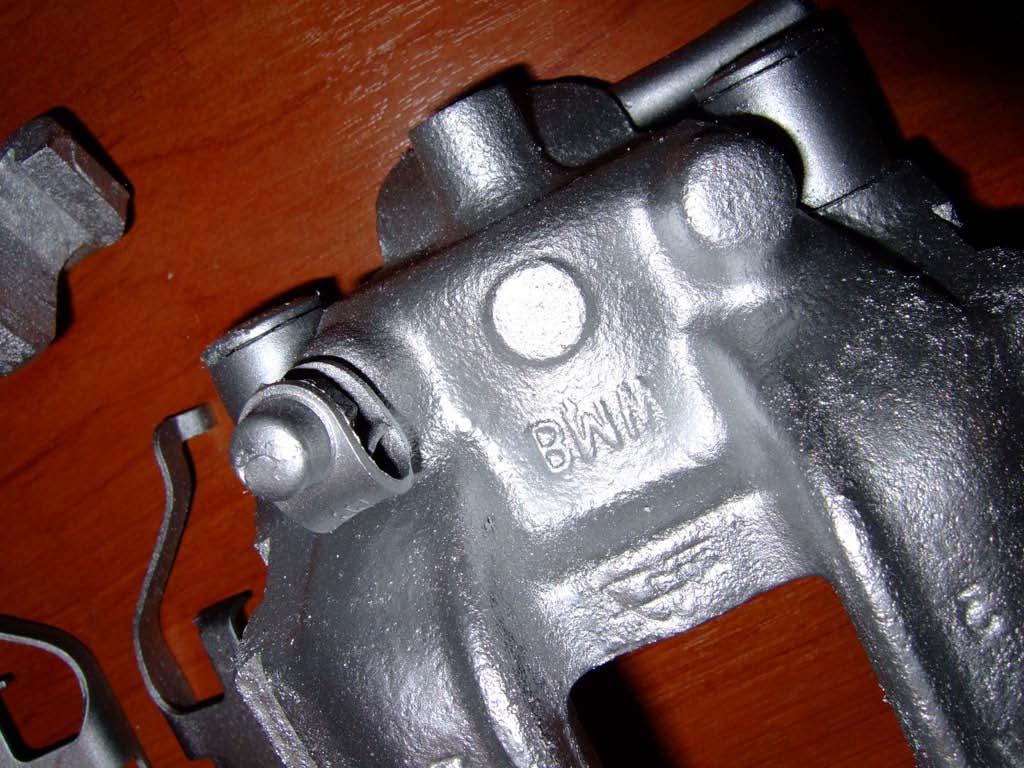
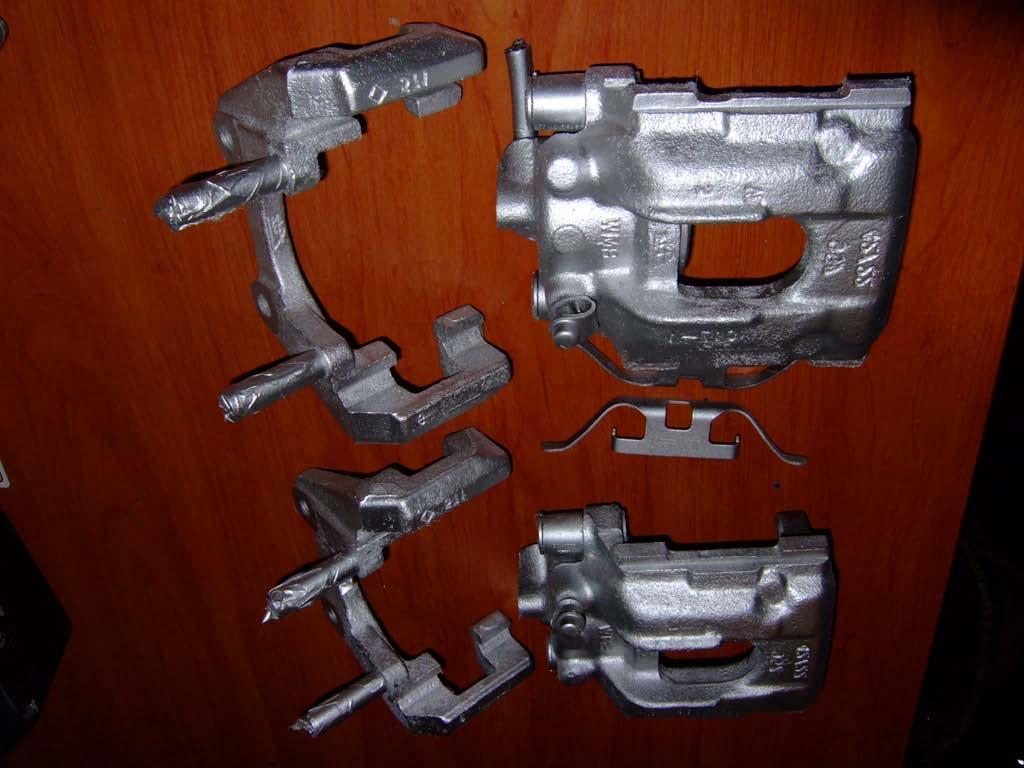
12 Painted with heat resistant paint to prevent rusting:
13
14
15
16
17

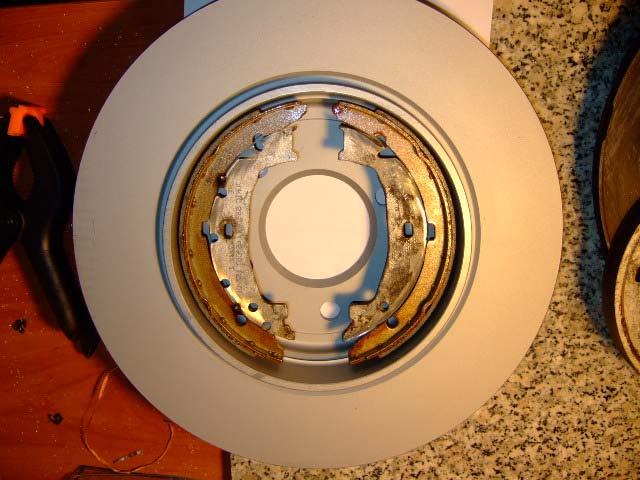
18 OEM 330 Rear Disks

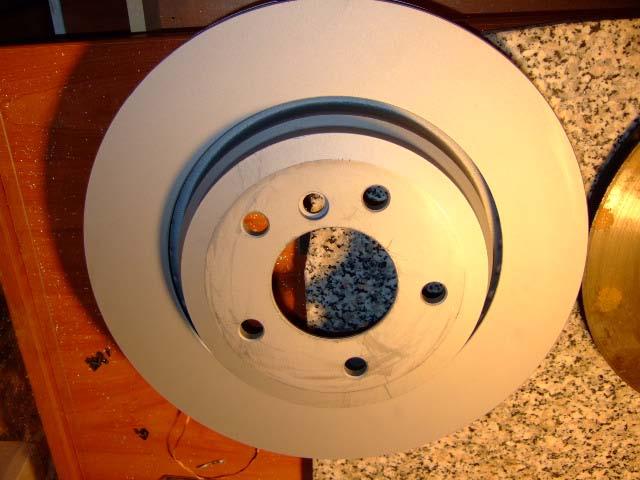
19 Side to side
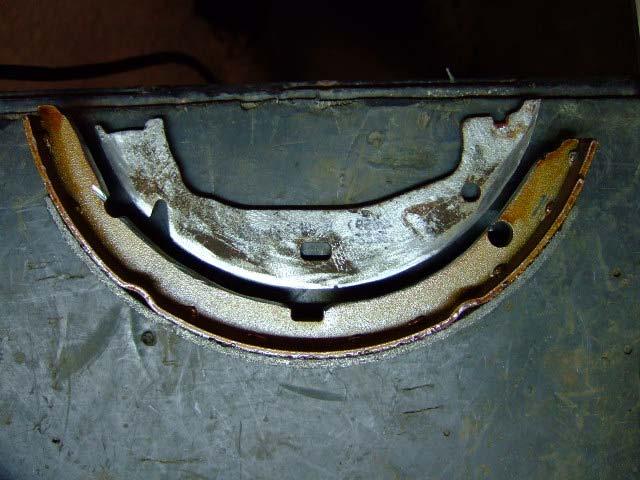
20


21 Fabricating some holders to preserve diameter and positioning of shoes so that I don't have to carry the disk with me all the time


22 Increase of diameter by 11.8mm


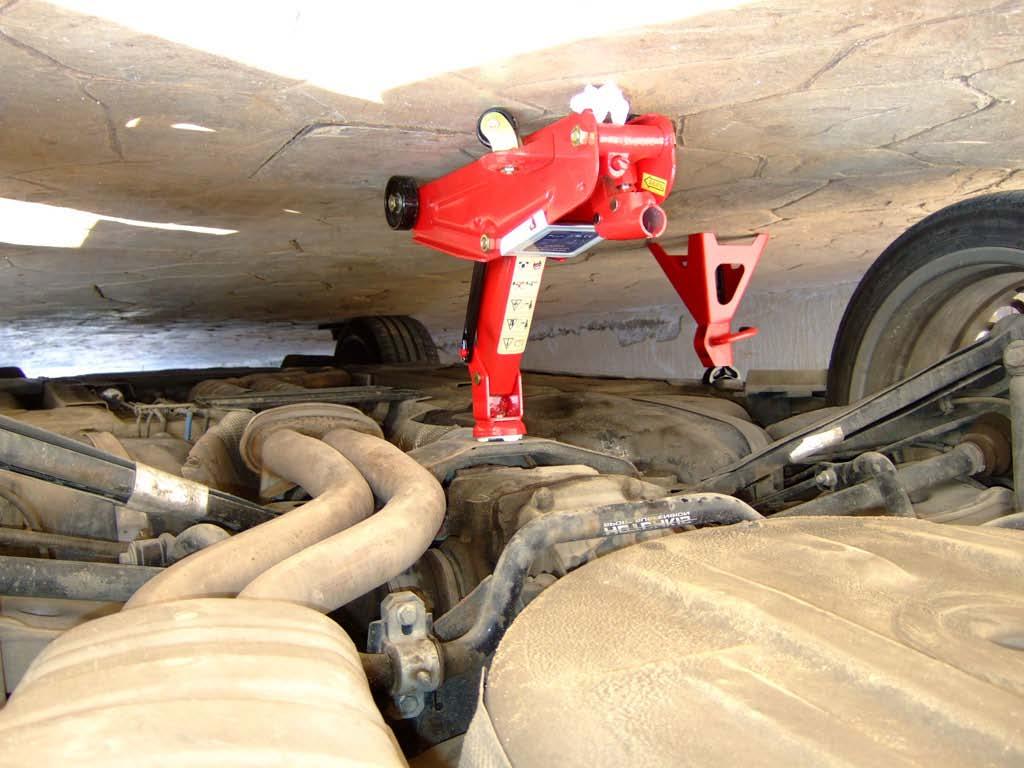
23 Time to cut the shoes to fabricate the franken-shoe :)


24 Removing the braking plate out of the 320 shoe How it will look


25 Marking the area to be cut on the 330 shoe
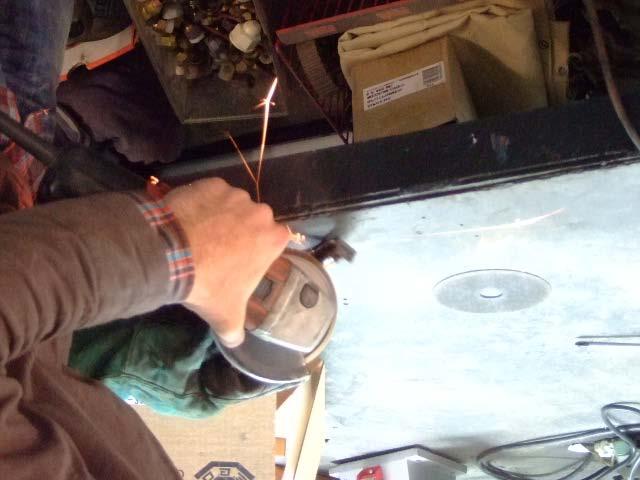
26 Professional grinder makes cutting easier

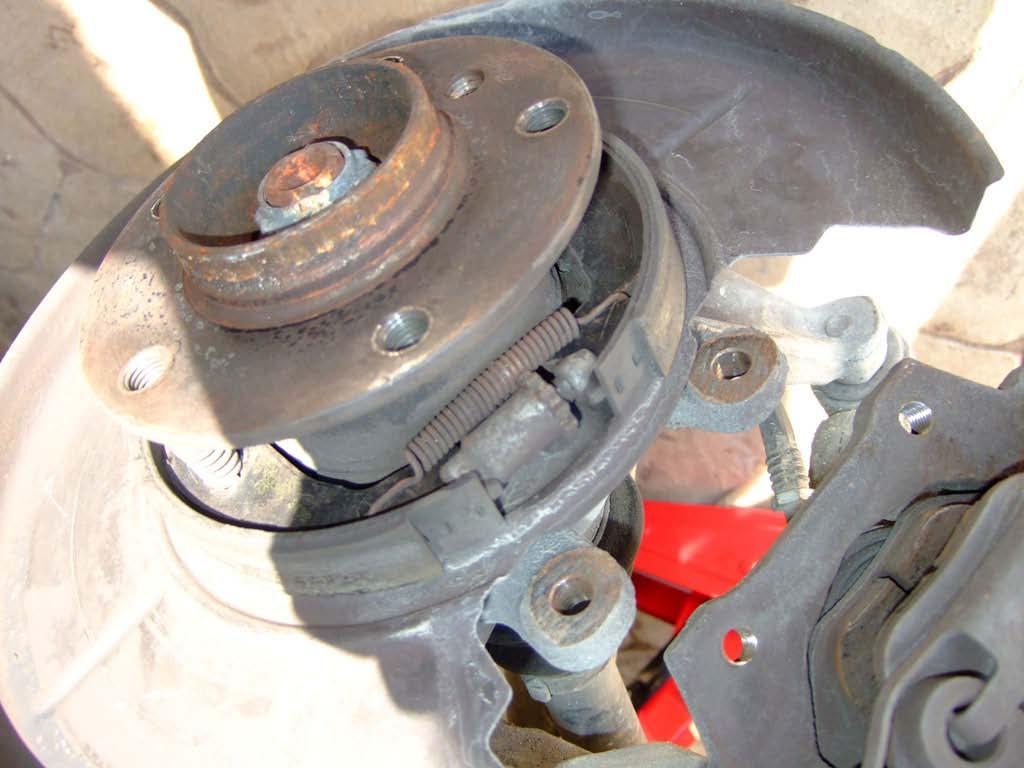
27 Spot welding the adapters/extensions to test fit!


28 I believe we are very accurate!

29 Both sides finished!

30 Car on jack and jack stands! - Handbrake DIY
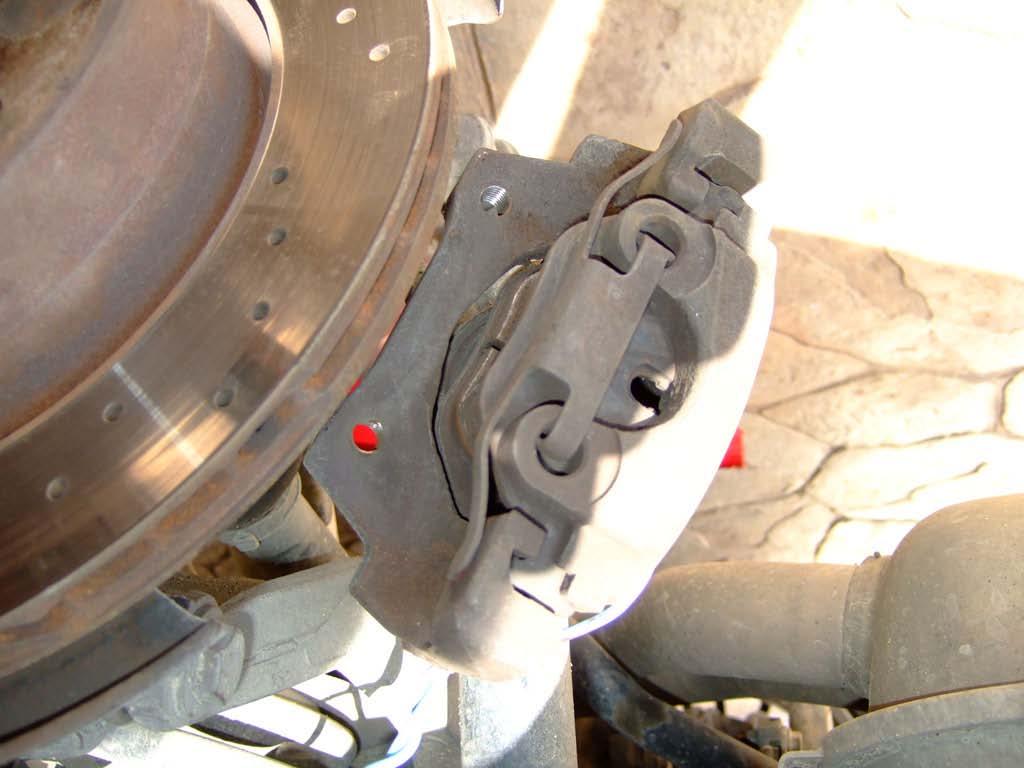
31

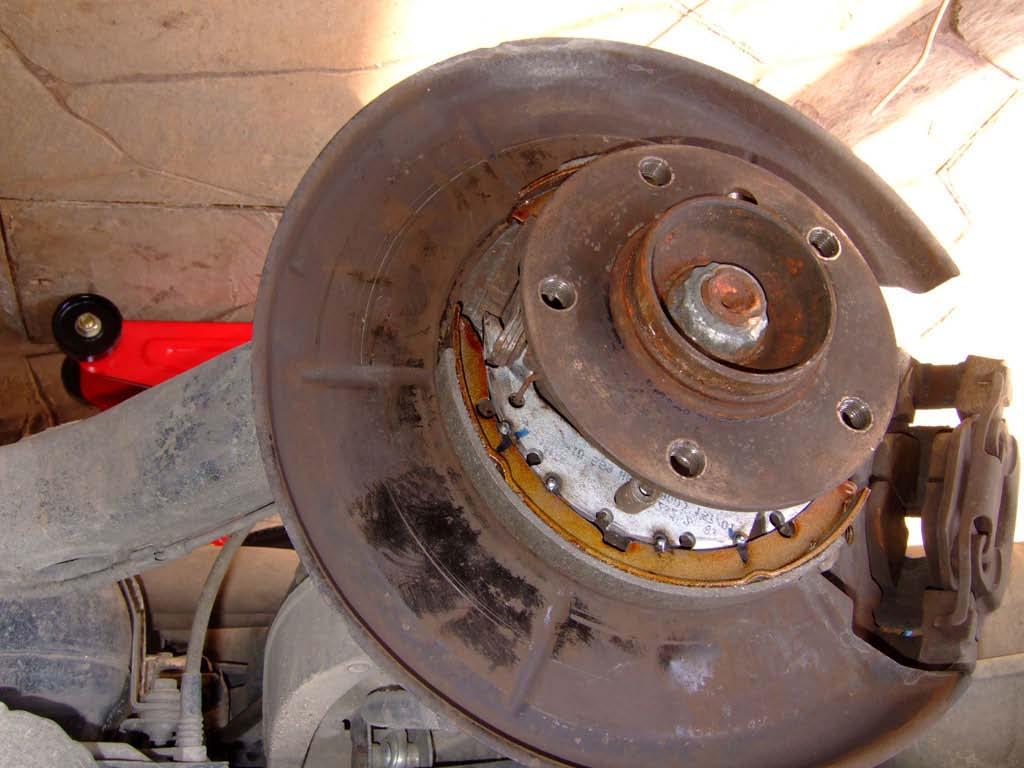
32 Removing 2x16mm bolts to release caliper
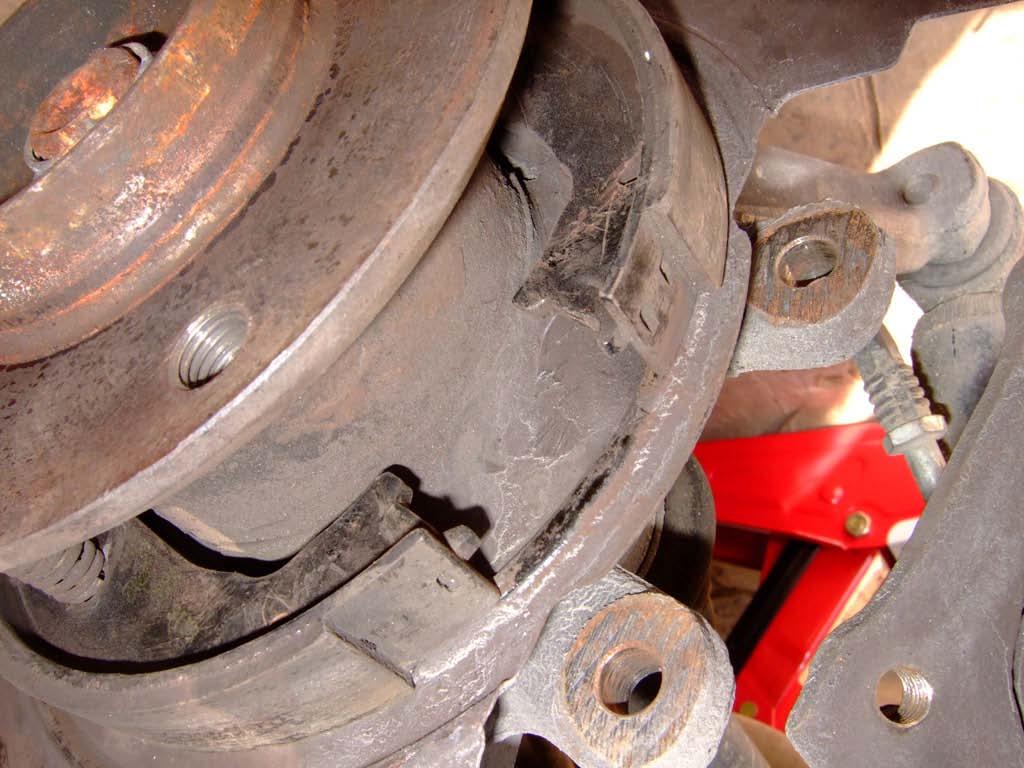
33

34 After removing the rotor, the handbrake assembly appears. First we remove the spring using needle nose pliers and safety glasses since everything is spring loaded and may fly anywhere! Then that little conical adjuster is removed.
35
36

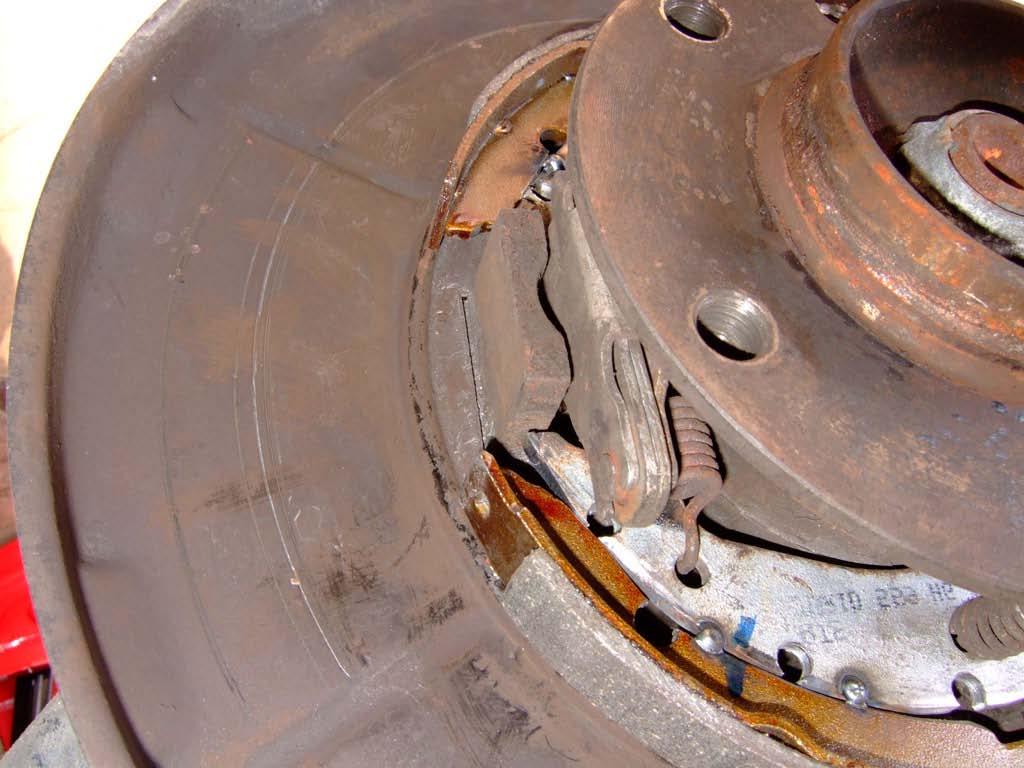
37 The other side of the handbrake has another spring to be removed as well, same way.

38 To remove the shoes, insert a 6mm hex key through the wheel bolt hole, twist 90 degrees and remove the retaining pin

39 Reassembly using the new hybrid brake shoes to test fit!

40 The dust shield took a beating since it was in the way of the larger 330 rotors, I had to bend it out of the way, that is until it's time to do the rear bearings, where I will get a proper 330 based dust shield as well. Unfortunately, without taking the hub apart it's impossible to remove it.
41
42
43

44 After verifying correct fitting, I removed the shoes again, fully welded them, painted them with rust prevention paint, and re-assembled them back! Here's the end result!
45
46
47
 ULT Ceramic pads.")
48 I didn't get into detail regarding the rear caliper installation, since it's bolt on, using the same mounts and brake lines. Brake pad sensor is the same as well! DIY Continued with installation of PBR (Axxis) ULT Ceramic pads. Previously I run some used ferodo pads that came with the calipers I bought because I didn't want to spend money in case the mod with the handbrake did not succeed. Additionally, I installed some modded 330 dust plates as well. I had to cut them and weld them on the existing ones due to the fact that the 330 dust plates need 330 trainling arms etc to fit. So again, cutting and welding was the only option.

49 Ceramic pads, now matched with the front ones!

50 330 Rear Dust plates
51 I marked and cut the existing 320 dust plates as per markings above and then did the same on the 330 plates. Afterwards I spot welded them in place to make a hybrid expanded 320 dust plate that would accommodate the 330 rotors.

52 End result with new pads and plates installed.
53

54 Wheels could use a bit of a cleaning I know.
LMB-C6 CF Senior Member
 LMB-C6 CF Senior Member Rotor install DIY... ****** FRONT: ****** Remove the wheel. To remove the rotor you need to remove the caliper and the bracket. There are 2 bolts for the caliper (top smaller bolt
BMW E46 Convertible Hydraulic Line #23 Replacement Guide Created by taylor192 of E46Fanatics.com
 BMW E46 Convertible Hydraulic Line #23 Replacement Guide Created by taylor192 of E46Fanatics.com BMW E46 Line #23 Replacment Guide, page 1 of 23 Background: Line #23 runs from the valve block on the driver's
Installing Rear Brake Pads on a WK Jeep
 Installing Rear Brake Pads on a WK Jeep Step by Step By Chirpz Disclaimer: I do not claim that this procedure is the right way or even the best way to change your rear brake pads. This is what I did after
A/F/X Body GM Installation Instructions Manual Disc Conversion
 A/F/X Body GM Installation Instructions Manual Disc Conversion 64-72 A Body / 67-69 F Body / 62-74 X Body DBMC09 & PVK71 pictured above (Booster, master & valve setups may vary by upgrades selected) Your
A/F/X Body GM Installation Instructions Manual Disc Conversion
 A/F/X Body GM Installation Instructions Manual Disc Conversion 64-72 A Body / 67-69 F Body / 62-74 X Body DBMC09 & PVK71 pictured above (Booster, master & valve setups may vary by upgrades selected) Your
Some tips and tricks I learned from getting clutch out of vehicle Skoda Octavia year 2000
 Some tips and tricks I learned from getting clutch out of vehicle Skoda Octavia year 2000 Last change 2013-Oct-11 I bought Haynes manual for a starter. That s something well worth it s cost I believe.
55-64 Full Size Chevy Installation Instructions Standard Disc Conversion
 55-64 Full Size Chevy Installation Instructions Standard Disc Conversion DBMC09, PV71 & PVB71 Pictured (Booster, master cylinder & valve setups may vary by upgrades selected) Your new disc brake conversion
Installation Instructions for disc brakes
 Installation Instructions for disc brakes Bedford CF 230-280, built 1974-1986, not suitable for vehicles with rear twin tyres Included 2 pcs. Wheel Hubs with Wheel Bolts, Mounted Brake Discs and Wheel
Improving the gearshift feel in an SW20.
 Improving the gearshift feel in an SW20. Part one In 3 parts. The SW20 gearshift can be often be greatly improved by eliminating play in the shift linkages, and this article covers three areas that need
How to Change Front Brake Pads on a Toyota Corolla
 How to Change Front Brake Pads on a Toyota Corolla Link to this article on (All other links in this document are disabled) Follow this picture guide to change the front brake pads on a 2003-2008 Toyota
Lincoln Mark VII T5 Swap Version submitted by 5.0 bird
 Lincoln Mark VII 1984-1989 T5 Swap Version 20070611 submitted by 5.0 bird I've decided to make an article to assist with the T5 swap for the 84-89 Mark VIIs, since I was just in there because my DOA didn't
Z1 Motorsports 300zx Akebono Brake Kit Installation Manual (Front)
") Z1 Motorsports 1200 Carrollton Villa Rica Hwy Carrollton GA 30116 770.838.7777 Z1 Motorsports 300zx Akebono Brake Kit Installation Manual (Front) Parts Included: 2 Akebono Front Brake Calipers (Pair; Nissan
Z1 Motorsports 1200 Carrollton Villa Rica Hwy Carrollton GA 30116 770.838.7777 Z1 Motorsports 300zx Akebono Brake Kit Installation Manual (Front) Parts Included: 2 Akebono Front Brake Calipers (Pair; Nissan
1969 Camaro. Concourse Style Disc Brake Conversion Kit Instllation Instructions
 Concourse Style Disc Brake Conversion Kit Instllation Instructions 1969 Camaro (1970 Chevelle Kit Shown) This document contains our regular disc brake conversion instructions with the addition of GM assembly
55-64 Full Size Chevy
 55-64 Full Size Chevy Installation Instructions Power Disc Conversion 9 slimline booster pictured Your new disc brake conversion kit can be bolted up with standard hand tools. The only tools you may not
Here's the difference (externally) in the and 04+ bumper and headlights: (00-03 on top, 04 on bottom)
 in the and 04+ bumper and headlights: (00-03 on top, 04 on bottom)") OK guys, I've been meaning to post this for awhile.. well here it goes. I did the '04 front end conversion on my '01 about 4-5 months ago, but then the dealer had to buy the car back for legal reasons.
OK guys, I've been meaning to post this for awhile.. well here it goes. I did the '04 front end conversion on my '01 about 4-5 months ago, but then the dealer had to buy the car back for legal reasons.
cfr angle kit INSTALLATION INSTRUCTIONS: 2009-present nissan 370z z infiniti g37 v36 Part Numbers: VOO-akns-0400
 cfr angle kit INSTALLATION INSTRUCTIONS: 2009-present nissan 370z z34 2008-2013 infiniti g37 v36 Part Numbers: VOO-akns-0400 We recommend that installation of all Voodoo13 parts be completed by a professional
Full Size GM Installation Instructions
 Full Size GM Installation Instructions Rear Disc Conversion 55 64 Full Size GM (Impala, Bel Air, etc.) This kit is for axle with a 3 3/8 spread center to center on the top two bolt holes (pictured left).
Converting a Series Land Rover to front wheel disc brakes using the kit made by Torrel Industries Ltd,
 Converting a Series Land Rover to front wheel disc brakes using the kit made by Torrel Industries Ltd, Torrel Industries ltd Series Land Rover front brake conversion kit: Difficulty - Low Except for one
1986 Rear Disk Brake Upgrade. All hard lines mounted to the rear axle with mounting screws. 1/4" fittings
 1986 Rear Disk Brake Upgrade Being well prepared for a project of this size is the key to success. I thought I was well prepared by doing a lot of research and getting all of the required parts before
E46 FUEL FILTER CHANGE Pics from CI
 1 of 10 5/3/2010 1:48 PM E46 FUEL FILTER CHANGE Pics from 2001 330CI Bellows Expansion Joints Metal Bellows Expansion Joints in Every Style from Flexicraft www.flexicraft.com/metal_bellows Ask a BMW Mechanic
Volvo 1800 Dash Pad Replacement
 Volvo 1800 Dash Pad Replacement (courtesy of John Garden State Chapter Volvo Club America) Reupholstering the dash Well it has been some time since I have been online in the forum. Winter is a quite time
2008 Toyota Tundra 4WD Brake Job: A Quick Job and Even Quicker Write-Up.
 FRONT BRAKES: 2008 Toyota Tundra 4WD Brake Job: A Quick Job and Even Quicker Write-Up. 1. Remove this bolt holding brake line bracket to the suspension. 2. I had to replace all 4 rotors at 60K miles, so
A/F/X Body GM Installation Instructions
 A/F/X Body GM Installation Instructions Power Disc Conversion 64-72 A Body / 67-69 F Body / 68-74 X Body 9 slimline booster pictured Your new disc brake conversion kit can be bolted up with standard hand
Assembly and User Guide
 Assembly and User Guide 2 Amp Adjustable Electronic Load 30V and 20 Watts Max Powered by: 9V Battery Pico Load is a convenient constant current load for testing batteries and power supplies. The digital
A /F/X Body Instruction Packet Rear Disc Conversion
 A /F/X Body Instruction Packet Rear Disc Conversion 64-72 A Body / 67-81 F Body / 62-74 X Body This kit is for axles with a 3 1/8 spread center to center on the top two bolt holes (pictured left). If your
 Installing Seat Belts in my Tudor August 2009 My '29 Tudor was restored about 25 years ago by my brother-in-law. He restored it to close to original, but made a few changes that many will claim are for
FRONT & 4 REAR GM WD LOWERING KIT
 92725200 88-98 2 FRONT & 4 REAR GM 1500 2WD LOWERING KIT Thank you for choosing Rough Country for all your suspension needs. Rough Country recommends a certified technician install this system. In addition
INSTALLATION INSTRUCTIONS
 INSTALLATION INSTRUCTIONS REAR DISC BRAKE CONVERSION KIT A126-1 1973-87 CHEVROLET 1/2 TON 2WD Thank you for choosing STAINLESS STEEL BRAKES CORPORATION for your braking needs. Pleases take the time to
NOTICE TO DEALER AND VEHICLE OWNER
 921751200 *1751BAG1* 1751BAG1 Thank you for choosing Rough Country for all your suspension needs. This kit will fit both 4WD and 2WD models, all brackets will be used for 4WD models. On 2WD models the
283F & 327F Engines : Distributor Cap Modification Kit Development Project
 283F & 327F Engines : Distributor Cap Modification Kit Development Project By Dick Morland Chris Craft offered the "F" series engines (283 F & 327 F) in Commanders from 23' to 35'. There are a lot of these
APPLIED GMC / 1 (800) KATO RD. FREMONT, CA GMC ALL DISC BRAKE KIT
 KATO RD. FREMONT, CA GMC ALL DISC BRAKE KIT") APPLIED GMC 510-440-1101 / 1 (800) 752-7502 47626 KATO RD. FREMONT, CA 94538 GMC ALL DISC BRAKE KIT Shade Tree Mechanic's Guide to Disc Brake Upgrade Installation Instructions Written by: Edited by: Randy
APPLIED GMC 510-440-1101 / 1 (800) 752-7502 47626 KATO RD. FREMONT, CA 94538 GMC ALL DISC BRAKE KIT Shade Tree Mechanic's Guide to Disc Brake Upgrade Installation Instructions Written by: Edited by: Randy
How to Replace the B2 Piston Bore Seal
 Page 1 Home Cars for sale Trucks for sale Where we are Links to other diesel sites About us Why diesel? Diesel Videos How they work How they sound FAQ Dodge Diesel Maintenance tips, parts and DIY DVD's
55-64 Full Size GM (Impala, Bel Air, etc.) This kit is for axles with a 3 3/8 spread center to center on the top two bolt holes (pictured left).
 This kit is for axles with a 3 3/8 spread center to center on the top two bolt holes (pictured left).") SUM-BK1624A Full Size GM Installation Instructions Rear Disc Conversion 55-64 Full Size GM (Impala, Bel Air, etc.) This kit is for axles with a 3 3/8 spread center to center on the top two bolt holes (pictured
SUM-BK1624A Full Size GM Installation Instructions Rear Disc Conversion 55-64 Full Size GM (Impala, Bel Air, etc.) This kit is for axles with a 3 3/8 spread center to center on the top two bolt holes (pictured
A /F/X Body Instruction Packet Rear Disc Conversion
 A /F/X Body Instruction Packet Rear Disc Conversion 64-72 A Body / 67-81 F Body / 62-74 X Body This kit is for axles with a 3 1/8 spread center to center on the top two bolt holes (pictured left). Rotor
Front Suspension Redo
 Front Suspension Redo Message: First, thanks to all the previous posters for guidance in my doing the suspension. As thanks, here s the updated document for doing the front suspension. Procedure: While
Passive Income Ideas
 DOWNLOAD & BUILD UPLOAD & SELL!!"#$%&'()%%)$'*$+$*,-,./0$(%$1123# Earn commissions on many of our plans! See how by visiting our home page www.gizmoplans.com and click on the Affiliates link at the top
My Hawk build Part 8 by Stuart Clarke
 My Hawk build Part 8 by Stuart Clarke Front hubs, brakes and brake lines. There was still no news on my rear springs so I thought I d find something else to get on with. I had the front hubs, brake calipers
Rebuilding the Alternator for a 2007 Honda Accord 4CYL. Honda CYL Alternator (Denso)
") Rebuilding the Alternator for a 2007 Honda Accord 4CYL Honda 2007 4CYL Alternator (Denso) The OEM brushes and bearings for this alternator are available for purchase online. On my vehicle with ~240k miles,
Rebuilding the Alternator for a 2007 Honda Accord 4CYL Honda 2007 4CYL Alternator (Denso) The OEM brushes and bearings for this alternator are available for purchase online. On my vehicle with ~240k miles,
Installation Instructions
 Instructions Created by an: DIY Alignment Toe Set Tool, 5 Patterns (SKU# DIY-TST) Installation Instructions CAUTION: Safety glasses should be worn at all times when working with vehicles and related tools
X-Brake Fitting Instructions See Appendix for fitting to Range Rover,Discovery and PTO vehicles + Upgrade kit
 X-Eng is a division of Foundry 4x4 Limited The Old Bakery, Rear of Vale Terrace, Tredegar, Gwent. NP22 4HT X-Brake Fitting Instructions See Appendix for fitting to Range Rover,Discovery and PTO vehicles
Signature Series A/F/X Body GM Installation Instructions Rear Disc Conversion
 Signature Series A/F/X Body GM Installation Instructions Rear Disc Conversion 64-72 A Body / 67-81 F Body / 62-74 X Body This kit is for axles with a 3 1/8 spread center to center on the top two bolt holes
Full Size GM Installation Instructions Rear Disc Conversion
 Full Size GM Installation Instructions Rear Disc Conversion 65 68 Full Size GM (Impala, Bel Air, etc.) This kit is for axles with a 3 3/8 spread center to center on the top two bolt holes (pictured left).
Installation Instructions for BMR Lowering Springs Performance ( Mustang GT)
") Installation Instructions for BMR Lowering Springs Performance (2015-2017 Mustang GT) Time Required: 3+ hours Notes: This install was done with the performance springs from BMR, but install should be the
Installation Instructions for BMR Lowering Springs Performance (2015-2017 Mustang GT) Time Required: 3+ hours Notes: This install was done with the performance springs from BMR, but install should be the
Tools & Parts I Used. Here's everything that comes with the kit.
 Ford Super Duty Power Tailgate Lock Install 2004 F250 4x4 XLT Sport Crew Cab Back to 2004 F250 Main Page This page describes the steps to install the Pop & Lock PL8250 power tailgate lock kit. This kit
EGR Performance Brakes Assembly Instructions DODGE DANA 70 '87 - '93 (Will not fit stock sized dual rear wheels)
") EGR Performance Brakes Assembly Instructions DODGE DANA 70 '87 - '93 (Will not fit stock sized dual rear wheels) Got Brakes? Parts List (2) Vented Rotors (2) Multi hole Cable Mount & L Brkt (2) Axle Tube
EGR Performance Brakes Assembly Instructions DODGE DANA 70 '87 - '93 (Will not fit stock sized dual rear wheels) Got Brakes? Parts List (2) Vented Rotors (2) Multi hole Cable Mount & L Brkt (2) Axle Tube
INSTALLATION INSTRUCTIONS
 INSTALLATION INSTRUCTIONS REAR DISC BRAKE CONVERSION KIT A157 1991-2004 Dodge Dakota 2WD 1991-2002 Dodge Dakota 4WD 1998-2002 Dodge Durango Thank you for choosing STAINLESS STEEL BRAKES CORPORATION for
4TH GEN SEATS IN A 3RD GEN TRUCK
 4TH GEN SEATS IN A 3RD GEN TRUCK by Flopster843 02 Oct 2016 If you drive a 3rd generation Dodge Ram truck, I am sure you have discovered that the OEM seats are not the greatest (Figure 1.) They are extremely
A/F/X Body GM Installation Instructions
 A/F/X Body GM Installation Instructions Rear Disc Conversion 64-72 A Body / 67-69 F Body / 62-74 X Body This kit is for axle with a 3 1/8 spread center to center on the top two bolt holes (pictured left).
MCG! 16 MOPAR COLLECTOR'S GUIDE
 Wayne Brown, better known in Mopar circles as "The Ram Man" spends more time studying brakes than anybody we know. Seriously, the guy absolutely thrives on messing about with old braking systems and coming
How to install the Barnett clutch and the stronger Oil Pump Drive Gear
 How to install the Barnett clutch and the stronger Oil Pump Drive Gear Written by WildFred I m from Germany so please excuse my English and the spelling. The following procedure is a combination of the
INSTALLATION INSTRUCTIONS
 INSTALLATION INSTRUCTIONS REAR DISC CONVERSION KIT A126-2 1988-98 C1500 2WD 10" REAR DRUM Thank you for choosing STAINLESS STEEL BRAKES CORPORATION for your braking needs. Pleases take the time to read
A /F/X Body Instruction Packet Rear Disc Conversion
 A /F/X Body Instruction Packet Rear Disc Conversion 64-72 A Body / 67-81 F Body / 62-74 X Body This kit is for axles with a 3 1/8 spread center to center on the top two bolt holes (pictured left). If your
Items Included in kit: FOLLOWING ARE THE BRAKE LINE RETROFIT KIT ITEMS
 Thank you for purchasing your RV-14 Brake and Fuel Line Kit. Please note that these directions are updated periodically as required and the current version will always be located on our website. These
A/F/X Body GM Installation Instructions Power Disc Conversion
 A/F/X Body GM Installation Instructions Power Disc Conversion 64-72 A Body / 67-69 F Body / 62-74 X Body DBMC09, PVK71 & RPB1001 pictured above (Booster, master & valve setups may vary by upgrades selected)
60 76 A Body Mopar Power Disc Conversion Installation Instructions
 62-72 B & E BodyMopar 60 76 A Body Mopar Power Disc Conversion Installation Instructions Special A-Body only parts shown below (In addition to parts above for A-Body cars, part # MDC66DC & MDC46DC) Your
VWvortex Forums > Golf IV & Jetta IV > DIY: Timing Belt And Coolant Pump Replacement on 2.0 AEG! Pics Inside! (Printable Version)
") VWvortex Forums > Golf IV & Jetta IV > DIY: Timing Belt And Coolant Pump Replacement on 2.0 AEG! Pics Inside! (Printable Version) Click here to print this topic. Post Title: DIY: Timing Belt And Coolant
VWvortex Forums > Golf IV & Jetta IV > DIY: Timing Belt And Coolant Pump Replacement on 2.0 AEG! Pics Inside! (Printable Version) Click here to print this topic. Post Title: DIY: Timing Belt And Coolant
Rear drum to disk conversion for a 00 Toyota Camry LE 4 cylinder
 Rear drum to disk conversion for a 00 Toyota Camry LE 4 cylinder *** Read and use at your own discretion I assume no liability for what you or anyone else does with this information. By reading this, you
Rekluse Motor Sports. The ProStart Clutch. H-D Big Twin ( )
") Rekluse Motor Sports The ProStart Clutch H-D Big Twin (1990 1997) Installation Guide Copyright 2006 Rekluse Motor Sports ProStart Revision 1.000 RMS680 H-D Big Twin 195-680 Manual Revision: 121206 Rekluse
Rekluse Motor Sports The ProStart Clutch H-D Big Twin (1990 1997) Installation Guide Copyright 2006 Rekluse Motor Sports ProStart Revision 1.000 RMS680 H-D Big Twin 195-680 Manual Revision: 121206 Rekluse
BRAKE PADS REPLACEMENT
 KLR650 Homepage Contact Me You must remove the "REMOVE-THIS" in my email address for it to work. This is a hobby website dedicated to the Kawasaki KLR650 motorcycle. I make no claim concerning the accuracy
JRSC + BBK Install on SVTF. Neil A. Shah medicnas on focaljet September 2006
 JRSC + BBK Install on SVTF Neil A. Shah medicnas on focaljet September 2006 ECU up here. When removing make sure the smaller bundles of wires don t get wrapped around the bottom edge and break - this almost
LJ20 Distributor - Disassembly Inspection Repair
 LJ20 Distributor - Disassembly Inspection Repair Old Codger New To Old Suzuki Jeeps The odometer on this 1972 LJ20 indicated the distributor had less than 10,000 miles of wear but during that time it had
Installation Instructions
 Preparing your vehicle to install your brake system upgrade 1. Rack the vehicle. 2. If you don t have a rack, then you must take extra safety precautions. 3. Choose a firmly packed and level ground to
Module 6: Air Foundation Brakes
 Air Brakes Terms and Definitions Basic Components That Make Up Air Foundation Brakes Types of Air Foundation Brakes Parts of a Cam Foundation Brake Parts of a Wedge Foundation Brake Parts of a Disc Foundation
Днепр) Russian Motorcycle Carburetors Part 2B: PZ-24 and PZ-28 Carburetor Assembly and Jet Drilling
 Russian Motorcycle Carburetors Part 2B: PZ-24 and PZ-28 Carburetor Assembly and Jet Drilling") Ural (Урал( Урал) - Dnepr (Днепр( Днепр) Russian Motorcycle Carburetors Part 2B: PZ-24 and PZ-28 Carburetor Assembly and Jet Drilling (applies also to K-37 K and K-38 K carbs) Ernie Franke eafranke@tampabay.rr.com
Ural (Урал( Урал) - Dnepr (Днепр( Днепр) Russian Motorcycle Carburetors Part 2B: PZ-24 and PZ-28 Carburetor Assembly and Jet Drilling (applies also to K-37 K and K-38 K carbs) Ernie Franke eafranke@tampabay.rr.com
Replace front brake pads and discs * (Ford Galaxy )
") Replace front brake pads and discs * (Ford Galaxy 2006-2015) *Caution! This instructions are created by random users and must be used as a reference only! Please, take all safety precautions, and if you're
Replace front brake pads and discs * (Ford Galaxy 2006-2015) *Caution! This instructions are created by random users and must be used as a reference only! Please, take all safety precautions, and if you're
Installation Manual TWM Performance Short Shift Kit Estimated Installation Time: Tools required:
 Page 1 Installation Manual TWM Performance Short Shift Kit 1993-2001 Nissan Altima 1991-2001 Infiniti G20 1991-2001 Nissan Sentra- 200SX 1991-1993 Nissan NX 1986-1989 Nissan Stanza 1995-2001 Nissan Maxima
Conversion of a Turnigy 9X to Hall effect sensors
 Conversion of a Turnigy 9X to Hall effect sensors Because English is not my mother language I kindly ask to be gracious. Unfortunately I had several times some problems with the low quality potentiometers
INSTALLATION INSTRUCTIONS PERFORMANCE AT THE WHEELS KIT W125
 INSTALLATION INSTRUCTIONS PERFORMANCE AT THE WHEELS KIT W125 1968-81 CAMARO & FIREBIRD 10 & 12 BOLT W/"C" CLIPS Thank you for choosing STAINLESS STEEL BRAKES CORPORATION for your braking needs. Pleases
 Updated May 2015 Okay this is what I learned while converting several Yamaha SUV 1200 jet skis with a 2 stroke engine to a 4 stroke engine. I believe that you can use a Yamaha FX or VX four stroke for
Installing the Wireless Charging upgrade kit in a 2018 XT5 (Platinum version)
") Installing the Wireless Charging upgrade kit in a 2018 XT5 (Platinum version) September 2, 2018 Tools needed: Wireless charger upgrade kit Plastic trim tools 7 mm nut driver Background: I purchased the
Installing the Wireless Charging upgrade kit in a 2018 XT5 (Platinum version) September 2, 2018 Tools needed: Wireless charger upgrade kit Plastic trim tools 7 mm nut driver Background: I purchased the
 DRUM BRAKE RIMS Periodic inspection of drum brake rims is necessary to determine indications of uneven or excessive wear. In general, brake rim failures other that regular wear are caused by brake linings
NEW BRAKE INSTALLATION. Let us show you how a
 Tech Article From Newsletter 17.2-2nd Quarter of 2011 NEW BRAKE INSTALLATION Let us show you how a Big Brake Install is easier than you think!! So, you have a 572 (or a hot 383) in your shoebox... you
FRONT DROP SPINDLES
 92725000 88-98 2 FRONT DROP SPINDLES Thank you for choosing Rough Country for all your suspension needs. Rough Country recommends a certified technician install this system. In addition to these instructions,
Installation Instructions
 Suzuki Samurai Rear Disk Brake Kits by Low Range Off Road (SKU# SB-LRD) Also included in the instructions are:!!! SB-LRDB Suzuki Samurai Disk Brake Bracket Kit by Low Range Off Road!!! SB-LRDB-FK-1 Suzuki
Go-ped ESR750 / ESR750EX Rear Brake Installation Instructions
 Go-ped ESR750 / ESR750EX Rear Brake Installation Instructions This kit provides all the parts you need to install a rear brake on your ESR750 or ESR750EX. It will not work on an ESR Sport, or other Go-ped
Ford 8, 9 Small Bearing Installation Instructions Rear Disc Conversion
 Ford 8, 9 Small Bearing Installation Instructions Rear Disc Conversion This kit is for Ford 9 rear axles with the small (2.835 ) style bearing and Ford 8 rear ends. This kit is designed to work with axles
HOW TO MODIFY A STOCK DODGE KEGGER INTAKE MANIFOLD
 HOW TO MODIFY A STOCK DODGE KEGGER INTAKE MANIFOLD Even though this 3.9L V6 intake manifold is smaller than the 5.2L and 5.9L V8 intake manifolds, the same instructions apply to all 3 engines. If you are
Revision Date: Building a dual pump system for an open boat. Description:
 Disclaimer: The information is provided as-is. The author(s) accepts no liability for the accuracy, availability, suitability, reliability and usability. The following information is in the public domain
Step #1 From your spool of 18 gauge primary wire, cut between 11 and 21 three inch strips of wire. You will only need 11 for the ROV, but it is good t
 How to make a ROV! Step #1 From your spool of 18 gauge primary wire, cut between 11 and 21 three inch strips of wire. You will only need 11 for the ROV, but it is good to have extras. Using the wire cutter,
BMW F10 Premium / Professional Audio system - adding a sub woofer part two
 BMW F10 Premium / Professional Audio system - adding a sub woofer part two I accept no liability for any work carried out as a result of this guide. Any damage caused to equipment or your car (or you)
Hawk Brake Pads ( Mustang GT/V6 Rear Pair)
") Hawk Brake Pads (1994-2004 Mustang GT/V6 Rear Pair) The below installation instructions work for the following products: Hawk HPS Brake Pads (1994-2004 Mustang GT/V6 Rear Pair) Hawk Performance Ceramic
Hawk Brake Pads (1994-2004 Mustang GT/V6 Rear Pair) The below installation instructions work for the following products: Hawk HPS Brake Pads (1994-2004 Mustang GT/V6 Rear Pair) Hawk Performance Ceramic
Rear Wheel Removal (by BassCliff)
") Rear Wheel Removal (by BassCliff) Hello to my GS riding friends! After picking up a nail in my rear tire (while on the freeway at 75mph!) I thought I would take a few pictures to help illustrate the rear
Rear Wheel Removal (by BassCliff) Hello to my GS riding friends! After picking up a nail in my rear tire (while on the freeway at 75mph!) I thought I would take a few pictures to help illustrate the rear
Signature Series A/F/X Body GM Installation Instructions Power Disc Conversion
 Signature Series A/F/X Body GM Installation Instructions Power Disc Conversion 64-72 A Body / 67-69 F Body / 62-74 X Body Your new disc brake conversion kit can be bolted up with standard hand tools. The
upper and lower ball joints ( I went with Moog from rockauto.com): two K80026 and two K8607T
: two K80026 and two K8607T") Parts required: two 5C3Z*4A322*AA = hub / steering knuckle o-ring two AC3Z*1S175*A = updated axle shaft "dust seal" two 5C3Z*3254*A = steering knuckle / axle shaft seal upper and lower ball joints ( I
Parts required: two 5C3Z*4A322*AA = hub / steering knuckle o-ring two AC3Z*1S175*A = updated axle shaft "dust seal" two 5C3Z*3254*A = steering knuckle / axle shaft seal upper and lower ball joints ( I
Wheel Bearing Replacement Passat TDI
 Rear Bearing/hub assembly replacement This is a fairly straight forward process. Pictures are not necessary for most of this procedure for a person with skills to do this repair. Anyone who thinks they
Air Compressor/Water Pump IV - Pilot Valve Stem, Test & Installation
 Page 1 of 8 Air Compressor/Water Pump Part IV Pilot Valve Stem, Test & Installation Nelson Riedel Nelson@NelsonsLocomotive.com Initial: 1/13/04 Last Revised: 0 Valve Test: I decided to test the steam valves
INSTALLATION INSTRUCTIONS
 INSTALLATION INSTRUCTIONS INSTALLATION INSTRUCTIONS FOR A136 REAR DRUM TO DISC BRAKE CONVERSION KIT for 1970-75 Jeep, CJ SERIES with Dana 44 flanged axle Thank you for choosing STAINLESS STEEL BRAKES CORPORATION
STARION 4 SPOT BRAKE CONVERSION By Merlin and Cookie.
 TECH FILE: #3 STARION 4 SPOT BRAKE CONVERSION By Merlin and Cookie. This article describes the front brake 4 piston calliper conversion, using either Wilwood Dynalite callipers or Tornado F3 callipers.
INSTALLATION INSTRUCTIONS
 INSTALLATION INSTRUCTIONS REAR DISC CONVERSION KIT A136-1 1976-86 AMC 20 AXLES WITH WARN FULL FLOATING AXLE CONVERSION Thank you for choosing STAINLESS STEEL BRAKES CORPORATION for your braking needs.
1984 Dodge W250 PICKUP
 1984 Dodge W250 PICKUP Submodel: Engine Type: V8 Liters: 5.2 Fuel Delivery: CARB Fuel: GAS Dana 44 MODELS THROUGH 1984 2. Raise and safely support the vehicle, then remove the wheel hub and bearings as
Brake Upgrades for FWD/4WD with 5x100 stud pattern
 Brake Upgrades for FWD/4WD with 5x100 stud pattern These started out as my original front brakes, & because I m more of a twisty road person, than straight line speed, I didn t think they d be adequate.
INSTALLATION GUIDE. KTM RFS Husaberg Polaris 450/525 Outlaw KTM 450/525 XC ATV Manual Revision:
 REKLUSE MOTOR SPORTS The z-start Pro Clutch INSTALLATION GUIDE KTM RFS 03-07 Husaberg Polaris 450/525 Outlaw KTM 450/525 XC ATV 191-833 Manual Revision: 010615 2002 Rekluse Motor Sports Rekluse Motor Sports,
Replacing the Vacuum Servo on 700/900 with ACC/ECC Double-Acting Servos. [Procedure from Dick Riess, to whom thanks are given; some notes from Dan]
![Replacing the Vacuum Servo on 700/900 with ACC/ECC Double-Acting Servos. [Procedure from Dick Riess, to whom thanks are given; some notes from Dan]](/thumbs/89/98811956.jpg "Replacing the Vacuum Servo on 700/900 with ACC/ECC Double-Acting Servos. [Procedure from Dick Riess, to whom thanks are given; some notes from Dan]") Replacing Vacuum Servos in ACC/ECC-Equipped 700/900 Cars FAQ Home Volvo Maintenance FAQ for 7xx/9xx/90 Cars HVAC Home OEM Manual Procedure for Replacing Vacuum Servos. See the FAQ file for a large.pdf
Replacing Vacuum Servos in ACC/ECC-Equipped 700/900 Cars FAQ Home Volvo Maintenance FAQ for 7xx/9xx/90 Cars HVAC Home OEM Manual Procedure for Replacing Vacuum Servos. See the FAQ file for a large.pdf
Re-building a Caliper
 Re-building a Caliper by Leslie Henson The pistons in the calipers on the 90 are in very poor condition, and although the brakes work ok, it plays on our mind that the pistons are badly corroded, and it
Installing the Audiovox CCS-100 Cruise Control.
 Installing the Audiovox CCS-100 Cruise Control. This article was written by: Lon Lawrence w650kawasaki@leaco.net Cruise Control : Audiovox CCS-100 ($89) Webpage : www.summitracing.com Message: I've installed
INSTALLATION GUIDE CRF150R Manual Revision:
 REKLUSE MOTOR SPORTS The z-start Pro Clutch INSTALLATION GUIDE CRF150R 191-810 Manual Revision: 032508 2002 Rekluse Motor Sports Rekluse Motor Sports, Inc. 110 E. 43rd Street Boise, Idaho 83714 208-426-0659
RED LINE LANDCRUISERS LLC. FJ40-70 series BIG BRAKE KIT INSTRUCTIONS
 RED LINE LANDCRUISERS LLC. FJ40-70 series BIG BRAKE KIT INSTRUCTIONS Tired of not have the brake performance on your land cruiser? Have you upgraded to 35,37" Tires, a V8? Well, This brake kit is for you.
INSTALLATION INSTRUCTIONS
 INSTALLATION INSTRUCTIONS REAR DISC BRAKE CONVERSION KIT A158 1994-97 Dodge Ram 1500 (2WD & 4WD) and REAR DISC BRAKE CONVERSION KIT A158-1 1998-01 Dodge Ram 1500 (2WD & 4WD) Thank you for choosing STAINLESS
BBK LONG TUBE HEADERS (99-04 GT, Mach 1, Bullitt)
") BBK LONG TUBE HEADERS (99-04 GT, Mach 1, Bullitt) Install Time: Approx. 8-10 hrs Parts Needed: BBK Long Tube Headers Shorty mid pipe X/H O2 wiring harness extensions Hi-temp thread locker Tools Required:
BBK LONG TUBE HEADERS (99-04 GT, Mach 1, Bullitt) Install Time: Approx. 8-10 hrs Parts Needed: BBK Long Tube Headers Shorty mid pipe X/H O2 wiring harness extensions Hi-temp thread locker Tools Required:
Installation Instructions and Suggestions For Jeep YJ Fiberglass Replacement Bodies
 Installation Instructions and Suggestions For Jeep YJ Fiberglass Replacement Bodies Getting started with the removal of your existing Jeep body. Trust nothing to memory; take photos of everything at different