E46 FUEL FILTER CHANGE Pics from CI
|
|
|
- Andra Welch
- 6 years ago
- Views:
Transcription

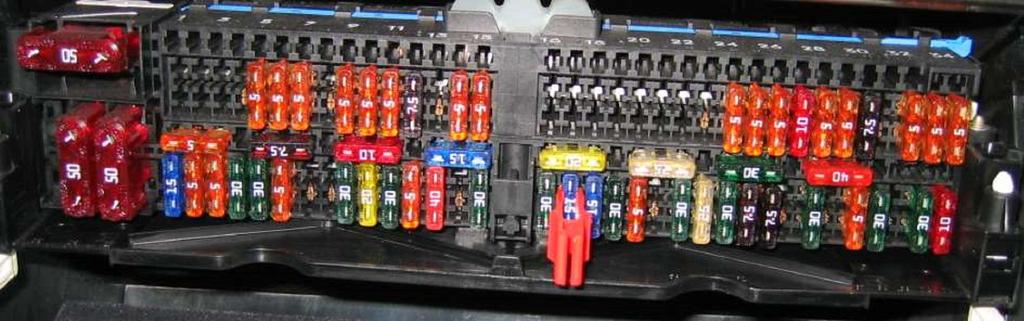
1 1 of 10 5/3/2010 1:48 PM E46 FUEL FILTER CHANGE Pics from CI Bellows Expansion Joints Metal Bellows Expansion Joints in Every Style from Flexicraft Ask a BMW Mechanic Now 11 BMW Mechanics Are Online. Ask a Question, Get an Answer ASAP. BMW.JustAnswer.com Denso Iridium Spark Plugs More Horsepower & Fuel Efficiency. Find Your Part and Where to Buy It. I am combining the information from this thread: Click Here and adding photos. From the above post with edits (Mine are in Bold): Changing the fuel filter is very straight forward. It is extremely easy. Follow the numerous DIY on this board regarding changing the OEM fuel filter. Here are some tips that you might find useful. 1) The fuel filter is located directly underneath the driver seat on the under carriage of the car. 1a) Remove Fuse #54 (Fuel Filter) This will stop the flow of gas. After you have removed Fuse #54, turn over the car until you cannot start it. It shouldn't take long... mine did it the first time, of course I turned it over a few more times to make sure I removed the most gas I could from the lines.)

2 2 of 10 5/3/2010 1:48 PM

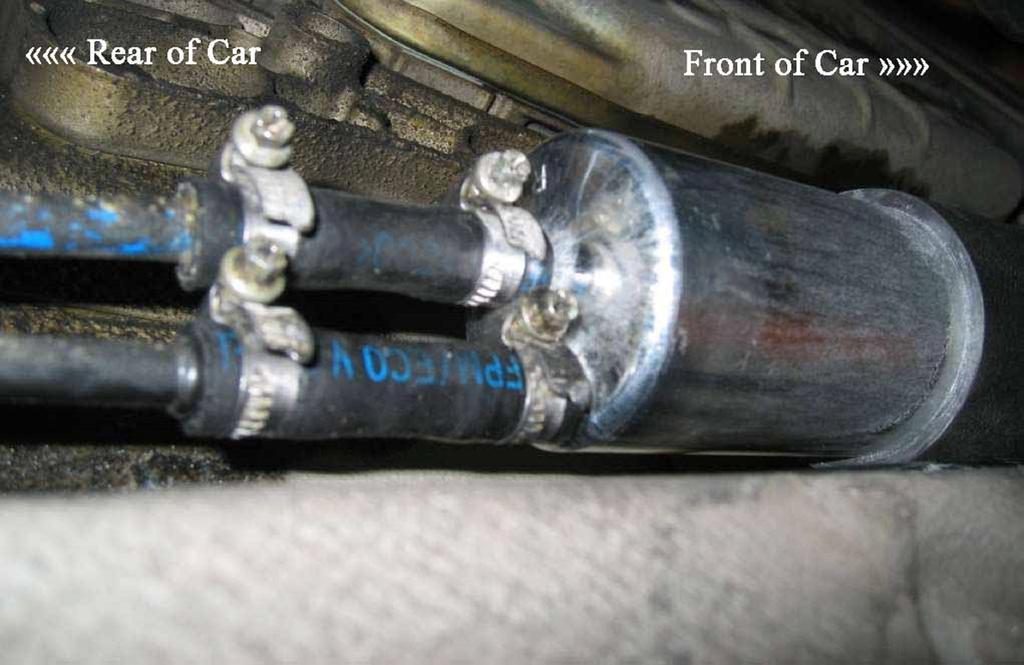
3 3 of 10 5/3/2010 1:48 PM 2) There are two ends on the fuel filter. The IN put is toward the gas tank. The OUT put is toward the front of the car. There is an arrow painted on the fuel filter. Just make sure the arrow is pointing toward the front and you will be OKAY. (If you mess this up, you shouldn't be doing this... The ends are different... different size hoses etc.)

4 4 of 10 5/3/2010 1:48 PM 3) There is a shield protecting the fuel filter from getting all banged up. Use 8mm socket to remove the nuts. (I've highlighted in Red Squares the location of the 3 nuts I removed. I only removed those 3 nuts, there is maybe 1 or 2 more towards the front of the car, but I just bent the shield out of the way and was able to remove the fuel filter without too many problems.)

5 5 of 10 5/3/2010 1:48 PM 4) After removing the shield, the fuel filter is secured by a bracket. Use a 10mm socket to remove it. (Correct)

6 6 of 10 5/3/2010 1:48 PM 5) The hoses are secured by a bunch of clamps. Use a "flat top" screw driver to loosen the clamps. To tighten the clamps use a 7/32 socket or a pair of pliers. You CANNOT tighten the clamps with a flat top screw driver. (Well, I found the easiest way for me involved a pair of pliers. I first removed the large rubber hose on the front of the car, then I removed the smaller hose on the front. Then I removed the rear two larger hoses. The front fuel filter lines on the car can move about 3-4 inches. That's how you can get the extra length you need. Also, I was able to use a phillips screw driver to both remove and tighten the clamps back on. 7/32 was too big for me, so that wasn't the same set of clamps on my car, yours may be different) 6) Remove the rubber hose by wedging a screw driver on the rubber hose while pulling and twisting the fuel filter. (As stated above I just used a set of pliers on the larger front hose toward the front of the car. I will say this was the hardest part of the whole process. I was worried gas would spray on me, but there was no spraying. Most of the gas came from the fuel filter itself... and off one of the rear fuel lines. Below are the hoses, clamps and nuts on the gound after I removed them.)

7 7 of 10 5/3/2010 1:48 PM 7) Be prepare to have lots and lots of fuel leakage. Clean fuel immediately. Fuel will evaporate faster when smear around rather than sitting in a puddle. (Have something to catch the gas, as you will have some spill, unless you are simply amazing. You can use clamps on the rubber hoses, but I see no real need. Have something metal or hard plastic to catch the gas. otherwise the gas will melt through many things.) 8) After you have attached the hoses and put everything back to it's original condition, put in fuse #54 and turn the car to position #2. Don't turn the car over! - If you do you might just get and error code thrown on the car possibly or not a smooth flow of gas, just turn it to position #2 then off... then #2 and off. Do this 3-4 times and then you can start up the car. I did this and my car started right up the first time, and I had no error codes and then I drove the car 350 miles the next day with no problems. SAFETY TIPS 1) Change fuel filter only in well ventilated area. I was changing my fuel filter outside and yet I still feel sick. (Agree... have a fan so it blows the fuel fumes away from you.) 2) Have a fire extinguisher ready in case. Would you rather take the time to buy or find a fire extinguisher than have your car destroy or blow up? (I didn't... why would anything blow up? If I had a fire extinguisher I would of had one present though.) 3) When removing the fuel line or when fuel are leaking out, make sure you priodically ground yourself from static electricity. Just touch all the metal/steal components underneath your car every two-three minutes or so. (Hehe, I was always touching the car car, but I didn't do that... I'm still alive.. whooo hooo!) Below are some more photos...

8 8 of 10 5/3/2010 1:48 PM

9 9 of 10 5/3/2010 1:48 PM

10 10 of 10 5/3/2010 1:48 PM Good Luck... With all the right tools and jacks you could probably do this in 30 mins, but depending on your speed and tools available it could take 1 to 1.5 hours depending on the speed you go at. Overall I would say it's a 5 on a scale of Since you need to jack up the car or drive it up on ramps to be able to access the fuel filter. Adding leaking gas to the mix always ramps it up a little bit on the toughness scale.
There is hence three things you can do - add oil, adjust the temp that the clutch begins to engage, or do both.
 As most of you may be aware, I have been doing a lot of research lately on our cooling system in the 80's including the fact that we have a dead spot on the OEM temp gauge which prompted me to not rely
How to Replace the B2 Piston Bore Seal
 Page 1 Home Cars for sale Trucks for sale Where we are Links to other diesel sites About us Why diesel? Diesel Videos How they work How they sound FAQ Dodge Diesel Maintenance tips, parts and DIY DVD's
1 of 2 9/4/ :27 AM
 Ford Mustang IAC IAB - Solving your idle problems http://www.muscularmustangs.com/iac.php 1 of 2 9/4/2010 10:27 AM Solving idle problems part 1 - Cleaning your IAC Does your idle rise and fall over and
Connecting the rear fog light on the A4 Jetta, while keeping the 5 Light Mod
 Connecting the rear fog light on the A4 Jetta, while keeping the 5 Light Mod DISCLAIMER: I'm human and make mistakes. If you spot one in this how to, tell me and I'll fix it This was done on my 99.5 Jetta.
W123 Transmission Vacuum Modulator Adjustment DIY - measure it the 'right' way
 W123 Transmission Vacuum Modulator Adjustment DIY - measure it the 'right' way Why do you need to do this?: You need to do this to properly check the internal hydraulic pressure of the transmission, either
The following information is gathered from pages of the Honda Aero Shop Manual.
 Original write-up by W. Boyter The following information is gathered from pages 3.10-3.12 of the Honda Aero Shop Manual. First of all, pull all your spark plugs, make sure your transmission is in neutral.
YOUR CAR's COOLANT MUST BE COLD TO DO THIS. DON'T BE STUPID AND SCALD YOURSELF.
 I just read through the service manual, checked out Billman's recommendations, and tackled the coolant change on my 2003 s2000. I'm not a mechanic by trade but have done valve adjustments, head gaskets,
Ford Super Duty 5.4L Spark Plug Change F250 4x4 XLT Sport Crew Cab
 1 of 32 Ford Super Duty 5.4L Spark Plug Change 2004 F250 4x4 XLT Sport Crew Cab Back to 2004 F250 Main Page Click Here for a PDF version of this article At close to 100k miles, I figured it was time for
VWvortex Forums > Golf IV & Jetta IV > DIY: Timing Belt And Coolant Pump Replacement on 2.0 AEG! Pics Inside! (Printable Version)
") VWvortex Forums > Golf IV & Jetta IV > DIY: Timing Belt And Coolant Pump Replacement on 2.0 AEG! Pics Inside! (Printable Version) Click here to print this topic. Post Title: DIY: Timing Belt And Coolant
VWvortex Forums > Golf IV & Jetta IV > DIY: Timing Belt And Coolant Pump Replacement on 2.0 AEG! Pics Inside! (Printable Version) Click here to print this topic. Post Title: DIY: Timing Belt And Coolant
Ford Racing BOSS 302 Engine Oil Cooler (11-14 GT)
") Tools needed: 14mm hex socket 7mm socket/wrench 8mm socket/wrench Ford Racing BOSS 302 Engine Oil Cooler (11-14 GT) 10mm socket (for airbox removal) ¾ inch or 19mm wrench Torque wrench Appropriate ratchets
Tools needed: 14mm hex socket 7mm socket/wrench 8mm socket/wrench Ford Racing BOSS 302 Engine Oil Cooler (11-14 GT) 10mm socket (for airbox removal) ¾ inch or 19mm wrench Torque wrench Appropriate ratchets
upper and lower ball joints ( I went with Moog from rockauto.com): two K80026 and two K8607T
: two K80026 and two K8607T") Parts required: two 5C3Z*4A322*AA = hub / steering knuckle o-ring two AC3Z*1S175*A = updated axle shaft "dust seal" two 5C3Z*3254*A = steering knuckle / axle shaft seal upper and lower ball joints ( I
Parts required: two 5C3Z*4A322*AA = hub / steering knuckle o-ring two AC3Z*1S175*A = updated axle shaft "dust seal" two 5C3Z*3254*A = steering knuckle / axle shaft seal upper and lower ball joints ( I
JRSC + BBK Install on SVTF. Neil A. Shah medicnas on focaljet September 2006
 JRSC + BBK Install on SVTF Neil A. Shah medicnas on focaljet September 2006 ECU up here. When removing make sure the smaller bundles of wires don t get wrapped around the bottom edge and break - this almost
DIY: Shiver Valve Check, Illustrated
 DIY: Shiver Valve Check, Illustrated By Petemoss, AF1 Forum Tools needed: 4mm allen wrench to remove all the fairing pieces 2.5mm allen wrench to remove battery holder 5mm allen wrench for valve cover
How To: Fix That Ugly Hanging E-Brake Cable A CFans Members Mod Project by dirtydawg
 How To: Fix That Ugly Hanging E-Brake Cable A CFans Members Mod Project by dirtydawg Skill Level: Easy Disclaimer: Please use caution and seek professional assistance when necessary. ColoradoFans.com,
BMW 528i E39 Sunroof Repair
 These instructions will help guide you through the repair process for broken sunroof control rails on an E39 chassis. Before I get started, I want to give a shout-out to a couple people who also posted
U-Score U-Score AAC Rank AAC Rank Vocabulary Vocabulary
 go 1 927 you 2 7600 i 3 4443 more 4 2160 help 5 659 it 6 9386 want 7 586 in 8 19004 that 9 10184 like 10 1810 what 11 2560 make 12 1264 is 13 10257 on 14 6674 out 15 2350 do 16 2102 here 17 655 eat 18
2007 Crown Victoria Police Interceptor (P71) Blend Door Actuator Replacement (If I did it, you can too.)
 Blend Door Actuator Replacement (If I did it, you can too.)") 2007 Crown Victoria Police Interceptor (P71) Blend Door Actuator Replacement (If I did it, you can too.) I'm not saying this is the only way, or even the right way, but it worked for me. First time I've
2007 Crown Victoria Police Interceptor (P71) Blend Door Actuator Replacement (If I did it, you can too.) I'm not saying this is the only way, or even the right way, but it worked for me. First time I've
Changing the Power Steering Belt
 Changing the Power Steering Belt Brett Dukes (Maverick) from the BigJimny Forum has contributed this article to the Website. Many thanks. Whilst off-roading on Sunday, my alternator Fan Belt snapped -
Disco 3 Clock Spring / Rotary Coupler replacement
 Disco 3 Clock Spring / Rotary Coupler replacement I recently had to change my Clock spring and thought some folks may find it helpful to see what it entailed. I did lots of reading around but couldn t
Spikes-Spider Hub Installation
 Spikes-Spider Hub Installation The instructions that are provided with the Spikes Spiders are pretty good. I've created this page for two reasons: to show those that are thinking of buying a set exactly
YOU MAY WANT TO FIRST TRY TO LOOSEN THE FILTER HOUSING
 2005 XC90 Tune-up (5-cyl) Including: Oil Change - Spark Plugs - Fuel Filter - Cabin Filter First off - let me say that I am an amateur (at best) mechanic, and I claim no responsibility for whatever you
Mercedes Diesel Valve Adjustment Procedure
 1 of 30 5/30/2008 12:58 PM Home Cars for sale Trucks for sale Where we are Links to other diesel sites About us Why diesel? Diesel Videos How they work How they sound FAQ Dodge Diesel Maintenance tips,
Door Panel Removal & Window Stop Adjustment
 Door Panel Removal & Window Stop Adjustment By: Jeff Wolford Disclaimer: This is simply an article of how I fixed my car. I m not responsible if you break, scratch, or mess up anything following my example.
How I installed new brake pads on my i with Sport Package (should be fine for other E39 s) By Robert B.
 By Robert B.") How I installed new brake pads on my 1999 528i with Sport Package (should be fine for other E39 s) How I installed new brake pads on my 1999 528i with Sport Package (should be fine for other E39 s) By
How I installed new brake pads on my 1999 528i with Sport Package (should be fine for other E39 s) How I installed new brake pads on my 1999 528i with Sport Package (should be fine for other E39 s) By
Illustrated guide to changing the mode of a Spektrum DX6 transmitter
 Page 1 of 8 Illustrated guide to changing the mode of a Spektrum DX6 transmitter Purpose Follow this process if you want to change the mode of your Spektrum DX6 transmitter. You can change between mode
How To: Thermostat change - D8 V6 194bhp
 How To: Thermostat change - D8 V6 194bhp Firstly, take off the Air Filter hoses and connectors and lift off. This leaves you with this workable space... I started with taking the two bolts out of the cable
 Installing Seat Belts in my Tudor August 2009 My '29 Tudor was restored about 25 years ago by my brother-in-law. He restored it to close to original, but made a few changes that many will claim are for
This is a guide to assist you adjust the valve clearance on a 2l V6 MIVEC engine found in a Mitsubishi FTO GPX
 Adjusting the valve clearance on a 2L V6 FTO engine This is a guide to assist you adjust the valve clearance on a 2l V6 MIVEC engine found in a Mitsubishi FTO GPX Disclaimer: This guide is to assist you
Do You Check Manual Transmission Fluid Hot Or Cold
 Do You Check Manual Transmission Fluid Hot Or Cold is a lot like having a worn out clutch in your vehicle with a manual transmission. Also, when your vehicle is cold, operate your engine at a lower RPM
Aamir_bt The legend..
 Aamir_bt The legend.. How to do timing on a 4XE1-W (DOHC) engine. well i decided to to a write up for DOHC timing since there was only the SOHC written up, and i had to do a timing belt on my stylus anyways,
Converting an A to 12v and Adding Turn Signals Bill Lee
 Converting an A to 12v and Adding Turn Signals Bill Lee Bill@WRLee.com When I bought my 1929 Tudor, it had been restored about 20 years earlier. It had halogens and had been converted to 12v negative ground,
Can You Put Automatic Transmission Fluid In A Manual Car
 Can You Put Automatic Transmission Fluid In A Manual Car WIth an automatic, you basically just need to check the dipstick and fill it up, as needed. To check the transmission fluid in a manual vehicle,
2001 V70 T5 ETM Removal and Cleaning Directions
 2001 V70 T5 ETM Removal and Cleaning Directions Howard Cheng howardc64@gmail.com 10/24/05 Version 1.4 Read this before you start I performed this ETM cleaning because I had gotten 2 reduced performance
Brake System Rebuilding the brake calipers
 Page 1 of 39 Brake System Rebuilding the brake calipers Written by the backyard hack mechanic Sean750 Document history: # 14 Jan 2004 added pictures of rear caliper rebuild kit # 13 Nov 2004 added more
O ring installation guide
 AtomicRice.com O ring installation guide Tools and materials needed: 1) Phillips Screwdriver ( one medium and one large head) 2) Small or Medium sized flathead screwdriver or thin rigid shim 3) Vaseline
 www.odometergears.com Mercedes-Benz Mechanical Odometer Repair This how to can be used for all mechanical repairs as the only difference will be the removal of the instrument cluster. http://www.dieselgiant.com/repairyourodometer.htm
DrVanos.com Stage II Installation Instructions. Tool rental is available with the purchase of a vanos kit *See website for more info*
 DrVanos.com Stage II Installation Instructions Special Tools Needed: Camshaft locking tool TDC Crank pin Sprocket turning tool Tool rental is available with the purchase of a vanos kit *See website for
HOW TO MODIFY A STOCK DODGE KEGGER INTAKE MANIFOLD
 HOW TO MODIFY A STOCK DODGE KEGGER INTAKE MANIFOLD Even though this 3.9L V6 intake manifold is smaller than the 5.2L and 5.9L V8 intake manifolds, the same instructions apply to all 3 engines. If you are
STEP #1: Remove the wheels from the truck. There are (6) 21mm lug nuts holding each wheel on... Remember Lefty Loosy, Righty Tighty.
 21mm lug nuts holding each wheel on... Remember Lefty Loosy, Righty Tighty.") - CustomTacos.com Page 1 of 36 How-To: Toytec Lift Install Read all of these install instructions prior to installing Toytec's suspension lift. I cannot be held responsible for any damages or personal
- CustomTacos.com Page 1 of 36 How-To: Toytec Lift Install Read all of these install instructions prior to installing Toytec's suspension lift. I cannot be held responsible for any damages or personal
Volvo 850 Radiator Replacement Jason Reed 29 March 2013
 This write up covers removing and replacing the radiator on a 97 855 GLT wagon with light pressure turbo and automatic transmission. This car has 162K miles. The radiator, which was original, developed
2010 Toyota Prius Fog Light Retrofit
 2010 Toyota Prius Fog Light Retrofit A DIY prospective Last updated: Friday, December 25, 2009 *** Disclaimer Use this document and its contents at your own risk! *** Forward: This document was compiled
Yep no change - it still pumps out hot air no matter how things were set.
 Page 1/5 Frequently Asked Questions Question Heating fails to adjust to the temperature you set Answer If you have Dual Zone Heating / Ventillation / Air Conditioning you might find that either side continues
Replace front brake pads and discs * (Ford Galaxy )
") Replace front brake pads and discs * (Ford Galaxy 2006-2015) *Caution! This instructions are created by random users and must be used as a reference only! Please, take all safety precautions, and if you're
Replace front brake pads and discs * (Ford Galaxy 2006-2015) *Caution! This instructions are created by random users and must be used as a reference only! Please, take all safety precautions, and if you're
How to change Swirl Flaps, on Diesel BMW
 How to change Swirl Flaps, on Diesel BMW I am now going to show you how i did it on my car. May'sedition of Total BMW (still in WHSmiths) did a cover on how to change and modify Swirl flaps on a 330d engine,
Brake Caliper Rebuild - Part Numbers & Tips Per Jim Millet, 3/15/2005
 Per Jim Millet, 3/15/2005 Not too difficult a job. Rears are easier than fronts to access. You ll need the following gasket sets: Front caliper gasket set, P/N 34 11 1 157 037, MSRP $13.58 Rear caliper
PML Installation Review p.k.y. 19 April 2014
 Reason for installing a PML 11036 transmission pan on my 2010 GMC Savana 3500: 1. My 2010 GMC 3500, 12 foot box truck is placed under heavy hauling condition (construction tools and building material)
BMW 3 Series Oxygen Sensor
 1984-1991 BMW 3 Series Oxygen Sensor Replacement Replace an old oxygen sensor on your E30 for better gas mileage. Written By: Andrew Bookholt ifixit CC BY-NC-SA www.ifixit.com Page 1 of 10 INTRODUCTION
Installing LED lights in a Hypercharger By Keith Edwards Joker s Wild! (Wildjokr)
") Installing LED lights in a Hypercharger By Keith Edwards Joker s Wild! (Wildjokr) THINGS YOU WILL NEED: A Hypercharger (duh!) LEDs (The ones I got were from Benny Bryant at Fantasies on Wheels in Sylacauga,
Installing LED lights in a Hypercharger By Keith Edwards Joker s Wild! (Wildjokr) THINGS YOU WILL NEED: A Hypercharger (duh!) LEDs (The ones I got were from Benny Bryant at Fantasies on Wheels in Sylacauga,
Hasse Mods for the Ampeg J20 Guitar Amp
 Hasse Mods for the Ampeg J20 Guitar Amp The following is adapted from a post I put up on The Gear Page, in the Amp Techincal forum. It shows the mods I did to my Ampeg J20. Okay, here s my mods for this
Rebuilding the Alternator for a 2007 Honda Accord 4CYL. Honda CYL Alternator (Denso)
") Rebuilding the Alternator for a 2007 Honda Accord 4CYL Honda 2007 4CYL Alternator (Denso) The OEM brushes and bearings for this alternator are available for purchase online. On my vehicle with ~240k miles,
Rebuilding the Alternator for a 2007 Honda Accord 4CYL Honda 2007 4CYL Alternator (Denso) The OEM brushes and bearings for this alternator are available for purchase online. On my vehicle with ~240k miles,
STEPS FOR REMOVING REAR ASHTRAY & CUP HOLDER, CENTER ARMREST, E- BRAKE CONSOLE, FRONT ASHTRAY, LOWER CENTER CONSOLE AND GLOVE BOX
 Please give credit where credit is due! This DIY was completed ENTIRELY by the hardest working VW Vortex moderator on the site!! Gary Thompson, Ph.D. - vortex ID VGRT6, email address vgrt6@yahoo.com. Please
Troubleshooting Guide for Limoss Systems
 Troubleshooting Guide for Limoss Systems NOTE: Limoss is a manufacturer and importer of linear actuators (motors) hand controls, power supplies, and cables for motion furniture. They are quickly becoming
Troubleshooting Guide for Okin Systems
 Troubleshooting Guide for Okin Systems More lift chair manufacturers use the Okin electronics system than any other system today, mainly because they re quiet running and usually very dependable. There
Two bolts at. Two each side where studs pass through. rear. Two bolts at. front. Front-most bolt for diagonal brace. Rear jacking point
 The following describes the process of changing the transmission s gear oil in my own 2008 CS 6sp. I have no relationship with any of the products mentioned, other than being a satisfied consumer. Exercise
BBK Ceramic Long Tube Headers (99-04 Cobra and Mach 1) - Installation Instructions
 - Installation Instructions") BBK Ceramic Long Tube Headers (99-04 Cobra and 03-04 Mach 1) - Installation Instructions The below installation instructions work for the following products: BBK Ceramic Long Tube Headers (99-04 Cobra
BBK Ceramic Long Tube Headers (99-04 Cobra and 03-04 Mach 1) - Installation Instructions The below installation instructions work for the following products: BBK Ceramic Long Tube Headers (99-04 Cobra
Tailgate Light Bar Installation by Flopster Feb 2015
 Tailgate Light Bar Installation by Flopster843 23 Feb 2015 If you ever looked at the rear of a 3rd generation Dodge Ram dually pickup truck, you'll notice that there is a light bar with 3 red marker lights
PA Performance High Torque Starter Solenoid Installation Instructions
 PA Performance High Torque Starter Solenoid Installation Instructions Introduction: If you are having issues with your starter related to your solenoid, the PA Performance High Torque Starter Solenoid
2001 BMW X5 4.4i. Fuel Filter Replacement
 P P 2001 BMW X5 4.4i Fuel Filter Replacement Symptoms for Replacement: OBDII code P0171, Lean Bank1, which could be a bad or dirty MAF sensor Sluggish engine performance including hesitation with Wide
Hood stripes Tools needed from AutoZone or any auto parts store: bottle spray, squeegee, a towel that you re using to clean you car up after washing,
 WARNING These following pages are instruction for C5 CE stripes; however, it is the same method applying vinyl. Please spend time to read thru these pages. At the end, it is your C5 GS1 stripes instruction.
Manual Where Do I Get Cars Save Gas Mileage Than Automatics
 Manual Where Do I Get Cars Save Gas Mileage Than Automatics Where do automatic cars fare now in the big fuel consumption debate: automatic significant moves made to improve the technology in automatic
Here's the difference (externally) in the and 04+ bumper and headlights: (00-03 on top, 04 on bottom)
 in the and 04+ bumper and headlights: (00-03 on top, 04 on bottom)") OK guys, I've been meaning to post this for awhile.. well here it goes. I did the '04 front end conversion on my '01 about 4-5 months ago, but then the dealer had to buy the car back for legal reasons.
OK guys, I've been meaning to post this for awhile.. well here it goes. I did the '04 front end conversion on my '01 about 4-5 months ago, but then the dealer had to buy the car back for legal reasons.
Improving the gearshift feel in an SW20.
 Improving the gearshift feel in an SW20. Part one In 3 parts. The SW20 gearshift can be often be greatly improved by eliminating play in the shift linkages, and this article covers three areas that need
 Page 1 of 14 This install requires work on your supplemental restraint system and could cause injury or damage to your car. If you are not comfortable performing the steps detailed here then do not attempt
Manual Where Do I Get Cars Need Transmission Fluid
 Manual Where Do I Get Cars Need Transmission Fluid This image compares the color of new transmission fluid to burnt fluid. be times when you need to get a transmission flush, in order to help protect your
This is what we are trying to create in the steps below
 You will need: (1) Some 3/4 aluminium or steel flat bar (+/- 1 foot) (2) About 12 of 3 Aluminium or steel tubing. (2) Piece of 3X3 silicone hose and 2 hose clamps (3) 1 K&N (or similar) high flow filter
Replacing MK4 Golf/Jetta radiator mounts in-car
 Replacing MK4 Golf/Jetta radiator mounts in-car This is a guide to replacing the radiator mounts in a MK4 Golf/Jetta. This involves moving the core support to the service position which allows you to do
Mustang Steeda Tri-Ax Shifter Installation Guide
 Mustang Steeda Tri-Ax Shifter Installation Guide The below installation instructions work for the following products: Mustang Short-Throw Shifters and Mustang Handles This "all questions answered" guide
VW 1998 Jetta GLX or VR6 GTI PCV valve Modification
 Disclaimer: This is how I ended up modifying my stock PCV so I did not have to buy a complete intake hose (+/- $150). Don t blame me if this does not work or if it makes it worse You are doing this at
Physics Work with your neighbor. Ask me for help if you re stuck. Don t hesistate to compare notes with nearby groups.
 Physics 9 2016-04-13 Work with your neighbor. Ask me for help if you re stuck. Don t hesistate to compare notes with nearby groups. Today we ll build on what we did Monday with batteries and light bulbs.
FITTING OIL TEMP AND PRESSURE GUAGES
 FITTING OIL TEMP AND PRESSURE GUAGES this guide is of reference to fitting an oil temp and pressure sender/ sensor into a sandwich plate- not the sump plug temp sensor (although it wouldn't be much different
Automatic trunk lid retrofit BMW F10 Bj.2011 by laser21 bimmerfest.com
 Automatic trunk lid retrofit BMW F10 Bj.2011 by laser21 bimmerfest.com lukasko@gmail.com This is a short guide to help you retrofit the option SA316 - automatic trunk lid mechanism into your F10. That
In summary, the procedures includes removal of the belly pans, draining of the engine block, draining of the radiator, coolant mixing and refilling.
 COOLANT DRAIN AND CHANGE PROCEDURE Recently, there was a request for a picture guide for draining/changing coolant (Robot808 and James-man) and since I was going to do this operation on Idaho (88), I took
Installing the Audiovox CCS-100 Cruise Control.
 Installing the Audiovox CCS-100 Cruise Control. This article was written by: Lon Lawrence w650kawasaki@leaco.net Cruise Control : Audiovox CCS-100 ($89) Webpage : www.summitracing.com Message: I've installed
We all put our heads together to try and determine what the facts were. They were as follows:
 VWvortex Forums > Eos > How to solve (or prevent) Eos Roof leaks As many of you know, I don t own an Eos. This makes it difficult to provide practical advice based on my own experience with the car, as
Timing belt change. Timing belt change
 Timing belt change Put 2 new Gates T275 timing belts on today. Tensioner drilled smooth and tight with less than 16,000 miles on her decided not to change the tensioners just the belts. You'll need some
Electronics. Electronics docs.imade3d.com/ Page 1 of 15
 Electronics 2018 docs.imade3d.com/ Page 1 of 15 Step 1 Wire Comb 4" zip ties Wire comb Step 2 Align the wire comb with the corresponding annotations (ie. filament fan, heat block, etc.), and secure it
Show me, Tell Me Questions.
 Show me, Tell Me Questions. Ford Fiesta. Below are all the DSA 2014 driving practical test questions and answers for a Ford Fiesta. At the start of the practical driving test, the driving examiner will
Some tips and tricks I learned from getting clutch out of vehicle Skoda Octavia year 2000
 Some tips and tricks I learned from getting clutch out of vehicle Skoda Octavia year 2000 Last change 2013-Oct-11 I bought Haynes manual for a starter. That s something well worth it s cost I believe.
Installing the Dan-Marc and Pingel setup.
 Installing the Dan-Marc and Pingel setup. This is an alternative to the OEM vacuum petcock. It's the setup I use and feel more comfortable with it. Many still like the OEM vacuum petcock and they can continue
Rebuilding the Power Steering Pump for a 2007 Honda Accord 4CYL
 Rebuilding the Power Steering Pump for a 2007 Honda Accord 4CYL Disclaimer: I have benefited greatly from others who have taken the time to post auto repair videos/tutorials online. To try and return the
Mercedes Manual Transmission Fluid Change How Often Do You
 Mercedes Manual Transmission Fluid Change How Often Do You Transmission repair costs are expensive, whether it's to rebuild or replace one. If you notice fluid under your car, you should have the transmission
Bendix Hydroboost Repair
 Bendix Hydroboost Repair Report this image Pic 1 the leaky power piston seal... (probably master cyl too.) Pic 2 PS fluid after spider removal and MC actuator rod Pic 3 Removing the accumulator (note 1/8
Anglefire s Guide to Radiator Replacement
 Land Rover Discovery 3 Anglefire s Guide to Radiator Replacement Mark Colston WWW.DISCO3CLUB.CO.UK August 2011 Version 1.0 Copyright Mark Colston Change Record. DATE Revision Update Notes Made By August
egr and butterfly valve pics
 Page 1 of 16 Forum Gallery Shop Sponsors Home FAQ New Posts Private Messages Search Members Members Map Calendar Groups Profile Donate Log Out [heine] Announcement: Please provide feedback on electronic
Spark Plug replacement on VW 2.0L engine with AEG code
 Spark Plug replacement on VW 2.0L engine with AEG code This is document is an attempt to describe and illustrate to some extent the process of replacing the spark plugs on a Volkswagen 2.0L engine with
Inside a typical car engine. Almost all cars today use a reciprocating internal combustion engine because this engine is:
 Tech Torque HOW PETROL ENGINES WORK The Basics The purpose of a gasoline car engine is to convert gasoline into motion so that your car can move. Currently the easiest way to create motion from gasoline
Door panel removal F07 5 GT
 Things needed Decent plastic trim removal tools Torx 30 Spare door clips 07147145753 I got away with a set of 5 but if I did it again I d be cautious and get 10. From prior experience if they are damaged
Instructional Video Productions and Sales
 Instructional Video Productions and Sales Home DVD Info Pictorials Sales Images Updates to DVDs Contact Information BMW R1200 Throttle Body Sync: If you are interested in a Video Version covering everything
1. Find the entire rear e-brake/hub assembly of a 330 and transplant it, which is expensive and not worth it imo.
 E46 330 Rear Brake Conversion DIY After completing the front brake conversion it was time for the rear ones. Good upgrade but no as simple or straightforward as the front one. Researching, I came to the
Projector39/Umnitza BMW Headlight & Re-Installation for E39s Predator Angel Eyes, and Lamin-X Installation
 Projector39/Umnitza BMW Headlight & Re-Installation for E39s Predator Angel Eyes, and Lamin-X Installation Now it is time to remove the headlights! Obviously you have to open the hood to do this. 100_3630.jpg
M1A1 Thompson Upgrade
 M1A1 Thompson Upgrade If you are mechanically inclined at all. This should be no problem. I'll start off with a list of things you will need. Thompson M1A1 Whisky Cigarettes Tools: Flat screwdriver No.
Fanatec GT3RS V1 to GT3RS V2 Tutorial
 Fanatec GT3RS V1 to GT3RS V2 Tutorial by Roy Visser 1 How to update your Fanatec GT3RS V1 wheel to a GT3RS V2 wheel Welcome to this guided and detailed tutorial for upgrading your Fanatec GT3RS V1 wheel
Replace C1U-H47 Carburator on Homelite
 Replace C1U-H47 Carburator on Homelite Weed Whacker It's cheaper, quicker, and more reliable to replace your carburetor with a new one, rather than rebuilding it. Written By: Gil ifixit CC BY-NC-SA www.ifixit.com
1986 Rear Disk Brake Upgrade. All hard lines mounted to the rear axle with mounting screws. 1/4" fittings
 1986 Rear Disk Brake Upgrade Being well prepared for a project of this size is the key to success. I thought I was well prepared by doing a lot of research and getting all of the required parts before
Ball Joint Replacement for 2005 F L SuperDuty SRW, 4x4 with ESOF
 Ball Joint Replacement for 2005 F-250 6.0L SuperDuty SRW, 4x4 with ESOF Parts required: two 5C3Z-4A322-AA = hub / steering knuckle o-ring (my originals were yellow, the replacements are black) two AC3Z-1S175-A
M52tu-M54 VANOS Assembly & Timing Using G.A.S. Professional Cam Tool Kit
 Home BMW Solutions Porsche Solutions DIY Tech Engine Services Dyno Services Machining About Contact Store Tool Rental M52tu-M54 VANOS Assembly & Timing Using G.A.S. Professional Cam Tool Kit This procedure
Disconnect the negative battery cable!
 Understanding Mod-3 on a C90 With Wiring Diagrams By DrJones18LC I do not have a C90 at my disposal (or audio/video equipment for that matter) so I can't make a live step by step how-to on doing Mod-3.
X-Type w/ non-premium sound amplifier installation instructions
 X-Type w/ non-premium sound amplifier installation instructions 1. Pull radio from dash (see Radio Removal Instructions ) 2. Disconnect wiring harness from back of radio by pushing in tab on plug and pulling
Figure 1: Valve housing smooth vs. o-ring groove
 If you are driving an older Corvette, and by that I mean a C2 or C3, it will eventually get to a point where the Power Steering Control Valve (PSCV) will leak and require attention. In 2002, I had to repair
*Some speedometers have these additional electronic connections. If yours does, then remove the smaller slotted screws shown.
 www.odometergears.com 1981-1985 240 Cable-Driven Speedometers (NOT for 1986 and later electronic units) http://www.davebarton.com/240-odometer-repair.html For this set of instructions below, I will not