Passive Income Ideas
|
|
|
- Hillary Owens
- 5 years ago
- Views:
Transcription


1 DOWNLOAD & BUILD UPLOAD & SELL!!"#$%&'()%%)$'*$+$*,-,./0$(%$1123# Earn commissions on many of our plans! See how by visiting our home page and click on the Affiliates link at the top of the page! ALSO Sell your Plans, How to Information, self help information and more under our DIY Plans section. Visit and click on the Sell Your Plans section at the top of the page for more information! If you have a website where you offer plans or information for sale, reach more customers by selling them on too. Offer them through Affiliate Marketing in our Affiliate plans section or you can upload them at no charge in our DIY Plans section. You get paid automatically through PayPal on our DIY Plans section and Affiliates get paid through our affiliate program. All of this is safe, secure and most of all HONEST! EARN GENEROUS COMMISSIONS ON Many of our Plans in our DIY Plans categories. Check out our affiliates link and our Sell Your Plans Link at the top of our main webpage for more information, or feel free to contact us for more information through our online Contact Us form submission, or us directly at info@gizmoplans.com. ADD A NEW TWIST TO THESE VINTAGE PLANS, MAKE THEM BETTER AND BRING THEM CURRENT WITH THE LATEST TECHNOLOGY AND IMPROVED DESIGN. Take photos and document everything, create a new set of plans and once complete upload and sell them at Passive Income Ideas Generate Auto Pilot Income From Simple Review Sites and or online referrals/reviews! Easy to set up and easy to get started residual part time home based income! Hello, Brian here from Gizmoplans. If your new to affiliate marketing and are interested in learning more on what Affiliate Marketing is all about this simple course will teach you everything! I purchased this course myself and implemented some of the strategies on our website gizmoplans.com. Prior to taking this course, I had taken a half day course at a local university, many of the strategies I learned in the University course were also taught in this online
2 course, PLUS MANY MORE unique EYE OPENING IDEAS, showing step by step ways WITH VIDEO on how to implement and make spare time income online. The course has been recently updated with all new videos and even more techniques. These strategies DO WORK, and once you have your own personal review site set up it generates auto pilot income, (totally passive income, or autopilot income) leaving you more time to do other things. I recommend this course for both newbies just starting out and looking for home income opportunities as well as others that already have a online presence or website looking for new unique marketing ideas or part time business opportunities. A couple of things to mention, the sales page is a bit hyped, but nothing bad, just, as in many sites, showing exceptional results. Keep in mind from what we have found, most reviews once set up correctly can earn on a average of $300 per month. This is not bad at all and is attainable, not to mention many people that use this system end up setting up MULTIPLE reviews. (2) PLEASE NOTE: with the program their are ways to speed up setting up your pages such as a recommended software called Keyword Elite, this helps automate and speed up findiing good keywords for your review page. This software is not needed to start out but if you find yourself setting up multiple review sites/reivew pages SEO software is nice to have to speed up the process, HOWEVER, I DO NOT recommend the Keyword Elite. I purchased it myself and ended up returning it for a refund because the customer service was terrible and I did not like how long it took to generate words I was looking for. Since then I have purchased different software for about the same price that came recommended By a Professional in SEO. With this new software I have had exceptional results. Should you get to that point just CONTACT US and I will fill you in for free on the best direction to take. ONE MORE THING, if you already have a website, personal blog, etc, you could quickly & easily implement strategies in this course to make your site generate more income for you. If you want to Make Passive Income, THIS IS IT and is definitely WORTH CHECKING OUT! The new course just released also shows you STEP BY STEP in video on how to do EVERYTHING! It does not get any more simple than that! FOR MORE INFORMATION ABOUT THIS PRODUCT Click Here! WHAT MAKES THIS EXTRA INCOME IDEA UNIQUE?? Once Your Review Site Is Set Up It Automatically Generates Extra Income For you 24/7 This Can Be Done With or WithOUT a website Passive Income Opportunity Home business income opportunity No previous experience required Simple proven techniques to earn money online Step by step instructions including video on how to implement Recently updated as of Jan 2011 Start out on a shoestring budget, very little money is needed to start and implement. When done correctly realistically start generating autopilot income within 1 months time or even less! Work from home in your spare time setting up your own product review site Shows you how to find products that people are searching for and looking to buy everyday online Legitimate Home Business Opportunity Make your current website or blog generate more income for you! THIS PROGRAM OFFERS A NO QUESTIONS ASKED 100% 60 DAY MONEY BACK GUARANTEE OR WE WOULD NOT RECOMMEND IT! The best part about it is, download the product and put it into action, if you don't see results you like within the 60 days simply request a refund, get all of your money back and YOU ARE OUT NOTHING!!

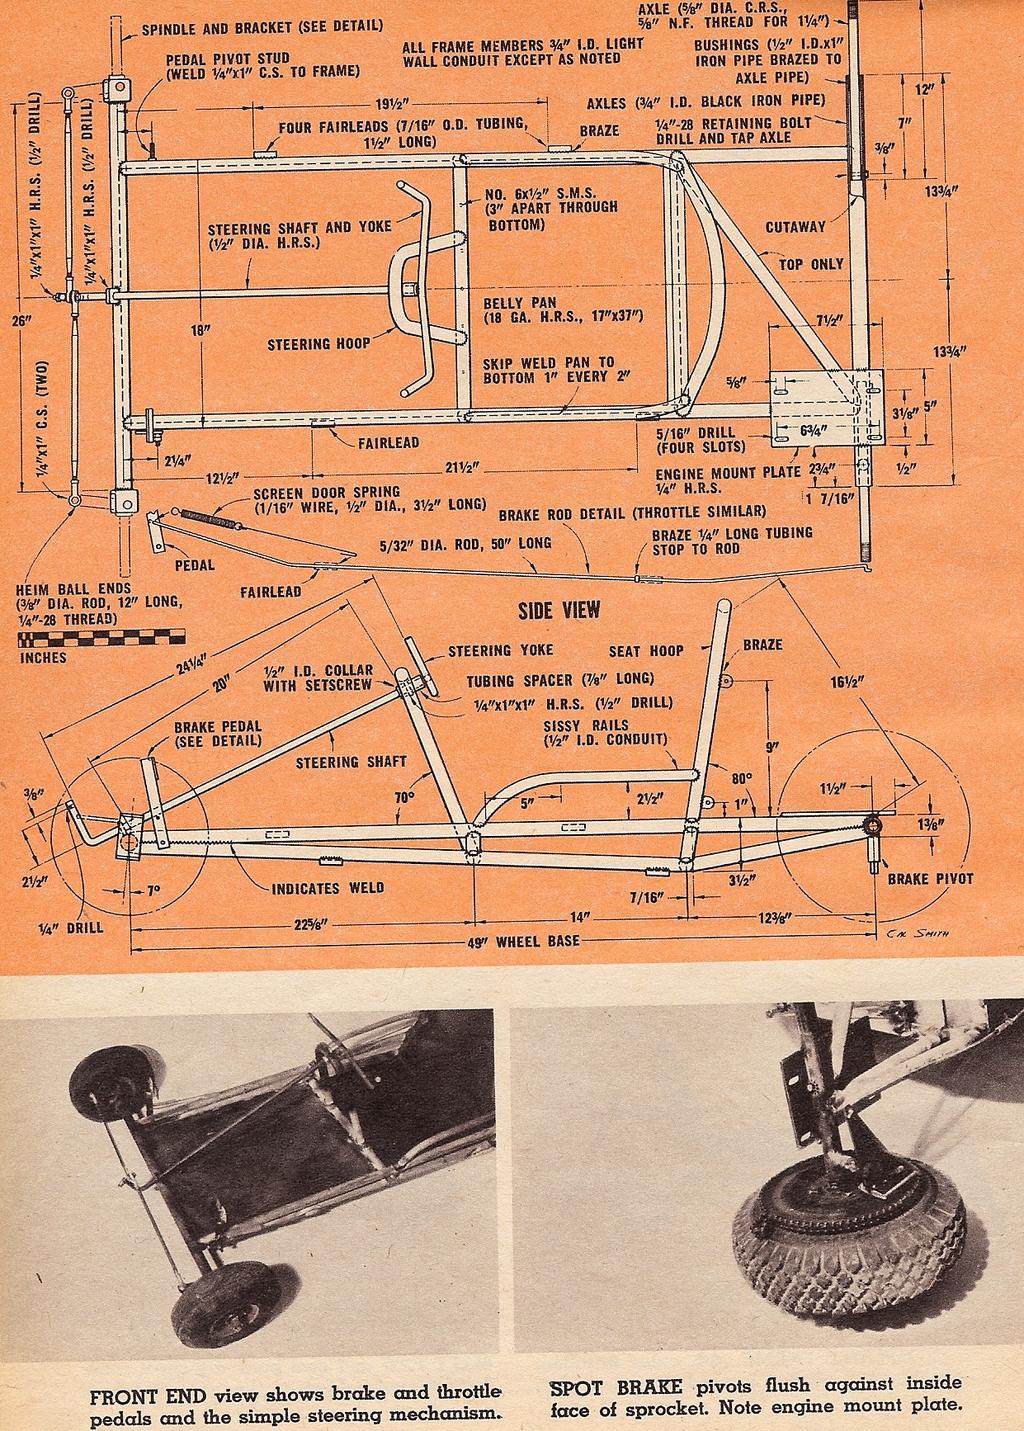
3 HOURS TO COMPLETE - APPROX 25 TOOLS REQUIRED: Square Hack Saw Tin Snips Files Hammer Large Vise Electric Hand Drill or Drill Press VINTAGE GO CART PLANS To help hold costs down, the frame is made of thin-wall conduit, but more expensive chrome-moly tubing could be substituted throughout. Some parts, the seat and steering hoops, steering yoke, front wheel spindle brackets and engine mount plate, could be purchased from various kart manufacturers online should you want to speed up the building process. Begin construction by drawing a side frame outline on a piece of scrap lumber. Cut and flare the tubing required and heat the lower piece to make the bend. Fit the pieces over the outline and clamp them. Then tack weld all joints and remove the framing from the board. Using the first side as a pattern, clamp the parts of the second to it and tack weld them together. This will insure uniformity.

4 Next fabricate the front and rear axles. Bend the front wheel spindle brackets to shape and drill them for the kingpin bolts. Then weld them to the front axle tube. Align them carefully, square on the tube ends and parallel to each other. The rear axle tube ends are bushed with a length of pipe to reduce the inside diameter for the 5/8-inch round stock axles. The axels are held in the tube with a quarter inch bolt near each inner end. They can be tapped for short bolts or holes can be drilled all the way through for bolts and nuts. The side frames, axles and crosspieces can now be assembled. Cut and flare the pieces and tack weld them, using a try square to make sure theyʼre aligned. Add the axles to the frame ends, squaring up the assembly as it progresses. Note that the front axle is rotated slightly in the side frame ends so that the king pin axis has a 7 degree rearward slant. The frame-axle assembly can now be completely welded at all joints. As the last step, add the diagonal crosspiece at the rear. The front wheel spindle units are made up next. Cut the kingpin bushing tubes to fit snug inside the brackets. Then weld the wheel spindle bolts to the sides of the bushings. Follow this by welding the spindle steering arm pieces to the bushings. Note that right and left hand units are required since the steering arm pieces slant inward. The steering and seat hoops are now formed and cut to fit onto the frame. To make the curves, apply heat and bend a little at a time so that the tubing will not deform. Tack weld the hoops in position after clamping them at the proper angles; then complete the welds. Next cut the belly pan and seat back to shape, checking the pieces against the frame for correct dimensions. Tack weld the belly pan into place on the bottom of the frame and then skip weld the pan edges to the frame. Welds should be about 1 long and 2 apart. Where the pan touches the crosspiece at the steering hoop rosette, welds can be used or the sheet and tubing can be drilled for self tapping sheet metal screws. To prevent the sheet steel from buckling during welding, use a chill block clamped about a quarter-inch from the edge along the area to be welded. The chill block can be a piece of 1/2x1x24 inch steel bar stock. The seat back is skip welded to the front of the seat hoop in the same manner as the belly pan. Make half round cuts to clear the side frame tubes. Sissy rails can now be bent to shape, fitted to the sides and seat hoop and welded into place.
5

6 The Steering Assembly is made next. Cut and drill the steering shaft support brackets of 1/4x1 inch strip steel. Bend the steering shaft front end and drill it for the tie-rod bolt. Then bend the yoke to shape. Put brackets and collars on the steering shaft and weld the yoke to the shaft end. Next slide the shaft through the top bracket to spread out the collars and weld the bracket to the underside of the hoop curve. Hold the lower end of the shaft at the proper angle to align the top bracket while welding. Finish by sliding the shaft into position and welding the front bracket to the top of the front axle. The tie rod ends are threaded for about one inch to match the Heim ball end fittings. Clevis end or Ford brake rod ends could be substituted if the ball ends are not readily available. Adjust the rod ends at the center to align the wheel spindles at zero degrees. Toe in or toe out can be adjusted later when the karts running qualities have be checked. While working on the front end, weld the pedal pivot bolts to the side frames. Drive and engine mount parts are next on the list. The wheel hub is first fitted with a larger washer for bolting on the large sprocket. This permits removal of the sprocket if different sizes are to be fitted. (If you do not wish to bother with removal, the sprocket can be welded flush to the wheel hub inside face.) The large washer and sprocket are drilled for mounting bolts. Disassemblethe wheel to make welding on the hub easier. The large washer is welded to the hub 3/16 inch from the inside face so the hub forms a shoulder for centering the sprocket. Weld the washer from behind, aligning it carefully so that it and the sprocket will track without any wobble. After assembly, mount the drive wheel and sprocket on the axle. Next bolt the engine to the mount plate, install the clutch (if used) and the chain. Now carefully align the chain and sprockets, moving the engine and mount on the frame. When set mark the position and clamp the mount plate to the frame. Then remove the engine and wheel and weld the mount plate to the frame. The engine mounting bolts should be in the center of the slots so that the engine can be shifted to correct the wear on the chain and sprocket.


7 The spot brake is made and installed next. Detail drawings are self explanatory, but follow this procedure for mounting on the axle: mount drive wheel on axle; mount brake on pivot bolt and tube; clamp brake firmly to sprocket in brake position (this will position pivot tube on bottom of axle tube); then clamp and weld pivot tube to axle. The throttle linkage is made next. Cut out and drill all parts shown on the detail drawing. Then put the engine in place on the mount so that the upper linkage parts can be aligned with the engine throttle. The brackets, rods and cranks can be assembled by brazing. Complete the throttle and brake linkage by making the pedals and push rods. Note that there are right and left hand pedals. Remember to

8 slide the fairleads and stop tubes onto the push rods before bending the S ends. Rods can be fitted with clevis ends if desired so that adjustments can be made. Fit one end of the rod to the brake at the rear and put the pedal on the other end. Next put the pedal on the pivot bolt at the front, clamp the fairleads to the side frames and braze them in place. Braze the stop to the rod ahead of the fairlead with the brake off and clear of the sprocket. The throttle push rod and pedal are assembled in a similar manner. Last, make and install return springs on both pedals. This completes the metal work on the kart. All welds should be wire brushed. Welding splatters and braze flux should be chipped off all metal surfaces and the metal cleaned before painting. Its a good idea to clean up the welds during fabrication for easy access to the tight corners.] Just about any type of engine can be used with slight modifications. The kart can also be customized in just about any way with such items as mufflers, drum brakes, chromed tanks, steering wheels, racing slicks etc. Plans can be modified to your liking and what you can afford!
60-65 Falcon, Comet & Ranchero Coil Spring IFS
 60-65 Falcon, 62-65 Comet & 62-65 Ranchero Coil Spring IFS All engine installations with this front end will require a rear sump oil pan. 289-302 Small Block Ford Motors Milodon rear sump pan holds 7 quarts
THE SCIENCE & MECHANICS half-size antique
 Build it to scale: THE SCIENCE & MECHANICS half-size antique truck with its 2-hp, 4-cycle gasoline engine makes a really sensational toy for a youngster. It will carry Junior around the lot at a brisk
Cable Shift Linkage Kit
 Cable Shift Linkage Kit INSTALLATION INSTRUCTIONS Ford column to Ford 4R70W/AODE Trans FOR PART NUMBER S: 2802650010 S INCE 1986 www.ididitinc.com 610 S. Maumee St., Tecumseh, MI 49286 PH: (517) 424-0577
First, check and record the camber and caster readings, they will be adjusted later.
 First, check and record the camber and caster readings, they will be adjusted later. The caliper-mounting bosses are machined perpendicular to the spindle so they are an excellent place for the level.
Next, set the bar level and tighten it down. Do this on both the driver and passenger sides.
 Next, set the bar level and tighten it down. Do this on both the driver and passenger sides. Using two tape measures, measure the outside width at the front and the rear of the tubes. The front dimension
WH Ford 2WD Steering System #2013/2015 Date 02/15/04 rev. 1
 Phone (209) 400-7200 Fax (209) 943-7923 www.wildhorses4x4.com WH Ford 2WD Steering System #2013/2015 Date 02/15/04 rev. 1 Basic system notes: This system works on 1966-1977 Broncos with manual steering
Detroit Speed, Inc. Mini Tubs Camaro/Firebird P/N:
 Detroit Speed, Inc. Mini Tubs 1967-1969 Camaro/Firebird P/N: 040401 The Detroit Speed Mini-Tubs are inner wheel housings designed to accommodate a wider wheel and tire package. They are engineered for
Installation Instructions Table of Contents
 Installation Instructions Table of Contents Pre- Installation of Garage Storage Lift 2 Layout the Garage Storage Lift 3 Installing the strut Channels 3 Install the Drive Assembly 5 Install the Drive Shaft
Detroit Speed, Inc. Mini Tubs Camaro/Firebird P/N:
 Detroit Speed, Inc. Mini Tubs 1967-1969 Camaro/Firebird P/N: 040401 The Detroit Speed Mini-Tubs are inner wheel housings designed to accommodate a wider wheel and tire package. They are engineered for
Installation Instructions Z-Gate Shifter
 Installation Instructions Z-Gate Shifter Part Number 80681 1998, 2001 by B&M Racing and Performance Products The B&M Z-Gate shifter can be used in vehicles equipped with most popular three speed automatic
My Hawk build Part 8 by Stuart Clarke
 My Hawk build Part 8 by Stuart Clarke Front hubs, brakes and brake lines. There was still no news on my rear springs so I thought I d find something else to get on with. I had the front hubs, brake calipers
INSTALLATION INSTRUCTIONS FOR PLEASE READ AND UNDERSTAND TERMS/POLICIES BEFORE YOU INSTALL THIS SYSTEM
 MOUNTAIN OFF ROAD ENTERPRISES. INC. P.O. BOX 690 DELTA, COLORADO 81416 970-625-0500 E-mail: info@mountainoffroad.com www.mountainoffroad.com INSTALLATION INSTRUCTIONS FOR 8795-3 PLEASE READ AND UNDERSTAND
Cable Shift Linkage Kit
 Cable Shift Linkage Kit INSTALLATION INSTRUCTIONS ididit column to Ford 4R70W/AODE Trans FOR PART NUMBER S: 2801600010, 2802600010 S INCE 1986 www.ididitinc.com 610 S. Maumee St., Tecumseh, MI 49286 PH:
HEIDTS SUPERIDE INSTALLATION INSTRUCTIONS OPEN WHEEL SUPERIDE INDEPENDENT FRONT SUSPENSION
 HEIDTS SUPERIDE INSTALLATION INSTRUCTIONS OPEN WHEEL SUPERIDE INDEPENDENT FRONT SUSPENSION Please read these instructions completely before starting your installation. Remember the basic rule for a successful
Slide the billet aluminum cap over the bushing and secure with the 3/8-16 x 2 1/2 socket head allen and locknuts provided.
 Slide the billet aluminum cap over the bushing and secure with the 3/8-16 x 2 1/2 socket head allen and locknuts provided. Put the urethane bushings into the upper antiroll-bar-link eyebolt. Coat the bushings
RS-2 SINGLE ACTION REAR BUMPER WITH TIRE CARRIER INSTALL MANUAL FOR JEEP WRANGLER ALL MODELS.
 RS-2 SINGLE ACTION REAR BUMPER WITH TIRE CARRIER INSTALL MANUAL FOR 2007-2016 JEEP WRANGLER ALL MODELS. Rear Bumper Installation Instructions 1) Remove factory rear bumper, (this includes all tow hitch
How to Set the Alignment on Ford Mustangs
 How to Set the Alignment on 1967-1973 Ford Mustangs Let's Get This Straight - Mustang Monthly Magazine Christopher Campbell Technical Editor March 25, 2015 Frontend alignment is one of the most basic adjustments
Timing the 9N/2N Steering Sector Gears
 Timing the 9N/2N Steering Sector Gears by John Korschot - www.johnsoldiron.com (May 2010) The procedure for timing a set of steering gears in the 9/2n tractors is published in the I&T FO4 shop manual.
INSTALLATION INSTRUCTIONS FOR PLEASE READ AND UNDERSTAND TERMS/POLICIES BEFORE YOU INSTALL THIS SYSTEM
 MOUNTAIN OFF ROAD ENTERPRISES. LLC. P.O. BOX 690 DELTA, COLORADO 81416 970-625-0500 E-mail: info@mountainoffroad.com www.mountainoffroad.com INSTALLATION INSTRUCTIONS FOR 8795-2 PLEASE READ AND UNDERSTAND
Z-Gate Universal Shifter
 Installation Instructions Z-Gate Universal Shifter Fits: GM, Ford, Lincoln and Chrysler Transmissions See Application Guide for Specific Applications Part #80681 Rev 06/01/2018 WORK SAFELY! For maximum
RHINO SUSPENSION SYSTEM INSTALLATION INSTRUCTIONS
 PARTS INCLUDED: 2 FRONT UPPER A-ARMS 2 FRONT LOWER A-ARMS 2 UNI-BALL JOINTS 2 UNI-BALL JOINT STUDS 2 UNI-BALL JOINT CAPS 2 RETAINING RINGS 1 FRONT SHOCK ASSEM. 2 DELRON STEERING STOPS 2 SHOCK MOUNT SPACERS
Toyota Tacoma Winch Mount Bumper Installation Instructions Tools Required: Transmission cooler relocation brackets Torque Wrench
 2016-2017 Toyota Tacoma Winch Mount Bumper Installation Instructions Tools Required: Items Included: Small flat head screw driver Winch Mount Ratchet, 10mm, 12mm, 14mm, 17mm & Skid Plate 19mm sockets Transmission
JK REAR BUMPER AND TIRE CARRIER
 JK REAR BUMPER AND TIRE CARRIER Installation Guide AEV30105AA (Updated 5/10/10) Page 1 of 20 Page 2 of 20 EXPLODED VIEW PLEASE READ BEFORE YOU START IN ORDER TO INSTALL THIS PART PROPERLY YOU OR YOUR INSTALLER
All engine installations with this front end will require a rear sump oil pan.
 1960-1965 Falcon, 1962-1965 Comet & 1962-1965 Ranchero Coil Spring IFS Tech line: 1-855-693-1259 www.totalcostinvolved.com Read and understand these instructions before starting any work! USE THE PARTS
1964 1/2-70 Mustang Torque Arm Rear Suspension Installation Instructions
 1964 1/2-70 Mustang Torque Arm Rear Suspension Installation Instructions 1-800-984-6259 www.totalcostinvolved.com Version 2 (c) 2008 Total Cost Involved Engineering, Inc. All Rights Reserved. Page 1 of
7333 INSTRUCTIONS FOR MILD STEEL A-ARM AVENGER CHASSIS MUSTANG
 #917333 Page 1 of 5 7333 INSTRUCTIONS FOR MILD STEEL A-ARM AVENGER CHASSIS 1994-2004 MUSTANG ITEM QTY PART NO/SIZE TUBE CODE DESCRIPTION 1 1 4080 Main hoop 2 1 pr 4180 Cage side (driver & passenger side)
DO NOT GRIND ANY WELDS! DO NOT QUENCH WELDS WITH WATER OR OIL. ALLOW TO AIR COOL.
 1 READ FIRST! PLEASE READ THROUGH ALL OF THE INSTRUCTIONS AND ENSURE THAT YOU UNDERSTAND THEM. BE SURE THAT YOU HAVE ALL THE REQUIRED GSI COMPONENTS, BASIC TOOLS, AND SKILLS. CUTTING THIS KIT REQUIRES
Installation Instructions. QuickSilver Shifter. Fits: GM, Ford, Chrysler Transmissions See Application Guide for Specific Applications Part # 80683
 Installation Instructions QuickSilver Shifter Fits: GM, Ford, Chrysler Transmissions See Application Guide for Specific Applications Part # 80683 WORK SAFELY! For maximum safety, perform this installation
OVER THE KNUCKLE 1-TON STEERING INSTALLATION INSTRUCTIONS
 OVER THE KNUCKLE 1-TON STEERING INSTALLATION INSTRUCTIONS TOOLS NEEDED Grinder with cutoff wheel, sawzall, cutting torches, or a plasma cutter Welder (for optional sway bar mounts) Hand drill with a ½
Installation Instructions StarShifter
 Installation Instructions StarShifter Part Number 80675 2000 by B&M Racing & Performance Products LLC The B&M StarShifter can be used in vehicles equipped with most popular three speed automatic transmissions.
Engine Leaks and Cures
 Engine Leaks and Cures The following information, printed in blue, is taken with permission from the website of Antique Engine Rebuilding located in Skokie Illinois. I have inserted a few pictures within
PRO RATCHET UNIVERSAL SHIFTER
 Installation Instructions PRO RATCHET UNIVERSAL SHIFTER Fits: GM, Ford and Chryslers w/automatic Transmission See Application Guide for Specific Vehicles Catalog # 80842 WORK SAFELY! For maximum safety,
RZR Lift Kit. Polaris RZR Part #: Rev
 RZR 570 2 Lift Kit Polaris RZR 570 2012+ Part #: 5101204 Rev. 081916 491 W. Garfield Ave., Coldwater, MI 49036. Phone: 517-278-7768 E-mail: sales-rtpro@sporttruckusainc.com SAFETY WARNING RT Pro UTV recommends
Suzuki Samurai to Toyota Front Spring Swap Kit, with Missing Link Shackles (SKU#SSP-TSFM) Installation Instructions
 Installation Instructions") Suzuki Samurai to Toyota Front Spring Swap Kit, with Missing Link Shackles (SKU#SSP-TSFM) Installation Instructions CAUTION: Safety glasses should be worn at all times when working with vehicles and related
Suzuki Samurai to Toyota Front Spring Swap Kit, with Missing Link Shackles (SKU#SSP-TSFM) Installation Instructions CAUTION: Safety glasses should be worn at all times when working with vehicles and related
Bachmann GWR Earl (Dukedog) EM Finescale Conversion
 EM Finescale Conversion") Bachmann GWR Earl (Dukedog) EM Finescale Conversion Before you start, it is a good idea to have some small containers or snap top poly bags to put screws and components in for safe keeping...much better
Bachmann GWR Earl (Dukedog) EM Finescale Conversion Before you start, it is a good idea to have some small containers or snap top poly bags to put screws and components in for safe keeping...much better
*NOTE* The following suspension system will not work with heavy duty axle housings as pictured below.
 1964 ½ - 1970 Ford Mustang Triangulated 4-Link Suspension Installation Instructions Tech Line: 1-855-693-1259 www.totalcostinvolved.com Read and understand these instructions before starting any work!
MM Caster/Camber Plates, (MMCC7989)
") 3430 Sacramento Dr., Unit D San Luis Obispo, CA 93401 Telephone: 805/544-8748 Fax: 805/544-8645 www.maximummotorsports.com MM Caster/Camber Plates, 1979-89 (MMCC7989) IMPORTANT: The bearing used in our
3430 Sacramento Dr., Unit D San Luis Obispo, CA 93401 Telephone: 805/544-8748 Fax: 805/544-8645 www.maximummotorsports.com MM Caster/Camber Plates, 1979-89 (MMCC7989) IMPORTANT: The bearing used in our
POWER RACK AND PINION STEERING INSTALLATION
 by Randy Irwin 1955-57 POWER RACK AND PINION STEERING INSTALLATION Randy Irwin - Technical Writer Randy has been involved in the Chevy parts business for over 25 years. He is a wizard at creating, making
Vanagon Subaru 5sp Linkage Kit:
 1 Vanagon Subaru 5sp Linkage Kit: This kit allows the installation of a Subaru 5sp transmission in your 1980-1991 Volkswagen Vanagon while utilizing the stock Vanagon shifter with little modification.
PYRTE. Building The Front Axle, Fork and Steering
 PYRTE Building The Front Axle, Fork and Steering The front axle on this traction engine is a very simple affair, in that it is a rectangular steel rod, sat on edge, with a pivot in the centre, which is
US Patent You will find many features that set our Caster/Camber Plates apart from the rest.
 3430 Sacramento Dr., Unit D San Luis Obispo, CA 93401 Telephone: 805/544-8748 Fax: 805/544-8645 www.maximummotorsports.com US Patent 6485223 Read all instructions before beginning work. Following instructions
All engine installations with this front end will require a rear sump oil pan.
 1960-1965 Falcon, 1962-1965 Comet & 1962-1965 Ranchero Coil-Over IFS Tech line: 1-855-693-1259 www.totalcostinvolved.com Read and understand these instructions before starting any work! USE THE PARTS LIST
FORD SuperRail Mounting Kit #3361
 FORD SuperRail Mounting Kit #3361 #4100 SuperGlide (16K) #4400 SuperGlide (20K) Gross Trailer Weight (Maximum) Vertical Load Weight (Max. Pin Weight) 16,000 lbs. 4,000 lbs. Gross Trailer Weight (Maximum)
Our goal is to make the install a breeze. Please read the entire guide before beginning.
 www.airkewld.com Page 1 of 6 IRS Axle Kit Install IRS Axle Kit Install Our goal is to make the install a breeze. Please read the entire guide before beginning. KITS SHOULD INCLUDE 2 - Control-arm mounting
Installation Instructions Sport Shifter
 The B&M Sport Shifter can be used in vehicles equipped with most popular three speed or four speed automatic transmissions. It is equipped with neutral safety and backup light switches, transmission brackets
1969 Camaro. Concourse Style Disc Brake Conversion Kit Instllation Instructions
 Concourse Style Disc Brake Conversion Kit Instllation Instructions 1969 Camaro (1970 Chevelle Kit Shown) This document contains our regular disc brake conversion instructions with the addition of GM assembly
2005+ Roll Bar (Mm5RB-20.1 to -20.6) Recommended Center punch 1/8" pilot drill 1-3/4" Hole saw 2" Hole saw
 Recommended Center punch 1/8 pilot drill 1-3/4 Hole saw 2 Hole saw") 3430 Sacramento Dr., Unit D San Luis Obispo, CA 93401 Telephone: 805/544-8748 Fax: 805/544-8645 www.maximummotorsports.com 2005+ Roll Bar (Mm5RB-20.1 to -20.6) Recommended Center punch 1/8" pilot drill
3430 Sacramento Dr., Unit D San Luis Obispo, CA 93401 Telephone: 805/544-8748 Fax: 805/544-8645 www.maximummotorsports.com 2005+ Roll Bar (Mm5RB-20.1 to -20.6) Recommended Center punch 1/8" pilot drill
Installation Instructions Pro Stick Shifter
 Installation Instructions Pro Stick Shifter Part Number 80701, 80702 & 80706 2012, 2010, 2008, 2001, 1998 by B&M Racing and Performance Products The B&M Pro Stick shifter #80701 and #80706 comes equipped
Light Truck MegaShifter
 Installation Instructions Light Truck MegaShifter The B&M Light Truck Megashifter shifter is designed to be used in most light trucks equipped with most popular three speed or four speed automatic transmissions.
MATCHLESS SPINNING WHEEL
 MATCHLESS SPINNING WHEEL Single Treadle to Double Treadle Conversion Instructions Find out more at schachtspindle.com Schacht Spindle Company 6101 Ben Place Boulder, CO 80301 p. 303.442.3212 f. 303.447.9273
Installation Instructions Right Hand Drive Megashifter
 Installation Instructions Right Hand Drive Megashifter Part Number 80685 1995, 2001, 2006, 2010 by B&M Racing & Performance Products The B&M Right Hand Drive Megashifter is designed specifically for vehicles
SAM-1 Fan Kit Installation Into HENG S Range Hood Model #R C David Jeffs June 2015
 SAM-1 Fan Kit Installation Into HENG S Range Hood Model #R0623500C David Jeffs June 2015 If you own an RV you probably have come to the same conclusion that I have. Everything related to an RV is plagued
FRONT AXLE GROUP 11A CONTENTS 11A-0. SECTION 0 GENERAL Removal 3 SECTION 1 FRONT AXLE HUB 1
 11A-0 GROUP 11A FRONT AXLE CONTENTS SECTION 0 GENERAL 1 1-1 Removal 3 SECTION 1 FRONT AXLE HUB 1 1-2 Inspection 3 1-3 Installation 4 1. Removal and Installation 1 1-1 Removal 1 SECTION 3 WHEEL ALIGNMENT
A/F/X Body GM Installation Instructions
 A/F/X Body GM Installation Instructions Power Disc Conversion 64-72 A Body / 67-69 F Body / 68-74 X Body 9 slimline booster pictured Your new disc brake conversion kit can be bolted up with standard hand
A/F/X Body GM Installation Instructions Manual Disc Conversion
 A/F/X Body GM Installation Instructions Manual Disc Conversion 64-72 A Body / 67-69 F Body / 62-74 X Body DBMC09 & PVK71 pictured above (Booster, master & valve setups may vary by upgrades selected) Your
INSTALLATION GUIDE. JK Rear bumper & tire carrier. AEV30105AC Last Updated: 10/11/16 US PATENT: D642,502 ; D
 AEV30105AC Last Updated: 10/11/16 JK Rear bumper & tire carrier US PATENT: D642,502 ; D633.024 INSTALLATION GUIDE PLEASE READ BEFORE YOU START TO GUARANTEE A QUALITY INSTALLATION, WE RECOMMEND READING
Parts List (Mini Bike)
") STEERING PRINCIPLES Ackerman Steering Principle The Ackerman Steering Principle defines the geometry that is applied to all vehicles (two or four wheel drive) to enable the correct turning angle of the
STEERING PRINCIPLES Ackerman Steering Principle The Ackerman Steering Principle defines the geometry that is applied to all vehicles (two or four wheel drive) to enable the correct turning angle of the
Build an electric Scoot-car
 513 Build an electric Scoot-car Designed by ROBERT W O O L S O N Here's a sidewalk special for young hot rodders that safely takes the corner on two wheels, has two forward speed and brakes that stop on
2008 Toyota Tundra 4WD Brake Job: A Quick Job and Even Quicker Write-Up.
 FRONT BRAKES: 2008 Toyota Tundra 4WD Brake Job: A Quick Job and Even Quicker Write-Up. 1. Remove this bolt holding brake line bracket to the suspension. 2. I had to replace all 4 rotors at 60K miles, so
1967 (Late) CORVETTE STANDARD (NON-ADJUSTABLE) STEERING COLUMN DISASSEMBLY & REPAIR INSTRUCTIONS PAPER #2
 CORVETTE STANDARD (NON-ADJUSTABLE) STEERING COLUMN DISASSEMBLY & REPAIR INSTRUCTIONS PAPER #2") Last Revision: 03SE2012 1967 (Late) - 1968 CORVETTE STANDARD (NON-ADJUSTABLE) STEERING COLUMN DISASSEMBLY & REPAIR INSTRUCTIONS PAPER #2 Disassembly and Repair Instructions Addressed in this Paper Degree
Last Revision: 03SE2012 1967 (Late) - 1968 CORVETTE STANDARD (NON-ADJUSTABLE) STEERING COLUMN DISASSEMBLY & REPAIR INSTRUCTIONS PAPER #2 Disassembly and Repair Instructions Addressed in this Paper Degree
Pro/Series 2000 Tubular A-Arm Front Suspension
 11 Mennonite Church Road Spring City, PA 19475 (610) 948-7303 Installation Instructions Pro/Series 2000 Tubular A-Arm Front Suspension (Pinto-Style) CAUTION!!! The most important requirement for a successful
INSTALLATION INSTRUCTIONS 64 ½ - 70 SUPERRIDE II INDEPENDENT FRONT SUSPENSION BX-350 FOR COYOTE AND MOD ENGINES
 INSTALLATION INSTRUCTIONS 64 ½ - 70 SUPERRIDE II INDEPENDENT FRONT SUSPENSION BX-350 FOR COYOTE AND MOD ENGINES Please read these instructions completely before starting your installation. Assemble suspension
250P Manure Spreader
 0P Manure Spreader Illustrated Parts Breakdown Page - Page Page Page Page Page Page Page Page Page Page Page Page Page Page - Page Page Page 0 Complete Front End PTO/Jack/Hitch Assembly Front Pulley Assembly
Jeep Wrangler Heavy Duty Drag Link Installation Instructions
 THE INFORMATION CONTAINED IN THIS DRAWING IS THE SOLE PROPERTY OF SYNERGY MFG. ANY REPRODUCTION IN PART OR WHOLE WITHOUT THE WRITTEN PERMISSION OF SYNERGY MFG IS PROHIBITED. Revisions Rev. Description
05+ Toyota Tacoma Rear Shock Hoop Install Notes Part# 86460
 159 North Maple St. Unit J, CORONA CA 92880 P. 951-737-9682 F. 951-737-9006 WWW.CHAOSFAB.COM 05+ Toyota Tacoma Rear Shock Hoop Install Notes Part# 86460 Note: This kit is designed to work with the Total
GR40 SLA Installation and Set Up Instructions.
 GR40 SLA Installation and Set Up Instructions. Read these instructions completely before beginning. These instructions are written for experienced installer/technicians with a strong idea as to how a chassis
Detroit Speed, Inc Chevy II Mini-Tubs P/N:
 Detroit Speed, Inc. 1962-67 Chevy II Mini-Tubs P/N: 040404 The Detroit Speed, Inc. Mini-Tubs are inner wheel housings designed to accommodate wider tire and wheel packages, including tires as wide as 295mm
The Magazine For Slot Car Enthusiasts
 The Magazine For Slot Car Enthusiasts Building the Tomy Super G+ By Milt Surratt Tomy Super G+ slot cars have been around in the current form for about 12 years. Out of the package, the Tomy HO slot car
Part # Mustang Complete CoilOver Kit
 Front Components: 1 12103509 Front CoilOvers 1 12102899 Lower StrongArms 1 12103699 Upper StrongArms 350 S. St. Charles St. Jasper, In. 47546 Ph. 812.482.2932 Fax 812.634.6632 www.ridetech.com Part # 12100109
Safety - Installation and Operation:
 4x4 or 4x2 Instructions EZGO Electric Cars Thank you for purchasing your 4x4 or 4x2 conversion kit. Safety at all times whether during installation or operation is utmost importance. Before After!!!!!!!!!!!!!!
Peg-Harness installation instructions
 Peg-Harness installation instructions I know it s not the easiest thing to do, but PLEASE READ THESE INSTRUCTIONS COMPLETELY so you will understand what you are trying to accomplish before you start drilling
S&W Race Cars and Components, Inc.
 S&W Race Cars and Components, Inc. 11 Mennonite Church Road Spring City, PA 19475 TECH & INFORMATION: 610-948-7303 ORDERS: 1-800-523-3353 FAX: 610-948-7342 CAUTION!!! - The most important requirement for
DODGE OFF ROAD T-STYLE STEERING KIT INSTALLATION INSTRUCTIONS
 Dodge Off Road, LLC Specializing in Dodge Ram Solid-Axle 4x4 Suspension and Steering for Off Road Applications 855.9009.DOR sales@dodgeoffroad.com dodgeoffroad.com DODGE OFF ROAD T-STYLE STEERING KIT INSTALLATION
Improving the gearshift feel in an SW20.
 Improving the gearshift feel in an SW20. Part one In 3 parts. The SW20 gearshift can be often be greatly improved by eliminating play in the shift linkages, and this article covers three areas that need
How To Build A Mini Chopper!
 How To Build A Mini Chopper! by Custom-Choppers-Guide.com Copyright All Rights Reserved. If you are new to such projects, it is strongly recommended that you do an assembly job, purchasing pre-constructed
FORD SuperRail Mounting Kit #3111
 FORD SuperRail Mounting Kit #3111 #3100 SuperGlide (12K) Gross Trailer Weight (Maximum) Vertical Load Weight (Max. Pin Weight) 12,000 lbs. 3,000 lbs. Installation Instructions SPECIFICATIONS Fits 2001-2003
LG CORVETTE GT2 COIL OVERS
 LG CORVETTE GT2 COIL OVERS THE MOST POWERFUL HEADERS ON THE PLANET Brought to you by LG Motorsports 972-429-1963 Parts Inventory: 1. Assembled Front shock and spring 2. Assembled Rear shock and spring
DODGE SuperRail Mounting Kit #0848
 DODGE SuperRail Mounting Kit #0848 #1200 Super 5 th (16K) #0800 Super 5 th (20.5K) Gross Trailer Weight (Maximum) Vertical Load Weight (Max. Pin Weight) 16,000 lbs. 4,000 lbs. Gross Trailer Weight (Maximum)
Hard Bar Sport, M1/M2 Hard Core Hardtop, M2 Sport, and Xtreme Installation Instructions
 HARDWARE KIT: Hard Bar Sport, M1/M2 Hard Core Shoulder Harness Guide Relocation Assemblies: 2-3/8" X 1" grade 8 bolts 4-3/8" flat washers 2-3/8" lock nuts 2 - brass bushings 2 - plastic trim caps 2-3/8"
Riding Mowers. Z44 and Z52 Accu-Z Razor (S/N and above) SM Service Manual Printed 9/24/09
 SM Service Manual Printed 9/24/09") Riding Mowers Z44 and Z52 Accu-Z Razor (S/N 472620 and above) 23802 357-044SM Service Manual 2006 Printed 9/24/09 Copyright 2006 All rights Reserved Land Pride provides this publication as is without warranty
Riding Mowers Z44 and Z52 Accu-Z Razor (S/N 472620 and above) 23802 357-044SM Service Manual 2006 Printed 9/24/09 Copyright 2006 All rights Reserved Land Pride provides this publication as is without warranty
DODGE. 12K Custom SuperRail Mounting Kit #3122. Gross Trailer Weight (Maximum)...12,000 lbs. Vertical Load Weight (Max. Pin Weight)...3,000 lbs.
...12,000 lbs. Vertical Load Weight (Max. Pin Weight)...3,000 lbs.") DODGE 12K Custom SuperRail Mounting Kit #3122 Gross Trailer Weight (Maximum)...12,000 lbs. Vertical Load Weight (Max. Pin Weight)...3,000 lbs. Installation Instructions SPECIFICATIONS Fits 2009-2018 Dodge1500
DODGE 12K Custom SuperRail Mounting Kit #3122 Gross Trailer Weight (Maximum)...12,000 lbs. Vertical Load Weight (Max. Pin Weight)...3,000 lbs. Installation Instructions SPECIFICATIONS Fits 2009-2018 Dodge1500
Hurst VMATIC3 INSTALLATION
 FORM 159 8530 07/12 Hurst VMATIC3 3-Speed & 4-Speed Automatic Shifter Catalog #3838530 2012 by Hurst Performance The Hurst Vmatic3 shifter can be used in vehicles equipped with most popular three speed
RZR XP 1000 HD Radius Rod Kit
 RZR XP 1000 HD Radius Rod Kit Polaris RZR XP 1000 2014-2016 Part #: 5201509 Rev. 111517 491 W. Garfield Ave., Coldwater, MI 49036. Phone: 517-278-7768 E-mail: sales-rtpro@sporttruckusainc.com SAFETY WARNING
INSTRUCTIONS FOR NYC K-11 PACIFIC KIT #100200
 INSTRUCTIONS FOR NYC K-11 PACIFIC 4-6-2 KIT #100200 These instructions provide photographs of completed model, exploded-view drawings, diagrams, step-by-step instructions and an itemized parts list. If
TSS Fit Kit Installation Instructions Timbersled Snow Bike System
 TSS Fit Kit Installation Instructions Timbersled Snow Bike System Information needed before you start: Read the entire installation instructions before starting. The instruction sheet is universal for
Installation Instructions Megashifter
 Installation Instructions Megashifter The B&M Megashifter shifter can be used in vehicles equipped with most popular three speed or four speed automatic transmissions. Your B&M Megashifter comes equipped
7256 INSTRUCTIONS FOR ELIMINATOR II A-ARM FRONT, 4-LINK REAR, MILD STEEL, INTERMEDIATE, SERIES CHASSIS
 #917256 Page 1 of 7 7256 INSTRUCTIONS FOR ELIMINATOR II A-ARM FRONT, 4-LINK REAR, MILD STEEL, INTERMEDIATE, SERIES CHASSIS ITEM QTY SIZE/PART NO. TUBE CODE DESCRIPTION 1 2 4138 Cage Side 2 2 4208 Forward
Detroit Speed, Inc. Mini-Tub Kit Chevy Nova, Oldsmobile Omega, Pontiac Ventura P/N: &
 Detroit Speed, Inc. Mini-Tub Kit 1968-74 Chevy Nova, Oldsmobile Omega, Pontiac Ventura P/N: 041207 & 041208 Item Component Quantity 1 DSE Mini Tubs 1968-74 X-Body 2 2 Rear Upper Shock Crossmember 1 3 Upper
FORD SuperRail Mounting Kit #3113. #3100 SuperGlide (12K) Gross Trailer Weight (Maximum) Vertical Load Weight (Max. Pin Weight) SPECIFICATIONS
 Gross Trailer Weight (Maximum) Vertical Load Weight (Max. Pin Weight) SPECIFICATIONS") FORD SuperRail Mounting Kit #3113 #3100 SuperGlide (12K) Gross Trailer Weight (Maximum) Vertical Load Weight (Max. Pin Weight) 12,000 lbs. 3,000 lbs. Installation Instructions SPECIFICATIONS Fits 2004-2008
FORD SuperRail Mounting Kit #3113 #3100 SuperGlide (12K) Gross Trailer Weight (Maximum) Vertical Load Weight (Max. Pin Weight) 12,000 lbs. 3,000 lbs. Installation Instructions SPECIFICATIONS Fits 2004-2008
HASPORT PERFORMANCE EFJ1
 HASPORT PERFORMANCE Installation Instructions For: Part Number EFJ1 for J-series V6 engines into 1988-1991 Honda Civic and CR-X Hasport Performance mounts are the result of extensive research and engineering.
Conversion to Renault NG 5 speed gearbox with cable actuated gear change
 Europa Series 2 (1969) Conversion to Renault NG 5 speed gearbox with cable actuated gear change NB: this is theoretical it shifts very precisely without too much effort in the garage with no oil in the
2008 & Newer Ford F-350 Chassis Cab 4-Link Rear Installation Instructions
 KLM18100 2686 Highway 92 - Oskaloosa, IA 52577 phone: 641.673.0468 - fax: 641.673.4168 2008 & Newer Ford F-350 Chassis Cab 4-Link Rear Installation Instructions Installation 1. Before doing anything, measure
Detroit Speed and Engineering Subframe Connector Camaro/Firebird P/N #
 Detroit Speed and Engineering Subframe Connector 1970-81 Camaro/Firebird P/N # 010103 1 2 5 3 4 Item Component Quantity 1 LH Subframe Connector 1 2 RH Subframe Connector 1 3 Inside Bracket 2 4 Outside
AmTryke Adult Recumbent Model JT2000 #50-FC-2000
 AmTryke Adult Recumbent Model JT2000 #50-FC-2000 TOOLS Needed for Assembly 5 mm Allen Wrench 8 mm Socket or Wrench 10 mm Socket or Wrench 14 mm Socket or Wrench 15 mm Socket or Wrench 22 mm Socket or Adjustable
FORD. SuperRail Mounting Kit #3520. #3600 SuperGlide (24K) Gross Trailer Weight (Maximum) Vertical Load Weight (Max. Pin Weight)
 Gross Trailer Weight (Maximum) Vertical Load Weight (Max. Pin Weight)") FORD SuperRail Mounting Kit #3520 #3600 SuperGlide (24K) Gross Trailer Weight (Maximum) Vertical Load Weight (Max. Pin Weight) 24,000 lbs. 6,000 lbs. Installation Instructions Fits 1999-2015 Ford Diesel
FORD SuperRail Mounting Kit #3520 #3600 SuperGlide (24K) Gross Trailer Weight (Maximum) Vertical Load Weight (Max. Pin Weight) 24,000 lbs. 6,000 lbs. Installation Instructions Fits 1999-2015 Ford Diesel
7211 A-ARM FRONT, 4-LINK, 3 X 2 FRAME, INTERMEDIATE, ELIMINATOR CHASSIS ITEM QTY SIZE/PART NO. TUBE CODE DESCRIPTION
 #917211 Page 1 of 6 7211 A-ARM FRONT, 4-LINK, 3 X 2 FRAME, INTERMEDIATE, ELIMINATOR CHASSIS ITEM QTY SIZE/PART NO. TUBE CODE DESCRIPTION 1 2 4138 Cage Side 2 2 4208 Forward strut 3 1 4038 Main Hoop 4 1
CALIFORNIA TRIMMER MOWER MAINTENANCE MANUAL
 CALIFORNIA TRIMMER MOWER MAINTENANCE MANUAL 2 Table of Contents Section 1: General Information Page Handle Assembly Instructions 4 Maintenance All Models 6 Oil Change Procedures All Models 9 Height Adjustment
Part 3: CHECKING TOE ANGLE -
 CHECKING TOE ANGLE - Part 3: With the caster and camber out of the way and the vehicle on a properly leveled surface, it's time to lay out the string network that will allow you to take accurate measurements
Gearbox Assembly 101. Introduction. Before Beginning. By Mark Schutzer 4/13/06
 Gearbox Assembly 101 By Mark Schutzer 4/13/06 Introduction If you are planning to re-motor an old brass locomotive you may want to upgrade to a new gearbox at the same time. The early 60 s and 70 s gearboxes
INSTRUCTIONS FOR M.O.R.E STEERING CORRECTION KIT PLEASE READ TERMS AND POLICIES ON PAGE 3 OF THESE INSTRUCTIONS
 MOUNTAIN OFF ROAD ENTERPRISES LLC. P.O. BOX 690, DELTA, COLORADO, 81416 970-625-0500 970-625-3747 Fax EMAIL: info@mountainoffroad.com www.mountainoffroad.com INSTRUCTIONS FOR M.O.R.E. 9930 STEERING CORRECTION