|
|
|
- Blake Parks
- 6 years ago
- Views:
Transcription
1 Updated May 2015 Okay this is what I learned while converting several Yamaha SUV 1200 jet skis with a 2 stroke engine to a 4 stroke engine. I believe that you can use a Yamaha FX or VX four stroke for the donor jet ski with similar process. If you are using an FX 140 for the conversion you should not run into any real issues. I know of two ways to do this conversion, and there are probably other ways. SUV conversion as of this documentation. One using a 2002 FX 140 as the donor and the second one using a 2005 FX 160 HO, either way you do the conversion you will need a donor ski that is complete. You'd be surprised how many hoses fitting, parts, and bolts you would need from it to complete the conversion. If you have a Canada model Yamaha SUV Jet Ski I have found that the jet pump main shaft is 2 longer than the standard skis and you will need to change the main shaft or use the FX jet pump or add the front pump spacer from the FX pump to the SUV pump and get the needed cable extensions. 1. The first way to do the conversion: a. Use a complete drive train out of the FX140 including the Intermediate shaft, engine, jet pump, etc. b. you will need to use cable extensions for the trim, reverse, and steering cables to allow for the 2 inch spacer the FX has in between front of the jet pump and the transom plate. c. You will reuse the SUV engine mounts. d. The rear motor mounts on the SUV stay in the same place. e. The front mounts have to be move forward. You will need to cut out the inner hull so you can cut out the aluminum backing plates and reuse them. There is not a lot of room to work with them but once you get the whole started you can epoxy or glue them in place using the bolts to hold them in place, after that you can fiberglass them in place. f. The 18.5 gallon tank from the FX fits perfectly in the SUV. The SUV hold down strap's fit perfectly on the tank I had to install some foam in front of the tank to keep the tank from moving forward. g. The fill neck of the FX tank is in a different spot so you will have to make a fill hose out of the SUV and FX fill hoses and some hose barbs. h. Others have used the SUV tanks but have to modify it to handle the FX fuel pump/sender assembly. i. You will need the entire wiring harness out of the FX and it will fit pretty well in the SUV hull. j. You'll have to use the throttle cable from the FX. It is barely long enough but work smoothly without any undue tension on it. k. If the donor ski has that sensor on the steering that applies power on a hard turn with no throttle, you'll have to plug that into the harness and wire tie it out of the way. l. Depending on the year model of the FX you will have to connect the exhaust from the engine to the water box on the SUV. m The bottom of the seat will have to be modified on the SUV to clear the air filter housing
2 2. The second way to do the conversion: (This is how I do my conversion.) a. Use the FX or VX engine including the Intermediate shaft, jet pump without the front spacer, or use your SUV jet pump as it is. b. You will need to use 2 inch spacers to mount the Intermediate shaft to the bulkhead. I removed the spacer off the front of the FX pump and cut off 3 of the 4 bolt holes and used them for my Intermediate shaft spacers. c. You will reuse the SUV engine mounts. d. The rear engine mounts on the SUV have to be move forward 2 inches. e. The front mounts have to be move forward. You will need to cut out the inner hull so you can cut out the aluminum backing plates and reuse them. There is not a lot of room to work with them but once you get the hole started you can epoxy or glue them in place using the bolts to hold them in place, after that you can fiberglass them in place. f. The 18.5 gallon tank from the FX fits perfectly in the SUV. The SUV hold down strap's fit perfectly on the tank I had to install some foam in front of the tank to keep the tank from moving forward. g. The fill neck of the FX tank is in a different spot so you will have to make a fill hose out of the SUV and FX fill hoses and some hose barbs. h. Others have used the SUV tanks but have to modify it to handle the FX fuel pump/sender assembly. i. You will need the entire wiring harness out of the FX and it will fit pretty well in the SUV hull. j. You'll have to use the throttle cable from the FX. It is plenty long enough with this setup. k. If the donor ski has that sensor on the steering that applies power on a hard turn with no throttle, you'll have to plug that into the harness and wire tie it out of the way. l. Depending on the year model of the FX you will have to connect the exhaust from the engine to the water box on the SUV. m. The bottom of the seat will have to be modified on the SUV to clear the air filter housing.

3 I have studied and measured the two pumps and intermediate shafts and have decided what I am going to do to install the 4 stroke Yamaha FX140 engine as for the pump end. There is a 2 inch difference between the two setups. The SUV pump has one impeller housing, this is where the wear ring is located. The FX140 has two impeller housings, the second impeller housing is like a 2 inch spacer in front of the pump, making the total length of the pump 2 inches longer than the SUV pump. Another words the FX140 pump will extend 2 inches longer from where it mounts to the transom plate than the SUV pump. If you remove the second impeller housing the two pumps look to be the same pumps. Here is a picture of both pumps. The left is the FX and right is the SUV.

4 Here is a picture with the second impeller housing removed from the FX140 pump. The left is the FX and right is the SUV. By using the FX140 pump unit with the second impeller housing you will need to do something about the difference in the length of the cables, trim steering and reverse. The length to the intermediate shaft will be ok. By using the FX140 pump without the or the second impeller housing or using the SUV pump you will not have any cable length problems but the distance to the intermediate shaft will be 2 inches forward of the original mounting location.


5 I am going to use my SUV pump so that I am not changing any engineering of the Jet Ski. Yamaha spent a lot of money designing the hull and pump setup and I am not as smart as their team. I will be making a spacer to space the intermediate shaft mounting point 2 inches forward from its original location. I think that this is the simplest solution. I will remove the rear bearing housing from the SUV intermediate shaft bearing and install it on the intermediate shaft bearing housing from the FX140. I need to do this because it is what makes the seal to keep water from entering the hull. I will also install a new hose that is 2 inches longer that seals the bearing housing to the hull pipe joint. Here is the original intermediate shafts. The left is the FX140 and the right is the SUV both 2002 model. Intermediate shaft bearing with 2 inch spacers. I made the spacers by cutting three of the four corner bolt holes or ears off of the second impeller housing from the FX140. The impeller housing was corroded through badly, you could see pin holes through it so it was no good to use but made the right size spacers that I needed. I have basically moved the extra 2 inches from sticking out from the back of the hull to moving the intermediate shaft forward 2 inches. This will give me more room behind the engine and save me from extending the three cables on the pump.

6 The rear mounts are 2 inches forward from the original location. I cut out the mounting plates and run a tap through each threaded hole. I took a straight edge and marked a line along the original engine mount holes on the SUV on each side. Marked holes 2 inches forward on the rear mounts and the front marks I marked while the engine was sitting in the SUV hull. I cut out the inner hull with a side grinder with a cutting disk and with a chisel and a screwdriver I separated the engine mounting plates from the hull. I removed the fiberglass from in front of the original mounting location on the bottom of the inner hull so that the mounting plates would be flush with the underside of the inner hull. The left rear mounting plate was beveled where the other three were rectangle. The right front mounting plate I had to cut about 1 1/2 inch off the front and at an angle so that it would fit the inner hull shape. I used some 5200 adhesive on the top of the mounting plates and put the bolts in each plate and tighten them in place. I then cleaned the area and laid the fiberglass matting to make the inner hull complete again.


7 I made a template for the cutout for the dash and was able to install the FX display. It is mounted from the back side (inside). I had to cut off the bottom two mounting bolt tabs and cut down the display thickness around the bottom and right sides looking at the display from the front. I used an air die grinder to cut out the dash and cut a grove along the bottom of the opening for the FX display to fit or sit into. This worked well to hold the bottom of the display in the dash and I was able to use the original top mounting tabs with a little trimming. I did have to take a side grinder and cut the thickness of the top tabs down flush so that the display would mount flush. I used black silicone to seal the display in the dash.
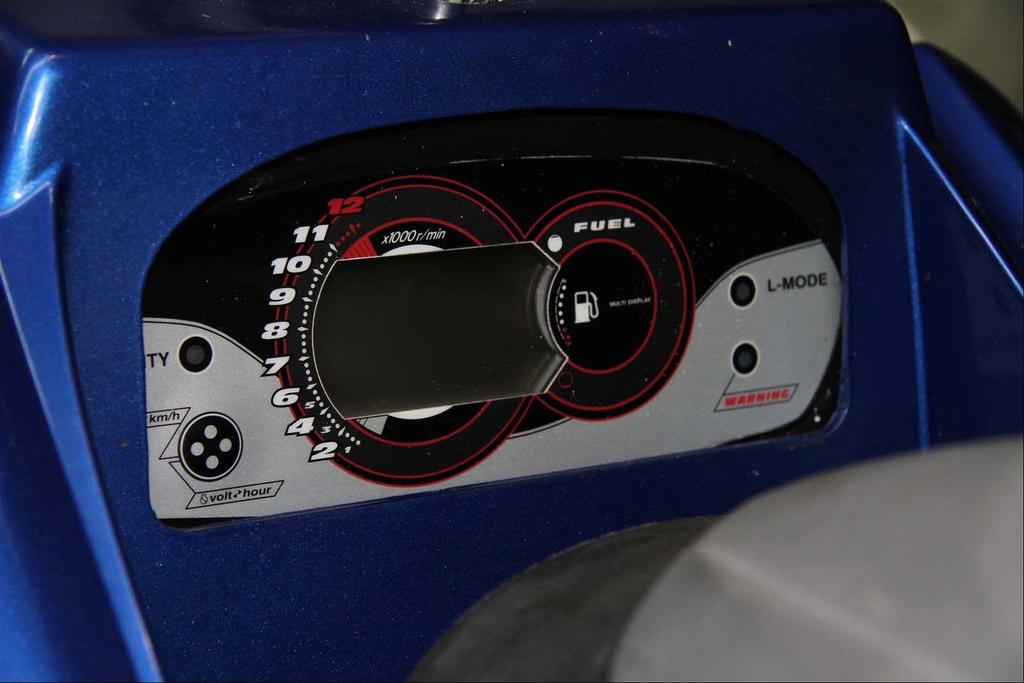
8

9 I mounted the ECU control box on the front of the bulkhead behind the engine high as I could. I made some spacers out of 1/2 inch CPVC to hold the control box at the right spacing from the bulkhead.

10 Here is what I cut from the bottom of the seat. I will put a metal plate back in for support.
11


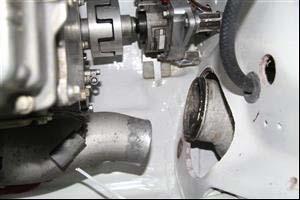
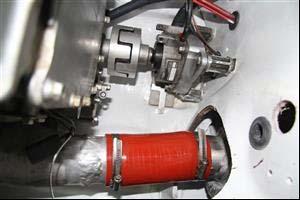
12 To hook up the exhaust you may need to get creative. There seems to be differences with different year models. I was working with a 2002 SUV and a 2002 FX140 and was able to use parts from both to get the exhaust hooked up by cutting off the front nipple of the FX140 water box and using it along with the flexible elbow from the SUV. I cut the flexible elbow to make an adapter or reducer using the FX nipple and hose clamps. I then used the FX140 flexible exhaust by removing the aluminum shroud and cutting the length to fit.
13 I will try to make a complete list of parts needed to do a SUV conversion using a good running VX or FX as a donor. This list does not include parts removed from the donor ski. I will add to this list as I need to buy parts. 1. 8" of 1 5/8 inch exhaust hose for the pump shaft housing to intermediate shaft bearing. The original hose is now 2" to short. 2. Three (3) 3 1/2 inch 5/16 SS bolts, nuts and 6 washers to mount the intermediate shaft bearing with the 2 inch spacers I cut from the FX pump front housing. 3. I recommend to replace the two (2) O-rings for the intermediate shaft bearing where the drive shaft enter the splines and new molly lube or grease for the shaft. 4. New oil filter and suggest to change the oil. 5. Sealant to mount the pump and any through the hull fittings /2 inches of 3 inch silicone hose to hookup exhaust. 7. Something like 30 SS hose clamps to replace all the hose clamps on the engine and all hose connections. 8. (2) 2 inch 5/16 SS bolts and SS wing nuts to mount bottom of the ECU to the bulkhead using some 1/2 CPVC pipe cut with an angel to fit the bulkhead as spacers. 9. (2) 3 inch 5/16 SS bolts and SS wing nuts to mount top of the ECU to the bulkhead using some 1/2 CPVC pipe cut with an angel to fit the bulkhead as spacers. 10. New 5 foot ground cable. The original FX cable is not long enough.
14 NOTES ON HOSES: 1. The hose from the top of the exhaust elbow at the top front of the engine runs to the left or port side of the hull and is discharged. 2. The hose from the top of the thermostat housing runs to the right front or starboard side of the ski and is discharged. This fitting will need to be added to the SUV hull. 3. The larger hose from the bottom of the thermostat goes to the right or starboard side of the pump tunnel in front of the exhaust outlet and is discharged. This fitting will need to be added to the SUV hull. 4. The hose from the top of the muffler goes to the top right or starboard side of the transom plate above the steering cable. 5. The hose from the bottom of the intake goes to the y-splitter and one side of the split goes to the washout connection and the other side of the y goes to the right or port side bottom of the transom plate. 6. The upper right or port side of the transom plate the port just below the trim cable goes to the one way check valve mounted up high then to the bilge pickup. 7. I would suggest adding a discharge fitting to the left or port side of the pump tunnel to be used for a electric bilge pump discharge point. If you want to have a tale tale port you can add a smaller discharge fitting from the electric bilge pump somewhere that you can see it when the bilge pump is running. These fittings will need to be added to the SUV hull. General Instructions: Step 1. Remove the engine and engine mounts. Remove the pump and intermediate shaft bearing housing. Remove the fuel tank. Clean the inside of the hull now. Step 2. Install the through the hull fittings now. One on the right front side of the hull. One on the left and Right side of the pump tunnel. Step 3. Mark the location for the engine mounts and cut out the inner hull and move the engine mount hull Plates to the new locations. Lay fiberglass to seal and enforce the hull. Enlarge the opening in the bulkhead for the water box up and to the right about 2 inches. Step 4. Install the jet pump then install the intermediate shaft bearing housing and check alignment. Use shims if needed for proper alignment. Step 5. Install ECU and wiring. Step 6. Install engine and use shims under engine mounts as needed to get the proper engine coupler Alignment. Step 7. Hook up exhaust, this will require some modifications. Hook up all wire connectors and hoses. Step 8. Double check all your work. Step 9. Install the battery. Crank engine, turn on water. Step 10. Put in water and check for any leaks, if no leaks then unload and run the ski for a few minutes then Stop and double check for any water or leaks in the hull. Enjoy your converted SUV.
Installation Instructions and Suggestions For Jeep YJ Fiberglass Replacement Bodies
 Installation Instructions and Suggestions For Jeep YJ Fiberglass Replacement Bodies Getting started with the removal of your existing Jeep body. Trust nothing to memory; take photos of everything at different
TABLE OF CONTENTS. 1 How to Use Control gauge and Rocker Switch Mounting Hardware... 3
 1 TABLE OF CONTENTS 1 How to Use.... 3 1.1 Control gauge and Rocker Switch... 3 1.2 Mounting Hardware.... 3 1.3Trailering with the SWITCHBLADE... 4 1.4 Maintaining your SWITCHBLADE... 4 2 INSTALLATION
FI AirGap intake installation instructions
 Updated March 2016 FI AirGap intake installation instructions Please read and understand all of the instructions and check to make sure that all of the parts (shown on last page) are present before you
Revision Date: Building a dual pump system for an open boat. Description:
 Disclaimer: The information is provided as-is. The author(s) accepts no liability for the accuracy, availability, suitability, reliability and usability. The following information is in the public domain
This is what we are trying to create in the steps below
 You will need: (1) Some 3/4 aluminium or steel flat bar (+/- 1 foot) (2) About 12 of 3 Aluminium or steel tubing. (2) Piece of 3X3 silicone hose and 2 hose clamps (3) 1 K&N (or similar) high flow filter
A /F/X Body Instruction Packet Rear Disc Conversion
 A /F/X Body Instruction Packet Rear Disc Conversion 64-72 A Body / 67-81 F Body / 62-74 X Body This kit is for axles with a 3 1/8 spread center to center on the top two bolt holes (pictured left). Rotor
Subaru Front Mount Intercooler Kit STI Subaru Front Mount Intercooler Kit STI
 Subaru Front Mount Intercooler Kit STI 2008-2014 715500 Subaru Front Mount Intercooler Kit STI 2008-2014 Congratulations on your purchase of the Subaru Front Mount Intercooler Kit STI 2008-2014. The following
BMW 2002 M42 Swap Notes-THIS IS NOT FINISHED
 BMW 2002 M42 Swap Notes-THIS IS NOT FINISHED This document is to help those that want to install an m42 into a BMW 2002. It is based around an e30 engine, trans, and wiring. You can use the e36 block/head/wiring
Procharger Stage II Intercooled Supercharger System (11-14 GT)
") Procharger Stage II Intercooled Supercharger System (11-14 GT) Installation Time: Approximately one day. Installed on 2012 Mustang GT 5.0/Manual Required Tools 3/8 Socket Set (Standard and Metric) 1/2
Procharger Stage II Intercooled Supercharger System (11-14 GT) Installation Time: Approximately one day. Installed on 2012 Mustang GT 5.0/Manual Required Tools 3/8 Socket Set (Standard and Metric) 1/2
INSTALLATION INSTRUCTIONS
 INSTALLATION INSTRUCTIONS FRONT DISC BRAKE CONVERSION KIT A129-2 1959-64 Full Size Chevrolet Car and FRONT DISC BRAKE CONVERSION KITS A129-3 & A129-4 1965-68 Full Size Chevrolet Car Thank you for choosing
***FOR COMPETITION USE ONLY as per US EPA regulations *** Factory Pipe Bill of Materials Kawasaki Ultra 150 Triple Pipe
 ***FOR COMPETITION USE ONLY as per US EPA regulations *** Factory Pipe Bill of Materials Kawasaki Ultra 150 Triple Pipe Item Qty Part Number Part Description 1 1 COMASM0947 Ultra 150 PTO Chamber assembly
1967 (Late) CORVETTE STANDARD (NON-ADJUSTABLE) STEERING COLUMN DISASSEMBLY & REPAIR INSTRUCTIONS PAPER #2
 CORVETTE STANDARD (NON-ADJUSTABLE) STEERING COLUMN DISASSEMBLY & REPAIR INSTRUCTIONS PAPER #2") Last Revision: 03SE2012 1967 (Late) - 1968 CORVETTE STANDARD (NON-ADJUSTABLE) STEERING COLUMN DISASSEMBLY & REPAIR INSTRUCTIONS PAPER #2 Disassembly and Repair Instructions Addressed in this Paper Degree
Last Revision: 03SE2012 1967 (Late) - 1968 CORVETTE STANDARD (NON-ADJUSTABLE) STEERING COLUMN DISASSEMBLY & REPAIR INSTRUCTIONS PAPER #2 Disassembly and Repair Instructions Addressed in this Paper Degree
Lincoln Mark VII T5 Swap Version submitted by 5.0 bird
 Lincoln Mark VII 1984-1989 T5 Swap Version 20070611 submitted by 5.0 bird I've decided to make an article to assist with the T5 swap for the 84-89 Mark VIIs, since I was just in there because my DOA didn't
Fizzle Intercooler Kit Installation Instructions
 Fizzle Intercooler Kit Installation Instructions Note: The minimum exhaust modification required for the installation of this intercooler is the removal of the OEM black plastic resonator box. It can easily
Installing the Audiovox CCS-100 Cruise Control.
 Installing the Audiovox CCS-100 Cruise Control. This article was written by: Lon Lawrence w650kawasaki@leaco.net Cruise Control : Audiovox CCS-100 ($89) Webpage : www.summitracing.com Message: I've installed
55-64 Full Size GM (Impala, Bel Air, etc.) This kit is for axles with a 3 3/8 spread center to center on the top two bolt holes (pictured left).
 This kit is for axles with a 3 3/8 spread center to center on the top two bolt holes (pictured left).") SUM-BK1624A Full Size GM Installation Instructions Rear Disc Conversion 55-64 Full Size GM (Impala, Bel Air, etc.) This kit is for axles with a 3 3/8 spread center to center on the top two bolt holes (pictured
SUM-BK1624A Full Size GM Installation Instructions Rear Disc Conversion 55-64 Full Size GM (Impala, Bel Air, etc.) This kit is for axles with a 3 3/8 spread center to center on the top two bolt holes (pictured
IAG Air / Oil Separator (AOS) For STi
 For STi") IAG Air / Oil Separator (AOS) For 2008-14 STi Part# IAG-ENG-7000 Tools Required: Ratchet, torque wrench, extensions, needle nose pliers, hose cutter, snips/scissors Sockets: 10mm, 12mm 13mm Wrenches: 10mm,
IAG Air / Oil Separator (AOS) For 2008-14 STi Part# IAG-ENG-7000 Tools Required: Ratchet, torque wrench, extensions, needle nose pliers, hose cutter, snips/scissors Sockets: 10mm, 12mm 13mm Wrenches: 10mm,
TS 770 R (W1999TSJRAUS-1999) Page 1 of 59 BILGE PUMP ASSEMBLY
 Page 1 of 59 BILGE PUMP ASSEMBLY") 1999 TS 770 R (W1999TSJRAUS-1999) Page 1 of 59 BILGE PUMP ASSEMBLY 1999 TS 770 R (W1999TSJRAUS-1999) Page 2 of 59 BILGE PUMP ASSEMBLY 1 0673-377 1 Fitting, Outlet - Bilge 2 0612-456 2 Seal, Fitting 3 0623-753
1999 TS 770 R (W1999TSJRAUS-1999) Page 1 of 59 BILGE PUMP ASSEMBLY 1999 TS 770 R (W1999TSJRAUS-1999) Page 2 of 59 BILGE PUMP ASSEMBLY 1 0673-377 1 Fitting, Outlet - Bilge 2 0612-456 2 Seal, Fitting 3 0623-753
Go-ped ESR750 / ESR750EX Rear Brake Installation Instructions
 Go-ped ESR750 / ESR750EX Rear Brake Installation Instructions This kit provides all the parts you need to install a rear brake on your ESR750 or ESR750EX. It will not work on an ESR Sport, or other Go-ped
Mustang Radiator Conversion DIY. By GearHeadPeter. January 27, 2011
 1964-1966 Mustang Radiator Conversion DIY By GearHeadPeter January 27, 2011 We all know that the radiators in our cars are not the best, especially if you have done any customization to the engine, which
11 - Fairings. Fairings. February XLF Page 11-1
 11 - Fairings Fairings February 2003 11-XLF Page 11-1 11 - Fairings This Page Intentionally Left Blank Page 11-2 11-XLF February 2003 11 - Fairings Contents 11.0 - Chapter Preface... 11-4 11.0.1 - Parts
Sikky Oil Pan Install Guide
 Sikky Oil Pan Install Guide **If you have a double chain timing belt or after market oil pump setup then further modifications may need to be made in order for the pan to fit.** Remove starter Remove plastic
Step 6: Remove and save the MAP sensor for later use. Step 7: Remove the passenger side intercooler pipe and the EGR intake manifold.
 LBZ Twin kit Install Step 1: Disconnect both batteries. Step 2: Drain coolant and oil also remove passenger side inner fender. Step 3: Remove intake box and piping. (Remove and save the MAF sensor in the
Thermostats, Radiator, Coolant Hose, Hydraulic Fan/Steering R&R PT38 8V92
 REMOVING AND REPLACING THE THERMOSTATS, COOLANT HOSES, RADIATOR AND CHANGING THE HYDRAULIC FAN/STEERING FILTER/OIL/SHAFT SEALS ON A 1987 PT38 8V92 BY CURT SPRENGER March 2007 Thermostats, Radiator, Coolant
928 Motorsports Supercharger Installation Copyright 2007, 928 Motorsports, LLC All Rights Reserved
 For Porsche 928 equipped with K-Jetronic (CIS) Fuel System Toll-Free Tech Hot Line: 877-FOR-928M 877-367-9286 Please do not copy this manual and give copies to your friends. Our ability to bring you this
DISPLACEMENT: The maximum displacement that may be achieved in the Ski Superstock Class is 1500 cc.
 SKSS.1 SUPERSTOCK CLASS COMPETITION Competitors in this class are allowed modifications to gain maximum machine and engine performance while restricting the build costs by prohibiting aftermarket hulls
13 October, 2014 Page 1
 13 October, 2014 In my second and last Helicycle I want to make everything better than the first one. That includes not only a transmission chip detector, but one for the tail rotor as well. The transmission
The gas tank cabinets
 1 of 5 7/15/2015 9:09 AM 1 of 5 The gas tank cabinets When the garage is full, there is always the second bedroom. The California house had a spare room behind the single-car garage where I set my shop
JRSC + BBK Install on SVTF. Neil A. Shah medicnas on focaljet September 2006
 JRSC + BBK Install on SVTF Neil A. Shah medicnas on focaljet September 2006 ECU up here. When removing make sure the smaller bundles of wires don t get wrapped around the bottom edge and break - this almost
10/12/2015 boostcontrol
 Boost Controller Updated May 14, 2002 Here is a boost controller that incorporates quick spool up, minimal spikes, and minimal hassle. You will merely have to clean it once in a while, or else put a tiny
CP3 Retrofit Pump Install:
 CP3 Retrofit Pump Install: 2A 4 2 5 3 6 1.) Clean this area very well. No dirt = No troubles!!!!! Lay lots of Rags under and around the pumps, alternator and belts!!!!! This will save dropped tools, parts,
WARNING: the engine does not come with oil in it. Please fill the oil before starting. The 200cc hardknock requires 9/10 of a quart of oil.
 WARNING: the engine does not come with oil in it. Please fill the oil before starting. The 200cc hardknock requires 9/10 of a quart of oil. Things needed for assembly. -2 tubes of blue loc-tite. I don
EXTRACTOR. Sled Tie Down Installation Instructions. Example: Yamaha FX140 ( The same instructions apply for all pwc models utilizing this attachment)
") EXTRACTOR Sled Tie Down Installation Instructions Example: Yamaha FX140 ( The same instructions apply for all pwc models utilizing this attachment) Step 1. You will need to install 1 to 3 stainless steel
EXTRACTOR Sled Tie Down Installation Instructions Example: Yamaha FX140 ( The same instructions apply for all pwc models utilizing this attachment) Step 1. You will need to install 1 to 3 stainless steel
Owner s Manual And Guide To Installation
 Owner s Manual And Guide To Installation < # > TABLE OF CONTENTS 1 How to Use...3 1.1 Control Keypad...3 1.2 Mounting Hardware...4 1.3 Auto Launch Details...5 1.4 Trailering with the SWITCHBLADE...6 1.5
INSTALLATION INSTRUCTIONS
 INSTALLATION INSTRUCTIONS Document# 19-0038 2004+ Lotus Elise (Series 2) Rear Clamshell Removal Kit Safely support the vehicle. This is a two-person job. Allow 1 to 2 hours for initial disassembly. Have
Slingshot Rotrex Supercharger Kit
 Slingshot Rotrex Supercharger Kit This supercharger kit improves on the Slingshot by forcing more dense air into the engine and creating more power. Installation time of the supercharger depends on you
M7 R52S & R53 Cold Air Intake Installation Guide 53-3M7301
 M7 R52S & R53 Cold Air Intake Installation Guide 53-3M7301 M7 Speed engineers and manufactures the highest quality MINI COOPER accessories and performance parts available anywhere on Planet Earth! Please
Front Axle Pinion Seal Replacement
 Front Axle Pinion Seal Replacement by Flopster843 10 Apr 2016 The AAM 925 axle used on the front of Dodge Ram trucks is a decent unit, but it does have its flaws. This axle lacks lockout hubs on the front
Steering Column to Steering Box. Installation Instructions. for Tri-Five Chevrolets. Right Hand Drive Steering Column. Instruction #
 Steering Column to Steering Box Installation Instructions for Tri-Five Chevrolets Right Hand Drive Steering Column Instruction # 8000000001 Thank you for purchasing the Tri-Five Chevy column from ididit.
Installation Instructions for Tri-Five Chevrolets. Steering Column to Steering Box
 Steering Column to Steering Box Installation Instructions for Tri-Five Chevrolets CLASSIC PERFORMANCE PRODUCTS inc. 8341 Artesia Blvd. Unit C, Buena Park, CA 90621 (714) 522-2000 (714) 522-2500 fax Thank
v Porsche 928
 1985-86 32v Porsche 928 Toll-Free Tech Hot Line: 877-FOR-928M 877-367-9286 Please do not copy this manual and give copies to your friends. Our ability to bring you this supercharger kit at this price relies
MGB V8 Roadster restoration project Report 138
 24th May 2017. FITTING THE CARPETS - continued I have included quite a lot of detail and photographs on the carpet and trim fitting, as it may help those who decide to do this job on their own car. The
PFadvantage Metalfor Araus 1360
 Metalfor Araus 1360 Note: Indented items indicate parts included in an assembly listed above Part Name/Description Part Number Quantity Instruction Kit Metalfor Araus 2005300-14 1 Display Bracket 4000134
Днепр) Russian Motorcycle Carburetors Part 2B: PZ-24 and PZ-28 Carburetor Assembly and Jet Drilling
 Russian Motorcycle Carburetors Part 2B: PZ-24 and PZ-28 Carburetor Assembly and Jet Drilling") Ural (Урал( Урал) - Dnepr (Днепр( Днепр) Russian Motorcycle Carburetors Part 2B: PZ-24 and PZ-28 Carburetor Assembly and Jet Drilling (applies also to K-37 K and K-38 K carbs) Ernie Franke eafranke@tampabay.rr.com
Ural (Урал( Урал) - Dnepr (Днепр( Днепр) Russian Motorcycle Carburetors Part 2B: PZ-24 and PZ-28 Carburetor Assembly and Jet Drilling (applies also to K-37 K and K-38 K carbs) Ernie Franke eafranke@tampabay.rr.com
Pump Gas Instructions for Polaris And 800 Models. Important Information before Installing This System:
 Pump Gas Instructions for Polaris 600 700 And 800 Models Important Information before Installing This System: Before you begin your turbo install, read through these instructions to determine if you are
SHARK UPPER WINDSHIELD FRAME & WINDSHIELD REPLACEMENT. Text and Photos by TOM BENFORD
 Text and Photos by TOM BENFORD I purchased a fathom green 69 big-block tri-power T-top coupe with only 42,000 original miles on it recently. I'm the third owner of the car, and I got it for a very good
Porsche 928 with 16v LH-Jetronic Fuel System
 Porsche 928 with 16v LH-Jetronic Fuel System Toll-Free Tech Hot Line: 877-FOR-928M 877-367-9286 Please do not copy this manual and give copies to your friends. Our ability to bring you this supercharger
We thank you for purchasing a manual petcock conversion kit from Murphs!
 We thank you for purchasing a manual petcock conversion kit from Murphs! The first step is removing the gas tank from the bike. We suggest running the tank down to reserve before removal, both for the
Projector39/Umnitza BMW Headlight & Re-Installation for E39s Predator Angel Eyes, and Lamin-X Installation
 Projector39/Umnitza BMW Headlight & Re-Installation for E39s Predator Angel Eyes, and Lamin-X Installation Now it is time to remove the headlights! Obviously you have to open the hood to do this. 100_3630.jpg
Dexter Never-Adjust Brake Install
 Dexter Never-Adjust Brake Install Arctic Fox 2007 29-5T Warning: This involves lifting your trailer, working under and around it. If you do not have the correct equipment and knowledge for this, please
INSTALLATION INSTRUCTIONS
 INSTALLATION INSTRUCTIONS FX4 ELITE REAR DISC CONVERSION KITS WITH INTERNAL PARKING BRAKE A110-14, A111-25, A111-29 for FORD 8" & 9" REAR ENDS Thank you for choosing STAINLESS STEEL BRAKES CORPORATION
Main Fuel Tank #9668 Date 3/17/18 rev. 0. Pic #1 Pic #2. Pic #3. Pic #4. Pic #5 Pic #6
 1045 S. Cherokee Lane Lodi CA 95240 Phone (209)400-7200 Fax (209)943-7923 www.wildhorses4x4.com Note: To assure a completely clean tank, use the large hole to inspect tank for any debris. It is highly
Page1. ISF Stainless Steel Headers // Part# HDR-004
 Congratulations on the purchase of your ISF Stainless Steel Headers and thank you for choosing Sikky Manufacturing. This installation manual is intended to guide you through the removal of the factory
INSTALLATION INSTRUCTIONS
 INSTALLATION INSTRUCTIONS POWER FRONT DISC CONVERSION KIT A126-7 1963-66 CHEVY C10 PICKUP NON-POWER FRONT DISC CONVERSION KIT A126-8 1963-72 CHEVY C10 PICKUP Thank you for choosing STAINLESS STEEL BRAKES
Keeping You Cool Under Pressure
 Installation Instruction for 92-93 GM 6.5L Turbo Diesel Series 3500-4 Wheel Drive Pickup and Series 1500, 2500, 3500 4 Wheel Drive Suburban Intercooler System (Part No. 2-436) TOOLS REQUIRED: 1.) Normal
How to stick a 3.4L engine into your Boxster.
 How to stick a 3.4L engine into your Boxster. When I purchased my 99 Boxster in January, it was already equipped with a TPC supercharger setup. While fun and a great improvement over the rather anemic
This information covers procedures for replacing the sealant for the crankshaft cover on the Volvo D16F engine.
 Volvo Trucks North America Greensboro, NC USA DService Bulletin Trucks Date Group No. Page 1.2008 216 50 1(17) Sealant Crankshaft Cover, Replacement D16F Sealant Crankshaft Cover, Replacement W2005773
Sunroof Repair. Sunroof Repair TSB. The sunroof repair kit available for the J30 is part number Y20. See images at bottom of document.
 Sunroof Repair This document is the text/images from the TSB (technical service bulletin) issued by Infiniti concerning the repair procedure for sunroof issues. Be advised that this is a LARGE, TIME-CONSUMING
Ford Racing BOSS 302 Engine Oil Cooler (11-14 GT)
") Tools needed: 14mm hex socket 7mm socket/wrench 8mm socket/wrench Ford Racing BOSS 302 Engine Oil Cooler (11-14 GT) 10mm socket (for airbox removal) ¾ inch or 19mm wrench Torque wrench Appropriate ratchets
Tools needed: 14mm hex socket 7mm socket/wrench 8mm socket/wrench Ford Racing BOSS 302 Engine Oil Cooler (11-14 GT) 10mm socket (for airbox removal) ¾ inch or 19mm wrench Torque wrench Appropriate ratchets
M1A1 Thompson Upgrade
 M1A1 Thompson Upgrade If you are mechanically inclined at all. This should be no problem. I'll start off with a list of things you will need. Thompson M1A1 Whisky Cigarettes Tools: Flat screwdriver No.
JEEP Wrangler JK/JKU Swing-A-Way Tire Carrier/RotoPpax WARNINGS/CAUTIONS NOTE. INSTALLATION INSTRUCTIONS 2 Door Models 85209
 JEEP Wrangler JK/JKU Swing-A-Way Tire Carrier/RotoPpax 2007-2017 INSTALLATION INSTRUCTIONS Item Kit No. 2 Door Models 85209 4 Door Models 85209 WARNINGS/CAUTIONS These instructions are for both the can
Factory Five Racing, Inc. 818 Kit Assembly manual revision 1J update
 Factory Five Racing, Inc. 818 Kit Assembly manual revision 1J update Turbo coolant overflow tank...1 Shifter handle...4 Install...4 Door skin...7 Door Liner... 10 Side mirrors... 14 Door handles and pulls...
JODALE PERRY. Parts List & Mounting Instructions. Jacobsen HR9016 JDP BUILT FOR LIFE
 JODALE PERRY Parts List & Mounting Instructions Jacobsen HR9016 JDP BUILT FOR LIFE Jacobsen HR9016 Mounting Instructions Standard Parts 1 - LH Rear Mounting Bracket 1 - RH Rear Mounting Bracket 1 - Front
This LED flashtube kit covers models 400, 404, 500, 504, 600, 680 & 506.
 L.E.D. INSTRUCTIONS I D T S O T U B I R M O C R Y N A P Kit contains: This LED flashtube kit covers models 400, 404, 500, 504, 600, 680 & 506. For the power supply: 1-LED power supply circuit board, 2
Pro Series SVHO Engine Cooling Upgrade Kit
 Pro Series SVHO Engine Cooling Upgrade Kit PART# - RY10080-ECUK-PC-1 APPLICATION(S): Yamaha FZ & FX SVHO using RIVA Power Cooler Kit (part # RY17080-PC) We strongly recommend the use of a service manual
INSTALLATION INSTRUCTIONS FOR COZY CAB A-1 AIR CONDITIONING KIT
 INSTALLATION INSTRUCTIONS FOR COZY CAB A-1 AIR CONDITIONING KIT 05-11 INSTALLATION INSTRUCTIONS A-12235 Air Conditioner Kit Cab set up instructions; This air conditioning kit is designed to be used with
ESS INSTALL. The donor car /6 Cosmos Black/Sand UUC Short Shifter Brembo cross drilled rotors Phillips Nav System 16:9
 ESS INSTALL The donor car.. 1997 540/6 Cosmos Black/Sand UUC Short Shifter Brembo cross drilled rotors Phillips Nav System 16:9 The install went in several stages. Disconnect the battery Stage 1 Remove
REAR STEEL BUMPER INSTALLATION INSTRUCTIONS Runner
 REAR STEEL BUMPER INSTALLATION INSTRUCTIONS 2010+ 4Runner Version 2.1.0 - September 2016 Thank you for purchasing the Southern Style OffRoad Toyota 4Runner 5 th Gen Modular Rear Plate Steel Bumper. It
Phone Fax
 Directions for Installation of ECS Paxton Supercharger Kit Disconnect battery Remove stock serpentine belt Remove stock belt tensioner, save the 2 bolts for later use on supercharger bracket Remove alternator
Cordless Drill Hydro Generator (9 May 05) Pico-Hydro Power using a Cordless Drill as DC Generator
 Pico-Hydro Power using a Cordless Drill as DC Generator") Pico-Hydro Power using a Cordless Drill as DC Generator Water wheel construction: One soon will get tired of hand cranking and will want to find a better way. In the near continuous raining condition as
Pico-Hydro Power using a Cordless Drill as DC Generator Water wheel construction: One soon will get tired of hand cranking and will want to find a better way. In the near continuous raining condition as
Rostra Electronic Cruise Control Install On a Stratoliner or Roadliner
 Rostra Electronic Cruise Control Install On a Stratoliner or Roadliner MATERIALS LIST: 1 - Rostra Part # 250-1223 (www.brandondist.com/products/cruise1223.htm) 1 - Signal Splitter part # 250-4369 1 - Engagement
Instructional Video Productions and Sales
 Instructional Video Productions and Sales Home DVD Info Pictorials Sales Images Updates to DVDs Contact Information Tire Plugging: Caution: This pictorial is for informational purposses only. I accept
Guide to fitting a MK2.5 (Facelift) Centre Console into a MK2 Focus. The Parts
 Centre Console into a MK2 Focus. The Parts") Guide to fitting a MK2.5 (Facelift) Centre Console into a MK2 Focus For the latest project on my MK2 Focus I decided that a Facelift centre console would tie my previous interior uplift together. As I
Guide to fitting a MK2.5 (Facelift) Centre Console into a MK2 Focus For the latest project on my MK2 Focus I decided that a Facelift centre console would tie my previous interior uplift together. As I
*** FOR COMPETITION USE ONLY per US EPA regulations *** Factory Pipe Bill of Materials Kawasaki STX-R Triple Pipe
 *** FOR COMPETITION USE ONLY per US EPA regulations *** Factory Pipe Bill of Materials Kawasaki STX-R Triple Pipe Item Qty Part Number Part Description 1 1 COMASM0935 STX-R PTO Chamber assembly 2 1 COMASM0936
Before starting installation
 Before starting installation The load rating for these tire-can/tire carriers is a MAXIMUM of 175 lbs. Please be aware that some tire and wheel combinations along with gas cans and hi-lift jacks can exceed
Front seats. j a t CAUTION! Before beginning repairs on the electrical system: Obtain the anti-theft radio security code. Switch the ignition off.
 j a t Front seats 72-1 CAUTION! Before beginning repairs on the electrical system: Obtain the anti-theft radio security code. Switch the ignition off. Search Advanced Search Disconnect the battery Ground
Rear Wheel Removal (by BassCliff)
") Rear Wheel Removal (by BassCliff) Hello to my GS riding friends! After picking up a nail in my rear tire (while on the freeway at 75mph!) I thought I would take a few pictures to help illustrate the rear
Rear Wheel Removal (by BassCliff) Hello to my GS riding friends! After picking up a nail in my rear tire (while on the freeway at 75mph!) I thought I would take a few pictures to help illustrate the rear
55-64 Full Size Chevy
 55-64 Full Size Chevy Installation Instructions Power Disc Conversion 9 slimline booster pictured Your new disc brake conversion kit can be bolted up with standard hand tools. The only tools you may not
Jeep Wrangler TJ. Complete Air Conditioning System. Slide Control Head. Installation instructions
 WWW.JEEPAIR.COM 1996-1998 Jeep Wrangler TJ Complete Air Conditioning System Slide Control Head Installation instructions Kit Information After 1994 every vehicle was designed for R134a refrigerant. The
2103 NITRO RAIL DRAGSTER KIT
 203 NITRO RAIL DRAGSTER KIT THANKS FOR BUYING RJ SPEED S NITRO DRAG KIT. IT IS A LITEWEIGHT CAR MADE FOR STRAIGHT LINE DRAG RACING AND CAN BE BROKEN IF RUN INTO SOLID OBJECTS AT HIGH SPEED. YOU WILL NEED
Turbinator-2 Build Manual
 Turbinator-2 Build Manual Thank you for your purchase of the Turbinator-2 sport jet by Boomerang RC Jets. This RC Jet IS NOT A TOY and should only be flown and operated by experienced RC Turbine Pilots.
2017+ L5P Duramax 3 ½ Down Pipe & EGR Fix Kit
 2017+ L5P Duramax 3 ½ Down Pipe & EGR Fix Kit Covers installation of PN s: WCF100630, WCF100829 Note: This Kit is for off road competition use only! Off Road Competition Use Tuning & Exhaust System is
Instructions to install the early ( ) Limited Slip Differential in the Late-model ( ) G28 Transaxle
 Limited Slip Differential in the Late-model ( ) G28 Transaxle") Instructions to install the early (1978-83) Limited Slip Differential in the Late-model (1985-1995) G28 Transaxle BACKGROUND: Most 928 owners know about the improvements to the 5- speed transaxle that
Instructions to install the early (1978-83) Limited Slip Differential in the Late-model (1985-1995) G28 Transaxle BACKGROUND: Most 928 owners know about the improvements to the 5- speed transaxle that
How To: Fix That Ugly Hanging E-Brake Cable A CFans Members Mod Project by dirtydawg
 How To: Fix That Ugly Hanging E-Brake Cable A CFans Members Mod Project by dirtydawg Skill Level: Easy Disclaimer: Please use caution and seek professional assistance when necessary. ColoradoFans.com,
INTERCOOLER UPGRADE INSTALLATION INSTRUCTIONS PART NUMBER D
 INTERCOOLER UPGRADE INSTALLATION INSTRUCTIONS PART NUMBER D330-0021 APPLICATION: 2014-16 F22 228i & xdrive coupe (see restrictions below) 2015-16 F23 228i & xdrive convertible 2012-16 F30 328i & xdrive
Building a Mick Reeves 1/4.5 Scale Hawker Hurricane...Instalment 9 Retracts, Door Covers, Radiator and Wing Centre Section
 Building a Mick Reeves 1/4.5 Scale Hawker Hurricane...Instalment 9 Retracts, Door Covers, Radiator and Wing Centre Section Finishing the Wing Set: Now that I ve got the tedious wing skinning behind me
OIL COOLER KIT INSTALLATION INSTRUCTIONS D Application: , E89 Z4 sdrive 35i without stock oil cooler* PARTS LIST
 OIL COOLER KIT INSTALLATION INSTRUCTIONS D570-0891 Application: 2009-11, E89 Z4 sdrive 35i without stock oil cooler* PARTS LIST Qty Part No. Description 1 D573-0050 Oil Cooler + Frame Assy 1 D573-0044
Installing the Wireless Charging upgrade kit in a 2018 XT5 (Platinum version)
") Installing the Wireless Charging upgrade kit in a 2018 XT5 (Platinum version) September 2, 2018 Tools needed: Wireless charger upgrade kit Plastic trim tools 7 mm nut driver Background: I purchased the
Installing the Wireless Charging upgrade kit in a 2018 XT5 (Platinum version) September 2, 2018 Tools needed: Wireless charger upgrade kit Plastic trim tools 7 mm nut driver Background: I purchased the
Assembly Manual. 1/10th Formula 1 Car
 Assembly Manual 1/10th Formula 1 Car Center Pivot Bag 1 3374 - Center Pivot Socket 40194 - Hard Anodized Alum Pivot ball 3254-2-56 *Note - Sometimes it is helpful to slightly over-tighten the top clamp
Prerequisites: Shop Manual (recommended) pages 3-9 through 3-13.
 pages 3-9 through 3-13.") Prerequisites: Order your gaskets average about $25.00 bucks X 2 so $50.00 4NK-11193-00-00 Obtain a shim kit (Should have several 265 and 270s) (Some dealers will exchange) Obtain a Valve Bucket Tool YM-33961
Prerequisites: Order your gaskets average about $25.00 bucks X 2 so $50.00 4NK-11193-00-00 Obtain a shim kit (Should have several 265 and 270s) (Some dealers will exchange) Obtain a Valve Bucket Tool YM-33961
O ring installation guide
 AtomicRice.com O ring installation guide Tools and materials needed: 1) Phillips Screwdriver ( one medium and one large head) 2) Small or Medium sized flathead screwdriver or thin rigid shim 3) Vaseline
VW SCIROCCO TWINTERCOOLER INSTALLATION INSTRUCTIONS
 VW SCIROCCO TWINTERCOOLER INSTALLATION INSTRUCTIONS Tools needed: T25 torx driver Small flat head screwdriver 12mm & 13mm socket, with ratchet Dremel or similar with cut off disc Large Phillips screwdriver
MARDER II ENGINE COMPARTMENT
 TWS 353048 MARDER II ENGINE COMPARTMENT Congratulations on purchasing one of the finer aftermarket resin conversion sets available. This kit was Mastered by Tom Kondziolka. This kit is intended to be used
Installation Manual for LCD Boost Controller device.
 Installation Manual for LCD Boost Controller device. Main Black box front view. The lonely white 4pin connector above means this box is equipped with the optional serial expansion card. Main black box
Geared Drives 200Z PSRU Zero Offset Gearbox with Centrifugal Clutch Assembly
 Instructions for Removing and replacing Gen X Gearbox with Geared Drives 200Z Prior to your gear box arriving: Using a strap or chain and an engine hoist to hold your engine up in the mount, remove your
INSTALLATION INSTRUCTIONS
 INSTALLATION INSTRUCTIONS BIG ROTOR / CALIPER RELOCATION FRONT KITS SUM-BK1422, BK1423, BK1424 1999-2006 GM 1/2 Ton Trucks & SUVs Thank you for choosing SUMMIT RACING for your braking needs. Pleases take
1986 Rear Disk Brake Upgrade. All hard lines mounted to the rear axle with mounting screws. 1/4" fittings
 1986 Rear Disk Brake Upgrade Being well prepared for a project of this size is the key to success. I thought I was well prepared by doing a lot of research and getting all of the required parts before
Integrated Engineering MK7/MQB Cold Air Intake Install Guide IEINCI2 & IEINCI8
 Integrated Engineering MK7/MQB Cold Air Intake Install Guide IEINCI2 & IEINCI8 Thank you for purchasing another high quality Integrated Engineering product! This instruction guide is used for installation
TMS Trailing Arm Race Bushings
 PART # TSU9980020 TMS Trailing Arm Race Bushings TMS Trailing arm race bushings replace the stock rubber bushings, and were developed in conjunction with the TMS SPEED World Challenge Racing Team. Over
SunFlower Helicopter Rocket LUNAR Build Session: 9/25/08 By Tom Desmarais
 SunFlower Helicopter Rocket LUNAR Build Session: 9/25/08 By Tom Desmarais Contents of Kit: A. 3 1/16 x1 x11 basswood rotors B. 3 1/16 x2 x2 basswood fins C. 3 1/16 x5/16 x1/2 basswood hold spacer D. 3