EXTRACTOR. Sled Tie Down Installation Instructions. Example: Yamaha FX140 ( The same instructions apply for all pwc models utilizing this attachment)
|
|
|
- Lucas Craig
- 5 years ago
- Views:
Transcription
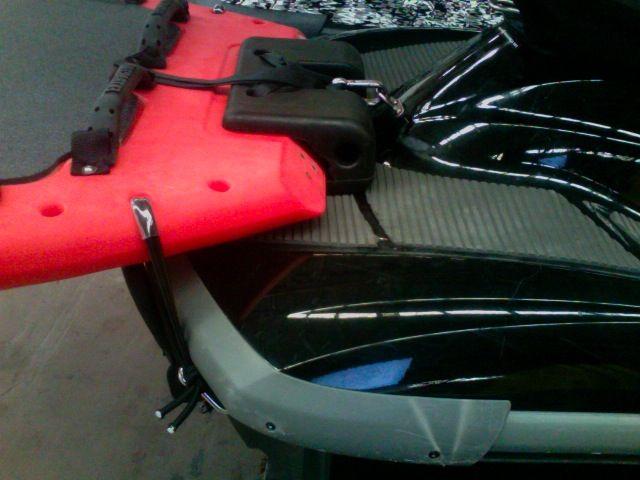
1 EXTRACTOR Sled Tie Down Installation Instructions Example: Yamaha FX140 ( The same instructions apply for all pwc models utilizing this attachment) Step 1. You will need to install 1 to 3 stainless steel bow eye cleats provided. Materials/Tools needed: * Drill, with 3/8" ( 9mm) bit * silicone sealant or epoxy adhesive * 9/16, 12 or 13mm box end ratchet wrench or adjustable end wrench or socket drive * measuring tape * 1 to 3 Stainless Bow Eye Cleats * 2 to 6 nylock nuts * One 3" x 3" x.75" piece of marine plywood or aluminum plate * two 5 foot long ( 1.7 meters) pieces of 3/8" bungee cord * one to two 3" stainless quick links, spring snaps and one 10 foot length of 1 inch tubular webbing

2 Step 2. Position center bow eye cleat as low as possible to where the pwc seat housing meets the transom step and where you have enough inside clearance and surface area inside the pwc hull to mount the 3" x 3" piece of plywood or aluminum plate backing. Approximately, 3 inches up from the transom step should be adequate. THIS IS IMPORTANT SO YOU MAXIMIZE STABILTY AND MINIMIZE SHOCK WHILE TOWING THE SLED Mark hole location.

3 Drill two 3/8 dia. Holes, 3 to 4 inches above transom step and in an area accessible from inside hull for mounting backing plates. Step 3. Drill holes with 3/8" diameter drill bit. Apply some silicone or epoxy putty to outside hole perimeter, press bow eye cleat through holes in pwc hull, locate backing plate inside the pwc hull and press plate onto bow eye cleat threaded studs. Locate bow eye cleat washer plate over studs and thread nylock nuts onto the studs. Tighten nuts and torque down backing plate and cleat.

4 Place u-bolt through holes, locate backup plates onto u-bolt threads, and tighten down with nuts and nyloc nuts.

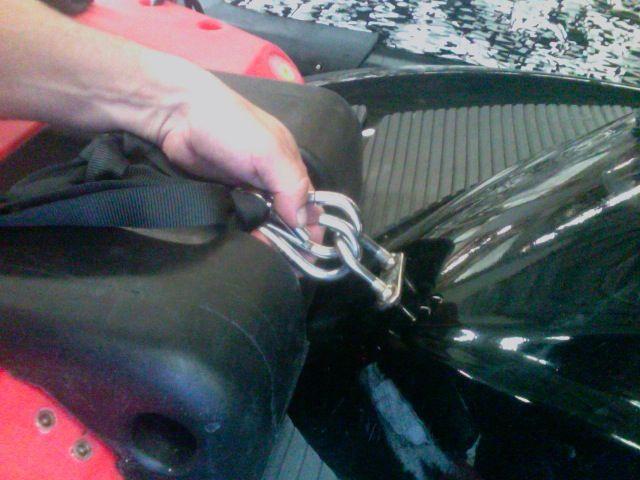
5 Step 4. Attach sled to the center pwc U-bolt that you just installed by connecting it with a stainless steel quick link, or spring clip and by tying the shortest knot possible with the nylon webbing provided, if this is a basic tie down version. This is the hardware used in the intermediate direct connect version. A Metal bracket assembly connected to the sled connects to the pwc u-bolt directly with a spring clip or quick link. Quick links must be threaded completely and tightened with a wrench to prevent failure.
 with Mega")
6 Use 1 (one) Spring clip or quick link with PRO model and 2 (two) with Mega models.

7 Keep length between knots, spring clips and pwc u-bolt as short as possible. This will minimize shock, prevent sled from slipping off the transom and improve performance.
8

9 Make sure spring clip gates face up towards the sky! Otherwise they may accidentally open and disconnect during operation.

10 DO NOT CONNECT SPRING CLIPS WITH GATE FACE DOWN. INTERFERENCE WITH THE BUMPER AND PWC WILL CAUSE A DISCONNECT WHILE IN USE!


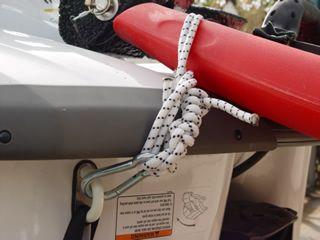
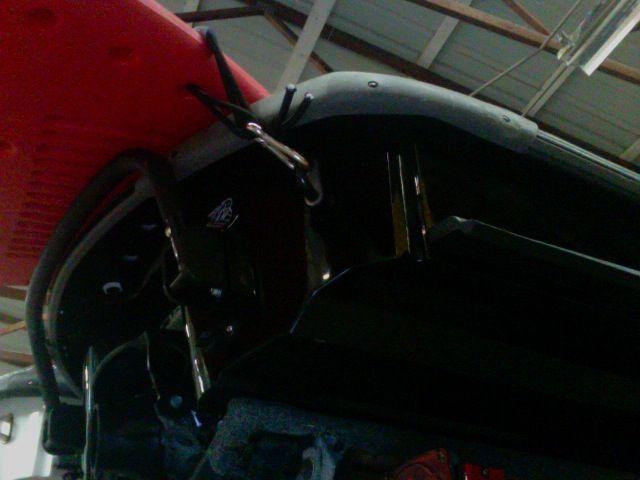
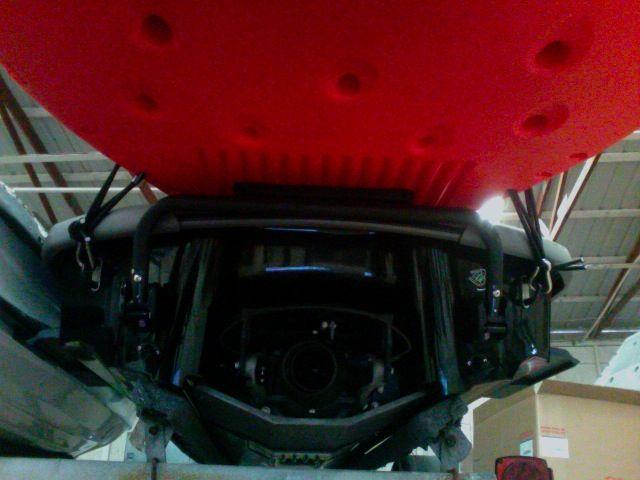
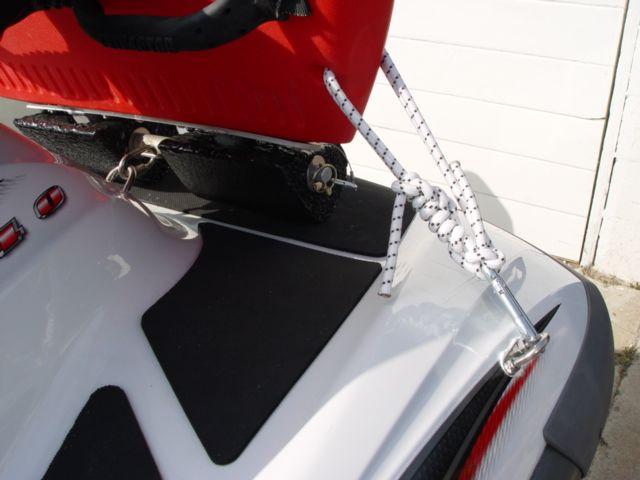
11 LEFT AND RIGHT BUNGEE ATTACHMENTS Step 5. The outer left and right bungee attachments need to be placed in a location either parallel to or aft of the bungee holes in the sled so that the sled rides as flat as possible against the transom step and without excessive play causing instability. You also want to position them in an area where the bungees will help lift the outside rail of the sled during a turn, and snap the sled back into the center position after making the turn. SOME PWCS HAVE U-BOLTS ALREADY MOUNTED IN THEIR STERN THAT WORK WELL WITH SOME SLEDS. OTHER PWCS AND SLEDS WILL REQUIRE U-BOLTS MOUNTED ON THE PWC PORT SIDE AND STARBOARD SIDE RUB_RAILS. The outer left and right bungee attachments need to be placed in a location either parallel to or aft of the bungee holes in the sled so that the sled rides as flat as possible against the transom step and without excessive play causing instability.. Install the outboard U bolts in the locations as described in the pictures.
12
13
14
15

16 Step 6. The left and right side bungees are connected to the left and right bow eye cleats via spring clips. The bungee cords come pre-looped and knotted. The bungee can be adjusted by adding or removing knots at the end of the bungee cord. The bungee cords can be re-positioned along any of the through holes in the rail of the sled so that they pull straight across or aft of the position of the side u-bolts mounted in the pwc. You want the bungees under enough tension while connected to the u-bolts so that the sled will have resistance when trying to swing the sled left or right. This will allow the sled to snap back to center position and also assist with lifting the outside rail of the sled during a turn.

17 Step 7. How to install left and right side mount U-bolts in the PWC MEASURE AND MARK U-bolt position FROM REAR OF PWC, along the rub rail and the fiberglass flange, where the top half of the pwc fastens to the pwc hull. PLACE THE U-Bolts IN A POSITION AWAY FROM FOOTPATH TO PREVENT POSSIBLE INJURY AND IN AN AREA WHERE THE HOLES CAN BE DRILLED THROUGH THE FLANGE AND THE BACKING PLATES AND NUTS CAN BE ACCESSED FOR TIGHTENING. Drill Holes. Add Silicone sealant to outer hole surfaces. Press cleat studs through holes and rest plate against pwc/silicone sealant surface. From inside the hull, locate cleat washer plate and thread nylock nuts. Tighten.

18 Example: Yamaha XL700
19
SUT-450-I ASSEMBLY REQUIREMENTS
 SUT-450-I Torque wrench, carpenters square, wire cutters, Phillips screwdriver, 7/16, 9/16, and 3/4 combination wrenches, ratchet, 9/16,3/4,13/16, and 7/8 sockets. ASSEMBLY REQUIREMENTS *Torque all T-bolt
Installation. minnkot amot or s.com
 Installation minnkot amot or s.com INSTALLATION Your Talon comes complete with the items listed below. Please take a moment to familiarize yourself with the parts list and tools needed prior to starting
Siderolling Tarp Systems Under 9 6 Wide
 Load Loc Select Maximizer Grain Carts Grain Bagger Siderolling Tarp Systems Under 9 6 Wide CRANK STYLE INSTALLATION INSTRUCTIONS MICHEL S INDUSTRIES, LTD. P.O. BOX 119 ST. GREGOR, SK. S0K 3X0 PH:306.366.2184
2017 Current Ford SuperDuty Adaptive Cruise Control Relocation Bracket Installation Instructions
 2017 Current Ford SuperDuty Adaptive Cruise Control Relocation Bracket Installation Instructions PREPARATION 1. Disconnect the negative terminal on the battery. Park the vehicle on level ground and set
SDHQ F-150 Winch Mount System Installation
 SDHQ 2015+ F-150 Winch Mount System Installation Recommended Tools: Door panel removal tool Needle Nose Pliers 10mm Socket or Wrench 13 mm or ½ Socket (⅜ Drive) 14 mm or 9/16 Socket (⅜ Drive) 21 mm or
SAFETY. Injury hazard
 SAFETY Your safety and the safety of others is very important. In order to help you make informed decisions about safety, we have provided installation instructions and other information. These instructions
INSTALLATION INSTRUCTIONS
 INSTALLATION INSTRUCTIONS OUTLAW REAR BUMPER APPLICATION: 2013-2018 Dodge Ram 1500 PART NUMBER: 58-81025 CONTENT ITEM QUANTITY DESCRIPTION TOOLS NEEDED 1 1 REAR BUMPER 18MM WRENCH 2 4 SENSOR L-TAB 5MM
GENERAL SAFETY PRECAUTIONS
 GENERAL SAFETY PRECAUTIONS WARNING! MOVING PART HAZARDS To prevent serious injury and property damage: Do not operate or install this product without reading and understanding these instructions. Keeps
INSTALLATION INSTRUCTIONS
 INSTALLATION INSTRUCTIONS OUTLAW REAR BUMPER APPLICATION: 2016-2018 Chevrolet Silverado 1500 PART NUMBER: 58-81005 CONTENT ITEM QUANTITY DESCRIPTION TOOLS NEEDED 1 1 REAR BUMPER 18MM WRENCH 2 4 SENSOR
STREET SCENE EQUIPMENT,INC.
 STREET SCENE EQUIPMENT,INC. 950-74585 BLACK POWDER COAT 950-76585 BLACK CHROME 365 McCormick Avenue 950-77585 SATIN FINISH Costa Mesa, Ca. 92626 950-78585 CHROME FINISH Phone (714) 426-0590 Fax (714) 426-0591
Suspension System RS6582B
 Suspension System RS6582B Tahoe/Yukon READ ALL INSTRUCTIONS THOROUGHLY FROM START TO FINISH BEFORE BEGINNING INSTALLATION IMPORTANT NOTES! WARNING: This suspension system will enhance the off-road performance
Owner smanual. Banks Ram-Air Super-Scoop Chevy/GMC Pickups. with Installation Instructions
 Owner smanual with Installation Instructions Banks Ram-Air Super-Scoop 2007-2013 Chevy/GMC Pickups THIS MANUAL IS FOR USE WITH SYSTEM 42235, 42236 & 42237 Gale Banks Engineering 546 Duggan Avenue Azusa,
Installation Instructions Table of Contents
 Installation Instructions Table of Contents Pre- Installation of Garage Storage Lift 2 Layout the Garage Storage Lift 3 Installing the strut Channels 3 Install the Drive Assembly 5 Install the Drive Shaft
POLARIS XLT-SPECIAL TRIPLE PIPE SET P.N
 1998-99 POLARIS XLT-SPECIAL TRIPLE PIPE SET P.N. 09-596 Important: Read instructions carefully before installation. 1-Remove stock exhaust, Y-pipe, and rear muffler support. 2-Install three exhaust flanges,
Conflicts None. TOYOTA TUNDRA 2017 Black Laser Cut Grille. Part Number: Accessory Code: BG3000. General Applicability
 TOYOTA TUNDRA 2017 Black Laser Cut Grille Part Number: 00016-34173 Accessory Code: BG3000 Conflicts None Kit Contents Item # Quantity Reqd. Description 1 1 Laser Cut Grille 2 1 Complete hardware kit General
Installation Instructions For Part Number: Scoop and Snorkel Kit
 Installation Instructions For Part Number: 883-275 Scoop and Snorkel Kit 2008-14 Polaris Ranger RZR 800 800 E.F.I. Tools Required For Installation: 7/16 and 1/2 Wrenches. 10mm, 7/16, and 1/2 Sockets. T-25
AL625 & AL625HD INSTALLATION & OWNER S MANUAL
 AL625 & AL625HD INSTALLATION & OWNER S MANUAL These instructions are provided to assist you in the installation of the AL625. If you require further assistance, our trained staff is ready to provide you
INSTALLATION INSTRUCTIONS DRAWERS #240
 INSTALLATION INSTRUCTIONS DRAWERS #240 Please read and fill out the enclosed warranty registration card to activate your warranty. SHIPMENT CONTENTS #1 Lid #2 Rear #3 Left side panel #4 Right side panel
SUT-250-S (These instructions are used for SUT-250-SCLC also)
") SUT-250-S (These instructions are used for SUT-250-SCLC also) Torque wrench, carpenters square, wire cutters, Phillips screwdriver, 7/16, 9/16, and 3/4 combination wrenches, ratchet, 9/16, 3/4, 13/16,
SUT-250-S (These instructions are used for SUT-250-SCLC also) Torque wrench, carpenters square, wire cutters, Phillips screwdriver, 7/16, 9/16, and 3/4 combination wrenches, ratchet, 9/16, 3/4, 13/16,
WARNING. When installed in accordance with these instructions, the front protection bar does not affect operation of the SRS airbag.
 Part Number: 36030 Product Description: BULL BAR WINCH TYPE Suited to vehicle/s: CHEVROLET C/K 500-3500 988-998 YEAR MODEL RANGE AND Warn 9,500-5,000lb WINCHES WARNING REGARDING VEHICLES EQUIPPED WITH
ch2200 ch2300 mt3 osprey pro-trim single s twin s sl-3 INSTALLATION INSTRUCTIONS AND OWNERS MANUAL MECHANICAL DUAL ENGINE CONTROL CH7800P SERIES
 MEMBER INSTALLATION INSTRUCTIONS AND OWNERS MANUAL Part # ISCH7800, Rev 1, 08/2013 www.seastarsolutions.com ch2200 ch2300 mt3 osprey pro-trim single s twin s sl-3 MANUFACTURED BY MARINE ACQUISITION INCORPORATED
Prepare the cargo area for storage of under-hood parts, removed as interference. (Put down blankets.)
") PCU Replacement Procedure John Mayer Hawthorne Auto Clinic 1-28-2014 updated 1-20-2016 Overall notes: It is preferable to perform the PCU replacement procedure on a lift, or to have access to under the
PCU Replacement Procedure John Mayer Hawthorne Auto Clinic 1-28-2014 updated 1-20-2016 Overall notes: It is preferable to perform the PCU replacement procedure on a lift, or to have access to under the
Factory Five Racing, Inc. 818 Kit Assembly manual revision 1i update
 Factory Five Racing, Inc. 818 Kit Assembly manual revision 1i update Pedal box...1 Cable Accelerator Pedal (2002-2005)...2 OEM seats...7 Windshield... 13 Center console... 19 Pedal box Attach the pedal
TOYOTA Epic22 Perfect Pass Install
 TOYOTA Epic22 Perfect Pass Install To start, here is the paddle wheel speedometer install. This alone is almost worth the price of the kit. You ll need: 2 hole saw and drill 5200 Marine Sealant Tape Measure
INSTALLATION INSTRUCTION 88146
 INSTALLATION INSTRUCTION 88146 Rev H FOR RANCHO SUSPENSION SYSTEM RS6547: 4WD SUBURBAN/YUKON XL, 4WD TAHOE/YUKON, & 4WD AVALANCHE READ ALL INSTRUCTIONS THOROUGHLY FROM START TO FINISH BEFORE BEGINNING
SAFETY THIS PRODUCT IS FOR OFFROAD USE ONLY. ALL LIABILITY FOR INSTALLATION AND USE RESTS WITH THE OWNER.
 SAFETY Your safety and the safety of others is very important. In order to help you make informed decisions about safety, we have provided installation instructions and other information. These instructions
OWNER S GUIDE & INSTALLATION INSTRUCTIONS
 OWNER S GUIDE & INSTALLATION INSTRUCTIONS Sealcast and Cast Resin Transducers Record the information found on the tag for future reference. Part No. Date Frequency khz with Airmar Fairings Models: M155,
Mustang V6 Shaker 99-04* Components Check List:
 Mustang V6 Shaker 99-04* Components Check List: *03 Model requires new hood CDC Inspected Installer Check Quantity Descriptions 1- Hood Appliqué 1- Aluminum Shaker Scoop 1- Lower Air Box w/drain tube fittings
Rail Fittings. Top Fittings Handrail Fittings Handrails Track Fittings Hinge Fittings Head Screws
 5 Top Fittings Handrail Fittings Handrails Track Fittings Hinge Fittings Head Screws Connectors Stanchion & End Fittings Elbow Tees Rail Tees Canvas Fasteners Rail Fittings 5 Rail Fittings BIMINI FITTINGS
The HMC-Lite Construction Guide
 The HMC-Lite Construction Guide The Heavy Metal-Lite Chassis is constructed using two identical drive modules. The drive modules are constructed using 3 mechanical sub-assemblies. The drive modules are
GP1800, VXR/VXS Rear Exhaust Kit PART# RY15061
 GP1800, VXR/VXS Rear Exhaust Kit PART# RY15061 We strongly recommend the use of a service manual to familiarize yourself with the various components and procedures involved with this installation. Please
Installation Instructions 2019 Chevy and GMC 1500 Rear Bumper Product Number: E4050, E4051 Application: Chevy and GMC 1500 Trucks
 IMPORTANT SAFETY GUIDE Your safety and the safety of others is very important. In order to help you make informed decisions about safety, we have provided the following warnings, safety precautions, installation
INSTALLATION INSTRUCTIONS
 INSTALLATION INSTRUCTIONS ----1075 North Ave. Sanger, CA 93657-3539 toll free: 800-445-3767 web: www.belltechcorp.com---- 5052 AIR JACK 94-99 DODGE ½ TON RAM C-1500 Congratulations! You were selective
INDUSTRY STANDARD BASE RAIL UNIVERSAL MOUNTING KIT PART NUMBER 2720
 INDUSTRY STANDARD BASE RAIL UNIVERSAL MOUNTING KIT PART NUMBER 2720 INSTALLATION INSTRUCTIONS Introduction The following steps provide general and vehicle-specific instructions for the installation of
Universal Super Shield & Ultimate Aluminum w/electric Drive Conversion Kits , , Installation Instructions
 WLH 09/19/16 111-0215 & 112-0215 607-0026 For technical support call us at (800) 368-3075 or visit our website at PullTarps.com. TABLE OF CONTENTS ***Assembly*** Conversion Kit-Universal Super Shield ***Wiring,
INSTRUCTIONS INSTRUCCIONES CONSIGNES
 AUTOMOTIVE PRODUCTS, INC. INSTRUCTIONS INSTRUCCIONES CONSIGNES APPLICATION: 2013-UP FORD ESCAPE APP PART # 28-21010, 28-21015 STYLIZED RUNNING BOARD ITEM QUANTITY DESCRIPTION TOOLS NEEDED 1 2 RUNNING BOARDS
2015 Ford F150 Rear Bumper w/ LED
 2015 Ford F150 Bumper w/ LED T527990 T527991 PARTS LIST: 1 Bumper Assembly 4 12mm Lock Washers 2 Mounting Brackets 6 12 mm Nylon Lock Nuts 4 Sensor Hole Plugs 8 4mm x 10mm Button Head Bolts 2 Plastic Plugs
81+ C10 Billet Hood Hinge Kit
 81+ C10 Billet Hood Hinge Kit Fitment 81-91 GM C10/K10, C20/K20, C30/K30, Pickups and SUVs Installation Notes Installation of this kit will require more than 1 person. It would suggested to have a 3 rd
INSTALLATION INSTRUCTIONS
 INSTALLATION INSTRUCTIONS Accessory Application Publications No. All 30482 S 2006 PILOT Issue Date P/N 08F23-S9V-100A SEP 2005 PARTS LIST Left front trim piece Right front trim piece Left rear trim piece
PRELIMINARY INSTALLATION INSTRUCTIONS. PARTS LIST Left front trim piece
 INSTALLATION INSTRUCTIONS Accessory Application Publications No. All 30482 S 2006 PILOT Issue Date P/N 08F23-S9V-100A SEP 2005 PARTS LIST Left front trim piece Right front trim piece Left rear trim piece
INSTALLATION INSTRUCTION Rev A
 INSTALLATION INSTRUCTION 88587 Rev A FOR RANCHO SUSPENSION SYSTEM RS6587B: 2009 DODGE RAM 1500 READ ALL INSTRUCTIONS THOROUGHLY FROM START TO FINISH BEFORE BEGINNING INSTALLATION IMPORTANT NOTES! WARNING:
ch2200 ch2300 mt3 osprey pro-trim single s twin s sl-3 INSTALLATION INSTRUCTIONS AND OWNERS MANUAL SIDE AND TOP MOUNT ENGINE CONTROLS MODEL SL-3
 MEMBER INSTALLATION INSTRUCTIONS AND OWNERS MANUAL Part # 212442, Rev 0, 08/2013 www.seastarsolutions.com ch2200 ch2300 mt3 osprey pro-trim single s twin s sl-3 MANUFACTURED BY MARINE ACQUISITION INCORPORATED
INSTALLATION MANUAL. UL2 Front Mount MODELS 4400 FM 6600 FM
 INSTALLATION MANUAL UL2 Front Mount MODELS 4400 FM 6600 FM R HydroHoist Boat Lifts HydroHoist Marine Group P.O. Box 1286 Claremore, OK USA 74018 1-800-825-3379 www.boatlift.com Pub. 10/14/08 HydroHoist
Part # C-10 Level 2 Complete Air Suspension System
 350 S. St. Charles St. Jasper, In. 47546 Ph. 812.482.2932 Fax 812.634.6632 www.ridetech.com Part # 11340299 63-70 C-10 Level 2 Complete Air Suspension System Front Components: 1 11330999 Front CoolRide
SAFETY. Read and understand all safety precautions and instructions before installing this product.
 SAFETY Your safety and the safety of others is very important. In order to help you make informed decisions about safety, we have provided installation instructions and other information. These instructions
Progression 29 Stern Drive
 Progression 29 Stern Drive This list is provided to help you to evaluate the many advantages that come STANDARD with a PROGRESSION 29. As you compare Progression s many superior features to the competition,
Assembly Instructions
 Assembly Instructions Part Number Description Model Approx. Assembly Time 99994-049 Cab Enclosure MULE SX 3-4 Hours WARNING Improper installation of this accessory could result in an accident causing serious
MINI COOPER HAVING INSTALLATION QUESTIONS? CALL TECHNICAL SUPPORT AT DESIGNED FOR USE WITH BALL MOUNT # D-19 / 45519
 10/8/2012 PAGE 1 of 6 ITEM 1 QTY 8 Parts List PART NUMBER DESCRIPTION 3/8" CONICAL TOOTHED WASHER TOOLS REQUIRED RATCHET TORQUE WRENCH 12" EXTENSION 12mm SOCKET 8mm SOCKET OFFSET SCREWDRIVER FLAT BLADE
INSTALLATION INSTRUCTIONS
 AUTOMOTIVE PRODUCTS, INSTALLATION INSTRUCTIONS ULTIMATE BULL BAR APPLICATION: 2009-2018 Dodge Ram 1500 (Excl. Rebel Model) 2019 Dodge Ram 1500 Classic PART NUMBER: 32-1960, 32-1965, 32-1960L, 32-1965L
Van Rack Installation Manual Dodge ProMaster
 1.888.772.8400 Big to small... We do it all Van Rack Installation Manual Dodge ProMaster Thank you for your purchase of an Unruh Fab Van rack. We have designed and built this rack so that you can easily
Mobtown Offroad Toyota Tacoma Bolt On Rock Slider Installation Instructions
 Mobtown Offroad 2005+ Toyota Tacoma Bolt On Rock Slider Installation Instructions Tools Needed: 9/16 Box Wrench 9/16 Standard and Deep Well Socket, 3/8 Drive Ratchet, 3/8 Drive 3/4 Standard Socket 3/4
INSTALLATION & OWNER S MANUAL
 INSTALLATION & OWNER S MANUAL CAB INSTALLATION INSTRUCTIONS JOHN DEERE 3000 SERIES (4200/4300/4400) (4210/4310/4410) & (3120/3320/3520/3720) HARD SIDED CAB ENCLOSURE (p/n 1JD3520AS) SOFT SIDED CAB ENCLOSURE
GRAIN CART TARP SYSTEM INSTALLATION AND OPERATION MANUAL
 GRAIN CART TARP SYSTEM INSTALLATION AND OPERATION MANUAL Grain Carts KITS Thunderstone Manufacturing, LLC. 3400 West O Street Lincoln, NE 68528 402-435-4249 (Fax) 402-438-3918 www.thunderstonemfg.com Aluminum
SAFETY SENSORS FIELD OF VIEW WILL BE ALTERED WITH USE OF THE REPLACEMENT BUMPER. Injury hazard
 SAFETY Your safety and the safety of others is very important. In order to help you make informed decisions about safety, we have provided installation instructions and other information. These instructions
INSTALLATION INSTRUCTIONS FULL HYDRAULIC INSIDE COMPONENTS
 11 Industry Drive Palm Coast, FL 32137 Phone 877.900.7278 Fax 386.445.1122 INSTALLATION INSTRUCTIONS FULL HYDRAULIC INSIDE COMPONENTS 1. Helm and steering column installation (reference. assembly print
INSTALLATION INSTRUCTION 88088
 INSTALLATION INSTRUCTION 88088 For Rancho Suspension Systems RS6588 & RS6589: FORD F-150 READ ALL INSTRUCTIONS THOROUGHLY FROM START TO FINISH BEFORE BEGINNING INSTALLATION Rev B IMPORTANT NOTES! WARNING:
2007 Current Jeep Wrangler JK Stealth Fighter Rear Bumper With Tire Gate Installation Instructions
 2007 Current Jeep Wrangler JK Stealth Fighter Rear Bumper With Tire Gate Installation Instructions PREPARATION 1. Disconnect the negative terminal on the battery. Park the vehicle on level ground and set
INSTALLATION INSTRUCTIONS
 11485 YEARS: 2015-CURRENT Safety glasses should be worn at all times while installing this product. INSTALLATION INSTRUCTIONS MODEL: C300 MAKE: MERCEDES STYLE: SEDAN WARNING: NEVER EXCEED YOUR VEHICLE
2015 Mustang Lightbar (All Models) CDC#
 CDC#") 2015 Mustang Lightbar (All Models) CDC# 1511-7000-01 Components: 1 CDC Lightbar Note: READ instructions before starting installation!!! CDC Part# Driver side bracket 0511-6001-05 Passenger side bracket
2015 Mustang Lightbar (All Models) CDC# 1511-7000-01 Components: 1 CDC Lightbar Note: READ instructions before starting installation!!! CDC Part# Driver side bracket 0511-6001-05 Passenger side bracket
PIRANHA I & 2 INSTALL GUIDE
 TOP Use 5/32" drill bit DO NOT LET DEADRISE INTERSECT THIS LINE PLACE EITHER CORNER ON DEADRISE ANGLE PIRANHA I & 2 INSTALL GUIDE Two components need to be installed on the boat: the transducer and the
SAFETY THIS PRODUCT IS FOR OFFROAD USE ONLY. ALL LIABILITY FOR INSTALLATION AND USE RESTS WITH THE OWNER.
 SAFETY Your safety and the safety of others is very important. In order to help you make informed decisions about safety, we have provided installation instructions and other information. These instructions
HP10171 KIT. Chevy/GMC Pick-Up Trucks 2500/3500* 2WD/4WD with or without 5 th Wheel Hitch
 HP10171 KIT Chevy/GMC Pick-Up Trucks 2500/500* 2WD/4WD with or without 5 th Wheel Hitch * See application guide for proper fitment. Use the strongest air springs on the market to eliminate your vehicle
WARNING NOTICE CAUTION ASSEMBLY INSTRUCTIONS
 MODEL 284 EZ-GLIDE SYSTEM 10' HIGH CUBE VAN DRIVER SIDE ALUMINUM DROP DOWN LADDER RACK ATTENTION Read and understand all instructions and warnings before operating or using this product. WARNING This product
Van Rack Installation Manual Ford Transit Connect
 1.888.772.8400 Big to small... We do it all Van Rack Installation Manual Ford Transit Connect Thank you for your purchase of an Unruh Fab Van rack. We have designed and built this rack so that you can
INSTALLATION INSTRUCTIONS
 INSTALLATION INSTRUCTIONS Accessory Application Publications No. Bll 30250 UNDER SPOILER 2006 RSX Issue Date JULY 2005 PARTS LIST Rear under spoiler 5 Stepped bolts 2 Bolts 7 Flange nuts, 6 mm 3 Square
INSTALLATION MANUAL. Power-Pole Blade Edition Shallow Water Anchor. Installation Instructions
 INSTALLATION MANUAL Power-Pole Blade Edition Shallow Water Anchor Installation Instructions CAUTION: Read this instruction manual carefully. Become familiar with the controls and know how to operate the
SAFETY THIS PRODUCT IS FOR OFFROAD USE ONLY. ALL LIABILITY FOR INSTALLATION AND USE RESTS WITH THE OWNER.
 SAFETY Your safety and the safety of others is very important. In order to help you make informed decisions about safety, we have provided installation instructions and other information. These instructions
FAX
 INSTALLATION INSTRUCTIONS 6090 Air Suspension Kit (pat. pending) 1999-2006 Tahoe, Suburban, Avalanche, Yukon Thank you for purchasing a quality Hellwig Product. PLEASE READ THIS INSTRUCTION SHEET COMPLETELY
SPECIAL INSTALLATION INSTRUCTIONS
 SPECIAL INSTALLATION INSTRUCTIONS WARN 4X FLARES FRONT AND REAR '98 TOYOTA HILUX DUAL-CAB As you read these instructions, you will see NOTES, CAUTIONS and WARNINGS. Each message has a specific purpose.
INSTALLATION INSTRUCTIONS
 AUTOMOTIVE PRODUCTS, INSTALLATION INSTRUCTIONS HDX AND SPORTSMAN GRILLE GUARD APPLICATION: 2015-2017 Chevrolet Silverado 2500/3500 PART NUMBER: 45-3780, 40-3785, 57-3780, 57-3785 ITEM QUANTITY DESCRIPTION
James Barone Racing Aftermarket Parts and Accessories
 Page1 James Barone Racing Aftermarket Parts and Accessories What you will need: Jack and Jack Stands Drill 1/8 and 1/4 drill bits Ratchet wrench 11mm socket Philips head screw driver Flat head screw driver
Technical Techniques. GEN 2 Wake Shaping Devices Installation (Replacing GEN 1) for X2, X10, X25, X30, and X46 X46:
 for X2, X10, X25, X30, and X46 X46:") PARTS REQUIRED: X46: Part #559964 (kit) X46: X2: Part #559960 (kit) X10: Part #559962 (kit) X30: Part #559963 (kit) X2, X10, X30: X25: Part #559961 (kit) TOOLS REQUIRED: Phillips #3 screwdriver or power
PARTS REQUIRED: X46: Part #559964 (kit) X46: X2: Part #559960 (kit) X10: Part #559962 (kit) X30: Part #559963 (kit) X2, X10, X30: X25: Part #559961 (kit) TOOLS REQUIRED: Phillips #3 screwdriver or power
SAFETY. Read and understand all safety precautions and instructions before installing this product.
 SAFETY Your safety and the safety of others is very important. In order to help you make informed decisions about safety, we have provided installation instructions and other information. These instructions
SAFETY THIS PRODUCT IS FOR OFFROAD USE ONLY. ALL LIABILITY FOR INSTALLATION AND USE RESTS WITH THE OWNER.
 SAFETY Your safety and the safety of others is very important. In order to help you make informed decisions about safety, we have provided installation instructions and other information. These instructions
Part # Mustang Complete CoilOver Kit
 Front Components: Part # 12100109 67-70 Mustang Complete CoilOver Kit 1 12103509 Non Adjustable Front CoilOvers 1 12102899 Lower StrongArms 1 12103699 Upper StrongArms Rear Components: 1 12106509 Non Adjustable
Installation Manual. For. Trident Boat Lifts
 Installation Manual For Trident Boat Lifts Page 2 Safety Precautions 1. Your boat lift is a heavy duty piece of equipment. It is important that all persons that may operate this unit have read and understood
INSTALLATION INSTRUCTIONS LD-1 REAR BUMPER RAM 1500 PART#R R #PW017838
 INSTALLATION INSTRUCTIONS LD-1 REAR BUMPER PART#R102617 R102620 #PW017838 PARTS LIST: 1 LD1 Bumper Assembly 4 12-1.75mm x 40mm Hex Bolts 1 Push in License Plate Light 4 12mm x 37mm x 3mm Flat Washers 2
99-03 V6 "Shaker" System Instructions. *03 Model requires new hood Contents w/ Kit. Tool List For Appliqué:
 99-03 V6 "Shaker" System Instructions *03 Model requires new hood Contents w/ Kit 1 - Hood Appliqué 1 - Aluminum Shaker Scoop 1 - Lower Air Box w/drain tube fittings (2) 1 - Upper Air Box w/cdc nameplate
INSTALLATION INSTRUCTIONS ADD ON INSIDE COMPONENTS USING SAGINAW SHUTTLE VALVE
 11 Industry Drive Palm Coast, FL 32137 Phone 877.900.7278 Fax 386.445.1122 INSTALLATION INSTRUCTIONS ADD ON INSIDE COMPONENTS USING SAGINAW SHUTTLE VALVE 1. Modifying Mercury shuttle valve Located at the
INSTALLATION INSTRUCTIONS Air Spring Kit Ford F-150 4WD IMPORTANT NOTES
 INSTALLATION INSTRUCTIONS 6154 Air Spring Kit 2004+ Ford F-150 4WD Thank you for purchasing a quality Hellwig Product. PLEASE READ THIS INSTRUCTION SHEET COMPLETELY BEFORE STARTING YOUR INSTALLATION IMPORTANT
BX Honda CR-V Installation Instructions
 Attachment Tab Height: 15.5 Attachment Tab Width: 24 Serial Number Please read BOTH these and the General Instructions prior to installing or operating this equipment. 1. Blue Ox towing products and accessories
INSTALLATION INSTRUCTION 89400
 INSTALLATION INSTRUCTION 89400 FOR RANCHO SUSPENSION SYSTEM RS66400B: 2012 RAM 1500 4WD. READ ALL INSTRUCTIONS THOROUGHLY FROM START TO FINISH BEFORE BEGINNING INSTALLATION Rev B IMPORTANT NOTES! WARNING:
 Updated May 2015 Okay this is what I learned while converting several Yamaha SUV 1200 jet skis with a 2 stroke engine to a 4 stroke engine. I believe that you can use a Yamaha FX or VX four stroke for
The Motor Ladder. Installation Instructions
 The Motor Ladder Installation Instructions Receiving The Ladder is delivered by common carrier (truck line). Check carefully on delivery that all items are received and that the ladder is free of any damage.
SECTION 35iS/U: LANDING GEAR & ENGINE MOUNT
 WD-1221 ENGINE MOUNT STANDOFF SECTION 35iS/U: LANDING GEAR & ENGINE MOUNT U-01203E-1 INBOARD DOUBLER PLATE U-01203B-1 INBOARD WEAR PLATE U-01203C-1 BEARING PLATE U-01203-2 (U-01203-1 SHOWN) INBOARD MAIN
2015+ Mustang Rear Valance Installation Instructions P/N: (R F953) (R F953BS)
 (R F953BS)") 2015+ Mustang Rear Valance Installation Instructions P/N: 421894 (R1315-17F953) 421919 (R1315-17F953BS) 39555 Schoolcraft Rd, Plymouth MI, 48170 800.59.ROUSH 2015+ Mustang Rear Valance Kit Installation
2015+ Mustang Rear Valance Installation Instructions P/N: 421894 (R1315-17F953) 421919 (R1315-17F953BS) 39555 Schoolcraft Rd, Plymouth MI, 48170 800.59.ROUSH 2015+ Mustang Rear Valance Kit Installation
Installation Instructions
 Installation Instructions TrailView Soft Top Important Safety Information For proper installation and best possible fit, please read all instructions BEFORE you begin. Periodically check all components
NX Combi Transducer. Installation and Operation Manual English
 NX Combi Transducer Installation and Operation Manual Start pack 3 1 Start pack 3 Edition: April 2007 2 Start pack 3 1 Registration... 3 2 Installation... 4 3 Mounting of Transom transducer... 4 3.1 Applications...
QTY 3D PART NO. FORD SERVICE PN DESCRIPTION VAA6Z A FIESTA 5 DOOR (4) PC. KIT
 PC. KIT") Rev. 08-4 - 2010 QTY 3D PART NO. FORD SERVICE PN DESCRIPTION 1 691620 VAA6Z-5820049-A 2011- FIESTA 5 DOOR (4) PC. KIT HARDWARE SUPPLIED 12 #8 X ¾ SELF DRILLING SCREWS 220 / 18.5 3M VHB DOUBLE FACE TAPE
Rev. 08-4 - 2010 QTY 3D PART NO. FORD SERVICE PN DESCRIPTION 1 691620 VAA6Z-5820049-A 2011- FIESTA 5 DOOR (4) PC. KIT HARDWARE SUPPLIED 12 #8 X ¾ SELF DRILLING SCREWS 220 / 18.5 3M VHB DOUBLE FACE TAPE
Installation / Owners Manual
 DEALER/INSTALLER: (1) Provide this Manual to end user END USER: Part Number: 94621 94622* *Packaged for Individual sale. (1) Read and follow this Manual for Reese Installation. (2) Save this Manual for
PIRANHA I & 2 INSTALL GUIDE
 PIRANHA I & 2 INSTALL GUIDE Two components need to be installed on the boat: the transducer and the control head. The control head displays sonar information, the transducer sends and receives sonar signals
Smooth Roll Advantage Side Dump
 Smooth Roll Advantage Side Dump Installation, Maintenance and Safety Instructions Sioux City Tarp 5201 Harbor Drive Sioux City, IA 51111 Ph: 712-258-6939 Getting Started Important: Please read manual thoroughly
WARNING: HARDWARE PACK (A ) DO NOT INSTALL if the truck has been lifted and the stock jounce bumper spacers are not on the vehicle.
 DO NOT INSTALL if the truck has been lifted and the stock jounce bumper spacers are not on the vehicle.") DO NOT INSTALL if the truck has been lifted and the stock jounce bumper spacers are not on the vehicle. 2550 WARNING: Do not inflate this assembly when it is unrestricted. The assembly must be restricted
DO NOT INSTALL if the truck has been lifted and the stock jounce bumper spacers are not on the vehicle. 2550 WARNING: Do not inflate this assembly when it is unrestricted. The assembly must be restricted
 INSTALLATION INSTRUCTIONS Accessory Application Publications No. AII 33173 UNDER 2007 ODYSSEY Issue Date JULY 2006 PART LIST Front under spoiler 5 Stepped bolts TOOLS AND SUPPLIES REQUIRED Phillips screwdriver
SAFETY SENSORS FIELD OF VIEW WILL BE ALTERED WITH USE OF THE REPLACEMENT BUMPER. Injury hazard
 SAFETY Your safety and the safety of others is very important. In order to help you make informed decisions about safety, we have provided installation instructions and other information. These instructions
B. B. 4. Remove the bed bolts A.) Using a 1/2 socket, remove the four inner bed bolts. B.) Using a T-25 Torx driver, remove the four outer bed bolts
 Using a 1/2 socket, remove the four inner bed bolts. B.) Using a T-25 Torx driver, remove the four outer bed bolts") Installation Instructions Part Number 883-275 Scoop and Snorkel Kit 2008-11 Polaris Ranger RZR 800 800 E.F.I. Thank you for purchasing the iraid Intake System. Contact iraid @ (800) 498-6951 8:00 M - 5:00
Installation Instructions Part Number 883-275 Scoop and Snorkel Kit 2008-11 Polaris Ranger RZR 800 800 E.F.I. Thank you for purchasing the iraid Intake System. Contact iraid @ (800) 498-6951 8:00 M - 5:00
SAFETY. Read and understand all safety precautions and instructions before installing this product.
 SAFETY Your safety and the safety of others is very important. In order to help you make informed decisions about safety, we have provided installation instructions and other information. These instructions
1-3/8 Designer Metals Telescoping Traversing Rod Installation Instructions
 1-3/8 Designer Metals Telescoping Traversing Rod Installation Instructions Please read and follow all installation instructions provided for proper operation and enjoyment of your new drapery hardware
Installation Instructions. Attention Dealers: Please give this owners manual to the customer when the product is delivered.
 Serving the Truck & Trailer Industry Since 1944 Attention Dealers: Please give this owners manual to the customer when the product is delivered. Call 800-535-9545 www.aeroindustries.com Indianapolis, IN
SAFETY THIS PRODUCT IS FOR OFFROAD USE ONLY. ALL LIABILITY FOR INSTALLATION AND USE RESTS WITH THE OWNER.
 SAFETY Your safety and the safety of others is very important. In order to help you make informed decisions about safety, we have provided installation instructions and other information. These instructions