Keeping You Cool Under Pressure
|
|
|
- Hilary Wilson
- 5 years ago
- Views:
Transcription
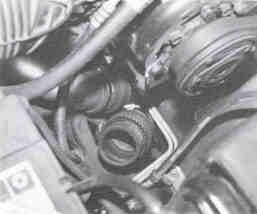
1 Installation Instruction for GM 6.5L Turbo Diesel Series Wheel Drive Pickup and Series 1500, 2500, Wheel Drive Suburban Intercooler System (Part No ) TOOLS REQUIRED: 1.) Normal complement of mechanic s hand tools 2.) Electric drill 3.) _ and 7/16 diameter drill bits 4.) Jack and jack stands 5.) Permatex red silicone INSTALLATION: 1.) Remove the following: a. Brace from compressor housing to intake manifold b. Plastic cover over intake manifold c. Oil breather tube d. Intake manifold extension casting e. Convoluted air duct from air cleaner to turbo inlet f. Turbo compressor housing Remove six 8mm bolts, retaining plates and wastegate on the backside of the compressor housing. Leave wastegate rod connected to the lever arm. Tap off the compressor housing, making certain it comes off straight and does not get cocked. The compressor housing is factory-assembled with three-bond sealant so it will be hard to break free. CAUTION: There is only clearance between the housing and the impeller and if it gets cocked and angled coming off, it can bend and damage the compressor wheel. 2.) Remove Intake Manifold Extension and Install Modified Shortened Unit with New Gasket On 1994 models, remove M.A.P. sensor and 3/8 NPT threaded sensor and install in new part. On 1993 models, plug the 3/8 hole with the pipe plug provided and drill the other sensor hole 7/16 diameter and tap _ NPT and plug with pipe plug provided. 3.) Re-install Compressor Housing Clean all adhesive from the groove in the back side and also on the mating plate. Apply a thin film of Permatex Red Silicone and re-install on the turbo, rotating about 120% from the original position, or to about 7:00 o clock position. Exact position is determined by the new brace, which goes under the three top bolts and replaces the three small tabs. Once alignment is correct, re-attach the wastegate and use existing tabs under remaining bolts, tighten all bolts and retain the brace with 5/16-18 X 1 bolt and special, heat resistant lock nut provided.
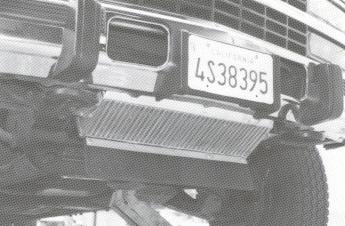
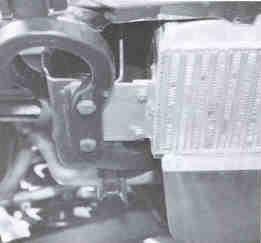
2 CAUTION: Make sure the compressor housing goes straight on and is not cocked. After it is tight, spin the turbo to be sure it is free. 4.) Relocate Heater Hose The heater hose is retained at the inner fender with a plastic holder. Snap open the holder and remove the bottom hose, and snap back. With a wire tie provided, position the hose on the top of the retainer in such a way as to provide more clearance between the turbo and hoses. 5.) Relocate Battery Cable On the right side, on top of the frame, the battery cable is retained on the inside edge of the frame with a clip and bolt. Remove the bolt, take the clip off the cable, reverse it, reinstall and flatten it. This provides additional clearance for the turbo for the turbo. 6.) Installation of Intercooler If your vehicle is equipped with two hooks bolted to the front bottom of the frame, remove the bolts and hooks and place the 1/8 thick intercooler mounting plates under the hooks and bolt back into position. Leave one side loose at this time. Hold the intercooler assembly into position with the angle bracket sitting on top of the plates. Loosen one piece, swing it clear and slide the intercooler up and swing the plate back. Check the position and alignment of the _ diameter holes and tighten plate into position. If your truck has no hooks, mount the plates with bolts (7/16-14 X 1 ), lock nuts and flat washers and _ thick steel backup plates provided. 7.) Bolting Intercooler Assembly to Mounting Plates Four _-20 X _ bolts, lock nuts and washers (for the bottom) are provided. Install and tighten them and then back off _ turn. CAUTION: Be sure to back off _ turn, as this will provide some compliance for frame deflection to eliminate the possibility of pulling the intercooler apart. 8.) Installation of Intercooler Tubes To provide clearance for the tubes, the transmission cooler lines must be pulled up about 1. This is done by pulling them loose from the retaining clip on the bottom right hand side of the engine models with the vacuum pump mounted on the right hand side of the engine have a different routing for the transmission cooler lines. On these models it is necessary to remove the line-retaining clip that is held in place by one oil pan bolt near the right hand side rear of the pan.
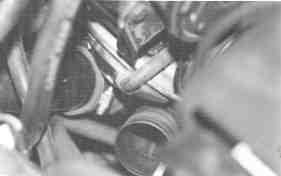
3 NOTE: On these models the #4 tube goes behind the cooler line and #2tube goes under the cooler line. All tubes are installed from the topside. Push the #2 tube down and connect to the intercooler with the hump hose. Install existing factory hose on the turbo and connect tubes #1 and #2 together with the hump hose. It maybe necessary to grind off the tip of the frame bracket to provide more clearance for the #2 tube (see sketch). Push the #3 tube down past the radiator hose and connect to the intercooler with the hump hose. Install #4 hose tube, using new hose at the top casting and joining to the #3 tube with a hump hose. Position as required for best clearance and tighten all hose clamps. It may be necessary to bend the reference line where it attaches to the compressor to provide more clearance for the #1 tube. CAUTION: Special constant tension hose clamps are provided, the same as the 2 existing factory clamps. As noted later, the crankcase ventilation system discharges oil vapor into the turbo and intercooler. The oil tends to permeate between the hose and tubes. It is therefore absolutely essential that the special clamps provided be used and torque to approximately 75 inches / lbs. to prevent the tubes from blowing out of the oil slicked hose. Also, be sure the clamp is positioned behind the bead on the end of the tube. (75 inches / lbs. is about as much torque as you can apply with a medium to large screwdriver or nut runner.) Note: After two weeks of operation, re-tighten all clamps. 9.) Manifold Cover Re-install the plastic cover on the manifold, convoluted inlet hose and attach existing oil tube to the brace plate using _-20 X _ bolts and three washers as spacers between the bracket and brace plate. Before installing, bend front of tube slightly to allow connection to the existing convoluted hose. 10.) Installation of Rubber Flap Attach flap to the back side of the aluminum bracket, using 1 X 1/16 flat bar as a backing plate. Bolt up with five _-20 X _ bolts and lock nuts provided. On standard height 3500 series vehicles, clearance between the road and the bottom of the flap is about 11 _. This length gives maximum airflow through the intercooler. If, for some reason, you want additional clearance, the flap can be trimmed 1 or 2 off the bottom, but the intercooler will be about 15% less effective.
4 New hose #4 tube #1 tube #3 tube #2 tube General layout showing the relationship of the intercooler to the turbocharger and routing of tubes Installation is now complete. Double check that all clamps are behind the beads on the tubes. Double check that there is no interference with the battery cable or other wiring, etc. Check that there is clearance between the steering gear idler and the intercooler tubes at right hand full lock. If any interference is noted, loosen clamps and re-arrange tubes as necessary to provide minimum 3/8 clearance. Make certain that no foreign material has entered the turbo or intake manifold and make sure the _ intercooler plate mounting bolts are backed off _ turn to prevent damage to the intercooler.


5 1992 and 1993 models 1994 models
Step 6: Remove and save the MAP sensor for later use. Step 7: Remove the passenger side intercooler pipe and the EGR intake manifold.
 LBZ Twin kit Install Step 1: Disconnect both batteries. Step 2: Drain coolant and oil also remove passenger side inner fender. Step 3: Remove intake box and piping. (Remove and save the MAF sensor in the
CHALLENGER TWIN TURBO SYSTEM INSTALLATION INSTRUCTIONS
 CHALLENGER TWIN TURBO SYSTEM INSTALLATION INSTRUCTIONS 1 Verify contents of kits with supplied packing list 1) Unhook the battery. 2) Remove wheel wells & front fascia of vehicle. 3) Remove the catalytic
Installation Instruction for '84-'89 Nissan 300ZX High Performance Intercooler System (Part No )
") Installation Instruction for '84-'89 Nissan 300ZX High Performance Intercooler System (Part No. 2-124) Page ii DCB (06/14/02 12:19 AM) Version 1.0 Page iii Table of Contents 1. TOOLS REQUIRED...1 2. INSTALLATION
Installation Instruction for '84-'89 Nissan 300ZX High Performance Intercooler System (Part No. 2-124) Page ii DCB (06/14/02 12:19 AM) Version 1.0 Page iii Table of Contents 1. TOOLS REQUIRED...1 2. INSTALLATION
Installation Instruction for '84-'89 Nissan 300ZX High Performance Intercooler System (Part No )
") Installation Instruction for '84-'89 Nissan 300ZX High Performance Intercooler System (Part No. 2-124) Routing of the Intercooler Pipe It is necessary to follow the exact sequence of the installation
Installation Instruction for '84-'89 Nissan 300ZX High Performance Intercooler System (Part No. 2-124) Routing of the Intercooler Pipe It is necessary to follow the exact sequence of the installation
Installation Instructions
 2011-2013 LML DURAMAX COMPOUND-ADD 2011-2015 LML A Duramax TURBO KIT Add INSTALL A Turbo INSTRUCTIONS Compound Kit Installation Instructions 1-800-955-0476 - www.industrialinjection.com - info@industrialinjection.com
05-08 GT. Hellion Power Systems Mustang Kit Instructions
 Hellion Power Systems 05-08 Mustang Kit Instructions 1. Disconnect Battery 2. Drain Radiator, keep fluid for re-installation. 3. Remove air box and inlethoses. 6. Next, underneath, punch oil pan for turbo
V1 Truck Manifold Turbo Kit for F-body
 V1 Truck Manifold Turbo Kit for 98-02 F-body Prep: -Remove all A/C Components, Alternator and brackets, tensioner, front bumper, front bumper foam, and front bumper support. Remove radiator and cooling
TURBO KIT INSTRUCTIONS
 Revision 12/20/10 TURBO KIT INSTRUCTIONS This turbo kit consists of the necessary parts to upgrade or add a turbo to your 22R/RE/RET. This kit may require some fabrication to address your particular application
4. Remove (4) 10mm and (1) 7mm bolt that holds fascia at front corners, on each side
 10mm and (1) 7mm bolt that holds fascia at front corners, on each side") 2010 Camaro LS3 1. Disconnect battery ground 2. Remove front wheels 3. Remove (5) push pins and (5) #20 torx screws on inner front wheel well liners and remove liners on each side 4. Remove (4) 10mm and
2010 Camaro LS3 1. Disconnect battery ground 2. Remove front wheels 3. Remove (5) push pins and (5) #20 torx screws on inner front wheel well liners and remove liners on each side 4. Remove (4) 10mm and
Banks High-Flow Boost Tubes. Step-by-step installation video: Bankspower.com/v/install-lml-boost-tubes
 with Installation Instructions Owner smanual Banks High-Flow Boost Tubes Stock Fitment 2011-2016 Chevy/GMC Turbo-Diesel Pickup Trucks THIS MANUAL IS FOR USE WITH PART NUMBER 25993 Gale Banks Engineering
Owner smanual. Banks Techni-Cooler Charge Air Cooler Assembly Dodge 6.7L Cummins (24-valve) ISB Pickup Trucks. with Installation Instructions
 ISB Pickup Trucks. with Installation Instructions") with Installation Instructions Owner smanual Banks Techni-Cooler Charge Air Cooler Assembly 07-08 Dodge 6.7L Cummins (24-valve) ISB Pickup Trucks Use with system p/n 25983 Gale Banks Engineering 546 Duggan
with Installation Instructions Owner smanual Banks Techni-Cooler Charge Air Cooler Assembly 07-08 Dodge 6.7L Cummins (24-valve) ISB Pickup Trucks Use with system p/n 25983 Gale Banks Engineering 546 Duggan
Corvette Stage X Twin Turbo Installation. Please read the entire instructions as we ve made many changes.
 Corvette Stage X Twin Turbo Installation Please read the entire instructions as we ve made many changes. Disconnect battery. Remove plastic fuel rail covers over the valve cover. Remove Air Box in front
Installation Manual v1.0: MST Turbo Kit ( ) 5.9L Dodge. Please read all instructions before installation.
 5.9L Dodge. Please read all instructions before installation.") Installation Manual v1.0: MST Turbo Kit (2003-2007) 5.9L Dodge Please read all instructions before installation. Figure 1: MST Kit Contents Figure 2: MST Hardware Kit Please make sure all of the components
Installation Manual v1.0: MST Turbo Kit (2003-2007) 5.9L Dodge Please read all instructions before installation. Figure 1: MST Kit Contents Figure 2: MST Hardware Kit Please make sure all of the components
99-04 GT. Hellion Power Systems Mustang GT Kit Instructions
 Hellion Power Systems 99-04 Mustang GT Kit Instructions Part 1 Hellion recommends that the front suspension system be installed either by trained professionals or by 5.Remove rack bolts K-Member Installation
INSTALLATION INSTRUCTIONS AIR/OIL SEPARATOR KIT
 INSTALLATION INSTRUCTIONS AIR/OIL SEPARATOR KIT 2015+ SUBARU WRX (LHD ONLY) Document: 19-0136 Support: info@radiumauto.com This document covers the installation of the Radium brake master cylinder brace
HYPERMAX ENGINEERING, INC. 7.3L POWER STROKE INTERCOOLER PACKAGE
 HYPERMAX ENGINEERING, INC. 7.3L POWER STROKE INTERCOOLER PACKAGE INSTALLATION INSTRUCTIONS Time will be saved if these instructions are read PRIOR to installation of the intercooler package. A. ITEMS TO
03-04 Mach 1. Hellion Power Systems Mach 1 Kit Instructions
 Hellion Power Systems 03-04 Mach 1 Kit Instructions Part 1 Hellion recommends that the front suspension system be installed either by trained professionals or by 5.Remove rack bolts K-Member Installation
IAG Street Series Air / Oil Separator (AOS) For 2017 WRX
 For 2017 WRX") P IAG Street Series Air / Oil Separator (AOS) For 2017 WRX Part# IAG-ENG-7152 Tools Required: Ratchet, torque wrench, extensions, needle nose pliers, hose cutter, snips/scissors, flathead screwdriver,
P IAG Street Series Air / Oil Separator (AOS) For 2017 WRX Part# IAG-ENG-7152 Tools Required: Ratchet, torque wrench, extensions, needle nose pliers, hose cutter, snips/scissors, flathead screwdriver,
Camaro/Trans Am V3 T6 Kit Installation Instructions
 1998-2002 Camaro/Trans Am V3 T6 Kit Installation Instructions A- Driver s Side Manifold B- Passenger s Side Manifold C- Crossover Pipe Parts List D- 2.5 v-band Clamp - Quantity-2 E- Downpipe F- Heat Wrap
Owner smanual. Banks Techni-Cooler Charge Air Cooler Assembly Dodge 6.7L Cummins (24-valve) ISB Pickup Trucks USE WITH SYSTEM P/N 25983
 ISB Pickup Trucks USE WITH SYSTEM P/N 25983") Owner smanual with Installation Instructions Banks Techni-Cooler Charge Air Cooler Assembly 07-08 Dodge 6.7L Cummins (24-valve) ISB Pickup Trucks USE WITH SYSTEM P/N 25983 Gale Banks Engineering 546 Duggan
Owner smanual with Installation Instructions Banks Techni-Cooler Charge Air Cooler Assembly 07-08 Dodge 6.7L Cummins (24-valve) ISB Pickup Trucks USE WITH SYSTEM P/N 25983 Gale Banks Engineering 546 Duggan
Owner smanual. Banks Techni-Cooler Charge Air Cooler Assembly Dodge 6.7L Cummins (24-valve) ISB Pickup Trucks. Use with system p/n 25985
 ISB Pickup Trucks. Use with system p/n 25985") Owner smanual with Installation Instructions Banks Techni-Cooler Charge Air Cooler Assembly 2009 Dodge 6.7L Cummins (24-valve) ISB Pickup Trucks Use with system p/n 25985 Gale Banks Engineering 546 Duggan
Owner smanual with Installation Instructions Banks Techni-Cooler Charge Air Cooler Assembly 2009 Dodge 6.7L Cummins (24-valve) ISB Pickup Trucks Use with system p/n 25985 Gale Banks Engineering 546 Duggan
Installation Manual v1.0: Aurora Plus Turbo Kit ( ) 5.9L Dodge. Please read all instructions before installation.
 5.9L Dodge. Please read all instructions before installation.") Installation Manual v1.0: Aurora Plus - 4000 Turbo Kit (2003-2007) 5.9L Dodge Please read all instructions before installation. Figure 1: Aurora Plus - 4000 Kit Contents 1 Figure 2: Aurora Plus Hardware
Installation Manual v1.0: Aurora Plus - 4000 Turbo Kit (2003-2007) 5.9L Dodge Please read all instructions before installation. Figure 1: Aurora Plus - 4000 Kit Contents 1 Figure 2: Aurora Plus Hardware
2015+ SUBARU STI FRONT-MOUNT INTERCOOLER PARTS LIST AND INSTALLATION GUIDE INSTALL DIFFICULTY DISCLAIMER CAUTION INSTALL PROCEDURE TOOLS NEEDED
 PARTS LIST AND PARTS INCLUDED 1PC ALUMINUM INTAKE PIPE 1PC BAR-AND-PLATE INTERCOOLER 1PC STEEL CRASH BAR W/ MOUNTING HARDWARE 2PC HOT-SIDE INTERCOOLER PIPES 2PC COLD-SIDE INTERCOOLER PIPES 1PC BPV FLANGE
This information covers procedures for replacing the sealant for the crankshaft cover on the Volvo D16F engine.
 Volvo Trucks North America Greensboro, NC USA DService Bulletin Trucks Date Group No. Page 1.2008 216 50 1(17) Sealant Crankshaft Cover, Replacement D16F Sealant Crankshaft Cover, Replacement W2005773
3 October 2016 PN# V Dodge Twin Turbo Kit (I-00274) ½ D o d g e 2 4 v I S B
 ½ D o d g e 2 4 v I S B") 3 October 2016 PN#1045320 24V Dodge Twin Turbo Kit (I-00274) 1 DOWNLOAD ENHANCED INSTALL MANUALS AT dieselperformance.com BD Twin Turbo Kit 1998½- 2 0 0 2 D o d g e 2 4 v I S B Part# 1045320 PLEASE READ
3 October 2016 PN#1045320 24V Dodge Twin Turbo Kit (I-00274) 1 DOWNLOAD ENHANCED INSTALL MANUALS AT dieselperformance.com BD Twin Turbo Kit 1998½- 2 0 0 2 D o d g e 2 4 v I S B Part# 1045320 PLEASE READ
Huron Speed Products Twin Turbo Install Gen 2 CTS-V (09-15)
") Huron Speed Products Twin Turbo Install Gen 2 CTS-V (09-15) 1 2 Remove two bolts in trunk cover with 8mm socket. Pull up on cover to remove. Unscrew net tie down on side cover where battery is located
Huron Speed Products Twin Turbo Install Gen 2 CTS-V (09-15) 1 2 Remove two bolts in trunk cover with 8mm socket. Pull up on cover to remove. Unscrew net tie down on side cover where battery is located
Tools Required. Metric Wrench Set Screwdriver Set Metric Socket Set Pliers Heavy duty hydraulic Jack and Car Stands Box knife or similar Hacksaw WD40
 Subaru 2004+ Legacy GT & Outback XT For JDM 2.0 twinscroll turbo and USDM 2.5 turbo models Front Mount Intercooler Fitting Instructions PN# LEG-1348-000 You are now the proud owner of a highly tested and
IAG Air / Oil Separator (AOS) For STi
 For STi") IAG Air / Oil Separator (AOS) For 2008-14 STi Part# IAG-ENG-7000 Tools Required: Ratchet, torque wrench, extensions, needle nose pliers, hose cutter, snips/scissors Sockets: 10mm, 12mm 13mm Wrenches: 10mm,
IAG Air / Oil Separator (AOS) For 2008-14 STi Part# IAG-ENG-7000 Tools Required: Ratchet, torque wrench, extensions, needle nose pliers, hose cutter, snips/scissors Sockets: 10mm, 12mm 13mm Wrenches: 10mm,
18SP680Rev3 EPA04 MBE 4000 Car Hauler Low Pressure Fuel Lines
 8SP680Rev3 EPA04 MBE 4000 Car Hauler Low Pressure Fuel Lines KIT DESCRIPTION These service kits include all necessary parts to replace the low pressure fuel lines between the fuel filter housing and fuel
7 th Gen. Celica GTS Turbo Kit Installation Guide This kit has not been CARB approved and is intended for racing / offroad purposes only.
 7 th Gen. Celica GTS Turbo Kit Installation Guide This kit has not been CARB approved and is intended for racing / offroad purposes only. The purpose of this guide is to serve as a reference for use when
Included parts: 1 - BorgWarner SX-E Turbocharger 1 - SX-E 90-Degree Compressor Outlet Elbow 1 - HSM Cast Exhaust Manifold 1 - HSM Downpipe
 TROUBLESHOOTING: Please read and understand all installation instructions before proceeding with the installation. If you have questions during the installation of this product, please email H&S Motorsports
Owner smanual. Banks Techni-Cooler System Dodge 6.7L Cummins (24-valve) ISB Pickup Trucks (2500/3500) USE WITH SYSTEM P/N 25987
 ISB Pickup Trucks (2500/3500) USE WITH SYSTEM P/N 25987") Owner smanual with Installation Instructions Banks Techni-Cooler System 2013-16 Dodge 6.7L Cummins (24-valve) ISB Pickup Trucks (2500/3500) USE WITH SYSTEM P/N 25987 Gale Banks Engineering 546 Duggan Avenue
Owner smanual with Installation Instructions Banks Techni-Cooler System 2013-16 Dodge 6.7L Cummins (24-valve) ISB Pickup Trucks (2500/3500) USE WITH SYSTEM P/N 25987 Gale Banks Engineering 546 Duggan Avenue
Section 10 Chapter 17
 Section 10 Chapter 17 24 Valve, 8.3 Liter Engine Air Intake System Note: All coding used in the 8.3 Liter and 9 Liter engine manuals are Cummins engine codes. These engine codes have no meaning to New
Huron Speed Products Twin Turbo Install Gen 2 CTS-V (09-15)
") Huron Speed Products Twin Turbo Install Gen 2 CTS-V (09-15) The following install guide is simply that, a guide to help you with installation. It is by no means the exact method to perform installation,
Huron Speed Products Twin Turbo Install Gen 2 CTS-V (09-15) The following install guide is simply that, a guide to help you with installation. It is by no means the exact method to perform installation,
BD Twin Turbo Cobra Kit
 14 September 2017 1045780-94 Dodge Cobra Kit (I-00377) 1 BD Twin Turbo Cobra Kit 2003-2012 Dodge HPCR Machined BD turbochargers only BUILDERS KIT Installation reccomendations to aid asssembly Does not
XRT300 AND XRT350 BA XR6 TURBO UPGRADE KIT FITTING INSTRUCTIONS
 XRT300 AND XRT350 BA XR6 TURBO UPGRADE KIT FITTING INSTRUCTIONS The use of NFU (No Further use) and REUSE (Re Use) relates to the individual parts storage when performing the upgrade. Also note that all
Scion FR-S ZN6. GTX2867R Gen2 (Internal Wastegate) Installation Instructions GPP P/N #
 Installation Instructions GPP P/N #") TURBO KIT Scion FR-S ZN6 Subaru BRZ ZC6 GTX2867R Gen2 (Internal Wastegate) Installation Instructions GPP P/N # 11518000 Vehicle Type Chassis Code Engine Code Transmission Model Year Scion FR-S DBA-ZN6
TURBO KIT Scion FR-S ZN6 Subaru BRZ ZC6 GTX2867R Gen2 (Internal Wastegate) Installation Instructions GPP P/N # 11518000 Vehicle Type Chassis Code Engine Code Transmission Model Year Scion FR-S DBA-ZN6
Procharger Stage II Intercooled Supercharger System (11-14 GT)
") Procharger Stage II Intercooled Supercharger System (11-14 GT) Installation Time: Approximately one day. Installed on 2012 Mustang GT 5.0/Manual Required Tools 3/8 Socket Set (Standard and Metric) 1/2
Procharger Stage II Intercooled Supercharger System (11-14 GT) Installation Time: Approximately one day. Installed on 2012 Mustang GT 5.0/Manual Required Tools 3/8 Socket Set (Standard and Metric) 1/2
OwNErS MaNual with INSTallaTION INSTrucTIONS
 OwNErS MaNual with INSTallaTION INSTrucTIONS EMISSIONS KIT light duty 6.2l chevrolet/gm diesel for use on gm 6.2L diesel trucks equipped with the banks sidewinder turbo system this manual is for use with
ZZP LNF Cobalt Turbo Upgrade
 ZZP LNF Cobalt Turbo Upgrade Note: These instructions are intended for installers with previous turbo installation experience. Some procedures will not be described in full detail. If you run into any
1996 Aerostar/Ranger/Explorer
 Page 1 of 11 Section 03-01B: Engine, 3.0L V-6 IN-VEHICLE SERVICE 1996 Aerostar and Ranger Vehicles Workshop Manual Water Pump SPECIAL SERVICE TOOL(S) REQUIRED Description Tool Number Fan Clutch Holding
EXPANSION TANK PARTS LIST AND INSTALLATION GUIDE
 PARTS LIST AND INSTALLATION GUIDE PARTS LIST 2 PC APPLICATION-SPECIFIC MOUNTING BRACKETS 2 PC BLACK, ANODIZED 6061 ALUMINUM CATCH CANS 4 PC SILICONE HOSES 4 PC PLASTIC BARBED FITTINGS 4 PC WORM-GEAR CLAMPS
This information covers the proper procedure for replacing the intake manifold gasket on the Volvo D16F engine.
 Volvo Trucks North America Greensboro, NC USA DService Bulletin Trucks Date Group No. Page 2.2007 251 39 1(14) Intake Manifold Gasket Replacement D16F Intake Manifold Gasket Replacement W2005773 This information
Installation Instructions
 Installation Instructions 2.0T FSI Intake Manifold: Featuring better flow, higher boost capacity, 40% larger plenum volume, and integrated flapper delete; this product will take your 2.0L VW TSI and FSI
INSTALLATION INSTRUCTIONS CATCH CAN KIT MITSUBISHI EVOLUTION X Document# Customer Support:
 The EVOX catch can kit is available in 3 variations. The PCV kit installs between the PCV valve and the intake manifold. The crankcase kit installs between the valve cover vent port and the pre-turbo air
IAG Competition Series Air / Oil Separator (AOS) For WRX
 For WRX") P IAG Competition Series Air / Oil Separator (AOS) For 2015-16 WRX Part# IAG-ENG-7252 Tools Required: Ratchet, torque wrench, extensions, needle nose pliers, hose cutter, snips/scissors, flat head screw
P IAG Competition Series Air / Oil Separator (AOS) For 2015-16 WRX Part# IAG-ENG-7252 Tools Required: Ratchet, torque wrench, extensions, needle nose pliers, hose cutter, snips/scissors, flat head screw
ASSEMBLY/INSTALLATION INSTRUCTIONS
 ASSEMBLY/INSTALLATION INSTRUCTIONS AURORA 3000 & 4000 SCORPION TURBO SYSTEM NOTICE: The engine oil must be changed any time the turbocharger is removed from the engine. The passages in the block underneath
REMOVAL & INSTALLATION
 REMOVAL & INSTALLATION NOTE: For reassembly reference, label all electrical connectors, vacuum hoses and fuel lines before removal. Also place mating marks on engine hood and other major assemblies before
03-04 Cobra. Hellion Power Systems Mustang Cobra Kit Instructions
 Hellion Power Systems 03-04 Mustang Cobra Kit Instructions NECESSARY PARTS REQUIRED FOR INSTALLATION Necessary: 03-04 Cobra hellion Kit ONLY 99-01 Alternator #YR3210346AA Alternator Bracket #XR3Z-10153-AB
LML 3 Y-Bridge Kit or High Flow Intake Bundle Package
 2011-2016 LML 3 Y-Bridge Kit or High Flow Intake Bundle Package Covers installation of PN s: WCF100607, WCF100691, WCF100716, & WCF100353 Note: This Kit is for off road competition use only! Overview-
MAZDASPEED3 Intercooler Instructions
 MAZDASPEED3 Intercooler Instructions Congratulations on your purchase of the COBB Tuning Front Mount Intercooler System for your 2007-2009 Mazdaspeed3. The following instructions should assist you through
BLACKBIRD INSTALLATION SUPPLEMENT
 BLACKBIRD INSTALLATION SUPPLEMENT FOR 2003-7 FORD 6.0 LITER DIESEL SINGLE ALTERNATOR F-350, F-450, F-550, EXCURSION VERSION 7-07 Parts Description Blackbird Wiring Manual Installation Supplement 6.0 Liter
Cylinder head/gasket, replacing
 1(16) Cylinder head/gasket, replacing Special tools: 951 2666, 951 2767, 999 5450, 999 5452, 999 5454, 999 5670, 999 5718, 999 5719, 999 5750, 999 5972 Removing the cylinder head gasket Note! As the illustrations
Solenoid Valve VCB, Replacement, D13F. This information covers the procedures for replacing the VCB solenoid valve on the Volvo D13F engine.
 Volvo Trucks North America Greensboro, NC USA DService Bulletin Trucks Date Group No. Page 10.2007 253 67 1(9) Solenoid Valve VCB, Replacement D13F Solenoid Valve VCB, Replacement, D13F This information
IAG Street Series Air / Oil Separator (AOS) For WRX
 For WRX") P IAG Street Series Air / Oil Separator (AOS) For 2015-16 WRX Part# IAG-ENG-7152 Tools Required: Ratchet, torque wrench, extensions, needle nose pliers, hose cutter, snips/scissors, flat head screw driver,
P IAG Street Series Air / Oil Separator (AOS) For 2015-16 WRX Part# IAG-ENG-7152 Tools Required: Ratchet, torque wrench, extensions, needle nose pliers, hose cutter, snips/scissors, flat head screw driver,
M-9424-M50CJ INTAKE MANIFOLD INSTALLATION INSTRUCTIONS
 Please visit www.fordracingparts.com for the most current instruction information!!! PLEASE READ ALL OF THE FOLLOWING INSTRUCTIONS CAREFULLY PRIOR TO INSTALLATION. AT ANY TIME YOU DO NOT UNDERSTAND THE
Instant Chat off the main page of Or simply call our tech team at
 FRONT MOUNT INTERCOOLER 2008-13 STI 2014-04- 08 Thank you for purchasing this PERRIN product for your car! Installation of this product should only be performed by persons experienced with installation
Lower Intake Manifold Replacement
 Lower Intake Manifold Replacement Removal Procedure 1. Turn OFF all the lamps and the accessories. 2. Ensure the ignition switch is in the OFF position. 3. Disconnect the negative battery cable from the
with installation boost GAUGE this manual is for use with systems
 owners manual with installation instructions dynafact boost GAUGE this manual is for use with systems 64050-64054 gale banks engineering 546 duggan avenue azusa, ca 91702 (626) 969-9600 www.bankspower.com
Disconnect the APP sensor harness connector. See Fig. 4. Remove the accelerator pedal mounting nuts. Remove the APP assembly.
 ENGINE CONTROLS - REMOVAL, OVERHAUL & INSTALLATION - 6.6L DIESEL... Page 1 of 41 FUEL SYSTEMS ACCELERATOR PEDAL POSITION SENSOR Removal & Installation Disconnect the APP sensor harness connector. See Fig.
1988 Ford F-350 PICKUP
 1988 Ford F-350 PICKUP Submodel: Engine Type: V8 Liters: 7.5 Fuel Delivery: FI Fuel: GAS 1987 93 4.9L Engine The intake and exhaust manifolds on these engines are known as combination manifolds and are
Ford E350, E450 Van LITER DIESEL ENGINE W/SINGLE OE ALTERNATOR TYPE B Uses TM-16, 4-3/4 Poly Groove Rear Port Compressor PARTS LIST
 2006-04 Ford E350, E450 Van 1784 6.0 LITER DIESEL ENGINE W/SINGLE OE ALTERNATOR TYPE B Uses TM-16, 4-3/4 Poly Groove Rear Port Compressor PARTS LIST 1 6m-1.0 x 15 Bolt 1 6m-1.0 x 45 Bolt 3 6m Flat Washer
BLACKBIRD INSTALLATION SUPPLEMENT
 BLACKBIRD INSTALLATION SUPPLEMENT FOR 2003-7 FORD 6.0 LITER DIESEL F-SERIES DUAL ALTERNATOR VERSION 10/07 Blackbird Installation Supplement for Ford 6.0. Liter Dual Alternator Parts included in the 6.0
C40008 & C40009 EXHAUST BRAKES
 EXHAUST BRAKES C40008 & C40009 1995 2003 Ford F250 / F350 7.3 L Powerstroke Diesel with manual transmissions 1995 1998 Ford F250 / F350 7.3 L Powerstroke Diesel with automatic transmission* *Requires the
JBR MAZDASPEED
 Page1 james Barone Racing Aftermarket Parts and Accessories JBR 2007 2009 MAZDASPEED 3 Front Mount Intercooler Piping Kit Installation Instructions for TR8 Intercooler Tooling: o Jack, Jack Stands, Ramps
Includes: 1. Upgraded Tube Type EGR Cooler 2. Silicone Hoses
 Includes: 1. Upgraded Tube Type EGR Cooler 2. Silicone Hoses CAUTION: Never work on a hot vehicle. The hot exhaust system or hot engine can cause serious injury in the form of burns. If the vehicle has
#TL T EA888 GEN 3 FUELING SYSTEM/ INSTALLATION INSTRUCTIONS
 #TL100069 2.0T EA888 GEN 3 FUELING SYSTEM/ INSTALLATION INSTRUCTIONS Notes: These instructions were written for a North American specification MkVII GTI. Other models, like the Golf R, are similar. When
Trackspeed Engineering, LLC 1289 Reamwood Ave #A, Sunnyvale, CA
 Trackspeed Engineering, LLC 1289 Reamwood Ave #A, Sunnyvale, CA 94089 650-701-7223 info@trackspeedengineering.com Trackspeed DIY Turbocharger System Installation Instructions v1.00 (10/12/16) Thanks for
BD Ford L Powerstroke CRANKCASE VENTILATION KIT
 3 August 2011 2003-07 Ford 6.0L CCV Kit 1 BD Ford 2003-2007 6.0L Powerstroke CRANKCASE VENTILATION KIT P/N# 1032175 PLEASE READ ALL INSTRUCTIONS BEFORE INSTALLATION 3 August 2011 2003-07 Ford 6.0L CCV
96-04 tt. Hellion Power Systems Mustang Twin Turbo Kit Instructions
 96-04 tt Hellion Power Systems 1996-2004 Mustang Twin Turbo Kit Instructions 1. Disconnect battery and elevate front end of car on either Jack stands or a lift if available 2.Lock steering wheel and remove
1991 Volkswagen Vanagon Syncro
 corner of radiator. See Fig. 1. Fig. 1: Bleeding Cooling System 2. Open bleeder valve in engine compartment (turn counterclockwise). See Fig. 1. Fill expansion tank until full. Start and run engine at
2015 Corvette Supercharger System Instructions
 2015 Corvette Supercharger System Instructions These instructions are meant to serve as a guide to the installation of the ECS 2015 Corvette Supercharging system. Please be sure to use all safety equipment
1992 Toyota Cressida
 Monday, May 16, 2016 5:32:47 PM Page 13 2005 Mitchell Repair Information Company, LLC. Fig. 7: Exploded View Of Typical Cylinder Head & Components Fig. 8: Cylinder Head Bolt Removal Sequence Monday, May
IAG Competition Series Air / Oil Separator (AOS) For 2017 STI
 For 2017 STI") P IAG Competition Series Air / Oil Separator (AOS) For 2017 STI Part# IAG-ENG-7251 Tools Required: Ratchet, torque wrench, extensions, needle nose pliers, hose cutter, snips/scissors, flat head screw driver,
P IAG Competition Series Air / Oil Separator (AOS) For 2017 STI Part# IAG-ENG-7251 Tools Required: Ratchet, torque wrench, extensions, needle nose pliers, hose cutter, snips/scissors, flat head screw driver,
INSTALL MANUAL D o d g e 1 2 v 6 B T A PLEASE READ ALL INSTRUCTIONS BEFORE INSTALLATION.
 PN#1045310 12V Dodge Twin Turbo Kit (I-00273) 1 INSTALL MANUAL BD Twin Turbo Kit 1994-1 9 9 8 D o d g e 1 2 v 6 B T A Part# 1045310 PLEASE READ ALL INSTRUCTIONS BEFORE INSTALLATION. * Picture as shown
Industrial Injections Compound Turbo Installation For 6.7L Scorpion
 Industrial Injections Compound Turbo Installation For 6.7L Scorpion Step 1: Whenever you are doing an installation the first thing you should do is unhook the batteries to avoid arcing. You will need an
ITEM QTY CHECK PART NUMBER DESCRIPTION
 PART #21128 2010 Camaro Cold Air Induction Stage II PACKING LIST Before installation, use this check list to make sure all necessary parts have been included. ITEM QTY CHECK PART NUMBER DESCRIPTION 1.
Owner smanual. Banks Techni-Cooler Charge Air Cooler Assembly to 2007 Dodge 5.9L Cummins (24-valve) ISB Pickup Trucks
 ISB Pickup Trucks") Owner smanual with Installation Instructions Banks Techni-Cooler Charge Air Cooler Assembly 2003 to 2007 Dodge 5.9L Cummins (24-valve) ISB Pickup Trucks Use with system p/n 25980, 25981 Gale Banks Engineering
Owner smanual with Installation Instructions Banks Techni-Cooler Charge Air Cooler Assembly 2003 to 2007 Dodge 5.9L Cummins (24-valve) ISB Pickup Trucks Use with system p/n 25980, 25981 Gale Banks Engineering
INSTALLATION INSTRUCTIONS AOS-R (Air Oil Separator-Return) Turbo Subaru and STi Document# Support:
 Turbo Subaru and STi Document# Support:") INSTALLATION INSTRUCTIONS AOS-R (Air Oil Separator-Return) 02-14 Turbo Subaru and 2015+ STi Document# 19-0102 Support: info@radiumauto.com These instructions are based on a vehicle with an OEM turbocharger
INSTALLATION INSTRUCTIONS AOS-R (Air Oil Separator-Return) 02-14 Turbo Subaru and 2015+ STi Document# 19-0102 Support: info@radiumauto.com These instructions are based on a vehicle with an OEM turbocharger
3 WRX/STI TURBO INLET HOSE
 3 WRX/STI TURBO INLET HOSE Thank you for purchasing this PERRIN product for your car! Installation of this product should only be performed by persons experienced with installation of aftermarket performance
Installation Manual v1.0: The Torque Pro Propane Injection System GM. Please read all instructions before installation.
 PRO66-INST Installation Manual v1.0: The Torque Pro Propane Injection System GM Please read all instructions before installation. Thank you for purchasing the ATS Torque Pro Propane Injection System. This
98-02 LS1 F-Body Single Turbo Truck Manifold Kit
 98-02 LS1 F-Body Single Turbo Truck Manifold Kit Prep: -Remove all A/C Components, Alternator and brackets, tensioner, front bumper, front bumper foam, and front bumper support. Remove radiator and cooling
2001 Ford Windstar ENGINES 3.8L V6 - VIN 4 - Windstar
 COWL TOP VENT PANEL 1. Remove windshield wiper pivot arms. Remove cowl top vent panel retaining screws. Release cowl top vent panel retaining clips. Remove windshield wiper fluid hose. Remove cowl top
Installation Manual v1.0: 10-Digit P/N: Aurora 3000 Turbo System L Powerstroke Ford
 Installation Manual v1.0: 10-Digit P/N: 202-930-3224 Aurora 3000 Turbo System 99-03 7.3L Powerstroke Ford Please read all instructions before installation. Figure 1 - Full Kit Photo 1. Park the vehicle
Slingshot Rotrex Supercharger Kit
 Slingshot Rotrex Supercharger Kit This supercharger kit improves on the Slingshot by forcing more dense air into the engine and creating more power. Installation time of the supercharger depends on you
 Page 1 of 5 2004 Pontiac GRAND PRIX Submodel: Engine Type: V6 Liters: 3.8 Fuel Delivery: FI Fuel: GAS Oil Pan Replacement Removal Procedure Disconnect the negative battery cable. Refer to Battery Negative
2004 Volvo C70 L5-2.4L Turbo VIN 63 B5244T7 Cylinder Head Assembly Service and Repair, Removal and Replacement: Cylinder Head/Gasket, Replacing
 1 of 25 8/18/2011 6:10 PM 2004 Volvo C70 L5-2.4L Turbo VIN 63 B5244T7 Cylinder Head Assembly Service and Repair, Removal and Replacement: Cylinder Head/Gasket, Replacing Cylinder head/gasket, replacement
KIT. light duty 6.2L chevrolet/gm diesel. for use on gm 6.2L diesel trucks equipped with the banks sidewinder turbo system
 owners manual with installation instructions EMISSIONS KIT light duty 6.2L chevrolet/gm diesel for use on gm 6.2L diesel trucks equipped with the banks sidewinder turbo system this manual is for use with
Includes: 1. Silicone Hose 2. EGR Block Off Plates 1. Exhaust Block Off Plate 2. Hose Clamps 1. Spacer/Washer 8. Bolts 2. Nuts
 Includes: 1. Silicone Hose 2. EGR Block Off Plates 1. Exhaust Block Off Plate 2. Hose Clamps 1. Spacer/Washer 8. Bolts 2. Nuts WARNING: This product is not legal for sale or use on pollution controlled
INSTALLATION INSTRUCTIONS AOS-R (Air Oil Separator-Return) Turbo Subaru and STi Document# Support:
 Turbo Subaru and STi Document# Support:") INSTALLATION INSTRUCTIONS AOS-R (Air Oil Separator-Return) 02-14 Turbo Subaru and 2015+ STi Document# 19-0102 Support: info@radiumauto.com These instructions are based on a vehicle with an OEM turbocharger
INSTALLATION INSTRUCTIONS AOS-R (Air Oil Separator-Return) 02-14 Turbo Subaru and 2015+ STi Document# 19-0102 Support: info@radiumauto.com These instructions are based on a vehicle with an OEM turbocharger
Bill of Materials for
 Bill of Materials for 77060012 1 2-P5153572 Inlet Pipe 1 21-202M 2.75" Filter 1 103-BLO-4820N Filter Hose Clamp 1 559999 Washer, Fender M6x25 1 1-3028 Washer, 1/4 SAE Flat 1 1-2072 Bolt, 1/4-20-UNC x 1
2012 Kia Soul L4 2.0L
 2012 Kia Soul L4 2.0L Vehicle» Engine, Cooling and Exhaust» Engine» Timing Chain» Service and Repair» Repair Procedures» Part 1 Removal Engine removal is not required for this procedure. CAUTION: Use fender
INSTALLATION INSTRUCTIONS DUAL OIL CATCH CAN KIT
 INSTALLATION INSTRUCTIONS DUAL OIL CATCH CAN KIT SUBARU WRX FA20F ENGINE Document: 19-0135 Support: info@radiumauto.com This dual catch can kit installs in the right-hand side of the engine bay and intercepts
OIL COOLER KIT INSTALLATION INSTRUCTIONS PART NUMBER D E92 335i/xi without stock oil cooler
 OIL COOLER KIT INSTALLATION INSTRUCTIONS PART NUMBER D570-0921 APPLICATION 2007-08 E92 335i/xi without stock oil cooler Congratulations for being selective enough to use a Dinan Engineering Oil Cooler
ZX-14 Stage I Turbo Kit
 62910 Peerless Ct. Bend, OR 97701 Phone 541.385.0706 Fax 541.382.9406 ZX-14 Stage I Turbo Kit WARNING: This turbo kit is for OFF-ROAD RACING use ONLY. Advisement: These instructions are written to be comprehensive
TOYOTA 4RUNNER COLD AIR INTAKE FJ CRUISER Preparation
 Preparation Part Number: PTR03-89100 Kit Contents Item # Quantity Reqd. Description 1 1 Air Filter (P/N: PTR43-00083) 2 1 Upper Air Box 3 1 Lower Air Box 4 1 Hump Coupler 5 1 Throttle Body Coupler 6 1
BLACKBIRD INSTALLATION SUPPLEMENT
 BLACKBIRD INSTALLATION SUPPLEMENT FOR 2008-105 FORD 6.4 LITER DIESEL F-SERIES VERSION 3/10 Parts Blackbird Wiring Manual Installation Supplement 6.4 liter Diesel Owner s Manual Includes Warrantee Registration
INSTRUCTIONS. INTERCOOLER UPGRADE BMW E82 135i 2008-
 INSTRUCTIONS INTERCOOLER UPGRADE BMW E82 135i 2008- Parts Included: - Intercooler - Left and right side pipes with hoses - 3 Silicone Hoses ( 2.5 x 3 ) - 1 Silicone Hose 90degree 2.5 elbow - 8 Hoseclamps
DISASSEMBLY. Engine. Special Tool(s) Locking Tool, Camshaft Phaser Sprocket Special Tool(s)
 Locking Tool, Camshaft Phaser Sprocket Special Tool(s)") 303-01B-1 DISASSEMBLY Engine Special Tool(s) Remover, Crankshaft Rear Slinger 303-514 (T95P-6701-AH) Special Tool(s) 303-01B-1 Locking Tool, Camshaft Phaser Sprocket 303-1046 Remover, Crankshaft Rear Seal
303-01B-1 DISASSEMBLY Engine Special Tool(s) Remover, Crankshaft Rear Slinger 303-514 (T95P-6701-AH) Special Tool(s) 303-01B-1 Locking Tool, Camshaft Phaser Sprocket 303-1046 Remover, Crankshaft Rear Seal
Installation instruction do88 performance Intercooler for Volvo S60/V60 T6 MY10-
 Installation instruction do88 performance Intercooler for Volvo S60/V60 T6 MY10-1. This instruction shows how to replace the OEM intercoolers with do88 performance intercoolers. At this type of installation