Installation Manual for LCD Boost Controller device.
|
|
|
- Opal Davis
- 5 years ago
- Views:
Transcription


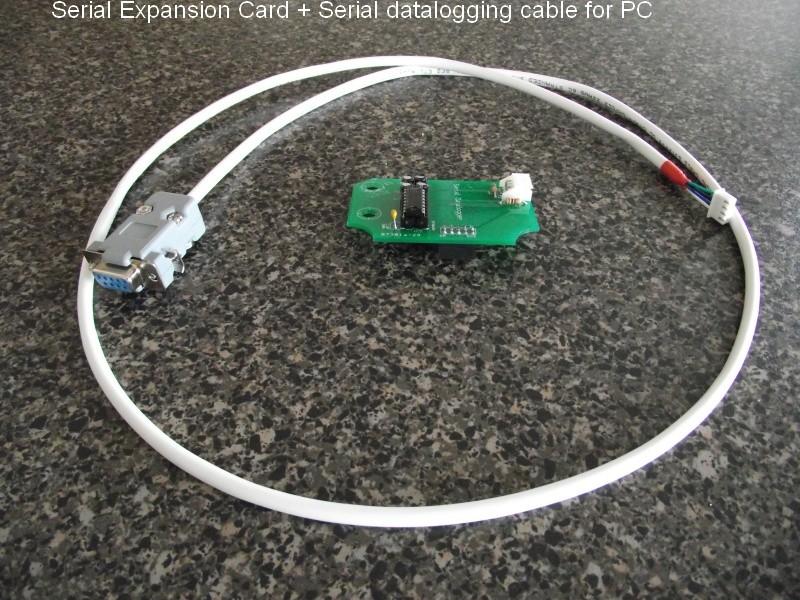
1 Installation Manual for LCD Boost Controller device. Main Black box front view. The lonely white 4pin connector above means this box is equipped with the optional serial expansion card. Main black box back view.
 Rotary")

2 LCD RGB Display shown with protective screen (to prevent scratches during shipping) Rotary Encoder Knob with bonus plastic knob (recommend replacing knob with something more attractive).


3 Boost solenoid harness for hooking up AEM/Mac valve boost solenoid. Older style power cord is pictured in red/black wire. Newer style power cord is pictured in white/black wire.


4 WBO2 input / Auxiliary input harness. Optional
5 Optional Optional

 sharp xacto knife diagonal cutters roto-zip for grinding clear silicone The rotary knob itself has")
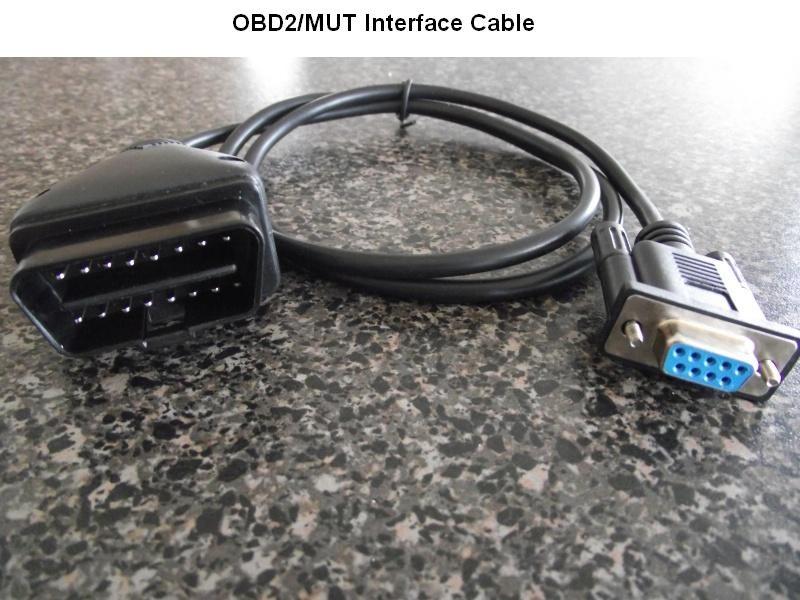
6 Miscellaneous items you may need thick walled vacuum hose (for internal pressure sensor) null-modem cable for updating firmware upgrades or for OBD1 palm datalog cables. knob (for rotary encoder) Add-a-fuse (for hooking up power easily and protect the device. Recommend 2 amp fuse) sharp xacto knife diagonal cutters roto-zip for grinding clear silicone The rotary knob itself has a D-shape shaft but I found these to fit anyways. Ebay has hundreds of different style knobs available.

7 Installation of boost solenoid: Diagram represents boost solenoid system for Dodge Stealth / Mitsubishi 3000GT VR4. Step 1: Disconnect the factory boost solenoid vacuum hoses and cap the exposed vacuum ports. Step 2: Install new AEM/Mac valve boost solenoid, note the boost solenoid is labeled with ports 1, 2 and 3. Port 2 goes to wastegate, and port 3 goes to Y-pipe (boost source). Port 1 is left open, you could optionally add a sintered vent or muffler to keep dirt out.


8 Factory boost solenoid can be completely removed and replaced with AEM / Mac valve. Step 3: The black box pressure sensors needs to measure boost, so grab a thick walled vacuum hose and feed it through the firewall and 'T' into something, perhaps the Blow Off Valve, etc. While feeding the vacuum hose through the firewall it might be a good idea to feed the boost solenoid harness through the same time. Keep in mind that you want the connector of the boost solenoid harness to be inside the vehicle so it can be hooked up to the black box. Step 4: Hookup the boost solenoid to the boost solenoid harness. Insert heat shrink tube into each wire, solder each wire and pull heat shrink tube over solder connection and use a heat gun (or hairdryer) to shrink and protect. Boost solenoids are not polarity sensitive so it does not matter which wire goes to which.


9 The best location to install the black box itself is behind the ECU where there's a lot of empty space and also minimize the length of the vacuum hose. In the picture below I used a product called Add-A-Fuse to provide 12 volt ignition power to both my wideband O2 controller and the black box. The older style power cord has two wires red and black. Red goes to 12 volt ignition, and black goes to ground. The newer style power cord is white (12v), and black (ground).


10 INSTALLING LCD SCREEN IN THE RPM GAUGE You may consider purchasing an extra cluster panel from ebay and work on that. This way you can take your time to do a good job. When you disassemble the cluster panel you do not have to remove trip reset pin, but it does make the job easier if it's out of the way. The easiest way to remove the pin is when the cluster panel is still attached to the car, push it down to reset and pull it out very quickly. If it didn't come out on your first attempt repeat by push down to reset and pull. Trying to remove it when the cluster panel is off the car will make it challenging. If you get frustrated and can't get it out, don't worry, it's not necessary to remove it. I've installed the LCD screen twice: The first attempt I installed an amber LCD screen pretty high up on the RPM gauge. Because it was so high up, I had to grind away part of the PCB see image below. Here's the amber LCD screen installed behind the RPM gauge.


11 In the background you can see I use hot glue gun, I don't recommend this as it doesn't give you enough time to align it properly. Instead I recommend clear silicone, as it gives you lots of time to work with before it dries, and is easily removable afterwards. The amber LCD as you can see sits a bit too high. I did have to grind away some the night light clear plastic reflector to get it that high. The data display on the screen is just fake, I was just formatting/spacing the text. I could not read the display in sunlight so I abandon it.


12 On my second attempt I used a sunlight readable LCD screen display and I also got a bit lazy and didn't feel like disassembling the RPM display, as a result the LCD display is lower.


13 RPM gauge meter removed from cluster panel to show what's behind there. As you can see, Mitsubishi had 11 unused future expansion lights. I grind all of that away to make room for the LCD screen.


14 RPM gauge meter laying face down. Using diagonal pliers I snapped and grinded down the white plastic to make room.


15 Here I mark the backside of the RPM meter of where the LCD will sit and also mark the location of the cutout. Using a new xacto knife and metal ruler I score the cutout many times. My LCD screen has a protective film still on it so I use a marker to see and verify how much of the screen will be covered/uncovered. I opted not to show the entire LCD screen, but only the portion of the screen that actually displays characters, as this will give me some lee way if my installation is not 100% aligned. The RPM meter transparent plastic night light has a rounded corner so I grinded some of that away so the LCD screen would fit straight and true.


16 Here's the RPM gauge temporarily installed in the cluster panel without the LCD screen to see how close of fit it will be. LCD screen is siliconed to the back of the RPM gauge.


17 LCD screen & cluster installed back into the car. Picture below is a customer's install who obviously spent more time doing a better job of centering.
Connecting the rear fog light on the A4 Jetta, while keeping the 5 Light Mod
 Connecting the rear fog light on the A4 Jetta, while keeping the 5 Light Mod DISCLAIMER: I'm human and make mistakes. If you spot one in this how to, tell me and I'll fix it This was done on my 99.5 Jetta.
upper and lower ball joints ( I went with Moog from rockauto.com): two K80026 and two K8607T
: two K80026 and two K8607T") Parts required: two 5C3Z*4A322*AA = hub / steering knuckle o-ring two AC3Z*1S175*A = updated axle shaft "dust seal" two 5C3Z*3254*A = steering knuckle / axle shaft seal upper and lower ball joints ( I
Parts required: two 5C3Z*4A322*AA = hub / steering knuckle o-ring two AC3Z*1S175*A = updated axle shaft "dust seal" two 5C3Z*3254*A = steering knuckle / axle shaft seal upper and lower ball joints ( I
750 Paso Wiring Upgrade
 750 Paso Wiring Upgrade Supplies required: 2 Bosch 30A/12V Relays # #0 332 209 150 (with mounting tab) 1 30 Amp fuse holder 1 10 Amp fuse holder 12 inches of brown 12 gauge wire 60 inches of red 14 gauge
Revised 10/22/2014 Page 2 of?
 1.Remove side panels, hood, seat, fuel tank, and 2.Remove stock air box, remove fuel line muffler. Save exhaust springs and rubber muffler mounts for turbo bracket. Sand back surface flat for mounting.
DCX2496 Linear Power Supply mod by
 DCX2496 Linear Power Supply mod by Construction Guide Linear Power Supply for the DCX2496 Introduction. One of my more rewarding modifications to the DCX2496 was the replacement of the stock I/O board
We will be upgrading from the factory, paper-cone disgrace to an Infinity Kappa 62.9i:
 In order to fully round out your stereo upgrade, the factory rear speakers must go. This is another easy job to tackle, but the fitment of the package tray and being hunched over in the rear glass area
Nissan GTR Alpha Fuel System
 Nissan GTR Alpha Fuel System Instructions V5 The goal of AMS is to provide the highest quality, best performing products available. By utilizing research and development, and rigorous testing programs
Ford Super Duty Dash Lighting LED Upgrade F250 4x4 XLT Sport Crew Cab
 Page 1 of 32 Ford Super Duty Dash Lighting LED Upgrade 2004 F250 4x4 XLT Sport Crew Cab Back to 2004 F250 Main Page Click Here for a PDF version of this article ** Updated 12/15/09 ** New version of the
Procharger Stage II Intercooled Supercharger System (11-14 GT)
") Procharger Stage II Intercooled Supercharger System (11-14 GT) Installation Time: Approximately one day. Installed on 2012 Mustang GT 5.0/Manual Required Tools 3/8 Socket Set (Standard and Metric) 1/2
Procharger Stage II Intercooled Supercharger System (11-14 GT) Installation Time: Approximately one day. Installed on 2012 Mustang GT 5.0/Manual Required Tools 3/8 Socket Set (Standard and Metric) 1/2
Model 377, 379, 386, 388, Sleeper no window
 Installation Manual Model 377, 379, 386, 388, 389 63 Sleeper no window 2390 Blackhawk Road P.O. Box 6007 Rockford, IL 61125 www.nitesystem.com 1-866-204-8570 NITE Plus Installation Procedures 1-2 Table
INSTALLATION INSTRUCTIONS. Revision 3.1.1
 INSTALLATION INSTRUCTIONS Revision 3.1.1 Table of Contents INTRODUCTION... 4 INSTALLATION OVERVIEW... 5 Included Parts... 6 DEVICE WIRING... 7 Required Parts... 7 Guidelines... 7 Wiring Diagram... 8 Compatible
Ford 6.7L Installation of the Guardian Safety System
 Ford 6.7L Installation of the Guardian Safety System Diesel Tech Industries Ltd. 14215-120 Avenue Edmonton, Alberta, Canada T5L 2R8 Phone: (780) 455-9876 info@dtiguardian.com www.dtiguardian.com DTI05-02.01/13
X-Type w/ non-premium sound amplifier installation instructions
 X-Type w/ non-premium sound amplifier installation instructions 1. Pull radio from dash (see Radio Removal Instructions ) 2. Disconnect wiring harness from back of radio by pushing in tab on plug and pulling
These instructions show how to build the Remote Controlled Fart machine Sound Kit.
 Remote Controlled Fart Machine Assembly Instructions These instructions show how to build the Remote Controlled Fart machine Sound Kit. Tools Required Drill with 7/64, 3/16, and ¼ drill bits. Holt melt
Fanatec GT3RS V1 to GT3RS V2 Tutorial
 Fanatec GT3RS V1 to GT3RS V2 Tutorial by Roy Visser 1 How to update your Fanatec GT3RS V1 wheel to a GT3RS V2 wheel Welcome to this guided and detailed tutorial for upgrading your Fanatec GT3RS V1 wheel
SHARK UPPER WINDSHIELD FRAME & WINDSHIELD REPLACEMENT. Text and Photos by TOM BENFORD
 Text and Photos by TOM BENFORD I purchased a fathom green 69 big-block tri-power T-top coupe with only 42,000 original miles on it recently. I'm the third owner of the car, and I got it for a very good
Fit a Japanese Regulator Rectifier unit to a 12v AC/DC Royal Enfield Bullet
 Fit a Japanese Regulator Rectifier unit to a 12v AC/DC Royal Enfield Bullet The standard, seperate regulator and rectifier units on the later model Royal Enfield Bullet are not noted for their reliability.
VT CWH. Capacitance Testing OVERVIEW
 OVERVIEW Chart LNG tanks incorporate a capacitance system for real time monitoring of the liquid level inside LNG tanks. This capacitance reading is converted to a signal that is sent to the fuel level
OpenROV. Tether Reel from Cheap Extension Cord Reel
 OpenROV Tether Reel from Cheap Extension Cord Reel In this guide I will show you the steps I took to modify a cheap extension cord reel into a tether reel. Written By: Brett Forsyth 2017 openrov.dozuki.com
Simple DIY Rev Switch Switch on or off anything at an adjustable engine rpm!
 Simple DIY Rev Switch Switch on or off anything at an adjustable engine rpm! By Julian Edgar So what about making it a general-purpose rev switch, able to switch pretty well any electrical loads? That
Rostra Electronic Cruise Control Install On a Stratoliner or Roadliner
 Rostra Electronic Cruise Control Install On a Stratoliner or Roadliner MATERIALS LIST: 1 - Rostra Part # 250-1223 (www.brandondist.com/products/cruise1223.htm) 1 - Signal Splitter part # 250-4369 1 - Engagement
4TH GEN SEATS IN A 3RD GEN TRUCK
 4TH GEN SEATS IN A 3RD GEN TRUCK by Flopster843 02 Oct 2016 If you drive a 3rd generation Dodge Ram truck, I am sure you have discovered that the OEM seats are not the greatest (Figure 1.) They are extremely
Kodak 750H Carousel Projector Repair
 Kodak 750H Carousel Projector Repair An AT YOUR OWN RISK PROJECT by Klaus Wolter, Rev B, 3-26-2016 Here I documen the repair of my 750H carousel. A common problem with this projector, and all of the projectors
Disco 3 Clock Spring / Rotary Coupler replacement
 Disco 3 Clock Spring / Rotary Coupler replacement I recently had to change my Clock spring and thought some folks may find it helpful to see what it entailed. I did lots of reading around but couldn t
Raxiom Factory GPS Rear Back-up Camera Kit (07-17 Wrangler)
") Raxiom Factory GPS Rear Back-up Camera Kit (07-17 Wrangler) Installation Time: 2.5-3Hrs Tools Required: 7mm Socket & Driver 10mm Socket 10mm Open end wrench Knife / Razor blade Zip-ties Wire Cutters Needle
Raxiom Factory GPS Rear Back-up Camera Kit (07-17 Wrangler) Installation Time: 2.5-3Hrs Tools Required: 7mm Socket & Driver 10mm Socket 10mm Open end wrench Knife / Razor blade Zip-ties Wire Cutters Needle
Installing the Dan-Marc and Pingel setup.
 Installing the Dan-Marc and Pingel setup. This is an alternative to the OEM vacuum petcock. It's the setup I use and feel more comfortable with it. Many still like the OEM vacuum petcock and they can continue
Peugeot 406 Coupe: Delocking your boot V.1 April 2005
 This is a first stab at a DIY guide to de-locking your 406 Coupe. It isn t a hard modification to do yourself, but you do need to be confident working on your cars electrics and removing and refitting
2010 Toyota Prius model II Head Unit Upgrade
 2010 Toyota Prius model II Head Unit Upgrade Monday, December 21, 2009 Disclaimer: Use this document and its contents at your own risk. Forward: Huge thanks to those members on Priuschat.com that forged
L/6.7L DODGE CUMMINS
 10/19/2012 2005-08 5.9/6.7 Dodge Cummins FlowMAX Lift Pump Kit # 1050310B - 1-2005-09 5.9L/6.7L DODGE CUMMINS BD FLOWMax V2 LIFT PUMP KIT Installation Instructions P/N # 1050310B PLEASE READ ALL INSTRUCTIONS
There was some debate whether or not there was a write up, with Pictures, for replacing the ignition switch.
 Replacing the Ignition Switch - Step by Step with Pictures. http://forums.audiworld.com/showthread.php?p=18927576 (Corey 02ALMSTT) (With updates/corrections by Dave F.) February 1, 2013 (I = Corey, mostly)
10/12/2015 boostcontrol
 Boost Controller Updated May 14, 2002 Here is a boost controller that incorporates quick spool up, minimal spikes, and minimal hassle. You will merely have to clean it once in a while, or else put a tiny
Ball Joint Replacement for 2005 F L SuperDuty SRW, 4x4 with ESOF
 Ball Joint Replacement for 2005 F-250 6.0L SuperDuty SRW, 4x4 with ESOF Parts required: two 5C3Z-4A322-AA = hub / steering knuckle o-ring (my originals were yellow, the replacements are black) two AC3Z-1S175-A
Tailgate Light Bar Installation by Flopster Feb 2015
 Tailgate Light Bar Installation by Flopster843 23 Feb 2015 If you ever looked at the rear of a 3rd generation Dodge Ram dually pickup truck, you'll notice that there is a light bar with 3 red marker lights
ECT Display Driver Installation for AP2 Module
 ECT Display Driver Installation for AP2 Module Overview The ECT Display Driver is a small module with a removable wire harness that mounts behind the driver's foot well cover. All wiring connections are
2007 Crown Victoria Police Interceptor (P71) Blend Door Actuator Replacement (If I did it, you can too.)
 Blend Door Actuator Replacement (If I did it, you can too.)") 2007 Crown Victoria Police Interceptor (P71) Blend Door Actuator Replacement (If I did it, you can too.) I'm not saying this is the only way, or even the right way, but it worked for me. First time I've
2007 Crown Victoria Police Interceptor (P71) Blend Door Actuator Replacement (If I did it, you can too.) I'm not saying this is the only way, or even the right way, but it worked for me. First time I've
CHAPTER 2. Current and Voltage
 CHAPTER 2 Current and Voltage The primary objective of this laboratory exercise is to familiarize the reader with two common laboratory instruments that will be used throughout the rest of this text. In
Revised 10/23/2015 Page 2 of 10
 1.Remove the gauge, side panels, hood and headlight. Remove the air box from the throttle bodies then remove the seat and gas tank. 2.Carefully remove temp sensor from air box using a small pick or screw
Triumph Street Triple VSM Grip Heater Install
 Triumph Street Triple VSM Grip Heater Install Introduction: With winter fast approaching and with painful memories of last winter riding with the club it was time to do something about getting some grip
Converting an A to 12v and Adding Turn Signals Bill Lee
 Converting an A to 12v and Adding Turn Signals Bill Lee Bill@WRLee.com When I bought my 1929 Tudor, it had been restored about 20 years earlier. It had halogens and had been converted to 12v negative ground,
Adding an LED indicator to the X10-WS467 wall switch Credit: Bruce Stydnicki
 1 of 6 1/2/2009 4:33 PM Adding an LED indicator to the X10-WS467 wall switch Credit: Bruce Stydnicki 1. I had a need to monitor the status of my outdoor lights which are connected to X10-WS467 wall switches.
BLUE LIGHT FOR DYNACO STEREO 120 OR PAT-4 ROCKER SWITCHES
 BLUE LIGHT FOR DYNACO STEREO 120 OR PAT-4 ROCKER SWITCHES 2012 AkitikA, LLC All rights reserved Revision 1p3 April 18, 2012 Page 1 of 15 Table of Contents Table of Contents... 2 Table of Figures... 2 Section
2010 Toyota Prius Fog Light Retrofit
 2010 Toyota Prius Fog Light Retrofit A DIY prospective Last updated: Friday, December 25, 2009 *** Disclaimer Use this document and its contents at your own risk! *** Forward: This document was compiled
Lincoln Mark VII Hood Insulation Repair Version written by AZMarkVII
 Lincoln Mark VII Hood Insulation Repair Version 20061223 written by AZMarkVII My hood insulator was, for the most part, intact. It had some tears and the surface material was missing in areas as large
M1A1 Thompson Upgrade
 M1A1 Thompson Upgrade If you are mechanically inclined at all. This should be no problem. I'll start off with a list of things you will need. Thompson M1A1 Whisky Cigarettes Tools: Flat screwdriver No.
Installing the Audiovox CCS-100 Cruise Control.
 Installing the Audiovox CCS-100 Cruise Control. This article was written by: Lon Lawrence w650kawasaki@leaco.net Cruise Control : Audiovox CCS-100 ($89) Webpage : www.summitracing.com Message: I've installed
Installation Instructions - ECS Tuning Vent Pod Vacuum/Boost Gauge Kit
 Installation Instructions - ECS Tuning Vent Pod Vacuum/Boost Gauge Kit This tutorial is provided as a courtesy by ECS Tuning. Part Number for (2005-2008) Proper service and repair procedures are vital
Corrado Club of Canada. VR6 Engine FAQ. By: Dennis
 Corrado Club of Canada VR6 Engine FAQ By: Dennis I thought I would snap a few pics of the engine compartment on my 1994 VR6 Corrado. First, this is the updated engine management system so it does have
K6JRF's Page formerly W6FZC
 K6JRF's Page formerly W6FZC My Mercedes Benz S500 Coupe (Updated: Nov 9, 2004) Analyze and Troubleshoot "Check Engine" MIL and Electronic Control Units (ECU)! Seat Belt Extender About one month ago, the
Power Seat Side Mount Installation & Wiring Instructions
 F22/F30/F31/F32/F80/F82/F87 (and other cars with the same sliders) Power Seat Side Mount Installation & Wiring Instructions These instructions assume a basic comfort with crimping and/or soldering. That
Asynchronous Restriking CDI 2 channel
 Asynchronous Restriking CDI 2 channel Parts List ARC-2 module Decals Power Cable Fuse Specifications Operating Voltage: 8-20V Operating Current: Max Operating RPM: Ambient Temp range: Ignition inputs:
Tecomotive - tinycwa User Manual
 Tecomotive - tinycwa User Manual Overview Contents - tinycwa controller - Fuse holder - Fuses (15A/30A) - Connector 8 pin (controller) - Connector 4 pin (water pump) - Connector 2 pin (temperature sensor)
Toyota Tacoma Winch Mount Bumper Installation Instructions Tools Required: Transmission cooler relocation brackets Torque Wrench
 2016-2017 Toyota Tacoma Winch Mount Bumper Installation Instructions Tools Required: Items Included: Small flat head screw driver Winch Mount Ratchet, 10mm, 12mm, 14mm, 17mm & Skid Plate 19mm sockets Transmission
Dodge Cummins Positive Air Shutoff
 1 INSTALL MANUAL 2010-2012 6.7 Dodge Cummins Positive Air Shutoff P/N# 1036722 P/N# 1036722-M UPLEASE READ ALL INSTRUCTIONS BEFORE INSTALLATION An Information decal has been provided in this kit. This
M GT 2005 up Mustang ENGINE START Push-Button INSTRUCTION SHEET
 Please contact the Ford Racing Techline for the most current instruction information @ (800) FORD-788!!! PLEASE READ THE FOLLOWING INSTRUCTIONS CAREFULLY PRIOR TO INSTALLATION!!! OVERVIEW: The following
Upgrade v3 to v3.2. SeeMeCNC Guides. Upgrade v3 to v3.2. Rostock Max v3 Uprgade to v3.2. Written By: SeeMeCNC seemecnc.dozuki.
 SeeMeCNC Guides Upgrade v3 to v3.2 Rostock Max v3 Uprgade to v3.2 Written By: SeeMeCNC 2018 seemecnc.dozuki.com/ Page 1 of 34 INTRODUCTION This guide is intended to Upgrade a Rostock Max v3 to a Rostock
Headlamp Adjusters motorised conversion by: Ant (Banjo1981)
") Headlamp Adjusters motorised conversion by: Ant (Banjo1981) What you will need: E30 adjuster switch assembly E30 Headlight adjusters E36 Adjuster motors (pref with the plugs still attached) Variable resistor
Headlamp Adjusters motorised conversion by: Ant (Banjo1981) What you will need: E30 adjuster switch assembly E30 Headlight adjusters E36 Adjuster motors (pref with the plugs still attached) Variable resistor
928 Motorsports Supercharger Installation Copyright 2007, 928 Motorsports, LLC All Rights Reserved
 For Porsche 928 equipped with K-Jetronic (CIS) Fuel System Toll-Free Tech Hot Line: 877-FOR-928M 877-367-9286 Please do not copy this manual and give copies to your friends. Our ability to bring you this
How-To Convert a W8 Cluster for Use in a MKIV TDI By Greg Menounos
 How-To Convert a W8 Cluster for Use in a MKIV TDI By Greg Menounos I didn t discover much of this information myself. Most of it is scattered across various threads on TDIClub and VWVortex. I just pulled
 Updated May 2015 Okay this is what I learned while converting several Yamaha SUV 1200 jet skis with a 2 stroke engine to a 4 stroke engine. I believe that you can use a Yamaha FX or VX four stroke for
PAT-4 TOROIDAL TRANSFORMER ASSEMBLY MANUAL
 PAT-4 TOROIDAL TRANSFORMER ASSEMBLY MANUAL 2015 AkitikA, LLC All rights reserved Revision 1p3 August 22, 2015 Page 1 of 13 Table of Contents Table of Contents... 2 Table of Figures... 2 Section 1: About
Revision Date: Building a dual pump system for an open boat. Description:
 Disclaimer: The information is provided as-is. The author(s) accepts no liability for the accuracy, availability, suitability, reliability and usability. The following information is in the public domain
Application Note. Atlas RS-3 Tsunami Digital Sound Decoder Installation Notes
 Application Note Atlas RS-3 Tsunami Digital Sound Decoder Installation Notes Overview This application note describes how to install a TSU-AT1000 digital sound decoder into an HO Atlas RS-3. Skill Level
APSX WIDEBAND D2 AFR CONTROLLER GAUGE. Installation and User Manual. APSX WIDEBAND D2 Manual V1.0
 APSX WIDEBAND D2 AFR CONTROLLER GAUGE Installation and User Manual APSX WIDEBAND D2 Manual V1.0 You purchased a wideband gauge! BENCH TEST BEFORE INSTALLING IT! USE A RELIABLE 12V POWER > 5AMP Stock (OEM)ECU
INSTALLATION MANUAL & OPERATING INSTRUCTIONS
 INSTALLATION MANUAL & OPERATING INSTRUCTIONS SIGALARM MODEL 210 PMB 405; West SR 46 Sanford, FL 32771 (800) 589-3769 (407) 328-9479 Fax: (407) 328-5889 Email:info@sigalarminc.com Internet: http://www.sigalarminc.com
JRSC + BBK Install on SVTF. Neil A. Shah medicnas on focaljet September 2006
 JRSC + BBK Install on SVTF Neil A. Shah medicnas on focaljet September 2006 ECU up here. When removing make sure the smaller bundles of wires don t get wrapped around the bottom edge and break - this almost
INSTALLATION INSTRUCTIONS. Revision 4.0.3
 INSTALLATION INSTRUCTIONS Revision 4.0.3 Table of Contents INTRODUCTION... 3 INSTALLATION OVERVIEW... 4 Included Parts... 5 DEVICE WIRING... 6 Required Parts... 6 Guidelines... 6 Wiring Diagram... 7 Engine
HA PRO INSTALLERʼS MANUAL. HA-008 v3. User s/installer s Manual
 HA-008 v3 HA - 280 PRO User s/installer s Manual INSTALLERʼS MANUAL Manufacturer: COMMERCIAL ELECTRONICS 264 HAYDONS ROAD, WIMBLEDON, LONDON SW19 8TT. UK TEL: +44 020 8404 7105 FAX: +44 020 8404 7104 http://www.hawkcaralarm.com
BLUE LIGHT FOR DYNACO STEREO 120, SCA-80, OR PAT-4 ROCKER SWITCHES
 BLUE LIGHT FOR DYNACO STEREO 120, SCA-80, OR PAT-4 ROCKER SWITCHES 2014 AkitikA, LLC All rights reserved Revision 1p5 April 8, 2014 Page 1 of 16 Table of Contents Table of Contents... 2 Table of Figures...
Weistec M157 WMI System
 Weistec M157 WMI System Installation Guide 2012-2013 E63 2014+ E63 4matic(S) 2011-2013 CLS63 2014+ CLS63 4matic(S) 2015+ S63 AMG (Without ABC Suspension) This product is legal in California for racing
Audi A8 ( ) MMI swivelling unit repair manual
 MMI swivelling unit repair manual") Audi A8 (2003-2007) MMI swivelling unit repair manual Tools which you will need: two pcs screwdriver (any kind, for vent removing ) (you can cover the metal part with any tape to prevent making scratches
Audi A8 (2003-2007) MMI swivelling unit repair manual Tools which you will need: two pcs screwdriver (any kind, for vent removing ) (you can cover the metal part with any tape to prevent making scratches
ANTI-LOCK BRAKE SYSTEM
 ANTI-LOCK BRAKE SYSTEM 1993 Mitsubishi Diamante 1993 BRAKES Mitsubishi - Anti-Lock Brake System Diamante DESCRIPTION The Anti-Lock BRAKE SYSTEM (ABS) is designed to prevent wheel lock-up during heavy braking.
INSTALLATION GUIDE Chevrolet Digital Dash Panel Part Number: DP6003 Year Series:
 INSTALLATION GUIDE Chevrolet Digital Dash Panel Part Number: DP6003 Year Series: 1967-1972 * Disconnect the battery before attempting any electrical work on your vehicle. * KIT COMPONENTS One (1) Digital
HOW-TO: Pimp your glowplug wiring
 HOW-TO: Pimp your glowplug wiring Contributed by Vince Waldon Tuesday, 30 September 2008 Last Updated Friday, 27 November 2009 vincewaldon.com var gajshost = (("https:" == document.location.protocol)?
REC-11+ REMOTE RECEIVER UNIT
 Resetting The Programmable Features The installer may quickly and easily return all 17 programmable features back to the factory settings. Changing individual features were explained in detail in the previous
Projector39/Umnitza BMW Headlight & Re-Installation for E39s Predator Angel Eyes, and Lamin-X Installation
 Projector39/Umnitza BMW Headlight & Re-Installation for E39s Predator Angel Eyes, and Lamin-X Installation Now it is time to remove the headlights! Obviously you have to open the hood to do this. 100_3630.jpg
Wide Band EFIE Installation Instructions. Locate the wide band oxygen sensor current wire
 Wide Band EFIE Installation Instructions Install your fuel efficiency device The EFIE is not intended to be a fuel saver by itself. You should install a device that is designed to get more energy out of
INSTALLATION OF A WARN M8000 WINCH IN A HIDDEN MOUNT ON THE 2001 EXPLORER SPORT TRAC
 INSTALLATION OF A WARN M8000 WINCH IN A HIDDEN MOUNT ON THE 2001 EXPLORER SPORT TRAC By: Kyle Schwulst Email: bigmellon@yahoo.com BACKGROUND I have always wanted a winch on my vehicle. There is just something
RedlineGoods Tacoma Installation Manual
 RedlineGoods 2016+ Tacoma Installation Manual AUTOMATIC SHIFT BOOT AND EBRAKE BOOT Press down on the factory shift boot collar to disconnect it from the shift knob. Unscrew shift knob Pull up on the rear
STEALTH. The MOST Versatile and Easiest To Use Towed Vehicle Braking System available! NEED HELP? Call WARNING
 0 STEALTH The MOST Versatile and Easiest To Use Towed Vehicle Braking System available! INSTALLATION manual NEED HELP? Call - -00-0- Read all instructions before installing or operating the Stealth. Failure
Written By: Markus. Step-by-Step guide how to replace a dead NICD-Battery with LiFePO-Batteries. Rollei 6000/6008 Battery LiFePO4 Replacement
 Rollei 6000/6008 Battery LiFePO4 Replacement Step-by-Step guide how to replace a dead NICD-Battery with LiFePO-Batteries. Written By: Markus ifixit CC BY-NC-SA www.ifixit.com Page 1 of 18 INTRODUCTION
Fabricating and Installing Headlight Relays. Mike Graham
 Fabricating and Installing Headlight Relays Mike Graham For some time I had been reading about the benefits of installing headlight relays. As I understand it, there are two principal benefits: the load
Greddy E-manage Installation and Tuning Information
 Greddy E-manage Installation and Tuning Information Overview The Emanage has a lot of functionality considering it is still a piggyback type engine management system and not a full standalone. By itself,
JEEVES. JEEVES Installation Manual. Installation Manual The Easiest Do-It-Yourself Dumbwaiter on the Market
 1 888-323-8755 www.nwlifts.com JEEVES Installation Manual The Easiest Do-It-Yourself Dumbwaiter on the Market This manual will cover the installation procedure step-by-step. The installation of this dumbwaiter
 Page 1 of 14 This install requires work on your supplemental restraint system and could cause injury or damage to your car. If you are not comfortable performing the steps detailed here then do not attempt
Setting the World s Performance Standards
 Setting the World s Performance Standards 743 East Iona Road, Idaho Falls, ID 83401, (208) 529-0244 Fax (208) 529-9000 Forced Air Hot Air Elimination Kit (Bed Fan Kit) For 800 RZR-4 P/N 67-165 Kit Contents:
Side Mount Installation & Wiring Instructions
 E81/E87/E90/E91/E92/F22/F30/F31/F32/F80/F82/F87 (and other cars with the same sliders) Side Mount Installation & Wiring Instructions These instructions assume a basic comfort with crimping and/or soldering.
How I Fitted the Digital Temperature Guage... By T-Cut
 How I Fitted the Digital Temperature Guage... By T-Cut Here's one way to install the digital temperature gauge designed by Hans Schaaper. I decided to fit mine into the redundant slot above the CD-80 radio
MOTOALLIANCE WINCH MOUNT
 , / 1-866-527-7637 www.motoalliance.com MOTOALLIANCE WINCH MOUNT Polaris RZR Thank you for purchasing our MotoAlliance winch mount(s). You now own a premium custom winch mount to allow you to use your
PN CHEVY TRI-FIVE. Kit Contents: Four panel Sequential LED Taillight kit installation guide
 Four panel Sequential LED Taillight kit installation guide Kit Contents: 2 tail light LED panels 2 tail light turn signal LED panels 1 rubber boot/sleeve kit 1 power wire with t-tap 1 driver side LED harness,
Main Harness Quantity: 1
 Smart Engine Start INSTALLATION MANUAL Genuine Part # : H001SVA900 Vehicle Model : WRX Kit Contents Service P/N: H001SVA910 Service P/N: H001SVA820 NOT USED NOT USED SES ECU Quantity: 1 Double-sided tape
Fitting HID Xenon Headlamp system to R75/MG-ZT
 Fitting HID Xenon Headlamp system to R75/MG-ZT By Ross R75 Time Required: 30-45 minutes Let me first of all start by saying that this subject in itself is an area of heated debate. The basic fact of the
Here's the difference (externally) in the and 04+ bumper and headlights: (00-03 on top, 04 on bottom)
 in the and 04+ bumper and headlights: (00-03 on top, 04 on bottom)") OK guys, I've been meaning to post this for awhile.. well here it goes. I did the '04 front end conversion on my '01 about 4-5 months ago, but then the dealer had to buy the car back for legal reasons.
OK guys, I've been meaning to post this for awhile.. well here it goes. I did the '04 front end conversion on my '01 about 4-5 months ago, but then the dealer had to buy the car back for legal reasons.
Modix Big-60 Assembly Manual Part 2
 Modix Big-60 Assembly Manual Part 2 Version 1.0, October 2017 Menu 1. Motors & End Stop Wiring... 3 2. Controller Wiring Check... 6 3. Extruder Wiring... 7 4. Electronic Box Cover... 9 5. Filament Sensor...
SeeMeCNC Guides. Orion Delta HE280 Hotend Upgrade. This How-to Guide will walk you through the steps of upgrading to the HE280 Hotend
 SeeMeCNC Guides Orion Delta HE280 Hotend Upgrade This How-to Guide will walk you through the steps of upgrading to the HE280 Hotend Written By: JJ Johnson 2017 seemecnc.dozuki.com Page 1 of 18 INTRODUCTION
Part Number DP6003 Chevy Truck Digital Dash YEARS 67-72
 Part Number DP6003 Chevy Truck Digital Dash YEARS 67-72 KIT COMPONENTS: One (1) Digital Circuit Board One (1) Smoked Acrylic See-Through Lens *Peel off protective covering from both sides of lens attached
Detroit Speed, Inc. Electric Headlight Door Kit Corvette P/N: &
 Detroit Speed, Inc. Electric Headlight Door Kit 1968-82 Corvette P/N: 122006 & 122007 The Detroit Speed Inc. Electric Headlight Door Kit replaces the stock vacuum actuated system on all 1968-82 Corvettes.
Change to BLUE High Density LED in Dashboard for Volvo V
 Change to BLUE High Density LED in Dashboard for Volvo V70-2001 VER. 1.1 1. Why we did it? Because 50% was not working. 2. We will try to show how to replace the original Lamps with LED in the Dashboard,
3 WRX/STI TURBO INLET HOSE
 3 WRX/STI TURBO INLET HOSE Thank you for purchasing this PERRIN product for your car! Installation of this product should only be performed by persons experienced with installation of aftermarket performance
Please Read Important Safety Information
 Please Read Important Safety Information Filling the Fuel Tank Never fill a fuel tank near a flame or ignition source which might ignite the fuel vapors. Avoid breathing fuel vapors or allowing the fuel
The throttle cable must be adjusted correctly for proper operation. It needs to register exactly 0% at idle
 The vast majority of DSMs that come in for a tune, either remote or in person, have issues that need to be addressed first in order to get a good end result. When remote tuning, it is up to you to sort