Fizzle Intercooler Kit Installation Instructions
|
|
|
- Annabella Moody
- 5 years ago
- Views:
Transcription
1 Fizzle Intercooler Kit Installation Instructions Note: The minimum exhaust modification required for the installation of this intercooler is the removal of the OEM black plastic resonator box. It can easily be replaced with an 8 long, 2.5 diameter straight pipe (a 90 degree elbow is also recommended for 2007 & newer models). Removing OEM system and preparing engine compartment for installation: 1. Unclip engine coolant overflow tank and remove from mounting location. Set it out of the way, but make sure it does not tip over. 2. RXP MODELS: Remove engine compartment cowling by first removing the two forwardmost M10 socket head cap bolts and rear-most M10 socket head cap bolt completely. Loosen the two remaining M10 socket head cap bolts on lower inside rear edge of engine compartment cowling. 3. RXT / GTX-SC LTD MODELS: Completely loosen the four M8 bolts holding engine compartment cross section in place. Remove both top and bottom halves of engine compartment cross-section support. The air intake duct attached to the bottom half will no longer be needed. 4. Remove OE rubber connecting hose joint between supercharger outlet and throttle body. 5. STEPS 5-8 SCIC MODELS ONLY: Disconnect the two waterlines connected to stock intercooler fittings at front of the intake manifold. Disconnect Line 1 at front of exhaust manifold and remove completely. Disconnect Line 2 at pump transom and remove completely. NOTE: Keep both lines for later use in the installation of the intercooler kit. 6. At the front of intake manifold remove the collar securing forward end of intercooler core to intake manifold housing. Keep the collar for securing the stock intercooler block-off plate. 7. Twist and pull stock intercooler core forward towards front of craft to remove. If the stock intercooler will not budge, proceed to loosen the 7 torx bolts that are holding the intake manifold to the engine block. 8. Install supplied block-off plug (with o-ring) into opening at front of intake manifold housing left when stock intercooler was removed. NOTE: Apply a thin layer of waterproof grease onto o-ring before installing block-off. Also, it is highly recommended to apply sensor safe silicone (gasket maker) to the mating surface of the block-off plate prior to
2 installation to ensure proper adhesion and to aid the prevention of a boost leak. Ensure that the plugs for the boost ports are sealed and secure if not in use. Secure the block off plate with the collar previously removed in step In the rear of craft on the left side of pump transom remove both of the upper and lower M10 x 45 bolts and washers securing pump support to hull. Test fit the arm of the two piece intercooler mounting bracket to ensure it mounts flush against pump transom. Attaching hardware to intercooler and preparing intercooler for installation: 10. There is one small threaded hole on the side of each intercooler end tank. Neither hole will be used in this installation. Each hole is to be plugged with one of the supplied M10 bolts, M10 lock washers, and M10 flat washers. Failing to plug these holes will result in a large boost leak and a significant loss in performance. Sealing the threads on each bolt is highly recommended. 11. Install the supplied straight silicone reducer onto the 3 intercooler inlet flange (supercharger/exhaust side of the craft). Secure the larger end of the reducer coupler to the intercooler inlet flange using one supplied 3 hose clamp. 12. Install the supplied bending reducer onto the 3 intercooler outlet flange (throttle body/intake side of the craft). Secure the reducer using one supplied 3 hose clamp, but do not fully tighten the clamp because the coupler may need to be rotated slightly or removed throughout the installation of the intercooler. 13. Install 1 supplied large brass fitting into each threaded end of the intercooler. The 90 degree hose fitting works best installed in the rear of the intercooler. Use a wrench to tighten the fittings until snug. Do not over tighten as the aluminum can cause the brass threads to strip. Also, you may need up to 1 full turn on the 90 degree fitting in order to have the hose barb be in the desired position in order to attach to the waterline. 14. The small threaded hole in the front plate of the intercooler can be used to install a sacrificial anode or an air bleed line. The small brass plug is included in order to fill this hole if it is not going to be used. A small brass hose barb fitting is included in the event that the user desires to run an air bleed line. Assembling and installing intercooler with intercooler bracket
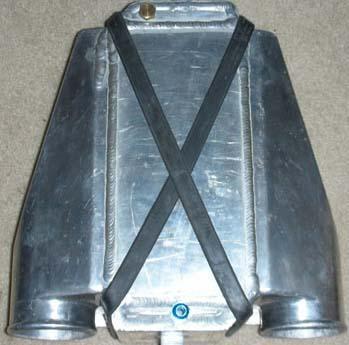
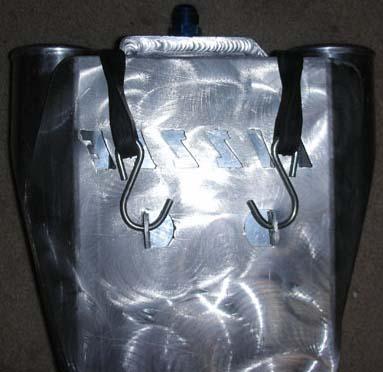
3 15. Secure the two supplied rubber straps to the mounting bracket plate using the supplied bolts, washers, and nuts. The nut-end of each bolt should be facing where the intercooler will sit and the head-end of each bolt should be facing the rear of the craft. Ensure that the hook on each rubber strap has the top opening of the S shape facing downward once the straps are installed onto the bracket plate. 16. Using the waterline previously removed from water inlet fitting at pump transom to stock intercooler; connect one end to water outlet fitting on intercooler. Route loose end towards exhaust side of engine, then forward and connect to hose barb fitting at front/bottom of the exhaust manifold. Secure using the original hose clamp. NOTE: For steps 17 & 20; take care not to kink hoses. It may be necessary to trim excess hose for proper fit and, if desired, use an additional 90 degree fitting for the remaining waterline hose barb. 17. The following instructions 17A and 17B are the two basic methods for installing the intercooler and bracket into their proper location. Choose the one that seems most appropriate for your space constraints and mechanical ability. It is recommended to seal the back face of the bracket support arm to the pump transom surface with silicone sealant (gasket maker) in order to avoid potential water leaks from the pump support bolts. Keep in mind that the intercooler bracket plate and the intercooler itself will need to be attached in a way that they are both rotated slightly towards the supercharger. This is essential in getting all of the piping to line up properly. 17A. Bolt the bracket plate and bracket arm together using the 3 supplied bolts and deep cylinder washers. Then, place the intercooler onto the bracket mounting plate. Strap the intercooler to the bracket plate by pulling the straps over the front of the intercooler and hooking each S hook to its respective attachment hole on the bottom side of the bracket mounting plate. The rubber straps work best when they are diagonally crossed over each other on top of the intercooler (see picture below). Once the intercooler is secured to the mounting plate with the straps, hook the bottom of the bracket arm leg around the engine coolant hose located near the pump transom. This will allow each of the holes on the bracket arm to line up with its respective matching hole on the pump transom. To hook the bracket arm around the large engine coolant hose you will have to turn the intercooler into a specific orientation. The intercooler will have to be placed so that it is standing vertically and sideways. In this position the back plate of the intercooler and mounting bracket will be sitting on the bottom of the hull. The 3 air inlet and outlet openings will be facing upwards. The intercooler being sideways will mean that the side air tanks (4.5 tall) of the intercooler (refer to step 10) will be facing front and back at this point, rather than side to side. Once the curve in the bracket arm is hooked under the hose, rotate the intercooler and bring it back to horizontal. This may not be necessary on the more spacious GTX/RXT. Re-install the factory pump support bolts through the bracket arm once the bracket arm is mating with the hull at the pump transom surface. The bolts with washers will first go
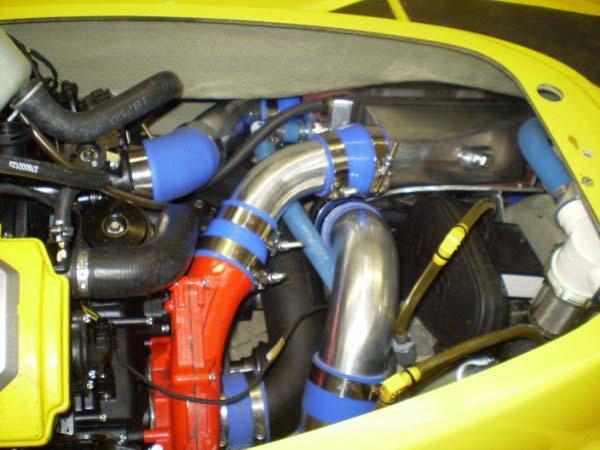
4 through the intercooler bracket arm, then into the pump support threads. Make sure to fully tighten these bolts. 17B. Place the intercooler onto the bracket mounting plate. Strap the intercooler to the bracket plate by pulling the straps over the front of the intercooler and hooking each S hook to its respective attachment hole on the bottom side of the bracket mounting plate. The rubber straps work best when they are diagonally crossed over each other on top of the intercooler (see picture below). Take the bracket arm and put it in place against the pump transom (with recommended silicone sealant). Re-install the factory pump support bolts once the bracket arm is mating with the hull at the pump transom. The bolts with washers will first go through the intercooler bracket arm, then into the pump support threads. Make sure to fully tighten these bolts. Finally, place the intercooler and bracket plate on top of the flat shelf of the bracket arm. Install the 3 supplied bolts and 3 long cylinder washers from the bottom to attach the bracket arm to the bracket plate. 18. Test fit the degree aluminum pipe between the supercharger and intercooler to identify which end of the pipe will attach to each coupler. Slide the 2.5 straight silicone coupler onto the 45 degree pipe so that the entire coupler is completely overlapping with the end of the pipe that will connect to the supercharger outlet. Insert the 45 degree pipe into the straight reducer coupler mentioned in step 11. Then, slide the 2.5 straight coupler with clamps onto the supercharger outlet. Secure the pipe and the remaining ends of each coupler with three of the supplied 2.5 clamps. The pipes can overlap with (go inside of) the intercooler inlet/outlet. 19. Slide the degree silicone elbow onto the supplied 2.5 aluminum straight pipe as far as it will go without forcing it. Insert the other end of the pipe into the 45 degree reducer coupler coming off of the intercooler. Position the pipe and degree coupler so the piping will line up with the throttle body inlet. Slide the degree coupler over the throttle body inlet. Rotate each 45 degree coupler again, if necessary, so that both angled couplers and the straight pipe are attached properly to each other and to their respective inlet or outlet. Add three of the supplied 2.5 clamps and then tighten the three clamps. Finish tightening the 3 clamp that secures the angled coupler to the intercooler outlet flange (refer to step 12). NOTE: It is recommended to seal the connections between the silicone hoses and the pipes with silicone in effort to prevent possible boost leaks. 20. Using the waterline previously removed from intercooler to exhaust manifold; connect end with distinct bend to the water inlet fitting on intercooler and secure the water line with a hose clamp. Route the loose end towards water inlet fitting at pump transom and secure using a hose clamp. Completing installation and cleaning engine compartment

5 21. Replace engine compartment cowling in reverse order of Step Replace engine coolant overflow tank. Again, be careful to not tip the overflow tank. 23. Installation is now complete. Thoroughly inspect the engine compartment for tools, rags, parts, etc. Run craft on a hose to ensure no leaks exist. Check service manual for flushing instructions. After engine cools check all hoses and clamps to make sure they are secure. NOTE: The couplers will expand after being heated. The clamps may need to be tightened a second time after running the machine. Make sure still to not over tighten the clamps. Enjoy your new found power. Don t forget to ride safe and have fun!
6
7
GEN-3 Power Cooler Kit
 GEN-3 Power Cooler Kit PART# RS1752-PC APPLICATION(S): 215hp Sea Doo RXP / RXT / GTX-Supercharged We strongly recommend the use of a service manual to familiarize yourself with the various components and
This booklet is for 215hp RXP, RXT, & GTX-SC applications.
 Rear Exhaust Kit PART# RS15050-1 We strongly recommend the use of a Sea Doo service manual to familiarize yourself with the various components and procedures involved with this installation. Please note
Pro Series SVHO Engine Cooling Upgrade Kit
 Pro Series SVHO Engine Cooling Upgrade Kit PART# - RY10080-ECUK-PC-1 APPLICATION(S): Yamaha FZ & FX SVHO using RIVA Power Cooler Kit (part # RY17080-PC) We strongly recommend the use of a service manual
Steeda S197 Mustang Whipple Supercharger Drive
 Steeda S197 Mustang Whipple Supercharger Drive Parts List Qty. Description 1 Whipple supercharger snout 1 Whipple snout collar 1 10-rib supercharger pulley 1 10-rib crank pulley 1 10-rib belt tensioner
IAG Street Series Air / Oil Separator (AOS) For WRX
 For WRX") P IAG Street Series Air / Oil Separator (AOS) For 2015-16 WRX Part# IAG-ENG-7152 Tools Required: Ratchet, torque wrench, extensions, needle nose pliers, hose cutter, snips/scissors, flat head screw driver,
P IAG Street Series Air / Oil Separator (AOS) For 2015-16 WRX Part# IAG-ENG-7152 Tools Required: Ratchet, torque wrench, extensions, needle nose pliers, hose cutter, snips/scissors, flat head screw driver,
IAG Competition Series Air / Oil Separator (AOS) For WRX
 For WRX") P IAG Competition Series Air / Oil Separator (AOS) For 2015-16 WRX Part# IAG-ENG-7252 Tools Required: Ratchet, torque wrench, extensions, needle nose pliers, hose cutter, snips/scissors, flat head screw
P IAG Competition Series Air / Oil Separator (AOS) For 2015-16 WRX Part# IAG-ENG-7252 Tools Required: Ratchet, torque wrench, extensions, needle nose pliers, hose cutter, snips/scissors, flat head screw
Weistec M113K Supercharger System Installation Guide
 Weistec M113K Supercharger System Installation Guide WARNING! DO NOT HAVE YOUR ECU REPROGRAMMED ANYWHERE BUT AT WEISTEC FOR THIS SUPERCHARGER. THE AMG 55 USES AN ELECTRONIC THROTTLE CONTROL (ETC), WHICH
The M7 Direct Flow Intercooler (DFIC) Installation Guide
 Installation Guide") The M7 Direct Flow Intercooler (DFIC) Installation Guide This information is meant only as a guide. The author of this information,, or any M7 Tuning employees assumes no liabilities for any outcomes resulting
The M7 Direct Flow Intercooler (DFIC) Installation Guide This information is meant only as a guide. The author of this information,, or any M7 Tuning employees assumes no liabilities for any outcomes resulting
INSTALLATION INSTRUCTIONS AIR/OIL SEPARATOR KIT
 INSTALLATION INSTRUCTIONS AIR/OIL SEPARATOR KIT 2015+ SUBARU WRX (LHD ONLY) Document: 19-0136 Support: info@radiumauto.com This document covers the installation of the Radium brake master cylinder brace
3 October 2016 PN# V Dodge Twin Turbo Kit (I-00274) ½ D o d g e 2 4 v I S B
 ½ D o d g e 2 4 v I S B") 3 October 2016 PN#1045320 24V Dodge Twin Turbo Kit (I-00274) 1 DOWNLOAD ENHANCED INSTALL MANUALS AT dieselperformance.com BD Twin Turbo Kit 1998½- 2 0 0 2 D o d g e 2 4 v I S B Part# 1045320 PLEASE READ
3 October 2016 PN#1045320 24V Dodge Twin Turbo Kit (I-00274) 1 DOWNLOAD ENHANCED INSTALL MANUALS AT dieselperformance.com BD Twin Turbo Kit 1998½- 2 0 0 2 D o d g e 2 4 v I S B Part# 1045320 PLEASE READ
- INSTALLATION INSTRUCTIONS -
 Sea-Doo 255hp OEM Intercooler Upgrade Kit PART# - RS17080-ICUK We strongly recommend the use of a Sea Doo service manual to familiarize yourself with the various engine components and procedures involved
IAG Competition Series Air / Oil Separator (AOS) For 2017 STI
 For 2017 STI") P IAG Competition Series Air / Oil Separator (AOS) For 2017 STI Part# IAG-ENG-7251 Tools Required: Ratchet, torque wrench, extensions, needle nose pliers, hose cutter, snips/scissors, flat head screw driver,
P IAG Competition Series Air / Oil Separator (AOS) For 2017 STI Part# IAG-ENG-7251 Tools Required: Ratchet, torque wrench, extensions, needle nose pliers, hose cutter, snips/scissors, flat head screw driver,
2010+ Audi B8 S4/S5 3.0T S-FLO Intake Kit INSTALLATION GUIDE FOR RACING USE ONLY
 INSTALLATION GUIDE 2010+ Audi B8 S4/S5 3.0T S-FLO Intake Kit FOR RACING USE ONLY Congratulations on your purchase of the AWE Tuning S-FLO Intake for the 2010+ Audi B8 S4 and B8 S5 3.0T. Exquisite build
8 Zip Tie Zip Tie 1 Union Fitting 1 ½ ½ Union Reducer Fitting Union 1 5/8 ½ (For Plastic Intake Manifold Vehicles)
") P IAG Street Series Air / Oil Separator (AOS) For 2017 STI Part# IAG-ENG-7151 Tools Required: Ratchet, torque wrench, extensions, needle nose pliers, hose cutter, snips/scissors, flat head screw driver,
P IAG Street Series Air / Oil Separator (AOS) For 2017 STI Part# IAG-ENG-7151 Tools Required: Ratchet, torque wrench, extensions, needle nose pliers, hose cutter, snips/scissors, flat head screw driver,
IAG Street Series Air / Oil Separator (AOS) For 2017 WRX
 For 2017 WRX") P IAG Street Series Air / Oil Separator (AOS) For 2017 WRX Part# IAG-ENG-7152 Tools Required: Ratchet, torque wrench, extensions, needle nose pliers, hose cutter, snips/scissors, flathead screwdriver,
P IAG Street Series Air / Oil Separator (AOS) For 2017 WRX Part# IAG-ENG-7152 Tools Required: Ratchet, torque wrench, extensions, needle nose pliers, hose cutter, snips/scissors, flathead screwdriver,
- INSTALLATION INSTRUCTIONS -
 APPLICATION(S): RXT-X / RXT / GTX-SC Pump Extension Kit (+50mm) PART# - RS33085-PEK-50 Required tools Part# Drive Shaft Holder Tool 529 035 986 PTO Seal Support Tool 529 035 842 Floating Ring Tool 529
Procharger Stage II Intercooled Supercharger System (11-14 GT)
") Procharger Stage II Intercooled Supercharger System (11-14 GT) Installation Time: Approximately one day. Installed on 2012 Mustang GT 5.0/Manual Required Tools 3/8 Socket Set (Standard and Metric) 1/2
Procharger Stage II Intercooled Supercharger System (11-14 GT) Installation Time: Approximately one day. Installed on 2012 Mustang GT 5.0/Manual Required Tools 3/8 Socket Set (Standard and Metric) 1/2
05-08 GT. Hellion Power Systems Mustang Kit Instructions
 Hellion Power Systems 05-08 Mustang Kit Instructions 1. Disconnect Battery 2. Drain Radiator, keep fluid for re-installation. 3. Remove air box and inlethoses. 6. Next, underneath, punch oil pan for turbo
LML 3 Y-Bridge Kit or High Flow Intake Bundle Package
 2011-2016 LML 3 Y-Bridge Kit or High Flow Intake Bundle Package Covers installation of PN s: WCF100607, WCF100691, WCF100716, & WCF100353 Note: This Kit is for off road competition use only! Overview-
- INSTALLATION INSTRUCTIONS -
 APPLICATION(S): Sea-Doo & (255hp) Free Flow Kit PART# - RS16080 Required tools ( ONLY) Part# VTS Socket Tool 295000133 *** NOTE: Allow craft s engine to cool thoroughly before performing installation.
IAG Air / Oil Separator (AOS) For STi
 For STi") IAG Air / Oil Separator (AOS) For 2008-14 STi Part# IAG-ENG-7000 Tools Required: Ratchet, torque wrench, extensions, needle nose pliers, hose cutter, snips/scissors Sockets: 10mm, 12mm 13mm Wrenches: 10mm,
IAG Air / Oil Separator (AOS) For 2008-14 STi Part# IAG-ENG-7000 Tools Required: Ratchet, torque wrench, extensions, needle nose pliers, hose cutter, snips/scissors Sockets: 10mm, 12mm 13mm Wrenches: 10mm,
Seadoo Supercharger Removal Guide RXP
 Seadoo Supercharger Removal Guide RXP RXT, RXT X, RXP X and GTX models are very similar and Removal and Installation is similar. The Ceramic washers installed by the OE manufacturer do not completely disintegrate
IAG Street Series Air / Oil Separator (AOS) For WRX & WRX STI
 For WRX & WRX STI") IAG Street Series Air / Oil Separator (AOS) For 2006-07 WRX & 2004-07 WRX STI Part# IAG-ENG-7100 Tools Required: Ratchet, torque wrench, extensions, needle nose pliers, hose cutter, snips/scissors, flat
IAG Street Series Air / Oil Separator (AOS) For 2006-07 WRX & 2004-07 WRX STI Part# IAG-ENG-7100 Tools Required: Ratchet, torque wrench, extensions, needle nose pliers, hose cutter, snips/scissors, flat
Industrial Injections Compound Turbo Installation For 6.7L Scorpion
 Industrial Injections Compound Turbo Installation For 6.7L Scorpion Step 1: Whenever you are doing an installation the first thing you should do is unhook the batteries to avoid arcing. You will need an
INSTALL MANUAL D o d g e 1 2 v 6 B T A PLEASE READ ALL INSTRUCTIONS BEFORE INSTALLATION.
 PN#1045310 12V Dodge Twin Turbo Kit (I-00273) 1 INSTALL MANUAL BD Twin Turbo Kit 1994-1 9 9 8 D o d g e 1 2 v 6 B T A Part# 1045310 PLEASE READ ALL INSTRUCTIONS BEFORE INSTALLATION. * Picture as shown
Power Filter Kit PART# - RS
 Power Filter Kit PART# - RS13100-1 We strongly recommend the use of a service manual to familiarize yourself with the various components and procedures involved with this installation. Please note that
2015+ SUBARU STI FRONT-MOUNT INTERCOOLER PARTS LIST AND INSTALLATION GUIDE INSTALL DIFFICULTY DISCLAIMER CAUTION INSTALL PROCEDURE TOOLS NEEDED
 PARTS LIST AND PARTS INCLUDED 1PC ALUMINUM INTAKE PIPE 1PC BAR-AND-PLATE INTERCOOLER 1PC STEEL CRASH BAR W/ MOUNTING HARDWARE 2PC HOT-SIDE INTERCOOLER PIPES 2PC COLD-SIDE INTERCOOLER PIPES 1PC BPV FLANGE
Tools Required. Metric Wrench Set Screwdriver Set Metric Socket Set Pliers Heavy duty hydraulic Jack and Car Stands Box knife or similar Hacksaw WD40
 Subaru 2004+ Legacy GT & Outback XT For JDM 2.0 twinscroll turbo and USDM 2.5 turbo models Front Mount Intercooler Fitting Instructions PN# LEG-1348-000 You are now the proud owner of a highly tested and
OIL COOLER KIT INSTALLATION INSTRUCTIONS PART NUMBER D E92 335i/xi (N55 engine) with M-Technic bumper and without stock oil cooler
 with M-Technic bumper and without stock oil cooler") OIL COOLER KIT INSTALLATION INSTRUCTIONS PART NUMBER D570-0925 APPLICATION 2011-12 E92 335i/xi (N55 engine) with M-Technic bumper and without stock oil cooler Congratulations for being selective enough
OIL COOLER KIT INSTALLATION INSTRUCTIONS PART NUMBER D570-0925 APPLICATION 2011-12 E92 335i/xi (N55 engine) with M-Technic bumper and without stock oil cooler Congratulations for being selective enough
Instant Chat off the main page of Or simply call our tech team at
 FRONT MOUNT INTERCOOLER 2008-13 STI 2014-04- 08 Thank you for purchasing this PERRIN product for your car! Installation of this product should only be performed by persons experienced with installation
R35 GTR ALPHA X TURBO KIT INSTALLATION INSTRUCTIONS
 R35 GTR ALPHA X TURBO KIT INSTALLATION INSTRUCTIONS 04 06 09 10 14 21 30 31 34 Turbo Kit Packaging Information Engine Mount Installation Exhaust Manifold Installation Heat Shield Exhaust Manifold Shield
Instant Chat off the main page of Or simply call our tech team at
 Subaru WRX/STI Air Oil Separator for Front Mounted Intercooler Setups 2013-02- 22 Thank you for purchasing this PERRIN product for your car! Installation of this product should only be performed by persons
IAG Street Series Air / Oil Separator (AOS) For WRX & WRX STI
 For WRX & WRX STI") IAG Street Series Air / Oil Separator (AOS) For 2006-07 WRX & 2004-07 WRX STI Part# IAG-ENG-7150 Tools Required: Ratchet, torque wrench, extensions, needle nose pliers, hose cutter, snips/scissors, flat
IAG Street Series Air / Oil Separator (AOS) For 2006-07 WRX & 2004-07 WRX STI Part# IAG-ENG-7150 Tools Required: Ratchet, torque wrench, extensions, needle nose pliers, hose cutter, snips/scissors, flat
Weistec M156/M159 ENGINE
 Weistec M156/M159 ENGINE Oil / Air Separator System Installation Guide 2007-2011 S63 AMG 2007-2011 ML63 AMG 2007 R63 AMG 2007-2008 CLK63 AMG 2008 CLK63 Black Series 2007-2011 CLS63 AMG 2008-Present C63
Parts List See cover Page
 Thank you for purchasing the CorkSport Front Mount Intercooler Kit for the 2010-2013 Mazdaspeed 3. Keep your BAT s under check with the CorkSport FMIC Kit with the small or large intercooler. Please let
3 WRX/STI TURBO INLET HOSE
 3 WRX/STI TURBO INLET HOSE Thank you for purchasing this PERRIN product for your car! Installation of this product should only be performed by persons experienced with installation of aftermarket performance
IAG Street Series Air / Oil Separator (AOS) For WRX & WRX STI
 For WRX & WRX STI") IAG Street Series Air / Oil Separator (AOS) For 2006-07 WRX & 2004-07 WRX STI Part# IAG-ENG-7150 Tools Required: Ratchet, torque wrench, extensions, needle nose pliers, hose cutter, snips/scissors, flat
IAG Street Series Air / Oil Separator (AOS) For 2006-07 WRX & 2004-07 WRX STI Part# IAG-ENG-7150 Tools Required: Ratchet, torque wrench, extensions, needle nose pliers, hose cutter, snips/scissors, flat
JBR MAZDASPEED
 Page1 james Barone Racing Aftermarket Parts and Accessories JBR 2007 2009 MAZDASPEED 3 Front Mount Intercooler Piping Kit Installation Instructions for TR8 Intercooler Tooling: o Jack, Jack Stands, Ramps
Subaru WRX Performance Charge-Pipe System, 2015+
 PARTS LIST AND PARTS LIST 1PC BAR-AND-PLATE INTERCOOLER 1PC INTERCOOLER MOUNTING BRACKET 1PC CHARGE-PIPE ASSEMBLY 1PC AIR DIVERTER WITH ATTACHED RUBBER GASKETS 1PC CHARGE-PIPE-TO-INTERCOOLER HOSE INSTALLATION
B5 A4 1.8t Front Mount Intercooler Install Instructions
 B5 A4 1.8t Front Mount Intercooler Install Instructions Only work underneath your vehicle after properly supporting it with adequate jack stands on a flat surface. NEVER work under a vehicle only supported
2015+ HELLCAT 6.2L HEMI System vehicle specific plate system xx
 These installation instructions will guide you through installing the Nitrous Outlet 2015+ Hellcat 6.2L Hemi Vehicle Specific Plate System on your vehicle. Before you get started, remember to never use
2017+ L5P Duramax 3 ½ Down Pipe & EGR Fix Kit
 2017+ L5P Duramax 3 ½ Down Pipe & EGR Fix Kit Covers installation of PN s: WCF100630, WCF100829 Note: This Kit is for off road competition use only! Off Road Competition Use Tuning & Exhaust System is
Wrenches: ⅞, 8mm, 10mm, 13mm, 19mm P. allen, Other: Electrical Tape
 IAG Street Series Air / Oil Separator (AOS) For 2008-14 STI Part# IAG-ENG-7100 Tools Required: Ratchet, torque wrench, extensions, needle nose pliers, hose cutter, snips/scissors, flat head screw driver,
GEN-3 Super-duty Supercharger Shaft Kit PART# - RY17040-UK-6S5-3
 GEN-3 Super-duty Supercharger Shaft Kit PART# - RY17040-UK-6S5-3 We strongly recommend the use of a service manual to familiarize yourself with the various components and procedures involved with this
4. Remove (4) 10mm and (1) 7mm bolt that holds fascia at front corners, on each side
 10mm and (1) 7mm bolt that holds fascia at front corners, on each side") 2010 Camaro LS3 1. Disconnect battery ground 2. Remove front wheels 3. Remove (5) push pins and (5) #20 torx screws on inner front wheel well liners and remove liners on each side 4. Remove (4) 10mm and
2010 Camaro LS3 1. Disconnect battery ground 2. Remove front wheels 3. Remove (5) push pins and (5) #20 torx screws on inner front wheel well liners and remove liners on each side 4. Remove (4) 10mm and
Rear Exhaust Kit PART# - RS
 Rear Exhaust Kit PART# - RS15110-1 APPLICATION(S): Sea Doo RXP-X 260 & GTR 215 We strongly recommend the use of a service manual to familiarize yourself with the various components and procedures involved
Included parts: 1 - HSM Billet Aluminum Throttle Body Adapter 1-5-Ply Stainless-Reinforced Hose Replacement 2 - Stainless T-bolt Clamps STEP 1
 TROUBLESHOOTING: Please read and understand all installation instructions before proceeding with the installation. If you have questions during the installation of this product, please email H&S Motorsports
INSTALLATION INSTRUCTIONS COOLANT TANK KIT
 INSTALLATION INSTRUCTIONS COOLANT TANK KIT 2017+ Honda Civic Type-R Document: 19-0197 Support: info@radiumauto.com NOTES: Installation to be performed on engines that are completely cooled down. Do NOT
Audi S1 Intake kit. Qty. Description
 Audi S1 Intake kit Description Qty Silicone Intake pipe 1 Vacuum hose 1 Heatshield 1 Bracket 1 Machined inlet 1 Vacuum connector 1 Filter 1 M6x16 cap head bolt 1 Tools Ratchet Extension Torx socket Sockets
Included parts: 1 - BorgWarner SX-E Turbocharger 1 - SX-E 90-Degree Compressor Outlet Elbow 1 - HSM Cast Exhaust Manifold 1 - HSM Downpipe
 TROUBLESHOOTING: Please read and understand all installation instructions before proceeding with the installation. If you have questions during the installation of this product, please email H&S Motorsports
INSTALLATION MANUAL BULLET PROOF OIL COOLER KIT F-SERIES
 INSTALLATION MANUAL BULLET PROOF OIL COOLER KIT 2003-2007 F-SERIES NEAL TECHNOLOGIES, INC. U.S. PATENT 8,375,917; 8,505,512 and OTHER PATENTS PENDING UPDATED 1/8/2018 2014 BULLET PROOF DIESEL BEFORE You
Z1 Motorsports 300zx 2.5 Upgraded piping & BA SMIC Install Guide
 Z1 Motorsports 300zx 2.5 Upgraded piping & BA SMIC Install Guide Congratulations on your new upgraded piping and intercooler kit, this kit has proven to provide the lowest intake air temps to date on our
Instant Chat off the main page of Or simply call our tech team at
 02-07 WRX/STI Air Oil Separator for Top Mounted Intercooler Setups 2013-02- 27 Thank you for purchasing this PERRIN product for your car! Installation of this product should only be performed by persons
OIL COOLER KIT INSTALLATION INSTRUCTIONS PART NUMBER D E92 335is (N54 engine) with BMW M-Technic bumper and with stock oil cooler
 with BMW M-Technic bumper and with stock oil cooler") OIL COOLER KIT INSTALLATION INSTRUCTIONS PART NUMBER D570-0923 APPLICATION: 2011 E92 335is (N54 engine) with BMW M-Technic bumper and with stock oil cooler Congratulations for being selective enough to
OIL COOLER KIT INSTALLATION INSTRUCTIONS PART NUMBER D570-0923 APPLICATION: 2011 E92 335is (N54 engine) with BMW M-Technic bumper and with stock oil cooler Congratulations for being selective enough to
Installation Instructions
 Installation Instructions 2.0T FSI Intake Manifold: Featuring better flow, higher boost capacity, 40% larger plenum volume, and integrated flapper delete; this product will take your 2.0L VW TSI and FSI
FRS/BRZ Air Oil Separator (AOS) Installation Manual
 Installation Manual") FRS/BRZ Air Oil Separator (AOS) Installation Manual Eric Hazen Rev. 2 Overview: Detailed instructions on installing the AOS for the FRS/BRZ/GT86. Difficulty: Beginner Time required: 1-3 hours depending
FRS/BRZ Air Oil Separator (AOS) Installation Manual Eric Hazen Rev. 2 Overview: Detailed instructions on installing the AOS for the FRS/BRZ/GT86. Difficulty: Beginner Time required: 1-3 hours depending
Included parts: 1 - BorgWarner SX-E Turbocharger 1 - SX-E 90-Degree Compressor Outlet Elbow 1 - HSM Cast Exhaust Manifold 1 - HSM Downpipe
 TROUBLESHOOTING: Please read and understand all installation instructions before proceeding with the installation. If you have questions during the installation of this product, please email H&S Motorsports
Please read the following completely prior to beginning installation.
 APPLICATION: `04~07 Kawasaki STX-15F Kawasaki STX-15F Supercharger Kit PART# RK1785 Please read the following completely prior to beginning installation. Although every effort has been made to simplify
GP1800, VXR/VXS Rear Exhaust Kit PART# RY15061
 GP1800, VXR/VXS Rear Exhaust Kit PART# RY15061 We strongly recommend the use of a service manual to familiarize yourself with the various components and procedures involved with this installation. Please
INSTALLATION INSTRUCTIONS FUEL RAIL
 INSTALLATION INSTRUCTIONS FUEL RAIL MITSUBISHI EVO X Document# 19-0067 Support: info@radiumauto.com WARNING: DON'T SMOKE OR WORK WITH OPEN SPARKS WHILE WORKING ON THE FUEL SYSTEM PREPARING THE VEHICLE:
2015 Corvette Supercharger System Instructions
 2015 Corvette Supercharger System Instructions These instructions are meant to serve as a guide to the installation of the ECS 2015 Corvette Supercharging system. Please be sure to use all safety equipment
These instructions were written for reference only and the use of a factory service manual is recommended.
 Introducing the CorkSport High Pressure Fuel Line designed for the MZR DISI. This fuel line is designed to replace the OEM fuel line which are prone to failure at the brazed connection at the rail. The
Page 6 of 6 OUTLAW DIESEL EGR COOLER DELETE KIT W/INTAKE ELBOW L FORD POWERSTROKE
 What s in the box 1 Exhaust Block-Off Plate 1 Exhaust Gasket 2 Coolant Line Plugs 1 Brass Barbed Hose Connector 1 Stand-off Spacer 4 M10-1.25 x 40 Hex Head Bolts (Exhaust Manifold) 2 M10-1.25 x 20 Hex
OIL COOLER KIT INSTALLATION INSTRUCTIONS PART NUMBER D E92 335i/xi (N55 engine) with BMW Standard bumper and with stock oil cooler
 with BMW Standard bumper and with stock oil cooler") OIL COOLER KIT INSTALLATION INSTRUCTIONS PART NUMBER D570-0924 APPLICATION: 2011-12 E92 335i/xi (N55 engine) with BMW Standard bumper and with stock oil cooler Congratulations for being selective enough
OIL COOLER KIT INSTALLATION INSTRUCTIONS PART NUMBER D570-0924 APPLICATION: 2011-12 E92 335i/xi (N55 engine) with BMW Standard bumper and with stock oil cooler Congratulations for being selective enough
 Special Tools Needed: DrVanos.com Stage I Installation Instructions Camshaft locking tool TDC Crank pin Sprocket turning tool Tool rental is available with the purchase of a vanos kit *See website for
OIL COOLER KIT INSTALLATION INSTRUCTIONS PART NUMBER D
 OIL COOLER KIT INSTALLATION INSTRUCTIONS PART NUMBER D570-0904 APPLICATION: 2011-2012 E90 335i/xi (N55 engine) with BMW standard bumper and with stock oil cooler Congratulations for being selective enough
These instructions were written for reference only and the use of a factory service manual is recommended.
 Introducing the CorkSport High Pressure Fuel Line designed for the MZR DISI. This fuel line is designed to replace the OEM fuel line which are prone to failure at the brazed connection at the rail. The
#TL T EA888 GEN 3 FUELING SYSTEM/ INSTALLATION INSTRUCTIONS
 #TL100069 2.0T EA888 GEN 3 FUELING SYSTEM/ INSTALLATION INSTRUCTIONS Notes: These instructions were written for a North American specification MkVII GTI. Other models, like the Golf R, are similar. When
IAG Street Series Air / Oil Separator (AOS) For WRX
 For WRX") IAG Street Series Air / Oil Separator (AOS) For 2008-14 WRX Part# IAG-ENG-7100 Tools Required: Ratchet, extensions, needle nose pliers, hose cutter, snips/scissors, flat head screw driver, hose clamping
IAG Street Series Air / Oil Separator (AOS) For 2008-14 WRX Part# IAG-ENG-7100 Tools Required: Ratchet, extensions, needle nose pliers, hose cutter, snips/scissors, flat head screw driver, hose clamping
Installation Instructions
 2011-2013 LML DURAMAX COMPOUND-ADD 2011-2015 LML A Duramax TURBO KIT Add INSTALL A Turbo INSTRUCTIONS Compound Kit Installation Instructions 1-800-955-0476 - www.industrialinjection.com - info@industrialinjection.com
Instant Chat off the main page of Or simply call our tech team at
 FRONT MOUNT INTERCOOLER 2015+ WRX 2017-07-07 Thank you for purchasing this PERRIN product for your car! Installation of this product should only be performed by persons experienced with installation of
INSTALLATION INSTRUCTIONS 97 FORD EXPEDITION
 INSTALLATION INSTRUCTIONS 97 FORD EXPEDITION 1. Read the instructions completely and carefully before you begin. Check the kit for proper contents (refer to the part s list and the picture diagrams). Before
Fuel Pressure Regulator Kit PART# - RY12040-RRFPR-6S5
 APPLICATION(S): Yamaha FX-SHO, FZR & FZS Fuel Pressure Regulator Kit PART# - RY12040-RRFPR-6S5 We strongly recommend the use of a service manual to familiarize yourself with the various components and
2015 WRX Engine Oil Cooler
 2015 WRX Engine Oil Cooler 2014-04-24 Thank you for purchasing this PERRIN product for your car! Installation of this product should only be performed by persons experienced with installation of aftermarket
GT-R Alpha 10/12 Turbo Kit
 GT-R Alpha 10/12 Turbo Kit Instructions V6 The goal of AMS is to provide the highest quality, best performing products available. By utilizing research and development, and rigorous testing programs AMS
MAZDASPEED3 Intercooler Instructions
 MAZDASPEED3 Intercooler Instructions Congratulations on your purchase of the COBB Tuning Front Mount Intercooler System for your 2007-2009 Mazdaspeed3. The following instructions should assist you through
Installation instruction do88 Intercooler for SAAB 9-3SS/SC 4-cyl Turbo
 Installation instruction do88 Intercooler for SAAB 9-3SS/SC 4-cyl Turbo This instruction shows how to replace the OEM intercooler with this performance intercooler. 1. 4. 5. At this type of installation
SHELBY GT500
 2007-2009 SHELBY GT500 Removal of Factory Unit WARNING: 1. Radiator fluid must be handled properly. Please observe local ordinances with regards to handling and disposal. 2. Allow vehicle and components
Turner M50 Manifold Adapter Install. April 26, 2012
 April 26, 2012 Models: 1996-99 E36 328i/M3; 1997-98 E39 528i, 1997-98 Z3 2.8, 1998-2000 MZ3 S52 Product(s): Turner M50 Manifold Adapter Kit Subject: Installation Guidelines and Tips This guide will aid
Installation Instructions :BMW B58 : Page 1
 Installation Instructions :BMW B58 : Page 1 1. We will start by removing the stock airbox system. Loosen the hose clamp around the airbox. Remove the MAF sensor plug the white clip unlocks by pulling it
TABLE OF CONTENTS PARTS LIST
 TROUBLESHOOTING: Note: You will have a check engine light and/or other problems unless using this product with a compatible ECM calibration. Contact your tuning supplier to learn whether or not aftermarket
Performance Air Intake, 2015+
 PARTS LIST AND PARTS LIST 1PC ALUMINUM INTAKE PIPE 1PC HIGH-FLOW, OILED AIR FILTER 1PC SILICONE INDUCTION HOSE 1PC AIRBOX 1PC 1/16 RUBBER STRIPPING, 9 LENGTH 1PC 1/16 RUBBER STRIPPING, 8.5 LENGTH 1PC WORM-GEAR
INSTALLATION INSTRUCTIONS AOS-R (Air Oil Separator-Return) Turbo Subaru and STi Document# Support:
 Turbo Subaru and STi Document# Support:") INSTALLATION INSTRUCTIONS AOS-R (Air Oil Separator-Return) 02-14 Turbo Subaru and 2015+ STi Document# 19-0102 Support: info@radiumauto.com These instructions are based on a vehicle with an OEM turbocharger
INSTALLATION INSTRUCTIONS AOS-R (Air Oil Separator-Return) 02-14 Turbo Subaru and 2015+ STi Document# 19-0102 Support: info@radiumauto.com These instructions are based on a vehicle with an OEM turbocharger
DURAMAX LML EGR DELETE
 2011-2012 DURAMAX LML EGR DELETE Sinister Diesel EGR Delete Kit A B C D E F G H PACKING LIST: QTY. A B C D E F G H QTY. 1 4 1 1 1 3 1 4 Description Blue Coolant Hose M8 x 25 Hex Head Bolts Exhaust Block
INSTALLATION INSTRUCTIONS AOS-R (Air Oil Separator-Return) Turbo Subaru and STi Document# Support:
 Turbo Subaru and STi Document# Support:") INSTALLATION INSTRUCTIONS AOS-R (Air Oil Separator-Return) 02-14 Turbo Subaru and 2015+ STi Document# 19-0102 Support: info@radiumauto.com These instructions are based on a vehicle with an OEM turbocharger
INSTALLATION INSTRUCTIONS AOS-R (Air Oil Separator-Return) 02-14 Turbo Subaru and 2015+ STi Document# 19-0102 Support: info@radiumauto.com These instructions are based on a vehicle with an OEM turbocharger
Subaru Front Mount Intercooler Kit STI Subaru Front Mount Intercooler Kit STI
 Subaru Front Mount Intercooler Kit STI 2008-2014 715500 Subaru Front Mount Intercooler Kit STI 2008-2014 Congratulations on your purchase of the Subaru Front Mount Intercooler Kit STI 2008-2014. The following
INSTALLATION INSTRUCTIONS
 APPLICATION(S): Kawasaki Ultra 250X Pro-Series Power Filter Kit PART# - RK13096 We strongly recommend the use of a service manual to familiarize yourself with the various components and procedures involved
Rotated Tuner Kit for Garrett GT Turbos
 Rotated Tuner Kit for Garrett GT Turbos 031411 Thank you for purchasing the PERRIN performance rotated turbo kit. Installation of this turbo should only be performed by persons experienced in the installation
VW SCIROCCO R TWINTERCOOLER INSTALLATION INSTRUCTIONS
 VW SCIROCCO R TWINTERCOOLER INSTALLATION INSTRUCTIONS Tools needed: T25 torx driver Small flat head screwdriver 12mm & 13mm socket, with ratchet Dremel or similar with cut off disc Large Phillips screwdriver
WRX/STI Engine Oil Cooler
 2002-14 WRX/STI Engine Oil Cooler 2014-04-21 Thank you for purchasing this PERRIN product for your car! Installation of this product should only be performed by persons experienced with installation of
Air Oil Separator for WRX/STI Top Mounted Intercooler Setups
 Air Oil Separator for 02-07 WRX/STI Top Mounted Intercooler Setups Thank you for purchasing this PERRIN product for your car! Installation of this product should only be performed by persons experienced
Exhaust Gas Recirculation Valve, Replace J S file://c:\program Files\cosids\DATA\TMP\ rtf.html. Remove
 1 Page 1 of 20 Exhaust Gas Recirculation Valve, Replace J982500 Remove 1. Disconnect battery negative lead 2. Disconnect hose (1) from oil filler on air cleaner assembly, then move to one side Release
Installation Instructions :BMW M2, M125i, M235i : Page 1
 Installation Instructions :BMW M2, M125i, M235i : Page 1 1. We will start by removing the stock airbox system. 2. Loosen the hose clamp which secures the intake tube to the flexible inlet tube. 3. Pull
INSTALLATION INSTRUCTIONS DUAL OIL CATCH CAN KIT
 INSTALLATION INSTRUCTIONS DUAL OIL CATCH CAN KIT SUBARU WRX FA20F ENGINE Document: 19-0135 Support: info@radiumauto.com This dual catch can kit installs in the right-hand side of the engine bay and intercepts
OIL COOLER KIT INSTALLATION INSTRUCTIONS PART NUMBER D
 OIL COOLER KIT INSTALLATION INSTRUCTIONS PART NUMBER D570-0907 APPLICATION: 2011-12 E90 335i/xi (N55 engine) with BMW M-Technic bumper and without stock oil cooler Congratulations for being selective enough
***FOR COMPETITION USE ONLY as per US EPA regulations *** Factory Pipe Bill of Materials Kawasaki Ultra 150 Triple Pipe
 ***FOR COMPETITION USE ONLY as per US EPA regulations *** Factory Pipe Bill of Materials Kawasaki Ultra 150 Triple Pipe Item Qty Part Number Part Description 1 1 COMASM0947 Ultra 150 PTO Chamber assembly
DrVanos.com Stage II Installation Instructions. Tool rental is available with the purchase of a vanos kit *See website for more info*
 DrVanos.com Stage II Installation Instructions Special Tools Needed: Camshaft locking tool TDC Crank pin Sprocket turning tool Tool rental is available with the purchase of a vanos kit *See website for
Edelbrock E-Force RPM Carburetor Supercharger C.I.D. Small-Block Chevy
 Edelbrock E-Force RPM Carburetor Supercharger 302-400 C.I.D. Small-Block Chevy 1986 and Earlier Style Heads: 1513, 1514, 15131, 15133, 15141, 15143 E-Tec and Vortec Style Heads: 1515, 1516, 15151, 15153,
Part# PLEASE READ ALL INSTRUCTIONS BEFORE INSTALLATION.
 16 November 2009 HPCR Dodge Twin Turbo Kit #1045430 1 BD Twin Turbo R700 Kit 2003-2007 Dodge HPCR ISBe Installation Instructions Part# 1045430 PLEASE READ ALL INSTRUCTIONS BEFORE INSTALLATION. UNLESS AN
FMCZTINT Mitsubishi Colt CZT front mounting intercooler installation
 FMCZTINT Mitsubishi Colt CZT front mounting intercooler installation Tools needed: Drill with 8mm HSS drill bit, hacksaw, dremel/stanley knife 3/8 drive ratchet with extension and 10mm,13mm sockets Torx