3.2 quarts Pennzoil Synchromesh transmission fluid (optional, but recommended)
|
|
|
- Milton Goodwin
- 5 years ago
- Views:
Transcription
1 List of tools and materials: Floor jack, jack stands, and car ramps 3/8 drive ratchet, with long and medium extensions 3/8 drive swivel 3/8 breaker bar / cheater bar 7/8 combo wrench 8mm, 10mm, 13mm, 15mm, 17mm sockets (short or deep) 12mm 12-point socket Pilot bearing puller attachment, with slide hammer (Rent-a-tool program at your favorite auto store) Small flathead screwdriver (optional) Rubber mallet Needle nose pliers Liquid Wrench, PB Blaster, or similar penetrating oil (optional, but likely) Brake cleaner Super Clean, or similar degreaser/cleaner Blue thread locker Permatex black RTV Mechanics gloves Oil/fluid catch can Shop towels 3.2 quarts Pennzoil Synchromesh transmission fluid (optional, but recommended) Giant piece of cardboard underneath the car while you work
2 In this write-up, we will be replacing the OEM clutch assembly with an Exedy Mach 350 Stage 1 clutch kit. In addition, a new clutch fork and pivot stud are also on the menu. For my specific application, I was initially looking at replacing just the faulty throwout bearing. However, since we ll already have the transmission out, we may as well replace everything else to avoid having to go back in there in a week/month. The Exedy Mach 350 Stage 1 Clutch Kit comes with both roller pilot and throwout (release) bearings, the pressure plate, and the friction disc. While we have the transmission removed, as mentioned above it is cheap insurance to also replace the clutch fork and pivot stud. Finally, when replacing any clutch it is recommended to either replace or resurface the flywheel in order to ensure a proper mating surface. As of this write-up, my 04 GT has just shy of 122,000 miles, and as evidenced by some of the pictures, it appears to have never been serviced. Please note, I have made every effort to properly identify lesser-known parts, such as the lower shift boot metal bezel ring in the shifter assembly, or the transmission spacer plate, and also referenced the 2003 Ford Mustang Service Manual for the correct torque specs for reassembly. Some typographical errors may be present, despite best efforts to find and correct them all. Pictures were taken midway through the process, beginning with the flywheel getting dropped off at the automotive machine shop, and several shots were used multiple times in this write-up. Because of the age/mileage, I chose to replace the transmission fluid rather than reuse it. As I discovered during this whole process, my transmission fluid looked like used motor oil, leading me to strongly believe this too had never been touched. Tremec s Service Topic 3-02 on recommended fluids for the TR3650 transmission states to use Dexron III or similar Automatic Transmission Fluid (ATF), referenced here. Ford released TSB stating to fill the TR3650 transmission with 3.0 Liters (US equivalent of 6.3 pints or 3.17 quarts), referenced here. As with everything in the DIY realm, safety first! Thanks for reading! Now, let us begin.

3 Steps: 1. Elevate your ride. For peace of mind, I put mine up on ramps and turned them in opposite directions for safety. 2. Disconnect the battery! You will be up close and personal with the starter, and metal tools conduct electricity quite well. 3. Remove shifter assembly. a. Remove shifter knob b. Remove housing, grasp firmly and pull back and up. There are 4 clips, two on either side


4 c. Unclip the cigarette lighter connection (flathead screwdriver will help) d. Remove shifter handle, 2x 10mm (re-torque to 27 lb-ft)


5 e. Remove the lower shift boot metal bezel ring, 4x 8mm f. Remove the shifter assembly from the transmission, 4x 13mm. For best results, reattach the shifter handle and gently rock it all the way left/right to break the seal. Once loose, pull straight up to remove.

6 g. There may be some residual transmission fluid on the underside of the shifter assembly. Take care to have a shop towel handy and DO NOT LOSE the plastic shift rod bushing. It will still be attached to the shifter assembly when removed from the transmission. There may also be a permanent gasket in place from previous servicing. DO NOT LOSE THIS PLASTIC BUSHING!!

 for later reinstallation b.")
7 4. Remove the H-pipe. The midpipe contains a total of 8x 15mm bolts, two per side both front and rear. Passenger side bolts at the manifold will require a swivel head attachment to reach. Note: This is a stock exhaust setup, those configurations with long-tube headers and/or aftermarket exhaust options may alter the removal steps accordingly. a. Label the O2 sensors (optional) for later reinstallation b. Remove the O2 sensors, both front and rear, using the 7/8 wrench

8 c. 8x 15mm (re-torque the rear 4 bolts to 26 lb-ft and the 4 manifold bolts to 30 lb-ft). Remove the rear four exhaust bolts first, placing a jack stand under the H to hold the rear up, then remove the front four bolts at the manifold. The four rear bolts are threaded from the rear.
.")
 Front of car Rear of car")
9 5. Remove the front subframe brace underneath the bell housing. Note: there is a lock-washer on the other end of each bolt. a. 2x 15mm (re-torque to 30 lb-ft) 6. Remove the starter (ensure you have disconnected the battery!). Note: All 3 starter bolts thread in from the front, and are very difficult to reach from directly underneath it. Use the long extension and swivel to reach them going through the front of the engine bay and over the passenger side A-arm. a. 3x 13mm (re-torque to 17 lb-ft) Front of car Rear of car


10 b. Leave the starter connected to the power cabling, and rest on the A-arm secured by a bungee cord or zip ties 7. Locate the drain plug and drain the transmission fluid into your catch can. a. 3/8 drive ratchet
.")

11 8. Once the transmission has been drained, mark and remove the driveshaft from the differential pinion flange. Note: There may be residual transmission fluid still present. When removing the driveshaft keep the catch can or shop towels handy. a. 4x 12mm, using the 12-point socket (re-torque to 83 lb-ft). You may need to lift up the rear tires off the ramps and turn the driveshaft to expose the other bolts. b. Push slightly towards the front to unseat from the lip on the pinion flange c. Gently slide the driveshaft towards the rear, taking care to catch any residual trans fluid d. Secure the driveshaft yoke, taking care that no dirt or other contaminants get on or inside Rear.. Front Keep this end clean of contaminants!


12 9. Remove the clutch fork dust cover to access and remove the clutch cable. a. 1x 10mm, the dust cover is located on the driver side of the transmission b. Using a pry bar or similar leverage, compress the clutch fork (move it towards the front) enough to relieve and remove the clutch cable. With no tension on the clutch cable, slide it in towards the transmission, then remove through the larger hole. Clutch cable Clutch fork


13 c. Using needle nose pliers, remove the clutch cable retaining clip d. Remove the clutch cabling from the transmission and set aside
14 10. Disconnect the reversing lamp switch and the output shaft speed sensor cabling from the transmission.

15 11. Break loose the transmission bolts, but do not remove just yet. Note #1: You will need multiple extensions and the swivel to reach the 2 topmost transmission bolts. To access these two bolts, run the extensions parallel to the length of the transmission. Note #2: There are 12 total bolts of varying sizes, all with a 13mm head. Reference the next picture of the transmission spacer plate for the correct placement and sizing locations. This spacer goes behind the flywheel. a. 9x 13mm (the 3x starter bolts were removed in Step 6) These two bolts are longer than the rest Top of transmission 3x starter bolts These two bolts are shorter than the rest Driver side Passenger side b. Support the transmission with a floor jack & transmission adapter attached for maximum stability c. Remove the top two bolts, break loose the remaining 7 bolts

16 12. Remove the transmission mount/crossmember. Note: Removing the transmission is a 2 or 3- person job because of the weight involved and how cumbersome 120 lbs of metal can be underneath the vehicle. a. 4x 15mm (re-torque to 40 lb/ft) Driver side bolts x2 Passenger side bolts x2 (not pictured)
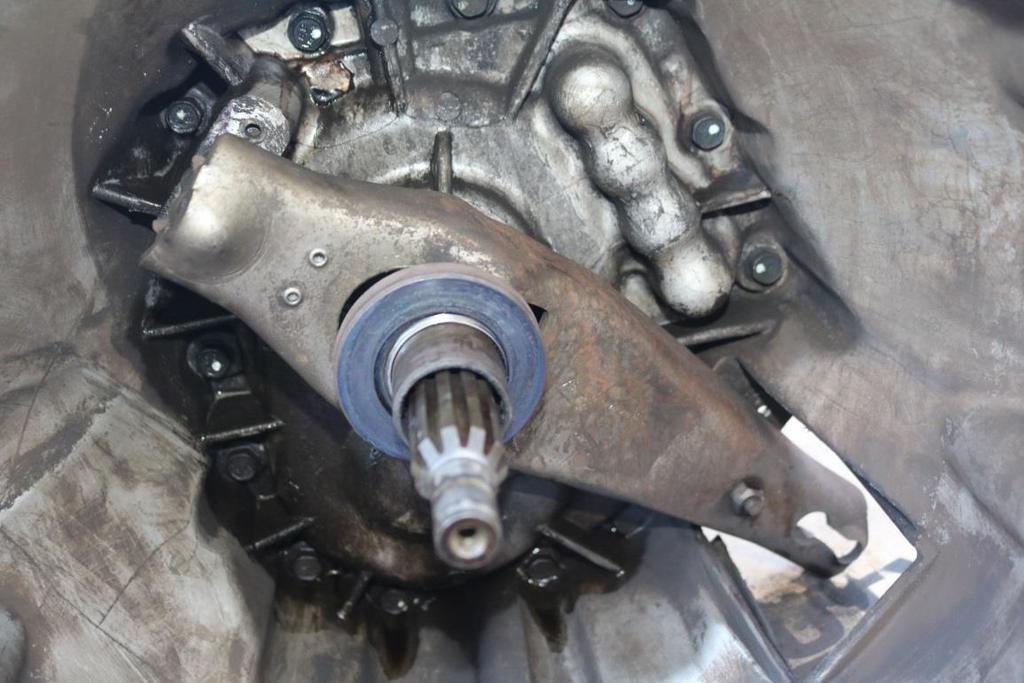
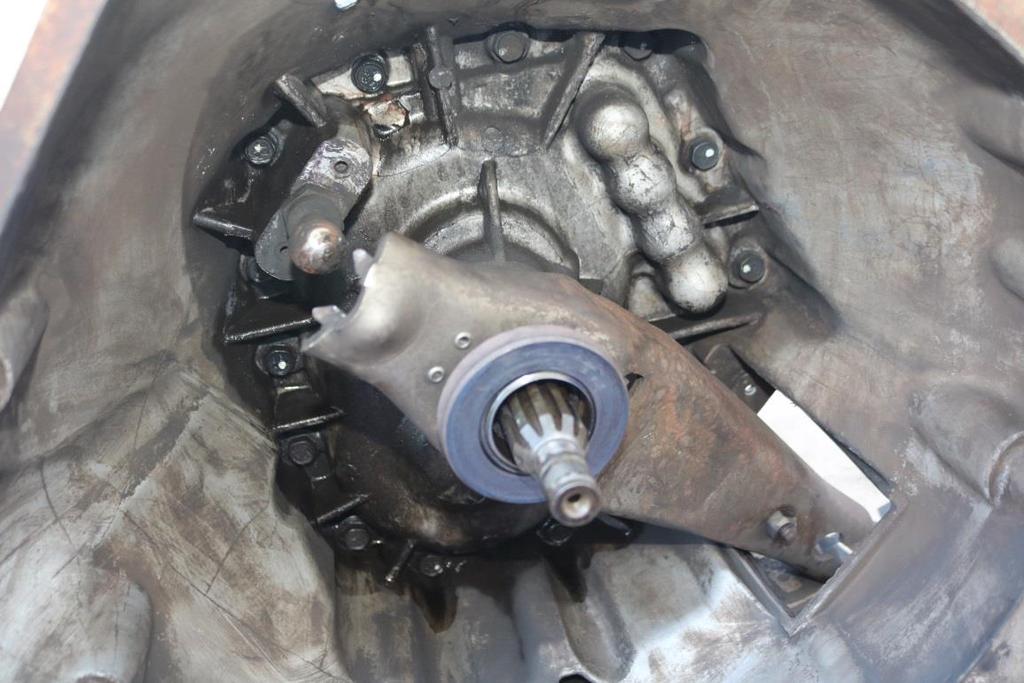
17 13. With the transmission fully supported by the floor jack, remove the remaining bolts at the bell housing. Note: We have already removed 3x for the starter, and 2x at the top, leaving 7 bolts. a. 7x 13mm (re-torque to 38 lb-ft). Reference the photo in step 11a b. With a buddy underneath stabilizing the transmission on the floor jack, slowly break the bell housing connection with the rear of the engine block c. Once free and fully supported by the floor jack, slowly take the transmission back to the rear of the vehicle, taking care to not scrape the input shaft against the pressure plate fingers or damage the pilot bearing. Once the input shaft is clear, lower the transmission all the way d. Slide the transmission out from underneath the vehicle
. a. 6x 13mm (re-torque to 24 lb-ft + 60 degrees) 15. Remove the flywheel.")
18 14. Remove the old pressure plate and friction disc. Note: As you remove the outer pressure plate, the inner friction disc (which is not bolted down) will also come free. Take caution as these two parts are deceptively heavy (about 20 lbs). a. 6x 13mm (re-torque to 24 lb-ft + 60 degrees) 15. Remove the flywheel. Photo was taken after it was resurfaced, before and after pics included for reference. Note: Part weighs about 22 lbs, be careful during removal. Note #2: Removing the flywheel bolts will turn the crankshaft. Have someone hold the crank in position with a 17mm long wrench or similar so it won t spin. Note #3: The flywheel bolt pattern is very specific. With a sharpie, mark a tooth and a static reference point like the exhaust manifold to greatly assist realignment during reinstallation. PS, sharpie the flywheel tooth, not your own #JustSayin a. 6x 17mm (re-torque to 59 lb-ft)


19 Resurfaced flywheel, showing bolt pattern for reference Flywheel dropped off at the machine shop for resurfacing 1/2


20 Flywheel dropped off at the machine shop for resurfacing 2/2 16. Remove the pilot bearing. a. Using the pilot bearing puller attachment, insert into the pilot bearing and open/expand into the grooves. Connect the slide hammer and 2-3 hits should remove the old pilot bearing Old pilot bearing New pilot bearing


21 17. Super Clean the rear of the engine block as needed. If the rear seal is bad, now is the time My mess was due to a leaky oil filter, thankfully.
 flywheel. Take note of any previous alignment markings during disassembly and remount accordingly. a. Apply thread locker to the 6x 17mm bolts and torque to 59 lb-ft b.")
22 *****REASSEMBLY ***** 18. Replace the pilot bearing. a. Seat the new bearing evenly into position and gently tap on it with the rubber mallet, taking care to ensure it is reseating evenly. When fully seated, it will be just about flush 19. Install the resurfaced (or new, we don t judge) flywheel. Take note of any previous alignment markings during disassembly and remount accordingly. a. Apply thread locker to the 6x 17mm bolts and torque to 59 lb-ft b. You will need someone to hold the crankshaft in place with 17mm wrench or breaker bar when torqueing down the 6 flywheel bolts c. Once mounted and secured, clean the surface of the flywheel with brake cleaner to remove residual grease caused by gloved hands or fingers


23 20. Install the Exedy Mach 350 Stage 1 friction disc and pressure plate. a. Using the provided tube of pink lube, apply to the spline grooves of the friction disc b. Using the provided alignment tool, place the friction disc onto the flywheel. Take note of the markings on the new friction disc, it will indicate flywheel side or in this case transmission side Old friction disc, indicating flywheel side Exedy Mach 350 Stage 1 friction disc, indicating transmission side Pink lube goes onto these spline grooves


24 c. The alignment tool will hold the new disc in place while we mount the pressure plate over the friction disc, with the alignment tool protruding out the middle d. Apply thread locker to the 6 bolts, and secure the pressure plate (torque to 24 lb-ft + 60 degrees)
 21. Replace the clutch fork, throwout bearing, an")
25 e. Mark your territory (and remove the alignment tool) 21. Replace the clutch fork, throwout bearing, and pivot stud. a. Slide the clutch fork down/towards the opening in the bell housing to release the clip connecting to the pivot stud, pull forward and remove. The throwout bearing is attached to the fork and will slide out with it
26


27 b. Remove and replace the pivot stud using 7/8 wrench

28 c. Remove and replace the throwout bearing. It will slide in and out of the grooved prongs on the clutch fork


29 d. Clean the bell housing with Super Clean, or similar degunkifier. Before and after shots:
 to provide a smoother contact for the new throwout bearing 22.")

30 e. Installation of the clutch fork is the reverse of removal. Apply a small amount of grease to the input shaft housing (NOT the grooved input shaft itself) to provide a smoother contact for the new throwout bearing 22. Reinstall the transmission. Note: You can use the clutch fork opening in the bell housing as a viewport to realign the input shaft in through the pressure plate. You may need to turn the input shaft slightly to get the grooves lined up properly with the clutch disc. a. Make sure the transmission spacer is remounted first. It can hang on the two large holes on either side of TDC, second from the top (reminder, these are the two long bolts)
31 b. Tie down or secure the loose hanging O2 sensors, clearing the way for the transmission c. Recall the bolt sizes and pattern from Step 11a and reinstall accordingly d. 9x 13mm at the bell housing e. 4x 15mm for the rear transmission mount/crossmember f. Transmission is now secured, lower the jack and remove 23. Reconnect the clutch cabling and dust cover. a. Thread the cable through the hole in the spacer/bell housing b. With no tension on the clutch fork, snake the cable back onto the fork c. Reinstall the retainer clip on the clutch cable d. Reinstall the clutch fork dust cover, 1x 10mm 24. Reconnect the reversing lamp switch and the output shaft speed sensor cabling to the transmission. 25. Reinstall the driveshaft. a. Install the driveshaft yoke into the transmission first, taking care not to damage the internals or shaft b. Bring the rear of the driveshaft up and onto the differential pinion flange c. 4x 12mm 12-point socket d. Apply thread locker and re-torque to 83 lb-ft 26. Reinstall the exhaust, along with the (2) front and (2) rear O2 sensors. Note: To avoid the O2 sensor cabling from getting overly twisted up, counter-twist them before installing to negate most or all of the twist. a. 8x 15mm (torque to 26 lb-ft at the rear and 30 lb-ft at the manifold) b. 7/8 wrench for the O2 sensors 27. Reinstall the starter. a. 3x 13mm, the easiest approach is through the front and over the A-arm (torque to 17 lb-ft) 28. Reinstall the front subframe brace. a. 2x 15mm (torque to 30 lb-ft)
. a. Add via the open/exposed shifter b.")
32 29. Add 3.2 quarts transmission fluid, the easiest method is via the gaping hole where the shifter is currently not. The late 01 to 04 GT uses the Tremec TR-3650 transmission, and as per Ford s TSB the TR-3650 takes 3 Liters (approximately 3.2 US Quarts). a. Add via the open/exposed shifter b. Clean the mating surfaces for the shifter assembly, and apply black RTV to reseal c. Reassemble the shifter in reverse order of Step Check the clutch pedal movement, and make any adjustments as necessary at this time. Also check for any fluid leaks before lowering. 31. Reconnect the battery. 32. Remove the ramps and test drive. Recommended break-in period from Exedy is 750 miles. Installation Guide Created by AM Customer Ted Hotchkiss on 02/27/2017
Exedy Mach 400 Stage 1 Clutch and Pilot Bearing (Late GT, Bullitt, Mach 1; Cobra): SKUs: & 50116
: SKUs: & 50116") Exedy Mach 400 Stage 1 Clutch and Pilot Bearing (Late 01-04 GT, Bullitt, Mach 1; 99-04 Cobra): SKUs: 62502 & 50116 Tools Needed: Car Jack with high lift capabilities (If not, block of wood may be required)
Exedy Mach 400 Stage 1 Clutch and Pilot Bearing (Late 01-04 GT, Bullitt, Mach 1; 99-04 Cobra): SKUs: 62502 & 50116 Tools Needed: Car Jack with high lift capabilities (If not, block of wood may be required)
Installation Instructions COMPETITION/PLUS SHIFTER Ford Mustang MT82 6-Speed Manual Transmission Catalog#
 Installation Instructions COMPETITION/PLUS SHIFTER 2015-2017 Ford Mustang MT82 6-Speed Manual Transmission Catalog# 3916037 Rev. 00 WORK SAFELY! For maximum safety, perform this installation on a clean,
Rear End Installation and Bearing Kit - 8.8in (86-12 V8; V6)
") Rear End Installation and Bearing Kit - 8.8in (86-12 V8; 11-13 V6) Tools Required: Jack Stands 5 Floor Jack 2 Oil Pans 1 Wheel Blocks 2 Differential Oil 3 qts Friction Modifier 3 bottles Tube of Black
Rear End Installation and Bearing Kit - 8.8in (86-12 V8; 11-13 V6) Tools Required: Jack Stands 5 Floor Jack 2 Oil Pans 1 Wheel Blocks 2 Differential Oil 3 qts Friction Modifier 3 bottles Tube of Black
BBK Ceramic Long Tube Headers (99-04 Cobra and Mach 1) - Installation Instructions
 - Installation Instructions") BBK Ceramic Long Tube Headers (99-04 Cobra and 03-04 Mach 1) - Installation Instructions The below installation instructions work for the following products: BBK Ceramic Long Tube Headers (99-04 Cobra
BBK Ceramic Long Tube Headers (99-04 Cobra and 03-04 Mach 1) - Installation Instructions The below installation instructions work for the following products: BBK Ceramic Long Tube Headers (99-04 Cobra
The Driveshaft Shop One Piece Aluminum Driveshaft Install for GT/BOSS
 The Driveshaft Shop One Piece Aluminum Driveshaft Install for 2011-14 GT/BOSS Tools and Equipment needed: Install time: approximately 2-3 hours Ratcheting socket wrench socket extensions 1/2 drive breaker
Mustang Differential Gears - Installation Instructions
 Mustang Differential Gears - Installation Instructions The below installation instructions work for the following products: Ford Racing Gears - 3.73 Gears for 8.8" Ford Rear End Ford Racing Gears - FRPP
WARNING: Only perform this installation if you are experienced, fully equipped mechanic.
 DYNATRAC V3.2 2005-Present Ford Super Duty 250/350-4x4, Front Axle, Free Spin Conversion Kit Some of the less common tools, which will be required: 6 point Spanner socket (OTC #7090-A or equivalent). These
Commander SUSPENSION SYSTEM INSTALLATION INSTRUCTIONS
 PARTS INCLUDED: 2 - FRONT UPPER A-ARMS 2 - FRONT LOWER A-ARMS 4 - COTTER PINS 2-12MM JAM NUTS 2 - TIE ROD EXTENDERS 8- FLANGED DELRON BUSHINGS 4- DELRON CASTER SPACERS 6 - GREASE FITTINGS 3 - BEARING REMOVAL
Slave Cylinder Weep Hole Drilling Procedure
 Slave Cylinder Weep Hole Drilling Procedure Tools Required: T20 Torx Driver T25 Torx Driver T25 Torx Bit with ¼ Ratchet Wrench 4mm Hex Key (Allen wrench) 5mm Hex Key 6mm Hex Key 8mm Hex Key 12mm Hex Key
Installation Instructions
 Preparing your vehicle to install your brake system upgrade 1. Rack the vehicle. 2. If you don t have a rack, then you must take extra safety precautions. 3. Choose a firmly packed and level ground to
Thank you for purchasing the Dezod Motorsports Return Fuel System for your Scion tc.
 Thank you for purchasing the Dezod Motorsports Return Fuel System for your Scion tc. We took much pride in putting together a fuel system that would deliver a maximum amount of fuel as simply as possible
V6 Spring Belt Tensioner
 Dodgerunner s V6 Spring Belt Tensioner Installation Guide Dodgerunner 2007 The bracket consists of two pieces of 1/8" steel bolted together. The main piece is flat plate with welded-on alternator mounting
FORD RACING DIFFERENTIAL COVER 8.8 IRS
 FORD RACING DIFFERENTIAL COVER 8.8 IRS Tools Needed: Socket set, metric and standard Sledge hammer Puller device, pitman puller Jack Jack stands Flat head screw drivers Torque wrench, capable of 8 ft/lbs
CALIFORNIA TRIMMER MOWER MAINTENANCE MANUAL
 CALIFORNIA TRIMMER MOWER MAINTENANCE MANUAL 2 Table of Contents Section 1: General Information Page Handle Assembly Instructions 4 Maintenance All Models 6 Oil Change Procedures All Models 9 Height Adjustment
DYNATRAC PRODUCTS V5.3
 DYNATRAC PRODUCTS V5.3 2000-2008 Dodge Hub Kit Stage 1 4x4, Front Axle Free Spin Conversion Kit Note: This Kit is not Approved for 2007 & up 3500 Cab and Chassis Trucks Due to a Larger U-Joint (If U-Joint
RHINO SUSPENSION SYSTEM INSTALLATION INSTRUCTIONS
 PARTS INCLUDED: 2 FRONT UPPER A-ARMS 2 FRONT LOWER A-ARMS 2 UNI-BALL JOINTS 2 UNI-BALL JOINT STUDS 2 UNI-BALL JOINT CAPS 2 RETAINING RINGS 1 FRONT SHOCK ASSEM. 2 DELRON STEERING STOPS 2 SHOCK MOUNT SPACERS
Lincoln Mark VII T5 Swap Version submitted by 5.0 bird
 Lincoln Mark VII 1984-1989 T5 Swap Version 20070611 submitted by 5.0 bird I've decided to make an article to assist with the T5 swap for the 84-89 Mark VIIs, since I was just in there because my DOA didn't
Front Axle Pinion Seal Replacement
 Front Axle Pinion Seal Replacement by Flopster843 10 Apr 2016 The AAM 925 axle used on the front of Dodge Ram trucks is a decent unit, but it does have its flaws. This axle lacks lockout hubs on the front
TCI Trans-Scat
 Page 1 of 5 Return to Instruction Sheet index TCI 400000 Trans-Scat Turbo Hydramatic 400-1965-Up This kit will allow you to re-program your transmission valve body. This kit will give you firm positive
Clutch Kit Install Guide
 Jack up and support the car on jack stands Remove the exhaust system (some models) Remove the driveshaft (rear wheel drive) Remove CV axle (front wheel drive) Manual transmission removal Clutch Kit Install
Ford Racing Performance Improvement Intake Manifold (96-04 GT) Time Necessary: Approximately 4 hours
 Time Necessary: Approximately 4 hours") Ford Racing Performance Improvement Intake Manifold (96-04 GT) Time Necessary: Approximately 4 hours Tools Required: Ratchet and socket set Torque wrench Large adjustable wrench Needle nose pliers A dozen
Ford Racing Performance Improvement Intake Manifold (96-04 GT) Time Necessary: Approximately 4 hours Tools Required: Ratchet and socket set Torque wrench Large adjustable wrench Needle nose pliers A dozen
Eibach Pro-Damper Shocks & Struts (05-09 All):
:") Eibach Pro-Damper Shocks & Struts (05-09 All): Required tools: 3/8 and 1/2 drive ratchets 7, 8, 10, 15, 16, 17, 18, 21 & 22 mm open ended wrenches 8 & 10 mm box end wrenches 10mm socket 13, 15 & 18 mm
Eibach Pro-Damper Shocks & Struts (05-09 All): Required tools: 3/8 and 1/2 drive ratchets 7, 8, 10, 15, 16, 17, 18, 21 & 22 mm open ended wrenches 8 & 10 mm box end wrenches 10mm socket 13, 15 & 18 mm
BBK LONG TUBE HEADERS (99-04 GT, Mach 1, Bullitt)
") BBK LONG TUBE HEADERS (99-04 GT, Mach 1, Bullitt) Install Time: Approx. 8-10 hrs Parts Needed: BBK Long Tube Headers Shorty mid pipe X/H O2 wiring harness extensions Hi-temp thread locker Tools Required:
BBK LONG TUBE HEADERS (99-04 GT, Mach 1, Bullitt) Install Time: Approx. 8-10 hrs Parts Needed: BBK Long Tube Headers Shorty mid pipe X/H O2 wiring harness extensions Hi-temp thread locker Tools Required:
 Special Tools Needed: DrVanos.com Stage I Installation Instructions Camshaft locking tool TDC Crank pin Sprocket turning tool Tool rental is available with the purchase of a vanos kit *See website for
SECTION 5B MANUAL TRANSMISSION TABLE OF CONTENTS
 SECTION 5B MANUAL TRANSMISSION TABLE OF CONTENTS General Description and Operation... 5B-2 Shift Lever... 5B-2 Transmission Assembly... 5B-2 Specifications... 5B-3 Diagnostic Information and Procedures...
Ford Racing GT500 Style Strut Mount Upgrade (05-12 All):
:") Ford Racing GT500 Style Strut Mount Upgrade (05-12 All): Required tools: (2) Jack stands Floor jack (1 is required but 2 is preferred) Torque wrench Spring compressor tool (can be rented at your local
Ford Racing GT500 Style Strut Mount Upgrade (05-12 All): Required tools: (2) Jack stands Floor jack (1 is required but 2 is preferred) Torque wrench Spring compressor tool (can be rented at your local
Installation Manual TWM Performance Short Shifter Cobalt SS/SC, SS/TC, HHR SS, Ion Redline and Saab 9-3
 Page 1 Installation Manual TWM Performance Short Shifter Cobalt SS/SC, SS/TC, HHR SS, Ion Redline and Saab 9-3 Please Note: It is preferable to park on a flat surface, as you will have to engage and disengage
ALLOY USA AXLE INSTALLATION (99-04 GT, Mach 1)
") ALLOY USA AXLE INSTALLATION (99-04 GT, Mach 1) Time Necessary: Approximately 4 hours Tools Required: Wrenches: 8mm, 13mm, 15mm, 5.5 mm allen, 6mm allen Sockets: 5/8, 3/4 Ratchet Floor Jack Jack Stands
ALLOY USA AXLE INSTALLATION (99-04 GT, Mach 1) Time Necessary: Approximately 4 hours Tools Required: Wrenches: 8mm, 13mm, 15mm, 5.5 mm allen, 6mm allen Sockets: 5/8, 3/4 Ratchet Floor Jack Jack Stands
DrVanos.com Stage II Installation Instructions. Tool rental is available with the purchase of a vanos kit *See website for more info*
 DrVanos.com Stage II Installation Instructions Special Tools Needed: Camshaft locking tool TDC Crank pin Sprocket turning tool Tool rental is available with the purchase of a vanos kit *See website for
Installation Instructions INDY SHIFTER Fits: Mustang Fastback & Convertible with MT-82 Transmission Catalog #
 Installation Instructions INDY SHIFTER Fits: 2015-2018 Mustang Fastback & Convertible with MT-82 Transmission Catalog # 3916036 Watch our installation video on YouTube WORK SAFELY! For maximum safety,
Set Up. We recommend that you read through this entire set of instructions prior to removing your 231 Transfer case from the Jeep
 Slip Yoke Eliminator Kit for New Process 231 Transfer Case Assemblies Crown Part # SYE231 Kit Components: 1. Rear Housing Assembly (Includes rear housing, rear output seal, rear output bearing and rear
1 M-3000-H4 F150 4X4 Lowering Kit
 READ INSTRUCTIONS COMPLETELY THROUGH BEFORE STARTING. IT IS RECOMMENDED THAT INSTALLATION BE DONE BY A QUALIFIED MECHANIC. REPLACE ALL STOCK PARTS THAT ARE DAMAGED OR WORN. ALWAYS WEAR EYE PROTECTION.
V6 Mustang BBK Long Tube Headers and Shorty X-Pipe:
 2011-2012 V6 Mustang BBK Long Tube Headers and Shorty X-Pipe: Time Required: Approximately 9 hours w/ 3 installers (highly recommended having help during install); process will be much faster with a lift
Installation Manual TWM Performance Short Shifter Subaru STi 2008+
 - 1 - Installation Manual TWM Performance Short Shifter Subaru STi 2008+ Please Note: It is preferable to park on a flat surface, as you will have to engage and disengage the hand brake and shift from
Special Note About The JDM High Performance Water Pump:
 Page 1 of 30 JDM Engineering, Inc. home Call Us! 732-780- 0770 back to Installation Instructions Electric Fan Upgrade Kit Electric Fan Wiring Diagram Thank you for your purchase of the JDM Engineering
Mustang 7.5 Limited Slip Differential (28 Spline) V8; V6:
 V8; V6:") Mustang 7.5 Limited Slip Differential (28 Spline) 79-85 V8; 86-10 V6: Required Tools: Ratchet Wrench Torque Wrench 1/2", 5/16, 3/4", 12mm and 15mm Sockets Lug nut Wrench Dial Indicator Digital Measuring
Mustang 7.5 Limited Slip Differential (28 Spline) 79-85 V8; 86-10 V6: Required Tools: Ratchet Wrench Torque Wrench 1/2", 5/16, 3/4", 12mm and 15mm Sockets Lug nut Wrench Dial Indicator Digital Measuring
HURST COMP/PLUS SHIFTER 2015 Ford Mustang (Getrag MT82 six-speed manual transmission) Catalog # by Hurst Performance
 Catalog # by Hurst Performance") FORM 159 0205 07/15 HURST COMP/PLUS SHIFTER 2015 Ford Mustang (Getrag MT82 six-speed manual transmission) Catalog #391 0205 2015 by Hurst Performance Thank you for purchasing the Hurst Comp/Plus Shifter.
FORM 159 0205 07/15 HURST COMP/PLUS SHIFTER 2015 Ford Mustang (Getrag MT82 six-speed manual transmission) Catalog #391 0205 2015 by Hurst Performance Thank you for purchasing the Hurst Comp/Plus Shifter.
Barton Short Throw Shifter 11/12 V6, GT Mustang:
 Barton Short Throw Shifter 11/12 V6, GT Mustang: Tools Required: 10mm deep socket Socket wrench 10 extension for socket wrench Jack Jack stand Small piece of wood Small hook tool (recommended) *can be
Hurst Billet Competition Plus Shifter - TR-3650 (05-10 GT) Installed in: 2010 Ford Mustang GT
 Installed in: 2010 Ford Mustang GT") Tools Required: Socket Ratchet 10 mm Wrench/Socket 10 mm Deep Socket 13 mm Wrench/Socket Socket Extension Flat Head Screw Driver WD-40 Hurst Billet Competition Plus Shifter - TR-3650 (05-10 GT) Installed
Tools Required: Socket Ratchet 10 mm Wrench/Socket 10 mm Deep Socket 13 mm Wrench/Socket Socket Extension Flat Head Screw Driver WD-40 Hurst Billet Competition Plus Shifter - TR-3650 (05-10 GT) Installed
Installation Instructions
 Instructions Created by an: 86-95 Suzuki Samurai Samurai Front Axle Knuckle Rebuild Kits (SKU# SAX-KRK) Installation Instructions Revised 6-6-14 Suggested Tools: CAUTION: Safety glasses should be worn
Owner smanual. Banks Billet TM Torque Converter Chevy/GMC Duramax Allison Transmission. with Installation Instructions
 with Installation Instructions Owner smanual Banks Billet TM Torque Converter 2001-2010 Chevy/GMC Duramax Allison Transmission THIS MANUAL IS FOR USE WITH KITS 72510 Gale Banks Engineering 546 Duggan Avenue
Owner smanual. Banks TorqueTube System Ford 5.4L F-150 (Late Body Style) with Installation Instructions
 with Installation Instructions") Owner smanual with Installation Instructions Banks TorqueTube System 2004-2008 Ford 5.4L F-150 (Late Body Style) THIS MANUAL IS FOR USE WITH SYSTEMS 48715 Gale Banks Engineering 546 Duggan Avenue Azusa,
Owner smanual with Installation Instructions Banks TorqueTube System 2004-2008 Ford 5.4L F-150 (Late Body Style) THIS MANUAL IS FOR USE WITH SYSTEMS 48715 Gale Banks Engineering 546 Duggan Avenue Azusa,
Return to Instruction Sheet index TCI Installation Instructions for Turbo Hydramatic 350C & 250C
 Page 1 of 6 Return to Instruction Sheet index TCI 326300 Installation Instructions for Turbo Hydramatic 350C & 250C NOTE: This kit was not intended for installation in transmissions that are in poor general
Changing the Struts on a WK Jeep CRD
 Changing the Struts on a WK Jeep CRD Step by Step By Chirpz Disclaimer: I do not claim that this procedure is the right way or even the best way to change your struts. This is what I did after reading
Part No amatic 350
 Watch our installation video on YouTube Installation Instructions Shift Improver Kit Part No. 30262 1968-1981 TurboHy urbohydr drama amatic 350 B&M Racing and Performance Products 2002 Congratulations!
TCI Trans-Scat
 Page 1 of 5 Return to Instruction Sheet index TCI 350000 Trans-Scat Installation Instructions For TURBO HYDRAMATIC 350 This kit will allow you to reprogram your transmission to meet your driving needs
1984 Dodge W250 PICKUP
 1984 Dodge W250 PICKUP Submodel: Engine Type: V8 Liters: 5.2 Fuel Delivery: CARB Fuel: GAS Dana 44 MODELS THROUGH 1984 2. Raise and safely support the vehicle, then remove the wheel hub and bearings as
ENG-14, Balance Shaft Oil Seal Replacement
 ENG-14, Balance Shaft Oil Seal Replacement Introduction The following procedure will provide instructions for replacing the balance shaft seals on a 944. It will also provide instructions for resealing
97-04 CHEVROLET CORVETTE C5
 97-04 CHEVROLET CORVETTE C5 IMPORTANT! WARRANTY AND INSTALLATION INSTRUCTIONS Please Forward All Information to Consumer Be sure to review the enclosed instructions prior to beginning the installation
Torqueflite Manual/Automatic Valve Body
 TCI 122400 Torqueflite Manual/Automatic Valve Body This valve body can be installed in a few hours by carefully following directions. Read all instructions first to familiarize yourself with the parts
DYNATRAC V6.0. WARNING: Only perform this installation if you are experienced, fully equipped mechanic.
 DYNATRAC V6.0 1999-2004 Ford Super Duty 250/550-4x4, Front Axle, Free Spin Conversion Kit Some of the less common tools, which will be required: 6 point Spanner socket (OTC #7090-A or equivalent) OR 4
Volvo 850 Radiator Replacement Jason Reed 29 March 2013
 This write up covers removing and replacing the radiator on a 97 855 GLT wagon with light pressure turbo and automatic transmission. This car has 162K miles. The radiator, which was original, developed
By AM Customer: Dean Smith, Aug. 8, 2014.
 Ford Racing Bullitt Axle-Back Exhaust (05-09 GT, GT500) By AM Customer: Dean Smith, Aug. 8, 2014. Tools for the Job: 13mm Wrench 13mm Socket 15mm Socket 15mm Deep Socket Ratchet(s) [I used a bigger one
-Magnet (not completely necessary but can come in handy)
") McLeod High Performance Hydraulic Clutch Line Upgrade (05-14 V8) Included in kit: -New clutch line -2 fittings Required Tools: -Floor jack and jack stands (or a lift) -Flashlight -Angled pick tool -13mm
McLeod High Performance Hydraulic Clutch Line Upgrade (05-14 V8) Included in kit: -New clutch line -2 fittings Required Tools: -Floor jack and jack stands (or a lift) -Flashlight -Angled pick tool -13mm
Installation Instructions HURST COMPETITION AND BILLET/PLUS SHIFTER Mustang w/5-speed Manual Transmission (GT only)
") Installation Instructions HURST COMPETITION AND BILLET/PLUS SHIFTER 2005-2010 Mustang w/5-speed Manual Transmission (GT only) Catalog# 3915201 WORK SAFELY! For maximum safety, perform this installation
Installation Instructions HURST COMPETITION AND BILLET/PLUS SHIFTER 2005-2010 Mustang w/5-speed Manual Transmission (GT only) Catalog# 3915201 WORK SAFELY! For maximum safety, perform this installation
Z32 Solid Rear Subframe Bushing Installation
 Z32 Solid Rear Subframe Bushing Installation Thank you for purchasing a set of Sonic Motorsport (NZ) designed and 300 Degree produced solid subframe bushings! Over time the OEM subframe bushings will fail.
Steeda Lower Control Arms ( )
") Steeda Lower Control Arms (2005-2012) NOTE: The following installation was performed on a 2007 Mustang GT/California Special. The control arms were previously sold in a blue color, but now they are sold
Steeda Lower Control Arms (2005-2012) NOTE: The following installation was performed on a 2007 Mustang GT/California Special. The control arms were previously sold in a blue color, but now they are sold
Maximum Motorsports Caster/Camber Plates Installation Guide (94-04)
") Maximum Motorsports Caster/Camber Plates Installation Guide (94-04) The below installation instructions work for the following products: Maximum Motorsports Caster/Camber Plates (94-04) Please read through
Maximum Motorsports Caster/Camber Plates Installation Guide (94-04) The below installation instructions work for the following products: Maximum Motorsports Caster/Camber Plates (94-04) Please read through
Installation Manual TWM Performance Short throw shifter 2001 and up Hyundai Accent
 Installation Manual TWM Performance Short throw shifter 2001 and up Hyundai Accent 1. Place the vehicle on a flat surface with blocks in front and behind the wheels preventing unwanted movement. The car
Installation Manual TWM Performance Short Shifter Nissan 350Z, 370Z Infiniti G35, G37
 Installation Manual TWM Performance Short Shifter Nissan 350Z, 370Z Infiniti G35, G37 It is preferable to park on a flat surface, as you will have to engage and disengage the hand brake and shift from
Wheel Bearing Replacement Passat TDI
 Rear Bearing/hub assembly replacement This is a fairly straight forward process. Pictures are not necessary for most of this procedure for a person with skills to do this repair. Anyone who thinks they
Lowering Spring Installation on a Mustang GT
 Lowering Spring Installation on a 99-04 Mustang GT This installation is very the same installation that many of the 79-04 Mustangs excluding Cobra require. Time to install: 2-3 hours to do alone with a
I hope this guide helps you as much as Boomer Bob helped me. We re just sharing what we know to help out other folks. Best of luck! Phil C.
 A brief tutorial on swapping cams for the Victory Cross Roads and Cross Country on the Victory Freedom 106 inch V-Twin Engine with 6 speed over drive transmission Disclaimer: Swapping cams on a Victory
Mirrored from:
 Mirrored from: http://www.wranglerforum.com/f274/install-synergy-suspension-ball-joints-write-up-147062.html 03-18-2012, 02:43 AM #1 SilverSport Supporting Member WF Supporting Member Install Synergy Suspension
Steeda Sport Mustang Lowering Springs (2005+) - Installation Instructions
 - Installation Instructions") Steeda Sport Mustang Lowering Springs (2005+) - Installation Instructions The below installation instructions work for the following products: Steeda Sport Mustang Lowering Springs (2005+) Please read
Steeda Sport Mustang Lowering Springs (2005+) - Installation Instructions The below installation instructions work for the following products: Steeda Sport Mustang Lowering Springs (2005+) Please read
99-04 Ford F250 Super Duty 4-6 Suspension Kit
 92758200 99-04 Ford F250 Super Duty 4-6 Suspension Kit Thank you for choosing Rough Country for your suspension needs. Rough Country recommends a certified technician installs this system. In addition
Ford Racing Front Lower Control Arms (05-12 GT & GT500):
:") Ford Racing Front Lower Control Arms (05-12 GT & GT500): Tools needed: Floor jack Jack stands 18mm & 21mm box end wrench 18mm & 21mm socket 13/16 socket (2) Ratchets Breaker bar Torque wrench (0-150 ft/lbs)
Ford Racing Front Lower Control Arms (05-12 GT & GT500): Tools needed: Floor jack Jack stands 18mm & 21mm box end wrench 18mm & 21mm socket 13/16 socket (2) Ratchets Breaker bar Torque wrench (0-150 ft/lbs)
Do not have any open flame or heat sources close to the installation
 March 6, 2017 IS# 791 Page 1 of 16 Thank you for purchasing a Transfer Flow, Inc. 50-gallon replacement fuel system for your 2011-16 Ford diesel short bed pickup. This system will fit any 2x4 or 4x4 crew
INSTALLATION INSTRUCTION 88088
 INSTALLATION INSTRUCTION 88088 For Rancho Suspension Systems RS6588 & RS6589: FORD F-150 READ ALL INSTRUCTIONS THOROUGHLY FROM START TO FINISH BEFORE BEGINNING INSTALLATION Rev B IMPORTANT NOTES! WARNING:
ADVANCE ADAPTERS INC. Fixed Yoke kit (S.Y.E. Kit)
") ADVANCE ADAPTERS INC. Fixed Yoke kit (S.Y.E. Kit) Instruction Sheet P/N: 50-7905 & 50-7906 KIT CONSISTS OF: No. Qty Part No. Description 1. 1 51-7906 TAILHOUSING, DIECAST 2. 1 52-7905 SHAFT, MAIN OUTPUT
ADVANCE ADAPTERS INC. Fixed Yoke kit (S.Y.E. Kit) Instruction Sheet P/N: 50-7905 & 50-7906 KIT CONSISTS OF: No. Qty Part No. Description 1. 1 51-7906 TAILHOUSING, DIECAST 2. 1 52-7905 SHAFT, MAIN OUTPUT
Sport Sway Bar Kit Mustang
 Sport Sway Bar Kit 22102 2005 Mustang Installation of Hotchkis Front Sway Bar 1F Raising Vehicle Securely block the rear wheels of the vehicle. Use a jack to lift up the front of the vehicle and use jack
RUBICRAWLER - JEEP TJ & JK ( ) W/ UNIVERSAL SHIFTER KIT CONSISTS OF: No. Qty Part No. Description
 W/ UNIVERSAL SHIFTER KIT CONSISTS OF: No. Qty Part No. Description") KIT CONSISTS OF: No. Qty Part No. Description 1. 1 RUBICRAWLER - GEAR BOX 2. 1 42R-UNIV - UNIVERSAL SHIFTER KIT PAGE 1 OF 8 Page Rev. Date: 11-06-18 Optional Items: Part No. Description 15-1000 - UNI-RAISE,
KIT CONSISTS OF: No. Qty Part No. Description 1. 1 RUBICRAWLER - GEAR BOX 2. 1 42R-UNIV - UNIVERSAL SHIFTER KIT PAGE 1 OF 8 Page Rev. Date: 11-06-18 Optional Items: Part No. Description 15-1000 - UNI-RAISE,
Call for product recommendations and to place your order!
 Driveline: Note: Driveshafts come with pinion yoke with 2.5 square bolt pattern. If using Mustang Cobra center section with 3.0 square pattern, call us. 70032 Denny s Driveshaft, MkI and MkII Roadster,
Page1. ISF Stainless Steel Headers // Part# HDR-004
 Congratulations on the purchase of your ISF Stainless Steel Headers and thank you for choosing Sikky Manufacturing. This installation manual is intended to guide you through the removal of the factory
ADVANCE ADAPTERS INC. P/N: NP231 SHORT SHAFT "FIXED YOKE" KIT
 Paso Robles, CA 93447 PAGE 1 OF 10 Telephone: (800) 350-2223 Fax: (805) 238-4201 Page Rev. Date: 06-24-02 KIT CONSISTS OF: No. Qty Part No. Description 1. 1 51-7906 TAILHOUSING, DIECAST 2. 1 52-7905 SHAFT,
Installation Instructions
 Instructions Created by an: Inchworm Tacoma Dual Case Adapter Installation Instructions Suggested Tools: CAUTION: Safety glasses should be worn at all times when working with vehicles and related tools
DRIVE AXLE Nissan 240SX DESCRIPTION & OPERATION AXLE RATIO & IDENTIFICATION AXLE SHAFT & BEARING R & I DRIVE SHAFT R & I
 DRIVE AXLE 1990 Nissan 240SX 1990 DRIVE AXLES Rear Axle - R200 240SX, 300ZX DESCRIPTION & OPERATION The axle assembly is a hypoid type gear with integral carrier housing. The pinion bearing preload adjustment
Replace clutch and flywheel * (Volkswagen Sharan 2010-Present)
") Replace clutch and flywheel * (Volkswagen Sharan 2010-Present) *Caution! This instructions are created by random users and must be used as a reference only! Please, take all safety precautions, and if
Replace clutch and flywheel * (Volkswagen Sharan 2010-Present) *Caution! This instructions are created by random users and must be used as a reference only! Please, take all safety precautions, and if
Nissan Pathfinder (R50) Automatic to Manual Transmission Conversion Manual
 Automatic to Manual Transmission Conversion Manual") 1996 1999 Nissan Pathfinder (R50) Automatic to Manual Transmission Conversion Manual 1 1996 1999 Nissan Pathfinder (R50) Automatic to Manual Transmission Conversion Manual Conversion performed and Manual
1996 1999 Nissan Pathfinder (R50) Automatic to Manual Transmission Conversion Manual 1 1996 1999 Nissan Pathfinder (R50) Automatic to Manual Transmission Conversion Manual Conversion performed and Manual
1992 Clutch. Eclipse, Expo/Expo LRV, Galant, Mirage, Precis, 3000GT
 Article Text ARTICLE BEGINNING 1992 Clutch Eclipse, Expo/Expo LRV, Galant, Mirage, Precis, 3000GT DESCRIPTION All clutches are single disc type. Pressure plate assembly uses a diaphragm spring to engage
INSTALLATION INSTRUCTIONS: LONG TRAVEL KIT 07+ FJ CRUISER and 05+ TACOMA
 INSTALLATION INSTRUCTIONS: LONG TRAVEL KIT 07+ FJ CRUISER and 05+ TACOMA ISNTALLATION DIFFICULTY: Advanced APPROX TIME: 6-8 Hours REQUIRED TOOLS: 14mm-35mm sockets, wrenches, and ratchet 9/16 and 5/8 12
KDT916 - Watts Link - Complete Assembly
 KDT916 - Watts Link - Complete Assembly Please read all instructions carefully prior to installation and verify all kit contents and tools are on hand prior to installation. Professional Installation by
Installation Manual TWM Performance Kia Forte Short Shifter
 Installation Manual TWM Performance Kia Forte 2009+ Short Shifter Begin the installation by parking on a flat surface, as you will have to engage and disengage the hand brake and shift from gears to neutral.
The Driveshaft Shop Aluminum One Piece Driveshaft (05-10 GT)
") Install Time: 2-3 Hours Tools Needed: Metric Hex Key Set 10mm, 13mm, 15mm deep socket 12 point 12mm deep socket ⅜ Rachet 5 ½ Rachet Extensions ½ Drive Breaker Bar Blue Thread Locker Rubber Mallet Pry Bar
Install Time: 2-3 Hours Tools Needed: Metric Hex Key Set 10mm, 13mm, 15mm deep socket 12 point 12mm deep socket ⅜ Rachet 5 ½ Rachet Extensions ½ Drive Breaker Bar Blue Thread Locker Rubber Mallet Pry Bar
04-08 FORD F150 4 KIT
 9257700 04-08 FORD F50 4 KIT THANK YOU FOR CHOOSING ROUGH COUNTRY FOR YOUR SUSPENSION NEEDS. Rough Country recommends a certified technician install this system. In addition to these instructions, professional
Installation Instructions
 86-95 Suzuki Samurai Rear Wheel Bearing Kit (SKU# SAX-RWB) Instructions also include:! Rear Hub Bolt Kit!!!! (SKU# SAX-AS)!! SJ410 Backing Plate!!!! (SKU# SAX-410)! SJ413 Rear Drum Brake Hardware Kit!
INSTALLATION INSTRUCTION 88148
 INSTALLATION INSTRUCTION 88148 Rev C For Rancho Suspension Systems RS6548, RS6549 & RS6550: GM 2500HD, 2500, and 1500HD Trucks READ ALL INSTRUCTIONS THOROUGHLY FROM START TO FINISH BEFORE BEGINNING INSTALLATION
Aamir_bt The legend..
 Aamir_bt The legend.. How to do timing on a 4XE1-W (DOHC) engine. well i decided to to a write up for DOHC timing since there was only the SOHC written up, and i had to do a timing belt on my stylus anyways,
WATTS LINK REAR SUSPENSION KIT
 WATTS LINK REAR SUSPENSION KIT INSTALLATION MANUAL: Saleen S-Series / H-Series / Mustang GT 05-09 Model Years P/N: -8002-C6859B Saleen Performance Inc. -800-888-8945 www.saleen.com STOP IF YOU ARE NOT
Procharger Stage II Intercooled Supercharger System (11-14 GT)
") Procharger Stage II Intercooled Supercharger System (11-14 GT) Installation Time: Approximately one day. Installed on 2012 Mustang GT 5.0/Manual Required Tools 3/8 Socket Set (Standard and Metric) 1/2
Procharger Stage II Intercooled Supercharger System (11-14 GT) Installation Time: Approximately one day. Installed on 2012 Mustang GT 5.0/Manual Required Tools 3/8 Socket Set (Standard and Metric) 1/2
MANUAL TRANSMISSION MUA 5C (4X2, 4X4) AND TREMEC T5R(4X2)
 AND TREMEC T5R(4X2)") MANUAL TRANSMISSION 7B 1 RODEO TRANSMISSION MANUAL TRANSMISSION MUA 5C (4X2, 4X4) AND TREMEC T5R(4X2) CONTENTS Service Precaution...................... 7B 2 General Description..................... 7B
MANUAL TRANSMISSION 7B 1 RODEO TRANSMISSION MANUAL TRANSMISSION MUA 5C (4X2, 4X4) AND TREMEC T5R(4X2) CONTENTS Service Precaution...................... 7B 2 General Description..................... 7B
Installation Instructions for BMR Lowering Springs Performance ( Mustang GT)
") Installation Instructions for BMR Lowering Springs Performance (2015-2017 Mustang GT) Time Required: 3+ hours Notes: This install was done with the performance springs from BMR, but install should be the
Installation Instructions for BMR Lowering Springs Performance (2015-2017 Mustang GT) Time Required: 3+ hours Notes: This install was done with the performance springs from BMR, but install should be the
ALL AMERICAN BILLET. Front Drive System - Small Block Ford Installation Instructions
 ALL AMERICAN BILLET Front Drive System - Small Block Ford Installation Instructions Small Block Ford with AC & PS All American Billet Store (800) 764-0926 www.allamericanbilletstore.com Items needed for
Multistrada (MTS) Tank Installation Notes. Tools Required. Phase 1: Remove Fairings. Phase 2: Remove Fuel Tank
 Tank Installation Notes. Tools Required. Phase 1: Remove Fairings. Phase 2: Remove Fuel Tank") The California Cycleworks MTS tank provides an aftermarket alternative to the OEM nylon fuel tanks as used on aircooled Desmodue Ducati Multistrada 1100, 1000, and 620 models. This fuel tank is NOT for
The California Cycleworks MTS tank provides an aftermarket alternative to the OEM nylon fuel tanks as used on aircooled Desmodue Ducati Multistrada 1100, 1000, and 620 models. This fuel tank is NOT for
WARNING: the engine does not come with oil in it. Please fill the oil before starting. The 200cc hardknock requires 9/10 of a quart of oil.
 WARNING: the engine does not come with oil in it. Please fill the oil before starting. The 200cc hardknock requires 9/10 of a quart of oil. Things needed for assembly. -2 tubes of blue loc-tite. I don
Installation Instructions
 Instructions Created by an: Inchworm Gear Clockable Toyota Dual Transfer Case Adapter Kit, 21 or 23 Spline SKU# TCASE-IW-300-000 Installation Instructions CAUTION: Safety glasses should be worn at all
MANUAL TRANSAXLE Return to Main Table of Contents
 MANUAL TRANSAXLE Return to Main Table of Contents GENERAL... 2 MANUAL TRANSAXLE CONTROL... 12 SHIFT LEVER ASSEMBLY... 14 MANUAL TRANSAXLE... 15 MANUAL TRANSAXLE ASSEMBLY... 17 FIFTH SPEED SYNCHRONIZER
CAMARO/FIREBIRD
 CAMARO/FIREBIRD 1967-1969 TKO 5-SPEED MANUAL TO MANUAL TRANSMISSION CONVERSION INSTALLATION MANUAL FOLLOW FACTORY SERVICE MANUAL (FSM) RECOMMENDED SAFETY PRECAUTIONS. TRANSMISSION REMOVAL AND INSTALLATION
TRANSMISSION AND TRANSFER CASE
 XJ TRANSMISSION AND TRANSFER CASE 21-1 TRANSMISSION AND TRANSFER CASE TABLE OF CONTENTS page AX5 MANUAL TRANSMISSION... 1 NV3550 MANUAL TRANSMISSION... 42 AUTOMATIC TRANSMISSION 30RH... 88 page AW 4 AUTOMATIC
Self-Adjust Clutch Installation Guide
 Self-Adjust Clutch Installation Guide 0 STOP! READ CAREFULLY BEFORE INSTALLING CLUTCH This clutch must be installed by a qualified installer. Improper installation or failure to replace or resurface the