Volvo 850 Radiator Replacement Jason Reed 29 March 2013
|
|
|
- Merry Gordon
- 5 years ago
- Views:
Transcription

1 This write up covers removing and replacing the radiator on a GLT wagon with light pressure turbo and automatic transmission. This car has 162K miles. The radiator, which was original, developed a crack in the plastic near the metal crimps at corner near the upper coolant inlet. Though there are some good guides on this job that have already been written up, I couldn t find a guide to doing this job that included swapping over the intercooler to the new radiator so I decided to write up my experience. The Haynes manual procedure was well organized but lacked detail. It also has the flaw of describing the radiator as coming out of the top of the car. I wouldn t recommend this approach it s much easier in my opinion to lower the radiator and remove it from the bottom of the car. The Chilton manual, while generally second rate and often worthless, was more detailed than the Haynes in this particular area. It correctly in my opinion shows removing the radiator from the bottom and has good photos of the fan shroud and radiator removal. I recommend checking it out for this job. I also consulted the write up on volvospeed.com as well as the VADIS parts list and replacement procedure (which was very brief). This job was not too hard technically and doesn t require too many specialized tools but there are lots of pieces that need to be removed or relocated in order to get the radiator out and back in. The job took me about 8 hours over two days. After I had rested up for a day, I took the old radiator apart at the end caps to see how the engine oil and automatic transmission fluid coolers were set up and to


2 get a look at the crack in the end cap. Photos of the disassembled radiator are at the end of this write up. New Radiator: The picture below shows the new radiator (Volvo part # note VADIS version year 2004 lists this part as but it has been superseded). It has connections for the transmission fluid cooling lines and the engine oil cooling lines. New radiator One notable difference in the design between the old radiator and the new radiator is that the new one has narrow cuts in the main aluminum frame at the top and the bottom. The old one has a continuous solid frame without cuts. I m guessing that the cuts are to make the radiator a little less rigid so that it doesn t crack as easily from expansion and contraction. Valeo (OEM) makes radiator for Volvo. Stress-relief slot in radiator (left: top view. right: side view).
. SEM stands for preassembled screw and washer (according to boltscience.com).")

3 The other parts that I bought included a new upper radiator hose (Volvo part # ), 2 SEMs screws which hold the radiator to the frame (Volvo ), and a new air shield because my old one was bent and cracked (Volvo ). SEM stands for preassembled screw and washer (according to boltscience.com). I also bought replacement o-rings for the oil cooler lines and the transmission fluid cooler lines. In the end I reused the original o-rings and haven t seen leaks yet. If they do leak, I ll replace the o-rings as needed. I got all the parts from Waltrip Volvo in TN. SEMs screws (Volvo ) hold the radiator through bushings onto frame Useful tools: 7, 8, 10, 12mm sockets (standard and deep) ¼ drive ¼ drive ratchet ¼ drive extensions (6 and 3 ) ¼ drive universal joint
4 Useful tool: ratchet with 6 long ¼ drive extension with a flex joint + socket. Nylon tie wraps (to hold up the condenser while the radiator and charge air cooler aka intercooler are out of the car) circlip pliers or needle nose pliers to pry open cooling line clips T25 bit and ratchet T25 screwdriver I ve written up a high level outline of the procedure to give a sense of the overall sequence of events. Following the high level outline I ve included an expanded section that goes in more detail line-by-line with photographs and comments on the individual steps. Procedure (high level outline): Removing the old radiator: 1) raise front of car on ramps 2) remove upper fan shroud bolts and screws 3) remove air shield and detach relays from air shield 4) disconnect clips holding vacuum lines and wiring to the fan shroud 5) remove air intake ducting 6) remove screws holding Evap Emissions charcoal canister purge valve 7) remove the cover plate over the throttle to improve access 8) disconnect fan wiring connectors 9) lift fan shroud up and out of the car 10) remove splash shield from under car 11) drain coolant from radiator petcock (13mm socket). 12) remove lower radiator coolant hose clamp and hose and drain more coolant from radiator 13) remove upper radiator coolant hose 14) Remove clips and disconnect engine oil cooling lines (upper and lower) and catch oil (about ½ liter). Cover the lines to exclude dirt 15) remove lower intercooler hose. 16) Remove clips and disconnect automatic transmission cooling lines (upper and lower) and catch fluid. Cover the lines to exclude dirt 17) from the front of the car, remove the upper radiator mounting bolts. 18) tiewrap the condenser to the front rail of the car to hold it in place. 19) remove the lower radiator mounting bolts 20) loosen the SEMs main mounting bolts that hold the radiator. 21) remove the bolts and lower the radiator down to the ground 22) the air pump may block the descent of the radiator (it did on my GLT). If so, remove the two bolts on the air pump bracket and lift the air pump up and backwards to allow clearance of the radiator. 23) rotate the bottom of the radiator/intercooler combination forwards and out from underneath the car. Swapping the intercooler over to the new radiator: 24) loosen the bolts to separate the intercooler from the radiator
5 25) remove clamp plates from intercooler and clips from radiator 26) Lift intercooler off of old radiator 27) install clips on new radiator (6 side clips and two clips at top) 28) assemble the intercooler onto the new radiator using plates and bolts Installing the new radiator: 29) position radiator and intercooler under car and lift up into the engine 30) install SEMs bolts into frame and tighten to hold the radiator 31) install lower radiator mounting bolts 32) cut and remove the tiewraps holding the condenser to the frame 33) install upper radiator mounting bolts 34) connect automatic transmission cooling lines and install clips. 35) install lower intercooler hose 36) connect upper and lower engine oil cooling lines and install clips 37) reattach the air pump bracket if needed to unbolt it in step 22 38) install fan shroud. Insert tabs at bottom into slots in radiator 39) connect the fan wiring connectors 40) re-attach the Evap purge valve to the fan shroud 41) install upper intercooler hose 42) install CPU air duct and airbox intake 43) position the relays, wires and vacuum hoses under the air shield 44) clip relays back into the air shield and lower air shield onto the shroud 45) install fan shroud bolts and screws 46) reattach cover plate over throttle Topping up fluids and checking for leaks: 47) refill expansion tank with 50/50 diluted water/coolant 48) top up engine oil 49) start car and check for leaks 50) top up coolant. 51) reinstall the splash shield under the car 52) lower car 53) drive car a short while and check the coolant level again.
 raise front of car on ramps.")

6 Detailed line-by-line Procedure Removing the old radiator: 1) raise front of car on ramps. Use jack stands and wheel chocks on both rear wheels to improve safety. 2) remove upper fan shroud bolts and screws
7


8 3) remove air shield and detach relays from air shield
")

9 4) disconnect connectors holding vacuum lines and wiring to the fan shroud 5) remove air intake ducting (CPU air duct, air box intake, upper intercooler hose)
10


11 Upper intercooler rubber hose removal: Upper intercooler metal tube removal:
 remove the cover")

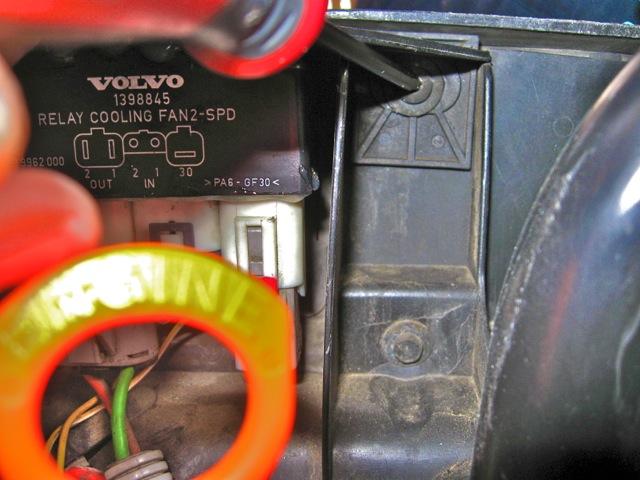
12 6) remove screws holding Evaporative Emissions charcoal canister purge valve 7) remove the cover plate over the throttle to improve access 8) disconnect fan wiring connectors (arrowed in picture below):


13 9) lift fan shroud up and out of the car
 remove splash shield from under car.")

14 Pictured above: view of old radiator after lifting the fan shroud out of the way 10) remove splash shield from under car. Note that the splash shield has three clips at the front that connect to the front bumper and a clip at the back that snaps into a slot in the rail at the bottom of the radiator.
. I drained about 6.")
 remove lower radiator coolant hose clamp")
15 11) drain coolant from radiator petcock (13mm socket). I drained about 6.5 liters of coolant. 12) remove lower radiator coolant hose clamp and hose and drain more coolant from radiator


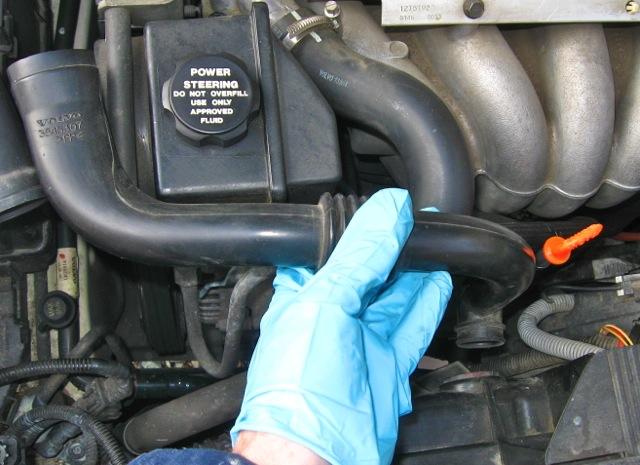
16 13) remove upper radiator coolant hose (I replaced the upper hose so I removed it from both ends, at the radiator and at the thermostat as pictured below):
. Cover the lines to exclude dirt.")

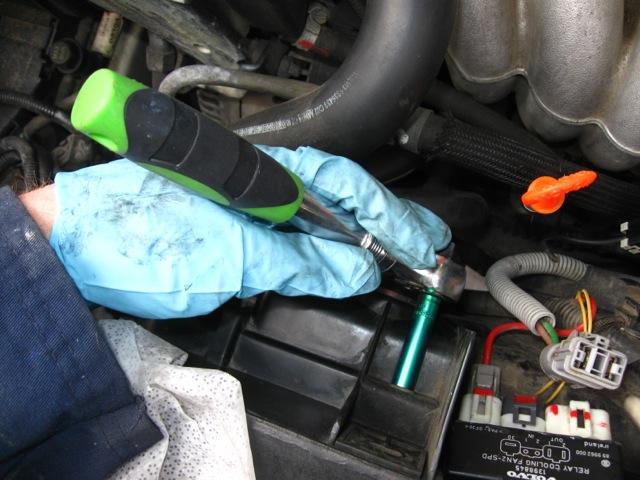
17 14) Remove clips and disconnect engine oil cooling lines (upper and lower) and catch oil (about ½ liter). Cover the lines to exclude dirt. Use circlip pliers (shown) or needle nose pliers to pry open the upper hose clip: Cover the fitting on the end of the line with a glove or rag (finger tip from a rubber glove shown below) to protect it from dirt


18 Lower hose removal (be prepared to catch the oil):


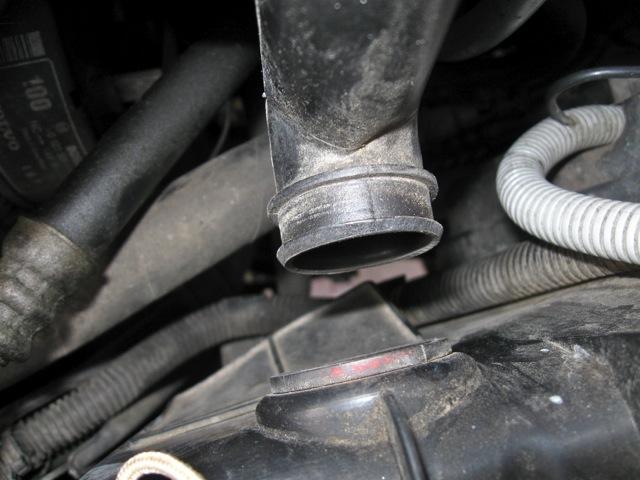
19 15) remove lower intercooler hose by disconnecting it at both ends: from the intercooler and the pipe leading to the throttle.
 from the front of the car, remove the upper radiator mounting bolts.")

20 16) Remove clips and disconnect automatic transmission cooling lines (upper and lower) and catch fluid (less than 100ml). Cover the lines to exclude dirt. 17) from the front of the car, remove the upper radiator mounting bolts. The position of these bolts between the radiator and the headlights makes it necessary to have a flexible tool. Note that there is a second bolt below the upper bolt do not remove the second bolt yet (it will come off after you remove the radiator + intercooler from the car).


21 Driver s side bolt (shown below). The bolt on this side is more difficult to reach. I had to guide the socket into position over the upper bolt from inside the engine bay as I maneuvered the flexible extension from the outside. 18) tie wrap the condenser to the front rail of the car to support it and hold it in place. When the lower radiator mounting bolts and SEMs bolts are removed, the support for the condenser will be from the tie wraps in order to keep stress off of the AC refrigerant lines.


22 19) remove the lower radiator mounting bolts. The condenser is now disconnected from the radiator and intercooler assembly.

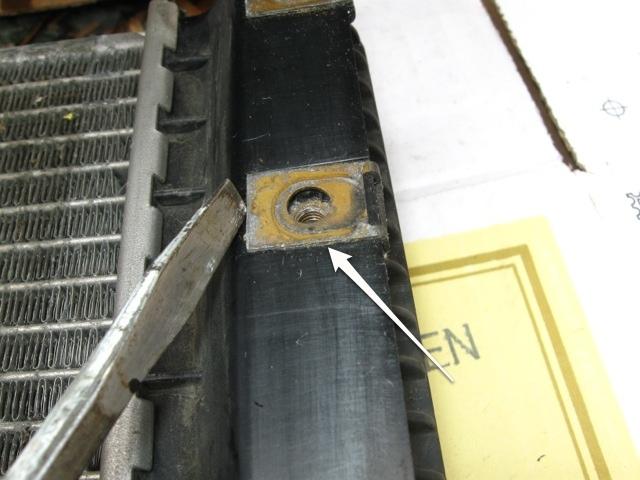
 remove the bolts as you hold and lower the radiator and")
23 20) loosen the SEMs main mounting bolts that hold the radiator to the frame. The radiator will start to descend as you loosen these bolts. 21) remove the bolts as you hold and lower the radiator and intercooler down to the ground. Note the condenser stays in place.
. If so, remove the two bolts on the air pump bracket and lift the air")
 rotate the bottom of the radiator/intercooler combination forwards and")
24 22) the air pump may block the descent of the radiator (it did on my GLT). If so, remove the two bolts on the air pump bracket and lift the air pump up and backwards to allow clearance of the radiator. 23) rotate the bottom of the radiator/intercooler combination forwards and out from underneath the car.
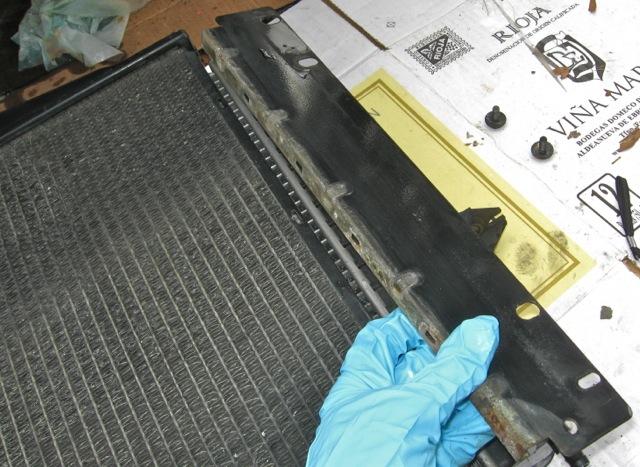
 loosen the bolts to separate")

25 Swapping the intercooler over to the new radiator: 24) loosen the bolts to separate the intercooler from the radiator 25) remove clamp plates from intercooler and clips from radiator
26

 Lift intercooler off")
27 Clips at top of radiator (2 clips). I cleaned these off with a wire brush, put some white lithium grease on them and transferred them over to the new radiator: 26) Lift intercooler off of old radiator:

 attach the intercooler onto the new radiator using the")
28 27) install clips on new radiator (6 side clips and two clips at top). The picture below shows the intercooler in place on top of the new radiator, before the two metal clamping plates have been installed to hold the intercooler against the radiator: 28) attach the intercooler onto the new radiator using the plates and bolts
 position new radiator")

29 Installing the new radiator: 29) position new radiator and intercooler under car and lift up into the engine area


30 30) install SEMs bolts into frame and tighten to hold the radiator in position Driver s side with radiator resting on the air pump:


31 Driver s side: Passenger s side:

 cut and remove the tie wraps")
32 31) install lower radiator mounting bolts the radiator now supports the condenser again. 32) cut and remove the tie wraps holding the condenser to the frame


33 33) reinstall upper radiator mounting bolts 34) connect upper and lower automatic transmission cooling lines and install clips. I applied ATF to the upper hose o-ring so that it would slide in nicely. I reused the original o-ring. I put tie wraps around the clips to insure the clips don t come loose.


34 35) install lower intercooler hose 36) connect upper and lower engine oil cooling lines and install clips and tie wraps. I applied oil to the o-rings on these lines to make them go in smoothly. I reused the original o-rings.
 install fan and shroud back into the")

35 37) reattach the air pump bracket if you needed to move it during removal of the radiator 38) install fan and shroud back into the engine. Insert tabs at bottom into slots in radiator. Image below shows the fan shroud after lowering it back into the engine compartment:
")


36 39) reconnect the fan wiring connectors 40) re-attach the Evap purge valve to the fan shroud 41) reinstall upper intercooler hose: 42) install CPU air duct and air box intake. Align the rubber bushings with the slots on the shroud. Above: realign the rubber bushings (left) to fit into the slots in shroud (right)


37 43) position the relays, wires and vacuum hoses back under the air shield 44) clip the relays back into the air shield and lower the air shield onto the shroud
 start car and check for leaks at the hoses (vacuum lines, intercooler hoses, coolant, oil, transmission fluid) 50) top up coolant. I was able to get about 5.")
38 45) tighten fan shroud bolts and screws 46) Reattach cover plate over throttle Topping up fluids and checking for leaks: 47) refill expansion tank with 50/50 diluted water/coolant 48) top up engine oil 49) start car and check for leaks at the hoses (vacuum lines, intercooler hoses, coolant, oil, transmission fluid) 50) top up coolant. I was able to get about liters of coolant back in at this point (I measured about 6.5 liters drained out originally, and there was some small amount left in the radiator or spilled) 51) reinstall the splash shield under the car 52) lower car 53) drive car a short while to let it fully heat up. Stop engine and check the coolant level again. I find in general that it drops about 1 liter. Top up. Disassembling the old radiator: I disassembled the old radiator the next day, after I had rested up a bit. I used a flat blade screwdriver to pry open the tangs away from the plastic end cap, allowing me to pull the end caps off of the core of the radiator. I took some pictures of the crack and the general construction of the coolers in the end caps. The overview picture below shows the inlet side of the radiator with the embedded engine oil cooler. The coolant inlet is at the upper left of the image and the crack is at that corner right next to the inlet connection:


39 Below are photos of the inlet side of the radiator where hot coolant enters the radiator. It is the part of the radiator exposed to the harshest temperature swings. This would be the most likely place for the radiator to fatigue and eventually fail due to the expansion and contraction caused by temperature cycling. The expansion and contraction cycles cause the plastic to crack over time as the plastic ages and becomes brittle. Perhaps the slots cut in the metal frame on the new radiator will decouple the frame expansion from the end cap and extend the life of the radiator. We ll see! The original one lasted for 160k miles and about 16 years. Crack as seen from the outside (left) and inside (right) of the end cap. Overall crack length was about 4cm.
Installation instruction do88 Performance Radiator for Volvo S60 V70 XC70 S
 Installation instruction do88 Performance Radiator for Volvo S60 V70 XC70 S80 00-09 1. This instruction shows how to replace the OEM radiator with do88 performance radiator. At this type of installation
2017+ L5P Duramax 3 ½ Down Pipe & EGR Fix Kit
 2017+ L5P Duramax 3 ½ Down Pipe & EGR Fix Kit Covers installation of PN s: WCF100630, WCF100829 Note: This Kit is for off road competition use only! Off Road Competition Use Tuning & Exhaust System is
Instant Chat off the main page of Or simply call our tech team at
 FRONT MOUNT INTERCOOLER 2015+ WRX 2017-07-07 Thank you for purchasing this PERRIN product for your car! Installation of this product should only be performed by persons experienced with installation of
Z1 Motorsports 300zx 2.5 Upgraded piping & BA SMIC Install Guide
 Z1 Motorsports 300zx 2.5 Upgraded piping & BA SMIC Install Guide Congratulations on your new upgraded piping and intercooler kit, this kit has proven to provide the lowest intake air temps to date on our
Parts List See cover Page
 Thank you for purchasing the CorkSport Front Mount Intercooler Kit for the 2010-2013 Mazdaspeed 3. Keep your BAT s under check with the CorkSport FMIC Kit with the small or large intercooler. Please let
2015+ EcoBoost F150 & Raptor Intercooler Install
 2015+ EcoBoost F150 & 2017+ Raptor Intercooler Install Note: This entire job can be performed with the truck on the ground - No need to raise the vehicle. The most difficult part is removing the grille
XDP Complete EGR Race Track Kit w/up-pipe. Item Number: XD144
 XDP Complete EGR Race Track Kit w/up-pipe Item Number: XD144 PACKING LIST: 2 - Lined 3/4" SS Hose Clamp 1-3/4 Silicone Hose 1 - XDP Engraved EGR Valve Block-Off Plate with O-ring 1 - EGR Cooler Block-Off
Procharger Stage II Intercooled Supercharger System (11-14 GT)
") Procharger Stage II Intercooled Supercharger System (11-14 GT) Installation Time: Approximately one day. Installed on 2012 Mustang GT 5.0/Manual Required Tools 3/8 Socket Set (Standard and Metric) 1/2
Procharger Stage II Intercooled Supercharger System (11-14 GT) Installation Time: Approximately one day. Installed on 2012 Mustang GT 5.0/Manual Required Tools 3/8 Socket Set (Standard and Metric) 1/2
Ford Racing Performance Improvement Intake Manifold (96-04 GT) Time Necessary: Approximately 4 hours
 Time Necessary: Approximately 4 hours") Ford Racing Performance Improvement Intake Manifold (96-04 GT) Time Necessary: Approximately 4 hours Tools Required: Ratchet and socket set Torque wrench Large adjustable wrench Needle nose pliers A dozen
Ford Racing Performance Improvement Intake Manifold (96-04 GT) Time Necessary: Approximately 4 hours Tools Required: Ratchet and socket set Torque wrench Large adjustable wrench Needle nose pliers A dozen
Installation instruction do88 Intercooler for Volvo S60 V70 XC70 S80 Turbo 00-09
 Installation instruction do88 Intercooler for Volvo S60 V70 XC70 S80 Turbo 00-09 1. This instruction shows how to replace the OEM intercooler with our performance intercooler. At this type of installation
SHELBY GT500
 2007-2009 SHELBY GT500 Removal of Factory Unit WARNING: 1. Radiator fluid must be handled properly. Please observe local ordinances with regards to handling and disposal. 2. Allow vehicle and components
Replacing MK4 Golf/Jetta radiator mounts in-car
 Replacing MK4 Golf/Jetta radiator mounts in-car This is a guide to replacing the radiator mounts in a MK4 Golf/Jetta. This involves moving the core support to the service position which allows you to do
Installation instruction do88 Intercooler for SAAB 9-3SS/SC 4-cyl Turbo
 Installation instruction do88 Intercooler for SAAB 9-3SS/SC 4-cyl Turbo This instruction shows how to replace the OEM intercooler with this performance intercooler. 1. 4. 5. At this type of installation
EXPANSION TANK PARTS LIST AND INSTALLATION GUIDE
 PARTS LIST AND INSTALLATION GUIDE PARTS LIST 1 PC MISHIMOTO RADIATOR 2 PC CAST THERMOSTAT HOUSINGS 1 PC MAGNETIC DRAIN PLUG W/ DOWTY OIL SEAL 4 PC RUBBER BUSHINGS AND METAL COLLARS 3 PC HARDWARE PACKETS
Ford Racing BOSS 302 Engine Oil Cooler (11-14 GT)
") Tools needed: 14mm hex socket 7mm socket/wrench 8mm socket/wrench Ford Racing BOSS 302 Engine Oil Cooler (11-14 GT) 10mm socket (for airbox removal) ¾ inch or 19mm wrench Torque wrench Appropriate ratchets
Tools needed: 14mm hex socket 7mm socket/wrench 8mm socket/wrench Ford Racing BOSS 302 Engine Oil Cooler (11-14 GT) 10mm socket (for airbox removal) ¾ inch or 19mm wrench Torque wrench Appropriate ratchets
IAG Street Series Air / Oil Separator (AOS) For 2017 WRX
 For 2017 WRX") P IAG Street Series Air / Oil Separator (AOS) For 2017 WRX Part# IAG-ENG-7152 Tools Required: Ratchet, torque wrench, extensions, needle nose pliers, hose cutter, snips/scissors, flathead screwdriver,
P IAG Street Series Air / Oil Separator (AOS) For 2017 WRX Part# IAG-ENG-7152 Tools Required: Ratchet, torque wrench, extensions, needle nose pliers, hose cutter, snips/scissors, flathead screwdriver,
Phone Fax
 Directions for Installation of ECS Paxton Supercharger Kit Disconnect battery Remove stock serpentine belt Remove stock belt tensioner, save the 2 bolts for later use on supercharger bracket Remove alternator
BHW Engine Coolant Temperature Replacement
 BHW Engine Coolant Temperature Replacement NEVER perform this procedure on a hot engine. Parts: 059 919 501 A dual temperature sensor 032 121 142 retaining spring N 903 168 02 sensor round seal N 905 216
IAG Competition Series Air / Oil Separator (AOS) For WRX
 For WRX") P IAG Competition Series Air / Oil Separator (AOS) For 2015-16 WRX Part# IAG-ENG-7252 Tools Required: Ratchet, torque wrench, extensions, needle nose pliers, hose cutter, snips/scissors, flat head screw
P IAG Competition Series Air / Oil Separator (AOS) For 2015-16 WRX Part# IAG-ENG-7252 Tools Required: Ratchet, torque wrench, extensions, needle nose pliers, hose cutter, snips/scissors, flat head screw
2015+ SUBARU STI FRONT-MOUNT INTERCOOLER PARTS LIST AND INSTALLATION GUIDE INSTALL DIFFICULTY DISCLAIMER CAUTION INSTALL PROCEDURE TOOLS NEEDED
 PARTS LIST AND PARTS INCLUDED 1PC ALUMINUM INTAKE PIPE 1PC BAR-AND-PLATE INTERCOOLER 1PC STEEL CRASH BAR W/ MOUNTING HARDWARE 2PC HOT-SIDE INTERCOOLER PIPES 2PC COLD-SIDE INTERCOOLER PIPES 1PC BPV FLANGE
IAG Street Series Air / Oil Separator (AOS) For WRX
 For WRX") P IAG Street Series Air / Oil Separator (AOS) For 2015-16 WRX Part# IAG-ENG-7152 Tools Required: Ratchet, torque wrench, extensions, needle nose pliers, hose cutter, snips/scissors, flat head screw driver,
P IAG Street Series Air / Oil Separator (AOS) For 2015-16 WRX Part# IAG-ENG-7152 Tools Required: Ratchet, torque wrench, extensions, needle nose pliers, hose cutter, snips/scissors, flat head screw driver,
Subaru Front Mount Intercooler Kit STI Subaru Front Mount Intercooler Kit STI
 Subaru Front Mount Intercooler Kit STI 2008-2014 715500 Subaru Front Mount Intercooler Kit STI 2008-2014 Congratulations on your purchase of the Subaru Front Mount Intercooler Kit STI 2008-2014. The following
COLD AIR INTAKE INSTALLATION INSTRUCTIONS PART NUMBER D A. APPLICATION: E36/7 M-Roadster or M-Coupe 3.
 COLD AIR INTAKE INSTALLATION INSTRUCTIONS PART NUMBER D760-0323A APPLICATION: 1998-00 E36/7 M-Roadster or M-Coupe 3.2 Liter PARTS LIST Air Filter Assembly 3 1/2" Tube Intake Shield Silicone Hose Airflow
Owner smanual. Banks Techni-Cooler System Dodge 6.7L Cummins (24-valve) ISB Pickup Trucks (2500/3500) USE WITH SYSTEM P/N 25987
 ISB Pickup Trucks (2500/3500) USE WITH SYSTEM P/N 25987") Owner smanual with Installation Instructions Banks Techni-Cooler System 2013-16 Dodge 6.7L Cummins (24-valve) ISB Pickup Trucks (2500/3500) USE WITH SYSTEM P/N 25987 Gale Banks Engineering 546 Duggan Avenue
Owner smanual with Installation Instructions Banks Techni-Cooler System 2013-16 Dodge 6.7L Cummins (24-valve) ISB Pickup Trucks (2500/3500) USE WITH SYSTEM P/N 25987 Gale Banks Engineering 546 Duggan Avenue
* PLEASE READ INSTRUCTIONS PRIOR TO INSTALLATION
 XDP 6.0L Complete EGR Delete Kit w/up-pipe Item Number: XD169 PACKING LIST: 2 - Lined 3/4" Hose Clamps, 1-180 Coolant Tube, 1-3/4 Silicone Hose, 1 - Stainless Steel Up-pipe 1 - EGR Valve Block-Off Plate,
Audi S4 SMIC Installation. B5 Audi S4 Side Mount Intercooler installation
 Audi S4 SMIC Installation B5 Audi S4 Side Mount Intercooler installation Disclaimer: These installation instructions are to be used as a guide only. It is at the reader and/or installer s discretion to
COLD AIR INTAKE INSTALLATION INSTRUCTIONS. # D Fits: i (4.8L)
") COLD AIR INTAKE INSTALLATION INSTRUCTIONS # D760-0012 Fits: 2006-10 550i (4.8L) PARTS LIST Air Box Assembly Left tube Center tube Right tube Outer Tube AFM housing AFM/TB tube Hardware Kit Congratulations
COLD AIR INTAKE INSTALLATION INSTRUCTIONS # D760-0012 Fits: 2006-10 550i (4.8L) PARTS LIST Air Box Assembly Left tube Center tube Right tube Outer Tube AFM housing AFM/TB tube Hardware Kit Congratulations
Generator, removing and
 Page 1 of 14 27-26 Generator, removing and installing CAUTION! Disconnect the battery Ground (GND) strap before working on the electrical system. Notes: Before disconnecting the battery, determine the
1. Disconnect the battery. This is important! This will prevent air bag deployment.
 PARTS PACKING LIST Evaporator assembly Drain tube Plastic air plug Hardware package 11040 3601 W. Clarendon Phoenix, Arizona 85019 (602) 233-0090 800-648-4475 www.ackits.com 2003-4 Jeep Wrangler EVAPORATOR
BEW engine timing belt replacement procedure from MOGolf (as demonstrated on a 2004 Jetta).
.") BEW engine timing belt replacement procedure from MOGolf (as demonstrated on a 2004 Jetta). Based on the procedure published by Volkswagen, but modified for the "average" shadetree mechanic. Some special
BEW engine timing belt replacement procedure from MOGolf (as demonstrated on a 2004 Jetta). Based on the procedure published by Volkswagen, but modified for the "average" shadetree mechanic. Some special
Tools needed: Here is a pic of the shift kit I used. It is a Transgo brand and as you can see, it just a bag full of springs and one valve.
 Before installing a shift kit, be sure the transmission is in good operating order. If your transmission is making noises, slipping, shifting bad or the fluid looks brown or smells burnt, take the transmission
2001 BMW X5 4.4i. Fuel Filter Replacement
 P P 2001 BMW X5 4.4i Fuel Filter Replacement Symptoms for Replacement: OBDII code P0171, Lean Bank1, which could be a bad or dirty MAF sensor Sluggish engine performance including hesitation with Wide
These instructions were written for reference only and the use of a factory service manual is recommended.
 Introducing the CorkSport High Pressure Fuel Line designed for the MZR DISI. This fuel line is designed to replace the OEM fuel line which are prone to failure at the brazed connection at the rail. The
2016+ NISSAN TITAN XD
 PARTS LIST AND PARTS INCLUDED 1PC MISHIMOTO INTERCOOLER 2PC SILICONE BOOTS WITH DURACORE TECHNOLOGY 4PC CONSTANT-TENSION T-BOLT CLAMPS 2PC ALUMINUM SPACERS MOUNTING HARDWARE CAUTION Never work on the cooling
Includes: 1. High Flow Turbo Up-Pipe 1. J-Hook Block Off / Coolant Reroute 1. Coolant Hose 1. EGR Valve Block Off Plate 2. Hose Clamps 4.
 Includes: 1. High Flow Turbo Up-Pipe 1. J-Hook Block Off / Coolant Reroute 1. Coolant Hose 1. EGR Valve Block Off Plate 2. Hose Clamps 4. Bolts & Nuts WARNING: This product is not legal for sale or use
Intake Kit Supplement for CRV and Pathfinder
 Intake Kit Supplement for CRV and Pathfinder This guide will briefly outline how to install the intake kits for the Honda CRV and Nissan Pathfinder. This is a pretty basic job, but for the average person
Installation instruction do88 Intercooler for SAAB
 Installation instruction do88 Intercooler for SAAB 9-5 98-09 This instruction shows how to replace the OEM intercooler with this performance intercooler without removing radiator or AC condenser from vehicle.
OIL COOLER KIT INSTALLATION INSTRUCTIONS PART NUMBER D
 OIL COOLER KIT INSTALLATION INSTRUCTIONS PART NUMBER D570-0904 APPLICATION: 2011-2012 E90 335i/xi (N55 engine) with BMW standard bumper and with stock oil cooler Congratulations for being selective enough
OIL COOLER KIT CHEVY CAMARO 2.0T PARTS LIST AND INSTALLATION GUIDE INSTALL DIFFICULTY DISCLAIMER CAUTION TOOLS NEEDED NOTE INSTALL PROCEDURE
 PARTS LIST AND PARTS INCLUDED 3PC APPLICATION-SPECIFIC MOUNTING BRACKETS 1PC HORN RELOCATION MOUNTING BRACKET 1PC 25-ROW OIL COOLER (SLEEK SILVER OR STEALTH BLACK) 1PC 4'4" STAINLESS STEEL BRAIDED HOSE
Installation instructions, accessories - Fuel driven heater 912-D
 XC90 Section Group Weight(Kg/Pounds) Year Month 8 87 2002 10 XC90 2003 D5244T, XC90 2004 D5244T, XC90 2005 D5244T AW50/51 AWD, XC90 2006 D5244T, XC90 2006 D5244T AW50/51 AWD D5244T R8703687 Page 1 of 20
Anglefire s Guide to Radiator Replacement
 Land Rover Discovery 3 Anglefire s Guide to Radiator Replacement Mark Colston WWW.DISCO3CLUB.CO.UK August 2011 Version 1.0 Copyright Mark Colston Change Record. DATE Revision Update Notes Made By August
Installation instruction do88 Intercooler for SAAB 9-3SS/SC 2,8 V6 Turbo
 Installation instruction do88 Intercooler for SAAB 9-3SS/SC 2,8 V6 Turbo This instruction shows how to replace the OEM intercooler with this performance intercooler. At this type of installation we always
These instructions were written for reference only and the use of a factory service manual is recommended.
 Introducing the CorkSport High Pressure Fuel Line designed for the MZR DISI. This fuel line is designed to replace the OEM fuel line which are prone to failure at the brazed connection at the rail. The
D. Jensen REMOVAL AND REPLACEMENT OF BRAKE BOOSTER ON LHD 95 XJ6
 D. Jensen REMOVAL AND REPLACEMENT OF BRAKE BOOSTER ON LHD 95 XJ6 V. 1.0 Nov. 26, 2005 Distribution: www.jag-lovers.com CC: X300 List Administrator The Fine Print: The following is a summary of my experience
List of parts needed below. Tools needed
 1 BMW 645 Coolant leak repair (Cap with Seal Repair and Expanding Coolant Pipe Installation w Pics) By Michael R. Brown (Estimated time to complete the job is 6-8 hrs) List of parts needed below. BMW PART
Includes: 1. J-hook Block Off / Coolant Reroute 1. Coolant Hose 1. Turbocharger Up Pipe Block Off Disc 2. Hose clamps
 Includes: 1. J-hook Block Off / Coolant Reroute 1. Coolant Hose 1. Turbocharger Up Pipe Block Off Disc 2. Hose clamps WARNING: This product is not legal for sale or use on pollution controlled vehicles
2001 V70 T5 ETM Removal and Cleaning Directions
 2001 V70 T5 ETM Removal and Cleaning Directions Howard Cheng howardc64@gmail.com 10/24/05 Version 1.4 Read this before you start I performed this ETM cleaning because I had gotten 2 reduced performance
Installation instruction do88 Intercooler for SAAB 9-3 1,9 TTiD
 Installation instruction do88 Intercooler for SAAB 9-3 1,9 TTiD This instruction shows how to replace the OEM intercooler with this performance intercooler. At this type of installation we always recommend
Subaru WRX Performance Charge-Pipe System, 2015+
 PARTS LIST AND PARTS LIST 1PC BAR-AND-PLATE INTERCOOLER 1PC INTERCOOLER MOUNTING BRACKET 1PC CHARGE-PIPE ASSEMBLY 1PC AIR DIVERTER WITH ATTACHED RUBBER GASKETS 1PC CHARGE-PIPE-TO-INTERCOOLER HOSE INSTALLATION
OIL COOLER KIT INSTALLATION INSTRUCTIONS PART NUMBER D E92 335i/xi (N55 engine) with BMW Standard bumper and with stock oil cooler
 with BMW Standard bumper and with stock oil cooler") OIL COOLER KIT INSTALLATION INSTRUCTIONS PART NUMBER D570-0924 APPLICATION: 2011-12 E92 335i/xi (N55 engine) with BMW Standard bumper and with stock oil cooler Congratulations for being selective enough
OIL COOLER KIT INSTALLATION INSTRUCTIONS PART NUMBER D570-0924 APPLICATION: 2011-12 E92 335i/xi (N55 engine) with BMW Standard bumper and with stock oil cooler Congratulations for being selective enough
CorkSport Mazdaspeed Protégé Intercooler Hoses Mazdaspeed Protégé
 CorkSport Mazdaspeed Protégé Intercooler Hoses 2002-2003.5 Mazdaspeed Protégé Thank you for purchasing the CorkSport Mazdaspeed Protégé Intercooler Hose Kit. This kit has been designed and tested to be
Installing the Wireless Charging upgrade kit in a 2018 XT5 (Platinum version)
") Installing the Wireless Charging upgrade kit in a 2018 XT5 (Platinum version) September 2, 2018 Tools needed: Wireless charger upgrade kit Plastic trim tools 7 mm nut driver Background: I purchased the
Installing the Wireless Charging upgrade kit in a 2018 XT5 (Platinum version) September 2, 2018 Tools needed: Wireless charger upgrade kit Plastic trim tools 7 mm nut driver Background: I purchased the
Always wear safety glasses when working on your vehicle.
 90-93 MAZDA MIATA SUPERCHARGER KIT The KraftWerks 90-93 Mazda Miata Supercharger Kit was designed for easy installation. Competent mechanics with the appropriate tools will find the process to be relatively
Installation Instruction for '84-'89 Nissan 300ZX High Performance Intercooler System (Part No )
") Installation Instruction for '84-'89 Nissan 300ZX High Performance Intercooler System (Part No. 2-124) Page ii DCB (06/14/02 12:19 AM) Version 1.0 Page iii Table of Contents 1. TOOLS REQUIRED...1 2. INSTALLATION
Installation Instruction for '84-'89 Nissan 300ZX High Performance Intercooler System (Part No. 2-124) Page ii DCB (06/14/02 12:19 AM) Version 1.0 Page iii Table of Contents 1. TOOLS REQUIRED...1 2. INSTALLATION
OIL COOLER KIT INSTALLATION INSTRUCTIONS PART NUMBER D E92 335is (N54 engine) with BMW M-Technic bumper and with stock oil cooler
 with BMW M-Technic bumper and with stock oil cooler") OIL COOLER KIT INSTALLATION INSTRUCTIONS PART NUMBER D570-0923 APPLICATION: 2011 E92 335is (N54 engine) with BMW M-Technic bumper and with stock oil cooler Congratulations for being selective enough to
OIL COOLER KIT INSTALLATION INSTRUCTIONS PART NUMBER D570-0923 APPLICATION: 2011 E92 335is (N54 engine) with BMW M-Technic bumper and with stock oil cooler Congratulations for being selective enough to
Installation Instruction for '84-'89 Nissan 300ZX High Performance Intercooler System (Part No )
") Installation Instruction for '84-'89 Nissan 300ZX High Performance Intercooler System (Part No. 2-124) Routing of the Intercooler Pipe It is necessary to follow the exact sequence of the installation
Installation Instruction for '84-'89 Nissan 300ZX High Performance Intercooler System (Part No. 2-124) Routing of the Intercooler Pipe It is necessary to follow the exact sequence of the installation
Z06 Corvette Lingenfelter High Flow Air Intake
 2006-2007 Z06 Corvette Lingenfelter High Flow Air Intake LN4233 1557 Winchester Road Decatur, Indiana 46733 260 724 2552 phone 260 724 8761 fax www.lingenfelter.com Parts List # Part number Description
Installation instruction do88 performance Intercooler for Volvo S60/V60 T6 MY10-
 Installation instruction do88 performance Intercooler for Volvo S60/V60 T6 MY10-1. This instruction shows how to replace the OEM intercoolers with do88 performance intercoolers. At this type of installation
HYUNDAI VELOSTER SHORT RAM 1.6T INTAKE INSTALLATION INSTRUCTIONS
 Installation: HYUNDAI VELOSTER SHORT RAM 1.6T INTAKE INSTALLATION INSTRUCTIONS Tools needed: 1/4 or 3/8 drive ratchet 12 extension (shorter ones work, but will be difficult to reach some bolts) 10mm socket
SR Performance Radiator Installation Instructions
 List of Tools: SR Performance Radiator Installation Instructions Phillips Head Screwdriver 3/8 Ratchet 8mm socket 7mm socket Optional Dremel or file Installation Instructions: Step 1 Drain radiator by
Special Note About The JDM High Performance Water Pump:
 Page 1 of 30 JDM Engineering, Inc. home Call Us! 732-780- 0770 back to Installation Instructions Electric Fan Upgrade Kit Electric Fan Wiring Diagram Thank you for your purchase of the JDM Engineering
Exhaust Heat Shield Instructions ND
 Exhaust Heat Shield Instructions ND 2016 + Thank you for purchasing the Track Dog Racing Exhaust Heat Shield for the 2016 to Present Mazda MX-5. Our TDR Heat Shield is designed to help maintain lower temperatures
Installation Instructions
 Suzuki Samurai 1 Inch and 2 Inch Body Lift Kit (SKU# SSP-BL) Installation Instructions Background: These instructions are designed for installing the 2 body lift. Our approach is to raise the entire body
7 th Gen. Celica GTS Turbo Kit Installation Guide This kit has not been CARB approved and is intended for racing / offroad purposes only.
 7 th Gen. Celica GTS Turbo Kit Installation Guide This kit has not been CARB approved and is intended for racing / offroad purposes only. The purpose of this guide is to serve as a reference for use when
Preparation. With the car on the ground you will want to:
 Doing a stage 3 swap was a LOT of work Audi S4 Stage 3 (K04) Install Doing a stage 3 swap was a LOT of work. Just a lot of small and simple tasks really. Just make sure you keep track of what you re doing.
2006 Honda Civic SI Supercharger Kit Installation Instruction Kit #
 2006 Honda Civic SI Supercharger Kit Installation Instruction Kit #350-091 3239 MONIER CIRCLE, STE.5 RANCHO CORDOVA, CA 95742 916.635.4550 FAX 916.635.4632 www.ct-engineering.com INS-157 VERSION: 3.25.2009
JBR MAZDASPEED
 Page1 james Barone Racing Aftermarket Parts and Accessories JBR 2007 2009 MAZDASPEED 3 Front Mount Intercooler Piping Kit Installation Instructions for TR8 Intercooler Tooling: o Jack, Jack Stands, Ramps
LML 3 Y-Bridge Kit or High Flow Intake Bundle Package
 2011-2016 LML 3 Y-Bridge Kit or High Flow Intake Bundle Package Covers installation of PN s: WCF100607, WCF100691, WCF100716, & WCF100353 Note: This Kit is for off road competition use only! Overview-
Cooling system components, removing and installing
 19-1 Cooling system components, removing and installing Note: When the engine is warm the cooling system is under pressure. If necessary release pressure before starting repair work. Hoses are secured
Prepare the cargo area for storage of under-hood parts, removed as interference. (Put down blankets.)
") PCU Replacement Procedure John Mayer Hawthorne Auto Clinic 1-28-2014 updated 1-20-2016 Overall notes: It is preferable to perform the PCU replacement procedure on a lift, or to have access to under the
PCU Replacement Procedure John Mayer Hawthorne Auto Clinic 1-28-2014 updated 1-20-2016 Overall notes: It is preferable to perform the PCU replacement procedure on a lift, or to have access to under the
INSTALLATION INSTRUCTIONS PART NUMBER AEM C (GUN METAL GRAY FINISH)
") Equipped with AEM Dryflow Filter No Oil Required! INSTALLATION INSTRUCTIONS PART NUMBER AEM-21-805C (GUN METAL GRAY FINISH) 2016.5-17 CHEVROLET CRUZE 1.4T ITEM NO. PART NUMBER DESCRIPTION QTY. 1 21-2038DK
Equipped with AEM Dryflow Filter No Oil Required! INSTALLATION INSTRUCTIONS PART NUMBER AEM-21-805C (GUN METAL GRAY FINISH) 2016.5-17 CHEVROLET CRUZE 1.4T ITEM NO. PART NUMBER DESCRIPTION QTY. 1 21-2038DK
EXPANSION TANK MUSTANG GT FORD FIESTA ST PARTS LIST AND INSTALLATION GUIDE PARTS LIST AND INSTALLATION GUIDE
 PARTS LIST MMHOSE-MUS8-15L: 4 PC SILICONE HOSES 8 PC CLAMPS 1 PC STAINLESS STEEL ADAPTER MMHOSE-MUS8-15U: 1 PC SILICONE HOSE 1 PC QUICK-DISCONNECT FITTING 1 PC CLAMP MMHOSE-MUS8-15ANC: INSTALLATION INSTRUCTIONS
2016+ Mazda Miata Front & Rear Sway Bar Installation Instructions
 Page1 James Barone Racing Aftermarket Parts and Accessories 2016+ Mazda Miata Front & Rear Sway Bar Installation Instructions Tools Required: Jack Lift or ramps Ratchet wrench Torque Wrench 6 and 12 Extension
Volkswagen MKVI 2.0T ECS Tuning Kohlefaser Luft-Technik System. Installation Tutorial ES ES
 Volkswagen MKVI 2.0T ECS Tuning Kohlefaser Luft-Technik System Installation Tutorial ES2712727 ES2739920 Required Tools: Flex Driver For Screw Type Hose Clamps* Phillips Screwdriver Torx T25 bit Torx T30
Instant Chat off the main page of Or simply call our tech team at
 FRONT MOUNT INTERCOOLER 2008-13 STI 2014-04- 08 Thank you for purchasing this PERRIN product for your car! Installation of this product should only be performed by persons experienced with installation
IMPORTANT INSTALLATION NOTE
 IMPORTANT INSTALL NOTE IMPORTANT INSTALLATION NOTE IMPORTANT INSTALL NOTE MISHIMOTO-SUPPLIED HARDWARE (8) PC M6 X 1.0 X 16MM FLANGE HEAD BOLT NOTE: DO NOT USE IMPACT GUN TO INSTALL SUPPLIED M6 HARDWARE
OIL COOLER KIT INSTALLATION INSTRUCTIONS PART NUMBER D E92 335i/xi (N55 engine) with M-Technic bumper and without stock oil cooler
 with M-Technic bumper and without stock oil cooler") OIL COOLER KIT INSTALLATION INSTRUCTIONS PART NUMBER D570-0925 APPLICATION 2011-12 E92 335i/xi (N55 engine) with M-Technic bumper and without stock oil cooler Congratulations for being selective enough
OIL COOLER KIT INSTALLATION INSTRUCTIONS PART NUMBER D570-0925 APPLICATION 2011-12 E92 335i/xi (N55 engine) with M-Technic bumper and without stock oil cooler Congratulations for being selective enough
BMW E46 Convertible Hydraulic Line #23 Replacement Guide Created by taylor192 of E46Fanatics.com
 BMW E46 Convertible Hydraulic Line #23 Replacement Guide Created by taylor192 of E46Fanatics.com BMW E46 Line #23 Replacment Guide, page 1 of 23 Background: Line #23 runs from the valve block on the driver's
MM010 6TH GEN CAMARO TUBULAR MOTOR MOUNTS
 BMR recommends professional installation of this product. A service lift is also recommended for installation of this product. Engine coolant is drained during install. Please review installation instructions
COLD AIR INTAKE INSTALLATION INSTRUCTIONS. # D Fits: i (4.8L)
") COLD AIR INTAKE INSTALLATION INSTRUCTIONS # D760-0013 Fits: 2006-10 650i (4.8L) PARTS LIST Air Box Assembly Left tube Center tube Right tube Support bracket AFM housing AFM/TB tube Hardware Kit Congratulations
COLD AIR INTAKE INSTALLATION INSTRUCTIONS # D760-0013 Fits: 2006-10 650i (4.8L) PARTS LIST Air Box Assembly Left tube Center tube Right tube Support bracket AFM housing AFM/TB tube Hardware Kit Congratulations
4. Remove (4) 10mm and (1) 7mm bolt that holds fascia at front corners, on each side
 10mm and (1) 7mm bolt that holds fascia at front corners, on each side") 2010 Camaro LS3 1. Disconnect battery ground 2. Remove front wheels 3. Remove (5) push pins and (5) #20 torx screws on inner front wheel well liners and remove liners on each side 4. Remove (4) 10mm and
2010 Camaro LS3 1. Disconnect battery ground 2. Remove front wheels 3. Remove (5) push pins and (5) #20 torx screws on inner front wheel well liners and remove liners on each side 4. Remove (4) 10mm and
Changing the Struts on a WK Jeep CRD
 Changing the Struts on a WK Jeep CRD Step by Step By Chirpz Disclaimer: I do not claim that this procedure is the right way or even the best way to change your struts. This is what I did after reading
SAFETY THIS PRODUCT IS FOR OFFROAD USE ONLY. ALL LIABILITY FOR INSTALLATION AND USE RESTS WITH THE OWNER.
 SAFETY Your safety and the safety of others is very important. In order to help you make informed decisions about safety, we have provided installation instructions and other information. These instructions
FRS/BRZ Air Oil Separator (AOS) Installation Manual
 Installation Manual") FRS/BRZ Air Oil Separator (AOS) Installation Manual Eric Hazen Rev. 2 Overview: Detailed instructions on installing the AOS for the FRS/BRZ/GT86. Difficulty: Beginner Time required: 1-3 hours depending
FRS/BRZ Air Oil Separator (AOS) Installation Manual Eric Hazen Rev. 2 Overview: Detailed instructions on installing the AOS for the FRS/BRZ/GT86. Difficulty: Beginner Time required: 1-3 hours depending
IE MK5/MK6 2.0T FSI & TSI FDS INTERCOOLER INSTALL GUIDE PART NUMBER: IETPCB1
 IE MK5/MK6 2.0T FSI & TSI FDS INTERCOOLER INSTALL GUIDE PART NUMBER: IETPCB1 Thank you for purchasing another high quality Integrated Engineering product! This instruction sheet is used for installation
IAG Competition Series Air / Oil Separator (AOS) For 2017 STI
 For 2017 STI") P IAG Competition Series Air / Oil Separator (AOS) For 2017 STI Part# IAG-ENG-7251 Tools Required: Ratchet, torque wrench, extensions, needle nose pliers, hose cutter, snips/scissors, flat head screw driver,
P IAG Competition Series Air / Oil Separator (AOS) For 2017 STI Part# IAG-ENG-7251 Tools Required: Ratchet, torque wrench, extensions, needle nose pliers, hose cutter, snips/scissors, flat head screw driver,
Audi S1 Intake kit. Qty. Description
 Audi S1 Intake kit Description Qty Silicone Intake pipe 1 Vacuum hose 1 Heatshield 1 Bracket 1 Machined inlet 1 Vacuum connector 1 Filter 1 M6x16 cap head bolt 1 Tools Ratchet Extension Torx socket Sockets
DrVanos.com Stage II Installation Instructions. Tool rental is available with the purchase of a vanos kit *See website for more info*
 DrVanos.com Stage II Installation Instructions Special Tools Needed: Camshaft locking tool TDC Crank pin Sprocket turning tool Tool rental is available with the purchase of a vanos kit *See website for
Application List L Cummins
 1 Discharging & Recharging of the A/C System is required for this install. INTERCOOLER INSTALLATION FOR 2010+ DODGE 6.7L CUMMINS Application List 2010+ 6.7L Cummins 1042530 PLEASE READ ALL INSTRUCTIONS
96-04 tt. Hellion Power Systems Mustang Twin Turbo Kit Instructions
 96-04 tt Hellion Power Systems 1996-2004 Mustang Twin Turbo Kit Instructions 1. Disconnect battery and elevate front end of car on either Jack stands or a lift if available 2.Lock steering wheel and remove
Low Range HD 2 Inch Body Lift Kit (Sidekick, GV, Vitara, Tracker, X90) SKU# KSP-BL2
 SKU# KSP-BL2") Low Range HD 2 Inch Body Lift Kit (Sidekick, GV, Vitara, Tracker, X90) SKU# KSP-BL2 Installation Instructions Background: These instructions are designed for installing the 2 body lift. They can also be
Low Range HD 2 Inch Body Lift Kit (Sidekick, GV, Vitara, Tracker, X90) SKU# KSP-BL2 Installation Instructions Background: These instructions are designed for installing the 2 body lift. They can also be
Installation Instructions Camaro ZL1 ( Z) ( ZB)
 ( ZB)") Installation Instructions Camaro ZL1 (501-1099-10-Z) (501-1099-10-ZB) Parts List 1 Insulated Air Box \ Lid 1 Thermal Coated Intake Tube / MAF Housing with (2) M4 x.7 thread 8mm long Stainless Screws; 1
Installation Instructions Camaro ZL1 (501-1099-10-Z) (501-1099-10-ZB) Parts List 1 Insulated Air Box \ Lid 1 Thermal Coated Intake Tube / MAF Housing with (2) M4 x.7 thread 8mm long Stainless Screws; 1
Slave Cylinder Weep Hole Drilling Procedure
 Slave Cylinder Weep Hole Drilling Procedure Tools Required: T20 Torx Driver T25 Torx Driver T25 Torx Bit with ¼ Ratchet Wrench 4mm Hex Key (Allen wrench) 5mm Hex Key 6mm Hex Key 8mm Hex Key 12mm Hex Key
MM009 6TH GEN CAMARO MOTOR MOUNT KIT
 BMR recommends professional installation of this product. A service lift is also recommended for installation of this product. If the vehicle is equipped with an oil cooler, engine coolant is drained during
DIY: Repairing/Replacing the Timing Chain Tensioner
 DIY: Repairing/Replacing the Timing Chain Tensioner By Saki GT - February 8, 2012 [youtube=http://www.youtube.com/watch?v=24cil5_9yvq] The above video is an example of how a bad Timing Chain Tensioner
RED ALPHA COOLANT EXPANSION TANK
 RED ALPHA COOLANT EXPANSION TANK Our Q60 and Q50 VR30 Red Alpha Expansion Tank increases the Red Alpha Heat Exchanger coolant capacity by an astounding 70% and the radiator coolant capacity by 28%! Our
2015+ WRX Charge Pipe
 2015+ WRX Charge Pipe 2017-04-20 Thank you for purchasing this PERRIN product for your car! Installation of this product should only be performed by persons experienced with installation of aftermarket
JRSC + BBK Install on SVTF. Neil A. Shah medicnas on focaljet September 2006
 JRSC + BBK Install on SVTF Neil A. Shah medicnas on focaljet September 2006 ECU up here. When removing make sure the smaller bundles of wires don t get wrapped around the bottom edge and break - this almost
03-04 Mach 1. Hellion Power Systems Mach 1 Kit Instructions
 Hellion Power Systems 03-04 Mach 1 Kit Instructions Part 1 Hellion recommends that the front suspension system be installed either by trained professionals or by 5.Remove rack bolts K-Member Installation
Fitting Instructions For The TDV6 EGR Blanking Kit To A 2006 Model Discovery 3 TDV6 GHSE
 Part Number DA1112 Fitting Instructions For The TDV6 EGR Blanking Kit To A 2006 Model Discovery 3 TDV6 GHSE You do this modification at your own risk. Britpart won t be held responsible for what is written