Development of a TL-5 Vertical Faced Concrete Median Barrier Incorporating Head Ejection Criteria
|
|
|
- Warren Gardner
- 5 years ago
- Views:
Transcription
1 Midwest States Regional Pooled Fund Research Program Fiscal Year (Year 15) Research Project Number SPR-3(017) NDOR Sponsoring Agency Code RPFP Development of a TL-5 Vertical Faced Median Barrier Incorporating Head Ejection Criteria Submitted by Scott K. Rosenbaugh, B.S.C.E, E.I.T. Graduate Research Assistant Dean L. Sicking, Ph.D., P.E. Professor and MwRSF Director Ronald K. Faller, Ph.D., P.E. Research Assistant Professor MIDWEST ROADSIDE SAFETY FACILITY University of Nebraska-Lincoln 527 Nebraska Hall Lincoln, Nebraska (402) Submitted to MIDWEST STATES REGIONAL POOLED FUND PROGRAM Nebraska Department of Roads 1500 Nebraska Highway 2 Lincoln, Nebraska MwRSF Research Report No. TRP December 10, 2007
2 TECHNICAL REPORT DOCUMENTATION PAGE 1. Report No Recipient s Accession No. TRP Title and Subtitle 5. Report Date Development of a TL-5 Vertical Faced Median Barrier Incorporating Head Ejection Criteria December 10, Author(s) 8. Performing Organization Report No. Rosenbaugh, S.K., Sicking, D.L., and Faller, R.K., TRP Performing Organization Name and Address 10. Project/Task/Work Unit No. Midwest Roadside Safety Facility (MwRSF) University of Nebraska-Lincoln 527 Nebraska Hall Lincoln, Nebraska SPR-3 (017) 11. Contract or Grant (G) No. 12. Sponsoring Organization Name and Address 13. Type of Report and Period Covered Midwest States Regional Pooled Fund Program Nebraska Department of Roads 1500 Nebraska Highway 2 Lincoln, NE Supplementary Notes Final Report, Sponsoring Agency Code RPFF Prepared in cooperation with U.S. Department of Transportation, Federal Highway Administration. 16. Abstract (Limit: 200 words) A concrete median barrier was designed as a cost efficient alternative to current barriers for use on roadways with heavy tractor-trailer traffic. The barrier geometry was configured to optimize small car and pickup truck safety. After reviewing over 100 previously conducted crash tests, it was determined that vertical faced barriers reduced the risk of vehicle rollover during impacts by eliminating tire climb and vehicle roll. Also, multiple crash test videos were utilized to create a head ejection envelope encompassing the extent of an occupant s head as it is ejected through the vehicle side window during impact. The top of the barrier was cut back to comply with this envelope. The internal steel reinforcement was optimized such that material costs were minimized while providing adequate strength. Slight alterations were made to ensure compatibility with common construction practices, such as slipforming. These alterations resulted from discussions with multiple contractors and members of various State Departments of Transportation. A 200 ft section of barrier was constructed and crash tested with an 80,000-lb tractor trailer in compliance with the NCHRP Report 350 requirements. The barrier performance satisfied all criteria under TL-5 impact conditions. 17. Document Analysis/Descriptors 18. Availability Statement Highway Safety, TL-5, Median Barriers, Crash Testing, Tractor Trailer, Head Ejection No restrictions. Document available from: National Technical Information Services, Springfield, Virginia Security Class (this report) 20. Security Class (this page) 21. No. of Pages 22. Price Unclassified Unclassified 355 i
3 DISCLAIMER STATEMENT The contents of this report reflect the views of the authors who are responsible for the facts and the accuracy of the data presented herein. The contents do not necessarily reflect the official views nor policies of the State Highway Departments participating in the Midwest States Regional Pooled Fund Research Program nor the Federal Highway Administration. This report does not constitute a standard, specification, or regulation. ii
4 ACKNOWLEDGMENTS The authors wish to acknowledge several sources that made a contribution to this project: (1) the Midwest States Regional Pooled Fund Program funded by the Connecticut Department of Transportation, Illinois Department of Transportation, Iowa Department of Transportation, Kansas Department of Transportation, Minnesota Department of Transportation, Missouri Department of Transportation, Nebraska Department of Roads, New Jersey Department of Transportation, Ohio Department of Transportation, South Dakota Department of Transportation, Wisconsin Department of Transportation, and Wyoming Department of Transportation for sponsoring this project, and (2) MwRSF personnel for conducting the crash test. Acknowledgment is also given to the following individuals who made a contribution to the completion of this research project. Midwest Roadside Safety Facility J.R. Rohde, Ph.D., P.E., Associate Professor J.D. Reid, Ph.D., Professor K.A. Polivka, M.S.M.E., E.I.T., Research Associate Engineer R.W. Bielenberg, M.S.M.E., E.I.T., Research Associate Engineer J.C. Holloway, M.S.C.E., E.I.T., Research Manager C.L. Meyer, B.S.M.E., E.I.T., Research Engineer II A.T. Russell, B.S.B.A., Laboratory Mechanic II K.L. Krenk, B.S.M.A, Field Operations Manager A.T. McMaster, Laboratory Mechanic I Undergraduate and Graduate Assistants Connecticut Department of Transportation Dionysia Oliveira, Transportation Engineer 3 Illinois Department of Transportation David Piper, P.E., Highway Policy Engineer iii
5 Iowa Department of Transportation David Little, P.E., Assistant District Engineer Deanna Maifield, Methods Engineer Kansas Department of Transportation Ron Seitz, P.E., Bureau Chief Rod Lacy, P.E., Road Design Leader Minnesota Department of Transportation Michael Elle, P.E., Design Standard Engineer Missouri Department of Transportation Joseph G. Jones, P.E., Technical Support Engineer Nebraska Department of Roads Amy Starr, Research Engineer Phil Tenhulzen, P.E., Design Standards Engineer Jodi Gibson, Research Coordinator New Jersey Department of Transportation Kiran Patel, P.E., P.M.P., C.P.M., Deputy State Transportation Engineer Ohio Department of Transportation Dean Focke, P.E., Standards Engineer South Dakota Department of Transportation David Huft, Research Engineer Bernie Clocksin, Lead Project Engineer Paul Oien, Project Engineer Wisconsin Department of Transportation John Bridwell, Standards Development Engineering Patrick Fleming, Standards Development Engineering iv
6 Wyoming Department of Transportation William Wilson, P.E., Standards Engineer Federal Highway Administration John Perry, P.E. Nebraska Division Office Danny Briggs, Nebraska Division Office Dunlap Photography James Dunlap, President and Owner Nebraska State Patrol Scott Olson, Trooper v
7 TABLE OF CONTENTS TABLE OF CONTENTS...vi LIST OF FIGURES...viii LIST OF TABLES... xi 1 INTRODUCTION Background Objectives LITERATURE REVIEW Median Barrier Geometries Vehicle Rollovers Head Ejection Design Loads / Barrier Strengths Evaluation of Highway Barriers Existing TL-5 Median Barriers Previous Full Scale TL-5 Crash Tests RESEARCH APPROACH BARRIER SHAPE STUDY Introduction Full-Scale Crash Test Data Comparison of Barrier Shape Results Comparison of Shape Results to NCHRP Report 350 Safety Criteria Barrier Shape Recommendation Head Ejection Study Introduction Video Analysis Procedure Head Ejection Measurements from Small Cars Head Ejection Measurements from Pickups Placement of Ejection Envelopes Envelope Adjustments for Vehicle Movement Head Ejection Interpolation for Mid-Size Vehicles Uses and Limitations of the Head Ejection Envelope BARRIER SHAPE DESIGN Barrier Height Barrier Face Geometry Longitudinal Asperities Option Geometric Alterations for Slipforming BARRIER REINFORCEMENT DESIGN Introduction Shape of Reinforcement Stirrup Use Decision General Stirrup Shape General Anchorage Design Barrier Optimization Factors Barrier vi
8 7.3.2 Longitudinal Rebar Stirrup Rebar Barrier Capacity Calculations Optimum Barrier Design Requirements Barrier Optimization Results Barrier End Section Design End Section Strength Calculations Barrier End Section Optimization End Section Substructure Design FULL-SCALE CRASH TEST PROGRAM Test Requirements Evaluation Criteria Barrier Design Details Barrier Substructure Barrier Design Impact Point Test Facility Vehicle Tow and Guidance Systems Test Vehicle Data Acquisition Systems Accelerometers Rate Transducers High Speed Photography Pressure Tape Switches Crash Test TL5CMB Test Description Barrier Damage Vehicle Damage Accelerometer and Rate Transducer Data Discussion ALTERNATIVE ANCHORAGE DESIGNS Anchoring with a Reinforced Footing Anchoring to a Reinforced Slab COMPARISON OF TL-5 CONCRETE MEDIAN BARRIERS SUMMARY AND CONCLUSIONS REFERENCES APPENDICES Appendix A. Interior Section Barrier Configurations and Calculations Appendix B. Barrier End Section Configurations and Calculations Appendix C. Torsion Reinforcement Design in Footer End Section Appendix D. Barrier Design Drawings in English Units Appendix E. Summary of Test TL5CMB-2 in English-Units Appendix F. Accelerometer and Rate Transducer Data, Test TL5CMB Appendix G. Alternate Footing Anchorage Design Calculations vii
9 LIST OF FIGURES Figure 1. Evolution of safety shape concrete barriers... 2 Figure 2. Constant Slope Barriers... 4 Figure 3. Bridge Rail Designed with Cut-Out Section to Prevent Head Slap [13] Figure 4. Geometry of the GM Shape Barrier Figure 5. New Jersey Shape and F Shape Barriers Figure 6. California Type 60 Single Slope and Vertical Shape Barriers Figure 7. General Shape of an Open Rail Figure 8. Lateral and Vertical Measurements from the Bottom of the Window Figure 9. Location and label of three points measured Figure 10. Plot of Data Measurements for Test Figure 11. Plot of Data Measurements for Test Figure 12. Plot of Data Measurements for Test I Figure 13. Plot of Data Measurements for Test Figure 14. Plot of Data Measurements for Test Figure 15. Plot of Data Measurements for Test Figure 16. Plot of Data Measurements for Test Figure 17. Plot of Data Measurements for Test Figure 18. Ejection Envelope Encompassing All Small Car Data Figure 19. Measured Points to Describe Maximum Vertical Position Figure 20. Plot of Data Measurements for Test Figure 21. Plot of Data Measurements for Test Figure 22. Plot of Data Measurements for Test Figure 23. Ejection Envelope Boundaries Encompassing All Pickup Data Figure 24. Assembly of Head Ejection Envelope Figure 25. Head Ejection Envelope with Vehicle Movement Adjustments (SI) Figure 26. Head Ejection Envelope with Vehicle Movement Adjustments (English) Figure 27. Measured Lateral Ejection vs. Head Height and Boundary Line Figure 28. Measured Vertical Ejection Position vs. Head Height and Boundary Line Figure 29. Measurements Taken to Determine Head Height Figure 30. Predicted Maximum Ejections and the Adjusted Envelope (SI) Figure 31. Predicted Maximum Ejections and the Adjusted Envelope (English) Figure 32. Head Ejection Envelope and Dimensions Figure 33. Forces Acting on a Tractor Trailer during Impact Figure 34. Barrier Face Geometry Options Figure 35. Barrier Face Geometry Figure 36. Possible Longitudinal Asperity Options for the Barrier Face Figure 37. Barrier Geometry after Slipforming Alterations Figure 38. Examples of Texturing [38] and Vertical Asperities [79] Figure 39. Stirrup Shape Possibilities Explored Figure 40. Anchorages of Freestanding Cage vs. Stirrups Cast into Base Slab Figure 41. Rebar Layouts for Different Numbers of Longitudinal Bars Figure 42. Illustrating the Restriction of Large Bars in Small Areas viii
10 Figure 43. Yield Line Failure Shape Assumption and Bending Moments Figure 44. Design A, One of Three Top Designs Figure 45. Design B, One of Three Top Designs Figure 46. Design C, One of Three Top Designs Figure 47. Assumed Failure Pattern of Barrier End Section Figure 48. Barrier End Section Configuration Figure 49. Footer and Barrier End Section Design Figure 50. Footer and Barrier End Section Design (English - Units) Figure 51. Layout for TL-5 Median Barrier Figure 52. TL-5 Median Barrier Interior Section Design Details Figure 53. TL-5 Median Barrier End Section Design Details Figure 54. TL-5 Median Barrier Slipform Design Details Figure 55. TL-5 Median Barrier Rebar Design Details Figure 56. Reinforcement and Casting of Footer with Barrier End Section Stirrups Figure 57. TL-5 Median Barrier Reinforcement, Lap Splices, and Dowel Tie Downs Figure 58. TL-5 Median Barrier Construction Figure 59. TL-5 Median Barrier Construction Cold Joint Figure 60. TL-5 Median Barrier Figure 61. Test Vehicle, Test TL5CMB Figure 62. Vehicle Dimensions, Test TL5CMB Figure 63. Vehicle Target Locations, Test TL5CMB Figure 64. Location of Cameras, Test TL5CMB Figure 65. Summary of Test Results and Sequential Photographs, Test TL5CMB Figure 66. Additional Sequential Photographs, Behind, Test TL5CMB Figure 67. Additional Sequential Photographs, Upstream, Test TL5CMB Figure 68. Additional Sequential Photographs, Downstream, Test TL5CMB Figure 69.Additional Sequential Photographs, Behind, Test TL5CMB Figure 70. Additional Sequential Photographs, Test TL5CMB Figure 71. Impact Location, Test TL5CMB Figure 72. Vehicle Final Position and Trajectory Marks, Test TL5CMB Figure 73. Barrier Damage, Test TL5CMB Figure 74. Barrier Cracks Upstream of Impact, Test TL5CMB Figure 75. Barrier Cracks 4.6 m (15 ft) from Upstream End, Test TL5CMB Figure 76. Barrier Cracks 5.8 m (19 ft) from Upstream End, Test TL5CMB Figure 77. Barrier Cracks 8.4 and 8.7 m (27.5 and 28.5 ft) from Upstream End, Test TL5CMB Figure 78. Barrier Cracks 12.2 m (40 ft) from Upstream End, Test TL5CMB Figure 79. Barrier Cracks 15.8 m (52.5 ft) from Upstream End, Test TL5CMB Figure 80. Barrier Damage, Gouges m (30-36 ft) from Upstream End, Test TL5CMB Figure 81. Barrier Damage to Top Protrusion, Test TL5CMB Figure 82. Barrier Damage to Top Protrusion m (40 47 ft) from Upstream End, Test TL5CMB Figure 83. Tire Marks from Middle to Downstream End, Test TL5CMB ix
11 Figure 84. Front-Side Barrier Asphalt Gaps Near Impact, Test TL5CMB Figure 85. Vehicle Damage, Test, TL5CMB Figure 86. Front Bumper Damage, Test TL5CMB Figure 87. Front Right Tractor Damage, Test TL5CMB Figure 88. Right Side Tractor Damage, Test TL5CMB Figure 89. Left Side Tractor Damage, Test TL5CMB Figure 90. Vehicle Damage to Front Tandems, Test TL5CMB Figure 91. Right Side Trailer Damage, Test TL5CMB Figure 92. Damage to Rear of Vehicle, Test TL5CMB Figure 93. TL-5 Median Barrier Anchored to a Longitudinal Reinforced Footer Figure 94. TL-5 Median Barrier Anchored to Slab Figure 95. Reinforced Tall Wall Safety Shaped Barrier [18, 19] Figure 96. Non-Reinforced Tall Wall Safety Shaped Barrier [18, 20] Figure 97. Single Slope Barrier [18] Figure D-1. Layout for TL-5 Median Barrier Figure D-2. TL-5 Median Barrier Design Details Figure D-3. TL-5 Median Barrier End Section Design Details Figure D-4. TL-5 Median Barrier Slipform Design Details Figure D-5. TL-5 Median Barrier Rebar Design Details Figure E-1. Summary of Test Results and Sequential Photographs, Test TL5CMB Figure F-1. Graph of Longitudinal Deceleration (CFC 60 Filtered) of Trailer, Test TL5CMB Figure F-2. Graph of 50-ms Average Longitudinal Deceleration (CFC 60 Filtered) of Trailer, Test TL5CMB Figure F-3. Graph of Longitudinal Change in Velocity (CFC 180 Filtered) of Trailer, Test TL5CMB Figure F-4. Graph of Lateral Deceleration (CFC 60 Filtered) of the Trailer, Test TL5CMB Figure F-5. Graph of 50-ms Average Lateral Deceleration (CFC 60 Filtered) of Trailer, Test TL5CMB Figure F-6. Graph of Lateral Change in Velocity (CFC 180 Filtered) of Trailer, Test TL5CMB Figure F-7. Graph of Vertical Acceleration (CFC 60 Filtered) of the Trailer, Test TL5CMB Figure F-8. Graph of 50-ms Average Vertical Deceleration (CFC 60 Filtered) of Trailer, Test TL5CMB Figure F-9. Graph of Vertical Change in Velocity (CFC 180 Filtered) of Trailer, Test TL5CMB Figure F-10. Graph of Trailer Roll, Yaw, and Pitch (Gyro Data), Test TL5CMB Figure F-11. Graph of Tractor Roll (Film Analysis), Test TL5CMB x
12 LIST OF TABLES Table 1. List of Previous Full Scale TL-5 Crash Tests Table 2. Vehicle and Impact Condition for Each Crash Test Group Table 3. Small car tests impacting at km/h ( mph) and 20 (part 1) Table 4. Pickup tests impacting at 100 km/h (62.1 mph) and 25 (part 1) Table 5. Pickup tests impacting at 96.6 km/h (60 mph) and 20 (part 1) Table 6. Sedan tests impacting at 96.6 km/h (60 mph) and 25 (part 1) Table 7. Barrier Shape Comparisons by Impact Conditions Table 8. Crash Tests Resulting in Vehicle Rollover Table 9. List of Small Car Tests Used to Describe Head Ejection Table 10. Data Measurements for Test Table 11. Data Measurements for Test Table 12. Data Measurements for Test I Table 13. Data Measurements for Test Table 14. Data Measurements for Test Table 15. Data Measurements for Test Table 16. Data Measurements for Test Table 17. Data Measurements for Test Table 18. List of Pickup Tests Used to Describe Head Ejection Table 19. Data Measurements for Test Table 20. Data Measurements for Test Table 21. Data Measurements for Test Table 22. Heights to the Bottom of the Side Window Table 23. Measured Vertical Movement of Side Window During Impact (SI) Table 24. Measured Vertical Movement of Side Window During Impact (English) Table 25. Head Heights from the Window Base and Ejection Measurements Table 26. Vehicle Measurements and Head Height Results Table 27. Predicted Results for Maximum Lateral and Minimum Vertical Ejection Table 28. List of Previous Successful Tractor Trailer Crash Tests Table 29. Cost per Foot of Barrier as a Function of Barrier Table 30. Amount of Longitudinal per Length for Various Configurations Table 31. Stirrup Design Requirements per Bar Size Table 32. Stirrup Lengths as a Function of Barrier and Bar Size (SI) Table 33. Stirrup Lengths as a Function of Barrier and Bar Size (English) Table 34. Mass of Stirrup per Meter of Barrier for All Combinations (SI) Table 35. Weight of Stirrup per Foot of Barrier for All Combinations (English) Table 36. Calculated Strength Capacities for Previous TL-5 Barriers Table 37. Optimum Designs by and Stirrup Combination (SI) Table 38. Optimum Designs by and Stirrup (English Units) Table 39. Optimum Designs by and Stirrup Configuration (SI) Table 40. Optimum Designs by and Stirrup Configuration (English-Units) Table 41. NCHRP Report 350 Test Level 5 Crash Test Conditions Table 42. NCHRP Report No. 350 Evaluation Criteria for Crash Testing xi
13 Table 43. Summary of Safety Performance Evaluation Results Table 44. Cantilever Moments of the Three Most Efficient Designs Table 45. Comparison of TL-5 Median Barriers (SI) Table 46. Comparison of TL-5 Median Barriers (English Units) Table A-1. Interior Section Strength and Cost Calculations - All Configurations Table B-1. Barrier End Section Strength and Cost Calculations - All Configurations xii
14 1 INTRODUCTION 1.1 Background Narrow medians and high traffic volumes warrant the use of longitudinal median barriers to separate opposing lanes of traffic. Narrow medians do not offer the driver of an errant vehicle sufficient time to recover and steer the vehicle back into the proper lane. As a result, cross-over accidents are common. Cross-over accidents often involve multiple vehicles and head-on collisions. Thus, cross-over accidents are very severe and have a high fatality risk. In fact, a study conducted by the Iowa Safety Management System found that between 1990 and 1999 cross-median crashes made up only 2.4 percent of all interstate crashes, yet these crashes resulted in 32.7 percent of all interstate fatalities [1]. In heavy traffic volume situations, the risk of tractor trailer cross-over crashes can become very high. Further, the severity of these crashes can cause multiple fatalities. Thus, there is a need for median barriers capable of containing tractor trailer trucks. The high force levels associated with redirecting a fully loaded tractor trailer merit a strong, rigid barrier. barriers have been shown to be extraordinarily expensive when designed to withstand heavy truck impacts [2]. Therefore, concrete median barriers are used to prevent heavy trucks from crossing over into the opposing lanes of traffic. Most concrete barrier shapes evolved from a barrier developed by General Motors and referred to as the GM shape. The GM shape was designed with the intension of minimizing vehicle sheet metal damage during low angle impacts [3]. The barrier incorporates a shallow lower slope and a steep upper slope. During low angle impacts, the tires climb the lower slope and redirect the vehicle without any sheet metal contact with the barrier. The upper slope serves 1
15 to redirect vehicles impacting at higher angles. The GM shape and all of its descendants are called safety shaped barriers. Figure 1 shows the GM shape along with the other concrete barrier shapes which have evolved from it. Figure 1. Evolution of safety shape concrete barriers In the late 1950 s and early 1960 s, the New Jersey State Department of Transportation developed what came to be called the New Jersey shape concrete barrier through years of crash testing and shape consideration [4, 5]. The New Jersey shape contains a 55 degree lower slope similar to the GM shape, but the height of the lower slope was reduced from 330 mm (13 in.) to 2
16 254 (10 in.). Although the New Jersey barrier was originally designed matching the height of the GM shape at 813 mm (32 in.) tall, it was later extended to a height of 1,067 mm (42 in.), to accommodate larger vehicles, specifically tractor trailers. The New Jersey barrier was designed for an impacting vehicle s tires to climb the barrier face during impact, similar to the GM shape. Allowing the vehicle tires to climb during impact reduces the damage to the sheet metal during low angle impacts. The lower step of the barrier also allows impact forces to act throughout the time the vehicle travels over the step and deeper into the barrier. This extended time results in lower peak impact forces and reduced accelerations for the passengers than the shorter interval associated with a flat wall. However, tire climb on the barrier face creates negative effects as well. At high impact angles, tire climb can induce high vehicular roll angles. Further, the high vertical loads applied to a vehicle tire as it climbs the barrier can cause damage to the suspension and steering linkages. This type of damage has been shown to induce vehicle rollover after the vehicle leaves the barrier. The risk of serious injury or fatality is many times higher in rollover accidents than nonrollover accidents [6]. Therefore, vehicle climb and roll should be minimized. The F-shape barrier was designed to reduce the amount of vehicle climb and roll through a parametric study of the basic New Jersey shape [7]. In this study, the impact performance of six new configurations (named A-F), were analyzed using computer simulations. The F-shape, as shown in Figure 1, was found to provide the lowest vehicle climb and roll, thus increasing vehicle stability. However, the maximum impact angle examined in the study was only 15 degrees. Even with these low angle impacts, a significant amount of climb and roll occurred. Also, the F-shape utilized the smallest lower step investigated in the study. 3
17 Constant slope barriers were developed to further increase vehicle stability by eliminating the lower slope of the New Jersey and F-shape barriers. Vehicle stability is greatly improved for constant slope barriers in comparison to the previous safety shapes, even for higher angle impacts of 20 to 25 degrees [8]. Barrier face slope remains the variable inside the group of constant slope barriers which has major effects on impact results. The optimum barrier shape for vehicle stability is a vertical face. Impact forces act normal to the barrier face, so for a vertical wall, the forces are completely horizontal. The normal to any other slope will contain a vertical component, and thus create some amount of vehicle climb and roll. Figure 2 illustrates a vertical face barrier along with two popular singleslope barriers. Figure 2. Constant Slope Barriers Constant slope barriers do carry some negative effects due to the elimination of the shallow, lower slope associated with safety shape barriers. First, by limiting vehicular movement, the impact time duration is shorter causing higher peak impact forces. These higher peak impact forces transfer to the vehicle occupants and lead to an increased risk of injury. 4
18 Vertical faces allow the least amount of lateral vehicle movement, so the highest peak impact forces are associated with vertical faces. Second, vehicle damage is more probable since sheet metal will contact the barrier for all impact angles. Also, suspension damage remains a problem in passenger vehicle impacts [9]. Vertical face barriers can also create a problem with head slap. Head slap occurs when the lateral impact forces cause the passenger s head to be ejected through the side window of the vehicle and contact the barrier or attachments to the barrier. Head slap greatly increases the risk of serious injury and fatality during impacts. Head slap is not a problem with safety-shaped barriers because the vehicle climbs the barrier face and rolls away from the barrier. Vertical faces do not cause vehicles to roll away from the barrier, so head slap can become a problem when the barrier extends above the bottom of a vehicle s window. Single-slope barriers have been designed in an attempt to balance the effects of increased peak impact forces and increased head slap issues with the reduction of vehicle climb and roll associated with vertical walls [10]. Single-slope barriers include the California Type 60 barrier and the Texas SSCB. These barriers incorporate angles of 9.1 and 10.8 degrees from vertical, respectively. A significant amount of wheel climb is still prevalent during impacts and may lead to vehicle instability problems, such as rollovers. As described above, all of these standard barrier shapes have some negative aspects. Both safety-shaped barriers and single-sloped barriers induce vehicle climb that leads to rollover. Vertical shaped barriers prevent vehicle climb, but can cause head slap for barriers taller than the bottom of a vehicle s window. As a result, there is a need for an improved median barrier 5
19 system that provides a safe impact performance for passenger vehicles and contains tractor trailer vehicles. 1.2 Objectives The objective of the research project was to design a new concrete median barrier to safely redirect vehicles ranging from small cars to fully loaded tractor trailers. The new barrier was intended to maximize stability in passenger vehicles by limiting wheel climb and roll, while addressing occupant safety by limiting peak impact forces, preventing head slap, and providing an economical alternative to existing concrete barrier designs. 6
20 2 LITERATURE REVIEW 2.1 Median Barrier Geometries The first concrete barriers were developed at the General Motors circular track proving grounds and came to be known as GM shape barriers [3]. The majority of impacts on this circular track were low-angle impacts causing minor scrapes and gouges to the vehicles sides. GM shape barriers were designed to minimize this damage by incorporating a shallow lower slope and a steeper upper slope. During low-angle impacts, the vehicle tires would climb the lower slope and be redirected without any sheet metal contact. The steeper upper slope of the barrier functioned to redirect vehicles impacting at higher angles. The New Jersey Turnpike Authority later adapted the GM shape into a barrier known as the New Jersey shape barrier [4-5]. New Jersey shape barriers retained the two-slope face geometry, but the shallow lower slope was shorter than that of the original GM shape. Vehicles were still able to climb the barrier face during impacts, thereby absorbing kinetic energy and extending the impact time duration. Both of these factors helped to reduce impact forces and decelerations to the vehicle and its occupants. However, vehicle climb has been shown to be excessive during high-angle impacts, thus leading to vehicle instabilities and even rollovers. Bronstad et al. [7] developed the F-shape barrier in the late 1970 s through a parametric study to reduce the risk of vehicle rollover. Using computer simulations, six new barrier configurations were analyzed. The F-shape, which had the smallest lower slope of the six configurations, resulted in the least amount of roll and climb. Thus, the F-shape was recommended over the New Jersey shape due to an increase in vehicle stability during impacts. The GM shape, the New Jersey shape, and the F- shape are collectively referred to as safety 7
21 shape barriers. Although all three were originally 813 mm (32 in.) tall, both the New Jersey shape and the F-shape are commonly altered to a height of 1,067 mm (42 in.) for applications involving impacts with tractor trailer vehicles. The safety shape barriers were presented in Figure 1 of Chapter 1. The single slope barrier was developed by Beason et al. [10] in The barrier stood 1,067 mm (42 in.) high and had a slope of 10.8 degrees along the barrier face. This geometry was designed to reduce the risk of rollover by eliminating the shallow lower slope of the safety shape barriers. A vertical face was recognized as being the optimum shape for limiting vehicle climb and roll, but concerns about an occupants head striking the barrier during impact, an event called head slap, lead to the barrier being given a slope. The sloped barrier face allows some climb and roll to move the occupant s head away from the barrier. Another advantage of the single slope barrier is that the adjacent roadway can be overlaid without adversely affecting barrier shape or performance. 2.2 Vehicle Rollovers The risk of vehicle rollover must be reduced because rollover crashes tend to be much more severe and carry an increased fatality rate. As demonstrated by a National Highway Traffic Safety Administration report which analyzed the nation s crash data for 2004 [6], fatalities are many times more likely to occur in rollover crashes than in non-rollover crashes. In fact, approximately one third of passenger vehicle fatalities were linked to rollover crashes. A study by Viner of the crashes in Illinois from 1985 to 1989 [11] found similar results showing rollover crashes to be more fatal. Viner further examined the problem and discovered 8
22 that the rate of rollover for impacts with guardrails was approximately 10 percent. Also, the rollover rate of concrete median barrier crashes was found to be over 5 percent. In 1990, Mak et al. [8] used computer simulations to study the effects impact speed, impact angle, and barrier geometry have on vehicle rollover. Both higher speeds and higher impact angles led to a greater risk of rollover for all barrier shapes, especially for safety-shaped barriers. In fact, the F-shape provided little performance improvement over the New Jersey shape. A constant sloped barrier with a slope of 80 degrees or higher was found to reduce the risk of roll over, while also increasing lateral vehicle decelerations. A vertical wall was found to be the best choice for the prevention of vehicle rollover, but it had the greatest lateral decelerations as well. 2.3 Head Ejection In 2004, Giavotto researched accident records containing occupant ejections [12]. Vehicle side windows were found to be the most prominent place of ejection, especially in crashes with safety barriers. Also, crashes involving this type of ejection were 11.7 times more likely to involve a fatality than barrier accidents without head ejection. Thus, it was recommended that measures be taken to prevent contact between the occupant s head and the barrier during crashes with safety barriers. In 2005, the Midwest Roadside Safety Facility designed an open concrete rail which reduced the risk of head slap [13]. The upper front face of the barrier was setback, thus allowing an ejected head to extend out the vehicle side window without contacting any portion of the barrier. This barrier is shown in Figure 3. 9
![Figure 3. Bridge Rail Designed with Cut-Out Section to Prevent Head Slap [13] 2.](/docs-images/85/91729872/images/23-0.jpg "4 Design Loads / Barrier Strengths National Cooperative Highway Research Program (NCHRP) Report 86 provided a system of equations for predicting the impact loads for different vehicle-barrier impacts")
23 Figure 3. Bridge Rail Designed with Cut-Out Section to Prevent Head Slap [13] 2.4 Design Loads / Barrier Strengths National Cooperative Highway Research Program (NCHRP) Report 86 provided a system of equations for predicting the impact loads for different vehicle-barrier impacts [14]. These equations allowed for a quick and relatively accurate calculation of both the lateral and longitudinal impact forces using vehicle dimensions, vehicle mass, impact speed, impact angle, the coefficient of friction between the vehicle and the barrier, and the deflection of the barrier. Using this procedure becomes difficult to use when analyzing tractor trailer impacts because the vehicle is not a single body but instead articulated. Thus, calculating the impact forces to the tractor and the trailer components of the vehicle requires either a simplification of the vehicle or a more complex procedure. In 1987, TTI conducted a study in which multiple vehicles were crashed into an instrumented vertical wall in order to measure the impact loadings [15]. Of specific interest to 10
24 this study, a 36,000 kg ( lb) tractor trailer was crashed into the wall at 86 km/h (55 mph) and 15 degrees. The peak lateral load of the tractor trailer was 980 kn (220 kips). In 1978, Hirsch [16] developed a method to calculate the structural capacity of a highway barrier utilizing yield line theory. This analysis predicts ultimate strength using the conservation of energy principle and an estimated failure shape. The internal energy absorbed is calculated as the sum of the bending moments multiplied by a displacement angle along each edge of the predicted failure shape, also called yield lines. The predicted failure shape is triangular, often referred to as a saw tooth shape. The external work, or energy applied to the barrier system, is equivalent to the impact load multiplied by a displacement. Thus, by using a barrier s resistance to both longitudinal bending and overturning, the ultimate strength, or impact load the barrier can withstand, can be calculated. 2.5 Evaluation of Highway Barriers Since 1993, National Cooperative Highway Research Program (NCHRP) Report 350 [17] has provided the standard for evaluating roadside safety devices. NCHRP Report 350 not only guides crash testing procedures and impact conditions for barriers and crash cushions, but also describes the criteria in which each test is evaluated. The report divides barriers into six different test levels, TL-1 through TL-6, with the severity and impact loading increasing with each level. TL-5 is the test level corresponding to tractor-van trailers, and thus is of interest to this study. NCHRP Report 350 requires a longitudinal TL-5 barrier to be tested with a 36,000 kg (79,400 lb) tractor-van trailer impacting at 80 km/h (50 mph) and 15 degrees as well as an
25 kg (1,800 lb) small car and a 2,000 kg (4,400 lb) pickup truck impacting at 100 km/h (62 mph) at 20 and 25 degrees, respectively. 2.6 Existing TL-5 Median Barriers The American Association of State Highway and Transportation Officials (AASHTO) Roadside Design Guide [18] has three concrete median barrier designs listed as TL-5 barriers. These barriers include a reinforced concrete New Jersey shape, a non-reinforced concrete New Jersey shape, and a reinforced concrete single slope barrier. All three of these barriers are 1,067 mm (42 in.) tall and are anchored using an asphalt keyway. The reinforced New Jersey shape barrier was successfully crash tested with a tractor trailer under TL-5 conditions by TTI in 1983 [19]. The non-reinforced New Jersey barrier, commonly referred to as the Ontario Tall Wall, was successfully tested by TTI in 1990 [20]. No record could be found containing a TL-5 crash test of the single slope barrier. 2.7 Previous Full Scale TL-5 Crash Tests In addition to the previously mentioned TL-5 crash tests involving the instrumented wall and the concrete median barriers found in the Roadside Design Guide, multiple bridge rails have been successfully tested with tractor trailers under TL-5 conditions. These barriers include a 1,067 mm (42 in.) vertical bridge rail [21], a New Jersey shaped barrier with a metal rail attached to the top measuring 1,270 mm (50 in.) in height [22], an open concrete rail with a metal rail attached to the top measuring 1,372 mm (54 in.) in height [23], and a 1,067 mm (42 in.) tall open concrete rail [13]. Although these barriers are bridge rails and not median barriers, the 12
26 calculated structural capacities of each can be used to guide the required strength for the new barrier. A smaller, 810 mm (32 in.) tall, reinforced concrete F-shape was tested with a tractor trailer near TL-5 conditions in the United Kingdom in the early 1980 s [24]. During impact, the vehicle broke out a section of the barrier and rolled over the barrier. The vehicle ended up on its side behind the barrier. Thus, the test of this short, median barrier under TL-5 conditions was a failure. In the early 1980 s, the Texas Transportation Institute (TTI) conducted a study of heavy truck impacts on median barriers [2]. Since steel barriers systems typically deform during vehicular impacts and impart lower forces and decelerations to passenger vehicles, the research objective of this project was to develop a steel median barrier system that was capable of redirecting fully-loaded tractor-trailer vehicles. However, TTI later found that designing a steel barrier would be impractical because a barrier capable of redirecting a tractor trailer would behave as a rigid wall when impacted by smaller passenger vehicles. In addition, a rigid steel barrier would be much more expensive than a reinforced concrete barrier. Thus, TTI concluded that concrete barriers are the best choice for redirecting heavy tractor trailers. One barrier system, the International Barriers Corporation s IBC Mark-7, was designed using steel panels and crash tested under TL-5 conditions in 1989 [25]. This barrier system was 1,168 mm (46 in.) tall and 1,118 mm (44 in.) wide. It utilized steel panels which lined both sides of a continuous chains of interlocked bins. These bins were filled with a dense aggregate and topped with a non structural lid. The barrier was non anchored to the ground. Instead, it was 13
27 designed to redirect vehicles by absorbing energy through the deformation of the steel panels and the displacement of the filler material. The Pennsylvania Department of Transportation installed two test sections of the IBC Mark-7 barrier on their highways to compare the barrier s constructions processes, in service performance, initial costs, and maintenance costs to standard concrete barriers [26]. The state of Pennsylvania found the IBC Mark-7 did not perform as well as standard concrete median barriers and did not recommend the barrier for further use. The IBC Mark-7 was found to be more complicated and more expensive during construction than standard concrete barriers. Also, maintenance costs were higher for the barrier after impacts due to the replacement of sections and the deformation in the barrier. The weight of the barrier, two times that of equivalent concrete barriers, required special consideration if installed on bridges. Finally, the IBC Mark-7 required a wider median for installation due to its 508 mm (20 in.) greater barrier width and its 0.6 m (2 ft) of deflection during impacts not seen in the standard concrete barriers. Table 1 summarizes all of the previously mentioned TL-5 crash tests. Table 1. List of Previous Full Scale TL-5 Crash Tests Test Tractor Trailer Barrier Ref Impact Conditions PASS Weight Barrier Description Height No. Speed Angle or (kg) (lbs) (km/h) (mph) (deg) (mm) (in.) FAIL ,369 80, Reinforced New Jersey Barrier PASS ,287 80, Non-reinforced New Jersey Barrier PASS D 19 39,210 86, F-shape Barrier FAIL ,000 79, Vertical Bridge Rail PASS ,324 80, New Jersey Barrier with Metal Rail PASS ,183 79, Open Rail with Metal Rail PASS ACBR ,822 78, Open Bridge Rail PASS ,324 80, Instrumented Vertical Wall ,287 80, IBC Mark PASS 14
28 3 RESEARCH APPROACH As presented in Chapter 1, concrete barriers incorporate a variety of shapes. Therefore, it was important to study how each shape affects vehicle stability and peak impact loads in order to identify the optimum barrier geometry. Previous full-scale crash test reports were obtained and information regarding vehicle climb, vehicle roll, and peak impact loads was gathered for each test. These values were then compared to evaluate the performance of different barrier shapes. Each crash test measurement was also compared with limits set by safety requirements to understand the importance of the observed variations. These comparisons provided a basis for selecting an optimum barrier shape. Barrier geometry was also designed to reduce the risk of head slap. Full-scale crash test videos were utilized to measure the extent an occupant s head can be ejected out the vehicle s side window. Although the lateral ejection could be easily measured from the dummy in these videos, the vertical position of the head had to incorporate the vehicle height, vehicle movement, such as roll and/or climb during impact, as well as the position of the head relative to the vehicle. After accounting for all of these factors, the ejection measurements from many tests were compiled together, and a head ejection envelope was drawn encompassing all of the data points. Since all of the crash test videos observed were of either small car or pickup truck impacts, the initial envelope had very distinct pockets for these two vehicle types. However, the middle of the envelope was under represented because mid-size vehicles, such as sedans and SUVs, were not included in the crash test videos. To fill this hole, the head ejection from midsize vehicles was interpolated from the previous small car and pickup measurements using the occupant riding height as the determining factor. The head ejection envelope could then be 15
29 adjusted to encompass all vehicle types. The upper portion of the selected barrier shape was then adjusted so that it did not violate the head ejection envelope. The resulting barrier geometry optimizes vehicle stability and impact forces while also reducing the risk of head slap. It was also deemed important to ensure the barrier could be constructed using common practices, such as slipforming. Hence, contractors from across the nation were surveyed regarding the most economical shape. The steel reinforcement was also optimized to give the barrier adequate strength at the lowest possible cost. Variations in the reinforcement configuration were explored by varying bar sizes, stirrup spacing, and number of longitudinal bars. Yield line theory was utilized to calculate the structural capacity, and contractor estimates for the cost of concrete and steel were used to calculate the cost for various reinforcement configurations. The top reinforcement designs could then be identified. The specific design would be left to the engineer and contractor to decide as the best fit for the individual project. Finally, a full-scale crash test involving a tractor trailer impacting the selected barrier design was conducted to examine structural adequacy. The test was run under the TL-5 test parameters and passed all of the evaluation criteria of NCHRP Report 350 [17]. 16
30 4 BARRIER SHAPE STUDY 4.1 Introduction Five rigid barrier shapes were closely examined in order to establish a basis for geometry. These barrier shapes included the New Jersey shape, F-shape, single slope, vertical, and open concrete rail. Both positive and negative aspects exist in each of the barrier shapes. By comparing the positive and negative attributes of each barrier shape, an optimum base geometry was selected. The evolution of concrete barrier shapes began on the General Motors circular test track. The majority of vehicle to barrier impacts around the track were low angle impacts causing damage, such as scrapes and gouges to the sides of vehicles. With the intent of minimizing this damage, the General Motors shape was developed with a shallow slope, 55 degrees, along its lower half, and a steeper slope, 80.4 degrees along the upper half. Also, a 51 mm (2 in.) vertical reveal was placed at the bottom of the barrier [3]. Vehicle tires were able to climb up the lower half of the barrier s shallow slope during impacts. Thus, vehicles were redirected back onto the track during low angle impacts without the vehicle sheet metal ever contacting the barrier, and damage to the vehicle was minimized. Figure 4 illustrates the GM shape concrete barrier. New Jersey shape barriers were developed from the GM shape and maintained the two slope geometry. The slope on the lower portion remained at 55 degrees, while the upper slope was increased to 84 degrees. Also, the height of the lower slope was reduced by 76 mm (3 in.), but the total barrier height remained at 813 mm (32 in.) [4, 5]. Later, the upper slope was extended to a height of 1,067 mm (42 in.), thus creating a barrier to contain tractor trailers. After these adjustments, New Jersey shape barriers still allowed vehicle tires to ride up the lower 17
31 surface. As the vehicle rides up the barrier face, both the impact energy and impact forces are reduced. These results are not only lessening the amount of vehicle damage, but also lowering the likelihood of injury arising from occupant contact with the vehicle interior through a reduction in lateral decelerations. Figure 4. Geometry of the GM Shape Barrier The total energy that must be dissipated during an impact event is the kinetic energy associated with the velocity normal to the barrier, often referred to as the impact severity. This energy is reduced by the New Jersey shape as a result of kinetic energy being converted into potential energy as the vehicle is raised up the face of the barrier. The gain in potential energy, or loss in kinetic energy, given to the vehicle is limited by the height that the vehicle can climb up the barrier. At low impact angles, this energy dissipation can be a significant portion of the total impact severity. However, for severe impacts at high speeds and high angles, the energy dissipated by vehicle climb is quite small compared to the total impact severity. 18
32 Lateral impact forces are reduced due to the extended time of an impact event with a New Jersey shape barrier compared to that of a flat rigid wall. As a vehicle climbs up the face of a New Jersey shape, a force is applied normal to the lower face of the barrier. The vertical component of this force lifts the vehicle, while the lateral component redirects the vehicle. Both the distance the vehicle travels laterally and the time of the impact event are therefore longer than if the impact occurred with a rigid planar wall. This longer impact time allows for lower peak forces with an associated reduction in peak acceleration applied to the vehicle. Climbing the face of the barrier also has negative consequences in the loss of vehicular stability. As the impact side of a vehicle climbs the barrier, the vehicle can experience a great deal of roll and, often times, will cause a rollover. The risk of serious injury and fatality are greatly increased during rollover crashes [11]. Hence, barriers should be designed to minimize the risk of vehicle rollover. The F- Shape was designed through a parametric study of the New Jersey shape with the intent of lessening the propensity for vehicle rollover [7]. The F-Shape incorporates two sloped face at angles of 55 and 84 as the New Jersey shape does. The difference is the location of the break point between slopes. The break point for the New Jersey shape is 330 mm (13 in.) above the bottom, while the F-shape break point is 254 mm (10 in.) above the bottom. Although this geometry change does improve vehicle stability, roll and climb remain major factors during an impact and the revised shape continues to cause rollovers. Both the New Jersey shape and F- shape shapes are routinely referred to as safety shapes and may be seen in Figure 5. 19
33 Figure 5. New Jersey Shape and F Shape Barriers Single-slope barriers have a constant flat face and eliminate the bottom reveal seen in safety shapes. Two different slopes have been used for single-slope barriers in the Texas SSCB barrier and California Type 60 barrier of 10.8 degrees and 9.1 degrees from vertical, respectively [27, 28]. Single-slope barriers were designed to have two advantages over the safety shape barriers. First, the constant barrier face eliminates problems with roadway overlays. Covering the bottom few inches of a single-slope barrier results in the same barrier face as before the overlay. Sufficient barrier height can be assured by constructing the barrier taller initially. This was not a possibility with safety-shape barriers. Second, the elimination of the lower, shallow sloped portion of a safety shape was intended to reduce the amount of vehicle climb and roll during impact. The vertical component of the impact force acting normal to the barrier face is much smaller for a steep, single-slope barrier than that of the lower curb of the safety shape. However, the single slope is much shallower than the upper slope on the safety shape. 20
34 Due to the reduction in vehicle movement throughout impact, single-slope barriers are expected to have shorter force impulses and, therefore, cause higher impact forces than safety shape barriers. Higher impact forces results in more damage to the vehicle as well as a greater likelihood of passenger injury. Also, as the peak forces are increased, so too is the vertical component of the impact force. Vehicle climb and roll are not eliminated, and a single-slope barrier can still lead to vehicle instabilities and rollovers. The vertical shape barrier essentially eliminates vehicle climb and the roll associated with it. A vertical barrier face significantly eliminates any vertical component of the impact force that lifts the vehicle. While safety shape barriers, Texas SSCB barriers, and California Type 60 barriers have vertical force components of the resulting impact force normal to the barrier face equal to 57 percent, 19 percent, and 16 percent, respectively, the vertical shape barrier applies only a lateral impact force. However, impact forces associated with vertical face barriers are higher than the previously mentioned shapes due to the lack of upward vehicle movement during impact. The vertical shape barrier is expected to cause more vehicle damage and increase the possibility of passenger injury. Both the vertical shaped barrier and the California Type 60 single slope barrier are shown in Figure 6. An open concrete rail consists of a continuous beam resting upon post segments, as seen in Figure 7. The opening between post segments creates an aesthetically pleasing view that is not exhibited by the previous shapes. Also, rain water can drain through and snow can be pushed through these openings and away from the roadway, a feature unique to an open concrete rail. However, the posts and openings must be designed carefully to prevent vehicle snag on a post that can further increase to the peak impact forces and the risk of occupant injury. 21
35 Figure 6. California Type 60 Single Slope and Vertical Shape Barriers Figure 7. General Shape of an Open Rail Open concrete rails have many of the same impact features as a vertical barrier since both have a vertical front face. Vehicle climb and the roll associated with it are virtually eliminated. Impact forces are expected to be higher than those of the safety shape and the single-slope barriers with the reduction in available lateral movement during impact. 22
36 4.2 Full-Scale Crash Test Data The impact forces and vehicle stability during a crash vary with the geometric shape of the barrier, as discussed in Section 4.1. In order to compare the performances of each barrier shape, data from previous full-scale crash tests were examined. Specifically, values for occupant impact velocities (OIVs), occupant ridedown decelerations (ORDs), the maximum roll angle, and the magnitude of vehicle climb were obtained from each crash test. Values for OIV and ORD came directly from crash test reports. Maximum roll angle and climb height, on the other hand, often required more investigation. Few crash test reports actually noted the maximum roll angle of the vehicle during impact. Many reports included a roll vs. time plot. In these cases, the maximum roll angle was obtained from the plot. In other circumstances, a report contained no information about vehicle roll during impact, but a video of the crash test was available. For these tests, the maximum roll angle was measured from the video utilizing either upstream or downstream viewpoints. Only vehicle roll that began before the vehicle exited the barrier was considered for the maximum roll angle. Any unforeseen roll taking place after the vehicle exited the barrier was considered the result of vehicle damage. Specific barrier shapes can cause wheel or suspension damage that lead to a rollover. Therefore, rollovers occurring after the vehicle left the barrier as a result of wheel or suspension damage were also noted. The maximum climb of a vehicle during impact was rarely documented in reports. Therefore, vehicle climb was defined as the vertical distance from the ground to the bottom of the tire marks on the barrier face. This distance was estimated from post impact photographs for 23
37 each of the full scale crash tests. A known distance obtained from the test report, usually the barrier height, was used to scale the measured distance of the tire marks. Crash tests were sorted into groups classified by test vehicle and impact condition. Table 2 displays the criteria of each group. The first two groups mirror the small car and pickup tests, 5-10 and 5-11, respectively, of the crash test matrix prescribed by NCHRP Report 350 [17]. Pickup tests were run with a target impact speed of 100 km/h (62.1 mph) and an impact angle of 25 degrees. Small car tests were run targeting impact conditions of km/h ( mph) and 20 degrees. The range of impact velocity is the result of NCHRP Report 350 having a target velocity of 100 km/h (62.1 mph), while the previous crash testing guide, NCHRP Report 230, had a target impact velocity of 96.6 km/h (60 mph) [29]. Tests run under both guidelines were lumped together to form a single small car group since the vehicle weight and impact angles remained unchanged. Table 2. Vehicle and Impact Condition for Each Crash Test Group Imapct Conditions Target Vehicle Weight Group Test Vehicle Velocity Angle (kg) (lbs) (km/h) (mph) (deg) 1 Small Car Pickup Pickup Sedan A second pickup group was added due to the lack of an F-shape barrier being tested with a pickup under NCHRP Report 350 conditions. This second pickup group corresponds to AASHTO Performance Level 2 crash tests as defined in the Guide Specifications for Bridge 24
38 Railings [30]. AASHTO PL-2 tests have a similar impact speed, 96.6 km/h (60 mph), a slightly lower impact angle, 20 degrees, and a heavier pickup, 2,449.4 kg (5,400 lbs), compared to the NCHRP Report 350 pickup tests. Finally, a group was created consisting of sedans. Although not currently a critical vehicle as described by NCHRP Report 350, sedans were used in the prior crash testing guideline, NCHRP Report 230. As a result, a large number of sedan tests have been conducted on shaped concrete barriers and, therefore, were included in the analysis. The sedan tests were run with target impact conditions matching the pickup test, 96.6 km/h (60 mph) and 25 degrees. Inside of each impact condition group, the tests were further divided by barrier shape, as discussed in Section 4.1. The tables on pages 26 through 32 present the results of all individual full-scale crash tests grouped by impact condition and barrier shape. The average OIV, ORD, maximum roll angle, and maximum vehicle climb for each impact condition and barrier shape combination were calculated and are shown below each group and are highlighted in green. A few OIV values were excluded from the average value calculations because the particular values were inconsistent with the rest of the group. As such, these values were classified as outliers. The OIV values for test no are less than half of the values from any of the pickup tests run at 25 degrees, including the lower impact force barrier shapes. Also, they are nearly 1/4 th of the remaining average OIV values of their group (pickup at 100 km/h (62.1 mph) and 25 degrees - vertical). Therefore, these OIV values were highlighted in red and were ignored from calculations. 25
39 Table 3. Small car tests impacting at km/h ( mph) and 20 (part 1) TEST No. REF. No. HEIGHT BARRIER VEHICLE WEIGHT (mm) (in.) SHAPE TYPE MAKE / MODEL (kg) (lbs) P New Jersey - raised step small car Leyland mini 760 1,675 R New Jersey small car Leyland mini 760 1,675 R New Jersey small car Leyland mini 760 1,675 R Safety shape small car Leyland mini 760 1, New Jersey small car 85 Fiat Uno ,722 N New Jersey - 4.5" step small car 82 Honda Civic 816 1,800 P New Jersey - raised step small car Leyland mini 760 1,675 NBR /914 27/36 New Jersey Combination Rail small car 78 Honda 867 1, New Jersey small car 74 Honda 892 1, New Jersey small car 85 Chevrolet Sprint 769 1,695 MS New Jersey - 1" step small car 84 Dodge Colt 798 1, F - Shape small car 80 Honda 1300 DX 892 1, Single Slope textured small car 92 Geo Metro 842 1, Single Slope small car 90 Toyota Tercel 845 1, Single Slope small car 90 Toyota Tercel 865 1, C Single Slope small car 80 Honda Civic 816 1, Single Slope textured small car 91 Chevrolet Sprint 823 1, Single Slope small car 92 Geo Metro 843 1,859 NCBR /762 18/30 Vertical Combination Rail small car 79 Honda 902 1, / /42 Vertical Combination Rail small car 83 Honda Civic 893 1,970 MN /914 20/ 36 Vertical Combo (1" protruding Curb) small car 88 Ford Festiva 816 1,800 I Vertical small car 84 Honda Civic 839 1,849 I Vertical small car 84 Honda Civic 839 1, Vertical small car 81 Honda Civic 891 1,965 MKS Open Rail small car 79 Honda 839 1,850 OKBR Open Rail small car 79 Honda 898 1, E Open Rail small car 80 Dodge Colt 913 2,014 KBR Open Rail small car 78 Honda 894 1, Open Rail small car 93 Ford Festiva 898 1, E Open Rail small car 80 Dodge Colt 872 1, Open Rail small car 93 Ford Festiva 821 1, / /52 Open Conc. Combo w/ curb small car 83 Honda Civic 888 1, / /54 Open Combination Rail small car 79 Honda Civic 870 1, Open Rail small car 88 Yugo 816 1, F Open Rail small car 80 VW Rabbit 894 1,971 26
40 Table 3. Small car tests impacting at km/h (60-62 mph) and 20 (part 2) TEST No. VEHICLE IMPACT OIV ORD CLIMB VELOCITY ANGLE LONG. LAT. LONG. LAT. (km/h) (mph) (deg.) (m/s) (fps) (m/s) (fps) (Gs) (Gs) (mm) (in.) MAX. ROLL ANGLE (deg.) VEHICLE ROLLOVER P NO R NO R YES R NO NO N YES P YES NBR NO NO NO MS NO Ave. - Small car & New Jersey NO Ave. - Small car & F-shape NO NO NO 9429C NO NO NO Ave. - Small car & Single Slope NCBR N/A N/A NO NO MN NO I NO I N/A N/A 5.9 N/A NO NO Ave. - Small car & Vertical MKS NO OKBR NO 1769-E NO KBR NO NO 1769-E NO NO NO NO NO 1769-F NO Ave. - Small car & OCR
41 Table 4. Pickup tests impacting at 100 km/h (62.1 mph) and 25 (part 1) TEST No. REF. No. HEIGHT BARRIER VEHICLE WEIGHT (mm) (in.) SHAPE TYPE MAKE / MODEL (kg) (lbs) New Jersey pickup 98 Chevrolet ,061 4, New Jersey pickup 91 Chevrolet ,077 4, / /96 New Jersey w/ Vertical Sound Wall pickup 96 Chevrolet ,998 4,405 MNPD / /54 New Jersey Combination Rail pickup 88 Ford F-250 1,996 4, Single Slope textured pickup 98 GMC Sierra ,027 4, Single Slope textured pickup 94 Chevrolet ,956 4, Single Slope textured pickup 90 GMC Sierra ,992 4, Single Slope textured pickup 90 Chevrolet ,958 4, Single Slope textured pickup 94 Chevrolet ,965 4,333 CYRO / 231 Single Slope 10.8 w/ Sound Wall pickup 98 GMC C2500 3/4 ton 2,013 4, Single Slope pickup 91 Ford F-250 2,009 4, Single Slope (steel) pickup 92 GMC ,196 4, Single Slope pickup 91 Ford F-250 2,018 4, Single Slope pickup 91 Chevrolet pickup 2,000 4, Single Slope 11 pickup 85 Chevrolet Custom 2,074 4, Single Slope pickup 90 Chevrolet 2500 PU 1,962 4, Vertical w/ Windows pickup 97 Chevrolet Cheyenne ,042 4, Vertical pickup 89 Chevrolet ,075 4,576 MN /914 20/ 36 Vertical Combo (1" protruding Curb) pickup 87 Ford F-250 2,014 4, Vertical w/ Windows pickup 98 Chevrolet ,049 4, Open Rail pickup 93 Chevrolet ,000 4, Open Rail pickup 93 Chevrolet ,000 4, Open Rail pickup 84 GMC Sierra ,041 4, Open Rail pickup 94 Chevrolet ,945 4, Open Rail pickup 97 Chevrolet ,041 4,501 NIT Open Rail pickup 95 GMC /4 ton 2,016 4,445 28
42 Table 4. Pickup tests impacting at 99.8 km/h (62 mph) and 25 (part 2) TEST No. VEHICLE IMPACT OIV ORD VELOCITY ANGLE LONG. LAT. LONG. LAT. (km/h) (mph) (deg.) (m/s) (fps) (m/s) (fps) (Gs) (Gs) (mm) (in.) NO NO NO MNPD NO Ave. - Pickup & New Jersey CLIMB MAX. ROLL ANGLE (deg.) VEHICLE ROLLOVER NO NO NO NO NO CYRO NO NO NO YES NO NO NO Ave. - Pickup & Single Slope NO NO MN NO NO Ave. - Pickup & Vertical NO NO NO NO NO NIT NO Ave. - Pickup & OCR
43 Table 5. Pickup tests impacting at 96.6 km/h (60 mph) and 20 (part 1) TEST No. REF. No. HEIGHT BARRIER VEHICLE WEIGHT (mm) (in.) SHAPE TYPE MAKE / MODEL (kg) (lbs) MS New Jersey pickup 84 Chevrolet Silverado 2,476 5, New Jersey pickup 81 Chevrolet Custum Deluxe 2,596 5, F - Shape pickup 81 Chevrolet 2,621 5, / /42 Vertical Combination Rail pickup 85 Chevrolet PU Custom Deluxe 2,526 5, Vertical (instrumented wall) pickup 80 Chevrolet Suburban 2,449 5, Vertical (instrumented wall) pickup 79 Chevrolet c-20 2,453 5, Vertical pickup 82 Chevrolet 2,612 5,759 I Vertical pickup 83 Chevrolet Scottsdale 2,443 5,386 NEOCR Open Rail pickup 85 Dodge Ram 250 2,448 5, / /52 Open Conc. Combo w/ curb pickup 84 GMC C1500 2,612 5, Open Rail pickup 82 Chevrolet C10 2,599 5,730 NEOCR Open Rail pickup 86 Ford F-250 2,446 5,394 30
44 Table 5. Pickup tests impacting at 96.6 km/h (60 mph) and 20 (part 2) TEST No. VEHICLE IMPACT OIV ORD VELOCITY ANGLE LONG. LAT. LONG. LAT. (km/h) (mph) (deg.) (m/s) (fps) (m/s) (fps) (Gs) (Gs) (mm) (in.) MS NO NO Ave. - Pickup & New Jersey CLIMB MAX. ROLL VEHICLE ANGLE ROLLOVER (deg.) NO Ave. - Pickup & F - Shape NO NO NO NO I NO Ave. - Pickup & Vertical NEOCR NO NO NO NEOCR NO Ave. - Pickup & OCR
45 Table 6. Sedan tests impacting at 96.6 km/h (60 mph) and 25 (part 1) TEST No. REF. No. HEIGHT BARRIER VEHICLE WEIGHT (mm) (in.) SHAPE TYPE MAKE / MODEL (kg) (lbs) CMB New Jersey sedan 64 Chevrolet 1,918 4, New Jersey w/ Glare Screen sedan 82 Mercury station wagon 1,977 4, New Jersey sedan 70 Mercury 2,249 4,960 KCB New Jersey - precast sedan 79 Cadillac Feetwood 1,959 4,320 CMB New Jersey sedan 73 Ambassador 2,041 4,500 Test New Jersey - precast sedan 66 Pontiac 2,041 4, New Jersey sedan 73 Dodge Polara 2,131 4,700 NBR /914 27/36 New Jersey Combination Rail sedan 78 Dodge 2,109 4, New Jersey sedan 68 Dodge 2,168 4,780 CMB New Jersey sedan 63 Plymouth 1,814 4, New Jersey sedan 65 Dodge 2,059 4, New Jersey sedan 69 Dodge 2,204 4, /991 27/ 39 New Jersey Combination Rail sedan 66 Dodge 2,222 4, New Jersey sedan 70 Mercury 2,249 4, New Jersey sedan 69 Dodge Polara 2,204 4,860 CMB F - Shape sedan 73 Ambassador 2,041 4,500 CMB F - Shape sedan 74 Ambassador 2,041 4, C Single Slope sedan 79 Cadillac Sedan deville 2,041 4, Vertical (instrumented wall) sedan 81 Buick Park Avenue 2,041 4,500 NCBR /762 18/30 Vertical Combination Rail sedan 78 Plymouth 2,113 4,660 KBR Open Rail sedan 78 Dodge 2,113 4,660 MKS Open Rail sedan 80 Dodge 2,127 4,690 OKBR Open Rail sedan 82 Dodge 2,113 4, / /54 Open Combination Rail sedan 79 Cadillac Copedeville 1,995 4, E Open Rail sedan 78 Ford Thunderbird 2,114 4, Open Rail sedan 81 Oldsmobile 98 2,041 4, F Open Rail sedan 79 Ford Thunderbird 2,117 4,669 32
46 Table 6. Sedan tests impacting at 96.6 km/h (60 mph) and 25 (part 2) TEST No. VEHICLE IMPACT OIV ORD VELOCITY ANGLE LONG. LAT. LONG. LAT. (km/h) (mph) (deg.) (m/s) (fps) (m/s) (fps) (Gs) (Gs) (mm) (in.) CMB NO NO YES KCB NO CMB NO Test NO NO NBR NO NO CMB NO NO NO NO YES NO Ave. - Sedan & New Jersey CLIMB MAX. ROLL ANGLE (deg.) VEHICLE ROLLOVER CMB NO CMB NO Ave. - Sedan & F-shape C NO Ave. - Sedan & Single Slope NO NCBR NO Ave. - Sedan & Vertical KBR N/A N/A NO MKS NO OKBR NO NO 1769-E NO NO 1769-F NO Ave. - Sedan & OCR
47 4.3 Comparison of Barrier Shape Results In order to quantify the differences in impact forces and vehicle stability between barrier shapes, the average impact statistics, obtained from Section 4.2, were calculated for each shape and impact condition combination. Average values were then expressed in terms of percent of average for the New Jersey shape barrier. Results of the barrier shape comparison are presented in Table 7. The New Jersey shape was chosen as the basis for comparison because it has been the most widely used concrete barrier shape across the United States for several decades. In all four impact conditions, the two vertical face barriers, vertical shape and open concrete rail, produced the lowest maximum roll angles. When compared to the New Jersey shape, the maximum roll angle for vertical barriers was found to be 65 to 79 percent lower for small car and pickup tests under NCHRP Report 350 conditions. Also, the vertical shape reduced roll by 89 percent from the roll observed for New Jersey shape barriers during sedan impacts. The maximum roll angle is clearly minimized by a vertical face geometry. The same outcome is observed in limiting the amount of vehicle climb. Vertical face geometries are found to allow the least amount of wheel climb in every impact condition. Looking specifically at the impact conditions related to NCHRP Report 350 tests, the vertical shape allowed only 4.4 percent of the climb observed during New Jersey shape impacts for pickup tests, and showed no climb at all in small car tests. The vertical shape has proven to be the best barrier for limiting both vehicular roll and wheel climb. 34
48 Table 7. Barrier Shape Comparisons by Impact Conditions SMALL km/h & 20 BARRIER TYPE OCCUPANT IMPACT VELOCITY OCCUPANT RIDEDOWN DECELERATION MAXIMUM NUMBER CLIMB LONG. LAT. LONG. LAT. ROLL ANGLE % of NJ OF TESTS % of NJ % of NJ % of NJ % of NJ (in.) (m/s) (ft/s) (m/s) (ft/s) (Gs) (Gs) (deg) NEW JERSEY % % % % % 27.0 F - SHAPE % % % % % 17.0 SINGLE SLOPE % % % % % 6.8 VERTICAL % % % % % 0.0 OPEN CONCRETE RAIL % % % % % km/h & 25 BARRIER TYPE OCCUPANT IMPACT VELOCITY OCCUPANT RIDEDOWN DECELERATION MAXIMUM NUMBER CLIMB LONG. LAT. LONG. LAT. ROLL ANGLE % of NJ OF TESTS % of NJ % of NJ % of NJ % of NJ (in.) (m/s) (ft/s) (m/s) (ft/s) (Gs) (Gs) (deg) NEW JERSEY % % % % % 32.9 F - SHAPE % 32.0 SINGLE SLOPE % % % % % - VERTICAL % % % % % - OPEN CONCRETE RAIL % % % % % km/h & 20 BARRIER TYPE OCCUPANT IMPACT VELOCITY OCCUPANT RIDEDOWN DECELERATION MAXIMUM NUMBER CLIMB LONG. LAT. LONG. LAT. ROLL ANGLE % of NJ OF TESTS % of NJ % of NJ % of NJ % of NJ (in.) (m/s) (ft/s) (m/s) (ft/s) (Gs) (Gs) (deg) NEW JERSEY % % % % % 11.0 F - SHAPE % % % % % 12.0 SINGLE SLOPE VERTICAL % % % % % 2.7 OPEN CONCRETE RAIL % % % % % km/h & 25 BARRIER TYPE OCCUPANT IMPACT VELOCITY OCCUPANT RIDEDOWN DECELERATION MAXIMUM NUMBER CLIMB LONG. LAT. LONG. LAT. ROLL ANGLE % of NJ OF TESTS % of NJ % of NJ % of NJ % of NJ (in.) (m/s) (ft/s) (m/s) (ft/s) (Gs) (Gs) (deg) NEW JERSEY % % % % % 22.5 F - SHAPE SINGLE SLOPE % % % % % 7.0 VERTICAL % % % % % 1.0 OPEN CONCRETE RAIL % % % % % 0.0
49 Note that open concrete rail does not have a barrier face near ground level in which to measure tire marks. Therefore, the climb is always estimated to be zero. Also, the face of open concrete rail is vertical. Therefore, it can be grouped in with the vertical shape as allowing the lowest amount of climb. The safety-shape barriers have proven to be the best shapes for lowering occupant impact velocities and ridedown decelerations. With the exception of the pickup tests impacting at 25 degrees, the two lowest average lateral ORDs always belonged to New Jersey and F- shape barriers. Also, the safety-shaped barriers tended to exhibit lower average OIV values than the other shapes. Although safety shapes perform poorly for vehicle stability, safety shapes have been shown to produce the lowest impact forces. As expected, the vertical shape tends to produce higher impact forces when compared to the New Jersey shape. The biggest increases were found in the OIV values. The vertical shape showed regular increases of up to 40 percent from the OIV values recorded from New Jersey shape tests. Increases were also observed for both lateral and longitudinal ORDs, 44 percent and 68 percent respectively, when the vertical shape was compared against New Jersey shape for small car impacts. Interestingly, the ORD values in both directions actually decrease slightly, between 3 percent and 20 percent, for pickup impacts. Nonetheless, vertical shaped barriers have routinely shown higher impact forces than the safety-shape barriers. 4.4 Comparison of Shape Results to NCHRP Report 350 Safety Criteria There are no specific requirements for maximum roll angle or wheel climb in NCHRP Report 350. The only requirement found in the document relating to vehicle stability is that 36
50 passenger vehicles must not roll over during impact. Table 8 lists the six crash tests which resulted in rollovers. Table 8. Crash Tests Resulting in Vehicle Rollover Test Ref. No. Vehicle Class Barrier Shape Imapct Conditions Velocity Angle (km/h) (mph) (deg) R51 31 Small Car New Jersey N-1 33 Small Car New Jersey P Small Car New Jersey Pickup Single Slope Sedan New Jersey Sedan New Jersey New Jersey shape barriers had the most occurrences of rollover. In fact, 27 percent of small car tests with New Jersey barrier resulted in rollover, and 13 percent of the sedan tests with New Jersey barrier experienced rollover. Combined with the pickup truck tests, the New Jersey shape barrier caused a rollover in 5 out of 32, or 16 percent of the tests studied. The single-slope barrier caused 1 rollover out of 19 tests, while both vertical barrier and open concrete rail caused no rollovers and passed every test in this criterion. NCHRP Report 350 sets limits for occupant impact velocity in both the longitudinal and lateral directions at 12 m/sec (39.4 ft/sec) and occupant ridedown decelerations in both directions at 20 Gs when evaluating small car impacts. These safety limits were originally set by NCHRP Report 230, which classifies the resulting injury as severe, but not life threatening. Currently, there are no OIV and ORD limits for sedan impacts and only lateral OIV and ORD limits are prescribed for pickup truck impacts (the longitudinal limits are the same as small car limits). 37
51 The Update to NCHRP Report 350 will address this issue and apply the same safety limits to all passenger vehicles. Therefore, the existing small car OIV and ORD limits will be applied to the other vehicle classes in this study. Referring back to the average OIVs and ORDs of Table 7 in Section 4.3, all of the barrier shapes are under the requirements for every vehicle class. In fact, not one of the individual fullscale crash tests comprising Table 3 through Table 6 in Section 4.2 reported an OIV above 12 m/s (39.4 ft/sec) and only one test recorded an ORD above 20 Gs. Test I2-1, a small car impacting a vertical shape barrier, recorded a lateral ORD of 27.5 Gs. However, the testing agency, Midwest Roadside Safety Facility, later concluded that this force spike occurred too late in the impact event (possibly a result of tail slap) to be harmful. The lateral ORD was ignored, and the test was passed as a result. Under the same judgment, every test has then passed the safety requirements set forth by NCHRP Report 350, and all of the barrier shapes were found to be satisfactory. As such, the benefit of one barrier shape over another through comparison of impact forces appears to be small. 4.5 Barrier Shape Recommendation Section 4.3 demonstrated that as the barrier face becomes more vertical, the amount of vehicle roll and wheel climb during impact are greatly reduced and, therefore, the probability of a rollover is greatly reduced. Mak and Sicking [8] demonstrated through the use of accident data that both incapacitating injuries and fatalities are more than twice as likely during rollover crashes. Obviously, rollovers need to be avoided, and vertical-faced barriers are the best choice to do so. 38
52 Limiting vehicular movement does have the negative consequence of increasing the impact forces. However, as explained in Section 4.4, the increased occupant impact velocities and occupant ridedown decelerations are still under the safety requirements set by NCHRP Report 350. Those requirements were set to prevent life threatening injuries, so the increases in OIV and ORD are believed to be relatively minor. Therefore, a barrier with a vertical face was chosen as the optimum geometry for impacts between rigid parapets and passenger vehicles. 39
53 5 Head Ejection Study 5.1 Introduction Often times, when a vehicle impacts a longitudinal barrier, the redirecting force can result in a passenger s head being ejected through the side window of the vehicle. When this occurs, the head is susceptible to striking any barrier component close to the vehicle. This event is called a head slap and can result in serious injury or death. Giavotto [12] found that accidents involving this type of ejection were 11.7 times more likely to involve a fatality than barrier accidents in general. Giavotto also found side windows to be the most prominent place of ejection, especially in crashes with safety barriers. Head slap can be eliminated by ensuring that roadside structural components are not placed in the region where an occupant s head is likely to strike them. In order to avoid placing structural components in this critical region, it is necessary to identify the envelope or locations for possible head ejection. Unfortunately, no database on head ejection trajectories has been developed to date. Thus, it was necessary to collect the needed data from videos of full-scale crash tests. Crash tests are normally recorded with high-speed cameras from multiple view points. Further, many crash tests involving passenger vehicles are run with a dummy in the front seat. For these tests, it is possible to estimate the displacement of the dummy s head outside the vehicle using high-speed test videos. An envelope containing displacements from multiple tests can then be created to represent the area where an occupant s head is likely to strike a roadside barrier or an associated barrier attachment, such as a sign, pole, post, or secondary railing. 40
54 Crash test videos used in this study were limited to only those consisting of passenger vehicles impacting rigid barriers. Rigid barriers, as compared to semi-rigid or flexible barriers, redirect errant vehicles more quickly and produce higher peak vehicle accelerations. These high accelerations tend to produce more severe head ejection, meaning greater displacement out of the side window. Head ejection resulting from more flexible barriers should be significantly less than the ejection distances experienced from rigid barriers. NCHRP Report 350 and its predecessors require that when a dummy is used in a crash test, it should be a Hybrid III 50 th percentile male dummy. As a result, all relevant crash tests have utilized the same size dummy. Also, only crash tests involving a restrained dummy with a seat belt were considered. Without the restraint of a seat belt, the dummy had nothing to prevent it from being completely ejected from the vehicle. It would be impractical to remove all roadside structures that could be struck by an occupant completely ejected from an automobile. Therefore, all of the crash tests used for evaluating head ejection incorporated belted dummies. 5.2 Video Analysis Procedure All of the relevant and available full-scale crash tests showing head ejection were obtained in, or converted into, AVI format. As a result, the crash and the dummy s head movement were analyzed on a frame by frame basis using the Redlake Motionscope software. Three camera viewpoints were potentially used to measure the head ejection from the crash test videos. The upstream, the downstream, and the top views allow the maximum lateral head ejection to be easily observed and measured. 41
55 The first step in any vehicle analysis is the establishment of a scale between video pixel location and distance in the video. The scale factor was established by comparing a known distance found in the test report to the number of pixels between the two objects on the video. Test reports contain vehicle lengths, vehicle widths, vehicle heights, and barrier dimensions. Whenever possible, all of these were used to calibrate the scale. Thus, multiple distances were used and the conversion ratios were averaged together to get a single scale factor. The scales for x and y distances were assumed to be the same, and individual measurements confirmed this assumption during the scale factor calculation. The bottom of the side window was used as the base point for all of the head motion measurements. This point was selected for two reasons. First, by basing the measurements from the bottom of the window, the individual vehicle heights were taken out of the analysis. Thus, the measured ejection could be applied to all vehicles, not just the specific test vehicle, by shifting the envelope up or down. Second, the maximum head ejection occurred approximately the time that the vehicle became parallel with the barrier. The side of the vehicle, including the bottom of the window, would then be in direct contact with the barrier. Any head displacements measured laterally out from the window would be susceptible to contact with either the barrier itself or any roadside device attached to the barrier. When gathering displacement data, both the lateral and the vertical location of the head during the impact were necessary to define the head ejection envelope. The lateral displacement of the head out of the window paired with its vertical position established a point representing the extent of head ejection on a 2-D plane normal to the side of the vehicle. Since the time that the maximum head ejection occurred very near the time when the vehicle became parallel to the 42

56 barrier, this 2-D plane was also normal to the face of the barrier. A head ejection envelope was formed on this plane by encompassing all of the points accumulated from different views and different tests. The envelope would be used to dictate the area from which roadside structures, or barrier components, must be excluded in order to prevent head slap. An example of how the lateral and vertical measurements were taken is shown in Figure 8. Vertical Lateral Figure 8. Lateral and Vertical Measurements from the Bottom of the Window The head ejection envelope must be defined by both the maximum lateral head displacement and lowest vertical head displacement. These two extremes were closely observed while tracking the path of the head as it was ejected out of the window. During impact, a 43
57 dummy s shoulder was normally pressed against the door and could not move. In this case, head ejection was caused by the rotation in the neck and slight shifting of the body. The body motion was restricted by the safety belts, and head displacement was the result of neck and torso bending. The rotating was further limited by the physical limits of the dummy s neck structure and contact with the bottom of the window. These limitations prevented the head from rotating past horizontal in any of the crash test videos studied. Thus, the maximum lateral and minimum vertical positions occurred simultaneously, and the critical time in each test was reached in only one frame. The dummy s head motion was tracked until its direction of motion reversed. All head ejection measurements were taken on the frame immediately prior to this reversal. For the upstream and downstream views, the lateral and vertical distances from bottom of the window were measured to three points to define the contour of the head. The three points on the head are the minimum vertical point, the maximum lateral point, and a point between the other two in order to better define the contour of the head. These points are labeled (1), (2), and (3), as shown in Figure 9. Each head ejection measurement was repeated 10 times for every applicable view of the crash test. Thus, each upstream and downstream view results in 30 independent points describing the extreme location of a passengers head. For the top view, only the maximum lateral displacement to a single point was measured since no vertical displacements could be measured. 44
58 Figure 9. Location and label of three points measured. The vertical measurement needed to complete the 2-D point for the top view was interpolated from the other views. The average of the vertical measurements taken for the point of maximum lateral displacement, point (3), in the upstream and downstream views, was used as the vertical displacement for all 10 of the measurements taken from the top view. This interpolation resulted in 10 data points describing only the maximum lateral head displacement for the top view. The head ejection measurements were separated into categories - small cars and pickups. Different head displacements were expected for these vehicles due to the difference in how a passenger sits in a pickup as compared to a small car. A pickup passenger usually sits more upright and higher relative to the window than small car occupants. If a pickup occupant s 45
59 shoulder doesn t contact the door, the head and neck can move closer to the window before neck rotation even begins. As a result, pickups tend to experience larger lateral ejection measurements than small cars. Small cars and pickups also have much different window heights. Remember, all ejection measurements were based from the bottom of the window. Therefore, all small cars measurements were grouped together with a common origin, while the pickup measurements were given a separate common origin. Thus, ejection envelopes were constructed for each vehicle type. These envelope pieces had to be placed at the correct vertical locations according to vehicle window heights to define the complete ejection envelope. This process is explained in Section Head Ejection Measurements from Small Cars Eight full-scale crash tests were used to measure the head ejection out of a small car. All eight crash tests involved rigid longitudinal barriers in compliance with NCHRP Report 350 test conditions. The high-speed videos for each test clearly showed the contour of the dummy s head as it traveled outside of the vehicle and, with only one exception, multiple camera views could be utilized. Table 9 contains a list of these tests along with impact conditions and the views used to measure head displacements. Note that head ejection was also observed in many other small car crash tests. However, these crash tests were excluded from the study due to either an obstruction to the view of the head motion or the extent of ejection was not large enough to affect the bounds of the head ejection envelope. 46
60 Table 9. List of Small Car Tests Used to Describe Head Ejection Test Impact Condition Applicable Views Ref. Vehicle Barrier Velocity Angle No. Top DS US (km/h) (mph) (deg) Festiva Open Rail X X Festiva Open Rail X X I Civic Vertical Wall X Tercel Single Slope Barrier X X Geo Metro Vertical Bridge Rail X X Geo Metro Single Slope Barrier X X X Geo Metro Open Rail X X X Tercel Single Slope Barrier X X All of tests shown in Table 9 were analyzed as described in Section 5.2. The following pages contain the data measured for each individual test in both tabular and graphical formats. Note that ejection data could not be collected for all views. 47
61 TEST Table 10. Data Measurements for Test DOWNSTREAM VIEW UPSTREAM VIEW TOP VIEW Point 1 Point 2 Point 3 Point 1 Point 2 Point 3 Point 3 Lateral (mm) Vertical (mm) Lateral (mm) Vertical (mm) Lateral (mm) Vertical (mm) Lateral (mm) Vertical (mm) Lateral (mm) Vertical (mm) Lateral (mm) Vertical (mm) Lateral (mm) Vertical (mm) Vertical Position (mm) DS VIEW US VIEW TOP VIEW Lateral Position (mm) Figure 10. Plot of Data Measurements for Test
62 TEST Table 11. Data Measurements for Test DOWNSTREAM VIEW UPSTREAM VIEW TOP VIEW Point 1 Point 2 Point 3 Point 1 Point 2 Point 3 Point 3 Lateral Vertical Lateral Vertical Lateral Vertical Lateral Vertical Lateral Vertical Lateral Vertical Lateral Vertical (mm) (mm) (mm) (mm) (mm) (mm) (mm) (mm) (mm) (mm) (mm) (mm) (mm) (mm) Vertical Position (mm) DS VIEW US VIEW TOP VIEW Lateral Position (mm) Figure 11. Plot of Data Measurements for Test
63 TEST I2-3 Table 12. Data Measurements for Test I2-3 Lateral (mm) DOWNSTREAM VIEW UPSTREAM VIEW TOP VIEW Point 3 Point 1 Point 2 Point 3 Point 1 Point 2 Point 3 Vertical (mm) Lateral (mm) Vertical (mm) Lateral (mm) Vertical (mm) Lateral (mm) Vertical (mm) Lateral (mm) Vertical (mm) Lateral (mm) Vertical (mm) Lateral (mm) Vertical (mm) Vertical Position (mm) DS VIEW US VIEW TOP VIEW Lateral Position (mm) Figure 12. Plot of Data Measurements for Test I2-3 50
64 TEST 533 Table 13. Data Measurements for Test 533 DOWNSTREAM VIEW UPSTREAM VIEW TOP VIEW Point 1 Point 2 Point 3 Point 1 Point 2 Point 3 Point 3 Lateral Vertical Lateral Vertical Lateral Vertical Lateral Vertical Lateral Vertical Lateral Vertical Lateral Vertical (mm) (mm) (mm) (mm) (mm) (mm) (mm) (mm) (mm) (mm) (mm) (mm) (mm) (mm) Vertical Position (mm) DS VIEW US VIEW TOP VIEW Lateral Position (mm) Figure 13. Plot of Data Measurements for Test
65 TEST Table 14. Data Measurements for Test DOWNSTREAM VIEW UPSTREAM VIEW TOP VIEW Point 1 Point 2 Point 3 Point 1 Point 2 Point 3 Point 3 Lateral (mm) Vertical (mm) Lateral (mm) Vertical (mm) Lateral (mm) Vertical (mm) Lateral (mm) Vertical (mm) Lateral (mm) Vertical (mm) Lateral (mm) Vertical (mm) Lateral (mm) Vertical (mm) Vertical Position (mm) DS VIEW US VIEW TOP VIEW Lateral Position (mm) Figure 14. Plot of Data Measurements for Test
66 TEST 511 Table 15. Data Measurements for Test 511 DOWNSTREAM VIEW UPSTREAM VIEW TOP VIEW Point 1 Point 2 Point 3 Point 1 Point 2 Point 3 Point 3 Lateral Vertical Lateral Vertical Lateral Vertical Lateral Vertical Lateral Vertical Lateral Vertical Lateral Vertical (mm) (mm) (mm) (mm) (mm) (mm) (mm) (mm) (mm) (mm) (mm) (mm) (mm) (mm) Vertical Position (mm) DS VIEW US VIEW TOP VIEW Lateral Position (mm) Figure 15. Plot of Data Measurements for Test
67 TEST 544 Table 16. Data Measurements for Test 544 DOWNSTREAM VIEW UPSTREAM VIEW TOP VIEW Point 1 Point 2 Point 3 Point 1 Point 2 Point 3 Point 3 Lateral Vertical Lateral Vertical Lateral Vertical Lateral Vertical Lateral Vertical Lateral Vertical Lateral Vertical (mm) (mm) (mm) (mm) (mm) (mm) (mm) (mm) (mm) (mm) (mm) (mm) (mm) (mm) Vertical Position (mm) DS VIEW US VIEW TOP VIEW Lateral Position (mm) Figure 16. Plot of Data Measurements for Test
68 TEST 531 Table 17. Data Measurements for Test 531 Lateral (mm) DOWNSTREAM VIEW UPSTREAM VIEW TOP VIEW Point 2 Point 3 Point 3 Point 1 Point 2 Point 3 Point 1 Vertical (mm) Lateral (mm) Vertical (mm) Lateral (mm) Vertical (mm) Lateral (mm) Vertical Lateral Vertical Lateral Vertical Lateral Vertical (mm) (mm) (mm) (mm) (mm) (mm) (mm) Vertical Position (mm) DS VIEW US VIEW TOP VIEW Lateral Position (mm) Figure 17. Plot of Data Measurements for Test
69 All of these small cars had similar dimensions, including height to the bottom of the side window. Also, an occupant will sit in a similar position while riding in any of these small cars. Therefore, the resulting head ejection measurements from all eight of the crash tests were compiled into a singular plot by using a common origin. The specific placement of the common origin, or height to the bottom of the window, will be determined in Sections 5.5 and 5.6. An envelope consisting of segmented lines beginning at the base of the window and extending out and up is constructed by encompassing all of the ejection measurements from the small car tests. This envelope constitutes the area outside the side window of a small car in which an ejected head may occupy during a crash. Figure 18 shows the constructed envelope represented by a series of blue lines surrounding the combined data points from the small car tests. Note that the bounds of head ejection envelope were found to be defined by impacts with vertical face barriers. This is important to note because it further justifies the choice of using only rigid barriers for this study. Remember, rigid barriers result in higher peak impact forces over shorter time durations than observed in impacts with semi-rigid barriers. Thus, rigid barriers should cause a greater degree of head ejection. Chapter 4 explained how vertical face barriers resulted in the highest peak force levels of the rigid barrier shapes, so having open concrete rails and vertical shape barriers provide the maximum lateral and minimum vertical head positions correlates well with the previous assumption. 56
70 Vertical Position (mm) TESTS I ENVELOPE Lateral Position (mm) Figure 18. Ejection Envelope Encompassing All Small Car Data
71 Also note, small cars represent the smallest passenger vehicles on the roadway with the lowest driver height and lowest window height. Therefore, small cars produce the lowest head ejection trajectory, and only define the lower bounds of the head ejection envelope. As such, no upper bound was given to the envelope. Larger vehicles must be used to define the upper portions of the head ejection envelope (see Sections 5.4 and 5.7). 5.4 Head Ejection Measurements from Pickups Few pickup tests have been run with a dummy in the vehicle because NCHRP Report 350 does not require it. As a result, no crash test videos could be found showing head ejection from a pickup impacting a rigid concrete barrier, which is the ideal situation for this study. The crash tests that were selected for this study have systems with some flexibility, but they were the stiffest barriers tested with available videos showing head ejections from pickups. Only three crash test videos were used to measure the amount of head ejection occurring from impacts between pickups and longitudinal barriers. These tests were all run in compliance with NCHRP Report 350 test conditions. Table 18 lists the tests as well as the views used for measuring the head displacement. Test involved a steel bridge rail which can be considered as rigid. Tests and were both transition systems going from semi-rigid guardrail to rigid concrete barrier. The Update to NCHRP Report 350 recommends that all tests have a dummy on the impacting side for tests in which an ejected head could impact the barrier or an attachment [75]. This new requirement should produce more tests involving head ejection from pickup trucks. 58
72 Table 18. List of Pickup Tests Used to Describe Head Ejection Test Impact Condition Applicable Views Ref. Vehicle Barrier Velocity Angle No. Top DS US (km/h) (mph) (deg) Chevy 2500 Bridge Rail X X Chevy 2500 Transition - Rein. W-Beam to X X Chevy 2500 Transition - Thrie Beam to X X The procedure that was used to calculate the maximum lateral and minimum vertical head positions mirrored those procedures used during the small car analysis, as described in Section 5.2. In addition, the maximum vertical position of the head was also determined from the pickup crash test videos. Maximum vertical position data defines the upper bound of the head ejection envelope, or the minimum height for objects directly above the barrier face. An initial observation from the pickup videos was that the dummy s head is higher on its return path back into the pickup cab. Often times, the head actually hits the top frame of the door before going back inside the cab. Thus, the measurements for the upper bounds on the ejection envelope were taken from frames after the maximum lateral displacement occurred and before the head re-entered the cab. Three different points on the dummy s head were tracked during the return path from the downstream view. These points are shown in Figure 19 and were numbered (4), (5), and (6). Point (6) is similar to point (3) in the previous analysis and measures the maximum lateral position of the head. Point (4) is the maximum vertical position, and Point (5) is used to define the head contour between the other two. Points (4) through (6) were measured in multiple frames to capture the head s motion from maximum lateral ejection back into the cab. The motion of the head was followed until the vehicle door was no longer in contact with the barrier, sometimes preceding a complete return into the cab. 59
73 Figure 19. Measured Points to Describe Maximum Vertical Position The following pages contain the data measured for each individual test in both tabular and graphical formats. Although all 10 measurements for data points (4) through (6) are shown together, the measurements were taken from multiple time frames in order to track the entire return motion from maximum ejection to the head s return to the cab. As with the small car measurements, data points (1) through (3) were all taken from the frame showing maximum ejection. 60
74 TEST Table 19. Data Measurements for Test DOWNSTREAM VIEW TOP VIEW DOWNSTREAM VIEW - Head Return Motion Point 1 Point 2 Point 3 Point 3 Point 4 Point 5 Point 6 Lateral (mm) Vertical (mm) Lateral (mm) Vertical (mm) Lateral (mm) Vertical (mm) Lateral (mm) Vertical (mm) Lateral (mm) Vertical (mm) Lateral (mm) Vertical (mm) Lateral (mm) Vertical (mm) Vertical Position (mm) DS VIEW TOP VIEW Return Motion Lateral Position (mm) Figure 20. Plot of Data Measurements for Test
75 TEST Table 20. Data Measurements for Test DOWNSTREAM VIEW TOP VIEW DOWNSTREAM VIEW - Head Return Motion Point 1 Point 2 Point 3 Point 3 Point 4 Point 5 Point 6 Lateral (mm) Vertical (mm) Lateral (mm) Vertical (mm) Lateral (mm) Vertical (mm) Lateral (mm) Vertical (mm) Lateral (mm) Vertical (mm) Lateral (mm) Vertical (mm) Lateral (mm) Vertical (mm) Vertical Position (mm) DS VIEW TOP VIEW Return Motion Lateral Position (mm) Figure 21. Plot of Data Measurements for Test
76 TEST Table 21. Data Measurements for Test DOWNSTREAM VIEW TOP VIEW DOWNSTREAM VIEW - Head Return Motion Point 1 Point 2 Point 3 Point 3 Point 4 Point 5 Point 6 Lateral (mm) Vertical (mm) Lateral (mm) Vertical (mm) Lateral (mm) Vertical (mm) Lateral (mm) Vertical (mm) Lateral (mm) Vertical (mm) Lateral (mm) Vertical (mm) Lateral (mm) Vertical (mm) Vertical Position (mm) DS VIEW TOP VIEW Return Motion Lateral Position (mm) Figure 22. Plot of Data Measurements for Test
77 Data measurements from all three of the crash tests were compiled into a singular plot by assuming a common origin. This assumption was justified by pointing out that pickups are all of similar dimensions, including height to the bottom of the window, and occupant seating positions. Therefore, the resulting head ejection measurements were similar. The envelope encompassing all of the ejection measurements from the pickup tests was constructed with line segments similar to that prepared for the small car envelope. However, the pickup ejection envelope must be considered as two independent boundaries. One boundary defines the maximum lateral ejection and minimum vertical position of the head. The other boundary defines the maximum vertical position of the head. The boundaries are considered separately because the lower boundary needs to be located at the lowest possible pickup height, while the upper bound will be located at the maximum possible pickup height. The exact location of each boundary is presented in Section 5.5. Figure 23 depicts the two ejection envelope bounds surrounding the combined data points from the pickup tests. 64
78 MAXIMUM VERTICAL ENVELOPE BOUNDARY Vertical Position (mm) TESTS / TIME FRAME Max Lateral Max Lateral Max Lateral Return Path Return Path Return Path MAXIMUM LATERAL ENVELOPE BOUNDARY Lateral Position (mm) Figure 23. Ejection Envelope Boundaries Encompassing All Pickup Data.
79 5.5 Placement of Ejection Envelopes The head ejection envelopes for small cars and pickups must then be placed in the correct position to create a singular envelope describing head ejection for both small cars and pickups. This required only the proper placement for the bottom of the window on the plane normal to the barrier face for each of the two vehicle classes. As explained in Section 5.2, the time of maximum head ejection is normally near the time when the vehicle becomes parallel with the barrier. At this point, the side of the vehicle, including the bottom of the side window, is in direct contact with the face of the barrier. Therefore, the origin of each vehicle envelope was given a horizontal position on the face of the barrier. In the case of a vertical barrier, the envelope origins were aligned vertically. The vertical position of the two head ejection envelopes was determined by identifying the critical bottom window height for each envelope. Since the maximum lateral and minimum vertical head extents are defined by the same envelope, these envelopes are critical at the lowest heights. Aligning the maximum ejection with the minimum window height ensures a conservative envelope that encompasses all of the larger vehicles as well. Therefore, the maximum ejection envelopes for both small cars and pickup trucks were placed at the lowest window height for their respective vehicle types. On the other hand, aligning the pickup s upper envelope bound with the maximum window height ensured that the ejection envelope encompassed ejections from all vehicles. Therefore, the pickup s upper bound ejection envelope needed to be placed at the critical maximum pickup window height. Many different vehicles were measured in order to determine these critical minimum and maximum heights to the bottom of the window. The first measurements taken were from 66
80 vehicles in the Midwest Roadside Safety Facility s test site, those which met the NCHRP Report 350 criteria for a small car test. Measuring actual test vehicles was considered a priority because 1) all of the collected ejection data came from these vehicles, and 2) these vehicles represent the smallest vehicles on the roadway. Vehicles matching the test vehicle classifications were also measured at car dealership lots. New vehicles, model year 2006, from the show rooms and used vehicles on the lots were measured at multiple dealerships including Ford, Chevrolet, Dodge, Saturn, Nissan, Honda, and Toyota. Each vehicle s side window height was measured twice, once on the driver side and once on the passenger side. The measurements were read with an English-unit tape measure and taken to the nearest half inch. Table 22 lists heights taken to the bottom of the window for every vehicle make and model measured. The trend of windows being higher in the newer model vehicles was easily observed. However, the older and smaller vehicles are still on the roadways and should be used in the head ejection design. The minimum height to the bottom of the side window was found to be 890 mm (35 in.) for small cars and 1,245 mm (49 in.) for pickups. The maximum height to the bottom of a pickup window was 1,372 mm (54 in.). All occurrences of the minimum window heights are highlighted in yellow, while the maximum window height is highlighted in red in Table 22. By placing the three envelope bounds in the correct locations, the total shape of the head ejection envelope was created. This singular envelope is illustrated in Figure 24 as an assembly of boundaries. Dimensions are not given because slight changes accounting for vehicle movements are necessary and are quantified in Section 5.6. Note that a vertical barrier face was assumed for the illustration. 67
81 Table 22. Heights to the Bottom of the Side Window MAKE / MODEL MIN. HEIGHT (m) Used Small Cars - Various Years Chevy Cavalier 4-door Chevy Cavalier 2-door Honda Civic 4-door Honda Civic 2-door Honda Accord 4-door Honda Accord 2-door Ford Escort 2-door Ford Focus 4-door Ford Contour 4-door Toyota Corolla 4-door Pontiac Sunfire 2-door Dodge Neon 4-door Toyota Echo Saturn Ion 4-door Geo Metro Kia Rio Small Cars Models Chevy Cobalt Eagle Legacy Subaru WRX Hyundai Tiburon Nissan Sentra Hyundai Elantra Honda S Honda Civic Honda Accord Saturn Ion Ford Fusion Ford Mustang Mazda RX Ford Focus Dodge Neon Toyota Prius Toyota Corolla Used Pickups - Various Years Chevy Ford F Dadge Ram Pickups Models Chevy Silverado Nissan Armada Ford F Ford F Dodge Ram Toyota Tundra SAMPLE HEIGHTS TO BOTTOM OF WINDOW (m) 68
82 Figure 24. Assembly of Head Ejection Envelope 5.6 Envelope Adjustments for Vehicle Movement Head ejection measurements were made relative to the bottom of the vehicle s side window, and the height to the window was determined from vehicle measurements. However, the window heights taken from stationary vehicles in Section 5.5 must be adjusted for a movement during the impact event. Vehicle roll, for example, would lower the window height and may lead to head ejection outside of the envelope. The expected magnitude and direction of vehicle roll is dependant on the shape of the barrier. Safety shape barriers, and to a lesser degree single-slope barriers, allow vehicles to climb during impacts. Vehicle climb raises the impact side of the vehicle and causes it to roll 69
83 away from the barrier. Vertical barriers, on the other hand, produce little to no climb and tend to cause impacting vehicles to roll toward the barrier. Only roll toward the barrier will lower the vehicle side window and adversely affect the bounds of the head ejection envelope. Also, as discussed in Section 5.3, impacts with vertical faced barriers set the bounds for the head ejection envelope, so alterations to the envelope due to vehicle movement should be the result of studying similar impacts. As such, only impacts with vertical-faced barriers were used to measure the movement of the side window. In most cases, the same crash test videos used to measure the head displacements in Sections 5.3 and 5.4 were used to measure vehicle movement. All four of the small car tests selected and two of the four pickup tests selected came from previously used videos. The pickup videos used to measure head displacement were not rigid, so it was unclear whether these tests would give good results for vertical vehicle movement. Therefore, two additional videos, test nos. MN-3 and NEOCR-5, were added to observe the effects of a pickup impacting a vertical concrete face since none of the pickup ejection videos contained such an impact. Test MN-3 impacted a vertical shape barrier [41], while NEOCR-5 impacted an open concrete bridge rail [62]. Using the downstream view, the vertical distance from the bottom of the vehicle side window was measured, first at impact, and then again at the time of maximum head ejection. For test nos. MN-3 and NEOCR-5, the second measurement was taken when the vehicle was parallel with the wall. The differences in measurements were then recorded and are listed in Table 23 and Table
84 Table 23. Measured Vertical Movement of Side Window During Impact (SI) Test Vehicle Type Ref No. Sample Measurements for Change in Vertical Position of Side Window (mm) Average (mm) Max. Vert. Shift (mm) Small Car Small Car I2-3 Small Car Small Car Pickup Pickup MN-3 Pickup NEOCR-5 Pickup Table 24. Measured Vertical Movement of Side Window During Impact (English) Test Vehicle Type Ref No. Sample Measurements for Change in Vertical Position of Side Window (in.) Average (in.) Max. Vert. Shift (in.) Small Car Small Car I2-3 Small Car Small Car Pickup Pickup MN-3 Pickup NEOCR-5 Pickup All of the small car data showed similar results. A small downward movement of the side window was observed during all of the impacts. A maximum displacement of approximately 13 mm (0.5 in.) was recorded during the crash test nos. I2-3 and The entire envelope boundary describing head ejection from small cars was lowered by 13 mm (0.5 in.) to accommodate the worst case conditions identified during crash testing. The added videos of pickups impacting rigid concrete barriers recorded similar results as the videos of pickups impacting less rigid barriers. A maximum displacement of approximately 57 mm (2.25 in.) was recorded during the crash test nos and NEOCR-5. Thus, the 71
85 maximum lateral head ejection boundary for pickup trucks was lowered by 57 mm (2.25 in.). Note that the vertical boundary of the ejection envelope was not adjusted to assure that the envelope would accommodate impacts wherein the vehicle does not roll toward the barrier. Figure 25 and Figure 26 depict the head ejection envelope after adjustments for vertical movement of the side window during impact. Figure 25. Head Ejection Envelope with Vehicle Movement Adjustments (SI) 72
86 Figure 26. Head Ejection Envelope with Vehicle Movement Adjustments (English) 5.7 Head Ejection Interpolation for Mid-Size Vehicles The head ejection envelope is incomplete without the considerations of mid-size vehicles. Here, mid-size vehicles refers to sedans, SUVs, small pickups, and other vehicles falling in between the size requirements for small cars and full-size pickups in NCHRP Report 350. These vehicles must be included in the ejection envelope design in order to assume safe performance for the full range of passenger vehicles. Mid-size vehicles are not defined in NCHRP Report 350 as a standard test vehicle. As a result, very few tests have been run with midsize vehicles, and no crash test videos showing head ejection could be found. Therefore, the head ejection from midsize vehicles had to be interpolated from the ejection of small cars and pickups. 73
87 The primary difference in head ejection between small cars and pickups is in the position a passenger sits in these vehicles. As explained in Section 5.2, a pickup passenger sits in a more upright and higher position relative to the window than a small car passenger. Sections 5.3 and 5.4 illustrated how this difference in positions leads to different head ejection displacements. Ejections from small cars were lower vertically, and in some cases, bounded only by the bottom of the window. Ejections from pickups were not only higher vertically, but also further laterally. Thus, increasing the vertical position of the passenger with respect to the window increases the maximum lateral head displacement and increases the vertical position of the head at the moment of maximum lateral displacement. Passengers of mid-size vehicles sit in positions somewhere between those of small cars and pickups. So, mid-size vehicles would exhibit more lateral head displacement than a small car and a lower minimum vertical position than a pickup. In order to quantify the head ejection displacements of mid-size vehicles, both the maximum lateral ejection and the minimum vertical position were assumed to be linear functions of the head height above the side window base. The first step in finding these linear functions was to identify dummy head heights relative to the side windows for the tests listed in Sections 5.3 and 5.4. The measurements came from test report pictures or video providing side or front views of the vehicle with the dummy properly seated. The distance to the top of the dummy s head from the base of the side window was measured and then scaled by a known distance such as vehicle length or vehicle height. Most tests had pre-impact pictures in the test reports or pre-impact video of these views. In a few cases when the crash video itself had to be used, a frame showing the head position and the vehicle height was utilized from either the downstream or upstream views. A clear photo or 74
88 video could not be found to estimate the head height above the window for crash test 531, so it was not used in the interpolating process. Table 25 lists the dummy s head height above the window base along with the lateral and vertical position of the maximum lateral ejection point for each test found in Sections 5.3 and 5.4. Table 25. Head Heights from the Window Base and Ejection Measurements Ref. No. Vehicle Type Head Height Above Maximum Ejection Test Window Base Lateral Vertical (mm) (mm) (mm) small car small car small car small car I small car small car small car pickup pickup pickup A plot was made of lateral ejection as a function of head height above the window base. A line was then drawn over the top of all the data points representing a linear boundary for maximum lateral head ejection for a specific head height. The line was constructed to predict the maximum effect of head height above the window in order to provide a conservative prediction of head ejection distance. The equation for this linear interpolation is L max (mm)= * h(mm) (eq 5.1-a) or L max (in.)= 1.32 * h(in.) (eq 5.1-b) 75
89 where L max is the maximum lateral ejection and h is the head height above the bottom of the window. Figure 27 shows the data plot with the interpolation line for maximum lateral ejection Predicted Maximum Lateral Ejection Lateral Ejection (mm) Head Height Above Window (mm) Figure 27. Measured Lateral Ejection vs. Head Height and Boundary Line The same process was repeated for the vertical position of the head. A plot was constructed of vertical ejection vs. head height above the window, and a boundary line was drawn. This time, the line was drawn under the data points because the lower bound vertical position was critical for small and intermediate vehicles. This line illustrates the conservative prediction tool used to interpolate the vertical ejection position for mid-size vehicles. The interpolation equation for the vertical ejection position is 76
90 V min (mm) = * h(mm) (eq 5.2-a) or V min (in.) = 1.57 * h(in.) (eq 5.2-b) where V min is the minimum vertical ejection position. Figure 28 shows the data plot and the boundary, or interpolation line for minimum vertical ejection Vertical Ejection (mm) Predicted Minimum Vertical Ejection Head Height Above Window (mm) Figure 28. Measured Vertical Ejection Position vs. Head Height and Boundary Line The maximum lateral ejection and the corresponding vertical position, point (3) in the displacement calculations of Sections 5.3 and 5.4, were used for the interpolation equation because the mid-size vehicles only define the middle portion of the ejection envelope. The upper bound, or return path of the head, is not needed because the full size pickup defines the upper 77

91 portion of the envelope. Similarly, lower contours of the head ejection envelope were defined by the small car. In order to obtain head heights above the windows of mid-size vehicles, a co-worker, Jason Hascall, was measured while sitting in the drivers seat of a wide range of vehicles. Mr. Hascall was chosen because his seated height closely matched that of a 50 th percentile male dummy. Measurements for head height, window height, and height to the bottom of the window were recorded for midsized vehicles in showrooms of Chevrolet, Dodge, Ford, Hyundai, Nissan, Honda, and Toyota dealerships. The head height and window height measurements are shown in Figure 29. Each distance was measured five times, and the averages were used to calculate the head height. The original vehicle measurements and the calculated head eights are shown in Table 26. Figure 29. Measurements Taken to Determine Head Height 78
92 Table 26. Vehicle Measurements and Head Height Results Vehicle Bottom Window Height Window Height Head Height Above Bottom of Window Year Make Model Type (mm) (in.) (mm) (in.) (mm) (in.) 2006 Mercury Milan sedan Pontiac Grand Prix sedan Dodge Stratus sedan Dodge Charger sedan Toyota Camery sedan Toyota Scion sedan Hyundai Sonata sedan Nissan Altima sedan Nissan Maxima sedan Ford Tarus sedan Chevrolet Cobalt small car Dodge Neon small car Hyundai Elantra small car Hyundai Tibron small car Honda Accord small car Honda Civic small car Dodge Dakota pickup Dodge Ram pickup Toyota Tundra pickup Hyundai Tucson pickup Nissan Frontier pickup Chevrolet Silverado pickup Chevrolet 2500 pickup Dodge Durango SUV Toyota Highlander SUV Toyota RAV4 SUV Honda Pilot SUV Honda CR-V SUV Chevrolet Equinox SUV Chevrolet Tahoe SUV The calculated head heights for each of the dealership vehicles were then plugged into the linear interpolation equations to find the maximum lateral and minimum vertical ejection displacements. The head heights from the test vehicles in the videos were also entered into the interpolation equations to show worst case scenario and better define the bounds of the head ejection envelope. While the maximum lateral displacement came straight from equation 5.1, the vertical position must be shifted into its proper place. The window height of each vehicle was 79
93 added to the predicted vertical ejection from equation 5.2. Then, the predicted vertical movement of the vehicle during impact was subtracted out. Since no crash videos or test data could be found on the vertical movement of a sedan or SUV, the vertical movement found for small cars was applied to sedans and the movement for pickup was applied to SUVs. Thus, every small car and sedan was given a vertical window drop of 12.7 mm (0.5 in.) and every pickup and SUV was given a drop of 57 mm (2.25 in.). Table 27 contains the results for the predicted lateral and vertical head ejection positions. Figure 30 and Figure 31 contain plots of the predicted maximum head ejection data in SI and English units. The head ejection envelope from Section 5.6 is drawn in blue. Amending this previous shape, a new head ejection envelope is drawn to encompass the predicted ejections of all vehicle classes. The new envelope shape is colored red. The adjusted shape was added to the rest of the head ejection envelope as shown in Figure
94 Table 27. Predicted Results for Maximum Lateral and Minimum Vertical Ejection Vehicle Bottom Window Height Head Height in Window Predicted Ejection Lateral Vertical Window Drop Total Vertical Year Model (mm) (in.) (mm) (in.) (mm) (mm) (mm) (mm) 2006 Milan Grand Prix Stratus Charger Camery Scion Sonata Altima Maxima Tarus Cobalt Neon Elantra Tibron Accord Civic Dakota Ram Tundra Tucson Frontier Silverado Durango Highlander RAV Pilot CR-V Equinox Tahoe Festiva Festiva Metro Tercel Civic Metro Metro
95 Previous Envelope Vertical Distance (mm) Small Cars Sedans Pickups SUVs Adjusted Envelope Lateral Ejection (mm) Figure 30. Predicted Maximum Ejections and the Adjusted Envelope (SI) 82
96 Vertical Distance (in.) Previous Envelope Small Cars Sedans Pickups SUVs 40 Adjusted Envelope Lateral Ejection (in.) Figure 31. Predicted Maximum Ejections and the Adjusted Envelope (English) 83
97 Figure 32. Head Ejection Envelope and Dimensions 5.8 Uses and Limitations of the Head Ejection Envelope The head ejection envelope was designed as a template for longitudinal barriers with the goal of eliminating head slap. The envelope was created on a plane through the barrier cross section, or normal to the barrier face, and applies along the entire length of a longitudinal barrier. 84
98 In order to prevent head slap, all barrier cross-sectional elements and attachments should meet the geometric design restraints set by the envelope. The head ejection envelope geometry shown in Figure 32 directly applies only to rigid barriers with a vertical or near vertical face. Semi-rigid or flexible barriers deform during impact and thereby reduce vehicle decelerations. Thus, the ejection envelope developed herein does not apply. Also, safety-shaped and single-sloped barriers allow an impact vehicle to climb and cause it to roll away from the barrier. Thereby, the head ejection envelope is not applicable to these barrier shapes. The head ejection envelope also has limitations on who it applies to. The envelope was designed for belted occupants only. An occupant not wearing a seatbelt runs the risk of being completely ejected from a vehicle during impact. Further, the head ejection envelope was designed using measurements from the Hybrid III 50 th percentile male dummy. Any person sitting higher than this in a vehicle is subject to having larger head ejection displacements than predicted by this envelope. If desired, alterations can be made to the ejection envelope in order for it to encompass taller occupants. The same process described in Section 5.7 can be used to predict the extent of ejection with one extra step. The difference in seated height between a taller occupant to the Hybrid III 50 th percentile male dummy should be added to the head height measured in each window before the linear interpolation equation are used to predict the lateral and vertical ejections. Finally, the upper bound of the envelope should be raised a distance equivalent to the difference in seated heights. 85
99 6 BARRIER SHAPE DESIGN 6.1 Barrier Height The design height of a barrier can simply be based off the height to the center of gravity of the impacting vehicle. Making the barrier taller than the vehicle s center of gravity ensures the vehicle can be redirected by a force acting horizontally through the center of gravity. This is usually the case for longitudinal barriers designed for restraining passenger vehicles. NCHRP Report 350 lists the center of gravity for the 820C and 2000P test vehicles as 551 mm (21.7 in.) and 701 mm (27.6 in.) respectively. Therefore, a barrier with a height of 711 mm (28 in.) or greater should be capable of redirecting both of these passenger vehicles. A problem arises when applying this approach to tractor trailer impacts. The center of gravity for heavy trucks is much higher than most traffic barriers. For example, NCHRP Report 350 recommends that the center of gravity height for the heavy truck ballast to be 1,849 mm (72.8 in.). However, full-scale crash testing has shown that barriers lower than the center of gravity height can safely redirect a test vehicle. The lower barrier heights are possible because the top of the barrier applies a vertical, stabilizing force to the bottom of the truck box as the truck box rolls onto the top of the barrier. The vertical force keeps the box upright and prevents it from rolling over the top of the barrier, while the horizontal forces applied to the truck tires redirect the vehicle. Thus, a TL-5 barrier must only be tall enough to apply a vertical force to the box, not the height of the center of gravity. Figure 33 illustrates these forces during an impact between a tractor trailer and a rigid concrete wall. 86

100 Figure 33. Forces Acting on a Tractor Trailer during Impact. The minimum barrier height deemed necessary to contain and redirect a tractor vantrailer was determined from previous TL-5 barrier systems. Table 28 contains a list of previous successful TL-5 full-scale crash tests meeting the NCHRP Report 350 requirements. The lowest barrier height from a successful TL-5 crash test was 1,067 mm (42 in.). This height has been proven adequate by four crash tests that have passed under NCHRP Report 350 TL-5 conditions. An 813 mm (32 in.) tall New Jersey shaped barrier was impacted under TL-5 conditions, but the barrier height was inadequate and the tractor trailer rolled over the top [24]. Therefore, the design height for the new TL-5 barrier was determined to be 1,067 mm (42 in.). 87
101 Table 28. List of Previous Successful Tractor Trailer Crash Tests. Test Tractor Trailer Ref Impact Conditions Barrier Height Weight Barrier Description No. Speed Angle (kg) (lbs) (km/h) (mph) (deg) (mm) (in.) ,369 80, New Jersey Shape Median ,287 80, New Jersey Shape Median ,324 80, New Jersey Shape with Metal Rail ,183 79, Open Rail with Metal Rail ,000 79, Vertical Bridge Rail ,324 80, Instrumented Vertical Wall ACBR ,822 78, Open Bridge Rail Barrier Face Geometry Passenger vehicle stability and impact forces associated with each of the five major barrier shapes; New Jersey shape, F-shape, single-slope, vertical, and open concrete rail; were examined in Chapter 4. Vertical-shaped barriers and open concrete rails both created the least amount of vehicle climb and roll to minimize the possibility for a rollover crash. Although the vertical-faced barriers showed increased peak force levels compared to the other shapes, the occupant impact velocities and occupant ridedown decelerations were still below the NCHRP Report 350 thresholds. Therefore, a vertical face was selected as the optimum barrier shape to safely redirect passenger vehicles (see Chapter 4 for details). Table 28 from Section 6.1 contains multiple tests in which a tractor trailer was successfully redirected with a vertical face barrier. Test no. ACBR-1 was performed on an open concrete bridge rail with an indented top [13], while test no was completed using a vertical face bridge rail [21]. Both of these 1067 mm (42 in.) tall barriers passed the NCHRP Report 350 evaluation criteria and validate the choice of a vertical face for the geometric design of the new TL-5 barrier. 88
102 Head slap from passenger vehicles was also considered when designing the barrier geometry. Since this barrier design was expected to be over 864 mm (34 in.) tall, the head ejection envelope created in Chapter 5 must be utilized. The head ejection envelope was placed adjacent to the face of the barrier and used as a template with which to design the top of the barrier. Multiple concepts for the barrier face shape were then identified within the head ejection envelope. Those design options are illustrated in Figure 34. Figure 34. Barrier Face Geometry Options. The design options were then evaluated, critiqued, and eliminated until only one remained. The curved indentation of Option A was considered too difficult to keep consistent in formwork and was, therefore, ejected. Options D, E, and F contained sharp 90 degree corners between vertical and horizontal surfaces which may be difficult to completely fill with concrete, thus leaving voids in the barrier. These three were also believed to be less aesthetical appealing 89
103 and were, therefore, discarded. Finally, the higher initial vertical face of Option C was more favorable for vehicle stability than Option B. Based upon this reasoning, Option C was selected as the barrier face shape for use in this study. The final barrier geometry was set by adjusting the general shape of Option C to be inside the head ejection envelope and rounding dimensions to whole numbered English dimensions. This modification was made by lowering the shallow slope after the first break point by one-half inch. This is a conservative design for head ejection and allows for some tolerance in vertical barrier placement during construction. The final barrier face geometry is dimensioned and displayed in Figure 35. Note the width of the barrier is not dimensioned because it was optimized based upon reinforcing steel requirements presented in Chapter 7. Figure 35. Barrier Face Geometry 90
104 6.3 Longitudinal Asperities Option Aesthetic additions to the barrier face geometry can be made in the form of longitudinal asperities. Asperities are neither critical structural features nor mandatory additions. Instead asperities are used as aesthetic enhancements of the barrier geometry. The plain flat face can be altered by adding a number of different protrusions, notches, or grooves to increase the barrier s visual appeal. A few examples of possible longitudinal asperity options are illustrated in Figure 36. Figure 36. Possible Longitudinal Asperity Options for the Barrier Face 91
105 As shown in Figure 36, asperities can be protrusions or indentations to the barrier face. However, the first break point on the top of the vertical face must not be moved inward. This point represents the beginning and base point of the head ejection envelope. If the top of the barrier is set back, impacting vehicles may be allowed to roll farther into the barrier and allow an occupant s head to strike the barrier. Therefore, any indentations in the barrier face must be added below the top of the barrier face. Protrusion asperities, on the other hand, can be added anywhere including the top of the face. Also, asperities of all types should not be added to the top narrow protrusion of the barrier. Adding more detail to this small portion would make construction of the barrier much more difficult. A lower limit also exists for the placement of any asperity type. If an asperity was located near the base of the barrier, it could create a mechanism for tires to climb the barrier face with an increased risk of rollover. Therefore, all asperities should be located on the upper portion of the barrier face, or above the middle of the impacting vehicle s tire. Pickup truck tire diameters are routinely measured around 762 mm (30 in.), so asperities must be at least 381 mm (15 in.) above the roadway surface. Longitudinal asperities placed on the upper half of the barrier can actually help prevent vehicle climb during impact. Protrusions on the barrier face indent the vehicle sheet metal, while indentations can allow vehicle sheet metal to intrude into the openings. Hence, asperities can interlock with vehicle sheet metal and resist any vertical movement. Thus, asperities not only provide visual appeal, but can also serve as a mechanism preventing vehicle climb. 92
106 6.4 Geometric Alterations for Slipforming Most median barriers today are being constructed without the use of conventional forms and are instead being slipformed. Slipforming is a process by which a machine casts concrete into a desired cross-sectional shape as it slowly travels down the roadway. The resulting product is a smooth, monolithic structure built without the need to set or tear down conventional forms. Consequently, slipforming greatly reduces labor requirements associated with constructing conventional formwork. Contractors and engineers from across the nation who regularly work with slipforming safety barriers were surveyed regarding the constructability of the chosen barrier geometry. Contractor recommendations were compiled and used to modify the barrier geometry where necessary. The contractor s biggest concerns dealt with the vertical face. Wet concrete does not maintain a perfect shape through the curing process without the use of fixed forms. Even with the drier mixes used for slipforming, some degree of slump is always present. As such, a perfectly vertical face is very difficult to construct, especially the proposed 864-mm (34-in.) high vertical face. Therefore, the barrier face needed to be given a slight batter, or slope, in order for slipforming to become practical. Some contractors used a rule of 1 mm of batter for every 12 mm, while others used a similar 1/24 limit. The 1/24 batter has been successfully used in many barrier construction projects, so it is possible to slipform. However, in recognition that some contractors expressed a concern this slope may raise costs, a batter of 1/18 was determined by splitting the middle of these two design rules. A 1/18 slope equates to a 3.2 degree angle from vertical. This angle is less than one third of the angles normally used for single-slope barriers: 9.8 and 11.2 degrees. A small amount of 93
107 vehicle climb and roll can be foreseen with a 1/18 slope, but these values should be a small fraction of the climb and roll associated with single-slope barriers. It is then expected that vehicle behavior during impacts will be closer to results seen from vertical-shape barriers than those of single-slope barriers. Vehicle stability should remain near the optimized levels of vertical-shape barriers. Because little or no climb is expected from the new barrier face, the head ejection envelope was not shifted vertically. The horizontal position of the envelope was based off the side of the vehicle, and window base, being in direct contact with the barrier face. This remains unchanged and the minimal amount of additional roll was not expected to alter the envelope shape. The ejection envelope remains applicable, and the top geometry was recommended to be unchanged to preserve the head ejection envelope design limits beginning at the top of the barrier face. Thus, the 1/18 slope was added to the barrier face by moving the bottom of the barrier outward by 48 mm (1.9 in.) on each side. The only adjustment made to the top geometry dealt with the interior angle. This angle drew concerns because it left no room for tolerance in the design. Any slight mishap or deviance from a perfectly straight line would adversely affect barrier aesthetics. This especially holds for any hand finishing required to fill voids in the barrier. Subsequently, the sharp angle was replaced with a 3 inch radius to eliminate this concern. Figure 37 depicts the barrier geometry amended for slipforming. If conventional forms are to be used during cast in place construction, the barrier geometry can remain as shown in Figure
108 Figure 37. Barrier Geometry after Slipforming Alterations. Recommendations were also received from contractors regarding the longitudinal asperities. Recessed asperities were preferred because of the added cost of creating protrusions in the forms. Intruding asperities can be established by adding elements inside a basic form. As a result, the same form could be used on multiple projects with different asperities or no asperities at all. Also, the size of longitudinal asperities should be limited. Contractors had expressed concerns that large asperities can cause concrete slumping and result in a poor looking product, and therefore, preferred deviations smaller than 25 mm (1 in.). The same distance, 25 mm (1 in.), is the allowable recession to the barrier face before the required clear cover is violated. Thus, 25 mm (1 in.) was established as the maximum deviation from the original barrier face for 95
109 all longitudinal asperities. This means intrusions must be a maximum of one inch deep and protrusions must be a maximum of one inch out from the face. Aesthetic treatments outside of longitudinal asperities can result in a varying barrier cross-sectional geometry. Examples of such barrier treatments include texturing or vertical asperities and are illustrated in Figure 38. By using conventional forms or special slipforming techniques, these aesthetic treatments can be added to the barrier face. However, texturing patterns must conform to the recommendations by White et al. [38] and asperities other than longitudinal grooves or protrusions must conform to the limitations set by Bullard et al. in NCHRP Report 554 [79]. 96

![Texturing [38]](/docs-images/85/91729872/images/110-1.jpg "and Vertical")
110 Figure 38. Examples of Texturing [38] and Vertical Asperities [79] 97
111 7 BARRIER REINFORCEMENT DESIGN 7.1 Introduction Many barrier design options, including rebar size, stirrup spacing, number of longitudinal bars, and barrier width, affect both the strength and the cost of the barrier. The goal of this chapter is to optimize these factors into one barrier design. The final barrier configuration should provide adequate structural capacity and provide a TL-5 barrier at the lowest possible cost. The individual steps needed to accomplish this goal are listed below: determine basic shape of internal steel; determine the anchorage system for the barrier; identify longitudinal steel, stirrup, and barrier width possibilities and associated costs of each; identify method for calculating barrier strength capacity; define the barrier design requirements; and optimize the barrier configuration. 7.2 Shape of Reinforcement Before the steel reinforcement could be optimized, the general shape of the reinforcement had to be determined. Longitudinal steel was always considered necessary, but stirrups were questionable. Some barriers are reinforced using only longitudinal steel, while other designs require stirrups. The necessity of stirrups was evaluated along with possible design shapes of the stirrups. Different methods to anchor the barrier to the ground were also examined in the search to finalize the general shape of internal steel reinforcement. 98
112 7.2.1 Stirrup Use Decision Longitudinal steel only designs feed the steel rebar directly into the slipform machine during the placement of the barrier s concrete. This method has two distinct advantages. Time and material are reduced by eliminating the need for stirrups and the labor necessary to bend rebar. Second, the placement of the longitudinal steel is more precise when feeding it directly into the slipform mold. The mold contains specific holes on the front side in which to feed the rebar and, thus, ensuring proper placement of the steel. Even if the slipform shifts laterally from its intended position, the rebar will still be in the correct position inside the barrier. This method of slipforming does have its limitations though. Immediately after concrete placement, the rebar is floating in the concrete. As a result, heavy bars can sink or shift downward through the concrete matrix before it has time to harden. Therefore, only small rebar sizes are recommended when stirrups are absent. Slipforming small radius barrier curves can also create problems. Casting straight rebar into a curved barrier may result in the rebar resisting the bend, attempting to straighten itself, and puncturing out of the barrier sides. Further, transverse steel is needed to resist slumping of the concrete and help maintain the vertical integrity of the barrier. This is especially true for tall barriers or barriers with steep sides. The use of stirrups within the overall barrier reinforcement configuration helps to reduce these problems. Stirrups prevent the movement of rebar during the slipforming process and keep the barrier shape intact by resisting concrete slump. The barrier geometry selected in Chapter 6 consists of 864 mm (34 in.) high near-vertical barrier faces. As such, prevention of concrete slump is a very important design consideration. Also, stirrups provide torsion resistance and 99
113 resistance to overturning. This additional strength may prove to be necessary in redirecting a tractor trailer truck under the NCHRP Report 350 test conditions. Finally, a stirrup design can be cast using either slipforming or conventional forms. For all of these reasons, it was decided to incorporate stirrups into the barrier reinforcement design General Stirrup Shape Multiple stirrup shape possibilities were explored in order to determine the best design by function and practicality. Figure 39 illustrates some of these designs. Although not shown on the drawings, all options incorporate a loop at the bottom to connect the stirrups. Stirrup options shown in Figure 39 were evaluated on simplicity and functionality in search of the best shape. Option A was considered too complex of a shape to be easily bent and was therefore dropped from consideration. Both the vertical and sloped versions of D failed to fill all parts of the barrier cross section. The vertical D did not support the top, while the sloped D pulled too far away from the barrier face. These designs were subsequently eliminated. Due to the discontinuity at the top of the stirrup, option C could not carry load from one side to the other. Thus, the B designs were selected as the best stirrup configuration concept. 100
114 Figure 39. Stirrup Shape Possibilities Explored Sloped stirrups made to match the slope of the barrier face would provide better resistance to concrete slumping and better hold the barrier shape compared to vertical stirrups. Also, bending rebar into stirrups that match the barrier slope is not any more difficult than if the stirrup sides were vertical. Therefore, the sloped option B was selected for the stirrup design. The actual dimensions of the stirrup is dependant on the bar size and barrier width. Both of these also affect the strength and construction costs presented in Section 7.6. Thus, the final size and set of dimensions could not be predetermined. The specific dimensions for stirrups as a function of bar size and barrier width are presented in Section
115 The placement of a stirrup, however, must follow a set of basic guidelines regardless of bar size and barrier width. Discussions with slipform contractors concluded that a 64 mm (2.5 in.) clear cover for the stirrups would be advantageous. Although 38 to 51 mm (1.5 to 2 in.) of clear cover is normally considered necessary to slipform a barrier, more cover creates an easier pouring operation. Thus, a clear cover of 64 mm (2.5 in.) was set to provide more tolerance room for the contractors. This amount of concrete cover also leaves room for possible asperities to be added, as discussed in Chapter 6. Intruding asperities added to the barrier face at the maximum depth of 25 mm (1 in.) would still have at least 38 mm (1.5 in.) of clear cover, the minimum cover needed for slipforming. The top of the barrier was allowed a slightly smaller clear cover of only 51 mm (2 in.) but still satisfied the values recommended by contractors. The cover requirements for the top were lowed for two reasons. First, the stirrups could reach farther into the top protrusion of the barrier with a smaller amount of cover. Providing reinforcement in this area was a priority in order to hold the barrier shape during slipforming and also to prevent the top from being broken during impacts. Second, asperities should not be added to the top portion of the barrier, so additional cover was not necessary General Anchorage Design To anchor concrete barriers to the ground, two different methods are popularly used for barriers with internal reinforcement cages, i.e. the stirrups and longitudinal reinforcement. For one system, the stirrups are extended out of the barrier and cast directly into a base slab or footer. The bottoms of the stirrups are cast in the base slab, or footer, leaving the top of the cage 102
116 extending upward. After the rigid base has hardened, the barrier is cast over the exposed reinforcement to complete the barrier. In the second anchorage method, the internal steel cage is made freestanding without direct ties to the base slab. The freestanding cages are held in place during slipforming using dowel bars. Asphalt is also often poured on both sides of the barrier to resist lateral movement. These two methods are illustrated in Figure 40. Figure 40. Anchorages of Freestanding Cage vs. Stirrups Cast into Base Slab Anchoring the barrier with stirrups cast directly into a rigid substructure provides the strongest system because it provides continuity of the internal steel. As long as the development length of the stirrup rebar is satisfied, the barrier will resist overturning and lateral movement with the full strength of the rebar. Also, this anchorage design is easier to slipform over due to 103
117 the rigidity of the rebar cage. With the bottom of the rebar cage cast into a rigid substructure, the cage itself becomes fixed in position and movement during slipforming is prevented. The use of a freestanding cage has its benefits as well. First, the cages can be assembled at any location and moved into position when the barrier is ready to be poured. The cages may be mass produced off site to minimize costs. Also, a barrier made with a free standing cage can be placed over any pre-existing surface, slab, or footer. Holes would be drilled into the substructure so that dowel bars can be inserted and even fastened with epoxy if desired. Alternatively, dowels can be inserted directly into stabilizing soil to eliminate the need for a slot. The asphalt keyway can also be easily applied to any median or shoulder surface to complete the barrier. Typically, 76 mm (3 in.) of asphalt is used for the keyway. Thus, the barrier must be initially cast at a height of 1,143 mm (45 in.) in order for it to stand 1,067 (42 in.) above the roadway after the asphalt is installed. The taller shape is produced by extending only the base of the barrier. No changes to the barrier face and top geometry is recommended. Anchoring with the use of dowel bars and an asphalt keyway is not as strong as casting the stirrups directly in a substructure. The asphalt should resist any lateral movement of the barrier, but the ability of the dowel bars to develop resistance to overturning remains questionable. The dowel bars are essentially used to hold the freestanding cage in position for slipforming operation and are normally only used at the quarter points along the length of each cage. This makes estimating the overturning resistance of the barrier somewhat challenging. Since both of these anchorage systems are used, the new barrier was designed to accommodate both types. The anchoring of freestanding cages with dowel bars and asphalt has 104
118 been shown to be a weaker system, so the primary design was focused on this anchorage system. As long as the freestanding cage passes all the design requirements and tests, adapting the design to a cage cast directly in with the substructure should be satisfactory. As such, the optimization of the internal steel in Section 7.6 was completed for the free standing cage, and the prescribed full-scale crash test was conducted on this anchorage system. 7.3 Barrier Optimization Factors The goal of this chapter was to find the combination of barrier component sizes and dimensions that minimize cost, while satisfying the strength limits needed to redirect a tractor trailer under NCHRP Report 350 impact conditions. The barrier design parameters used in this analysis included the barrier width, the longitudinal rebar, and the stirrup rebar. Practical limitations were identified for each of these variable components, and an associated cost for each of the components was calculated in preparation for the total barrier cost optimization calculations Barrier Varying the barrier width affects both the bending strength and the overturning strength. However, widening the barrier adds cost to the barrier through the extra concrete needed to fill the cross section. The barrier optimization analysis was designed to balance these effects. The barrier face geometry was set in Chapter 6, leaving only the width of the top protrusion of the barrier to define the final cross section. Possibilities for the top width were limited to between 102 mm and 204 mm (4 and 8 in.). Any width smaller than 102 mm (4 in.) 105
119 would prevent internal steel from fitting in the top of the barrier due to the clear clover restraints. Also, narrow top widths are susceptible to being completely separated from the barrier during an impact. A maximum of 204 mm (8 in.) was set because early calculations showed a barrier with a 204 mm (8 in.) top would provide strengths much greater than needed. Thus, the width of barrier top was varied from 102 to 204 mm (4 to 8 in.) in 25 mm (1 in.) intervals. The cost associated with each width interval is a function of the cost of concrete and the barrier cross sectional area. was estimated at a cost of $62.12 per cubic meter ($81.25 per cubic yard) from construction companies throughout the Midwest. The cross-sectional area was calculated for each barrier width by ignoring the rounded internal angle near the top of the barrier face. Also, as pointed out in Section 7.2, the barrier was designed with a dowel bar and asphalt keyway anchorage system. As such, the total height of the cast barrier shape was 1,143 mm (45 in.), not 1,067 mm (42 in.), to allow the 76 mm (3 in.) asphalt keyway to be poured along both sides of the barrier. Table 29 contains the calculated cross-sectional area and the cost of concrete associated with each barrier width. Costs were calculated per unit length of barrier as a basis for comparing one design to another. Table 29. Cost per Foot of Barrier as a Function of Barrier at Barrier Top at Barrier Base Cross Section Area Volume Per Length of Barrier Cost Per Length of Barrier (mm) (mm) (m 2 ) (in 2 ) (m 3 / m (yd 3 / ft) ($ / m) $60.88 $ $63.97 $ $67.05 $ $70.14 $ $73.22 $
120 7.3.2 Longitudinal Rebar Both the size and the number of longitudinal bars were varied through the cross section. All rebar sizes between #3 bar and #6 bar, 10 and 19 mm (0.375 and 0.75 in.) in diameter respectively, were considered for use as longitudinal steel. One bar size was used in each longitudinal steel configuration. The number of longitudinal bars varied from 5 to 13 using increments of 2. The odd number of bars for every design was the result of an equal number of bars on each side of the barrier and putting one at the top bend of the stirrup. Also, a longitudinal bar was located at every bend in the top part of the stirrup, so three bars had the same position for every configuration. Figure 41 illustrates a few of these longitudinal steel layout options. Calculating the cost for each of the longitudinal steel configurations was completed using an estimated price of rebar of $0.46 per kilogram ($1.02 per pound). This cost estimate was derived from discussions with multiple construction companies in the Midwest region. Included in the estimate is both material cost and labor needed to bend and tie rebar. Thus, the rebar cost also applies to the stirrup cost calculated in Section Figure 41. Rebar Layouts for Different Numbers of Longitudinal Bars 107
121 The total mass (weight) of the rebar per unit length of barrier is used to calculate the cost of the longitudinal steel. The total amount of longitudinal steel will be added in with the stirrup rebar to get a total amount of steel in mass per meter (weight / foot). Table 30 breaks down the mass per meter (weight / foot) of barrier of longitudinal steel for each of the configuration possibilities. Multiplying these values by the estimated cost of steel, $0.46 per kilogram ($1.02 per pound), produces the estimated cost of each arrangement. Table 30. Amount of Longitudinal per Length for Various Configurations Weight of Longitudinal per Barrier Length Number #3 bar #4 bar #5 bar #6 bar of Bars kg / m lbs / ft kg / m lbs / ft kg / m lbs / ft kg / m lbs / ft Stirrup Rebar The barrier stirrups were varied in both bar size and in spacing, in a manner similar to the longitudinal steel. Stirrup bar sizes were varied between #3 bar and #6 bar. The spacing between stirrups was varied from 305 to 914 mm (12 to 36 in.) in intervals of 152 mm (6 in.). The minimum spacing of 305 mm (12 in.) was set because a tighter spacing could cause concrete flow problems during slipforming and leave voids in the barrier. The 914 mm (36 in.) maximum was set because a longer spacing would allow the longitudinal steel to sag and the concrete to slump between ties rendering the spacing impractical. 108
122 Stirrup costs were calculated as a function of weight, as described in Section However, the stirrup weight is a function of bar size, stirrup length, and spacing. Each rebar size has a standard rebar mass (weight) which can be directly applied to the mass (weight) calculation. Spacing is important because the different barrier configurations were compared on a cost per unit length basis. Thus, the number of stirrups in each barrier meter (foot), or fraction there of, was needed. The final factor, the stirrup length, was more difficult to estimate since the length is dependant on both the bar size and the barrier width. Section 7.2 pointed out that the stirrups must have a clear cover of 64 mm (2.5 in.) from the barrier face. Thus, as the barrier gets wider, the stirrups get wider and the overall length of the stirrups increase. The clear cover also effects how high into the top protrusion of the barrier that the stirrup can reach. With the narrower sections, the stirrup has limited reach, but with the wider sections, the stirrup can reach all the way into the top of the barrier. The higher a stirrup can reach in the barrier, the longer its overall length. Therefore, as the barrier gets wider, the stirrups become longer due to the increased width and increased height of the stirrup. The stirrup bar size effects the stirrup length because the bar size limits the minimum bend diameter. Bigger bars have larger minimum bend diameters, thereby restricting the stirrups ability to fit into tight areas. For example, getting steel into the upper protrusion of the barrier when the top width is specified at 102 mm (4 in.) requires a small bar size, and small bending diameter. As illustrated in Figure 42 for a #3 bar and a #6 bar both bent at the minimum allowable diameter, large diameter bars cannot provide reinforcement for the top of the barrier. 109
123 Figure 42. Illustrating the Restriction of Large Bars in Small Areas Rebar size also affects the stirrup length through the minimum development length. If a larger bar size is used, the stirrup length would be increased due to a longer development length requirement. In fact, the minimum development length, and minimum length for a lap splice, exceeds the length of straight segments in the barrier for both #5 and #6 rebar. Hooks were required to anchor the stirrup ends for these bar size and, for uniformity, were applied to the smaller bars as well. However, the minimum extension after a hook is still a function of the bar diameter, so the larger the bar, the longer the stirrup. With all of these factors affecting stirrup length, the length of every combination of bar size and barrier width had to be calculated separately. Each combination conformed to the clear cover limits prescribed in Section as well as the minimum bend diameter and extension beyond hooks requirements found in the American Industries standards [80]. These requirements are shown in Table 31. The extension past a hook was rounded up to the nearest inch for simplicity. 110
124 Table 31. Stirrup Design Requirements per Bar Size Bar Size Clear Cover Along Barrier Clear Cover For Barrier Top Minimum Inside Bend Diameter Minimum Extension Extension Used Face/Bottom Beyond a Hook (mm) (in.) (mm) (in.) (mm) (in.) (mm) (in.) (mm) (in.) The lengths of the each stirrup were then measured for every bar size and barrier width combination. Table 32 and Table 33 contain the calculated lengths in SI and English units respectively. Table 32. Stirrup Lengths as a Function of Barrier and Bar Size (SI) Stirrup Lengths (mm) Top Bar Size #3 #4 #5 #6 (mm) 102 2,777 2,817 2,835 3, ,853 2,887 2,905 3, ,910 2,938 2,974 3, ,961 2,988 3,006 3, ,012 3,046 3,070 3,473 Table 33. Stirrup Lengths as a Function of Barrier and Bar Size (English) Stirrup Lengths Top Bar Size #3 #4 #5 #
125 Estimating the cost of each stirrup requires the spacing and bar masses (weights) to be incorporated into the calculation. Therefore, the stirrup lengths need to be divided by the spacing, to get the length of stirrup used per length of barrier. Next, multiply the rebar mass (weight) per length to get the stirrup mass (weight) per barrier length. Table 34 and Table 35 list the amount of steel per length of barrier for each of the possible stirrup size, stirrup spacing, and barrier width combinations. These values can then be multiplied by the estimated price of steel, $0.46 per kilogram ($1.02 per pound), to get the cost of each stirrup configuration. Table 34. Mass of Stirrup per Meter of Barrier for All Combinations (SI) Barrier Top (mm) Stirrup Bar Size Stirrup Length (mm) Bar Mass (kg / m) 305 mm Spacing Mass of Stirrups in Pounds Per Barrier Foot (kg / m) 457 mm Spacing 610 mm Spacing 762 mm Spacing 914 mm Spacing #3 2, #4 2, #5 2, #6 3, #3 2, #4 2, #5 2, #6 3, #3 2, #4 2, #5 2, #6 3, #3 2, #4 2, #5 3, #6 3, #3 3, #4 3, #5 3, #6 3,
126 Table 35. Weight of Stirrup per Foot of Barrier for All Combinations (English) Barrier Top Stirrup Bar Size Stirrup Length Bar Weight (lb / ft) Weight of Stirrups in Pounds Per Barrier Foot (lbs / ft) 12" Spacing 18" Spacing 24" Spacing 30" Spacing 36" Spacing # # # # # # # # # # # # # # # # # # # # Barrier Capacity Calculations The ultimate strength for each of the barrier configurations was calculated using yield line theory. Yield line theory predicts the ultimate strength by treating the barrier like a flat slab and using the conservation of energy principle with an assumed failure shape. The external work, or energy applied to the barrier system, is equivalent to the impact load multiplied by a displacement. The internal energy absorbed is calculated as the sum of the bending moments multiplied by the displacement angle along each edge of the predicted failure shape, also called yield lines [16]. The predicted failure is a saw tooth shape, as shown in Figure 43. The moments associated with a concrete parapet include the bending moment along the length of the wall, M w ; the cantilever bending moment at the base of the barrier resisting overturning, M c ; and the 113

127 bending moment of beams located in or on top of the barrier, M b. Also, the impact load assumes the shape of a distributed line load of constant magnitude, w, and length, l, usually applied at the top of the barrier, or height, H. Figure 43. Yield Line Failure Shape Assumption and Bending Moments The ultimate strength of the barrier is found using a combination of two equations. The first equation is used to calculate the critical length, L, of the failure shape. The second calculates the ultimate strength of the barrier as a function of the individual bending moments and the critical length. A load safety factor of Φ = 0.9 was used in the second equation to ensure integrity. l l L = + + 8H ( M + M H ) b M c w (eq. 7.1) 2 8M b 8M wh M c L φ ( wl) = 0.9 * + + (eq. 7.2) L l L l H ( L l ) In the above equations, wl is the total resistive force and H is the height to the load. Also, the bending moment of the wall, M w, is in terms of moment per vertical length of barrier. 114
128 Finally, the cantilever bending moment resisting overturning, M c, is in terms of moment per longitudinal length of barrier. The variables dealing with the applied load were set to match the impacting vehicle, a tractor trailer, and the barrier geometry. For example, the applied load height, H, was set at 864 mm (34 in.) to match the height of the first break point on the barrier face. Only the barrier face is expected to provide the lateral force in redirecting the tractor trailer. The top protrusion of the barrier is only expected to provide the vertical force to keep the box from rolling over the barrier. Thus, the critical load position is at the top of the barrier face. The length of the applied distributed line load was approximated from the length of the tandem axles of the tractor trailer. The peak impact load is expected to coincide with the impact of the either the tractor tandems or the trailer tandems [15]. Both of the tandems have approximately the same length of 2,438 mm (8 ft). Therefore, the length of the applied load, l, was set at 2,438 mm (8 ft). The longitudinal bending moment of the barrier wall, M w, is a function of the barrier cross-sectional properties. The barrier cross-sectional geometry was modeled as a rectangular shape to simplify the calculations. The upper portion of the barrier was not included in the equivalent rectangular beam because its small width and height would not contribute significantly to the barrier s structural capacity. The effective rectangular beam was therefore selected to be 864 mm (34 in.) high, and the width was set to be equal to the average width below the upper protrusion. The portion of the barrier below the ground was not included in the analysis because other anchorage systems do not extend below the grade. 115
129 For the moment calculations with the simplified rectangular shape, the longitudinal steel for each configuration was placed at a depth 89 mm (3.5 in.) from both the front and back surfaces to account for clear cover, bar diameter, and barrier slope factors. Note that the top bar, located in the upper protrusion of the barrier, was neglected. The exclusion of the top bar from the strength calculations resulted in an even number of bars to be distributed to the barrier sides. Refer back to Figure 41 in Section for an illustration of the longitudinal steel layout and its symmetry. The moment obtained from the simplified barrier cross section then had to be divided by the applied load height in order to get M w. Thus, the resulting bending moment from each combination of barrier width and longitudinal steel configuration was divided by the applied load height, H equal to m (2.833 ft), to get M w in units of kn-m/m (kip-ft/ft). The cantilever moment, M c, was calculated through the barrier section on the same plane as the roadway. The stirrups and the concrete along this plane were assumed fixed regardless of the anchorage type. Moment capacities were again calculated on simplified geometries. The section was represented by a rectangle with a width equal to the stirrup spacing and a depth equal to the width of the base for each configuration. The steel was positioned with 63.5 mm (2.5 in) of clear cover as designed in Section The moment capacity for each of the stirrup configurations was then divided by the stirrup spacing to obtain the correct units for M c of knm/m (kip-ft/ft) of barrier length. The variable representing any beams in or on the barrier, M b, did not apply to the geometry of this barrier. Therefore, M b was equal to zero for all barrier configurations. 116
130 During all moment calculations for M w and M c, the compressive strength of concrete was assumed to be 27.6 MPa (4 ksi). Through discussions will contractors, concrete mixes resulting in a minimum 28 day compressive strength of 27.6 MPa (4 ksi) are commonly used during slipform operations, so it was selected as the design strength. Also, all longitudinal and stirrup rebar were designed with a yield strength of MPa (60 ksi). 7.5 Optimum Barrier Design Requirements All of the barrier options were required to incorporate enough longitudinal steel to meet shrinkage and temperature requirements. Shrinkage and temperature steel prevents premature cracks and deterioration and ensures a long barrier life. Also, with adequate steel in the concrete barrier, expansion / contraction joints are not necessary. The American Institute sets the required area of shrinkage and temperature steel as times the cross-sectional area [80]. Of course, the specific amount of steel needed is then a function of the barrier width. Thus, all barrier design options that did not meet the minimum temperature and shrinkage steel requirement were eliminated from further consideration. The barrier must be designed with sufficient strength to redirect a tractor trailer. The minimum capacity for the barrier was set through strength evaluations of previous TL-5 barriers. A yield line analysis, described in Section 7.4, was used to calculate the ultimate strength capacity of three barriers. All three barriers were 1,067 mm (42 in.) tall, reinforced concrete parapets and were successfully crash tested under NCHRP Report 350 TL-5 impact conditions. The calculated capacities for each of the three barrier systems are listed in Table
131 Table 36. Calculated Strength Capacities for Previous TL-5 Barriers Test Ref No. Barrier Description Barrier Height Ultimate Strength (mm) (kn) (kips) Reinforced - New Jersey Shape Median Reinforced - Vertical Bridge Rail ACBR-1 13 Reinforcd - Open Bridge Rail A strength capacity of kn (211.7 kips) was selected as the minimum ultimate strength for the barrier. This strength was the lowest of the proven barrier capacities in previous crash tests. Therefore, any barrier configuration resulting in a capacity of kn (211.7 kips) or above should redirect a tractor trailer under NCHRP Report 350 impact conditions. 7.6 Barrier Optimization Results Every combination of longitudinal steel, stirrup bar size, stirrup spacing, and barrier width identified previously was used in the optimization process and resulted in 2000 barrier configurations. The ultimate strength for each configuration was calculated using yield line theory, as described in Section 7.4. The barrier configurations not meeting the necessary ultimate capacity were eliminated from consideration. The cost for each of the structurally adequate designs was estimated in terms of price per barrier foot, as explained in Section 7.3. Finally, the barriers which meet all of the design requirements were compared in terms of cost, and the optimum barrier designs were chosen. Appendix A contains the calculated strengths and costs for all of the 2,000 possible barrier configurations. Abbreviated lists of the best designs are shown in Table 37 and Table
132 For each of the barrier width and stirrup combinations, the optimum longitudinal steel configuration is listed. The shortened list also contains the calculated capacities and costs for each option. A blank line in the table represents a width and stirrup combination in which none of the longitudinal steel options met the design requirements. The barrier configurations highlighted in yellow in Table 37and Table 38 are pointed out as three of the best barrier designs. These three meet all of the design criteria, are three of the least costly designs, and provide a variety of reinforcement possibilities with different stirrup sizes, stirrup spacing, and number of longitudinal bars. Detailed drawings for each of these three designs are shown in Figure 44 through Figure
133 Table 37. Optimum Designs by and Stirrup Combination (SI) Top (mm) Bar Size (#) Stirrups Spacing (mm) Longitudinal Bar Size Quantity (#) $ $ $ $ $ $ $ $ $ $ $ $ $ $ $ $ $ $ $ $ $ $ $ $ $ $ $ $ $ $ $ $ $ $ ΦRw (kn) Total Cost ($ / m)
134 Table 37(Continued). Optimum Designs by and Stirrup Combination (SI) Top (mm) Bar Size (#) Stirrups Spacing Longitudinal Bar Size Quantity ΦRw (kn) Total Cost ($ / m) (mm) (#) $ $ $ $ $ $ $ $ $ $ $ $ $ $ $ $ $ $ $ $ $ $ $ $ $ $ $ $
135 Table 38. Optimum Designs by and Stirrup (English Units) Top (in.) Bar Size (#) Stirrups Spacing (in.) Longitudinal Bar Size Quantity (#) $ $ $ $ $ $ $ $ $ $ $ $ $ $ $ $ $ $ $ $ $ $ $ $ $ $ $ $ $ $ $ $ $ $ ΦRw (kips) Total Cost ($/foot)
136 Table 38 (Continued). Optimum Designs by and Stirrup (English Units) Top (in.) 7 8 Bar Size (#) Stirrups Spacing Longitudinal Bar Size Quantity ΦRw (kips) Total Cost ($/foot) (in.) (#) $ $ $ $ $ $ $ $ $ $ $ $ $ $ $ $ $ $ $ $ $ $ $ $ $ $ $ $
137 Figure 44. Design A, One of Three Top Designs 124
138 Figure 45. Design B, One of Three Top Designs 125
139 Figure 46. Design C, One of Three Top Designs 126
140 Different construction companies and State DOTs had varying preferences among the top three designs. Design C was preferred by some for the closer stirrup spacing to hold the barrier shape from slumping and a small stirrup to make bending easier. Others preferred Design B for the narrow barrier width and because it contained the fewest number of longitudinal bars, thus requiring the least amount of ties and labor. Finally, Design A was preferred because of its low cost, narrow width, and providing the highest number of longitudinal bars to prevent stirrup movement during slipforming. Clearly, a consensus selection was not available. Instead, the specific choice of internal reinforcement and barrier width will be left for the project engineer to select. Design A was selected for the full-scale crash testing because it contained the lowest ultimate strength capacity of the selected designs. The capacity of Design A, kn (215.4 kips), represents the minimum ultimate strength needed for this barrier. Thus, any other configuration with an ultimate strength at or above kn (215.4 kips) would be a valid selection for use as an alternative to Design A. 7.7 Barrier End Section Design The end sections of a reinforced concrete median barrier require special attention due to the lack of continuity. Strength calculations described above are based upon the assumption that impact loads can be distributed both upstream and downstream from impact. However, impact loads near the end of a barrier can only be distributed in a single direction. Also, special consideration should be given to the anchorage of the end section to ensure the full design capacity is met in this critical area. 127
141 7.7.1 End Section Strength Calculations Yield line theory was again utilized for the strength calculations of the end section, but the loss of continuity causes the fracture pattern of the barrier to change from that observed in the middle of the barrier. Typically, the saw tooth shape seen for the interior section is replaced by a single fracture line. This yield line is presented in Figure 47. Applying yield line theory to this failure shape leads to the following equations [16]. Note, a load safety factor of Φ = 0.9 is still used and the variables have not been altered from the definitions given in Section 7.4. l l L = + + 8H ( M + M H ) b M c w (eq. 7.3) 2 8M b 8M wh M c L φ ( wl) = 0.9 * + + (eq. 7.4) L l L l H ( L l ) Figure 47. Assumed Failure Pattern of Barrier End Section 128
142 7.7.2 Barrier End Section Optimization The same combinations of longitudinal steel, stirrup bar size, stirrup spacing, and barrier width used for the internal section optimization in Section 7.6 were utilized to optimize the barrier end section. Requirements for minimum shrinkage and temperature steel and for an ultimate strength capacity of kn (211.7 kips) were also carried over from the internal section optimization. The only difference between the two optimizations was in the yield line calculations for strength capacity, as described in Section Table 39 and Table 40 present an abbreviated list of the best designs for each of the barrier width and stirrup combinations presented in SI and English units, respectively. A blank line in the table represents a width and stirrup combination in which none of the longitudinal steel options meet the design requirements. Note, none of the configurations using #3 or #4 stirrups meet the design strength, so these possibilities were not listed in the table. Appendix B contains the calculated strengths and costs for all of the 2,000 possible barrier end section configurations. A barrier end section does have the additional requirement of matching the interior barrier section configuration. The barrier width must be consistent throughout the length of the barrier, so the width of the end section is predetermined by the width of the interior section. Also, it is preferable that the same longitudinal steel configuration carryover to the end section design. As such, Table 39 and Table 40 should be used as a guide to determine the size and spacing of the stirrups by ensuring the chosen longitudinal steel is equal to or more than the amount of longitudinal steel shown in the table. Appendix B may be used as well to check a specific configuration. 129
143 Table 39. Optimum Designs by and Stirrup Configuration (SI) Top (mm) Bar Size (#) Stirrups Spacing (mm) Longitudinal Bar Size Quantity (#) ΦRw (kn) Total Cost ($/meter) $ $ $ $ $ $ $ $ $ $ $ $ $ $
144 Table 40. Optimum Designs by and Stirrup Configuration (English-Units) Top (in.) Bar Size (#) Stirrups Spacing (in.) Longitudinal Bar Size Quantity (#) ΦRw (kips) Total Cost ($/foot) $ $ $ $ $ $ $ $ $ $ $ $ $ $
145 An end section configuration was then chosen for the barrier to be crash tested. The end section needed to match the 102 mm (4 in.) top width and the 11 #4 longitudinal rebar of the interior section of Design A from Section 7.6. As highlighted in yellow in Table 39 and Table 40, the only stirrup configuration to satisfy these restraints was a #6 rebar spaced at 305 mm (12 in.) intervals. Even though using only 9 #4 bars for the longitudinal steel would meet the strength requirement, 11 #4 bars was used to match the interior section and develop more continuity between the interior and end sections. Figure 48 illustrates the selected end section configuration. Note, the stirrups are extending through the base of the barrier with the intent of being tied to, or cast into, some form of substructure. Due to the lack of continuity, the risk of barrier overturning moment is amplified significantly. In order to provide the needed overturning resistance, the stirrups were designed to be fully anchored in a concrete footing. The final shape of the stirrup and the end section substructure is presented in Section 7.8. The length of the barrier end section is determined from the critical length, L, calculated as part of the yield line analysis. The end section configuration must extend at least as far into the barrier as the critical length, however, it is recommended to extend a few feet past this length to ensure that failure does not reach the weaker interior section of the barrier. For the design chosen, the critical length was calculated to be 2.7 m (8.75 ft). Therefore, the end section was given a length of 3.7 m (12 ft). 132
146 Figure 48. Barrier End Section Configuration 133
147 7.8 End Section Substructure Design Due to a lack of continuity near the ends of longitudinal concrete barriers, concerns arise about properly anchoring the barrier. Typically, the stirrups in the end sections are cast directly into whatever substructure the barrier is sitting on. In new roadway construction, the stirrups can be cast in the roadway slabs. If the barrier is being placed on an existing roadway, the stirrups may be cast into a footer designed specifically to anchor the end section. Completely embedding the stirrups ensures the development of the moment required to resist overturning as well as resistance to lateral movement. For the full-scale crash test, the barrier was constructed with a footer to anchor the end section stirrups. The footer was designed following a process described by Faller [81]. This paper describes the function of the footer as providing sufficient torsion resistance to match the overturning moment of the end section. No other design loads need be applied. To calculate the design load, the cantilever moment, M c, was multiplied by the critical length, L, to obtain the torsion load on the footer. Both of these values can be found in Appendix B for the chosen end section configuration. The torsion load was then divided by a safety factor of Φ=0.75 to obtain the design load. The torsion strength of the concrete was subtracted out and steel reinforcement was designed to carry the remainder of the load by following the standards of ACI Following this procedure, the resulting footer was designed and is shown in Figure 49 and Figure 50 in SI and English units, respectively. The specific calculations are shown in Appendix C. The footer was placed 76 mm (3 in.) below the roadway surface so that the asphalt keyway could continue the entire length of the barrier, preserving uniformity. The barrier 134
148 stirrups were extended into the footer and hooked around longitudinal steel in order to obtain the necessary embedment length to fully development the strength of these bars. Remember, the design intends for the stirrups to be cast in with the footer first. The barrier is cast over the stirrups after the footer has hardened. The footer was placed under the entire length of the end section, not just the calculated critical length. Anchoring all of the end section stirrups provides uniformity and adds a little extra strength to the barrier, making the design conservative. Thus, the length of the footer was set at 3,658 mm (12 ft) to match the length of the end section, as determined in Section
149 136 Figure 49. Footer and Barrier End Section Design
150 137 Figure 50. Footer and Barrier End Section Design (English - Units)
151 8 FULL-SCALE CRASH TEST PROGRAM 8.1 Test Requirements Longitudinal barriers, such as median barriers, must satisfy the requirements provided in NCHRP Report 350 [17] to be accepted for use on the National Highway System. According to TL-5 criteria found in NCHRP Report 350, the bridge railing system must be subjected to three full-scale vehicle crash tests. The three crash tests are as follows: I. Test Designation 5-10: An 820-kg (1,808-lb) small car impacting the median barrier system at a nominal speed and angle of km/h (62.1 mph) and 20 degrees, respectively. II. Test Designation 5-11: A 2,000-kg (4,409-lb) pickup truck impacting the median barrier system at a nominal speed and angle of km/h (62.1 mph) and 25 degrees, respectively. III. Test Designation 5-12: A 36,000-kg (79,366-lb) tractor-trailer vehicle impacting the median barrier system at a nominal speed and angle of 80.0 km/h (49.7 mph) and 15 degrees, respectively. Although the small car and pickup truck tests are used to evaluate the overall performance of the length-of-need section and occupant risk problems arising from the snagging or overturning of the vehicle, both tests were deemed unnecessary based on previous testing of single-slope and vertical barrier systems. The California Department of Transportation, or CALTRANS, successfully conducted test no on an 813-mm (32-in.) tall, single-slope 138
152 barrier that was angled 9.1 degrees from vertical [40]. Also, the Texas Transportation Institute, or TTI, has successfully tested an 813-mm (32-in.) tall, vertical concrete barrier under the same small car performance criteria of NCHRP Report 350 [37]. Since the proposed test barrier has a constant slope face 864 mm (34 in.) high at an angle between these two approved systems, 3.2 degrees, an 820-kg (1,808-lb) small car crash test was considered unnecessary for this project. In addition, TTI conducted test no on both an 813-mm (42-in.) tall, vertical barrier and an 813-mm (32-in.) tall, single-slope barrier with an angle of 10.8 degrees from vertical [58, 54]. Both of these systems were successfully tested under the performance requirements of NHCRP Report 350 for pickup truck impacts. Therefore, a 2,000-kg (4,409-lb) pickup truck crash test was also considered unnecessary for this project. The test conditions for TL-5 longitudinal barriers are summarized in Table 41. Table 41. NCHRP Report 350 Test Level 5 Crash Test Conditions Test Article Test Designation Test Vehicle (km/h) Impact Conditions Speed (mph) Angle (deg.) Evaluation Criteria C A,D,F,H,I,K,M Longitudinal Barrier P A,D,F,K,L,M V A,D,G,K,M 1 Evaluation criteria explained in Table Evaluation Criteria Evaluation criteria for full-scale vehicle crash testing are based on three appraisal areas: (1) structural adequacy; (2) occupant risk; and (3) vehicle trajectory after collision. Criteria for 139
153 structural adequacy are intended to evaluate the ability of the bridge railing to contain, and redirect impacting vehicles. Occupant risk evaluates the degree of hazard to occupants in the impacting vehicle. Vehicle trajectory after collision is a measure of the potential for the postimpact trajectory of the vehicle to become involved in secondary collisions with other vehicles or fixed objects. These three evaluation criteria are defined in Table 42. The full-scale vehicle crash test was conducted and reported in accordance with the procedures provided in NCHRP Report No
154 Table 42. NCHRP Report No. 350 Evaluation Criteria for Crash Testing Structural Adequacy Occupant Risk Vehicle Trajectory A. Test article should contain and redirect the vehicle; the vehicle should not penetrate, underride, or override the installation although controlled lateral deflection of the test article is acceptable. D. Detached elements, fragments or other debris from the test article should not penetrate or show potential for penetrating the occupant compartment, or present an undue hazard to other traffic, pedestrians, or personnel in a work zone. Deformations of, or intrusions into, the occupant compartment that could cause serious injuries should not be permitted. F. The vehicle should remain upright during and after collision although moderate roll, pitching, and yawing are acceptable. G. It is preferable, although not essential, that the vehicle remain upright during and after collision. H. Longitudinal and lateral occupant impact velocities should fall below the preferred value of 9 m/s (29.53 ft/s), or at least below the maximum allowable value of 12 m/s (39.37 ft/s). I. Longitudinal and lateral occupant ridedown accelerations should fall below the preferred value of 15 g s, or at least below the maximum allowable value of 20 g s. K. After collision it is preferable that the vehicle's trajectory not intrude into adjacent traffic lanes. L. The occupant impact velocity in the longitudinal direction should not exceed 12 m/sec (39.37 ft/sec), and the occupant ridedown acceleration in the longitudinal direction should not exceed 20 G s. M. The exit angle from the test article preferably should be less than 60 percent of test impact angle measured at time of vehicle loss of contact with test device. 141
155 8.3 Barrier Design Details The test installation consisted of a reinforced concrete barrier anchored by an asphalt overlay on each side of the barrier system. A concrete foundation was placed at each end of the barrier in order to anchor the barrier end sections. The design details are shown in Figure 51 through Figure 55. The corresponding English-Unit drawings are shown in Appendix D. Photographs of the test installation are shown in Figure 56 through Figure Barrier Substructure The TL-5 concrete median barrier was placed inside a pit measuring m long by m wide (200 ft by 20 ft) surrounded by concrete slabs. The barrier was situated in the pit, so that the front face was 3.61 m (11 feet 10 in.) from the front edge of the pit as shown in Figure 51. Crushed limestone rock filled the pit until the surface was 76 mm (3 in.) below the surface of the surrounding concrete slabs. Crushed limestone was chosen to represent a weak common base material. and asphalt would provide a much stronger base support. Thus, by testing with crushed limestone, placing the barrier over any of the stronger base materials would be acceptable. A 76-mm (3-in.) thick, asphalt overlay was placed on both the front and back sides of the barrier for its entire length. As illustrated in Figure 52 through Figure 54, the asphalt surface was flush with the surrounding concrete apron. The barrier interior section stirrup cages were tied to dowel bars in order to hold the cages in position during casting. These dowel bars consisted of 610 mm (24 in.) long pieces of No. 4 rebar. Half the length of each dowel bar was driven into the crushed limestone pit, thus 142
156 leaving the other half exposed to attach the cages. The dowel bars were located near the quarter points along each of the barrier cages, or roughly every 1.37 m (4.5 ft), and can be seen in Figure 52, Figure 54, and Figure 57. Footers were located under each of the barrier end sections. Both footers measured 3.66 m long by 1.22 m wide by 0.61 m deep (12 ft by 4 ft by 2 ft). The top of the footer was placed level with the crushed limestone pit allowing the asphalt overlay to be poured on top of the footer as well, preserving a uniform approach to the barrier. The concrete used for the footer was an L4000 mix consisting of 30 percent limestone and 70 percent sand-gravel and had a prescribed minimum compressive strength of 27.6 MPa (4,000 psi). The actual compressive strength measured from cylinder tests before test day, 95 days after pouring, was 38.1 MPa (5,528.9 psi). All steel reinforcement was Grade 60 rebar and was given a minimum concrete clear cover of 64 mm (2.5 in.). Each footer was reinforced with No. 6 rebar stirrups spaced every 152 mm (6 in.) and 16 No. 6 longitudinal rebar, measuring 3,505 mm (138 in.) long, spread throughout the cross section, as shown in Figure 53. The stirrup bars were 3,416 mm (141 in.) long and were bent into a rectangular shape. Also, the barrier end section stirrups were tied to and cast within the footer reinforcement, as shown in Figure 53, and Figure Barrier Design The TL-5 barrier consisted of a continuous reinforced concrete wall, as shown in Figure 60. The barrier was m ( ft) long and cast at a height of 1,143 mm (45 in.). However, the barrier height was 1,067 mm (42 in.) after the asphalt overlay was applied. The 143
157 base width and top width of the barrier were 613 mm ( in.) and 102 mm (4 in.), respectively. The barrier face stood 864 mm (34 in.) above the roadway and had a 1/18 slope. Head ejection requirements prompted the upper portion of the barrier to be cut back, as shown in Figure 52 through Figure 54, and Figure 60. forms were used, and the barrier was cast in place in order to minimize test costs. As a result, the interior angle located in the top cut back of the barrier was left as a straight angle; not rounded off as recommended for slipforming operations. These two variations are depicted in Figure 52 and Figure 54. The concrete used for the median barrier was the same as that used in the footings. The barrier was cast in place in two separate pours, approximately half the barrier was cast during each pour. The actual compressive strength of the concrete determined from cylinder testing prior to test day, 46 and 39 days after pouring, was found to be 42.9 MPa and 39.1 MPa (6,217.9 psi and 5,672.5 psi) for the first (upstream half) and second (downstream half) pours, respectively. Even though the design calculations used a concrete strength of 27.6 MPa (4,000 psi), this increase in concrete strength resulted in an increase to the calculated design strength of less than 2 percent. A minimum concrete clear cover of 64 mm (2.5 in.) was applied to all rebar placed inside the barrier. All steel reinforcement was Grade 60 rebar. As described in Section 7.6, the barrier interior was reinforced with No. 5 rebar stirrups spaced every 457 mm (18 in.) and 11 No. 4 longitudinal bars. The stirrup bars were 2,705 mm (111.5 in.) long and were bent to fit in the barrier cross section with a clear cover of 64 mm (2.5 in.). The longitudinal rebar was 6,096 mm (240 in.) long and was positioned throughout the barrier cross section, as shown in Figure 52 and Figure 57. Stirrups and longitudinal bars were tied together to form 6.1 m (20 ft) rebar cages. Dowel bars were use to tie the cages down at 144
158 approximately every quarter point, or 1.37 m (4.5 ft). Also, lap splices measuring at least 305 mm (12 in.) long were used to connect the longitudinal steel from one cage to the next. The dowel bars and lap splices are shown in Figure 57. The barrier end section reinforcement made up the last 3.66 m (12 ft) on each end of the barrier and consisted of different stirrups from the interior section. The end section stirrups were 3,734 mm (147 in.) long No. 6 bars bent to follow the shape of the barrier cross section. These stirrups also extended into the footings located below each end section. The longitudinal rebar remained the same as the interior section, except the 11 No. 4 bars were only 3810 mm (150 in.) in length. The end section reinforcement is shown in Figure 53 and Figure Impact Point The full-scale crash test was intended to examine the interior section of the barrier. Thus, the target impact point needed to be a sufficient distance from the stronger, fully-anchored end sections, while still being far enough upstream for the vehicle to be completely redirected before it reached the downstream end of the barrier. The rear of the tractor trailer of test ACBR-1 was observed to contact the rail approximately 1.83 m (6 ft) behind the initial impact point. Adding this distance to half of the critical length calculated from the yield line analysis, 2.29 m (7.5 ft), and the length of the end section, 3.66 m (12 ft), resulted in a minimum distance of 7.77 m (25.5 ft). Thus, the impact point was chosen to be 9.14 m (30 ft) from the upstream end of the barrier, as shown in Figure
159 146 Figure 51. Layout for TL-5 Median Barrier
160 147 Figure 52. TL-5 Median Barrier Interior Section Design Details
161 148 Figure 53. TL-5 Median Barrier End Section Design Details
162 149 Figure 54. TL-5 Median Barrier Slipform Design Details
163 150 Figure 55. TL-5 Median Barrier Rebar Design Details


164 Figure 56. Reinforcement and Casting of Footer with Barrier End Section Stirrups 151


165 Tie Down Dowels Figure 57. TL-5 Median Barrier Reinforcement, Lap Splices, and Dowel Tie Downs 152


166 Figure 58. TL-5 Median Barrier Construction 153


167 Figure 59. TL-5 Median Barrier Construction Cold Joint 154


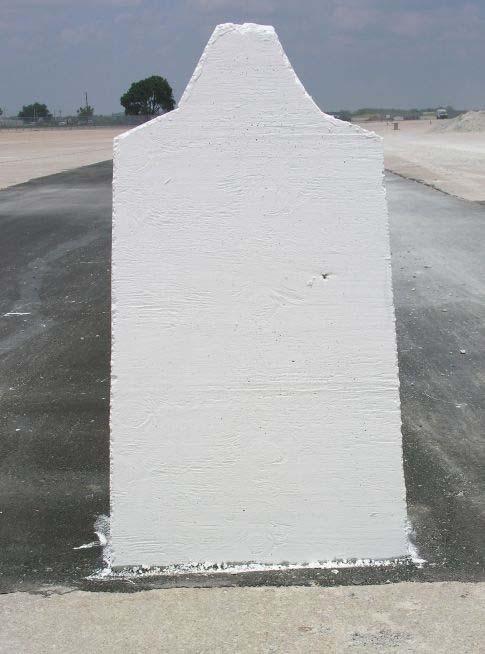

168 Figure 60. TL-5 Median Barrier 155
169 8.4 Test Facility The testing facility is located at the Lincoln Air-Park on the northwest (NW) side of the Lincoln Municipal Airport and is approximately 8.0 km (5 mi.) NW of the University of Nebraska-Lincoln. 8.5 Vehicle Tow and Guidance Systems A reverse cable tow system with a 1:2 mechanical advantage was used to propel the test vehicle. The distance traveled and the speed of the tow vehicles were one-half that of the test vehicle. The test vehicle was released from the tow cable before impact with the median barrier system. A digital speedometer was located on the tow vehicle to increase the accuracy of the test vehicle impact speed. A vehicle guidance system developed by Hinch [82] was used to steer the test vehicle. A guide-flag, attached to the left-front wheel and the guide cable, was sheared off before impact with the median barrier system. The 9.5 mm (0.375 in.) diameter guide cable was tensioned to approximately 15.6 kn (3,500 lbf), and supported laterally and vertically every m (100 ft) by hinged stanchions. The hinged stanchions stood upright while holding up the guide cable, but as the vehicle was towed down the line, the guide-flag struck and knocked each stanchion to the ground. The vehicle guidance system was 889 m (2,915 ft) long. 8.6 Test Vehicle A 1991 White GMC Conventional WG65T Tractor with a 1988 Pines 48 ft Trailer was used as the test vehicle. The test inertial and gross static masses were both 36,154 kg (79,
170 lbs). The test vehicle is shown in Figure 61, and vehicle dimensions are shown in Figure 62. The longitudinal component of the center of gravity was determined using the measured axle weights. The locations of the final centers of gravity are shown in Figure 62. Vehicle ballast, consisting of steel panels, concrete barriers, and foam blocks, was used to obtain the desired test weight. Square black and white-checkered targets were placed on the vehicle to aid in the analysis of the high-speed film, as shown in Figure 61 and Figure 63. A checkered target was placed on the roof of the trailer marking the ballast center of gravity. Other target locations included on the driver s side door, on the passenger s side door, on the roof of the vehicle, on the windshield, and on all four corners of each side of the trailer box. The front wheels of the test vehicle were aligned for camber, caster, and toe-in values of zero so that the vehicle would track properly along the guide cable. A 5B flash bulb was mounted on the hood of the vehicle to correlate the time of impact between electronic transducers and high-speed film. The flash bulb was fired by a pressure tape switch mounted on the front face of the bumper. A remote-controlled brake system was installed in the test vehicle so the vehicle could be brought safely to a stop after the test. 157


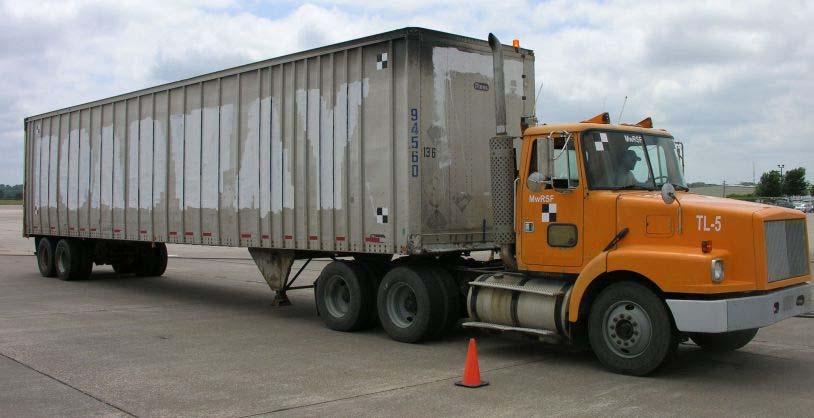
171 Figure 61. Test Vehicle, Test TL5CMB-2 158
172 Date: 7/12/2007 Test Number: TL5CMB-2 Tractor: VIN No.: Year: 4V1JLBJEGMR Make: Odometer: White/GMC Model: WG65T Trailer: VIN No.: 1P JKA29485 Make: Pines 48' Model: 48' Van Year: 1988 *(All Measurements Refer to Impacting Side) Vehicle Geometry - mm (in.) A 2604 (102.5) G 5906 (232.5) N 0 T 1016 (40.) B 1314 (51.75) H 1831 (72.1) O 584 (23.) U 597 (23.5) C 3270 (128.75) J 1746 (68.75) P 2007 (79.) V 781 (30.75) D 1334 (52.5) K 1575 (62.) Q 1842 (72.5) W 4064 (160.) E (401.) L 1156 (45.5) R 1981 (78.) X NA NA F 1257 (49.5) M 902 (35.5) S 533 (21.) Mass - kg (lb) M 1 CURB 3,973 (8,760) Test Inertial 4,441 (9,790) Gross Static 4,441 (9,790) M 2 5,144 (11,340) 17,017 (37,515) 17,017 (37,515) M 3 NA NA NA M 4 NA NA NA M 5 3,955 (8,720) 14,696 (32,400) 14,696 (32,400) M Total 13,073 (28,820) 36,154 (79,705) 36,154 (79,705) Note any damage prior to test: Normal Wear Figure 62. Vehicle Dimensions, Test TL5CMB-2 159
173 TEST #: TL5CMB-2 TARGET GEOMETRY-- mm (in.) A 1708 (67.25) E 7777 (306.2) I NA NA M NA NA B NA NA F NA NA J NA NA N 1842 (72.5) C 2178 (85.75) G NA NA K 5251 (206.75) O 1657 (65.25) D 5390 (212.2) H NA NA L (299.3) Figure 63. Vehicle Target Locations, Test TL5CMB-2 160
174 8.7 Data Acquisition Systems Accelerometers Two triaxial piezoresistive accelerometer systems, described below, were used to measure the acceleration in the longitudinal, lateral, and vertical directions. Principle EDR: Model EDR-4M6 Instrumented Sensor Technology (IST) of Okemos, MI ± 200 G s 10,000 Hz Sample Rate 3 Differential Channels, 3 Single-Ended Channels 6 Mb RAM Memory 1,500 Hz lowpass filter Secondary EDR: Model EDR-3 Instrumented Sensor Technology (IST) of Okemos, MI ± 200 G s 3,200 Hz Sample Rate 256 Kb RAM Memory 1,120 Hz lowpass filter The principle EDR was mounted near the trailer tandems, while the secondary EDR was mounted near the tractor tandems. Computer software DynaMax 1 (DM-1) and DADiSP, was used to analyze and plot the accelerometer data. 161
175 8.7.2 Rate Transducers An Analog Systems 3-axis rate transducer with a range of 1,200 degrees/sec in each of the three directions (pitch, roll, and yaw) was used to measure the rates of motion of the test vehicle. The rate transducer was mounted inside the body of the EDR-4M6 and recorded data at 10,000 Hz to a second data acquisition board inside the EDR-4M6 housing. The raw data measurements were then downloaded, converted to the appropriate Euler angles for analysis, and plotted. Computer software, DynaMax 1 and DADiSP, was used to analyze and plot the rate transducer data High Speed Photography For test TL5CMB-2, four AOS high-speed video cameras with operating speeds of 500 frames/sec were used to film the crash test. Two Canon digital video cameras and four JVC digital video cameras, all with a standard operating speed of frames/sec, were also used to film the crash test. A high-speed AOS video camera (with a 12.5-mm lens) and a Canon digital video camera were placed above the test installation to provide a field of view perpendicular to the ground. A JVC digital video camera and a high-speed AOS video camera were placed downstream from the impact point and had a field of view parallel to the barrier. A high-speed AOS video camera and a JVC digital video camera were placed downstream from the impact point and behind the barrier so that the views were parallel with the vehicle approach path. A high-speed AOS video camera and a JVC digital video camera were placed upstream from the impact point and had a field of view parallel to the barrier. A JVC digital camera was placed upstream of the impact point and held a view parallel to the vehicle approach path. A Cannon 162
176 digital video camera was placed on the traffic side of the barrier and had a field of view perpendicular to the barrier. A schematic of all ten camera locations for test TL5CMB-2 is shown in Figure 64. The high speed AOS video and standard digital video were analyzed using the ImageExpress MotionPlus software and Redlake Motion Scope software, respectively Pressure Tape Switches For test TL5CMB-2, five pressure-activated tape switches, spaced at 2 m (6.56 ft) intervals, were used to determine the speed of the vehicle before impact. Each tape switch fired a strobe light which sent an electronic timing signal to the data acquisition system as the left-front tire of the test vehicle passed over it. Test vehicle speed was determined from electronic timing mark data recorded using the "DADiSP" software. Strobe lights and high-speed film analysis are used only as a backup in the event that vehicle speed cannot be determined from the electronic data. 163
177 164 Figure 64. Location of Cameras, Test TL5CMB-2
178 8.8 Crash Test TL5CMB-2 The 35,956-kg (79,705-lb) tractor trailer impacted the concrete median barrier at a speed of 84.9 km/h (52.7 mph) and an angle of 15.4 degrees. A summary of the test results and sequential photographs are shown in Figure 65. The summary of the test results and sequential photographs in English-units are shown in Appendix E. Additional sequential photographs are shown in Figure 66 through Figure Test Description Initial vehicle impact occurred approximately 9.1 m (30 ft) from the upstream end of the barrier, as shown in Figure 71. Shortly afterward, the right-front fender began to crush. At seconds after impact, the tractor began to yaw away from the barrier. At sec, the right-front corner of the engine hood contacted the top protrusion of the barrier. At the same time, the right-front wheel was pushed rearward. At sec, the right-front fender began to lift and rotate forward, while the tractor started to roll into the barrier. At sec, the left-front tire turned toward the barrier. At sec, the vehicle hood began to lift and rotate forward. At sec, the left-front tractor tire lifted off of the concrete surface. At this same time, the hood and bumper were severely crushed. At sec, the right-front corner of the trailer contacted the top protrusion of the barrier. At sec, the trailer started to roll toward and yaw away from the barrier while it rode on the top of the barrier. By sec, the vehicle s hood had risen up to block the windshield from a downstream viewpoint. At sec, the right-front corner of the trailer was vertically coincident with the back face of the barrier. At sec. the bottom and right-front corner of the trailer was crushed while it leaned heavily toward the 165
179 barrier. At sec, both right-rear trailer tires were lifted from the ground. At sec, the tractor reached a maximum positive roll and began to roll back away from the barrier. At sec, the left-rear tires were lifted off the ground. At sec, the left-front tractor tires returned to the roadway surface. At 0.54 sec, the tractor was parallel to the barrier while still leaning toward it. At sec, sparks were visible as the right-front corner of the trailer slid along the top cutout edge of the barrier. At sec, the trailer was parallel with the barrier. At this same time, the trailer s right-rear corner impacted the face of the barrier. At sec, the tractor has rolled back to a level position. At sec, the trailer frame began to twist clockwise. At sec, the tractor started to roll toward the barrier, and by sec, the left-front tire had been again lifted from the roadway surface. At sec, the vehicle hood had rotated all the way forward and contacted the roadway surface. At 1.15 sec, the trailer reached its maximum roll over the barrier, 22.8 degrees, and began to roll back away from the barrier. At this same time, all left-side tires were in the air. At sec, the left-front tire returned to the roadway surface. At sec, the left-front side tandem tires re-contacted the roadway surface. The vehicle continued to ride down the barrier face for the entire length of the barrier until it finally passed the downstream end approximately 2.9 seconds after the initial impact. The vehicle came to rest after rolling through two rows of temporary concrete barriers positioned downstream of the system. This secondary impact caused further damage to the tractor. Specifically, the left side of the tractor and the rear tractor axles received heavy damage not present as the vehicle left the barrier. The final resting place of the vehicle was 92 m (302 ft) downstream from the downstream end of the barrier and 46 m (151 ft) laterally behind the barrier system. The trajectory and final position of the tractor trailer are shown in Figure 65 and Figure
180 8.8.2 Barrier Damage Damage to the concrete median barrier was minimal, as shown in Figure 73 through Figure 84. Barrier damage consisted of contact and gouge marks to the barrier face, barrier cracking, and spalling of the concrete. The vehicle contacted the barrier from the point of impact, 9.1 m (30 ft) from the upstream end, all the way to the downstream end, 52 m (170 ft) from impact. All points in the following description were measured from the upstream end of the barrier. Tire contact marks from the right-front tractor tire began at 9.8 (32 ft), while tire marks from the rear tandems began at 7.6 m (25 ft). These tire marks continued down the barrier to 18.3 m (60 ft), as shown in Figure 73. Gouging also took place throughout this region of the barrier face. A 254-mm wide by 254-mm tall by 13-mm deep (10 x 10 x 0.5-in.) gouge was found at 9.8 m (32 ft). Also, an arcing gouge measuring 6 mm (0.25 in.) deep was located from 10 to 11 m (33 to 36 ft). Finally, a straight, horizontal gouge measuring 13 mm (0.5 in.) deep was found from 11 to 12.2 m (36 to 40 ft). The gouges found in the face of the concrete barrier are shown in Figure 80. Farther upstream, two long diagonal cracks and another gouge in the concrete were found, as shown in Figure 74. The 0.8 m (30 in.) long gouge was found at 6.4 m (21 ft) and was caused by the initial contact of the bottom, rear, right corner of the trailer. The cracks were the result of the impact load applied to the barrier when the trailer rear tandems impacted the barrier. Both cracks started at the bottom of the front face and finished on the back side of the barrier while taking the shape of upstream yield line cracks, as discussed in Section 7.4. The first crack, located at 4.6 m (15 ft), was a hairline crack that stopped on the back side of the top protrusion, 167
181 as shown in Figure 75. This crack, along with most of the others, was colored red in the photographs to better illustrate the length and shape of the crack. The second crack, at 5.8 m (19 ft), was approximately 2 mm (1/16 in.) wide and extended all the way to the asphalt surface on the back of the barrier. This crack caused small pockets of spalling along its length, the largest of which was located on the back side of the top protrusion. This was the largest crack in the barrier and is illustrated in Figure 76. Two more hairline cracks were found in the barrier at 8.4 and 8.7 m (27.5 and 28.5 ft). The crack at 8.4 m (27.5 ft) began on the front of the top barrier protrusion and extended all the way to the base of the barrier on the back side. The crack at 8.7 m (28.5 ft) began 0.8 m (30 in.) above the roadway surface on the front of the barrier and concluded 0.8 m (30 in.) above the ground on the back of the barrier. Also, another gouge in the concrete was found just upstream of these cracks on the barrier s front face. The cracks and the gouge are shown in Figure 77. A single, hairline crack was found on the back of the barrier at 12.2 m (40 ft), as shown in Figure 78. This vertical crack extended from the inside angle of the top protrusion down to 76 mm (3 in.) shy of the asphalt surface. The final hairline cracks were shaped similar to downstream yield line cracks and originated from a pre-existing vertical crack at 15.8 m (52.5 ft), as shown in Figure 79. The first crack in this group was located on the front face of the barrier and extended diagonally from the bottom of the barrier to meet the pre-existing crack 0.7 m (28 in.) above the asphalt surface. Next, a 102-mm (4-in.) long crack was found extending downstream and upward from the preexisting crack on the front face of the top protrusion. Another 102-mm (4-in.) long crack was found extending downstream from the pre-existing crack on the top of the barrier protrusion. 168
182 One final crack measuring 254 mm (10 in.) long was found extending downstream and downward on the back face of the top barrier protrusion. The top barrier protrusion was left with many contact marks, gouges, and instances of concrete spalling as a result of the trailer box riding down it during impact, as shown in Figure 81 and Figure 82. This concrete surface damage was minor at first, between 9.4 and 12.2 m (31 and 40 ft), but became heavier farther downstream and between 12.2 and 15.2 m (40 and 50 ft). The worst of this damage occurred to the top front edge of the barrier between 12.8 and 14.0 m (42 and 46 ft) where the gouging and spalling was approximately 76 to 102 mm (3 to 4 in.) in width. Contact marks from the trailer box on the top protrusion continued with much less severity until 33.5 m (110 ft). Although the initial tire marks concluded at 18.2 m (60 ft), more tire marks began at 25.3 m (83 ft) and continued down to the end of the barrier, as shown in Figure 83. Mixed in with these contact marks were occasional gouges in the concrete. The only substantial gouge was 254 mm (10 in.) long and 13 mm (0.5 in.) deep located halfway up the barrier front face at 35.7 m (117 ft). Finally, small gaps were found between the front of the barrier and the asphalt near the impact point. These gaps were only a few millimeters (1/16 1/8 in.) wide, but provide evidence that the barrier did experience some dynamic movement or rotation during impact. These gaps are shown in Figure
183 8.8.3 Vehicle Damage Vehicle damage was moderate, as shown in Figure 85. The hood and both front fenders were disengaged and ended up in pieces below the rear trailer tandems. The front bumper was disengaged from the right frame horn, and the attaching bolts were all sheared off. The front bumper was also bent around both the right and left-frame horns. The right-frame horn was buckled inward and twisted clockwise, as shown in Figure 86. The front tractor axle was rotated and pushed backward, leaving the right-front tire underneath the cab, as shown in Figure 87. All four of the right-front spring hangar attachment bolts were disengaged. The right-front U-bolt axle attachment was bent and broken in multiple places and was pushed to the rear end of the spring. The bolts attaching the right-front shock absorber to the frame and the spring were both bent. Also, the right-front corner of the cab contained significant scraping and gouging. Occupant compartment deformations were negligible. The tread was separated from the right-front tire, and the tire nuts and bolts were ground down. The right-side gas tank was completely removed and came to rest approximately 15 m (50 ft) from the vehicle, as shown in Figure 88. The gas tank was crushed in several places and was punctured on one side. The gas tank mounting assembly and running boards were crushed and twisted severely. The front mounting arm was torn and twisted downstream. The left-front tire was pushed forward as a result of the front axle rotating as previously described. The tire was also flat and separated from the rim, as shown in Figure 89. The leftside gas tank was crushed on the inward side and rotated so that the front of the tank was touching the ground. The tank mounting arms were bent and twisted, and the middle mounting 170
184 arm was the only arm which remained attached to the tank. The running board was disengaged on the rear end and buckled in the middle. The front axle of the tractor tandems was disengaged from the tractor frame, rotated so that the right side was rearward and the left side was forward, and came to rest underneath the rear axle of the tractor tandems, as shown in Figure 90. The front axle of the tandems was only attached to the tractor by hoses. The front axle s right rim was bent in multiple places, and the left rim had one side bent. Both tires on the right side of the front axle were flat, and the outermost tire was separated from the rim. The rear axle of the tractor tandems suffered much less damage but was still rotated so that the right side was farther forward than the left. Because the rear axle was on top of the front axle, the left-rear tires were suspended in the air. Also, the drive shaft was disengaged and was found laying on the ground next to the vehicle. The trailer had scrapes and gouges on its right side from leaning on the top of the barrier, as shown in Figure 91. These scrapes and gouges were in a straight line beginning 533 mm (21 in.) above the bottom at the front of the box and finishing 229 mm (9 in.) above the bottom at the rear of the box. Many of the vertical ribs on the side of the trailer box were torn open or even torn off the trailer box. The right side of the box was bowed outward due to the slight shifting of the ballast, as shown in Figure 92. Finally, the lower right corner bracket at the back of the trailer was fractured and bent downward Accelerometer and Rate Transducer Data Unfortunately, the secondary EDR did not record any data during the impact. It is believed that the sensitivity was set too low, thus causing the EDR to trigger prematurely and fill 171
185 up the recorders memory buffer. Thus, all electronic data recorded during the test came from the primary EDR located near the rear trailer tandems. Recognizing that (1) occupant impact velocities (OIVs) and occupant ridedown accelerations (ORDs) are not required by NCHRP Report 350 for evaluating tractor trailer impacts and (2) the EDR data was recorded at the rear of the trailer rendering the data irrelevant to the occupant compartment, the OIV and ORD values were not computed for test TL5CMB-2. The recorded data is shown graphically in Appendix F Discussion The analysis of the test results for test TL5CMB-2 showed that the concrete median barrier adequately contained and redirected the vehicle without permanent displacements of the barrier. There were no detached elements nor fragments of which showed potential for penetrating the occupant compartment nor presented undue hazard to other traffic. Deformations of, or intrusion into, the occupant compartment that could have caused serious injury did not occur. The test vehicle did not penetrate nor ride over the barrier and remained upright during and after the collision. Vehicle roll, pitch, and yaw angular displacements were noted, see Appendix F, and were deemed acceptable because they did not adversely influence occupant risk safety criteria nor cause rollover. After collision, the vehicle rode down the face of the barrier and did not intrude into adjacent traffic lanes. Thus, the vehicle s exit angle was less than 60 percent of the impact angle. Therefore, test TL5CMB-2 conducted on a concrete median barrier was determined to be acceptable according to the TL-5 safety performance criteria found in NCHRP Report 350. Note, the test also satisfies all evaluation criteria for test 5-12 found in the 172
186 Update to NCHRP Report 350 [75]. A summary of the safety performance evaluation is provided in Table 43. Table 43. Summary of Safety Performance Evaluation Results Evaluation Factors Structural Adequacy Occupant Risk Vehicle Trajectory Evaluation Criteria A. Test article should contain and redirect the vehicle; the vehicle should not penetrate, underride, or override the installation although a controlled lateral deflection of the test article is acceptable. D. Detached elements, fragments or other debris from the test article should not penetrate or show potential for penetrating the occupant compartment, or present an undue hazard to other traffic, pedestrians, or personnel in a work zone. Deformations of, or intrusions into, the occupant compartment that could cause serious injuries should not be permitted. G. It is preferable, although not essential, that the vehicle remain upright during and after collision. K. After collision it is preferable that the vehicle's trajectory not intrude into adjacent traffic lanes. M. The exit angle from the test article preferably should be less than 60 percent of test impact angle measured at time of vehicle loss of contact with test device. Test TL5CMB-2 S S S S S S - Satisfactory M - Marginal U - Unsatisfactory NA - Not Available 173
187 0.000 sec sec sec sec sec 174 Test Number...TL5CMB-2 Date... 7/12/07 Test Article... Median Barrier Impact Location m from Upstream End Material... Nebraska L4000 mix Reinforcing Material... Grade 60 Rebar Barrier Length m Base mm Height Above Surface... 1,067 mm Total Height... 1,143 mm Footers Length... 3,658 mm... 1,219 mm Thickness mm Asphalt Thickness mm Vehicle Model White GMC Tractor... with 1988 Pines 48 Trailer Curb...13,072 kg Test Inertial...36,154 kg Gross Static...36,154 kg Vehicle Speed Impact km/h Exit...NA Vehicle Angle Impact deg Exit...NA Vehicle Stability...Satisfactory Occupant Ridedown Deceleration (10 msec avg.) Longitudinal...NA Lateral...NA Occupant Impact Velocity Longitudinal...NA Lateral...NA Vehicle Damage...Moderate TAD...1-RFQ-5 and 1-RD-5 SAE... 1-FREN4 and 1-RDES1 Vehicle Stopping Distance m downstream of impact Test Article Damage... Minimal Maximum Deflection Permanent Set...NA Dynamic...38 mm Working mm Figure 65. Summary of Test Results and Sequential Photographs, Test TL5CMB-2
188 0.000 sec sec sec sec sec sec sec sec Figure 66. Additional Sequential Photographs, Behind, Test TL5CMB-2 175


189 0.000 sec sec sec sec sec sec sec sec Figure 67. Additional Sequential Photographs, Upstream, Test TL5CMB-2 176


190 0.000 sec sec sec sec sec sec sec sec Figure 68. Additional Sequential Photographs, Downstream, Test TL5CMB-2 177

191 0.000 sec sec sec sec sec sec sec sec Figure 69.Additional Sequential Photographs, Behind, Test TL5CMB-2 178


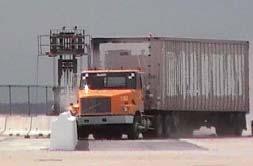


192 0.000 sec sec sec sec sec sec sec sec sec sec Figure 70. Additional Sequential Photographs, Test TL5CMB-2 179


193 Figure 71. Impact Location, Test TL5CMB-2 180


194 Figure 72. Vehicle Final Position and Trajectory Marks, Test TL5CMB-2 181


195 Figure 73. Barrier Damage, Test TL5CMB-2 182


196 Figure 74. Barrier Cracks Upstream of Impact, Test TL5CMB-2 183
 from Upstream End, Test")
197 184 Figure 75. Barrier Cracks 4.6 m (15 ft) from Upstream End, Test TL5CMB-2


198 185 Figure 76. Barrier Cracks 5.8 m (19 ft) from Upstream End, Test TL5CMB-2


 from")
199 186 Figure 77. Barrier Cracks 8.4 and 8.7 m (27.5 and 28.5 ft) from Upstream End, Test TL5CMB-2
200 Figure 78. Barrier Cracks 12.2 m (40 ft) from Upstream End, Test TL5CMB-2 187


201 188 Figure 79. Barrier Cracks 15.8 m (52.5 ft) from Upstream End, Test TL5CMB-2


")

202 189 Figure 80. Barrier Damage, Gouges m (30-36 ft) from Upstream End, Test TL5CMB-2

203 Figure 81. Barrier Damage to Top Protrusion, Test TL5CMB-2 190


 from")
204 191 Figure 82. Barrier Damage to Top Protrusion m (40 47 ft) from Upstream End, Test TL5CMB-2


205 Figure 83. Tire Marks from Middle to Downstream End, Test TL5CMB-2 192


206 Figure 84. Front-Side Barrier Asphalt Gaps Near Impact, Test TL5CMB-2 193


207 Figure 85. Vehicle Damage, Test, TL5CMB-2 194


208 Figure 86. Front Bumper Damage, Test TL5CMB-2 195


209 Figure 87. Front Right Tractor Damage, Test TL5CMB-2 196


210 197 Figure 88. Right Side Tractor Damage, Test TL5CMB-2


211 Figure 89. Left Side Tractor Damage, Test TL5CMB-2 198


212 199 Figure 90. Vehicle Damage to Front Tandems, Test TL5CMB-2


213 Figure 91. Right Side Trailer Damage, Test TL5CMB-2 200


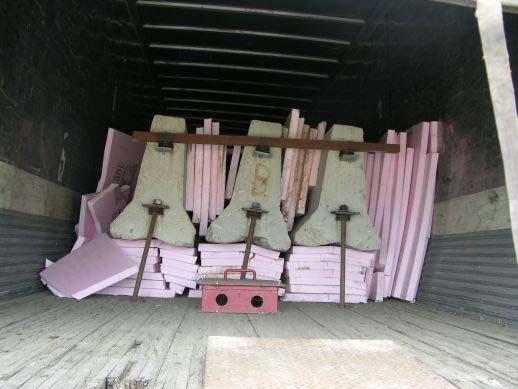
214 201 Figure 92. Damage to Rear of Vehicle, Test TL5CMB-2
DEFLECTION LIMITS FOR TEMPORARY CONCRETE BARRIERS
 Midwest State s Regional Pooled Fund Research Program Fiscal Year 1998-1999 (Year 9) NDOR Research Project Number SPR-3(017) DEFLECTION LIMITS FOR TEMPORARY CONCRETE BARRIERS Submitted by Dean L. Sicking,
PR V2. Submitted by. Professor MIDWEST Vine Street (402) Submitted to
 Submitted to") FINAL REPORT PR4893118-V2 ZONE OF INTRUSION STUDY Submitted by John D. Reid, Ph.D. Professor Dean L.. Sicking, Ph.D., P.E. Professorr and MwRSF Director MIDWEST ROADSIDE SAFETY FACILITY University of Nebraska-Lincoln
FINAL REPORT PR4893118-V2 ZONE OF INTRUSION STUDY Submitted by John D. Reid, Ph.D. Professor Dean L.. Sicking, Ph.D., P.E. Professorr and MwRSF Director MIDWEST ROADSIDE SAFETY FACILITY University of Nebraska-Lincoln
CRITICAL FLARE RATES FOR W-BEAM GUARDRAIL DETERMINING MAXIMUM CAPACITY USING COMPUTER SIMULATION NCHRP 17-20(3)
") CRITICAL FLARE RATES FOR W-BEAM GUARDRAIL DETERMINING MAXIMUM CAPACITY USING COMPUTER SIMULATION NCHRP 17-2(3) Submitted by Beau D. Kuipers, B.S.M.E., E.I.T. Graduate Research Assistant Ronald K. Faller,
CRITICAL FLARE RATES FOR W-BEAM GUARDRAIL DETERMINING MAXIMUM CAPACITY USING COMPUTER SIMULATION NCHRP 17-2(3) Submitted by Beau D. Kuipers, B.S.M.E., E.I.T. Graduate Research Assistant Ronald K. Faller,
TEST MATRICES FOR EVALUATING CABLE MEDIAN BARRIERS PLACED IN V-DITCHES
 Midwest States Regional Pooled Fund Research Program Fiscal Year 2012 (Year 22) Research Project Number TPF-5(193) Supplement #44 NDOR Sponsoring Agency Code RPFP-12-CABLE1&2 TEST MATRICES FOR EVALUATING
1962: HRCS Circular 482 one-page document, specified vehicle mass, impact speed, and approach angle for crash tests.
 1 2 3 1962: HRCS Circular 482 one-page document, specified vehicle mass, impact speed, and approach angle for crash tests. 1973: NCHRP Report 153 16-page document, based on technical input from 70+ individuals
PERFORMANCE EVALUATION OF THE PERMANENT NEW JERSEY SAFETY SHAPE BARRIER UPDATE TO NCHRP 350 TEST NO (2214NJ-2)
") PERFORMANCE EVALUATION OF THE PERMANENT NEW JERSEY SAFETY SHAPE BARRIER UPDATE TO NCHRP 350 TEST NO. 4-12 (2214NJ-2) Submitted by Karla A. Polivka, M.S.M.E., E.I.T. Research Associate Engineer Dean L.
PERFORMANCE EVALUATION OF THE PERMANENT NEW JERSEY SAFETY SHAPE BARRIER UPDATE TO NCHRP 350 TEST NO. 4-12 (2214NJ-2) Submitted by Karla A. Polivka, M.S.M.E., E.I.T. Research Associate Engineer Dean L.
Cable-to-Post Attachments for Use in Non- Proprietary High-Tension Cable Median Barrier Phase II
 University of Nebraska - Lincoln DigitalCommons@University of Nebraska - Lincoln Nebraska Department of Transportation Research Reports Nebraska LTAP 3-24-2016 Cable-to-Post Attachments for Use in Non-
Midwest Guardrail System Without Blockouts
 Duplication for publication or sale is strictly prohibited without prior written permission of the Transportation Research Board Paper No. 13-0418 Midwest Guardrail System Without Blockouts by John D.
INCREASED SPAN LENGTH FOR THE MGS LONG-SPAN GUARDRAIL SYSTEM PART III: FAILURE ANALYSIS
 Midwest States Pooled Fund Research Program Fiscal Years 2013 (Years 23) Research Project Number TPF-5(193) Supplement #56 NDOR Sponsoring Agency Code RPFP-13-MGS-3 INCREASED SPAN LENGTH FOR THE MGS LONG-SPAN
Manual for Assessing Safety Hardware
 American Association of State Highway and Transportation Officials Manual for Assessing Safety Hardware 2009 vii PREFACE Effective traffic barrier systems, end treatments, crash cushions, breakaway devices,
PERFORMANCE EVALUATION OF THE FREE-STANDING TEMPORARY BARRIER UPDATE TO NCHRP 350 TEST NO WITH 28" C.G. HEIGHT (2214TB-2)
") PERFORMANCE EVALUATION OF THE FREE-STANDING TEMPORARY BARRIER UPDATE TO NCHRP 350 TEST NO. 3-11 WITH 28" C.G. HEIGHT (2214TB-2) Submitted by Karla A. Polivka, M.S.M.E., E.I.T. Research Associate Engineer
PERFORMANCE EVALUATION OF THE FREE-STANDING TEMPORARY BARRIER UPDATE TO NCHRP 350 TEST NO. 3-11 WITH 28" C.G. HEIGHT (2214TB-2) Submitted by Karla A. Polivka, M.S.M.E., E.I.T. Research Associate Engineer
DISTRIBUTION: Electronic Recipients List TRANSMITTAL LETTER NO. (15-01) MINNESOTA DEPARTMENT OF TRANSPORTATION. MANUAL: Road Design English Manual
 MINNESOTA DEPARTMENT OF TRANSPORTATION. MANUAL: Road Design English Manual") DISTRIBUTION: Electronic Recipients List MINNESOTA DEPARTMENT OF TRANSPORTATION DEVELOPED BY: Design Standards Unit ISSUED BY: Office of Project Management and Technical Support TRANSMITTAL LETTER NO.
DISTRIBUTION: Electronic Recipients List MINNESOTA DEPARTMENT OF TRANSPORTATION DEVELOPED BY: Design Standards Unit ISSUED BY: Office of Project Management and Technical Support TRANSMITTAL LETTER NO.
DEVELOPMENT OF A TRANSITION BETWEEN FREE-STANDING AND REDUCED-DEFLECTION PORTABLE CONCRETE BARRIERS PHASE I
 Research Project Number TPF-5(193) Supplement #78 DEVELOPMENT OF A TRANSITION BETWEEN FREE-STANDING AND REDUCED-DEFLECTION PORTABLE CONCRETE BARRIERS PHASE I Submitted by Mojdeh Asadollahi Pajouh, Ph.D.
PERFORMANCE EVALUATION OF THE FREE-STANDING TEMPORARY BARRIER UPDATE TO NCHRP 350 TEST NO (2214TB-1)
") PERFORMANCE EVALUATION OF THE FREE-STANDING TEMPORARY BARRIER UPDATE TO NCHRP 350 TEST NO. 3-11 (2214TB-1) Submitted by Karla A. Polivka, M.S.M.E., E.I.T. Research Associate Engineer Dean L. Sicking, Ph.D.,
PERFORMANCE EVALUATION OF THE FREE-STANDING TEMPORARY BARRIER UPDATE TO NCHRP 350 TEST NO. 3-11 (2214TB-1) Submitted by Karla A. Polivka, M.S.M.E., E.I.T. Research Associate Engineer Dean L. Sicking, Ph.D.,
PERFORMANCE EVALUATION OF THE MODIFIED G4(1S) GUARDRAIL UPDATE TO NCHRP 350 TEST NO WITH 28" C.G. HEIGHT (2214WB-2)
 GUARDRAIL UPDATE TO NCHRP 350 TEST NO WITH 28 C.G. HEIGHT (2214WB-2)") PERFORMANCE EVALUATION OF THE MODIFIED G4(1S) GUARDRAIL UPDATE TO NCHRP 350 TEST NO. 3-11 WITH 28" C.G. HEIGHT (2214WB-2) Submitted by Karla A. Polivka, M.S.M.E., E.I.T. Research Associate Engineer Dean
PERFORMANCE EVALUATION OF THE MODIFIED G4(1S) GUARDRAIL UPDATE TO NCHRP 350 TEST NO. 3-11 WITH 28" C.G. HEIGHT (2214WB-2) Submitted by Karla A. Polivka, M.S.M.E., E.I.T. Research Associate Engineer Dean
s MEDIAN BARRIERS FOR TEXAS HIGHWAYS
 s MEDIAN BARRIERS FOR TEXAS HIGHWAYS SUMMARY REPORT of Research Report Number 146-4 Study 2-8-68-146 Cooperative Research Program of the Texas Transportation Institute and the Texas Highway Department
Evaluation of the Midwest Guardrail System Stiffness Transition with Curb
 Duplication for publication or sale is strictly prohibited without prior written permission of the Transportation Research Board Paper No. -0 Evaluation of the Midwest Guardrail System Stiffness Transition
Evaluation of the Midwest Guardrail System stiffness transition with curb
 University of Nebraska - Lincoln DigitalCommons@University of Nebraska - Lincoln Civil Engineering Faculty Publications Civil Engineering 2016 Evaluation of the Midwest Guardrail System stiffness transition
Continued Development of a Non-Proprietary, High-Tension, Cable End Terminal System
 University of Nebraska - Lincoln DigitalCommons@University of Nebraska - Lincoln Nebraska Department of Transportation Research Reports Nebraska LTAP 4-29-2016 Continued Development of a Non-Proprietary,
Development and Implementation of the Simplified MGS Stiffness Transition
 Duplication for publication or sale is strictly prohibited without prior written permission of the Transportation Research Board Paper No. 12-3367 Development and Implementation of the Simplified MGS Stiffness
MINIMUM EFFECTIVE LENGTH FOR THE MIDWEST GUARDRAIL SYSTEM
 Duplication for publication or sale is strictly prohibited without prior written permission of the Transportation Research Board Paper No. 15-0484 MINIMUM EFFECTIVE LENGTH FOR THE MIDWEST GUARDRAIL SYSTEM
AASHTO Manual for Assessing Safety Hardware, AASHTO/FHWA Joint Implementation Plan Standing Committee on Highways September 24, 2015
 AASHTO Manual for Assessing Safety Hardware, 2015 AASHTO/FHWA Joint Implementation Plan Standing Committee on Highways September 24, 2015 Full Scale MASH Crash Tests (NCHRP 22-14(02)) Conducted several
Development and Validation of a Finite Element Model of an Energy-absorbing Guardrail End Terminal
 Development and Validation of a Finite Element Model of an Energy-absorbing Guardrail End Terminal Yunzhu Meng 1, Costin Untaroiu 1 1 Department of Biomedical Engineering and Virginia Tech, Blacksburg,
EXTENDING TL-2 SHORT-RADIUS GUARDRAIL TO LARGER RADII
 Research Project Number TPF-5(193) Supplement 27 EXTENDING TL-2 SHORT-RADIUS GUARDRAIL TO LARGER RADII Submitted by Cody S. Stolle, Ph.D., E.I.T. Post-Doctoral Research Associate Robert W. Bielenberg,
Advances in Simulating Corrugated Beam Barriers under Vehicular Impact
 13 th International LS-DYNA Users Conference Session: Automotive Advances in Simulating Corrugated Beam Barriers under Vehicular Impact Akram Abu-Odeh Texas A&M Transportation Institute Abstract W-beam
Improving Roadside Safety by Computer Simulation
 A2A04:Committee on Roadside Safety Features Chairman: John F. Carney, III, Worcester Polytechnic Institute Improving Roadside Safety by Computer Simulation DEAN L. SICKING, University of Nebraska, Lincoln
CRASH TEST OF MILE POST MARKER. T. J. Hirsch Research Engineer. and. Eugene Buth Assistant Research Engineer. Research Report Number 146-8
 CRASH TEST OF MILE POST MARKER by T. J. Hirsch Research Engineer and Eugene Buth Assistant Research Engineer Research Report Number 146-8 Studies of Field Adaption of Impact Attenuation Systems Research
SAFETY PERFORMANCE OF WORK-ZONE DEVICES UNDER MASH TESTING
 SAFETY PERFORMANCE OF WORK-ZONE DEVICES UNDER MASH TESTING Schmidt, Faller, Lechtenberg, Sicking, Holloway Midwest Roadside Safety Facility Nebraska Transportation Center University of Nebraska-Lincoln
DEVELOPMENT OF A MASH TL-3 TRANSITION BETWEEN GUARDRAIL AND PORTABLE CONCRETE BARRIERS
 Duplication for publication or sale is strictly prohibited without prior written permission of the Transportation Research Board Paper No. 17-01712 DEVELOPMENT OF A MASH TL-3 TRANSITION BETWEEN GUARDRAIL
A MASH Compliant W-Beam Median Guardrail System
 0 0 0 0 0 A MASH Compliant W-Beam Median Guardrail System By A. Y. Abu-Odeh, R. P. Bligh, W. Odell, A. Meza, and W. L. Menges Submitted: July 0, 0 Word Count:, + ( figures + tables=,000) =, words Authors:
Guardrail/Bridgerail Recommendations for Very Low Volume Local Roads in Kansas
 Guardrail/Bridgerail Recommendations for Very Low Volume Local Roads in Kansas MINK Conference September 20, 2017 Ronald J. Seitz, P.E. and Tod Salfrank The Problem The Local Road System in Kansas is Very
Research Project Number SPR-P1(13)M326 DEVELOPMENT OF A MASH TL-3 TRANSITION BETWEEN GUARDRAIL AND PORTABLE CONCRETE BARRIERS.
M326 DEVELOPMENT OF A MASH TL-3 TRANSITION BETWEEN GUARDRAIL AND PORTABLE CONCRETE BARRIERS.") Research Project Number SPR-P1(13)M326 DEVELOPMENT OF A MASH TL-3 TRANSITION BETWEEN GUARDRAIL AND PORTABLE CONCRETE BARRIERS Submitted by David A. Gutierrez, B.S.C.E., E.I.T. Graduate Research Assistant
Research Project Number SPR-P1(13)M326 DEVELOPMENT OF A MASH TL-3 TRANSITION BETWEEN GUARDRAIL AND PORTABLE CONCRETE BARRIERS Submitted by David A. Gutierrez, B.S.C.E., E.I.T. Graduate Research Assistant
Crash Testing Growth Common Roadside Hardware Systems Draft FHWA and AASHTO Requirements for Implementing MASH 2015
 64 th Annual Illinois Traffic Safety and Engineering Conference October 14, 2015 Crash Testing Growth Common Roadside Hardware Systems Draft FHWA and AASHTO Requirements for Implementing MASH 2015 1 https://www.youtube.com/watch?feature
John Rohde, Ph.D., P.E. Associate Professor Department of Civil Engineering University of Nebraska-Lincoln
 Report # MATC-UNL: 222 Final Report 25-1121-1-222 Development of a Socketed Foundation for Cable Barrier Posts - Phase I John Rohde, Ph.D., P.E. Associate Professor Department of Civil Engineering University
Product Specification. ABSORB 350 TM TL-2 Non-Redirective, Gating, Crash Cushion Applied to Quickchange Moveable Barrier
 TB 000612 Rev. 0 Page 1 of 9 Product Specification ABSORB 350 TM TL-2 Non-Redirective, Gating, Crash Cushion Applied to Quickchange Moveable Barrier I. General The ABSORB 350 TM TL-2 System is a Non-Redirective,
Texas Transportation Institute The Texas A&M University System College Station, Texas
 1. Report No. FHWA/TX-04/9-8132-1 4. Title and Subtitle TESTING AND EVALUATION OF THE FLORIDA JERSEY SAFETY SHAPED BRIDGE RAIL 2. Government Accession No. 3. Recipient's Catalog No. 5. Report Date February
KENTUCKY TRANSPORTATION CENTER
 Research Report KTC-08-10/UI56-07-1F KENTUCKY TRANSPORTATION CENTER EVALUATION OF 70 MPH SPEED LIMIT IN KENTUCKY OUR MISSION We provide services to the transportation community through research, technology
Evaluation and Design of ODOT s Type 5 Guardrail with Tubular Backup
 Evaluation and Design of ODOT s Type 5 Guardrail with Tubular Backup Draft Final Report Chuck A. Plaxico, Ph.D. James C. Kennedy, Jr., Ph.D. Charles R. Miele, P.E. for the Ohio Department of Transportation
VULCAN BARRIER TL-3 GENERAL SPECIFICATIONS
 VULCAN BARRIER TL-3 GENERAL SPECIFICATIONS I. GENERAL A. The VULCAN BARRIER TL-3 (VULCAN TL-3) shall be a highly portable and crashworthy longitudinal barrier especially suited for use as a temporary barrier
VULCAN BARRIER TL-3 GENERAL SPECIFICATIONS
 VULCAN BARRIER TL-3 GENERAL SPECIFICATIONS I. GENERAL A. The VULCAN BARRIER TL-3 (VULCAN TL-3) shall be a highly portable and crashworthy longitudinal barrier especially suited for use as a temporary barrier
DEVELOPMENT OF A MASH TL-3 MEDIAN BARRIER GATE
 TTI: 9-1002 DEVELOPMENT OF A MASH TL-3 MEDIAN BARRIER GATE ISO 17025 Laboratory Testing Certificate # 2821.01 Crash testing performed at: TTI Proving Ground 3100 SH 47, Building 7091 Bryan, TX 77807 Research/Test
NTC. Cable Median Barrier Failure Analysis and Prevention
 Nebraska Transportation Center Report # TRP-03-275-12 Final Report 25-1121-0001-428 Cable Median Barrier Failure Analysis and Prevention Dean L. Sicking, Ph.D., P.E. Professor Department of Civil Engineering
TRACC. Trinity Attenuating Crash Cushion
 TRACC Trinity Attenuating Crash Cushion CSP Pacific Business Unit of Fletcher Concrete & Infrastructure Limited 306 Neilson Street Onehunga, Auckland Phone: (09) 634 1239 or 0800 655 200 Fax: (09) 634
Texas Transportation Institute The Texas A&M University System College Station, Texas
 1. Report No. FHWA/TX-07/0-5527-1 4. Title and Subtitle DEVELOPMENT OF A LOW-PROFILE TO F-SHAPE TRANSITION BARRIER SEGMENT 2. Government Accession No. 3. Recipient's Catalog No. Technical Report Documentation
February 8, In Reply Refer To: HSSD/CC-104
 February 8, 2008 200 New Jersey Avenue, SE. Washington, DC 20590 In Reply Refer To: HSSD/CC-04 Barry D. Stephens, P.E. Sr. Vice President Engineering Energy Absorption Systems, Inc. 367 Cincinnati Avenue
Form DOT F (8-72) Texas Transportation Institute The Texas A&M University System College Station, Texas
 Texas Transportation Institute The Texas A&M University System College Station, Texas") 1. Report No. FHWA/TX-02/4162-1 Technical Report Documentation Page 2. Government Accession No. 3. Recipient's Catalog No. 4. Title and Subtitle EVALUATION OF TEXAS GRID-SLOT PORTABLE CONCRETE BARRIER
1. Report No. FHWA/TX-02/4162-1 Technical Report Documentation Page 2. Government Accession No. 3. Recipient's Catalog No. 4. Title and Subtitle EVALUATION OF TEXAS GRID-SLOT PORTABLE CONCRETE BARRIER
SUMMARY CHANGES FOR NCHRP REPORT 350 GUIDELINES [NCHRP (02)] Keith A. Cota, Chairman Technical Committee on Roadside Safety June 14, 2007
![SUMMARY CHANGES FOR NCHRP REPORT 350 GUIDELINES [NCHRP (02)] Keith A. Cota, Chairman Technical Committee on Roadside Safety June 14, 2007](/thumbs/87/97351925.jpg "SUMMARY CHANGES FOR NCHRP REPORT 350 GUIDELINES [NCHRP (02)] Keith A. Cota, Chairman Technical Committee on Roadside Safety June 14, 2007") SUMMARY CHANGES FOR NCHRP REPORT 350 GUIDELINES [NCHRP 22-14 (02)] Keith A. Cota, Chairman Technical Committee on Roadside Safety June 14, 2007 BACKGROUND Circular 482 (1962) First full scale crash test
SUMMARY CHANGES FOR NCHRP REPORT 350 GUIDELINES [NCHRP 22-14 (02)] Keith A. Cota, Chairman Technical Committee on Roadside Safety June 14, 2007 BACKGROUND Circular 482 (1962) First full scale crash test
July 10, Refer to: HSA-10/CC-78A
 July 10, 2003 Refer to: HSA-10/CC-78A Barry D. Stephens, P.E. Senior Vice President of Engineering ENERGY ABSORPTION Systems, Inc. 3617 Cincinnati Avenue Rocklin, California 95765 Dear Mr. Stephens: Your
Implementation of AASHTO s Manual for Assessing Safety Hardware (MASH) 2016
 2016") Implementation of AASHTO s Manual for Assessing Safety Hardware (MASH) 2016 Update from the Technical Committee on Roadside Safety Keith Cota, New Hampshire DOT MASH 2016 Overview Background Ballot Results/Dates
Implementation of AASHTO s Manual for Assessing Safety Hardware (MASH) 2016 Update from the Technical Committee on Roadside Safety Keith Cota, New Hampshire DOT MASH 2016 Overview Background Ballot Results/Dates
Universal TAU-IIR Redirective, Non-Gating, Crash Cushion
 TB 110927 Rev. 0 Page 1 of 5 Product Specification Universal TAU-IIR Redirective, Non-Gating, Crash Cushion I. General The Universal TAU-IIR system is a Redirective, Non-Gating Crash Cushion in accordance
RELATIVE COSTS OF DRIVING ELECTRIC AND GASOLINE VEHICLES
 SWT-2018-1 JANUARY 2018 RELATIVE COSTS OF DRIVING ELECTRIC AND GASOLINE VEHICLES IN THE INDIVIDUAL U.S. STATES MICHAEL SIVAK BRANDON SCHOETTLE SUSTAINABLE WORLDWIDE TRANSPORTATION RELATIVE COSTS OF DRIVING
Development of Iowa Dot Combination Bridge Separation Barrier with Bicycle Railing
 University of Nebraska - Lincoln DigitalCommons@University of Nebraska - Lincoln Engineering Mechanics Dissertations & Theses Mechanical & Materials Engineering, Department of 8-2018 Development of Iowa
FHWA/IN/JTRP-2000/23. Final Report. Sedat Gulen John Nagle John Weaver Victor Gallivan
 FHWA/IN/JTRP-2000/23 Final Report DETERMINATION OF PRACTICAL ESALS PER TRUCK VALUES ON INDIANA ROADS Sedat Gulen John Nagle John Weaver Victor Gallivan December 2000 Final Report FHWA/IN/JTRP-2000/23 DETERMINATION
A Proposed Modification of the Bridge Gross Weight Formula
 14 MID-CONTINENT TRANSPORTATION SYMPOSIUM PROCEEDINGS A Proposed Modification of the Bridge Gross Weight Formula CARL E. KURT A study was conducted using 1 different truck configurations and the entire
W-Beam Approach Treatment at Bridge Rail Ends Near Intersecting Roadways
 TRANSPORTATION RESEARCH RECORD 1133 51 W-Beam Approach Treatment at Bridge Rail Ends Near Intersecting Roadways M. E. BRONSTAD, M. H. RAY, J. B. MAYER, JR., AND c. F. MCDEVITT This paper is concerned with
Technical Report Documentation Page Form DOT F (8-72) Reproduction of completed page authorized
 Reproduction of completed page authorized") 1. Report No. FHWA/TX-05/0-4162-3 4. Title and Subtitle 2. Government Accession No. 3. Recipient's Catalog No. DEVELOPMENT OF LOW-DEFLECTION PRECAST CONCRETE ARRIER 5. Report Date January 2005 Technical
1. Report No. FHWA/TX-05/0-4162-3 4. Title and Subtitle 2. Government Accession No. 3. Recipient's Catalog No. DEVELOPMENT OF LOW-DEFLECTION PRECAST CONCRETE ARRIER 5. Report Date January 2005 Technical
Median Barriers in North Carolina
 Median Barriers in North Carolina AASHTO Subcommittee on Design - 2006 June 13-16, 2006 Jay A. Bennett North Carolina DOT State Roadway Design Engineer Brian Murphy, PE Traffic Safety Engineer Safety Evaluation
VERIFICATION & VALIDATION REPORT of MGS Barrier Impact with 1100C Vehicle Using Toyota Yaris Coarse FE Model
 VERIFICATION & VALIDATION REPORT of MGS Barrier Impact with 1100C Vehicle Using Toyota Yaris Coarse FE Model CCSA VALIDATION/VERIFICATION REPORT Page 1 of 4 Project: CCSA Longitudinal Barriers on Curved,
Performance Based Design for Bridge Piers Impacted by Heavy Trucks
 Performance Based Design for Bridge Piers Impacted by Heavy Trucks Anil K. Agrawal, Ph.D., P.E., Ran Cao and Xiaochen Xu The City College of New York, New York, NY Sherif El-Tawil, Ph.D. University of
safedirection.com.au Ref: PM 017/02
 DISTRIBUTOR 0 Product Manual Ref: PM 017/02 Table of Contents 1.0 Introduction... 3 2.0 The... 3 3.0 How the Functions... 4 4.0 Crash Test Performance... 4 5.0 Characteristics of Terminals... 5 5.1 Gating
Update to NCHRP Report 350. Current Safety Issues
 Workshop on the Update to NCHRP Report 350 and Current Safety Issues July 18 21, 2004 Sponsored by TRB COMMITTEE AFB20 ROADSIDE SAFETY DESIGN DoubleTree Hotel Overland Park-Corporate Woods 10100 College
Development of Turning Templates for Various Design Vehicles
 Transportation Kentucky Transportation Center Research Report University of Kentucky Year 1991 Development of Turning Templates for Various Design Vehicles Kenneth R. Agent Jerry G. Pigman University of
REPORT NUMBER: 301-CAL SAFETY COMPLIANCE TESTING FOR FMVSS 301 FUEL SYSTEM INTEGRITY HONDA MOTOR COMPANY 2007 HONDA ACCORD 4-DOOR SEDAN
 REPORT NUMBER: 301-CAL-07-05 SAFETY COMPLIANCE TESTING FOR FMVSS 301 FUEL SYSTEM INTEGRITY HONDA MOTOR COMPANY 2007 HONDA ACCORD 4-DOOR SEDAN NHTSA NUMBER: C75304 CALSPAN TEST NUMBER: 8832-F301-05 CALSPAN
Control of Pavement Smoothness in Kansas
 Report No. FHWA-KS-8-5 Final REPORT Control of Pavement Smoothness in Kansas William H. Parcells, Jr., P.E. Kansas Department of Transportation Topeka, Kansas May 29 KANSAS DEPARTMENT OF TRANSPORTATION
Vehicle Crash Tests of Concrete Median Barrier Retrofitted with Slipformed Concrete Glare Screen
 TRANSPORTATION RESEARCH RECORD 1419 35 Vehicle Crash Tests of Concrete Median Barrier Retrofitted with Slipformed Concrete Glare Screen PAYAM RowHANI, DoRAN GLAuz, AND RoGER L. STOUGHTON Two vehicle crash
Wyoming Road Closure Gate
 38 TRANSPORTATION RESEARCH RECORD 1528 Wyoming Road Closure Gate KING K. MAK, ROGER P. BLIGH, AND WILLIAM B. WILSON Road closure gates are used to close certain highways when driving conditions become
Methodologies and Examples for Efficient Short and Long Duration Integrated Occupant-Vehicle Crash Simulation
 13 th International LS-DYNA Users Conference Session: Automotive Methodologies and Examples for Efficient Short and Long Duration Integrated Occupant-Vehicle Crash Simulation R. Reichert, C.-D. Kan, D.
Development of a Finite Element Model of a Motorcycle
 Development of a Finite Element Model of a Motorcycle N. Schulz, C. Silvestri Dobrovolny and S. Hurlebaus Texas A&M Transportation Institute Abstract Over the past years, extensive research efforts have
BarrierGate. General Specifications. Manual Operations General Specifications
 BarrierGate General Specifications Manual Operations General Specifications BarrierGate GENERAL SPECIFICATIONS I. GENERAL A. The BarrierGate system (the gate) shall be designed and manufactured by Energy
Statement before the New Hampshire House Transportation Committee. Research on primary-enforcement safety belt use laws
 Statement before the New Hampshire House Transportation Committee Research on primary-enforcement safety belt use laws Jessica B. Cicchino, Ph.D. Insurance Institute for Highway Safety The Insurance Institute
Recommendations for AASHTO Superelevation Design
 Recommendations for AASHTO Superelevation Design September, 2003 Prepared by: Design Quality Assurance Bureau NYSDOT TABLE OF CONTENTS Contents Page INTRODUCTION...1 OVERVIEW AND COMPARISON...1 Fundamentals...1
PRODUCT DESCRIPTION. X-Tension DS. is suitable for all road types: Motorways, country roads, city streets for speed categories up to 110 km/h.
 INDEX Introduction 2 Product Description 3 Installation 6 Specifications 7 Crash Tests Table 8 Reusability 9 FAQ 10 Annexes 14 Drawings 15 Pictures 16 Crash Tests Results 18 Approvals 23 INTRODUCTION Improving
D-25 Speed Advisory System
 Report Title Report Date: 2002 D-25 Speed Advisory System Principle Investigator Name Pesti, Geza Affiliation Texas Transportation Institute Address CE/TTI, Room 405-H 3135 TAMU College Station, TX 77843-3135
REPORT NUMBER: 301-MGA SAFETY COMPLIANCE TESTING FOR FMVSS 301R FUEL SYSTEM INTEGRITY REAR IMPACT
 REPORT NUMBER: 301-MGA-2011-008 SAFETY COMPLIANCE TESTING FOR FMVSS 301R FUEL SYSTEM INTEGRITY REAR IMPACT MAZDA MOTOR CORPORATION 2011 MAZDA 2 SPORT MT NHTSA NUMBER: CB5400 PREPARED BY: MGA RESEARCH CORPORATION
DEVELOPMENT OF A TEMPORARY BARRIER SYSTEM FOR OFF-ROAD APPLICATIONS
 DEVELOPMENT OF A TEMPORARY BARRIER SYSTEM FOR OFF-ROAD APPLICATIONS Kenneth H. Addink Graduate Research Assistant Brian G. Pfeifer, Ph.D., P.E. Research Associate Engineer John R. Rohde, Ph.D., P.E. Associate
Analysis of Existing Work-Zone Sign Supports Using Manual for Assessing Safety Hardware Safety Performance Criteria
 University of Nebraska - Lincoln DigitalCommons@University of Nebraska - Lincoln Civil Engineering Faculty Publications Civil Engineering 2011 Analysis of Existing Work-Zone Sign Supports Using Manual
Toyota Motor North America, Inc. Grant of Petition for Temporary Exemption from an Electrical Safety Requirement of FMVSS No. 305
 This document is scheduled to be published in the Federal Register on 01/02/2015 and available online at http://federalregister.gov/a/2014-30749, and on FDsys.gov DEPARTMENT OF TRANSPORTATION National
MASH Test 3-11 on the T131RC Bridge Rail
 TTI: 9-1002-12 MASH Test 3-11 on the T131RC Bridge Rail ISO 17025 Laboratory Testing Certificate # 2821.01 Crash testing performed at: TTI Proving Ground 3100 SH 47, Building 7091 Bryan, TX 77807 Test
Guide Rail Safety Symposium
 Ministry of Transportation Guide Rail Safety Symposium MTO Provincial Roadside Safety Update Mark C. Ayton, P. Eng. Senior Engineer, Highway Design MTO Highway Standards Branch MTO Provincial Roadside
REPORT NUMBER: 301-MGA SAFETY COMPLIANCE TESTING FOR FMVSS 301R FUEL SYSTEM INTEGRITY REAR IMPACT
 REPORT NUMBER: 301-MGA-2010-007 SAFETY COMPLIANCE TESTING FOR FMVSS 301R FUEL SYSTEM INTEGRITY REAR IMPACT NISSAN MOTOR COMPANY LTD 2010 NISSAN CUBE NHTSA NUMBER: CA5205 PREPARED BY: MGA RESEARCH CORPORATION
Correlation of Occupant Evaluation Index on Vehicle-occupant-guardrail Impact System Guo-sheng ZHANG, Hong-li LIU and Zhi-sheng DONG
 07 nd International Conference on Computer, Mechatronics and Electronic Engineering (CMEE 07) ISBN: 978--60595-53- Correlation of Occupant Evaluation Index on Vehicle-occupant-guardrail Impact System Guo-sheng
MASH 2016 Implementation: What, When and Why
 MASH 2016 Implementation: What, When and Why Roger P. Bligh, Ph.D., P.E. Senior Research Engineer Texas A&M Transportation Institute June 7, 2016 2016 Traffic Safety Conference College Station, Texas Outline
CFIRE December 2009
 i BRIDGE ANALYSIS AND EVALUATION OF EFFECTS UNDER OVERLOAD VEHICLES (PHASE 1) CFIRE 02-03 December 2009 National Center for Freight & Infrastructure Research & Education College of Engineering Department
Safety Briefing on Roof Crush How a Strong Federal Roof Crush Standard Can Save Many Lives & Why the Test Must Include Both Sides of the Roof
 Safety Briefing on Roof Crush How a Strong Federal Roof Crush Standard Can Save Many Lives & Why the Test Must Include Both Sides of the Roof ~ Public Citizen ~ www.citizen.org The Importance of Far Side
TEXAS TRANSPORTATION INSTITUTE THE TEXAS A & M UNIVERSITY SYSTEM COLLEGE STATION, TEXAS 77843
 NCHRP REPORT 350 ASSESSMENT OF EXISTING ROADSIDE SAFETY HARDWARE by C. Eugene Buth, P.E. Senior Research Engineer Wanda L. Menges Associate Research Specialist and Sandra K. Schoeneman Research Associate
Sponsored by Roadside Safety Research Program Pooled Fund Study
 Proving Ground Report No. 405160-10 Report Date: August 2010 EVALUATION OF EXISTING T-INTERSECTION GUARDRAIL SYSTEMS FOR EQUIVALENCY WITH NCHRP REPORT 350 TL-2 TEST CONDITIONS by Akram Y. Abu-Odeh Associate
MASH TEST 3-10 ON 31-INCH W-BEAM GUARDRAIL WITH STANDARD OFFSET BLOCKS
 TTI: 9-1002 MASH TEST 3-10 ON 31-INCH W-BEAM GUARDRAIL WITH STANDARD OFFSET BLOCKS ISO 17025 Laboratory Testing Certificate # 2821.01 Crash testing performed at: TTI Proving Ground 3100 SH 47, Building
REPORT NUMBER: 301-CAL SAFETY COMPLIANCE TESTING FOR FMVSS 301 FUEL SYSTEM INTEGRITY REAR IMPACT
 REPORT NUMBER: 301-CAL-09-01 SAFETY COMPLIANCE TESTING FOR FMVSS 301 FUEL SYSTEM INTEGRITY REAR IMPACT HYUNDAI MOTOR COMPANY 2009 HYUNDAI ACCENT 4-DOOR SEDAN NHTSA NUMBER: C90503 CALSPAN TRANSPORTATION
White Paper. Compartmentalization and the Motorcoach
 White Paper Compartmentalization and the Motorcoach By: SafeGuard, a Division of IMMI April 9, 2009 Table of Contents Introduction 3 Compartmentalization in School Buses...3 Lap-Shoulder Belts on a Compartmentalized
Texas Transportation Institute The Texas A&M University System College Station, Texas
 1. Report No. FHWA/TX-05/9-8132-P7 4. Title and Subtitle TL-4 CRASH TESTING OF THE F411 BRIDGE RAIL 2. Government Accession No. 3. Recipient's Catalog No. 5. Report Date October 2004 Technical Report Documentation
REPORT NUMBER: 301-MGA SAFETY COMPLIANCE TESTING FOR FMVSS 301R FUEL SYSTEM INTEGRITY REAR IMPACT
 REPORT NUMBER: 301-MGA-2010-005 SAFETY COMPLIANCE TESTING FOR FMVSS 301R FUEL SYSTEM INTEGRITY REAR IMPACT NISSAN MOTOR COMPANY LTD 2010 NISSAN CUBE NHTSA NUMBER: CA5201 PREPARED BY: MGA RESEARCH CORPORATION
Virginia Department of Transportation
 TEST REPORT FOR: Virginia Department of Transportation SKT SP 350 50 (15.24 m) System PREPARED FOR: Virginia Department of Transportation 1401 E. Broad St. Richmond, VA 23219 TEST REPORT NUMBER: REPORT
June 5, In Reply Refer To: HSSD/B-178. Mr. Kevin K. Groeneweg Mobile Barriers LLC Genesee Trail Road Golden, CO Dear Mr.
 June 5, 2008 1200 New Jersey Avenue, SE. Washington, DC 20590 In Reply Refer To: HSSD/B-178 Mr. Kevin K. Groeneweg Mobile Barriers LLC 24918 Genesee Trail Road Golden, CO 80401 Dear Mr. Groeneweg: This
Crash Performance of Strong-Post W-Beam Guardrail with Missing Blockouts Carolyn E. Hampton and Hampton C. Gabler
 Crash Performance of Strong-Post W-Beam Guardrail with Missing Blockouts Carolyn E. Hampton and Hampton C. Gabler Virginia Tech Center for Injury Biomechanics, Blacksburg VA 24061 Abstract Missing blockouts
Evaluation of Barriers for Very High Speed Roadways
 TTI: 0-6071 Evaluation of Barriers for Very High Speed Roadways ISO 17025 Laboratory Testing Certificate # 2821.01 Crash testing performed at: TTI Proving Ground 3100 SH 47, Building 7091 Bryan, TX 77807
Assessing Options for Improving Roadside Barrier Crashworthiness
 13 th International LS-DYNA Users Conference Session: Simulation Assessing Options for Improving Roadside Barrier Crashworthiness D. Marzougui, C.D. Kan, and K.S. Opiela Center for Collision Safety and
Evaluation of Major Street Speeds for Minnesota Intersection Collision Warning Systems
 Evaluation of Major Street Speeds for Minnesota Intersection Collision Warning Systems Shauna Hallmark, Principal Investigator Center for Transportation Research and Education Iowa State University June
Heating Comparison of Radial and Bias-Ply Tires on a B-727 Aircraft
 'S Heating Comparison of Radial and Bias-Ply Tires on a B-727 Aircraft November 1997 DOT/FAA/AR-TN97/50 This document is available to the U.S. public through the National Technical Information Service
REPORT NUMBER: 301-CAL SAFETY COMPLIANCE TESTING FOR FMVSS 301 FUEL SYSTEM INTEGRITY REAR IMPACT MAZDA MOTOR CORPORATION 2008 MAZDA CX-9 SUV
 REPORT NUMBER: 301-CAL-08-03 SAFETY COMPLIANCE TESTING FOR FMVSS 301 FUEL SYSTEM INTEGRITY REAR IMPACT MAZDA MOTOR CORPORATION 2008 MAZDA CX-9 SUV NHTSA NUMBER: C85401 CALSPAN TRANSPORTATION SCIENCES CENTER
REPORT NUMBER: 301-MGA SAFETY COMPLIANCE TESTING FOR FMVSS 301R FUEL SYSTEM INTEGRITY REAR IMPACT
 REPORT NUMBER: 301-MGA-2007-002 SAFETY COMPLIANCE TESTING FOR FMVSS 301R FUEL SYSTEM INTEGRITY REAR IMPACT NISSAN MOTOR CO., LTD. 2006 NISSAN PATHFINDER LE 4X2 NHTSA NUMBER: C65200 PREPARED BY: MGA RESEARCH