91/2 Bulb End Fuel. Low Pressure. Fitting. Low Pressure 12Molded Hose. High Pressure 11Feed Line. Injection Line
|
|
|
- Cathleen Hamilton
- 5 years ago
- Views:
Transcription
1

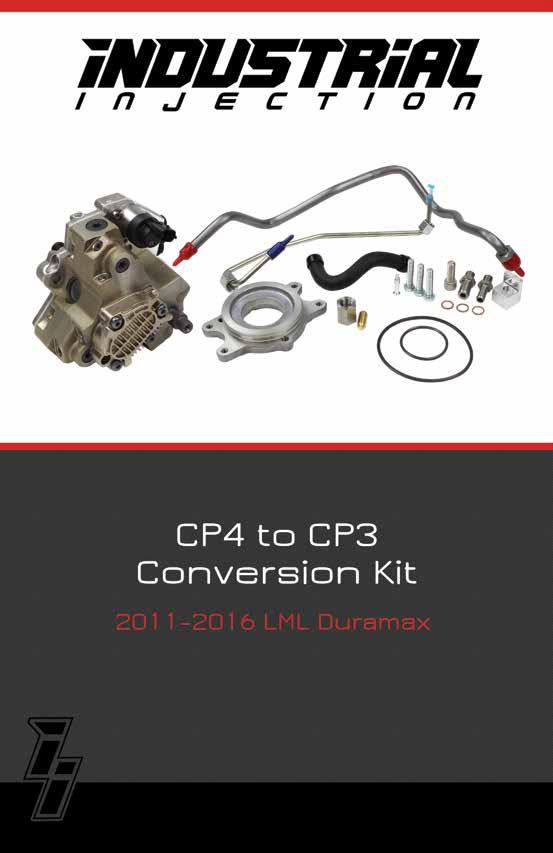
2 Parts list 1CP3 & O-Rings 2CP3 Mounting Plate 3Mounting Plate Hardware 43 Brass Sealing Washers 5Fuel Temp Sensor Bracket 6Fuel Temp Sensor Bracket Hardware 7Fuel Rail Cap & plug 83/8 Bulb End Fuel Fitting
3 91/2 Bulb End Fuel Fitting Low Pressure 10Feed Line High Pressure 11Feed Line Low Pressure 12Molded Hose Injection Line 13Plug
4 NO WARRANTY STATEMENT High performance parts & products no warranty policy: The purchaser understands and recognizes that high performance diesel products and services sold by INDUSTRIAL INJECTION SERVICE. INC. are exposed to many and varied conditions due to the manner in which they are installed and used. INDUSTRIAL INJECTION SERVICE. INC., makes no warranties either expressed or implied including any warranty of merchantability or fitness for a particular purpose. No salesman, officer, agent or representative of INDUSTRIAL INJECTION SERVICE. INC., is authorized to waive or modify this warranty disclaimer and limitation of damages. Further, no representation, promise, description of goods or affirmation of fact made by any salesman, officer, agent or representative of INDUSTRIAL INJECTION SERVICE. INC., shall be effective to any extent whatsoever to waive or modify this warranty disclaimer and limitation of damages. All cores due 30 days after invoice date - no credit after 60 days. Purchasers of our product(s) agree to accept full responsibility for any loss of factory warranty and or loss of product life cycle attributable to the installation and use of said product(s). ALL HIGH PERFORMANCE PARTS & PRODUCTS ARE MADE FOR COMPETITION AND RACE USE ONLY. If you have any questions call us at CP4 to CP3 Conversion LML Duramax


5 STEP 1 Disconnect the negative battery cables from both the passenger side and the drivers side batteries. STEP 2 Remove the factory intake assembly and resonator. Note: In order to remove the factory intake, you will need to disconnect the upper coolant hose on the coolant bottle. and disconnect the air intake sensors. STEP 3 Disconnect all sensors from factory intake horn, and remove factory intake horn from vehicle


6 STEP 4 Remove the plastic elbow that connects to the turbo, then continue to remove the EGR system from the vehicle if still equipped. STEP 5 Remove the factory Y bridge from the valley of the engine. STEP 6 To gain access to the front of the engine, we recommend removing the fan shroud and fan. Start by disconnecting the upper radiator hose and moving it out of the way. Remove the upper fan shroud and unbolt the fan hub. Remove the serpentine belt, unbolt the AC compressor and move it out of the way. Once that is out of the way you can continue to remove the fan shroud and fan hub from the vehicle. Note: you will need to remove the TCM from the shroud and set it out of the way before you remove the shroud from the vehicle. Continued on next page» 6 CP4 to CP3 Conversion LML Duramax


7 » Step 6 Continued STEP 7 Remove the belt tensioner and the alternator in order to gain access to the front mounting belts of the CP


8 STEP 8 Remove both of the high pressure fuel lines that route from the top of the CP4 to the passenger side fuel rail. STEP 9 Remove the low pressure fuel line in the valley of the engine to the fuel filter housing. Disconnect the pressure fitting in the valley and loosen clamp at fuel filter housing to remove. Note: a new fuel line is supplied for increased pump clearance. STEP 10 Disconnect and remove the low pressure fuel supply hose and the low pressure fuel return hose from the CP4. Disconnect and discard the hard line that goes from the CP4 to the 9th injector. Be sure to remove the small rubber gasket on the 9th injector line and install it on the supplied block off. Insert the supplied block off into the 9th injector fuel supply. Remove low pressure hoses. Remove rubber gasket and re-use. Continued on next page» 8 CP4 to CP3 Conversion LML Duramax


9 » Step 10 Continued Remove and discard 9th injector hard line. STEP 11 In order to gain access to the CP4 mounting bolts you will want to remove the fan pulley and mount. Then twist the water pump outlet pipe to gain access to the CP4 mounting bolts. STEP 12 Remove the four CP4 mounting bolts on the front of the engine, then remove the CP4 from the valley of the engine. Note: you may need to gently pry on the CP4 to help with removal. Note: make sure all electrical connections are disconnected from the CP


10 STEP 13 Remove the green temperature sensor on the bottom of the CP4. Install the sensor into the supplied mounting block and mount it to the empty hole on the drivers side of the AC compressor mounting location. Re-insert the connection. STEP 14 Using the supplied plug and cap, install it onto the rail on the third port and tighten. 10 CP4 to CP3 Conversion LML Duramax


11 STEP 15 With the CP4 removed from the truck, you can now proceed to remove the gear from the CP4 to reuse on the CP3. Note: you may need to use a gear puller in order to remove the gear. STEP 16 Locate your new CP3 and hardware to prepare for installation. You will first remove the factory return and feed fittings. Replace them with the new supplied return and feed fittings using the supplied copper sealing washers. 3/8 Return 1/2 Feed


12 STEP 17 Install supplied CP3 shaft o-ring seal and apply grease. Install supplied CP3 mounting bracket using supplied hardware and lock washers. Then install outer o-ring and apply grease. Outer o-ring applied with grease. STEP 18 Install the CP4 gear onto the CP3 using the factory CP4 nut. Note: when fully tightened, the nut will not be totally threaded onto the CP3 shaft. 12 CP4 to CP3 Conversion LML Duramax


13 STEP 19 You can now install the new CP3 into the valley of the engine. Utilize the four factory CP4 mounting bolts to install. STEP 20 Install the supplied 1/2 fuel feed hose from the filter housing to the CP3. STEP 21 Re-using the factory 3/8 hose, install fuel return hose to the CP


14 STEP 22 You can now install the supplied low pressure fuel feed hard line in the valley of the engine to the filter housing. STEP 23 You can now install the supplied high pressure fuel line from the CP3 to the passenger side fuel rail. 14 CP4 to CP3 Conversion LML Duramax
15 STEP 24 You can now re-assemble the remaining parts of the truck that were removed. Before starting your truck be sure to check all fluid levels and top them off if needed. Note: before attempting to start your truck, after changing the fuel filter, you will want to bleed the low pressure fuel system. Note: while truck is running, make sure to check all fuel fittings for leaks. Note: for this kit to work properly you must use EFI Live or EZ Lynk tuning
16
All cores due 30 days after invoice date - no credit after 60 days.
 NO WARRANTY STATEMENT High performance parts & products no warranty policy: The purchaser understands and recognizes that high performance diesel products and services sold by INDUSTRIAL INJECTION SERVICE.
All cores due 30 days after invoice date - no credit after 60 days.
 NO WARRANTY STATEMENT High performance parts & products no warranty policy: The purchaser understands and recognizes that high performance diesel products and services sold by INDUSTRIAL INJECTION SERVICE.
2Charge Air Elbow, 1Install hose & Parts list. hardware kit. Clamp & O-ring. Downpipe clamp. Downpipe w/ Wrap 3 & Wrap Clamp.
 Parts list 1Install hose & hardware kit 2Charge Air Elbow, Clamp & O-ring Downpipe w/ Wrap 3 & Wrap Clamp Downpipe clamp 4 4 Straight Boot 5 Exhaust manifold w/ 6 gaskets 5.9L Only 6.7L Only 4 Intake Pipe
All cores due 30 days after invoice date - no credit after 60 days.
 NO WARRANTY STATEMENT High performance parts & products no warranty policy: The purchaser understands and recognizes that high performance diesel products and services sold by INDUSTRIAL INJECTION SERVICE.
2017+ L5P Duramax 3 ½ Down Pipe & EGR Fix Kit
 2017+ L5P Duramax 3 ½ Down Pipe & EGR Fix Kit Covers installation of PN s: WCF100630, WCF100829 Note: This Kit is for off road competition use only! Off Road Competition Use Tuning & Exhaust System is
Ford 6.0L. Part #: Part #: BD GASKET PART# will be needed for this installation.
 1 BD EGR COOLER 2003-2007 Ford 6.0L Part #: 1090201 Part #: 1090202 PLEASE READ ALL INSTRUCTIONS BEFORE INSTALLATION BD GASKET PART# 1090002 will be needed for this installation. 2 K I T C O N T E N T
Installation Manual v1.0: Twin CP3 Fuel Injection Kit Dodge 5.9L
 Installation Manual v1.0: Twin CP3 Fuel Injection Kit 2004.5-2007 Dodge 5.9L Figure 1 - Full Kit Photo 25 Figure 2 - Hardware Kit Please read all instructions before installation. This kit is not emissions
DURAMAX LMM EGR DELETE
 007.5-010 DURAMAX LMM EGR DELETE Duramax LMM EGR Delete B K I J F D G H A C PACKING LIST: E Part # A B C D E F G H I J K QTY. 1 1 1 1 Description Billet Intake Block Off Plate with O-ring Exhaust Block
Installation Instructions
 2011-2013 LML DURAMAX COMPOUND-ADD 2011-2015 LML A Duramax TURBO KIT Add INSTALL A Turbo INSTRUCTIONS Compound Kit Installation Instructions 1-800-955-0476 - www.industrialinjection.com - info@industrialinjection.com
DURAMAX LML EGR DELETE
 2011-2012 DURAMAX LML EGR DELETE Sinister Diesel EGR Delete Kit A B C D E F G H PACKING LIST: QTY. A B C D E F G H QTY. 1 4 1 1 1 3 1 4 Description Blue Coolant Hose M8 x 25 Hex Head Bolts Exhaust Block
Includes: 1. High Flow Turbo Up-Pipe 1. J-Hook Block Off / Coolant Reroute 1. Coolant Hose 1. EGR Valve Block Off Plate 2. Hose Clamps 4.
 Includes: 1. High Flow Turbo Up-Pipe 1. J-Hook Block Off / Coolant Reroute 1. Coolant Hose 1. EGR Valve Block Off Plate 2. Hose Clamps 4. Bolts & Nuts WARNING: This product is not legal for sale or use
Includes: 1. Silicone Hose 2. EGR Block Off Plates 1. Exhaust Block Off Plate 2. Hose Clamps 1. Spacer/Washer 8. Bolts 2. Nuts
 Includes: 1. Silicone Hose 2. EGR Block Off Plates 1. Exhaust Block Off Plate 2. Hose Clamps 1. Spacer/Washer 8. Bolts 2. Nuts WARNING: This product is not legal for sale or use on pollution controlled
Included: 2. Intake Block Off Plates 1. Exhaust Block Off Plate 1. Coolant Hose - Reroutes the EGR Cooler Coolant 12. Pieces of mounting hardware -
 Included: 2. Intake Block Off Plates 1. Exhaust Block Off Plate 1. Coolant Hose - Reroutes the EGR Cooler Coolant 12. Pieces of mounting hardware - Nuts, Bolts, & Washers 2. Hose Clamps 1. Support Bracket
L DURAMAX LBZ EGR DELETE GDP TUNING
 2006-2007.5 6.6L DURAMAX LBZ EGR DELETE GDP TUNING ! WARNING REGARDING EMISSIONS LAWS Not legal for sale or use on pollution-controlled motor vehicles anywhere in the be used on vehicles that are operated
Phone Fax
 Directions for Installation of ECS Paxton Supercharger Kit Disconnect battery Remove stock serpentine belt Remove stock belt tensioner, save the 2 bolts for later use on supercharger bracket Remove alternator
Installation Manual v2.2: Twin CP3 Fuel Injection Kit Dodge 5.9L
 12/13/11 ATS Twin CP3 Kit 701-900-2272-INST Installation Manual v2.2: Twin CP3 Fuel Injection Kit 2003-2004 Dodge 5.9L Figure 1 - Full Kit Photo 26 Figure 2 - Hardware Kit 1 Please read all instructions
Cut zip ties and remove 2 plastic wiring harness brackets.
 TROUBLESHOOTING: Please read and understand all installation instructions before proceeding with the installation. Included parts: 1 - New Bosch Cp3 Pump 1 - HSM Pulley 1 - Serpentine Belt 1 - Pump Bracket/
Included parts: 1 - New Bosch CP3 Pump 1 - HSM Pulley 1 - Serpentine Belt 1 - Pump Bracket/ Hardware STEP 1
 TROUBLESHOOTING: Please read and understand all installation instructions before proceeding with the installation. If you have questions during the installation of this product, please contact H&S Motorsports
Includes: 1. J-hook Block Off / Coolant Reroute 1. Coolant Hose 1. Turbocharger Up Pipe Block Off Disc 2. Hose clamps
 Includes: 1. J-hook Block Off / Coolant Reroute 1. Coolant Hose 1. Turbocharger Up Pipe Block Off Disc 2. Hose clamps WARNING: This product is not legal for sale or use on pollution controlled vehicles
DURAMAX LBZ EGR DELETE
 006-007.5 DURAMAX LBZ EGR DELETE ! WARNING REGARDING EMISSIONS LAWS Not legal for sale or use on pollution-controlled motor vehicles anywhere in the United States. Legal ONLY for off-road competition racing
LML 3 Y-Bridge Kit or High Flow Intake Bundle Package
 2011-2016 LML 3 Y-Bridge Kit or High Flow Intake Bundle Package Covers installation of PN s: WCF100607, WCF100691, WCF100716, & WCF100353 Note: This Kit is for off road competition use only! Overview-
4. Remove (4) 10mm and (1) 7mm bolt that holds fascia at front corners, on each side
 10mm and (1) 7mm bolt that holds fascia at front corners, on each side") 2010 Camaro LS3 1. Disconnect battery ground 2. Remove front wheels 3. Remove (5) push pins and (5) #20 torx screws on inner front wheel well liners and remove liners on each side 4. Remove (4) 10mm and
2010 Camaro LS3 1. Disconnect battery ground 2. Remove front wheels 3. Remove (5) push pins and (5) #20 torx screws on inner front wheel well liners and remove liners on each side 4. Remove (4) 10mm and
* PLEASE READ INSTRUCTIONS PRIOR TO INSTALLATION *
 XDP Duramax LBZ EGR Race Track Kit Item Number: XD165 PACKING LIST: 1 LBZ EGR Plate for Up Pipe 5 M8x1.25-20mm Bolt 2 M10x1.5 Flange Hex Nut 1 LBZ EGR Plate for Intake 1 M8x1.25-45mm Bolt 1 M8x1.25 Flange
INSTALLATION INSTRUCTIONS AIR/OIL SEPARATOR KIT
 INSTALLATION INSTRUCTIONS AIR/OIL SEPARATOR KIT 2015+ SUBARU WRX (LHD ONLY) Document: 19-0136 Support: info@radiumauto.com This document covers the installation of the Radium brake master cylinder brace
Included parts: 1 - New Bosch CP3 Pump 1 - HSM Pulley 1 - Serpentine Belt 1 - Pump Brackets/Hardware
 TROUBLESHOOTING: Please read and understand all installation instructions before proceeding with the installation. If you have questions during the installation of this product, please email H&S Motorsports
Includes: 1. Upgraded Tube Type EGR Cooler 2. Silicone Hoses
 Includes: 1. Upgraded Tube Type EGR Cooler 2. Silicone Hoses CAUTION: Never work on a hot vehicle. The hot exhaust system or hot engine can cause serious injury in the form of burns. If the vehicle has
Installation Manual v1.0: Twin CP3 Fuel Injection Kit Dodge 6.7L
 04/05/2012 Dodge 2010-2011 6.7L Twin CP3 701-900-2356-INST Installation Manual v1.0: Twin CP3 Fuel Injection Kit 2010-2011 Dodge 6.7L Figure 1 - Full Kit Photo 29 Figure 2 - Hardware Kit (800) 949-60002
Ford 6.0L Powerstoke Regulated Fuel Return
 Ford 6.0L Powerstoke Regulated Fuel Return ! WARNING REGARDING EMISSIONS LAWS Not legal for sale or use on pollution-controlled motor vehicles anywhere in the United States. Legal ONLY for off-road competition
XDP Complete EGR Race Track Kit w/up-pipe. Item Number: XD144
 XDP Complete EGR Race Track Kit w/up-pipe Item Number: XD144 PACKING LIST: 2 - Lined 3/4" SS Hose Clamp 1-3/4 Silicone Hose 1 - XDP Engraved EGR Valve Block-Off Plate with O-ring 1 - EGR Cooler Block-Off
Included parts: 1 - BorgWarner SX-E Turbocharger 1 - SX-E 90-Degree Compressor Outlet Elbow 1 - HSM Cast Exhaust Manifold 1 - HSM Downpipe
 TROUBLESHOOTING: Please read and understand all installation instructions before proceeding with the installation. If you have questions during the installation of this product, please email H&S Motorsports
2014 Dodge Challenger R/T. The water pump (1) is mounted directly to the timing chain cover and is equipped with a non serviceable integral pulley.
 is mounted directly to the timing chain cover and is equipped with a non serviceable integral pulley.") Fig. 73: Water Pump A centrifugal water pump (2) circulates coolant through the water jackets, passages, intake manifold, radiator core, cooling system hoses and heater core. The pump is driven from the
Fig. 73: Water Pump A centrifugal water pump (2) circulates coolant through the water jackets, passages, intake manifold, radiator core, cooling system hoses and heater core. The pump is driven from the
Duramax LMM EGR Delete With Intake Tube
 Duramax LMM EGR Delete With Intake Tube PACKING LIST: QTY. 4 2 2 2 Description Intake Charge Pipe w/ O-Ring M8 Flange Nut M8x25 Flange Hex Bolt M0x20 Hex Head Bolts M8x25 Socket Head Bolts M8x20 Hex Head
Timing Belt. Removal ENGINE MECHANICAL (6VD1 3.2L) 6A-27
 6A-27") Removal 1. Disconnect battery ground cable. 2. Remove air cleaner assembly. 3. Remove radiator upper fan shroud from radiator. 4. Move drive belt tensioner to loose side using wrench then remove drive
Removal 1. Disconnect battery ground cable. 2. Remove air cleaner assembly. 3. Remove radiator upper fan shroud from radiator. 4. Move drive belt tensioner to loose side using wrench then remove drive
* PLEASE READ INSTRUCTIONS PRIOR TO INSTALLATION
 XDP 6.0L Complete EGR Delete Kit w/up-pipe Item Number: XD169 PACKING LIST: 2 - Lined 3/4" Hose Clamps, 1-180 Coolant Tube, 1-3/4 Silicone Hose, 1 - Stainless Steel Up-pipe 1 - EGR Valve Block-Off Plate,
Disconnect the APP sensor harness connector. See Fig. 4. Remove the accelerator pedal mounting nuts. Remove the APP assembly.
 ENGINE CONTROLS - REMOVAL, OVERHAUL & INSTALLATION - 6.6L DIESEL... Page 1 of 41 FUEL SYSTEMS ACCELERATOR PEDAL POSITION SENSOR Removal & Installation Disconnect the APP sensor harness connector. See Fig.
DOWNLOAD ENHANCED INSTALL MANUALS
 U 3 October 2016 1041564 6.7L Performance Intake Plate Manual (I-00371) 1 DOWNLOAD ENHANCED INSTALL MANUALS Cummins 6.7L High Flow Intake Plenum Cover 1041564 2008-2016 6.7L RAM 2500-3500 Pickup PLEASE
Included parts: 1 - BorgWarner SX-E Turbocharger 1 - SX-E 90-Degree Compressor Outlet Elbow 1 - HSM Cast Exhaust Manifold 1 - HSM Downpipe
 TROUBLESHOOTING: Please read and understand all installation instructions before proceeding with the installation. If you have questions during the installation of this product, please email H&S Motorsports
Cut zip ties and remove 2 plastic wiring harness brackets.
 TROUBLESHOOTING: Please read and understand all installation instructions before proceeding with the installation. If you have questions during the installation of this product, please email H&S Motorsports
Twin Turbo Installation Instructions
 Twin Turbo Installation Instructions Pacific Performance Engineering 303 N Placentia Ave. Fullerton, CA 92831 www.ppediesel.com Legal in California only for racing vehicles which may never be used on the
FMK265SD F L DIESEL WITH DUAL ALTERNATORS
 WITH DUAL ALTERNATORS This kit will NOT work on trucks equipped with adaptive steering. INSTALLATION NOTES 1. Disconnect negative batteries cables. Remove the air duct from the passenger side and the black
This kit may void factory warranty please check with manufacturer.
 Thank you for purchasing a Sinister Manufacturing Company EGR delete kit. Precision manufactured using aircraft quality 304 stainless steel and billet aluminum; this EGR kit is designed to endure years
1999 E-Series Workshop Manual
 http://www.fordservicecontent.com/pubs/content/~wsxm/~mus~len/21/sxm31c16.h... Page 1 of 3 SECTION 303-01C: Engine 6.8L 1999 E-Series Workshop Manual IN-VEHICLE REPAIR Procedure revision date: 06/30/1998
REMOVAL & INSTALLATION
 REMOVAL & INSTALLATION TIMING BELT Removal (Esteem) 1. Disconnect negative battery cable. Remove right side engine under cover. Remove power steering and A/C compressor drive belts. 2. Remove A/C compressor
BD Venom Dual Fuel F O R D 6. 7 L P O W E R S T R O K E Installation Instructions
 U 21 March 2017 (1050470) Venom Dual Fuel Kit (I-00390) 1 DOWNLOAD ENHANCED INSTALL MANUALS AT dieselperformance.com BD Venom Dual Fuel 2 0 1 1-2 0 1 6 F O R D 6. 7 L P O W E R S T R O K E Installation
Page 6 of 6 OUTLAW DIESEL EGR COOLER DELETE KIT W/INTAKE ELBOW L FORD POWERSTROKE
 What s in the box 1 Exhaust Block-Off Plate 1 Exhaust Gasket 2 Coolant Line Plugs 1 Brass Barbed Hose Connector 1 Stand-off Spacer 4 M10-1.25 x 40 Hex Head Bolts (Exhaust Manifold) 2 M10-1.25 x 20 Hex
Installation Manual v1.4: ATS Twin CP3 Kit 2001 GM LB7 Duramax. Please read all instructions before installing the ATS Twin CP3 Kit
 Installation Manual v1.4: ATS Twin CP3 Kit 2001 GM LB7 Duramax Please read all instructions before installing the ATS Twin CP3 Kit Thank you for purchasing the ATS Twin CP3 Kit. The picture below shows
BD Venom Dual Fuel F O R D 6. 7 L P O W E R S T R O K E Installation Instructions
 U 30 January 2017 (1050470) Venom Dual Fuel Kit (I-00390) 1 DOWNLOAD ENHANCED INSTALL MANUALS AT dieselperformance.com BD Venom Dual Fuel 2 0 1 1-2 0 1 4 F O R D 6. 7 L P O W E R S T R O K E Installation
2002 Explorer Sport/Sport Trac Workshop Manual
 Page 1 of 17 SECTION 303-01: Engine 4.0L Single Overhead Camshaft (SOHC) IN-VEHICLE REPAIR Procedure revision date: 07/13/2005 Cylinder Head Special Tool(s) Spark Plug Wire Remover 303-106 (T74P-6666-A)
Dual Fueler Kit Dodge Cummins 6.7L kit w/no pump ( ) package w/pump ( ) Installation Guide
 package w/pump ( ) Installation Guide") Pacific Performance Engineering, Inc. www.ppediesel.com Dual Fueler Kit Dodge Cummins 6.7L 2007.5-2010 kit w/no pump (2130030) 2007.5-2010 package w/pump (2130031) Installation Guide Technical Support
Pacific Performance Engineering, Inc. www.ppediesel.com Dual Fueler Kit Dodge Cummins 6.7L 2007.5-2010 kit w/no pump (2130030) 2007.5-2010 package w/pump (2130031) Installation Guide Technical Support
Timing Belt. Removal 6A 27 ENGINE MECHANICAL (6VD1 3.2L)
") Removal 1.Disconnect battery ground cable. 2.Remove air cleaner assembly. 3.Remove radiator upper fan shroud from radiator. 4.Move drive belt tensioner to loose side using wrench then remove drive belt.
Removal 1.Disconnect battery ground cable. 2.Remove air cleaner assembly. 3.Remove radiator upper fan shroud from radiator. 4.Move drive belt tensioner to loose side using wrench then remove drive belt.
CP3 Retrofit Pump Install:
 CP3 Retrofit Pump Install: 2A 4 2 5 3 6 1.) Clean this area very well. No dirt = No troubles!!!!! Lay lots of Rags under and around the pumps, alternator and belts!!!!! This will save dropped tools, parts,
INSTALLATION INSTRUCTIONS
 Equipped with AEM Dryflow Filter No Oil Required! INSTALLATION INSTRUCTIONS PART NUMBER: 21-8203 2003-2005 DODGE RAM 1500 Pickup V8-5.7L C.A.R.B. E.O. # D-670 2003-2005 DODGE RAM 2500 Pickup V8-5.7L C.A.R.B.
IAG Competition Series Air / Oil Separator (AOS) For WRX
 For WRX") P IAG Competition Series Air / Oil Separator (AOS) For 2015-16 WRX Part# IAG-ENG-7252 Tools Required: Ratchet, torque wrench, extensions, needle nose pliers, hose cutter, snips/scissors, flat head screw
P IAG Competition Series Air / Oil Separator (AOS) For 2015-16 WRX Part# IAG-ENG-7252 Tools Required: Ratchet, torque wrench, extensions, needle nose pliers, hose cutter, snips/scissors, flat head screw
Installation Manual v1.1: ATS Twin CP3 Kit GM LB7 Duramax. Please read all instructions before installing the ATS Twin CP3 Kit
 Installation Manual v1.1: ATS Twin CP3 Kit 2002-2004 GM LB7 Duramax Please read all instructions before installing the ATS Twin CP3 Kit This kit is not emissions legal in California. Kit is legal only
6.4L EGR Delete With Intake Elbow
 6.4L EGR Delete With Intake Elbow J I E C B F D G H A Part# A B C D E F G H I J PACKING LIST: QTY. 2 4 2 4 2 Description Exhaust Block-Off Plate Exhaust Gasket Coolant Line Plugs Brass Barbed Hose Connector
IAG Street Series Air / Oil Separator (AOS) For WRX
 For WRX") P IAG Street Series Air / Oil Separator (AOS) For 2015-16 WRX Part# IAG-ENG-7152 Tools Required: Ratchet, torque wrench, extensions, needle nose pliers, hose cutter, snips/scissors, flat head screw driver,
P IAG Street Series Air / Oil Separator (AOS) For 2015-16 WRX Part# IAG-ENG-7152 Tools Required: Ratchet, torque wrench, extensions, needle nose pliers, hose cutter, snips/scissors, flat head screw driver,
Muncie Power Products
 Muncie Power Products CMKF08-6400-P8-AC 2008-2010 Ford F-250-550 6.4L Diesel W-WO/AC, WO/Dual Alt. WO/Vacuum Pump INSTALLATION NOTES 1. Using a 8mm socket or wrench, disconnect the negative battery cables
CUSTOM-DIESEL.COM ATTENTION VERY IMPORTANT - PLEASE READ
 ATTENTION VERY IMPORTANT - PLEASE READ IF YOU PURCHASED THIS ITEM FROM EBAY, WE WANT YOU TO KNOW THAT EBAY HAS ALWAYS GIVEN YOU, THE BUYER, THE STRENGTH TO VOICE YOUR OPINION OF EBAY SELLERS BY LEAVING
 Page 1 of 6 Section 03-01B: Engine, 7.5L MFI Workshop Manual IN-VEHICLE SERVICE Procedure revision date: 05/17/2000 Engine Front Cover SPECIAL SERVICE TOOL(S) REQUIRED Description Crankshaft Damper Remover
IAG Street Series Air / Oil Separator (AOS) For 2017 WRX
 For 2017 WRX") P IAG Street Series Air / Oil Separator (AOS) For 2017 WRX Part# IAG-ENG-7152 Tools Required: Ratchet, torque wrench, extensions, needle nose pliers, hose cutter, snips/scissors, flathead screwdriver,
P IAG Street Series Air / Oil Separator (AOS) For 2017 WRX Part# IAG-ENG-7152 Tools Required: Ratchet, torque wrench, extensions, needle nose pliers, hose cutter, snips/scissors, flathead screwdriver,
2000 Nissan Altima SE
 Removal 1. Release fuel pressure. See FUEL PRESSURE RELEASE. Drain coolant from radiator and cylinder block. Drain engine oil. Disconnect all necessary coolant hoses, electrical connectors, vacuum hoses,
Fig. 1: Remove the bolts which fasten the upper timing belt cover... Fig. 2:... and remove the cover
 Show Timing Belt and Covers REMOVAL & INSTALLATION 1983 87 626 NOTE: For access, safely support the car, then remove the right front wheel and splash shield. 1. Loosen the alternator mounting bolts and
DODGE CUMMINS DUAL PUMP & DELUXE DUAL PUMP KIT
 SUBJECT: DODGE CUMMINS DUAL PUMP & DELUXE DUAL PUMP KIT Page 1 of 10 FITMENT: 2003 2007 Dodge Cummins with 5.9L KIT P/N: FPE-DPK-59-NP-[BK,BL,OG,RD], FPE-DPK-59-NP-DX [BK,BL,OG,RD], FPE-DPK-59-3K-[BK,BL,OG,RD],
Vehicle Level Engine, Cooling and Exhaust Cooling System Water Pump Service and Repair Removal. Removal
 1 of 7 4/5/2008 11:18 PM Home Account Contact ALLDATA Log Out Help Select Vehicle New TSBs Technician's Reference Component Search: METRO TOYOTA OK 1994 Jeep Truck Wrangler L6-242 4.0L VIN S MFI Conversion
INSTALL MANUAL D o d g e 1 2 v 6 B T A PLEASE READ ALL INSTRUCTIONS BEFORE INSTALLATION.
 PN#1045310 12V Dodge Twin Turbo Kit (I-00273) 1 INSTALL MANUAL BD Twin Turbo Kit 1994-1 9 9 8 D o d g e 1 2 v 6 B T A Part# 1045310 PLEASE READ ALL INSTRUCTIONS BEFORE INSTALLATION. * Picture as shown
2/18/2017 Cylinder Head Assembly Service and Repair, Removal and Replacement: Cylinder Head
 Cylinder Head http://repair.alldata.com/alldata/article/display.action?componentid=65&itypeid=401&nonstandardid=2762152&vehicleid=47645&miles=&printfriendl 1/17 RH Splash Shield Accessory Drive Belt, Thermostat
REMOVAL & INSTALLATION
 REMOVAL & INSTALLATION NOTE: For reassembly reference, label all electrical connectors, vacuum hoses and fuel lines before removal. Also place mating marks on engine hood and other major assemblies before
Industrial Injections Compound Turbo Installation For 6.7L Scorpion
 Industrial Injections Compound Turbo Installation For 6.7L Scorpion Step 1: Whenever you are doing an installation the first thing you should do is unhook the batteries to avoid arcing. You will need an
STEP 1 Disconnect the negative terminal from both batteries.
 TROUBLESHOOTING: Please read and understand all installation instructions before proceeding with the installation. If you have questions during the installation of this product, please email H&S Motorsports
SLP Camaro ZL1 STAGE 3 (650 HP)
") SLP - 2012 Camaro ZL1 STAGE 3 (650 HP) PART #26002 PACKING LIST Before installation, use this check list to make sure all necessary parts have been included. ITEM QTY CHECK PART NUMBER DESCRIPTION 1. 1
SLP - 2012 Camaro ZL1 STAGE 3 (650 HP) PART #26002 PACKING LIST Before installation, use this check list to make sure all necessary parts have been included. ITEM QTY CHECK PART NUMBER DESCRIPTION 1. 1
Forbidden Diesel Performance Ford 6.7L Powerstroke EGR Delete Instructions 6.7L EGR DELETE BY FORBIDDEN DIESEL PERFORMANCE. Page 1
 6.7L EGR DELETE BY FORBIDDEN DIESEL PERFORMANCE Page 1 WARNING REGARDING EMISSIONS LAWS Not legal for sale or use on pollution-controlled motor vehicles anywhere in the United States. Legal ONLY for off-road
BD TrackMaster S D o d g e H P C R Installation Instructions
 7 July 2016 PN#1045701, 1045702, 1045704 Dodge 6.7L TMS400 (I-00361) 1 BD TrackMaster S400 2008-2012 D o d g e H P C R Installation Instructions 1045701 2008-2009 Dodge 6.7L TMS400 1045702 2010-2012 Dodge
INSTALLATION INSTRUCTIONS
 Equipped with AEM Dryflow Filter No Oil Required! INSTALLATION INSTRUCTIONS PART NUMBER:22-489 2004 MAZDA Miata Mazdaspeed L4-1.8L C.A.R.B. E.O. # D-670 PARTS LIST Description Qty. Part Number Element
2014 RAM C/V Tradesman
 Fig. 91: Suction Hose Ball Valve NOTE: View typical 14. Open the suction hose's ball valve to begin refilling the cooling system. 15. When the vacuum gauge reads zero, the system is filled. NOTE: On some
BD SUPER B SPECIAL Dodge 5.9L Cummins 24v ISB
 1 This turbo is intended for high performance applications and is not to be used for towing applications BD SUPER B SPECIAL 1994-2002 Dodge 5.9L Cummins 24v ISB Part# 1045120 PLEASE READ ALL INSTRUCTIONS
Cummins 6.7L High Flow Intake Plenum Cover PLEASE READ ALL INSTRUCTIONS BEFORE INSTALLATION
 U 4 February 2016 1041564 6.7L Performance Intake Plate Manual (I-00371) 1 Cummins 6.7L High Flow Intake Plenum Cover 1041564 2008-2016 6.7L RAM 2500-3500 Pickup PLEASE READ ALL INSTRUCTIONS BEFORE INSTALLATION
05-08 GT. Hellion Power Systems Mustang Kit Instructions
 Hellion Power Systems 05-08 Mustang Kit Instructions 1. Disconnect Battery 2. Drain Radiator, keep fluid for re-installation. 3. Remove air box and inlethoses. 6. Next, underneath, punch oil pan for turbo
NOTE: Do not disassemble upper intake manifold from lower intake manifold unless replacement of one of the components is necessary.
 Fig. 2: Lower Intake Manifold Bolt Tightening Sequence INTAKE MANIFOLD (UPPER) NOTE: Do not disassemble upper intake manifold from lower intake manifold unless replacement of one of the components is necessary.
1996 Aerostar/Ranger/Explorer
 Page 1 of 11 Section 03-01B: Engine, 3.0L V-6 IN-VEHICLE SERVICE 1996 Aerostar and Ranger Vehicles Workshop Manual Water Pump SPECIAL SERVICE TOOL(S) REQUIRED Description Tool Number Fan Clutch Holding
CHALLENGER TWIN TURBO SYSTEM INSTALLATION INSTRUCTIONS
 CHALLENGER TWIN TURBO SYSTEM INSTALLATION INSTRUCTIONS 1 Verify contents of kits with supplied packing list 1) Unhook the battery. 2) Remove wheel wells & front fascia of vehicle. 3) Remove the catalytic
Installation Manual v1.2: LLY / LBZ/LMM Twin CP3 Kit GM Duramax. Please read all instructions before installation.
 03/24/09 701-900-4290 - INST Installation Manual v1.2: LLY / LBZ/LMM Twin CP3 Kit 04.5-07.5 GM Duramax Please read all instructions before installation. This kit is not emissions legal in California. Kit
Scion FR-S ZN6. GTX2867R Gen2 (Internal Wastegate) Installation Instructions GPP P/N #
 Installation Instructions GPP P/N #") TURBO KIT Scion FR-S ZN6 Subaru BRZ ZC6 GTX2867R Gen2 (Internal Wastegate) Installation Instructions GPP P/N # 11518000 Vehicle Type Chassis Code Engine Code Transmission Model Year Scion FR-S DBA-ZN6
TURBO KIT Scion FR-S ZN6 Subaru BRZ ZC6 GTX2867R Gen2 (Internal Wastegate) Installation Instructions GPP P/N # 11518000 Vehicle Type Chassis Code Engine Code Transmission Model Year Scion FR-S DBA-ZN6
Dodge 24v ISBe
 BD SUPER B 2003-2004 Dodge 24v ISBe (Non 600 motors) Part # 1045230 PLEASE READ ALL INSTRUCTIONS BEFORE INSTALLATION This turbo system is not compatible with an AFE intake system WITHOUT MODIFICATIONS.
3 October 2016 PN# V Dodge Twin Turbo Kit (I-00274) ½ D o d g e 2 4 v I S B
 ½ D o d g e 2 4 v I S B") 3 October 2016 PN#1045320 24V Dodge Twin Turbo Kit (I-00274) 1 DOWNLOAD ENHANCED INSTALL MANUALS AT dieselperformance.com BD Twin Turbo Kit 1998½- 2 0 0 2 D o d g e 2 4 v I S B Part# 1045320 PLEASE READ
3 October 2016 PN#1045320 24V Dodge Twin Turbo Kit (I-00274) 1 DOWNLOAD ENHANCED INSTALL MANUALS AT dieselperformance.com BD Twin Turbo Kit 1998½- 2 0 0 2 D o d g e 2 4 v I S B Part# 1045320 PLEASE READ
EGR Cooler Delete Kit
 EGR Cooler Delete Kit 2008-2010 6.4 Liter Ford ATTENTION!!!! The Street Diesel Performance Egr Cooler Delete System kits are designed to be used in conjunction with proper tuning and supporting hardware
This information covers procedures for replacing the sealant for the crankshaft cover on the Volvo D16F engine.
 Volvo Trucks North America Greensboro, NC USA DService Bulletin Trucks Date Group No. Page 1.2008 216 50 1(17) Sealant Crankshaft Cover, Replacement D16F Sealant Crankshaft Cover, Replacement W2005773
Remove four nuts, then the cooling fan assembly.
 The DOHC and SOHC engines both use the same Service and Repair procedure from Isuzu. Make note that the DOHC and SOHC engines both use a single gear for the camshaft but use different alignment marks.
INSTALLATION INSTRUCTIONS PART NUMBER:
 Equipped with AEM Dryflow Filter No Oil Required! INSTALLATION INSTRUCTIONS PART NUMBER: 21-505B (Blue Finish) 21-505C (Gun Metal Grey Finish) 21-505R (Red Finish) 2002-2005 ACURA RSX L4-2.0L Manual Trans.
Please call us at Mon-Fri 8am-5pm if you need any additional assistance.
 TM Upgraded 6.0L EGR Cooler R Thank you for purchasing a Sinister Diesel Upgraded EGR Cooler. This EGR cooler is designed to endure years of heavy use.these installation instructions have been written
BulletProofDiesel.com
 BulletProofDiesel.com Bullet Proof Oil Cooler Kit Neal Technologies, Inc. (Patent pending) Updated 6/29/2011 Installation Manual 2003-2009 E-Series 1 Instruction Manual BulletProofDiesel.com Oil Block
M-TUNED COOLANT RE-ROUTE KIT
 M-TUNED COOLANT RE-ROUTE KIT Part # MC-RR-216, MC-RR-218 Applications: 90-93 Miata 1.6L B6 94-97 Miata 1.8L BP More detailed instructions: http://www.etdracing.com/m-tuned/reroute.pdf 1) Disconnect Negative
INSTALLATION INSTRUCTIONS PART NUMBER:
 Equipped with AEM Dryflow Filter No Oil Required! INSTALLATION INSTRUCTIONS PART NUMBER: 21-8214 2006 DODGE Ram 1500 Pickup V6-3.7L C.A.R.B. E.O. # D-670 * NOTE: Legal in California only for racing vehicles
Mercedes E63/CLS AMG Carbon Turbo Intake System Instructions
 Mercedes E63/CLS AMG Carbon Turbo Intake System Instructions The goal of Alpha Performance is to provide the highest quality, best performing products available. By utilizing research and development,
ZZPerformance.com. Dual Pass Kit install AKA Option A upgrade
 ZZPerformance.com ZZ-DUALPIC rev A Dual Pass Kit install AKA Option A upgrade Tools you will need: Flat head screw driver Trim removal tool (H.E. install only, not required) 10mm socket 6mm socket 5/8
TABLE OF CONTENTS PARTS LIST
 TROUBLESHOOTING: Note: You will have a check engine light and/or other problems unless using this product with a compatible ECM calibration. Contact your tuning supplier to learn whether or not aftermarket
1999 Nissan Altima GLE
 TIMING CHAIN CAUTION: If cylinder head is installed and timing chain is disconnected, DO NOT rotate camshaft or crankshaft; valves will contact pistons, resulting in bent valves. NOTE: Following procedure
PARTIAL ENGINE ASSY (2TR FE)
") COMPONENTS 147 1421Z01 Clip Hood Subassy x9 Radiator Support to Frame Seal LH 30 (306, 22) 30 (306, 22) Fan and Generator V Belt 5.0 (51, 44 in. lbf) Fan Shroud Fan Pulley Fan w/ Fluid Coupling PRE RUNNER
COMPONENTS 147 1421Z01 Clip Hood Subassy x9 Radiator Support to Frame Seal LH 30 (306, 22) 30 (306, 22) Fan and Generator V Belt 5.0 (51, 44 in. lbf) Fan Shroud Fan Pulley Fan w/ Fluid Coupling PRE RUNNER
DISC BRAKE/DUAL MASTER CYLINDER CONVERSION. Tools, Equipment and Supplies Needed:
 Please take the time to read the enclosed instructions carefully. If you have any questions, call our Product Assistance personnel for clarification. It is important to note that these instructions contain
Figure 1 - Kit Contents
 11/11/2009 204-900-4248 - INST Installation Manual v1.2: 204-900-4248: Pulse Flow Exhaust Manifolds 2001-2004 LB7 Duramax 6.6L Note: OFF-ROAD USE ONLY if used on California emissions LB7 or EGR Equipped
4 December 2017 PN# , , Dodge 6.7L Rumble B SXE (I-00400) 1. BD Rumble B SXE. D o d g e 6. 7 L H P C R Installation Instructions
 1. BD Rumble B SXE. D o d g e 6. 7 L H P C R Installation Instructions") 4 December 2017 PN#1045705, 1045706, 1045708 Dodge 6.7L Rumble B SXE (I-00400) 1 DOWNLOAD ENHANCED INSTALL MANUALS AT dieselperformance.com BD Rumble B SXE D o d g e 6. 7 L H P C R Installation Instructions
4 December 2017 PN#1045705, 1045706, 1045708 Dodge 6.7L Rumble B SXE (I-00400) 1 DOWNLOAD ENHANCED INSTALL MANUALS AT dieselperformance.com BD Rumble B SXE D o d g e 6. 7 L H P C R Installation Instructions