Installation Manual v1.0: Twin CP3 Fuel Injection Kit Dodge 6.7L
|
|
|
- Job Wood
- 5 years ago
- Views:
Transcription

1 04/05/2012 Dodge L Twin CP INST Installation Manual v1.0: Twin CP3 Fuel Injection Kit Dodge 6.7L Figure 1 - Full Kit Photo 29 Figure 2 - Hardware Kit (800)


2 Please read all instructions before installation. This kit is not emissions legal in California. Kit is legal only on race vehicles that will not be used on public highways. Note: DO NOT remove any high pressure fittings from the pump. Doing so can result in damage to the internal components. CAUTION: Cleanliness cannot be overemphasized when handling or replacing diesel fuel system components. This especially includes the fuel injectors, high-pressure fuel lines and fuel injection pump. Very tight tolerances are used with these parts. Dirt contamination could cause rapid part wear and possible plugging of fuel injector nozzle tip holes. This in turn could lead to possible engine misfire. Always wash/clean any fuel system component thoroughly before disassembly and then air dry. Cap or cover any open part after disassembly. Before assembly, examine each part for dirt, grease or other contaminants and clean if necessary. When installing new parts, lubricate them with clean engine oil or clean diesel fuel only. 1. Before starting the installation, please check to make sure all of the parts pictured above are inside the Dodge Twin CP3 kit. A complete corresponding list of components can be found on pages 13 and Disconnect the (-) negative battery terminals. 3. Drain the coolant from the radiator and remove the upper radiator hose. 4. Remove the engine oil dipstick and set aside (plug/cap off the dipstick tube so nothing can fall in during installation). 5. Remove the plastic engine cover by removing the 4 bolts shown. Set it aside. Engine Cover Bolts Dipstick Figure 3 - Engine Cover and Dipstick (800)
3 6. Remove the factory serpentine belt and discard it. Note: Once the serpentine belt is loose, it is helpful to loosen the tensioner bolt to remove the belt. 7. Thoroughly clean the area around the intake manifold and the front of the fuel rail. Place shop towels around any fuel fitting that will be removed to absorb any fuel leakage. 8. Remove the engine oil dipstick tube mounting bolts located on the intake manifold. This will allow the dipstick tube to move and provide better access to fuel lines, however, take care not to bend the dipstick tube. 9. Remove the banjo bolt and washers from the return line located at the front of the fuel rail and set them aside. 10. Loosen the high pressure supply line nut on the back of the factory pump. Remove the high pressure supply line from the rail and rotate it out of the way. 11. Label and remove all the high pressure lines from the rail and the fuel injector ports in the head. Set them aside. NOTE: The injector lines can be difficult to remove. A ¾ or 19mm crowfoot wrench is helpful. 12. Remove the electrical connector from the fuel pressure sensor located on the back of the fuel rail. #11 Injector Lines #12 Fuel Rail Pressure Sensor #9 Return Line Banjo Fitting #10 High Pressure Supply Line Figure 4 - Fuel Rail Assembly (800)
4 04/05/2012 Dodge L Twin CP INST 13. Remove the three 10mm bolts and 10mm stud holding the fuel rail in place. Carefully slide the fuel rail out of the engine compartment. 14. Clamp the fuel rail in a vise using the mount flanges used to bolt the rail to the engine. Carefully remove the fuel pressure sensor. 15. Locate the high pressure fitting (#24, Figure 1), lubricate the threads with clean diesel fuel and thread it into the fuel rail. To prevent leaks, torque the fitting to 52 ft-lbs. 16. Install the factory pressure sensor into the high pressure junction (#11, Figure 1) and torque the sensor to 52 ft-lbs. Be sure to apply a small amount of grease or clean engine oil to the sealing surface of the sensor before installing. 17. Reinstall the fuel rail using the factory hardware. Apply thread locking compound to the threads and torque them to 18 ft-lbs. 18. Install the number 6 cylinder high pressure line hand tight first, and then torque each nut to 30 ft-lbs. Repeat for the remaining high pressure lines. Again, cleanliness cannot be overemphasized at this stage. 19. Reinstall the factory fuel rail supply and return lines. 20. Loosely install the high pressure junction on the high pressure junction bracket (#12, Figure 1) using the 6mm hardware provided. 21. Two threaded holes are located on the driver s side of the head. This is where the junction block bracket will mount. Using the M x 16mm bolts included in the kit, loosely install the bracket and junction block to the side of the head behind in intake elbow. Backside High Pressure Line Junction Block Bracket Junction Block Frontside High Pressure Line Figure 5 - High Pressure Line Routing (800)

 connect the extension harness into the factory harness.")


5 22. Install the backside high pressure line between the new fitting in the fuel rail and the junction block. Adjust the position of the high pressure junction as necessary. 23. The factory rail pressure sensor harness is not long enough to reach the new location of the fuel pressure sensor. Using the extension harness (#28, Figure 1) connect the extension harness into the factory harness. Plug the opposing connector from the extension harness into the sensor in the high pressure junction. NOTE: Be sure to orient the rail pressure sensor connectors as show below. There is a ramp and clip that must be connected properly. The block on the opposite side will then slide into the slot of the opposing connector. If reversed, the truck will not idle properly and the engine will likely shut off. Ramp Clip Block Slot Figure 6 - Rail Pressure Sensor Connector Orientation 24. Using the supplied 3/8 bolts and hardware, loosely install the new pump support and pulley bracket to the timing cover below the intake elbow. Leaving this piece loose will allow adjustment when installing the pump bracket. Use these holes Figure 7 - Pump Support Bracket Mounting Holes 25. Using the supplied 8mm hardware, install the new CP3 pump and radiator hose support bracket in the CP3 bracket with the fittings oriented as shown below. A 5mm allen wrench will be necessary for the socket head cap screws. (800)


6 Figure 8 - Pump Bracket Assembly 26. Remove the mount holding the wiring loom to the front of the head. Install the CP3 bracket/pump on the head with the three supplied M10 x 1.5 bolts and 10mm flat washers as shown. Use a small amount of thread locking compound on the three 10mm bolts. Torque each of the bolts to 35 ft-lbs. Note: Prior to installing the pump and bracket, it can be useful to start installing the new fittings and lines in the factory fuel pump. Please refer to step 30 to determine the correct installation procedure for your application. 27. Install the 8mm bolt and flange nut through the slotted hole in the bottom of the pump bracket and the top of the pump support bracket. Tighten all pump support bracket hardware. The finished product should appear similar to the figure below. Figure 9 - Pump Mounting Assembly (800)
7 28. Install front-side high pressure line between the high pressure fitting on new injection pump and the high pressure junction. Torque fittings to 30 ft-lbs. 29. Install the new idler pulley (#6, Figure 1) in the threaded standoff on the pump support bracket. Apply a small amount of thread locking compound on the pulley threads and torque the bolt to 35 ft-lbs. 30. There are two common ways to supply fuel to the new pump: a. Use the factory lift pump and share the supply between the two injection pumps (adequate, but limits performance gains). b. Supply the injection pumps with an aftermarket lift pump and filter (performance applications). Supplies are included with the ATS Dodge Twin CP3 Kit to help connect the fuel lines for both options. Some aftermarket lift pump kits use different sized lines and fittings. The fittings included in the kit will help but may work with all aftermarket lift pump kits. Option A Factory Lift Pump: Note: Pictures of this installation are shown at the end of this section. A1. If the factory lift pump will supply both pumps, the factory plastic supply and return lines will be utilized. A2. Using approximately 7 inches 3/8 fuel line (#16, Figure 1), the 90 barbed to JIC-6 fitting (#21, Figure 1) and the barbed banjo fitting (#18, Figure 1) assemble the new supply line as shown below. To install the fittings, simply push them into the fuel line. These types of fittings do not require hose clamps. This line will be used to transfer fuel from the factory pump up to the new pump. Figure 10 - Supply Line Assembly A3. Disconnect the factory supply line from the fuel pump and rotate it out of the way. (800)
, 2 copper sealing washers and the new supply line as shown.")
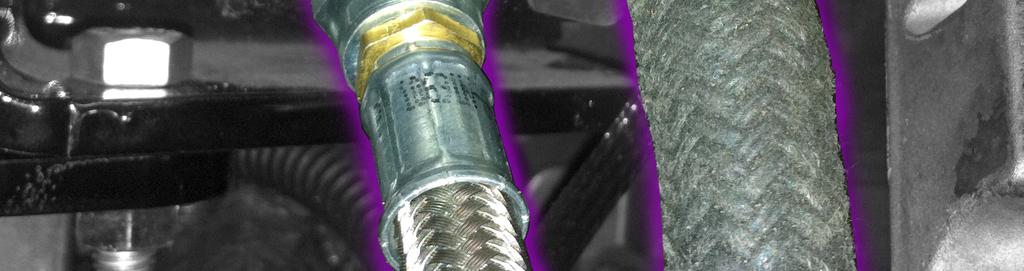
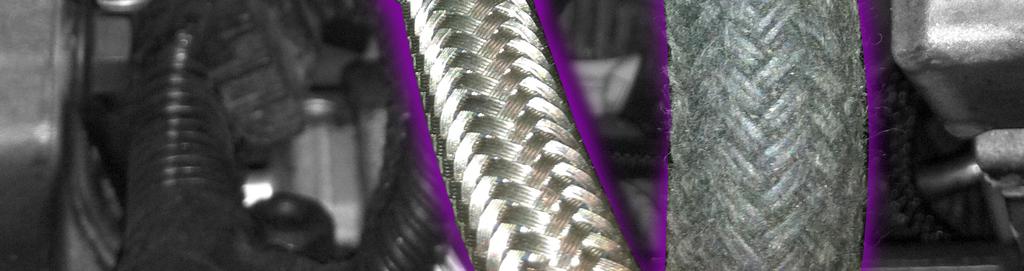
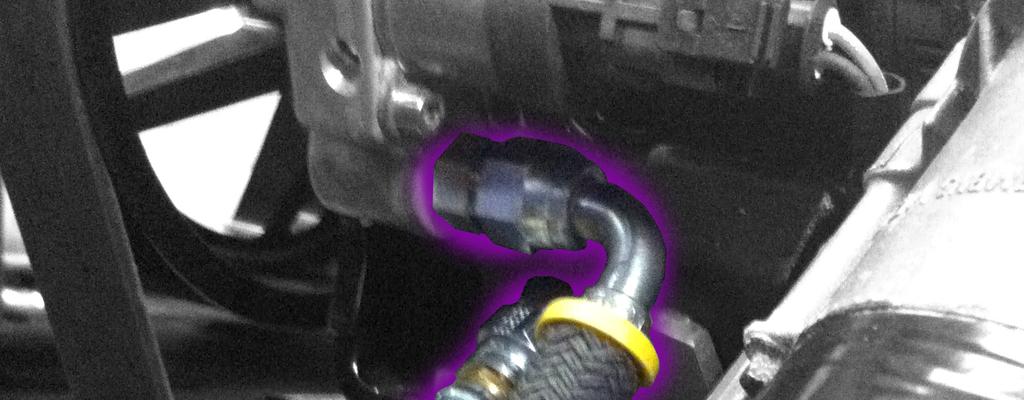
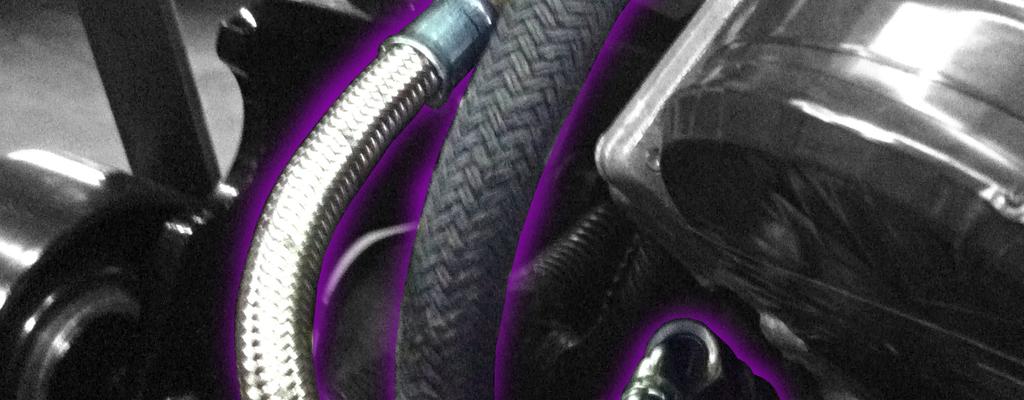
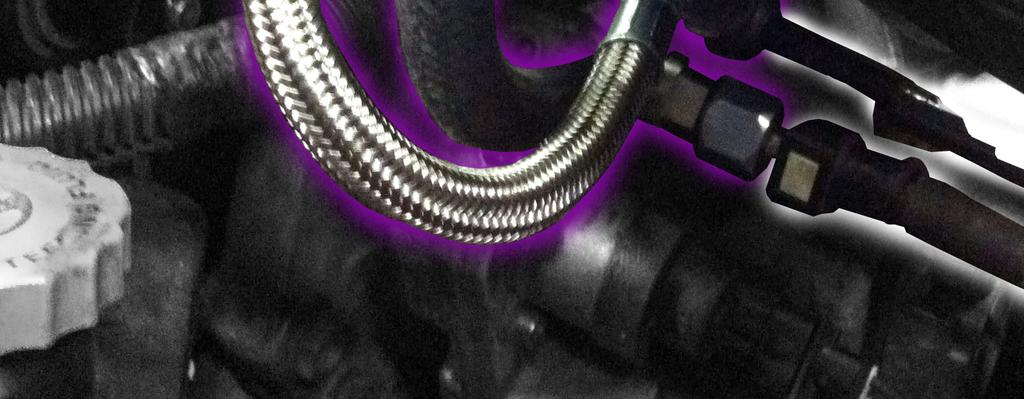
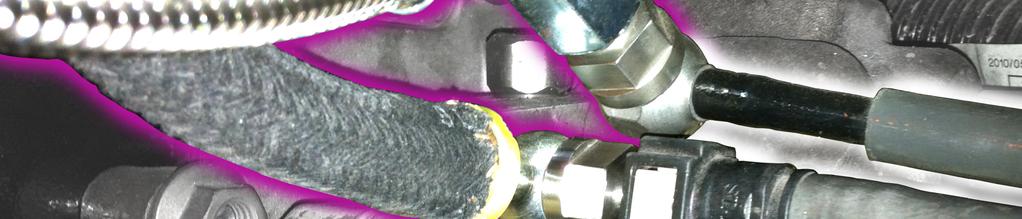
8 A4. Remove the factory quick-disconnect supply fitting from the factory injection pump. Replace that fitting with a 12mm banjo to 5/16 quickdisconnect fitting (#26, Figure 1), 2 copper sealing washers and the new supply line as shown. Orient the barbed fitting such that it points toward the front of the vehicle. Connect the 90 fitting to the fitting already in the new pump as shown at the end of this section. Slide factory supply line over fitting until it clicks into place Insert into factory pump Figure 11 - Factory Pump Supply Fitting (hose not shown) A5. Connect the factory supply line to the end of the new fitting as shown at the end of this section. A6. Remove the banjo bolt from the return line on the factory injection pump. Replace this fitting with a 12mm banjo to JIC-6 fitting (#22, Figure 1 and brass washers, as with the supply line. A7. Locate the new return line (#13, Figure 1). Connect the 45 fitting to the return fitting in the factory pump. Route the line around the supply line and connect the straight fitting to the fitting in the new pump as shown below. Note: When routing the line, make sure it will not touch the hose. Engine vibration can cause the braided line to rub through the rubber line. (800)


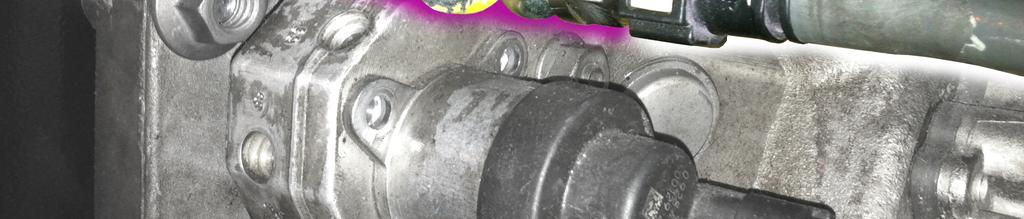
9 04/05/2012 Dodge L Twin CP INST 12mm to JIC-6 Fitting 12mm Banjo to JIC-6 Fitting Factory Return Line 12mm Banjo to 5/16 Fuel Line Fitting Factory Supply Line Figure 12 - Factory Lift Pump Plumbing (800)
10 Option B Single Aftermarket Lift Pump: B1. Remove the factory fuel supply line between the fuel filter housing and factory injection pump. B2. Remove the quick disconnect from the injection pump. B3. Install a 12mm banjo to JIC-6 fitting, a barbed 12mm banjo fitting and sealing washers in its place. Orient the barbed fitting up and away from the motor. Use the supplied barbed to JIC-6 brass fitting (#19, Figure 1) to connect the lift pump to the injection pump. B4. Connect the braided stainless return line as described in Option A. B5. If an aftermarket lift pump was installed prior to the Twin CP3 installation, it may be necessary to extend the 3/8 fuel line supplying the pumps. In this case, use the supplied 3/8 union. NEW PUMP FUEL RAIL HIGH PRESSURE JUNCTION BLOCK RETURN FACTORY FUEL FILTER HOUSING SUPPLY FACTORY PUMP LIFT PUMP Figure 13 - Single Lift Pump System 31. Install the Twin CP3 Billet Pulley (#2, Figure 1) and nut (#17, Figure 1). Torque the pulley nut to 52 ft-lbs. 32. Install the new ATS radiator hose in place of the factory hose reusing the factory clamps. Snap the radiator hose into the clamp on the support bracket. 33. Unplug the factory CP3 regulator harness from the factory pump. (800)

11 34. Connect the factory harness to the ATS Twin CP3 controller harness and connect the two male connectors into the existing and new CP3 pump fuel pressure regulators. 35. Using the Velcro provided, attach the controller to the top of the fuse box or in another convenient location away from any excessive heat. 36. Connect the black ground lead to the negative (-) terminal on the battery. 37. Connect the red power wire to the positive (+) terminal on the battery. The CP3 electronics must have full time power to avoid extremely high rail pressure during vehicle startup. The electronics do not pull enough current to drain the battery. Make sure a 7.5 Amp or 10 Amp fuse is in the fuse holder. 38. Install the ATS accessory belt as shown in Figure 1. Be sure to tighten the tensioner bolt if it was removed. Note: the belt can be difficult to install. Dodge changed the A/C compressor in 2010 and the tensioner will contact the compressor before it can swing all the way down. ATS Pulley New Idler Pulley Figure 14 - Belt Routing 39. Refill engine coolant using approved coolant. 40. Remove any towels or rags used to absorb fuel leakage during installation. 41. Reinstall engine oil dipstick. 42. Reconnect the (-) negative battery terminals. (800)
12 43. Turn the ignition to the ON position without starting the vehicle. Check for fuel leaks. If no leaks are present, start the vehicle. It may take a few tries to because the fuel lines start empty. If no leaks are present at idle, drive the vehicle being sure to use the entire throttle range. Park the vehicle and check for signs of leaking fuel. Pay special attention to high pressure fittings in the rail and on the pump. 44. If no leaks are found, reinstall the plastic engine cover to complete the installation. Have Any Questions? Thank you for purchasing the ATS Twin CP3 Kit. Please check our website at for technical support and other performance products such as the 5- Star torque converter, ATS High Performance Valve Body and ATS High Performance Transmission along with our full line of power enhancers. Please call or our Technical Service Department, 8:00am to 5:30pm Mountain Standard Time, Monday through Friday. Contact Information Toll Free: Local: Fax: Website: info@atsdiesel.com We strive to make our instructions as clear and complete as possible. To achieve this, our instructions are under constant construction. We encourage you to visit our website to check for the most up-to-date manuals and diagrams as well as other information. If you have any suggestions as to how we can improve this installation manual, let us know at mailto:suggestions@atsdiesel.com. (800)
13 Bill of Materials 1. Dodge Twin CP3 Injection Pump (1) Rear Port High Pressure Fitting (2) 12mm to JIC-6 Fitting (1) High Pressure Port Plug (1) Fuel Injection Pump Twin CP3 Pulley Twin CP3 Radiator Hose Bracket, Radiator Hose Support Bracket, Pump Support / Secondary Pulley Mount Pulley, Idler 7C3Z-8678-BB /8 Polypropylene Clamp 2339T Rib Serpentine Belt Backside High Pressure Steel Fuel Line Frontside High Pressure Steel Fuel Line High Pressure Junction High Pressure Junction Bracket, Adjustable 2-Piece Design Steel Braided Return Line Bracket, CP3 Pump Mount Twin CP3 Control Harness of 3/8 Fuel Line CP3 Pulley Nut /8 Barbed 12mm Banjo Fitting (2) JIC-6 Female Barbed Fitting /8 Barbed Union JIC-6 Barbed Fitting (2) 12mm Banjo Bolt to JIC-6 Fitting (800)
14 23. (4) 12mm Copper Sealing Washers High Pressure Fitting mm to JIC-6 Fitting mm Banjo to 5/16 Quick Connect Fuel Fitting Thread Locking Compound.02oz Tube 91458A Rail Pressure Harness Extension Kit Hardware Kit (3) M10 X 1.5 X 30 Flange Bolt (3) M X 50 Socket Head Cap Screw (4) M Flange Nuts (4) 8mm Flat Washer (3) 10mm Flat Washer (2) M6-1.0 X 12 Hex Head Cap Screw (2) M6 Lock Washer (2) M6 Washer (3) 3/8-16 X 2 Flange Bolt (3) 3/8-16 Nut (3) 3/8 Lock Washer (3) 3/8 Washer (1) M X 25 Cap Screw (1) X ¾ Button Head Screw (1) Nylon Insert Nut (2) M X 16 Cap Screw Not Pictured: 30. ATS Instructions Folder (1) ATS Instructions INST (2) ATS Stickers 31. ATS Warranty (800)
Installation Manual v2.2: Twin CP3 Fuel Injection Kit Dodge 5.9L
 12/13/11 ATS Twin CP3 Kit 701-900-2272-INST Installation Manual v2.2: Twin CP3 Fuel Injection Kit 2003-2004 Dodge 5.9L Figure 1 - Full Kit Photo 26 Figure 2 - Hardware Kit 1 Please read all instructions
Installation Manual v1.0: Twin CP3 Fuel Injection Kit Dodge 5.9L
 Installation Manual v1.0: Twin CP3 Fuel Injection Kit 2004.5-2007 Dodge 5.9L Figure 1 - Full Kit Photo 25 Figure 2 - Hardware Kit Please read all instructions before installation. This kit is not emissions
Installation Manual v1.1: ATS Twin CP3 Kit GM LB7 Duramax. Please read all instructions before installing the ATS Twin CP3 Kit
 Installation Manual v1.1: ATS Twin CP3 Kit 2002-2004 GM LB7 Duramax Please read all instructions before installing the ATS Twin CP3 Kit This kit is not emissions legal in California. Kit is legal only
Installation Manual v1.2: LLY / LBZ/LMM Twin CP3 Kit GM Duramax. Please read all instructions before installation.
 03/24/09 701-900-4290 - INST Installation Manual v1.2: LLY / LBZ/LMM Twin CP3 Kit 04.5-07.5 GM Duramax Please read all instructions before installation. This kit is not emissions legal in California. Kit
Installation Manual v1.4: ATS Twin CP3 Kit 2001 GM LB7 Duramax. Please read all instructions before installing the ATS Twin CP3 Kit
 Installation Manual v1.4: ATS Twin CP3 Kit 2001 GM LB7 Duramax Please read all instructions before installing the ATS Twin CP3 Kit Thank you for purchasing the ATS Twin CP3 Kit. The picture below shows
Installation Manual v1.0: 10-Digit P/N: Aurora 3000 Turbo System L Powerstroke Ford
 Installation Manual v1.0: 10-Digit P/N: 202-930-3224 Aurora 3000 Turbo System 99-03 7.3L Powerstroke Ford Please read all instructions before installation. Figure 1 - Full Kit Photo 1. Park the vehicle
Figure 1 - Kit Contents
 11/11/2009 204-900-4248 - INST Installation Manual v1.2: 204-900-4248: Pulse Flow Exhaust Manifolds 2001-2004 LB7 Duramax 6.6L Note: OFF-ROAD USE ONLY if used on California emissions LB7 or EGR Equipped
Installation Manual v1.1: Piece Pulse Flow Exhaust Manifold, Stock Replacement L Cummins
 Installation Manual v1.1: 204-927-2326 2-Piece Pulse Flow Exhaust Manifold, Stock Replacement 2007.5-2016 6.7L Cummins Please read all instructions before installation. We suggest purchasing new gaskets
Installation Manual v1.0: MST Turbo Kit ( ) 5.9L Dodge. Please read all instructions before installation.
 5.9L Dodge. Please read all instructions before installation.") Installation Manual v1.0: MST Turbo Kit (2003-2007) 5.9L Dodge Please read all instructions before installation. Figure 1: MST Kit Contents Figure 2: MST Hardware Kit Please make sure all of the components
Installation Manual v1.0: MST Turbo Kit (2003-2007) 5.9L Dodge Please read all instructions before installation. Figure 1: MST Kit Contents Figure 2: MST Hardware Kit Please make sure all of the components
Installation Manual v1.3: 2-Piece Exhaust Manifold Dodge 5.9L. Please read all instructions before installation.
 Installation Manual v1.3: 2-Piece Exhaust Manifold 2003-2007 Dodge 5.9L Please read all instructions before installation. Figure 1 - Dodge 2-Piece Exhaust Manifold Kit 1. Disconnect BOTH negative (-) battery
Installation Manual v1.1: The ATS Arc-flow Intake Manifold Dodge-Cummins 5.9. Please read all instructions before installation.
 Installation Manual v1.1: The ATS Arc-flow Intake Manifold 2006-07 Dodge-Cummins 5.9 Please read all instructions before installation. Thank you for purchasing the ATS Arc-flow Intake Manifold. This manual
Installation Manual v1.0: Aurora Plus Turbo Kit ( ) 5.9L Dodge. Please read all instructions before installation.
 5.9L Dodge. Please read all instructions before installation.") Installation Manual v1.0: Aurora Plus - 4000 Turbo Kit (2003-2007) 5.9L Dodge Please read all instructions before installation. Figure 1: Aurora Plus - 4000 Kit Contents 1 Figure 2: Aurora Plus Hardware
Installation Manual v1.0: Aurora Plus - 4000 Turbo Kit (2003-2007) 5.9L Dodge Please read all instructions before installation. Figure 1: Aurora Plus - 4000 Kit Contents 1 Figure 2: Aurora Plus Hardware
Installation Manual v1.0: : Pulse Flow Exhaust Manifolds 2006 LBZ Duramax 6.6L EGR Equipped Vehicles
 10/11/2013 204-901-4308 - INST Installation Manual v1.0: 204-901-4308: Pulse Flow Exhaust Manifolds 2006 LBZ Duramax 6.6L EGR Equipped Vehicles Figure 1 - Kit Contents 1 Please read all instructions before
Installation Manual v1.0: Force Cool Kit Dodge with NV4500/NV4500HD/NV5600 Manual Transmissions. Please read all instructions before installation.
 Installation Manual v1.0: Force Cool Kit Dodge with NV4500/NV4500HD/NV5600 Manual Transmissions Please read all instructions before installation. Figure 1 - Force Cool Kit Note: Use Teflon sealing tape
Installation Manual v1.2: Ford Sub Zero Intercooler L Ford Trucks. Please read all instructions before installation.
 9/14/2009 203-900-3224 - INST Installation Manual v1.2: Ford Sub Zero Intercooler 99-03 7.3L Ford Trucks Please read all instructions before installation. Note: Some aftermarket air intakes can interfere
Installation Manual v1.0: P/N 202-A Aurora 3000/5000 Compound Turbo Kit Dodge Cummins 5.9
 Installation Manual v1.0: P/N 202-A35-2272 Aurora 3000/5000 Compound Turbo Kit 2003-2007 Dodge Cummins 5.9 Please read all instructions before installation. Figure 1. Figure 2. Figure 3. Figure 4. 1. Install
Installation Manual v1.0: RPM Governor Spring Installation Dodge. Please read all instructions before installation.
 Installation Manual v1.0: 705-940-2164 4000 RPM Governor Spring Installation 1994-98 Dodge Please read all instructions before installation. The stock governor springs begin to restrict fuel rack travel
2/10/ INST
 Installation Manual v1.2: Dana 60 / Dana 70 ATS Protector Differential Cover Dodge (Rear)- 1994-2002 2500 w/ Automatic Transmission (47RH, 47RE) Ford (Front) - 1985-1998 F350, 2000 F350/450/550 Dually,
2/10/ INST
 Installation Manual v1.1: Dana 80 ATS Protector Differential Cover Dodge - 1994-2002 2500 w/ 5-Speed Manual Transmission (NV4500); all 94-02 3500 Trucks Ford 1999 & Newer F350 & F450 Dually Superduty;
Installation Manual v1.0: The Torque Pro Propane Injection System GM. Please read all instructions before installation.
 PRO66-INST Installation Manual v1.0: The Torque Pro Propane Injection System GM Please read all instructions before installation. Thank you for purchasing the ATS Torque Pro Propane Injection System. This
05/03/ INST. Ford 6.0L Aurora Turbo Installation v Ford 6.0L Powerstroke
 Ford 6.0L Aurora Turbo Installation v1.6 2003-2007 Ford 6.0L Powerstroke Please read all instructions before installation. 1. Begin by disconnecting the negative terminals of both batteries. 2. Find the
2017+ L5P Duramax 3 ½ Down Pipe & EGR Fix Kit
 2017+ L5P Duramax 3 ½ Down Pipe & EGR Fix Kit Covers installation of PN s: WCF100630, WCF100829 Note: This Kit is for off road competition use only! Off Road Competition Use Tuning & Exhaust System is
Installation Instructions for: TOYOTA 4.5L SUPERCHARGER SYSTEM
 Installation Instructions for: TOYOTA 4.5L SUPERCHARGER SYSTEM 1995-1997 Land Cruiser * PREMIUM FUEL REQUIRED * Magnuson Products LLC 1990 Knoll Drive, Bldg A, Ventura, CA 93003 (805) 642-8833 phone *
Shotgun Single Barrel HPFP install guide
 Shotgun Single Barrel HPFP install guide Thank you for your purchase of the VTT Shotgun Single Barrel HPFP upgrade! First thing to do when you open your box is to make sure all parts are in their respective
BD Venom Dual Fuel F O R D 6. 7 L P O W E R S T R O K E Installation Instructions
 U 21 March 2017 (1050470) Venom Dual Fuel Kit (I-00390) 1 DOWNLOAD ENHANCED INSTALL MANUALS AT dieselperformance.com BD Venom Dual Fuel 2 0 1 1-2 0 1 6 F O R D 6. 7 L P O W E R S T R O K E Installation
BD Venom Dual Fuel F O R D 6. 7 L P O W E R S T R O K E Installation Instructions
 U 30 January 2017 (1050470) Venom Dual Fuel Kit (I-00390) 1 DOWNLOAD ENHANCED INSTALL MANUALS AT dieselperformance.com BD Venom Dual Fuel 2 0 1 1-2 0 1 4 F O R D 6. 7 L P O W E R S T R O K E Installation
Installation Manual v1.0: Dodge 68RFE Automatic Transmission. Please read all instructions before the installation of the ATS Co-Pilot
 09/30/11 601-900-2356-INST Installation Manual v1.0: 2010-11 Dodge 68RFE Automatic Transmission Please read all instructions before the installation of the ATS Co-Pilot Thank you for purchasing the ATS
12/05/2012 Lockup Co-Pilot Instructions INST. Installation Manual v1.6: Dodge 68RFE Automatic Transmission
 Installation Manual v1.6: 2007.5-09 Dodge 68RFE Automatic Transmission Please read all instructions before the installation of the ATS Co-Pilot Thank you for purchasing the ATS Co-Pilot transmission management
2006 Honda Civic SI Supercharger Kit Installation Instruction Kit #
 2006 Honda Civic SI Supercharger Kit Installation Instruction Kit #350-091 3239 MONIER CIRCLE, STE.5 RANCHO CORDOVA, CA 95742 916.635.4550 FAX 916.635.4632 www.ct-engineering.com INS-157 VERSION: 3.25.2009
BEFORE BEGINNING INSTALLATION
 COMPLETE CHASSIS FUEL LINE KITS For 1996-2000 Honda Civic Equipped with B-Series Engine INSTALLATION INSTRUCTIONS PLEASE study these instructions carefully before beginning this installation. Most installations
Single Barrel Shotgun HPFP Install Guide
 Single Barrel Shotgun HPFP Install Guide Thank you for purchasing the VTT Single Barrel Shotgun HPFP upgrade kit! PLEASE READ THE ENTIRE GUIDE BEFORE BEGINNING INSTALLATION! The first thing you should
DURAMAX LML EGR DELETE
 2011-2012 DURAMAX LML EGR DELETE Sinister Diesel EGR Delete Kit A B C D E F G H PACKING LIST: QTY. A B C D E F G H QTY. 1 4 1 1 1 3 1 4 Description Blue Coolant Hose M8 x 25 Hex Head Bolts Exhaust Block
FREE $15 Gift Card for every $100 spent on Ship To Home orders. Find Out How
 1 of 29 10/12/2011 5:05 PM FREE $15 Gift Card for every $100 spent on Ship To Home orders. Find Out How Ford Ranger/Explorer/Mountaineer 1991-1999 Intake Manifold REMOVAL & INSTALLATION Print The engines
Disconnect the APP sensor harness connector. See Fig. 4. Remove the accelerator pedal mounting nuts. Remove the APP assembly.
 ENGINE CONTROLS - REMOVAL, OVERHAUL & INSTALLATION - 6.6L DIESEL... Page 1 of 41 FUEL SYSTEMS ACCELERATOR PEDAL POSITION SENSOR Removal & Installation Disconnect the APP sensor harness connector. See Fig.
DODGE CUMMINS Air-Boss CR Intake Plenum
 Installation Manual P/N 0307-ABIP 2003-07 DODGE CUMMINS Air-Boss CR Intake Plenum Installation Instructions P/N 0307-ABIP GDP Air-Boss CR Plenum Installation PLEASE READ ALL INSTRUCTIONS BEFORE BEGINNING
Mega-Rail System Installation
 Installation Manual Mega-Rail System P/N 030767-MRS 2003-2007 DODGE CUMMINS Mega-Rail System Installation Installation Instructions GDP 03-07 Mega-Rail System P/N 030767-MRS PLEASE READ ALL INSTRUCTIONS
6.4L EGR Delete With Intake Elbow
 6.4L EGR Delete With Intake Elbow J I E C B F D G H A Part# A B C D E F G H I J PACKING LIST: QTY. 2 4 2 4 2 Description Exhaust Block-Off Plate Exhaust Gasket Coolant Line Plugs Brass Barbed Hose Connector
INSTALLATION INSTRUCTIONS CATCH CAN KIT
 INSTALLATION INSTRUCTIONS CATCH CAN KIT FORD FOCUS Document: 19-0150 Support: info@radiumauto.com STEPS 1 TO 19 COVER THE PCV SIDE CATCH CAN KIT (P/N: 20-0315) STEPS 20-32 COVER THE CRANKCASE CATCH CAN
INSTALLATION INSTRUCTIONS CATCH CAN KIT
 INSTALLATION INSTRUCTIONS CATCH CAN KIT FORD FOCUS Document: 19-0150 Support: info@radiumauto.com STEPS 1-19 COVER THE PCV SIDE CATCH CAN KIT (P/N: 20-0315) STEPS 20-32 COVER THE CRANKCASE CATCH CAN KIT
Edelbrock Victor II Intake Manifold. For Chrysler 5.7L (Eagle) and 6.1L Gen III HEMI Engines Part #7179
 and 6.1L Gen III HEMI Engines Part #7179") For Chrysler 5.7L (Eagle) and 6.1L Gen III HEMI Engines PLEASE study these instructions carefully before beginning this installation. You should be familiar with and comfortable working on your vehicle.
For Chrysler 5.7L (Eagle) and 6.1L Gen III HEMI Engines PLEASE study these instructions carefully before beginning this installation. You should be familiar with and comfortable working on your vehicle.
INSTALLATION INSTRUCTIONS COOLANT TANK KIT
 INSTALLATION INSTRUCTIONS COOLANT TANK KIT 2017+ Honda Civic Type-R Document: 19-0197 Support: info@radiumauto.com NOTES: Installation to be performed on engines that are completely cooled down. Do NOT
Edelbrock Victor II Intake Manifold. For Chrysler 5.7L (Eagle), 6.1L and 6.4L Gen III HEMI Engines Part #7179
, 6.1L and 6.4L Gen III HEMI Engines Part #7179") For Chrysler 5.7L (Eagle), 6.1L and 6.4L Gen III HEMI Engines PLEASE study these instructions carefully before beginning this installation. You should be familiar with and comfortable working on your
For Chrysler 5.7L (Eagle), 6.1L and 6.4L Gen III HEMI Engines PLEASE study these instructions carefully before beginning this installation. You should be familiar with and comfortable working on your
Included parts: 1 - New Bosch CP3 Pump 1 - HSM Pulley 1 - Serpentine Belt 1 - Pump Brackets/Hardware
 TROUBLESHOOTING: Please read and understand all installation instructions before proceeding with the installation. If you have questions during the installation of this product, please email H&S Motorsports
All cores due 30 days after invoice date - no credit after 60 days.
 NO WARRANTY STATEMENT High performance parts & products no warranty policy: The purchaser understands and recognizes that high performance diesel products and services sold by INDUSTRIAL INJECTION SERVICE.
PowerMax Diesel Upgrade For Cummins Engines
 PowerMax Diesel Upgrade For Cummins Engines 00.5-007.5 Dodge Ram With Cummins 5.9L Item 3 4 5 6 7 8 9 0 3 4 5 6 7 8 Parts List Description Turbocharger Ancillary kit 773069- (includes) Installation Instructions
BD 6.7L Super B Special Turbo Kit For L Dodge -- I n s t a l l a t i o n I n s t r u c t i o n s -- PN#
 28 January 2014 1045140 6.7L Super B Special Turbo Installation (I-00266) 1 BD 6.7L Super B Special Turbo Kit For 2007.5-2012 6.7L Dodge -- I n s t a l l a t i o n I n s t r u c t i o n s -- PN# 1045140
Ford 6.0L Regulated Return Kit
 2003-2007 Ford 6.0L Regulated Return Kit A. Passenger Rear Return B. Line (Longer w/ 1-90 fitting) C. Driver Rear Return Line (Shorter w/ 1-90 fitting) D. Fuel Return Line (2 female fittings) E. Passenger
Powerstroke 6.4L EGR Block Kit
 Read instructions thoroughly before proceeding! ***This kit may void factory warranty please check with manufacturer.*** You will need the following tools for this installation: 10mm wrench 13mm wrench
All cores due 30 days after invoice date - no credit after 60 days.
 NO WARRANTY STATEMENT High performance parts & products no warranty policy: The purchaser understands and recognizes that high performance diesel products and services sold by INDUSTRIAL INJECTION SERVICE.
STEALTH BIG AIR KIT - Yamaha Roadliner/Stratoliner and Raider
 Page: 1 If you question your abilities it may be best for an experienced service technician perform this installation. A Yamaha Service Manual would be helpful to have on hand for reference. Revision:
Ford 6.0L Powerstoke Regulated Fuel Return
 Ford 6.0L Powerstoke Regulated Fuel Return ! WARNING REGARDING EMISSIONS LAWS Not legal for sale or use on pollution-controlled motor vehicles anywhere in the United States. Legal ONLY for off-road competition
Page 6 of 6 OUTLAW DIESEL EGR COOLER DELETE KIT W/INTAKE ELBOW L FORD POWERSTROKE
 What s in the box 1 Exhaust Block-Off Plate 1 Exhaust Gasket 2 Coolant Line Plugs 1 Brass Barbed Hose Connector 1 Stand-off Spacer 4 M10-1.25 x 40 Hex Head Bolts (Exhaust Manifold) 2 M10-1.25 x 20 Hex
INSTALLATION INSTRUCTIONS CATCH CAN KIT
 INSTALLATION INSTRUCTIONS CATCH CAN KIT FORD FOCUS Document: 19-0150 Support: info@radiumauto.com STEPS 1 TO 19 COVER THE PCV CATCH CAN KIT (P/N: 20-0315) STEPS 20-32 COVER THE CRANKCASE CATCH CAN KIT
Dodge 24v ISB
 1 BD KILLER B SINGLE TURBO KIT 1994-2002 Dodge 24v ISB Part #: 1045163 PLEASE READ ALL INSTRUCTIONS BEFORE INSTALLATION UNLESS AN EO# IS LISTED, THIS PRODUCT IS LEGAL IN CALIFORNIA FOR RACING VEHICLES
Included parts: 1 - New Bosch CP3 Pump 1 - HSM Pulley 1 - Serpentine Belt 1 - Pump Bracket/ Hardware STEP 1
 TROUBLESHOOTING: Please read and understand all installation instructions before proceeding with the installation. If you have questions during the installation of this product, please contact H&S Motorsports
BLACKBIRD INSTALLATION SUPPLEMENT
 BLACKBIRD INSTALLATION SUPPLEMENT 2008 GM 2500 AND 3500 6.6 DURAMAX DIESEL VERSION 5-08 Parts Included in Installation Kit Before beginning installation, check the parts kit thoroughly against the parts
Cut zip ties and remove 2 plastic wiring harness brackets.
 TROUBLESHOOTING: Please read and understand all installation instructions before proceeding with the installation. Included parts: 1 - New Bosch Cp3 Pump 1 - HSM Pulley 1 - Serpentine Belt 1 - Pump Bracket/
REMOVAL & INSTALLATION
 REMOVAL & INSTALLATION NOTE: For reassembly reference, label all electrical connectors, vacuum hoses and fuel lines before removal. Also place mating marks on engine hood and other major assemblies before
ADM Performance 6079 Mapleshade Lane Dallas, Texas (214)
") 1) Disconnect Battery Ground 2) Raise front end of Vehicle FAN INSTALL INSTRUCTIONS 3) Remove lower Radiator hose and drain coolant into a pan. (you will reuse coolant later) 4) Remove Air Intake piping
1) Disconnect Battery Ground 2) Raise front end of Vehicle FAN INSTALL INSTRUCTIONS 3) Remove lower Radiator hose and drain coolant into a pan. (you will reuse coolant later) 4) Remove Air Intake piping
4 December 2017 PN# , , Dodge 6.7L Rumble B SXE (I-00400) 1. BD Rumble B SXE. D o d g e 6. 7 L H P C R Installation Instructions
 1. BD Rumble B SXE. D o d g e 6. 7 L H P C R Installation Instructions") 4 December 2017 PN#1045705, 1045706, 1045708 Dodge 6.7L Rumble B SXE (I-00400) 1 DOWNLOAD ENHANCED INSTALL MANUALS AT dieselperformance.com BD Rumble B SXE D o d g e 6. 7 L H P C R Installation Instructions
4 December 2017 PN#1045705, 1045706, 1045708 Dodge 6.7L Rumble B SXE (I-00400) 1 DOWNLOAD ENHANCED INSTALL MANUALS AT dieselperformance.com BD Rumble B SXE D o d g e 6. 7 L H P C R Installation Instructions
Table of Contents. 4 Getting Started 4 About the Juice 5 Safety Terms 5 Product Registration 6 Important Notes 7 Truck Orientation
 Table of Contents 4 Getting Started 4 About the Juice 5 Safety Terms 5 Product Registration 6 Important Notes 7 Truck Orientation 8 Juice Installation 1999-2003 (7.3L) 8 Supplied Items & Required Tools
Engine Removal/Installation
 Engine Removal/Installation Make sure jacks and safety stands are placed properly and hoist brackets are attached to correct positions on the engine. (See Section 1). Apply parking brake and block rear
advanced FLOW engineering Instruction Manual P/N: Make: Dodge Model: 2500 / 3500 Year: Engine: I-6 5.9L (td)
") advanced FLOW engineering Instruction Manual P/N: 42-22011 DFS780 PRO Make: Dodge Model: 2500 / 3500 Year: 1998.5-2002 Engine: I-6 5.9L (td) 1 Label Qty. Description Part Number A 1 Fuel Manifold Assembly
advanced FLOW engineering Instruction Manual P/N: 42-22011 DFS780 PRO Make: Dodge Model: 2500 / 3500 Year: 1998.5-2002 Engine: I-6 5.9L (td) 1 Label Qty. Description Part Number A 1 Fuel Manifold Assembly
INSTALLATION INSTRUCTIONS AOS-R (Air Oil Separator-Return) Turbo Subaru and STi Document# Support:
 Turbo Subaru and STi Document# Support:") INSTALLATION INSTRUCTIONS AOS-R (Air Oil Separator-Return) 02-14 Turbo Subaru and 2015+ STi Document# 19-0102 Support: info@radiumauto.com These instructions are based on a vehicle with an OEM turbocharger
INSTALLATION INSTRUCTIONS AOS-R (Air Oil Separator-Return) 02-14 Turbo Subaru and 2015+ STi Document# 19-0102 Support: info@radiumauto.com These instructions are based on a vehicle with an OEM turbocharger
3 October 2016 PN# V Dodge Twin Turbo Kit (I-00274) ½ D o d g e 2 4 v I S B
 ½ D o d g e 2 4 v I S B") 3 October 2016 PN#1045320 24V Dodge Twin Turbo Kit (I-00274) 1 DOWNLOAD ENHANCED INSTALL MANUALS AT dieselperformance.com BD Twin Turbo Kit 1998½- 2 0 0 2 D o d g e 2 4 v I S B Part# 1045320 PLEASE READ
3 October 2016 PN#1045320 24V Dodge Twin Turbo Kit (I-00274) 1 DOWNLOAD ENHANCED INSTALL MANUALS AT dieselperformance.com BD Twin Turbo Kit 1998½- 2 0 0 2 D o d g e 2 4 v I S B Part# 1045320 PLEASE READ
#TL T EA888 GEN 3 FUELING SYSTEM/ INSTALLATION INSTRUCTIONS
 #TL100069 2.0T EA888 GEN 3 FUELING SYSTEM/ INSTALLATION INSTRUCTIONS Notes: These instructions were written for a North American specification MkVII GTI. Other models, like the Golf R, are similar. When
Procharger Stage II Intercooled Supercharger System (11-14 GT)
") Procharger Stage II Intercooled Supercharger System (11-14 GT) Installation Time: Approximately one day. Installed on 2012 Mustang GT 5.0/Manual Required Tools 3/8 Socket Set (Standard and Metric) 1/2
Procharger Stage II Intercooled Supercharger System (11-14 GT) Installation Time: Approximately one day. Installed on 2012 Mustang GT 5.0/Manual Required Tools 3/8 Socket Set (Standard and Metric) 1/2
CAUTIONS AND WARNINGS
 FIREWALL FORWARD FUEL LINE KITS For 1996-2000 Honda Civic Equipped with B-Series Engine INSTALLATION INSTRUCTIONS PLEASE study these instructions carefully before beginning this installation. Most installations
BD TrackMaster S D o d g e H P C R Installation Instructions
 7 July 2016 PN#1045701, 1045702, 1045704 Dodge 6.7L TMS400 (I-00361) 1 BD TrackMaster S400 2008-2012 D o d g e H P C R Installation Instructions 1045701 2008-2009 Dodge 6.7L TMS400 1045702 2010-2012 Dodge
Wiper motor bolt and spacer. 3. Place relays as shown in picture so you can route the wires.
 TSB Fan Relay Kit Please refer to a factory repair manual when working on your car. 1. Disconnect battery cables from the battery. 2. Remove bolt and spacer from wiper motor as shown in the picture. Wiper
Dodge 5.9L Cummins 24v ISBe
 15 December 2011 Part # 1045160 Killer B Dodge 2003-07 - 1 - BD Killer B Single Turbo 2003-2007 Dodge 5.9L Cummins 24v ISBe Part #1045160 PLEASE READ ALL INSTRUCTIONS BEFORE INSTALLATION. UNLESS AN EO#
18SP680Rev3 EPA04 MBE 4000 Car Hauler Low Pressure Fuel Lines
 8SP680Rev3 EPA04 MBE 4000 Car Hauler Low Pressure Fuel Lines KIT DESCRIPTION These service kits include all necessary parts to replace the low pressure fuel lines between the fuel filter housing and fuel
Long Tube Header Installation PNs , 17276
 Long Tube Header Installation PNs - 17260, 17276 ***** Please compare the parts in the box with the bill of materials provided ***** to assure that you have all the parts necessary for this installation.
BD 6.7L Super B Special Turbo Kit For L Dodge -- I n s t a l l a t i o n I n s t r u c t i o n s -- PN#
 26 September 2012 1045140 6.7L Super B Special Turbo Installation 1 BD 6.7L Super B Special Turbo Kit For 2007.5-2012 6.7L Dodge -- I n s t a l l a t i o n I n s t r u c t i o n s -- PN# 1045140 PLEASE
These instructions were written for reference only and the use of a factory service manual is recommended.
 Introducing the CorkSport High Pressure Fuel Line designed for the MZR DISI. This fuel line is designed to replace the OEM fuel line which are prone to failure at the brazed connection at the rail. The
DOWNLOAD ENHANCED INSTALL MANUALS
 U 3 October 2016 1041564 6.7L Performance Intake Plate Manual (I-00371) 1 DOWNLOAD ENHANCED INSTALL MANUALS Cummins 6.7L High Flow Intake Plenum Cover 1041564 2008-2016 6.7L RAM 2500-3500 Pickup PLEASE
DURAMAX LMM EGR DELETE
 007.5-010 DURAMAX LMM EGR DELETE Duramax LMM EGR Delete B K I J F D G H A C PACKING LIST: E Part # A B C D E F G H I J K QTY. 1 1 1 1 Description Billet Intake Block Off Plate with O-ring Exhaust Block
INSTALLATION INSTRUCTIONS FUEL RAIL
 INSTALLATION INSTRUCTIONS FUEL RAIL MITSUBISHI EVO X Document# 19-0067 Support: info@radiumauto.com WARNING: DON'T SMOKE OR WORK WITH OPEN SPARKS WHILE WORKING ON THE FUEL SYSTEM PREPARING THE VEHICLE:
INSTALLATION INSTRUCTIONS AOS-R (Air Oil Separator-Return) Turbo Subaru and STi Document# Support:
 Turbo Subaru and STi Document# Support:") INSTALLATION INSTRUCTIONS AOS-R (Air Oil Separator-Return) 02-14 Turbo Subaru and 2015+ STi Document# 19-0102 Support: info@radiumauto.com These instructions are based on a vehicle with an OEM turbocharger
INSTALLATION INSTRUCTIONS AOS-R (Air Oil Separator-Return) 02-14 Turbo Subaru and 2015+ STi Document# 19-0102 Support: info@radiumauto.com These instructions are based on a vehicle with an OEM turbocharger
Slingshot Rotrex Supercharger Kit
 Slingshot Rotrex Supercharger Kit This supercharger kit improves on the Slingshot by forcing more dense air into the engine and creating more power. Installation time of the supercharger depends on you
STEP 1 Disconnect the negative terminal from both batteries.
 TROUBLESHOOTING: Please read and understand all installation instructions before proceeding with the installation. If you have questions during the installation of this product, please email H&S Motorsports
TRU-TIME CAM GEARS Dodge Neon Part number series
 TRU-TIME CAM GEARS 1993 1997 Dodge Neon Part number 23 850 series! WARNING: This installation is not for the mechanically challenged! If you are not mechanically inclined or do not understand the procedure
INSTALLATION INSTRUCTIONS AIR/OIL SEPARATOR KIT
 INSTALLATION INSTRUCTIONS AIR/OIL SEPARATOR KIT 2015+ SUBARU WRX (LHD ONLY) Document: 19-0136 Support: info@radiumauto.com This document covers the installation of the Radium brake master cylinder brace
6.7L Cummins EGR Delete
 6.7L Cummins EGR Delete H I A B E C D F J K G L PACKING LIST: Part# A B C D E F G H I J K L QTY. 4 Description Coolant Hose Coolant Hose Connector M0 Flange Nut 5/6 Bolts, Nuts, and Flat Washers /4-0 Bolt,
DODGE CUMMINS DUAL PUMP & DELUXE DUAL PUMP KIT
 SUBJECT: DODGE CUMMINS DUAL PUMP & DELUXE DUAL PUMP KIT Page 1 of 10 FITMENT: 2003 2007 Dodge Cummins with 5.9L KIT P/N: FPE-DPK-59-NP-[BK,BL,OG,RD], FPE-DPK-59-NP-DX [BK,BL,OG,RD], FPE-DPK-59-3K-[BK,BL,OG,RD],
INSTALLATION INSTRUCTIONS CATCH CAN KIT
 INSTALLATION INSTRUCTIONS CATCH CAN KIT FORD FIESTA ST Document: 19-0175 Support: info@radiumauto.com STEPS 1-14 COVER THE PCV SIDE CATCH CAN KIT (P/N: 20-0377) STEPS 15-35 COVER THE CRANKCASE CATCH CAN
Scion FR-S ZN6. GTX2867R Gen2 (Internal Wastegate) Installation Instructions GPP P/N #
 Installation Instructions GPP P/N #") TURBO KIT Scion FR-S ZN6 Subaru BRZ ZC6 GTX2867R Gen2 (Internal Wastegate) Installation Instructions GPP P/N # 11518000 Vehicle Type Chassis Code Engine Code Transmission Model Year Scion FR-S DBA-ZN6
TURBO KIT Scion FR-S ZN6 Subaru BRZ ZC6 GTX2867R Gen2 (Internal Wastegate) Installation Instructions GPP P/N # 11518000 Vehicle Type Chassis Code Engine Code Transmission Model Year Scion FR-S DBA-ZN6
INSTALLATION INSTRUCTIONS PORT INJECTION KIT (PIK)
") INSTALLATION INSTRUCTIONS PORT INJECTION KIT (PIK) FORD FOCUS 2.3L ECOBOOST Document: 19-0155 Support: info@radiumauto.com IMPORTANT NOTES: 1. This installation requires minor metal cutting. Air tools
INSTALLATION INSTRUCTIONS PORT INJECTION KIT (PIK) FORD FOCUS 2.3L ECOBOOST Document: 19-0155 Support: info@radiumauto.com IMPORTANT NOTES: 1. This installation requires minor metal cutting. Air tools
Phone Fax
 Directions for Installation of ECS Paxton Supercharger Kit Disconnect battery Remove stock serpentine belt Remove stock belt tensioner, save the 2 bolts for later use on supercharger bracket Remove alternator
3.4L V6 SUPERCHARGER 7 TH INJECTOR KIT
 Part Number: 00602-17620-260 00602-17620-261 00602-17620-263 00602-17620-264 00602-17620-274 00602-17620-275 00602-17620-276 Section I Installation Preparation Kit Contents Item # Quantity Reqd. Description
WARNING: ALWAYS relieve fuel pressure before disconnecting any fuel related component. DO NOT allow fuel to contact engine or electrical components.
 4.0L V8 - VINS [K,U] Selected Block 1990 Lexus LS 400 For Lextreme Powertrain 2020 S. Hacienda Blvd. # D Hacienda Heights California 91745 Copyright 1998 Mitchell Repair Information Company, LLC Friday,
Shotgun Double Barrel HPFP install guide
 Shotgun Double Barrel HPFP install guide Thank you for your purchase of the VTT Shotgun Double Barrel HPFP upgrade! First thing to do when you open your box is to make sure all parts are in their respective
ALL AMERICAN BILLET. Front Drive System - Small Block Ford Installation Instructions
 ALL AMERICAN BILLET Front Drive System - Small Block Ford Installation Instructions Small Block Ford with AC & PS All American Billet Store (800) 764-0926 www.allamericanbilletstore.com Items needed for
FMK265SD F L DIESEL WITH DUAL ALTERNATORS
 WITH DUAL ALTERNATORS This kit will NOT work on trucks equipped with adaptive steering. INSTALLATION NOTES 1. Disconnect negative batteries cables. Remove the air duct from the passenger side and the black
Included: 2. Intake Block Off Plates 1. Exhaust Block Off Plate 1. Coolant Hose - Reroutes the EGR Cooler Coolant 12. Pieces of mounting hardware -
 Included: 2. Intake Block Off Plates 1. Exhaust Block Off Plate 1. Coolant Hose - Reroutes the EGR Cooler Coolant 12. Pieces of mounting hardware - Nuts, Bolts, & Washers 2. Hose Clamps 1. Support Bracket
6.7L Dodge Cummins Performance Intake Plate Instruction Manual PLEASE READ ALL INSTRUCTIONS BEFORE INSTALLATION
 U 28 March 2013 1041562 6.7L Performance Intake Plate Manual 1 6.7L Dodge Cummins Performance Intake Plate Instruction Manual P/N# 1041562 6.7L Dodge Cummins Grid Heater PLEASE READ ALL INSTRUCTIONS BEFORE
KIT CONTENTS. Multimeter or test light Wire crimpers or soldering equipment. Wire terminals & connectors 10A inline fuse
 RUSSELL FORD 5.0L COMPLETE EFI PLUMBING KIT INSTALLATION INSTRUCTIONS Please study these instructions carefully before installing your new complete fuel system kit. If you have any questions, please call
Includes: 1. Silicone Hose 2. EGR Block Off Plates 1. Exhaust Block Off Plate 2. Hose Clamps 1. Spacer/Washer 8. Bolts 2. Nuts
 Includes: 1. Silicone Hose 2. EGR Block Off Plates 1. Exhaust Block Off Plate 2. Hose Clamps 1. Spacer/Washer 8. Bolts 2. Nuts WARNING: This product is not legal for sale or use on pollution controlled
SHELBY GT500
 2007-2009 SHELBY GT500 Removal of Factory Unit WARNING: 1. Radiator fluid must be handled properly. Please observe local ordinances with regards to handling and disposal. 2. Allow vehicle and components
HI-FLOW FUEL RAIL. Installation Instructions for: Part Numbers , ,
 HI-FLOW FUEL RAIL Installation Instructions for: Part Numbers 25-100, 25-103, 25-112 ADVANCED ENGINE MANAGEMENT INC. 2205 126 TH Street, Unit A Hawthorne, CA. 90250 Phone: (310) 484-2322 Fax: (310) 484-0152