Included parts: 1 - New Bosch CP3 Pump 1 - HSM Pulley 1 - Serpentine Belt 1 - Pump Brackets/Hardware
|
|
|
- Terence Casey
- 5 years ago
- Views:
Transcription
1
 623-4450.")

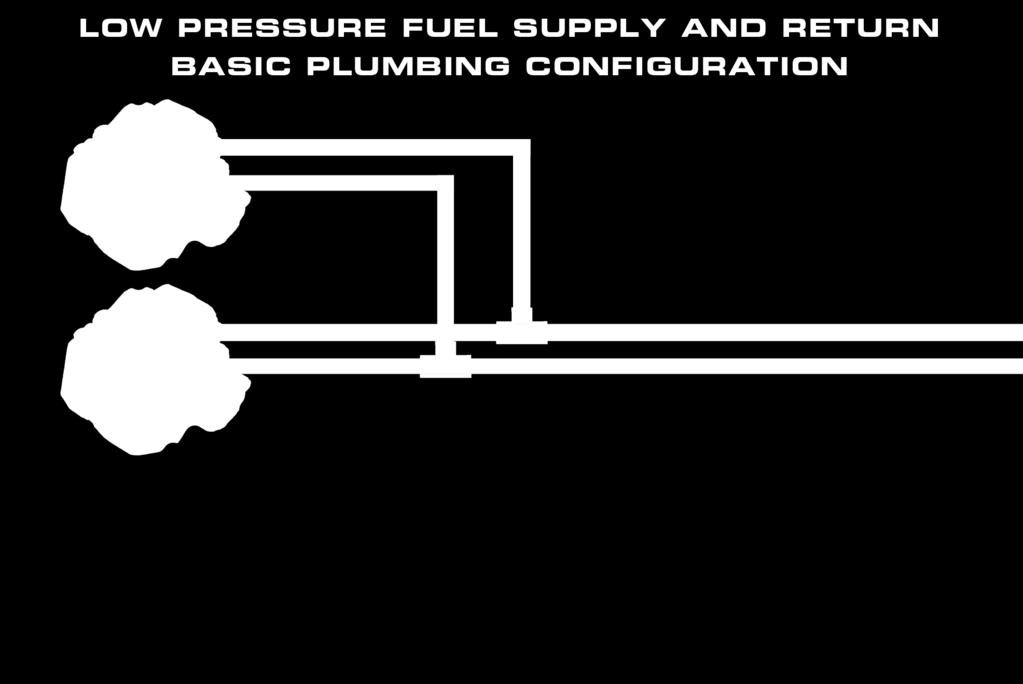
2 TROUBLESHOOTING: Please read and understand all installation instructions before proceeding with the installation. If you have questions during the installation of this product, please H&S Motorsports support at or call (855) Included parts: 1 - New Bosch CP3 Pump 1 - HSM Pulley 1 - Serpentine Belt 1 - Pump Brackets/Hardware 1 - Pump Control Module 1 - High Pressure Fuel Lines/Fittings 1 - Upper Radiator Hose Note: An aftermarket low pressure fuel system is required but is not included with this kit. It is the responsibility of the end user to supply and route an appropriate low pressure fuel system in order for the dual high pressure fuel system to function properly. A basic diagram is included on the last page of this instruction manual to outline a correct low pressure fuel supply and return configuration. This kit may not work with some factory parts installed. STEP 1 Disconnect the negative terminal from both batteries. Drain approximately 3-4 gallons from the cooling system and remove the factory upper radiator hose. STEP 2 Disconnect the engine cooling fan electrical connection near the bottom-driver side of the fan shroud. Using a cooling fan wrench tool, loosen the cooling fan hub nut. Remove the 4 nuts (2 upper, 2 lower) that anchor the fan shroud to the engine supports and remove the cooling fan/shroud assembly from the vehicle. Note: The kit can be installed without removing the engine cooling fan, but it can be very difficult to access some of the fasteners during installation L Cummins Dual High Pressure Fuel Kit


 3/8x16x2.")
.")
3 STEP 3 Remove the bolts holding the driver side upper fan shroud support bracket to the front engine cover and remove the bracket. You may set these parts aside as they will not be re-installed. STEP 4 Using a 1/2 drive ratchet or breaker bar, release the serpentine belt tensioner and slide the belt off of one of the accessories before releasing the tensioner. Remove the tensioner mounting bolt. Remove the tensioner and serpentine belt from the vehicle. STEP 5 Locate the supplied main dual pump mounting plate, supplied idler pulley and spacer, (1) 3/8x16x2.25 bolt, (2) 3/8 flat washers, and (1) 3/8 nyloc nut. Install the spacer into the idler pulley (small end of the spacer will slide into the bearing). Using the 3/8 bolt, two 3/8 washers, and 3/8 nyloc nut, install the idler pulley onto the main dual pump mounting plate as shown and torque the hardware to 35 ft-lbs. 3

 3/8 flat washers, and (4) 3/8 nyloc nuts to fasten the main pump mounting plate to the engine timing")
 3/8x16x1.")

4 STEP 6 Using one of the supplied M8x1.25x30mm socket head bolts, loosely install the main dual pump mounting plate to the engine timing cover before using the supplied (4) 3/8x16x2.25 bolts, (8) 3/8 flat washers, and (4) 3/8 nyloc nuts to fasten the main pump mounting plate to the engine timing cover also as shown. Leave all hardware finger tight at this time. STEP 7 Locate the supplied angle support bracket, (2) 3/8x16x1.25 bolts, (4) 3/8 flat washers, (2) 3/8 nyloc nuts, and (2) M10x1.5x20mm flange head bolts. Loosely install the angle support bracket to the main pump mounting plate and cylinder head as shown (the M10 bolts will be used for the cylinder head side). Torque all (6) 3/8 mounting plate hardware to 35 ft-lbs first, torque the front 8mm socket head bolt to 25 ft-lbs, and torque the (2) 10mm bolts on the cylinder head last to 35 ft-lbs L Cummins Dual High Pressure Fuel Kit
 5/16 flat washers, and (3) 5/16 nyloc nuts, mount the CP3 pump to the main")


5 STEP 8 Using the supplied Bosch CP3 pump, (3) 5/16x18x2.0 bolts, (6) 5/16 flat washers, and (3) 5/16 nyloc nuts, mount the CP3 pump to the main fuel pump mounting plate as shown. Torque the hardware to 25 ft-lbs. STEP 9 Locate the supplied dual fuel pump pulley, pulley retaining nut, and lock washer. Install the pulley onto the CP3 pump using the supplied hardware. Carefully hold the pulley in place by using the holes machined in the pulley or by using another pulley holding tool and torque the nut to 75 ft-lbs. 5

 before installing the fitting into the fuel rail.")

6 STEP 10 Locate the fuel rail pressure sensor located near the front of the factory fuel rail. Disconnect the electrical connection from the sensor and carefully remove the sensor from the fuel rail. The fuel rail may still be slightly pressurized and will contain some residual fuel, so take care to remove the sensor slowly and have a rag handy to clean up any fuel spillage that may occur when the sensor is removed. Locate the supplied rail feed fitting and ensure that it is clean and free of any debris. Apply a small amount of clean engine oil to the bottom sealing surface of the fitting (the end that goes into the fuel rail) before installing the fitting into the fuel rail. Torque the fitting to 75 ft-lbs. STEP 11 Locate the supplied high pressure fuel distribution block and make sure it is clean and free of any debris. Apply a small amount of clean engine oil to the sealing surface of the previously removed fuel rail pressure sensor before installing the sensor into the high pressure fuel distribution block. Use a bench vice or something similar to carefully hold the block while the sensor is torqued to 75 ft-lbs L Cummins Dual High Pressure Fuel Kit


 of both fuel lines before installing the fuel lines as shown.")
7 STEP 12 Locate the supplied fuel distribution mounting block and (2) M8 hex head bolts. Install the mounting block in the position shown and torque the M8 hex head bolts to 25 ft-lbs. Loosely install the fuel distribution block onto the previously installed mounting block using the M8 hardware as shown. Leave this hardware finger tight at this time. STEP 13 Locate the (2) supplied high pressure fuel lines and make sure they are clean and free of any debris. Apply a small amount of clean engine oil to the sealing surfaces (the cone-shaped ends) of both fuel lines before installing the fuel lines as shown. Carefully snug the high pressure fuel line nuts while ensuring that the lines and fuel distribution block stay aligned properly. After fuel lines are snug and proper alignment is achieved, torque the distribution block hardware to 25 ft-lbs and then torque the fuel line nuts to 37 ft-lbs. 7
 on the factory CP3 pump.")


8 STEP 14 Reconnect the electrical connection to the factory fuel rail pressure sensor. STEP 15 Unplug the FCA (fuel control actuator) on the factory CP3 pump. Locate the supplied dual pump control module and harness. Find a suitable mounting location for the dual pump control module on the driver side of the engine bay and carefully route the FCA connectors to the FCAs as stated in separate instructions included with the control module. Route and connect power and ground leads as instructed while taking extra care to ensure that none of the control module wiring will come into contact with any hot or moving components L Cummins Dual High Pressure Fuel Kit


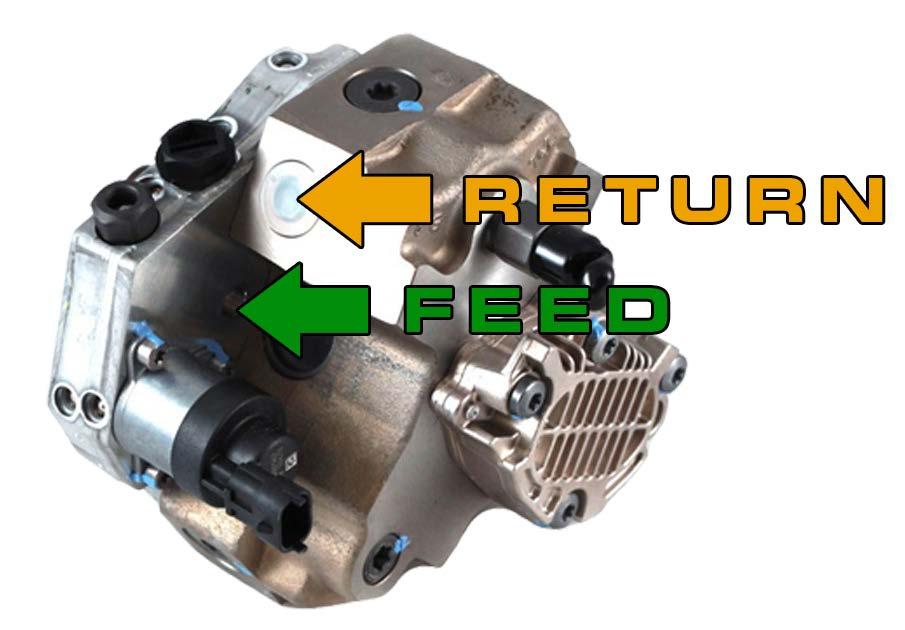
9 STEP 16 Using the supplied rubber coated sealing washers, install the supplied 12mm to 6AN adapter fittings into the CP3 pump as shown. We have supplied 6AN push-lock style fittings to be used when plumbing the secondary CP3 to the vehicle s low pressure fuel supply and return systems. There are many different ways to plumb the secondary CP3 into the low pressure fuel feed and return systems depending on the fuel system configuration. See the last page of this instruction manual for a basic plumbing diagram. -RETURN -FEED STEP 17 Slide the new supplied serpentine belt through the previously removed factory tensioner before re-installing the tensioner and belt on the vehicle. Carefully route the serpentine belt as shown in the diagram below and torque the factory tensioner bolt to 35 ft-lbs. Double-check that the belt is installed properly on all pulleys or damage may occur. 9
.")
10 STEP 18 Re-install the factory cooling fan and shroud in the reverse order of removal. Tighten the cooling fan nut on the fan hub to the factory specification. Re-install the 3 remaining fan shroud nuts (the driver side upper shroud support was removed in a previous step so the 4th nut will not be re-used). Install the supplied HSM Upper Radiator Hose using the factory clamps and re-fill the engine coolant. STEP 19 Locate the (2) supplied 5/16 plastic trim retainers. Drill two 1/4 holes in the fan shroud in the approximate location shown and install the plastic trim retainers. Reconnect the cooling fan connector and zip-tie the wiring harness back to the factory support. Make sure that no wiring or other components will come into contact with the fan! STEP 20 Double-check that the low pressure fuel supply and return systems are plumbed properly. Reconnect the batteries and turn the key to the RUN position (without starting the vehicle) to prime the low pressure fuel system and check for leaks. After no leaks are detected in the low pressure system, start the vehicle and CAREFULLY check for any high pressure system leaks. Keep in mind that the vehicle may take several cranking attempts before it will start due to the fuel rail being drained during parts installation. STEP 21 Bleed and re-fill the cooling system as necessary. Test drive the vehicle to ensure that everything is operating properly. Depending on other vehicle modifications, some custom engine tuning may be required for optimal performance. Enjoy your H&S Motorsports Dual High Pressure Fuel Kit! L Cummins Dual High Pressure Fuel Kit

11 11

12
STEP 1 Disconnect the negative terminal from both batteries.
 TROUBLESHOOTING: Please read and understand all installation instructions before proceeding with the installation. If you have questions during the installation of this product, please email H&S Motorsports
Cut zip ties and remove 2 plastic wiring harness brackets.
 TROUBLESHOOTING: Please read and understand all installation instructions before proceeding with the installation. If you have questions during the installation of this product, please email H&S Motorsports
Included parts: 1 - New Bosch CP3 Pump 1 - HSM Pulley 1 - Serpentine Belt 1 - Pump Bracket/ Hardware STEP 1
 TROUBLESHOOTING: Please read and understand all installation instructions before proceeding with the installation. If you have questions during the installation of this product, please contact H&S Motorsports
L Ford Power Stroke Intercooler Pipe Upgrade
 Rev: 10.30.14 TROUBLESHOOTING: Please read and understand all installation instructions before proceeding with the installation. If you have questions during the installation of this product, please email
Cut zip ties and remove 2 plastic wiring harness brackets.
 TROUBLESHOOTING: Please read and understand all installation instructions before proceeding with the installation. Included parts: 1 - New Bosch Cp3 Pump 1 - HSM Pulley 1 - Serpentine Belt 1 - Pump Bracket/
Included parts: 1 - BorgWarner SX-E Turbocharger 1 - SX-E 90-Degree Compressor Outlet Elbow 1 - HSM Cast Exhaust Manifold 1 - HSM Downpipe
 TROUBLESHOOTING: Please read and understand all installation instructions before proceeding with the installation. If you have questions during the installation of this product, please email H&S Motorsports
STEP 1 STEP 2. Disconnect the negative terminal from both batteries.
 TROUBLESHOOTING: Please read and understand all installation instructions before proceeding with the installation. If you have questions during the installation of this product, please email H&S Motorsports
Included parts: 1 - BorgWarner SX-E Turbocharger 1 - SX-E 90-Degree Compressor Outlet Elbow 1 - HSM Cast Exhaust Manifold 1 - HSM Downpipe
 TROUBLESHOOTING: Please read and understand all installation instructions before proceeding with the installation. If you have questions during the installation of this product, please email H&S Motorsports
Included parts: 1 - HSM Billet Aluminum Throttle Body Adapter 1-5-Ply Stainless-Reinforced Hose Replacement 2 - Stainless T-bolt Clamps STEP 1
 TROUBLESHOOTING: Please read and understand all installation instructions before proceeding with the installation. If you have questions during the installation of this product, please email H&S Motorsports
All cores due 30 days after invoice date - no credit after 60 days.
 NO WARRANTY STATEMENT High performance parts & products no warranty policy: The purchaser understands and recognizes that high performance diesel products and services sold by INDUSTRIAL INJECTION SERVICE.
All cores due 30 days after invoice date - no credit after 60 days.
 NO WARRANTY STATEMENT High performance parts & products no warranty policy: The purchaser understands and recognizes that high performance diesel products and services sold by INDUSTRIAL INJECTION SERVICE.
BD Venom Dual Fuel F O R D 6. 7 L P O W E R S T R O K E Installation Instructions
 U 21 March 2017 (1050470) Venom Dual Fuel Kit (I-00390) 1 DOWNLOAD ENHANCED INSTALL MANUALS AT dieselperformance.com BD Venom Dual Fuel 2 0 1 1-2 0 1 6 F O R D 6. 7 L P O W E R S T R O K E Installation
BD Venom Dual Fuel F O R D 6. 7 L P O W E R S T R O K E Installation Instructions
 U 30 January 2017 (1050470) Venom Dual Fuel Kit (I-00390) 1 DOWNLOAD ENHANCED INSTALL MANUALS AT dieselperformance.com BD Venom Dual Fuel 2 0 1 1-2 0 1 4 F O R D 6. 7 L P O W E R S T R O K E Installation
FMK265SD F L DIESEL WITH DUAL ALTERNATORS
 WITH DUAL ALTERNATORS This kit will NOT work on trucks equipped with adaptive steering. INSTALLATION NOTES 1. Disconnect negative batteries cables. Remove the air duct from the passenger side and the black
TABLE OF CONTENTS PARTS LIST
 TROUBLESHOOTING: Note: You will have a check engine light and/or other problems unless using this product with a compatible ECM calibration. H&S Motorsports provides compatible calibrations for H&S Performance
DODGE CUMMINS DUAL PUMP & DELUXE DUAL PUMP KIT
 SUBJECT: DODGE CUMMINS DUAL PUMP & DELUXE DUAL PUMP KIT Page 1 of 10 FITMENT: 2003 2007 Dodge Cummins with 5.9L KIT P/N: FPE-DPK-59-NP-[BK,BL,OG,RD], FPE-DPK-59-NP-DX [BK,BL,OG,RD], FPE-DPK-59-3K-[BK,BL,OG,RD],
Installation Manual v1.0: Twin CP3 Fuel Injection Kit Dodge 5.9L
 Installation Manual v1.0: Twin CP3 Fuel Injection Kit 2004.5-2007 Dodge 5.9L Figure 1 - Full Kit Photo 25 Figure 2 - Hardware Kit Please read all instructions before installation. This kit is not emissions
Installation Manual v2.2: Twin CP3 Fuel Injection Kit Dodge 5.9L
 12/13/11 ATS Twin CP3 Kit 701-900-2272-INST Installation Manual v2.2: Twin CP3 Fuel Injection Kit 2003-2004 Dodge 5.9L Figure 1 - Full Kit Photo 26 Figure 2 - Hardware Kit 1 Please read all instructions
2017+ L5P Duramax 3 ½ Down Pipe & EGR Fix Kit
 2017+ L5P Duramax 3 ½ Down Pipe & EGR Fix Kit Covers installation of PN s: WCF100630, WCF100829 Note: This Kit is for off road competition use only! Off Road Competition Use Tuning & Exhaust System is
TABLE OF CONTENTS. If you have any questions during the installation of this product, please H&S Motorsports support at
 TROUBLESHOOTING: Note: You will have a check engine light and/or other problems unless using this product with a compatible ECM calibration. Contact your tuning supplier to learn whether or not aftermarket
Shotgun Single Barrel HPFP install guide
 Shotgun Single Barrel HPFP install guide Thank you for your purchase of the VTT Shotgun Single Barrel HPFP upgrade! First thing to do when you open your box is to make sure all parts are in their respective
 Special Tools Needed: DrVanos.com Stage I Installation Instructions Camshaft locking tool TDC Crank pin Sprocket turning tool Tool rental is available with the purchase of a vanos kit *See website for
Front Drive System - Big Block Chevy Installation Instructions Big Block Chevy with AC & with PS
 Front Drive System - Big Block Chevy Installation Instructions Big Block Chevy with AC & with PS All American Billet Store (800) 764-0926 www.allamericanbilletstore.com Items needed for install Jack Jack
Procharger Stage II Intercooled Supercharger System (11-14 GT)
") Procharger Stage II Intercooled Supercharger System (11-14 GT) Installation Time: Approximately one day. Installed on 2012 Mustang GT 5.0/Manual Required Tools 3/8 Socket Set (Standard and Metric) 1/2
Procharger Stage II Intercooled Supercharger System (11-14 GT) Installation Time: Approximately one day. Installed on 2012 Mustang GT 5.0/Manual Required Tools 3/8 Socket Set (Standard and Metric) 1/2
Single Barrel Shotgun HPFP Install Guide
 Single Barrel Shotgun HPFP Install Guide Thank you for purchasing the VTT Single Barrel Shotgun HPFP upgrade kit! PLEASE READ THE ENTIRE GUIDE BEFORE BEGINNING INSTALLATION! The first thing you should
Installation Manual v1.0: Twin CP3 Fuel Injection Kit Dodge 6.7L
 04/05/2012 Dodge 2010-2011 6.7L Twin CP3 701-900-2356-INST Installation Manual v1.0: Twin CP3 Fuel Injection Kit 2010-2011 Dodge 6.7L Figure 1 - Full Kit Photo 29 Figure 2 - Hardware Kit (800) 949-60002
BLACKBIRD INSTALLATION SUPPLEMENT
 BLACKBIRD INSTALLATION SUPPLEMENT FOR5.3 AND 6 LITER VORTEC SUBURBAN/YUKON/SILVERADO VERSION 2-06 Blackbird Installation Supplement for GM 5.3 and 6 liter Vortec-Suburban/Silverado Parts Included in Installation
6. Remove OEM bolts from engine at locations A, B, and C. Lay the wiring off to the side.
 700359 DewEze Clutch Pump Kit #700359 Ford 5.4L, 6.8L w/ and w/o A/C AA mount 1999- INSTALLATION INSTRUCTIONS 1. Disconnect the battery. 2. Drain the radiator. 3. Remove the air cleaner assembly. 4. Remove
IAG Air / Oil Separator (AOS) For STi
 For STi") IAG Air / Oil Separator (AOS) For 2008-14 STi Part# IAG-ENG-7000 Tools Required: Ratchet, torque wrench, extensions, needle nose pliers, hose cutter, snips/scissors Sockets: 10mm, 12mm 13mm Wrenches: 10mm,
IAG Air / Oil Separator (AOS) For 2008-14 STi Part# IAG-ENG-7000 Tools Required: Ratchet, torque wrench, extensions, needle nose pliers, hose cutter, snips/scissors Sockets: 10mm, 12mm 13mm Wrenches: 10mm,
ALL AMERICAN BILLET. Front Drive System - Small Block Ford Installation Instructions
 ALL AMERICAN BILLET Front Drive System - Small Block Ford Installation Instructions Small Block Ford with AC & PS All American Billet Store (800) 764-0926 www.allamericanbilletstore.com Items needed for
BLACKBIRD INSTALLATION SUPPLEMENT
 BLACKBIRD INSTALLATION SUPPLEMENT 2008 GM 2500 AND 3500 6.6 DURAMAX DIESEL VERSION 5-08 Parts Included in Installation Kit Before beginning installation, check the parts kit thoroughly against the parts
DrVanos.com Stage II Installation Instructions. Tool rental is available with the purchase of a vanos kit *See website for more info*
 DrVanos.com Stage II Installation Instructions Special Tools Needed: Camshaft locking tool TDC Crank pin Sprocket turning tool Tool rental is available with the purchase of a vanos kit *See website for
Installation Manual v1.4: ATS Twin CP3 Kit 2001 GM LB7 Duramax. Please read all instructions before installing the ATS Twin CP3 Kit
 Installation Manual v1.4: ATS Twin CP3 Kit 2001 GM LB7 Duramax Please read all instructions before installing the ATS Twin CP3 Kit Thank you for purchasing the ATS Twin CP3 Kit. The picture below shows
XDP Complete EGR Race Track Kit w/up-pipe. Item Number: XD144
 XDP Complete EGR Race Track Kit w/up-pipe Item Number: XD144 PACKING LIST: 2 - Lined 3/4" SS Hose Clamp 1-3/4 Silicone Hose 1 - XDP Engraved EGR Valve Block-Off Plate with O-ring 1 - EGR Cooler Block-Off
1996 Aerostar/Ranger/Explorer
 Page 1 of 11 Section 03-01B: Engine, 3.0L V-6 IN-VEHICLE SERVICE 1996 Aerostar and Ranger Vehicles Workshop Manual Water Pump SPECIAL SERVICE TOOL(S) REQUIRED Description Tool Number Fan Clutch Holding
BLACKBIRD INSTALLATION SUPPLEMENT
 BLACKBIRD INSTALLATION SUPPLEMENT FOR 2003-7 FORD 6.0 LITER DIESEL SINGLE ALTERNATOR F-350, F-450, F-550, EXCURSION VERSION 7-07 Parts Description Blackbird Wiring Manual Installation Supplement 6.0 Liter
Mishimoto Performance Aluminum Mustang Radiator - Manual - (94-95 GT/Cobra/V6) - Installation Instructions
 - Installation Instructions") Mishimoto Performance Aluminum Mustang Radiator - Manual - (94-95 GT/Cobra/V6) - Installation Instructions The below installation instructions work for the following products: Mishimoto Performance Aluminum
Mishimoto Performance Aluminum Mustang Radiator - Manual - (94-95 GT/Cobra/V6) - Installation Instructions The below installation instructions work for the following products: Mishimoto Performance Aluminum
Slingshot Rotrex Supercharger Kit
 Slingshot Rotrex Supercharger Kit This supercharger kit improves on the Slingshot by forcing more dense air into the engine and creating more power. Installation time of the supercharger depends on you
Installation Manual v1.2: LLY / LBZ/LMM Twin CP3 Kit GM Duramax. Please read all instructions before installation.
 03/24/09 701-900-4290 - INST Installation Manual v1.2: LLY / LBZ/LMM Twin CP3 Kit 04.5-07.5 GM Duramax Please read all instructions before installation. This kit is not emissions legal in California. Kit
BLACKBIRD INSTALLATION SUPPLEMENT
 BLACKBIRD INSTALLATION SUPPLEMENT FOR 2008-105 FORD 6.4 LITER DIESEL F-SERIES VERSION 3/10 Parts Blackbird Wiring Manual Installation Supplement 6.4 liter Diesel Owner s Manual Includes Warrantee Registration
Ford 6.7 EGR Delete Kit
 Fits: 2011 12 Powerstroke 6.7L Read instructions thoroughly before proceeding! ***This kit may void factory warranty please check with manufacturer.*** ***This kit is intended for off road use only.***
Scion FR-S ZN6. GTX2867R Gen2 (Internal Wastegate) Installation Instructions GPP P/N #
 Installation Instructions GPP P/N #") TURBO KIT Scion FR-S ZN6 Subaru BRZ ZC6 GTX2867R Gen2 (Internal Wastegate) Installation Instructions GPP P/N # 11518000 Vehicle Type Chassis Code Engine Code Transmission Model Year Scion FR-S DBA-ZN6
TURBO KIT Scion FR-S ZN6 Subaru BRZ ZC6 GTX2867R Gen2 (Internal Wastegate) Installation Instructions GPP P/N # 11518000 Vehicle Type Chassis Code Engine Code Transmission Model Year Scion FR-S DBA-ZN6
Ford 6.0L Regulated Return Kit
 2003-2007 Ford 6.0L Regulated Return Kit A. Passenger Rear Return B. Line (Longer w/ 1-90 fitting) C. Driver Rear Return Line (Shorter w/ 1-90 fitting) D. Fuel Return Line (2 female fittings) E. Passenger
TABLE OF CONTENTS PARTS LIST
 TROUBLESHOOTING: Note: You will have a check engine light and/or other problems unless using this product with a compatible ECM calibration. Contact your tuning supplier to learn whether or not aftermarket
BLACKBIRD INSTALLATION SUPPLEMENT
 BLACKBIRD INSTALLATION SUPPLEMENT FOR 2003-7 FORD 6.0 LITER DIESEL F-SERIES DUAL ALTERNATOR VERSION 10/07 Blackbird Installation Supplement for Ford 6.0. Liter Dual Alternator Parts included in the 6.0
Powerstroke EGR Delete A B C
 20-203 6.7 Powerstroke EGR Delete A B C D E F G H I J K Part # A B C D E F G H I J K PACKING LIST: QTY. 3 5 2 Description Sensor Bracket Exhaust Blockoff Plate Straights Barbed Brass Fitting 39 5/8 Coolant
EXPANSION TANK PARTS LIST AND INSTALLATION GUIDE
 PARTS LIST AND INSTALLATION GUIDE PARTS LIST 2 PC APPLICATION-SPECIFIC MOUNTING BRACKETS 2 PC BLACK, ANODIZED 6061 ALUMINUM CATCH CANS 4 PC SILICONE HOSES 4 PC PLASTIC BARBED FITTINGS 4 PC WORM-GEAR CLAMPS
Ford Racing Performance Improvement Intake Manifold (96-04 GT) Time Necessary: Approximately 4 hours
 Time Necessary: Approximately 4 hours") Ford Racing Performance Improvement Intake Manifold (96-04 GT) Time Necessary: Approximately 4 hours Tools Required: Ratchet and socket set Torque wrench Large adjustable wrench Needle nose pliers A dozen
Ford Racing Performance Improvement Intake Manifold (96-04 GT) Time Necessary: Approximately 4 hours Tools Required: Ratchet and socket set Torque wrench Large adjustable wrench Needle nose pliers A dozen
Power Steering Pump. GM Century/Lumina/Grand Prix/Intrigue REMOVAL & INSTALLATION BLEEDING
 1 of 9 GM Century/Lumina/Grand Prix/Intrigue 1997-2000 Power Steering Pump REMOVAL & INSTALLATION BLEEDING When servicing the power steering pump, inspect the power steering fluid. Look for foaming, milky
Air Commander Late Model Ford F-150
 EASYSTREET Air Commander Late Model Ford F-150 www.airliftcompany.com MN-544 (02506) ECR 5206 Please read these instructions completely before proceeding with installation The oil level in the compressor
Small Block Ford Serpentine Drive System with & without Power Steering
 an ISO 9001:2008 Registered Company Small Block Ford Serpentine Drive System with & without Power Steering 18865 Goll St. San Antonio, TX 78266 Phone: 210-654-7171 Fax: 210-654-3113 www.vintageair.com
Industrial Injections Compound Turbo Installation For 6.7L Scorpion
 Industrial Injections Compound Turbo Installation For 6.7L Scorpion Step 1: Whenever you are doing an installation the first thing you should do is unhook the batteries to avoid arcing. You will need an
IAG Street Series Air / Oil Separator (AOS) For 2017 WRX
 For 2017 WRX") P IAG Street Series Air / Oil Separator (AOS) For 2017 WRX Part# IAG-ENG-7152 Tools Required: Ratchet, torque wrench, extensions, needle nose pliers, hose cutter, snips/scissors, flathead screwdriver,
P IAG Street Series Air / Oil Separator (AOS) For 2017 WRX Part# IAG-ENG-7152 Tools Required: Ratchet, torque wrench, extensions, needle nose pliers, hose cutter, snips/scissors, flathead screwdriver,
Small Block Ford Serpentine Drive System with & without Power Steering
 an ISO 9001:2008 Registered Company Small Block Ford Serpentine Drive System with & without Power Steering 18865 Goll St. San Antonio, TX 78266 Phone: 210-654-7171 Fax: 210-654-3113 www.vintageair.com
Models Affected: Visions with Propane Engines CORRECTIVE ACTION ---- PROCEDURE
 Propane Belt Squeal Models Affected: Visions with Propane Engines ISSUE Front End Accessory Drive (FEAD) Belt chirping/squealing caused by improper fore-aft crankshaft pulley positioning. CORRECTIVE ACTION
DOWNLOAD ENHANCED INSTALL MANUALS
 U 3 October 2016 1041564 6.7L Performance Intake Plate Manual (I-00371) 1 DOWNLOAD ENHANCED INSTALL MANUALS Cummins 6.7L High Flow Intake Plenum Cover 1041564 2008-2016 6.7L RAM 2500-3500 Pickup PLEASE
Installation Manual v1.1: ATS Twin CP3 Kit GM LB7 Duramax. Please read all instructions before installing the ATS Twin CP3 Kit
 Installation Manual v1.1: ATS Twin CP3 Kit 2002-2004 GM LB7 Duramax Please read all instructions before installing the ATS Twin CP3 Kit This kit is not emissions legal in California. Kit is legal only
Installation Guide for Rough Country 30 in. Chrome Series LED Light Bar w/ Hood Mounting Brackets
 Installation Guide for Rough Country 30 in. Chrome Series LED Light Bar w/ Hood Mounting Brackets Installation Time: 1 Hour Tools Required Trim removal tool (plastic or wood to prevent scratches on the
INSTALLATION INSTRUCTIONS FUEL RAIL
 INSTALLATION INSTRUCTIONS FUEL RAIL MITSUBISHI EVO X Document# 19-0067 Support: info@radiumauto.com WARNING: DON'T SMOKE OR WORK WITH OPEN SPARKS WHILE WORKING ON THE FUEL SYSTEM PREPARING THE VEHICLE:
Mishimoto Performance Aluminum Radiator w/ Stabilizer - Manual (97-04 GT, Mach 1; Cobra)
") Mishimoto Performance Aluminum Radiator w/ Stabilizer - Manual (97-04 GT, Mach 1; 97-01 Cobra) Installed on: 2000 Mustang GT (manual transmission) Tools: 8mm socket 10mm socket 13mm socket 3/4" wrench
Mishimoto Performance Aluminum Radiator w/ Stabilizer - Manual (97-04 GT, Mach 1; 97-01 Cobra) Installed on: 2000 Mustang GT (manual transmission) Tools: 8mm socket 10mm socket 13mm socket 3/4" wrench
Moddit. How to Install Raceseng S1/S2 Pulley Kit on Subaru BRZ
 Moddit How to Install Raceseng S1/S2 Pulley Kit on Subaru BRZ A quick and simple write up on the Raceseng S1/S2 Pulley Kit install on our Subaru BRZ. Written By: Ruthie 2017 www.moddit.com Page 1 of 11
* PLEASE READ INSTRUCTIONS PRIOR TO INSTALLATION
 XDP 6.0L Complete EGR Delete Kit w/up-pipe Item Number: XD169 PACKING LIST: 2 - Lined 3/4" Hose Clamps, 1-180 Coolant Tube, 1-3/4 Silicone Hose, 1 - Stainless Steel Up-pipe 1 - EGR Valve Block-Off Plate,
OMIX-ADA EXHAUST MANIFOLD
 OMIX-ADA EXHAUST MANIFOLD Installation Time: 240 Minutes Tools Required: 3/8 ratchet 3/8 3 extension 10 mm socket 13mm socket 9/16 socket Flashlight 9/16 box end wrench Pocket screw driver Can of brake
2017 Current Ford SuperDuty Adaptive Cruise Control Relocation Bracket Installation Instructions
 2017 Current Ford SuperDuty Adaptive Cruise Control Relocation Bracket Installation Instructions PREPARATION 1. Disconnect the negative terminal on the battery. Park the vehicle on level ground and set
SDHQ F-150 Winch Mount System Installation
 SDHQ 2015+ F-150 Winch Mount System Installation Recommended Tools: Door panel removal tool Needle Nose Pliers 10mm Socket or Wrench 13 mm or ½ Socket (⅜ Drive) 14 mm or 9/16 Socket (⅜ Drive) 21 mm or
SL63 Weistec M156 Supercharger System Installation Guide Stage 1 / Stage 2
 SL63 Weistec M156 Supercharger System Installation Guide Stage 1 / Stage 2 WARNING! DO NOT HAVE YOUR ECU REPROGRAMMED ANYWHERE BUT AT WEISTEC FOR THIS SUPERCHARGER. THE AMG 63 USES AN ELECTRONIC THROTTLE
N55 Turbo upgrade install guide
 N55 Turbo upgrade install guide Thank you for your purchase of the VTT BMW N55 Stage 2 turbo charger upgrade! First thing to do when you open your box is to make sure all parts are in their respective
IAG Street Series Air / Oil Separator (AOS) For WRX
 For WRX") P IAG Street Series Air / Oil Separator (AOS) For 2015-16 WRX Part# IAG-ENG-7152 Tools Required: Ratchet, torque wrench, extensions, needle nose pliers, hose cutter, snips/scissors, flat head screw driver,
P IAG Street Series Air / Oil Separator (AOS) For 2015-16 WRX Part# IAG-ENG-7152 Tools Required: Ratchet, torque wrench, extensions, needle nose pliers, hose cutter, snips/scissors, flat head screw driver,
2017 Current Ford Raptor HoneyBadger Rear Bumper Installation Instructions
 2017 Current Ford Raptor HoneyBadger Rear Bumper Installation Instructions PREPARATION 1. Disconnect the negative terminal on the battery. Park the vehicle on level ground and set the emergency brake.
Always wear safety glasses when working on your vehicle.
 90-93 MAZDA MIATA SUPERCHARGER KIT The KraftWerks 90-93 Mazda Miata Supercharger Kit was designed for easy installation. Competent mechanics with the appropriate tools will find the process to be relatively
ADDICTIVE DESERT DESIGNS
 Preparation: Disconnect the negative battery terminal. Park the vehicle on level ground and set the emergency brake. We recommend reading through the installation instructions in whole before performing
MAZDASPEED3 Intercooler Instructions
 MAZDASPEED3 Intercooler Instructions Congratulations on your purchase of the COBB Tuning Front Mount Intercooler System for your 2007-2009 Mazdaspeed3. The following instructions should assist you through
Huron Speed Products Twin Turbo Install Gen 2 CTS-V (09-15)
") Huron Speed Products Twin Turbo Install Gen 2 CTS-V (09-15) The following install guide is simply that, a guide to help you with installation. It is by no means the exact method to perform installation,
Huron Speed Products Twin Turbo Install Gen 2 CTS-V (09-15) The following install guide is simply that, a guide to help you with installation. It is by no means the exact method to perform installation,
M62 Alternator Removal / Replacement (Water Cooled)
") M62 Alternator Removal / Replacement (Water Cooled) Pre-Steps 1. Disconnect Battery Positive lead 2. Charge Your Battery with battery charger to full charge (So you new alternator wont have to work as
M62 Alternator Removal / Replacement (Water Cooled) Pre-Steps 1. Disconnect Battery Positive lead 2. Charge Your Battery with battery charger to full charge (So you new alternator wont have to work as
Subaru WRX Performance Charge-Pipe System, 2015+
 PARTS LIST AND PARTS LIST 1PC BAR-AND-PLATE INTERCOOLER 1PC INTERCOOLER MOUNTING BRACKET 1PC CHARGE-PIPE ASSEMBLY 1PC AIR DIVERTER WITH ATTACHED RUBBER GASKETS 1PC CHARGE-PIPE-TO-INTERCOOLER HOSE INSTALLATION
91/2 Bulb End Fuel. Low Pressure. Fitting. Low Pressure 12Molded Hose. High Pressure 11Feed Line. Injection Line
 Parts list 1CP3 & O-Rings 2CP3 Mounting Plate 3Mounting Plate Hardware 43 Brass Sealing Washers 5Fuel Temp Sensor Bracket 6Fuel Temp Sensor Bracket Hardware 7Fuel Rail Cap & plug 83/8 Bulb End Fuel Fitting
Factory safe air/fuel ratio s for Optimum performance Patent# 7,359,795
 Part Number SP1125 2007-09 BMW 335i 2008-09 BMW135i 3.0L Twin Turbo L6 This kit is equipped with the Injen/AMSOIL Ea nanofiber dry filters, Ea nanofiber filters do not require oil. 1-2 piece air intake
CP3 Retrofit Pump Install:
 CP3 Retrofit Pump Install: 2A 4 2 5 3 6 1.) Clean this area very well. No dirt = No troubles!!!!! Lay lots of Rags under and around the pumps, alternator and belts!!!!! This will save dropped tools, parts,
Shotgun Double Barrel HPFP install guide
 Shotgun Double Barrel HPFP install guide Thank you for your purchase of the VTT Shotgun Double Barrel HPFP upgrade! First thing to do when you open your box is to make sure all parts are in their respective
IAG Competition Series Air / Oil Separator (AOS) For WRX
 For WRX") P IAG Competition Series Air / Oil Separator (AOS) For 2015-16 WRX Part# IAG-ENG-7252 Tools Required: Ratchet, torque wrench, extensions, needle nose pliers, hose cutter, snips/scissors, flat head screw
P IAG Competition Series Air / Oil Separator (AOS) For 2015-16 WRX Part# IAG-ENG-7252 Tools Required: Ratchet, torque wrench, extensions, needle nose pliers, hose cutter, snips/scissors, flat head screw
IAG Street Series Air / Oil Separator (AOS) For WRX
 For WRX") IAG Street Series Air / Oil Separator (AOS) For 2008-14 WRX Part# IAG-ENG-7100 Tools Required: Ratchet, extensions, needle nose pliers, hose cutter, snips/scissors, flat head screw driver, hose clamping
IAG Street Series Air / Oil Separator (AOS) For 2008-14 WRX Part# IAG-ENG-7100 Tools Required: Ratchet, extensions, needle nose pliers, hose cutter, snips/scissors, flat head screw driver, hose clamping
Ford 7.3L Powerstroke Regulated Fuel Return
 Ford 7.3L Powerstroke Regulated Fuel Return 7.3L Regulated Fuel Return A B C D E PART# A B C D E F G H I J K L M N O P Q R S S PACKING LIST: QTY. 2 2 2 2 2 F G H Description Driver Front Soft Line (5.5
FlowMax Lift Pump Kit
 15 June 2016 (1050316) 2008-2010 Ford 6.4L FlowMax Lift Pump Kit (I-00359) - 1-2008-2010 Ford 6.4L PowerStroke FlowMax Lift Pump Kit Installation Instructions P/N# 1050316 PLEASE READ ALL INSTRUCTIONS
INSTALLATION MANUAL
 INSTALLATION MANUAL 1500350 Parts List 1 Driver / left inner fender liner 1 Passenger / right inner fender liner 4 Z-hanger brackets 1 Thread-set bolt, M6 1 Thread-set washer 1 Thread-set spacer 22 Hex
2016+ NISSAN TITAN XD
 PARTS LIST AND PARTS INCLUDED 1PC MISHIMOTO INTERCOOLER 2PC SILICONE BOOTS WITH DURACORE TECHNOLOGY 4PC CONSTANT-TENSION T-BOLT CLAMPS 2PC ALUMINUM SPACERS MOUNTING HARDWARE CAUTION Never work on the cooling
ITEM QTY CHECK PART NUMBER DESCRIPTION
 PART #21128 2010 Camaro Cold Air Induction Stage II PACKING LIST Before installation, use this check list to make sure all necessary parts have been included. ITEM QTY CHECK PART NUMBER DESCRIPTION 1.
EXPANSION TANK PARTS LIST AND INSTALLATION GUIDE
 PARTS LIST AND INSTALLATION GUIDE PARTS LIST 1 PC MISHIMOTO RADIATOR 2 PC CAST THERMOSTAT HOUSINGS 1 PC MAGNETIC DRAIN PLUG W/ DOWTY OIL SEAL 4 PC RUBBER BUSHINGS AND METAL COLLARS 3 PC HARDWARE PACKETS
6.7L Cummins EGR Delete
 6.7L Cummins EGR Delete H I A B E C D F J K G L PACKING LIST: Part# A B C D E F G H I J K L QTY. 4 Description Coolant Hose Coolant Hose Connector M0 Flange Nut 5/6 Bolts, Nuts, and Flat Washers /4-0 Bolt,
Part # Description Qty Inspected By Rack & Pinion Pump Kit Remote Reservoir Line Kit Shaft Kit
 58-62 Corvette Power Rack & Pinion Kit Instructions # 8011530 Unisteer offers a limited warranty against all manufacturer defects of their kits and supplied parts. Unisteer will not honor any warranty
AEV30308AA Last Updated: 05/31/18. 4 DUALSPORT sc SUSPENSION system for RAM 1500 air ride standard and rebel INSTALLATION GUIDE
 AEV30308AA Last Updated: 05/31/18 4 DUALSPORT sc SUSPENSION system for RAM 1500 air ride standard and rebel INSTALLATION GUIDE PLEASE READ BEFORE YOU START TO GUARANTEE A QUALITY INSTALLATION, WE RECOMMEND
2010 CAMARO COG DRIVE UPGRADE Installation Instructions
 2010 CAMARO COG DRIVE UPGRADE Installation Instructions 2010 CAMARO SS (LS3 & L99) P/N: 4GE118-010, 4GE118-020, 4GE118-030 ENGINEERING, LLC 1650 Pacific Avenue, Channel Islands, CA 93033-9901 Phone 805
2015 WRX Engine Oil Cooler
 2015 WRX Engine Oil Cooler 2014-04-24 Thank you for purchasing this PERRIN product for your car! Installation of this product should only be performed by persons experienced with installation of aftermarket
Edelbrock E-Force Supercharger Part #1538: Dodge 1500 Truck 5.7L V8 HEMI
 Edelbrock E-Force Supercharger Part #1538: 2009-2014 Dodge 1500 Truck 5.7L V8 HEMI 2009-14 Dodge 5.7L Hemi 1500 Truck INTRODUCTION Thank you for purchasing the Edelbrock Supercharger System for the 2009-15
PARTS LIST INSTALLATION INSTRUCTIONS PARTS LIST AND INSTALLATION GUIDE INSTALL TIME: 2 HOURS INSTALL DIFFICULTY: 3/5
 PARTS LIST AND PARTS LIST 1PC MISHIMOTO INTERCOOLER 1PC M6 X 1.0 X 20MM FLANGE BOLT 1PC M4 X 0.7 X 12MM BUTTON-HEAD BOLT 1PC M4 LOCK WASHER 1PC MAP SENSOR O-RING 2. Remove the eight pop clips that hold
Part Number SP BMW 335i BMW135i 3.0L Twin Turbo L6
 This kit is equipped with the Injen/AMSOIL Ea nanofiber dry filters, Ea nanofiber filters do not require oil. Part Number SP1125 2007-09 BMW 335i 2008-09 BMW 3.0L Twin Turbo L6 1-2 piece air intake system
Detroit Speed, Inc. Electric Headlight Door Kit Corvette P/N: &
 Detroit Speed, Inc. Electric Headlight Door Kit 1968-82 Corvette P/N: 122006 & 122007 The Detroit Speed Inc. Electric Headlight Door Kit replaces the stock vacuum actuated system on all 1968-82 Corvettes.
INSTALLATION INSTRUCTIONS COOLANT EXPANSION TANK
 INSTALLATION INSTRUCTIONS COOLANT EXPANSION TANK 2011+ FORD MUSTANG Document: 19-0147 Support: info@radiumauto.com Steps below show installation in a 2015+ Ford Mustang (P/N: 20-0286) The same procedure
07-11 GM 4WD 1500 P/U 1 1/4 Body Lift
 92RC70100 07-11 GM 4WD 1500 P/U 1 1/4 Body Lift Thank you for choosing Rough Country for all your suspension needs. Rough Country recommends a certified technician install this kit. Attempts to install
Edelbrock E-Force Supercharger JEEP WRANGLER JK 3.6L V6 Part #1527 and 15270
 Edelbrock E-Force Supercharger 2012-14 JEEP WRANGLER JK 3.6L V6 Part #1527 and 15270 INTRODUCTION Thank you for purchasing the Edelbrock Supercharger System for the Jeep Wrangler with 3.6L V6 Pentastar.
C63 Weistec M156 Supercharger System Installation Guide Stage 3
 C63 Weistec M156 Supercharger System Installation Guide Stage 3 WARNING! DO NOT HAVE YOUR ECU REPROGRAMMED ANYWHERE BUT AT WEISTEC FOR THIS SUPERCHARGER. THE AMG 63 USES AN ELECTRONIC THROTTLE CONTROL