Please use this How to in conjunction with the workshop manual pdf on the same subject.
|
|
|
- Herbert Caldwell
- 5 years ago
- Views:
Transcription

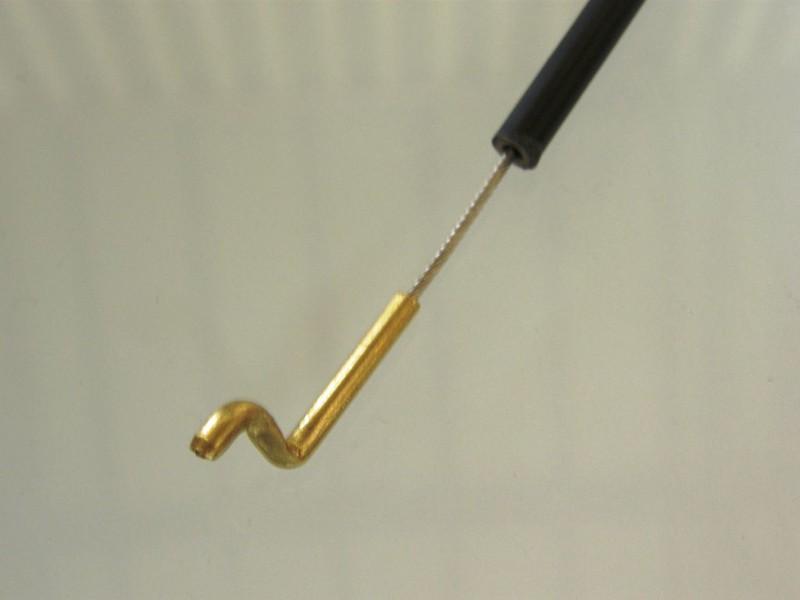
1 Please use this How to in conjunction with the workshop manual pdf on the same subject. The workshop manual is a decent guide but fails to mention a few things which would hinder progress and probably cause damage to parts. Parts needed: One replacement bonnet cable OEM supplied at approx. 25 (special order). It comes with new grommet attached. Tools needed: A cable removing tool as pictured in the workshop manual. This I made myself. It is simply a length (approx 5 metres) of 1.5mm or 2mm wire rope available in B & Q and similar outlets, 6-8 ferrules and access to a crimper, Only use half the ferrules you may need the other half for later in the process. The wire rope and ferrules costs about 5 Simply create a loop at one end just big enough to fit the end of the bonnet cable through and using the ferrules and crimper to make the loop permanent.

2 Other tools required: Gorilla tape/gaffer tape or similar 10mm spanner Torx drivers A torch WD40 Lubricating oil The whole job took me 2 hours. I m a timid DIYer and didn t want to damage anything and more importantly lose the cable half way along its run so took my time. With the knowledge I have now on how to do it I could probably do it in an hour. Firstly disconnect the battery The job necessitates exposing the fuse box situated under the steering wheel and removing the securing bolts before manipulating it into a position where access can be gained to the grommet in the bulkhead. Once the battery is disconnected follow the workshop pdf in removing: The sound insulation under the fascia: This is held by 3 trim clips which are reusable. The trim below the fascia:

3 This is the panel which is hinged below the steering wheel. Quarter turn the three clips holding the trim up and lift up the steering wheel adjustment lever to allow it to drop down and then unscrew the 2 torx screws which become exposed once the panel drops down. The bonnet release lever: This is held by one 10mm bolt. The scuttle trim. This is held by a torx screw down near the carpet where it meets the door shut trim and a reusable trim clip and a 10mm nut at the top. It is also held by a metal spring clip so needs gently prising off. Still following the workshop pdf partly remove the fuse box bracket assembly. There are 2 10mm nuts to the rear which need undoing. One you would have already undone in removing the scuttle trim Once the nuts have been removed the bracket can be gently prised off the 2 remaining studs. This is the point where I found the workshop instructions wanting. Having prised the bracket from the studs I found it didn t actually allow enough (if any) movement of the fuse box to give sight of the bonnet cable and grommet, which is the ultimate aim. What needs to be done next is to prise the fuse box bracket off a metal arm which is situated at the top of the fuse box. It sits in a groove and simply pulls free. (Pic 4 shows the metal arm once prised away from the fuse box).

4 The metal arm is in the foreground. In the background to the left you can see the grommet. Once this has been done the fuse box bracket can swing down and if a torch is shone in the space vacated by the fuse box aimed up towards the bulkhead the bonnet cable and grommet are revealed. Pic5 shows the grommet more clearly:

5 At this point the bonnet release cable is free inside the cabin and you should have a clear view of where it passes through the bulkhead. Turn your attention now to outside. Follow the workshop instructions to: Remove the 4 reusable trim clips holding the plastic top trim and remove the top trim. The workshop manual then states remove the outer cable stop. I puzzled over this for some minutes until I narrowed it down to a black torx screw near one of the inner bonnet stops to the left of the bonnet locks as you face the car. To accurately identify it run your hand on the underside of the panel and you should feel a metal clip which the screw holds on and clamps onto the bonnet cable:

6 As you remove the screw it also releases a plastic bracket holding a rubber hose. Keep hold of both plastic bracket and metal clamp as you remove the screw to save losing them into the engine bay. There is a second plastic hose bracket a few cms further towards the wing: As you remove the screw it also releases a plastic bracket holding a rubber hose. Keep hold of both plastic bracket and metal clamp as you remove the screw to save losing them into the engine bay. There is a second plastic hose bracket a few cms further towards the wing:

7 This holds the same hose and the bonnet cable but is not attached to the body but will be lost and/or hinder removal of the cable if not taken off. The next instruction is to remove the cable end from the bonnet lock. You will see the cable end is Z shaped:

8 I could find no way of releasing it from the bonnet lock without loosening the lock by removing one of the 2 10mm bolts holding it on and loosening the other. I was concerned about retightening in the correct position but on close inspection there are 2 raised lugs on the panel holding the lock which provide accurate guides for retightening. (See pic 9 showing the bonnet lock slackened off):

9 The bonnet cable is now free. At this point I took time to follow its run to get an idea of what lay ahead. It runs through an aperture on the front panel, follows the front panel towards the wing and then seems to enter the wing itself before reappearing near the bonnet hinge. It is near the hinge you will see the cable emerge from the wing and it is here you will see the grommet that you have exposed in the cabin earlier. (See pic10). You can just see the grommet at right angles behind the hinge:

10 I spent quite a time trying to pull this 5-6cm long grommet from the bulkhead to no avail. It is in tight and it s difficult to get any sort of grip on it. The workshop instructions advise to push it through to the cabin from the engine bay. Good luck with that one too. I had no luck. SHORT NOTE ON REMOVING THE GROMMET: ( I decided that once I d pulled the bonnet cable through the wing and had sight and hold of the wire rope tool I could simply use brute force to try and drag it through the grommet to the cabin. There could be one of 2 outcomes. Brute force would drag the old cable, along with the wire rope through the grommet, possibly dragging the grommet out with it (a desirable outcome) or the wire rope would break in the process. If the latter should happen and it did - it is simply a matter of feeding the wire rope through the hole left by the eventual removal of the grommet and making another loop if required and reattaching as before. As happened with me, the wire rope broke so I dragged the old cable through the grommet and once the grommet had no cable running through it. It made it easy to yank it out without fuss. If you try the brute force method lubricate the grommet inside to give yourself the best chance). It is now you need you bonnet cable removing tool. Or simply put the wire rope with loop that you made earlier. Slip the Z shaped cable end into the loop. I then used Gorilla tape to ensure the wire rope tool could not part company with the bonnet cable as for this to happen will obviously cause no end of grief. I then grabbed the bonnet cable along its run in short stretches and teased the cable and the attached wire rope through. Teasing it gently it took only minutes to pull the cable through one end of the wing and back through the other end. Make sure the wire rope is still attached and then decide what method you are going to use to complete the removal. If you have managed to get the grommet out simply pull through from the cabin until the whole bonnet cable appears. You should still have the other end of the wire rope visible near the bonnet lock waiting to be tugged on to reverse the procedure. Attach the new cable (using Gorilla tape as insurance) and poke it through the bulkhead. The new cable is supplied with new grommet already in place so the old grommet can be discarded. (See pics 11,12 & 13
:")
11 showing the new cable):
12

13 I eased the grommet right up to the lever it give a full free run of cable. I used WD40 to help. Once the cable has been passed through the bulkhead I took the advice of other contributors on this subject and, while holding the cable up dribbled lubricating oil down between inner cable and sheath. That done it is simply a case of using the wire rope tool to tease the bonnet cable back along its dedicated route. Once I d got the cable in place I attached it to the bonnet lock and reseated the bonnet lock. Working back inside the cabin I then sprayed WD40 on the cable and grommet to assist in locating it in its hole. I then very gently (as the lever is not very robust) operated the lever to see if the bonnet released o.k. Once satisfied that it did I put everything back together. The cable doesn t have adjustment on it so as long as it is not kinked or stretched everything should work o.k. The last job was to degrease both locks with WD40. All trim clips removed are reusable.
Fitting the Bell Auto Services (B-A-S) TDV6 EGR Blanking Kit to a 2006 model Discovery 3 TDV6 HSE
 TDV6 EGR Blanking Kit to a 2006 model Discovery 3 TDV6 HSE") Fitting the Bell Auto Services (B-A-S) TDV6 EGR Blanking Kit to a 2006 model Discovery 3 TDV6 HSE Before I describe how I did this, I must first thank other members of the Disco3.co.uk forum (namely J,moore
Fitting the Bell Auto Services (B-A-S) TDV6 EGR Blanking Kit to a 2006 model Discovery 3 TDV6 HSE Before I describe how I did this, I must first thank other members of the Disco3.co.uk forum (namely J,moore
Door panel removal F07 5 GT
 Things needed Decent plastic trim removal tools Torx 30 Spare door clips 07147145753 I got away with a set of 5 but if I did it again I d be cautious and get 10. From prior experience if they are damaged
Door Panel Removal & Window Stop Adjustment
 Door Panel Removal & Window Stop Adjustment By: Jeff Wolford Disclaimer: This is simply an article of how I fixed my car. I m not responsible if you break, scratch, or mess up anything following my example.
Rear Speaker replacement.
 Rear Speaker replacement. First off you need the right rear speakers. The easy bit is 6x9 and better than a 15W paper cone, the difficult bit is getting a mounting depth under 74mm. Or to be more precise,
Fitting Instructions For The TDV6 EGR Blanking Kit To A 2006 Model Discovery 3 TDV6 GHSE
 Part Number DA1112 Fitting Instructions For The TDV6 EGR Blanking Kit To A 2006 Model Discovery 3 TDV6 GHSE You do this modification at your own risk. Britpart won t be held responsible for what is written
what you need to do is hit the taper housing as hard as you can with your hammers AT THE SAME TIME and at a slight angle, what will happen is you
 first things first, get the car on axle stands and the wheels off. Open the bonnet to let more light through to the area in which you'll be working. The following guide shows the passenger side being done
Peugeot 406 Coupe: Delocking your boot V.1 April 2005
 This is a first stab at a DIY guide to de-locking your 406 Coupe. It isn t a hard modification to do yourself, but you do need to be confident working on your cars electrics and removing and refitting
OEM Cruise Control Installation in GMC/Chevy NBS trucks
 OEM Cruise Control Installation in 99-02 GMC/Chevy NBS trucks May 2008 ~ Rampage_Rick Having just installed factory cruise control in my 00 Sierra, I thought I d share the fun. I followed the steps outlined
FITTING OIL TEMP AND PRESSURE GUAGES
 FITTING OIL TEMP AND PRESSURE GUAGES this guide is of reference to fitting an oil temp and pressure sender/ sensor into a sandwich plate- not the sump plug temp sensor (although it wouldn't be much different
At Mark's suggestion I thought I'd write this up so future Coupe lovers can have as much fun* as I did with this job.
 At Mark's suggestion I thought I'd write this up so future Coupe lovers can have as much fun* as I did with this job. My enormous thanks to forum members, particularly glorfindel, for their advice when
REPAIR for: Sidelamp Bulb(s) Faulty, Left Tail Lamp Faulty, Right Tail Lamp Faulty, Directional Indicator Faulty, Left Hand Stop Bulb Faulty
 Faulty, Left Tail Lamp Faulty, Right Tail Lamp Faulty, Directional Indicator Faulty, Left Hand Stop Bulb Faulty") REPAIR for: Sidelamp Bulb(s) Faulty, Left Tail Lamp Faulty, Right Tail Lamp Faulty, Directional Indicator Faulty, Left Hand Stop Bulb Faulty DIFFICULTY LEVEL: ***** Drilling, Wire Crimping, Tight Spaces,
REPAIR for: Sidelamp Bulb(s) Faulty, Left Tail Lamp Faulty, Right Tail Lamp Faulty, Directional Indicator Faulty, Left Hand Stop Bulb Faulty DIFFICULTY LEVEL: ***** Drilling, Wire Crimping, Tight Spaces,
This guide will explain how to remove the old springs from the car and replace them with lowering springs.
 fubar Guide: Fitting lowering springs to the Mk2 Clio The method described below worked for me. I am not saying it is the only method to complete the task. I will not accept any responsibility for damage
Disco 3 Clock Spring / Rotary Coupler replacement
 Disco 3 Clock Spring / Rotary Coupler replacement I recently had to change my Clock spring and thought some folks may find it helpful to see what it entailed. I did lots of reading around but couldn t
Improving the gearshift feel in an SW20.
 Improving the gearshift feel in an SW20. Part one In 3 parts. The SW20 gearshift can be often be greatly improved by eliminating play in the shift linkages, and this article covers three areas that need
C4 Sound Deadening & Insulation Kit Interior Removal & Installation Instructions
 C4 Sound Deadening & Insulation Kit Interior Removal & Installation Instructions Ok, let's start with taking the radio bezel dash area off first. Here is what the OEM radio looks like, and the points you
Apologies for the absence of pictures during the removal. I was just getting on with it and completely forgot about taking pictures.
 Please note that this is exclusive to a non-sunroof vehicle. Those with sunroofs will have additional fittings/fixings to deal with, of which I have no knowledge of. Apologies for the absence of pictures
Fitment Guide Volkswagen Golf GTI MK V1.0
 Fitment Guide Volkswagen Golf GTI MK6 2010 V1.0 www.ecliptech.com.au You need 3 wires to fit the Shift-I to the GTI. Power and Ground from the diagnostics port (near driver s side knee) and the RPM signal
J&M Mustang Adjustable Panhard Rod (05-09) - Installation Instructions
 - Installation Instructions") J&M Mustang Adjustable Panhard Rod (05-09) - Installation Instructions The below installation instructions work for the following products: J&M Mustang Adjustable Panhard Rod (05-09) Please read through
J&M Mustang Adjustable Panhard Rod (05-09) - Installation Instructions The below installation instructions work for the following products: J&M Mustang Adjustable Panhard Rod (05-09) Please read through
Troubleshooting Guide for Okin Systems
 Troubleshooting Guide for Okin Systems More lift chair manufacturers use the Okin electronics system than any other system today, mainly because they re quiet running and usually very dependable. There
Air Oil Separator for WRX
 Air Oil Separator for 2015+ WRX 2018-06-05 Thank you for purchasing this PERRIN product for your car! Installation of this product should only be performed by persons experienced with installation of aftermarket
How to change Swirl Flaps, on Diesel BMW
 How to change Swirl Flaps, on Diesel BMW I am now going to show you how i did it on my car. May'sedition of Total BMW (still in WHSmiths) did a cover on how to change and modify Swirl flaps on a 330d engine,
*Some speedometers have these additional electronic connections. If yours does, then remove the smaller slotted screws shown.
 www.odometergears.com 1981-1985 240 Cable-Driven Speedometers (NOT for 1986 and later electronic units) http://www.davebarton.com/240-odometer-repair.html For this set of instructions below, I will not
How I installed new brake pads on my i with Sport Package (should be fine for other E39 s) By Robert B.
 By Robert B.") How I installed new brake pads on my 1999 528i with Sport Package (should be fine for other E39 s) How I installed new brake pads on my 1999 528i with Sport Package (should be fine for other E39 s) By
How I installed new brake pads on my 1999 528i with Sport Package (should be fine for other E39 s) How I installed new brake pads on my 1999 528i with Sport Package (should be fine for other E39 s) By
List of parts needed below. Tools needed
 1 BMW 645 Coolant leak repair (Cap with Seal Repair and Expanding Coolant Pipe Installation w Pics) By Michael R. Brown (Estimated time to complete the job is 6-8 hrs) List of parts needed below. BMW PART
Looking up the front of the engine from under the radiator. (Picture taken with belt under tension.)
") 8. If you re replacing the AC compressor drive belt as well, it s time to loosen its belt tensioner. The AC compressor belt tensioner is very obvious under the front of the car. Loosen the 13mm bolt, then
8. If you re replacing the AC compressor drive belt as well, it s time to loosen its belt tensioner. The AC compressor belt tensioner is very obvious under the front of the car. Loosen the 13mm bolt, then
13 October, 2014 Page 1
 13 October, 2014 In my second and last Helicycle I want to make everything better than the first one. That includes not only a transmission chip detector, but one for the tail rotor as well. The transmission
Volvo 1800 Dash Pad Replacement
 Volvo 1800 Dash Pad Replacement (courtesy of John Garden State Chapter Volvo Club America) Reupholstering the dash Well it has been some time since I have been online in the forum. Winter is a quite time
Intake Kit Supplement for CRV and Pathfinder
 Intake Kit Supplement for CRV and Pathfinder This guide will briefly outline how to install the intake kits for the Honda CRV and Nissan Pathfinder. This is a pretty basic job, but for the average person
How To: Thermostat change - D8 V6 194bhp
 How To: Thermostat change - D8 V6 194bhp Firstly, take off the Air Filter hoses and connectors and lift off. This leaves you with this workable space... I started with taking the two bolts out of the cable
PIL0478 ISSUE 01/ 07/16
 ISSUE 01/ 07/16 PIL0478 ZAFIR G9 CEILING FITTING PIL0478 ISSUE 01/ 07/16 PART C PART E PART 21 SELV 1 1.B 1 3.1 3.3 3.4 3.5 3.6, 3.8 3.10 3.12 3.14 3.16 3.17 3.18 3.19 3.19 ATTENTION! THE TABLE BELOW
Troubleshooting Guide for Limoss Systems
 Troubleshooting Guide for Limoss Systems NOTE: Limoss is a manufacturer and importer of linear actuators (motors) hand controls, power supplies, and cables for motion furniture. They are quickly becoming
Cackle cure Kit Installation by Pete Cleveland (aka FTE) for Dino Fuel Alternatives
 for Dino Fuel Alternatives") Cackle cure Kit Installation by Pete Cleveland (aka F250_ @ FTE) for Dino Fuel Alternatives March 26, 2007 Test Vehicle: 2002 Ford F250 XLT, 7.3L PowerStroke TurboDiesel, 2WD, Crew Cab, SWB, SRW, 124,000
Cackle cure Kit Installation by Pete Cleveland (aka F250_ @ FTE) for Dino Fuel Alternatives March 26, 2007 Test Vehicle: 2002 Ford F250 XLT, 7.3L PowerStroke TurboDiesel, 2WD, Crew Cab, SWB, SRW, 124,000
Tempted by the Fruit of Another (A Little Red Diversion)
") Part 4 Tempted by the Fruit of Another (A Little Red Diversion) Last month saw the Green n Mean s back end problems remedied; it also saw the purchase of another V12 XJS by the lost soul writing this article.
Part 4 Tempted by the Fruit of Another (A Little Red Diversion) Last month saw the Green n Mean s back end problems remedied; it also saw the purchase of another V12 XJS by the lost soul writing this article.
It should be used in conjunction with the full Vortex thread entitled
 Phaeton Upgrade How to fit a rear AC Controller to 5 Seat Phaetons Summary This document provides resources, guidance, hints and tips to achieve the change shown in the above two photographs. I cannot
This is a guide to assist you adjust the valve clearance on a 2l V6 MIVEC engine found in a Mitsubishi FTO GPX
 Adjusting the valve clearance on a 2L V6 FTO engine This is a guide to assist you adjust the valve clearance on a 2l V6 MIVEC engine found in a Mitsubishi FTO GPX Disclaimer: This guide is to assist you
INSTALLATION INSTRUCTIONS
 INSTALLATION INSTRUCTIONS FUEL SURGE TANK INSTALLATION KIT 1999-2006 BMW E46 COUPE Document# 19-0056 Support: info@radiumauto.com Note: This kit was designed for a standard single pump Radium Engineering
Connecting the rear fog light on the A4 Jetta, while keeping the 5 Light Mod
 Connecting the rear fog light on the A4 Jetta, while keeping the 5 Light Mod DISCLAIMER: I'm human and make mistakes. If you spot one in this how to, tell me and I'll fix it This was done on my 99.5 Jetta.
Tools Required. Metric Wrench Set Screwdriver Set Metric Socket Set Pliers Heavy duty hydraulic Jack and Car Stands Box knife or similar Hacksaw WD40
 Subaru 2004+ Legacy GT & Outback XT For JDM 2.0 twinscroll turbo and USDM 2.5 turbo models Front Mount Intercooler Fitting Instructions PN# LEG-1348-000 You are now the proud owner of a highly tested and
Remove the 3-11mm nuts holding mirror on. Don t drop the nuts!
 2005-2012 Ford Mustang Puddle Lamp Kit Parts List: Quantity: Tool List: LED Lamps 2 Flat head screwdriver Seals 2 Ratchet & Socket set OR Nuts 2 Adjustable Wrench Wiring harness 1 Drill & 11/16 th bit
UrS6 Brake Servo Replacement Douglas Fifield July 2006
 UrS6 Brake Servo Replacement Douglas Fifield (douglas.fifield@gmail.com) July 2006 This write-up covers the replacement of the brake servo on a 95.5 S6. The master cylinder remained intact and connected,
 Page 1 of 33 Welcome, goldeneye006 Notifications My Profile Settings Log Out Forum What's New? Home Classifieds Vendors Vendor Specials Store New Rules Posts Private Advertising Messages FAQ Calendar Community
Another CJ picture guide to replacing the key cylinder in a non-tilt steering column
 Another CJ picture guide to replacing the key cylinder in a non-tilt steering column by John Strenk Well I'm sure it's happened to all of us one time or another. You park your jeep and go to turn off your
Brake lever removed. Not too much corrosion on this one. The circlip retaining the plunger can be seen more clearly after cleaning with WD40
 Genuine Suzuki Kits to re-furbish your Master Cylinder are available from your regular Kettle parts supplier Part No. 59600-45811 and should cost about 20. The Kits contain all of the parts that you need
Ford Racing BOSS 302 Engine Oil Cooler (11-14 GT)
") Tools needed: 14mm hex socket 7mm socket/wrench 8mm socket/wrench Ford Racing BOSS 302 Engine Oil Cooler (11-14 GT) 10mm socket (for airbox removal) ¾ inch or 19mm wrench Torque wrench Appropriate ratchets
Tools needed: 14mm hex socket 7mm socket/wrench 8mm socket/wrench Ford Racing BOSS 302 Engine Oil Cooler (11-14 GT) 10mm socket (for airbox removal) ¾ inch or 19mm wrench Torque wrench Appropriate ratchets
JRSC + BBK Install on SVTF. Neil A. Shah medicnas on focaljet September 2006
 JRSC + BBK Install on SVTF Neil A. Shah medicnas on focaljet September 2006 ECU up here. When removing make sure the smaller bundles of wires don t get wrapped around the bottom edge and break - this almost
Another CJ picture guide to
 Another CJ picture guide to replacing the key cylinder in a non-tilt steering column by John Strenk Well I'm sure it's happened to all of us one time or another. You park your jeep and go to turn off your
Triumph Street Triple VSM Grip Heater Install
 Triumph Street Triple VSM Grip Heater Install Introduction: With winter fast approaching and with painful memories of last winter riding with the club it was time to do something about getting some grip
Mustang CDC Lightbar (94-04) - Installation Instructions
 - Installation Instructions") Mustang CDC Lightbar (94-04) - Installation Instructions The below installation instructions work for the following products: Classic Design Concepts Mustang Convertible Lightbar (94-04 Carbon Fiber) Classic
Mustang CDC Lightbar (94-04) - Installation Instructions The below installation instructions work for the following products: Classic Design Concepts Mustang Convertible Lightbar (94-04 Carbon Fiber) Classic
2001 V70 T5 ETM Removal and Cleaning Directions
 2001 V70 T5 ETM Removal and Cleaning Directions Howard Cheng howardc64@gmail.com 10/24/05 Version 1.4 Read this before you start I performed this ETM cleaning because I had gotten 2 reduced performance
Nissan GTR Alpha Fuel System
 Nissan GTR Alpha Fuel System Instructions V5 The goal of AMS is to provide the highest quality, best performing products available. By utilizing research and development, and rigorous testing programs
LITTLE JOHN Mk2 REWIRING - SWITCH, MOTOR, & MAINS INPUT
 LITTLE JOHN Mk2 REWIRING - SWITCH, MOTOR, & MAINS INPUT Overview I could see that the machine needed rewiring by the state of the perished mains lead and the large quantity of insulation tape that Dad
Aamir_bt The legend..
 Aamir_bt The legend.. How to do timing on a 4XE1-W (DOHC) engine. well i decided to to a write up for DOHC timing since there was only the SOHC written up, and i had to do a timing belt on my stylus anyways,
FITTING OF (WESTFALIA) REMOVABLE TOWBAR ON SKODA OCTAVIA WITHOUT TOWBAR PREPARATION (04/11/16 CJ v1.0)
 REMOVABLE TOWBAR ON SKODA OCTAVIA WITHOUT TOWBAR PREPARATION (04/11/16 CJ v1.0)") FITTING OF (WESTFALIA) REMOVABLE TOWBAR ON SKODA OCTAVIA 2013+ WITHOUT TOWBAR PREPARATION (04/11/16 CJ v1.0) A. INTRO ALL STEPS COMPLETED AT YOUR OWN RISK! I AM NOT LIABLE FOR ANY LOSS OR DAMAGE! These
FITTING OF (WESTFALIA) REMOVABLE TOWBAR ON SKODA OCTAVIA 2013+ WITHOUT TOWBAR PREPARATION (04/11/16 CJ v1.0) A. INTRO ALL STEPS COMPLETED AT YOUR OWN RISK! I AM NOT LIABLE FOR ANY LOSS OR DAMAGE! These
TD5 BOOSTER INSTALLATION GUIDE
 TD5 BOOSTER INSTALLATION GUIDE SAFETY NOTICE: Please ensure that you have removed the ignition key, and that you have it on you whilst fitting this device! Although this guide shows fitting instructions
DIY: Shiver Valve Check, Illustrated
 DIY: Shiver Valve Check, Illustrated By Petemoss, AF1 Forum Tools needed: 4mm allen wrench to remove all the fairing pieces 2.5mm allen wrench to remove battery holder 5mm allen wrench for valve cover
X.L. BAND W/ SPRING ASSIST INSTRUCTION MANUAL
 PARTS LIST X.L. BAND W/ SPRING ASSIST INSTRUCTION MANUAL (2) Bands (1) Handle assembly (2) Side hinge assemblies (1) Left rear hinge assembly (1) Right rear hinge assembly (2) front spring s (2) rear spring
Installation Instructions. Door Pockets Porsche
 Installation Instructions Door Pockets Porsche 911 69-73 Before you begin The installation of your door pockets in itself is relatively straight forward. However to get a perfect fit some (time-consuming)
YOU MAY WANT TO FIRST TRY TO LOOSEN THE FILTER HOUSING
 2005 XC90 Tune-up (5-cyl) Including: Oil Change - Spark Plugs - Fuel Filter - Cabin Filter First off - let me say that I am an amateur (at best) mechanic, and I claim no responsibility for whatever you
Mercedes E63/CLS AMG Carbon Turbo Intake System Instructions
 Mercedes E63/CLS AMG Carbon Turbo Intake System Instructions The goal of Alpha Performance is to provide the highest quality, best performing products available. By utilizing research and development,
Projector39/Umnitza BMW Headlight & Re-Installation for E39s Predator Angel Eyes, and Lamin-X Installation
 Projector39/Umnitza BMW Headlight & Re-Installation for E39s Predator Angel Eyes, and Lamin-X Installation Now it is time to remove the headlights! Obviously you have to open the hood to do this. 100_3630.jpg
Tools needed: Here is a pic of the shift kit I used. It is a Transgo brand and as you can see, it just a bag full of springs and one valve.
 Before installing a shift kit, be sure the transmission is in good operating order. If your transmission is making noises, slipping, shifting bad or the fluid looks brown or smells burnt, take the transmission
Peg-Harness installation instructions
 Peg-Harness installation instructions I know it s not the easiest thing to do, but PLEASE READ THESE INSTRUCTIONS COMPLETELY so you will understand what you are trying to accomplish before you start drilling
Audi A8 ( ) MMI swivelling unit repair manual
 MMI swivelling unit repair manual") Audi A8 (2003-2007) MMI swivelling unit repair manual Tools which you will need: two pcs screwdriver (any kind, for vent removing ) (you can cover the metal part with any tape to prevent making scratches
Audi A8 (2003-2007) MMI swivelling unit repair manual Tools which you will need: two pcs screwdriver (any kind, for vent removing ) (you can cover the metal part with any tape to prevent making scratches
Mustang One-Touch Convertible Top Module (2005+) - Installation Instructions
 - Installation Instructions") Mustang One-Touch Convertible Top Module (2005+) - Installation Instructions The below installation instructions work for the following products: Mustang One-Touch Convertible Top Module (2005+) Please
Mustang One-Touch Convertible Top Module (2005+) - Installation Instructions The below installation instructions work for the following products: Mustang One-Touch Convertible Top Module (2005+) Please
Kobo/XCSoar Large Battery Notes -
 Kobo/XCSoar Large Battery Notes - www.50k-or-bust.com These notes relate to the modification of Kobo Mini and Touch ebook readers by fitting a GPS chip (technically a GPS module) for navigation only or
PLEASE READ THROUGH THE WHOLE WRITE UP BEFORE ACTUALLY USING IT!!!!
 JDM power folding mirror switch install into stock USDM harness. By: Greg L., Zeke21 on twinturbo.net PLEASE READ THROUGH THE WHOLE WRITE UP BEFORE ACTUALLY USING IT!!!! This is how I was able to get the
Pontoon Assembly Instructions and manual. Read before using hoist.
 Page 1 Pontoon Assembly Instructions and manual. Read before using hoist. For Models 32BL18, 32BL22, 32BL25 and 42BL28 R Model 32BL22 Shown Proudly Made in Michigan By NuCraft Metal Products 402 Southline
Smart Opener Retrofit by Richard Bevan (bimmerfest riku2)
") Smart Opener Retrofit by Richard Bevan (bimmerfest riku2) Document history V 1.0 02.04.2015 Document created. Introduction This document tells how to retrofit the smart opener to a 2011 BMW 5 series (F10).
Smart Opener Retrofit by Richard Bevan (bimmerfest riku2) Document history V 1.0 02.04.2015 Document created. Introduction This document tells how to retrofit the smart opener to a 2011 BMW 5 series (F10).
There is hence three things you can do - add oil, adjust the temp that the clutch begins to engage, or do both.
 As most of you may be aware, I have been doing a lot of research lately on our cooling system in the 80's including the fact that we have a dead spot on the OEM temp gauge which prompted me to not rely
MKVI Jetta Fog Light Kit
 MKVI Jetta Fog Light Kit Part Number VW Jetta Fog Light Installation This tutorial is provided as a courtesy by ECS Tuning. Proper service and repair procedures are vital to the safe, reliable operation
2010 Toyota Prius Fog Light Retrofit
 2010 Toyota Prius Fog Light Retrofit A DIY prospective Last updated: Friday, December 25, 2009 *** Disclaimer Use this document and its contents at your own risk! *** Forward: This document was compiled
INSTALLATION INSTRUCTIONS
 INSTALLATION INSTRUCTIONS FUEL SURGE TANK INSTALLATION KIT 1999-2006 BMW E46 COUPE Document# 19-0056 Support: info@radiumauto.com Note: This kit wasn t designed for a FST-R, but can be accomplished. 1.
Lethal Performance Dual FPDM Harness Kit Installation
 Lethal Performance Dual FPDM Harness Kit Installation The Lethal Performance Dual FPDM Harness Kit is a plug-and-play modification. Depending on whether you are using the Lethal Performance wire upgrade
WARNING These following pages are instruction for C5 CE stripes; however, it is the same method applying vinyl. Please spend time to read thru these
 WARNING These following pages are instruction for C5 CE stripes; however, it is the same method applying vinyl. Please spend time to read thru these pages. At the end, it is your C5/C6 ME stripes' instruction.
ARMOR UP FOR YOUR NEXT ADVENTURE! 6530 Federal Blvd. Lemon Grove, CA (844) , ext
 , ext") ARMOR UP FOR YOUR NEXT ADVENTURE! 6530 Federal Blvd. Lemon Grove, CA 91945 1(844)726-3373, ext. 102 info@pelfreybilt.com www.pelfreybilt.com 2016+ Toyota Tacoma Front Plate Bumper Start by removing the
ARMOR UP FOR YOUR NEXT ADVENTURE! 6530 Federal Blvd. Lemon Grove, CA 91945 1(844)726-3373, ext. 102 info@pelfreybilt.com www.pelfreybilt.com 2016+ Toyota Tacoma Front Plate Bumper Start by removing the
REPLACEMENT GEAR CHANGE CABLES Installation Guide
 Some sections are from the Lotus Service Manual V6: REPLACEMENT GEAR CHANGE CABLES Installation Guide For additional assistance, send questions by email to cables@lotusm100.com Copyright 2013 lotusm100.com
Changing the Struts on a WK Jeep CRD
 Changing the Struts on a WK Jeep CRD Step by Step By Chirpz Disclaimer: I do not claim that this procedure is the right way or even the best way to change your struts. This is what I did after reading
Mini R53 Top Mount Intercooler Fitting Instructions
 Parts Pro Alloy Intercooler 2 x M6 x 12 Hex head bolt 2 x M6 Washer 1 x 30-45mm Hose Clip Tools Required T30 Torx Bit 12mm Spanner 11mm Spanner Deep 10mm Socket 11mm Socket 8mm Socket Extension bar Ratchet
Front Axle Pinion Seal Replacement
 Front Axle Pinion Seal Replacement by Flopster843 10 Apr 2016 The AAM 925 axle used on the front of Dodge Ram trucks is a decent unit, but it does have its flaws. This axle lacks lockout hubs on the front
AB65HCTR Maxogen Kit
 AB65HCTR Maxogen Kit For Honda EP3 Civic Type-R & DC5 Integra 1 AB65HCTR Performance Air Box Kit Contents Qty Description Airbox Assembly 1 X AB65H Carbon Air Box 1 X Carbon Fibre Air Filter Retaining
Install: Part A. First things first: Running the wiring for the Neo-Pod
 Install: Part A First things first: Running the wiring for the Neo-Pod These instructions follow installation of #31649KL Neo-Pod (the fully loaded version with amp, sub, etc.) in a factory Wrangler sound
M62 Alternator Removal / Replacement (Water Cooled)
") M62 Alternator Removal / Replacement (Water Cooled) Pre-Steps 1. Disconnect Battery Positive lead 2. Charge Your Battery with battery charger to full charge (So you new alternator wont have to work as
M62 Alternator Removal / Replacement (Water Cooled) Pre-Steps 1. Disconnect Battery Positive lead 2. Charge Your Battery with battery charger to full charge (So you new alternator wont have to work as
Land Rover Discovery 3. Bodsy s Brake Bible. Ian Bodsworth Disco3Club.co.uk June 2010 Version 1.2a
 Land Rover Discovery 3 Bodsy s Brake Bible Ian Bodsworth Disco3Club.co.uk June 2010 Version 1.2a Change Record DATE Revision Update Notes Made By May 2010 1.2 Amended Torque Figures and bolt Ian Bodsworth
GM TRUCK BACKUP CAMERA INSTALLATION
 GM TRUCK 07-13 BACKUP CAMERA INSTALLATION Thank you for your purchase! These instructions are intended for the do-it-yourselfer who decides to install the camera without professional assistance. Keep in
My Hawk build Part 8 by Stuart Clarke
 My Hawk build Part 8 by Stuart Clarke Front hubs, brakes and brake lines. There was still no news on my rear springs so I thought I d find something else to get on with. I had the front hubs, brake calipers
Replacement Front Outer Tie Rod End (85-93 All)
") Replacement Front Outer Tie Rod End (85-93 All) Materials in the box: One outer tie rod end, castle nut, cotter pin, nut, and grease fitting. Tools Needed: Jack and Jack Stands Pry bar (you may or may
Replacement Front Outer Tie Rod End (85-93 All) Materials in the box: One outer tie rod end, castle nut, cotter pin, nut, and grease fitting. Tools Needed: Jack and Jack Stands Pry bar (you may or may
Tacoma 1 Body Lift
 Support@toyteclifts.com Read all of the installation instructions prior to ToyTec Lifts body lift installation. ToyTec Lifts L.L.C. recommends that this be installed by a certified auto technician 2005-2015
Installation Directions for FINGER STICK and Blocker Plate
 Installation Directions for FINGER STICK and Blocker Plate What is a Finger Stick? A Finger Stick is a simple circuit that modifies the MAF signal on LLY and LBZ engines (not LB7 engines) to expected levels
INSTALLATION INSTRUCTIONS
 INSTALLATION INSTRUCTIONS Models: 7105 & 7105TK Dodge Ram 1500 ('02 Current) Ram 2500 & 3500 '03 - Current with stock manual mirrors. IF YOU DO NOT CURRENTLY HAVE MANUAL MIRRORS, THE WRONG SET HAS BEEN
Hood stripes Tools needed from AutoZone or any auto parts store: bottle spray, squeegee, a towel that you re using to clean you car up after washing,
 WARNING These following pages are instruction for C5 CE stripes; however, it is the same method applying vinyl. Please spend time to read thru these pages. At the end, it is your C5 GS1 stripes instruction.
TL4076 Top 5 Tips Get to know your TL4076
 TL4076 Top 5 Tips Get to know your TL4076 Thermal Break with Teflon liner (behind fan) Hot End Assembly Fan Heat Block Extruder with toothed gear(brass) and idler (steel) Filament Guide Tube Nozzle Cable
Fitting new lock and replacing a door latch assembly
 Fitting new lock and replacing a door latch assembly It has long been a problem with older MGBs and Midgets that once the door lock becomes worn the whole barrel assembly twists with the key as you try
CLUTCH CABLE REPLACEMENT GUIDE FOR THE FOLLOWING PRODUCTS 2004 ONWARDS
 1 Issue 2 CLUTCH CABLE REPLACEMENT GUIDE FOR THE FOLLOWING PRODUCTS 2004 ONWARDS Mountfield 460R PD Briggs & Stratton Sprint Engine. Mountfield 460R PD/ES Briggs & Stratton Quantum Engine. Mountfield 460R
BBK LONG TUBE HEADERS (99-04 GT, Mach 1, Bullitt)
") BBK LONG TUBE HEADERS (99-04 GT, Mach 1, Bullitt) Install Time: Approx. 8-10 hrs Parts Needed: BBK Long Tube Headers Shorty mid pipe X/H O2 wiring harness extensions Hi-temp thread locker Tools Required:
BBK LONG TUBE HEADERS (99-04 GT, Mach 1, Bullitt) Install Time: Approx. 8-10 hrs Parts Needed: BBK Long Tube Headers Shorty mid pipe X/H O2 wiring harness extensions Hi-temp thread locker Tools Required:
TD5 BOOSTER INSTALLATION GUIDE
 TD5 BOOSTER INSTALLATION GUIDE SAFETY NOTICE: Please ensure that you have removed the ignition key, and that you have it on you whilst fitting this device! Although this guide shows fitting instructions
MAZDA 3 MPS FRONT MOUNTING INTERCOOLER INSTALLATION
 MAZDA 3 MPS FRONT MOUNTING INTERCOOLER INSTALLATION Tools needed: 7mm Hose clamp driver 10mm,12mm sockets and suitable ratchet with extensions Flat bladed screwdriver Pliers Phillips screwdriver KIT CONTENTS
 Page 1 of 14 Welcome, goldeneye006 Notifications My Profile Settings Log Out Forum What's New? Home Classifieds Vendors Vendor Specials Store New Rules Posts Private Advertising Messages FAQ Calendar Community
Some tips and tricks I learned from getting clutch out of vehicle Skoda Octavia year 2000
 Some tips and tricks I learned from getting clutch out of vehicle Skoda Octavia year 2000 Last change 2013-Oct-11 I bought Haynes manual for a starter. That s something well worth it s cost I believe.
Pictorial Guide How to install a Innovate Wideband O2 Sensor in a Clio 2 RS
 Pictorial Guide How to install a Innovate Wideband O2 Sensor in a Clio 2 RS I installed my LC-1 wide band 02 sensor purchased from Fastchip. Here's a quick summary with pictures of the install. I am pleased
MGB V8 Roadster restoration project Report 86
 2 nd November 2016. There seems to be so much to do, odds and ends to order, not enough space to do stuff. This morning I think I better start writing down a list of things to do that are easier while