M62 Alternator Removal / Replacement (Water Cooled)
|
|
|
- Alexina Oliver
- 5 years ago
- Views:
Transcription
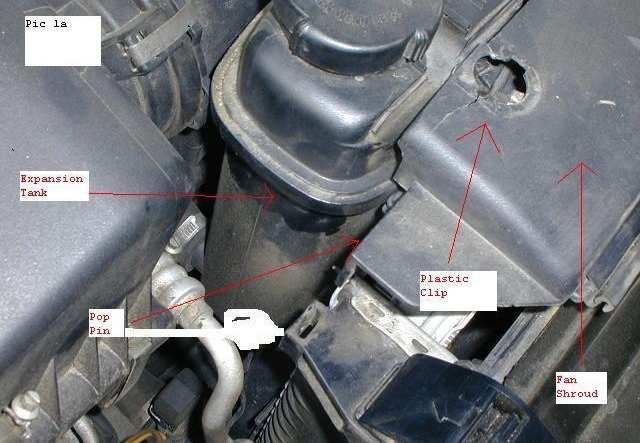
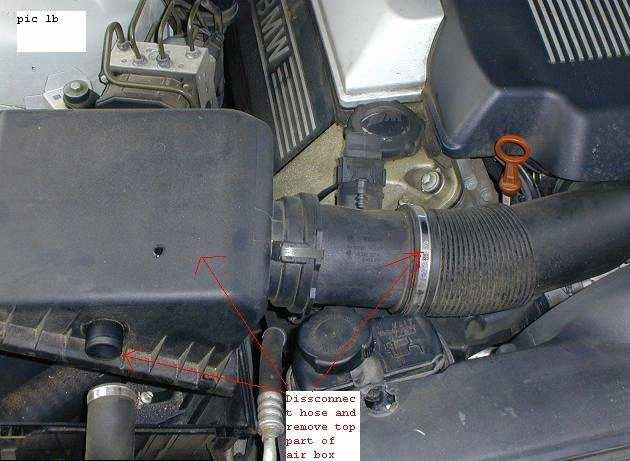
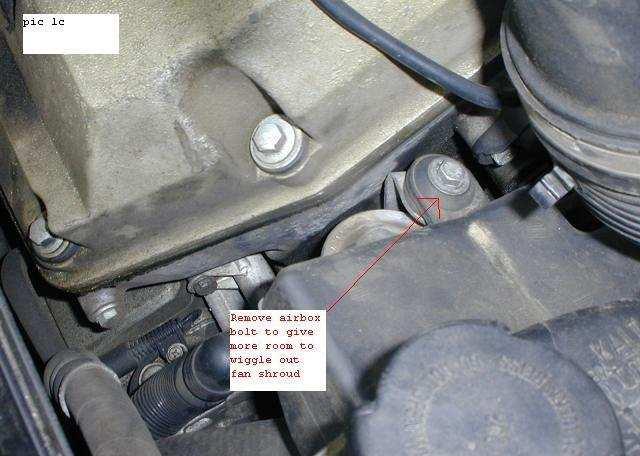
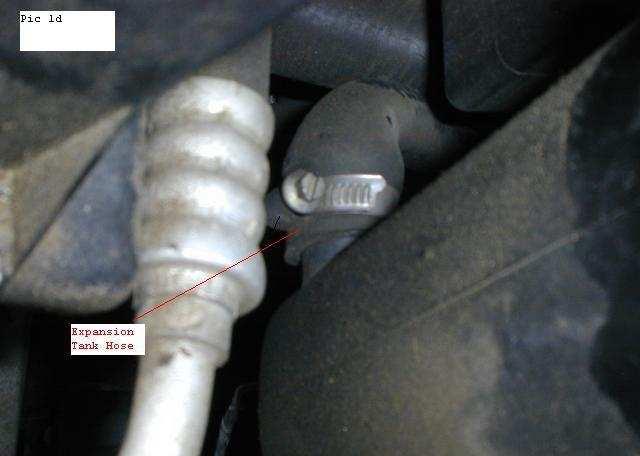
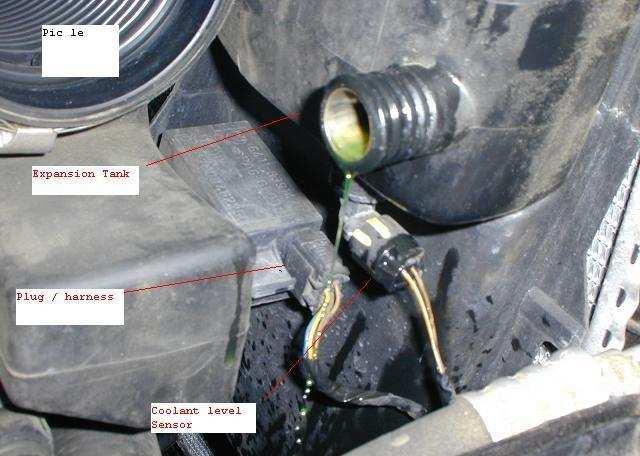
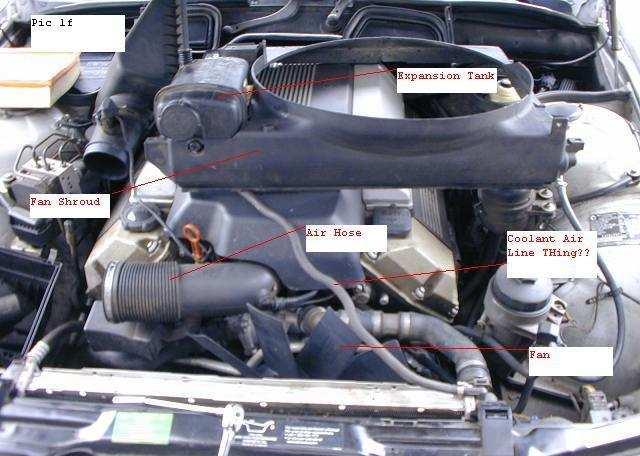
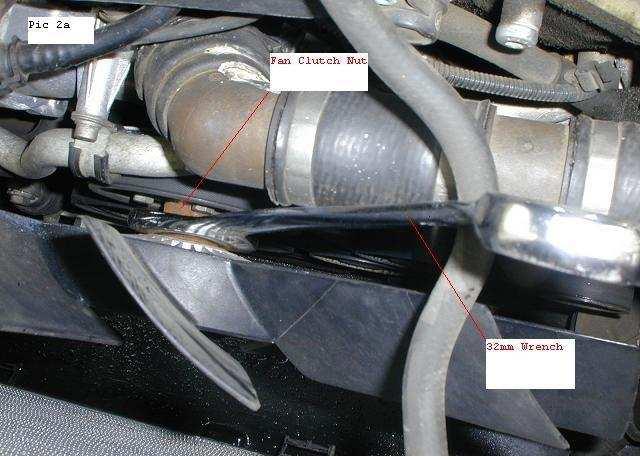
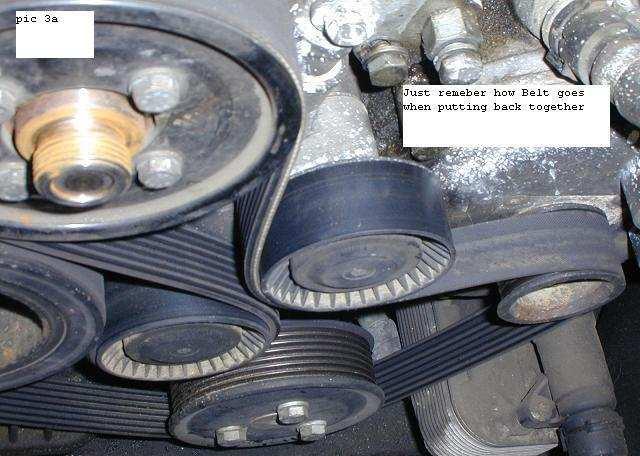
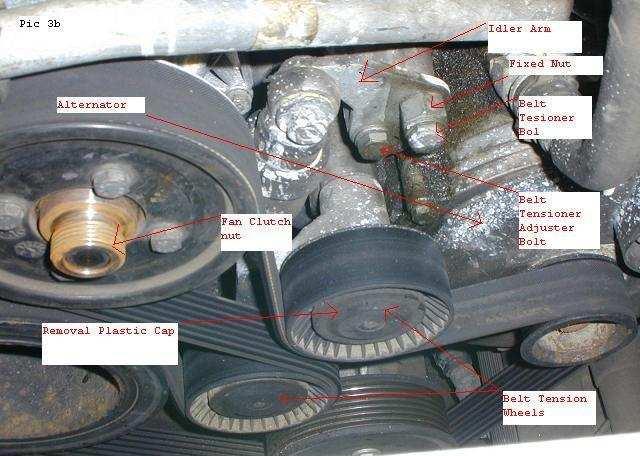
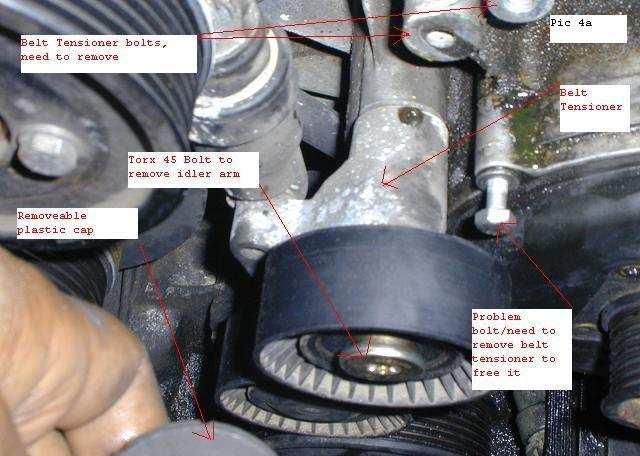
1 M62 Alternator Removal / Replacement (Water Cooled) Pre-Steps 1. Disconnect Battery Positive lead 2. Charge Your Battery with battery charger to full charge (So you new alternator wont have to work as hard) 3. Make sure you have Coolant available to replace what spills (Mine was 1.5 gallons) 4. Have a Sealant available, Silicone or RTV (I used Red RTV= High Temp) Begin Removal 1. Remove Fan Shroud a. Remove 2 plastic pop pins and clip around expansion tank b. Remove top of Airbox to free up space, undo air hoses c. Remove Airbox bolt to make it easier to get out d. Lift up fan shroud, and disconnect hose at bottom of expansion tank (Flat Screwdriver) e. Disconnect 2 electrical plugs under expansion tank f. Move fan shroud up and out of the way 2. Remove Fan a. Using a large wrench and hammer, place wrench on the Nut and hit the wrench with the hammer to create an impact to loosen the nut. (The Nut is REVERSE Thread, so hit it like your tightening it, (righty tighty, lefty loosey)) Once the nut is knocked loose, then you can just unscrew it. b. When putting it aside, keep the fan vertical, don t lay it down, maybe lean it on the wall, or bench, so the Fan Clutch fluid doesn t disappear, never to return c. When re-installing it, also hit it with impact to tighten, and remember it is reverse thread. 3. Remove Serpentine Belt a. This would be a good time to snap a picture, or draw how the belt goes around the wheels and pulleys, when it come to re-installation b. Loosen the Belt Tensioner Bolts, there are 2, notice one of them appears to have a big nut attached to the back, that nut is stationary, so only loosen the bolt for now. c. Once loose, the belt tensioner will swing freely, allowing the belt to be removed with ease. 4. Remove Belt Tensioner/Idler Arm a. Remove the dust cap over the Idler Arm Pulley (With Small Flat Head Screwdriver), to reveal Torx Bolt. b. Using a #45 Torx bit remove the bolt and this releases the Idler arm/belt Tensioner. c. Remove the 2 bolt mentioned above in 3b
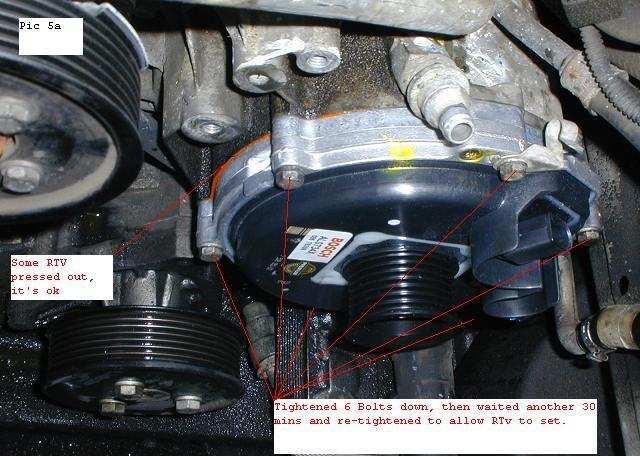
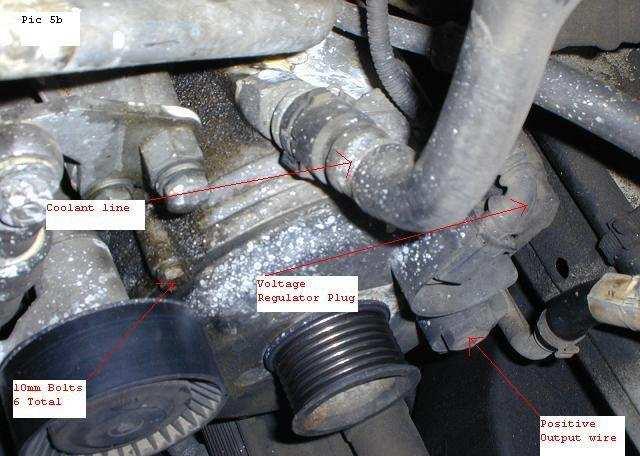
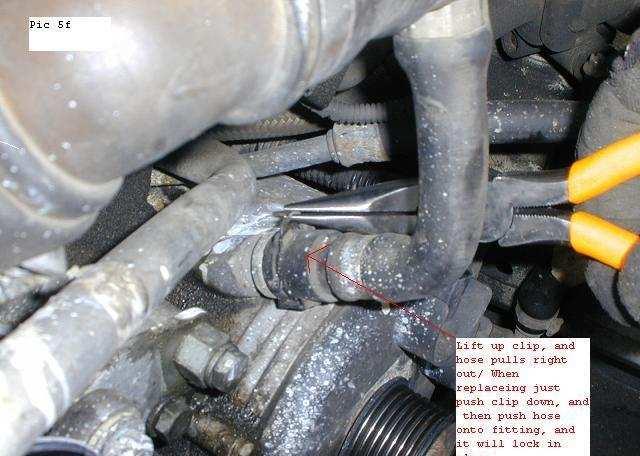
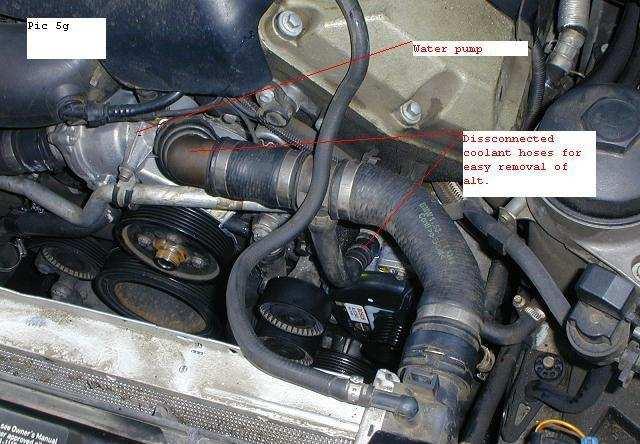
2 d. No we have a free shot at the alternator 5. Remove Alternator a. Remove (6) 10mm Bolts from the Alternator housing, these bolt hold it into the coolant canister. b. Unplug the electrical harness, I believe this is the voltage regulator c. Unscrew the nut that hold on the large output cable d. The alternator is now free. e. Turn it around 180 degrees, and try to pull it out, make sure you do not damage the radiator in any way f. I had to remove some more coolant hoses to get it out, some say you don t need to remove more coolant hoses, but I did, just in case. g. I removed the hose going to the canister, and the top hose going to the water pump h. Now your old alternator is out, and the hard work is done, it is easier to put it all back together, then to take it apart for the first time. Begin Re-Installation 1. Re-install new Alternator a. Clean off surface of alternator housing where alt will be sealed in the coolant canister b. Apply small bead of sealant around Alternator gasket c. Put new alternator in it home and re-attach the (6) 10mm Bolts, tighten them down some. d. Wait about minutes to let Sealant set, and re-tighten down the Bolts. (Wait longer if engine was cold to begin) e. Re-attach Electrical harness, and Output wire f. New Alternator is in. 2. Re-install Idler Arm/Belt Tensioner a. Re-Install with Torx bolt, making sure the wheels are down, and the 2 bolt holes are up. b. Insert the 2 bolt for the belt tensioner from 4c c. Re-install the Serpentine belt, making sure the ribs are the right way, and it running in correct pattern d. Tighten down the Belt Tensioner, as tight as possible, you may want an extra hand to keep pressure on it, as you tight down the bolts e. Now that the belt is on tight, and the alternator is in, just go back and put everything back together, remember the Fan is reverse thread, and hit it with an impact to seat it. Once everything is back in place, don t forget to top off the coolant. The whole procedure should not take more than 2 hours.
3
4
5
6
7
8
9


10 Faisal Ahmed (Faisal in Laurel, MD)
 Special Tools Needed: DrVanos.com Stage I Installation Instructions Camshaft locking tool TDC Crank pin Sprocket turning tool Tool rental is available with the purchase of a vanos kit *See website for
1 of 3 3/1/ :50 AM
 Fan Clutch Service and Repair, Removal and Replacement http://repair.alldata.com/alldata/article/display.action?componentid=76&... 1 of 3 3/1/2016 11:50 AM Coupling unit - Viscous Fan Service Repair No
DrVanos.com Stage II Installation Instructions. Tool rental is available with the purchase of a vanos kit *See website for more info*
 DrVanos.com Stage II Installation Instructions Special Tools Needed: Camshaft locking tool TDC Crank pin Sprocket turning tool Tool rental is available with the purchase of a vanos kit *See website for
Ford Racing BOSS 302 Engine Oil Cooler (11-14 GT)
") Tools needed: 14mm hex socket 7mm socket/wrench 8mm socket/wrench Ford Racing BOSS 302 Engine Oil Cooler (11-14 GT) 10mm socket (for airbox removal) ¾ inch or 19mm wrench Torque wrench Appropriate ratchets
Tools needed: 14mm hex socket 7mm socket/wrench 8mm socket/wrench Ford Racing BOSS 302 Engine Oil Cooler (11-14 GT) 10mm socket (for airbox removal) ¾ inch or 19mm wrench Torque wrench Appropriate ratchets
Jeep Wrangler TJ. Complete Air Conditioning System. Slide Control Head. Installation instructions
 WWW.JEEPAIR.COM 1996-1998 Jeep Wrangler TJ Complete Air Conditioning System Slide Control Head Installation instructions Kit Information After 1994 every vehicle was designed for R134a refrigerant. The
Jeep Wrangler TJ 4.0 LITER Installation instructions
 www.jeepair.com 2000-2001 Jeep Wrangler TJ 4.0 LITER Installation instructions Important information about your system, and warranty DO NOT ADD ANY OIL TO ANY PART OF THE SYSTEM. DO NOT USE THE SIGHT GLASS
Jeep Wrangler 4.0 Liter TJ Jeep Wrangler 2.5 Liter TJ Installation instructions
 TM www.jeepair.com 1999 Jeep Wrangler 4.0 Liter TJ 1999-2001 Jeep Wrangler 2.5 Liter TJ Installation instructions Kit Information After 1994 every vehicle was designed for R134a refrigerant. The Jeep kit
Included parts: 1 - New Bosch CP3 Pump 1 - HSM Pulley 1 - Serpentine Belt 1 - Pump Brackets/Hardware
 TROUBLESHOOTING: Please read and understand all installation instructions before proceeding with the installation. If you have questions during the installation of this product, please email H&S Motorsports
Mustang Short Throw Sport Shifter (All 83 - Early 01 & V6 T-5/T-45 Transmission) - Installation Instructions
 - Installation Instructions") Mustang Short Throw Sport Shifter (All 83 - Early 01 & 01-04 V6 T-5/T-45 Transmission) - Installation Instructions The below installation instructions work for the following products: Mustang Short Throw
Mustang Short Throw Sport Shifter (All 83 - Early 01 & 01-04 V6 T-5/T-45 Transmission) - Installation Instructions The below installation instructions work for the following products: Mustang Short Throw
BEW engine timing belt replacement procedure from MOGolf (as demonstrated on a 2004 Jetta).
.") BEW engine timing belt replacement procedure from MOGolf (as demonstrated on a 2004 Jetta). Based on the procedure published by Volkswagen, but modified for the "average" shadetree mechanic. Some special
BEW engine timing belt replacement procedure from MOGolf (as demonstrated on a 2004 Jetta). Based on the procedure published by Volkswagen, but modified for the "average" shadetree mechanic. Some special
Procharger Stage II Intercooled Supercharger System (11-14 GT)
") Procharger Stage II Intercooled Supercharger System (11-14 GT) Installation Time: Approximately one day. Installed on 2012 Mustang GT 5.0/Manual Required Tools 3/8 Socket Set (Standard and Metric) 1/2
Procharger Stage II Intercooled Supercharger System (11-14 GT) Installation Time: Approximately one day. Installed on 2012 Mustang GT 5.0/Manual Required Tools 3/8 Socket Set (Standard and Metric) 1/2
YOU MAY WANT TO FIRST TRY TO LOOSEN THE FILTER HOUSING
 2005 XC90 Tune-up (5-cyl) Including: Oil Change - Spark Plugs - Fuel Filter - Cabin Filter First off - let me say that I am an amateur (at best) mechanic, and I claim no responsibility for whatever you
Highly Styled, Low Cost Serpentine Drive
 Highly Styled, Low Cost Serpentine Drive Installation Instructions Ford 460 Big Block Kit #30275 (with Power Steering) and #30270 (without Power Steering) Included Parts List Main Front Bracket Kit P/N
C3 Syncro Drive Proclimb 1100 Installation Instructions
 Revision 4 Nov 8-2013 201A Old Town Road, Sicamous, BC. V0E 2V4 Ph 250-833 3538 Fax 888-716 5903 www.c3powersports.com Thank you for purchasing a ProClimb M, ProCross F & XF SyncroDrive Note: This modification
v Porsche 928
 1985-86 32v Porsche 928 Toll-Free Tech Hot Line: 877-FOR-928M 877-367-9286 Please do not copy this manual and give copies to your friends. Our ability to bring you this supercharger kit at this price relies
Installation Instructions INDY SHIFTER Fits: Mustang Fastback & Convertible with MT-82 Transmission Catalog #
 Installation Instructions INDY SHIFTER Fits: 2015-2018 Mustang Fastback & Convertible with MT-82 Transmission Catalog # 3916036 Watch our installation video on YouTube WORK SAFELY! For maximum safety,
BMW 3 Series Oxygen Sensor
 1984-1991 BMW 3 Series Oxygen Sensor Replacement Replace an old oxygen sensor on your E30 for better gas mileage. Written By: Andrew Bookholt ifixit CC BY-NC-SA www.ifixit.com Page 1 of 10 INTRODUCTION
Looking up the front of the engine from under the radiator. (Picture taken with belt under tension.)
") 8. If you re replacing the AC compressor drive belt as well, it s time to loosen its belt tensioner. The AC compressor belt tensioner is very obvious under the front of the car. Loosen the 13mm bolt, then
8. If you re replacing the AC compressor drive belt as well, it s time to loosen its belt tensioner. The AC compressor belt tensioner is very obvious under the front of the car. Loosen the 13mm bolt, then
Thermostats, Radiator, Coolant Hose, Hydraulic Fan/Steering R&R PT38 8V92
 REMOVING AND REPLACING THE THERMOSTATS, COOLANT HOSES, RADIATOR AND CHANGING THE HYDRAULIC FAN/STEERING FILTER/OIL/SHAFT SEALS ON A 1987 PT38 8V92 BY CURT SPRENGER March 2007 Thermostats, Radiator, Coolant
Single Barrel Shotgun HPFP Install Guide
 Single Barrel Shotgun HPFP Install Guide Thank you for purchasing the VTT Single Barrel Shotgun HPFP upgrade kit! PLEASE READ THE ENTIRE GUIDE BEFORE BEGINNING INSTALLATION! The first thing you should
Jeep Wrangler TJ 4.0 LITER Installation instructions
 www.jeepair.com 2002-2004 Jeep Wrangler TJ 4.0 LITER Installation instructions Kit Information These directions are for 2002-2006 model Jeep Wranglers. After 1994 every vehicle was designed for R134a refrigerant.
Installation manual BMW E TS1/TS2
 Installation manual BMW E46 330 TS1/TS2 Technical support Europe: +4741558555 Technical support USA: (858)314-2954 Email support: support@esstuning Installation manual BMW E46 330 TS1/TS2 Remove and send
Prerequisites: Shop Manual (recommended) pages 3-9 through 3-13.
 pages 3-9 through 3-13.") Prerequisites: Order your gaskets average about $25.00 bucks X 2 so $50.00 4NK-11193-00-00 Obtain a shim kit (Should have several 265 and 270s) (Some dealers will exchange) Obtain a Valve Bucket Tool YM-33961
Prerequisites: Order your gaskets average about $25.00 bucks X 2 so $50.00 4NK-11193-00-00 Obtain a shim kit (Should have several 265 and 270s) (Some dealers will exchange) Obtain a Valve Bucket Tool YM-33961
REMOVAL & INSTALLATION
 REMOVAL & INSTALLATION NOTE: For reassembly reference, label all electrical connectors, vacuum hoses and fuel lines before removal. Also place mating marks on engine hood and other major assemblies before
REMOVAL & INSTALLATION
 REMOVAL & INSTALLATION CAUTION: This application is an interference engine. Do not rotate camshaft or crankshaft when timing belt is removed, or engine damage may occur. TIMING BELT CAUTION: DO NOT turn
Installation Instructions COMPETITION/PLUS SHIFTER Ford Mustang MT82 6-Speed Manual Transmission Catalog#
 Installation Instructions COMPETITION/PLUS SHIFTER 2015-2017 Ford Mustang MT82 6-Speed Manual Transmission Catalog# 3916037 Rev. 00 WORK SAFELY! For maximum safety, perform this installation on a clean,
Phone Fax
 Directions for Installation of ECS Paxton Supercharger Kit Disconnect battery Remove stock serpentine belt Remove stock belt tensioner, save the 2 bolts for later use on supercharger bracket Remove alternator
Disconnect the APP sensor harness connector. See Fig. 4. Remove the accelerator pedal mounting nuts. Remove the APP assembly.
 ENGINE CONTROLS - REMOVAL, OVERHAUL & INSTALLATION - 6.6L DIESEL... Page 1 of 41 FUEL SYSTEMS ACCELERATOR PEDAL POSITION SENSOR Removal & Installation Disconnect the APP sensor harness connector. See Fig.
6. Remove OEM bolts from engine at locations A, B, and C. Lay the wiring off to the side.
 700359 DewEze Clutch Pump Kit #700359 Ford 5.4L, 6.8L w/ and w/o A/C AA mount 1999- INSTALLATION INSTRUCTIONS 1. Disconnect the battery. 2. Drain the radiator. 3. Remove the air cleaner assembly. 4. Remove
M7 R52S & R53 Cold Air Intake Installation Guide 53-3M7301
 M7 R52S & R53 Cold Air Intake Installation Guide 53-3M7301 M7 Speed engineers and manufactures the highest quality MINI COOPER accessories and performance parts available anywhere on Planet Earth! Please
DIY: Shiver Valve Check, Illustrated
 DIY: Shiver Valve Check, Illustrated By Petemoss, AF1 Forum Tools needed: 4mm allen wrench to remove all the fairing pieces 2.5mm allen wrench to remove battery holder 5mm allen wrench for valve cover
Shotgun Single Barrel HPFP install guide
 Shotgun Single Barrel HPFP install guide Thank you for your purchase of the VTT Shotgun Single Barrel HPFP upgrade! First thing to do when you open your box is to make sure all parts are in their respective
Engine, disassembling and
 Page 1 of 38 13-1 Engine, disassembling and assembling Lock carrier, moving into service position Special tools and equipment 3369 support tool 1 - Bolts 2 - Bolts 3 - Bolts 4 - Bolts 5 - Bore 45 Nm (33
Cut zip ties and remove 2 plastic wiring harness brackets.
 TROUBLESHOOTING: Please read and understand all installation instructions before proceeding with the installation. Included parts: 1 - New Bosch Cp3 Pump 1 - HSM Pulley 1 - Serpentine Belt 1 - Pump Bracket/
BLACKBIRD INSTALLATION SUPPLEMENT
 BLACKBIRD INSTALLATION SUPPLEMENT FOR 2003-7 FORD 6.0 LITER DIESEL SINGLE ALTERNATOR F-350, F-450, F-550, EXCURSION VERSION 7-07 Parts Description Blackbird Wiring Manual Installation Supplement 6.0 Liter
JRSC + BBK Install on SVTF. Neil A. Shah medicnas on focaljet September 2006
 JRSC + BBK Install on SVTF Neil A. Shah medicnas on focaljet September 2006 ECU up here. When removing make sure the smaller bundles of wires don t get wrapped around the bottom edge and break - this almost
Integrated Engineering VW Jetta & GLI MK6 ( ) 2.0T/1,8T Gen 3 Cold Air Intake Install
 2.0T/1,8T Gen 3 Cold Air Intake Install") Integrated Engineering VW Jetta & GLI MK6 (2013.5+) 2.0T/1,8T Gen 3 Cold Air Intake Install Thank you for purchasing another high quality Integrated Engineering product! This instruction guide is used
Integrated Engineering VW Jetta & GLI MK6 (2013.5+) 2.0T/1,8T Gen 3 Cold Air Intake Install Thank you for purchasing another high quality Integrated Engineering product! This instruction guide is used
Changing the Struts on a WK Jeep CRD
 Changing the Struts on a WK Jeep CRD Step by Step By Chirpz Disclaimer: I do not claim that this procedure is the right way or even the best way to change your struts. This is what I did after reading
INSTALLATION INSTRUCTIONS
 HIGH FLOW AIRFLOW METER INSTALLATION INSTRUCTIONS PART NUMBER D763-1600A APPLICATION: 2001-06 E46 M3 Parts List: Hose clamp 64Z (7) Plastic Rivets Air Filter Temp Sensor & Harness (2) Button Head Screws
BHW Engine Coolant Temperature Replacement
 BHW Engine Coolant Temperature Replacement NEVER perform this procedure on a hot engine. Parts: 059 919 501 A dual temperature sensor 032 121 142 retaining spring N 903 168 02 sensor round seal N 905 216
Muncie Power Products
 Muncie Power Products CMKF08-6400-P8-AC 2008-2010 Ford F-250-550 6.4L Diesel W-WO/AC, WO/Dual Alt. WO/Vacuum Pump INSTALLATION NOTES 1. Using a 8mm socket or wrench, disconnect the negative battery cables
Ford Racing Performance Improvement Intake Manifold (96-04 GT) Time Necessary: Approximately 4 hours
 Time Necessary: Approximately 4 hours") Ford Racing Performance Improvement Intake Manifold (96-04 GT) Time Necessary: Approximately 4 hours Tools Required: Ratchet and socket set Torque wrench Large adjustable wrench Needle nose pliers A dozen
Ford Racing Performance Improvement Intake Manifold (96-04 GT) Time Necessary: Approximately 4 hours Tools Required: Ratchet and socket set Torque wrench Large adjustable wrench Needle nose pliers A dozen
C&L Cold Air Intake w/ 80MM MAF (01 Bullitt)
") C&L Cold Air Intake w/ 80MM MAF (01 Bullitt) Install time: Approx. 30 min. Tools Required: 10mm Socket 8mm Socket 3/8in ratchet or 1/4in ratchet Flat head screw driver 1/4in bit driver for supplied T20
C&L Cold Air Intake w/ 80MM MAF (01 Bullitt) Install time: Approx. 30 min. Tools Required: 10mm Socket 8mm Socket 3/8in ratchet or 1/4in ratchet Flat head screw driver 1/4in bit driver for supplied T20
BD Venom Dual Fuel F O R D 6. 7 L P O W E R S T R O K E Installation Instructions
 U 21 March 2017 (1050470) Venom Dual Fuel Kit (I-00390) 1 DOWNLOAD ENHANCED INSTALL MANUALS AT dieselperformance.com BD Venom Dual Fuel 2 0 1 1-2 0 1 6 F O R D 6. 7 L P O W E R S T R O K E Installation
Installation Manual v1.0: Twin CP3 Fuel Injection Kit Dodge 5.9L
 Installation Manual v1.0: Twin CP3 Fuel Injection Kit 2004.5-2007 Dodge 5.9L Figure 1 - Full Kit Photo 25 Figure 2 - Hardware Kit Please read all instructions before installation. This kit is not emissions
BD Venom Dual Fuel F O R D 6. 7 L P O W E R S T R O K E Installation Instructions
 U 30 January 2017 (1050470) Venom Dual Fuel Kit (I-00390) 1 DOWNLOAD ENHANCED INSTALL MANUALS AT dieselperformance.com BD Venom Dual Fuel 2 0 1 1-2 0 1 4 F O R D 6. 7 L P O W E R S T R O K E Installation
Required tools are: Parts list:
 BEW cam and lifters replacement procedure by zanzabar Jay Roberts, Petaluma, CA. (modified from engine timing belt replacement procedure from MOGolf as demonstrated on a 2004 Jetta). Required tools are:
4 pieces of silicone hose Unless you have AEM then you have 2 2.5, 1 3, and 1 3.5
 The parts in your kit: 3 pieces of Mandrel-Bent Aluminized Tubing: 1 Straight 1 45 degree bend with straight section 1 curved section 4 pieces of silicone hose 1 2.5 1 3.5 2 3 Unless you have AEM then
Tools needed: Here is a pic of the shift kit I used. It is a Transgo brand and as you can see, it just a bag full of springs and one valve.
 Before installing a shift kit, be sure the transmission is in good operating order. If your transmission is making noises, slipping, shifting bad or the fluid looks brown or smells burnt, take the transmission
Special Note About The JDM High Performance Water Pump:
 Page 1 of 30 JDM Engineering, Inc. home Call Us! 732-780- 0770 back to Installation Instructions Electric Fan Upgrade Kit Electric Fan Wiring Diagram Thank you for your purchase of the JDM Engineering
OEM Cruise Control Installation in GMC/Chevy NBS trucks
 OEM Cruise Control Installation in 99-02 GMC/Chevy NBS trucks May 2008 ~ Rampage_Rick Having just installed factory cruise control in my 00 Sierra, I thought I d share the fun. I followed the steps outlined
INSTALLATION INSTRUCTIONS STILLEN SUPERCHARGER KIT Nissan 350Z P/N &
 Equipment needed: 1. Assorted sockets and wrenches 2. +,- Screwdrivers 3. Assorted pliers/ Clamps 4. Wire cutting/crimping tools 5. Thread locking compound (blue) 6. Solder gun/ shrink wrap (optional)
5.7 BigBully CAI Installation Instruction Sheet
 5.7 BigBully CAI Installation Instruction Sheet Please Read Carefully Our 5.7 BigBully CAI is designed to fit in the stock air box area. If you have altered this area in any way then it is your responsibility
Preparation. With the car on the ground you will want to:
 Doing a stage 3 swap was a LOT of work Audi S4 Stage 3 (K04) Install Doing a stage 3 swap was a LOT of work. Just a lot of small and simple tasks really. Just make sure you keep track of what you re doing.
Installation Instructions for BMR Lowering Springs Performance ( Mustang GT)
") Installation Instructions for BMR Lowering Springs Performance (2015-2017 Mustang GT) Time Required: 3+ hours Notes: This install was done with the performance springs from BMR, but install should be the
Installation Instructions for BMR Lowering Springs Performance (2015-2017 Mustang GT) Time Required: 3+ hours Notes: This install was done with the performance springs from BMR, but install should be the
STEP 1 Disconnect the negative terminal from both batteries.
 TROUBLESHOOTING: Please read and understand all installation instructions before proceeding with the installation. If you have questions during the installation of this product, please email H&S Motorsports
GrimmSpeed Install Guide Series Installing the GrimmSpeed WRX Boost Control Solenoid Updated 4/14/15
 GrimmSpeed Install Guide Series Installing the GrimmSpeed 2015+ WRX Boost Control Solenoid Updated 4/14/15 Introduction: This guide will illustrate the installation of the GrimmSpeed 2015+ WRX Boost Control
Fan Shroud: Service and Repair Fan cowling To remove 1. Remove the upper engine cover.
 Fan Shroud: Service and Repair Fan cowling To remove 1. Remove the upper engine cover. 2. Remove the battery cover and undo the battery cables. 3. Remove the battery cooling pipe by releasing it from the
EURO HEADLIGHT ADJUSTER REMOVAL AND INSTALLATION
 EURO HEADLIGHT ADJUSTER REMOVAL AND INSTALLATION This document is a step by step explanation of how to remove and replace the headlight adjusters in the Euro headlights. Parts needed to repair both headlights:
Thank you for purchasing the Craven Speed FlexPod Complete Gauge Pod Kit For R56, R58, R59, R60 with Refresh Engines (2011+)
") Thank you for purchasing the Craven Speed FlexPod Complete Gauge Pod Kit For R56, R58, R59, R60 with Refresh Engines (2011+) Before You Start Please read instructions completely before installing. These
Thank you for purchasing the Craven Speed FlexPod Complete Gauge Pod Kit For R56, R58, R59, R60 with Refresh Engines (2011+) Before You Start Please read instructions completely before installing. These
Installing Nameless Performance High Flow cats on a Jaguar XKR
 Installing Nameless Performance High Flow cats on a 2000-2002 Jaguar XKR Part I, removal preparation under the hood, left side. 1. Open the hood and remove the coolant tank cap on the driver's side of
2015 Corvette Supercharger System Instructions
 2015 Corvette Supercharger System Instructions These instructions are meant to serve as a guide to the installation of the ECS 2015 Corvette Supercharging system. Please be sure to use all safety equipment
Mercedes Diesel Valve Adjustment Procedure
 1 of 30 5/30/2008 12:58 PM Home Cars for sale Trucks for sale Where we are Links to other diesel sites About us Why diesel? Diesel Videos How they work How they sound FAQ Dodge Diesel Maintenance tips,
Fitting the Bell Auto Services (B-A-S) TDV6 EGR Blanking Kit to a 2006 model Discovery 3 TDV6 HSE
 TDV6 EGR Blanking Kit to a 2006 model Discovery 3 TDV6 HSE") Fitting the Bell Auto Services (B-A-S) TDV6 EGR Blanking Kit to a 2006 model Discovery 3 TDV6 HSE Before I describe how I did this, I must first thank other members of the Disco3.co.uk forum (namely J,moore
Fitting the Bell Auto Services (B-A-S) TDV6 EGR Blanking Kit to a 2006 model Discovery 3 TDV6 HSE Before I describe how I did this, I must first thank other members of the Disco3.co.uk forum (namely J,moore
1996 Aerostar/Ranger/Explorer
 Page 1 of 11 Section 03-01B: Engine, 3.0L V-6 IN-VEHICLE SERVICE 1996 Aerostar and Ranger Vehicles Workshop Manual Water Pump SPECIAL SERVICE TOOL(S) REQUIRED Description Tool Number Fan Clutch Holding
Cold Air Intake Installation Instructions
 Page 1/5 3.04 INS262 BAVARIAN AUTOSPORT Cold Air Intake Installation Instructions NOTE: Throughout the instructions the term AFM is used. It refers to the Air Flow Meter which is located between the engine
There is hence three things you can do - add oil, adjust the temp that the clutch begins to engage, or do both.
 As most of you may be aware, I have been doing a lot of research lately on our cooling system in the 80's including the fact that we have a dead spot on the OEM temp gauge which prompted me to not rely
Slave Cylinder Weep Hole Drilling Procedure
 Slave Cylinder Weep Hole Drilling Procedure Tools Required: T20 Torx Driver T25 Torx Driver T25 Torx Bit with ¼ Ratchet Wrench 4mm Hex Key (Allen wrench) 5mm Hex Key 6mm Hex Key 8mm Hex Key 12mm Hex Key
Thermo-Bob 3 Installation Manual: KLR650E (2008 and newer)
") Thermo-Bob 3 Installation Manual: KLR650E (2008 and newer) Thank you for purchasing the Thermo-Bob 3 radiator bypass system for the KLR650. Since the KLR already has a doohickey, it seemed that this thingamabob
Thermo-Bob 3 Installation Manual: KLR650E (2008 and newer) Thank you for purchasing the Thermo-Bob 3 radiator bypass system for the KLR650. Since the KLR already has a doohickey, it seemed that this thingamabob
How to change Swirl Flaps, on Diesel BMW
 How to change Swirl Flaps, on Diesel BMW I am now going to show you how i did it on my car. May'sedition of Total BMW (still in WHSmiths) did a cover on how to change and modify Swirl flaps on a 330d engine,
BLACKBIRD INSTALLATION SUPPLEMENT
 BLACKBIRD INSTALLATION SUPPLEMENT FOR 2003-7 FORD 6.0 LITER DIESEL F-SERIES DUAL ALTERNATOR VERSION 10/07 Blackbird Installation Supplement for Ford 6.0. Liter Dual Alternator Parts included in the 6.0
Timing Belt: Service and Repair Installation NOTE: Check the water pump for water leakage and the oil seal for oil leakage.
 1991 Daihatsu Truck Rocky L4-1589cc 1.6L SOHC Page 1 Timing Belt: Service and Repair Installation NOTE: Check the water pump for water leakage and the oil seal for oil leakage. Repair any water leakage
REMOVAL & INSTALLATION
 REMOVAL & INSTALLATION CAUTION: This application is an interference engine. Do not rotate camshaft or crankshaft when timing belt is removed, or engine damage may occur. TIMING BELT Removal 1. Raise and
Slingshot Rotrex Supercharger Kit
 Slingshot Rotrex Supercharger Kit This supercharger kit improves on the Slingshot by forcing more dense air into the engine and creating more power. Installation time of the supercharger depends on you
Changing the Power Steering Belt
 Changing the Power Steering Belt Brett Dukes (Maverick) from the BigJimny Forum has contributed this article to the Website. Many thanks. Whilst off-roading on Sunday, my alternator Fan Belt snapped -
Keeping You Cool Under Pressure
 Installation Instruction for 92-93 GM 6.5L Turbo Diesel Series 3500-4 Wheel Drive Pickup and Series 1500, 2500, 3500 4 Wheel Drive Suburban Intercooler System (Part No. 2-436) TOOLS REQUIRED: 1.) Normal
Intake Manifold: Service and Repair Removal
 1992 Toyota Truck Pickup 2WD V6-180.5 2959cc 3.0L SOHC (3VZ-E) Copyright 2013, ALLDATA 10.52 Page 1 Intake Manifold: Service and Repair Removal NOTE: If removing and later reinstalling the fluid coupling
FMK265SD F L DIESEL WITH DUAL ALTERNATORS
 WITH DUAL ALTERNATORS This kit will NOT work on trucks equipped with adaptive steering. INSTALLATION NOTES 1. Disconnect negative batteries cables. Remove the air duct from the passenger side and the black
B5 A4 1.8t Front Mount Intercooler Install Instructions
 B5 A4 1.8t Front Mount Intercooler Install Instructions Only work underneath your vehicle after properly supporting it with adequate jack stands on a flat surface. NEVER work under a vehicle only supported
Installation Manual v2.2: Twin CP3 Fuel Injection Kit Dodge 5.9L
 12/13/11 ATS Twin CP3 Kit 701-900-2272-INST Installation Manual v2.2: Twin CP3 Fuel Injection Kit 2003-2004 Dodge 5.9L Figure 1 - Full Kit Photo 26 Figure 2 - Hardware Kit 1 Please read all instructions
Porsche 928 with 16v LH-Jetronic Fuel System
 Porsche 928 with 16v LH-Jetronic Fuel System Toll-Free Tech Hot Line: 877-FOR-928M 877-367-9286 Please do not copy this manual and give copies to your friends. Our ability to bring you this supercharger
PLEASE READ THROUGH THE WHOLE WRITE UP BEFORE ACTUALLY USING IT!!!!
 JDM power folding mirror switch install into stock USDM harness. By: Greg L., Zeke21 on twinturbo.net PLEASE READ THROUGH THE WHOLE WRITE UP BEFORE ACTUALLY USING IT!!!! This is how I was able to get the
INSTALLATION MANUAL. Ford 5.4L F
 INSTALLATION MANUAL Applications Rapid Flow Part Number Ford 5.4L F150 09-10 51200 Parts Included Parts Included and Tools Needed: This section displays the parts included in the package and the tools
1995 Mitsubishi Montero LS. Ensure timing marks are aligned. Mark timing belt direction of rotation.
 TIMING BELT NOTE: Ensure timing marks are aligned. Mark timing belt direction of rotation. Removal 1. Disconnect negative battery cable. Drain engine coolant. Remove engine coolant reservoir tank, fan
Volvo P1 Air Intake. ELEVATE Turbo Intake Pipe. MAF Sensor. Inlet Manifold. Air Filter Housing. ECU Cover
 Volvo P1 Air Intake Tools needed: 13mm Combination Wrench Flat Blade Screwdriver T30 Torx Driver T25 Torx Driver 8mm Combination Wrench and/or Socket with Ratchet 10mm Combination Wrench and/or Socket
2001 V70 T5 ETM Removal and Cleaning Directions
 2001 V70 T5 ETM Removal and Cleaning Directions Howard Cheng howardc64@gmail.com 10/24/05 Version 1.4 Read this before you start I performed this ETM cleaning because I had gotten 2 reduced performance
Shotgun Double Barrel HPFP install guide
 Shotgun Double Barrel HPFP install guide Thank you for your purchase of the VTT Shotgun Double Barrel HPFP upgrade! First thing to do when you open your box is to make sure all parts are in their respective
CP3 Retrofit Pump Install:
 CP3 Retrofit Pump Install: 2A 4 2 5 3 6 1.) Clean this area very well. No dirt = No troubles!!!!! Lay lots of Rags under and around the pumps, alternator and belts!!!!! This will save dropped tools, parts,
Timing belt change. Timing belt change
 Timing belt change Put 2 new Gates T275 timing belts on today. Tensioner drilled smooth and tight with less than 16,000 miles on her decided not to change the tensioners just the belts. You'll need some
Highly Styled, Low Cost Serpentine Drive
 Highly Styled, Low Cost Serpentine Drive Installation Instructions Style Track Chevy Small Block Kit #21100 (without Power Steering) and #21150 (with Remote Power Steering) and #21155 (with Saginaw Power
Highly Styled, Low Cost Serpentine Drive
 Highly Styled, Low Cost Serpentine Drive Installation Instructions Chevy Big Block #21200 Style Track (without Power Steering) #21250 Style Track (with Remote Power Steering) #21255 Style Track (with Saginaw
Fanatec GT3RS V1 to GT3RS V2 Tutorial
 Fanatec GT3RS V1 to GT3RS V2 Tutorial by Roy Visser 1 How to update your Fanatec GT3RS V1 wheel to a GT3RS V2 wheel Welcome to this guided and detailed tutorial for upgrading your Fanatec GT3RS V1 wheel
1. Start by removing stock air box and inlet feeding from above front bumper (or any aftermarket are filter system you might have).
.") 1. Start by removing stock air box and inlet feeding from above front bumper (or any aftermarket are filter system you might have). 2. Unplug radiator fan (plug is just behind top of bumper on drivers
1. Start by removing stock air box and inlet feeding from above front bumper (or any aftermarket are filter system you might have). 2. Unplug radiator fan (plug is just behind top of bumper on drivers
INSTALLATION INSTRUCTIONS
 COLD AIR INTAKE INSTALLATION INSTRUCTIONS PART NUMBER D760-0390C APPLICATION: 1999-2003 E39 M5 PARTS LIST 1 Left Aluminum Intake Tube 1 Air Pump Bracket (A) 1 Right Aluminum Intake Tube 1 Air Pump Bracket
ENGINE ACCESSORIES. D20DT Engine. PCV valve and oil separator. Turbo charger. EGR pipe (LH, Center, RH) Cooling fan clutch. Auto tensioner.
 Cooling fan clutch. Auto tensioner.") 01 41 ENGINE ACCESSORIES Engine GENERAL PCV valve and oil separator Turbo charger Power steering pump Fuel return hose Alternator EGR pipe (LH, Center, RH) Cooling fan clutch EGR valve Auto tensioner Cable
01 41 ENGINE ACCESSORIES Engine GENERAL PCV valve and oil separator Turbo charger Power steering pump Fuel return hose Alternator EGR pipe (LH, Center, RH) Cooling fan clutch EGR valve Auto tensioner Cable
BeetleBot. The Simple Zippy Screw-Together Robot Kit! SKU: K JB. jb/
 BeetleBot The Simple Zippy Screw-Together Robot Kit! www.solarbotics.com 1-866-276-2687 SKU: K JB http://www.solarbotics.com/products/k_ jb/ Document Revision: January 05 2016 Shell Board 2 x Sensor Wires
Olson Kustom Works th St SE #M, Monroe, WA (949)
") Olson Kustom Works 17404 147 th St SE #M, Monroe, WA 98272 (949)742-0613 Jesse@OKW-Inc.com FOR REVISIONS ALL 2017 BRACKET REVISIONS, revised July 2017 Thank you for your purchase from OKW. If you have
Olson Kustom Works 17404 147 th St SE #M, Monroe, WA 98272 (949)742-0613 Jesse@OKW-Inc.com FOR REVISIONS ALL 2017 BRACKET REVISIONS, revised July 2017 Thank you for your purchase from OKW. If you have
Ford Focus Zetec SVT Timing Belt
 2000-2004 Ford Focus Zetec SVT Timing Belt Replacement This guide will show you how to replace the timing belt on the 2.0L DOHC Zetec with VCT on a 2002 Ford Focus SVT. This is an interference motor. Written
Volvo 850 Radiator Replacement Jason Reed 29 March 2013
 This write up covers removing and replacing the radiator on a 97 855 GLT wagon with light pressure turbo and automatic transmission. This car has 162K miles. The radiator, which was original, developed
WARNING: IF YOU ARE NOT EXPERIENCED IN THE AREA OF AUTOMOTIVE MECHANICS WE STRONGLY URGE THAT YOU REFER THIS INSTALLATION TO YOUR MECHANIC.
 INSTALLATION INSTRUCTIONS STILLEN SUPERCHARGER KIT 2003+ Infiniti G35 Materials supplied: See attached list Equipment needed: 1. Assorted sockets and wrenches 2. +,- Screwdrivers 3. Assorted pliers/ Clamps