FITTING OF (WESTFALIA) REMOVABLE TOWBAR ON SKODA OCTAVIA WITHOUT TOWBAR PREPARATION (04/11/16 CJ v1.0)
|
|
|
- James Payne
- 5 years ago
- Views:
Transcription


1 FITTING OF (WESTFALIA) REMOVABLE TOWBAR ON SKODA OCTAVIA WITHOUT TOWBAR PREPARATION (04/11/16 CJ v1.0) A. INTRO ALL STEPS COMPLETED AT YOUR OWN RISK! I AM NOT LIABLE FOR ANY LOSS OR DAMAGE! These instructions are a guide, based on the workshop manual and towbar/electrics fitting instructions for the installation of a Westfalia removable towbar on the Skoda Octavia MK3 (in this case, 2015 model) including comprehensive body work removal instructions. Towbar installation instructions will be needed as electronics may vary along with interior trim levels! I completed the work in a slightly different order, but this guide is the best way! A relatively comprehensive set of tools will aid the fitting (Torx bits, socket sets, screwdrivers, electrical tape, smooth pry bar, needle point tweezers, cutters, pliers, torque wrench, electrical tape). Images are numbered on the bottom left referring to instruction steps (e.g. A-1 => A. Intro 1 (Towbar kit ) ). Instructions are given in text and as overlays/highlighting on images. Most steps have at least one reference image. Additional references/tips before starting: 1. Towbar kit, part of the bumper reinforcement bar, cap for attachment hole, removable neck with two keys, 4 bolts, connector fitting plate and hinge (not shown) 2. Electrics kit (control module, rear wiring loom, front wiring loom, additional fuse box, connector housing, fuses, mounting fixings)

 6.")
2 3. A picture of some of the work to come 4. Tip: Tape screws to the relevant removed panels in aid of not losing them! (Just remember to remove them from the panel before clipping them back into the car ) 5. Tip: Wrap a flat-bade screwdriver in electrical tape as a soft pry bar (see later images) 6. Tip: Cable tie new looms to existing loom at existing body tie points (see later images)
 8. Tip: Use torque wrench for attaching new bar.")

3 7. Tip: Use torx allen key from spare wheel tool kit for removing bumper wheel-well screws (they are very difficult to access and not a common tool to own) 8. Tip: Use torque wrench for attaching new bar. If not owned, it can be stored in the spare wheel storage compartment, along with correct socket as an alternative to the crap tyre iron 9. Tip: Use dentist spatula tool as pry bar (rounded edges) (see later images) REMOVAL/FITTING B. INTERIOR TRIM 1. Boot trim


![sides) [2 screws each], pegs (2 on](/docs-images/83/88005810/images/4-2.jpg "left hand side, one closest to lights")
4 a. Remove boot liner, parcel shelf and compartment retainers (or equivalent rear trim) b. Remove folding luggage hooks (both sides) [2 screws each], pegs (2 on left hand side, one closest to lights on right hand side) [1 screw each]
![c. Remove rear trim piece [1 screw] then](/docs-images/83/88005810/images/5-0.jpg "pulling vertically upwards, sharply (2")

5 c. Remove rear trim piece [1 screw] then pulling vertically upwards, sharply (2 clips). These types of clips do make a loud snap sound! It is quite worrying but perfectly normal.

.")
6 2. Back seats a. Remove ISOFIX caps b. Remove ISOFIX shrouding c. Remove seat base by lifting vertically upwards at front (2 clips). Then carefully - unclip upholstery (image shows clips which may grab into upholstery. Slip your hand in to release
![d. Remove retaining cover and seat mount clip [1 screw] by inserting](/docs-images/83/88005810/images/7-0.jpg "screwdriver to unclip the cover then rotating up and through seats (you may")

7 d. Remove retaining cover and seat mount clip [1 screw] by inserting screwdriver to unclip the cover then rotating up and through seats (you may need to move the seats up and down in order to do this, it is a faff) Remove torx screw and rotate seat mount clip off in the same fashion. Parts pictured for reference


8 e. Remove seat back by pulling left hand side out of mount then sliding off pin 3. LHS trim rear, part names REFERNECE IMAGE:

, showing how bottom")
9 a. Remove pillar C top by inserting screwdriver, unclipping top then sliding out bottom Interior view of panel for reference (top clips popped off), showing how bottom slides out
![b. Remove pillar C wheel arch [1 pin 1 nut] then by pulling horizontally](/docs-images/83/88005810/images/10-0.jpg "away from the car body, from top to bottom, unclipping in the process (may")

10 b. Remove pillar C wheel arch [1 pin 1 nut] then by pulling horizontally away from the car body, from top to bottom, unclipping in the process (may require levering with screwdriver). Part pictured with location of the clips for reference: Remove these first (these are positioned under the rear seat base)
![c. Remove pillar C middle section [1 screw] by prying horizontally](/docs-images/83/88005810/images/11-0.jpg "from back to front (ensure pulling as horizontal as possible due to")

11 c. Remove pillar C middle section [1 screw] by prying horizontally from back to front (ensure pulling as horizontal as possible due to tight fit and long length pins) Location of clips and pins for reference (note the bottom clips must pass through the carpet on reinstallation)
 by prying outwards and gently")

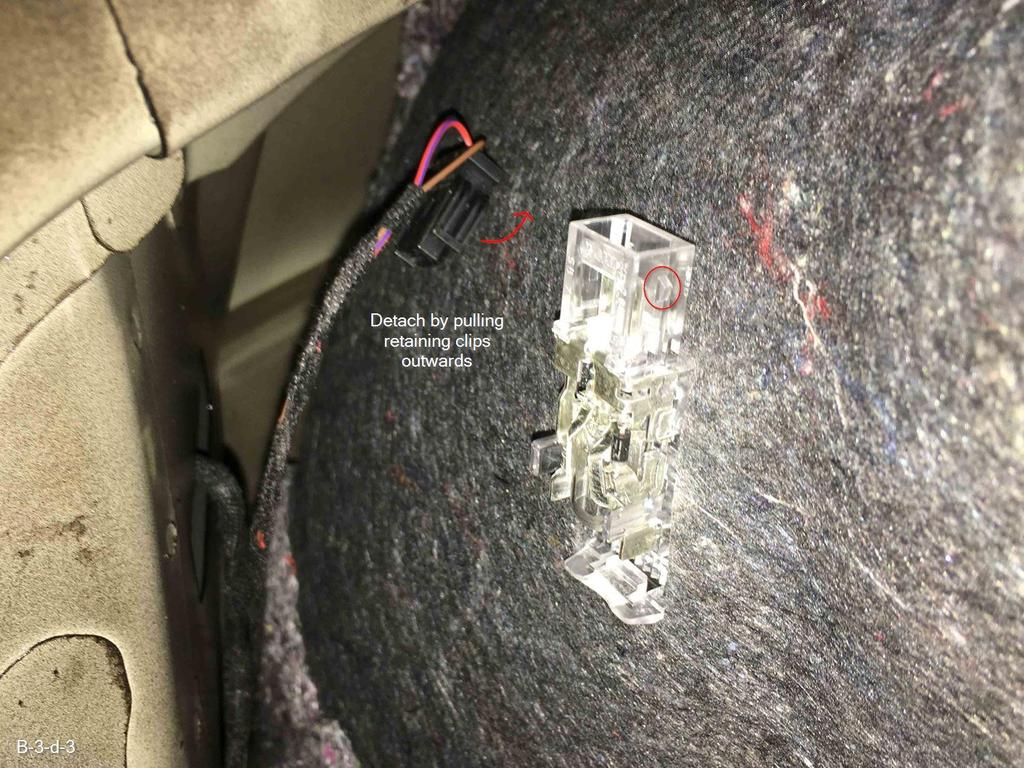
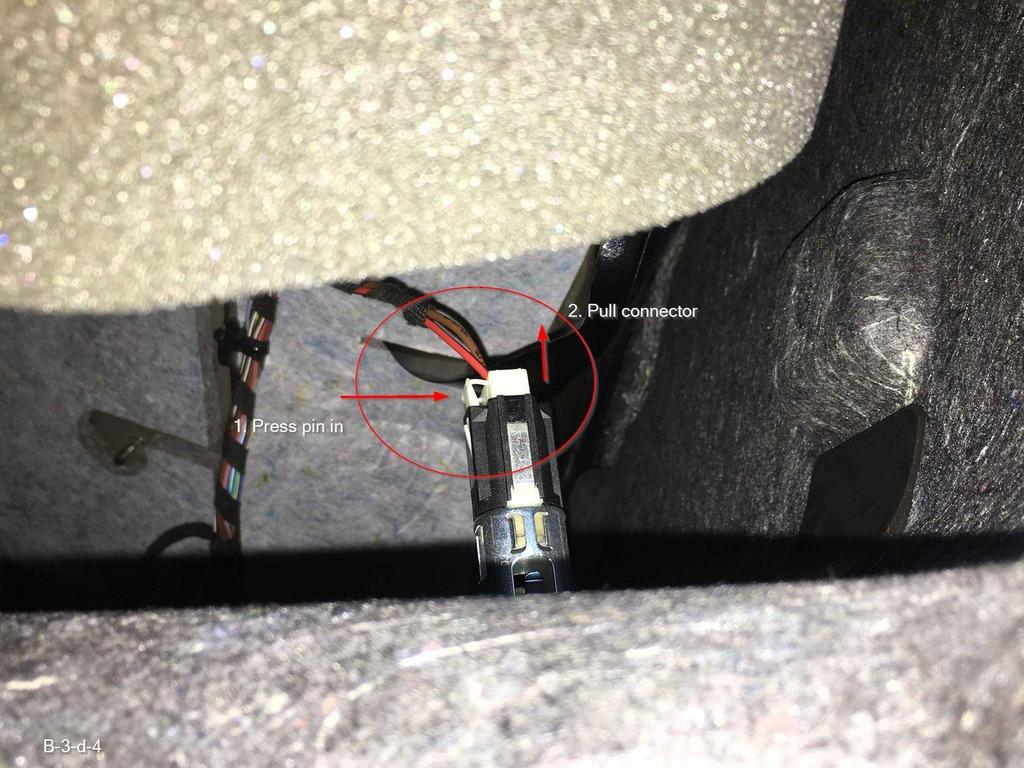
12 d. Remove left hand side boot carpet trim (2 connectors) by prying outwards and gently pulling carpet away from side panel, over fixing points. Gentle pulling allows for unplugging of connectors
13


14 The following image highlights the obstructions in the removal of the carpet for reference 4. LHS trim front a. Remove centre dash left trim by inserting dentist tool prybar then pulling away from dash


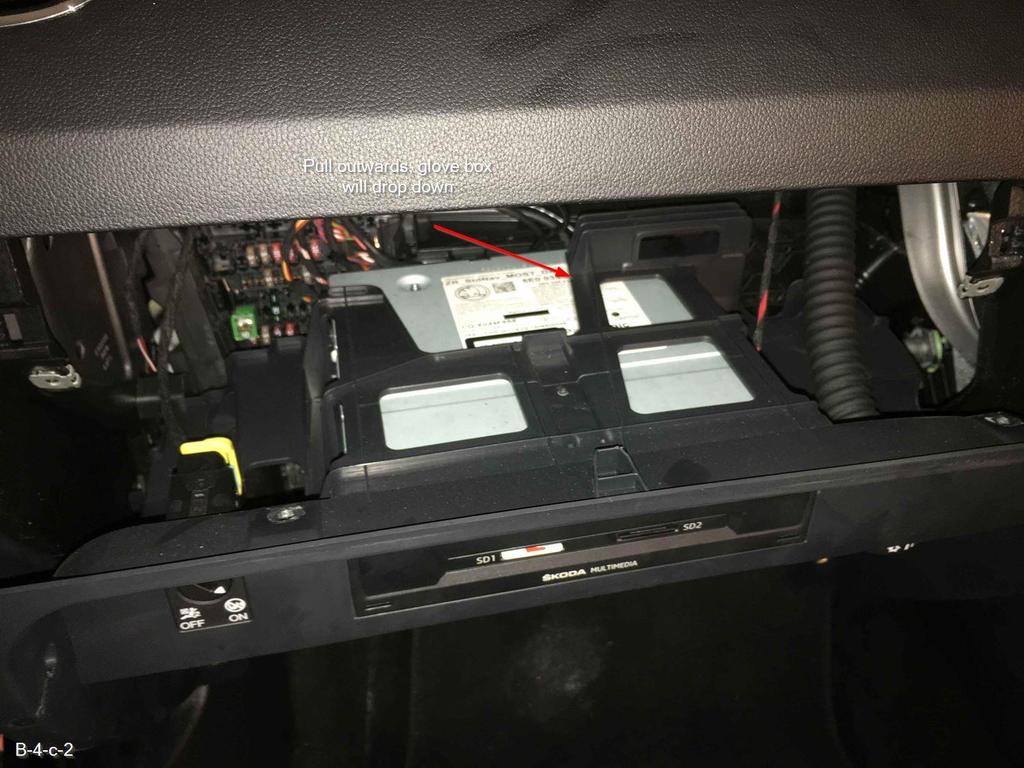
15 b. Remove glove box by opening glove box then inserting screwdriver through hole to unclip damper. Close glove box most of the way then pull up and outwards sharply (or wiggle) to release from hinges c. Remove glove box surround [6 screws] (2 connectors simple clips/catches, multiple radio connectors see image for help, AC hose may need screwdriver to help wiggle off)
16
![d. Remove bonnet lock release handle [1 retaining clip] by pulling handle towards you (the action of opening the bonnet).](/docs-images/83/88005810/images/17-0.jpg "Hold in this position and use screwdriver to pull retaining clip out. It may fall into trim do not worry.")

17 d. Remove bonnet lock release handle [1 retaining clip] by pulling handle towards you (the action of opening the bonnet). Hold in this position and use screwdriver to pull retaining clip out. It may fall into trim do not worry. The handle should then easily detach from the trim This appears quite difficult on first try, but ensure you are pulling the handle fully and use a torch to first locate the clip, then pushing it outwards with a screwdriver (towards the front of the car)


18 e. Remove pillar A lower trim [1 pin] by removing pin and pulling top part outwards, bottom part upwards

![Remove lights [2 screws each] (1 connector each) by gently wiggling](/docs-images/83/88005810/images/19-1.jpg "and pulling outwards to release plastic pins from retaining holes")
19 C. EXTERIOR TRIM 1. Lights a. Remove light surround trim by pulling outwards b. Remove lights [2 screws each] (1 connector each) by gently wiggling and pulling outwards to release plastic pins from retaining holes (on the left side of the body). These can be quite tight

![side].](/docs-images/83/88005810/images/20-1.jpg "Three are visible, one is under")
20 2. Bumper a. Remove wheel well screws [4 each side]. Three are visible, one is under protective material between bumper and trim (almost vertical)
![b. Remove bumper underside screws [8 total], 6 easily visible,](/docs-images/83/88005810/images/21-0.jpg "2 closest to wheels are slightly more difficult to see (only 2")

21 b. Remove bumper underside screws [8 total], 6 easily visible, 2 closest to wheels are slightly more difficult to see (only 2 on sides are shown in images for reference) c. Unclip sides by gently pulling outwards (ensure no screws still in - do not force!)

 f.")

22 d. Unclip rear catches by pushing in clips with screwdriver, then pulling bumper forwards e. Release reverse sensor connectors and clips (if applicable) f. CUT BUMPER (check dimensions around 22cm, there should be a faint raised section showing the outline of the cut required already on the bumper), cut using chosen method - knife, tidy up by filing)


23 It does not have to be perfect as it is not visible! (Almost perfect will do )

![right], may require digging out sealant b.](/docs-images/83/88005810/images/24-1.jpg "Prise away from sealant starting at the bottom,")
24 3. Bumper reinforcement bar a. Remove LHS and RHS [3 screws left, 4 screws right], may require digging out sealant b. Prise away from sealant starting at the bottom, then lift bar up (it is hooked on)

 c.")
25 4. New towbar and bumper reinforcement bar a. Cut slots or remove square cut-outs of protective coating in frame rails in order to inset bolts b. Insert towbar and screw in [4 screws - torque 60Nm). Check the necessary depth as there are multiple fixing holes (in Octavia III hatchback case you should see the spare holes) c. Assemble socket mounting point, ensuring correct tightness to be easily retractable, but locking in nature (follow assembly instructions/guess as it is near-impossible to explain through photos)


26 D. ELECTRICS 1. Rear a. Remove the plug in the car boot base and insert new cable with existing grommet. Ensure proper seal b. Feed rear cable and run over tow bar away from exhaust, fix with cable ties and cut excess


27 c. Cut off useless boot (check instructions!) and feed through socket mount d. Attach socket to connector housing and mount ensuring adequate and proper sealing


28 e. Insert grounding connectors into local grounding point (10mm) [3 grounding points, 2 low 1 up high]
 used")

29 f. Plug all tailing leads into control box g. Mount box to wheel arch (hook and loop (Velcro) used and nylon spacer locks are optional, I just happened to own them and they worked perfectly to lock the box into place)
, ready for")

30 2. Feed cables through interior trim a. Run front loom next to existing looms. Tape cables to a mouse (hard, flexible piece of thin material wood), ready for feeding through pillar B trim panel and gently feed through b. Remove mouse and continue to feed new loom alongside existing loom, using cable ties as suggested in earlier tips


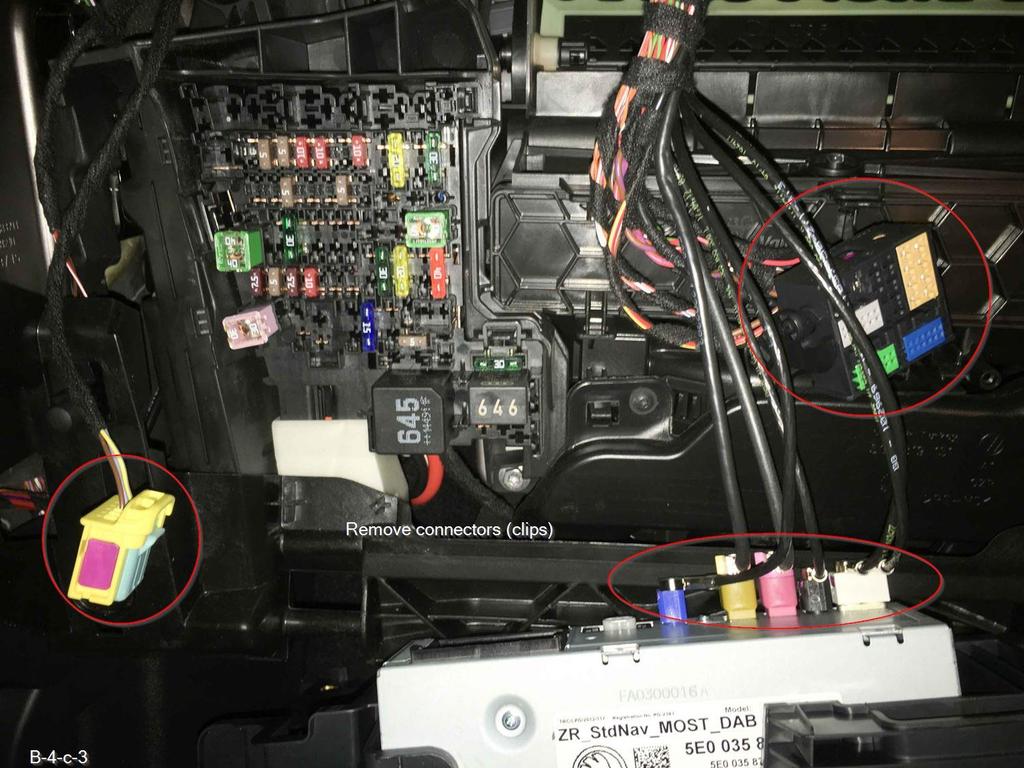
31 3. Front a. Remove battery GND terminal (10mm) b. Remove fuse box main (lower) connector by pressing clip and pulling white shrouding downwards

 and C (right) into foot well for access then cut retention")
32 c. Remove BCM connectors (all three makes for easier work) by pressing small clips in with a screwdriver, pulling down lever and releasing connector (put your hand upwards from next to fuse box) d. Pull BCM connectors A (left) and C (right) into foot well for access then cut retention cable ties and press clips to remove pin trays from connector body


33 e. Observe pin numbers moulded into connectors and the corresponding wiring colours f. Use tweezers to remove appropriate pins, replace with new trailer loom pins (follow instructions!)


34 g. Place existing pins into relevant new loom connectors (provided) and tuck connectors above pin trays


35 h. Reinsert into BCM connectors and attach with cable ties i. Plug BCM connectors back into sockets (a royal pain in the ass)


36 j. Unclip fuse box k. Plug additional fuse box tails into rear connectors (numbered), observing numbers on the back of the fuse box


37 l. Place fuses into additional fuse box m. Clip and snap tail wires into additional fuse box rear
 connector through shrouding o.")

38 n. Reclip fuse box and reinsert fuse box main (lower) connector through shrouding o. Cable tie to existing looms ensuring no strain on any cables or connectors, and no fouling of air filter/ducting/fixings
 [8 underside screws] [4 wheel-well screws each] 2. Lights [2 screws each] 3. Light surround trim (clips) INTERIOR TRIM 1.")
39 p. Place additional fuse holder in appropriate space It is done! Installation of panels is in the reverse order. No pictures are provided by the order is listed here for reference: E. INSTALLATION EXTERIOR TRIM 1. Bumper (electrical connectors) [8 underside screws] [4 wheel-well screws each] 2. Lights [2 screws each] 3. Light surround trim (clips) INTERIOR TRIM 1. Glove box surround (2 simple connectors, multiple radio connectors, AC hose) [6 screws] 2. LHS trim front a. Insert pillar A lower trim [1 pin] b. Insert clip into boot lock handle and reclip by simply pressing back into pin c. Insert glove box surround (2 connectors, radio, AC hose) [6 screws] d. Insert glove box and clip damper (extend damper first), attach hinges, then clip damper on with screwdriver e. Insert centre dash left trim (clips) 3. LHS trim rear a. Insert left hand side boot carpet trim (2 connectors), careful to feed all fixing through capet b. Insert pillar C middle section [1 screw], careful again to place clips through carpet c. Insert pillar C wheel arch [1 plastic hand nut, 1 pin] d. Insert pillar C top (clips) 4. Back seats a. Insert seat back (pin and retainer)
![b. Insert retaining cover and clip [1 screw] c. Insert seat base (clips) d. Insert ISOFIX clips e. Insert ISOFIX shrouding 5. Boot trim a. Insert rear trim piece (clips) [1 screw] b.](/docs-images/83/88005810/images/40-0.jpg "Insert folding luggage hooks (both sides) [2 screws each], pegs (both left hand side, one closest to back right hand side) [1 screw each] c.")
40 b. Insert retaining cover and clip [1 screw] c. Insert seat base (clips) d. Insert ISOFIX clips e. Insert ISOFIX shrouding 5. Boot trim a. Insert rear trim piece (clips) [1 screw] b. Insert folding luggage hooks (both sides) [2 screws each], pegs (both left hand side, one closest to back right hand side) [1 screw each] c. Insert boot liner, parcel shelf and compartment retainers (or equivalent rear trim) F. COMPLETE 1. Completed work (tow-hitch in)
 The electrics should all work as-is; however for the car to detect and adjust systems, coding is required in multiple modules.")

41 2. Completed work (tow-hitch out) - invisible! 3. View of tools required G. CODING (VCDS) The electrics should all work as-is; however for the car to detect and adjust systems, coding is required in multiple modules. This turns off rear-parking sensors, sets up the car alarm, enables traction control, disables eco-mode etc. (when the car detects trailer electrics are attached). The chosen tool to complete this is VCDS from Ross-Tech. Either a Micro-CAN or HEX+CAN interface cable is required. These can be purchased or rented. Review VCDS instructions if you are not confident! Perform an auto-scan and save the log file before attempting long coding. These instructions are adapted from pncarrerars on Briskoda forum with updated instructions since VCDS version is now up to 16 with different labels.
 with your own controller to double check you have selected the correct controller for coding. 2.")
42 1. Enable 69-Trailer in CAN gateway (Select control module > 19-CAN Gateway > Tick 69 Trailer ) Tip: When continuing with the next steps (long coding), you can check the module being coded by comparing the titles of the input boxes in the instructions (in the example below, 5Q ) with your own controller to double check you have selected the correct controller for coding. 2. Enable Byte 1 Bit 1 in BCM (Cent. Elec.) using Long Coding Assist (Select control module > 09-Cent. Elec. > Long Coding Helper > Byte 1 > Tick Trailer Hitch control module installed


43 3. Enable Byte 5 Bit 4 in Engine (Go to Drivetrain tab > 01-Engine > Long Coding Helper > Byte 5 > Tick Trailer installed 4. Enable trailer stabilisation adaption in ABS (Go to Chassis tab > 03-ABS Brakes > Adaptations > Channel Vehicle and trailer stabilization > Set to activated 5. Change Byte 3 to 01 Trailer Hitch Installed in Park Assist (Go to Electronics 1 tab > 76-Park Assist > Long Coding Helper > Byte 3 > Set to 01 Trailer Hitch installed (manually removable) 6. Change Byte 3 to appropriate option and Byte 1 to 01 Trailer connector diagnosis active in Trailer (Go to Electronics 1 tab > 69-Trailer > Long Coding Helper > Byte 3 > (select appropriate option, usually 00 Terminal 30 Output (Pin 9) 02 Terminal 30 Output (Pin 9) active when Trailer connected > Byte 1 > Set to 01 Trailer Connector Diagnosis active

44 7. (Instructions extracted from forum post only! Not performed on my car). Change Byte 16 to 01 Trailer Recognition Control Module installed in Lane Assistant Camera (Go to A5 Lane Assist Camera > Long Code Helper > Byte 16 > Set to 01 Trailer Recognition Control Module installed
Raxiom Factory GPS Rear Back-up Camera Kit (07-17 Wrangler)
") Raxiom Factory GPS Rear Back-up Camera Kit (07-17 Wrangler) Installation Time: 2.5-3Hrs Tools Required: 7mm Socket & Driver 10mm Socket 10mm Open end wrench Knife / Razor blade Zip-ties Wire Cutters Needle
Raxiom Factory GPS Rear Back-up Camera Kit (07-17 Wrangler) Installation Time: 2.5-3Hrs Tools Required: 7mm Socket & Driver 10mm Socket 10mm Open end wrench Knife / Razor blade Zip-ties Wire Cutters Needle
Depress each tab as you pull the bezel off. The bezels are tight. L.H. shown.
 2013-2014 Ford Mustang V6 & Boss 302 Lower Valance Fog Light Kit Parts List: Quantity: Tool List: Fog light & bulb with bracket 2 Flat head & Phillips screwdriver Black bezels 2 Ratchet & Socket set OR
Please read thoroughly before starting installation and check that kit contents are complete.
 Rear Vision System Mirror Display 2013-Current Ram (Kit part number 1009-9518) Please read thoroughly before starting installation and check that kit contents are complete. Items Included in the Kit: Rear
2015 Copyright Maxspeed-Motorsports.com
 1 Porsche PCM 3.1 Backup Camera Installation Instructions. Thank you for purchasing your product at www.maxspeedmotorsports.com Before you start please understand that these installation instructions are
INSTALLATION INSTRUCTIONS
 9002-6513 Rear Vision System W/ Zoom Aftermarket and Factory 8.4 Touch Screen Display (Factory Display requires Chrysler/Dodge dealer to activate) 2009 2012 RAM (Part B) 2013 Current RAM (Part A) NOTE:
MK7 GTI Electronic Folding Mirror Conversion
 MK7 GTI Electronic Folding Mirror Conversion 01 Mirror and Switch Installation 1. Using a soft pry tool remove the trim panel on the driver side door handle. 02 2. Remove 2 T-30 torx screws. 03 3. On the
INSTALLATION INSTRUCTIONS
 Rear Vision System Aftermarket and Factory 5.0, 8.4 and 6.1 MyGig Touch Screen Display (Factory Display requires Chrysler/Dodge dealer to activate) 2009 Current* Dodge Ram (Kit part number 1009-6503) *NOTE:
GMC Duramax (LBZ) High Idle Kit Note: Only for automatic transmissions with cruise control
 High Idle Kit Note: Only for automatic transmissions with cruise control") U 17 December 2014 (1036606) 2006-07 GMC Duramax (LBZ) High Idle Kit (I-00318) 1 GMC Duramax (LBZ) High Idle Kit Note: Only for automatic transmissions with cruise control 1036606 2006-2007 GMC Duramax
U 17 December 2014 (1036606) 2006-07 GMC Duramax (LBZ) High Idle Kit (I-00318) 1 GMC Duramax (LBZ) High Idle Kit Note: Only for automatic transmissions with cruise control 1036606 2006-2007 GMC Duramax
INSTALLATION INSTRUCTIONS
 INSTALLATION INSTRUCTIONS Accessory Application Publications No. BII 25830 2004 MDX Issue Date SEP 2003 PARTS LIST 2 Clips Trailer Hitch Kit: P/N 08L92-S3V-200A Receiver cover Trailer hitch Harness Kit:
Z-Gate Universal Shifter
 Installation Instructions Z-Gate Universal Shifter Fits: GM, Ford, Lincoln and Chrysler Transmissions See Application Guide for Specific Applications Part #80681 Rev 06/01/2018 WORK SAFELY! For maximum
INSTALLATION INSTRUCTIONS JEEP 2011-UP JK SECURITY FULL CONSOLE #274
 INSTALLATION INSTRUCTIONS JEEP 2011-UP JK SECURITY FULL CONSOLE #274 PARTS CHECKLIST Tuffy Console #9 Left Front Mounting Bracket #10 Right Front Mounting Bracket #11 Electronics mounting bracket #12 Divider
INSTALLATION INSTRUCTIONS
 Rear Vision System Mirror Display Dodge Ram Kit Contents: Instruction Sheets Template Chassis Harness Endgate Handle with Camera Wire Ties (Qty: 17) Bottle of ZTech Plug for Non-Locking Endgates (Optional)
Installation instructions, accessories RTI S80
 Installation instructions, accessories Instruction No 8685714 Version 1.0 5 Part. No. RTI S80 Volvo Car Corporation RTI S80-8685714 - V1.0 Page 1 / 25 Equipment A0000161 A0000162 A0801178 D8802049 Page
INSTALLATION INSTRUCTIONS
 INSTALLATION INSTRUCTIONS Accessory Application Publications No. ATTACHMENT (EX-L WITH NAVI) 2008 RIDGELINE AII 36587 Issue Date MAY 2007 PARTS LIST Attachment Kit P/N: 08B21-SJC-102 Template Rear camera
Installation Instructions Z-Gate Shifter
 Installation Instructions Z-Gate Shifter Part Number 80681 1998, 2001 by B&M Racing and Performance Products The B&M Z-Gate shifter can be used in vehicles equipped with most popular three speed automatic
PLEASE READ THIS INSTRUCTIONS CAREFULLY, BEFORE YOU START INSTALLATION
 INSTALLATION INSTRUCTIONS PART NUMBER: L0SXC000 DESCRIPTION: 09 ASCENT TRAILER HITCH PLEASE READ THIS INSTRUCTIONS CAREFULLY, BEFORE YOU START INSTALLATION SAFETY PRECAUTION: When installing Trailer Hitch,
INSTALLATION INSTRUCTIONS
 Rear Vision System Tailgate Emblem Camera Mirror Display 2009-Current Ford F-150 and 2010-Current Super Duty (Kit part number 1008-9527) Kit Contents: Mirror Tailgate Emblem Mount with Camera Interior
INSTALLATION INSTRUCTIONS
 GENUINE PARTS INSTALLATION INSTRUCTIONS 1 DESCRIPTION: Trailer Tow Harness 2 APPLICATION: Nissan Rogue 3 PART NUMBER: 999T8 G2000 4 KIT CONTENTS: 999T8 G2000 Item Qty. Part Description Service Part Number
STEPS FOR REMOVING REAR ASHTRAY & CUP HOLDER, CENTER ARMREST, E- BRAKE CONSOLE, FRONT ASHTRAY, LOWER CENTER CONSOLE AND GLOVE BOX
 Please give credit where credit is due! This DIY was completed ENTIRELY by the hardest working VW Vortex moderator on the site!! Gary Thompson, Ph.D. - vortex ID VGRT6, email address vgrt6@yahoo.com. Please
Deuce/Ace Installation Instructions
 HARDWARE KIT: Upper Mounting Plate: 2-7/16" (11mm) X 3.5" bolts 2-7/16" flange nuts 2-2" spacers 2-7/16" trim cap mounting washers 2 - plastic trim caps TOOLS NEEDED: safety glasses wrenches 16mm or 5/8"
Installation instructions, accessories. Parking assistance, rear
 Installation instructions, accessories Instruction No 31330676 Version 1.4 Part. No. 30758088, 9487266, 30786087, 31359215 Parking assistance, rear Volvo Car Corporation Parking assistance, rear- 31330676
INSTALLATION INSTRUCTIONS
 INSTALLATION INSTRUCTIONS Accessory HITCH Application 2012 CROSSTOUR Publications No. AII 46198 Issue Date JULY 2011 PARTS LIST Trailer Hitch Kit P/N 08L92-TP6-101 Upper spacer A (5 mm) (Some are not used.)
Curt Mfg. Trailer Hitch and Hoppy Wiring Kit Installation Instructions
 Curt Mfg. Trailer Hitch and Hoppy Wiring Kit Installation Instructions The Curt trailer hitch replaces the stock rear cross member in the Touareg. It attaches with 8 bolts just like the factory VW hitch.
INSTALLATION INSTRUCTIONS
 INSTALLATION INSTRUCTIONS Accessory Application Publications No. AUTOMATIC AII 27160 2005 CR-V Issue Date ATTACHMENT KIT SEP 2004 PARTS LIST Automatic Day/Night Mirror Attachment Kit (sold separately)
INSTALLATION INSTRUCTIONS
 INSTALLATION INSTRUCTIONS Accessory S P/N 08V67-SJC-101 Application 2012 RIDGELINE Publications No. AII 12006 Issue Date NOV 2011 PARTS LIST Back-up sensor harness 3 Wire ties with small clips (2 Not used)
1 of 2 5/25/17, 4:57 PM
 1 of 2 5/25/17, 4:57 PM Overview - Bumper Cover, Audi Q5 S-Line and Audi SQ5 If the vehicle has lane change assistance, the lane change assistance control module (J769) / (J770) must be recalibrated. 1
INSTALLATION INSTRUCTIONS
 INSTALLATION INSTRUCTIONS Accessory Application Publications No. in- ENTERTAINMENT SYSTEM 2004 TSX BII 24811 Issue Date APRIL 2003 PARTS LIST Attachment Kit P/N 08B23-SDA-101A Monitor bracket harness FM
INSTALLATION INSTRUCTIONS
 INSTALLATION INSTRUCTIONS Accessory S P/N 08V67-SJC-101 Application 2010 RIDGELINE Publications No. AII 42117 Issue Date AUG 2009 PARTS LIST Back-up sensor harness 3 Wire ties with small clip (2 Not used)
CARM INTERNATIONAL TOWING MODULES
 CARM INTERNATIONAL TOWING MODULES (TA100/200 Instructions Revision = 1) Each Towing Module (if ordered with Loom Pack) is shipped with: A/ These instructions B/ 1 x Towing Control Module C/ 1 x high current
SHELBY GT500
 2007-2009 SHELBY GT500 Removal of Factory Unit WARNING: 1. Radiator fluid must be handled properly. Please observe local ordinances with regards to handling and disposal. 2. Allow vehicle and components
INSTALLATION INSTRUCTIONS
 Rear Vision System Tailgate Handle Camera Mirror Display 2004-2014 Ford F-150 and 2008-2015 Ford Super Duty (Kit part numbers 9002-9521) Kit Contents: Mirror Tailgate Handle with camera and harness Interior
INSTALLATION INSTRUCTIONS
 INSTALLATION INSTRUCTIONS Accessory Application Publications No. AII 25877 PILOT Issue Date AUG 2003 Optional ATF and power steering coolers are required when installing the trailer hitch. 2 Spacers PARTS
INSTALLATION INSTRUCTIONS
 INSTALLATION INSTRUCTIONS Document# 19-0038 2004+ Lotus Elise (Series 2) Rear Clamshell Removal Kit Safely support the vehicle. This is a two-person job. Allow 1 to 2 hours for initial disassembly. Have
Fitting Instructions
 Reverse Park Assist Suitable for: Nissan Navara Kit Part No: 5466XX NP00 Tow-Pro Wiring Kit Fitting Instructions Accessory Kit Estimated Fitting Time: 0 Minutes FI98 Page 0 of 5 General Notes Read through
C15C C15C. Page 1 of 20
 2 x Lid Front Hinge 1135 8 x M8 Bolt 8 x M8 Washer (3mm Thick) 4 x M6 Large washers 4 x M6 Spring washers 4 x M6 x 40mm Bolts 6 x M6 20mm Bolts 6 x M6 Washers 20 x Screws 2 x Lid mount gas strut bracket
Part Number: PT
 Preparation Part Number: PT374-02090 Kit Contents Item # Quantity Reqd. Description 1 1 Auto Dimming Mirror Assembly w/ shift area light 2 1 Hardware bag Hardware Bag Contents Item # Quantity Reqd. Description
Conflicts: Vehicles without a sunroof Vehicles with a single sunroof
 Toyota Sienna (Dual Sunroof) 2011-10.2 Overhead Video Part Number: 00016-00110 00016-00110-17 Fit Kit 00016-00120 00016-00120-17 Fit Kit Accessory Code: ED5 Conflicts: Vehicles without a sunroof Vehicles
Prius XM Radio Installation Instructions. Eddie Bell
 2004-2005 Prius XM Radio Installation Instructions By Eddie Bell www.metrotpn.com 1 Let me begin by saying this is an easy but time consuming job. Set aside a few hours of your time for the install. If
INSTALLATION INSTRUCTIONS
 INSTALLATION INSTRUCTIONS Accessory TRAILER HITCH Application 201 CR-V Publications No. Issue Date PARTS LIST Trailer Hitch Kit P/N 08L92-T0A-100 Hex nut, 12 mm Trailer hitch Hitch pin Hitch pin clip Ball
BMW 3 SeriesE90 - E93 Factory Alarm Install
 Instructions on a BMW 3 Series Factory Alarm Install. Written By: Danielle 2017 guides.drivediy.com Page 1 of 9 INTRODUCTION Tips on how to install a BMW 3 Series Factory alarm. Credit: CC 330i[E90Post.com
Remove the 3-11mm nuts holding mirror on. Don t drop the nuts!
 2005-2012 Ford Mustang Puddle Lamp Kit Parts List: Quantity: Tool List: LED Lamps 2 Flat head screwdriver Seals 2 Ratchet & Socket set OR Nuts 2 Adjustable Wrench Wiring harness 1 Drill & 11/16 th bit
PLEASE READ THESE INSTRUCTIONS CAREFULLY, BEFORE YOU START INSTALLATION
 PART NUMBER: L0SSJ000 INSTALLATION INSTRUCTIONS DESCRIPTION: FORESTER TRAILER HITCH PLEASE READ THESE INSTRUCTIONS CAREFULLY, BEFORE YOU START INSTALLATION SAFETY PRECAUTION: When installing Trailer Hitch,
GOMINIGO Third Brake Light Pulsar Kit. Installation Instructions
 Page 1 of 8 Mini Cooper Installation Instructions This kit allows the owner of any MINI Cooper or Cooper S to create a blinking effect from the third brake light assembly. The MINI Cooper being hit from
GENUINE PARTS INSTALLATION INSTRUCTIONS
 GENUINE PARTS INSTALLATION INSTRUCTIONS 1. 2. 3. 4. DESCRIPTION: Illuminated Kick Plate Kit APPLICATION: Murano PART NUMBER: 999G6 C2000, 999G6 C2100, 999G6 C2200 999Q9 AY001 - Accessory Service Connector
VELAR HITCH INSTALLATION INSTRUCTIONS TOW RANGE ROVER MODEL/ TRIM YEARS: WEIGHT CAPACITY to Present PARTS & SUPPLIES: TOOLS REQUIRES:
 HITCH INSTALLATION INSTRUCTIONS MAKE: RANGE ROVER YEARS: 2018 to Present MODEL/ TRIM VELAR PACKAGE: TOW WEIGHT CAPACITY TRAILER TONGUE 5300 LBS. 300 LBS. INSTALLATION TIME: 2 HOURS NO YES YES PARTS & SUPPLIES:
Installation Instructions for Chevrolet Colorado, GMC Canyon, LT, Z71, With Factory Fog Lights
 Installation Instructions for 2015-2018 Chevrolet Colorado, GMC Canyon, LT, Z71, With Factory Fog Lights This kit is designed to allow use of your factory fog light operation along with an addition auxiliary
INSTALLATION INSTRUCTIONS
 Rear Vision System Tailgate Emblem Camera Aftermarket Display 2009-Current Ford F-150 and 2010-Current Super Duty (Kit part number 1008-6509) Kit Contents: Tailgate Emblem Mount with Camera Chassis Harness
TOYOTA im INTERIOR LIGHT KIT Preparation
 Preparation Part Number: PT922-12170 Kit Contents Item # Quantity Reqd. Description 1 1 Main Wire Harness 2 1 Switch 3 1 Switch Header 4 1 ECU 5 1 ECU Bracket 6 1 Hardware Kit 7 1 Instruction Card 8 1
INSTALLATION INSTRUCTIONS
 INSTALLATION INSTRUCTIONS Accessory TRAILER HITCH Application 2012 CR-V Publications No. AII 12095 Issue Date DEC 2011 PARTS LIST Trailer Hitch Kit P/N 08L92-T0A-100 Hex nut, 12 mm Trailer hitch Hitch
Volkswagen MKVI Jetta w/keyless Start Traction Control Button Retrofit Kit Installation Instructions
 Volkswagen MKVI Jetta w/keyless Start Traction Control Button Retrofit Kit Installation Instructions Proper service and repair procedures are vital to the safe, reliable operation of all motor vehicles
 INSTALLATION INSTRUCTIONS Accessory Application Publications No. AII 38133-38406 HITCH 2008 ODYSSEY Issue Date NOV 2007 NOTE: A required heavy-duty power steering cooler, ATF cooler and air duct are required
INSTALLATION INSTRUCTIONS
 INSTALLATION INSTRUCTIONS FUEL SURGE TANK INSTALL KIT Honda S2000 Document# 19-0063 Support: info@radiumauto.com WARNING: DO NOT SMOKE WHILE WORKING ON FUEL SYSTEMS. KEEP SPARKS AND OPEN FLAMES AWAY FROM
Ford Mustang GT-Style Fog Light Kit Parts List: Quantity: Tool List:
 2013-2014 Ford Mustang GT-Style Fog Light Kit Parts List: Quantity: Tool List: Fog light (Left& Right) 2 Flat head & Phillips screwdriver Upper grille with surround 1 Ratchet & Socket set OR Lower grille
WARNING TAKE NOTE OF THE FOLLOWING: THIS PRODUCT MUST BE INSTALLED EXACTLY AS PER THESE INSTRUCTIONS USING ONLY THE HARDWARE SUPPLIED.
 ARB WINCH/NONWINCH BUMPER TO SUIT TOYOTA HJ100 IFS PRODUCT No. 3913140 5100050 Top Tube Kit 5100160 Buffer Kit With hole (required when fitting Top Tube) 5100170 Buffer Kit With no hole Fitting Kit No.
INSTALLATION INSTRUCTIONS
 Rear Vision System Mirror Display 2004 onwards Ford F-150 and 2008 onwards Ford Super Duty (Kit part numbers 1008-9520 and 1008-9525) Kit Contents: RVS Interior (shorter) Harness RVS Chassis (longer) Harness
TOYOTA RAV TRAILER WIRE HARNESS Preparation
 Preparation Part Number: PU322-42013-UW Kit Contents Item # Qty Description 1 1 Trailer Module Harness 2 1 Trailer 4-Flat Harness 3 1 Trailer Power Wire Harness 4 1 Mounting Bracket, 4-Flat 5 2 Screw #10-24
Installation instructions, accessories - Volvo Navigation System, widescreen
 S60 Section Group Weight(Kg/Pounds) Year Month 3 39 2001 04 S60 2001, S60 2002 Page 1 of 21 Page 2 of 21 Required tools A0000162 A0000161 A0801178 M8802509 M3903563 Page 3 of 21 M3903565 M8503983 Page
INSTALLATION INSTRUCTIONS. Rear Vision System Aftermarket Display 2009-Current Dodge Ram (Kit part number )
") Rear Vision System Aftermarket Display 2009-Current Dodge Ram (Kit part number 1009-6503) Kit Contents: Chassis Harness with RCA (Note: In some cases a RCA extension may be required to connect to your
Rear Vision System Aftermarket Display 2009-Current Dodge Ram (Kit part number 1009-6503) Kit Contents: Chassis Harness with RCA (Note: In some cases a RCA extension may be required to connect to your
Assembly instructions Original parking distance control system, Volkswagen
 Assembly instructions Original parking distance control system, Volkswagen Set contents: 1 x controller 1 x buzzer 4 x sensor Set contents: 4 x covering rings 4 x protective rings Special tools, test and
Installation instructions, accessories - Bluetooth, Mute kit XC / Volvo Car Corporation Göteborg, Sweden
 XC90 Section Group Weight(Kg/Pounds) Year Month 3 393 0.5/1.1 2006 11 XC90 2003, XC90 2004, XC90 2005, XC90 2006, XC90 2007, XC90 2008, XC90 2009, XC90 2010 Page 1 of 15 Required tools A0000162 IMG-242205
Headlamp Assembly. Headlamp Bulb Low Beam H4. Headlamp Bulb High Beam H7 REMOVAL AND INSTALLATION Exterior Lighting
 417-01-52 Exterior Lighting 417-01-52 REMOVAL AND INSTALLATION Headlamp Assembly 3. Remove the rubber boot from the lamp back face. WARNING: Bulbs become hot to touch and can cause burns if not allowed
INSTALLATION INSTRUCTIONS
 INSTALLATION INSTRUCTIONS [1] Description: Tow Hitch Wire Harness Kit [2] Application: Nissan Rogue Note: Tow Harness application is limited to specific vehicle option packages that include tow harness
INSTALLATION INSTRUCTIONS. Rear Vision System Aftermarket Display 2009-Current Dodge Ram (Kit part number )
") Rear Vision System Aftermarket Display 2009-Current Dodge Ram (Kit part number 1009-6503) Kit Contents: Chassis Harness with RCA Endgate Handle with Camera 1 bag containing: Wire Ties (Qty: 17) Bottle
Rear Vision System Aftermarket Display 2009-Current Dodge Ram (Kit part number 1009-6503) Kit Contents: Chassis Harness with RCA Endgate Handle with Camera 1 bag containing: Wire Ties (Qty: 17) Bottle
Evo X Walbro 450 Pump System
 Evo X Walbro 450 Pump System Installation Guide Please contact us at sales@wtftuned.com with any additional questions Tools required: 8 mm socket and wrench, needle-nose pliers, razor, drill w/ 5/64 bit,
INSTALLATION INSTRUCTIONS
 INSTALLATION INSTRUCTIONS Accessory Application Publications No. AII 30518 KIT 2006 PILOT Issue Date NOV 2005 NOTE: Accessory ATF and power steering coolers are required when installing the trailer hitch.
Ford Mustang V6 OEM-Style Fog Light Kit Parts List: Quantity: Tool List:
 2015-2017 Ford Mustang V6 OEM-Style Fog Light Kit Parts List: Quantity: Tool List: LED Foglights/ Bezels 2 Flat head & Phillips screwdriver (if you ordered part#3600) Ratchet & Socket set OR Wiring harness
Fitting Instructions
 Tow-Pro Wiring Kit Fitting Instructions Holder Colorado / Colorado 7 Accessory Kit Estimated Fitting Time: 0 Minutes FI7 Page 0 of General Notes Read through the fitting instructions before installation
GENUINE PARTS INSTALLATION INSTRUCTIONS
 GENUINE PARTS INSTALLATION INSTRUCTIONS 1. 2. 3. 4. DESCRIPTION: Accent light Kit APPLICATION: Versa (2012) PART NUMBER: 999F3 AW008 - Universal Accent Lighting Kit. KIT CONTENTS: Item QTY Description
Fitting Instructions
 Tow-Pro Wiring Kit Fitting Instructions Suitable for: Toyota Hilux / Fortuner Accessory Kit Estimated Fitting Time: 90 Minutes FI807 Page 0 of Issue: Date: /08/08 08 General Notes Safety Notes Suitable
Installation of Auto Meter Cobalt Boost/Vacuum Gauge:
 Installation of Auto Meter Cobalt Boost/Vacuum Gauge: Fitment: All 79-14 models. This installation was completed on a 2004 Mustang GT, and should be identical for all 1999-2004 model Mustangs. Time needed:
CVO - with ipod Amp & Speaker Upgrade Install Instructions for Batwing Fairing
 CVO - with ipod Amp & Speaker Upgrade Install Instructions for Batwing Fairing Tools Needed: 1/2 inch Socket Wire Cutters 7/16 inch Socket Wire Strippers 5/16 inch Socket Phillips Screwdriver 1/2 inch
GENUINE PARTS INSTALLATION INSTRUCTIONS
 GENUINE PARTS INSTALLATION INSTRUCTIONS DESCRIPTION: APPLICATION: PART NUMBER: Electronic Tailgate Lock Kit Nissan Titan 999M2-W3005 KIT CONTENTS: Item Qty. Part Description Service Part Number A 1 Electronic
INSTALLATION INSTRUCTIONS FOR MK4 VOLKSWAGEN JETTA (BORA) /GOLF 1.8T, 2.0L, VR6, & R32 MODELS ALSO FITS ALL MODELS OF SEAT LEON & TOLEDO
 /GOLF 1.8T, 2.0L, VR6, & R32 MODELS ALSO FITS ALL MODELS OF SEAT LEON & TOLEDO") CI100001 INSTALLATION INSTRUCTIONS FOR 1999.5-2005 MK4 VOLKSWAGEN JETTA (BORA) /GOLF 1.8T, 2.0L, VR6, & R32 MODELS ALSO FITS ALL MODELS OF SEAT LEON & TOLEDO Thank you for choosing to purchase a Carbonio
CI100001 INSTALLATION INSTRUCTIONS FOR 1999.5-2005 MK4 VOLKSWAGEN JETTA (BORA) /GOLF 1.8T, 2.0L, VR6, & R32 MODELS ALSO FITS ALL MODELS OF SEAT LEON & TOLEDO Thank you for choosing to purchase a Carbonio
INSTALLATION INSTRUCTIONS
 2007-Current Jeep Wrangler 360º System for Factory MyGig Display (Kit # AVMS-3701) Please read thoroughly before starting installation and check that kit contents are complete. Items Included in the Kit:
INSTALLATION GUIDE PREMIUM FRONT BUMPER FOR RAM AEV30304AA Last Updated: 09/18/17
 AEV30304AA Last Updated: 09/18/17 PREMIUM FRONT BUMPER FOR RAM 1500 INSTALLATION GUIDE PLEASE READ BEFORE YOU START To guarantee a quality installation, we recommend reading these instructions thoroughly
Reverse Camera Installation Instructions
 Reverse Camera Installation Instructions XUV500 Issue: 1-01/03/2013 Page 1 of 12 Fitting Time: 45 Minutes Parts Supplied: Reverse Camera Wiring Harness Tools and Materials Flat Blade Screw driver Phillips
INSTALLATION INSTRUCTIONS
 INSTALLATION INSTRUCTIONS Accessory TRAILER HITCH Application 2012 ODYSSEY Publications No. AII 46755 Issue Date SEP 2011 PARTS LIST Trailer Hitch Kit P/N 08L92-TK8-100 Trailer Hitch Harness Kit P/N 08L91-TK8-100
Front seats. Special tools and equipment. VAS 5094 airbag adapter. Connecting page 72-9.
 Page 1 of 23 72-1 Front seats Special tools and equipment VAS 5094 airbag adapter Connecting page 72-9. Page 2 of 23 72-2 Front seats, removing and installing WARNING! Before starting work on seats, connect
TIP-OUT GLASS WINDSHIELD KIT
 TIP-OUT GLASS WINDSHIELD KIT P/N 2881108 APPLICATION Verify accessory fitment at Polaris.com. BEFORE YOU BEGIN Read these instructions and check to be sure all parts and tools are accounted for. Please
INSTALLATION INSTRUCTIONS
 INSTALLATION INSTRUCTIONS Accessory Application Publications No. SYSTEM ACCORD 2-DOOR (LX/EX L4, LX V6) AII 25749 Issue Date FEB 2004 PARTS LIST Double-sided adhesive tape XM Radio Attachment Kit : P/N
INSTALLATION INSTRUCTIONS
 INSTALLATION INSTRUCTIONS Accessory TRAILER HITCH Application 2011 ODYSSEY Publications No. AII 43937 Issue Date SEP 2010 PARTS LIST Trailer Hitch Kit P/N 08L92-TK8-100 Trailer Hitch Harness Kit P/N 08L91-TK8-100
INSTALLATION INSTRUCTIONS
 2007-Current Jeep Wrangler 360º System for Factory Display Radios (Kit # AVMS-3701) Please read thoroughly before starting installation and check that kit contents are complete. Items Included in the Kit:
INSTALLATION INSTRUCTIONS
 2007-Current Jeep Wrangler 360º System for Factory Display Radios (Kit # AVMS-3701v2) Please read thoroughly before starting installation and check that kit contents are complete. Items Included in the
900 Installation instructions. SCdefault
 SCdefault 900 Installation instructions SITdefault Parking assistance (SPA) MONTERINGSANVISNING INSTALLATION INSTRUCTIONS MONTAGEANLEITUNG INSTRUCTIONS DE MONTAGE Accessories Part No. Group Date Instruction
INSTALLATION INSTRUCTIONS
 2007-Current Jeep Wrangler 360º System for Aftermarket display (Kit # AVMS-3700v2) Please read thoroughly before starting installation and check that kit contents are complete. Items Included in the Kit:
PART NUMBER: H630SSJ000. Kit Contents: A. Amplifier with Bracket (1) D. Badge (2) with push nuts (4)
 D. Badge (2) with push nuts (4)") Kit Contents: A. Amplifier with Bracket (1) D. Badge (2) with push nuts (4) E. Clip B. Harness (1) C. Cable tie (8) F. Mounting Hardware (2) G. Replacement Speaker (2) H. HVAC Duct extension (2) IMPORTANT:
Kit Contents: A. Amplifier with Bracket (1) D. Badge (2) with push nuts (4) E. Clip B. Harness (1) C. Cable tie (8) F. Mounting Hardware (2) G. Replacement Speaker (2) H. HVAC Duct extension (2) IMPORTANT:
GENUINE PARTS INSTALLATION INSTRUCTIONS
 GENUINE PARTS INSTALLATION INSTRUCTIONS 1. 2. 3. 4. DESCRIPTION: Accent light Kit APPLICATION: R42H (2011) PART NUMBER: 999F3 AW000 - Universal Accent Lighting Kit. KIT CONTENTS: Item QTY Description Service
2015 Mustang Lightbar (All Models) CDC#
 CDC#") 2015 Mustang Lightbar (All Models) CDC# 1511-7000-01 Components: 1 CDC Lightbar Note: READ instructions before starting installation!!! CDC Part# Driver side bracket 0511-6001-05 Passenger side bracket
2015 Mustang Lightbar (All Models) CDC# 1511-7000-01 Components: 1 CDC Lightbar Note: READ instructions before starting installation!!! CDC Part# Driver side bracket 0511-6001-05 Passenger side bracket
Installation MKIV Headlight Housings with Fog Lamps (Procedures apply to both MKIV Jetta and Golf)
") Page 1 This tutorial is provided as a courtesy by ECS Tuning. Service Procedure Installation Proper service and repair procedures are vital to the safe, reliable operation of all motor vehicles as well
Page 1 This tutorial is provided as a courtesy by ECS Tuning. Service Procedure Installation Proper service and repair procedures are vital to the safe, reliable operation of all motor vehicles as well
INSTALLATION INSTRUCTIONS
 INSTALLATION INSTRUCTIONS Accessory P/N 08E10-TA0-100 Application 2008 ACCORD 2-AND 4-DOOR Publications No. AII 35358 Issue Date AUG 2007 PARTS LIST Ambient Light Kit 2 Ambient lights Fuse label Washer
Audi. Installation Instructions. Bluetooth Gateway M1000-C-BT1-AUD1. Version 1.1
 Audi Installation Instructions Version 1.1 Bluetooth Gateway M1000-C-BT1-AUD1 Kit Contents: Bluetooth ECU Microphone Vehicle Interface Loom Operating Manual Tools/Ancillaries Required: Panel Removal tools
Rear Vision System Tailgate Emblem Camera Aftermarket Display 2009-Current Ford F-150 and 2010-Current Super Duty (Kit part number )
") Rear Vision System Tailgate Emblem Camera Aftermarket Display 2009-Current Ford F-150 and 2010-Current Super Duty (Kit part number 1008-6509) Kit Contents: Tailgate Emblem Mount with Camera Chassis Harness
Rear Vision System Tailgate Emblem Camera Aftermarket Display 2009-Current Ford F-150 and 2010-Current Super Duty (Kit part number 1008-6509) Kit Contents: Tailgate Emblem Mount with Camera Chassis Harness
Installation Instructions. QuickSilver Shifter. Fits: GM, Ford, Chrysler Transmissions See Application Guide for Specific Applications Part # 80683
 Installation Instructions QuickSilver Shifter Fits: GM, Ford, Chrysler Transmissions See Application Guide for Specific Applications Part # 80683 WORK SAFELY! For maximum safety, perform this installation
BMW E61 Hydraulic Pump replacement instructions
 BMW E61 Hydraulic Pump replacement instructions This DIY will guide you through the tasks needed to successfully replace your defective tailgate hydraulic pump Difficulty 3 of 10. The most difficult part
TOYOTA Yaris Hatchback EC REARVIEW MIRROR Preparation
 Preparation Part Number: PT374-02090 Kit Contents Item # Quantity Reqd. Description 1 1 Auto Dimming Mirror Assembly w/ shift area light 2 1 Hardware bag Hardware Bag Contents Item # Quantity Reqd. Description
Installation Manual TWM Performance Short Shifter Cobalt SS/SC, SS/TC, HHR SS, Ion Redline and Saab 9-3
 Page 1 Installation Manual TWM Performance Short Shifter Cobalt SS/SC, SS/TC, HHR SS, Ion Redline and Saab 9-3 Please Note: It is preferable to park on a flat surface, as you will have to engage and disengage
Main Lift Cylinders. Level of difficulty: Not very hard, only a number of steps involved requires some patience, but is very rewarding!
 Main Lift Cylinders Level of difficulty: Not very hard, only a number of steps involved requires some patience, but is very rewarding! Tools needed: - Stubby Phillips screwdriver, or ratchet with Phillips
TCI FastGate Shifter Installation Instructions
 151 INDUSTRIAL DRIVE ASHLAND, MISSISSIPPI 38603 http://www.tciauto.com TELEPHONE: 662-224-8972 FAX LINE: 662-224-8255 E-MAIL: tech@tciauto.com TCI 616541 FastGate Shifter Installation Instructions The
Guide to fitting a MK2.5 (Facelift) Centre Console into a MK2 Focus. The Parts
 Centre Console into a MK2 Focus. The Parts") Guide to fitting a MK2.5 (Facelift) Centre Console into a MK2 Focus For the latest project on my MK2 Focus I decided that a Facelift centre console would tie my previous interior uplift together. As I
Guide to fitting a MK2.5 (Facelift) Centre Console into a MK2 Focus For the latest project on my MK2 Focus I decided that a Facelift centre console would tie my previous interior uplift together. As I
HAYMAN REESE PART No: 03099RW BMW X4 F26 Series May 2014 Onwards INSTALLATION INSTRUCTIONS
 PART No: 03099RW BMW X4 F26 Series May 2014 Onwards PLEASE ENSURE THAT ALL INSTRUCTIONS ARE UNDERSTOOD PRIOR TO FITMENT PLACE THESE INSTRUCTIONS IN THE VEHICLE S GLOVEBOX AFTER INSTALLATION IS COMPLETED