MAZDA 3 MPS FRONT MOUNTING INTERCOOLER INSTALLATION
|
|
|
- Irma Wells
- 6 years ago
- Views:
Transcription


1 MAZDA 3 MPS FRONT MOUNTING INTERCOOLER INSTALLATION Tools needed: 7mm Hose clamp driver 10mm,12mm sockets and suitable ratchet with extensions Flat bladed screwdriver Pliers Phillips screwdriver
 1x 45-60mm hose clip 6x 50-70mm hose clip 1x 60-80mm hose")
2 KIT CONTENTS 1x Forge Intercooler 2x Forge intercooler hardpipes 2x 90 degree 60mm silicon hoses 1x 90 degree silicon reducer hose 1x straight silicon reducer hose 5x M6 penny washers 5x M6x12 bolts 4x M6 nyloc nuts 3x aluminium brackets (2x intercooler, 1x horn) 1x 45-60mm hose clip 6x 50-70mm hose clip 1x 60-80mm hose clip


3 1. Jack the front of the car up in the air and support on axle stands or ramps so you can safely work underneath it. Open the bonnet and remove the two 10mm bolts holding the cover on to the stock intercooler. 2. Using a 10mm socket, loosen the jubilee clip holding the intercooler outlet hose to the intercooler.


4 3. Remove the vacuum hose from the top of the dump valve, and the 25mm return hose from the side of the dump valve, by using pliers to compress the clips, then remove both 12mm bolts and take the dump valve off the intercooler. 4. With the dump valve removed, the inlet hose is accessible loosen the jubilee clip with a 10mm socket.


5 5. Undo the two 12mm nuts at the front holding the intercooler to the mounting bracket and the one 12mm nut at the back, then lift the intercooler up off the bracket, pulling it out of the inlet and outlet hoses as you do. The inlet and outlet hoses can now be removed from the car. KEEP the rubber anti-vibration grommets under each nut for later use. 6. Working under the car remove the seven 10mm bolts holding the engine undertray on, and remove it from the car.


6 7. Undo the three 10mm bolts on each side holding the front edge of the wheel arch liners to the underside of the bumper. and the five bolts along the front underside of the bumper to remove the secondary undertray.


7 8. In the wheel arches, undo the centre phillips head screws from their plastic retainers, then when unscrewed, pull the retainers from the holes. Repeat for both sides. 9. Pull the corner of the arch liner away where the wing joins the bumper to reveal a 10mm bolt remove both sides, and pull the bumper outwards away from the wing. With the arch liner pulled back, also remove the foglight wiring (if fitted)


8 10. Back in the engine bay, remove the four plastic phillips head screws and their retainers, then remove the two phillips head screws at either end of the grille.


9 11. With all screws removed, reach down from above (or up from below) and remove the air temp sensor from behind the lower grille, and pull out the clip holding the wiring to the bumper. 12. Reach down behind the top grille either side of the bonnet latch, and you should see two black clips holding the bumper to the crash bar. Unclip these, and the bumper will be free to be removed from the car. Locating lug Clip


10 13. Remove the plastic panel in the passenger side (on a RHD car) arch, by removing the two 10mm bolts and the push clip which will have to be levered out. 14. Undo the 10mm bolt holding the horn to the chassis (next to the plastic shielding removed above), and remove its mounting bracket. Use the shortest of the brackets supplied and mount the horn to the chassis as shown below using a supplied M6x12 bolt and washer.
. 16.")
 to hold the intercooler, whilst you use two M6x12 bolts, and two penny washers push the bolts though the holes and into the brackets on the intercooler, then tighten with")
11 15. Undo the bolt holding the power steering cooler pipe to its bracket, then position the pipe BEHIND the bracket and bolt it up from the other side (this has the effect of pushing the power steering pipework closer to the radiator). 16. On the crash bar, note the location of the two existing square cutouts in recesses on the crash bar, and drill two 7mm holes in the centre of those recesses, 13mm up from the bottom of the bar. Get an assistant (or a jack) to hold the intercooler, whilst you use two M6x12 bolts, and two penny washers push the bolts though the holes and into the brackets on the intercooler, then tighten with two M6 nyloc nuts held with a spanner or pliers. Also take this opportunity to clip the air temp sensor on to the holes provided in the lower air guide of the Forge intercooler. Holes in line with square cutouts, 13mm up from the bottom of the bar Air temp sensor


12 17. Use the two supplied brackets of matching length to temporarily secure the bottom of the intercooler, by using another of the M6x12 bolts, penny washer and nyloc nut on each side of the intercooler, and one of the stock Mazda bolts on the chassis. Push the intercooler as close to the power steering cooler pipe as possible, then tighten the bolts. 18. Fit the reducing elbow to the turbo outlet with one of the supplied 45-60mm clips this is a tight fit and will require some lubrication. We find silicone spray (dashboard cleaner) works best. Angle the outlet about 45 degrees across the engine, don t tighten the clip yet.


13 19. Attach the two 90 degree silicon bends to the outlets on the intercooler with two 50-70mm clips. Leave the clips loose at the moment. Lubricate the open ends, and position 50-70mm clips on the open ends. 20. Remove one of the anti-vibration grommets you kept on the stock intercooler in step 5, and place it in the triangular bracket on the longer of the two Forge pipes. Thread the pipe down through the engine bay and into the UPPER of the two 90 degree bends, and then locate the grommet onto the stud on the top of the engine block, and into the bend in step 18. Place grommet from step 5 in here
, and into the")

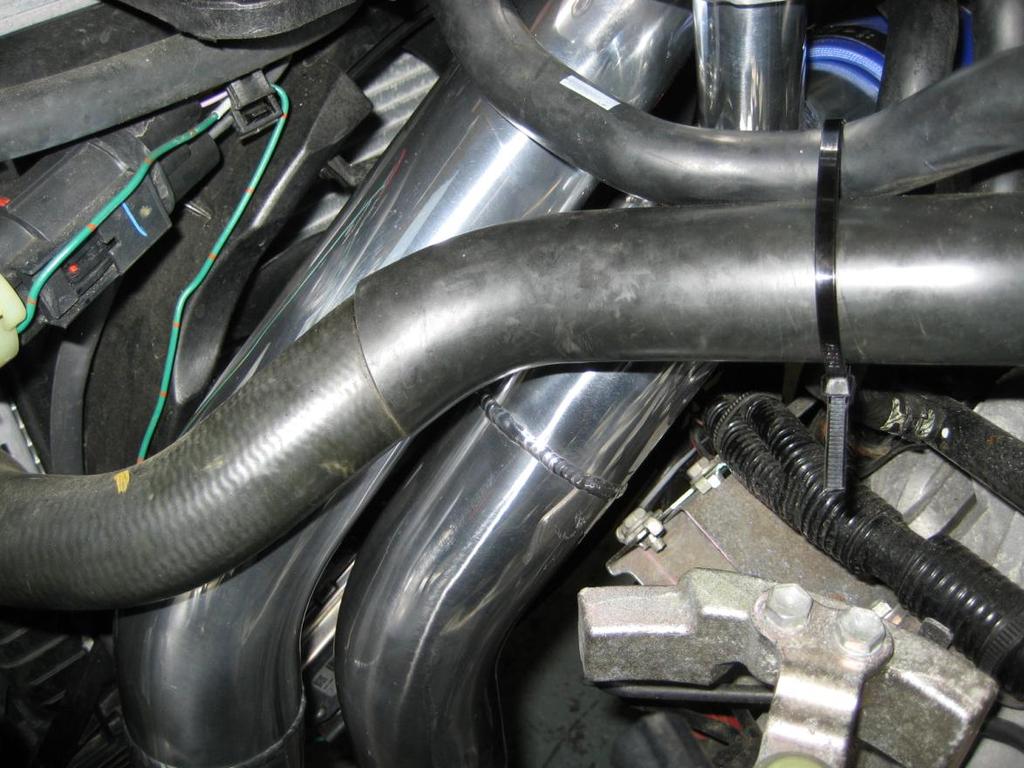
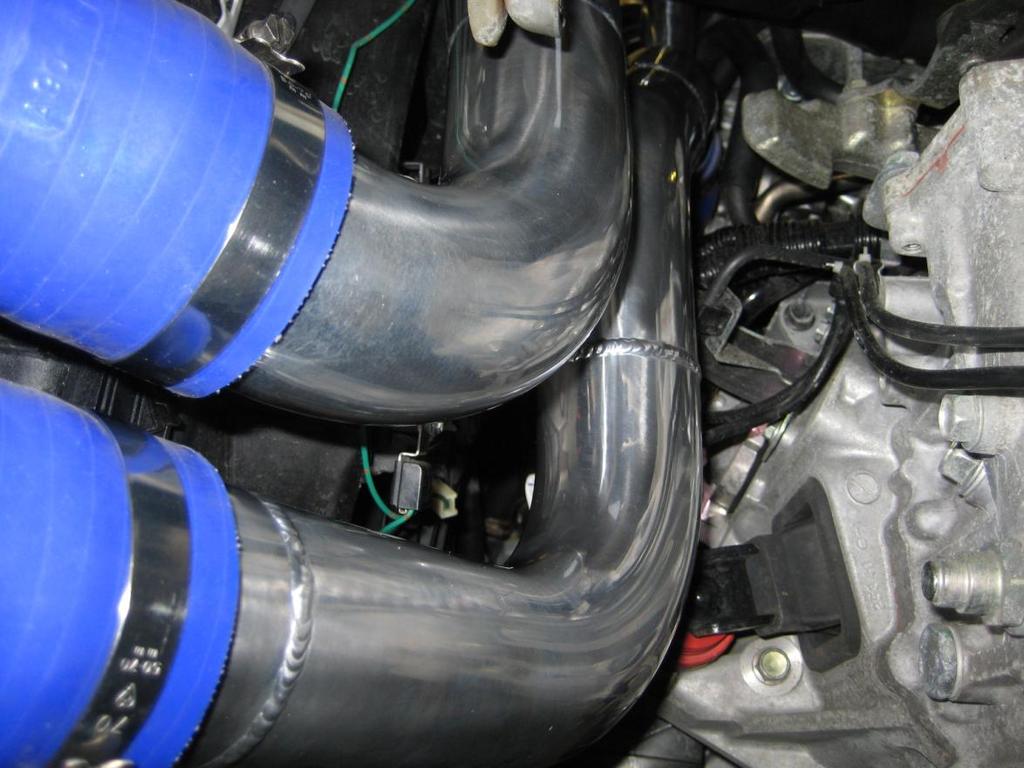
14 21. Place the short straight reducer onto the throttle body and secure with one 50-70mm clip and one 60-80mm clip, then feed the other hard pipe into the engine bay (lift the radiator hoses slightly to help), and into the LOWER of the two 90 degree bends on the intercooler. The hardpipes should not touch at any point. When you are ahppy with the fit, tighten ALL jubilee clips with a hose clamp driver and tighten the nut on the anti-vibration grommet.
15


16 22. Reinstall the dump valve removed in step 3 (we refitted a Forge valve in place of the original) and shorten the vaccum hose as shown to fit back between the valve and the inlet manifold. 23. Replace the bumper on the front of the car noting that the Forge intercooler has a lower air guide that sits inside the grille opening and may catch on the bumper as its reinstalled. Reinstall the engine undertrays noting that two of the undertray bolts now hold the intercooler lower brackets in place (pic in step 17). Enjoy your new found performance! ENGINEERED FOR PERFORMANCE
FMCZTINT Mitsubishi Colt CZT front mounting intercooler installation
 FMCZTINT Mitsubishi Colt CZT front mounting intercooler installation Tools needed: Drill with 8mm HSS drill bit, hacksaw, dremel/stanley knife 3/8 drive ratchet with extension and 10mm,13mm sockets Torx
FIAT 500 ABARTH FRONT MOUNTED INTERCOOLER INSTALLATION
 FIAT 500 ABARTH FRONT MOUNTED INTERCOOLER INSTALLATION Tools needed: T30 screwdriver/bit 10mm socket, suitable extension and ratchet 17mm socket, suitable extension and ratchet 10mm ratchet spanner Pozidriv/Phillips
VW SCIROCCO TWINTERCOOLER INSTALLATION INSTRUCTIONS
 VW SCIROCCO TWINTERCOOLER INSTALLATION INSTRUCTIONS Tools needed: T25 torx driver Small flat head screwdriver 12mm & 13mm socket, with ratchet Dremel or similar with cut off disc Large Phillips screwdriver
VW SCIROCCO R TWINTERCOOLER INSTALLATION INSTRUCTIONS
 VW SCIROCCO R TWINTERCOOLER INSTALLATION INSTRUCTIONS Tools needed: T25 torx driver Small flat head screwdriver 12mm & 13mm socket, with ratchet Dremel or similar with cut off disc Large Phillips screwdriver
NISSAN JUKE DIG- T 1.6T FMIC & HARDPIPE KIT INSTALLATION INSTRUCTIONS
 NISSAN JUKE DIG- T 1.6T FMIC & HARDPIPE KIT INSTALLATION INSTRUCTIONS Please thoroughly read through and familiarize yourself with these instructions in their entirety prior to beginning any part of the
mk3 SEAT Ibiza Cupra Front Mount Intercooler.
 mk3 SEAT Ibiza Cupra Front Mount Intercooler. Warning be sure not to let any foreign body enter the inlet track of the vehicle whilst the following work is being carried out. Serious engine damage may
VOLKSWAGEN GOLF MK5 GTI 2.0 TFSI FMIC INSTALLATION INSTRUCTIONS
 VOLKSWAGEN GOLF MK5 GTI 2.0 TFSI FMIC INSTALLATION INSTRUCTIONS Please thoroughly read through and familiarize yourself with these instructions in their entirety prior to beginning any part of the installation
Subaru Front Mount Intercooler Kit STI Subaru Front Mount Intercooler Kit STI
 Subaru Front Mount Intercooler Kit STI 2008-2014 715500 Subaru Front Mount Intercooler Kit STI 2008-2014 Congratulations on your purchase of the Subaru Front Mount Intercooler Kit STI 2008-2014. The following
AUDI TT RS FRONT MOUNTED INTERCOOLER INSTALLATION
 AUDI TT RS FRONT MOUNTED INTERCOOLER INSTALLATION Tools needed: T20 screwdriver/bit T25 screwdriver/bit T30 screwdriver/bit 10mm deep reach socket and suitable ratchet Sharp Stanley knife or Dremel Brake
MAZDASPEED3 Intercooler Instructions
 MAZDASPEED3 Intercooler Instructions Congratulations on your purchase of the COBB Tuning Front Mount Intercooler System for your 2007-2009 Mazdaspeed3. The following instructions should assist you through
XRT300 AND XRT350 BA XR6 TURBO UPGRADE KIT FITTING INSTRUCTIONS
 XRT300 AND XRT350 BA XR6 TURBO UPGRADE KIT FITTING INSTRUCTIONS The use of NFU (No Further use) and REUSE (Re Use) relates to the individual parts storage when performing the upgrade. Also note that all
Tools Required. Metric Wrench Set Screwdriver Set Metric Socket Set Pliers Heavy duty hydraulic Jack and Car Stands Box knife or similar Hacksaw WD40
 Subaru 2004+ Legacy GT & Outback XT For JDM 2.0 twinscroll turbo and USDM 2.5 turbo models Front Mount Intercooler Fitting Instructions PN# LEG-1348-000 You are now the proud owner of a highly tested and
A Fitting Guide for the Forge Motorsport Front Mounting Intercooler for the BMW Mini Cooper S Turbo R56 Models
 A Fitting Guide for the Forge Motorsport Front Mounting Intercooler for the BMW Mini Cooper S Turbo R56 Models (A copy of this guide is available online, in the media section of our website) A general
Mini R53 Top Mount Intercooler Fitting Instructions
 Parts Pro Alloy Intercooler 2 x M6 x 12 Hex head bolt 2 x M6 Washer 1 x 30-45mm Hose Clip Tools Required T30 Torx Bit 12mm Spanner 11mm Spanner Deep 10mm Socket 11mm Socket 8mm Socket Extension bar Ratchet
PWI Mazda BT50 & Ford Ranger 2012-onwards 2.2L / 3.2L 68mm Intercooler fitment instructions.
 PWI53860 - Mazda BT50 & Ford Ranger 2012-onwards 2.2L / 3.2L 68mm Intercooler fitment instructions. Tools required: 3/8 drive or similar ratchet with 8mm &10mm long sockets. Flat blade screwdriver. T27
BMW N54 TWIN TURBO THROTTLE BODY HARD PIPE INSTALLATION INSTRUCTIONS
 BMW N54 TWIN TURBO THROTTLE BODY HARD PIPE INSTALLATION INSTRUCTIONS Tools needed: Short flat blade screwdriver T20, T25 Torxs 14mm spanner Needle nosed pliers 7mm hose clamp driver Safety eyewear, footwear,
Always wear safety glasses when working on your vehicle.
 90-93 MAZDA MIATA SUPERCHARGER KIT The KraftWerks 90-93 Mazda Miata Supercharger Kit was designed for easy installation. Competent mechanics with the appropriate tools will find the process to be relatively
---Optional Items---
 1 2 3 4 5 6 ---Optional Items--- 10 9 11 7 8 12 This package should contain: 1. One (1) CorkSport Crashbar Weldment 2. Eight (8) M8x1.25x20 mm Bolts 3. Eight (8) M8x1.25mm Nyloc Nuts 4. Sixteen (16) M8
Audi S1 Intake kit. Qty. Description
 Audi S1 Intake kit Description Qty Silicone Intake pipe 1 Vacuum hose 1 Heatshield 1 Bracket 1 Machined inlet 1 Vacuum connector 1 Filter 1 M6x16 cap head bolt 1 Tools Ratchet Extension Torx socket Sockets
With 190 bhp CORSA VXR STAGE 3 CONVERSION TECH NOTE
 TECH NOTE CORSA VXR STAGE 3 CONVERSION Vauxhall tuning experts Courtenay Sport take us through their Stage 3 and exhaust upgrade for the Corsa VXR. Words and photos: Dougie With 190 bhp in standard form,
APIKOL Ur-S4/S6 Gen. II Front Mount Intercooler INSTALLATION INSTRUCTIONS
 APIKOL Ur-S4/S6 Gen. II Front Mount Intercooler INSTALLATION INSTRUCTIONS Only work underneath your vehicle after properly supporting it with adequate jack stands on a flat surface. NEVER work under a
Holden VE SIDI series II V6 OTR CAI Installation Instructions
 Holden VE SIDI series II V6 OTR CAI Installation Instructions 1 P a g e Shown above is a standard V6 VE LFW SIDI engine bay. Your MAF Loom may need to be extended by an auto electrician. Please check the
JBR MAZDASPEED
 Page1 james Barone Racing Aftermarket Parts and Accessories JBR 2007 2009 MAZDASPEED 3 Front Mount Intercooler Piping Kit Installation Instructions for TR8 Intercooler Tooling: o Jack, Jack Stands, Ramps
FRONT MOUNT INTERCOOLER GOLF / JETTA IV 1.8T PART # & P INSTALATION INSTRUCTIONS
 FRONT MOUNT INTERCOOLER GOLF / JETTA IV 1.8T PART # 48.10.90 & 48.10.90P INSTALATION INSTRUCTIONS PART LIST: 1 INTERCOOLER CORE 1 U-BENT TUBE 1 L-SHAPED TUBE 1 INTERCOOLER INLET TUBE 4 M6 NYLOC NUT 3 M6
AUDI TT RS FRONT MOUNTED INTERCOOLER INSTALLATION
 AUDI TT RS FRONT MOUNTED INTERCOOLER INSTALLATION Tools needed: T20 screwdriver/bit T25 screwdriver/bit T30 screwdriver/bit 10mm deep reach socket and suitable ratchet Sharp Stanley knife or Dremel Brake
Installation Instructions : Jaguar F-Type Intake System : Page 1
 Installation Instructions : Jaguar F-Type Intake System : Page 1 1. Remove the undertray all the Torx bolts and the hex bolts holding the splitters in place need to be removed. 2. Starting with the right
2015+ SUBARU STI FRONT-MOUNT INTERCOOLER PARTS LIST AND INSTALLATION GUIDE INSTALL DIFFICULTY DISCLAIMER CAUTION INSTALL PROCEDURE TOOLS NEEDED
 PARTS LIST AND PARTS INCLUDED 1PC ALUMINUM INTAKE PIPE 1PC BAR-AND-PLATE INTERCOOLER 1PC STEEL CRASH BAR W/ MOUNTING HARDWARE 2PC HOT-SIDE INTERCOOLER PIPES 2PC COLD-SIDE INTERCOOLER PIPES 1PC BPV FLANGE
CHALLENGER TWIN TURBO SYSTEM INSTALLATION INSTRUCTIONS
 CHALLENGER TWIN TURBO SYSTEM INSTALLATION INSTRUCTIONS 1 Verify contents of kits with supplied packing list 1) Unhook the battery. 2) Remove wheel wells & front fascia of vehicle. 3) Remove the catalytic
FRONT MOUNTED INTERCOOLER KIT. Renault 5 GT Turbo 1985* to 1991
 1 FRONT MOUNTED INTERCOOLER KIT Renault 5 GT Turbo 1985* to 1991 Although this has been fitted to a Phase 2 model, there is little reason to believe it will not fit the Phase 1 model as well. It is recommended
Huron Speed Products Twin Turbo Install Gen 2 CTS-V (09-15)
") Huron Speed Products Twin Turbo Install Gen 2 CTS-V (09-15) 1 2 Remove two bolts in trunk cover with 8mm socket. Pull up on cover to remove. Unscrew net tie down on side cover where battery is located
Huron Speed Products Twin Turbo Install Gen 2 CTS-V (09-15) 1 2 Remove two bolts in trunk cover with 8mm socket. Pull up on cover to remove. Unscrew net tie down on side cover where battery is located
IE MK5/MK6 2.0T FSI & TSI FDS INTERCOOLER INSTALL GUIDE PART NUMBER: IETPCB1
 IE MK5/MK6 2.0T FSI & TSI FDS INTERCOOLER INSTALL GUIDE PART NUMBER: IETPCB1 Thank you for purchasing another high quality Integrated Engineering product! This instruction sheet is used for installation
Exhaust Heat Shield Instructions ND
 Exhaust Heat Shield Instructions ND 2016 + Thank you for purchasing the Track Dog Racing Exhaust Heat Shield for the 2016 to Present Mazda MX-5. Our TDR Heat Shield is designed to help maintain lower temperatures
INSTALLATION INSTRUCTIONS PART NUMBER:21-729
 Equipped with AEM Dryflow Filter No Oil Required! INSTALLATION INSTRUCTIONS PART NUMBER:21-729 2010-2013 MAZDA MX-5 MIATA 2.0L I-4 PARTS LIST Description Qty. Part Number A Tube, Lower Intake, 2006-13
MAZDA BT-50 (October 2011 Production Onwards) 1 & 3 PIECE HARD TONNEAU REMOTE LOCKING KIT INSTALLATION INSTRUCTIONS
 1 & 3 PIECE HARD TONNEAU REMOTE LOCKING KIT INSTALLATION INSTRUCTIONS") MAZDA BT-50 (October 0 Production Onwards) & 3 PIECE HARD TONNEAU REMOTE LOCKING KIT INSTALLATION INSTRUCTIONS Installation Time: Approx. 0 Minutes Care Instructions: Clean Tonneau Cover with a mild detergent
MAZDA BT-50 (October 0 Production Onwards) & 3 PIECE HARD TONNEAU REMOTE LOCKING KIT INSTALLATION INSTRUCTIONS Installation Time: Approx. 0 Minutes Care Instructions: Clean Tonneau Cover with a mild detergent
ANTZ Performance. FG-FGX 4 Air Intake Kit + Battery relocation kit installation. Remove factory components:
 ANTZ Performance https://www.facebook.com/antzperformance/ FG-FGX 4 Air Intake Kit + Battery relocation kit installation. Remove factory components: 1.Remove factory intercooler piping on the left, with
Installation Instructions :BMW B58 : Page 1
 Installation Instructions :BMW B58 : Page 1 1. We will start by removing the stock airbox system. Loosen the hose clamp around the airbox. Remove the MAF sensor plug the white clip unlocks by pulling it
FIAT 500 ATMOSPHERIC VALVE INSTALLATION
 FIAT 500 ATMOSPHERIC VALVE INSTALLATION Tools needed: 10mm socket and 3/8 ratchet 3mm & 5mm Allen keys Flat bladed screwdriver Wire cutters Pliers Hose clamp driver (7mm) T20 and T30 Screw drivers 1. Open
Parts List See cover Page
 Thank you for purchasing the CorkSport Front Mount Intercooler Kit for the 2010-2013 Mazdaspeed 3. Keep your BAT s under check with the CorkSport FMIC Kit with the small or large intercooler. Please let
INSTALLATION INSTRUCTIONS Unitronic Intercooler Upgrade Kit for 2.0 TFSI (EA113) UH007-ICA
 UH007-ICA") Unitronic recommends that you read through the entire installation instructions prior to beginning the installation to familiarize yourself with the included components, tools required, and procedures
Unitronic recommends that you read through the entire installation instructions prior to beginning the installation to familiarize yourself with the included components, tools required, and procedures
Fitting Instructions. Revo MQB Golf/GTi/Octavia/Leon Intercooler. Recommended Tools. Contents RV581M Dealer installation advised.
 RV581M100100 Recommended Tools Contents No. Description Tools Size Intercooler Torx Bit T25, T30 Bracket Kit llen Key 4, 5 mm Silicone Hoses Socket 7, 10, 16, 19 mm Hose Clamps Flat Head Screwdriver Small,
B5 A4 1.8t Front Mount Intercooler Install Instructions
 B5 A4 1.8t Front Mount Intercooler Install Instructions Only work underneath your vehicle after properly supporting it with adequate jack stands on a flat surface. NEVER work under a vehicle only supported
Audi S4 SMIC Installation. B5 Audi S4 Side Mount Intercooler installation
 Audi S4 SMIC Installation B5 Audi S4 Side Mount Intercooler installation Disclaimer: These installation instructions are to be used as a guide only. It is at the reader and/or installer s discretion to
Installation instruction do88 Intercooler for SAAB
 Installation instruction do88 Intercooler for SAAB 9-5 98-09 This instruction shows how to replace the OEM intercooler with this performance intercooler without removing radiator or AC condenser from vehicle.
Huron Speed Products Twin Turbo Install Gen 2 CTS-V (09-15)
") Huron Speed Products Twin Turbo Install Gen 2 CTS-V (09-15) The following install guide is simply that, a guide to help you with installation. It is by no means the exact method to perform installation,
Huron Speed Products Twin Turbo Install Gen 2 CTS-V (09-15) The following install guide is simply that, a guide to help you with installation. It is by no means the exact method to perform installation,
INSTRUCTIONS. INTERCOOLER UPGRADE BMW E82 135i 2008-
 INSTRUCTIONS INTERCOOLER UPGRADE BMW E82 135i 2008- Parts Included: - Intercooler - Left and right side pipes with hoses - 3 Silicone Hoses ( 2.5 x 3 ) - 1 Silicone Hose 90degree 2.5 elbow - 8 Hoseclamps
Performance Inlet Manifold
 Performance Inlet Manifold Tools needed (some tools not required on some models): 13mm Combination Wrench Flat Blade Screwdriver T30 Torx Driver T25 Torx Driver 10mm Combination Wrench and/or Socket with
Installation Instructions MX-5 Dual Air Horns
 440 Rutherford St. P.O. Box 847 Goleta, CA 93117 1-800-667-7872 FAX 805-692-2525 www.mossmotors.com Tools required: Phillips screwdriver, 8mm, 10mm and 21mm sockets, 8mm and 10mm combination wrenches,
7C1550 COBB Tuning R35 GT-R Silicone Hose Kit Install Instructions
 7C1550 COBB Tuning R35 GT-R Silicone Hose Kit Install Instructions Nissan GT-R (R35) Silicone Hose Kit Congratulations on your purchase of the COBB GT-R Silicone Hose Kit for your Nissan GT-R. The following
Part number SP1305. Maintaining your Cold air intake system: Tools required:
 Part number SP1305 2000-03 Honda S2000 4 cyl. 2.0L 2004-06 Honda S2000 4 cyl. 2.2L 1-2 piece cold air intake 1-3 Injen filter (#1014) 1-2 3/4 x 3 silicone step hose (#3040) 1-3 straight hose (#3044) 1-
Chapter 11. Engine & Associated Systems Contents INTRODUCTION. Tools Required
 Chapter 11 Engine & Associated Systems Contents INTRODUCTION...1 Tools Required...1 Parts Required...2 FITTING OF ENGINE AND SYSTEMS...3 1 Fitting Chassis Mount...3 2 Fitting Radiator Brackets...3 3 Preparing
Integrated Engineering VW Jetta & GLI MK6 ( ) 2.0T/1,8T Gen 3 Cold Air Intake Install
 2.0T/1,8T Gen 3 Cold Air Intake Install") Integrated Engineering VW Jetta & GLI MK6 (2013.5+) 2.0T/1,8T Gen 3 Cold Air Intake Install Thank you for purchasing another high quality Integrated Engineering product! This instruction guide is used
Integrated Engineering VW Jetta & GLI MK6 (2013.5+) 2.0T/1,8T Gen 3 Cold Air Intake Install Thank you for purchasing another high quality Integrated Engineering product! This instruction guide is used
PARTS LIST INSTALLATION INSTRUCTIONS PARTS LIST AND INSTALLATION GUIDE INSTALL TIME: 2 HOURS INSTALL DIFFICULTY: 3/5
 PARTS LIST AND PARTS LIST 1PC MISHIMOTO INTERCOOLER 1PC M6 X 1.0 X 20MM FLANGE BOLT 1PC M4 X 0.7 X 12MM BUTTON-HEAD BOLT 1PC M4 LOCK WASHER 1PC MAP SENSOR O-RING 2. Remove the eight pop clips that hold
Part number RD1306. Maintaining your Cold air intake system: Tools required:
 Part number RD1306 06-07 Honda S2000 4 cyl. 2.2L 1-2 piece cold air intake 1-3 Injen filter (#1014) 1-2 3/4 x 3 silicone step hose (#3040) 1-3 straight hose (#3044) 4- Power-bands.362.048 (#4004) 1-1525
05-08 GT. Hellion Power Systems Mustang Kit Instructions
 Hellion Power Systems 05-08 Mustang Kit Instructions 1. Disconnect Battery 2. Drain Radiator, keep fluid for re-installation. 3. Remove air box and inlethoses. 6. Next, underneath, punch oil pan for turbo
OIL COOLER KIT INSTALLATION INSTRUCTIONS PART NUMBER D E92 335i/xi without stock oil cooler
 OIL COOLER KIT INSTALLATION INSTRUCTIONS PART NUMBER D570-0921 APPLICATION 2007-08 E92 335i/xi without stock oil cooler Congratulations for being selective enough to use a Dinan Engineering Oil Cooler
INTERCOOLER PIPE KIT CHEVY CAMARO 2.0T PARTS LIST AND INSTALLATION GUIDE PARTS INCLUDED CAUTION INSTALL PROCEDURE TOOLS NEEDED
 PARTS LIST AND PARTS INCLUDED 2PC ALUMINUM PIPES W/ CNC-MACHINED QUICK-DISCONNECTS 1PC ALUMINUM PIPE W/ CNC-MACHINED 2-BOLT FLANGE 2PC QUICK-DISCONNECT SPRING CLIPS 1PC 2.75" 90 SILICONE COUPLER 1PC 2.25"
OIL COOLER KIT CHEVY CAMARO 2.0T PARTS LIST AND INSTALLATION GUIDE INSTALL DIFFICULTY DISCLAIMER CAUTION TOOLS NEEDED NOTE INSTALL PROCEDURE
 PARTS LIST AND PARTS INCLUDED 3PC APPLICATION-SPECIFIC MOUNTING BRACKETS 1PC HORN RELOCATION MOUNTING BRACKET 1PC 25-ROW OIL COOLER (SLEEK SILVER OR STEALTH BLACK) 1PC 4'4" STAINLESS STEEL BRAIDED HOSE
Subaru WRX Performance Charge-Pipe System, 2015+
 PARTS LIST AND PARTS LIST 1PC BAR-AND-PLATE INTERCOOLER 1PC INTERCOOLER MOUNTING BRACKET 1PC CHARGE-PIPE ASSEMBLY 1PC AIR DIVERTER WITH ATTACHED RUBBER GASKETS 1PC CHARGE-PIPE-TO-INTERCOOLER HOSE INSTALLATION
AB65KVZS180 ITG Maxogen Airbox Kit Fitting Instructions
 AB65KVZS180 ITG Maxogen Airbox Kit Fitting Instructions 1 AB65KVZS Performance Air Box Fitting Instructions: Rover 45 MG ZS180 (2.5 V6) PARTS LIST: QTY Description 1 X AB65C Carbon Air Box (with 6mm drain
CorkSport Mazdaspeed Protégé Intercooler Hoses Mazdaspeed Protégé
 CorkSport Mazdaspeed Protégé Intercooler Hoses 2002-2003.5 Mazdaspeed Protégé Thank you for purchasing the CorkSport Mazdaspeed Protégé Intercooler Hose Kit. This kit has been designed and tested to be
IE B9 A4/A5 Cold Air Intake Install Guide
 IE B9 A4/A5 Cold Air Intake Install Guide Thank you for purchasing another high quality Integrated Engineering product! This instruction guide is used for installation of IE s Cold Air Intake Kit for Audi
EVOMS Cayenne TT V-Flow Installation Instructions
 EVOMS Cayenne TT V-Flow Installation Instructions Passenger s Side OEM Air Box Removal: 1) Using a flat head screw driver, remove the plastic OEM engine covers by unscrewing the large plastic hold down
Installation Instructions :BMW E39 M5 : Page 1
 Installation Instructions :BMW E39 M5 : Page 1 1. We will start by removing the front bumper. Remove the 3 x 8mm hex head bolts in the wheel arch liners on both sides. Turn the wheels to gain access. 2.
7B1210 COBB BMW N54 Charge Pipe
 7B1210 COBB BMW N54 Charge Pipe Installation Instructions Congratulations on your purchase of the COBB BMW N54 Charge Pipe for your BMW. The following instructions will assist you through your installation
54531/ FORD FUSION
 54531/51531 54531/51531 13-15 FORD FUSION 13-15 FORD FUSION FORD FUSION Upper Class Grille w/ Bars TOOLS REQUIRED: Socket Set Flat/Phillips Screw Drivers Torx Bits Plastic Pry Bar 3/16 Drill Bit and Drill
Installation instructions, accessories - Fuel driven heater 912-D
 XC90 Section Group Weight(Kg/Pounds) Year Month 8 87 2002 10 XC90 2003 D5244T, XC90 2004 D5244T, XC90 2005 D5244T AW50/51 AWD, XC90 2006 D5244T, XC90 2006 D5244T AW50/51 AWD D5244T R8703687 Page 1 of 20
Volvo P1 Air Intake. ELEVATE Turbo Intake Pipe. MAF Sensor. Inlet Manifold. Air Filter Housing. ECU Cover
 Volvo P1 Air Intake Tools needed: 13mm Combination Wrench Flat Blade Screwdriver T30 Torx Driver T25 Torx Driver 8mm Combination Wrench and/or Socket with Ratchet 10mm Combination Wrench and/or Socket
Procharger Stage II Intercooled Supercharger System (11-14 GT)
") Procharger Stage II Intercooled Supercharger System (11-14 GT) Installation Time: Approximately one day. Installed on 2012 Mustang GT 5.0/Manual Required Tools 3/8 Socket Set (Standard and Metric) 1/2
Procharger Stage II Intercooled Supercharger System (11-14 GT) Installation Time: Approximately one day. Installed on 2012 Mustang GT 5.0/Manual Required Tools 3/8 Socket Set (Standard and Metric) 1/2
20964/B 20964/B 2014 TOYOTA TUNDRA TUNDRA. Billet Grille. Fig 1. Fig 2
 Billet Grille TOOLS REQUIRED: PARTS LIST: Socket Set (6) U-Nuts Flat/Phillips Screw Drivers (8) #10 Screws Pliers (2) #8 Screws ¾ (2) 2 Flange Bracket (1) Top Plate Overlay Bracket - driver (1) Top Plate
Banks High-Flow Boost Tubes. Step-by-step installation video: Bankspower.com/v/install-lml-boost-tubes
 with Installation Instructions Owner smanual Banks High-Flow Boost Tubes Stock Fitment 2011-2016 Chevy/GMC Turbo-Diesel Pickup Trucks THIS MANUAL IS FOR USE WITH PART NUMBER 25993 Gale Banks Engineering
Mazda 3 & Mazdaspeed 3 Oil Cooler Installation Instructions
 Page1 2007-2009 Mazda 3 & Mazdaspeed 3 Oil Cooler Installation Instructions Tooling: Jack and jack stands or a lift Socket wrench and torque wrench 10mm and 14mm sockets 3/16 Allen wrench 10mm wrench Pliers
There is also a 115 BHP version which uses a Siemens SID807 ECU, Siemens injectors and a Garrett GTD1244VZ VNT turbo charger.
 The 1.6 8V HDI engine is fitted to vehicles after 2010 and comes with three different power options. There are 75 BHP and 92 BHP models which both use the same injectors, turbo and ECU. These come fitted
VOLKSWAGEN AMAROK MY17> 1 & 3 PIECE HARD TONNEAU REMOTE LOCKING KIT INSTALLATION INSTRUCTIONS
 VOLKSWAGEN AMAROK MY7> & PIECE HARD TONNEAU REMOTE LOCKING KIT INSTALLATION INSTRUCTIONS Care Instructions: Clean Tonneau Cover with a mild detergent and water solution. Do not use abrasive cleaners or
Installation instruction do88 Intercooler for Volvo S60 V70 XC70 S80 Turbo 00-09
 Installation instruction do88 Intercooler for Volvo S60 V70 XC70 S80 Turbo 00-09 1. This instruction shows how to replace the OEM intercooler with our performance intercooler. At this type of installation
HYUNDAI VELOSTER SHORT RAM 1.6T INTAKE INSTALLATION INSTRUCTIONS
 Installation: HYUNDAI VELOSTER SHORT RAM 1.6T INTAKE INSTALLATION INSTRUCTIONS Tools needed: 1/4 or 3/8 drive ratchet 12 extension (shorter ones work, but will be difficult to reach some bolts) 10mm socket
V1 Truck Manifold Turbo Kit for F-body
 V1 Truck Manifold Turbo Kit for 98-02 F-body Prep: -Remove all A/C Components, Alternator and brackets, tensioner, front bumper, front bumper foam, and front bumper support. Remove radiator and cooling
REVi RX-8 Intake. RX-8 REVi Intake System I PN Installation Instructions. Tools Required:
 RX-8 REVi Intake System PN 18299 Installation Instructions I-18299 Tools Required: Small/Stubby Phillips head screwdriver Small flat head screwdriver Medium Phillips head screwdriver 10mm socket and ratchet
Integrated Engineering MK7/MQB TSI GEN 3 FDS Intercooler Install. Part Number IETPCI1
 Integrated Engineering MK7/MQB TSI GEN 3 FDS Intercooler Install Part Number IETPCI1 Thank you for purchasing another high quality Integrated Engineering product! This instruction guide is used for installation
Left Hand Drive (non i-eloop) Installation guide for BBR Turbocharger Conversion Mazda MX-5/Miata ND 2.0L 2015 on
 Installation guide for BBR Turbocharger Conversion Mazda MX-5/Miata ND 2.0L 2015 on") Left Hand Drive (non i-eloop) Installation guide for BBR Turbocharger Conversion Mazda MX-5/Miata ND 2.0L 2015 on Contents Introduction... 2 Tools and parts... 2 Required:... 2 Optional:... 2 Torque settings:...
Left Hand Drive (non i-eloop) Installation guide for BBR Turbocharger Conversion Mazda MX-5/Miata ND 2.0L 2015 on Contents Introduction... 2 Tools and parts... 2 Required:... 2 Optional:... 2 Torque settings:...
FITTING KIT No s : BULL BAR WINCH ( P/No ) BULL BAR NON WINCH ( P/No )
 BULL BAR NON WINCH ( P/No )") ARB WINCH / NON WINCH BULL BAR TO SUIT LANDROVER DISCOVERY 2003 ONWARD. FITTING KIT No s :- 617 1793 BULL BAR WINCH ( P/No 343 2120 ) 617 1794 BULL BAR NON WINCH ( P/No 323 2120 ) WARNING FOR VEHICLES
ARB WINCH / NON WINCH BULL BAR TO SUIT LANDROVER DISCOVERY 2003 ONWARD. FITTING KIT No s :- 617 1793 BULL BAR WINCH ( P/No 343 2120 ) 617 1794 BULL BAR NON WINCH ( P/No 323 2120 ) WARNING FOR VEHICLES
99-04 GT. Hellion Power Systems Mustang GT Kit Instructions
 Hellion Power Systems 99-04 Mustang GT Kit Instructions Part 1 Hellion recommends that the front suspension system be installed either by trained professionals or by 5.Remove rack bolts K-Member Installation
Nissan R35 GTR Intercooler Pipe Kit w/ Cold Air Intake Installation Instructions
 Nissan R35 GTR Intercooler Pipe Kit w/ Cold Air Intake Installation Instructions 1. Disconnect the negative terminal on the battery that is located at the passenger firewall side. 2. Remove both front
BBT006/ BBC006/ BBCD006 TOYOTA LANDCRUISER 100 SERIES IFS
 INSTALLATION GUIDE BBT006/ BBC006/ BBCD006 TOYOTA LANDCRUISER 100 SERIES IFS Ironman 4x4 BBT/ BBC/ BBCD006 Bull Bars fit to a Toyota Landcruiser 100 Series (IFS). It will take about 2 hours to install.
INSTRUCTION. INTERCOOLER UPGRADE BMW E92 335i
 INSTRUCTION INTERCOOLER UPGRADE BMW E92 335i 2007-2011 Parts Included: - Intercooler - Shroud with seals - Left and right side pipes with hoses - 1 Silicone Hoses ( 2.5 x 3 ) - 2 Silicone Hose 45 degree
4 pieces of silicone hose Unless you have AEM then you have 2 2.5, 1 3, and 1 3.5
 The parts in your kit: 3 pieces of Mandrel-Bent Aluminized Tubing: 1 Straight 1 45 degree bend with straight section 1 curved section 4 pieces of silicone hose 1 2.5 1 3.5 2 3 Unless you have AEM then
MGA Gearbox Conversion Kit. Fitting Instructions
 MGA Gearbox Conversion Kit Fitting Instructions KIT CONTENTS Mazda MX-5 5 Speed Transmission: Vitesse Gearbox Case Vitesse Bellhousing Vitesse Machined Front Plate Modified rear case to accept Mazda mechanical
IE Audi B9 S4, S5, A4, A5, Allroad FDS Intercooler Install Guide IETPCK1
 IE Audi B9 S4, S5, A4, A5, Allroad FDS Intercooler Install Guide IETPCK1 Thank you for purchasing the best performing intercooler on the market! This instruction guide is used for installation of IE s
TyrolSport UGSMIC Install Instructions for Audi A4.
 TyrolSport UGSMIC Install Instructions for Audi A4. Tools Necessary: Torx T25, T45. 10mm socket and ratchet. 6mm hex wrench. Flat blade screwdriver. Hacksaw blade or die grinder or dremel tool. Drill (not
COBB SF SHORT RAM INTAKE SYSTEM MazdaSpeed3
 COBB SF SHORT RAM INTAKE SYSTEM MazdaSpeed3 Congratulations on your purchase of the COBB Tuning SF Intake System. The following instructions should assist you through your installation process. Please
INTERCOOLER UPGRADE INSTALLATION INSTRUCTIONS PART NUMBER D
 INTERCOOLER UPGRADE INSTALLATION INSTRUCTIONS PART NUMBER D330-0021 APPLICATION: 2014-16 F22 228i & xdrive coupe (see restrictions below) 2015-16 F23 228i & xdrive convertible 2012-16 F30 328i & xdrive
PART NUMBER: MAZDA MX-5 L4-2.0L C.A.R.B. E.O. # D MAZDA MX-5 Miata L4-2.0L C.A.R.B. E.O. # D-670-6
 Equipped with AEM Dryflow Filter No Oil Required! INSTALLATION INSTRUCTIONS PART NUMBER:21-640 2006-2008 MAZDA MX-5 L4-2.0L C.A.R.B. E.O. # D-670-6 2006-2009 MAZDA MX-5 Miata L4-2.0L C.A.R.B. E.O. # D-670-6
Current Range Rover Sport STRUT Collection Installation Manual
 2014 - Current Range Rover Sport STRUT Collection Installation Manual 1 1. Removing Main Grille and Lower Fascia 1.1 Run a line of low tack masking tape across the front of the bumper below the grille
Installation instruction do88 Intercooler for SAAB 9-3SS/SC 2,8 V6 Turbo
 Installation instruction do88 Intercooler for SAAB 9-3SS/SC 2,8 V6 Turbo This instruction shows how to replace the OEM intercooler with this performance intercooler. At this type of installation we always
Wood Grain Warrior Line Incognito hidden winch bumper installation instructions Lexus GX470
 Wood Grain Warrior Line Incognito hidden winch bumper installation instructions 2003-2009 Lexus GX470 Version 1.0-2016 Thank you for purchasing the Southern Style OffRoad Wood Grain Warrior Line Lexus
INTERCOOLER UPGRADE INSTALLATION INSTRUCTIONS PART NUMBER D
 INTERCOOLER UPGRADE INSTALLATION INSTRUCTIONS PART NUMBER D330-0021 APPLICATION: 2014-16 F22 228i & xdrive coupe (see restrictions below) 2012-16 F30 328i & xdrive sedan 2014-16 F31 328i xdrive wagon 2014-16
C15C C15C. Page 1 of 20
 2 x Lid Front Hinge 1135 8 x M8 Bolt 8 x M8 Washer (3mm Thick) 4 x M6 Large washers 4 x M6 Spring washers 4 x M6 x 40mm Bolts 6 x M6 20mm Bolts 6 x M6 Washers 20 x Screws 2 x Lid mount gas strut bracket
Installation Instructions :AUDI 8V RS3 : Page 1
 Installation Instructions :AUDI 8V RS3 : Page 1 1. We will start by removing the stock airbox system. Remove the 2 screws holding the inlet duct in place. Then push the duct into the airbox to release
Keeping You Cool Under Pressure
 Installation Instruction for 92-93 GM 6.5L Turbo Diesel Series 3500-4 Wheel Drive Pickup and Series 1500, 2500, 3500 4 Wheel Drive Suburban Intercooler System (Part No. 2-436) TOOLS REQUIRED: 1.) Normal
2014+ FORD FIESTA ST DIRECT-FIT OIL COOLER KIT PARTS LIST AND INSTALLATION GUIDE CAUTION PARTS INCLUDED NOTE TOOLS NEEDED INSTALL PROCEDURE
 PARTS LIST AND PARTS INCLUDED 3PC APPLICATION-SPECIFIC MOUNTING BRACKETS & SPACER 1PC 19-ROW OIL COOLER 1PC 4 ', X 1'' BRAIDED HOSE W/90-10AN FITTINGS 1PC 3'' X 2.5 '' BRAIDED HOSE W/45 AND 90-10AN FITTINGS
54531/ FORD FUSION
 2014-2015 FORD Upper Class Grille w/ Bars TOOLS REQUIRED: Socket Set Flat/Phillips Screw Drivers Torx Bits Plastic Pry Bar 3/16 Drill Bit and Drill Motor PARTS LIST: (4) #8 u-nuts (2) seal brackets (driver