APIKOL Ur-S4/S6 Gen. II Front Mount Intercooler INSTALLATION INSTRUCTIONS
|
|
|
- Caren Booker
- 6 years ago
- Views:
Transcription


1 APIKOL Ur-S4/S6 Gen. II Front Mount Intercooler INSTALLATION INSTRUCTIONS Only work underneath your vehicle after properly supporting it with adequate jack stands on a flat surface. NEVER work under a vehicle only supported with a jack. Estimated Installation Time: Approximately 3-5 Hours 1
.")
2 1) Remove the lower bumper grilles, center grille first, followed by the side grilles. Remove front bumper assembly by removing two 6mm allen bolts (picture below is looking up at the underside of the bumper). Gently unclip the sides of bumper by pushing down on the sides of the bumper while simultaneousily pulling out the top edge of the bumper followed by the bottom edge of the clip. The bumper can now be pulled straight off from the front of the vehicle (this procedure is much easier with a helper). 2) Remove plastic undertray. 2

 Remove the lower headlight trim piece by removing the single Phillips head screw, holding the headlight washer in it s extended position and")
3 3) Remove driver s headlight washer cover by pulling the headlight washer out (toward the front of the vehicle). The cover is held in place by a single tab on the top and two tabs on the bottom side. Carefully lift the highlighted tab in order to remove the cover in a forward/downward motion. 4) Remove the lower headlight trim piece by removing the single Phillips head screw, holding the headlight washer in it s extended position and carefully pulling the trim piece toward the vehicle centerline (to the left). Work the headlight washer assembly through the rectangular opening in the trim piece. 3

 Remove the upper bumper trim section by removing the 4 bolts (10 mm wrench) which are located under the headlight")
4 5) Remove the drivers side headlight by removing the 4 Phillips head screws which hold it in. 2 of the screws are circled in the picture and the remaining two are under the headlight and are accessible after removing the trim piece in the previous step. Unplug the headlight and turn signal. 6) Remove the upper bumper trim section by removing the 4 bolts (10 mm wrench) which are located under the headlight assemblies. The corner trim pieces simply slide over the center trim section. Passenger Side 4

5 Driver s Side Gently Pull 5

.")
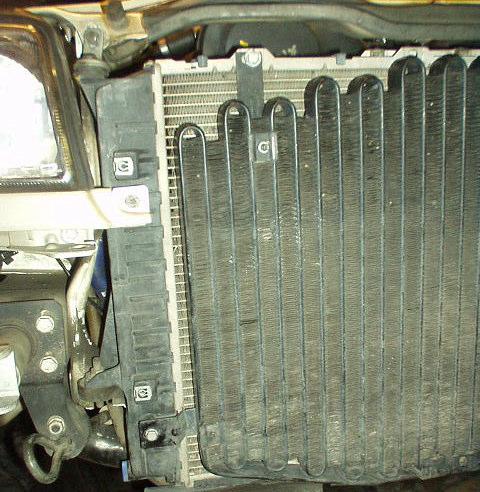
6 7) Remove the factory turbo to intercooler cross-over pipe. Remove the 13mm nut near the accordion hose (crossover pipe to lower intercooler inlet). Remove the 13mm fastener near the oil filter. Accordion Hose 6


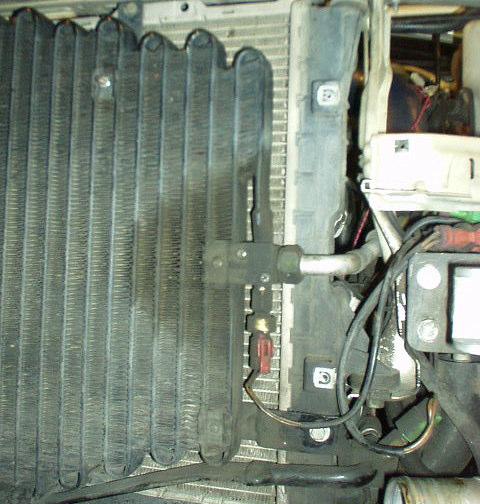
7 8) Remove the factory intercooler: First, loosen the upper and lower hose clamps. Second, remove the two front-most hex head fasteners. Third, remove the bottom hex head fastener by pulling the intercooler downward and patiently removing the final fastener. 9) Remove the power steering cooler and pull to the side. 7


8 10) Remove horn assembly by removing the single bolt (13mm) which mounts the L shaped horn bracket (seen below) to the passenger side frame rail. Pull back the rubber dust boots on each horn and disconnect the four electrical connections 11) Rotate the horns to orient them as seen in the picture below and re-tighten the fasteners. 12) Re-install the L shaped horn bracket with the horns now positioned on top of the frame-mounting bracket. Re-connect the horn electrical connections and re-install the dust boots. 8


9 13) Relocate the power steering cooler under the vehicle and attach to the subframe with the included hex-head self-drilling screws. It is easiest to predrill holes for these screws. It is not necessary to remove the lines from the power steering cooler to complete this operation, the hoses will swivel. In many instances, some seepage may occur or is already occurring at these fittings. It is recommended that the factory crimp clamps be replaced with hose clamps at this time. 9
,")


10 14) Install the two upper intercooler support brackets onto the aluminum intercooler mounting tabs using the provided flat-head hex head fasteners (2), flat washers (2) and nylock nuts (2). (The steel bracket should be located to the front of the tab and tightened so the brackets are oriented vertically off of the intercooler). The aluminum tab is countersunk to allow a flush hardware fit on the back of the tab.) 15) Remove the plastic air box inlet duct (2 Phillips head screws)-r12 only. 10

11 16) Remove the two nuts on top of the radiator (10mm wrench), and hang the FMIC with the intercooler support brackets on the protruding studs. Re-install the nuts and tighten. Note: This step varies for vehicles equipped with R12 A/C condenser. See additional addendum forr12 install instructions. 17) Trim the rubber AC/radiator shroud around the FMIC inlet and outlet to clear the intercooler end tanks. 11


12 18) Install the supplied 2 ¾ intercooler inlet pipe to the turbocharger outlet hose, but do not yet tighten the hose clamp. (Note: The oil cooler line closest to the intercooler pipe may need to be loosened slightly and rotated clockwise and retightened to accommodate pipe fitment.) Oil Cooler Line Rotate 19) Install the supplied 2 ¾ Samco hose coupling onto the intercooler inlet and tighten the hose clamp. Insert the 2 ¾ aluminum inlet pipe into the Samco hose coupling and tighten the hose clamp. Re-check alignment of the turbocharger outlet hose to intercooler piping and tighten the hose clamp. 12
13 20) Place the supplied molding pieces (2) onto the inner edge of the stock intercooler upper support bracket and the driver s side frame rail where the intercooler outlet pipe will pass through to connect to the throttle-body hose. 21) Install the 2 ½ intercooler outlet pipe to the throttle body inlet hose. The hose fits snugly on the 2 ½ tubing and may slide in more easily with a slight application of liquid dish soap (Palmolive or equivalent) to the bead of the aluminum tube prior to installation. Do not tighten hose clamp. 13

 Install the lower mounting bracket to lower crossover tube with supplied hose clamps.")
14 22) Install the supplied 2 ½ Samco hose coupling onto the intercooler outlet and tighten the hose clamp. Insert the 2 ½ aluminum outlet pipe into the Samco hose coupling and tighten the hose clamp. Re-check alignment of the throttle body inlet hose to intercooler piping and tighten the hose clamp. 23) Install the lower mounting bracket to lower crossover tube with supplied hose clamps. Prior to fully tightening hose clamps, install the M6 mounting bolt through the bracket and tighten into the lower intercooler-mounting block. Tighten hose clamps. 14
15 24) Place the bumper cover face down on a soft/padded surface to avoid damage to the paint/plastic. Trim the inside of the bumper cover as depicted in supplementary bumper trimming instructions. 25) Reinstall trim, headlights etc. and bumper cover. Note: When test fitting the bumper cover it may be helpful to unscrew the bumper mounts on the chassis a few turns (maximum of 2-3mm). This will allow extra clearance for the intercooler behind the bumper cover, however, turning these mounts out too far will cause the rear of the bumper to not be in alignment with the fender flare. Thank You For Your Gen. II Intercooler purchase. Please enjoy responsibly!!!! 15
.")
16 Supplemental R12 install instructions: 1. Follow step 14 above. The AC condenser needs to be separated from the radiator. This is accomplished by removing 4 fasteners (2 on the top of the AC and to on the lower sides (all 10mm head bolts). The drivers side top bolt is most easily removed and re-installed if the upper radiator support is removed by taking out all visible painted bolts. The radiator support will need to be set aside, but cannot be completely removed due to the hood release cable. 16
17 17


18 2. Once the 4 AC bolts are removed carefully swing the AC outwards. 3. Remove the 2 Phillips screws that hold the 2 upper mounting plates to the AC condenser. 18


19 4. Replace the Phillips head screws with the longer hex head fasteners and reinstall on the AC. Place a supplied 10mm head nut on both protruding studs. 5. The longer bolts sticking through the AC condenser now provide a mounting location for the supplied FMIC bracket. After reinstalling the AC and the upper radiator support, hang the FMIC on the 2 studs and install with the remaining 2 10mm head nuts and the supplied wavy washers. 19

20 6. Continue with step 16 in the above instructions. 20
B5 A4 1.8t Front Mount Intercooler Install Instructions
 B5 A4 1.8t Front Mount Intercooler Install Instructions Only work underneath your vehicle after properly supporting it with adequate jack stands on a flat surface. NEVER work under a vehicle only supported
MAZDASPEED3 Intercooler Instructions
 MAZDASPEED3 Intercooler Instructions Congratulations on your purchase of the COBB Tuning Front Mount Intercooler System for your 2007-2009 Mazdaspeed3. The following instructions should assist you through
Toyota Tacoma Winch Mount Bumper Installation Instructions Tools Required: Transmission cooler relocation brackets Torque Wrench
 2016-2017 Toyota Tacoma Winch Mount Bumper Installation Instructions Tools Required: Items Included: Small flat head screw driver Winch Mount Ratchet, 10mm, 12mm, 14mm, 17mm & Skid Plate 19mm sockets Transmission
Subaru Front Mount Intercooler Kit STI Subaru Front Mount Intercooler Kit STI
 Subaru Front Mount Intercooler Kit STI 2008-2014 715500 Subaru Front Mount Intercooler Kit STI 2008-2014 Congratulations on your purchase of the Subaru Front Mount Intercooler Kit STI 2008-2014. The following
Instant Chat off the main page of Or simply call our tech team at
 FRONT MOUNT INTERCOOLER 2008-13 STI 2014-04- 08 Thank you for purchasing this PERRIN product for your car! Installation of this product should only be performed by persons experienced with installation
OIL COOLER KIT INSTALLATION INSTRUCTIONS PART NUMBER D E92 335i/xi without stock oil cooler
 OIL COOLER KIT INSTALLATION INSTRUCTIONS PART NUMBER D570-0921 APPLICATION 2007-08 E92 335i/xi without stock oil cooler Congratulations for being selective enough to use a Dinan Engineering Oil Cooler
Audi S4 SMIC Installation. B5 Audi S4 Side Mount Intercooler installation
 Audi S4 SMIC Installation B5 Audi S4 Side Mount Intercooler installation Disclaimer: These installation instructions are to be used as a guide only. It is at the reader and/or installer s discretion to
SHELBY GT500
 2007-2009 SHELBY GT500 Removal of Factory Unit WARNING: 1. Radiator fluid must be handled properly. Please observe local ordinances with regards to handling and disposal. 2. Allow vehicle and components
Parts List See cover Page
 Thank you for purchasing the CorkSport Front Mount Intercooler Kit for the 2010-2013 Mazdaspeed 3. Keep your BAT s under check with the CorkSport FMIC Kit with the small or large intercooler. Please let
---Optional Items---
 1 2 3 4 5 6 ---Optional Items--- 10 9 11 7 8 12 This package should contain: 1. One (1) CorkSport Crashbar Weldment 2. Eight (8) M8x1.25x20 mm Bolts 3. Eight (8) M8x1.25mm Nyloc Nuts 4. Sixteen (16) M8
Tools Required. Metric Wrench Set Screwdriver Set Metric Socket Set Pliers Heavy duty hydraulic Jack and Car Stands Box knife or similar Hacksaw WD40
 Subaru 2004+ Legacy GT & Outback XT For JDM 2.0 twinscroll turbo and USDM 2.5 turbo models Front Mount Intercooler Fitting Instructions PN# LEG-1348-000 You are now the proud owner of a highly tested and
MAZDA 3 MPS FRONT MOUNTING INTERCOOLER INSTALLATION
 MAZDA 3 MPS FRONT MOUNTING INTERCOOLER INSTALLATION Tools needed: 7mm Hose clamp driver 10mm,12mm sockets and suitable ratchet with extensions Flat bladed screwdriver Pliers Phillips screwdriver KIT CONTENTS
2017+ L5P Duramax 3 ½ Down Pipe & EGR Fix Kit
 2017+ L5P Duramax 3 ½ Down Pipe & EGR Fix Kit Covers installation of PN s: WCF100630, WCF100829 Note: This Kit is for off road competition use only! Off Road Competition Use Tuning & Exhaust System is
REVi RX-8 Intake. RX-8 REVi Intake System I PN Installation Instructions. Tools Required:
 RX-8 REVi Intake System PN 18299 Installation Instructions I-18299 Tools Required: Small/Stubby Phillips head screwdriver Small flat head screwdriver Medium Phillips head screwdriver 10mm socket and ratchet
PARTS LIST INSTALLATION INSTRUCTIONS PARTS LIST AND INSTALLATION GUIDE INSTALL TIME: 2 HOURS INSTALL DIFFICULTY: 3/5
 PARTS LIST AND PARTS LIST 1PC MISHIMOTO INTERCOOLER 1PC M6 X 1.0 X 20MM FLANGE BOLT 1PC M4 X 0.7 X 12MM BUTTON-HEAD BOLT 1PC M4 LOCK WASHER 1PC MAP SENSOR O-RING 2. Remove the eight pop clips that hold
09-12 Dodge 4WD /4 Body Lift
 92RC80000 09-12 Dodge 4WD 1500 1 1/4 Body Lift Thank you for choosing Rough Country for all your suspension needs. Rough Country recommends a certified technician install this kit. Attempts to install
Wood Grain Warrior Line Incognito hidden winch bumper installation instructions Lexus GX470
 Wood Grain Warrior Line Incognito hidden winch bumper installation instructions 2003-2009 Lexus GX470 Version 1.0-2016 Thank you for purchasing the Southern Style OffRoad Wood Grain Warrior Line Lexus
Performance Air Intake, 2015+
 PARTS LIST AND PARTS LIST 1PC ALUMINUM INTAKE PIPE 1PC HIGH-FLOW, OILED AIR FILTER 1PC SILICONE INDUCTION HOSE 1PC AIRBOX 1PC 1/16 RUBBER STRIPPING, 9 LENGTH 1PC 1/16 RUBBER STRIPPING, 8.5 LENGTH 1PC WORM-GEAR
Installation instruction do88 Intercooler for SAAB 9-3SS/SC 2,8 V6 Turbo
 Installation instruction do88 Intercooler for SAAB 9-3SS/SC 2,8 V6 Turbo This instruction shows how to replace the OEM intercooler with this performance intercooler. At this type of installation we always
OIL COOLER KIT INSTALLATION INSTRUCTIONS PART NUMBER D
 OIL COOLER KIT INSTALLATION INSTRUCTIONS PART NUMBER D570-0904 APPLICATION: 2011-2012 E90 335i/xi (N55 engine) with BMW standard bumper and with stock oil cooler Congratulations for being selective enough
OIL COOLER KIT INSTALLATION INSTRUCTIONS PART NUMBER D E92 335i/xi (N55 engine) with M-Technic bumper and without stock oil cooler
 with M-Technic bumper and without stock oil cooler") OIL COOLER KIT INSTALLATION INSTRUCTIONS PART NUMBER D570-0925 APPLICATION 2011-12 E92 335i/xi (N55 engine) with M-Technic bumper and without stock oil cooler Congratulations for being selective enough
OIL COOLER KIT INSTALLATION INSTRUCTIONS PART NUMBER D570-0925 APPLICATION 2011-12 E92 335i/xi (N55 engine) with M-Technic bumper and without stock oil cooler Congratulations for being selective enough
Z1 Motorsports 370Z/G37 Oil Cooler Kit Installation Manual
 Z1 Motorsports 2877 Carrollton Villa Rica Hwy Carrollton GA 30116 770.838.7777 Z1 Motorsports 370Z/G37 Oil Cooler Kit Installation Manual For 19, 25 and 34 Row Oil Cooler Kits Parts Included: 1 SETRAB
C 6 ROUND HOLE STAINLESS STEEL GRILLE KIT GEN 2.2 INSTALLATION INSTRUCTIONS
 C 6 ROUND HOLE STAINLESS STEEL GRILLE KIT GEN 2.2 INSTALLATION INSTRUCTIONS Thank you for the purchase of our new C6 GRILLE KIT product. When installed correctly this product will keep your radiator and
2015+ SUBARU STI FRONT-MOUNT INTERCOOLER PARTS LIST AND INSTALLATION GUIDE INSTALL DIFFICULTY DISCLAIMER CAUTION INSTALL PROCEDURE TOOLS NEEDED
 PARTS LIST AND PARTS INCLUDED 1PC ALUMINUM INTAKE PIPE 1PC BAR-AND-PLATE INTERCOOLER 1PC STEEL CRASH BAR W/ MOUNTING HARDWARE 2PC HOT-SIDE INTERCOOLER PIPES 2PC COLD-SIDE INTERCOOLER PIPES 1PC BPV FLANGE
7C1550 COBB Tuning R35 GT-R Silicone Hose Kit Install Instructions
 7C1550 COBB Tuning R35 GT-R Silicone Hose Kit Install Instructions Nissan GT-R (R35) Silicone Hose Kit Congratulations on your purchase of the COBB GT-R Silicone Hose Kit for your Nissan GT-R. The following
Installation instruction do88 Intercooler for SAAB 9-3 1,9 TTiD
 Installation instruction do88 Intercooler for SAAB 9-3 1,9 TTiD This instruction shows how to replace the OEM intercooler with this performance intercooler. At this type of installation we always recommend
Locate the 4 screws on each side of the vehicle, on the inner fender well liner. Remove them with a Torx T25 bit:
 Installation Instructions for TyrolSport UG SM IC. The first step in installing the UG SMIC is removing the front bumper. Locate the 4 screws on each side of the vehicle, on the inner fender well liner.
INSTRUCTIONS. INTERCOOLER UPGRADE BMW E82 135i 2008-
 INSTRUCTIONS INTERCOOLER UPGRADE BMW E82 135i 2008- Parts Included: - Intercooler - Left and right side pipes with hoses - 3 Silicone Hoses ( 2.5 x 3 ) - 1 Silicone Hose 90degree 2.5 elbow - 8 Hoseclamps
Fitting Instructions. Revo MQB Golf/GTi/Octavia/Leon Intercooler. Recommended Tools. Contents RV581M Dealer installation advised.
 RV581M100100 Recommended Tools Contents No. Description Tools Size Intercooler Torx Bit T25, T30 Bracket Kit llen Key 4, 5 mm Silicone Hoses Socket 7, 10, 16, 19 mm Hose Clamps Flat Head Screwdriver Small,
FRONT MOUNT INTERCOOLER GOLF / JETTA IV 1.8T PART # & P INSTALATION INSTRUCTIONS
 FRONT MOUNT INTERCOOLER GOLF / JETTA IV 1.8T PART # 48.10.90 & 48.10.90P INSTALATION INSTRUCTIONS PART LIST: 1 INTERCOOLER CORE 1 U-BENT TUBE 1 L-SHAPED TUBE 1 INTERCOOLER INLET TUBE 4 M6 NYLOC NUT 3 M6
Page 1 of 6
 WWW.ATPTURBO.COM Page 1 of 6 Procedure: Installation for the ATP direct replacement high flow/high density front mounted intercooler assembly on the 2007 and newer Volvo C30 / S40 T5 Model Purpose of this
SAFETY THIS PRODUCT IS FOR OFFROAD USE ONLY. ALL LIABILITY FOR INSTALLATION AND USE RESTS WITH THE OWNER.
 SAFETY Your safety and the safety of others is very important. In order to help you make informed decisions about safety, we have provided installation instructions and other information. These instructions
Installation Instructions :BMW B58 : Page 1
 Installation Instructions :BMW B58 : Page 1 1. We will start by removing the stock airbox system. Loosen the hose clamp around the airbox. Remove the MAF sensor plug the white clip unlocks by pulling it
VW SCIROCCO TWINTERCOOLER INSTALLATION INSTRUCTIONS
 VW SCIROCCO TWINTERCOOLER INSTALLATION INSTRUCTIONS Tools needed: T25 torx driver Small flat head screwdriver 12mm & 13mm socket, with ratchet Dremel or similar with cut off disc Large Phillips screwdriver
INSTALLATION INSTRUCTIONS ELEVATION FRONT BUMPER DODGE RAM
 INSTALLATION INSTRUCTIONS PARTS LIST: 1 Elevation Bumper Assembly 24 12mm x 37mm OD x 3mm Flat Washers 2 Frame Mounting Brackets 12 12mm Nylon Lock Nuts 8 12-1.75mm x 50mm Hex Bolts 2 License Plate Mounting
Lexus NX Fine Mesh and Dynamic Radar Cruise Control Fine Mesh Grilles
 IMPORTANT: PLEASE KEEP THIS INSTRUCTION MANUAL FOR FUTURE REFERENCE! 2015-16 Lexus NX Fine Mesh and Dynamic Radar Cruise Control Fine Mesh Grilles Upper Insert - factory chrome surround and emblem reused
2. With the rear door open remove pull-style clip from the passenger side just below the door latch.
 LoD Offroad FJ Cruiser Rear Bumper with Tire Carrier Installation Instructions 1. Begin with removing factory spare from the rear door. 2. With the rear door open remove pull-style clip from the passenger
INSTALLATION INSTRUCTION BULL BAR DODGE RAM 1500 PART NUMBER
 INSTALLATION INSTRUCTION 09-12 DODGE RAM 1500 PART NUMBER - 200691 PARTS LIST: Qty Description Qty Description 1 Bull Bar 10 12mm Lock Washers 2 Upper Frame Mounting Brackets (for trucks without tow hooks
Installation instruction do88 Intercooler for SAAB 9-3SS/SC 4-cyl Turbo
 Installation instruction do88 Intercooler for SAAB 9-3SS/SC 4-cyl Turbo This instruction shows how to replace the OEM intercooler with this performance intercooler. 1. 4. 5. At this type of installation
IE MK5/MK6 2.0T FSI & TSI FDS INTERCOOLER INSTALL GUIDE PART NUMBER: IETPCB1
 IE MK5/MK6 2.0T FSI & TSI FDS INTERCOOLER INSTALL GUIDE PART NUMBER: IETPCB1 Thank you for purchasing another high quality Integrated Engineering product! This instruction sheet is used for installation
VW SCIROCCO R TWINTERCOOLER INSTALLATION INSTRUCTIONS
 VW SCIROCCO R TWINTERCOOLER INSTALLATION INSTRUCTIONS Tools needed: T25 torx driver Small flat head screwdriver 12mm & 13mm socket, with ratchet Dremel or similar with cut off disc Large Phillips screwdriver
09-12 Dodge 4WD Leveling Kit
 9235900 09-12 Dodge 4WD 1500 2.5 Leveling Kit Thank you for choosing Rough Country for all your suspension needs. DOES NOT FIT TRX PACKAGE VEHICLES!! Rough Country recommends a certified technician install
M-9603-FST FOCUS ST COLD AIR INTAKE KIT INSTALLATION INSTRUCTIONS
 M-9603-FST Please visit www.fordracingparts.com for the most current instruction information.!!! PLEASE READ ALL OF THE FOLLOWING INSTRUCTIONS CAREFULLY PRIOR TO INSTALLATION. AT ANY TIME YOU DO NOT UNDERSTAND
HYBRID DEVELOPMENT INTERNATIONAL RACING INTERCOOLER KIT INSTALLATION MANUAL
 HYBRID DEVELOPMENT INTERNATIONAL RACING INTERCOOLER KIT INSTALLATION MANUAL Please read before continuing Please read through all the instruction and practice all precaution in all aspect of safety and
2014+ FORD FIESTA ST DIRECT-FIT OIL COOLER KIT PARTS LIST AND INSTALLATION GUIDE CAUTION PARTS INCLUDED NOTE TOOLS NEEDED INSTALL PROCEDURE
 PARTS LIST AND PARTS INCLUDED 3PC APPLICATION-SPECIFIC MOUNTING BRACKETS & SPACER 1PC 19-ROW OIL COOLER 1PC 4 ', X 1'' BRAIDED HOSE W/90-10AN FITTINGS 1PC 3'' X 2.5 '' BRAIDED HOSE W/45 AND 90-10AN FITTINGS
INTERCOOLER UPGRADE INSTALLATION INSTRUCTIONS PART NUMBER D
 INTERCOOLER UPGRADE INSTALLATION INSTRUCTIONS PART NUMBER D330-0021 APPLICATION: 2014-16 F22 228i & xdrive coupe (see restrictions below) 2012-16 F30 328i & xdrive sedan 2014-16 F31 328i xdrive wagon 2014-16
OIL COOLER KIT INSTALLATION INSTRUCTIONS PART NUMBER D E92 335i/xi (N55 engine) with BMW Standard bumper and with stock oil cooler
 with BMW Standard bumper and with stock oil cooler") OIL COOLER KIT INSTALLATION INSTRUCTIONS PART NUMBER D570-0924 APPLICATION: 2011-12 E92 335i/xi (N55 engine) with BMW Standard bumper and with stock oil cooler Congratulations for being selective enough
OIL COOLER KIT INSTALLATION INSTRUCTIONS PART NUMBER D570-0924 APPLICATION: 2011-12 E92 335i/xi (N55 engine) with BMW Standard bumper and with stock oil cooler Congratulations for being selective enough
PART NUMBER: MAZDA MX-5 L4-2.0L C.A.R.B. E.O. # D MAZDA MX-5 Miata L4-2.0L C.A.R.B. E.O. # D-670-6
 Equipped with AEM Dryflow Filter No Oil Required! INSTALLATION INSTRUCTIONS PART NUMBER:21-640 2006-2008 MAZDA MX-5 L4-2.0L C.A.R.B. E.O. # D-670-6 2006-2009 MAZDA MX-5 Miata L4-2.0L C.A.R.B. E.O. # D-670-6
SAFETY SENSORS FIELD OF VIEW WILL BE ALTERED WITH USE OF THE REPLACEMENT BUMPER. Injury hazard
 SAFETY Your safety and the safety of others is very important. In order to help you make informed decisions about safety, we have provided installation instructions and other information. These instructions
OIL COOLER KIT INSTALLATION INSTRUCTIONS PART NUMBER D
 OIL COOLER KIT INSTALLATION INSTRUCTIONS PART NUMBER D570-0907 APPLICATION: 2011-12 E90 335i/xi (N55 engine) with BMW M-Technic bumper and without stock oil cooler Congratulations for being selective enough
INSTALLATION INSTRUCTIONS PART NUMBER:21-729
 Equipped with AEM Dryflow Filter No Oil Required! INSTALLATION INSTRUCTIONS PART NUMBER:21-729 2010-2013 MAZDA MX-5 MIATA 2.0L I-4 PARTS LIST Description Qty. Part Number A Tube, Lower Intake, 2006-13
Bumper Removal PART NUMBER: F151MRDS PRODUCT: RDS FRNT BUMPER APPLICATION: F-150
 PARTS INCLUDED: QTY RDS BUMPER 1 SKID PLATE BRACKT 1 ADAPTIVE CRUISE 1 CONTROL BRACKET SKID PLATE 1 HARDWARE: QTY ½ X1 ½ Hex bolt 10 ½ hex nuts 10 ½ fender washer 20 3/8 x 1 Button head 6 3/8 hex nuts
20964/B 20964/B 2014 TOYOTA TUNDRA TUNDRA. Billet Grille. Fig 1. Fig 2
 Billet Grille TOOLS REQUIRED: PARTS LIST: Socket Set (6) U-Nuts Flat/Phillips Screw Drivers (8) #10 Screws Pliers (2) #8 Screws ¾ (2) 2 Flange Bracket (1) Top Plate Overlay Bracket - driver (1) Top Plate
Part Numbers: TTU-BGP14 & TTU-BGB14
 Date: 10.14.2015 TOYOTA TUNDRA 2014-17 Billet Grille Part Numbers: TTU-BGP14 & TTU-BGB14 Grille Hardware Bag Contents Item # Quantity. Description 1 6 U-Nuts 2 8 #10 Screws 3 2 #8 Screws 4 2 2 Flange Brackets
INTERCOOLER UPGRADE INSTALLATION INSTRUCTIONS PART NUMBER D
 INTERCOOLER UPGRADE INSTALLATION INSTRUCTIONS PART NUMBER D330-0021 APPLICATION: 2014-16 F22 228i & xdrive coupe (see restrictions below) 2015-16 F23 228i & xdrive convertible 2012-16 F30 328i & xdrive
OIL COOLER KIT INSTALLATION INSTRUCTIONS PART NUMBER D E92/E93 335i/xi with stock oil cooler
 OIL COOLER KIT INSTALLATION INSTRUCTIONS PART NUMBER D570-0920 APPLICATION 2007-10 E92/E93 335i/xi with stock oil cooler Congratulations for being selective enough to use a Dinan Engineering Oil Cooler
Subaru WRX Performance Charge-Pipe System, 2015+
 PARTS LIST AND PARTS LIST 1PC BAR-AND-PLATE INTERCOOLER 1PC INTERCOOLER MOUNTING BRACKET 1PC CHARGE-PIPE ASSEMBLY 1PC AIR DIVERTER WITH ATTACHED RUBBER GASKETS 1PC CHARGE-PIPE-TO-INTERCOOLER HOSE INSTALLATION
2010+ Audi B8 S4/S5 3.0T S-FLO Intake Kit INSTALLATION GUIDE FOR RACING USE ONLY
 INSTALLATION GUIDE 2010+ Audi B8 S4/S5 3.0T S-FLO Intake Kit FOR RACING USE ONLY Congratulations on your purchase of the AWE Tuning S-FLO Intake for the 2010+ Audi B8 S4 and B8 S5 3.0T. Exquisite build
IE Audi B9 S4, S5, A4, A5, Allroad FDS Intercooler Install Guide IETPCK1
 IE Audi B9 S4, S5, A4, A5, Allroad FDS Intercooler Install Guide IETPCK1 Thank you for purchasing the best performing intercooler on the market! This instruction guide is used for installation of IE s
Vortech Charge Air Cooler
 Vortech Charge Air Cooler Installation Instructions 2015 Ford Mustang 2.3L EcoBoost P/N: 8N310-040 ENGINEERING, INC. 1650 Pacific Avenue, Channel Islands, CA 93033-9901 Phone 805 247-0226 Fax: 805 247-0669
BLACKBIRD INSTALLATION SUPPLEMENT
 BLACKBIRD INSTALLATION SUPPLEMENT FOR 2003-7 FORD 6.0 LITER DIESEL F-SERIES DUAL ALTERNATOR VERSION 10/07 Blackbird Installation Supplement for Ford 6.0. Liter Dual Alternator Parts included in the 6.0
INSTALLATION INSTRUCTIONS 97 FORD EXPEDITION
 INSTALLATION INSTRUCTIONS 97 FORD EXPEDITION 1. Read the instructions completely and carefully before you begin. Check the kit for proper contents (refer to the part s list and the picture diagrams). Before
HARD PIPE KIT
 701550 HARD PIPE KIT 2014 Ford Fiesta ST Congratulations on your purchase of the COBB Hard Pipe Kit for your 2014+ Ford Fiesta ST. The following instructions will assist you through your installation process.
Installation Instructions for C & R Heat Exchanger Removal of Factory Unit
 Installation Instructions for C & R Heat Exchanger Removal of Factory Unit Remove the 8 clips that retain the upper radiator shroud. Remove the shroud. Remove the coolant tank cap from the heat exchanger
Installation Instructions : Audi C7 RS6 Intake System : Page 1
 Installation Instructions : Audi C7 RS6 Intake System : Page 1 1. Remove Engine cover and loosen the clamps around the inlet hoses of the airbox. 2. Pull the hoses away from the turbo tubes. 3. Release
HIGH FLOW COLD AIR INTAKE SYSTEM INSTALLATION INSTRUCTIONS D , D A
 HIGH FLOW COLD AIR INTAKE SYSTEM INSTALLATION INSTRUCTIONS D760-0320, D760-0320A 1992-95 325i, is 1995 M3 (3.0L) Parts List: 1 Intake Tube 1 Silicone Hose 1 Air Flow Meter Bracket 1 Hose Clamp (#36z) 1
Procharger Stage II Intercooled Supercharger System (11-14 GT)
") Procharger Stage II Intercooled Supercharger System (11-14 GT) Installation Time: Approximately one day. Installed on 2012 Mustang GT 5.0/Manual Required Tools 3/8 Socket Set (Standard and Metric) 1/2
Procharger Stage II Intercooled Supercharger System (11-14 GT) Installation Time: Approximately one day. Installed on 2012 Mustang GT 5.0/Manual Required Tools 3/8 Socket Set (Standard and Metric) 1/2
TESLA MODEL S REAR UNDER SPOILER & DIFFUSER SYSTEM
 TESLA MODEL S Thank you for purchasing your Unplugged Performance Rear Under Spoiler & Diffuser System for the Tesla Model S! Please read this manual carefully prior to installation. REAR UNDER SPOILER
SL63 Weistec M156 Supercharger System Installation Guide Stage 1 / Stage 2
 SL63 Weistec M156 Supercharger System Installation Guide Stage 1 / Stage 2 WARNING! DO NOT HAVE YOUR ECU REPROGRAMMED ANYWHERE BUT AT WEISTEC FOR THIS SUPERCHARGER. THE AMG 63 USES AN ELECTRONIC THROTTLE
OIL COOLER KIT INSTALLATION INSTRUCTIONS PART NUMBER D E92 335is (N54 engine) with BMW M-Technic bumper and with stock oil cooler
 with BMW M-Technic bumper and with stock oil cooler") OIL COOLER KIT INSTALLATION INSTRUCTIONS PART NUMBER D570-0923 APPLICATION: 2011 E92 335is (N54 engine) with BMW M-Technic bumper and with stock oil cooler Congratulations for being selective enough to
OIL COOLER KIT INSTALLATION INSTRUCTIONS PART NUMBER D570-0923 APPLICATION: 2011 E92 335is (N54 engine) with BMW M-Technic bumper and with stock oil cooler Congratulations for being selective enough to
FMCZTINT Mitsubishi Colt CZT front mounting intercooler installation
 FMCZTINT Mitsubishi Colt CZT front mounting intercooler installation Tools needed: Drill with 8mm HSS drill bit, hacksaw, dremel/stanley knife 3/8 drive ratchet with extension and 10mm,13mm sockets Torx
2015+ EcoBoost F150 & Raptor Intercooler Install
 2015+ EcoBoost F150 & 2017+ Raptor Intercooler Install Note: This entire job can be performed with the truck on the ground - No need to raise the vehicle. The most difficult part is removing the grille
TyrolSport UGSMIC Install Instructions for Audi A4.
 TyrolSport UGSMIC Install Instructions for Audi A4. Tools Necessary: Torx T25, T45. 10mm socket and ratchet. 6mm hex wrench. Flat blade screwdriver. Hacksaw blade or die grinder or dremel tool. Drill (not
»Product» Safety Warning
 D2201 Installation Instructions 2012-2014 Dodge Ram 1500 4WD 2" Adventure Series Suspension System Read and understand all instructions and warnings prior to installation of product and operation of vehicle.
CLS63 Weistec M156 Supercharger System Installation Guide Stage 1 / Stage 2
 CLS63 Weistec M156 Supercharger System Installation Guide Stage 1 / Stage 2 WARNING! DO NOT HAVE YOUR ECU REPROGRAMMED ANYWHERE BUT AT WEISTEC FOR THIS SUPERCHARGER. THE AMG 63 USES AN ELECTRONIC THROTTLE
Mustang Shaker
 2005-2009 Mustang Shaker CDC #110050 ( 05/ 06) or 0711-7000-01 ( 07/ 09) Component Check List: Quantity/Description Part # CDC Installer 1 - Engine Cover Assembly 114050 1 - Aluminum Shaker Scoop 183020
IMPORTANT: PLEASE RETAIN THIS INSTRUCTION MANUAL FOR FUTURE REFERENCE
 IMPORTANT: PLEASE RETAIN THIS INSTRUCTION MANUAL FOR FUTURE REFERENCE 2009 Toyota RAV-4 Stainless Steel Mesh Grilles L 30 G8P Fine Mesh Part #30-002-09 Quantity Description Part No. Upper Mesh Grille (includes):
JBR MAZDASPEED
 Page1 james Barone Racing Aftermarket Parts and Accessories JBR 2007 2009 MAZDASPEED 3 Front Mount Intercooler Piping Kit Installation Instructions for TR8 Intercooler Tooling: o Jack, Jack Stands, Ramps
7 th Gen. Celica GTS Turbo Kit Installation Guide This kit has not been CARB approved and is intended for racing / offroad purposes only.
 7 th Gen. Celica GTS Turbo Kit Installation Guide This kit has not been CARB approved and is intended for racing / offroad purposes only. The purpose of this guide is to serve as a reference for use when
INSTALLATION INSTRUCTIONS Unitronic Intercooler Upgrade Kit for 2.0 TFSI (EA113) UH007-ICA
 UH007-ICA") Unitronic recommends that you read through the entire installation instructions prior to beginning the installation to familiarize yourself with the included components, tools required, and procedures
Unitronic recommends that you read through the entire installation instructions prior to beginning the installation to familiarize yourself with the included components, tools required, and procedures
(W) INSTALLATION INSTRUCTIONS GRILLE GUARD TOYOTA TUNDRA / SEQUOIA PART # &
 INSTALLATION INSTRUCTIONS GRILLE GUARD TOYOTA TUNDRA / SEQUOIA PART # &") (W) INSTALLATION INSTRUCTIONS PART # 501894 & 501895 PARTS LIST: 1 Grille Guard 4 3/8" Flat Washers 1 Driver/Left Frame 2 3/8" Nylon Lock Nuts 1 Passenger/Right Frame 4 12mm Plastic Washers 1 Driver/Left
(W) INSTALLATION INSTRUCTIONS PART # 501894 & 501895 PARTS LIST: 1 Grille Guard 4 3/8" Flat Washers 1 Driver/Left Frame 2 3/8" Nylon Lock Nuts 1 Passenger/Right Frame 4 12mm Plastic Washers 1 Driver/Left
ADJUSTABLE ANTI-ROLL BAR INSTALLATION INSTRUCTIONS PART NUMBER D PARTS LIST
 ADJUSTABLE ANTI-ROLL BAR INSTALLATION INSTRUCTIONS PART NUMBER D120-0580 DESCRIPTION: Front 28mm; 3-hole adjustable APPLICATION: 2014-16 F22 228i/M235i 2015-16 F23 228i/M235i Convertible 2013-16 F30 320i
Fig A. Addictive Desert Designs. Preparation: Removal:
 Preparation: Disconnect the negative battery terminal. Park the vehicle on level ground and set the emergency brake. We recommend reading through the installation instructions in whole before performing
Installation Instructions : Jaguar F-Type Intake System : Page 1
 Installation Instructions : Jaguar F-Type Intake System : Page 1 1. Remove the undertray all the Torx bolts and the hex bolts holding the splitters in place need to be removed. 2. Starting with the right
(2) License Plate Plugs
 License Plate Plugs") PARTS LIST: 1 HD Bull Nose Bumper Assembly 12 12-1.75mm x 50mm 1 Driver/left Frame Mounting Bracket 40 12mm x 37mm OD x 3mm Flat Washers 1 Passenger/right Frame Mounting Bracket 20 12mm Lock Washers 1
PARTS LIST: 1 HD Bull Nose Bumper Assembly 12 12-1.75mm x 50mm 1 Driver/left Frame Mounting Bracket 40 12mm x 37mm OD x 3mm Flat Washers 1 Passenger/right Frame Mounting Bracket 20 12mm Lock Washers 1
Installation instruction do88 Performance Radiator for Volvo S60 V70 XC70 S
 Installation instruction do88 Performance Radiator for Volvo S60 V70 XC70 S80 00-09 1. This instruction shows how to replace the OEM radiator with do88 performance radiator. At this type of installation
A Fitting Guide for the Forge Motorsport Front Mounting Intercooler for the BMW Mini Cooper S Turbo R56 Models
 A Fitting Guide for the Forge Motorsport Front Mounting Intercooler for the BMW Mini Cooper S Turbo R56 Models (A copy of this guide is available online, in the media section of our website) A general
Included parts: 1 - BorgWarner SX-E Turbocharger 1 - SX-E 90-Degree Compressor Outlet Elbow 1 - HSM Cast Exhaust Manifold 1 - HSM Downpipe
 TROUBLESHOOTING: Please read and understand all installation instructions before proceeding with the installation. If you have questions during the installation of this product, please email H&S Motorsports
Current Range Rover Sport STRUT Collection Installation Manual
 2014 - Current Range Rover Sport STRUT Collection Installation Manual 1 1. Removing Main Grille and Lower Fascia 1.1 Run a line of low tack masking tape across the front of the bumper below the grille
Installation Instructions FMIC Ford F250 F L Power Stroke. Front Mount Intercooler Kit
 Installation Instructions FMIC 1994-97 Ford F250 F350 7.3L Power Stroke Front Mount Intercooler Kit RACIG www.cxracing.com 1627 Chico Ave, South El Monte, CA 91733 Tel: sales-(626) 575-3288, fax (626)
Always wear safety glasses when working on your vehicle.
 90-93 MAZDA MIATA SUPERCHARGER KIT The KraftWerks 90-93 Mazda Miata Supercharger Kit was designed for easy installation. Competent mechanics with the appropriate tools will find the process to be relatively
Equipped with AEM Dryflow Filter No Oil Required! INSTALLATION INSTRUCTIONS PART NUMBER C (GUN METAL GRAY FINISH) NISSAN SENTRA 1.
 NISSAN SENTRA 1.") Equipped with AEM Dryflow Filter No Oil Required! INSTALLATION INSTRUCTIONS PART NUMBER 21-799C (GUN METAL GRAY FINISH) 2014-16 NISSAN SENTRA 1.8L 1 ITEM NO. PART NUMBER DESCRIPTION QTY. 1 21-2157D AIR
Equipped with AEM Dryflow Filter No Oil Required! INSTALLATION INSTRUCTIONS PART NUMBER 21-799C (GUN METAL GRAY FINISH) 2014-16 NISSAN SENTRA 1.8L 1 ITEM NO. PART NUMBER DESCRIPTION QTY. 1 21-2157D AIR
Banks High-Flow Boost Tubes. Step-by-step installation video: Bankspower.com/v/install-lml-boost-tubes
 with Installation Instructions Owner smanual Banks High-Flow Boost Tubes Stock Fitment 2011-2016 Chevy/GMC Turbo-Diesel Pickup Trucks THIS MANUAL IS FOR USE WITH PART NUMBER 25993 Gale Banks Engineering
2007 Current Jeep Wrangler JK Stealth Fighter Front Bumper Installation Instructions
 2007 Current Jeep Wrangler JK Stealth Fighter Front Bumper Installation Instructions PREPARATION 1. Disconnect the negative terminal on the battery. Park the vehicle on level ground and set the emergency
INSTALLATION INSTRUCTIONS BULL BAR DODGE RAM 1500 PART # B-D1091;B-D2091
 INSTALLATION INSTRUCTIONS PART # B-D1091;B-D2091 PARTS LIST: Qty Description Qty Description 1 Bull Bar 10 12mm Lock Washers 2 Upper Frame Brackets (for trucks without tow hooks only) 8 12-1.75mm Hex Nuts
Instant Chat off the main page of Or simply call our tech team at
 FRONT MOUNT INTERCOOLER 2015+ WRX 2017-07-07 Thank you for purchasing this PERRIN product for your car! Installation of this product should only be performed by persons experienced with installation of
Z1 Motorsports 350Z / G35 Oil Cooler Kit Installation Manual
 Z1 Motorsports 2877 Carrollton Villa Rica Hwy Carrollton GA 30116 770.838.7777 Z1 Motorsports 350Z / G35 Oil Cooler Kit Installation Manual For 19, 25 and 34 Row Oil Cooler Kits Parts Included: 1 Aluminum
INSTALLATION INSTRUCTIONS
 INSTALLATION INSTRUCTIONS Document# 19-0038 2004+ Lotus Elise (Series 2) Rear Clamshell Removal Kit Safely support the vehicle. This is a two-person job. Allow 1 to 2 hours for initial disassembly. Have
Fig A ADDICTIVE DESERT DESIGNS. Preparation: Removal:
 Preparation: Disconnect the negative battery terminal. Park the vehicle on level ground and set the emergency brake. We recommend reading through the installation instructions in whole before performing
Rear bumper cannot be used for towing after installation of the rear bumper relocation brackets.
 921RC7030 GM 88-98 4WD 1500 P/U 3 Body Lift Thank you for choosing Rough Country for all your suspension needs. *RC703BAG2* RC703BAG2 Rough Country recommends a certified technician install this kit. Attempts